

Page 1
IV Medication Management System
For use with list 40051-04
System
Operating
Manual
Abbott
Laboratories
North Chicago, IL 60064
USA
430-0637
1 -CO4 (Rev.
8/W
VERSION
1.11
SERIES
Page 2
Section 1
INTRODUCTION
Contents
1
- 1
.
. . . . . . . . . . . . . . . . . . . . . . . . . . . . . . . . . . . . .
IV
1.1 FEATURES OF THE
1.2
SAFETYFEATURES
1.3
WARNINGS,CAUTIONS,ANDNOTES
MEDICATION MANAGEMENT SYSTEM
................................
......................
1.4 INSTRUMENT INSTALLATION PROCEDURES
1.4.1 UNPACKING INSTRUCTIONS
1.4.2 INSPECTION
...............................
1.4.3 40OOPLUSSELFTEST
1.4.4 PRINTERSETUP
.............................
.......................
..........................
Section 2
EQUIPMENT DESCRIPTION
2.1 BACKLITDISPLAYSCREEN
2.2 ESCAPEFUNCTION
2.3 BASESCREEN
..................................
...........................
...............................
2.4 PROGRAMMING INPUT INDICATOR (CURSOR)
2.5 LED STATUS INDICATORS
2.6 NOTATIONAREAS
2.7 PRINTER
.....................................
................................
............................
Section 3
SETUP . . . . . . . . . . . . . . . . . . . .
..=-...................3-1
..................
.................
.........
-
1
1
l-2
l-3
-
3
1
-
3
1
l-4
l-4
l-4
-
1
.
2
. . . . . . . . . . . . . . . . . . . . . . . . . . . . . . .
2-l
2-l
2-l
-
2
2
-
3
2
2-3
2-4
3.1 SETUPPROCEDURES
3.1.1 RESTOREPREVIOUSPROGRAMMING
3.1.2 INITIATE NEW PROGRAMMING
3.1.3
RESPONSETOLOWBAlITERYCONDI’TION
3.2 PRIMING PROCEDURES: PRIMARY ADMINISTRATION SET
3.2.1 CASSE’ITEPRIMINGMODES
CASSETTEPOWERPRIME(LINEA).
GRAVITYPRIME
3.2.2
3.2.1.1
3.2.1.2
PRIMINGTHECASSETI’E
3.2.3 PATIENTLINEPRIMINGMODES
3.2.3.1
PATlENTLINEPOWERPRIME
3.2.3.2 PATIENTLINEGRAVITYPRIME
3.2.4 PRIMINGTHEPATIENTLINE.
3.2.5
CASSE-ITE~ST
3.2.5.1
3.2.5.2
CASSE’lTETESTFAILED
CASSE’ITETEST
..............................
.......................
.........................
.........................
......................
.............................
SATISFACTORY
..................
.....................
...............
...........
..............
.....................
.................
.................
....................
................
3.3 PRIMING PROCEDURES: PRIMARY ADMINISTRATION SET
WITHGRAVITYFLGWPREVENTIONVALVE
3.4 PRIMING PROCEDURES: SECONDARY ADMINISTRATION SET
3.5 CONNECTINGASYRINGETOTHECASSE-ITE
3.6 CONNECTING A SYRINGE AND SYRINGE ADAPTOR TO THE CASSETTE
3.7 REMOVINGTHE CASSETTE
FROMTHE DEVICE
...................
........
................
...
...............
3
3
3
3
3-l
3-2
-
3
3-3
-
3
3-6
3-6
3-6
3-6
3-7
3-7
-
3
3-7
3-8
3-8
-
3-9
-
10
-
11
-
12
-
13
2
4
7
3
9
Omni-Flow 4000 Plus
IV
Medication Management System
iii
430-06371-004 (Rev.
4/!33)
Page 3
Contents
Section
PROGRAMMING
4
4.1 MAINTENANCE INFUSIONS
4.2 CONTINUOUS INFUSIONS
4.2.1
ML/HRINFUSIONS.
4.2.1.1 PROGRAMMING OR CHANGING AN
4.2.1.2 CHANGING AN
UNITOFMEASUREINFUSION
4.2.2 ALTERNATE UNITS OFMEASURE
4.2.2.1
PROGRAMMING A NEW ALTERNATE UNIT OF
MEASURE INFUSION
4.2.2.2 CHANGING
AN
4.2.2.3 CHANGING AN ALTERNATE UNIT OF MEASURE
INFUSIONTOML/HRINFUSION
4.2.3 CHANGINGTHEGLOBALBODYWEIGHT
4.2.4 CONCURRENTFLOW..
4.3 INTERMITTENT INFUSIONS
Section 5
ADDITIONAL OPERATING FEATURES
TOSTOPANYOFTHELINES
5.1
HOLDANDRESUMEFUNCTIONS
5.2
...........................
5.2.1 HOLDINDMDUALLINESORALLLINES
5.2.2 RESUMEINFUSIONSAFTERHOLD
LINESIJATUSFUNCTION
5.3
SPECLAL
5.4
5.4.1
AUTOMATIC AIR DETECTION AND ELIMINATION
5.5
EMPTYINGTHECOLLECTIONBAG
5.6
BA?TERY
5.7
ACCESSING HISTORY REPORTS
5.8
5.8.1
FUNCTIONS.
DESCRB?-I’ION
OPERATION
ACCESSING HISTORY REPORTS WITHOUT A PRINTER
.............................
..............................
OF SPECIAL FUNCTIONS
.............................
5.8.2 ACCESSING HISTORY REPORTS
5.8.2.1
5.8.2.2
DEVICESTATUSREPORT.
IVHISTORYREPORT
ML/HR
INFUSION TO AN ALTERNATE
ALTERNATE
........................
......................
........................
WITH
.....................
.
4
. . . . . . . . . . . . . . . . . . . . . . . . . . . . . . . . . . . . .
ML/HR
INFUSION
(MCG/KG/MIN)
INFUSIONS
. . . . . . . . . . _ . . . . . . . . . . . . . . . .
.
. . . . . . . . . . . . . . . . . . . . . . . . . .
UNITOF MEASURE INFUSION
................
...................
.................
...............
........
A PRINTER
..................
..........
.
4
. . . . . . . . . . . . . . . . . . . . . . . . . .
.
4
4-2
.
4
. . .
. . . . . . . . . . . . . . . .
.
4
. . . . . . . _ . . . . . . . . . . . . .
. . . . . . . . . . . . . . . . . . . . . . . .
.
4
. . . . . . . . . . . . . . . . . _ . . . . . . . .
.
5
. . . . . . . . . . . . . . . . . . . . . . . . . .
-
.
4-3
.
4
. . . .
.
4
.
.
4-5
. . . . . . . . . . . . . . .
.
4-6
. . . . . . . . . . . . . . .
.
4-7
5
5-
5
5
5
5
5-14
5-
1
-
1
-
2
-
2
-
4
-
8
-
1
5-l
5-2
5-2
5-3
5-3
5
5
-
-
-
-
-
-
4
-
5
-
4
-
5
11
11
12
13
13
14
14
Section 6
ALARMCONDITIONSANDDISPLAYS
6.1
FLUIDDELIVERYALARMS
6.2 PUMPING
6.3 WARNINGALARMS
Section
7
ALARMS..
............................
................................
TROUBLESHOOTING
7.1 TROUBLESHOOTING GUIDE
Section 8
CLEANING AND DISINFECTING
430-06371-804 (Rev.
7195)
.
............................
iv
.
6-l
. . . . . . . . . . . . . . . . . . . . . . . . .
6-2
..6- 3
6-3
-
1
.
7
. . . 1 . . . . . . . . . . . . . . . . . . . . . . . . . . . . . .
-
1
.
7
System Operating Manual
. . . . . . . . . . . . . . . . . . . . . . . . . .
-
1
.
8
. . . . . . . . . . . . . . . . . . . . . . . . . . . . .
Page 4
Section 9
WARNINGS, CAUTIONS AND PRECAUTIONS
.....................
Contents
9-l
9.1 WARNINGS.
9.2 CAUTIONS
9.3 PRECAUTIONS
.................................
..................................
................................
Section 10
SERVICE AND PERFORMANCE INFORMATION . . . . . . . . . . . . . . . . . . . .
Section 11
4oooPLussETs
IVADMINISTRATIONSETS
11.1
11.2ACCESSORY
...................................
..........................
SETS
..............................
Section 12
SPECIFICATIONS . . . . . . . . . . . . . . . . . . . . . . . . . . . . . . . . . . .
Section 13
KEYPAD
DESCRIPTION . . . . . . . . . . . . . . . . . . . . . . . . . . . . . . . .
9-l
9-2
9-3
-
10
-
11
-
11
11-2
-
12
-
13
1
1
1
1
1
Section 14
-
1
WARRANTY . . . . . . . . . . . . . . . . . . . . . . . . . . . . . . . . . . . . . .
Copyright 1996 Abbott Laboratories
All Rights Reserved
14
This document and the subject matter disclosed herein are proprietary information. Abbott Laboratories
retains all the exclusive rights of dissemination, reproduction, manufacture and sale. Any party using
this document accepts it in confidence, and agrees not to duplicate it in whole or in part nor disclose it to
others without the written consent of Abbott Laboratories.
Omni-Flow 4000 Plus IV Medication Management System
(Rev.
8/96)
V
430-06371
-CO4
Page 5
Section 1
INTRODUCTION
The Omni-Flow 4000
Omni-Flow 4000, with added data communications capability and new data entry screens which
incorporate automatic calculation, plus programming from alternate units of measure entry.
Plus IV Medication Management System incorporates all the features of the
1.1
FEATURES OF THE IV MEDICATION
MANAGEMENT SYSTEM
Incorporating microprocessor electronic design and safety features, the 4000 Plus represents a
major advance in instrumentation for the delivery and management of intravenous therapy.
The 4000 Plus includes the following capabilities of the Omni-Flow 4000:
Four-channel medication delivery through a single patient line
Programmable
Multi-dose containers
Programmable automatic in-line dilution
Programmable automatic flushing between incompatible medications
Any combination of both continuous and intermittent infusions
Real-time clock
irom
Infuses
Automatic air detection and elimination
Needleless connections
combinations of bags, bottles. and syringes
Additional capabilities of the 4000 Plus include:
ail
0
Programmable in
Q
RS-232 communication (for printers)
CI
Date/time stamp (optional) of blood chemistry, hematology, vital signs, and other medication
administration
Q
Detailed documentation, through the following printed reports (on demand):
-
Device Status Report:
Line status A, B, C, and D (ON, OFF, PGM, HLD, INF,
Dilution and flush data
Current infusion regimen details
Time and volume remaining in dose
-
IV Flow Sheet
Omni-Flow 4000 Plus IV Medication Management System
Mcg/Kg/Min
on
channels
l-l
DLY)
430-06371-004 (Rev.
4/93)
Page 6
Section 1 INTRODUCTION
-
IV History Report:
Line mode changes: off, on, intermittent infusion, hold, dilute, delay, flush, KVO,
programmed
Records details of infusion: as programmed, actual delivered, regimen changed
Records non-infusion event documentation: blood, hematology, blood chemistry,
vital signs
All events date/time stamped
P
Programming and
Selective hold for each medication
0
Advanced programming to preprogram all lines and place lines on hold
0
Automatic power prime of Line A for minimum solution waste
0
Prioritized alarms stacked and presented sequentially for resolution
CI
Additional alarms: full collection bag, transfer to battery, external communications fault
CI
User selected power-up defaults:
memory
retention following power OFF
IineD
until
needed
- Time: 12-hour AM/PM or 24-hour military format
-
KVO:
to 99.9
mL/hr,l.O
-
1 to 12 psi (in 1 psi increments)- Patient line occlusion alarm
- Units of temperature: degrees Centigrade or Fahrenheit
Callbacks-
0
Local display of IV History Report on LCD Display
1.2 SAFETY FEATURES
The 4000 Plus
maximiz
The device automatically performs a
when the [ON/CHARGE] switch is placed in the ON position
ION/CHARGEl
If the
most recent
during power up (see Section 3.
The device maintains duplicate programming memory.
information does not match, the device alarms
A two-step procedure is required to remove the cassette from the device
To change pumping instructions (rates, volume, stopping lines), two keys must be pressed
in order
A comprehensive self test
cassette, and interface. This 36-second cassette test is activated every time the [PRIME
PATIENT LINE) (ENTER) key sequence is pressed
progr
es
safety and reliability with the following features:
self
test of its electrical and mechanical components
switch is turned to CHARGE during infusion, the device retains the
amming
and infusion data in a nonvolatile memory. The data is reinstated
procedures)
Setup
I,
If the duplicate programming
identiiies
a variety of potential malfunctions within the device,
Note: The user can bypass the cassette test; however, Abbott Laboratories recommends the routine
use of this test.
430-06371-004 (Rev.
4/93)
l-2
System Operating Manual
Page 7
1.3 WARNINGS, CAUTIONS, AND NOTES
1.3
WARNINGS, CAUTIONS, AND NOTES
Throughout this manual, three types of alert messages are used: warnings, cautions, and notes,
as described below. Pay attention to all alert messages.
WARNING
A WARNING CONTAINS SPECIAL SAFETY EMPHASIS AND MUST BE OBSERVED AT ALL
TIMES.
FAILURE TO OBSERVE A WARNING IS POTENTIALLY LIFE THREATENING.
CAUTION: A CAUTION
information that could prevent irreversible damage or hardware failure. Neglecting to pay
attention to a CAUTION could result in serious injury.
.
Note:
A Note highlights information that helps explain a concept or procedure.
usuaIly
appears in front of a procedure or statement. It contains
1.4 INSTRUMENT INSTALLATION PROCEDURES
utilize
In order to fully
the System Operating Manual prior to use.
PRODUCT DAMAGE MAY OCCUR UNLESS PROPER CARE IS EXERCISED DURING THE
UNPACKING AND INSTALLATION PROCESS. THE BATTERY PACK MAY NOT BE FULLY
CHARGED UPON RECEIPT.
TEST.
Note:
Instrument
4000 Plus capabilities. it is important to become thoroughly familiar with
WARNING
lT
FAILS THE SELF
instahation
should be performed by qualified personnel only.
DO NOT PLACE THE DEVICE IN SERVICE IF
1.4.1
UNPACKING INSTRUCTIONS
Each shipping carton should contain the following items:
0
Omni-Flow 4000 Plus IV Medication Management System with attached power cord
Omni-Fiow
c3
Carefully remove the device from the shipping carton. The carton should be retained in the event
the device needs to be shipped.
Omni-Flow 4000 Plus IV Medication Management System
4000 Plus System Operating Manual
-
3
1
430-06371-004 (Rev.
4193)
Page 8
1
Section
INTRODUCTION
1.4.2
INSPECTION
Inspect the packing container for visible shipping damage.
the delivering carrier immediately.
Freight claims or insurance claims must be
Should any damage be found, contact
filed
within seven
days.
Inspect the device for damage.
Do not use the device if it appears to be damaged; contact the
Abbott Laboratories Technical Service Center.
CAUTION: If device appears to be damaged, do not operate: return for service.
Plug the power cord into a 1
lO/
120 volt AC outlet. The device is ready for immediate AC use.
Do
not operate the device on battery power until it has been plugged into an electrical outlet for at
least 24 hours.
Locate the [ON/CHARGE] switch on the back of the device and toggle the switch to the ON position.
Unlock the cassette locking lever and remove the shipping cassette.
Cassettefrom
fhe Device, for additional information on removing a cassette. Discard the shipping
See Section 3.5,
Removing
the
cassette: do not use.
1.4.3
4000
Do not place the 4000 Plus in service until the
Procech.ues,
PLUS SELF TEST
self test has been conducted. See Section 3.1, Setup
for detailed information on the device self test.
1.4.4
PRINTER SETUP
The 4000 Plus allows the user to print history report information.
serial printers. The user should become thoroughly familiar with the system operating manual
which is included with the printer.
The following DIP switch configuration is for the Seiko DPU-4 11
printer. The printer operating manual should detail the printer DIP switch locations.
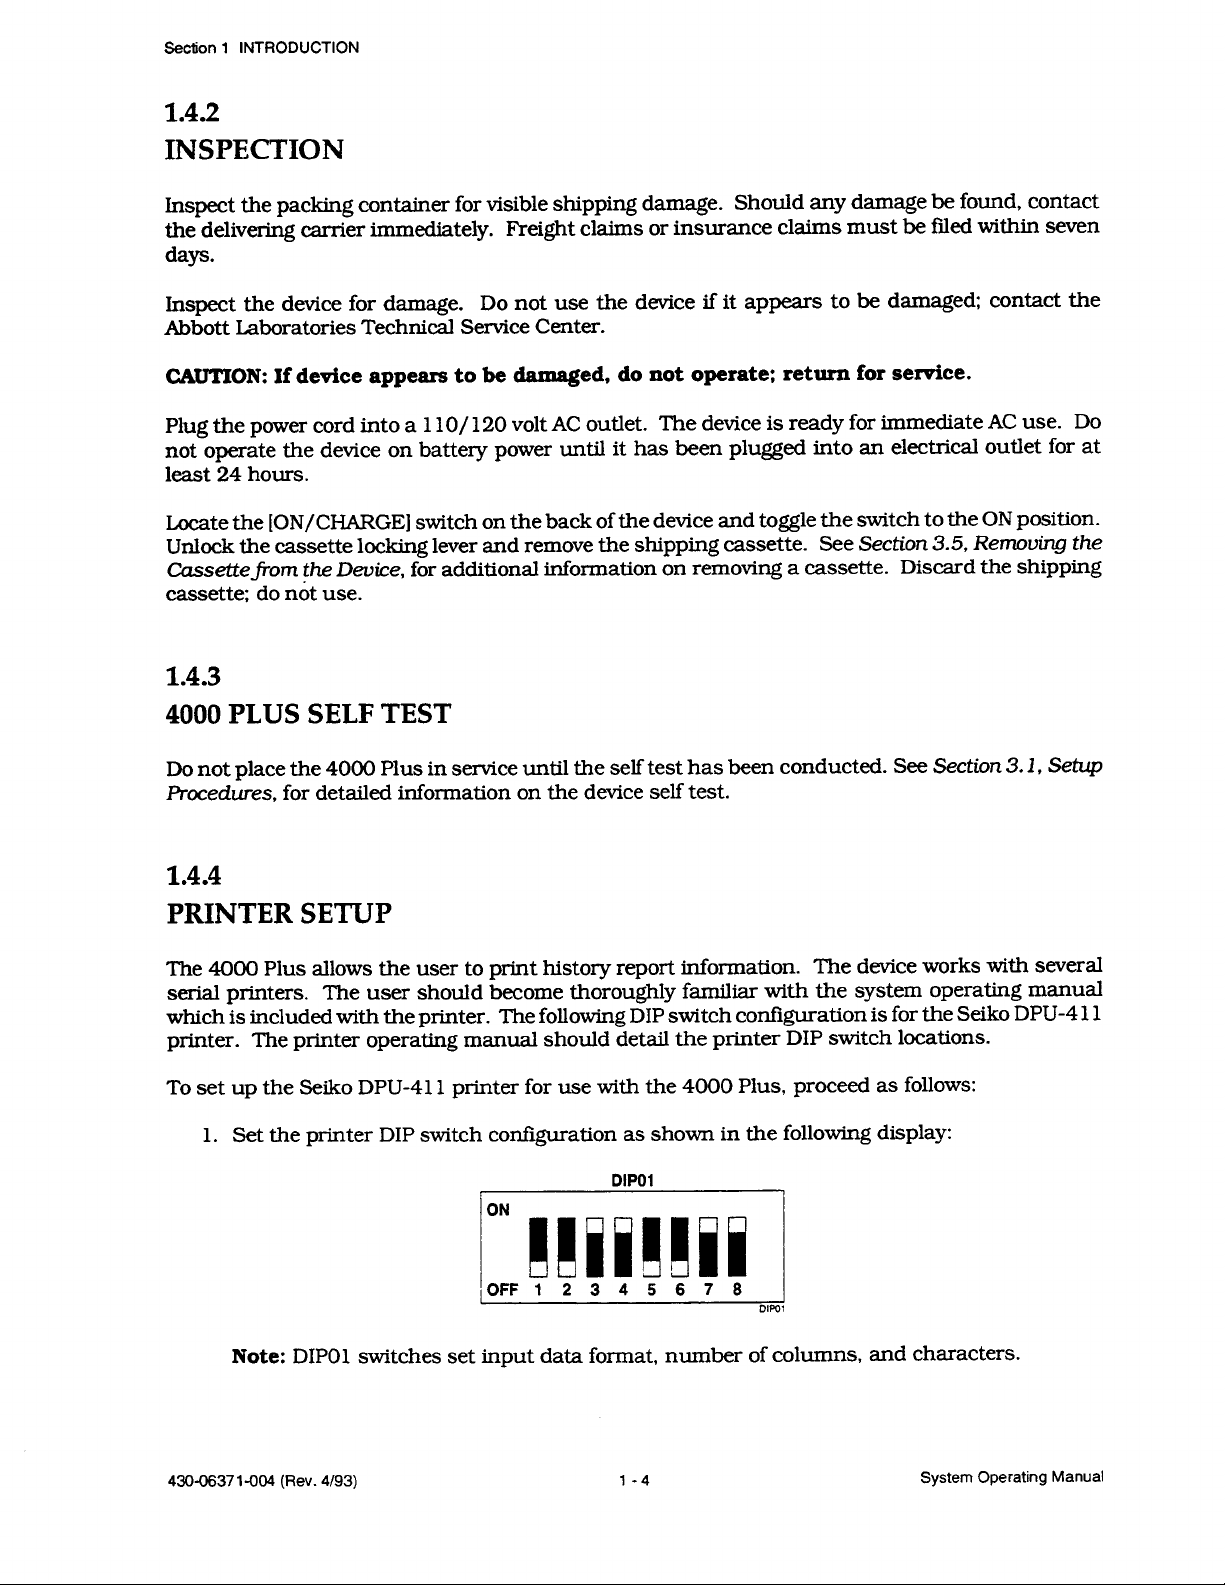
To set up the Seiko DPU-411 printer for use with the 4000 Plus, proceed as follows:
1.
Set the printer DIP switch configuration as shown in the following display:
DIP01
Note:
DIP01 switches set input data format, number of columns, and characters.
The device works with several
430-0637
l-004
(Rev.
4193)
l-4
System Operating Manual
Page 9
DIP02
1.4 INSTRUMENT INSTALLATION PROCEDURES
_iii!??I
Note:
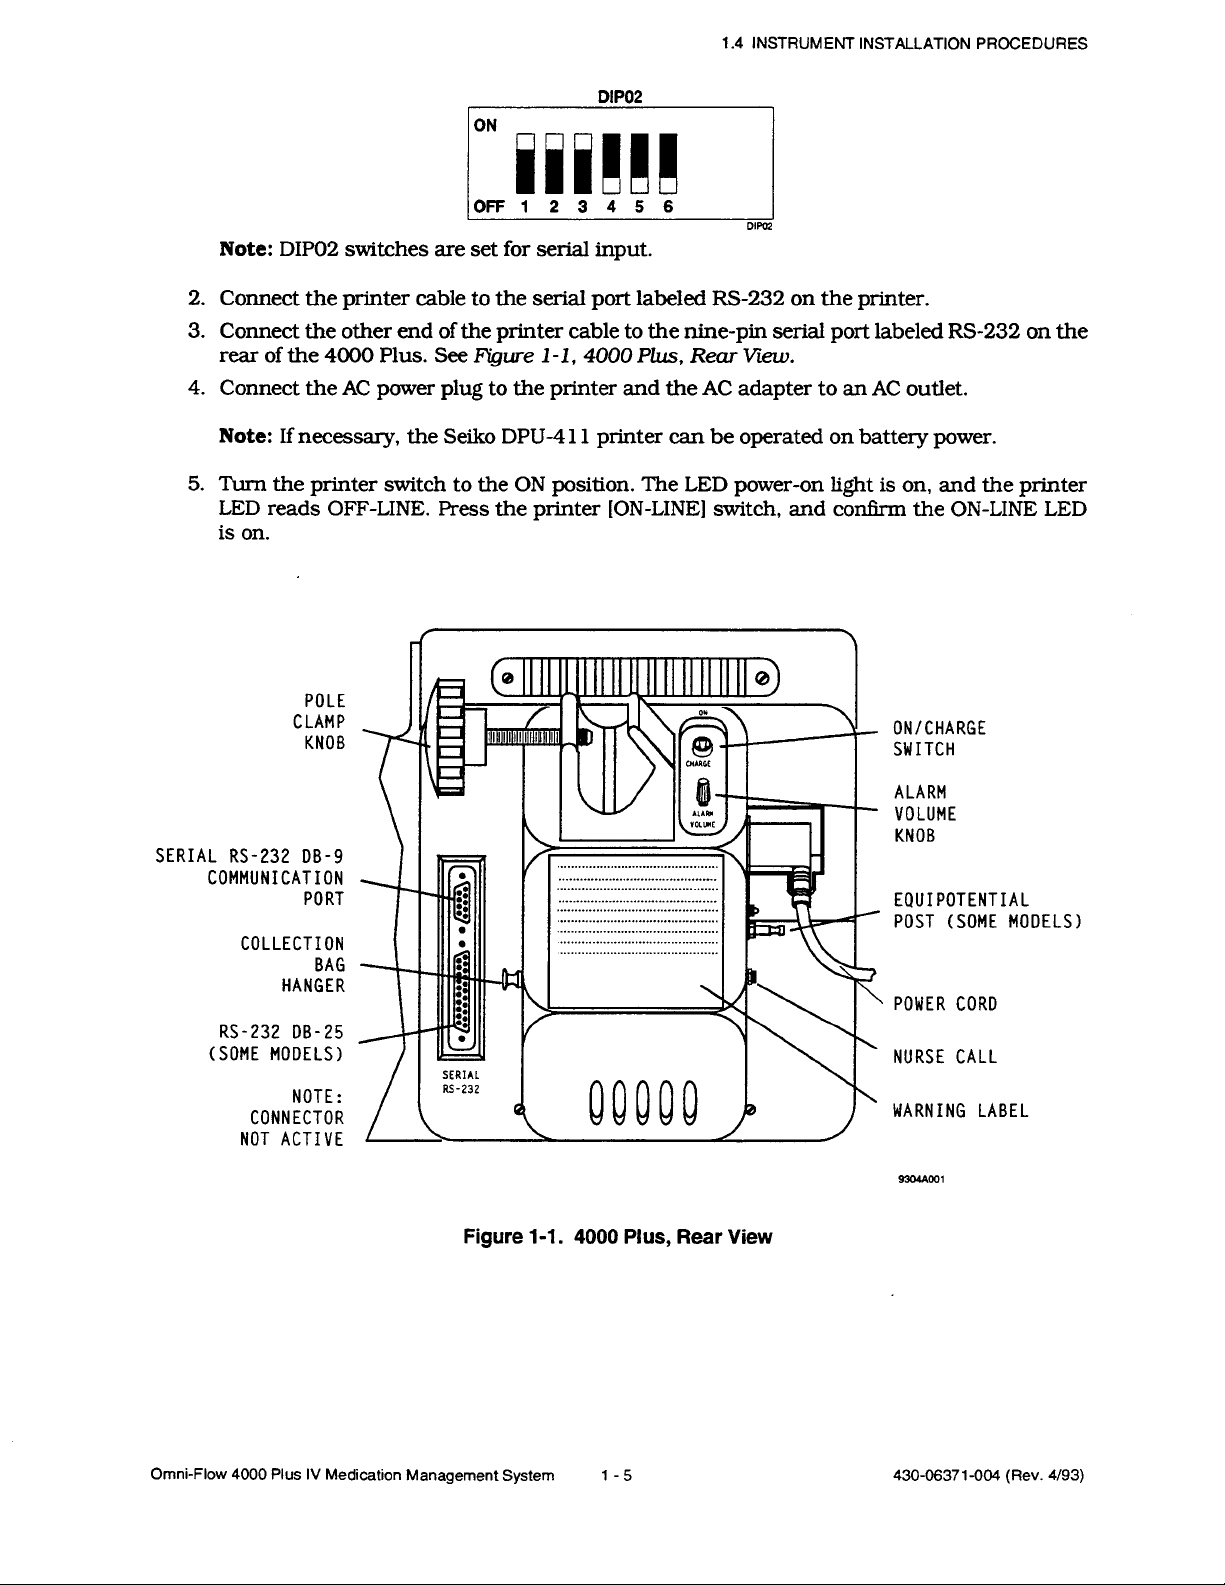
DIP02 switches are set for serial input.
serial
2.
Connect the printer cable to the
3.
Connect the other end of the printer cable to the nine-pin serial port labeled IRS-232 on the
rear of the 4000 Plus. See Figure
4.
Connect the AC power plug to the printer and the AC adapter to an AC outlet.
Note:
If necessary, the Seiko DPU-4 11 printer can be operated on battery power.
port labeled RS-232 on the printer.
1
-I, 4000 Plus,
Rear
DIP@2
view.
5. Tum the printer switch to the ON position. The LED power-on light is on, and the printer
LED reads OFF-LINE. Press the printer [ON-LINE] switch, and
con&m
the ON-LINE LED
is on.
POLE
CLAMP
KNOB
ON/CHARGE
SWITCH
SERIAL RS-232 OB-9
COMMUNICATION
PORT
COLLECTION
BAG
HANGER
RS-232 OB-25
(SOME MODELS)
NOTE:
CONNECTOR
NOT ACTIVE
Figure
l-l. 4000
ALARM
VOLUME
KNOB
EQUIPOTENTIAL
POST (SOME MODELS)
POWER CORD
NURSE CALL
WARNING LABEL
Plus, Rear View
Omni-Flow 4000 Plus IV Medication Management System
1-5
430-06371-004 (Rev.
4/93)
Page 10
Section 2
EQUIPMENT
The 4000 Plus incorporates a number of prog
the device. While performing setup or progr
Ikypad
13,
Note:
keypad may be in lowercase letters.
Note: Figures are
figures may not reflect the product exactly.
Description
In-text references to device keypad are shown in uppercase letters; corresponding text on
Figure
rendered as graphic representations to approximate actual product; therefore,
DESCRIPTION
’
g aids to simplify the setup and operation
13-1,400O
amming
Plus,
functions it may be helpful to refer to Section
View, details the keypad.
Front
of
2.1
BACKLIT DISPLAY SCREEN
8O-character
The
on and stays on for two minutes when any key on the keypad is pressed. The display screen
provides prompting messages, prog
messages to aid in the setup and use of the device.
display screen is
back& to aid visibility in dim or dark areas.
*
g information, infusion status information, and alarm
The light comes
2.2
ESCAPE FUNCTION
The (ESCAPE] key can be utilized any time the user is unsure of the next step or is unable to exit
a particular display screen.
restart a programming sequence.
Press the [ESCAPE] key to return the display to the base screen and
2.3
BASE SCREEN
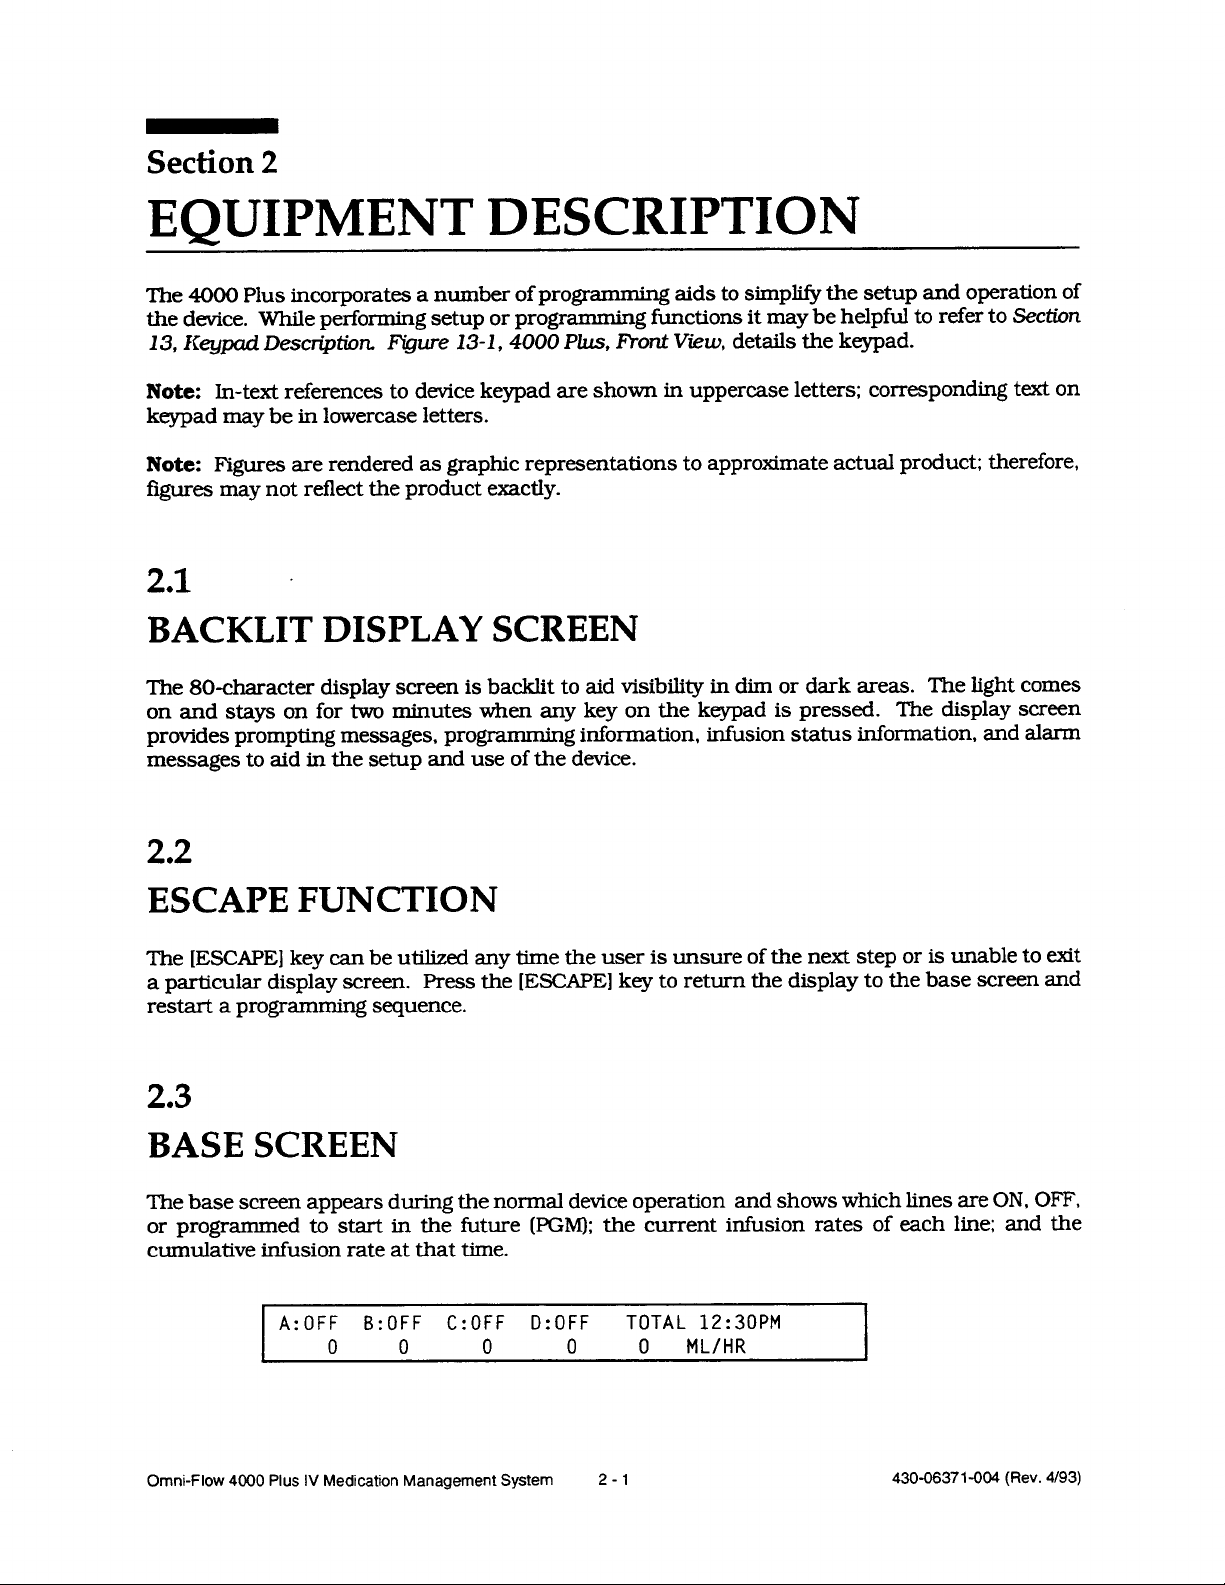
The base screen appears during the normal device operation and shows which lines are ON, OFF,
(PGM);
or programmed to start in the future
cumulative infusion rate at that time.
A:OFF B:OFF C:OFF
0 0 0
the current infusion rates of each line; and the
D:OFF
0 0
TOTAL
12:30PM
ML/HR
Omni-Flow 4000 Plus IV Medication Management System
2-l
430-06371-004 (Rev.
4/93)
Page 11
Section 2 EQUIPMENT DESCRIPTION
The base screen is the device status screen. During programming or operation, an intermittent
beeping tone alerts the user that the device is not in the base screen. The beeping tone is a reminder
ramming sequence is not complete. This reminder tone ceases upon return
to the user that a
prog
to the base screen.
The base screen
utilizes
each individual line:
ON
Indicates the line is currently running in the
Indicates the line is infusing an
running in the maintenance mode of operation.
DIL
LineAis
Indicates that Line A is
Indicates that Line A
intermittent infusion.
PGM
Indicates that an intermittent line is programmed to deliver a dose of medication
sometime in the future,
AND/OR
line
A is running in maintenance mode while another
if
MD
intermittent
Indicates that line operation is suspended either due to an
dose.
the user placing it on hold.
DLY
Indicates a programmed intermittent infusion
preceding intermittent infusion, being on hold (HLD), or due to a
the following indicators to assist in determining the pumping status of
diluting
is_flushing
a drug on another line.
the cassette and patient line after or before an
intenniftent
dose to the patient. Also appears if
coRtiRuous
(PGM)
mode of operation.
line
is delivering an
alarm
condition or
is being delayed due to a
flush
OFF
Indicates the line has been stopped and is OFF.
2.4
PROGRAMMING INPUT INDICATOR (CURSOR)
A flashing programming input indicator (cursor) automatically appears on the display screen at
the first information entry point.
Press the [NEXT] key to move the cursor forward.
[LAST] key to move the cursor backwards. To clear any entry where the cursor is flashing, press
the [CLEAR
Note: Several
ENTRYI
key.
programming screens do not allow an advance to the next screen if all the necessary
programming information has not been entered on that screen (i.e.,
total volume on a continuous infusion, the screen cannot be advanced).
automaticahy
moves to the entry point which is missing the required programming information.
The cursor must be moved to the next entry point on the screen.
To move to a previous entry point, press the
a
rate is entered, but not a
if
In these cases, the cursor
430-06371-004 (Rev.
4193)
2-2
System Operating Manual
Page 12
2.5 LED STATUS INDICATORS
2.5
LED STATUS INDICATORS
The front panel LED indicators located next to the alphabetical line designations (A, B, C. D),
indicate their status as follows:
D
Off when the line is off
D
Flashing when the line is infusing medication
tJ
On steadily when the line is programmed to start at a future time or the infusion of a line is
suspended (on hold).
The LED indicators located on the left side of the front panel indicate their status as follows:
-
P
AC POWER
BATTERY
LI
Q
ALARM-ill
Ij’igure
See
illuminated (green) when the device is operating on AC power.
-
illuminated (yellow) when the device is operating on battery power.
13-1,
uminated
4000
(red) when the device is in an alarm condition.
l+ont View, for location of the LED indicators.
Plus,
2.6
NOTATION AREAS
D)
The white area next to the alphabetical line designations (A, B, C,
making notations about the medication or the programming on that line.
pen or pencil should be used for these notations.
or a soft eraser.
This area can be cleaned with an alcohol swab
on the front panel are for
Anon-permanent felt-tip
Omni-Flow 4000 Plus IV Medication Management System
2-3
430-06371-004 (Rev.
4193)
Page 13
Section 2 EQUIPMENT DESCRIPTION
2.7
PRINTER
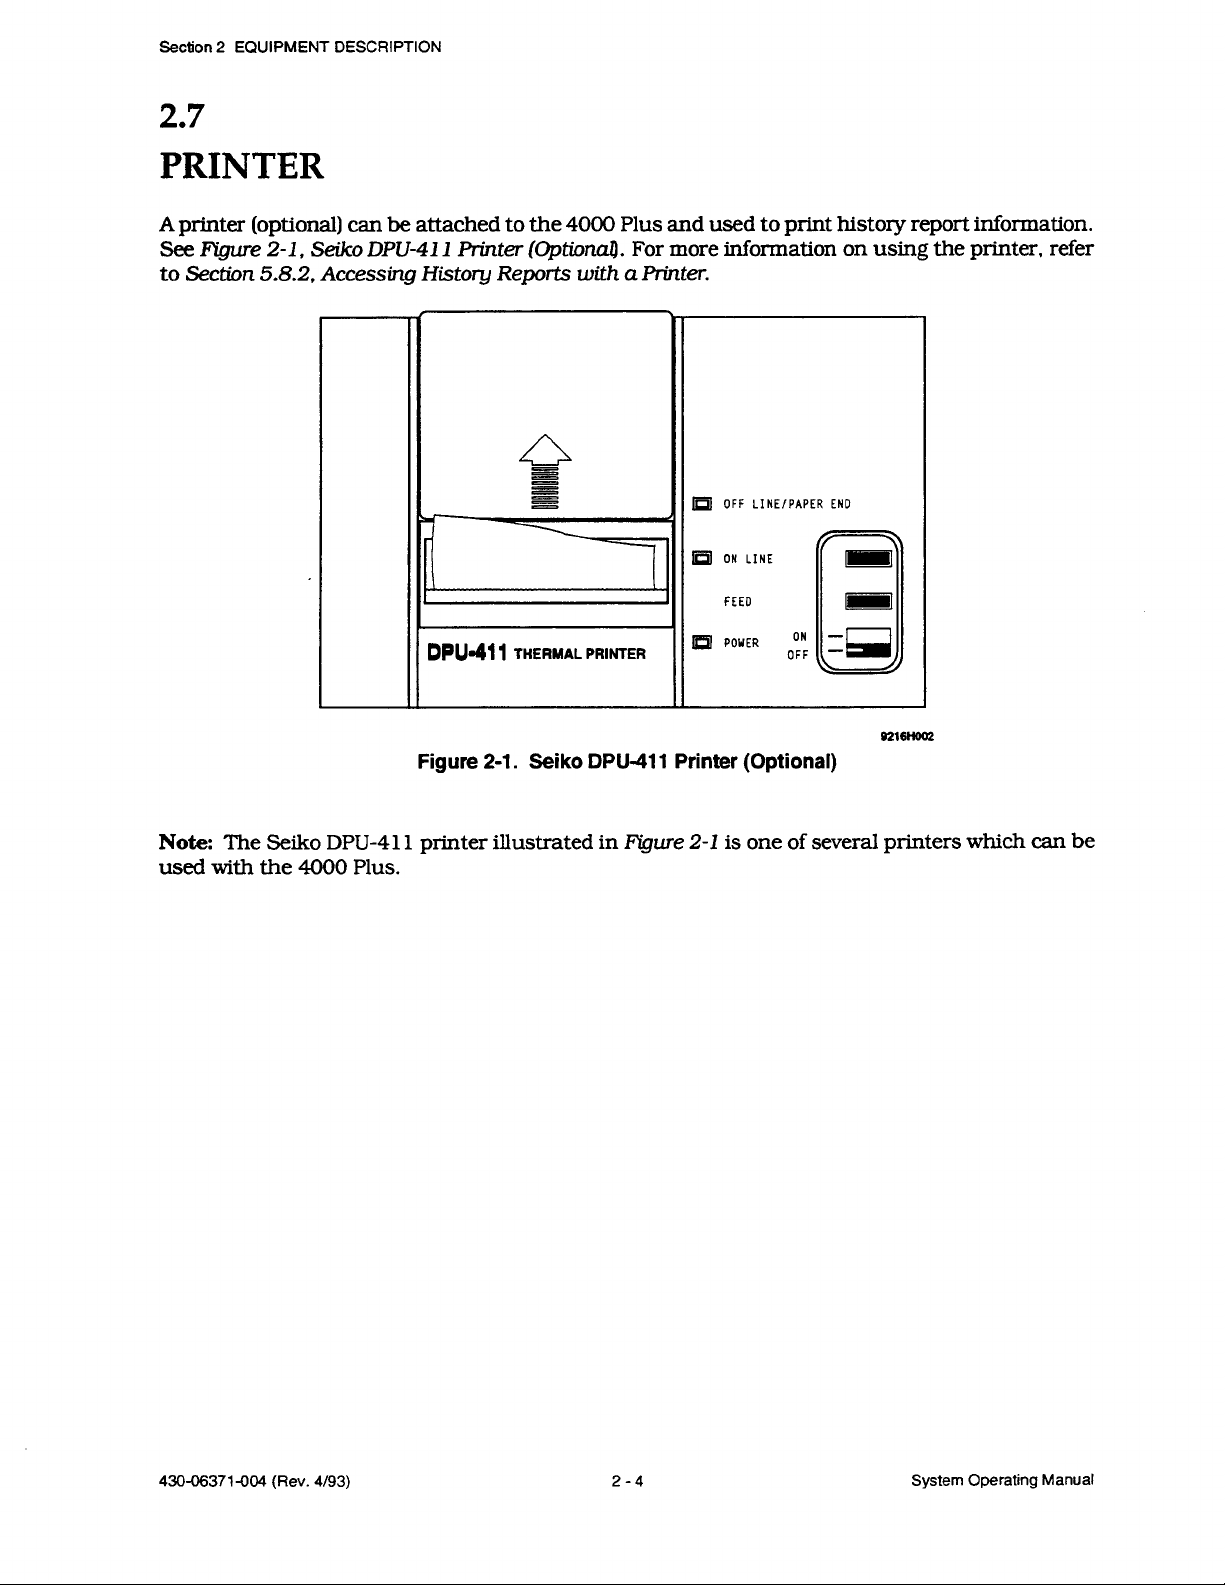
A printer (optional) can be attached to the 4000 Plus and used to print history report information.
See Figure
to Section
58.2,
DPU-41
2-I, Seiko
I
printer
(Optima&
Accessing History Reports with a Printer.
s
gg
-
For more information on using the printer, refer
m
OFF LINE/PAPER END
1
DPUJl
Figure 2-1. Seiko
THERMAL PRINTER
DPU-411
6216H602
Printer (Optional)
Note: The Seiko DPU411 printer illustrated in Figure 2-I is one of several printers which can be
used with the
4000
Plus.
430-06371-004 (Rev.
4/93) 2-4
System Operating Manual
Page 14
Section
3
SETUP
The following sections detail setup and priming procedures for the 4000 Plus.
Intmniuction,
1,
Keypad Description,
Plus,
4000
Note:
to AC power for at least 24 hours.
Rear Viw, for overview illustrations of the device.
Prior to placing the 4000 Plus in service, fully recharge the battery by connecting the device
me
13-1,400O
Plus,
Front View and Section
See Section
3.1
SETUP PROCEDURES
WARNING
ARRANGE TUBING, CORDS, AND CABLES TO MINIMIZE THE RISK OF PATIENT
STRANGULATION OR ENTANGLEMENT.
CAUTIOlt
audible.
the back of the device.
Abbott Laboratories
To set up the 4000 Plus, proceed as follows:
When
If the
programming
co&rmatory beep is inaudible, adjust the
Tech&al
the device, the confirmatory response beep should be clearly
ALARM
If after adjustment the beep is still inaudible, contact
Support Operations.
VOLUME knob located on
Figure
13,
l-l,
1.
Use the pole clamp to attach the device to an IV pole.
2.
Connect the power cord to a properly grounded 1
3. Toggle the (ON/CHARGE] switch to the ON position.
Note:
the cassette holster. If the service code appears, remove the cassette and cycle the power to
the device (power the device off, then on by toggling the
then
Confkm
4.
lights are off.
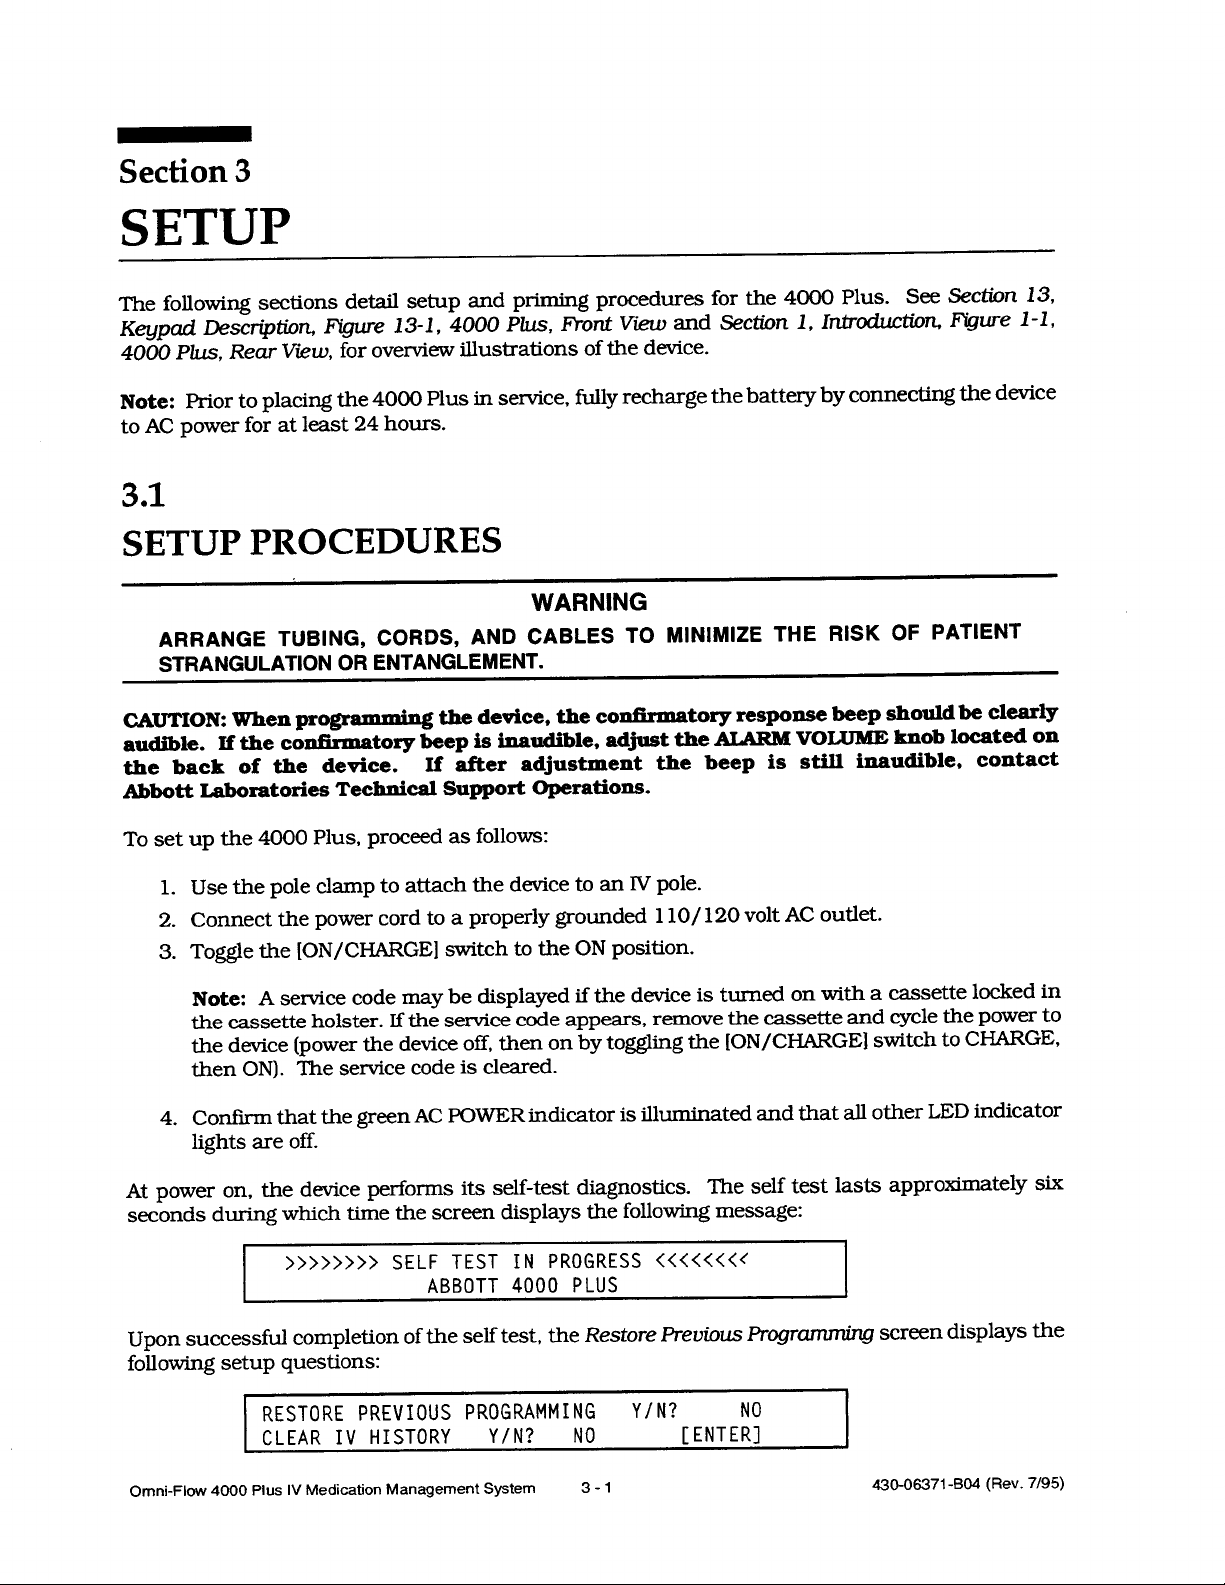
At power on, the device performs its self-test diagnostics.
seconds during which time the screen displays the following message:
Upon successful completion of the self test, the Restore Previous Programming screen displays the
following setup questions:
A service code may be displayed if the device is turned on with a cassette locked in
ON). The service code is cleared.
that the green AC POWER indicator is illuminated and that all other LED indicator
>>>>>>>> SELF TEST IN PROGRESS
ABBOTT 4000 PLUS
RESTORE PREVIOUS PROGRAMMING
CLEAR IV HISTORY
YIN? NO
lo/120 volt AC outlet.
]ON/CHARGE)
The self test lasts approximately six
<<<<<<<(
Y/N?
[ENTE:;
switch to CHARGE,
Omni-Flow 4000 Plus IV Medication Management System 3-l
430-06371-804 (Rev.
7/95)
Page 15
Section 3 SETUP
Note: The
Restore Previous Programming screen displays two setup questions. Select YES or NO
to each query before pressing the [ENTER] key. The [ENTER] key enters all setup instructions
into device memory.
3.1.1
RESTORE PREVIOUS PROGRAMMING
progr
To restore previous
Select YES to Restore Previous Programming Y/IV?. Previous programming is restored to
1.
the device.
When YES is selected to Restore
0
IV Flow Sheet
Q
Line Progr
Select NO to Clear
2.
Note:
Select YES
amming
amming:
N
to
at the Restore Previous Programming screen, proceed as follows:
Preuious
Programming Y/IV?, the following data is restored:
Any lines that were not OFF are put on HLD
Histo
y Y/N?. Previous IV history is retained.
IV
Clear
History Y/N? to remove previous patient IV history.
Press the [ENTER] key to enter all setup instructions into device memory.
3.
Note:
power is down.
During a power shut down, programmed start times for lines are delayed for as long as the
Upon power up and restoring previous programming, the user should review the
programmed information before pressing the [RESUME] key to begin programmed infusions.
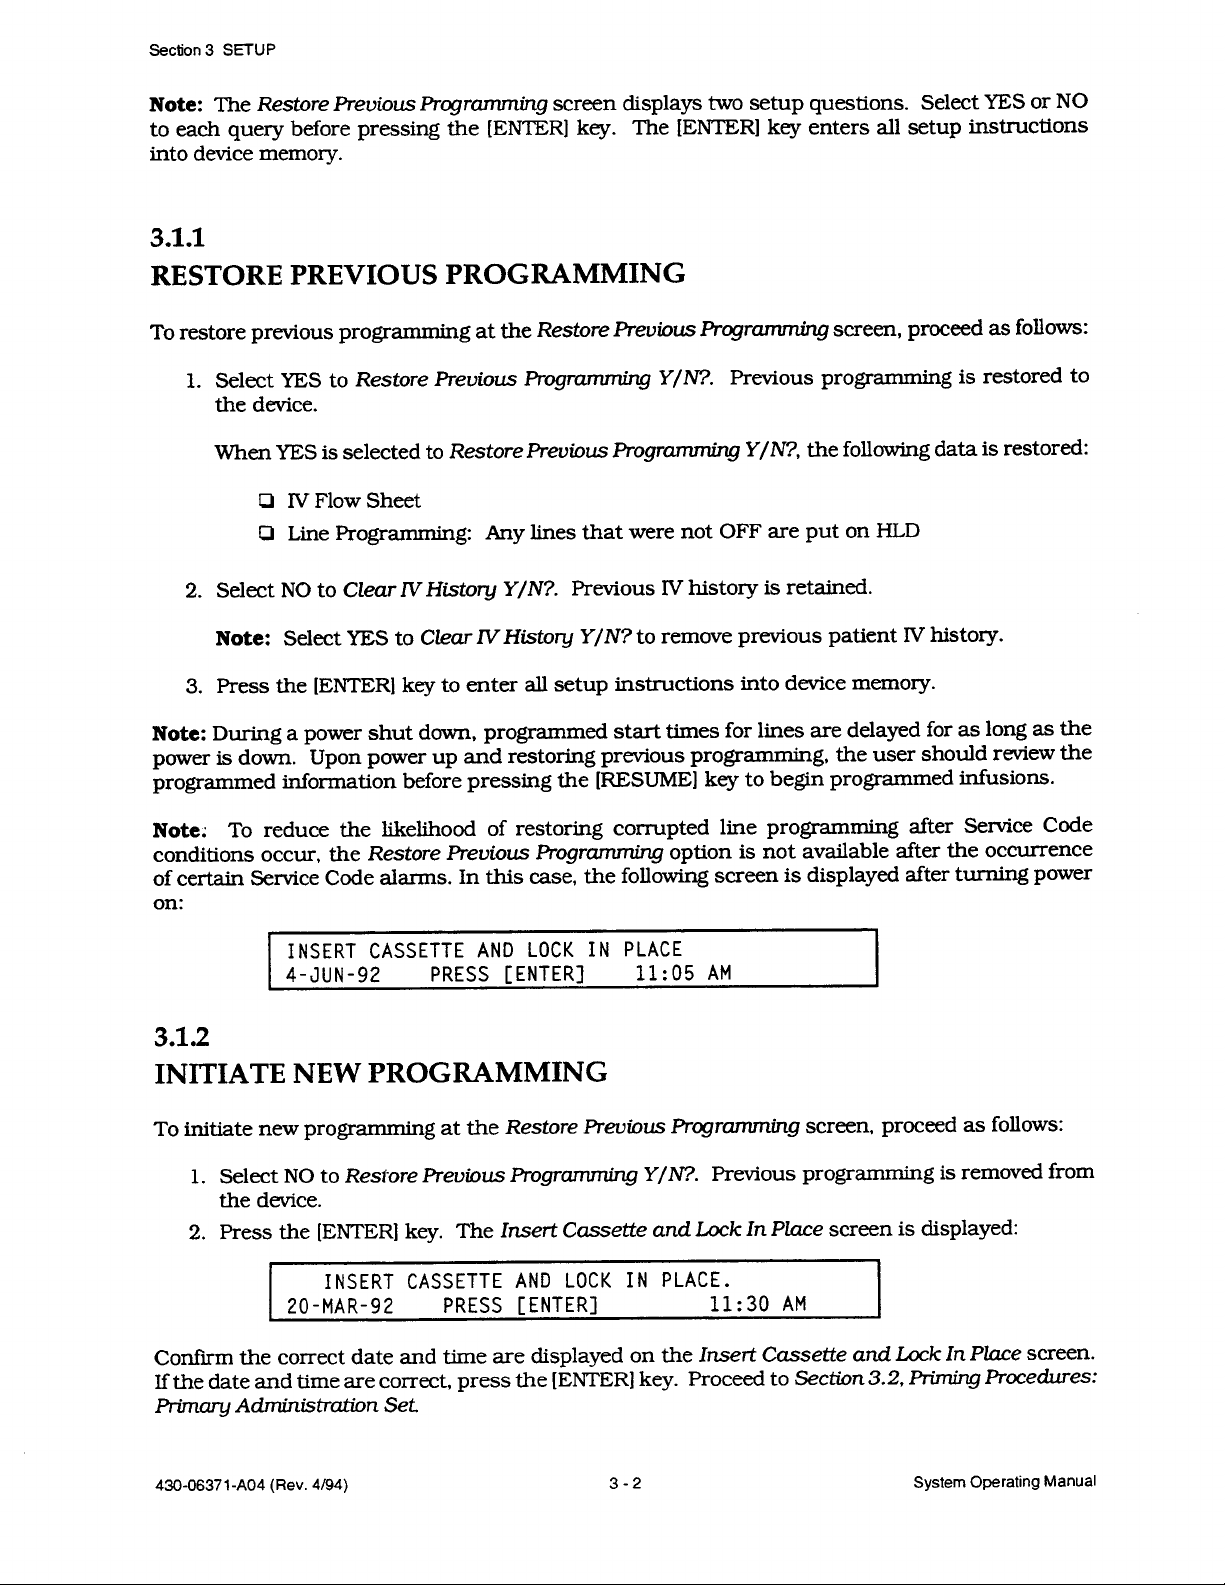
Note;
conditions occur, the Restore Previous Programming
To reduce the likelihood of restoring corrupted line programming after Service Code
option is not available after the occurrence
of certain Service Code alarms. In this case, the following screen is displayed after turning power
on:
INSERT CASSETTE AND LOCK IN PLACE
4-JUN-92
PRESS [ENTER]
11:05
AM
3.1.2
INITIATE NEW PROGRAMMING
To initiate new progr
1.
Select NO to Restore Previous Programming Y/N?. Previous programming is removed from
the device.
2.
Press the [ENTER] key. The Insert Cassette and Lock In
amming
at the Restore
Preuims Programming screen, proceed as follows:
Place
screen is displayed:
INSERT CASSETTE AND LOCK IN PLACE.
11:30
ZO-MAR-92 PRESS [ENTER]
AM
Confirm the correct date and time are displayed on the Insert Cassette and Lock In
If the date and time are correct, press the [ENTER] key.
Proceed to Section 3.2, Priming Procedures:
Primay Administration Set
430-0637 1 -A04 (Rev.
4194)
3-2
System Operating Manual
Place
screen.
Page 16

If the date and time are incorrect on the Insert Cassette and
(ESCAPE] key. The Bypass Cassette Test screen is displayed:
BYPASS CASSETTE TEST? NO
PRESS [ENTER]
3.1 SETUP PROCEDURES
Lack
In Place screen, press the
Press the
Refer to Section 5.4, Special
to set date, time, and display format.
toggling the ION/CHARGE] switch to CHARGE, then ON.
the
SelfTest
(YES/NO] key to change NO to YES. Press the [ENTER] key. The base screen is displayed:
A:OFF B:OFF C:OFF
I
0 0 0
~&ions,
D:OFF
TOTAL
0
0
for detailed instructions on using [SPECIAL
12:3OPM
When date and time are correct, cycle the device power by
Cycling the power returns the device to
screen, followed by the Restore Previous Programming screen.
Repeat Steps 1 and 2 as follows:
1.
Select NO to Restore
Previous
Programming Y/N?.
Previous programming is removed from
the device.
Insert
2.
Press the (ENTER] key.
The
Cassette and Lock In Place screen is displayed.
the correct date and time are displayed on the screen.
Proceed to Section 3.2, Priming Procedures:
3.
Note:
Do not bypass the cassette test.
Primay Administration Set.
3.1.3
RESPONSE TO LOW BATTERY CONDITION
ML/HR
I
FUNCTIONI(
1
I
Coniirm
If
a low battery condition is detected by the device self test, the Current
HR
11:35
CURRENT TIME
DATE
(DD-MM-W) :
1.
Confii
2.
If the date and time are incorrect, use the (NEXT] key and
the correct date and time are displayed on the Current
PM 24
30-MAR-92
TIME Y/N? NO
[ENTERI
[LAST]
as appropriate. Overwrite the old data with the new data.
Note:
Refer to Section 5.4, Special Functions, for more detailed information on setting date
and time.
3.
Upon data entry completion, press the [ENTER] key. The KVO Rate screen is displayed:
KVO RATE:
MAX OCCLUSION:
I
4.
Confirm
5.
If the default
that the correct information displays on the KVO Rate screen.
cursor as appropriate.
l.OML/HR
lOPSI
values
are to be changed, use the [NEXT] and [LAST] keys to position the
[ENTER1
Enter values for KVO and Maximum Patient Line Occlusion
Pressure. The values entered become the default settings for the device.
Note: Default settings remain in device memory when the device is turned off or on.
Time
screen is displayed:
Time
screen.
key to position the cursor
I
Omni-Flow 4000 Plus IV Medication Management System
3-3
430-06371
-A04
(Rev.
4/94)
Page 17
Section 3 SETUP
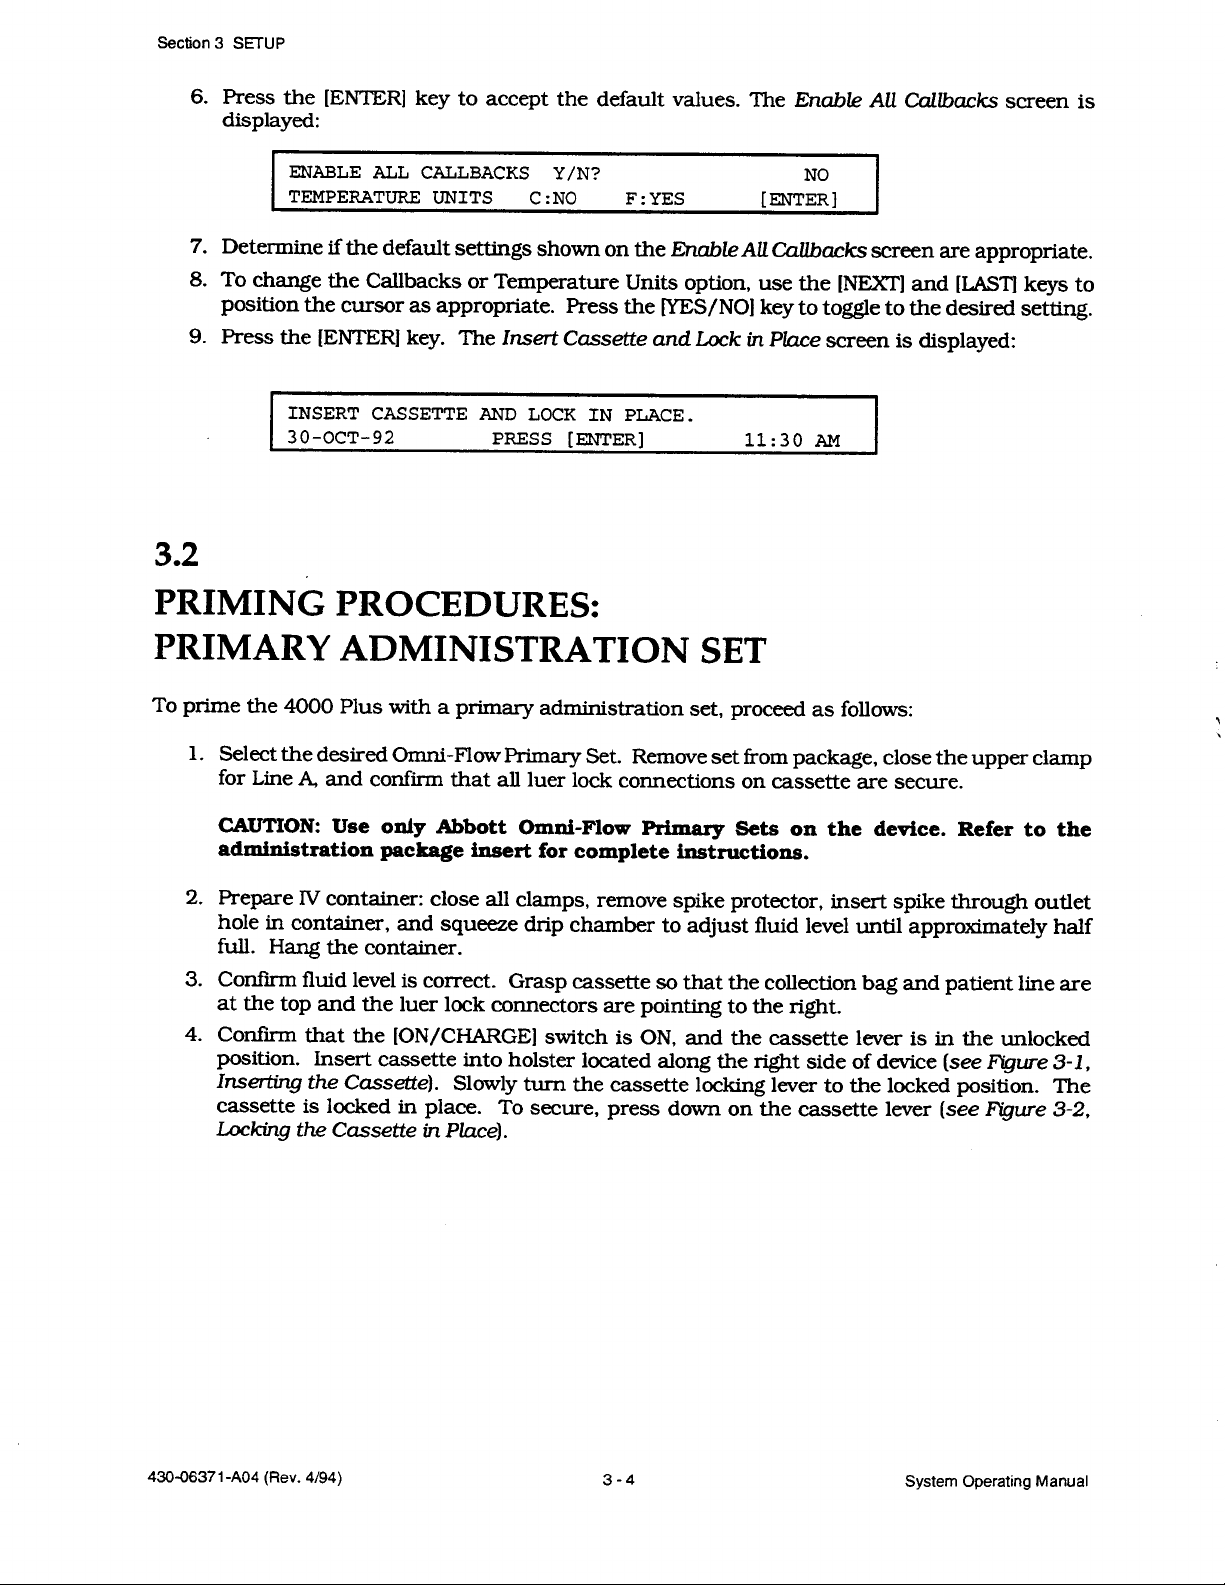
6. Press the
(ENTER] key to accept the default values. The
Enable
Callbacks
AU
displayed:
ENABLE ALL CALLBACKS Y/N?
TEMPERATURE UNITS
7.
Determine if the default settings shown on the
C:NO
F:YES
Enable
[ENT:]
AU Callbacks screen are appropriate.
8. To change the Callbacks or Temperature Units option, use the [NEXT] and
position the cursor as appropriate.
9.
Press the [ENTER] key. The Insert Cassette and Lock in
INSERT CASSETTE AND LOCK IN PLACE.
30-OCT-92
pmss [E NTER]
Press the
(YES/NO1
key to toggle to the desired setting.
11:30
Place
screen is displayed:
AM
3.2
PRIMING PROCEDURES:
PRIMARY ADMINISTRATION SET
screen is
(LAS?1
keys to
To prime the 4000 Plus with a primary administration set, proceed as follows:
1.
Select the desired Omni-Flow Primary Set.
A,
for Line
CAUTION:
and confirm that all luer lock connections on cassette are secure.
Use only Abbott Omni-Flow Primary Sets on the device. Refer to the
Remove set
from
package, close the upper clamp
administration package insert for complete instructions.
2.
Prepare IV
container: close all clamps, remove spike protector, insert spike through outlet
hole in container, and squeeze drip chamber to adjust fluid level until approximately half
full. Hang the container.
3.
Confii fluid level is correct.
Grasp cassette so that the collection bag and patient line are
at the top and the luer lock connectors are pointing to the right.
4.
Confii
that the (ON/CHARGE] switch is ON, and the cassette lever is in the unlocked
position. Insert cassette into holster located along the right side of device (see
Inserting
the Cassette). Slowly turn the cassette locking lever to the locked position. The
cassette is locked in place. To secure, press down on the cassette lever (see
in
Locking the Cassette
Place).
l?gure
Figure
3-1,
3-2,
430-0637
-A04 (Rev.
1
4194)
3-4
System Operating Manual
Page 18
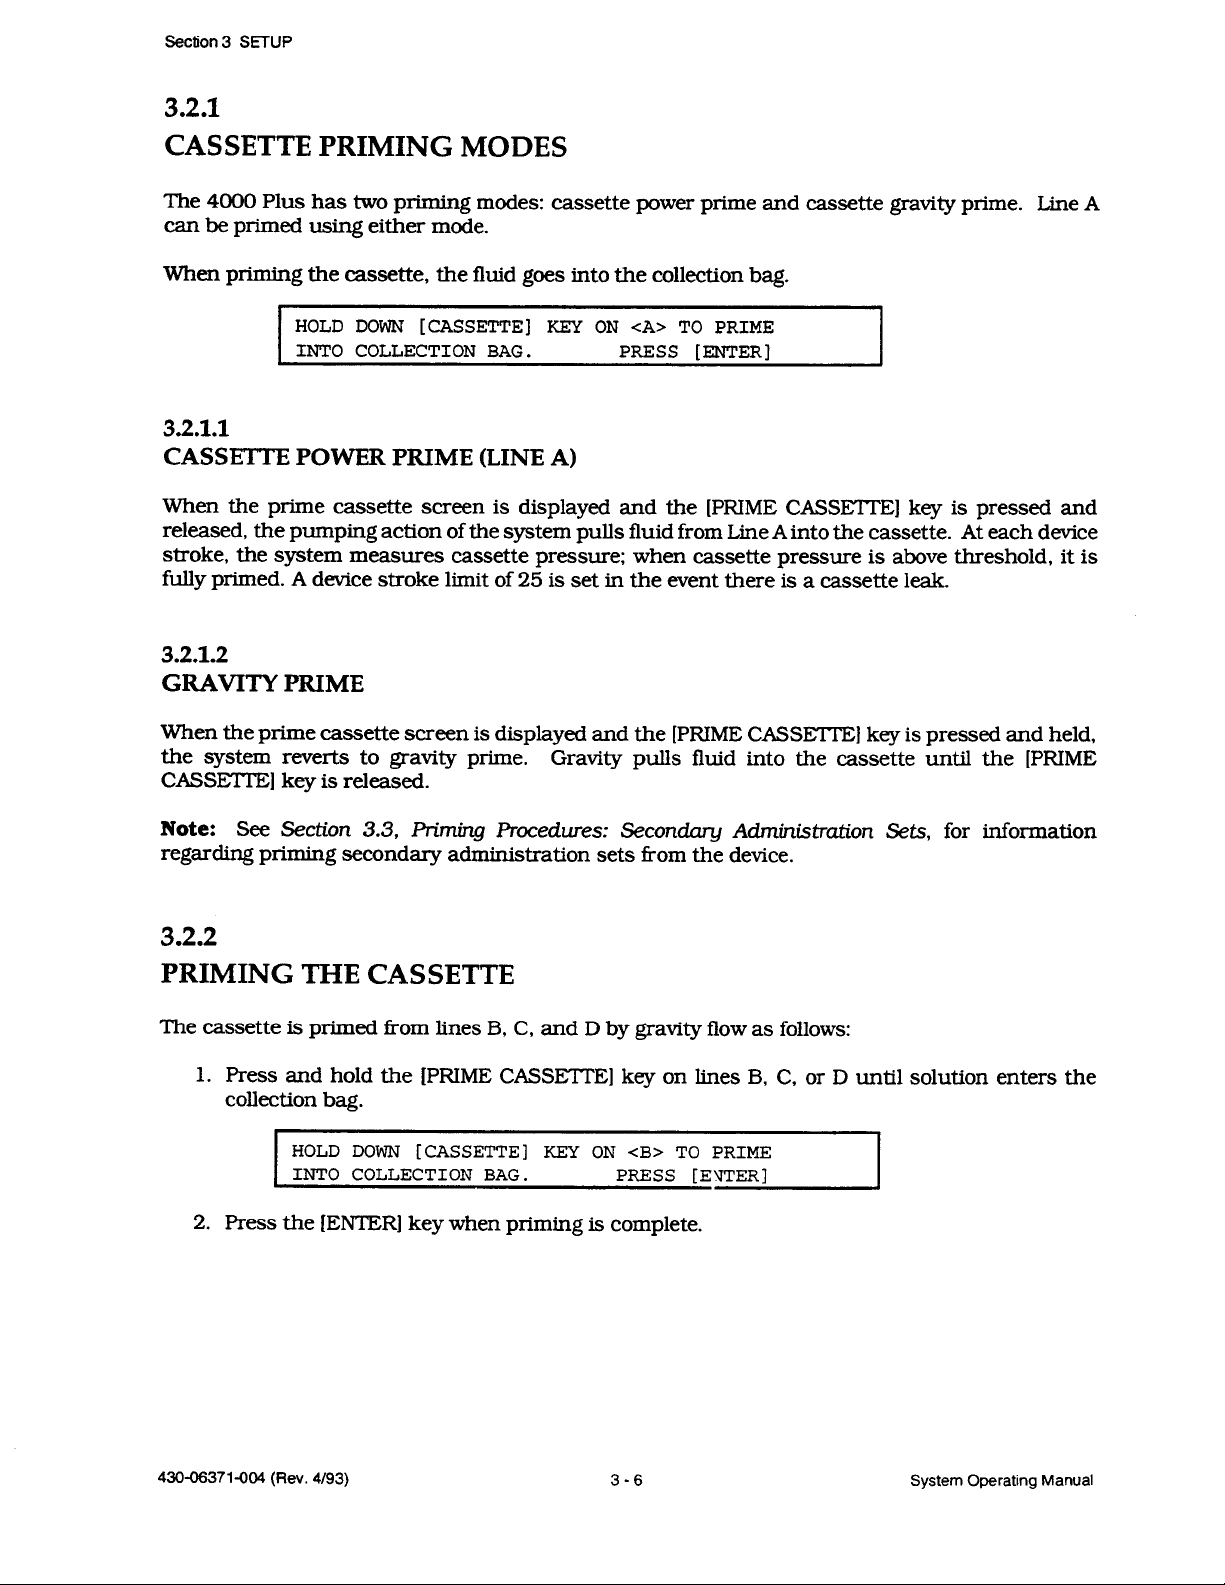
CAUTION:
Turn
the
cassette
3.2 PRIMING PROCEDURES: PRIMARY ADMINISTRATION SET
locking lever slowly to lock cassette in place.
Note:
Con&m
the cassette
locking lever is in the locked position. The cassette lever must
be locked in place and properly secured before any operation can continue.
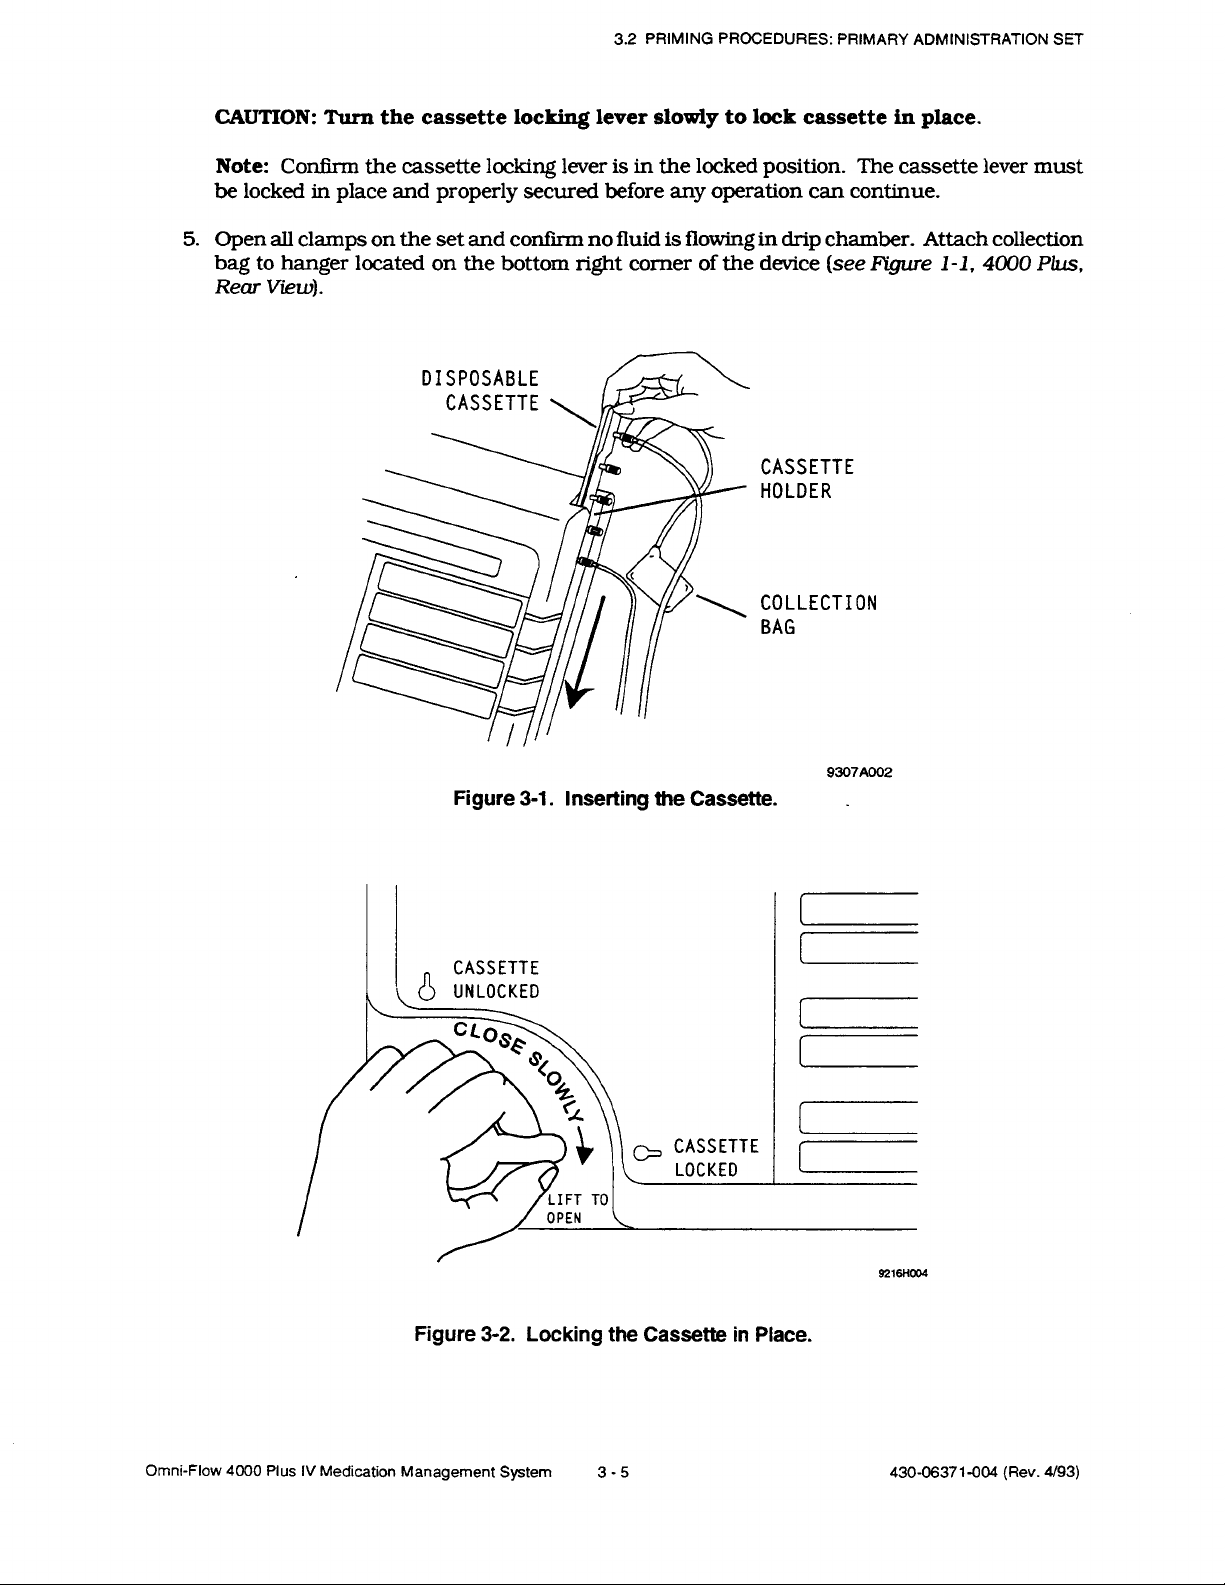
Open all clamps on the set and confirm no fluid is flowing in drip chamber. Attach collection
5.
bag to hanger located on the bottom right comer of the device (see Figure l-l, 4000 Plus,
Rear View).
CASSETTE
HOLDER
COLLECTION
BAG
Figure 3-1. Inserting the Cassette.
CASSETTE
~8
UNLOCKED
OPEN
<
Figure 3-2. Locking the Cassette in Place.
9307AOO2
_
9216H02-4
Omni-Flow 4000 Plus IV Medication Management System
3-5
430-06371-004 (Rev.
4193)
Page 19
Section 3 SETUP
3.2.1
CASSETTE PRIMING MODES
The 4000 Plus has two priming modes: cassette power prime and cassette gravity prime.
Line A
can be primed using either mode.
When priming the cassette, the fluid goes into the collection bag.
<A>
HOLD
DOWN [C AS SETTE ] KEY
INTO COLLECTION BAG.
0~
TO PRI ME
PRESS [ENTER]
3.2.1.1
CASSETTE POWER PRIME (LINE A)
When the prime cassette screen is displayed and the [PRIME CASSETTE] key is pressed and
Ainto
released, the pumping action of the system pulls fluid from Line
the cassette.
stroke, the system measures cassette pressure; when cassette pressure is above threshold, it is
fully primed. A device stroke limit of 25 is set in the event there is a cassette leak.
3.2.1.2
GRAVITYPRIME
When the prime cassette screen is displayed and the (PRIME CASSETTE1 key is pressed and held,
the system reverts to gravity prime.
Gravity pulls fluid into the cassette until the (PRIME
CASSETTE] key is released.
At each device
Note: See
regarding priming secondary administration sets
Section 3.3, Priming Procedures: Secondary Administration Sets, for information
Tom
the device.
3.2.2
PRIMING THE CASSETTE
The cassette is primed from lines B, C, and D by gravity flow as follows:
1. Press and hold the [PRIME CASSETTE] key on lines B, C, or D until solution enters the
collection bag.
~0
PRIME
DowN
HOLD
INTO COLLECTION BAG. PRESS
2.
Press the [ENTER] key when priming is complete.
[CASSETT E] KEY ON
<B>
[E:;T]
4193)
3-6
System Operating Manual430-06371-004 (Rev.
Page 20
3.2
PRIMING PROCEDURES: PRIMARY ADMINISTRATION SET
3.2.3
PATIENT LINE PRIMING MODES
The patient (distal) line may be primed either by power prime or by gravity prime.
WARNING
DO NOT CONNECT LINE TO PATIENT WHILE PRIMING PATIENT LINE.
Note: Priming the
patient line can only occur when ALL lines are OFF.
3.2.3.1
PATIENT LINE POWER PRIME
prime
When the
then released, the pumping action of the system pulls fluid from Line A into the cassette. At each
device stroke, the system measures cassette pressure; when cassette pressure is above threshold,
it is fully primed. After reaching the pressure threshold, the patient line is opened and an additional
13 strokes are pumped, corresponding to 3
microbore 60 inch patient line.
Note:
When using power prime,
to patient.
Note:
In the event of an occlusion alarm, use the appropriate aseptic techniques to remove the
filter cap at the distal end of the patient line
3.2.3.2
PATIENT LINE GRAVITY PRIME
When the [PRIME PATIENT LINE] key is pressed and held, the system reverts to gravity prime.
Gravity pulls fluid into the cassette until the [PRIME PATIENT LINE] key is released.
Patient Line screen is displayed and the (PRIME PATIENT LINE] key is pressed,
mL
of fluid. This volume is
sufficient
to prime the entire
con&m the patient line is fully cleared of all air before connecting
Additional gravity priming may be required to fully clear air from the line.
3.2.4
PRIMING THE PATIENT LINE
i?om
T
O
prime the
1.
Press
patient line
and hold the [PRIME PATIENT LINE] key until all air is cleared from the patient line.
DO'~~N
HOLD
PRIME PATIENT LINE.
2. When priming is complete, press the (ENTER] key.
Note:
When using the
gravity
Administration Set With
1V
Omni-Flow 4000 Plus
Medication Management System 3-7
lines B, C, or D, proceed as follows:
[PATIENT
flow
Grauity
LINE ] KEY ON
PRESS
prevention valve set, see Section 3.3, Priming
Plow Prevention Value.
<B>
TO
[ ENTER ]
Procedures:
430-0637 l-004 (Rev.
Primary
4193)
Page 21
Section 3 SETUP
3.2.5
CASSETTE TEST
The device performs a cassette test for approximately 36 seconds.
CAUTIONz
It is extremely important to always perform the cassette test when inserting a
new cassette.
CASSETTE TEST IN PROGRESS
ABBOTT 4000 PLUS
When the cassette test is completed, one of two screens is displayed: Possible Faulty Cassette
?&~pe
screen, or Select Infusion
screen.
3.2.5.1
CASSETTE TEST FAILED
If
the cassette
fails the cassette test, the device alarms and the Possible Faulty Cassette screen is
displayed:
+
-POSSIBLE FAULTY
REPRIME OR REPLACE CASSETTE
CASSETTE-
[MUTE1
If the cassette fails the cassette test, proceed as follows:
1.
Silence the alarm by pressing the (MUTE] key. To clear the alarm, press the (MUTE1 key
again. Check for air bubbles, and
2.
Prime the cassette as described in Section 3.2.2. Prime the patient line as described in
reprime
if necessary.
Section 3.2.4.
3.
Ifit
fails the cassette test again, replace cassette. Prime new cassette as described in Section
3.2.2.
Prime the patient line as described in Section 3.2.4. If two cassettes fail in a row,
send the device to clinical engineering.
430-06371-004 (Rev.
4193)
3-8
System Operating Manual
Page 22
3.3 PRIMING PROCEDURES: PRIMARY ADMINISTRATION SET WITH GRAVITY FLOW PREVENTION VALVE
3.2.5.2
CASSETTE TEST SATISFACTORY
If the cassette test is satisfactorily completed, the following screen is displayed:
SELECT INFUSION TYPE
PRESS [CONTINUOUS] OR [INTERMITTENT]
To prepare for connecting IV containers or syringes to the remaining three lines, press the
[ESCAPE] key. The base screen is displayed.
THE DEVICE IS NOW READY FOR CONNECTING
REMAINING THREE LINES.
lV CONTAINERS OR SYRINGES TO THE
3.3
PRIMING PROCEDURES:
PRIMARY ADMINISTRATION SET WITH GRAVITY
FLOW PREVENTION VALVE
from
CAUTIONS:
cassette is removed from the device without closing the clamps. The gravity flow prevention
valve does not prevent mixing of drug lines. Close all clamps before removing cassette.
The gravity flow prevention valve requires pressure to open (1.5 to 5.0 psi). The device
occlusion pressure setting may require adjustment to prevent nuisance occlusion alarms.
Note:
insert of the administration set. These instructions apply to the 4000 Plus only.
To prime the
valve,
These
proceed as follows:
The gravity flow prevention valve protects the patient
instructions offer an alternative priming procedure to those found on the package
4000
Plus with a primary administration set containing the gravity flow prevention
free flow if the
1.
Remove the primary set from package, close the upper clamp for Line A, and
all luer lock connections on the cassette are secure.
CAUTION:
administration package insert for complete instructions.
2.
Prepare IV container: close all clamps, remove spike protector, insert spike
hole in container, and squeeze drip chamber to adjust fluid level until approximately half
full. Hang the container.
3.
Confirm fluid level is correct. Grasp cassette so that the collection bag and patient line are
at the top and the luer lock connectors are pointing to the right.
4.
Confii
position. Insert cassette into holster located along the right side of device (see Figure
Inserting
cassette is locked
Locking
Omni-Flow 4000 Plus IV Medication Management System
Use only Abbott Omni-Flow
that the (ON/CHARGE] switch is ON, and the cassette lever is in the unlocked
the
Cassette). Slowly turn the cassette locking lever to the locked position. The
in
place.
the Cassette in Place).
To secure, press down on the cassette lever (see Figure 3-2,
primary
3-9
confii
Sets on the device. Refer to the
throu$
430-06371 -A04 (Rev.
that
outlet
3-l.
4/94)
Page 23

Section 3 SETUP
CAUTION: Turn the cassette locking lever slowly to lock cassette in place.
Note:
be locked in place and properly secured before any operation can continue.
5.
Open all clamps on the set and confirm no fluid is flowing in drip chamber. Attach collection
bag to hanger located on the bottom right comer of the device (see Figure l-l, 4000
Rear View).
6.
Prime the cassette using the Line A [PRIME CASSETTE] key until all air is cleared from the
cassette into the collection bag. Press the [ENTER] key.
7.
Attach any extension set or other devices to the gravity flow prevention valve located at the
distal end of the patient line (do not attach to a venipuncture device).
8.
Press the Line A (PRIME PATIENT LINE] key to power prime the patient line.
flow prevention valve prevents gravity prime mode from priming the patient line.
Note:
10
unul
9.
Press the (ESCAPE] key. When the Cassette Test Screen displays, enter YES to bypass the
cassette test and return to the base screen.
10.
When the base screen displays, press Line A [PRIME PATIENT LINE] to power prime the
patient line.
11
Press the
test.
12.
Determine if the venipuncture device is indwelling.
indwelling, prepare and insert the venipuncture device in the patient per hospital
procedure.
13.
Attach the primed patient line to the venipuncture device.
Con&m
the cassette
locking lever is in the locked position. The cassette lever must
Plus,
The gravity
additional power primes are needed to prime the patient line, repeat Steps 9 and
If
primed.
[ENTER] key when the patient line is fully primed. The device preforms a cassette
If the venipuncture device is not
THE LINE IS NOW READY FOR PROGRAMMING.
3.4
PRIMING PROCEDURES:
SECONDARY ADMINISTRATION SET
To prime the 4000 Plus with a secondary administration set, proceed as follows:
1.
Select the
desired Omni-Flow Secondary Set.
CAUTION: Use only Abbott Omni-Flow Secondary Sets. Refer to the administration
package insert for complete instructions.
2.
Prepare IV
container:
close all clamps, remove spike protector, insert spike through outlet
hole in container, and squeeze drip chamber to adjust fluid level until approximately half
full. Hang container.
3.
Confirm fluid level is correct. Remove distal cap
4.
Remove the luer lock protector for the cassette line to be used.
cassette.
Remove set from package; close clamp.
from
secondary set.
Connect secondary set to
Note: An
prime prior to connecting the
430-0637 1 -A04 (Rev.
alternative method
is to
secondq
4l94)
open the
clamp and clear all air from the set by gravity
set to the cassette.
3-
10
System Operating Manual
Page 24

3.5 CONNECTING A SYRINGE TO THE CASSETTE
5.
Prime the line by pressing the appropriate [PRIME CASSETTE] key until no air bubbles are
visible in the connection site or cassette.
THE LINE IS NOW READY FOR PROGRAMMING.
4000
To prime the
as follows:
1. Put all lines on hold.
2. Connect and prime secondary set as described above.
3. Press the [RESUME] key, then the [ENTER] key.
CAUTION:
or&inaUy
Fluid
bag.
sequence.
Plus with a secondary administration set while other lines are running, proceed
fluid
Priming directs
in the cassette may be displaced into the collection bag by the priming
air
and
out through the cassette and into the collection
3.5
CONNECTING A SYRINGE TO THE CASSETTE
Note:
To connect a syringe to the cassette, proceed as follows:
Note:
during cassette prime.
THE LINE IS NOW READY FOR PROGRAMMING.
For syringe infusions, only use 20 cc to 60 cc size syringes.
1.
Remove luer lock protector for the cassette line to be used.
compatible stop-cock or syringe support elbow into the cassette.
2.
Connect the syringe to the stop-cock or elbow, with the syringe in a vertical position (see
Figure
3-3, Syringe Connected to the Cassette).
cassette.
3.
If air bubbles are visible in the connection sight or cassette, prime the line by pressing the
appropriate [PRIME CASSETTE] key.
Syringes may not prime easily with gravity flow.
.
Open fluid pathway from syringe to the
Some force may be required on the plunger
Connect an Omni-Flow
Figure 3-3. Syringe Connected to the Cassette
Omni-Flow 4000 Plus IV Medication Management System
3-11
430-06371 -A04 (Rev.
4/94)
Page 25

Section 3 SETUP
3.6
CONNECTING A SYRINGE AND SYRINGE
ADAPTOR TO THE CASSETTE
A syringe adaptor serves to vent the syringe, making it less susceptible to plunger stopper
resistance. When programming the 4000 Plus and using the syringe adaptor, it is recommended
that the Syringe option be set to NO.
To attach a syringe and syringe adaptor to the cassette, proceed as follows:
1.
Prepare the syringe using aseptic technique.
2.
Attach the adapter to the syringe (see Figure 3-4, Connecting Syringe
to Cassette).
3.
Attach an Omni-Flow compatible stop-cock or a syringe support elbow to the adaptor (see
Figure 3-4).
4.
Prime the adaptor and stop-cock/syringe support elbow.
5.
Remove the luer lock protection for the cassette line to be used.
or syringe support elbow to the cassette.
and
Syringe Adaptor
Connect primed stop-cock
THE LINE IS NOW READY FOR PROGRAMMING.
U
Figure 3-4. Connecting Syringe and Syringe Adaptor to
'SYRINGE
Cassette
3-
4l94)430-06371-A04 (Rev.
12
System Operating Manual
Page 26

3.7 REMOVING THE
CASSRTE
FROM THE DEVICE
3.7
REMOVING THE CASSETTE FROM THE DEVICE
WARNING
REMOVING
UNRESTRICTED FLOW. All CLAMPS MUST BE CLOSED TO PREVENT FLOW TO PATIENT
AND/OR MIXING OF DRUGS.
To remove a cassette from the 4000 Plus, proceed as follows:
1.
Confirm that the ION/CHARGE] switch is ON and all lines are OFF.
2.
Close clamps on all lines to prevent free flow and/or mixing of drugs.
3. Lift cassette locking lever and turn counterclockwise. Allow approximately 3 seconds for
the piston to retract.
4. Pull cassette from holster.
CASSElTE FROM DEVICE WITHOUT CLOSING LINE CLAMPS MAY RESULT IN
a
cassette becomes jammed or a Pump Service Code 0800 occurs while inserting or removing
If
the cassette, proceed as follows:
1.
Cycle the device power. Toggle the [ON/CHARGE] switch to CHARGE, then ON.
2.
Push the cassette completely down in the holster until it is securely seated.
3.
Confih-m
4.
Proceed with programming.
the self test completes.
Omni-Flow 4000 Plus IV Medication Management System
3-13
430-06371 -A04 (Rev.
4/94)
Page 27

Section 4
PROGRAMMING
amming
When
during programming.
CAUTION:
into the
progr
drip
After
chamber on each appropriate
the 4000 Plus, listen for the device response (audible
programming
confirmatory
the device, ensure that pumping has begun by
fill
stroke for each line in use.
verifying
beep)
flow
4.1 MAINTENANCE INFUSIONS
The 4000
to deliver when an intermittent line is infusing) or in the maintenance mode (device stops delivering
when an intermittent line is infusing and restarts when the intermittent line stops infusing).
If an intermittent with dilution programmed on Lines B. C, or D is put on hold, and a maintenance
infusion was previously prgrammed on Line
programming on Line A continues.
To set up line A, proceed as follows:
1.
Plus can infuse on Line A in either the continuous mode of operation (device continues
A,
the dilution is put on hold and the maintenance
Press the [MAINTENANCE INFUSION]
key for Line A
A> MAINTENANCE
TOTAL VOLUME: 0 ML
Set
2.
3.
Note:
flushing or diluting mode. If Line A is flushing or diluting, the display only allows the entry of a
new source container volume.
Omni-Flow 4000 Plus IV Medication Management System
a rate using the numeric keys, then press the [NEXT] key.
Note:
appears on the display screen.
specifications.
Set a Total Volume to be infused using the numeric keys, then press the
start the line.
The
Maintenance or continuous rate on Line A can only be changed when Line A is not in the
If the line rate chosen exceeds the combined maximum rate of the device. a message
A> MAINTENANCE
TOTAL VOLUME: 250ML
base screen is displayed:
r
A: INF B: OFF C: OFF D: OFF TOTAL
5.0
RATE:5_0ML/HR
Refer to Section 12,
RATE:5.0ML/HR
0 0 0
4-l
[ENTER]
[ENTER]
5.0
12:30
Spec~@cations,
PM
ML/HR
for rate range
[ENTER]
430-0637 l-004 (Rev.
key to
4193)
Page 28

Section 4 PROGRAMMING
4.2
CONTINUOUS INFUSIONS
The 4000
the user two methods of programming:
Note:
continuous mode, press the [CONTINUOUS INFUSION] key. Use the [NEXT] and
Plus infuses up to four medications at the same time in the continuous mode and offers
ML/HR
To change either the rate in MCG or
mL/hr,
MCG/KG/MIN.
and
or total volume on any line operating in the
[LASTI
keys to
move the cursor to the desired field that requires a change. Any change may be made while the
line is operating; there is no need to stop the flow. After making a change, press the
[ENTER]
key
and the device begins operating at the new rate and/or volume immediately.
Note:
without
Note:
ConcurrentFlow).
Note:
not stop.
Continuous infusions may not be programmed over Maintenance or Intermittent infusions
first
stopping the Maintenance or Intermittent infusion.
Concurrent flow exists when two or more drugs are given simultaneously (see Section
Continubus
infusions are rate
specific
and alarm when dose is complete. The infusion does
4.2.4,
The device keeps pumping at programmed rate and does not go to KVO.
4.2.1
ML/HR
The following sections detail the required steps to program an
change an
INFUSIONS
mL/hr
infusion.
mL/hr
infusion and the steps to
4.2.1.1
PROGRAMMING OR CHANGING AN
mL/hr
To program a new
1.
Press the [CONTINUOUS INFUSION] key for
B>
RATE:
Note:
If [CONTINUOUS INFUSION] was pressed in error or there is a need to begin again,
infusion, or change an existing
VOL:
OMCG/KG/MIN OMG IN OML [ENTER]
press the [ESCAPE] key to return to the base screen.
2.
The cursor appears in the RATE field. Enter the delivery rate. Use the
VOL
the cursor to the
Note:
If the line
field.
rate chosen exceeds the combined maximum rate of the device, a message
appears on the display screen.
Enter the volume to be delivered.
Refer to Section 12,
specifications.
3.
Press the [ENTER] key to start the infusion.
ML/HR INFUSION
mL/hr
the
line used. The following screen is displayed:
OML WT: OKGOMLIHR
Spectfications,
infusion, proceed as follows:
[NEml key to move
DeZiue
y Rate Range, for
430-06371-004 (Rev.
4/93)
4-2
System Operating Manual
Page 29

4.2.1.2
CHANGING AN
ML/HR INFUSION TO AN ALTERNATE UNIT OF MEASURE
INFUSION
To change an existing
1.
Press the [CONTINUOUS INFUSION] key for the line used. For example, when using line
mL/hr
B, the following screen is displayed:
4.2 CONTINUOUS INFUSIONS
infusion to an alternate unit of measure infusion, proceed as follows:
B>
RATE:
2.
Since the line has previously been programmed in
ML/HR
3.
Use the
Note: If
4.
Use the [NEXT] key to move the cursor to the
field.
[NEXTI
programming in MCG/MIN is desired, enter a body weight of one (1).
MCG/KG/MIN
5.
Use the
6.
Use the
Note: If
[NEXTI
[NEXTI
B>
RATE:
3.OOMCG/KG/MIN
no
15.0ML/HR
OMCG/KG/MIN OMG IN
key to enter the appropriate global body weight, if one does not already exist.
rate.
key to move the cursor to the
key to move the cursor to the
16.9ML/HR
entry is made in the Volume field, the volume entered in the
VOL:
VOL:
2OOMG
25OML
MG
ML
25OML
IN
w"r:
OML
field, and enter the medication dose.
field.
WI':
25OML
OKG
CENTER1
mL/hr,
MCG/KG/MUV
the cursor will appear in the
field, and enter the
Enter the diluent volume.
75.OKG
[ENTER]
ML
field becomes
the default container volume.
Note: The
7.
To start the infusion, press the [ENTER] key. The following screen is displayed:
calculated delivery rate in
ML/HR
appears in the
ML/HI?
Rate field.
D:OFF
A:INF B:ON C:OFF
35.0 16.9
In this
35
example, the base screen shows Line A has been programmed as a maintenance at
mL/hr.
Line B runs at 16.9
until stopped.
(The
mL/hr
0
rate for Line B is the calculated result of the
TOTAL
0
mL/hr
in a continuous mode of operation and continues
program.) The base screen only displays delivery rates in
Omni-Flow 4000 Plus IV Medication Management System 4
51.9
-
3
12:30PM
ML/HR
mL/hr.
MCG/KG/MIN
430-06371-004 (Rev.
4/93)
Page 30

Section 4 PROGRAMMING
4.2.2
ALTERNATE UNITS OF MEASURE
‘I&e
following sections detail the required steps to program an alternate unit of measure infusion
(MCG/KG/MIN)
INFUSIONS
and the steps to change a unit of measure infusion.
The
Note:
4000 Plus will not accept
specified (non-zero): rate
weight
&VT).
MCG/KG/MIN
(MCG/KG/MIN),
dose amount
programming unless all data fields are
(MG],
diluent volume (ML], and body
4.2.2.1
PROGRAMMING A NEW ALTERNATE UNIT OF MEASURE INFUSION
To program a new alternate unit of measure (MCG/KG/MIN) infusion, proceed as follows:
Press the [CONTINUOUS INFUSION] key for the line used.
1.
For example, when using line
B, the following screen is displayed:
B>
RATE:
OMCIG/KG/MIN
2.
The cursor is in the
OML/HR
ML/H.R
field. Use the (NEXT] key to move the cursor to the
VOL:
OMG IN
om
WT:
OML
OKG
rENTERi
I
VOL
field,
and enter the container volume.
VOL
Note:
If no entry is made in the
field, the volume entered in the ML field becomes the
default container volume.
3.
Use the
[NEXTl
key to move the cursor to the
weight, if one does not already
Note:
4.
Use the
5.
Use the
6.
Use the
Note: The
7.
To start the
If
programming in MCG/MIN is desired, enter a body weight of one
[NEXTI
key to move the cursor to the
[NEXTI
key to move the cursor to the
[NEXTI
key to move the cursor to the
calculated delivery rate in
infusion,
A:INF B:ON C:OFF
35.0
I
press the [ENTER] key. The following screen is displayed:
16.9 0
&St.
D:OFF
ML/HR
TOTAL
51.9
0
WTfield
MCG/KG/MINfield
MG
ML
appears in the
12:3OpM
and enter the appropriate global body
(
1).
and enter the desired rate.
field, and enter the medication dose.
field.
ML/HR
Enter the diluent volume.
ML/HI?
Rate field.
I
In this example, the base screen shows Line A has been programmed as a maintenance at
35
mL/hr.
Line B runs at 16.9
until stopped.
(The
mL/hr
mL/hr
rate for Line B is the calculated result of the
program.) The base screen only displays delivery rates in
in a continuous mode of operation and continues
MCG/KG/MIN
mL/hr.
8.
Repeat Steps 1 through 7 for each line to operate in a continuous mode of operation.
430-06371X104 (Rev.
4/93) 4-4
System Operating Manual
Page 31

4.2.2.2
CHANGING AN ALTERNATE UNIT OF MEASURE INFUSION
4.2 CONTINUOUS INFUSIONS
To change an alternate unit of measure infusion
Press the [CONTINUOUS INFUSION] key for the line used. For example, when using line
1.
(MCG/KG/MIN],
B, the following screen is displayed:
RATE:
3.00MCG/KG/MIN
Since the
2.
line has previously been programmed in Alternate units of Measure,
will appear in the
16.9ML/HRB>
MCG/KG/MIN
VOL:
2OOMG
field.
250ML WT:
IN
Confirm
Lmchanged.
Note: If
Enter new
3.
4.
Use the
5.
Use the
Note: If
programming in MCG/MIN is desired, enter a body weight of one
MCG/KG/MIN
[NEXTI
key to move the cursor to the
[NEXTj
key to move the cursor to the ML field.
no entry is made in the
rate.
Volume
MG
field, the volume entered in the
the default container volume.
Note: The
6.
To start the infusion, press the [ENTER] key. The following screen is displayed:
calculated delivery rate in
ML/HR
appears in the
proceed as follows:
75.OKG
25OML
[ENTER]
the cursor
(
1).
to remain
that global body weight is
field, and enter the medication dose.
Enter the diluent volume.
ML
field becomes
ML/HI?
Rate field.
.
35.0 16.9
0
D:OFF
0
TOTAL A:INF B:ON C:OFF
51.9
12:3OpM
ML/HR
In this example, the base screen shows Line A has been programmed as a maintenance at
35
until stopped.
program.) The base screen only displays delivery rates in
4.2.2.3
mL/hr.
Line B runs at 16.9
mL/hr
(The
mL/hr
rate for Line B is the calculated result of the
in a continuous mode of operation and continues
mL/hr.
CHANGING AN ALTERNATE UNIT OF MEASURE INFUSION TO
INFUSION
To change an alternate unit of measure infusion to
1. Press the
[CONTINUOL
S INFUSION] key for the line used. For example, when using line
mL/hr,
proceed as follows:
B, the following screen is displayed:
B>
RATE:
3.OOMCG/KG/MIN
2. Since the
line was previously programmed in alternate units of measure, the cursor will
appear in the
3.
Use the [LAST] key to move the cursor to the
16.9MWHR
MCG/KG/MIN
field.
VOL: 250ML WT:
2OOMG
IN 250ML [ENTER]
W7’field.
75.OKG
Press [CLEAR
body weight.
MCG/KG/MIN
MLJHR
ENTRY to clear the
Omni-Flow 4000 Plus IV Medication Management System
4-5
430-06371-004 (Rev.
4/93)
Page 32

Section 4 PROGRAMMING
4.
Use the [LAST] key to move the cursor to the
5.
Use the [LAST] key to move the cursor to the
Note:
If the line
rate chosen exceeds the combined maximum rate of the device, a message
VOL
ML/MI
appears on the display screen. Refer to Section 12.
field.
Enter the volume to be delivered.
field and enter the desired rate.
Spec~$ica.tions.
DeUuey
Rate Range, for
specifications.
6.
Press the [ENTER] key to start the infusion.
4.2.3
CHANGING THE GLOBAL BODY WEIGHT.
The global body weight is established when the first weight and concentration are entered on a
continuous line. Entries in both fields are required to program in MCG. The patient weight must
be consistent on all lines with the exception of 1 kg to program in MCG/MIN. If another weight is
entered, the following screen is displayed:
GLOBAL BODY WEIGHT CANNOT BE CHANGED
[ESC
AP
WHILE LINES ARE INFUSING
Global body weight can be changed only while lines are stopped or while no other line is running
in
MCG/KG/MIN.
When a new body weight is entered, the following screen is displayed:
E]
BODY WT. CHANGED FROM _KG
[ENTER] TO ACCEPT [ESCAPE] TO REVISE
Pressing [ENTER] starts the line and establishes a new
TO-KG
global
body weight. The [ESCAPE] key
causes the line programming screen to appear with the cursor in the global body weight field.
When subsequent lines programmed in MCG are restarted, the new global
and the
mL/h.r
rate is adjusted based on the
MCG/KG/MIN
field and new weight.
body
weight appears
To accept the new global body weight and adjusted delivery rate for lines programmed in MCG,
press the [CONTINUOUS INFUSION] key for the respective line, and then confii the new setting
by pressing the [ENTER] key.
If a line was previously programmed with a weight of 1 kg, its body weight is retained when the
global body weight is changed.
If the global body weight is changed to 1 kg, or 1 kg is changed to global body weight, the
WT
MCG/KG/MmT
previous
and Concentration fields
mL/hr
value remains unchanged.
To change from MCG programming to
are
tiL/hr
erased as the cursor is moved ii-om the
programming,
enter a zero in the body weight field.
field. The
When [ENTER] is pressed, or as the cursor is moved from the weight field, it erases the
MCG/KG/MIN
into this screen. The previous
field and Concentration field values. The global body weight appears upon re-entry
mL/hr
value remains until changed.
430-0637 l-004 (Rev.
4/93)
4-6
System Operating Manual
Page 33

4.2.4
CONCURRENT FLOW
4.2 CONTINUOUS INFUSIONS
Variation in patient response
may occur when delivering certain short half-life drugs if the
difference of the delivery rates between the lines is large. Drugs with a short half-life (approximately
six minutes or less when given intravenously] include the following:
0
Nitroglycerine
Q
Nitroprusside
Norepinephrine
P
CI
Oxytocin
0
Procainamide
0
Trimethaphan
Note:
D
Dobutamine
D
Dopamine
LI
Epinephrine
0
Esmolol
D
Isoproterenol
D
Lidocaine
This list is not intended to be all-inclusive of drugs with a short half-life (critical drugs].
Clinicians should be familiar with the pharmacodynamics of any critical drug before
administration.
The following delivery rate guidelines represent a worst-case
scenaxio
of a nitroprusside infusion
in combination with one or more drugs. This example represents an unlikely extreme since it
considers a 20 second half-life for nitroprusside which is widely regarded as the drug with the
shortest half-life in humans (reference the British Journal of Anesthesiology). These guidelines
for nitroprusside would avoid variations in patient response in such an extreme case:
If nitroprusside (with a 20 second half-life) is to be infused at a rate of less than 10.0
mL/hr,
the combined infusion rate of drugs on the other three lines should be no greater than five
times the critical drug (nitroprusside) rate.
If nitroprusside (with a 20 second half-life) is to be infused at a rate of 10.0 to 20.0
mL/hr,
the combined infusion rate of drugs on the other three lines should be no greater than 10
times the critical drug (nitroprusside) rate.
mL/hr
Ifnitroprusside (with a 20 second half-life) is to be infused at a rate of 20.0
or greater,
the combined infusion rate of drugs on the other three lines can be programmed at any desired
rate.
This information is presented to inform clinicians of a rare situation that could be misinterpreted
if they are unfamiliar with this phenomenon.
CAUTION:
When infusing short half-life drugs at a low flow rate, automatic air elimination
interrupts the delivery of medication to the patient. This medication interruption is
dependent upon the infusion rate aud may cause a change in patient parameters.
Omni-Flow 4000 Plus IV Medication Management System
4-7
430-06371-004 (Rev.
4/93)
Page 34

Section 4 PROGRAMMING
4.3
INTERMITTENT INFUSIONS
The
4000 Plus can infuse
be infused on Lines B, C, and D.
To set up lines B, C, and D as intermittent infusions, proceed as follows:
1.
Press the
Input the volume of EACH dose infused.
2.
[INTERMITTENT
B>
EACH DOSE:
(RATE:
B>
EACH
(RATE:
as many as three intermittent medications. These medications can only
INFUSION] key on the line used.
(HRS:MIN)
0:OO
0:OO
[ENTER1
(HRS:MIN)
CENTER]
OML OVER
OML/HR)
DOSE:5O.OML
OML/HR)
0
Q:
OVER
0
Q:
X: 1
X: 1
3.
Press
the
Note:
Note:
[NEXTI
B>
EACH
(RATE:
Rate has been automatically calculated.
the
line
If
Input the total time EACH dose is to be infused.
key.
DOSE:50_OML
15OML/HR)
rate chosen exceeds the combined maximum rate of the device, an alert
message appears on the display.
specifications.
STARTING LINE WOULD CAUSE MAXIMUM RATE
-
REPROGRAM
50.oML
If this
Press the
4.
Press the
5.
TO BE EXCEEDED
is a single dose, proceed to Step 6.
[NEXf] key. Input the dosing frequency
B>
EACH DOSE:
(RATE:
[NEXTI
B>
EACH
(RATE:
15OML/HR)
key. Input the total number of doses to be delivered
DOSE:50_0ML
15OML/HR)
(HRS:MIN)
0:20
OVER
0
Q:
X: 1
[ENTERI
Refer to Section 12, Specifications, for delivery rate range
[ENTER1
(9)
(the number of hours between doses].
OVER
X:0
Q: 6
OVER
Q: 6 X: 4
0:20
0:20
(HRSZMIN)
[ENTERI
(HRS/MIN)
[ENTI:R]
(x).
Note: A
the total of the dosing frequency times the number of doses cannot exceed 24.
6.
Press the [ENTER] key.
B>
Callback
The
default to NO. If
430-06371-004 (Rev.
maximum of 24 hours of intermittent infusions can be programmed for a line: i.e.,
CALLBACK Y/N: NO
DILUTION Y/N: NO
Y/N,
Syringe Y/N,
“10
is correct, proceed to Step 7.
4/93)
SYRINGE Y/N: NO
(ENTER]
and Dilution Y/N queries (as shown in the above screen]
4-8
System Operating Manual
Page 35

INTERMllTENT INFUSIONS
4.3
To answer YES to any of the queries (Callback Y/N, Syringe Y/N, or
the
[NEXT1
key to move to the desired field. Press the
[YES/NO]
key to
Dilufion
change
Y/N), press
the selection.
When selections are correct, proceed to Step 7.
CALLBACIG
Callback
Callback can be canceled in two ways:
Callback
To
be called to the device each time the line starts and stops, select YES to
Y/N.
When called to the device, stop the
Y/N; or use
[SPECIAL
stop the line, re-enter the screen, and select NO to
FUNCTION][5]
(see
alarm
by pressing the [MUTE] key twice.
Section
5.4, Special Functions,
for more
information about use of special functions).
SYRINGE:
Note: Failure
If
infusing directly from a syringe, select YES to Syringe Y/N.
to select YES to Syringe
Y/Nmay
cause an occlusion alarm due to a sticking
syringe plunger.
Line
DlLUTION:
To dilute a concentrated medication with the solution running on
A, select
YES to Dilution Y/N.
All dilutions are made with the solution on Line A. The only infusions that can be
programmed for dilution are intermittent infusions (B. C, or D). The screens necessary to
perform a dilution are accessible during the programming of an intermittent infusion.
If YES is selected to Dilution Y/N, press the [ENTER] key. The following screen is displayed:
DILUTION VOLUME:
DILUTION RATE:
OML FROM LINE A
OML/HR
[ENTER]
Input either a per dose dilution volume or a dilution rate. The device calculates the other
value automatically, based on the dose time
[NJZXTI
by pressing the
7.
To begin infusing immediately, press the [ENTER] key.
B>START
AT
TIME NOW
key.)
12:30
12:30
HR
HR
pr~eviously
[ENTER]
entered.
(Move cursor, if necessary,
Line B has begun to infuse its dose.
150
12:30PM
ML/HR
I
A:OFF B:INF C:OFF
150
I
Note:
0
To cancel the dilution of a particular line, STOP and reprogram the line being diluted
by changing YES to NO.
D:OFF
TOTAL
0 0
Recheck the number of doses remaining in the container and the
start time of the next dose.
Alternately, to delay the start of the line up to 23 hours, input a start time using the keypad
8.
numeric keys.
Correct
AM/PM,
if
necessary, by pressing the
[NEXT]
key once, then the
[AM/PM1
key.
B>START
AT 4:00 PM
TIME NOW
12:30
PM
Line B now shows that it is programmed to start, but does not start infusing its first dose
until the time set. Press [ENTER] to return to the base screen.
Omni-Flow 4000 Plus IV Medication Management System
[ENTER]
-
9
4
430-06371 -A04 (Rev.
4194)
Page 36

Section 4 PROGRAMMING
A: ON B:PGM C:OFF
50.0 0 0 0
Note: The line
change for a particular line.
must be OFF to re-enter the intermittent programming screen and make a
If it is currently infusing or programmed to start in the future,
D:OFF
TOTAL
12:30PM
50.0
MLIHR
the line must be stopped before re-entering the programming screen.
Note:
must first be stopped before programmin
Lines which are currently programmed for intermittent or maintenance infusions
g continuous infusions over these lines.
CAUTION: When restarting an intermittent line that has been stopped, the start time
and dosing information for the next dose must be reset.
Note:
If two
the device infuses them in alphabetical order (Line B, then C, then
or more intermittent infusions are scheduled to start at exactly the same time,
D).
Only one intermittent
infusion can be infusing at a time. The schedule of doses rolls and begins from the time
the first dose is given.
Note:
Near the
end of an intermittent infusion with dilution, delivery of the diluent may be
completed before delivery of medication is completed (or vice versa], depending on the
diluent/medication
ratio. When this occurs, the rate for the completed line will be displayed
as zero, until the full dosage/dilution programmed is delivered.
If an intermittent line is scheduled to start during the infusion delivery time frame of another
intermittent line, its scheduled start and dose schedule is delayed until the current
intermittent infusion has completed. This feature maintains the proper interval between
scheduled intermittent doses.
Note:
To program an automatic flush before or after any intermittent infusions, refer to the
[SPECIAL
FUNCTION][2]
description in Section 5.4, Special
Fw-tctions,
for further
information.
Note: If a flush is
programm
ed to occur after an intermittent infusion, and the intermittent
line is placed on hold while the intermittent infusion is running, and then stopped using
the
[STOPI
key for that line (or
[SPECLAL
FUNCTION][4])
, the flush will not start. The flush
will occur if the line is active when stopped using the [STOP] key for that line.
Note:
Flushes increase the interval between intermittents by the amount of time allocated
for the flush.
WARNINGS
WHEN ADMINISTERING CRITICAL MEDICATIONS, MONITOR DEVICE PERFORMANCE
FREQUENTLY. THE USE OF THE CALLBACK FEATURE IS RECOMMENDED FOR
INTERMITTENT INFUSIONS, DILUTIONS, AND FLUSHES. CALLBACK ALLOWS
CONFIRMATION OF SUCCESSFUL COMPLETION OF THE INTENDED THERAPY.
NEAR THE END OF AN INTERMITTENT INFUSION WITH DILUTION, A SMALL AMOUNT OF
MEDICATION MAY BE DELIVERED WITHOUT BEING DILUTED. THE DILUTION FROM LINE
A MAY COMPLETE BEFORE THE MEDICATION. MEDICATION THAT COULD POTENTIALLY
CAUSE PATIENT HARM IF DELIVERED UNDlLUTED(E.G., POTASSIUM CHLORIDE), SHOULD
BE DILUTED APPROPRIATELY BEFORE ADMINISTRATION.
-B04
430-0637 1
(Rev.
7/95)
4-
10
System Operating Manual
Page 37

Section 5
-
ADDITIONAL OPERATING
,
/
FEATURES
Section 5 details emptying the collection bag, battery operation, and additional operating features
of the 4000 Plus, including the following:
P
Stopping the device lines
cl
Hold and resume
0
Line status
Ll
Special functions
0
Automatic
0
Accessing history reports
5.1
air
detection and elimination
TO STOP ANY OF THE LINES
To stop any of the device lines, proceed as follows:
1.
Press the
to start in the future), and the following screen is displayed:
2. Press the
Note:
the appropriate
Recheck rate, total volume, and programming instructions, then press the [ENTER] key.
CAUTION:
Reprogram subsequent intermittent doses.
programmed on Line
will restart after all currently infusing intermittents have completed.
[STOP] key for the line to be stopped (either currently operational or programmed
TO
STOP LINE <A>
PRESS [ENTER]
[ENTER]
To restart a stopped line with the same drugs/fluid and delivery instructions, press
key. The line turns OFF.
RMlTIENT INFUSION] or [CONTINUOUS INFUSION] key for that line.
[INTE
lf
Line A is stopped while it is flushing, only the current flush is stopped.
A will
restart;
any
maintenance
Auy continuous infusion
fnfusion
already programmed
alxeady
Omni-Flow 4000
Plus
IV Medication Management System
5-l
430-06371
-A04
(Rev.
4194)
Page 38

Section 5 ADDITIONAL OPERATING FEATURES
5.2
HOLD AND RESUME FUNCTIONS
The [HOLD] key is used to place one or more operating lines on hold. The [HOLD] key function
delays continuous and intermittent infusions in progress, and reschedules subsequent (future]
intermittent infusions. All previous intermittent line progr
amming
used while taking pressure readings, changing containers, or
5.2.1
HOLD INDIVIDUAL LINES OR ALL LINES
To place individual lines or all lines on hold, proceed as follows:
is unaffected. Hold may be
performing
other tests.
1.2.Press the [HOLD] key. A
HOLD DELAYS OR RESCHEDULES
Note:
-WARNING-
INFUSIONS [ESCAPE] OR PRESS [ENTER]
To cancel the hold operation, press the [ESCAPE] key, and the base screen returns
Warning
screen is displayed:
to the display.
Press the [ENTER] key to continue the hold operation. The following screen is displayed:
_,
HOLD LINES
OR TO HOLD ALL
_,
LINES
(USE STATUS KEYS)
PRESS
[ENTER]
J
To specify the lines to be put on hold, proceed as follows:
1.
Press the [LINE STATUS] key and [NEXT] key for each line to be put on hold.
2. Press the [ENTER] key.
The lines selected, if currently infusing, are placed on hold. The HLD message appears on the
base screen for
To ensure that lines which have intermittent infusions with dilution will not be
lines currently infusing.
all
affected,
Line A
may only be placed on hold using the Hold All Lines option.
Note:
lines currently infusing are placed on hold. The HLD message appears on the base screen.
To place all lines on hold, press the [ENTER] key without specifying individual lines. All
.
A line programmed for future intermittent infusions is displayed as PGM on the base screen. If
start
placed on hold, its programmed
time, and the start time for subsequent intermittent infusions
is delayed. Start time is rescheduled to a time which is equivalent to the original start time plus
the length of time the line was on hold. A DLY (delayed) status message appears on the base
screen.
Lines placed on hold which were currently infusing (continuous or intermittent) are displayed as
HLD (on hold) on the base screen. These lines also have subsequent intermittent infusions (if
any) rescheduled to a time which is equivalent to the original start time plus the length of time
the line was on hold.
430-06371
-A04 (Rev.
4194)
5-2
System Operating Manual
Page 39

5.3
LINE STATUS FUNCTION
5.2.2
RESUME INFUSIONS AFTER HOLD
To resume infusions after a hold, proceed as follows:
1. Press the [RESUME] key.
2. Press the
If the device is in hold for more than two minutes, it will alarm and the following Warning screen
is displayed:
[ENTER] key.
--WARNING-
MUTE/HOLD TIME EXCEEDED
PRESS [MUTE] OR [RESUME]
Resume infusions as detailed in Steps 1 and 2, or press the [MUTE] key to silence the alarm for
two additional minutes.
5.3
LINE STATUS FUNCTION
At any time during the medication infusion, the programming status on each line can be obtained
by pressing the appropriate [LINE STATUS] keys.
Note: The
To go from one line status screen to another, press the [LINE STATUS] key desired.
[ENTER] key or the [ESCAPE] key to return to the base screen.
Sample status screens for various operating conditions follow:
line status screens can be accessed only when the base screen appears on the display.
Press the
MAINTENANCE
I
VOL REM:
I
Line A
RATE:50.OML/HRA>
85.OML
TIME REM :
operating in a maintenance
42~1~~HR
mode.
I
I
A> FLUSHING AFTER B
I
I
FLUSH
DIL
REM:5_0ML
Line
A operating
R.EM:25.OML
Line A
A> CONTINUOUS RATE:
VOL REM:
496ML
Line
Omni-Flow 4000 Plus IV Medication Management System
TIME REM:
inflush mode. Rate: 300
TIME REM:
opera&g
lOOML/HR
TIME REM:
A operating in continuous mode.
TOTAL
FLUSH:5.0ML
OHR
DILUTION:50.0MLA>DILUTING LINE C TOTAL
OHR
in dilution mode.
4HR 58MIN
5-3
1MIN
30MIN
mL/hr.
I
I
I
I
430-06371-004 (Rev.
4/93)
Page 40

Section 5 ADDITIONAL OPERATING FEATURES
A>
VOLUME REMAINING:
C>
1
B>DOSE
I
intermit&&
C>DOSE:
NEXT DOSE
Intermittentline
D>
STOPPED.
Line A in
CONTINUOUS RATE:
VOL REM:
496ML
Continuous line
REM:35.OML TIME
EACH
line
DOSE:50.0ML Q: 6 X: 4 DIL:
currently
50 .OML OVER OHR 30MIN DIL:
3:00
PM Q: 6 DOSES REM: 3 CB
programme
OFF
200ML
a stopped or
lOOML/HR
TIME REM:
in&z&g
REM:OHR 18MIN CB
o_oPcondition
4HR 58MIN
at 100
mL/hr.
0ML
mL
OML
dose with CallbackinJ&ng (dose in progress) a 50
d to start in thefuture with Callback
Lines
not
started
I
I
I
5.4
SPECIAL FUNCTIONS
The 4000
base screen. Press the [ESCAPE] key at any time to return the display to the base screen.
a special function, press the [SPECLAL FUNCTION] key, followed by the appropriate special
function number (use keypad numeric keys].
screen is displayed:
Plus incorporates a number of special functions which can only be accessed from the
To access
Press the [SPECLAL FUNCTION] key and the following
TO SELECT SPECIAL FUNCTION
PRESS APPROPRIATE NUMBER
DESCRD’TION
External event recording
Sets or changes the current time and date
Programs a flush either after or
(O-9)
FUNCTION KEY
IO1
*
[11
[21
before any intermittent line infusion
Cancels all subsequent flushes
I31
Stops all lines at once
Selects or cancels Callback
4X)*371-004
(Rev.
4193)
5-4
[41
I51
System Operating Manual
Page 41

5.4
SPECIAL FUNCTIONS
Selects or changes preset values of
KVO
rate, maximum occlusion pressure, units
of temperature, enables Callback, and allows
reset of these values to manufacturer’s settings.
Selects the print (format) mode
definition
Selects preprogram function
Clears IV Flow Sheet
IV
Prints
Flow Sheet
Displays purge totals for all lines
Reset IV History
(*All lines must be
OFF
to select this function.)
5.4.1 .
DESCRIPTION OF SPECIAL FUNCTIONS
*
I61
I71
ISI*
I91
[AM/PM1
[IV FLOW
[CLEAR
ENTRYI
SHEEI’]
The following subsections describe each special function and procedures for their use.
[SPECIAL FUNCTION][O]
Records external events.
The 4000 Plus documents certain external events by entering them into the battery backed-up
memory with a date/time stamp, then printing them with the IV History Report. The event fields
accept any values entered within the allowable spaces and print out the same.
The
lYES/NOl
key can be used to review the events available, or the number of the desired event
may be entered.
PROC 1
20-MAR-92
Events
Omni-Flow 4000 Plus IV Medication Management System
are as follows:
1.
Blood Sample Chemistry
2.
Blood Sample Hematology
3.
Blood Sample Other
4.
Urine Sample
5.
Oral Medication Administration
6.
Y-Site Injection
7.
Patient Temperature (value can be entered)
8.
Pulse (value can be entered)
9.
Respiration (value can be entered)
10.
CVP (value can be entered)
11.
Blood Pressure Reading (value can be entered)
BLOOD SAMPLE DRAW
3:29
PM
-
CHEMISTRY
YES /NO ] [ ENTER ]
[
5-5
430-06371-004 (Rev.
493)
Page 42

Section 5 ADDITIONAL OPERATING FEATURES
Record an went by entering a value, date, and time of actual went
and time]: then, press the
selection of another event.
[SPECIAL
FUNCTION][l]
[ENTER]
Press the
key. The device returns to the
[ESCAPE]
key to return to the base screen.
(if different
procedure
Sets or changes date and time.
The device maintains date and time values when powered down.
The time format may be based
on 12-hour AM/PM or 24-hour (military) time as the default.
Note: The
time and date can only be changed when ALL lines are OFF.
To change the date and time values, proceed as follows:
1.
Press the [SPECIAL FUNCTION] key, followed by numeric key
CURRENT TIME 12:00 PM 24HR TIME Y/N? NO
DATE(DD-MMM-W):
2.
Input the new time using the numeric keys:
CURRENT TIME
DATE(DD-MMM-W)
21-FEB-92
lo:00
PM 24HR TIME Y/N? NO
: 21-FEB-92
[ENTER1
[ENTER]
[
11.
from current date
0 screen to allow
3.
To change the
display to AM/PM designation, press the
INEm] key to move the cursor, then
press the [AM/PM] key.
,
CURRENT TIME 10:00 AM 24HR TIME Y/N? NO
21-FEB-92DATE(DD-MMM-YY):
Note:
To display military (24 hour) time, press the [NEXT] key, then press the
[ENTER]
keY.
4.
Set the date, month, and year by pressing the appropriate numeric key. Use the
[NEXT] keys to position the cursor in the required field.
CURRENT
DATE(DD-MMM-W): 21-FEB-92
After setting time
Cm
DATE(DD-MMM-W):
5.
Press the
[ENTER] key and the base screen is displayed:
A:OFF
B:OFF
0 0
24HR
TIME
lo:00
AM
TIME Y/N? NO
[ENTER]
and date, the display screen appears as follows:
TIME 11:00 AM 24HR TIME Y/N? NO
20-MAR-92
C:OFF
0 0
D:OFF
TOTAL
0
[ENTER]
1l:OOAM
MIJ/HR
1
[YES/NO1
[LASTI
and
Note: If the battery pack has become fully discharged, cycle the device. Toggle the
[ON/CHARGE] switch to CHARGE, then ON. Reset the time with the [SPECIAL
FUNCTION1
while the battery pack was depleted.
430-06371-004 (Rev.
1
keys. The internal self check of the
I1
4193)
5-6
real
time clock may have been missed
System Operating Manual
Page 43

Section 5 ADDITIONAL OPERATING FEATURES
3.
To restart any line, press the infusion type key for the line. Press the [ENTER] key to page
through and review the programming screens. Make changes as each screen is reviewed.
Note:
using the [SPECIAL FUNCTION]
[SPECIAL
If
a flush is programmed to occur after an intermittent infusion and all lines are stopped
[4]
key, the flush will not start.
FUNCTION][5]
Selects or cancels intermittent mode CALLBACK.
The 4000
Plus has the capability to call the user to the device as a line is starting and when it
stops. This feature can only be used with intermittent infusions (B, C, or D). The feature can be
selected during the programming of each of those lines.
To select or cancel intermittent mode CALLBACK, proceed as follows:
1.
Press the [SPECIAL FUNCTION] key, followed by numeric key
PROGRAM CALLBACKS Y/N? B: NO C: NO D: NO
I-
2.
Press the [YES/NO] key then press the [NEXT] and [LAST] keys to either select or deselect
151.
I
a CALLBACK on a line-by-line basis.
the
3.
Press the [ENTER] key to return to
[SPECIAL
FUNCTION][G]
base screen.
Selects or changes preset values.
The device maintains preset values when powered down. To select or change preset values, proceed
as follows:
161.
1.
Press the [SPECIAL FUNCTION] key, followed by numeric key
The following screen is
displayed:
RESET TO MANUFACTURER'S
SETTINGS Y/N? NO
ToresettheKVOrate,
2.
maximum occlusion pressure, enable callbacks and set temperature
units to manufacturer’s factory settings, use the
response.
IfYES is selected, press [ENTER] to reset the values and return to the base screen.
CENTER1
lYES/NO]
key to toggle the desired
Otherwise, press [ENTER] and proceed to Step 3.
3.
Use the numeric keys to adjust the KVO rate from 1.0 to 99.9
Note: The
Alwm
6,
4. Use the [NEXT] key to position the cursor in the
device delivers at the KVO rate as a result of certain alarm conditions.
Conditions and Displays, for further information regarding alarms.
m-urn
mL/hr.
See Section
occlusion pressure field.
Maximum occlusion pressure thresholds from 1 to 12 psi can be selected in 1 psi increment.
Note: The
reports a patient line occlusion. See Section 6,
informationregardingalarms.
maximum occlusion pressure threshold is the pressure at which the device
AZcum
Conditions
and Displays,
for further
KVO RATE: 1.0
MAX OCCLUSION: 10
430-0637 l-804 (Rev.
7/95)
ML/HR
PSICENTERI
5-8
System Operating Manual
Page 44

5.4
SPECIAL FUNCTIONS
The default values set at the factory are 1.0
5.
mL/hr
for KVO rate, and 10 psi for maximum
occlusion pressure. Press the [ENTER] key to accept these values.
Note: Two
asterisks (**) appear in the lower right comer of the base screen to indicate that
either of these default values has changed.
The following screen is displayed:
NO
[ENTER]
Select YES to Enable AU
CaUbacks
6.
Use the
ENABLE ALL CALLBACKS Y/N?
TEMPERATURE UNITS C:NO F:YES
[YES/NO]
key to toggle the desired default.
Y/N? and the 4000 Plus will callback after any line stops, starts or intermittent delivery is
completed.
7.
Press the [NEXT] key to position the cursor over the Temperature Units
[YES/NO]
the
8.
Press [ENTER] to accept the values displayed. The values are retained in memory.
Note:
Values are preserved when the device power is cycled, and the memory is checked
key to toggle the desired units of temperature.
C:NO
RYES.
Use
when the device is powered ON. If it is determined that the device memory has been reset
to default’values due to an extreme low battery condition or power interruption, the Preset
Values screen is displayed.
[SPECIAL
FUNCTlON]m
Selects print mode.
To select print mode, proceed as follows:
Press the [SPECIAL FUNCTION] key, followed by numeric key
1.
displayed:
IV HISTORY YIN? NO DEV STATUS YIN? YES
PRINT MODE DEFINITION
Use the
2.
mS/NO]
key in the
lV History field to change the response in the
field and specify which printed report is desired. Use of the
required and has no effect. The mode selection is preserved in memory and retained when
the device is powered ON.
3.
Press the [ENTER] key to enter the selections.
Note:
See
Section 5.8.2, Accessing
of the Device Status and IV History Report print modes.
[SPECIAL
FUNCTION][8]
Selects preprogram function.
[7l.
The following
[ENTER]
Device
[LAST1
[NEXTI
Histo
y Reports with a Printer, for a detailed description
and
keys is not
screen
Status
is
This function can only be selected when all lines are OFF. To select a preprogram function, proceed
as follows:
1.
Press the [SPECIAL FUNCTION] key, followed by numeric key
PREPROGRAM FUNCTION SELECTION Y/N? NO
[RESUME] TO START INFUSIONS
Omni-Flow 4000 Plus IV Medication Management System
[ENTER]
5-9
[Sl.
430-06371
-A04 (Rev.
4l94)
Page 45

Section 5 ADDITIONAL OPERATING FEATURES
Note: This
screen default response is YES.
2.
Press the
key again to return to the base screen.
Note:
as each line of progr
for continuous infusions, DLY for intermittent infusions, PGM for a maintenance infusion.
The hold condition remains in effect without the usual two-minute warning for lines on
hold. The preprogram function should only be selected when all lines, including patient
line. are primed. If at least one infusion has already been programmed, the preprogram
function can be deselected by stopping
[SPECIAL
To initiate infusion once lines have been preprogrammed,
3.
the [ENTER] key.
[SPECIAL
FUNCTION][S]
Records IV
To record
IV
screen shows the current status of the preprogram function. If enabled, the
lYES/NOl
When
selected, all lines and subsequent programming are placed in a hold condition
FUNCTION][S]
key to select or deselect the preprogram function. Press the
amming
is completed. A hold condition is indicated as follows: HLD
all
lines. If no infusions have been programmed,
must be used to deselect preprogram mode.
[ENTER1
press the [RESUME] key, then
Iv
FlowSheet data into
History and clears the IV Flow Sheet.
Flow Sheet data into IV History and clear the IV Flow Sheet, proceed as follows:
1. Press the [SPECIAL FUNCTION] key, followed by numeric key
CLEAR IV FLOW SHEET
[ENTER]
To clear the
2.
[SPECIAL
FUNCTION][AM/PM]
lV Flow Sheet, press the [ENTER] key.
191.
Prints IV Flow Sheet (requires AC power).
To print the
IV
Flow Sheet, proceed as follows:
1. Press the [SPECIAL FUNCTION1 key, followed by the [AM/PM] key.
PRINT IV FLOW SHEET
[ENTER]
IV
2. To print the
[SPECIAL
FUNCTION][IV
Flow Sheet, press the [ENTER] key.
FLOW SHEET]
Displays purge totals for all lines.
To display purge totals for all lines, proceed as follows:
1.
Press the [SPECIAL FUNCTION] key, followed by the
2. Press [ENTER] to return to the base screen.
430-0637 1
-A04
(Rev.
4194)
5-10
[IV
FLOW
SHEET1
key.
System Operating Manual
Page 46

5.5
AUTOMATIC AIR DETECTION AND ELIMINATION
[SPECIAL FUNCTION][CLEAR
ENTRVJ
Resets IV History for new patient.
To reset IV History for a new patient, proceed as follows:
1.
Press the
2.
Use the
[SPECIAL
mS/NO]
prevents patient
CLEAR IV HISTORY Y/N? NO
FUNCTION] key, followed by the [CLEAR
ENTRY]
key to select YES. All prior IV History information is cleared. This function
IV
histories being combined.
PRESS [ENTER]
key.
5.5
AUTOMATIC AIR DETECTION AND ELIMINATION
The 4000 Plus air-elimination system automatically detects and eliminates small air bubbles that
might appear in the cassette during operation. Upon sensing air in the cassette (approximately
120 microliters), the device automatically clears the air into the collection bag portion of the
Omni-Flow Primary Set by flushing the cassette with fluid from Line A.This process causes a
temporary interruption of medication delivered to the patient. The device attempts to clear the air
twice.
user with an air-in-line alarm. See Section 6.
this alarm condition.
Should there be more air present than can be cleared automatically, the device alerts the
Conditions and
Alarm
Disp4s,
for information on
Note: If
on hold
occlusion is
intermittent infusions change
Note: If air
air-in-line or upstream occlusion occurs on Line B, C. or D, only the
(HLD] .
If
no other lines are infusing, Line A infuses at the selected KVO rate.
detxted on Line A, all the lines currently infusing are put on hold. Subsequent
corn
programmed
(PGM)
to delayed
IDLY).
has entered the cassette from a completely empty container, the device puts the line
on hold and activates an air-in-line alarm. If the hold occurs on Line A,
a.&cted
a.ll
lines go into the hold
line is placed
If the upstream
state.
CAUTION:
When infusing short
half-life
drugs at a low flow rate. automatic air elimination
interrupts the delivery of medication to the patient. This medication interruption is
dependent upon
the
infusion rate and may cause a change in patient parameters.
5.6
EMPTYING THE COLLECTION BAG
It is important that during device operation the collection bag be checked periodically, and emptied
or changed if necessary. The collection bag should be changed or emptied if more than half full
or bulging.
Should the collection bag be completely filled during pumping, the following alarm condition
results:
POSSIBLE FULL COLLECTION BAG
OR OCCLUSION LINE A
Omni-Flow 4000 Pius IV Medication Management System
[RESUME]
5-11
430-06371-004 (Rev.
493)
Page 47

Section 5 ADDITIONAL OPERATING FEATURES
To empty the collection bag, proceed as follows:
1.
Close the collection bag tubing clamp.
2.
Carefully remove the collection bag line from the cassette by turning the luer lock connector
counterclockwise.
3.
Dispose of the collected fluid as prescribed by hospital policy.
re-used, if permitted by hospital policy, by opening the tubing clamp and gently squeezing
and emptying the contents.
Although it is recommended that the collection bag be replaced. it may be reused.
4.
the collection bag line to the cassette by turning the luer lock connector clockwise.
the tubing clamp and hang the collection bag on the collection bag hanger.
5.7
BATTERY OPERATION
The collection bag may be
Connect
Open
Note:
Prior to placing the device in service, fully recharge the battery by
connecting
the device to
AC power for at least 24 hours.
The 4000 Plus is intended to be used on battery power only for emergency backup
(ie.. AC power
failure or inadvertent disconnection from AC power) or temporary portable operation (i.e., patient
moving from one location to another).
The yellow battery indicator illuminates when the device is operating on battery power. The
4000 Plus can operate on battery power for up to five hours at a cumulative delivery rate of
125
n&/lx. Approximately 30 minutes prior to battery pack depletion, a LOW BATI’ERY alarm
sounds and a
CAUTION:
Warning
-WARN I
CORD INTO ELECTRICAL OUTLET OR [MUTE]
If the LOW BATTERY alarm
screen is displayed:
LOW BATTERY. PLUG POWER
NG-
souuds,
connect the device to AC power
immediately.
Press the [MUTE] key to silence the audible alarm for two minutes.
After two minutes, the warning
screen and alarm tone return. The device should not be operated on battery power after the LOW
BATTERY
alarm sounds. When the battery can no longer provide the necessary power to support
the device, operation ceases.
24
Recharging occurs any time the device is connected to AC power.
the battery pack when device operation has stopped.
The [ON/CHARGE] switch does not have to
be in the ON position for the battery pack to recharge.
It takes
It is strongly recommended that the
hours to fully recharge
4000 Plus be connected to AC power whenever possible to ensure a fully charged battery pack is
available for patient ambulation or emergency power outage conditions.
If the device is used frequently for portable operation, battery life may be significantly reduced,
and battery alarms may increase.
Reduced battery life
also
increases the battery recharge time.
As a general rule, the more often the battery is discharged and recharged, the sooner it need to be
replaced. Leaving the battery in a less than a fully-charged state for any period of time is a primary
cause of damage. Battery damage can occur in a matter of hours. resulting in a permanent loss
of battery capacity.
Note:
430-06371
A permanently-damaged battery cannot be recharged to full capacity.
-B04 (Rev.
7/95)
5-12
System Operating Manual
Page 48

5.8 ACCESSING HISTORY REPORTS
CAUTIONz
If
the device should be disconnected or
may not maintain device operation.
to assure
Do not operate a device with an
Connect the device to AC power whenever practicable
maximum battery
capaciq during patient transport or ambulation.
insticiently
power
if
fails, an
charged or depleted battery pack.
insaciently
charged battery pack
WARNING
REPEATED OPERATION OF DEVICE TO LOW BATTERY
CAPACITY OF THE BATTERY PACK. DEEP
BAlTERY
PACK UNUSABLE.
BAlTERY DISCHARGE MAY RENDER THE
CONDlTlON
AFFECTS CHARGE
5.8
ACCESSING HISTORY REPORTS
Section 5.8 provides information on accessing history reports with and without a printer.
5.8.1
ACCESSING HISTORY REPORTS WITHOUT A PRINTER
History reports may be accessed without a printer through the use of the IV Flow Sheet.
The 4000 Plus tracks the total volume infused on each line and the cumulative total. Access to
these totals is obtained by pressing the [IV FLOW SHEET] key. The following screen is displayed:
C:LOG
A:LOG B:LOG
350 75.0
D:LOG TOTAL EDIT? NO
0 25.0 450
[ENTER]
To clear the entry of a specific line or the cumulative total, proceed as follows:
1.
To edit line values, press the [YES/NO] key in the Edit field.
clear
2.
Use the [NEXT] key to position the cursor to
3.
Press the [CLEAR
ENTRY]
key.
Move cursor to next line and repeat. Clearing the individual
each desired line and the total.
lines does not automatically clear the total; the total must be cleared separately.
4.
Press the [ENTER] key.
afl’ect
Note: Resetting the IV Flow Sheet in this manner does not
the programming
information and/or performance of the device.
Alternately, to
5.
FUNCTION][9]
clear
all lines and the cumulative total simultaneously, press the [SPECIAL
and [ENTER] keys. This special function feature automatically encodes the
IV Flow Sheet information into the IV History and then clears all values to zero.
6.
After turning the device ON, select NO to the RESTORE PREVIOUS PROGRAMMING query
thz
and
IV Flow Sheet information is cleared.
Note: To
use this feature, it is important to confirm the IV Flow Sheet log has been reset to
zero for all values at the beginning of any period being monitored.
Omni-Flow 4000 Plus IV Medication Management System
5-
13
430-06371-804 (Rev.
7/95)
Page 49

Section 5 ADDITIONAL OPERATING FEATURES
5.8.2
ACCESSING HISTORY REPORTS WITH A PRINTER
The 4000
time/date stamped external
Device Status Report and IV History Report.
information on printer setup.
Plus can provide printed reports of infusion status and infusion history, as well as certain
events.
There are two standard reports for local or remote printing:
Co&rm
printer
1.4.4,
See Section
that the printer is connected to the 4000 Plus and turned
Setup. for detailed
on.
5.8.2.1
DEVICE STATUS REPORT
The device status is a snapshot of the current status and the programmed wents on each line at
the time the printed status report is requested.
The Device Status Report includes the following
information:
P
Line status A, B, C, and D (ON, OFF, PGM, INF,
Dilution and flush data
cl
Current infusion regimen details
cl
cl
Time and volume remaining in dose
DLY)
To obtain a Device Status Report, proceed as follows:
Press [SPECIAL FUNCTION],
1.
followed by numeric key
171.
IV HISTORY Y/N? NO
PRINT MODE DEFINITION
History
N
Select NO for
2.
3.
Press [ENTER]. The 4000 Plus returns to the base screen.
A:OFF
4.
Confirm that the printer is connected to the 4000 Plus, has paper supply, is turned on, and
is ready to
Press the [PRINT] key and the date and time is displayed for this print.
5.
0 0
print_
Y/N?. Device Status Y/N? automatically changes to YES.
0 0 0
DEV STATUS Y/N? YES
D:OFF
TOTAL B:OFF C:OFF
12:3OPM
ML/m
tENTEN
printing begins immediately.
Note:
If printer is not ready or is not properly connected, three beeps sound. This function
requires AC power.
5.8.2.2
IV HISTORY REPORT
IV
The
portion of or all the data may be printed out at any time.
the oldest information is deleted first.
History Report retains a minimum of 48 hours of the most recent historical data.
When the historical data buffer is full,
IV
The
History Report includes the following information:
Press
(ENTER1
and
Any
430-06371-804 (Rev.
7~95)
5-14
System Operating Manual
Page 50

5.8
ACCESSING HISTORY REPORTS
Line
mode
changes (off, on, intermittent infusion, hold, dilute, delay, flush,
WO]
Non-infusion event documentation (blood, hematology, blood chemistry, vital signs, etc.)
Date/time stamp for all events
lV
O
obtain an
T
1.
2.
Press [SPECIAL
With the cursor at
Note:
History Report, proceed as follows:
FUNCTION][71.
IV HISTORY Y/N? NO DEV STATUS Y/N?
PRINT MODE DEFINITION
N
History Y/N?, select YES and press [ENTER].
By answering YES to
N
History
Y/N?, Device Status Y/N? automatically changes to
YES
[ENTER]
NO.
Press the [PRINT] key and the following screen is displayed:
3.
1O:OoAM
IV HISTORY
117 EVENTS
Using the [NEXT] and [LAST] keys, move the cursor to the data fields to specify the range
4.
FM:20-FEB-91
TO:23-FEB-91
1l:OOPM [ENTER]
of events to print. The [YES/NO] key is used to select the month. The data keypad is then
used to enter from and/or specific date and
time,
or number of wents to print.
It is only
necessary to enter data into two of the three category fields to receive a report.
[ENTER] to display the following screen.
Press
SERIAL PORT Y/N? YES
IV HISTORY DESTINATION
To view the IV History on the display screen, select NO to
5.
DISPLAY Y/N? NO
[ENTER1
Serial
Port Y/N? (YES
to
Display
Y/N’?) and press the [ENTER] key. The first two lines of the most recent IV History went are
displayed on the screen.
IV
Note:
To print the IV History Report, select YES to
6.
See
Table 5-1,
Scanning
History for detailed scanning instructions.
Serial
Port
Y/N? (NO to
Disp4
Y/N??
and press
the [ENTER] key.
fi-om
Note: The
display screen backlight flashes to distinguish it
the status screen.
Press the [ESCAPE] key to return to the base screen.
Table 6-l. Scanning IV History
Key
[NEXT->]
[<-LAST]
Scroll up display, display next line of IV History Report
Scroll
down display, display previous line of IV History Report
Function
[AM/PM] Skip to start of next newer event or start of current event
[YES/NO]
Omni-Flow 4000 Plus IV Medication Management System
Skip to start of next older event
5-15
430-06371~B04
(Rev.
7195)
Page 51

Section 6
ALARM CONDITIONS AND DISPLAYS
Certain alarms may switch fluid delivery to KVO.
are interrupted.
and the patient’s clinical condition. Clinicians need to be cognizant of such particulars during
alarm situations.
CAUTION:
operations and fail-es, including interrupted medication or fluid delivery
close
supedsion
CAUTlON:
Under most alarm conditions, the device stops operation and generates an alarm for corrective
action.
the battery pack; replacing the device or cassette; or other procedures described in this manual.
As discussed in previous sections, the 4000 Plus is designed to sound an audible
an appropriate message should system checks identify a problem.
display alerts the healthcare professional of operational problems and permits timely intervention
to place the device back into operation quickly without undue risk to the patient.
Section
is a troubleshooting guide for failures which may occur but do not
condition.
Note: Alarm
recent historical data.
Section
Should excessive alarms occur. remove the device from service.
Corrective actions may include recycling the power: reprogramming the device: recharging
summarize
6
5.8, Accessing
The clinical consequences vary depending upon the particulars of the infusion(s)
For those patients who are likely to be adversely
and provision for immediate corrective action should be provided.
s various alarm
events
are added to the IV History, which
To aid in alarm analysis, the
History
conditions and recommended corrective actions. Section 7
Reportsl.
In these situations, fluid and/or drug therapies
atTected
The audible alarm and message
necessa.rily
retains
IV
a minimum of 48 hours of the most
History can be reviewed or printed [see
by unintended
from
the device,
alarrn
and display
result in an alarm
Should an alarm sound, proceed as follows:
1.
Press [MUTE] to temporarily silence the audible alarm (for a maximum of two minutes]. The
red alarm light remains ON. After two minutes, the audible alarm is reactivated.
Note:
second time to completely cancel the alarm.
2.
Observe the display and determine the cause of the alarm. It is possible to have multiple
alarm conditions occur. Each alarm type is prioritized as to
current alarm visual display is overwritten, but not lost, if a subsequent higher priority
alarm occurs.
of occurrence. The
pressing the
Omni-Flow 4000 Plus IV Medication Management System
In the Callback mode or if a faulty cassette alarm occurs, press the
alann
The preceding
fist
press of the [MUTE] key silences the audible alarm;
[MUTE]
key returns the user to the base screen.
is placed on the alarm stack based on priority and time
[MUTEI
severity
-
1
6
and chronology. The
subsequently
430-06371-804 (Rev.
key a
7195)
Page 52

Section 6 ALARM CONDITIONS AND DISPLAYS
3.
Correct the
to resume all infusions. Using the resume function, stacked alarms are displayed by
priority. Higher priority alarms are displayed first. If multiple alarms of the same priority
exist, such as multiple Upstream Occlusions, the alarms are displayed in reverse
chronological order, the most recent alarm displayed first.
Each stacked alarm displayed is accompanied by an audible alarm tone of two seconds duration.
This tone is used to call attention to the alarm condition, but does not require pressing the
key to silence the audible tone.
Note:
When multiple alarms occur, the alarms are presented in order of severity and chronology.
Three distinct
tables, in order of priority.
identii?ed
alann
swerity
problem and press the [RESUME] key, followed by the [ENTER] key,
[MUTE]
classtications
exist.
These classifications are listed in the following
6.1 FLUID DELIVERY ALARMS
A fluid delivery alarm causes ALL lines to be put on hold (HLD).
conditions which may cause fluid delivery alarms.
The following table details
ALARM MESSAGE
-
CASSElTE UNLOCKED
GRAVITY FLOW
DEVICE SERVICE CODE
REQUIRED
OCCLUSION IN PATIENT LINE
FULL COLLECTION BAG OR
OCCLUSION ON LINE A
AIR-IN-LINE OR OCCLUSION LINE A
POSSIBLE
-
SERVICE
LINES
PUT ON
HOLD
ALL
ALL
ALL Check patient line for closed clamp or
ALL
ALL Check for air bubbles in cassette. Check
Make certain the cassette lever is locked
and correctly seated
Turn power OFF, then ON. Restore
previous programming and press
[RESUME], then [ENTER]. If failure
repeats, remove from service
kinks.
Note: Low occlusion pressure settings
may cause patient line occlusion alarms
when infusing fluids through microbore
tubing at higher rates
Check all lines for closed clamps or kinks.
Check fill capacity of collection bag.
Confirm IV bag is a minimum of 17 inches
above the device
Line A for closed clamp
container volume on Line A. Confirm IV
bag is a minimum of 17 inches
device
CORRECTIVE ACTION
or
kinks. Check IV
above the
430-06371-804 (Rev.
7/95) 6-2
System Operating Manual
Page 53

6.2
PUMPING ALARMS
The following table details conditions which may cause pumping alarms.
LINES
ALARM MESSAGE
PUT ON
HOLD
CORRECTIVE ACTION
62
PUMPING ALARMS
AIR-IN-LINE OR OCCLUSION
(Lines B, C, D)
UNABLE TO PUMP AT
PROGRAMMED
RATE
ALARM
LINE
ONLY
LINE A
REVERTS
TO KVO
AND
LINES B,
C, AND D
ARE ON
HOLD
Check for air in cassette. Check alarm line
for closed clamp or kinks. Check IV
container volume on alarm line. Confirm IV
bag is a minimum of 17 inches above the
device
Check patient line for closed clamp or
kinks. Check all lines for closed clamps or
kinks. Confirm IV bag is a minimum of 17
inches above the device.
Note: Pending alarms must be cleared
before reprogramming over Line A, if an
error or alarm causes Line A to revert to
KVO
6.3
WARNING ALARMS
The following table details conditions which may cause warning alarms.
LINES
ALARM MESSAGE
POSSIBLE EMPTY CONTAINER
BAlTERY
LOW
MUTE/HOLD TIME EXCEEDED
WARNING
POSSIBLE FAULTY CASSETTE
CASSETTE TEST TIMEOUT NONE
Omni-Flow 4000 Plus IV Medication Management System 6-3
WARNING NONE
PUT ON
HOLD
NONE
NONE
NONE
CORRECTIVE ACTION
Check bag or syringe volume
Connect device to AC power and recharge
device for a minimum of 24 hours
[RESUME] or [STOP] for all lines on hold
Reprime
recurs, replace cassette and repeat
cassette test
Press [ENTER] to repeat test
Press [ESCAPE] to abort test
cassette and repeat test. If alarm
430-06371
7/95)-B04 (Rev.
Page 54

Section 7
TROUBLESHOOTING
Certain system operating conditions do not result in audible
these conditions could cause device malfunction. These operating conditions are
and correctable.
Refer to the Troubleshooting Guide for detailed information regarding no-alarm operating
symptoms, probable causes, and corrective actions.
aku-rns;
however. if not corrected,
easily
identifiable
7.1
TROUBLESHOOTING GUIDE
The following table identifies probable causes specific to overdelivery or underdelivery in italics.
Omni-Flow 4000 Plus IV Medication Management System 7-1
430-06371-004 (Rev.
4193)
Page 55

Sedon 7 TROUBLESHOOTING
I
SYMPTOM
SUSPECTED
AMOUNT Of
LESS THAN
AND LINE STATUS SCREEN
TOTAL DELNERY IS MORE THAN
PROGRAMMED ACCORDING TO IV FLOW
SHEETOR
SUSPECTED
AMOUNT
GREATER THAN
SHEET, AND LINE
TOTAL DELNERY IS LESS
PROGRAMMED ACCORDING TO IV FLOW
OVERDELIVERY:
SOLUTION
INDlCAlED
LINE STATUS SCREEN
OF SOLUTION IN IV CONTAINER IS
IN IV CONTAINER IS
BY IV FLOW SHEET
LIyvDE/7DELwEf?Y:
N
FLOW
BY
INMCATED
STATUS SCREEN
STATUS SCREEN
‘THAN
PROBABLE CAUSE CORRECTIVE ACTION
IPERATOR PROGRAMMING ERROR REVIEW THE PROGRAM
FUSPECTED
EXCESSIVE
:XCESSIVE
DLLECTION
iuSPEC7ED
-/NCOMf’A?7BLEADM/N/STRATlON
-/VfLOWSHfET WAS CLEARED
-DEL/VERY EXCEEDS 9,999 ML,
CAUSING
:ASSElTE INLET PORTS ARE DAMAGED AND IF DAMAGE IS SUSPECTED TO THE
IRE
:XTERNAL
‘ALVES
OVERDELIVERY:
AIR-/N-LINE
LxLwEar
BAG
NuMBEa
LEAKING, WHCH CAUSE REPLACE
LEAKAGE
ACCUMULATKINS CAUSELUID SPILL
TO
FUNCTlON IMPROPERLY
WHlCH
CAUSES
ro
THE
UNDERDELIVERY:
RoLLovER
SET
ENTERED AND CORRECT ANY ERRORS
CHECK TO ENSURE THAT LUER
CONNECTlONS ARE SECURE
USED
COMPATlBLE
USE
CYCLE POWER: TURN POWER OFF. TURN
POWER ON. RESUME
PROGRAMMING AND RESTART INFUSION. IF
THE RESTART
PROBLEM, REMOVE 4000 PLUS
FOR
SERVCING
CASSElTE
IF FLUID SPILL
PROBABLE CAUSE OF MALFUNCTION,
REPLACE DEVICE.
REMOVE
DEVCE
TO
PERMlTCLEANlNG
SE-tllNGS
ADMlNlSlRAllON
PREVlOUS
DOES NOT CLEAR THE
ACCUMULATKIN IS A
ARER
A FLUID SPILL.
AS SOON AS POSSIBLE
AS
SET
CASSEllE,
4OGfI
:ASSETl-E
OR 4000 PLUS IS DAMAGED AND
HE VALVES ARE NOT FULLY
lrkiOlJT
FIRSTCLOSING OFF ALL TUBING
:LAMPS
FOR EACH LINE
:ASSEllE
LOCKING LEVER IS DAMAGED
APROPERLY FILLED IV FLUID CONTAINER REPROGRAM INFUSION AND/OR RESTART
IESULTING
IN
INCORRECT
OPERATlONAL SUSPECT, STOP DELIVERY AND PERFORM
6
UNLOCKED:ASSETlE LOCKING LEVER
STARTlNG
VOLUME A NEW CONTAINER
IF CASSETTE OR
A CASSETTE TEST
-IF
CASSETTE PASSES TEST, RESTART THE
4000 PLUS AND ESTABLISH CORRECT FLOW.
MONlTOR ALL LINES FOR PROPER
OPERATION
-IF
CASSETTE FAILS TEST, REPEAT TEST. IF
CASSETTE FAILS AGAIN. REPLACE
SHOULD 4000 PLUS FAIL TO PERFORM
CORRECTLY, REPLACE DEVICE
CLOSE TUBING CLAMPS ON ALL LINES
BEFORE UNLOCKING
LEVER. GRAVITY DELIVERY
RESULTS IF MORE THAN ONE LINE IS OPEN
REPLACE
DEVlCE
PLUS RELIABILITY IS
CASSEllE
CASSElTE
LOCKING
ANDX)R MIXING
430-06371-004 (Rev.
4193)
7-2
System Operating Manual
Page 56

7.1 TROUBLESHOOTING GUIDE
SYMPTOM
LUlD
BACKUP:
LUID
IS BACKING UP ONE OR MORE OF THE
THE DRIP CHAMBER IS FILLING
INES;
PROBABLE CAUSE
CASSEllE LOCKING LEVER AND
CLAMPS ARE NOT CLOSED
CASSETlE
DEVCE CASSETTE
CLOSING DURING DEVICE DELIVERY STROKE
FLUID SPILL
TO
OR 4000 PLUS IS DAMAGED AND
VALVE INTERFACE IS NOT REPLACE
FUNCTlON
ACCUMULATlONS
IMPROPERLY
ALLlU8lNG
CAUSE VALVES
CORRECTIVE
CLOSE TUBING
BEFORE UNLOCKING
LEVER. GRAVITY DELIVERY
RESULTS IF MORE THAN ONE
GRAVlTY
IN
IF DAMAGE IS SUSPECTED TO THE CASSEllE,
IF CASSETTE OR
SUSPECT, STOP DELNERY AND PERFORM
A CASSETTE TEST
-IF
MONlTOR ALL LINES FOR PROPER
OPERATlON
-IF
CASSETTE FAILS AGAIN, REPLACE
SHOULD 4000 PLUS FAIL TO PERFORM
CORRECTLY, REPLACE 4000 PLUS
IF
PROBABLE CAUSE OF MALFUNCTION,
REPLACE DEVICE.
REMOVE
TO PERMIT CLEANING
MODE
CASSEiTE
CASSEllE PASSES TEST, RESTART THE
PLUS
AND ESTABLISH CORRECT FLOW.4000
CASSETTE FAILS TEST, REPEAT TEST. IF
FLUlD
ACCUMULATlON
SPILL
DEVlCE AS
ACTlON
CLAMPS ON ALL
CASSEl-lE
ANDlDR MIXING
LINE
4OGU
RELIA8lLlTY IS
PLUS
IS A
FLUID SPILL,
A
AFlER
SOON AS POSSIBLE
LHES
LOCKING
IS OPEN
CASSETTE
XCESSIVE PURGING:
BAG
IS FILLING OLLECTlON
TOO QUICKLY
EXCESSIVE AIR-IN-LINE WHICH CAUSES
EXCESSIVE DELIVERY TO THE
COLLECTKIN
CASSETIE
DEVICE CASSEllE VALVE INTERFACE IS NOT
CLOSING DURING DEVICE DELNERY STROKE
LUER
PROPERLY SEATED
FLUID SPILL
TO
FUNCTKIN
SECONDARY TUBING IS
FLUID FLOW
BAG
OR 4000 PLUS IS DAMAGED
CONNECTlONS ARE NOT
ACCUMULATlONS
IMPROPERLY
CAUSE VALVES
RESTRlCTlNG
AND
CHECK TO ENSURE THAT LUER
CONNECTIONS ARE SECURE
4ooO
IF CASSETTE OR
SUSPECT, STOP DELIVERY AND PERFORM
A CASSETTE TEST
-IF
CASSEllE PASSES TEST, RESTART THE
4000 PLUS AND ESTABLISH CORRECT FLOW.
MONlTOR ALL LINES FOR PROPER
OPERATION
-IF
CASSETTE FAILS TEST, REPEAT TEST. IF
CASSElTE
SHOULD 4000 PLUS FAIL TO PERFORM
CORRECTLY, REPLACE 4000 PLUS
CHECK TO ENSURE THAT LUER
CONNECTIONS ARE SECURE
IF FLUID SPILL
PROBABLE CAUSE OF MALFUNCTION,
REPLACE DEVICE.
REMOVE
TO PERMIT CLEANING
USE ONLY ABBOTT OMNI-FLOW
SECONDARY SETS
FAILS AGAIN, REPLACE CASSEllE
DEVlCE AS SOON AS POSSIBLE
PLUS RELIABILITY IS
ACCUMULATON IS A
AFIER
A FLUID SPILL,
Omni-Flow 4000 Plus IV Medication Management System
7
-
3
430-06371-004 (Rev.
4193)
Page 57

Section 7 TROUBLESHOOTING
SYMPTOM
FAILURE TO
OCCLUDED LINE IS OBSERVED AND THE
OCCLUSKJN
BEEN
DETECTCCCLUSK)N:
ALARM HAS NOT
ACTlVAlED
I
BATTERY PACK IS DEPLETED:
WHEN OPERATING ON
GOES BLANK
ANALARM
WiTH OR WITHOUT
BATTERY, THE SCREEN
PROBABLE CAUSE
X3%USION ALARM DELAYED BECAUSE
DELNERY RATE REQUIRES A
.OWER
POINT
dARM
CCLUSION
:ASSETlE OR
IEVCE
5
NOT MEASURING THE TRUE PRESSURE IN
HE
LUID
0 FUNCTION IMPROPERLY
HE
IMIT POWER: TURN
SETTHG
4000
CASSElTE
CASSEl-lE,
SPILL ACCUMULATIONS CAUSE VALVES
BAIERY
PLUS IS DAMAGED. THE
PRESSURE TRANSDUCER
OR A VALVE
PACK HAS BEEN USED PAST
0CCLUSK)NTlME TO REACH THE .ONGER
IS SET HIGHER THAN
Is
LEAKING
RESET RATE OR
RESETOCCLUSION PRESSURE
IF DAMAGE IS SUSPECTED TO THE CASSEllE,
REPLACE CASSEllE
IF CASSETTE OR 4000 PLUS
SUSPECT, STOP DELIVERY AND PERFORM
A CASSEllE TEST
-IF
CASSEllE PASSES TEST, RESTART THE
4000 PLUS AND ESTABLISH CORRECT FLOW.
MONITOR ALL LINES FOR PROPER
OPERAllON
-IF
CASSETTE FAILS
CASSEllE FAILS AGAIN, REPLACE CASSETTE
SHOULD 4000 PLUS FAIL TO PERFORM
CORRECTLY, REPLACE DEVICE
IF FLUID SPILL
PROBABLE CAUSE OF MALFUNCTION,
REPLACE
REMOVE 4000 PLUS AS SOON AS POSSIBLE
TO
PERMil
CONNECT UNIT TO AC CURRENT. CYCLE
ITS
ON. RESUME
RESTART INFUSION ON AC CURRENT
IF DAMAGE IS SUSPECTED
PACK. REPLACE DEVICE
CORRECTNE ACTION
RESETOCCLUSON
SETTlNGISER EXPECTED TO LOWER
TEST, REPEATTEST. IF
ACCUMULATIDN
AFTER A FLUID SPILL,
DEVCE.
CLEANING
POWER OFF. TURN POWER
PREVlDUS PROGRAMMING AND
SETTING
RELIABILfl’Y
IS A
TC
THE BATTERY
IS
OPERATlON ON AC OR
NO
CASSETTE
KEYPAD FAILS TO RESPOND
TEST FAILS
I
430-06371-004 (Rev.
4193)
BATTERY
All-ERY
PACK IS DEFECTIVE AND CANNOT
E RECHARGED
All-ERY
CHARGER CIRCUIT
3OOPLUSHASBEENEXPDSEDTO
XCESSIVE VOLTAGE; FUSE IS OPEN;
OWER BOARD IS DAMAGED
ASSElTE
VALVE DIAPHRAGM IS NOT
x)0
PLUS IS DAMAGED AND CASSEllE
ITERFACE
EYPAD IS DAMAGED
Ki
IS INADEQUATE
[
7-4 System Operating Manual
DEFECTlVE
IS
8AllERY
REPLACE
BAllERlES DISCHARGE FREQUENTLY,
IF
REPLACE
REPLACE
OPERATE THE
F
FAILURE PERSISTS, REPLACE
TEST.
CASSETTE. IF SECOND CASSEllE FAILS
TEST, REPLACE DEVICE
REPLACE DEVICE
REPLACE DEVICE
PACK
DEVlCE
DEVlCE
CASSETIE LOCKING LEVER
TIMES, THEN JNCTIONING PROPERLY SEVERAL
REPEATCASSEl-lE
Page 58

Section 8
CLEANING AND DISINFECTING
CAUTIONS:
To avoid mechanical or electronic damage, do not immerse the device in any fluids or
cleaning solutions.
Tom
Do not operate devices that contain residue
can interfere with the free movement of the valve stems and/or the pressure-sensing
lf
mechanism.
the device cannot be completely cleaned, return it for service.
solution spills. Sticky or gummy residue
Certain cleaning and sanitizing compounds may slowly degrade components made
some plastic materials. Using abrasive cleaners or cleaning solutions not recommended by
Abbott Laboratories may result in product damage.
combinations of isopropyl alcohol and
Never use sharp objects such as fingernails, paper clips, or needles to clean any part of the
device.
Do not sterilize by heat, steam, ethylene oxide
To avoid device damage, cleaning solutions should be used only as directed in Table 8.1,
Cleaning Solutions.
manufacturer for specific information.
It is important to ensure that the cassette channel and all plungers on the right side of the device
are free of any material buildup or sticky substance. This area should be checked and cleaned
frequently. Do not use acetone, alcohol, or abrasive cleaners on the device. Clean the device with
a soft, lint-free cloth or swab dampened with soap and water, or a general nonstaining chemical
disinfectant. Refer to hospital housekeeping, central service, or infection control for further
information.
Note:
Not
all cleaning solutions are sanitizers. Check product labeling.
The disinfecting properties of cleaning solutions vary: consult the
Table 8-l. Cleaning Solutions
dimethyl
benzyl
@TO),
Do not use compounds containing
ammonium chloride.
or radiation.
fkom
Cleaning Solution
@
Vesphene
Manu-Klenz
Formula C
Super Edisonite
Household bleach
LifeCare
Towelette (subject to
availability)
Omni-Flow 4000 Plus IV Medication Management System
II se
@
TM
@
@
Germicidal
Manufacturer
Calgon Vestal Laboratories Per manufacturer’s recommendation
Calgon Vestal Laboratories Per manufacturer’s recommendation
Diversey Corporation
S. M. Edison Chemical Co.
Various
Manufactured for
Abbott Laboratories
8-l
Preparation
Per manufacturer’s recommendation
Per manufacturer’s recommendation
Per hospital procedures; do not exceed
one part bleach in ten parts water
Per manufacturer’s recommendation;
use undiluted
430-06371 -CO4 (Rev.
8196)
Page 59

SYMPTOM PROBABLE CAUSE
JNDEFINED PROBLEM:
IiE
SCREEN HAS AN UNREADABLE MESSAGE
JNIT
IS STUCK IN ONE FUNCTION, I.E., FLUSH
IS
CASSElTE OR 4000 PLUS
4O@l
PLUS IS SUBJECTED TO AN EXCESSIVE
ELECTROMAGNETK:
ELECTROSTATIC
ELECTRONCS ARE DAMAGED
DlSCHARGE AND THE
DAMAGED
FIELD OR
7.1 TROUBLESHOOTING GUIDE
ACTlONCORRECTlVE
4C00
IF CASSETTE OR
SUSPECT, STOP
A CASSEllE
-IF
CASSETTE PASSES TEST, RESTART THE
4000 PLUS AND ESTABLISH CORRECT FLOW.
MONITOR AU LINES FOR PROPER
OPERATION
-IF
CASSETTE FAILS TEST, REPEAT TEST. IF
CASSElTE FAILS AGAIN, REPLACE CASSETTE
4000 PLUS FAIL TO PERFORM
SHOULD
CORRECTLY, REPLACE 4000 PLUS
CYCLE
POWER:
POWER ON. RESUME
PROGRAMMING AND RESTART INFUSION. IF
THE RESTART DOES NOT CLEAR THE
PROBLEM, REMOVE THE
SERVlClNG
FOR
PLUS RELIABILITY IS
DELlVERY AND PERFORM
‘IEST
TURN
POWER OFF. TURN
PREVlOUS
4OW PLUS
JNRESOLVED SYMPTOM:
IWO PLUS PROBLEM COULD NOT
‘0
JOT
‘RINTER
ANDlDR CORRECTIVE
CAUSE
RESOLVE
SllUATlDN
(OPTIONAL) INOPERATIVE
BE
RELATED
ACTlON
RANDOM INTERNAL SYSTEM FAILURE
DID
PRINTER
CABLING IS DAMAGED OR PRINTER
IS DAMAGED
NOT SET UP CORRECTLY
IF CASSEllE OR
SUSPECT, STOP
A
CASSETTE TEST
CASSElTE
-IF
4000
PLUS AND ESTABLISH
MONITOR ALL LINES FOR
PROPER OPERATION
-IF
CASSEllE FAILS TEST, REPEAT TEST. IF
CASSEFE
SHOULD4000 PLUS FAIL TO PERFORM
CORRECTLY. REPLACE DEVICE
REFER TO PRINTER OPERATING MANUAL FOR
TROU8LESHODTlNG AND PRODUCT
SERVCING
CONFIRM PAPER IS LOADED, POWER IS ON;
AND PRINTER IS ON-LINE
4WO PLUS RELIABILITY IS
DELNERY
PASSES TEST, RESTART THE
FAILS AGAIN, REPLACE CASSEllE
INFORMATION
AND PERFORM
CORRECT FLOW.
Omni-Flow 4000 Plus IV Medication Management System
7-5
430-06371-004 (Rev.
4193)
Page 60

Section 9
WARNINGS, CAUTIONS AND
PRECAUTIONS
Section 9 is a comprehensive listing of the warnings, cautions, and precautions detailed
throughout this manual.
9.1
WARNINGS
Warnings contain special safety emphasis and must be observed at all times. Failure to observe
a warning is
Product damage may occur unless proper care is exercised during the unpacking and
installation process. The battery pack may not be fully charged upon receipt.
the device in service if it fails the self test.
Do not connect line to patient while priming patient line.
Removing cassette from device without closing line clamps may result in unrestricted flow.
All clamps must be closed to prwent flow to patient and/or mixing of drugs.
Continuous infusions are rate specific and
not stop. The device keeps pumping at programmed rate and does not go to KVO.
When administering critical medications, monitor device performance frequently.
of the callback feature is recommended for intermittent infusions, dilutions, and flushes.
Callback allows confirmation of successful completion of the intended therapy.
Near the end of an intermittent infusion with dilution, a
delivered without being diluted.
medication.
(e.g., potassium chloride), should be diluted appropriately before administration.
Repeated operation of device to low battery condition
pack.
A possible explosion hazard exists if the device is used in the presence of flammable
anesthetics.
Arrange tubing, cords, and cables to minimize the risk of patient strangulation or
entanglement.
potent.iaJly
Deep battery discharge may render the battery pack unusable.
life threatening.
alaxm
when dose is complete.
small
amount of medication may be
The dilution from line A may complete before the
Medication that could potentially cause patient harm if delivered undiluted
affects
charge capacity of the battery
Do not place
The infusion does
The use
Omni-Flow 4000 Plus IV Medication Management System
(Rev.
4194)
-
1
9
430-06371
-A04
Page 61

Section 9 WARNINGS, CAUTIONS AND PRECAUTIONS
9.2 CAUTIONS
A caution usually appears in front of a procedure or statement. It contains information that could
prevent
result in serious injury.
irreversible damage or hardware failure. Neglecting to pay attention to a caution could
If device appears to be damaged, do not operate: return damaged devices for service.
When prog
the
confirmatory
the device.
ramming the device, a confirmatory response beep should be clearly audible. If
beep is inaudible, adjust the
ALARM
VOLUME knob located on the back of
If after adjustment the beep is still inaudible, contact Abbott Laboratories
Technical Support Operations.
Use only Abbott Omni-Flow Primary Sets on the device.
Refer to the administration package
insert for complete instructions.
Use only Abbott
On-m&Flow
Secondary Sets on the device.
Refer to the administration
package insert for complete instructions.
va.lve
The gravity
i?om
the device without closing the clamps. The gravity flow
the mixing of drug lines. Close all
prevention valve requires pressure to open (1.5
setting may require adjustment to
protects the patient flow prevention
clamps
prevent
before removing the cassette. The gravity flow
5p
nuisance occlusion alarms.
free flow if
prevention
5.0 psi). The device occlusion pressure
the
cassette is removed
valve does not prevent
from
Tum the cassette locking lwer slowly to lock cassette in place.
It is extremely important to always perform the cassette test when inserting a new cassette.
After progr
amming
chamber on each appropriate
the device, ensure that pumping has begun
fill
byveri@ing
stroke for each line in use.
flow into the drip
When restarting an intermittent line that has been stopped, the start time and dosing
information for the next dose must be reset.
When infusing short half-life drugs at a low flow rate, automatic air elimination interrupts
the delivery of medication to the patient. This medication interruption is dependent upon
the infusion rate and may cause a change in patient parameters.
If Line A is stopped while it is flushing, only the current flush is stopped.
subsequent intermittent doses.
restart:
any maintenance infusion
Any continuous infusion
already
already
programmed on Line A will restart after all
programmed on Line A will
Reprogram
currently infusing intermittents have completed.
If the LOW
Do not operate a device with an insufficiently charged or depleted battery pack.
should be disconnected or if power fails, an
BAmRY
alarm sounds, connect the device to AC power immediately.
If the device
instiiciently
charged battery pack may not
maintain device operation. Connect the device to AC power whenever practicable to assure
maximum battery capacity during patient transport or ambulation.
For those patients who are likely to be adversely affected by unintended operations and
i?om
failures, including interrupted medication or fluid delivery
the device, close supervision
and provision for immediate corrective action should be provided.
Should excessive alarms continue to occur, the device should be removed for service.
To avoid mechanical or electronic damage, do not immerse the device in any fluids or cleaning
solutions.
Do not operate devices that contain residue from solution spills. Sticky or gummy residue
f&e
can interfere with the
mechanism.
If it cannot be completely cleaned, return the device for service.
movement
of
the valve
stems and/or the pressure-sensing
430-06371
-B04 (Rev.
7195)
9-2
System Operating Manual
Page 62

9.3 PRECAUTIONS
cl
Certain cleaning and sanitizing compounds may slowly degrade components made from some
plastic materials.
Laboratories
of isopropyl alcohol and
Li
Never
use sharp objects such as fingernails. paper clips, or needles to clean any part of the
Using abrasive cleaners or cleaning solutions not recommended by Abbott
may
result
in product damage.
dimethyl
benzyl
Do not use compounds containing combinations
an-znonium
chloride.
device.
Do not sterilize by heat, steam, ethylene oxide (ETO], or radiation.
cl
D
To avoid device damage,
So2u.tion.s.
The disinfecting properties of cleaning solutions vary; consult the manufacturer
cleaning
solutions should be used as directed in Table 8.1, Cleaning
for specific information.
Do not attempt to disassemble device or perform repairs.
cl
Federal (USA) law restricts this device to sale by or on the order of a physician or other licensed
cl
practitioner.
Use of radio
a
frequency
emitting devices such as cellular telephones and 2-way radios in close
proximity of this device may affect its operation.
9.3 PRECAUTIONS
Before operating the 4000 Plus, the user should become thoroughly familiar with the proper use
of the device as outlined in this manual. Precautions to be observed in operation of the 4000 Plus
follow.
Do not attempt to disassemble or repair the device.
service personnel.
the
A service code may be displayed if
the
holster. If
service code appears. remove the cassette and cycle the power. Toggle the
device is turned on with a cassette locked in the cassette
[ON/CHARGE] switch to CHARGE, then ON, to clear the service code.
Turn cassette locking lever slowly to prevent sudden release of spring mechanism.
It is recommended that the cassette test safety feature be routinely performed at each cassette
insertion.
For normal operation, the device must be connected to a hospital grade AC outlet,
If quality of AC power source is in doubt, use battery power.
prevent
To
flow interruption, it is necessary to plug the device into AC power immediately
upon low-battery alarm.
If the battery pack has become fully discharged, cycle the power. Toggle the [ON/CHARGE]
switch to CHARGE, then ON, and reset the time with the [SPECIAL
internal self check of the real time clock may have been missed while the battery pack was
depleted.
After progr
amming
chamber on each
the device, ensure that pumping has begun by
fti
stroke.
When infusing two or more medications, the user should confirm drug compatibility and
program the device accordingly.
When administering critical medications, monitor device performance frequently. The use of
the Callback feature is recommended for intermittent infusions, dilutions, and flushes.
Callback allows confirmation of successful completion of the intended therapy.
Refer all service to qualified and trained
FUNCTIONI[ll
verifying
flow into the drip
keys. The
Omni-Flow 4000 Plus IV Medication Management System 9
-
3
430-06371-804 (Rev.
7195)
Page 63

Section 9 WARNINGS, CAUTIONS AND PRECAUTIONS
Q
Certain undiluted drugs are chemically reactive and may adversely affect plastics. These
drugs should be diluted according to manufacturer’s instructions prior to infusion.
lever
0
Unrestricted fluid flow occurs if the cassette locking
IV fluid containers are open. Before unlocking cassette locking
closed to
Q
For continual protection against risk of fire, replace fuse with a 250 VAC 0.6 A SB unit.
Cl
Do not sterilize, autoclave, or immerse this device in any manner.
0
The 4000 Plus is an electronic device with many components. Efforts have been made to
prevent
flow to patient and/or mixing of drugs.
is unlocked while the
lever.
all clamps must be
clamps.to
the
ensure the quality and long life of these components; however, any component is subject to
possible failure which may cause the 4000 Plus to malfunction and alarm.Backup systems
to provide intravenous therapy should be available in the event of a device malfunction or
failure.
0
The 4000 Plus contains electrical components that may be
or
emissions. Caution should be exercised when the device operates in these
MRI
affected
environments. Shield the device from X-ray by a lead apron. If exposure to RF, X-ray, or
the
emissions does
occur,
cycle the power by turning
device off, then back on, to allow the
by exposure to RF, X-ray,
MRI
self test to repeat. Return the device for service if there is any concern about reliability of
operation.
Plus
CI
The 4000
D
A solution must be placed on Line A for the device to function properly.It is recommended
is not to be used in a hyperbaric chamber.
that a neutral solution be placed on Line A
0
To cancel the dilution of a particular line, press the [STOP] key and reprogram the line being
diluted by changing the YES to NO. Recheck the number of doses remaining in the container
staxt
and the
Q
Nonhazardous, low-level electrical potentials are commonly observed when fluids are
administered using infusion devices.
time of the next dose.
These potentials are well within accepted safely
standards, but may create artifacts on voltage sensing equipment such as ECG, EMG and
EEG machines. These artifacts
at a rate that is associated with the infusion rate.
If the
vary
monitoring machine is not operating correctly or has loose or defective connections to its
sensing electrodes, these artifacts may be accentuated so as to simulate actual physiological
signals. To determine if the abnormality in the monitoring equipment is caused by the
infusion device instead of some other source in the environment, set the infusion device so
that it is temporarily not delivering fluid. Disappearance of the abnormality indicates that it
was probably caused by electronic noise generated by the infusion device.
Proper setup and
maintenance of the monitoring equipment should eliminate the artifact. Refer to the
appropriate monitoring system documentation for setup and maintenance instructions.
430-06371-804 (Rev.
7/95)
9-4
System Operating Manual
Page 64

Section 10
SERVICE AND PERFORMANCE
INFORMATION
If the 4000 Plus fails to respond to the operating or troubleshooting procedures listed in this
manual, and the cause
cannot be
determined, discontinue use of the device.
CAUTION:
Service and product performance information may be obtained by contacting:
Product
Do not attempt to disassemble device or perform repairs.
Through January 5.1997
Abbott Laboratories
Technical Support Operations
980 Linda Vista Avenue
Mountain View, California 94043
Effective January 6, 1997
Abbott Laboratories
Technical Support Operations
775 Jarvis Drive
Morgan Hill, California 95037
inquiries may be telephoned to the following number:
l-800-24 l-4002
Contact the Abbott Laboratories
device for repair. A Returned Goods Authorization must be obtained prior to the return of any
4000 Plus.
Carefully package the device (preferably in the original
Laboratories Technical Service Center with the Returned Goods Authorization
identified.
Abbott Laboratories cannot assume any responsibility for loss or damage to returned instruments
while they are in transit or for the unauthorized return of any instruments.
Note:
Pre-authorization must be received prior to the return of any 4000 Plus.
Omni-Flow 4000 Plus IV Medication Management System
Technica.l
Service Center to obtain authorization to return the
pa&i.@,
10-l
and ship it prepaid to the Abbott
(RGA)
clearly
430-06371 -CO4 (Rev.
8/96)
Page 65

Section 11
4000 PLUS SETS
Use only Omni-Flow Primary Sets with the 4000 Plus. Primary Omni-Flow Sets can be used as
a gravity administration set with the device. Sets are sterile and for single use only.
11.1
IV ADMINISTRATION SETS
The following table lists the intravenous administration sets for use with the 4000 Plus.
LlST
NO.
11167
11168*
11169*
11440
11599*
DE8CRIPTION
Primary Macro-bore Device Set, convertible piercing pin 122
inches in total length with 72 inches of tubing from cassette to
patient, collection bag, roller clamp, one
and luer lock adaptor.
Primary Micro-bore Device Set, convertible piercing pin
approximately 80 inches in total length
micro-bore tubing from cassette to patient, collection bag,
roller clamp, one
Primary Micro-bore Device Set, convertible piercing pin
approximately 110 inches in total length with 60 inches of
micro-bore tubing from cassette to patient, collection bag,
roller clamp, one
LifeShield@
approximately 118 inches in length, collection bag, roller
clamp, two prepierced reseal
LifeShield@
approximately 110 inches in total length with 60 inches of
micro-bore tubing from cassette to patient, collection bag,
roller clamp, two prepierced reseal
Primary Macro-bore Device Set, convertible piercing pin,
Primary Micro-bore Device Set, convertible piercing pin,
‘Y” injection site and luer lock adaptor.
‘Y” injection site and luer lock adaptor.
‘Y’
injection sites.
‘r’
‘Y” injection site
with
30 inches of
injection sites.
11606*
11681;
Omni-Flow 4000 Plus IV Medication Management System
Primary Micro-bore Device Set with gravity flow prevention valve,
convertible piercing pin, approximately 110 inches in total
length with 60 inches of Micro-bore tubing from cassette
to patient, collection bag, roller clamp, one
site and luer lock adaptor.
LifeShield@
activated valve port at lower
piercing pin, approximately 110 inches in total length.
Sixty inches of Micro-bore tubing (approx. 2 ml priming
capacity], from cassette to patient: collection bag, and
roller clamp.
Omni-Flow Primary I.V. Pump Set with capped luer
11-l
‘r’
injection
“y”
injection site. Convertible
430-06371
-A04
(Rev.
4l94)
Page 66

Section 11 4000 PLUS SETS
11139
4052 1
40522
40524
11137
11140
11141
11181
Secondary Set, convertible piercing pin approximately
40 inches in total length, clamp, luer lock adaptor.
IV
Colorgarda Midlength Secondary
Set, 40 inches, orange
striped tubing for line identification, and luer lock
adaptor.
IV
Colorgard’ Midlength Secondary
Set, 40 inches, green striped
tubing for line identification, and luer lock adaptor.
IV
Colorgard@
Midlength Secondary
Set, 40 inches, purple striped
tubing for line identification, and luer lock adaptor.
Nonvented Soluset, 150 x 15, 40 inches, with male luer lock adaptor.
Low absorption proximal nitroglycerin set, vented, 40 inches,
with male luer lock adaptor.
Nonvented Y-type blood set with high capacity, bucket type
nylon blood filter, 40 inches, with male luer lock adaptor.
Mid-length secondary set with in-line
IVEX
.22
micron filter, 40 inches.
with male luer lock adaptor.
l
When infusing highly viscous solutions (i.e., 25% Dextrose) through micro-bore sets, at normal
delivery rates, an occlusion pressure of twelve (12) psi should be set for
backpressure of approximately 1.5 psi (approximately 75
mmHg)
the
device.
is allowed. Exceeding these
A maximum
parameters may result in occlusion alarms.
11.2
ACCESSORY SETS
LlST
1736
40500
40055
11607
NO.
DESCRlPTION
Low
absorption, distal nitroglycerin extension set, 60 inches, with male
luer lock adaptor.
Collection bag. Sterile nonpyrogenic fluid path. Single use only.
Do not
rester&e.
Colorgard three-way stopcock. Omni-Flow compatible, for use with
syringes or mid-length secondary sets.
Gravity flow prevention valve, for use with the Omni-Flow medication
management systems. Restricts gravity flow.
11441
Vented syringe adapter.
Note: This list may be updated without notice; contact the Customer Service Department for
current listings.
430-0637 1
-A04 (Rev.
4194)
11-2
System Operating Manual
Page 67

Section 12
SPECIFICATIONS
Pumping Mechanism:
Dimensions:
Weight:
Power Requirements:
Fuse:
AC Line Leakage:
Plug:
Piston Diaphragm
Height: 11
Width:
Approximately 15 lbs
12 inches
Depth: 7
50 Watts, 120 VAC,
Slow blow, 0.6 A, 250 VAC
Less than 20 Micro Amps
Hospital Grade (3 pin)
inches
l/4
l/2 inches
50/60
Hz
Case Material:
Battery Type:
Battery Life:
Battery Pack Recharge Time:
Omni-Flow 4000 Plus IV Medication Management System
Structural Foam
12 Volt, Sealed Lead Acid,
Rechargeable
5 hours at 125
(Low Battery alarm activated
with 30 minutes of battery
life remaining)
24 hours with device OFF
12-1
mL/hr
430-06371
-A04
(Rev.
4194)
Page 68

Section 12 SPECIFICATIONS
Delivery
Rate Range:
mL
-
100
mL
1.0
0.1
fi-om
mL/hr
100-700
increments up to 100
maximum for 3-4 lines, 500
maximurn
for single line with syringe)
per hour in
mL/hr
mL/hr
incrementsmL then in 1
(600
mL/hr
mL/hr
Container Volume
and Dose Range:
Rate:
KVO
Fltid Types:
Nurse Call Jack:
External
Communications:
l.OmL-30OOmLin.lmL
100
increments up to
mL
in 1
3000
Preset at 1.0
increments from 100
mL
mL/hr.
Selectable from 1.0
mL
per hour
IV
All standard
fluids
mL then
mL
-99.9
-
including lipid emulsions,
blood and packed cells
l/4
inch phono jack
RS-232, DB-9 connector set to 9600 baud
Note:
RS-232 DB-25 connector not active
on some models
Occlusion Pressure:
430-06371-A04 (Rev.
4/94)
Alarms:
Cassette
Unlocked
Air In Line/Upstream Occlusion
Occlusion in Patient Line
Possible Empty Container
Low Battery Voltage
Possible Faulty Cassette
Callback Requested
Device Failure/Service Required
Unable to Pump at Programmed Rate
Possible Full Collection Bag
Transfer to Battery Operation
Communications Fault
Preset at 10 psi
User
selectable from
12-2
1-12 psi
System Operating Manual
Page 69

Section 13
KEYPAD DESCRIPTION
Section
DISPLAY SCREEN: The 80-character, backlit, liquid crystal display provides
1.
instructions, programming information, alarm messages, and status information.
-RIG]
2.
[PRINT] KEY:
3.
with [SPECIAL FUNCTION]
4.
[SPECIAL
to access any of the special functions.
[Iv
5.
on each of the lines and the total volume for all four lines.
[PRIME
6.
tubing and the cassette into the collection bag.
m
7.
air.
[CONTINUOUS INFUSION]
8.
continuous infusion on any line.
13
describes the front panel of the 4000 Plus.
KEY8 O-9: Use these keys to input infusion rates, volumes, and times.
Press this key to print either the IV Flow Sheet or the
171.
KEYz Press this key (followed by the appropriate numeric key)
FUNCTION]
FLOW
SHEET]
CASSETTE]
PATIENT
The patient line can be primed only when ALL lines are OFF.
KEY:
KEYz
Press this key to display a running total of the volume infused
Press and hold this key to clear air
KEY:
Press and hold this key to clear the patient line of LME]
KEYz
Press this key (on Lines A, B, C, or
IV
History, selected
from
the upstream
D]
to program a
all
[MTERMITTENT
9.
an intermittent infusion of a medication.
[STOP]
10.
stop the operation of any of the lines.
lrJNE
11.
programming information for each line. The information remains visible on the display
screen until the [ENTER] or [ESCAPE] key is pressed.
LINE INDICATOR LIGHTS: On continuously when a line is programmed to start;
12.
flashing when a line is operating: off when a line is off.
NOTATION AREAS: These areas may be used to make notations concerning the
13.
medication and/or programming on each line. Clean with an alcohol swab or a soft
eraser. Use a nonpermanent felt-tip pen or pencil.
WTENANCE
14.
maintenance infusion on Line A. Line A stops when an intermittent infusion starts
and restarts automatically when the intermittent line stops.
Omni-Flow 4000 Plus IV Medication Management System
KEE
STATUS] KEY:
INFUSION]
Press this key (on Lines A, B, C. or D), then press the [ENTER] key to
INFuSIONl
KEF
Press this key (on Lines A, B, C, or D) to obtain the current
KEY:
D)
Press this key (on Lines B. C, or
Press this key (on Line A only) to program a
13-l
to program
430-06371-004 (Rev.
4193)
Page 70

Section 13 KEYPAD DESCRIPTION
KEYz
(YE6/NO]
15.
Press this key to answer any of the programming questions on
intermittent infusions or special functions.
KEYz
16.
INEXT]
Press this key to move the cursor to the next information entry point on
a screen.
17.
(ENTEN
KEX Press this key to enter programming information or to advance to
another screen.
KEYz
18.
WT]
Press this key to move the cursor back to the last information entry point
on a screen.
KEYz
19.
20.
[CLEAR
(AM/PlKl
ENTRpj
Press this key when changing the AM/PM time designation.
KEYz
Press this key to clear information at the current cursor
location.
IESCAPE]
21.
KEY: Press this key to return to the base screen, or to return to the
programming screen after certain message screens.
particular programming sequence is unclear.
CASSETTE
22.
cassette in place.
LOCEING
To unlock the cassette, lift up the cassette locking
LEVER:
Move the cassette locking lever clockwise to lock the
counterclockwise.
23.
l’MUTE1
geV:
Press this key to mute the audible alarm for a two-minute period or to
cancel the Callback or Faulty Cassette Alarms.
24. ALARM
25.
BATTERY
LIGHT: This light illuminates when the device is in an alarm mode.
LlGHTz
This light
illuminates when the device is disconnected
power, or when there is an AC power failure.
Use the key to restart any time a
lever
and turn
i?om
AC
26. AC
27.
POWER
KEYz
LIGHT:
This light ill
Use this key to put currently operating lines on hold. Press the BOLD]
key, then press the [ENTER] key.
uminates
All lines (including A) may be put on hold by pressing
when the device is connected to AC power.
IHOLDI
the [ENTER] key again. Any combination of Lines B. C, and D may be put on hold by
pressing [LINE STATUS] keys. An alarm sounds after two minutes when lines are on
hold.
[REsuMEl
28.
to resume device operation following an alarm condition.
EEY: Press this key to review pending alarms, then press the [ENTER] key
Press the
(RESUME1
key,
then press the [ENTER] key to resume device operation after a HOLD condition.
430-06371-004 (Rev.
4193)
13-2
System Operating Manual
Page 71

Figure
13-l. 4000
Plus, Front View
Omni-Flow 4000 Plus IV Medication Management System
13-3
430-06371-004 (Rev.
4/93)
 Loading...