

Page 1

ABBOTT
TM
System Operating Manual
For use with the
Abbott GemStar Pump
List 13000-36
ABBOTT LABORATORIES, NORTH CHICAGO, IL 60064, USA
430-600095-002 (Rev. 8/02)
Page 2

Abbott GemStar™Pump
System Operating Manual
For use with the
Abbott GemStar Pump
List 13000-36
PLEASE
Read this entire manual before
using the Abbott GemStar Pump
This manual is designed for use by healthcare professionals, caregivers, and
patients.
For consultation and technical support, contact your local Abbott
Laboratories sales office.
This manual is designed for use with Abbott GemStar Pumps used in the United
Kingdom, Australia, and other English-speaking countries.
Abbott GemStar Manual 430-600095-002 (Rev. 8/02) i
Page 3

Change History
Part Number Description of Change Pages Changed
430-600095-001
(Rev. 3/00)
430-600095-002
(Rev. 8/02)
Original Release N/A
Second Release N/A
ii Abbott GemStar Manual 430-600095-002 (Rev. 8/02)
Page 4

Contents
Introduction 1
Abbott GemStar Pump Layout ......................... 2
Abbott GemStar Pump Components ...................... 4
Therapies .................................... 5
Abbott GemStar Pump Features ........................ 6
Menu System .................................. 7
Operating Modes ................................ 8
Abbott GemStar Pump Set ........................... 8
Indications for Use ............................... 9
Contraindications for Use ........................... 10
Warnings and Cautions ............................ 10
System Setup 15
Setup Overview ................................ 15
Selecting a Power Source ........................... 15
Priming an Abbott GemStar Pump Set .................... 18
Loading the Cassette ............................. 26
Releasing the Cassette ............................ 27
Basic Operation 29
Quick Start ................................... 29
Operating Tips ................................. 29
Powering On the Pump ............................ 30
Accessing the Programming Menu ...................... 30
Programming the Pump ............................ 31
Starting a New Container ........................... 32
Weight Dosed 33
Therapy Features and Specifications ..................... 33
Weight Dosed Programming .......................... 33
Auto KVO ................................... 34
Rate Titration ................................. 34
Changing a Weight Dosed Program ...................... 35
Weight Dosed Programming Worksheet .................... 36
Pain Management 37
Therapy Features and Specifications ..................... 37
Pain Management Programming ....................... 37
Bolus Delivery ................................. 38
Loading Dose Delivery ............................. 40
Changing a Pain Management Program .................... 41
Pain Management Programming Worksheet ................. 42
Abbott GemStar Manual 430-600095-002 (Rev. 8/02) iii
Page 5

mL/hr Only 43
Therapy Features and Specifications ..................... 43
mL/hr Only Programming ........................... 43
Auto KVO ................................... 43
Rate Titration ................................. 44
Piggybacking .................................. 44
Changing a mL/hr Only Program ....................... 47
mL/hr Only Programming Worksheet ..................... 48
Intermittent 49
Therapy Features and Specifications ..................... 49
Intermittent Programming ........................... 49
Intermittent Delivery Interruptions ....................... 51
Changing an Intermittent Program ....................... 53
Intermittent Programming Worksheet ..................... 54
Total Parenteral Nutrition (TPN) 55
Therapy Features and Specifications ..................... 55
TPN Programming ............................... 55
Changing a TPN Program ........................... 56
TPN Auto Taper Down ............................. 56
TPN Programming Worksheet ......................... 57
Continuous 59
Therapy Features and Specifications ..................... 59
Continuous Programming ........................... 59
Rate Titration ................................. 60
Piggybacking .................................. 60
Changing a Continuous Program ....................... 63
Continuous Programming Worksheet ..................... 64
Variable Time 65
Therapy Features and Specifications ..................... 65
Variable Time Programming .......................... 65
Variable Time Delivery Interruptions ..................... 66
Changing a Variable Time Program ...................... 66
Variable Time Programming Worksheet .................... 67
Options Menu 69
Overview .................................... 69
Tips for Using the Options Menu ....................... 69
Review Program ................................ 70
Histories .................................... 71
Keypad Lock .................................. 73
Change Pump Settings ............................ 75
Set Clock .................................... 77
iv Abbott GemStar Manual 430-600095-002 (Rev. 8/02)
Page 6

Print ...................................... 77
Speed Protocol ................................ 78
Next Dose ................................... 79
Connecting to the Data Port .......................... 80
Clinician Instructions 85
Clinician Locking Sequence Instructions ................... 85
Program and Deliver a Clinician Activated Loading Dose ........... 86
Display Shift Totals .............................. 87
Troubleshooting 89
Alarm Messages ................................ 89
Alert Messages ................................ 94
Other Display Messages ............................ 97
Maintenance 99
Pump Storage ................................. 99
Cleaning and Disinfecting ........................... 99
Repair .................................... 101
Operation Test 103
Equipment Required ............................. 103
Test Setup .................................. 103
Performing the Operation Test ........................ 104
Printing Test Results ............................. 107
Operation Test Checklist ........................... 108
Optional System Components 109
Connecting the Bolus Cord .......................... 110
Recharging the Battery Pack ......................... 111
Using the Abbott GemStar Lockboxes .................... 112
Using the Abbott Carrying Cases ....................... 114
Using the Abbott GemStar Docking Station ................. 119
Pump Sets 121
Abbott GemStar Pump Specifications 123
Occlusion Information ............................ 126
Warranty 137
IEC Symbols inside back cover
Abbott GemStar Manual 430-600095-002 (Rev. 8/02) v
Page 7

Notes
vi Abbott GemStar Manual 430-600095-002 (Rev. 8/02)
Page 8

Introduction
The Abbott GemStar™ Pump is a small and lightweight, single-channel infusion device
that can be powered by AC mains adaptor, rechargeable battery pack, two disposable AA
batteries, or the Abbott GemStar Docking Station. The Abbott GemStar Pump is designed
for use in the home, in the hospital, or anywhere electronic infusion is required. When
powered by batteries, the Abbott GemStar Pump is ideal for ambulatory patients.
The following conventions are used throughout this manual:
Convention Use Example
d
f
[ALL CAPS]
ALL CAPS Display messages The pump displays END OF
WARNING: A WARNING message contains special safety emphasis and
must be observed at all times. Failure to observe a warning
message is potentially life threatening.
CAUTION: A CAUTION usually appears in front of a procedure or statement. It
contains information that could prevent irreversible product damage or
hardware failure. Neglecting to pay attention to a caution could result in
serious patient or user injury.
Note: A NOTE provides information to help clarify a procedure or statement.
Tip: A TIP emphasizes a procedure or statement that makes the pump easier to
use.
Keys
Press [YES/ENTER] to continue.
INFUSION.
Page 9
Introduction
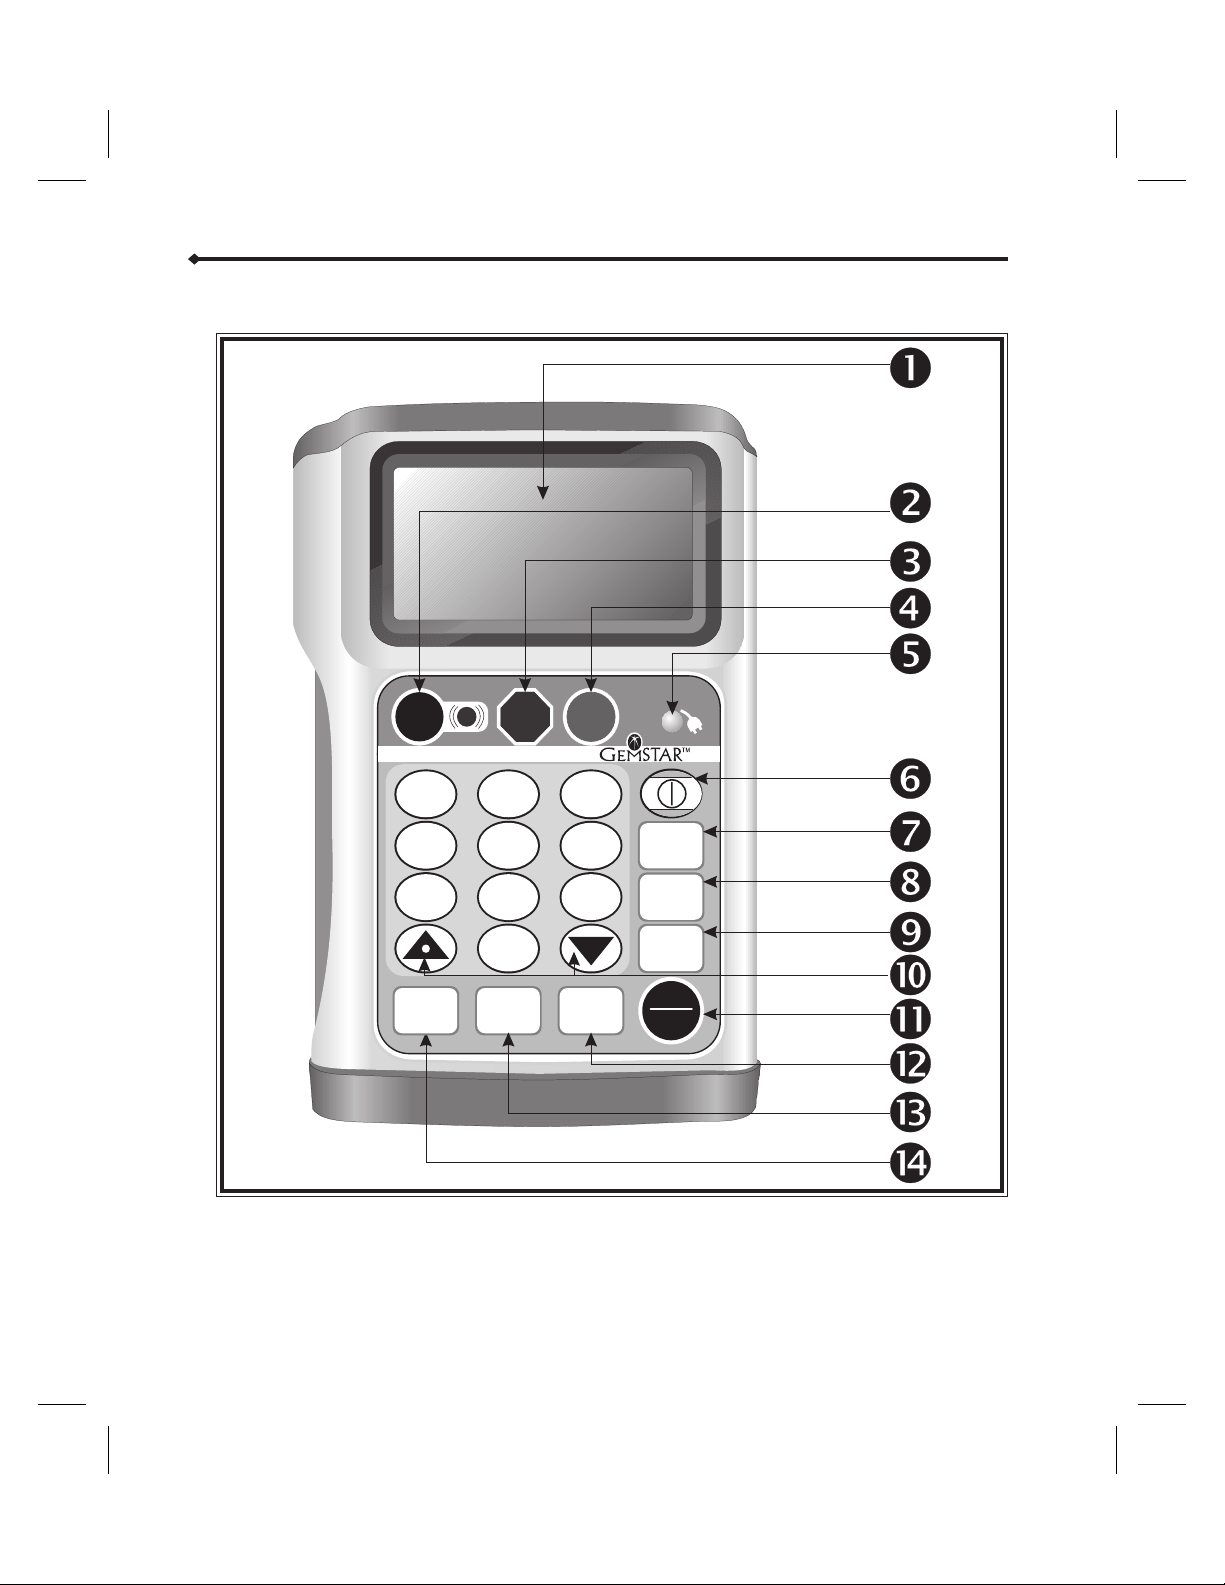
Abbott GemStar Pump Layout
SILENCE
ABBOTT
1
4
7
PURGE
STOP
2
5
START
3
6
89
0
HELP
NO
POWER
BACK-UP
CHANGE
OPTIONS
YES
ENTER
2 Abbott GemStar Manual 430-600095-002 (Rev. 8/02)
Page 10

Introduction
1 DISPLAY
2 SILENCE
3 STOP
4 START
5 POWER INDICATOR
6
7 BACK-UP
8 CHANGE
9 OPTIONS
10
11 YES/ENTER
12 NO
13 HELP
14 PURGE
ON/OFF
Four-line display indicates the pump’s status.
•
Temporarily silences alarm.
•
Stops infusion.
•
Starts infusion.
•
Indicates the pump is powered by AC mains when lit continuously.
•
Indicates the pump is powered by external batteries when flashing.
•
Powers the pump on or off.
•
Provides access to previous steps during programming.
•
Exits Help, Change, and Options menus.
•
Provides access to these menu items from the STOP or RUN
•
mode*:
1 Review/Resume
2 New Container
3 New Program
• Corrects an entry during a programming step.
• Provides access to these menu items from the STOP or RUN
mode*:
1 Review Program
2 Histories
3 Keypad Lock
4 Pump Settings
•
Scrolls through display messages.
•
UP arrow enters a decimal point in numeric entries.
•
Responds “YES” to display questions.
•
Accepts entries and advances to the next step.
•
Responds “NO” to display questions.
•
Provides context-sensitive information during programming steps
and alarm conditions.
•
Otherwise displays Shift Totals.
•
Clears an AIR-IN-LINE alarm.
•
Primes an Abbott GemStar Pump Set.
4 Change Program
5 Piggybacking
5 Set Clock
6 Print
7 Speed Protocol
8 Next Dose
*
Not all menu items are available with all modes. Refer to the appropriate section for more information.
Abbott GemStar Manual 430-600095-002 (Rev. 8/02) 3
Page 11
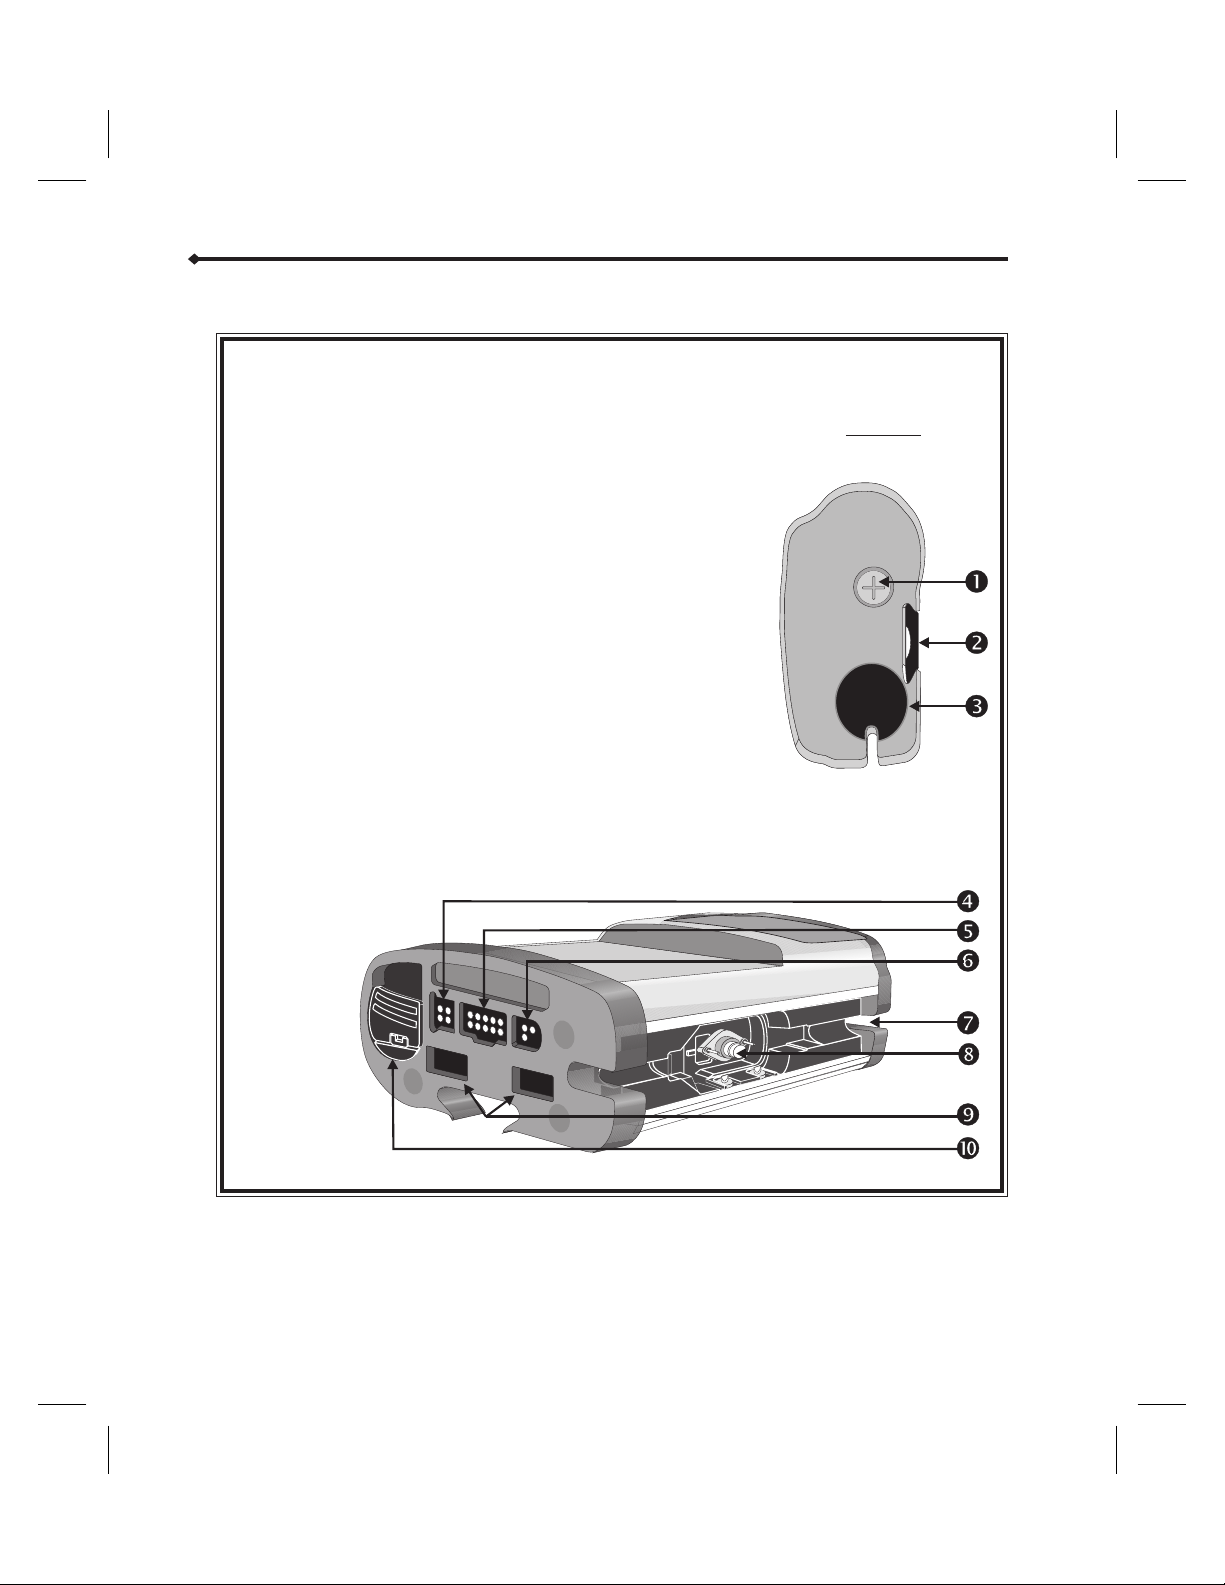
Introduction
Abbott GemStar Pump Components
1 Bolus Button Press this button to initiate a bolus
2 Pole Clamp Track Use to connect to an optional pole
3 Cassette Release
Button
4 Power Connector Use to connect AC mains adaptor to
5 Data Port
Connector
6 Bolus Connector Use to connect a bolus cord to the
7 Tubing Channel Align pump set tubing in this channel.
8 Cassette Pocket Load the cassette into this pocket.
9 Battery Pack
Connector
10 Battery
Compartment
delivery if available in the current
program.
clamp.
Push down on this button to release
the cassette from the pump.
the pump.
Use to connect a printer or computer
to the pump.
pump.
Use to connect the Abbott GemStar
Rechargeable Battery Pack to the
pump.
Install two fresh, disposable AA
batteries in this compartment for
battery power.
Top View
4 Abbott GemStar Manual 430-600095-002 (Rev. 8/02)
Page 12

Therapies
Seven types of therapy are available for delivery of medications and fluids. The following
table lists available features and possible applications of each therapy.
Therapy Possible Applications
AUTO KVO
TITRATION
PIGGY-
BACKING
Introduction
BOLUS
DOSE
LOADING
TAPER UP /
DOWN
d
Weight Dosed Critical care, pediatrics
Pain Management Administration of
analgesics or anesthetics
for patient-controlled pain
management (PCA)
mL/hr Only Simple rate programming
Intermittent Interval-based therapies
such as antibiotics
TPN Total Parenteral Nutrition
fluid delivery
Continuous Delivery of mg, mcg, or
mL/hr with a selectable
KVO (Keep Vein Open)
option
Variable Time Chronotherapy
Legend: • = Available
Note: Menu items may vary depending on the pump’s configuration.
··
···
··
·
··
·
Abbott GemStar Manual 430-600095-002 (Rev. 8/02) 5
Page 13

Introduction
Abbott GemStar Pump Features
Adjustable
•
Settings
Alerts and
•
Alarms
Audible Keypad
•
Response
Keypad Lock
•
New Container
•
Piggybacking
•
Power-on
•
Self-test
Adjusts the distal occlusion pressure limits,
air sensor sensitivity, real-time clock, and
audible alarm volume.
Signals audible and visual alarms when
attention is required.
Sounds a single beep when any key is
pressed. If an invalid key is pressed, the
pump sounds a flutter tone.
Restricts access to various options. Four lock
levels are available.
Repeats the current program without
reprogramming the pump.
Allows delivery from a secondary container
during a Continuous or mL/hr Only program.
Performs a self-test each time the pump is
powered on.
Refer to the “Options Menu”
section.
Refer to the “Troubleshooting”
section.
Refer to Abbott GemStar Pump
Layout in this section for keypad
information.
Refer to the “Options Menu” and
“Clinician Instructions” sections.
Refer to the “Basic Operation”
section.
Refer to the appropriate therapy
section.
Refer to the “Basic Operation”
section.
•
Operation Test
•
Program
History
•
Speed Protocols
Performs user-assisted tests to verify the
pump is functioning properly.
Maintains a history event log, with a date
and time stamp of each event for each
program. Review the history on the display,
or download it to a printer or computer.
Stores up to nine frequently used programs
in the pump’s memory for quick access.
Refer to the “Operation Test”
section.
Refer to the “Options Menu”
section.
Refer to the “Options Menu”
section.
6 Abbott GemStar Manual 430-600095-002 (Rev. 8/02)
Page 14

Menu System
The Abbott GemStar Pump uses a menu system that provides step-by-step guidance
through all of the pump’s functions. Refer to the following table for a list of functions
within each menu. Use the keypad to select menu items, answer display prompts, and
enter numeric values as required.
Introduction
d
f
Note: Menu items may vary depending on the pump’s configuration.
Tip: A menu item does not have to be on the display to be selected.
Programming Menu Select NEW PROGRAM from the Change Menu to access
1 WEIGHT DOSED
2 PAIN MANAGEMENT
3 ML/HR ONLY
4 INTERMITTENT
5 TPN
6 CONTINUOUS
7 VARIABLE TIME
Change Menu
1 REVIEW/RESUME
2 NEW CONTAINER
3 NEW PROGRAM
4 CHANGE PROGRAM
5 PIGGYBACKING
the Programming Menu. Refer to the “Basic
Operation” section for more information on accessing
the Programming Menu.
Press the number key
corresponding to the
therapy type to be
programmed. For example,
press [2] to select Pain
Management.
Press [CHANGE] to access the Change Menu.
Press the number key
corresponding to the
desired Change Menu
function.
Note: Piggybacking is only
available in mL/hr Only and
Continuous therapies.
Refer to the appropriate therapy
section for instructions on
entering a program.
For menu item [2], refer to
Starting a New Container in the
“Basic Operation” section for
instructions.
For menu items [3], [4], and [5],
refer to the appropriate therapy
section for instructions.
Options Menu
1 REVIEW PROGRAM
2 HISTORIES
3 KEYPAD LOCK
4 PUMP SETTINGS
5 SET CLOCK
6 PRINT
7 SPEED PROTOCOL
8 NEXT DOSE
Press [OPTIONS] to access the Options Menu.
Press the number key
corresponding to the
desired Option Menu
function.
Refer to the “Options Menu”
section for instructions.
Abbott GemStar Manual 430-600095-002 (Rev. 8/02) 7
Page 15

Introduction
Operating Modes
The Abbott GemStar Pump has four operating modes:
Help Mode
•
Programming Mode
•
Run Mode
•
Stop Mode
•
The pump enters the HELP mode when [HELP] is pressed while
programming or during an alarm condition. The HELP mode displays
additional information.
The pump enters the PROGRAMMING mode after the pump is
powered on or when [CHANGE] is pressed.
After [START] is pressed, the pump enters the RUN mode, even
during periods of non-delivery.
When programming is complete, the pump enters the STOP mode
until [START] is pressed to begin the programmed therapy.
When the programmed therapy is complete, and during certain alarm
conditions, the pump automatically enters the STOP mode.
Press [STOP] to enter the STOP mode at any time.
Abbott GemStar Pump Set
The Abbott GemStar Pump must be operated with an Abbott
GemStar Pump Set, which is a sterile, single-use, disposable
pump set.
STERILE
2
Fluid path and areas beneath undisturbed protective set covers are sterile and
nonpyrogenic in the intact unit package.
Contact an Abbott Laboratories Representative for more information on selecting the
appropriate pump set configuration.
Additional disposable components, such as air-eliminating filters and extension sets, may
be added to the line as required by the therapy. To use an Abbott GemStar Pump Set,
follow the instructions included with the set.
8 Abbott GemStar Manual 430-600095-002 (Rev. 8/02)
Page 16
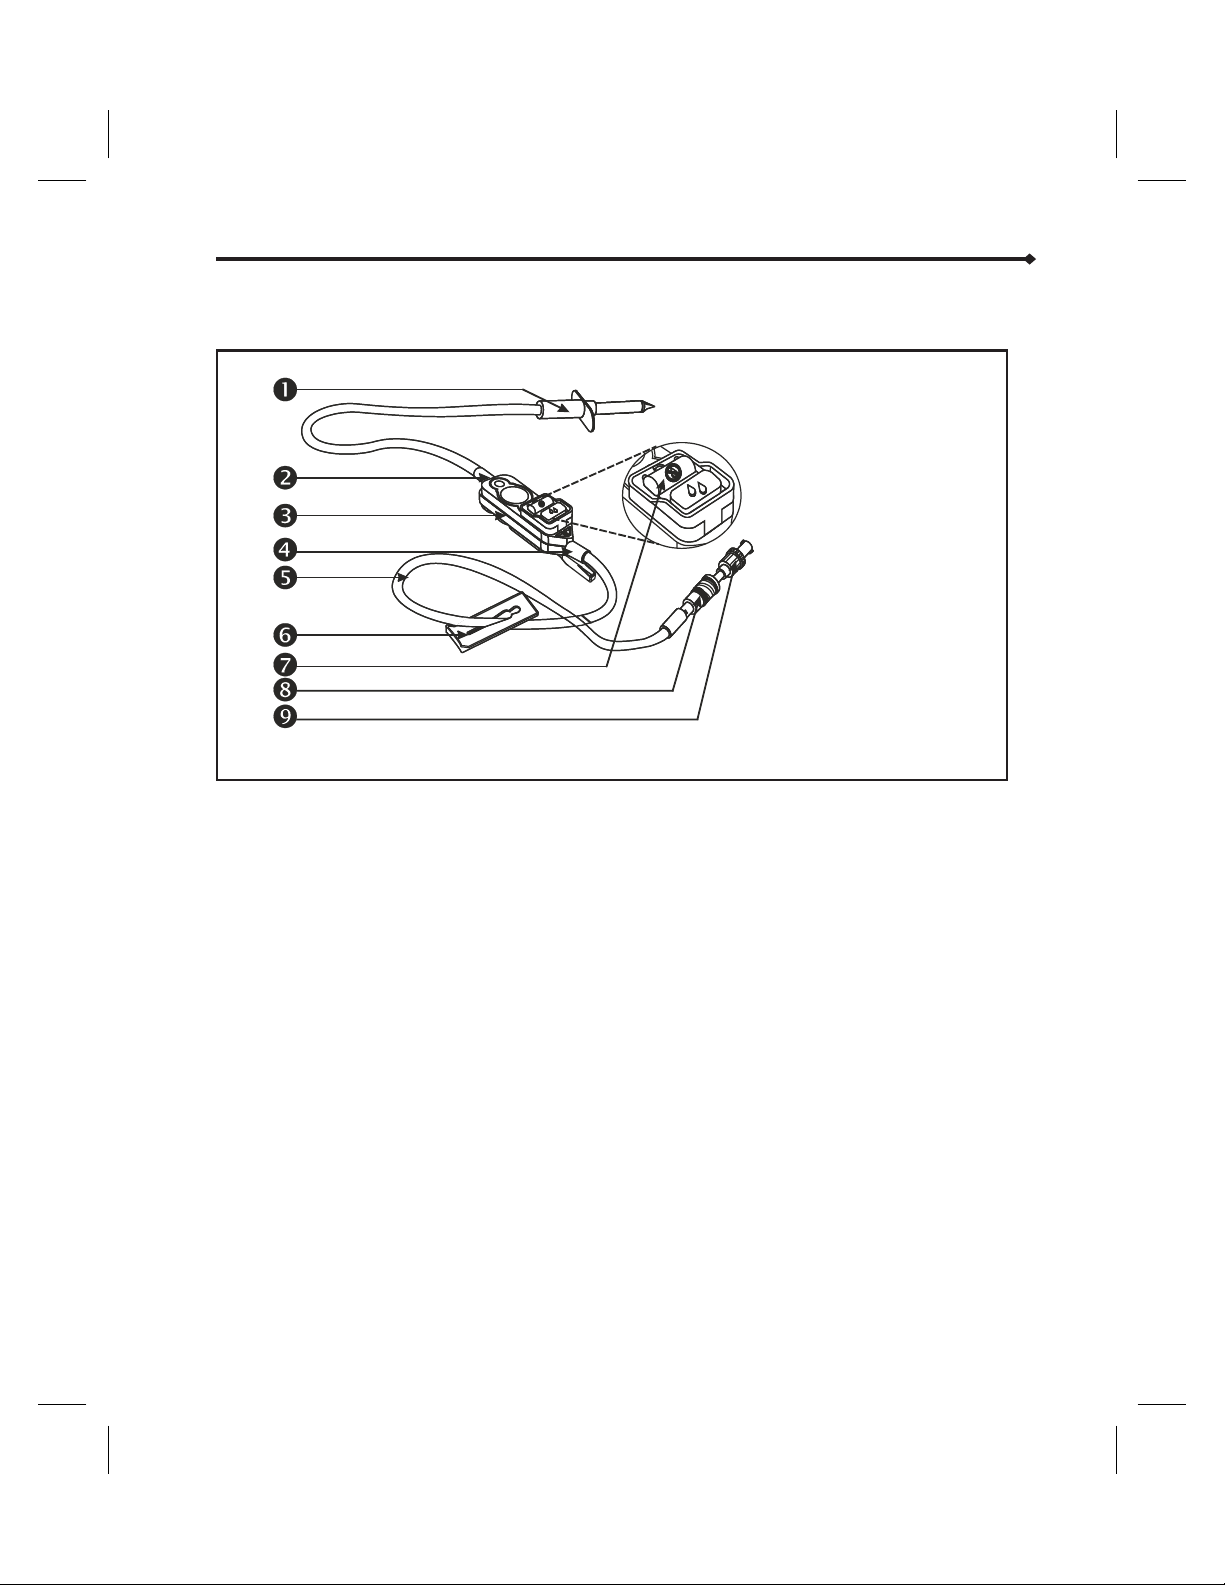
The basic components of the Abbott GemStar Pump Set are shown below:
Indications for Use
Physicians or certified, licensed healthcare professionals should always oversee infusions.
Pump users should be under the supervision of a healthcare professional and should be
instructed in using and troubleshooting the pump. Instruction should emphasize
preventing intravenous (I.V.) related complications, including appropriate precautions to
prevent accidental infusion of air.
Introduction
1 Piercing Pin
2 Proximal End
3 Cassette
4 Distal End
5 Tubing
6 Slide Clamp
7 Flow Stop
8 Secure Lock
9 Anti-Siphon
Valve
The pump is suitable for intravenous, arterial, subcutaneous, short-term epidural
infusion and parenteral administration of general I.V. fluids, medications, nutritional
fluids, and blood/blood products. The epidural route is recommended to provide
anesthesia or administer analgesia for periods up to 96 hours.
d
Abbott GemStar Manual 430-600095-002 (Rev. 8/02) 9
Note: Epidural administration of anesthetics is recommended in the continuous mode only.
Epidural administration of analgesics may be delivered by continuous, bolus, or continuous
with bolus.
For epidural use, the administration of drugs is restricted to those anesthetic and
analgesic drugs approved for continuous epidural administration: e.g., Chloroprocaine
Hydrochloride USP, Lidocaine Hydrochloride USP, and Morphine Sulfate Injection USP
(Preservative Free).
Page 17

Introduction
WARNING: Delayed respiratory depression following continuous epidural
For epidural administration, the following is recommended:
administration of preservative-free morphine sulfate has been
reported.
6
Nylon or Teflon® catheter
6
Pump sets without Y-sites
6
Stickers for the tubing indicating ongoing administration
d
Note: Facilities practicing epidural anesthesia/analgesia must be staffed and equipped to
manage cardio-pulmonary resuscitation. Supplies should include oxygen, naloxone, and other
appropriate resuscitative drugs and equipment. Continuous monitoring (e.g., oximetry) is
recommended for the patient during epidural administration, as well as frequent patient
observation for side effects (for up to 24 hours) following completion of drug administration by
the epidural route.
Contraindications for Use
The Abbott GemStar Pump should not be operated by persons who do not have the
mental and physical capability or the emotional stability to properly operate this pump.
Drugs not compatible with silicone rubber or PVC plastic, or not stable under infusion
conditions, should not be used with this system.
Warnings and Cautions
The following is a list of warnings and cautions that should be heeded when operating
the Abbott GemStar Pump. Elsewhere in this manual, warnings and cautions that are
relevant to the procedure being discussed are repeated. Pay attention to all alert
messages.
General Cautions
6
Federal (USA) law restricts this device to sale by or on the order of a physician or other
licensed practitioner.
6
Manual references to specific values are approximate only, unless indicated otherwise.
Air-in-line sensitivity values are approximate only.
6
Disconnect the pump from the patient BEFORE connecting the pump to a computer or
printer.
6
For those patients who are likely to be adversely affected by unintended operations
and failures, including interrupted medication or fluid delivery from the device, close
supervision and provision for immediate corrective action should be provided.
10 Abbott GemStar Manual 430-600095-002 (Rev. 8/02)
Page 18

Regarding Drugs Used, Pump Sets, and Containers
USE ONLY Abbott GemStar Pump Sets with the Abbott GemStar Pump. Use of
6
unauthorized sets may result in injury to the patient or damage to the pump.
NEVER use drugs that are incompatible with silicone rubber or PVC plastic.
6
To reduce the loss of potency for drugs known to be absorbed by PVC plastic and
6
silicone, begin infusion as soon as practical after priming the pump set. Use of high
flow rates during infusion will minimize drug absorption.
DO NOT use medications which are unstable under infusion conditions.
6
ALWAYS use connections with Luer Lock™ fittings.
6
Use aseptic technique with all fluid-path connections. Remove the protective
6
coverings as assembly progresses.
ALWAYS close the slide clamps before removing the cassette from the pump.
6
Ensure the cassette is properly installed before using the pump.
6
Arrange tubing, cords, and cables to minimize the risk of patient strangulation or
6
entanglement.
When using the pump for secondary delivery (piggybacking), ensure the fluids being
6
administered are chemically and physically compatible.
NEVER use vented fluid containers (e.g., glass or rigid plastic) unless suspended from a
6
pole.
Stop infusion if signs or symptoms of infiltration occur.
6
6
In vitro studies have shown that infusing older units of additive solution packed red
blood cells or frozen deglycerolized red blood cells at rates greater than 200 mL/hr
may produce some level of hemolysis that may be considered clinically unacceptable.
6
Failure to use the anti-siphon valve may result in unrestricted flow.
6
When infusing short-half-life drugs (i.e. those dosed with units of mcg/kg/min) at very
low rates (0.8 mL/hr or less) the rate may be too slow for that drug. Consider using a
lower drug concentration with these drugs so a pump rate above 0.8 mL/hr can be
used.
6
If the cassette is removed from the pump, ALWAYS disconnect the pump set from the
patient and purge the line before restarting therapy.
Introduction
Regarding Air-In-Line and Infusion
6
To reduce the risk of infusing air, use an air-eliminating filter when the air sensitivity
is set to OFF.
6
ALWAYS remove all air from the cassette, tubing, and injection site prior to
connecting to the patient. ALWAYS disconnect the pump set from the patient prior to
priming or purging.
6
ALWAYS set the Air Sensitivity to either ON or 2mL when using vented drip chambers.
Abbott GemStar Manual 430-600095-002 (Rev. 8/02) 11
Page 19

Introduction
Regarding Pump Operation
If the pump does not perform as stated in this manual, remove the pump from service
6
IMMEDIATELY.
ALWAYS connect to a grounded AC mains power source when using AC mains power.
6
If the quality of the grounding source is in doubt, operate the pump only with
batteries.
USE ONLY the AC mains adaptors specifically labeled for use with the Abbott GemStar
6
Pump.
Installing disposable batteries is recommended, regardless of the power source used,
6
to provide continuing operation if the external power source fails. ALWAYS replace
BOTH batteries with new batteries when a change is required.
The use of rechargeable batteries in the battery compartment is NOT recommended.
6
ALWAYS avoid sources of high-intensity electromagnetic radiation (e.g., radio
6
transmitters, MRI scanners, microwave ovens, X-ray machines, and CAT scanners).
Use of radio-frequency emitting devices, such as cellular telephones, 2-way radios,
6
and Electrical Surgical Devices (ESU), in close proximity to this device may affect its
operation.
Possible explosion hazard exists if the pump is used in the presence of flammable
6
anesthetics. NEVER use the pump in the presence of flammable or explosive vapors.
Non-hazardous, low-level electrical potentials are commonly observed when fluids are
6
administered using infusion devices. These potentials are well within accepted safety
standards, but may create artifacts on voltage-sensing equipment, such as ECG, EMG,
and EEG machines. These artifacts vary at a rate that is associated with the infusion
rate. If the monitoring machine is not operating correctly or has loose or defective
connections to its sensing electrodes, these artifacts may be accentuated so as to
simulate actual physiological signals. To determine if the abnormality in the
monitoring equipment is caused by the infusion device instead of some other source
in the environment, set the infusion device so that it is temporarily not delivering
fluid. Disappearance of the abnormality indicates that it was probably caused by
electronic noise generated by the infusion device. Proper setup and maintenance of
the monitoring equipment should eliminate the artifact. Refer to the appropriate
monitoring system documentation for setup and maintenance instructions.
Regarding Handling and Maintenance
6
Product damage may occur if proper care is not exercised during unpacking,
installation, and use. Should the pump inadvertently be subjected to mishandling,
check connections and programmed data to confirm no damage has occurred. Refer to
the “Operation Test” section for further information.
6
ALWAYS fully close the battery door when using disposable batteries.
6
ALWAYS avoid dropping or hitting the pump. If the pump is dropped or hit, ALWAYS
verify programmed data.
6
NEVER use sharp objects (e.g., fingernails, pens, pencils, or other probes) to program
or clean the pump.
6
Use care not to damage the silicone seals around the sensor bodies in the cassette
pocket.
12 Abbott GemStar Manual 430-600095-002 (Rev. 8/02)
Page 20

Introduction
To avoid mechanical or electronic damage, NEVER submerge pump in water or other
6
fluids and avoid fluid spills. If pump becomes wet, dry it immediately with a dry,
lint-free cloth. Check connections and programmed data.
Some cleaning and sanitizing compounds may slowly degrade components made from
6
some plastic materials. DO NOT use compounds containing combinations of isopropyl
alcohol and dimethyl benzyl ammonium chloride.
DO NOT sterilize by heat, steam, ethylene oxide (ETO), or radiation. Apply
6
disinfectants to the outside surface of the pump only. DO NOT use abrasive cleaners or
materials on the pump. Using abrasive cleaners or cleaning solutions not
recommended by Abbott Laboratories may result in product damage.
USE ONLY the AC mains adaptor specifically labeled for use with the Abbott GemStar
6
Pump to charge the battery pack.
The Abbott GemStar AC Mains Adaptor is for use with the Abbott GemStar Pump or
6
Abbott GemStar Battery Pack only. DO NOT use the Abbott GemStar AC mains adaptor
with other products.
During charging, the battery pack is warm. If the battery pack becomes hot to the
6
touch, IMMEDIATELY unplug the AC mains adaptor and contact Abbott Customer
Support.
Please comply with local disposal and recycling regulations as appropriate for
6
disposable batteries, rechargeable battery packs, medical electronic components, and
pump sets.
Abbott GemStar Manual 430-600095-002 (Rev. 8/02) 13
Page 21

Notes
14 Abbott GemStar Manual 430-600095-002 (Rev. 8/02)
Page 22

System Setup
The minimum elements required for using the Abbott GemStar Pump are:
6
Abbott GemStar Pump
6
Appropriate power source
6
Appropriate Abbott GemStar Pump Set
6
Appropriate fluid container
6
Patient access device
Air-eliminating filters and extension sets may be added to the line as required by the
therapy.
d
Note: Contact an Abbott Laboratories Representative for more information on selecting the
appropriate pump set configuration.
Setup Overview
1 Select an appropriate power source.
2 Prime the pump set.
3 Load the cassette into the pump.
4 Select the appropriate optional system components, such as a bolus cord, as
required.
Selecting a Power Source
The Abbott GemStar Pump may be powered by one or more of the following:
6
Abbott GemStar AC Mains Adaptor
6
Abbott GemStar Battery Pack
6
Two disposable AA batteries
Abbott GemStar Manual 430-600095-002 (Rev. 8/02) 15
Page 23
System Setup
CAUTION: To ensure proper pump operation, ALWAYS replace BOTH batteries with
fresh, disposable AA batteries when a change is required.
Use of rechargeable batteries in the battery compartment is NOT
recommended.
Installing disposable batteries is recommended, regardless of the power
source used, to provide continuing operation if the external power
source fails.
Installing Disposable Batteries
1 Flip up the tab of the battery
door (A) on the bottom of the
pump.
2 While holding onto the tab,
turn the battery door
counterclockwise (B) until it is
released from the battery
compartment. Pull the door
free (C) and remove any
existing batteries.
3 Install two fresh, disposable
AA batteries into the battery
compartment. Ensure the
negative and positive battery
terminals are inserted
according to the diagram at
right.
A
B
C
4 Return the battery door to the
battery compartment (D).
5 Turn the battery door
clockwise (E). Ensure the
battery door is secured under
the slot. Snap the tab down to
lock the battery door in place
(F).
F
E
D
16 Abbott GemStar Manual 430-600095-002 (Rev. 8/02)
Page 24
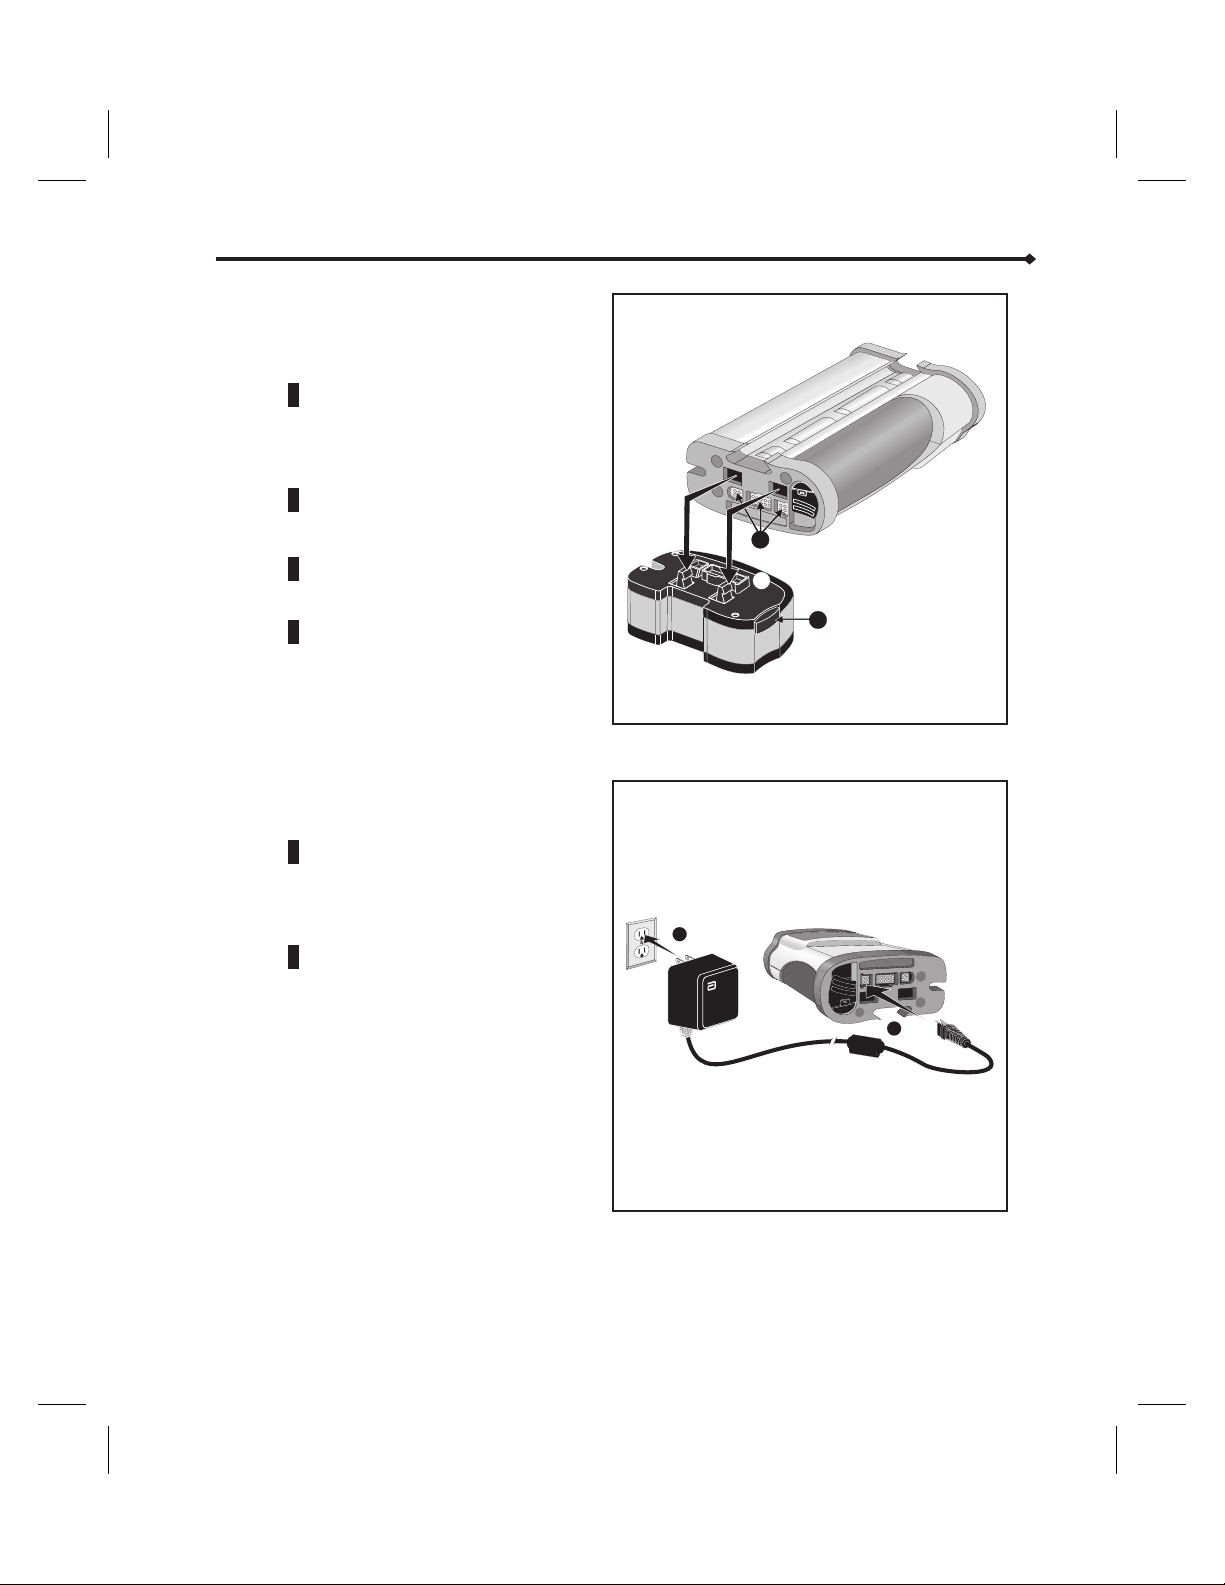
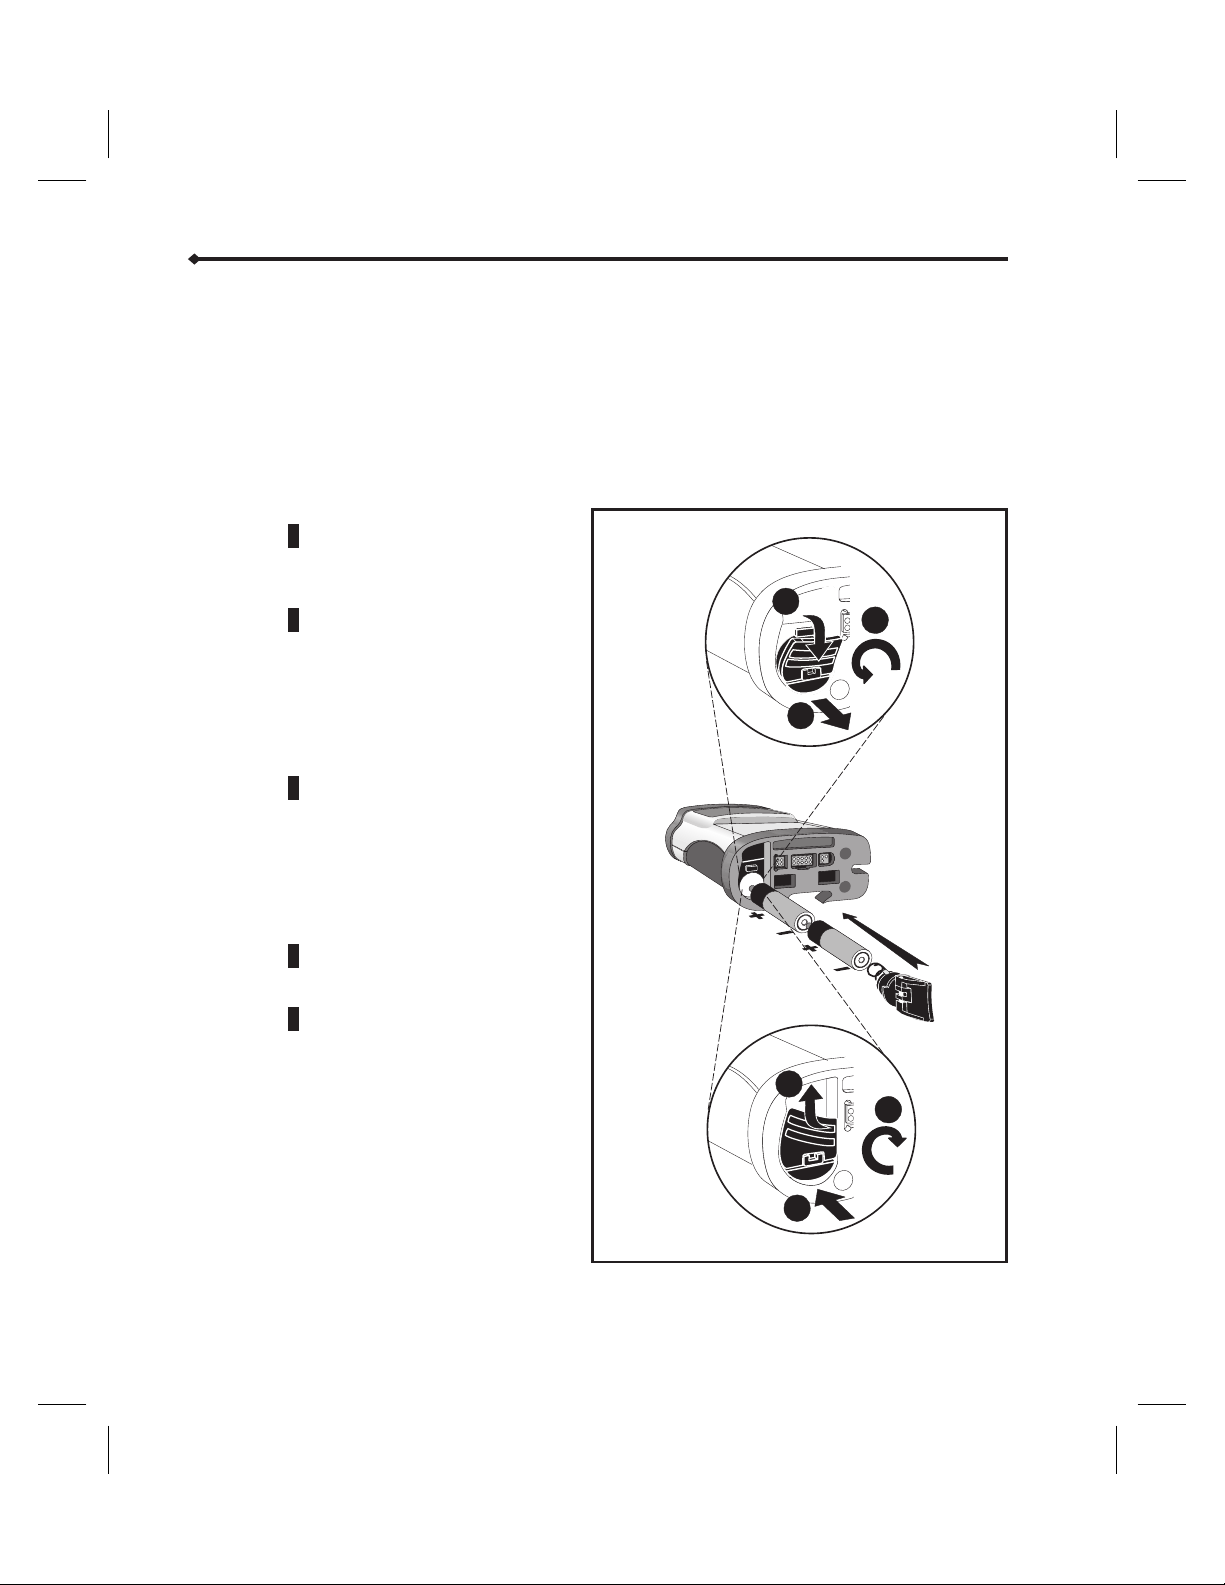
Connecting the Rechargeable
Battery Pack
To connect the battery pack:
1 Align the connectors on the top
of the battery pack (A) with the
connectors on the bottom of the
pump (B).
2 Snap the battery pack into place.
System Setup
To release the battery pack:
1 Press the release button (C) on
the battery pack.
2 Remove the battery pack from
the pump.
Connecting the Abbott GemStar AC
Mains Adaptor
1 Connect the cord of the AC mains
adaptor to the connector labeled
“3VDC” on the bottom of the
pump.
2 Plug the AC mains adaptor into a
standard wall outlet.
CAUTION: ALWAYS connect to a
grounded AC mains
power source when
using the AC mains
adaptor. USE ONLY AC
mains adaptors
specifically labeled for
use with the Abbott
GemStar Pump.
B
A
C
B
A
Abbott GemStar Manual 430-600095-002 (Rev. 8/02) 17
Page 25
System Setup
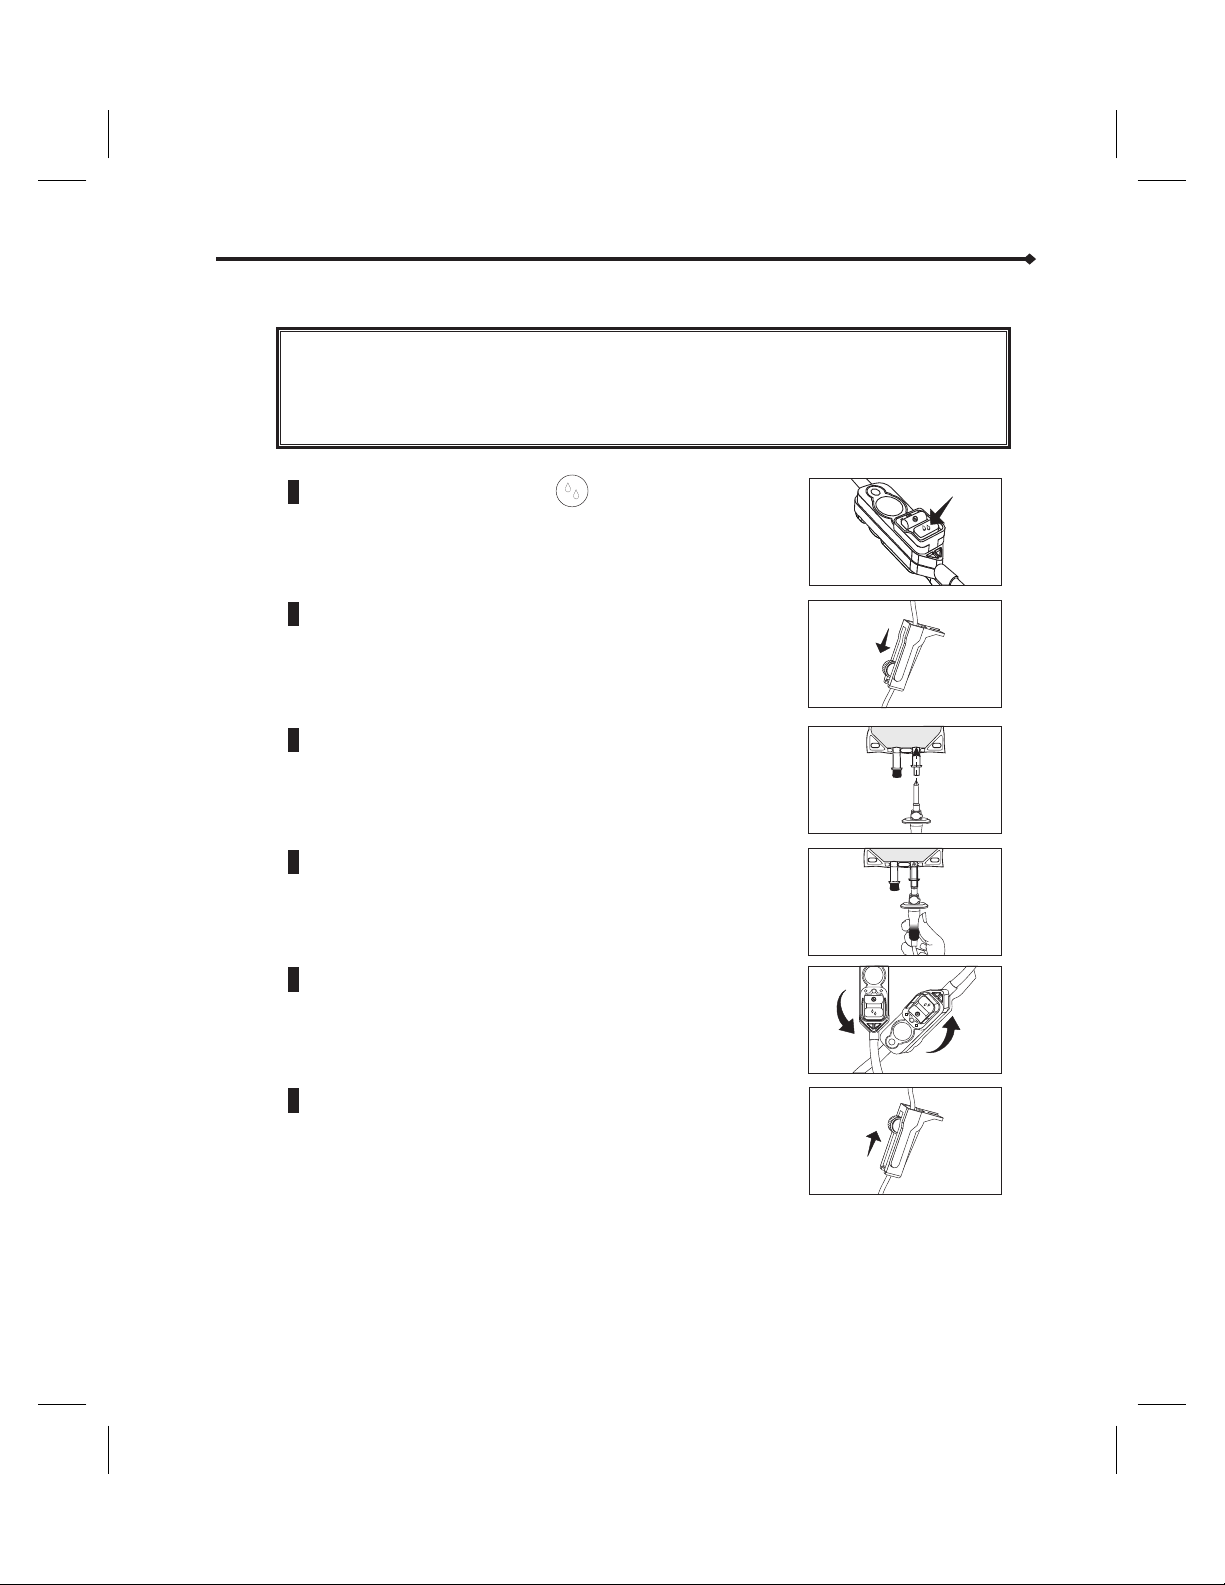
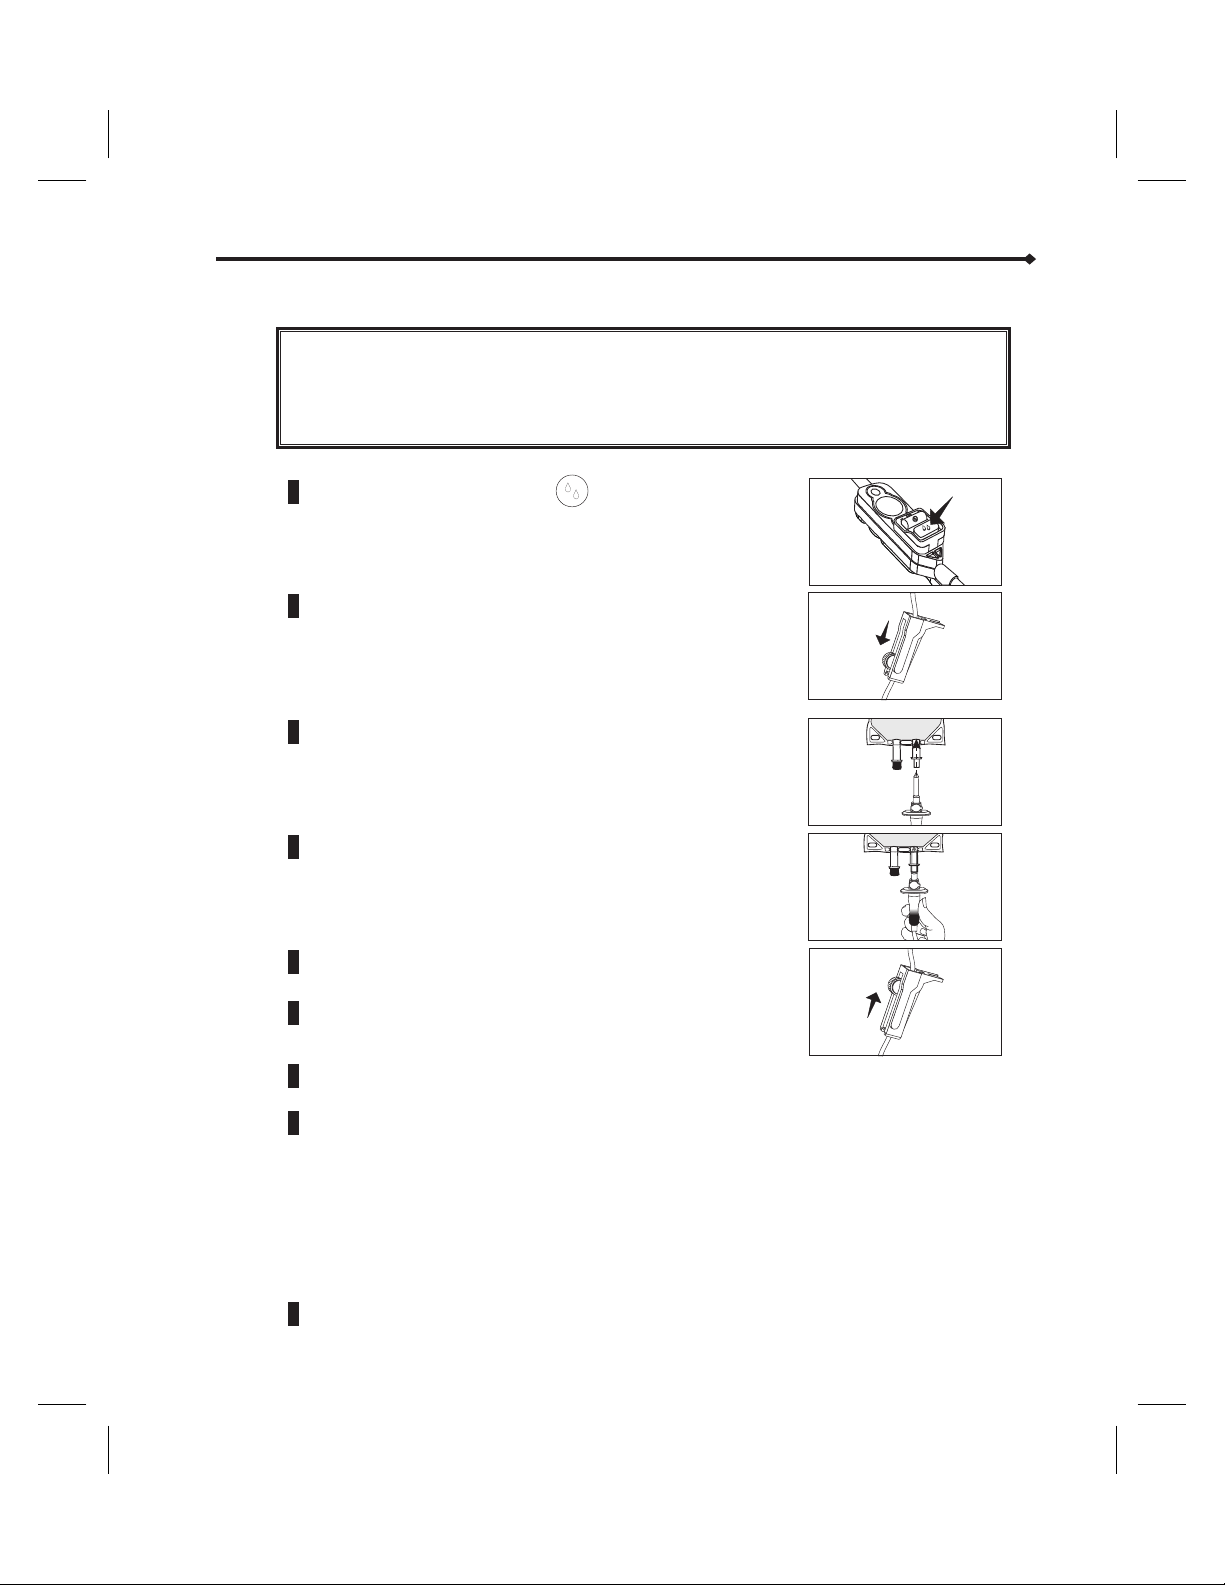
Priming an Abbott GemStar Pump Set
The Abbott GemStar Pump Set must be primed to eliminate air from the cassette and
tubing before loading into the pump.
WARNING:
CAUTION: USE ONLY Abbott GemStar Pump Sets with the Abbott GemStar Pump. Use
d
d
Note: Refer to the appropriate instructions included with the pump set for more information.
False occlusion alarms and fluid delivery inconsistencies may occur when pumping viscous
fluids in microbore tubing at rates greater than 500 mL/hr.
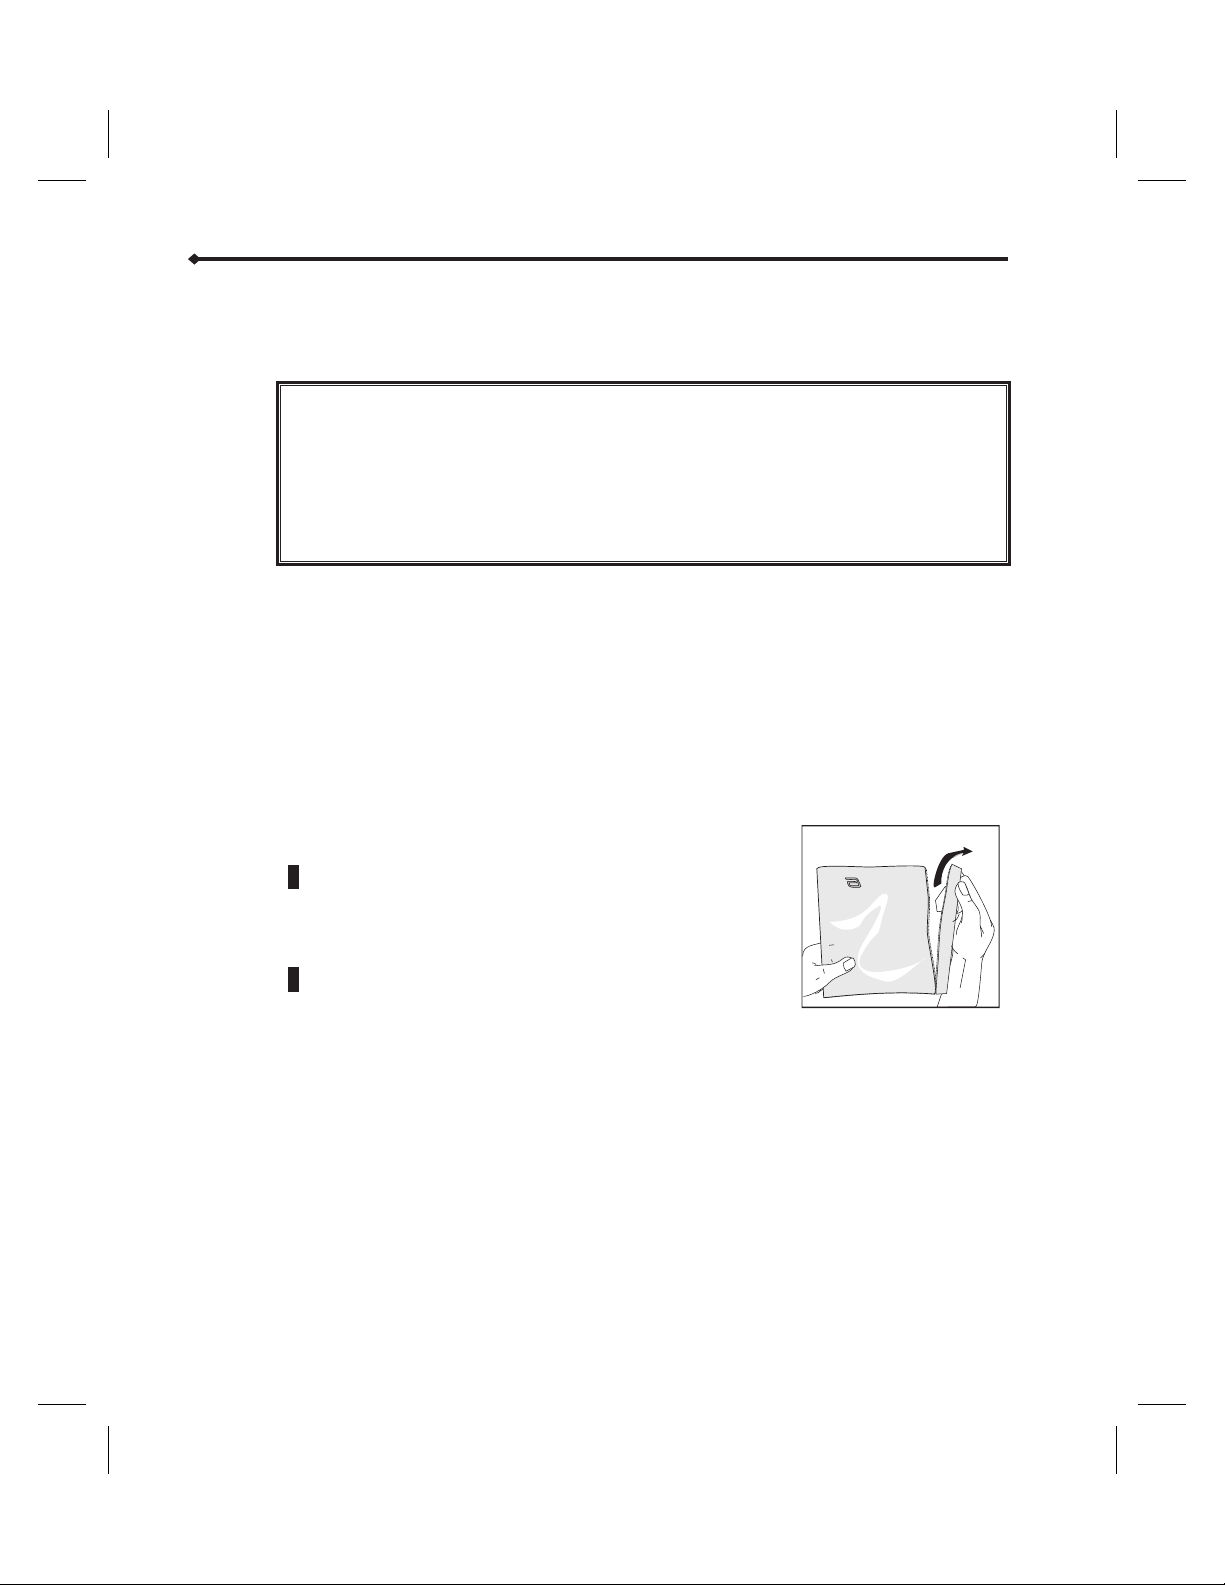
Opening the Pump Set
1 Open the Abbott GemStar Pump Set package and
remove the contents.
Note: Packaging may differ from the diagram shown.
2 Remove the protective covers from the fluid container
administration port and the pump set.
ALWAYS remove air from the cassette, tubing, and injection
site prior to connecting to the patient. ALWAYS disconnect the
pump set from the patient prior to priming or purging. Arrange
tubing, cords, and cables to minimize the risk of patient
strangulation or entanglement.
Failure to use the anti-siphon valve may result in unrestricted
flow.
of unauthorized sets may result in injury to the patient or damage to the
pump.
To prevent contamination, use aseptic technique with all fluid-path
connections. Remove protective coverings as assembly progresses.
18 Abbott GemStar Manual 430-600095-002 (Rev. 8/02)
Page 26
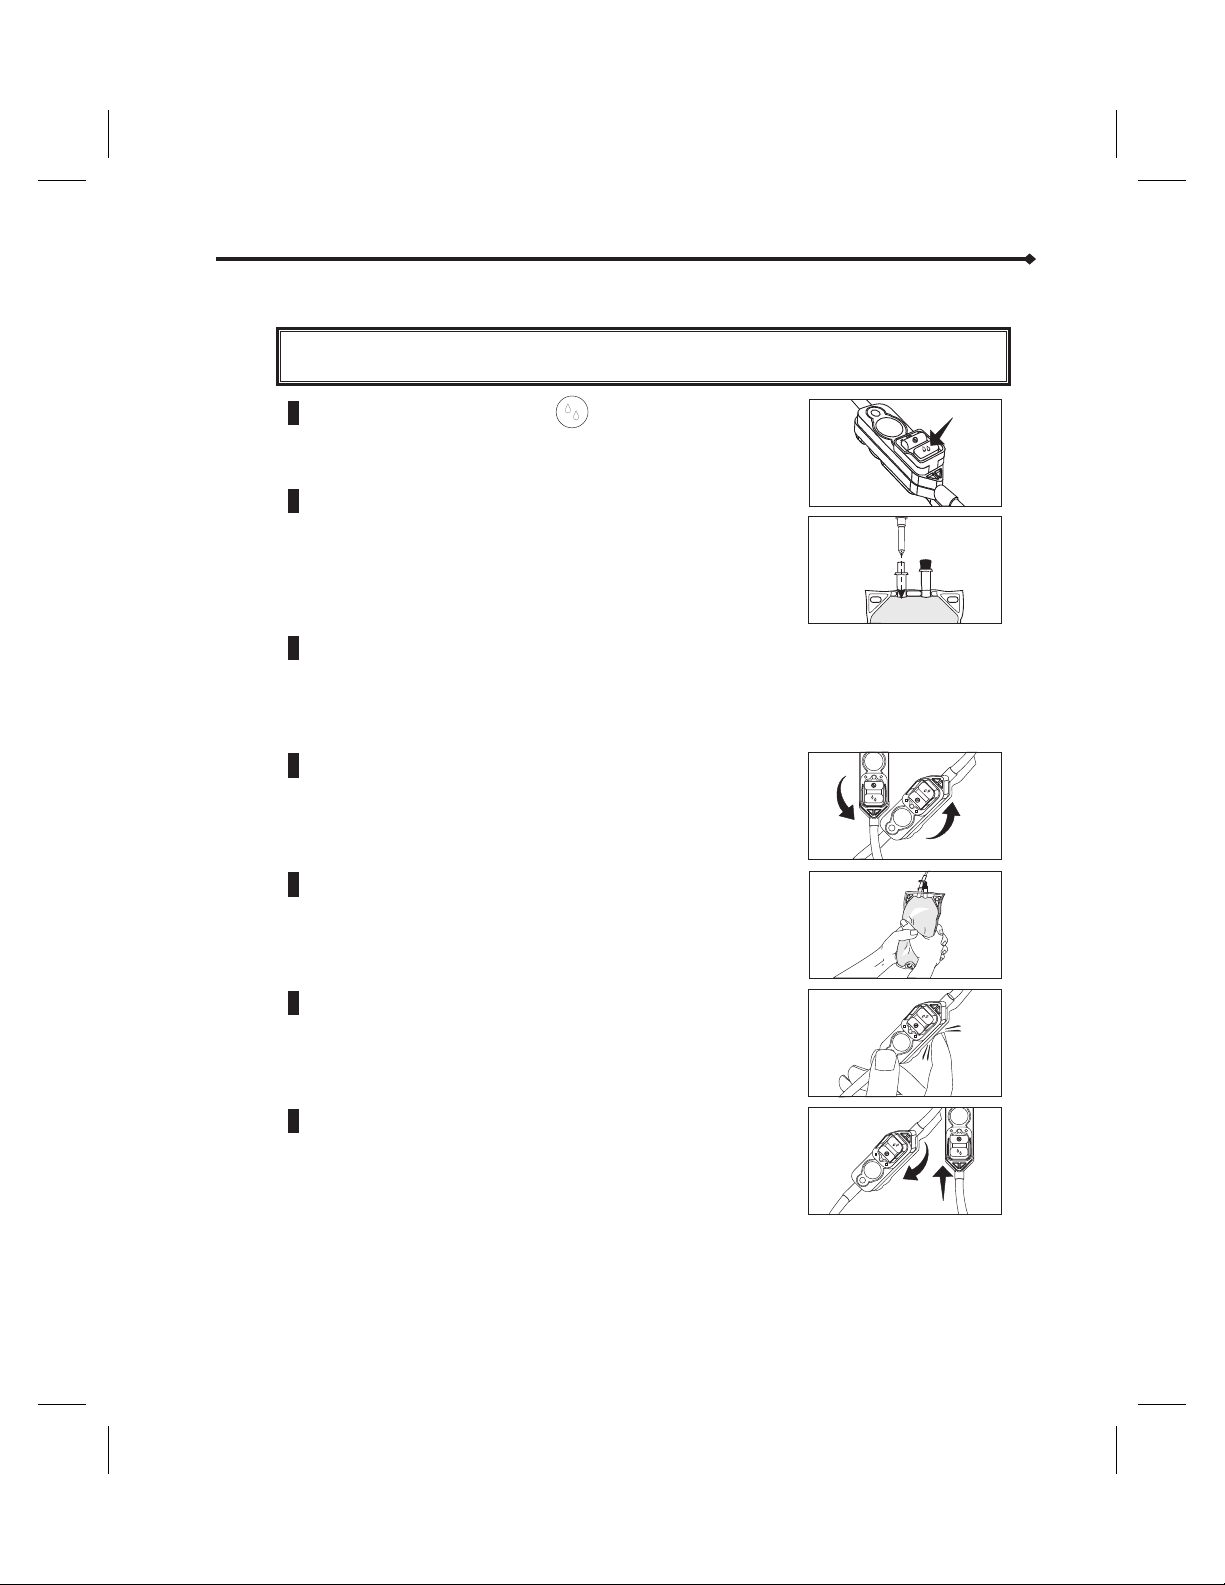
Priming Pump Sets WITHOUT a Drip Chamber
System Setup
WARNING:
Failure to use the anti-siphon valve may result in unrestricted
flow.
1 Push down on the flow stop to ensure the cassette
is in the open (priming) position.
2 Hold the flexible fluid container with the administration
port pointed toward the ceiling and insert the piercing
pin.
3 Open the slide clamp.
4 Invert the cassette approximately 45°.
5 While holding the inverted cassette, squeeze or roll the
flexible fluid container to eliminate air from the
container, cassette, and tubing.
6 If necessary, tap the cassette to eliminate any remaining
air bubbles.
7 Return the cassette to the upright position. Continue
priming until fluid fills the tubing.
Abbott GemStar Manual 430-600095-002 (Rev. 8/02) 19
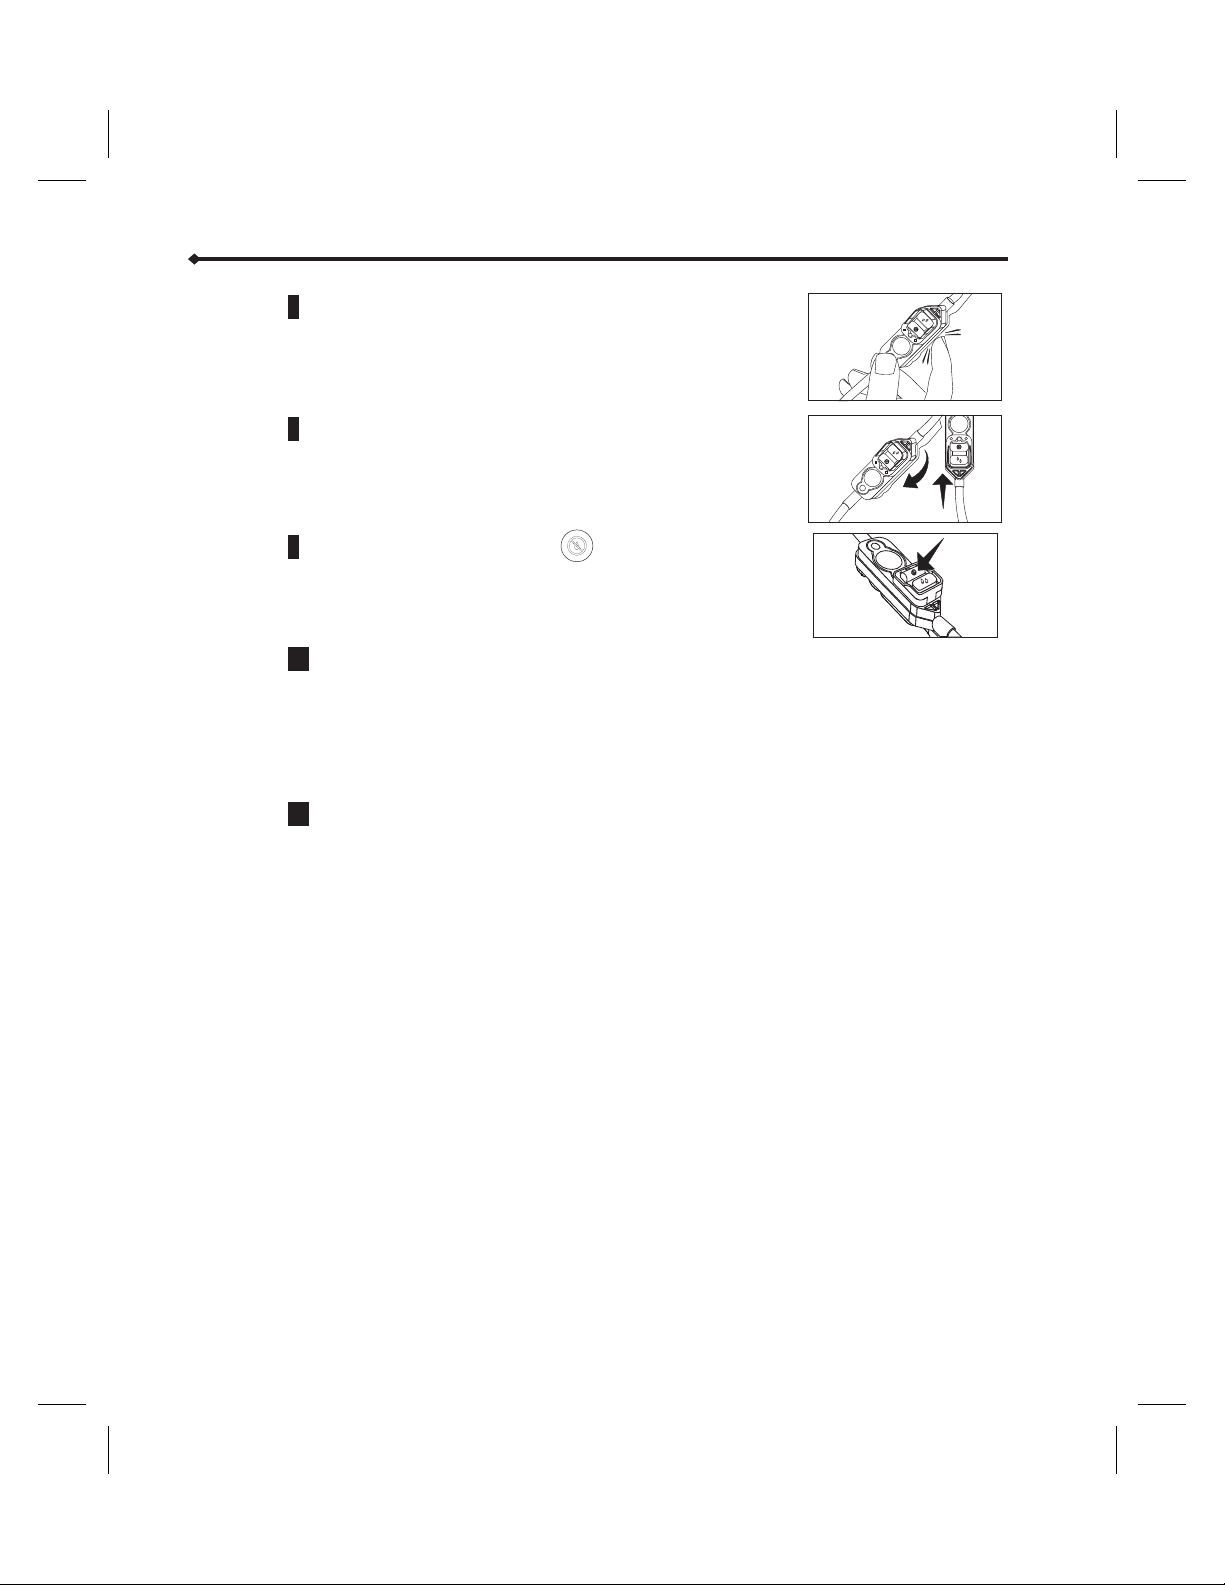
Page 27
System Setup
8 Push down on the flow stop to ensure the cassette
is in the closed position.
9 Insert the cassette into the cassette pocket. Refer to
“Loading the Cassette” on page 26.
CAUTION: When priming is complete, ensure no fluid flows at the distal end of
the pump set. If flow is observed, DO NOT use the pump set.
10 Connect the pump set to the patient-access device.
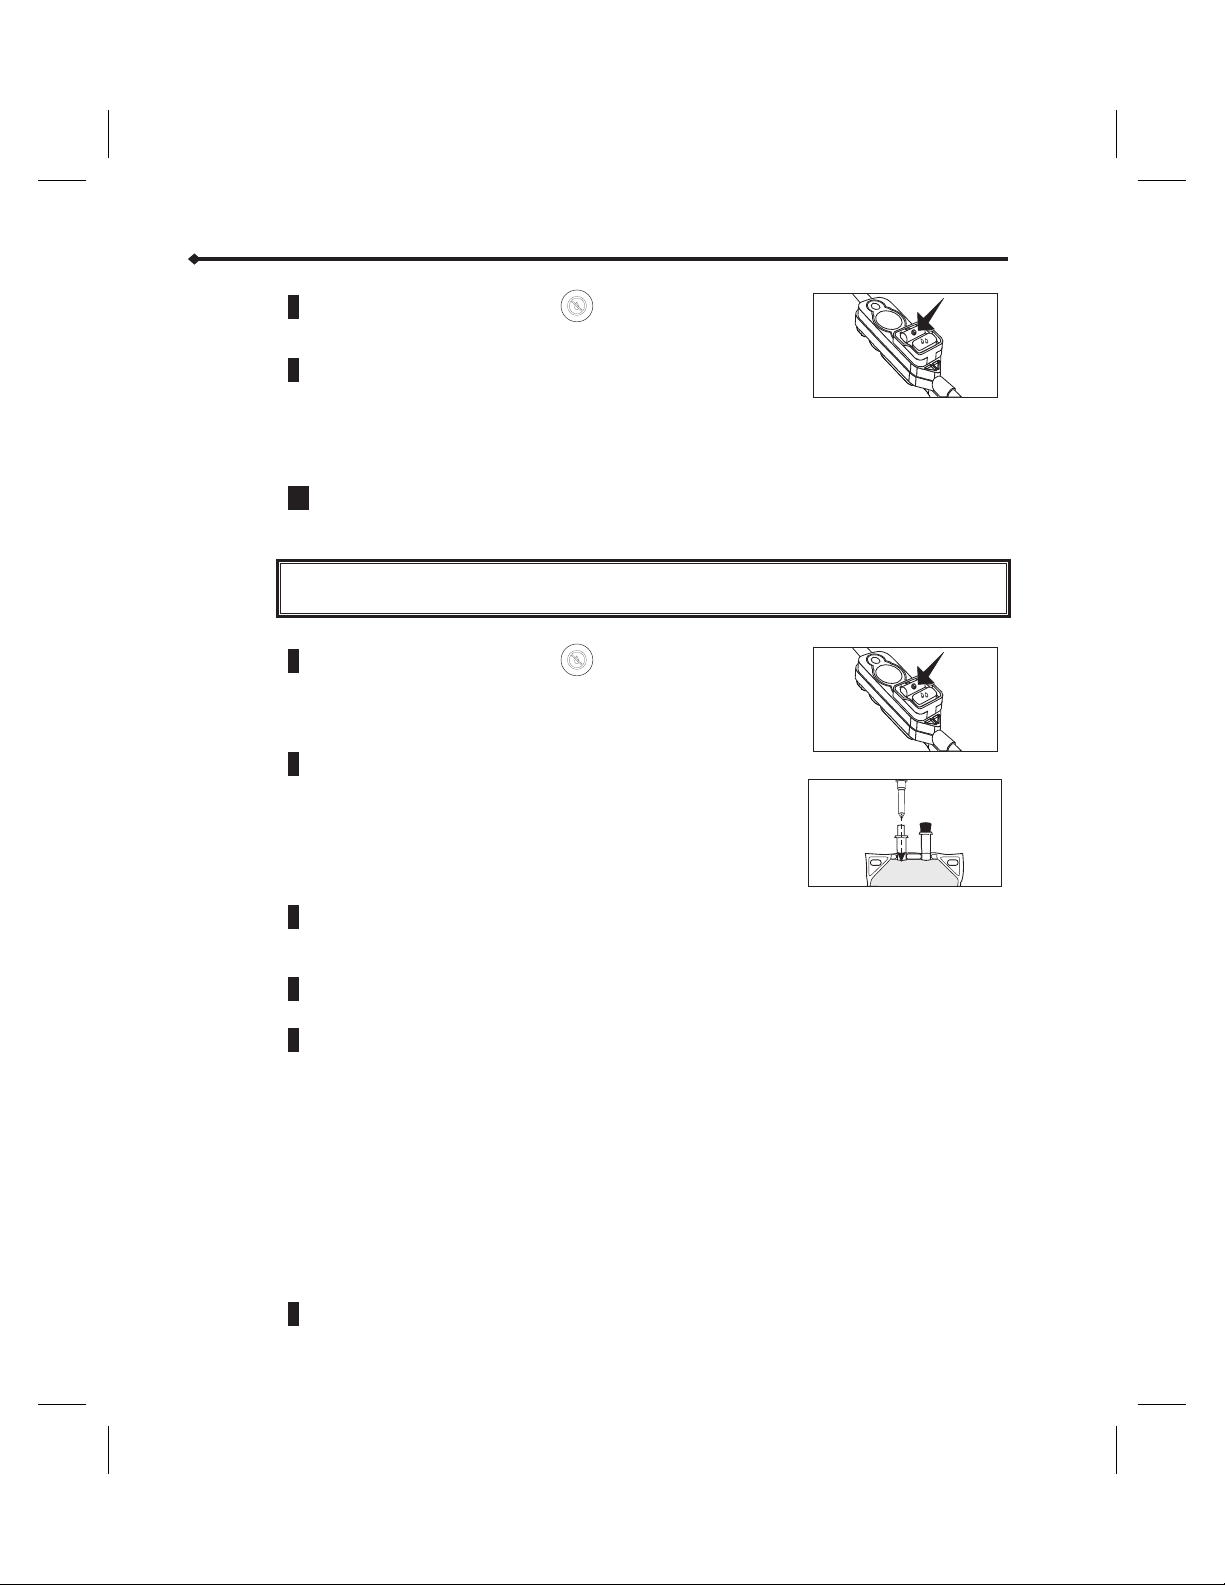
Priming Pump Sets WITHOUT a Drip Chamber Using the PURGE Key
d
WARNING:
Failure to use the anti-siphon valve may result in unrestricted
flow.
1 Push down on the flow stop to ensure the cassette
is in the closed position.
2 Hold the flexible fluid container with the administration
port pointed toward the ceiling and insert the piercing
pin.
3 Insert the cassette into the cassette pocket. Refer to “Loading the Cassette” on
page 26.
4 Press [PURGE]. PRIME THE SET? displays. Press [YES/ENTER].
5 While holding the flexible fluid container with the administration port pointing
toward the ceiling, press and hold [
Note: Purge rate is 250 mL/hr. The pump purges for up to 2 minutes each time you press
and hold [
PURGE].
PURGE].
Continue using the PURGE key until fluid fills the tubing. Ensure all air is removed
from the container, cassette, and tubing.
CAUTION: When priming is complete, ensure no fluid flows at the distal end of
the pump set. If flow is observed, DO NOT use the pump set.
6 Connect the pump set to the patient-access device.
20 Abbott GemStar Manual 430-600095-002 (Rev. 8/02)
Page 28
Priming Pump Sets WITH a Drip Chamber
System Setup
WARNING:
Failure to use the anti-siphon valve may result in unrestricted
flow.
ALWAYS set the Air Sensitivity to either ON or 2mL when
using vented drip chambers.
1 Push down on the flow stop to ensure the cassette
is in the open (priming) position.
2 Close the CAIR® (roller) clamp.
3 Insert the piercing pin into the container. Suspend the
container on an I.V. Pole.
4 Squeeze the drip chamber until filled halfway.
5 Invert the cassette approximately 45°.
6 Open the CAIR® (roller) clamp.
Abbott GemStar Manual 430-600095-002 (Rev. 8/02) 21
Page 29
System Setup
7 If necessary, tap the cassette to eliminate any remaining
air bubbles.
8 Return the cassette to the upright position. Continue
priming until fluid fills the tubing.
9 Push down on the flow stop to ensure the cassette
is in the closed position.
10 Insert the cassette into the cassette pocket. Refer to
“Loading the Cassette” on page 26.
CAUTION: When priming is complete, ensure no fluid flows at the distal end of
11 Connect the pump set to the patient-access device.
the pump set. If flow is observed, DO NOT use the pump set.
22 Abbott GemStar Manual 430-600095-002 (Rev. 8/02)
Page 30
Priming Pump Sets WITH a Drip Chamber Using the PURGE Key
System Setup
WARNING:
Failure to use the anti-siphon valve may result in unrestricted
flow.
ALWAYS set the Air Sensitivity to either ON or 2mL when
using vented drip chambers.
1 Push down on the flow stop to ensure the cassette
is in the open (priming) position.
2 Close the CAIR® (roller) clamp.
3 Insert the piercing pin into the container. Suspend the
container on an I.V. Pole.
4 Squeeze the drip chamber until filled halfway.
5 Open the CAIR
®
(roller) clamp.
6 Insert the cassette into the cassette pocket. Refer to
“Loading the Cassette” on page 26.
7 Press [PURGE]. PRIME THE SET? displays. Press
[
YES/ENTER].
8 Press and hold [PURGE].
d
Note: Purge rate is 250 mL/hr. The pump purges for up to 2 minutes each time you press
and hold [
Continue using the PURGE key until fluid fills the tubing. Ensure all air is removed
from the container, cassette, and tubing.
CAUTION: When priming is complete, ensure no fluid flows at the distal end of the
PURGE].
pump set. If flow is observed, DO NOT use the pump set.
9 Connect the pump set to the patient-access device
Abbott GemStar Manual 430-600095-002 (Rev. 8/02) 23
Page 31

System Setup
Priming Pump Sets with Extensions
WARNING:
Failure to use the anti-siphon valve may result in unrestricted
flow.
1 Push down on the flow stop to ensure the cassette
is in the open (priming) position.
2 Hold the flexible fluid container with the administration
port pointed toward the ceiling and insert the piercing
pin.
3 Open the slide clamp.
4 Invert the cassette approximately 45°.
5 While holding the inverted cassette, squeeze or roll the
flexible fluid container to eliminate air from the
container, cassette, and tubing.
6 If necessary, tap the cassette to eliminate any remaining
air bubbles.
7 Return the cassette to the upright position. Continue
priming until fluid fills the tubing.
24 Abbott GemStar Manual 430-600095-002 (Rev. 8/02)
Page 32

System Setup
8 Push down on the flow stop to ensure the cassette
is in the closed position.
9 Insert the cassette into the cassette pocket. Refer to “Loading the Cassette” on page
26.
d
d
Note: Extension set with anti-siphon valve must be attached before patient-use.
10 Connect the extension set to the pump set (refer to the instructions that come with
the pump set).
11 Press [PURGE]. PRIME THE SET? displays. Press [YES/ENTER].
12 Press and hold [PURGE].
Note: Purge rate is 250 mL/hr. The pump purges for up to 2 minutes each time you press
and hold [
Continue using the PURGE key until fluid fills the tubing. Ensure all air is removed
from the container, cassette, and tubing.
CAUTION: When priming is complete, ensure no fluid flows at the distal end of
13 If extension set has a Y-extension, prime it if needed.
14 Connect the pump set to the patient-access device.
PURGE].
the pump set. If flow is observed, DO NOT use the pump set.
Abbott GemStar Manual 430-600095-002 (Rev. 8/02) 25
Page 33

System Setup
Loading the Cassette
1 Align the cassette as shown.
2 Insert the cassette into the
cassette pocket.
3 Push the cassette into the
pocket until it is firmly seated.
When properly installed, the
cassette cannot be removed
from the pocket unless the
cassette release button is
pushed.
CAUTION: Ensure the cassette is
properly installed.
4 Align the tubing in the tubing
channel.
CAUTION: Before connecting to
the patient-access
device, ensure no
fluid flows at the
distal end of the
pump set while the
pump is in the
mode. If flow is
observed, DO NOT use
the pump set.
5 Connect the pump set to the patient-access device.
STOP
26 Abbott GemStar Manual 430-600095-002 (Rev. 8/02)
Page 34

Releasing the Cassette
System Setup
d
1 Close the slide clamp or CAIR
distal line.
2 Push down on the cassette release button on the top of
the pump.
3 Remove the cassette.
Note: When the cassette is released from the pump, the cassette flow stop automatically reverts
to the closed position, preventing free flow.
®
(roller) clamp on the
Abbott GemStar Manual 430-600095-002 (Rev. 8/02) 27
Page 35

Notes
28 Abbott GemStar Manual 430-600095-002 (Rev. 8/02)
Page 36

Quick Start
To start a therapy:
1 Determine the program settings. Refer to the appropriate therapy section for a
worksheet (that may be copied) to record the program settings.
2 Set up the pump and prime the cassette. Refer to the “System Setup” section.
3 Power-on the pump and access the Programming Menu. Refer to Powering On the
Pump in this section.
4 Select the therapy type and follow the display prompts to enter the program.
Refer to the appropriate therapy section for detailed instructions.
5 Press [START] to begin delivery.
Basic Operation
f
Tip: To enter a new program when the pump is already powered on: (1) Press
[
STOP] to place the pump in STOP mode, (2) press [CHANGE] to access the
Change Menu, and (3) select
pump displays the Programming Menu.
Operating Tips
Many of the pump’s functions advance to the next step automatically when the display
prompt is answered. Use the number keys to enter requested values, then press
[
YES/ENTER] to advance to the next step. The following keys are useful during
programming:
[HELP] During programming and alarm conditions press [HELP] to display
[CHANGE]
[BACK-UP] Press [BACK-UP] to return to a previous display, to exit OPTIONS,
d
Note: To power-off the pump, press and HOLD until the display clears.
NEW PROGRAM. The current program clears and the
information about the current condition. Otherwise press [HELP]to
display shift totals.
Press the up or down arrow to scroll through long display messages.
Press the up arrow to insert a decimal point in a numeric value.
If you enter an incorrect numeric value during programming, press
[CHANGE] before pressing [YES/ENTER] to reset the value to zero.
or to exit the HELP mode.
ON/OFF
Abbott GemStar Manual 430-600095-002 (Rev. 8/02) 29
Page 37

Basic Operation
Powering On the Pump
CAUTION: If the self-test does not display or if beeps do not sound at power-on,
contact Abbott Customer Support before using the pump.
1 Press [ ] to power-on the pump. The pump
ON/OFF
completes a self-test and displays the currently set
time. No response is required. If the set time is not
correct, refer to Setting the Clock in the “Options Menu”
section.
d
Note: The self-test takes approximately 30 seconds to
complete. If the pump is locked, lock symbols appear at the beginning and end of the
second line:
UNIT SELF-TEST .
2 The pump evaluates the available power source(s). Respond to the display message
as described in the following table:
Display Message Power Source(s) User Response
No message displays AC power and disposable
LOW BATTERIES
ENTER TO CONFIRM
NO INTERNAL BATT
NO POWER LOSS
ALARM AVAILABLE
ENTER TO CONFIRM
USING BATTERIES
ENTER TO CONFIRM
USING EXT BATT
ENTER TO CONFIRM
batteries
AC power and low voltage
disposable batteries; or low
voltage disposable batteries
only
No disposable batteries or
dead disposable batteries;
and external power
Disposable batteries only
Docking station battery or
battery pack; and disposable
batteries
No response required, the pump advances to
the next step.
Press [YES/ENTER] to confirm.
Power-off the pump and install two fresh
disposable AA batteries to ensure backup
power source.
Press [YES/ENTER] to confirm.
Power-off the pump and install two fresh,
disposable AA batteries to ensure backup
power source.
Press [YES/ENTER] to confirm.
If an external power source is in use, ensure
the connections are secure.
Press [YES/ENTER] to confirm.
If an AC mains adaptor is in use, ensure the
connections are secure.
GEMSTAR 7
UNIT SELF-TEST
TIME IS 10:00 A M
FRI, 1 JAN 99
Accessing the Programming Menu
After powering on, the pump determines if a program is currently stored in its memory.
Respond to the display message as described in the following table:
30 Abbott GemStar Manual 430-600095-002 (Rev. 8/02)
Page 38

Display Message Condition User Response
To enter a new program:
No message; the pump
displays the
Programming Menu.
CURRENT THERAPY:
(type of therapy)
USE CURRENT?
YES OR NO
Pump memory is clear.
A program is currently
stored in pump memory.
ä
Select a therapy from the Programming Menu
and enter a new program. Refer to the
appropriate therapy section for instructions.
To continue the current program:
ä
Press [YES/ENTER].
Note: A program review is required if the pump
has been powered off for 5 or more minutes.
To reset the current program:
ä
1. Press [YES/ENTER].
2. Press [CHANGE] to access the Change Menu.
Refer to Starting a New Container on the
following page.
Note: If the pump has been powered off for 5 or
more minutes, the Change Menu displays
automatically.
ä To enter a new program:
1. Press [NO]. CLEARING PROGRAM displays.
2. Select a therapy from the Programming Menu
and enter a new program. Refer to the
appropriate therapy section for instructions.
Programming the Pump
The pump’s menu system provides step-by-step guidance through the programming
process. Refer to the appropriate therapy section for more information on programming
the pump.
Basic Operation
1 Select the desired therapy from the Programming Menu.
2 Enter the requested parameters as prompted. Refer to the appropriate therapy
section for a programming worksheet.
d
Note: Program parameters can be changed at any time until the Program Review is
complete. Press [
desired. Changing some parameters may require new entries for subsequent program
displays.
BACK-UP] to return to previous program displays and make changes as
3 Review the program, if required. Press [YES/ENTER] when done.
4 SAVING PROGRAM displays and the program is stored in the pump’s memory, then
the pump enters the
f
Abbott GemStar Manual 430-600095-002 (Rev. 8/02) 31
Tip: If you enter an incorrect numeric value during programming, press [CHANGE]
BEFORE pressing [
value.
STOP mode.
YES/ENTER] to reset the value to zero. Then enter the correct
Page 39

Basic Operation
Starting a New Container
d
Note: The NEW CONTAINER function is not available when the pump is in FULL Lock. Refer
to the “Options Menu” section for more information on locking the keypad.
To repeat the current program with a new container:
1 From the STOP mode, press [CHANGE] to access the Change Menu.
2 Select NEW CONTAINER from the Change Menu. NEW CONTAINER displays for
several seconds and the amount infused clears from the pump’s memory.
3 Review the program.
4 Press [START] to begin delivery.
32 Abbott GemStar Manual 430-600095-002 (Rev. 8/02)
Page 40

Weight Dosed
Therapy Features and Specifications
This therapy allows programming of delivery rate as a function of body weight.
Programming ranges are listed in the programming worksheet included in this
6
section. If a number outside of the acceptable program range is entered, an error
message displays the minimum or maximum value allowed.
The air sensitivity in a Weight Dosed program is automatically set to ON. This setting
6
may be changed through the Options Menu after programming is complete. Refer to
Air Sensitivity in the “Options Menu” section for more information.
The pump automatically delivers KVO (Keep Vein Open) after the programmed VTBI
6
(Volume To Be Infused) has completed.
The rate can be titrated while the pump is infusing.
6
WARNING:
ALWAYS set the Air Sensitivity to either ON or 2mL when
using vented drip chambers.
Weight Dosed Programming
1 Select WEIGHT DOSED from the Programming Menu.
2 Select the unit of measure.
3 Enter the patient weight, if required.
d
f
Note: Total concentration is ALWAYS entered as mg in mL, even if mcg is the selected unit
of measure.
4 Enter the concentration as mg in mL:
Tip: Use [ ] to toggle between mL and mg.
•
Enter the value in mg when “mg” flashes on the display.
•
Enter the value in mL when “mL” flashes on the display.
•
Press [YES/ENTER] to confirm.
5 Enter the rate.
The pump automatically displays the mL/hr equivalent even when another unit of
measure is selected.
6 Enter the VTBI.
7 Review the program.
Abbott GemStar Manual 430-600095-002 (Rev. 8/02) 33
Page 41

Weight Dosed
WARNING: IIf the cassette is removed from the pump, ALWAYS disconnect
Auto KVO
When the programmed VTBI has completed delivery, Auto KVO delivery begins
automatically and the empty container alarm sounds.
the pump set from the patient and purge the line before
restarting therapy.
d
Note: Auto KVO delivers even while the empty container alarm sounds. Press [SILENCE] to
quiet the alarm for 2 minutes.
If the weight dosed rate is greater than or equal to 1 mL/hr, the Auto KVO delivers at 1
mL/hr. If the weight dosed rate is less than 1 mL/hr, the Auto KVO delivers at the same
rate.
Rate Titration
To titrate the rate while the pump is infusing:
1 In the RUN mode, press the numeric keys corresponding to the new rate. The rate
flashes on the display. Press [
For example: if the current rate is 4.0 mg/kg/hr, press [
the rate to 5.0 mg/kg/hr.
Press [ ] to enter the rate in mL. When using units other than mL, the pump
automatically adjusts the mL/hr value.
You have approximately five seconds after pressing a key to press another numeric
key, the decimal key, or [
rate does not change and the delivery continues as programmed.
2 NEW RATE displays with the new value.
•
Press [YES/ENTER] within 10 seconds to accept the change and begin delivery at
the new rate.
•
Press [NO] to continue delivery at the programmed rate.
YES/ENTER].
5][YES/ENTER] to change
YES/ENTER]. If no key is pressed within five seconds, the
34 Abbott GemStar Manual 430-600095-002 (Rev. 8/02)
Page 42

Changing a Weight Dosed Program
Weight Dosed
d
Note: You cannot change a program when the pump is in FULL or NEW CONTAINER Lock.
Can be changed at any time Cannot be changed
Delivery rate
•
VTBI
•
Patient weight
•
To change a program:
Unit of measure
•
Concentration (amount of drug)
•
1 From the STOP mode, press [CHANGE] and select [4] CHANGE PROGRAM.
2 As each program parameter displays, make the desired changes or press
[
YES/ENTER] to accept the current setting.
3 Review the program.
4 Press [START] to begin delivery.
Abbott GemStar Manual 430-600095-002 (Rev. 8/02) 35
Page 43

Weight Dosed
Abbott GemStar
™
Weight Dosed Programming Worksheet
GIVE:
Parameter Selections and/or Values to be
Entered
Therapy Weight Dosed N/A
Unit of Measure
Patient Weight
Concentration
(2 entries are required. Use to
toggle)
Rate
VTBI
(Volume To Be Infused)
mcg/kg/min
q
mcg/kg/hr
q
mcg/min
q
mg/kg/min
q
mg/kg/hr
q
mg/min
q
mL/hr
q
(When programming in kg/min or kg/hr)
(For all units of measure EXCEPT mL/hr)
mg
in
mL
Programmable
Ranges
N/A
2.0 - 200.0 kg
0.1 - 9999000 mg
0.1 - 9999 mL
(see below *)
0.1 - 9999 mL
* Programmable Ranges for Rate:
0.1 - 8333 mg/kg/min
0.1 - 500000 mg/kg/hr
0.1 - 16666 mg/min
0.01 - 166666 mcg/kg/min
0.01 - 9999999 mcg/kg/hr
0.01 - 166666 mcg/min
0.1 - 1000 mL/hr
CAUTION: When infusing short-half-life drugs (i.e. those dosed with units of
mcg/kg/min) at very low rates (0.8 mL/hr or less) the rate may be too slow
for that drug. Consider using a lower drug concentration with these
drugs so a pump rate above 0.8 mL/hr can be used.
36 Abbott GemStar Manual 430-600095-002 (Rev. 8/02)
Page 44

Pain Management
Therapy Features and Specifications
This therapy allows programming of a continuous only, bolus only, or continuous with
bolus delivery.
Programming ranges are listed in the programming worksheet included in this
6
section. If a number outside of the acceptable program range is entered, an error
message displays the minimum or maximum value allowed.
In Continuous + Bolus protocols, you may zero either the continuous rate or the
6
bolus when entering or changing a program. The continuous rate and bolus volume
cannot be zero at the same time.
The default bolus delivery rate is 125 mL/hr.
6
A loading dose may be set during programming, which can be delivered after
6
programming and priming are complete. The loading dose rate is 125 mL/hr.
d
Note: The use of a lockbox is recommended with pain management protocols. Refer to "Using
the Abbott GemStar Lockboxes" on page 106 for instructions on using a lockbox with the
Abbott GemStar Pump.
Pain Management Programming
1 Select PAIN MANAGEMENT from the Programming Menu.
2 Select the delivery mode.
d
d
Note: If you select Continuous + Bolus, you can change the continuous delivery rate or
bolus amount to zero through the
3 Select the unit of measure and concentration as required.
4 Set the continuous delivery rate.
Note: The pump only delivers in increments of 0.1 mL. Values entered in a Pain
Management therapy may be rounded to the nearest 0.1 mL. For example, at a
concentration of 15 mg/mL, a rate of 5 mg rounds to 4.5 mg.
5 mg = .333 mL
4.5 mg = .3 mL
When a value is rounded, the pump sounds four quick beeps,
few seconds, and then the rounded value displays. Press [
rounded value and continue to the next step.
5 Program a loading dose as required.
CHANGE menu without reprogramming the pump.
ROUNDING displays for a
YES/ENTER] to accept the
Abbott GemStar Manual 430-600095-002 (Rev. 8/02) 37
Page 45

Pain Management
6 Program a bolus dose with lockout time and dose limit as required.
Regarding a 1-Hour or 4-Hour Dose Limit: The hour dose limit is the maximum
volume (continuous plus bolus or bolus only amount) that may be delivered over the
selected period. When the programmed dose limit is reached, the continuous
delivery stops and a new bolus is not allowed. As the oldest delivery amounts age
out of the Hour Dose Limit record, the pump accepts bolus requests or resumes
continuous delivery (if programmed).
d
d
Note: If a 1-hour or 4-hour dose limit is programmed, a bolus in progress does not stop
until the individual bolus volume has been delivered. Therefore, a bolus delivery initiated
before the programmed dose limit is reached may exceed the dose limit at the completion
of the bolus.
Loading doses are not included in the hour dose limit volume and a dose limit in effect
does not prevent the delivery of a loading dose.
7 If programmed in units of mcg or mg, the line displaying the units flashes. Enter the
container size in proper unit measure or see the note below.
Note: In order to enter the total in mL when programming a concentration, press
[]to move to the mL line. Enter the mL value when
8 Select the air sensitivity.
9 Review the program.
WARNING: I
Bolus Delivery
Bolus doses and delivery limits are set during programming. The default bolus dose
delivery rate in a pain management protocol is 125 mL/hr.
A bolus cord is available for patient bolus requests; refer to Connecting the Bolus Cord in
the “Optional System Components” section for more information.
mL flashes on the display.
If the cassette is removed from the pump, ALWAYS disconnect
the pump set from the patient and purge the line before
restarting therapy.
38 Abbott GemStar Manual 430-600095-002 (Rev. 8/02)
Page 46

Pain Management
Delivering a Bolus Dose
From the
button on the end of the bolus cord to begin bolus dose delivery.
flashes on the display, and the amount infused accrues as the delivery progresses.
When the bolus dose is complete, the following will occur:
RUN mode, press either the bolus button [+] on the top of the pump or the
BOLUS DELIVERY
6
The bolus request and delivery amount are recorded to the event and bolus
history logs.
6
Delivered boluses are added to the total bolus amount in the program amounts.
6
The bolus lockout time is reset (if applicable) and subsequent bolus requests are
ignored until the lockout time has elapsed.
6
Programmed infusion continues.
d
Note: ALL bolus requests are recorded to the Event and Bolus History logs.
If the bolus delivery does not start, it may be locked out by one of the following
conditions:
6
Bolus lockout period
6
Loading dose delivery in progress
6
Bolus dose delivery in progress
6
Bolus per-hour limit
6
1-hour or 4-hour dose limit
Bolus Dose Interruptions
Bolus deliveries may be interrupted by pressing [
When [
START] is pressed again, COMPLETE BOLUS NOW? displays. Refer to the
following table for the appropriate response:
To do this: Press this key: Bolus lockout time is set to:
Deliver the remaining bolus amount
Clear the undelivered bolus amount
[YES/ENTER]
[NO]
STOP] or by an alarm condition.
The time of delivery completion
The time the bolus was interrupted
Abbott GemStar Manual 430-600095-002 (Rev. 8/02) 39
Page 47

Pain Management
Loading Dose Delivery
A loading dose is set during programming and can be delivered after programming and
priming are complete.
d
Note: Loading dose amounts are not included in a 1-hour or 4-hour limit.
Delivering a Loading Dose
1 After priming and programming are complete, press [START].
2 DELIVER THE LOADING DOSE NOW? displays. Press [YES/ENTER] to begin
delivery.
When the loading dose is complete, the following will occur:
6
Programmed infusion begins automatically.
6
The dose amount is recorded to the history log.
6
The bolus lockout time is reset (if applicable) and subsequent bolus requests are
ignored until the lockout time has elapsed.
Loading Dose Interruptions
Loading dose deliveries may be interrupted by pressing
condition.
When the interruption is resolved, press [
displays. Refer to the following table for the appropriate response:
To do this: Press this key:
Deliver the remaining loading dose amount
Clear the undelivered loading dose amount
[STOP] or by an alarm
START]. COMPLETE THE LOADING DOSE?
[YES/ENTER]
[NO]
40 Abbott GemStar Manual 430-600095-002 (Rev. 8/02)
Page 48

Changing a Pain Management Program
Pain Management
d
d
Note: You cannot change a program when the pump is in FULL or NEW CONTAINER Lock.
With a
RATE CHANGE Lock, the continuous delivery rate and bolus amount can be changed
within the set ranges.
Can be changed at any time Cannot be changed
Delivery rate
•
Bolus
•
Bolus lockout
•
Note: Although the delivery mode cannot be changed, if a Continuous + Bolus therapy is
programmed, the continuous rate or bolus amount can be changed to zero. This function may
be restricted by the minimum values set with a
To change a program:
Container size
•
Air sensitivity
•
Dose limit amount
•
RATE CHANGE Lock.
Delivery mode
•
Unit of measure
•
Concentration
•
Dose limit type
•
1 From the STOP mode, press [CHANGE] and select [4] CHANGE PROGRAM.
2 As each program parameter displays, make the desired changes, or press
[
YES/ENTER] to accept the current setting.
3 Review the program.
4 Press [START] to begin delivery.
Abbott GemStar Manual 430-600095-002 (Rev. 8/02) 41
Page 49

Pain Management
Abbott GemStar
Pain Management Programming Worksheet
GIVE:
Parameters Selections and/or Values to be
Entered
Therapy Pain Management N/A
Delivery Mode
Unit of Measure
Continuous Rate
Loading Dose
Bolus Dose
Continuous
q
Bolus Only
q
Continuous + Bolus
q
Concentration:
q
Concentration:
q
mL
q
q No
q Yes Amount:
mg/mL
mcg/mL
™
Programmable Ranges
N/A
0.1 - 100 mg/mL
1 - 1000 mcg/mL
0.1 - 2500 mg/hr
1 - 25000 mcg/hr
0.1 - 25.0 mL/hr
0.1 - 2500 mg
1 - 25000 mcg
0.1 - 25.0 mL
0 - 2500 mg
0 - 25000 mcg
0 - 25.0 mL
Bolus Lockout
Optional Dose Limit
Container Size
Air Sensitivity
q
4-hour limit Amount:
q
1-hour limit Amount:
q
# boluses/hour Number:
q
No dose limit
Note: For Bolus Only, the 1 or 4 hour limit minimum is 1 bolus dose.
q
On Alarms at approx. 0.5 mL of air
q
2 mL Alarms at approx. 2 mL of air
q
Off No alarm
minutes 5 - 999 min
4X rate - 400 mL, 40000 mg, 400000 mcg*
Rate - 100 mL, 10000 mg, 100000 mcg*
1-12
*
For continuous plus bolus delivery.
0.1 - 99999 mg
1 - 9999000 mcg
0.1 - 9999 mL
N/A
42 Abbott GemStar Manual 430-600095-002 (Rev. 8/02)
Page 50

Therapy Features and Specifications
This therapy allows quick programming of delivery rate in milliliters (mL) only.
Programming ranges are listed in the programming worksheet included in this
6
section. If a number outside of the acceptable program range is entered, an error
message displays the minimum or maximum value allowed.
The air sensitivity is automatically set to ON. This setting may be changed through
6
the Options Menu after programming is complete. Refer to Air Sensitivity in the
“Options Menu” section for more information.
The pump automatically delivers KVO (Keep Vein Open) after the programmed VTBI
6
(Volume To Be Infused) is complete.
The rate can be titrated while the pump is infusing.
6
An optional secondary container can be “piggybacked” on the primary container
6
during regular delivery using an Abbott GemStar Piggyback Pump Set. Refer to
Piggybacking in this section for more information.
A program review is not required and is only available through the Change or Options
6
Menu.
mL/hr Only
WARNING:
ALWAYS set the Air Sensitivity to either ON or 2mL when
using vented drip chambers.
mL/hr Only Programming
1 Select mL/hr Only from the Programming Menu.
2 Enter the rate.
3 Enter the VTBI.
d
Abbott GemStar Manual 430-600095-002 (Rev. 8/02) 43
Note: A program review is not required for mL/hr Only programs.
WARNING: I
If the cassette is removed from the pump, ALWAYS disconnect
the pump set from the patient and purge the line before
restarting therapy.
Page 51

mL/hr Only
Auto KVO
When the programmed VTBI has completed delivery, Auto KVO delivery begins
automatically and the empty container alarm sounds.
d
Note: Auto KVO delivers even while the empty container alarm sounds. Press [SILENCE] to
quiet the alarm for 2 minutes.
If the mL/hr Only rate is greater than or equal to 1 mL/hr, the Auto KVO delivers at 1
mL/hr. If the mL/hr Only rate is less than 1 mL/hr, the Auto KVO delivers at the same
rate.
Rate Titration
To titrate the rate while the pump is infusing:
1 In the RUN mode, press the numeric keys corresponding to the new rate. The rate
flashes on the display. Press [
For example, if the current rate is 100 mL/hr, press [
the rate to 50 mL/hr.
d
Note: You have approximately five seconds after pressing a key to press another numeric
key, the decimal key, or [
does not change and the delivery continues as programmed.
2 NEW RATE displays with the new value.
•
Press [YES/ENTER] within 10 seconds to accept the change and begin delivery at
the new rate.
•
Press [NO] to continue delivery at the programmed rate.
Piggybacking
Piggybacking with the Abbott GemStar Pump requires the use of an Abbott GemStar
Primary Piggyback Pump Set with a proximal Y-site backcheck valve and a secondary
piggyback set with an extension hook. The secondary container must be higher than
the primary container. Refer to the instructions included with the piggyback pump set
for more information.
YES/ENTER].
5][0][YES/ENTER] to change
YES/ENTER]. If no key is pressed within five seconds, the rate
d
WARNING:
The piggyback rate and piggyback VTBI display until the secondary container has been
delivered. Then the primary delivery resumes automatically.
Note: Piggyback infusion amount is NOT added to the primary programmed infusion amount.
44 Abbott GemStar Manual 430-600095-002 (Rev. 8/02)
When using the pump for secondary delivery (piggybacking),
ensure the fluids being administered are chemically and
physically compatible.
Page 52

Preparing for Secondary Delivery (Piggybacking)
1 Ensure a primary piggyback pump set
with a proximal Y-site backcheck
valve is in place.
2 Use the extension hook from the
secondary pump set to suspend the
primary container from the I.V. pole.
3 Prepare the secondary pump set
according to the instructions included
with the set.
4 Attach a needle or blunt cannula (if
appropriate) and prime the secondary
pump set.
5 Suspend the secondary container
from the I.V. pole.
mL/hr Only
d
Note: When using a secondary container
of 500 mL or greater, ensure the bottom
of the secondary container is at least 7
inches (17.8 cm) above the fluid level in
the primary container. Use additional
extension hooks if necessary.
6 Connect the secondary pump set to
the proximal Y-site (or proximal port).
Abbott GemStar Manual 430-600095-002 (Rev. 8/02) 45
Page 53

mL/hr Only
Programming a Secondary Delivery (Piggybacking)
d
f
d
Note: To distinguish the piggyback delivery from the primary
delivery,
down to completion. For example, a piggyback rate of 250
mL/hr with a remaining VTBI of 218.5 mL will display as
shown.
Tip: Prepare and set up containers BEFORE
programming the pump for piggyback delivery.
1 Press [CHANGE] and select [5] PIGGYBACKING from the Change Menu.
2 Enter the dose amount for the secondary container.
3 Enter the infusion time for the secondary container.
4 Open the slide clamp or CAIR® (roller) clamp on the tubing of the secondary set.
5 Press [YES/ENTER] to begin piggyback delivery.
Note: Primary flow stops until the secondary VTBI is delivered; then primary flow automatically
resumes. Any remaining secondary fluid will be delivered at the primary rate. The maximum
piggyback rate is 300 mL/hr. For secondary rates above 300 mL/hr, flow may occur from the
primary container.
Changing a Piggyback Delivery
1 Press [CHANGE] and select [5] PIGGYBACKING from the Change Menu.
2 Press [CHANGE] to reset the dose amount to zero.
3 Enter the new piggyback dose amount and press [YES/ENTER].
4 Set the infusion time for the secondary container.
5 Press [YES/ENTER] to begin piggyback delivery.
PIGGYBACK displays and the piggyback VTBI counts
PIGGYBACK
RATE 250.0 mL/hr
VTBI 218.5 mL
UUUUU
d
Note: You must know the amount that has already been delivered. When the piggyback dose
amount is changed, the pump begins a new VTBI countdown.
Canceling a Piggyback Delivery
1 Press [CHANGE] and select [5] PIGGYBACKING from the Change Menu.
2 Press [CHANGE] to reset the dose amount to zero.
3 Press [YES/ENTER] to cancel piggyback delivery.
46 Abbott GemStar Manual 430-600095-002 (Rev. 8/02)
Page 54

Changing a mL/hr Only Program
mL/hr Only
d
d
Note: You cannot change a program when the pump is in FULL or NEW CONTAINER Lock.
Can be changed at any time
Delivery rate
•
Container size
•
Piggybacking
•
To change a program:
1 From the STOP mode, press [CHANGE] and select [4] CHANGE PROGRAM.
2 As each program parameter displays, make the desired changes or press
[
YES/ENTER] to accept the current setting.
3 Press [START] to begin delivery.
Note: A program review is not required and is only available through the Change or Options
Menu.
Abbott GemStar Manual 430-600095-002 (Rev. 8/02) 47
Page 55

mL/hr Only
Abbott GemStar
™
mL/hr Only Programming Worksheet
GIVE:
Parameter Selections and/or Values to be
Entered
Therapy mL/hr Only N/A
Rate
VTBI
(Volume To Be Infused)
Programmable Ranges
0.1 - 1000 mL/hr
0.1 - 9999 mL
48 Abbott GemStar Manual 430-600095-002 (Rev. 8/02)
Page 56

Therapy Features and Specifications
This therapy allows programming of multiple doses at regular intervals.
Programming ranges are listed in the programming worksheet included in this
6
section. If a number outside of the acceptable program range is entered, an error
message displays the minimum or maximum value allowed.
Optional KVO (Keep Vein Open) may be set during programming.
6
The pump may be disconnected from the patient between dose deliveries. A call back
6
alarm can be set to alert the patient or caregiver to reconnect the pump before the
next scheduled delivery begins. The pump must remain powered on for the call back
alarm to function.
Intermittent Programming
1 Select INTERMITTENT from the Programming Menu.
2 Enter the dose amount.
3 Enter the infusion time for each dose.
For example, press [
4 Enter the frequency of dose deliveries.
For example, press [
5 Enter the total number of doses in the container.
To determine the number of doses in the container, divide the volume in the
container by the dose amount.
6 Enter the KVO rate.
KVO delivers before a delayed start time, between doses, and after the last dose until
the total container is infused.
If no KVO is desired, press [
7 Enter the container size.
The pump automatically calculates the minimum container size required to deliver
the number of programmed doses and KVO between doses.
2][0] if each dose is to deliver for 20 minutes.
2][0][0] to start a dose every two hours.
YES/ENTER] while the value displayed is zero.
Intermittent
d
Abbott GemStar Manual 430-600095-002 (Rev. 8/02) 49
Note: If KVO is desired before a delayed start, you must increase the container size to
accommodate the desired KVO volume.
8 Select the air sensitivity.
Page 57

Intermittent
9 SET CALL BACK ALARM FOR NEXT DOSE? displays.
The pump may be disconnected from the patient between dose deliveries. The call
back alarm can be set to alert the patient or caregiver to reconnect the pump before
the next scheduled delivery begins. At the set time before each dose, the alarm
sounds,
silence the alarm for three minutes. Then reconnect the pump to the patient.
For example, press [
the next scheduled delivery.
When programming the call back alarm, be sure to allow enough time for the
patient or caregiver to reconnect the pump to the patient and to press [
BEFORE the scheduled dose start time.
•
•
START flashes on the display, and the alarm LED flashes. Press [SILENCE]to
1][0] to set the alarm to sound 10 minutes before the start of
START]
Press [YES/ENTER] to set the call back alarm.
Press [NO] if you do not want to set the call back alarm.
d
f
Note: The call back alarm works only when the pump is powered on AND in the STOP
mode. DO NOT power-off the pump while it is disconnected from the patient if you have set
the call back alarm.
10 Confirm the displayed time is correct. Press [OPTIONS] to change the clock if
required.
11 The current time and START NOW? displays.
•
Press [YES/ENTER] to begin delivery when the pump enters the RUN mode.
•
Press [NO] to set a delayed start time. SET START TIME displays. Enter the
desired start time and press [
YES/ENTER] when done.
12 Review the program.
WARNING:
Tip: To use a delayed start without specifying a start time: (1) Press [YES/ENTER];
(2) Complete the program review; (3) Power-off the pump; (4) When the pump is
powered on again, complete the program review, then press [
delivery.
If the cassette is removed from the pump, ALWAYS disconnect
the pump set from the patient and purge the line before
restarting therapy.
START] to begin
50 Abbott GemStar Manual 430-600095-002 (Rev. 8/02)
Page 58

Intermittent Delivery Interruptions
Missed Start Time
If the programmed start time is missed, it can be changed through the Options Menu.
6
Refer to Next Dose in the “Options Menu” section more information.
If the pump remains in the STOP mode and the first dose is missed, press [START]to
6
begin delivery immediately and all subsequent doses will be shifted.
If the pump is programmed with a delayed start time and is then powered off before
6
[
START] is pressed, the pump will skip to the NEXT occurrence of the programmed
start time.
For example, the current time is 10:00 PM. The user sets the delayed start time for
10:30 PM and then powers off the pump. The user does not power on the pump until
10:40 PM, which is 10 minutes AFTER the scheduled start time. The pump does not
begin delivery until 10:30 PM the FOLLOWING day.
Dose Interruptions
To understand how interruptions are resolved, compare the normal Intermittent delivery
diagram below for a 1-hour dose every four hours, to the interruption diagrams shown in
the examples:
Intermittent
12123456789101112
Dose Delivered -
6
If an Intermittent dose is interrupted and the pump is placed in the RUN mode during
the on or off cycle of the current dose, the dose continues delivery from the point
where it was interrupted and all subsequent doses are shifted.
Abbott GemStar Manual 430-600095-002 (Rev. 8/02) 51
Page 59

Intermittent
6
For example, in the following diagram, an intermittent dose was started at 2:00. The
dose was interrupted during the current dose cycle and was started again before the
end of the current dose cycle.
12123456789101112
Dose Delivered - Dose Interrupted -
If an Intermittent dose is interrupted and the pump is placed in the RUN mode after
the off cycle of the current dose, the next dose begins delivery and all subsequent
doses are shifted if necessary.
For example, in the following diagram, an intermittent dose was stared at 2:00. It
was interrupted during the current delivery cycle at 2:30, but was not started again
until after the current delivery cycle at 6:45:
12123456789101112
Dose Delivered - Dose Interrupted -
6
When the dose is complete, the start time for the Next Dose displays. To change the
start time refer to the “Options Menu” section.
6
Any missed Intermittent doses, except the first dose, are added to the end of the
delivery schedule.
52 Abbott GemStar Manual 430-600095-002 (Rev. 8/02)
Page 60

Changing an Intermittent Program
Intermittent
d
Note: You cannot change a program when the pump is in FULL or NEW CONTAINER Lock.
Can be changed at
any time
Dose parameters
•
KVO rate
•
Container size
•
Air sensitivity
•
Call back alarm
•
To change a program:
Can be changed if no dose is
in progress
Next dose start time
•
Cannot be changed after
[START] is pressed
Current time
•
1 From the STOP mode, press [CHANGE] and select [4] CHANGE PROGRAM.
2 As each program parameter displays, make the desired changes or press
[
YES/ENTER] to accept the current setting.
3 Review the program.
4 Press [START] to begin delivery.
Abbott GemStar Manual 430-600095-002 (Rev. 8/02) 53
Page 61

Intermittent
Abbott GemStar
™
Intermittent Programming Worksheet
GIVE:
Parameters Selections and/or Values to be Entered Programmable Ranges
Therapy Intermittent N/A
Dose Amount
0.1 - 9600 mL
Infusion Time Per Dose
hrs:min 1 min - 24 hrs
Dose Frequency
(Infusion time per dose + 1 min)
to 96 hrs
1 - 999
0.1 -5.0 mL/hr
0.1 - 9999 mL
N/A
Number of Doses Per
Container
KVO
(Keep Vein Open)
Container Size*
Air Sensitivity
hrs:min
q No KVO Rate: 0.0
q Yes KVO Rate:
q On Alarms at approx. 0.5 mL of air
q
2 mL Alarms at approx. 2 mL of air
q
Off No alarm
Call Back Alarm
Start Time
*
The pump automatically calculates the minimum container size required to deliver the
q
No
q
Yes
Alarm:
q
Start immediately after programming
q
Start time:
Specify AM or PM if not 24-hour clock.
hrs:min before start
1 min - time between doses
12:00 AM - 11:59 PM or
00:00 - 23:59
number of programmed doses and KVO between doses. If KVO is desired before a delayed
start, you must increase the container size to accommodate the desired KVO volume.
54 Abbott GemStar Manual 430-600095-002 (Rev. 8/02)
Page 62

Total Parenteral Nutrition (TPN)
Therapy Features and Specifications
This therapy allows programming of Total Parenteral Nutrition (TPN) protocols.
Programming ranges are listed in the programming worksheet included in this
6
section. If a number outside of the acceptable program range is entered, an error
message displays the minimum or maximum value allowed.
Taper Up and Taper Down may be programmed to gradually increase and decrease
6
the rate of delivery at the beginning and end of a therapy. If Taper Down is selected
during programming, the pump allows auto tapering if the continuous delivery is
stopped before the programmed volume has completed delivery.
Optional KVO (Keep Vein Open) may be set during programming.
6
TPN Programming
1 Select TPN from the Programming Menu.
2 Select the TPN delivery mode.
3 Enter the total VTBI (Volume To Be Infused).
Maximum VTBI is 9600 mL minus any taper amount.
4 Enter the Taper Up and Taper Down times (if applicable).
d
d
d
Abbott GemStar Manual 430-600095-002 (Rev. 8/02) 55
Note: Time is entered in hours:minutes. For one hour, press [1][0][0];
not [
6][0].
5 Enter the total time to infuse.
6 Enter the KVO rate. If no KVO is desired, press [YES/ENTER] while the value
displayed is zero.
Note: KVO runs after Taper Down until the total container is infused.
7 Enter the container size (VTBI + KVO).
Note: If KVO is programmed, you must increase the container size to accommodate the
desired KVO volume.
8 Select the air sensitivity.
9 Review the program.
WARNING: I
If the cassette is removed from the pump, ALWAYS disconnect
the pump set from the patient and purge the line before
restarting therapy.
Page 63

Total Parenteral Nutrition (TPN)
Changing a TPN Program
d
Note: You cannot change a program when the pump is in FULL or NEW CONTAINER Lock.
Can be changed before
[START] is pressed
VTBI
•
Taper times
•
Total TPN time
•
To change a program:
1 From the STOP mode, press [CHANGE] and select [4] CHANGE PROGRAM.
2 As each program parameter displays, make the desired changes or press
[
YES/ENTER] to accept the current setting.
3 Review the program.
4 Press [START] to begin delivery.
TPN Auto Taper Down
Auto Taper Down is only available if a Taper Down time was entered during
programming. Auto Taper Down may be activated when the continuous delivery portion
of a TPN with Taper Down protocol is stopped. Auto Taper Down is not available while
the pump is in an alarm condition.
1 Press [STOP] during TPN delivery.
DO YOU WANT AUTO TAPERING? displays.
•
Press [NO] to return to the STOP mode and then, if desired, press [START]to
resume therapy.
•
Press [YES/ENTER] to set Auto Taper Down.
2 Enter the Auto Taper Down time.
The maximum Auto Taper Down time is three hours OR two times the remaining
volume divided by the continuous delivery rate, whichever is less.
Can be changed at any time Cannot be changed
KVO rate
•
Increase container size only
•
Air sensitivity
•
Delivery mode
•
d
Note: Time is entered in hours:minutes. For one hour, press [1][0][0];
not [
6][0].
3 Press [YES/ENTER] to return to the RUN mode, then press [START] to begin Auto
Taper Down.
56 Abbott GemStar Manual 430-600095-002 (Rev. 8/02)
Page 64

Total Parenteral Nutrition (TPN)
Abbott GemStar
™
TPN Programming Worksheet
GIVE:
Parameters Selections and/or Values to be
Entered
Therapy TPN N/A
Delivery Mode
VTBI
(Volume To Be Infused)
Taper Up
Taper Down
Total Time to Infuse
Continuous
q
Continuous + Taper Down
q
Continuous + Taper Up
q
Continuous + Taper Up and Down
q
mL 1 - 9600 mL*
q No
q Yes
q No
q Yes
hrs:min 1 min - 24 hrs
hrs:min
hrs:min
Programmable Ranges
N/A
1 min - 3 hrs
1 min - 3 hrs**
KVO
(Keep Vein Open)
q
No KVO Rate: 0.0
q
Yes KVO Rate:
1.0 - 5.0 mL/hr
Container Size
(VTBI + KVO)
Air Sensitivity
q
On Alarms at approx. 0.5 mL of air
q
2 mL Alarms at approx. 2 mL of air
q
Off No alarm
mL 9999 mL max
N/A
* Maximum VTBI is 9600 mL minus any taper amount.
** Programmable ranges for taper down are 1 minute to 3 hours OR 2 times the remaining volume
divided by the continuous delivery rate, whichever is less.
Abbott GemStar Manual 430-600095-002 (Rev. 8/02) 57
Page 65

Notes
58 Abbott GemStar Manual 430-600095-002 (Rev. 8/02)
Page 66

Therapy Features and Specifications
This therapy allows programming of a continuous delivery.
Programming ranges are listed in the programming worksheet included in this
6
section. If a number outside of the acceptable program range is entered, an error
message displays the minimum or maximum value allowed.
Optional KVO (Keep Vein Open) may be set during programming.
6
The rate can be titrated while the pump is infusing.
6
An optional secondary container can be “piggybacked” on the primary container
6
during regular delivery using an Abbott GemStar Piggyback Pump Set. Refer to
Piggybacking in this section for more information.
Continuous Programming
1 Select CONTINUOUS from the Programming Menu.
2 Select the unit of measure and concentration as required.
3 Enter the rate.
4 Enter the VTBI.
5 Enter the KVO rate, if desired.
KVO runs after the programmed VTBI until the total container is infused. If no KVO
is desired, press [
6 Enter the container size (VTBI + KVO).
VTBI is the default value on the
YES/ENTER] while the value displayed is zero.
CONTAINER display.
Continuous
d
Abbott GemStar Manual 430-600095-002 (Rev. 8/02) 59
Note: If KVO is programmed, you must increase the container size to accommodate the
KVO delivery.
In order to enter the total in mL when programming a concentration, press []to move
to the mL line and enter the mL size.
7 Select the air sensitivity.
8 Review the program.
WARNING: I
If the cassette is removed from the pump, ALWAYS disconnect
the pump set from the patient and purge the line before
restarting therapy.
Page 67

Continuous
Rate Titration
To titrate the rate while the pump is infusing:
1 In the RUN mode, press the numeric keys corresponding to the new rate. The rate
flashes on the display. Press [
For example: if the current rate is 100 mL/hr, press [
the rate to 50 mL/hr.
YES/ENTER].
5][0][YES/ENTER] to change
d
Note: You have approximately five seconds after pressing a key to press another numeric
key, the decimal key, or [
does not change and the delivery continues as programmed.
2 NEW RATE displays with the new value.
Press [YES/ENTER] within 10 seconds to accept the change and begin delivery at
•
the new rate.
Press [NO] to continue delivery at the programmed rate.
•
Piggybacking
Piggybacking with the Abbott GemStar Pump requires the use of an Abbott GemStar
Primary Piggyback Pump Set with a proximal Y-site backcheck valve and a secondary
piggyback set with an extension hook. The secondary container must be higher than
the primary container. Refer to the instructions included with the piggyback pump set
for more information.
WARNING:
The piggyback rate and piggyback VTBI display until the secondary container has been
delivered. Then the primary delivery resumes automatically.
d
Note: Piggyback infusion amount is NOT added to the primary programmed infusion amount.
YES/ENTER]. If no key is pressed within five seconds, the rate
When using the pump for secondary delivery (piggybacking),
ensure the fluids being administered are chemically and
physically compatible.
60 Abbott GemStar Manual 430-600095-002 (Rev. 8/02)
Page 68

Preparing for Secondary Delivery (Piggybacking)
1 Ensure a primary piggyback pump set
with a proximal Y-site backcheck
valve is in place.
2 Use the extension hook from the
secondary pump set to suspend the
primary container from the I.V. pole.
3 Prepare the secondary pump set
according to the instructions included
with the set.
4 Attach a needle or blunt cannula (if
appropriate) and prime the secondary
pump set.
5 Suspend the secondary container
from the I.V. pole.
Continuous
d
Abbott GemStar Manual 430-600095-002 (Rev. 8/02) 61
Note: When using a secondary container
of 500 mL or greater, ensure the bottom
of the secondary container is at least 7
inches (17.8 cm) above the fluid level in
the primary container. Use additional
extension hooks if necessary.
6 Connect the secondary pump set to
the proximal Y-site (or proximal luer
port).
Page 69

Continuous
Programming a Secondary Delivery (Piggybacking)
d
f
d
Note: To distinguish the piggyback delivery from the primary
delivery,
down to completion. For example, a piggyback rate of 250
mL/hr with a remaining VTBI of 218.5 mL will display as
shown.
Tip: Prepare and set up containers BEFORE
programming the pump for piggyback delivery.
1 Press [CHANGE] and select [5] PIGGYBACKING from the Change Menu.
2 Enter the dose amount for the secondary container.
3 Enter the infusion time for the secondary container.
4 Open the slide clamp or CAIR® (roller) clamp on the tubing of the secondary set.
5 Press [YES/ENTER] to begin piggyback delivery.
Note: Primary flow stops until the secondary VTBI is delivered; then primary flow automatically
resumes. Any remaining secondary fluid will be delivered at the primary rate. The maximum
piggyback rate is 300 mL/hr. For secondary rates above 300 mL/hr, flow may occur from the
primary container.
Changing a Piggyback Delivery
1 Press [CHANGE] and select [5] PIGGYBACKING from the Change Menu.
2 Press [CHANGE] to reset the dose amount to zero.
3 Enter the new piggyback dose amount and press [YES/ENTER].
4 Set the infusion time for the secondary container.
5 Press [YES/ENTER] to begin piggyback delivery.
PIGGYBACK displays and the piggyback VTBI counts
PIGGYBACK
RATE 250.0 mL/hr
VTBI 218.5 mL
UUUUU
d
Note: You must know the amount that has already been delivered. When the piggyback dose
amount is changed, the pump begins a new VTBI countdown.
Canceling a Piggyback Delivery
1 Press [CHANGE] and select [5] PIGGYBACKING from the Change Menu.
2 Press [CHANGE] to reset the dose amount to zero.
3 Press [YES/ENTER] to cancel piggyback delivery.
62 Abbott GemStar Manual 430-600095-002 (Rev. 8/02)
Page 70

Changing a Continuous Program
Continuous
d
Note: You cannot change a program when the pump is in FULL or NEW CONTAINER Lock.
Can be changed at any time Cannot be changed
Delivery rate
•
VTBI
•
KVO rate
•
To change a program:
Container size
•
Air sensitivity
•
Piggybacking
•
Unit of measure
•
Concentration
•
1 From the STOP mode, press [CHANGE] and select [4] CHANGE PROGRAM.
2 As each program parameter displays, make the desired changes or press
[
YES/ENTER] to accept the current setting.
3 Review the program.
4 Press [START] to begin delivery.
Abbott GemStar Manual 430-600095-002 (Rev. 8/02) 63
Page 71

Continuous
Abbott GemStar
™
Continuous Programming Worksheet
GIVE:
Parameter Selections and/or Values to be
Entered
Therapy Continuous N/A
Unit of Measure
Rate
VTBI
(Volume To Be Infused)
KVO
(Keep Vein Open)
Concentration:
q
Concentration:
q
mL
q
q No KVO Rate: 0.0
q Yes KVO Rate:
mg/mL
mcg/mL
Programmable Ranges
0.1 - 1000 mg/mL
1 - 1000 mcg/mL
0.1 - 9999 mg/hr
1 - 999900 mcg/hr
0.1 - 1000 mL/hr
0.1 - 99999 mg
1 - 9999000 mcg
0.1 - 9999 mL
0.1 - 5.0 mL/hr
Container Size
(VTBI + KVO)
0.1 - 99999 mg
1 - 9999000 mcg
0.1 - 9999 mL
Air Sensitivity
q
On Alarms at approx. 0.5 mL of air
q
2 mL Alarms at approx. 2 mL of air
q
Off No alarm
N/A
64 Abbott GemStar Manual 430-600095-002 (Rev. 8/02)
Page 72

Therapy Features and Specifications
This therapy allows programming of multiple doses at specified times.
Programming ranges are listed in the programming worksheet included in this
6
section. If a number outside of the acceptable program range is entered, an error
message displays the minimum or maximum value allowed.
Optional KVO (Keep Vein Open) may be set during programming.
6
The default bolus delivery rate is 400 mL/hr.
6
Variable Time Programming
1 Select VARIABLE TIME from the Programming Menu.
2 Select the phase type. Press [1] for Percentages, [2] for Rates, or [3] for Doses.
3 Select the unit of delivery.
4 Change the displayed time if necessary.
5 Enter the optional base rate with start and stop time.
6 If programming in Rates or Doses, go to step 7. If programming in Percentages, set
the daily amount.
7 Enter the phase information for each phase. Up to 24 phases can be programmed.
Variable Time
d
d
Abbott GemStar Manual 430-600095-002 (Rev. 8/02) 65
Note: If programming in percentages, the total daily amount of all phases programmed
must equal 100%.
8 Enter the optional bolus dose and its lockout.
9 Enter the optional KVO.
10 Enter the container size.
The pump calculates the minimum container size required to deliver the phases,
base rate, and KVO for one day or in a 24-hour period. If delivering the protocol for
more than one day, multiply this amount by the number of days of therapy.
Note: You must increase the container size to accommodate bolus deliveries.
11 Select the air sensitivity.
12 Review the program.
WARNING: I
If the cassette is removed from the pump, ALWAYS disconnect
the pump set from the patient and purge the line before
restarting therapy.
Page 73

Variable Time
d
Note: With variable time programming, the pump keeps track of where it is in the program
each minute of the entire 24-hour period. For example, if Phase 1 is missed, and the pump is
placed in
parameters from the middle of Phase 2.
RUN mode in the middle of Phase 2, it starts delivery according to the program
Variable Time Delivery Interruptions
If a phase is interrupted and
the pump is placed in the RUN mode:
Before the end of the phase. The phase runs to its scheduled stop time.
After the end of the phase, but before the
beginning of the next start time.
In the middle of a phase and the phase start
was missed because of a program interruption
or a missed program start.
Then:
The next phase begins delivery at the scheduled
start time.
All applicable Base Rate or KVO delivery infuses
while waiting for the start of the next phase.
The pump immediately begins delivery of the
current phase at its current time-based point.
Changing a Variable Time Program
d Note: You cannot change a program when the pump is in FULL or NEW CONTAINER Lock.
Can be changed at any
time
Can ONLY be changed
before [START] is pressed
Cannot be changed
d
•
KVO rate
•
Container size
•
Air sensitivity
•
Bolus
To change a program:
•
Current time
•
Base rate
•
Daily amount
•
Phase parameters
•
Unit of measure
•
Concentration
•
Phase type
1 From the STOP mode, press [CHANGE] and select [4] CHANGE PROGRAM.
2 As each program parameter displays, make the desired changes or press
[
YES/ENTER] to accept the current setting.
3 Review the program.
4 Press [START] to begin delivery.
Note: The container size cannot be made smaller than the daily total of phases, base rate, and
KVO combined; or the current amount delivered, whichever is greater.
66 Abbott GemStar Manual 430-600095-002 (Rev. 8/02)
Page 74

Variable Time
Abbott GemStar
™
Variable Time Programming Worksheet
GIVE:
Parameter Selections and/or Values to be
Entered
Select Phase Type
Unit of Measure
Current Time Confirm or correct current time. 12:00 AM - 11:59 PM
Base Rate
Total Daily Amount for All Phases: __________ (required only when programming in percentages)
———- SEE ATTACHED WORKSHEET———-
Bolus Dose
Bolus Lockout
KVO
(Keep Vein Open)
Percentages
q
Rates
q
Doses
q
Concentration:
q
Concentration:
q
mL
q
q No
q Yes Start time:
Stop time:
Rate:
q
No KVO Rate: 0.0
q
Yes KVO Rate:
mg/mL
mcg/mL
minutes 5 - 999 min
Programmable
Ranges
0.1 - 100%*
0.1 - 400 mL/hr
0.1 - 9600 mL
0.1 - 1000 mg/mL
1 - 1000 mcg/mL
or 00:00 - 23:59
12:00 AM - 11:59 PM
or 00:00 - 23:59
0.1 - 400 mL/hr
0.1 mL - 25.0 mL
0.1 mg - 2500 mg
1 mcg - 25000 mcg
0.0 - 5.0 mL/hr
Container Size
(Total Daily Amount X Number of Days
of Therapy)
Air Sensitivity
*Sum of all phases must equal 100% when programmed in percentages.
q
On Alarms at approx. 0.5 mL of air
q
2 mL Alarms at approx. 2 mL of air
q
Off No alarm
0.1 - 99999 mg
1 - 9999000 mcg
0.1 - 9999 mL
N/A
Abbott GemStar Manual 430-600095-002 (Rev. 8/02) 67
Page 75

Variable Time
Phase Start Time Stop Time Percentage Rate Dose
1
2
3
4
5
6
7
8
9
10
11
12
13
14
15
16
17
18
19
20
21
22
23
24
TOTAL
Note: The sum of all phases must equal
100% when programmed in percentages.
68 Abbott GemStar Manual 430-600095-002 (Rev. 8/02)
Page 76

Overview
Options Menu
1 Press [OPTIONS] from the RUN or STOP mode.
2 Select the number key that corresponds to the
desired function.
3 Follow the display prompts for the selected function.
Refer to the appropriate Options Menu function
description in this section for more information.
d
Note: Menu selections may vary depending on the
configuration of the pump. Some Options Menu functions are
not available in all modes.
Tips for Using the Options Menu
The following keys are helpful when using the Options Menu:
Press the corresponding number key to select a menu function.
viewing a display.
Press the up or down arrow to scroll through long display messages.
OPTIONS.
f
[1]-[8]
[YES/ENTER] Press [YES/ENTER] to accept changes, or to continue when done
[BACK-UP] Press [BACK-UP] to return to a previous display or to exit
Tip: A menu item does not have to be on the display to be selected. For
example, only items 1 through 4 display when the Options Menu is first
accessed. To select the Print Menu without scrolling the display, press [
1 REVIEW PROGRAM
2 HISTORIES
3 KEYPAD LOCK
4 PUMP SETTINGS
5 SET CLOCK
6 PRINT
7 SPEED PROTOCOL
8 NEXT DOSE
6].
d
Abbott GemStar Manual 430-600095-002 (Rev. 8/02) 69
Note: When the pump exits OPTIONS, the display returns to the mode the pump was in when
the Options Menu was accessed.
Page 77

Options Menu
Select this item from
the Options Menu:
REVIEW PROGRAM
HISTORIES
KEYPAD LOCK
PUMP SETTINGS
SET CLOCK
PRINT
SPEED PROTOCOLS
NEXT DOSE
To do this function: Comments:
Display the current program
settings.
Display the history for the latest
400 events, shift or volume totals,
bolus history (if available), or
current configuration settings.
Clear the history. Access the
Operation Test.
Access the locking and unlocking
functions to prevent unauthorized
alteration of the infusion protocol.
Change the air sensor, occlusion
sensor, and sound level settings.
Set the clock. The clock can be displayed in 12-hour
Print the history event log, bolus
history (if available), current
program settings, and speed
protocols.
Assign, review/recall, and delete
the stored protocols.
Change the start time of the next
dose when an interruption has
caused a missed dose in an
intermittent program.
N/A
N/A
The lock levels allow the clinician to
restrict access to various levels of
pump operation. When the pump is
locked under a particular level, a
small lock symbol displays by the
name of the applied lock level on the
Keypad Lock Menu.
N/A
or 24-hour format.
Files may be downloaded to a printer
or personal computer.
Allows up to 9 speed protocols to be
saved in pump memory. Removing
power has no effect on the Speed
Protocol settings.
NEXT DOSE appears on the menu
only when the pump is in an
intermittent program and changing
the next dose is allowed.
Review Program
1 Select REVIEW PROGRAM from the Options Menu;
PROGRAM REVIEW displays.
2 Press [YES/ENTER]or[BACK-UP] when done to
exit
OPTIONS.
f
Tip: PROGRAM REVIEW is also accessed by
selecting Review/Resume from the Change Menu;
or at power-on if a program is stored in the pump’s
memory and the pump has been powered off for 5
or more minutes.
70 Abbott GemStar Manual 430-600095-002 (Rev. 8/02)
1 REVIEW PROGRAM
2 HISTORIES
3 KEYPAD LOCK
4 PUMP SETTINGS
5 SET CLOCK
6 PRINT
7 SPEED PROTOCOL
8 NEXT DOSE
Page 78

Histories
1 Select HISTORIES from the Options Menu.
2 Select the number key that corresponds to the
3 Complete the appropriate steps for the selected
desired function.
function.
Options Menu
1 REVIEW PROGRAM
2 HISTORIES
3 KEYPAD LOCK
4 PUMP SETTINGS
5 SET CLOCK
6 PRINT
7 SPEED PROTOCOL
8 NEXT DOSE
Select this item from the
Histories Menu:
HISTORY
SHIFT TOTALS
VOLUME TOTALS
CONFIGURATION
CLEAR HISTORY
BOLUS HISTORY
OPERATION TEST
To do this function: Display includes:
Display history event log of the
latest 400 events.
Display or clear shift totals.
Display volume totals.
Display pump configuration.
Clear history event log and bolus
history.
Display bolus history in hourly
increments for the last 48 hours.
Bolus History is available only
when a bolus is programmed or
has been programmed during
the last 48 hours.
Perform user-assisted Operation
Test.
Current date and time
•
Date and time the program was
•
cleared, a new container was
selected, or a speed protocol
was recalled
• History event log of the latest
400 events
• Time and date when shift was
cleared
• Volume infused in the shift
• Any relevant program-specific
information
• Amount infused
•
VTBI
•
Any relevant program-specific
information
Dependent upon pump
configuration
CLEARING HISTORY
displays for 3 to 4 seconds.
•
Current date and time
•
Number of boluses delivered
•
Number of bolus demands
•
Amount delivered through
bolus delivery
•
Display messages guide the
user through each section of
the test
Abbott GemStar Manual 430-600095-002 (Rev. 8/02) 71
Page 79

Options Menu
Display History, Shift Totals, Volume Totals, and
Configuration
d
d
f
f
Note: Some menu items may not be available depending on the
configuration of the pump.
1 Select the number key that corresponds to the desired
function.
2 Press [BACK-UP] when done to exit OPTIONS.
Note: For Shift Totals only, the pump displays CLEAR
TOTALS? YES OR NO
shift totals or press [
clearing the shift totals.
Tip: Press and hold or to scroll through the
history displays faster.
Clear History Event Log and Bolus History
1 Select CLEAR HISTORY from the Histories Menu.
2 CLEARING HISTORY displays for 3-4 seconds before the
pump exits
Tip: Press [BACK-UP] to exit OPTIONS immediately.
Display Bolus History
OPTIONS.
. Press [YES/ENTER] to clear the
NO] to exit OPTIONS without
VERSION N.NNN
S/N XXXXXXXX
TIME IS 09:00 AM
FRI, 11 JUN 99
NEW CONTAINER
08:15AM 11 JUN
HISTORY CLEARED
11:00PM 10 JUN
EVENT LOG
PM11:18 SET ON
AIR SENSITIVITY
PM11:18 SET CONT
SIZE 100 mL
PM11:18 SET RATE
1.0 mL/hr
PM11:18 SHIFT
CLEARED
END OF EVENT LOG
Sample History Event Log
1 Select BOLUS HISTORY from the Histories Menu.
2 Press [BACK-UP] when done to exit OPTIONS.
d
Note: Bolus History is only available if the current
program has a bolus programmed, or had a bolus
programmed at one time. The Bolus History is maintained
in hourly increments for the latest 48 hours.
The Bolus History is cleared when a new program is
entered, a Speed Protocol is recalled, or the History is
cleared.
Operation Test
This function allows the testing of various pump operations to ensure the Abbott
GemStar Pump is working properly. Refer to the “Operation Test” section for
instructions.
72 Abbott GemStar Manual 430-600095-002 (Rev. 8/02)
TIME IS 09:15 AM
FRI, 11 JUN 99
BOL DEL NNNN
BOL DEM NNNN
BOL AMT XXXX.X mL
XX:XXM TO XX:XXM
Page 80

Keypad Lock
1 Select KEYPAD LOCK from the Options Menu.
2 Select the desired lock level.
The following lock levels, listed from lowest to highest
restrictions, are available:
Lock Level Abbreviation
Therapy Lock
Rate Change Lock
New Container Lock
Full Lock
The Abbott GemStar Pump allows two lock levels to be applied at the same time.
Therapy Lock may be used with either Full Lock, New Container Lock or Rate Change
Lock.
When two lock levels are applied, if a function is available under one lock level but not
the other, the more stringent restrictions apply.
Options Menu
1 REVIEW PROGRAM
2 HISTORIES
3 KEYPAD LOCK
4 PUMP SETTINGS
5 SET CLOCK
6 PRINT
7 SPEED PROTOCOL
T
R
N
F
8 NEXT DOSE
1 THERAPY LOCK
2 RATE CHANGE
3 NEW CONTAINER
4 FULL LOCK
When the pump is locked under a particular level, a small lock symbol ( ) appears next
to the applied lock level as shown above. When the pump is in
RUN or STOP mode, the
lock symbol appears in the lower left corner of the display and the lock level abbreviation
appears in the lower right corner.
The table on the following page lists the functions available for each lock level. Refer to
“Clinician Instructions” on page 85 for detailed instructions.
Abbott GemStar Manual 430-600095-002 (Rev. 8/02) 73
Page 81

Options Menu
Abbott GemStar
U = Unlock
T = Therapy Lock
R = Rate Change Lock
Function U T R N F Comments
Lock/Unlock Keypad
Power Pump On or Off
Start or Stop Infusion
Access Display, Help, Print, and Program
Review Functions
Deliver a Bolus
Silence an Alarm
Select a New Container
Purge
Change a Program
Review/Recall Speed Protocol
Assign or Delete Speed Protocol
Set Air Sensitivity, Distal Occlusion Level,
Sound Level, and Clock
Clear Shift Totals
Program and Deliver a Loading Dose
(Outside of Programming Mode)
Enter a New Program
Piggybacking
Rate Titration
Operation Test
Clear History
Select Another Therapy
™
Keypad Lock Level Functions
N = New Container Lock
F = Full Lock
• = Function is Available
·····
Rate Change Lock is available only if the current
program is Pain Management.
·····
·····
·····
·····
If programmed.
·····
····
····
Under Rate Change Lock, only the delivery rate or
···
··
bolus dose volume can be changed and must be within
the preset values.
Under Therapy Lock, the recalled protocol must be the
same type that was programmed when the pump was
locked.
··
··
····
··
Under Therapy Lock, the new program must be of the
··
same type that was programmed when the pump was
locked.
··
··
·
·
·
74 Abbott GemStar Manual 430-600095-002 (Rev. 8/02)
Page 82

Change Pump Settings
1 Select PUMP SETTINGS from the Options Menu.
2 Select the number key that corresponds to the
desired pump setting.
3 Follow the display prompts. Refer to the
appropriate steps of the desired pump setting for
more information.
Options Menu
1 REVIEW PROGRAM
2 HISTORIES
3 KEYPAD LOCK
4 PUMP SETTINGS
5 SET CLOCK
6 PRINT
7 SPEED PROTOCOL
8 NEXT DOSE
Select this item from
the Pump Settings
Menu:
AIR SENSOR
OCCL SENSOR
SOUND LEVEL
To do this function: Comments:
Change the air sensor
sensitivity.
Change the distal occlusion
sensor sensitivity.
Adjust the audible alarm
level.
The air alarm sounds when the pump detects
an air bubble of approximately 0.5 mL when
ON; or at approximately 2 mL when 2 mL is
selected. The air alarm does not sound if OFF
is selected.
The air alarm may also be set during
programming if the current therapy allows it.
Removing power has no effect on the air alarm
setting.
Default Setting: High
The pump alarms when distal pressure is
greater than the selected occlusion sensor
limit.
Default Setting: Maximum
Abbott GemStar Manual 430-600095-002 (Rev. 8/02) 75
Page 83

Options Menu
Air Sensitivity
WARNING:
The current air sensitivity flashes on the display.
To reduce the risk of infusing air, use an air-eliminating filter
when the air sensitivity is set to OFF.
1 Select the desired Air Sensitivity level:
If OFF is selected, AIR ELIMINATING FILTER IS
•
RECOMMENDED
If ON or 2mLis selected, CHANGE AIR ALARM
•
FROM XXXX TO XXXX
displays.
displays.
2 Select [YES/ENTER]or[NO]:
If [NO] is selected, the air sensitivity does not
•
change, the current air alarm status displays, and
the pump exits
If [YES/ENTER] is selected, the new setting is
•
accepted, the air alarm status displays for
approximately 3 seconds, before the pump exits
Occlusion Sensor
OPTIONS.
1 Select the desired setting.
2 MAKE XXXXX DEFAULT? displays. Select
[
YES/ENTER]or[NO].
•
If [NO] is selected, the distal occlusion setting is
temporarily in effect until a new program is entered
or the pump has been off for more than 24 hours.
•
If [YES/ENTER] is selected, the distal occlusion setting is permanent until the
setting is changed again.
AIR SENSITIVITY
1ON
22mL
3 OFF
CHANGE AIR ALARM
FROM: XXXX
TO: XXXX
YES OR NO
OPTIONS.
DISTAL OCCLUSION
1 HIGH
2 MEDIUM
3 LOW
Sound Level
f
76 Abbott GemStar Manual 430-600095-002 (Rev. 8/02)
1 When the Sound Level function is accessed, the pump
sounds intermittent beeps at the current sound level.
The blocks on the top line of the display indicate the
current sound level. Use [ ] to increase the sound
level. Use [ ] to decrease the sound level.
Tip: Press [CHANGE] to restore the sound level to
the default setting.
2 Press [YES/ENTER] when done.
- nnnnnnnn +
USE st TO ADJUST
THE SOUND LEVEL
ENTER WHEN DONE
Page 84

Options Menu
Set Clock
1 Select SET CLOCK from the Options Menu.
2 Select 12-Hour or 24-Hour format (24-Hour format
is shown in example).
3 Use the arrow keys to set the weekday and month.
4 Use the number keys to enter the current day, year,
and time.
d
Note: When entering the time in 12-Hour format, use
5 Press [YES/ENTER] to confirm.
f
Tip: To view the clock from the RUN or STOP mode,
press [
HOLD [
Print
WARNING: Disconnect the pump from the
d
Note: Ensure the printer is connected to the pump BEFORE
selecting a print function. Refer to “Connecting to a Printer”
in this section for more information.
1 Select PRINT from the Options Menu.
2 Select the number key that corresponds to the
desired print function.
3 When the print transmission is complete, the pump exits OPTIONS.
to toggle between AM and PM.
YES/ENTER], then immediately press and
1]. The clock displays until [1] is released.
patient BEFORE connecting the
pump to a printer or computer.
1 REVIEW PROGRAM
2 HISTORIES
3 KEYPAD LOCK
4 PUMP SETTINGS
5 SET CLOCK
6 PRINT
7 SPEED PROTOCOL
8 NEXT DOSE
SET CLOCK TYPE
1 SELECT 12 HOUR
2 SELECT 24 HOUR
TIME IS 20:35
MON, 26 JUL 99
ENTER TO CONFIRM
1 REVIEW PROGRAM
2 HISTORIES
3 KEYPAD LOCK
4 PUMP SETTINGS
5 SET CLOCK
6 PRINT
7 SPEED PROTOCOL
8 NEXT DOSE
Abbott GemStar Manual 430-600095-002 (Rev. 8/02) 77
Page 85

Options Menu
Select this item from
the Print Menu:
PRINT HISTORY
PRINT PROGRAM
PRINT PROTOCOL
PRINT BOLUS Hx
STOP PRINT
Speed Protocol
1 Select SPEED PROTOCOL from the Options Menu.
2 Select the number key that corresponds to the
desired protocol function.
3 Follow the display prompts. Refer to the
appropriate Speed Protocol functions for more
information.
To do this function:
Print the current program, shift and volume totals, and history event
log up to the most recent 400 events since the history was last
cleared.
Print the current program.
Print a specified speed protocol or a complete list of all speed
protocols. If a protocol is not assigned, NOT ASSIGNED prints next
to that protocol number.
Print the current program, shift and volume totals, and the bolus
history (Hx) for the latest 48 hours, when the current program has a
bolus programmed or had a bolus programmed at one time.
Cancel the print function. This function is only available if you have
selected one of the print functions above.
1 REVIEW PROGRAM
2 HISTORIES
3 KEYPAD LOCK
4 PUMP SETTINGS
5 SET CLOCK
6 PRINT
7 SPEED PROTOCOL
8 NEXT DOSE
Select this item from
the Speed Protocol Menu:
ASSIGN
REVIEW/RECALL
DELETE
To do this function:
Store a program in pump memory for later use.
Review assigned protocols from the RUN or STOP mode.
Recall an assigned protocol from the STOP mode.
Delete protocols from pump memory.
78 Abbott GemStar Manual 430-600095-002 (Rev. 8/02)
Page 86

Assign
1 Select ASSIGN from the Speed Protocol menu.
2 Select [1]-[9] to assign to the new protocol.
Options Menu
If the selected speed protocol is already assigned,
ASSIGNMENT?
•
•
Review/Recall
1 Select REVIEW/RECALL from the Speed Protocol menu.
2 Select the desired protocol to review/recall.
3 Review the program.
4 Press [YES/ENTER]:
•
•
Delete
1 Select DELETE from the Speed Protocol Menu.
2 Select the desired protocol to delete.
3 Press [YES/ENTER] to confirm deletion, or [NO] to exit OPTIONS without deleting.
Next Dose
This function is only available when the current therapy
is Intermittent and the pump is not delivering a dose.
To set the time for the next dose:
1 Select NEXT DOSE from the Options Menu.
2 Use the number keys to enter the start time for the
next dose. Press [
accept the change and exit
REPLACE PROTOCOL
displays.
Press [YES/ENTER] to replace the protocol. The new speed protocol displays and
the pump exits
Press [NO] to keep the existing protocol and exit OPTIONS.
If in the STOP mode, select [1] to recall the protocol; or select [2] to review
another protocol.
If in the RUN mode, the pump exits OPTIONS.
OPTIONS.
YES/ENTER] when done to
OPTIONS.
1 REVIEW PROGRAM
2 HISTORIES
3 KEYPAD LOCK
4 PUMP SETTINGS
5 SET CLOCK
6 PRINT
7 SPEED PROTOCOL
8 NEXT DOSE
f
Abbott GemStar Manual 430-600095-002 (Rev. 8/02) 79
Tip: Use to toggle between AM and PM.
Page 87

Options Menu
Connecting to the Data Port
The Data Port may be used to connect the Abbott GemStar Pump to a Seiko® DPU 414 or
compatible serial printer to print the Operation Test results or the files available from
the Print Menu. Using communication software included with most computer operating
systems (or available from local sources), these files can also be transferred to a
computer.
WARNING:
Equipment Needed
Abbott GemStar Pump
Abbott Serial Printer Cable List
13078-01
Seiko DPU 414 or Compatible Serial
Printer
Serial DB9 Female-to-Female Gender
Changer*
Null Modem*
Computer*
*Available from local sources.
Configuration Settings
Refer to the printer or computer documentation for information on configuration
settings. The printer or computer must be configured as follows to use the Data Port:
Disconnect the pump from the patient BEFORE connecting the
pump to a printer or computer.
Connect to Printer Connect to Computer
••
••
•
•
•
•
Baud Rate
Data Bits
Stop Bits
Carriage Return (+Line Feed)
Flow Control
Parity
= 2400
=8
=1
= None
= CR+LF
= None
When using the Seiko DPU 414 printer, the switch settings MUST be configured to work
with the Abbott GemStar Pump.
80 Abbott GemStar Manual 430-600095-002 (Rev. 8/02)
Page 88

Options Menu
To configure the switch settings on the Seiko DPU 414:
1 Slide the POWER switch to ON while pressing the ONLINE button.
2 After the list of the current settings starts printing out, release the ONLINE button.
3 Set the switches according to the table below.
Push ONLINE button to continue setting switches.
Press ONLINE to set switch ON.
•
Press FEED to set switch OFF.
•
4 Continue setting switches until “Dip SW setting complete!!” is printed.
Switch Settings for Seiko DPU-414 Printer
Switch Function Setting Button to Press
SW1-1 Input Method: Serial Off FEED
SW1-2 Printing Speed: High On ONLINE
SW1-3 Auto Loading: On On ONLINE
SW1-4 CR function: CR and LF On ONLINE
SW1-5 DIP SW setting command: Enabled On ONLINE
SW1-6 Printing density: 100% Off FEED
SW1-7 Printing density: 100% On ONLINE
SW1-8 Printing density: 100% On ONLINE
SW2-1 Print Mode: 40 columns On ONLINE
SW2-2 User defined char: On On ONLINE
SW2-3 Ordinary Characters: On On ONLINE
SW2-4 Zero Font: No slash On ONLINE
SW2-5 Character Set: American On ONLINE
SW2-6 Character Set: American On ONLINE
SW2-7 Character Set: American On ONLINE
SW2-8 Character Set: American Off FEED
SW3-1 Data bit length: 8 bits On ONLINE
SW3-2 Parity: No parity On ONLINE
SW3-3 Parity condition: Odd On ONLINE
SW3-4 Flow control: H/S busy On ONLINE
SW3-5 Baud rate: 2400 bps On ONLINE
SW3-6 Baud rate: 2400 bps Off FEED
SW3-7 Baud rate: 2400 bps Off FEED
SW3-8 Baud rate: 2400 bps On ONLINE
Abbott GemStar Manual 430-600095-002 (Rev. 8/02) 81
Page 89

Options Menu
Connecting to the Seiko Printer
d
WARNING:
CAUTION: Do not connect the Abbott GemStar AC Mains Adaptor to a printer.
Note: For maximum battery life, the pump should be operated on AC mains when connected to
a printer or computer.
1 Connect the serial printer cable to the printer and to the data port on the bottom of
the pump.
2 Ensure the printer is ONLINE and ready to receive data. Refer to printer
documentation for more information.
3 Ensure paper is loaded in the printer.
4 Select the desired print function from the pump menu.
Disconnect the pump from the patient BEFORE connecting the
pump to a printer or computer.
A
B
82 Abbott GemStar Manual 430-600095-002 (Rev. 8/02)
Page 90

Connecting to a Computer
Options Menu
d
f
WARNING:
Note: For maximum battery life, the pump should be operated on AC mains when connected to
a printer or computer.
1 Connect the serial printer cable to the null modem (A).
2 Connect the null modem to the serial gender changer (B).
3 Connect the serial gender changer to the serial port of the computer (C).
4 Connect the serial printer cable to the data port (D) on the bottom of the pump.
5 Configure the communications software on the computer. Refer to Configuration
Settings on page 80.
Tip: After the data transfer is complete, the file may be viewed or printed using
any text editor.
Disconnect the pump from the patient BEFORE connecting the
pump to a printer or computer.
C
B
A
D
Abbott GemStar Manual 430-600095-002 (Rev. 8/02) 83
Page 91

Notes
84 Abbott GemStar Manual 430-600095-002 (Rev. 8/02)
Page 92

Clinician Instructions
The instructions in this section apply to special features available to clinicians. If desired,
remove this section from the manual to prevent unauthorized access to these features.
Clinician Locking Sequence Instructions
Locking the Pump
d
f
d
To lock the pump from the
1 Press [OPTIONS] to display the Options Menu.
2 Select KEYPAD LOCK from the Options Menu.
Note: If the pump is already in a single lock state, the Lock Sequence Number must be
entered before a second lock level can be applied. Refer to “Adding a Second Lock Level” for
more information.
3 Select the desired lock level.
For
THERAPY, NEW CONTAINER and FULL Lock, go to step 5.
4 For RATE CHANGE Lock, set the minimum and maximum programmable ranges for
the continuous delivery rate and bolus dose in a Pain Management program.
Tip: Press [ ] to toggle between the MIN and MAX values.
•
MIN
flashes on the display. Enter the minimum value.
•
MAX
flashes on the display. Enter the maximum value.
•
Press [YES/ENTER] when done.
•
Repeat step 4 for bolus dose if available in the current program.
5 Enter the lock sequence number. Asterisks display as the numbers are entered.
•
For THERAPY Lock, enter [0][0][0][3][1].
•
For UNLOCKED, FULL, NEW CONTAINER, and RATE CHANGE lock levels, enter
[
1][3][0][0][0].
Note: Default lock sequence numbers are shown.
RUN or STOP mode:
Abbott GemStar Manual 430-600095-002 (Rev. 8/02) 85
Page 93

Clinician Instructions
Adding a Second Lock Level
1 Complete steps 1 and 2 for “Locking the Pump”.
d
d
Unlocking the Pump
d
Note: When the pump is in a single lock state, the pump displays ENTER LOCK
SEQUENCE NUMBER
Pain Management, and the clinician wants to add
the pump will request the Lock Sequence Number before
added.
2 Enter the Lock Sequence Number.
3 Complete steps 4 and 5 for “Locking the Pump”.
Note: When two lock levels are applied, if a function is available under one lock level but
not the other, the more stringent restrictions apply.
1 Select the locked level from the Keypad Lock Menu.
2 Enter the lock sequence number for that level.
Note: If the pump is locked under two levels, each level must be unlocked separately.
Unlocking one level has no effect on the other level. For example, if both
RATE CHANGE lock levels are applied, the clinician must unlock both the RATE
CHANGE
3 The pump displays the current lock levels. Press [YES/ENTER] to return to the mode
the pump was in when the Options Menu was selected.
and THERAPY locks.
. For example, if the pump is currently under THERAPY LOCK for
RATE CHANGE as a second lock level,
RATE CHANGE lock can be
THERAPY and
Program and Deliver a Clinician Activated Loading Dose
This feature is available only when the keypad is UNLOCKED or when THERAPY is the
only lock level. The loading dose rate is 125 mL/hr.
1 From the STOP mode, press [YES/ENTER] immediately followed by [0].
2 PROGRAM A LOADING DOSE? displays.
3 Press [YES/ENTER] to continue.
4 Enter the loading dose. Press [YES/ENTER] when done.
5 DELIVER THE LOADING DOSE NOW? displays.
d
Note: If [YES/ENTER] is pressed, infusion DOES NOT begin automatically when the
clinician activated loading dose is complete. Press [
loading dose is complete.
86 Abbott GemStar Manual 430-600095-002 (Rev. 8/02)
START] to resume infusion after the
Page 94

Clinician Instructions
d
Note: If [NO] is pressed, the pump returns to the STOP mode. When [START] is pressed,
DELIVER LOADING DOSE NOW? displays again. Press [YES/ENTER] to deliver the
loading dose. Infusion resumes automatically when the loading dose is complete. Press
[
NO] to cancel the loading dose and resume infusion.
Press [YES/ENTER] to deliver the loading dose. After the loading dose is complete,
•
press [
START] to resume infusion.
Press [NO] to return to the STOP mode. Press [START] to resume infusion.
•
Display Shift Totals
1 Press [OPTIONS] and select HISTORIES.
2 Select SHIFT TOTALS from the Histories Menu.
3 The shift totals display. Use the [ ] and
[ ] to scroll the display. When done, the pump
f
displays
4 Press [YES/ENTER] to clear the shift totals or press
[
NO] to exit OPTIONS without clearing the shift totals.
Tip: Press [HELP] to display shift totals when the pump is not in PROGRAMMING
mode or an alarm condition.
CLEAR TOTALS? YES OR NO.
END OF
SHIFT TOTALS
CLEAR TOTALS?
YES OR NO s
Abbott GemStar Manual 430-600095-002 (Rev. 8/02) 87
Page 95

Notes
88 Abbott GemStar Manual 430-600095-002 (Rev. 8/02)
Page 96

Troubleshooting
This section contains information on audible and visual alarms that may occur with the
Abbott GemStar Pump.
CAUTION: If the pump does not perform as stated in this manual, stop using it
IMMEDIATELY.
For consultation and technical support contact your local Abbott Laboratories sales
office.
f
Tip: Press [HELP] for additional information during programming and alarm
conditions.
Alarm Messages
Alarm Display Message
Y = Yes
N=No
AIR IN LINE
•
Pump automatically
enters STOP mode.
Is the
pump
infusing?
N A/V
Alarm
Cause/
Condition
A = Audible alarm
V = Visual alarm
The specified volume of air
has been detected in the
line distal to the cassette
while infusing.
Remedy
1. Press [SILENCE]to
quiet the alarm for 1
minute.
2. Press [STOP] to clear
the alarm.
3. Disconnect the patient
from the pump set.
4. Press and hold
[PURGE].
Note: Purge rate is 250
mL/hr. The pump purges
for up to 2 minutes each
time you press and hold
[PURGE].
5. Reconnect the pump set
to the patient-access
device.
6. Press [START] to begin
delivery.
Abbott GemStar Manual 430-600095-002 (Rev. 8/02) 89
Page 97

Troubleshooting
Alarm Display Message
Y = Yes
N=No
CHANGE BATTERIES
CHECK CASSETTE-X
CALL
1.800.XXX.XXXX
CODE: NN/MMM/TTT
Is the
pump
infusing?
N A/V
N A/V
N A/V
Alarm
Cause/
Condition
A = Audible alarm
V = Visual alarm
The pump has entered the
STOP mode due to
battery voltage below
acceptable levels.
The cassette is improperly
installed or not installed.
X indicates where to look
for the cause of the alarm:
A = Air Sensor
D = Distal
P = Proximal
The pump has detected a
condition that may require
service.
Remedy
1.
Replace both disposable
batteries with fresh AA
batteries and press
ON/OFF
[ ] to restart the
pump; OR temporarily
connect the pump to
the AC mains adaptor
and the pump will
automatically restart.
Replace both batteries
as soon as possible.
2. After power-on, resume
the current program.
Refer to Accessing the
Programming Menu in
the “Basic Operation”
section for more
information.
1. Press [SILENCE]to
quiet the alarm for 1
minute.
2. Press [STOP] to place
the pump in the STOP
mode.
3. Reinstall the cassette.
4. Press [START] to begin
delivery.
1. Write down the codes
and telephone number.
2. Power-off the pump. If
the pump does not
power-off, disconnect
external power and
remove the batteries.
3. Call the telephone
number shown on the
display message.
90 Abbott GemStar Manual 430-600095-002 (Rev. 8/02)
Page 98

Troubleshooting
Alarm Display Message
Y = Yes
N=No
DIST. OCCLUSION
Is the
pump
infusing?
Alarm
Cause/
Condition
A = Audible alarm
V = Visual alarm
N A/V The pump has detected
sustained distal pressure
over the user-selected
limit.
To avoid a bolus infusion
after an occlusion,refer to
page 126.
Remedy
1. Press [SILENCE]to
quiet the alarm for 1
minute.
2. Press [STOP] to place
the pump in the stop
mode.
3. Check for sources of
distal occlusion:
Kinked tubing below
Þ
the pump
Clamped patient-
Þ
access device
Þ Clogged I.V. filter
Þ Other obstructions
4. If the problem persists,
remove and reinstall
the cassette. Refer to
Loading the Cassette in
the “System Setup”
section.
5. Press [START] to begin
delivery.
Abbott GemStar Manual 430-600095-002 (Rev. 8/02) 91
Page 99

Troubleshooting
Alarm Display Message
Y = Yes
N=No
LOW BATTERIES
POWER LOSS
Is the
pump
infusing?
Y A/V
N A/V
Alarm
Cause/
Condition
A = Audible alarm
V = Visual alarm
The pump has detected
battery voltage below
acceptable levels and the
batteries are the primary
power source.
Note: The pump allows the
user to clear the LOW
BATTERIES audible and
visual alarm. If the condition
has not been corrected after
15 minutes, the audible and
visual alarms resume.
If the pump is infusing and a
LOW BATTERIES alarm
occurs, the pump continues
for approximately 30
minutes* before it can no
longer deliver due to
insufficient power.
*If an external power source
is used, the rate is changed,
or the pump is powered-on
after a LOW BATTERIES
alarm and those same
batteries are still in the
pump, this interval may be
different.
The pump has detected a
power failure due to one
of the following:
•
Batteries have been
removed while the
pump was on battery
source.
•
External power has
failed or has been
disconnected and no
batteries are installed.
•
Pump has been
powered on with
insufficient power
source.
Remedy
1. Press [SILENCE]to
quiet the alarm for 15
minutes.
2. Press [STOP] to place
the pump in the STOP
mode.
3. Connect the pump to
AC mains adaptor,
rechargeable battery
pack, OR replace both
disposable batteries
with fresh AA batteries.
4. Press [START] to begin
delivery.
1. Connect the pump to
AC mains adaptor,
rechargeable battery
pack, OR replace both
disposable batteries
with fresh AA batteries.
2. Power-on the pump.
Review the program if
required.
3. Press [START] to begin
delivery.
92 Abbott GemStar Manual 430-600095-002 (Rev. 8/02)
Page 100

Troubleshooting
Alarm Display Message
Y = Yes
N=No
PROX. OCCLUSION
USING BATTERIES
Is the
pump
infusing?
Alarm
N A/V
YV
Cause/
Condition
A = Audible alarm
V = Visual alarm
The pump has detected
sustained negative
pressure on its proximal
side.
This is a normal response
when:
•
The pump has been
powered on with only
disposable batteries as
a power source; or
•
The pump has switched
to internal power
(disposable batteries)
due to a loss of external
power or a reduction in
external power below
acceptable levels.
Remedy
1. Press [SILENCE]to
quiet the alarm for 1
minute.
2. Press [STOP] to place
the pump in the stop
mode.
3. Check for sources of
proximal occlusion:
Kinked tubing above
Þ
pump
Blockage in the bag
Þ
and in the spike
Þ Empty bag
Þ High torque syringe
Þ Other obstructions
4. If the problem persists,
clamp the distal line
and reinstall the
cassette. Refer to
Loading the Cassette in
the “System Setup”
section. If the alarm
still persists, power-off
the pump. Clamp the
distal line, then
power-on the pump.
5. Press [START] to begin
delivery.
When powering on the
pump:
•
Press [YES/ENTER]to
confirm disposable
batteries are the only
power source.
When switching from AC
mains:
•
Press [SILENCE]to
clear the alarm.
Abbott GemStar Manual 430-600095-002 (Rev. 8/02) 93
 Loading...