

Page 1

St. Jude Medical™ Patient
User's Guide
Controller
For Deep Brain Stimulation Systems
Model 3875
Page 2

CAUTION: Federal (USA) law restricts this device to sale by or on the order of
a physician.
™ Indicates a trademark of the Abbott group of companies.
‡ Ind
Bluetooth and Bluetooth logo are registered trademarks of Bluetooth SIG, Inc.
Pat.
©
icates a third-party trademark, which is property of its respective owner.
http://www.abbott.com/patents
2020 Abbott. All Rights Reserved.
Page 3

i
Contents
About This Guide ...................................................... 1
Symbols and Definitions ...................................... 1
Terms Used in This Document ............................ 6
Prescription and Safety Information .......................... 7
Intended Use ...................................................... 7
Indications for Use .............................................. 7
Contraindications ................................................ 8
MRI Safety Information ........................................ 8
Warnings ............................................................. 9
Precautions ....................................................... 15
Adverse Effects ................................................. 23
Patient Expectations .......................................... 28
Product Description ................................................ 30
About Your System ............................................ 31
Overview of the Patient Controller ...................... 33
Items You Will Receive ...................................... 37
Your Personal Identification Card ....................... 38
Directions for Use ................................................... 39
Start-up Screen ................................................. 39
Overview of the Therapy Screen ........................ 41
Starting and Stopping Stimulation ...................... 45
Mode ................................................................ 47
Using the Surgery Mode Feature ....................... 49
Using the MRI Mode Features ........................... 52
Viewing and Selecting a Program ....................... 57
Adjusting Strength ............................................. 60
System Information ........................................... 63
Page 4

ii
Additional Patient Controller Information ................. 66
Maintaining the Generator and Patient Controller .... 67
Checking the Generator Battery Status .............. 67
Checking the Patient Controller Battery Status ... 68
Caring for the Patient Controller ......................... 69
Cybersecurity ......................................................... 70
Protecting Access to the Patient Controller ......... 70
Wireless Security Measures ............................... 71
Guidelines for Secure Use ................................. 72
Troubleshooting ...................................................... 73
Troubleshooting Messages for MRI Mode .......... 85
Technical Support .................................................. 88
Appendix A: Downloading the Patient Controller
App ..................................................................... 89
Appendix B: Pairing the Patient Controller to the
Generator ............................................................ 91
Appendix C: Regulatory Statements ........................ 92
Statement of FCC Compliance ........................... 92
Statement of Compliance With License-Exempt
RSS Standard (Canada) .................................. 94
Declaration of Conformity (Industry Canada)
Notice to Users of Radio and Television .......... 94
Identification Information for Product
Registration .................................................... 94
Product Classification Statement (CISPR 11,
Class B) .......................................................... 95
Page 5

iii
Wireless Technology Information ....................... 95
Radio Transmitter, Cables, Transducers ............ 97
Quality of Service for Wireless Technology ......... 98
Page 6

Page 7

1
About This Guide
This guide explains how to use the St. Jude Medical™
Patient Controller application (Model 3875) with your
neurostimulation system. If you have any questions
about your system, contact Technical Support.
Symbols and Definitions
The following symbols may be used in this document
and on some of the products and packaging:
NOTE: For symbols and definitions for the
patient controller, refer to the user guide
available at support.apple.com/manuals for
the Apple‡ iOS‡ device you are using to run
the patient controller app; or, on the patient
controller Home screen, tap
General > About > Legal > Regulatory.
Settings >
Page 8

2
Symbol
Definition
continuous operation.
required.
Table 1. Symbols and definitions
Caution, consult accompanying documents
Consult this document for important safetyrelated information (This symbol is blue
and white on the device.)
Consult instructions for use
Follow instructions for use on this website
Device contains a type BF applied part to
protect you from shock. The device is
internally powered and is intended for
Magnetic Resonance (MR) Conditional, an
item with demonstrated safety in the MR
environment within the defined conditions.
At a minimum, address the conditions of
the static magnetic field, the switched
gradient magnetic field, and the
radiofrequency fields. Additional
conditions, including specific
configurations of the item, may be
Page 9

3
Symbol
Definition
Magnetic Resonance (MR) Unsafe, an item
MR environment
device.
Table 1. Symbols and definitions
poses unacceptable risks to the patient,
medical staff, or other persons within an
Device contains a radio-frequency (RF)
transmitter, which may cause RF
interference with other devices near this
Keep dry
Ingress protection rating for a device that is
protected from the intrusion of solid foreign
objects as small as 12.5 mm in diameter
and is protected from vertically dripping
water when the device is tilted at an angle
up to 15 degrees
Expiration date
Date of manufacture
Catalog number
Manufacturing facility
Page 10

4
Symbol
Definition
barrier or its packaging is compromised
Table 1. Symbols and definitions
Temperature limits for storage conditions
Humidity limits
Pressure limits
Manufacturer
Do not use if the product sterilization
Contents quantity
Programmer
Accessories
Serial number
Batch code
Unique Device Identification
Prescription use only
Page 11

5
Symbol
Definition
By ensuring that this product is disposed of
Abbott Medical.
of this directive.
Table 1. Symbols and definitions
This product shall not be treated as
household waste. Instead it is the user’s
responsibility to return this product to
Abbott Medical for reprocessing.
properly, you will help prevent potential
negative consequences for the
environment and human health, which
could be caused by inappropriate waste
handling of this product. The recycling of
materials will help to conserve natural
resources.
For more information about how to return
this product for recycling, please contact
European conformity, affixed in
accordance with the relevant provisions of
AIMD directive 90/385/EEC. Hereby,
Abbott Medical declares that this device is
in compliance with the essential
requirements and other relevant provisions
Authorized European representative
Page 12

6
Symbol
Definition
Compliance Mark (RCM)
the Japan Radio Law
Table 1. Symbols and definitions
Australian Communications and Media
Authority (ACMA) and New Zealand Radio
Spectrum Management (RSM) Regulatory
This equipment is certified for type
certification pursuant of Article 38-24 of
Terms Used in This Document
This section contains definitions of some of the terms
used in this document.
Magnetic Resonance (MR) Conditional system. A
group of implanted parts that allows a patient to
receive a magnetic resonance imaging (MRI) scan
safely if all the requirements for the implanted parts
and for scanning are met.
Program. A combination of stimulation parameters
that are set to get a desired therapeutic effect.
Stimulation parameter. A setting that is part of a
complete program.
Page 13

7
Prescription and Safety Information
Read this section to gather important prescription and
safety information.
Intended Use
This neurostimulation system is designed to deliver
electrical stimulation to targets in the brain. The
St. Jude Medical™ Patient Controller app is intended
to be used as part of the system to help the patient
manage prescribed stimulation programs.
Indications for Use
This system is indicated for the following conditions:
Bilateral stimulation of the subthalamic nucleus
(STN) or the internal globus pallidus (GPi) as an
adjunctive therapy to reduce some of the
symptoms of advanced levodopa-responsive
Parkinson’s disease that are not adequately
controlled by medications.
Unilateral or bilateral stimulation of the ventral
intermediate nucleus (VIM) of the thalamus for
the suppression of disabling upper extremity
tremor in adult essential tremor patients whose
tremor is not adequately controlled by
medications and where the tremor constitutes a
significant functional disability.
Page 14

8
Contraindications
This system is contraindicated for patients who meet
the following criteria:
Are unable to operate the system
Have unsuccessful test stimulation
The following procedures are contraindicated for
patients with a deep brain stimulation system. Advise
patients to inform their healthcare professional that
they cannot undergo the following procedures:
Diathermy (short-wave diathermy, microwave
diathermy, or therapeutic ultrasound diathermy)
Electroshock therapy and transcranial magnetic
stimulation (TMS)
MRI Safety Information
You may be implanted with the parts that make up a
Magnetic Resonance (MR) Conditional system, which
allows you to receive an MRI scan if all the
requirements for the implanted parts and for scanning
are met. Scanning under different conditions may
cause device malfunction, severe injury, or death.
Contact your physician before receiving an MRI scan
to find out if you can undergo the procedure and to
learn more about any risks. Additionally, before
receiving an MRI scan, inform the healthcare
professional that you are implanted with a
neurostimulation system. If you do not have an MR
Conditional system, you cannot receive an MRI.
Page 15

9
Do not bring your patient controller into the scanner
magnet room. It can be affected by the MRI magnet,
may present a projectile hazard, and is MR Unsafe.
For more information about what you need to do to
prepare for an MRI scan, refer to "Using the MRI
Mode Features" (page 52) in this guide.
Warnings
The following warnings apply to these components.
NOTE: For nontherapy-related warnings
regarding the St. Jude Medical™ Patient
Controller, refer to the user guide available at
support.apple.com/manuals for the Apple‡
iOS‡ device you are using to run the patient
controller app.
System Warnings
Pregnancy and nursing. Do not use the
neurostimulation system if you are pregnant or
nursing.
High stimulation outputs and charge density limits.
Avoid excessive stimulation. A risk of brain tissue
damage exists with parameter settings using high
amplitudes and wide pulse widths.
High amplitudes and wide pulse widths should only
be programmed with due consideration of the
warnings concerning charge densities. The system
can be programmed to use parameter settings outside
the range of those used in the clinical studies.
Page 16

10
If the programming of stimulation parameters exceeds
2
the charge density limit of 30 μC/cm
, a screen will
appear warning you that the charge density is too
high. Charge density can be reduced by lowering the
stimulation amplitude or pulse width. For more
information, contact your physician.
Higher amplitudes and wider pulse widths may
indicate a system problem or a suboptimal lead
placement. Stimulation at high outputs may cause
unpleasant sensations or motor disturbances or may
render the patient incapable of controlling the patient
controller. If unpleasant sensations occur, the device
should be turned off immediately using the patient
magnet.
Risk of depression, suicidal thoughts, and suicide.
New onset or worsening depression, which may be
temporary or permanent, is a risk that has been
reported with DBS therapy. Suicidal thoughts, suicide
attempts, and suicide are events that have also been
reported. Patients and caregivers should consider the
following:
Before the procedure, be sure you talk to your
treating physician(s) if you have a history of
depression, suicidal thoughts, or have attempted
suicide. Be sure you understand the possible
risks of new onset or worsening depression
(including suicidal thoughts) as well as the
potential clinical benefits of DBS therapy.
Page 17

11
After the procedure, if you notice unusual
changes in mood or behavior (such as increased
anxiety, sleeping problems, loss of interest in
activities, feeling of hopelessness, mood swings,
weight loss or weight gain), or impulse control,
contact your physician. If you are having thoughts
of suicide, contact your physician or emergency
services immediately.
It is important to attend on-going follow-up visits
with your physician to manage your therapy.
Operation of machinery and equipment. Do not
operate potentially dangerous machinery, power tools,
or vehicles or engage in any activity that could be
unsafe if your symptoms were to unexpectedly return.
Device components. The use of components not
approved for use by Abbott Medical may result in
damage to the system and increased risk to the
patient.
Electrosurgery devices. Electrosurgery devices may
harm you or damage your neurostimulation system. If
you need to receive a procedure using an
electrosurgery device, place your generator in Surgery
Mode. Your physician may only use bipolar
electrosurgery devices and they should keep the
device as far away from your neurostimulation system
as possible. Additionally, they must confirm the
neurostimulation system is functioning correctly after
your procedure.
Page 18

12
Radiofrequency or microwave ablation. Careful
consideration should be used before using
radiofrequency (RF) or microwave ablation in patients
who have an implanted neurostimulation system since
safety has not been established. Induced electrical
currents may cause heating, especially at the lead
electrode site, resulting in tissue damage.
Implanted cardiac devices. Physicians need to be
aware of the risk and possible interaction between a
neurostimulation system and an implanted cardiac
system, such as a pacemaker or defibrillator.
Electrical pulses from a neurostimulation system may
interact with the sensing operation of an implanted
cardiac system, causing the cardiac system to
respond inappropriately. To minimize or prevent the
implanted cardiac system from sensing the output of
the neurostimulation system, (1) maximize the
distance between the implanted systems; (2) verify
that the neurostimulation system is not interfering with
the functions of the implanted cardiac system; and (3)
avoid programming either device in a unipolar mode
(using the device’s can as an anode) or using
neurostimulation system settings that interfere with
the function of the implantable cardiac system.
Other active implanted devices. The
neurostimulation system may interfere with the normal
operation of another active implanted device, such as
a pacemaker, defibrillator, or another type of
Page 19

13
neurostimulator. Conversely, the other active
implanted device may interfere with operation of the
neurostimulation system.
Case damage. If the case of the implantable pulse
generator (IPG) is pierced or ruptured, severe burns
could result from exposure to battery chemicals.
Cremation. The IPG should be explanted before
cremation because the IPG could explode. Return the
explanted IPG to Abbott Medical.
Low frequencies. Stimulation frequencies at less than
30 Hz may cause tremor to be driven (meaning that
tremor occurs at the same frequency as the
programmed frequency). For this reason,
programming at frequencies less than 30 Hz is not
recommended.
Return of symptoms and rebound effect. The
abrupt cessation of stimulation for any reason will
probably cause disease symptoms to return. In some
cases, symptoms may return with a greater intensity
than what a patient experienced before system
implantation (rebound effect). In rare cases, this can
create a medical emergency.
Emergency procedures. Designate a representative
(family member or close friend) to notify any
emergency medical personnel of your implanted
neurostimulation system if emergency care is
required. You will receive an identification card to
carry that will inform emergency medical personnel of
Page 20

14
your implanted system. Use caution when undergoing
any procedure that could include radiofrequency (RF)
or microwave ablation, defibrillation, or cardioversion.
Device Warnings
Explosive or flammable gases. Do not use the device
in an environment where explosive or flammable gas
fumes or vapors are present, including hyperbaric
chambers. Operating the device could cause it to
ignite, causing severe burns, injury, or death.
Interference with other devices. This equipment can
radiate radiofrequency (RF) energy that may interfere
with other electronic devices, including other active
implanted devices. Avoid placing equipment
components directly over other electronic devices. To
correct the effect of interference with other devices,
turn off the equipment or increase the distance
between the equipment and the device being
affected.
Application modification. To prevent unintended
stimulation, do not modify the operating system or
application in any way.
Strangulation. The cords in this system pose a
strangulation risk. To avoid strangulation, be careful
when using cords and keep cords out of the reach of
children.
Page 21

15
Precautions
The following precautions apply to these components.
NOTE: For nontherapy-related precautions for
the St. Jude Medical™ Patient Controller,
refer to the user guide available at
support.apple.com/manuals for the Apple‡
iOS‡ device you are using to run the patient
controller app.
General Precautions
Infection. Follow proper infection control procedures.
Infections may require that the device be explanted.
Electromagnetic interference (EMI). Some
equipment in home, work, medical, and public
environments can generate EMI that is strong enough
to interfere with the operation of a neurostimulation
system or damage system components. Avoid getting
too close to these types of EMI sources, which include
the following examples: commercial electrical
equipment (such as arc welders and induction
furnaces), communication equipment (such as
microwave transmitters and high-power amateur
transmitters), high-voltage power lines, radiofrequency identification (RFID) devices, and some
medical procedures (such as therapeutic radiation
and electromagnetic lithotripsy).
Page 22

16
Security, antitheft, and radiofrequency identification
(RFID) devices. Some antitheft devices, such as those
used at entrances or exits of department stores,
libraries, and other public establishments, and airport
security screening devices may affect stimulation.
Additionally, RFID devices, which are often used to
read identification badges, as well as some tag
deactivation devices, such as those used at payment
counters at stores and loan desks at libraries, may
also affect stimulation. Use caution when approaching
such a device and request help to bypass the device.
If you must go through or near a gate or doorway
containing this type of device, move quickly and then
check your IPG to determine if it is turned on or off.
Unauthorized changes to stimulation parameters.
Do not make unauthorized changes to physicianestablished stimulation parameters.
Damage to shallow implants. Falling and other
traumatic accidents can damage shallowly implanted
components such as the leads and extensions.
Long-term safety and effectiveness. The long-term
safety and effectiveness of this neurostimulation
system has not been established beyond 5 years.
Safety and effectiveness has not been established for
patients with neurological disease other than
Parkinson’s disease or essential tremor, previous
surgical ablation procedures, dementia,
coagulopathies, or moderate to severe depression;
Page 23

17
patients under 22 years; implantation in targets other
than STN or GPi for Parkinson's disease and VIM for
essential tremor; patients with an active implantable
device; patients requiring MRI.
Handling and Implantation
Component manipulation. Do not rub or press on
implanted components through the skin. This may
cause the leads to move leading to stimulation at the
implant site, IPG inversion leading to the inability to
communicate with the device, or skin erosion that can
lead to another surgical procedure or possible
infection.
Abandoned leads. The long-term safety associated
with multiple implants, leads left in place without use,
replacement of leads, multiple implants into the target
structure, and lead explant is unknown.
Hospital and Medical Environments
Medical tests and procedures. Before undergoing
medical tests or procedures (such as therapeutic
radiation or electrolysis), contact your physician to
determine if the procedure will cause you injury or
damage your neurostimulation system. Specifically,
you should be aware that medical devices such as
electrohydraulic lithotriptors, therapeutic X rays,
computerized tomography (CT) scans, cobalt
machines, and linear accelerators may cause damage
to the electronic circuitry of an implanted
neurostimulation system.
Page 24

18
Electrical medical treatment. In the case that a
medical treatment is administered where an electrical
current is passed through the body from an external
source, first deactivate the IPG by setting all
electrodes to off, turning stimulation off, and setting
the stimulation strength to zero. Regardless if the
device is deactivated, take care to monitor the device
for proper function during and after treatment.
High-output ultrasonics and lithotripsy. The use of
high-output devices, such as an electrohydraulic
lithotriptor, may cause damage to the electronic
circuitry of an implanted device. If lithotripsy must be
used, do not focus the energy near the device.
Ultrasonic scanning equipment. The use of
ultrasonic scanning equipment may cause
mechanical damage to an implanted neurostimulation
system if used directly over the implanted device.
External defibrillators. Safety for use of external
defibrillator discharges on a patient receiving
neurostimulation has not been established. External
defibrillation can cause induced currents in the leadextension portion of the neurostimulation system.
After defibrillation, confirm the neurostimulation
system is still working.
Therapeutic radiation. Therapeutic radiation may
damage the electronic circuitry of an implanted
neurostimulation system, although no testing has
been done and no definite information on radiation
Page 25

19
effects is available. Sources of therapeutic radiation
include therapeutic X rays, cobalt machines, and
linear accelerators. If radiation therapy is required, the
area over the implanted IPG should be shielded with
lead. Damage to the system may not be immediately
detectable.
Electrocardiograms. Ensure the neurostimulator is off
before initiating an electrocardiogram (ECG). If the
neurostimulator is on during an ECG, the ECG
recording may be adversely affected, resulting in
inaccurate ECG results. Inaccurate ECG results may
lead to inappropriate treatment of the patient.
Home and Occupational Environments
Patient activities and environmental precautions.
Patients should take reasonable care to avoid devices
that generate strong EMI, which may cause the
neurostimulation system to unintentionally turn on or
off. Patients should also avoid any activities that would
be potentially unsafe if their symptoms were to return
unexpectedly. These activities include but are not
limited to climbing ladders and operating potentially
dangerous machinery, power tools, and vehicles.
Sudden loss of stimulation may cause patients to fall
or lose control of equipment or vehicles, injure others,
or bring injury upon themselves.
Activities requiring excessive twisting or stretching.
Patients should avoid activities that may put undue
stress on the implanted components of the
Page 26

20
neurostimulation system. Activities that include
sudden, excessive or repetitive bending, twisting, or
stretching can cause component fracture or
dislodgement. Component fracture or dislodgement
may result in loss of stimulation, intermittent
stimulation, stimulation at the fracture site, and
additional surgery to replace or reposition the
component.
Activities requiring coordination. Loss of
coordination is a possible side effect of DBS therapy.
You should use caution when doing activities that
require coordination, even if you were able to do them
before receiving therapy (for example, swimming).
Bathing. You should exercise reasonable caution
when bathing.
Component manipulation by patient. Patients
should avoid manipulating the implanted system
components (for example, the neurostimulator, the
burr hole site). This can result in component damage,
lead dislodgement, skin erosion, or stimulation at the
implant site. Manipulation may cause device
inversion, inhibiting the ability to use the magnet to
start or stop stimulation.
Scuba diving or hyperbaric chambers. Avoid scuba
diving below 30 m (100 ft) of water or entering
hyperbaric chambers above 4.0 atmospheres
absolute (ATA). Pressures below 30 m (100 ft) of
water (or above 4.0 ATA) could damage your
Page 27

21
neurostimulation system. Before diving or using a
hyperbaric chamber, contact your physician to
discuss the effects of high pressure.
Skydiving, skiing, or hiking in the mountains. High
altitudes should not affect the neurostimulator;
however, the patient should consider the movements
involved in any planned activity and take precautions
to avoid putting undue stress on the implanted
system. Patients should be aware that during
skydiving, the sudden jerking that occurs when the
parachute opens may cause lead dislodgement or
fractures, which may require surgery to repair or
replace the lead.
Household appliances. Household appliances that
contain magnets (for example, refrigerators, freezers,
inductive cooktops, stereo speakers, mobile
telephones, cordless telephones, standard wired
telephones, AM/FM radios, and some power tools)
may unintentionally cause the neurostimulation
system to turn on or turn off.
Therapeutic magnets. Patients should be advised to
not use therapeutic magnets. Therapeutic magnets
(for example, magnets used in pillows, mattress pads,
back belts, knee braces, wrist bands, and insoles)
may unintentionally cause the neurostimulation
system to turn on or off.
Page 28

22
Physician instructions. Always follow the programs
and therapy instructions established for you by your
physician. If you do not, the therapy may be less
effective.
Patient training. Do not use your neurostimulation
system until an authorized clinician has trained you
how to control stimulation and safely use the system.
Magnet usage. The magnet provided with the system
is a high-powered magnet intended for use solely with
the system. Keep it away from watches, credit cards,
computer disks, and other magnetically sensitive
items to avoid damaging them. Always place the
keeper bar on the magnet when not in use.
Home use. This product is intended for home use per
physician instruction. To avoid damage and other
potential hazards, keep this product away from
children and pets.
Wireless use restrictions. In some environments, the
use of wireless functions (for example, Bluetooth
®
wireless technology) may be restricted. Such
restrictions may apply aboard airplanes, near
explosives, or in hazardous locations. If you are
unsure of the policy that applies to the use of this
device, please ask for authorization to use it before
turning it on.
Device Precautions
Keep the device dry. Your device is not waterproof.
Keep it dry to avoid damage. Do not use the device
Page 29

23
when engaging in activities that might cause it to get
wet, such as swimming or bathing.
Handle the device with care. The device is a
sensitive electronic device that can be damaged by
rough handling, such as dropping it on the ground.
Control of your device. Keep your device out of the
hands of children in order to avoid potential damage
or unauthorized change in stimulation parameters.
Battery precaution. This device contains a lithium
ion battery as well as other potentially hazardous
materials. Do not crush, puncture, or burn the device
because explosion or fire may result. Return it to
Abbott Medical for proper disposal.
Device modification. This equipment is not
serviceable by the customer. To prevent injury or
damage to the system, do not modify the equipment.
If needed, return the equipment to Abbott Medical for
service.
Adverse Effects
Deep brain stimulation potentially has the following
adverse effects:
Possible surgical complications. Surgical
complications include, but are not limited to, the
following: intracranial hemorrhage (which can lead to
stroke, paralysis, or death); subcutaneous
hemorrhage or seroma; hematoma; cerebrospinal
fluid leakage or cerebrospinal fluid abnormality; brain
Page 30

24
contusion; infection or inflammation; antibiotic
anaphylaxis; skin disorder; edema; persistent pain at
surgery site or IPG site; erosion; brachial plexus injury
(nerves to chest, shoulder and arm); postoperative
pain, stress, or discomfort; neuropathy (nerve
degeneration); hemiparesis (muscular weakness or
partial paralysis on one side of body); ballism or
hemiballism (uncontrollable movements on both or
only one side of the body); confusion—transient,
nocturnal or ongoing; cognitive impairment, including
delirium, dementia, disorientation, psychosis and
speech difficulties; aphasia; deep vein thrombosis;
complications from anesthesia; phlebitis (vein
inflammation); pulmonary embolism (sudden blood
vessel obstruction); aborted procedures (air
embolism, unable to find target, surgical complication,
etc.); complications from unusual physiological
variations in patients, including foreign body rejection
phenomena; pneumonia, seizure or convulsions;
paralysis (loss of motor function, inability to move);
stroke and death.
Possible deep brain stimulation complications.
Deep brain stimulation complications include, but are
not limited to, the following:
Device-related complications
- Undesirable changes in stimulation related to
cellular changes in tissue around the
electrodes, changes in the electrode position,
loose electrical connections, or lead fracture
Page 31

25
- Loss of therapeutic benefit as a result of
change in electrode positions, loose electrical
connections, or lead or extension fracture
- Initial jolt or tingling during stimulation; jolting
or shocking sensations
- Infection
- Paresthesia
- Lead fracture, migration, or dislodgement
- Misplaced lead
- Extension malfunction, fracture, or disconnect
- Deep brain stimulation system failure or
battery failure within the device
- Deep brain stimulation system malfunction or
dislodgement
- Spontaneous turning on or off of the IPG
- Allergic or rejection response to implanted
materials
- Persistent pain, tightness, or redness at the
incision sites or general pain
- General erosion or local skin erosion over the
IPG
- Persistent pain, tightness, or discomfort
around the implanted parts (for example,
along the extension path in the neck)
Page 32

26
- Impaired wound healing (for example, incision
site drainage) or abscess formation
- Additional neurosurgical procedure to manage
one of the above complications or to replace a
malfunctioning component
Stimulation-related complications or other
complications
- Worsening of motor impairment and
Parkinson’s disease symptoms including
dyskinesia, rigidity, akinesia or bradykinesia,
myoclonus, motor fluctuations, abnormal gait
or incoordination, ataxia, tremor, and
dysphasia
- Paresis, asthenia, hemiplegia, or hemiparesis
- Dystonia
- Sensory disturbance or impairment including
neuropathy, neuralgia, sensory deficit,
headache, and hearing and visual
disturbance
- Speech or language impairment including,
aphasia, dysphagia, dysarthria, and
hypophonia
- Cognitive impairment including attention
deficit, confusion, disorientation, abnormal
thinking, hallucinations, amnesia, delusions,
dementia, inability to act or make decisions,
psychic akinesia, long term memory
impairment, psychiatric disturbances,
depression, irritability or fatigue, mania or
Page 33

27
hypomania, psychosis, aggression, emotional
lability, sleep disturbance, anxiety, apathy,
drowsiness, alteration of mentation, postural
instability and disequilibrium
- Restless leg syndrome
- Supranuclear gaze palsy
- Hypersexuality or increased libido
- Decreased therapeutic response
- Urinary incontinence or retention
- Diarrhea or constipation
- Cardiac dysfunction (for example,
hypotension, heart rate changes, or syncope)
- Difficulty breathing
- Increased salivation
- Weight gain or loss
- Eye disorder including eye apraxia or
blepharospasm
- Nausea or vomiting
- Sweating
- Fever
- Hiccups
- Cough
- Cramps
- Worsening existing medical conditions
Page 34

28
Patient Expectations
You and your doctor should discuss the benefits and
risks of deep brain stimulation. The primary goal of
deep brain stimulation for Parkinson's disease is to
increase the amount of time that you are not bothered
by dyskinesias, that is involuntary movements. The
primary goal of deep brain stimulation for essential
tremor (ET) is to reduce your tremor. In patients with
Parkinson's disease or ET who achieve these
improvements, deep brain stimulation may improve
their quality of life and reduce the need for
medications.
As with any surgery or therapy, deep brain stimulation
has risks and complications. See the "Adverse Effects"
(page 23) for a list of complications associated with
deep brain stimulation. Most side effects of deep
brain stimulation surgery are temporary and are
resolved within the first few months. However, some
complications can be more serious or permanent. In
the event that side effects are intolerable or you are
not satisfied with the therapy, the deep brain
stimulation system can be turned off or usually it can
be surgically removed. You also need to be aware that
you cannot undergo diathermy procedures,
electroshock therapy, transcranial magnetic
stimulation or MRIs as discussed in
“Contraindications” (page 8).
Page 35

29
Talk to your doctor about the risks associated with
placement and use of a deep brain stimulation
system.
Your deep brain stimulation team will work with you to
adjust programming and medication (if appropriate) to
find the best possible combination for your symptoms
and lifestyle. Programming will be done using a device
that can “talk” with your stimulator through your skin.
During the programming session, the clinician will
explore a range of stimulation variables to determine
the optimal settings for you. You will likely need to visit
your deep brain stimulation team a few times to
optimize your settings. Some people notice benefits
quickly, and others may need more time. While your
clinician is determining your settings, you may
experience some temporary sensations. These
temporary sensations normally stop when the settings
are changed or adjusted.
The months following your surgery can be exciting as
you become familiar with your deep brain stimulation
system. Your symptoms may significantly improve,
and you may begin to return to some of the activities
you enjoy. Talk to your deep brain stimulation team
about these activities to ensure that they won’t
damage your system.
Page 36

30
Product Description
The St. Jude Medical™ Patient Controller application
(Model 3875) allows you to view, select, and control
the programs that your physician has prescribed. The
St. Jude Medical™ Patient Controller communicates
wirelessly with the generator.
NOTE: In this document, the term "patient
controller" refers to the St. Jude Medical™
Patient Controller device and "patient
controller app" refers to the
St. Jude Medical™ Patient Controller
application (app).
Page 37

31
About Your System
This neurostimulation system is designed to deliver
electrical stimulation to targets in the brain. The
neurostimulation system includes the following
primary components:
Implantable pulse generator (IPG)
Extensions
Leads
Patient magnet
Patient controller (a device provided by
Abbott Medical or a compatible personal Apple‡
iOS‡ device)
NOTE: For more information on compatible
devices, see "Appendix A: Downloading the
Patient Controller App" (page 89).
The IPG connects to the implanted extensions, which
connect to the leads implanted in the brain. The IPG
delivers electrical pulses through the extensions and
leads to electrodes at a selected target in the brain in
order to provide therapeutic stimulation. The patient
magnet can turn the IPG on and off if the physician
enabled this functionality. Physicians use the clinician
programmer to create and modify a program for a
patient. Patients use the patient controller to control
their prescribed program.
The following image shows how the major system
components are intended to interact.
Page 38

32
1. Patient controller
5. Patient magnet
Figure 1. Interaction between major system
components
2. IPG
3. Extensions
4. Leads
Page 39

33
Overview of the Patient Controller
Your patient controller may be a device provided by
Abbott Medical or a compatible personal Apple‡ iOS‡
device.
Before you begin, be sure you are familiar with how to
perform basic operational functions on your patient
controller.
NOTE: For nontherapy-related information on
how to use the patient controller, refer to the
user guide available at
support.apple.com/manuals for the Apple iOS
device you are using to run the patient
controller app.
The patient controller app is available from the Apple
App Store and can be downloaded to your device
using your Apple ID.
See "Appendix A: Downloading the Patient Controller
App" (page 89) for more information on compatible
devices and for instructions on downloading the
patient controller app.
Using a Provided Device
If you are using a patient controller provided by
Abbott Medical, refer to the following figure for the
patient controller features.
Page 40
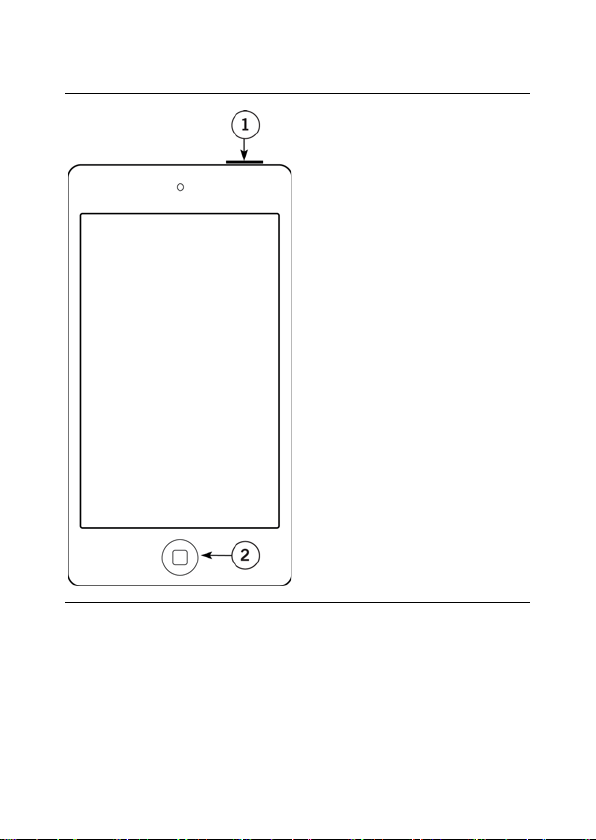
34
1. Power button
Figure 2. Patient controller features
2. Patient controller
Home button
Page 41

35
button.
Table 2. Patient controller feature descriptions
Power button To turn the patient controller on,
press and hold the Power button
until the Apple icon appears.
To turn the patient controller off,
press and hold the Power button
until the slide to power off bar
appears, and then slide the bar to
the right.
To wake the patient controller from
sleep mode, press the Power
button.
To unlock the patient controller,
press the Home button.
To place the patient controller in
sleep mode, press the Power
Patient controller
Home button
Press the patient controller Home
button to return to the patient
controller Home screen.
To wake the patient controller from
sleep mode, press the patient
controller Home button.
Page 42

36
left, up, or down.
Table 2. Patient controller feature descriptions
Touch screen
swipe
functionality
To swipe the screen to the right,
touch the left side of the screen
and briefly drag your finger to the
right side, and then lift your finger
from the screen. Use the same
general steps to swipe the screen
Using a Compatible Personal Device
If you are using a compatible personal Apple iOS
device, be sure you are familiar with how to perform
these basic operational functions on your patient
controller:
Turning the patient controller on and off
Placing the patient controller in sleep mode
Waking the patient controller from sleep mode
Locking and unlocking the patient controller
Using touchscreen functions such as tap and
screen swipe actions
Returning to the Home screen
Page 43

37
Items You Will Receive
If you are using a patient controller provided by
Abbott Medical, you will receive the following items to
use with your system:
Patient controller and charging cord
Protective case for the patient controller
Patient magnet
Product documentation
If you are using a compatible personal Apple‡ iOS‡
device, you will receive the following items:
Patient magnet
Product documentation
NOTE: For more information on compatible
devices, see "Appendix A: Downloading the
Patient Controller App" (page 89).
Page 44

38
Your Personal Identification Card
A temporary medical identification card is included
with the product documentation. Your physician will
complete the card and give it to you. Once you or your
physician submit a patient registration form, Abbott
will mail you a permanent identification card. The
registration card does the following things:
Identifies you as having an implanted medical
device
Identifies the model numbers and locations of
your implanted system parts to help determine if
you can safely receive an MRI scan
Helps you pass through security systems like
those in airports
Provides information that allows your physician to
be contacted in an emergency
If you have questions about your card or need to
request a replacement card, contact Customer
Service at 1-800-727-7846 and follow the prompt.
Page 45

39
Directions for Use
Read this section for instructions on how to use the
patient controller app. If you do not have the app
downloaded, see "Appendix A: Downloading the
Patient Controller App" (page 89) for instructions.
Start-up Screen
Tap the patient controller app icon on the patient
controller Home screen to launch the app. The patient
controller app automatically connects to your
generator. If you have multiple generators, you will
need to select the generator from the list.
NOTE: If you need to pair your patient
controller and generator, see "Appendix B:
Pairing the Patient Controller to the
Generator" (page 91) for instructions.
®
NOTE: In some cases, use of Bluetooth
wireless technology media devices (such as
headphones or speakers) may prevent the
patient controller from connecting to your
generator. Abbott Medical recommends
disconnecting these accessories before you
attempt to adjust your therapy.
Page 46

40
NOTE: The first time you launch the patient
controller app, the Legal Notices screen
opens. Tap
Accept to use the app. The legal
notice can be viewed at any time in the
Information screen.
NOTE: To avoid interruption while adjusting
your therapy, Abbott Medical recommends
enabling Do Not Disturb mode on your
patient controller prior to connecting to your
generator. Instructions for doing so have
been published by Apple, which can be
found at support.apple.com/enus/HT204321.
NOTE: Before the app can establish
communication with the IPG a prompt may
display requesting the user to allow
®
Bluetooth
wireless connection access. Tap
OK to allow Bluetooth® wireless connection
access. Otherwise, the application will be
unable to communicate with the generator.
Visit support.apple.com/en-us/HT210578 for
more information.
While your app starts up, you will see the following
Start-up screen.
NOTE: The patient controller app times out
after 3 minutes of inactivity.
Page 47

41
NOTE: If a passcode is not set for the device,
the Consider adding a passcode to this
device message will be displayed. Open the
device’s settings to add a passcode to secure
the device.
Figure 3. Start-up screen
Overview of the Therapy Screen
After the patient controller app connects with the
generator, the Therapy screen appears.
Page 48

42
1. Screen title
8. Strength button
Figure 4. Therapy screen
2. Generators button
3. Information icon
4. Program name
5. Mode
6. Sleep Timer
7. Therapy button
Page 49

43
Screen Section
or Button Name
Description
you are viewing.
63) for more information.
Table 3. Therapy screen descriptions
Screen title Displays the name of the screen
Generators button Tap the Generators button to
display the Generator List screen
and end the session with the
current generator.
Information icon Tap the Information icon to
display the system information.
See "System Information" (page
Program name Displays the name of the active
program. Tap to display the
Programs screen.
See "Viewing and Selecting a
Program" (page 57) for more
information.
Page 50

44
Screen Section
or Button Name
Description
information.
off. Tap to turn therapy on or off.
Table 3. Therapy screen descriptions
Mode Displays the active dosage
(Continuous or Intermittent). Tap
to display the Mode screen and
enable Airplane Ready mode,
Surgery Mode, or MRI Mode.
See "Mode" (page 47) for more
Sleep Timer Displays the amount of time until
therapy turns off. Tap to display
the Sleep Timer screen.
See "Mode" (page 47) for more
information.
Therapy button Displays whether therapy is on or
Strength button Displays the active program
stimulation strength level. Tap to
display the Strength screen. You
will not see this button if your
physician has not programmed
you to modify your program
strength.
See "Adjusting Strength" (page
60) for more information.
Page 51

45
Starting and Stopping Stimulation
You may start and stop stimulation using the patient
controller app or the included magnet if your
physician has enabled magnet use.
Starting and Stopping Stimulation Using the Patient Controller
To start or stop stimulation using the patient controller
app, do the following:
Tap the Therapy is ON or Therapy is OFF button
on the Therapy screen to turn stimulation on and
off.
NOTE: When you turn stimulation on from the
Therapy screen, stimulation strength will
gradually return to the target strength.
Page 52

46
1. Magnet
Starting and Stopping Stimulation Using the Magnet
If your physician has enabled magnet use, you may
start and stop stimulation with a magnet.
To start or stop stimulation using the magnet, follow
these steps:
1. Take the keeper bar off the magnet.
Figure 5. Magnet and keeper bar
2. Keeper bar
2. Hold the magnet perpendicular to and centered
directly over the generator site.
3. Hold the magnet in place for 2 seconds.
4. Remove the magnet, replace the keeper bar, and
store the magnet.
Stimulation will either start (using the most
recently used program) or stop.
CAUTION: Do not use the magnet provided
with the system around magnetically
sensitive items to avoid damaging them.
Page 53

47
Mode
Depending on the programmed dosage, Continuous
or Intermittent is displayed on the Therapy screen.
Continuous – provides nonstop stimulation
Intermittent – automatically alternates stimulation
on and off for the preset periods in the selected
program; displays the remaining time in the
current on or off period
NOTE: In neurostimulation therapy, “dose”
refers to the delivery of a quantity of energy to
tissue. A difference in “dose” in this context
does not imply differences in expected
effectiveness response as it would with a
drug. There is no demonstrated difference in
safety or effectiveness among these doses.
The Sleep Timer displays the remaining stimulation
time or Off if the Sleep Timer is off.
Tap Sleep Timer on the Therapy screen to open
the Sleep Timer screen, then tap the desired
amount of time until stimulation turns off.
Tap Mode to open the Mode screen. From this screen
you may place your system in Airplane Ready mode,
enable Surgery Mode, or enable MRI Mode (when
applicable).
Page 54

48
To enable Airplane Ready mode, tap Airplane
Ready to view the Airplane Ready screen. Follow
the instructions on the screen to turn Airplane
Ready on or off. For instructions about turning
Bluetooth® wireless technology on, see
"Troubleshooting" (page 73).
For more information about Surgery Mode, see
"Using the Surgery Mode Feature" (page 49).
For more information about MRI Mode, see
"Using the MRI Mode Features" (page 52).
Figure 6. Mode screen
Page 55

49
Using the Surgery Mode Feature
This section provides information and instructions
about what you need to do before and after a surgical
procedure. Using this feature turns therapy off while
you undergo your procedure.
NOTE: If you feel uncomfortable completing
the following steps, contact Abbott Medical
before your procedure. Contact your clinician
before your procedure to learn more about
any risks.
Preparing for a Surgical Procedure
If you are going to undergo a surgical procedure,
follow these guidelines:
Set your IPG to Surgery Mode before your
procedure. See "Setting the IPG to Surgery Mode"
(page 50) for instructions.
Charge your patient controller before the
procedure.
Bring your identification card and patient
controller to the procedure.
Page 56

50
Setting the IPG to Surgery Mode
To set your IPG into Surgery Mode, follow these steps:
1. From the Therapy screen, tap Mode to display
the Mode screen.
2. Tap Surgery Mode to view the Surgery Mode
screen.
Figure 7. Surgery Mode screen
3. Tap the Surgery Mode toggle button.
Stimulation stops and you may undergo your
surgical procedure.
Page 57

51
Disabling the Surgery Mode
After your procedure, you need to disable Surgery
Mode to restart stimulation. To disable Surgery Mode,
follow these steps:
1. Launch the patient controller app and connect
with your generator. You should see the following
screen, showing that the IPG is in Surgery Mode.
Figure 8. Generator is in Surgery Mode screen
Page 58

52
2. Tap Exit Surgery Mode. The patient controller
app disables Surgery mode. The Therapy screen
appears, showing that stimulation therapy is off.
3. To start stimulation, tap Therapy is OFF.
Using the MRI Mode Features
You may be implanted with the parts that make up a
Magnetic Resonance (MR) Conditional system, which
allows you to receive an MRI scan if all the
requirements for the implanted parts and scanning
are met. This section provides information and
instructions about what you need to do before and
after an MRI scan.
NOTE: Contact your clinician before receiving
an MRI scan to find out if you can undergo
the procedure and to learn more about any
risks.
You have two ways to learn if the implanted parts of
your system are MR Conditional:
Your personal identification card, which your
clinician or MRI technologist will use
Your patient controller app
- Tap to display the system information. The
top of the screen displays the message
"System is MR Conditional" if implanted parts
of your system are approved MR Conditional
models.
Page 59

53
- Tap Mode on the Therapy screen to display
the Mode screen. The MRI Mode option is
available if implanted parts of your system are
approved MR Conditional models.
Preparing for an MRI Scan
If you have an MR Conditional system and will receive
an MRI scan, follow these guidelines:
Charge your patient controller before the
procedure.
Bring your identification card and patient
controller to the procedure.
Set your IPG to MRI mode before the MRI scan.
See "Setting the IPG to MRI Mode" (page 54) for
instructions.
CAUTION: Do not bring your patient
controller into the scanner magnet room
since it may be affected by the MRI
magnet, may present a projectile hazard,
and is MR Unsafe.
Page 60

54
Setting the IPG to MRI Mode
To set your IPG into MRI mode, follow these steps:
1. From the Therapy screen, tap Mode to display
the Mode screen.
2. Tap MRI Mode to view the MRI Mode screen.
Figure 9. MRI Mode screen
Page 61

55
3. Tap the MRI Mode toggle button to turn on MRI
mode.
4. When the "Set Generator to MRI Mode" message
appears, tap Continue. Stimulation stops, and the
patient controller app checks the system for any
issues. If the checks are successful, the "Proceed
with MRI" message appears and the MRI mode is
on.
CAUTION: Do not delete the paired
Bluetooth® wireless connection between
the IPG and the patient controller and do
not delete the IPG from the Generators list
while the system is in MRI mode. Doing so
will prevent the system from disabling MRI
mode, which may prevent therapy from
being turned on again.
NOTE: If a warning screen appears, such as
those shown in "Troubleshooting Messages
for MRI Modes" (page 85), do not proceed
with the scan.
Disabling the MRI Mode
After your procedure, you need to disable the MRI
mode to restart stimulation. To disable the MRI mode,
follow these steps:
1. Launch the patient controller app and connect
with your generator. You should see the following
screen, showing that the IPG is in MRI mode.
Page 62
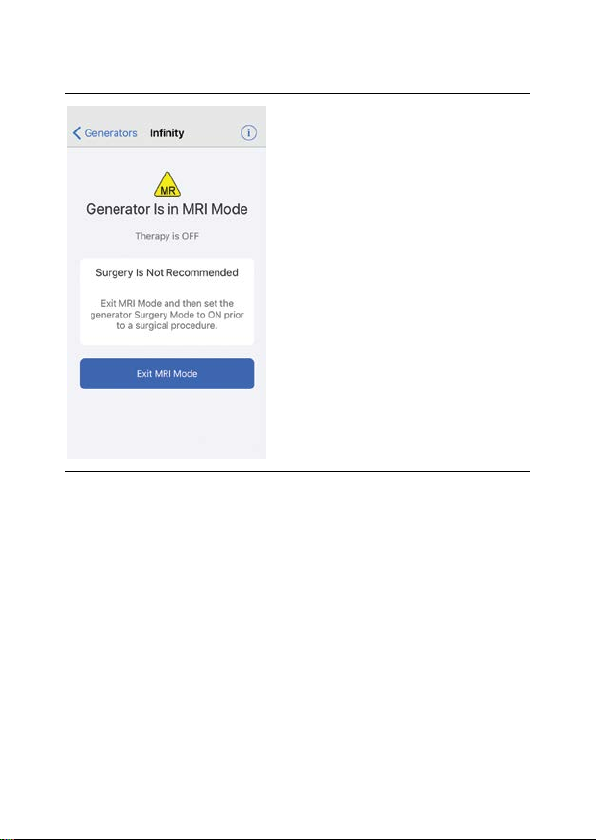
56
Figure 10. MRI Mode screen
2. Tap Exit MRI Mode. The patient controller app
disables MRI mode. The Therapy screen appears,
showing that stimulation therapy is off.
3. To start stimulation, tap Therapy is OFF.
Page 63

57
Viewing and Selecting a Program
Tap the program name on the Therapy screen to open
the Programs screen. On the Programs screen you
can view and select any of the saved programs.
To navigate between the saved programs, either:
Swipe the screen right or left in the area
containing the program information
Tap the right or left arrows
To select a program:
When you locate the program you want to
activate, tap Select This Program.
NOTE: When you select a new program,
stimulation strength will gradually increase to
the target strength set for the selected
program.
Page 64

58
1. Cancel button
6. Select This Program button
Figure 11. Programs screen
2. Program name
3. Left arrow
4. Right arrow
5. Program indicator
Page 65

59
Screen Section
or Button Name
Description
Cancel
changes will be made.
programs.
Select This Program
program as your active program.
Table 4. Programs screen descriptions
Cancel button Tap
Therapy screen. No program
Program name Displays the program name of the
current Programs screen. A check
mark next to the program name
indicates the currently selected
program.
Left and right
arrows
Tap the left and right arrows to
scroll through your saved
Program indicator Displays the number of programs
available and indicates which
program is on the screen.
Select This
Program button
Tap
select the currently displayed
to return to the
to
Page 66

60
Adjusting Strength
Tap Strength on the Therapy screen to open the
Strength screen. On the Strength screen you can
modify strength for the selected side.
Tap the + or – buttons to increase or decrease
strength.
The number and green bar above the buttons will
increase or decrease as you increase or decrease
strength.
Page 67

61
1. Done button
6. Increase button
Figure 12. Strength screen
2. Side 1 tab
3. Side 2 tab
4. Physician prescribed strength setting
5. Decrease button
Page 68

62
Screen Section
or Button Name
Description
Done
return to the Therapy screen.
for Side 2.
the selected side.
Table 5. Strength screen descriptions
Done button Tap
to save changes and
Side 1 tab Tap to view and modify strength
for Side 1.
Side 2 tab Tap to view and modify strength
Physician
prescribed
strength setting
The white notch indicates the
strength setting prescribed by
your physician.
Increase button Tap to increase the strength for
Decrease button Tap to decrease the strength for
the selected side.
Page 69

63
If the MultiStim™ programming feature is included as
part of your therapy, you will see the following screen.
Figure 13. Strength screen with MultiStim
programming feature
System Information
Tap on the Therapy screen to display the system
information. From these screens, you can view the
information for your generator, leads and extensions,
and patient controller app by tapping the
corresponding buttons.
Page 70

64
1. Done button
5. Patient Controller button
Figure 14. System information Generator screen
2. Manuals button
3. Generator button
4. Leads/Extensions button
Page 71

65
Screen Section
or Button Name
Description
Done
return to the Therapy screen.
model number.
number.
Table 6. System information descriptions
Done button Tap
to save changes and
Manuals button Tap to view information about how
to download the MRI Procedure
Information manual.
Generator button Tap to view information about your
generator, such as the generator
Leads/Extensions
button
Tap to view information about your
leads and extensions, such as the
model numbers.
Patient Controller
button
Tap to view information about your
patient controller, such as the
patient controller app model
Page 72

66
Additional Patient Controller Information
Tap at the bottom of the Generators screen to view
additional patient controller information such as the
Legal Notices. From this screen, you can also export
the patient controller log.
NOTE: When exporting the patient controller
log, you must select whether to Remove or
Include Personally Identifiable Information
(PII). It is recommended to select Remove
unless directed by your clinician or Technical
Support.
Page 73

67
Maintaining the Generator and Patient Controller
This section provides tips and other information about
maintaining your generator and patient controller.
Checking the Generator Battery Status
As the battery is used, the generator battery indicator
on the Generator information screen shows the battery
status. When the battery status is good,
displayed; and when the battery is approaching the
end of service,
lasts depends on the programmed stimulation
settings, how often stimulation is used, and how often
you communicate with the generator, so
communicate with your generator only when
necessary.
NOTE: When the generator battery is
approaching the end of service a warning
pops up on your patient controller app.
NOTE: You may also receive low battery
warnings regarding the patient controller, so
make sure to read the warning before
dismissing.
is displayed. How long the battery
is
Page 74

68
Checking the Patient Controller Battery Status
Be sure to monitor the patient controller battery status
(indicated in the top right corner of the screen). As
the battery is used, the battery indicator shows the
remaining charge. Recharge the patient controller
using only the Apple‡ charging cord and wall outlet
plug provided with your device.
NOTE: Keep the patient controller charged or
have a power supply nearby. Familiarize
yourself with the patient controller’s battery
life so you can anticipate its recharging
needs. For more information, refer to the user
guide available at
support.apple.com/manuals for the Apple
iOS‡ device you are using to run the patient
controller app.
Page 75

69
Caring for the Patient Controller
If you are using a patient controller provided by
Abbott Medical, clean the protective case by wiping
off the outer surface using a moist cloth and a small
amount of mild soap. Do not use a cloth that is
saturated. Do not use alcohol, ammonia-based
cleaning agents, cleaning solutions, or solvents to
clean the case.
NOTE: For more information on how to care
for the patient controller, refer to the user
guide available at
support.apple.com/manuals for the Apple‡
iOS‡ device you are using to run the patient
controller app.
Page 76

70
Cybersecurity
To protect the devices, products, and systems that
connect patients to healthcare professionals and
institutions, Abbott takes a broad and deep approach
to ensuring safety, privacy, and security. Visit the
information page available at
www.NMCybersecurity.Abbott to learn more about the
Abbott Medical neuromodulation cybersecurity
program. Periodically, Abbott may update this website
with important messages related to the cybersecurity
of your patient device.
Protecting Access to the Patient Controller
To prevent unauthorized access to your Apple‡
device, set up a passcode or other supported method
of biometric security (such as a Touch ID). For
instructions, refer to the user guide available at
support.apple.com/manuals for the Apple‡ iOS‡
device you are using to run the patient controller app.
Page 77

71
Wireless Security Measures
The wireless signals are secured through device
system design that includes the following:
The generator will encrypt its wireless
communication.
Only one patient controller may communicate with
the generator at the same time.
A unique key for each unit that is checked during
each transmission.
Built-in pairing that specifies valid and legitimate
pairing among units.
Proprietary authentication in addition to the
pairing procedure specified in Bluetooth® Smart
wireless technology, which includes an element of
proximity.
A proprietary algorithm that detects and prevents
an unauthorized user from attempting to pair with
the generator.
Page 78

72
Guidelines for Secure Use
Users should adhere to the following guidelines when
using the system:
Do not use the application if the operating system
is compromised (for example, jailbroken).
Do not share your Apple‡ ID login information or
device passcode.
Do not allow other users to access the mobile
device.
Do not install untrusted apps on the device you
are using to run the patient controller app.
Secure your home network with a Wi-Fi‡
password, and only connect to trusted secured
networks when not at home.
If the Apple device is lost or stolen, use Apple-
provided instructions at support.apple.com/en-
us/HT201472 to disable and/or erase your device.
If you receive a "Device Not Secure" notification in
the App, contact Abbott Medical.
Regularly check and upgrade to the latest
available version of the Patient Controller App
from the App Store.
Install iOS‡ software upgrades on your device as
they are made available by Apple‡, after verifying
iOS software version compatibility with the Patient
Controller App via
www.NMmobiledevicesync.com/dbs.
Page 79

73
Troubleshooting
This section provides troubleshooting procedures to
help you identify and solve problems that may occur.
NOTE: If you encounter problems other than
those described in this section, contact
Technical Support.
NOTE: Refer to the terms and conditions for
repair or replacement of Abbott Medical
neurostimulation system components as
stated in the Limited Warranty card included
in your product documentation.
Page 80

74
Message
Solution
Settings
Bluetooth
Table 7. Troubleshooting messages
Turn On Bluetooth to
Access Generator
Turn on Bluetooth®
wireless technology on
your patient controller if
communication is
disabled.
1. Return to the patient
controller Home
screen and tap
.
2. Tap
, then
tap the Bluetooth
toggle button.
NOTE: If you turn
®
Bluetooth
wireless
technology off and
on or reset the
app, it will take
longer to
reconnect to your
generator.
Page 81

75
Message
Solution
persists.
problem, contact Technical
to adjust your therapy.
Table 7. Troubleshooting messages
System Problem
The system encountered
a problem. Contact
Abbott if this problem
Generator Unavailable
Make sure the generator
is in range and has
enough battery power.
Generator Not
Connected
Connect to the generator
Try the action again. If you
continue to encounter this
Support.
Make sure your generator
is in range and the battery
has enough charge (see
"Checking the Generator
Battery Status" (page 67)),
then try connecting to your
generator again.
If your generator does not
have enough battery
power, contact your
physician.
Your connection has timed
out. Reconnect to your
generator.
Page 82

76
Message
Solution
problem, contact Technical
Support.
problem, contact Technical
Support.
Table 7. Troubleshooting messages
Connection Problem with
the Generator
Connection Lost
A magnet was used to
place the generator in
the Bluetooth pairing
mode.
Connection Not Ready
This device was not
ready to find the
generator.
Replace Generator Soon
The generator is
approaching its end of
service and will need to
be replaced soon.
Contact your physician to
schedule a replacement.
Try connecting to your
generator again. If you
continue to encounter this
Try connecting to your
generator again.
If you continue to
encounter this problem,
contact Technical Support.
Try connecting to your
generator again. If you
continue to encounter this
Contact your physician.
Page 83

77
Message
Solution
schedule a replacement.
Dismiss
another program.
View Programs
Table 7. Troubleshooting messages
Replace Generator
The generator has
reached the end of its
service.
Contact your physician to
Therapy is OFF
Therapy was turned off
because the program
needed to be reset.
Therapy is OFF
You will need to select
Strength was Decreased
The generator could not
deliver the desired
strength.
Contact your clinician if
the problem persists.
Contact your physician.
Tap
Tap
.
to
select another program.
Try adjusting strength
again.
If you continue to
encounter this problem,
contact your physician.
Page 84

78
Message
Solution
the problem persists.
Table 7. Troubleshooting messages
Strength is OFF
The generator could not
deliver the desired
strength.
Contact your clinician if
Unsupported Device
This application is not
compatible with this
device.
Try adjusting strength
again.
If you continue to
encounter this problem,
contact your physician.
Use the device provided by
Abbott Medical or a
compatible personal
Apple‡ iOS‡ device.
NOTE: For more
information on
compatible
devices, see
"Appendix A:
Downloading the
Patient Controller
App" (page 89).
Page 85

79
Message
Solution
the latest version.
ntact Technical
Table 7. Troubleshooting messages
Patient Controller App
Update Required
This app must be
updated to work with the
newer generator
software. Open the App
Store from this device
and update the app to
Open the App Store from
the device and update the
patient controller app to
the latest version. If you
continue to encounter this
problem, co
Support.
Page 86

80
Problem
Possible Cause
Possible Solution
drained.
Table 8. Possible causes and solutions for potential
issues
Cannot locate
patient
controller app.
Patient
controller has
no power or has
lost power.
Patient
controller app is
not on patient
controller Home
screen.
Patient
controller’s
battery is
Patient
controller is
damaged or
malfunctioning.
Swipe through
screens from the
patient controller
Home screen to
locate app.
Search for the
app using the iOS
search function.
Recharge the
battery using the
charger.
Replace the
patient controller.
Page 87

81
Problem
Possible Cause
Possible Solution
the charger.
charger.
malfunctioning.
Table 8. Possible causes and solutions for potential
issues
Patient
controller will
not charge.
Nothing is
displayed on
the screen.
Charger is
disconnected
from the patient
controller.
Correct plug
adapter (voltage
converter) is not
connected to
Charger is
defective.
Patient
controller is
damaged or
Patient
controller is off
or has timed
out.
Connect the
charger to the
patient controller.
Connect the
appropriate plug
adapter (voltage
converter) to the
Replace the
charger.
Replace the
patient controller.
Turn on the
patient controller.
Page 88

82
Problem
Possible Cause
Possible Solution
Support.
malfunctioning.
Table 8. Possible causes and solutions for potential
issues
Patient
controller’s
battery is
Recharge the
battery using the
charger.
drained.
Screen is
damaged or
malfunctioning.
If the patient
controller appears
to be powered on
but without
display, the
screen may be
defective. Contact
Technical
Patient
controller will
not respond to
input.
Patient
controller has
locked up.
Perform a soft
reset by turning
the patient
controller off and
back on.
Touchscreen
interface is
Replace the
patient controller.
damaged or
Page 89

83
Problem
Possible Cause
Possible Solution
drained.
he patient
of sight.
Table 8. Possible causes and solutions for potential
issues
Patient
controller is not
communicating
with the
generator.
Patient
controller is off
or has timed out
and is in
standby mode.
Patient
controller
battery is
Bluetooth®
wireless
technology
connection is
not strong or
turned off.
Wake up the
patient controller.
Charge t
controller battery.
Decrease the
distance between
the devices.
Move the devices
away from other
devices that may
be causing
interference.
Move the devices
so they share line
Page 90

84
Problem
Possible Cause
Possible Solution
speakers).
messages" table.
Table 8. Possible causes and solutions for potential
issues
Do not operate
other wireless
devices at the
same time.
Disconnect any
Bluetooth®
wireless
technology media
accessories (such
as headphones or
Wait a few
minutes and try
connecting again.
Turn on
Bluetooth®
wireless
technology using
the instructions in
the
"Troubleshooting
Page 91

85
Problem
Possible Cause
Possible Solution
Table 8. Possible causes and solutions for potential
issues
Patient
controller is
Replace the
patient controller.
damaged or
malfunctioning.
Troubleshooting Messages for MRI Mode
The following tables show issues you may encounter
while setting MRI mode. The first table shows possible
issues that you may see on the Mode screen while
trying to open the MRI Mode screen. The second
table shows messages that you may see while setting
MRI mode. Follow the guidelines to help troubleshoot
the issue.
Page 92

86
Problem
Possible Cause
Solution
MRI is Not
Permitted
MRI Mode
an MRI scan.
controller.
Table 9. Possible causes and solutions for potential
issues with opening the MRI Mode screen from
the Mode screen
displayed
instead of the
option on the
Mode screen.
Cannot access
the Mode
screen.
is
A part of the
system is not
MR Conditional.
The IPG is not
connected to the
patient
Contact your
clinician for help
identifying the
models of your
system. If you
have any
implanted parts
that are not MR
Conditional, you
cannot receive
Try connecting
to the IPG again.
Page 93

87
Message
Description
clinician.
voltage is too low.
Table 10. Troubleshooting messages for MRI mode
MRI is Not Advised
There may be a problem
with the implanted
lead(s). Contact your
MRI is Not Advised
There may be a problem
with the implanted
lead(s). Contact your
clinician. Your clinician
can perform an
additional check to see if
MRI Mode can be set.
MRI is Not Advised
The generator battery
The generator is not in
MRI mode, and an MRI
scan cannot be performed.
The generator is not in
MRI mode, and an MRI
scan cannot be performed.
Contact your clinician for
additional assistance.
The generator is not in
MRI mode, and an MRI
scan cannot be performed.
Page 94

88
Technical Support
For technical questions and support for your product,
use the following information:
+1 855 478 5833 (toll-free within North America)
+1 651 756 5833
For additional assistance, call your local Abbott
Medical representative.
Page 95

89
Appendix A: Downloading the Patient Controller App
You must download the patient controller app to your
patient controller (either a device provided by
Abbott Medical or a compatible personal Apple‡ iOS‡
device) in order to use the patient controller with your
generator. The patient controller app is compatible
with Apple iOS mobile digital devices as specified on
the Abbott Medical neuromodulation patient
resources page at
www.NMmobiledevicesync.com/dbs. Be sure your
patient controller is running an Apple-released iOS
version before downloading the patient controller app.
If you do not have an Apple ID you can create one
while setting up the device or before installing the
app. For instructions, refer to the Apple ID support
page at support.apple.com/apple-id.
Page 96

90
If you have already set up your patient controller, see
the following steps for downloading the app.
To create a new Apple ID:
1. Make sure the device is connected to a Wi-Fi‡
network.
2. Follow the onscreen prompts.
NOTE: Use an existing e-mail address or set
up a free iCloud‡ e-mail address. Note your
password since you will need it to verify your
account and update your app.
3. Click Verify now in the e-mail sent to your e-mail
address.
4. Follow the onscreen prompts to finish creating
your Apple ID.
To download the app:
1. Make sure the device is connected to a Wi-Fi‡
network.
2. Tap the App Store icon on the patient controller
Home screen.
3. Enter Abbott Patient Controller in the Search
field.
4. Once you locate the correct app, follow the
onscreen prompts.
NOTE: If you encounter problems
downloading the app, contact Technical
Support.
Page 97

91
Appendix B: Pairing the Patient Controller to the Generator
To pair the patient controller to the generator:
1. Place the magnet perpendicular to the generator
for 10 seconds.
2. Tap the patient controller app.
The patient controller app launches.
3. Tap .
The Add Generator screen opens.
4. Tap an available generator in the "Select a
Generator…" list.
If no generators are found, you will see the No
Generators Found message. Tap to search for
available generators again and refresh the
generator list.
5. Enter the pin code displayed on the screen in the
Bluetooth Pairing Request dialog box.
6. Tap Pair to pair the patient controller and
generator.
The "Connecting to Generator…" message
displays while the patient controller is connecting
to the generator.
Page 98

92
Appendix C: Regulatory Statements
NOTE: These statements are applicable to
the generator. For Regulatory Statements
regarding the patient controller, refer to the
user guide available at
support.apple.com/manuals for the Apple‡
iOS‡ device you are using to run the patient
controller app; or, on the patient controller
Home screen, tap
About > Legal > Regulatory.
Statement of FCC Compliance
This equipment has been tested and found to comply
with the limits for a Class B digital device, pursuant to
part 15 of the FCC rules. These limits are designed to
provide reasonable protection against harmful
interference in a residential installation. This
equipment generates, uses, and can radiate
radiofrequency energy and, if not installed and used
in accordance with the instructions, may cause
harmful interference to radio communications.
However, there is no guarantee that interference will
not occur in a particular installation.
Settings > General >
Page 99

93
If this equipment does cause harmful interference to
radio or television reception, which can be determined
by turning the equipment off and on, the user is
encouraged to try to correct the interference by one or
more of the following measures:
Reorient or relocate the receiving antenna.
Increase the separation between the equipment
and receiver.
Connect the equipment into an outlet on a circuit
different from that to which the receiver is
connected.
Consult the dealer or an experienced radio/TV
technician for help.
Operation is subject to the following two conditions:
This device may not cause harmful interference.
This device must accept any interference
received, including interference that may cause
undesired operation.
Modifications not expressly approved by the
manufacturer could void the user’s authority to
operate the equipment under FCC rules.
Page 100

94
Statement of Compliance With LicenseExempt RSS Standard (Canada)
This device complies with Industry Canada licenseexempt RSS standard(s). Operation is subject to the
following two conditions: (1) this device may not
cause interference, and (2) this device must accept
any interference, including interference that may
cause undesired operation of the device.
Declaration of Conformity (Industry Canada) Notice to Users of Radio and Television
This Class B digital apparatus meets all the
requirements of the Canadian interference-causing
equipment regulations.
Identification Information for Product Registration
This device has a label that contains, among other
information, a product identifier in the following
format:
 Loading...