

Page 1

ABARTHPUNTO
Page 2

SUMMARY
The Innovative Telematic Solution for cars
based on Microsoft Auto™
GENERAL INFORMATION ................................................. 3
Hands-free system .................................................................. 3
SMS message reader ............................................................... 5
Media Player ............................................................................. 6
Road safety ............................................................................... 7
DISPLAY AND BUTTONS ON
THE STEERING WHEEL ....................................................... 8
HANDS-FREE FUNCTION QUICK GUIDE .................... 10
Preparing your mobile phone phonebook ......................... 10
Getting to know voice commands ...................................... 11
Pairing your mobile phone .................................................... 11
Making a phone call ................................................................. 12
QUICK GUIDE TO SMS MESSAGE READER ................. 13
QUICK GUIDE TO THE MEDIA PLAYER ......................... 13
USING Blue&Me™ .............................................................. 14
Steering wheel controls ......................................................... 14
Car radio controls .................................................................. 14
Voice commands ..................................................................... 14
Display ....................................................................................... 17
Audio ......................................................................................... 17
Blue&Me™ function menu ................................................. 18
HANDS-FREE FUNCTIONS ................................................ 19
Making a phone call ................................................................. 19
Managing incoming calls ......................................................... 23
Managing calls in progress ..................................................... 23
Conference call function ........................................................ 24
SMS MESSAGE READER FUNCTIONS ............................. 25
Reading the last message received ...................................... 25
Inbox .......................................................................................... 26
Managing SMS messages ......................................................... 26
Deleting all messages .............................................................. 27
Notification settings ................................................................ 27
MEDIA PLAYER FUNCTIONS ............................................ 28
Connecting a USB device to Blue&Me™ ........................ 28
Managing the media library ................................................... 29
– Selection by folder ............................................................... 29
– Selection by artist ................................................................ 30
– Selection by genre ............................................................... 31
– Selection by album ............................................................... 31
– Selection by playlist ............................................................. 32
Playing audio tracks ................................................................ 32
– Shuffle playback of the whole media library ................... 32
– Now playing (track data) .................................................... 33
– Pause ....................................................................................... 33
– Brake ...................................................................................... 33
Page 3

– Next track ............................................................................. 33
– Previous track ....................................................................... 33
– Changing audio source ....................................................... 34
Practical tips for using Media Player..................................... 34
– Scrolling ................................................................................. 34
– Organising multimedia files ................................................ 34
– Creating a media library on Blue&Me™ ......................... 35
– Creating a playlist for Blue&Me™ ................................ 35
USB settings .............................................................................. 35
– Automatic playback ............................................................. 35
– Shuffle ..................................................................................... 36
– Track loop ............................................................................. 36
SETTING FUNCTIONS ......................................................... 37
Pairing a mobile phone ........................................................... 37
Managing user data .................................................................. 40
Advanced options ................................................................... 43
Exit settings menu ................................................................... 43
TECHNOLOGIES SUPPORTED BY Blue&Me™ ......... 44
Mobile phones with Bluetooth
®
technology ................... 44
– Mobile phones with phonebook management
function .................................................................................. 44
– Mobile phones with single contact function
management .......................................................................... 44
– Mobile phones with SMS message management ........... 44
Supported USB storage devices ........................................... 45
– USB storage devices ............................................................ 45
– Managing audio files from iPod devices ........................... 45
– Supported digital audio files .............................................. 46
– Supported playlist formats ................................................. 47
LIST OF AVAILABLE VOICE COMMANDS .................... 48
Table of always available voice commands ........................ 48
Table of hands-free voice commands ................................. 49
Table of SMS message reader voice commands ............... 51
Table of Media Player voice commands ............................. 52
Table of setting functions voice commands ...................... 55
TROUBLESHOOTING ......................................................... 56
Hands-free ................................................................................ 56
– General .................................................................................. 56
SMS message reader ............................................................... 64
Media Player ............................................................................. 66
iPod ............................................................................................ 71
PERSONAL DATA PROTECTION .................................... 72
IMPORTANT INFORMATION ON USING
THE SYSTEM SOFTWARE ................................................... 73
Page 4

Hands-free system with Bluetooth®technology,
SMS message reader and Media Player
GENERAL INFORMATION
Blue&Me™ based on Microsoft Auto™
is a personal infotainment system which
allows the use of communication and entertainment applications, specially designed
for use on cars.
The Blue&Me™ system installed on your
car is equipped with hands-free, SMS message reader and Media Player, and it is preset for the installation of additional services that will become available over time.
Note
Not all mobile phones support the SMS
text message reader function or automatic phonebook transfer via Bluetooth
more information on mobile phones which
support this function, go to www.fiat.com.
®
. For
Thanks to its complete integration with
the voice commands, the steering wheel
controls, the car radio controls and the information on the instrument panel display,
the Blue&Me™ system allows customers
who have a mobile phone with Blue-
tooth®to use it even if it is in their jack-
et pocket or handbag without ever having
to take their hands off the steering wheel.
To use the voice commands, there is no
need for a voice learning stage by the voice
recognition system.
The system is capable of recognising the
voice commands given, irrespective of
gender, by the tone of voice and intonation of the person giving the instructions.
With this system you can also play your
favourite music stored on a USB device
and select tracks and playback modes with
both voice commands and buttons on the
steering wheel.
HANDS-FREE SYSTEM
The basic characteristic of this function is
the hands-free communication with voice
recognition and Bluetooth
This system allows you to make and receive phone calls using voice commands
or manual controls on the steering wheel
in complete safety, freedom and comfort
while driving, in full compliance with the
requirements of the law.
Bluetooth
connection between your mobile phone
and the hands-free system installed on
your car.
®
technology enables wireless
®
technology.
3
Page 5

To use the hands-free function, you need
a Bluetooth®technology enabled mobile
phone. This function allows you to interact vocally with your mobile phone while
driving, even if your mobile device does
not feature this capability. You can also interact with your mobile phone manually
and visually using the steering wheel controls and the instrument panel display.
For more information on the mobile
phones supported by Blue&Me™, refer
to the chapter TECHNOLOGIES SUPPORTED BY BLUE&ME™.
To get started with the Blue&Me™
hands-free function with voice recognition,
simply pair your Bluetooth
®
technology
enabled mobile phone with the system.
Pairing is an operation that has to be carried out only once.
Note
During the mobile phone pairing procedure, Blue&Me™ attempts to detect
a phone equipped with Bluetooth
®
technology within range. It then establishes the
connection using a Personal Identification
Number (PIN).
Once your phone is paired, you can transfer your mobile phone contacts to the
system, make a phone call either by using the phonebook or dictating the phone
number, accept a call and answer a second incoming call.
To interact with Blue&Me™ you can use
both the buttons on the steering wheel
and voice commands. With voice recognition, you can perform system functions
by giving voice commands which are
recognised by the system. When the system recognises a voice command, it will
respond with the appropriate action.
Voice recognition is an easy and convenient way to use Blue&Me™.
All the system functions are available within the Blue&Me™ Main Menu. When the
car is not moving, you can scroll through
the menu using both the buttons on the
steering wheel and voice commands.
When you are travelling, you can interact with Blue&Me™using buttons on the
steering wheel or voice commands relevant only to phone functions (LAST
CALLS and PHONEBOOK) and the
Media Player. To activate settings functions
when travelling you can only use voice
commands.
The hands-free function enables the following operations:
❒
Calling a contact in the phonebook
using voice commands – you can call
a contact in your mobile phone phonebook using your voice. You can also call
someone in your phonebook by selecting from those that appear on the
display of the instrument panel.
(This function requires your phonebook
to be copied onto the car’s hands-free
system).
❒
Dialling a telephone number using voice commands – you can dial
a phone number by saying the digits.
4
Page 6

❒
Calling the sender of an SMS message – you can directly call the phone
number of the sender of the last message
received, or a message already received
and saved in the Blue&Me™ inbox.
❒
Accepting a call – you can accept an
incoming call by pressing the ß/MENU
button on the steering wheel.
❒
Conference Call – you can call another contact with a phone conversation already in progress (with Bluetooth
phones that support this function)
❒
Call waiting – while engaged in a phone
conversation, you can receive notification of another incoming phone call, answer the incoming phone call, and
switch between the calls. (Call waiting
is only supported by some of the compatible mobile phones).
❒
Refuse a call – you can refuse an
incoming call by pressing the key
/MENU
ß
.
SMS MESSAGE READER
(only for mobile phones which
support this function)
A speech synthesiser integrated with
Blue&Me™ can automatically read incoming messages on your car radio received on a mobile phone equipped with
Bluetooth
®
technology. Abbreviations
and emoticons in the text message are
also interpreted.
®
The SMS message reader functions are
managed by the steering wheel controls or
Blue&Me™ voice commands.
The Blue&Me™ SMS message reader allows you to:
❒
Be informed, by means of a warning
message on the instrument panel display, of a new SMS message on your
mobile phone with Bluetooth®; the
number/name of the sender is displayed and Blue&Me™ will also ask
whether to read the message to you.
❒
Manage the inbox on your mobile
phone connected to Blue&Me™.
❒
Re-read previously received and saved
SMS messages.
❒
Make a voice call to the sender of the
received SMS message by means of the
steering wheel controls or voice commands.
❒
Delete single SMS messages or the entire SMS inbox by means of the steering wheel controls or voice commands.
Blue&Me™ can also recognise and read
abbreviations (e.g. “LOL” will be read
“Laughing out loud”) and interpret the
most common emoticons (e.g. :-) will be
read as Smiley) used for texting today.
5
Page 7

MEDIA PLAYER
With the Blue&Me™ Media Player you
can play, via the car sound system, the digital audio files stored on a USB device by
simply connecting it to the USB port located in the car.
In this way, you can play your personal
music collections while you are driving.
❒
iPod player – see “Management of audio files from iPod devices”.
With the Media Player, you can:
❒
Digital audio playback – you can play
back your digital audio files or a customised playlist (see “Compatible digital audio files”).
❒
Audio selection by category –you
can play back all audio in a certain category, e.g. album, artist or genre.
❒
Using the playback functions – whilst
playing tracks you can use other functions such as Play, Stop, Next, Previous,
Shuffle and Track loop.
Note
Media Player does not support DRM (Digital Rights Management) protected audio
files. Unsupported audio files on the USB
device will be ignored (see “Compatible
digital audio files”).
To use Media Player, simply plug your USB
device to the car-s USB port (either directly or with an extension lead). When
the key is turned to MAR, Blue&Me™
will start to create your media library index. At the end of the operation, you can
navigate through the whole library and
browse categories by using the steering
wheel controls, voice commands or car
radio controls. After you have chosen
what you want to listen to, Blue&Me™
will play it through the cars audio system.
6
Page 8
ROAD SAFETY
WARNING
Using certain functions of this system while driving can distract your attention from the road, and possibly cause an acci-
it and, if required, only when the car is stopped.
dent or have other serious consequences; for this reason certain functions must only be used when driving conditions allow
WARNING
Read and follow these instructions: before using your system, read and follow all the safety information and instructions in this
quences.
Keep the manual in the car: if it is kept in the car, the User Guide will become something quick and easy to consult for those not familiar
with the system. Make sure that before using the system for the first time, all persons have access to the User Guide and read its instructions
and safety information carefully.
IMPORTANT: Looking at the system when driving can divert attention from the road, risking accidents or other serious consequences. Do not change system settings or enter data non-verbally (using the manual controls) while driving. Stop the car
in a safe and legal manner before carrying out these operations. This is important since while setting up or changing some functions your attention may be distracted from the road and you may have to remove your hands from the wheel.
Voice commands: the system functions can be carried out using only voice commands. Using voice commands while driving allows you to op-
erate the system without removing your hands from the wheel.
Looking at the display for a long time: while driving, do not use any function that requires looking at the display for a long time. Pull over
in a safe and legal manner before attempting to access a function of the system that requires prolonged attention. Even occasional short glances
at the display may be hazardous if your attention is diverted from driving at a critical moment.
Setting the volume: do not turn the volume up too high. Keep the volume at a level where you can still hear outside traffic and emergency
signals while driving. Driving while unable to hear these sounds may cause an accident.
Using the voice recognition: the voice recognition software is based on a statistical process that is subject to error. It is your responsibility
to monitor voice recognition functions included in the system and address any errors.
Danger of distraction: the functions may require manual settings (not using voice commands). Attempting to perform such setup or insert
data while driving can seriously distract your attention and could cause an accident or other serious consequences. Stop the vehicle in a safe
and legal manner before attempting these operations.
manual (“User Guide“). Failure to observe the precautions found in this User Guide may lead to an accident or other serious conse-
GENERAL OPERATION
7
Page 9
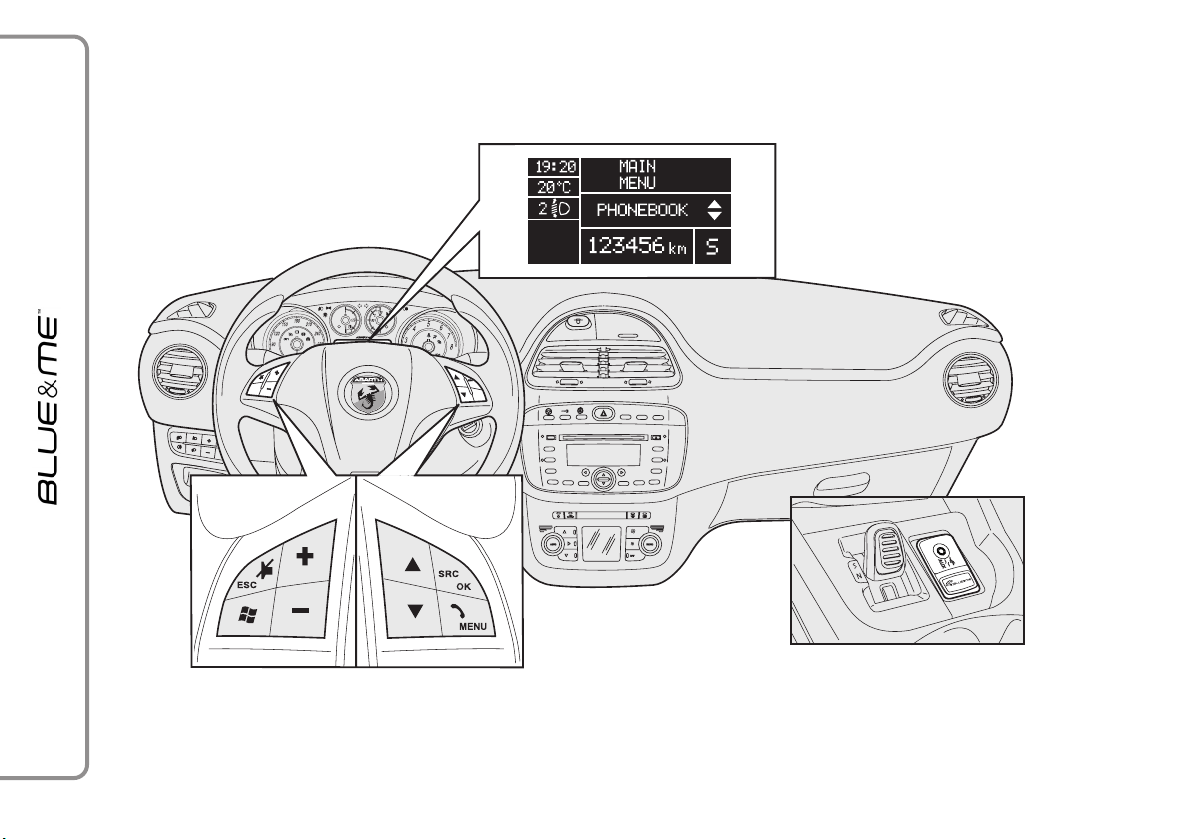
DISPLAY AND CONTROLS ON THE STEERING WHEEL
F0U1027Abg
fig. 1
8
Page 10

Button
Short press
(less than 1 second)
Long press
(more than 1 second)
/MENU
ß
/ESC
&
‘
+/
−
N/O
SRC/OK
NO
(*)
(*)
¯˙
Notes
(*) Radio buttons
For many functions, the SRC/OK and ß/MENU controls on the steering wheel are interchangeable and you can select the button you prefer.
❒
❒
For both methods of operating the steering wheel controls (short press or hold down), the function is activated when you release the button.
– Activate the Main Menu of Blue&Me™
– Confirm selected menu option
– Accept an incoming phone call
– Switch between two ongoing phone conversations
(call waiting)
– Select the message displayed
– Deactivate voice recognition
– Interrupt a voice announcement
– Interrupt the reading of an SMS message
– Exit from the Main Menu of Blue&Me™
– Exit from a submenu and return to the previous menu option
– Exit from the current menu option without saving
– Turn the microphone on/off during a phone conversation
– Mute the ring tone of an incoming call
– Media Player Pause on/off
– Enable voice recognition
– Interrupt voice announcement to provide a new voice command
– Adjust the volume of Blue&Me™ functions: hands-free,
SMS message reader, Media Player, voice announcements
– Scroll through Blue&Me™
menu items – Select Media Player tracks
– Scroll through SMS messages in the list
– Confirm manually selected menu option
– Switch phone conversation from the hands-free system
to your mobile phone and vice versa
– Audio source selection (Radio, CD, CD Changer, Media Player, AUX)
– Select the SMS message displayed
– Selection of previous/next folder/artist/genre/album depending
on the mode selected
– Play previous/next track (Media Player mode)
– Reject an incoming phone
call
– End the phone call
in progress
–
– Repeat the last voice
message given by
the system
–
–
–
–
–
9
Page 11

HANDS-FREE QUICK GUIDE
To start using the hands-free function with
Bluetooth®Blue&Me™voice recognition:
❒
Turn the ignition key to MAR
❒
Try out the voice commands
❒
Pair your mobile phone
❒
Make a phone call.
Instructions for each of the above func-
tions are given in the following paragraphs.
PREPARING YOUR MOBILE
PHONE PHONEBOOK
Before creating a pairing relationship between your mobile phone and Blue&
Me™ you should make sure that you have
your contacts in your mobile phone
phonebook so that you can use them with
the hands-free system.
If your phonebook is empty, create
new entries for frequently dialled phone
numbers. For further details, consult your
mobile phone manual.
For the best use of the car-s hands/free
system, refer to the suggestions for how
to store the names in your mobile phone
directory in the SETTINGS FUNCTIONS
– PAIRING A MOBILE PHONE chapter.
IMPORTANT NOTES
❒
The phonebook copied to Blue&Me™
can only be used when the corresponding mobile phone is connected.
❒
Entries stored in SIM card or mobile
phone memory can be transferred to
Blue&Me™ with different procedures, depending on your mobile phone
model.
10
Page 12

GETTING TO KNOW
VOICE COMMANDS
When talking to the system, you can always use the voice command “Help”, to
obtain detailed instructions on the voice
commands available for each stage of interaction.
To try out the the “Help” command, proceed as follows:
❒
Press the steering wheel button ‘.
❒
After Blue&Me™ emits a tone indicating that voice recognition is active,
say “Help”. Blue&Me™ will give the
list of voice commands available.
❒
After the help message is finished, say
“Settings” and then, after the message,
“Help”. Blue&Me™ will repeat the list
of voice commands available for the
SETTINGS menu.
❒
You can then give one of the available
commands and proceed with the dialogue as you wish.
❒
If you need further help, press ‘and
say “Help” again.
PAIRING YOUR MOBILE PHONE
IMPORTANT This operation should be
carried out only with the car stationary.
To pair your mobile phone, proceed as
follows:
❒
Press ‘and say “Settings” then, at
the end of the Blue&Me™ message
say “Pairing”.
❒
The system will show the phone pairing
number (PIN) on the instrument panel
display. For the next two stages, consult the chapters in your mobile phone
manual on pairing and connecting
through Bluetooth®technology.
❒
On your mobile phone, search for devices equipped with Bluetooth®technology (the setting on your mobile
phone might be called Search or New
Device). Find “Blue&Me” in this list
(the name that identifies the Blue&
Me™ system in your vehicle) and select it.
❒
When prompted, enter the PIN displayed on the instrument panel display
using your mobile phone keypad. If pairing is successful, the system will say
“Connecting” and at the end the display will show, as confirmation, the ID
of the paired mobile phone.
It is important to wait for this confirmation message – if you press
/ESC before it appears, you risk can-
&
celling the pairing process. If the pairing
fails, an error message will appear; in this
case, you will need to repeat the procedure.
❒
After pairing, Blue&Me™ will say
“Welcome” immediately after connecting for the first time. This message
will no longer be heard at subsequent
pairing or connecting procedures.
/MENU or
ß
11
Page 13

❒
Blue&Me™ will ask if you would like
to copy the phonebook of the phone
that you have just paired to Blue&
Me™. You are advised to copy it. To
start copying the phonebook say “Yes”,
otherwise say “No”.
❒
On some compatible mobile phones the
names in the directory are not copied
automatically, but have to be transferred
by the user using the mobile phone keypad. If prompted byBlue&Me™ carry out this procedure following the instructions specific to your mobile
phone and press ß/MENU when you
have finished.
MAKING A PHONE CALL
Imagine that “John” is one of the contacts
stored in your phonebook.
To call John, proceed as follows:
❒
Press the steering wheel button ‘and
say “Call John”.
❒
If the name is recognised, the system
will display the information for the contact on the display.
If there is just one phone number for John
in your phonebook, the system will ask if
you would like to call John. To start the
call say “Yes”, otherwise say “No”.
If John has several phone numbers, the
system will ask which phone number you
would like to call (e.g.: “Call John (at)
work or (at) home?”). Answer with the
type of phone number required (e.g. “(at)
Home”).
If John has several phone numbers but the
type of phone number is missing, the system will display the selected contact and
a list of related phone numbers. The
hands-free system will ask if you would like
to call the phone number displayed. If the
number displayed is the one you wish to call,
say “Yes”, otherwise say “No”. If this is the
correct contact but the wrong number, say
“Forward” or “Backward” to see the
other phone numbers for this person.
To call the displayed phone number, say
“Call”. You can also scroll through the
phone number list manually by pressing
the
N
or Obuttons on the steering
wheel until you find the required number.
When you do, press ß/MENU or SRC/
OK to make the call.
❒
To end the call, press ß/MENU for
more than one second.
If you encounter difficulties with using
the hands-free system, refer to the chapter “HANDS-FREE – TROUBLESHOOTING”.
12
Page 14

QUICK GUIDE TO SMS
MESSAGE READER
(only for mobile phones which
support this function)
If your Bluetooth®phone supports this
function, when you receive a new SMS
message, Blue&Me™ alerts you with an
audible signal and asks you if you want to
read it.
❒
say “Yes” or press the ß/MENU or
SRC/OK buttons: the system will read
the last message received
❒
say “No” or press the button &/ESC;
the system will store the message and
you can read it later.
To get to know all the functions and ways
of using the SMS message reader, refer to
the chapter “SMS MESSAGE READER
FUNCTIONS”.
If you encounter difficulties using the
SMS message reader, refer to the “SMS
MESSAGE READER TROUBLESHOOTING”.
QUICK GUIDE
TO THE MEDIA PLAYER
Proceed as follows to start playing the digital audio files stored on your USB device:
❒
Copy the tracks to your USB device
(see paragraph “Compatible digital audio files”).
❒
USB devices without USB cable: simply connect the USB device (directly or
with an extension lead) to the USB port
on the car (see fig. 1).
❒
USB devices with USB cable: use the cable to connect the USB device to the
USB port on the car (see fig. 1).
❒
Turn the ignition key to MAR.
Blue&Me™ will automatically start to
play your digital tracks, selecting them
from the library that is created when
the USB device is connected.
❒
The time required by Blue&Me™ to
recognise your USB device and start
playback may depend on the type of device, its capacity and its contents.
❒
After Blue&Me™ has created the library of your digital audio files, you can
select and play tracks, albums, artists and
playlists by interacting manually or verbally with Blue&Me™. Creating the library may require a few minutes if your
USB device contains many files.
❒
iPod player – see paragraph “Managing
audio files from iPod devices”.
❒
You can also decide whether to play audio files automatically when the USB/
iPod device is connected or to play
them only on your command.
To get to know all the functions and ways
of using the Media Player, refer to the
chapter “MEDIA PLAYER FUNCTIONS”.
If you encounter difficulties with using
the Media Player, refer to the chapter “MEDIA PLAYER – TROUBLESHOOTING”.
13
Page 15

USING Blue&Me™
STEERING WHEEL CONTROLS
The controls on the steering wheel (see
fig. 1) are used with the hands-free
function, to activate voice recognition, to
use Media Player functions or to select
a Blue&Me™ menu option.
Certain buttons have multiple functions
which depend on the state of the system
in a given moment.
The function chosen in response to a key
press depends in some cases on the duration of the key press (short or long).
For further information refer to the
chapter “DISPLAY AND THE STEERING
WHEEL CONTROLS”.
Note
The instructions on the use of the system
through manual controls are shown in the
text by the symbol
?
.
CAR RADIO CONTROLS
In Media Player mode, the buttons
/¯/˙
on the front of the radio activate:
NO
Select previous/next folder/artist/
genre/album depending on the selection mode enabled
¯˙
Play previous/next track.
N/O
VOICE COMMANDS
Voice commands can be given by the driver, who does not need to change their
normal driving position to be heard by
the system. The microphone is properly
located and oriented for this purpose.
The words which are recognised by the
system are identified as “voice commands”.
The hands-free system recognises and responds to a preset list of voice commands.
The list of available voice commands depends on the point you are at in the handsfree system menu. The list of voice commands available at any moment is always
available by pressing
or saying “Help” after a system message.
Blue&Me™ also recognises personalised
versions of voice commands such as the
name of a contact in your phonebook.
There is no voice training phase required
for using voice commands with this
hands-free system.
and saying “Help”,
‘
14
Page 16

To give the system a voice command, press
, wait for the acoustic signal which in-
‘
dicates that the voice recognition system
is active; at this point you can give the
command in your normal voice, not too
quickly but without interruptions. When
the system recognises the command, it will
give a response or act on your command.
The voice commands are divided into level 1, level 2 and level 3.
When a valid* 1st level voice command is
given, the system will activate 2nd level
voice commands; when a valid 2nd level
voice command is given, the system will
activate 3rd level voice commands.
If the user gives a valid 1st level voice command, then the submenu relevant to that
command will remain active until a voice
command leading to another level is given
or the interaction is interrupted; the same
rule applies for the other lower levels (2
and 3rd).
A voice announcement is a spoken message initiated by the system. To cancel
a voice announcement, press
press ‘and say “Cancel”.
A voice interaction is a exchange of messages/commands between the system and
the user. To initiate a voice interaction,
press
rupt an interaction and start a new one,
press ‘at any time during the interaction and issue a voice command.
To stop an ongoing interaction press
&
indicating that voice recognition has been
deactivated.
nd
and issue a command. To inter-
‘
/ESC. You will hear an audible signal
&
/ESC, or
For a list of all available keywords, re-
fer to the chapter LIST OF AVAILABLE
VOICE COMMANDS.
To listen again to the last message given
by the system, press
one second or briefly press ‘and say
“Repeat”.
The hands-free system may issue voice
announcements.
* Valid means that the voice command given is included in the Blue&Me™ vocabulary and can therefore be recognised by the system
at a given level.
for more than
‘
The help function can give the list of commands available to you at any time, depending on the level that you are currently
in. To use the help system, say “Help”.
Listen to the list of available commands
and decide which command to give to the
system.
Adjust the volume to a level that is comfortable and safe while the car is in motion.
To adjust the preset Blue&Me™ volume,
refer to the “SPEECH VOLUME function”
section in the car radio instruction booklet. To temporarily adjust the volume of
the current phone call, press + or − or
adjust the position of the car radio knob.
After the phone call has ended, the volume will revert to the original level.
You can also press + or − to adjust the
volume of the current Blue&Me™ voice
announcement.
Remember that, to interrupt a voice announcement, you can press
during a voice interaction and give a new
voice command.
at any time
‘
15
Page 17

Notes
❒
Instructions concerning the use of voice
commands are identified in the text by
the symbol }.
❒
After you press ‘, if you do not issue a voice command within a few seconds, the system will prompt you to
give a voice command. If you do not respond, then voice recognition deactivates. This is also the case if you do not
respond to a question from the system.
You will hear a audible signal indicating that voice recognition has been deactivated.
❒
When the system fails to recognise one
of your voice commands, it will give you
another opportunity to issue the voice
command. If you are unsure of whether
the voice command is appropriate for
a given level, say “Help”.
Using voice recognition
The voice recognition system may occasionally fail to recognise a voice command.
To ensure that your voice commands are
always recognised by the system, use the
following guidelines:
❒
After pressing ‘, give the voice command after the system provides the audible signal that indicates that voice
recognition is active.
❒
After the system has asked you a question, wait a second before giving the answer, in order to be sure that voice
recognition is active.
❒
If you want to give a command without
waiting for the system to finish its announcement or question, you can press
again briefly to interrupt the system
‘
and give your command.
❒
Speak at a normal volume.
❒
Pronounce words clearly, not too
quickly but without interruptions.
❒
If possible, try to minimise noise inside
the car.
❒
Ask the other passengers not to talk
before you give voice commands. This
is to prevent misunderstanding since
the system may recognise other words
(in addition to or different from your
voice command) if several people are
speaking.
❒
If your car has a sun roof, you are advised to close it before using voice
recognition.
Notes
For countries where a version in the native language is not available, voice recognition of the different commands and
above all phonebook contacts may be difficult. You are therefore advised to adopt
a pronunciation/accent that conforms to
the language present on Blue&Me™.
To change the voice recognition language
contact a Abarth Dealership or consult the
dedicated area on www.fiat.com.
16
Page 18

DISPLAY
The various options in the Blue&Me™
Main Menu are displayed on the instrument panel display and the car radio (see
fig. 1).
The display shows the following information:
❒
Status information for the mobile
phone connected with Bluetooth
®
technology:
❒;indicates that Blue&Me™ is con-
nected to a mobile with Bluetooth
®
technology.
❒
Absence of the ;symbol means that
the connection with the mobile phone
has been lost.
❒
Symbol Ãindicates that the active call
is the first to be answered; this symbol
is present only in the event of a call
waiting.
❒
Symbol Àindicates that the active call
is the second to be answered; this symbol is present only in the event of a call
waiting.
❒
The Symbol ‰indicates that a Conference Call is in progress.
❒
Name of your current network operator
(“- - - - -” is displayed if not available).
❒
Information relating to the receipt of an
SMS message, the phone number or the
name (if stored in the phonebook) of the
sender of the SMS message.
❒
Information relating to the audio track
that is being listened to with Media
Player.
❒
Current Blue&Me™ function information or selected menu option information.
AUDIO
Blue&Me™ uses your car’s audio system
to provide audio output (hands-free, Media Player, voice announcements and audible signals). For this purpose, the active
audio source is muted for the time required.
You can always adjust the audio volume
either through the car radio or the steering wheel controls.
The car radio display shows dedicated
messages to inform you that the audio system is being used by Blue&Me™.
17
Page 19

Blue&Me™ FUNCTION MENU
The Blue&Me™ Main Menu shows the
options in a list which is shown on the instrument panel display. The Blue&Me™
system settings can be changed or the
functions activated by using the available
options.
The Main Menu includes the following options:
❒
LAST CALLS – this submenu allows
you to view a list of recent calls, made or
received. This list is either downloaded
from your mobile phone memory, or
updated during use of the hands-free
system, or both.
❒
PHONEBOOK – this submenu allows
you to view the phone numbers in your
phonebook and to select one to dial. If
there is a large number of entries in your
phonebook, they will be grouped in alphabetical submenus. The number of
contacts within a group depends on the
number of entries in your phonebook.
❒
SMS MESSAGE READER
(only for mobile phones which
support this function)
This submenu allows you to read the
last SMS message received, call the
sender of the SMS message or delete
the last SMS message received.
You can store up to 20 text messages
in a dedicated inbox and listen to them
later, call the sender or delete them.
You can also set the notification methods for SMS messages received.
❒
MEDIA PLAYER – this submenu allows you to scroll through the digital
audio tracks in the library by folder,
artist, genre, album or by playlist. This
menu can also be used to select the
tracks to be played and change Media
Player settings.
IPod player – see “Managing audio files
from iPod devices”.
❒
SETTINGS – this submenu allows
you to manage your phonebook entries, pair a new device or access information on the Blue&Me™ system
and applications.
Activating the Main Menu
To activate the Blue&Me™ Main Menu,
press
/MENU then interact with the sys-
ß
tem by using the steering wheel controls.
Navigating through the menu
options
To navigate through menu items, press
orO.
When the number of characters for
a phonebook contact exceeds the maximum number of characters allowed, the
name will be truncated.
To select the option shown on the display,
press SRC/OK or
To exit from the selected item or from
a submenu, press
ß
&
/ESC.
/MENU.
N
18
Page 20

HANDS-FREE FUNCTIONS
Blue&Me™ lets you make and receive
phone calls on your Bluetooth®technology enabled mobile phone using voice
recognition or steering wheel controls.
You can use voice commands to phone
your contacts by saying their name and/or
surname, or you can phone numbers that
are not stored, by saying the number out
loud, or you can call the sender of a received SMS message.
With the steering wheel controls, you can
make phone calls to people in your phonebook or call history list by selecting the
desired contact in the LAST CALLS or
PHONEBOOK submenu.
Furthermore, you can respond to incoming calls, redial an engaged number,
receive a call alert, read an SMS message
or delete it.
If you encounter difficulties using
phone functions with the car’s hands-free
system, refer to the chapter “HANDSFREE TROUBLESHOOTING”.
Notes
❒
Before you can make and receive phone
calls using the hands-free system, you
must create a pairing relationship for
your mobile phone.
For more information refer to the chap-
ter “SETTING FUNCTIONS – PAIRING
A MOBILE PHONE”.
❒
To activate the hands-free system, the
ignition key must be turned to MAR.
❒
If during a phone call you turn the ignition key to STOP, you can continue
your conversation through the handsfree system for a further 15 minutes.
MAKING A PHONE CALL
A call can be made in one of the following ways:
❒
Calling a contact in your phonebook
❒
Dialling a phone number using voice
commands
❒
Dialling a phone number using the mobile phone keypad
❒
Calling a phone number using call history (last calls)
❒
Call the sender of a received SMS message
For more information refer to the chap-
ter SMS MESSAGE READER FUNCTIONS – MANAGING SMS messages.
19
Page 21

Calling a name in the phonebook
You must create a pairing relationship and
download your mobile phone phonebook
to the system to use this feature.
To call a contact in your phonebook
using manual interaction, proceed as
?
follows:
Activate the Main Menu by pressing ß/MENU.
Select CONTACTS and then press
SRC/OK or ß/MENU.
Press NorOto select the alphabetic group to which the name of the
person belongs, press SRC/OK or
/MENU and then select the de-
ß
sired name.
If there is only one phone number
for the person you wish to contact,
press SRC/OK or ß/MENU to
make the call.
If there are several phone numbers
for the person you wish to contact,
press SRC/OK or
cess the different contact numbers,
then select the one you wish to contact using Nor
SRC/OK or ß/MENU to make the
call.
To end the call, press ß/MENU for
more than one second.
/MENU to ac-
ß
O
and press
Or, using voice interaction:
}
Imagine that you would like to call
the contact “John” in your mobile
phone phonebook.
Press ‘and say “Call John” or
“Call John (on/at) Mobile” (in the
voice command, the word “Mo-
bile” represents the type of phone
number you would like to call. The
phone number type could also be
“(at) Home”, “(at) Work”, or
“(on/at) Other”).
If the name is recognised, the system will display the recognised contact’s information (John, in the example) on the display screen.
If the person has just one phone
number, the system will ask if you
would like to call them. To start the
call say “Yes”, otherwise say “No”.
If the person has several phone
numbers, the system will ask which
phone number you would like to call
(e.g. “Call John (at) Work or (at)
Home?”). Answer with the type of
phone number required (e.g. “(at)
Home”).
If the person has several phone
numbers but the type is missing, the
system will display the contact and
a list of related phone numbers.
To call the displayed phone number,
say “Call”.
If the contact is recognised correctly but the phone number is wrong,
you can scroll through the phone
number list manually by pressing
orO. When you have identified the
number you want, press ß/MENU
or SRC/OK to make the call.
To end the call, press ß/MENU for
more than one second.
Tip
When you call a contact with multiple
phone numbers, indicate the type of number you want to call in the voice command
(“(at) Home”, “(at) Work”, “(on/at)
Mobile”) This will reduce the number of
steps required to make the phone call.
N
20
Page 22

Dialling a number using voice
commands
To dial a phone number using voice
interaction, proceed as follows:
}
Press
The system will reply “Number,
please”.
Give the phone number as a sequence of single digits (e.g. “0”, “1“,
“2”, “3”, “4”, “5”, “6”, “7”, “8”, “9”,
“+” (plus), “#” (hash) or “*” (star).
For example, 0113 290103 is pronounced “zero, one, one, three, two,
nine, zero, one, zero, three”.
The system will display and repeat
the complete phone number recognised.
If the number is complete, say
“Call”. If you have not finished giving the phone number, say the remaining digits and then say “Call”.
and say “Dial
‘
”.
The system will start the call to the
displayed phone number.
To end the call, press
more than one second.
You can give the phone number in
“digit groups” which allows you to
verify the recognised number one
group at a time. Digit groups are
created by the pauses you make
while saying the digits. If you pause
after pronouncing a certain number
of digits, a digit group is created. The
system will repeat the digits recognised.
If the given digits are correct, you
can continue to dictate the phone
number. If they are incorrect, you
can delete the digit group by saying
“Delete”. The system will delete
the last group of numbers and display the partially-composed phone
number. You can then give the remaining digits of the phone number.
To cancel the phone call, say “Can-
cel”.
/MENU for
ß
To cancel the phone number displayed and start dialling again, say
“Start over”.
To ask the system to repeat the
recognised phone number, say
“Repeat”. If no phone number was
dialled, the system says that no
number is available.
If the repeated phone number is
correct, say “Call” to start the call.
Note
When dialling a phone number using voice
commands, it is essential to minimise background noise in the car and that the other passengers do not speak while you are
dictating the number. Since the system operates irrespective of who is speaking, it
will recognise other voices; there is therefore the risk that some numbers are
recognised incorrectly, added to correct
numbers or not recognised.
21
Page 23

Dialling a number using the mobile
phone keypad
Alternatively, you can dial a phone
number using your mobile phone
?
keypad and then continue your
conversation using the hands-free
system.
For this operation you must create
a pairing relationship and bring the
mobile phone within range of the
hands-free system of your car.
To dial a phone number using your
mobile phone keypad, proceed as
follows:
❒
Dial the phone number on your
mobile phone keypad and make
the phone call following the procedure required by your mobile
phone.
❒
Conduct the conversation using
the hands-free system.
❒
To end the call, press ß/MENU
for more than one second or use
the appropriate button on your
mobile phone.
Dialling a number using call history
(last calls)
The LAST CALLS option is a list of calls
made or received. It can consist of up to
ten incoming calls, ten outgoing calls and
five missed calls.
To dial a phone number using manual interaction, proceed as follows:
?
❒
Activate the Main Menu by pressing ß/MENU.
❒
Select the LAST CALLS option and then press SRC/OK or
/MENU.
ß
❒
The system will present a list of
phone numbers. Use NorOto
select the desired phone number; then press SRC/OK or
/MENU to make the call.
ß
❒
When you have finished your
conversation, press ß/MENU
for more than one second to end
the call.
Or, using voice interaction:
}
To call back the last incoming phone
number, press
back”.
The system will display information
about the last caller and ask if you
would like to call them. To start the
call say “Yes”, otherwise say “No”.
and say “Call-
‘
To redial the last phone number you
called, say “Redial”. The system will
display information about the last
contact you called and will ask if you
would like to call them. To start the
call say “Yes”, otherwise say “No”.
The “Recall” command can also be
used. In this case, the system will ask
“Redial or callback?”. To call back
the last person you phoned, say
“Outgoing call”. To call the last
person who phoned you, say “In-
coming call”
22
Page 24

MANAGING INCOMING CALLS
With the hands-free function you can respond to incoming calls using the controls
on the steering wheel. When a phone call
is received, the system will display information about the caller’s identity if available.
The incoming phone call will be indicated
with the customised ring tone from your
phone (if this function is available on your
phone).
Answering a phone call
❒
To answer a call, press ß/MENU.
❒
To end the call, press ß/MENU for
more than one second.
Rejecting a call
❒
To reject a call, press ß/MENU for
more than one second.
Ignoring a call
❒
To ignore the phone call and mute the
ring tone, press &/ESC. Press &/ESC
again to go hear the ring tone again.
Answering an incoming call during
a conversation
To answer an incoming call whilst another conversation is in progress, press
/MENU. The system will switch to the
ß
incoming phone call and put the current
phone conversation on hold.
Note
Certain mobile phones can transmit your
contacts’ ring tones to the hands-free system. In this case the incoming phone calls
will use customised ring tones on your
mobile phone.
MANAGING CALLS
IN PROGRESS
Transferring a call from your
mobile phone to the hands-free
system
If you enter the car during a mobile phone
conversation, you can transfer the phone
conversation to the car’s hands-free system.
Proceed as follows:
❒
Get into the car and turn the ignition
key to MAR, to activate the hands-free
system.
❒
The system will communicate with the
previously paired phone confirming the
possibility of activating the hands-free
system.
❒
To transfer the conversation to the
hands-free system, activate the function
as required by your mobile phone. This
process is different for each mobile
phone.
❒
The phone conversation is transferred
to the car’s hands-free system.
23
Page 25

Transferring a phone conversation
from the hands-free system to
your mobile phone
To transfer a phone conversation from the
hands-free system to your mobile phone,
press SRC/OK.
You can talk on your mobile phone and
continue to use the controls on the
steering wheel. In particular, if you have
more than one active conversation, you
can press
phone call to the other; press ß/MENU
for more than one second to end the conversation.
Putting a phone call on hold
To put a call in progress on hold and disable the microphone in order to be able
to talk without being heard by the person you are talking to press
/MENU to switch from one
ß
/ESC.
&
CONFERENCE CALL FUNCTION
(only with Bluetooth
phones that support this function)
The Telephone Conference function allows you to make a phone call to a third
person during an active call. In this way
you can speak with both people at the
same time.
To start a Conference while you are engaged in a phone conversation, call the
second contact as described in the section
MAKING A PHONE CALL.
®
technology
When Conference Call function is active
the display will show “CONFERENCE”.
Once the conference is activated, holding down the
both calls.
Note
A third incoming call received during
a conference call cannot be managed.
/MENU button will end
ß
24
Page 26

SMS MESSAGE READER FUNCTIONS
(only for mobile phones which support this function)
If your mobile phone equipped with Bluetooth®technology supports the SMS mes-
sage reader function, when a new SMS message is received, Blue&Me™will notify
you with an acoustic signal and ask you
if you want to read it (depending on the
notification options set).
To see the list of mobile phones and
functions supported, consult the dedicated website www.fiat.com, Blue&
Me
™
section, or call Customer Services
on 00800.222784.00.
For information on the notification op-
tions, refer to the paragraph Notification
settings.
If you want Blue&Me™to read
the SMS message received with
?
manual interaction, press SRC/OK
or ß /MENU. The SMS message
will be read taking into account any
abbreviations and emoticons within the text.
If you do not want to read the SMS
message, press &/ESC; Blue&
Me™ will not read the message
but save it so that it can be read another time (for further information,
refer to the Read last message
received paragraph).
Or, using voice interaction:
if you say “Yes”, Blue&Me™ will
}
read the text of the message, taking into account any abbreviations
present, but if you do not want to
read the message just say “No”: the
system will save it to give you the
possibility of reading it later (for
further information please refer to
Read last message received
paragraph).
READING THE LAST MESSAGE
RECEIVED
When an SMS message is received, whether
it is read or not, Blue&Me
in an inbox (refer to the Inbox paragraph).
If you want to read the last message
received, activate the Blue&Me
?
Main Menu and select the MESSAGE
READER option, then press SRC/
OK or ß/MENU.
Select the READ LAST option and
press SRC/OK or ß/MENU; in
this way Blue&Me™ will read the
last message received.
Or, using voice interaction:
}
Press
Blue&Me™will read the text of
the last message received.
and say “Read last”,
‘
™
will save it
™
25
Page 27

INBOX
Blue&Me™ stores up to 20 received
messages (if there are concatenated messages the number of messages stored may
be less) during the connection with your
Bluetooth
box is full, if a new message is received the
oldest message will be deleted even if it has
not been read yet. Messages in the inbox
can be deleted individually or collectively
(refer to the MANAGING SMS MESSAGES
paragraph).
?
®
mobile phone. When the in-
If you want to read a specific message
stored with manual interaction, open
the Main Menu of Blue&Me™ and
select the MESS.READER option
and then press SRC/OK or ß/
MENU.
Select the option MESSAGES RE-
CEIVED then press SRC/OK or
/MENU. Scroll through the saved
ß
messages until you reach the one
you want: the system will display information on the identity of the
sender of the message, where available. Select READ then press SRC/
OK or ß/MENU; Blue&Me™
will read the selected SMS message.
Or, using voice interaction:
}
Press ‘and say “Message reader“; after the audible signal say “Inbox“; Blue&Me™ will display the
information on the display for the
first message in the inbox (if in the
phonebook, the sender’s number
will be displayed).
You can scroll through the Inbox
by saying “Back” or “Next”; when
the required message appears, say
“Read”; Blue&Me™ will read out
the selected message.
Say “Delete” to delete the selected
message.
MANAGING SMS MESSAGES
For each SMS message received, Blue&
Me™ can:
❒
read it
❒
call the sender’s phone number directly
❒
delete it
In order to do this using manual interaction, activate the Blue&Me™
?
Main Menu while the message is being read, then use the SRC/ OK or
/MENU buttons to select the
ß
required function.
Or, using voice interaction:
}
Press ‘and say “Read” or “Call”
or “Delete“, the system will select
the chosen option.
26
Page 28

DELETING ALL MESSAGES
Blue&Me™ can store up to 20 SMS mes-
sages; receiving a new message will delete
the oldest message from the inbox. All the
SMS messages stored in the Blue&Me™
memory can be deleted with a single command.
If you want to delete all messages
with manual interaction, activate the
?
of Blue&Me™Main Menu and select
DELETE ALL, then press SRC/
OK or ß/MENU. The system will
ask DEL. MESS.? Press SRC/OK
or ß/MENU to confirm or press
/ESC to cancel.
&
Or, using voice interaction:
}
Press ‘and say “Message reader”.
After the audible signal say “Delete
all“; Blue&Me™ will ask you
“Delete all messages from
car?”. Say “Yes” to confirm the
deletion of all SMS messages from
the system, or say “No” to cancel
the deletion.
SIGNAL SETTINGS
You can set notification modes for the
Blue&Me™ SMS message reader. There
are three possibilities:
❒
VIS.+ACOUST.:
Blue&Me™signals the receipt of
a new message both on the instrument
panel display and by an acoustic signal.
Blue& Me™ will also offer to read
the message.
❒
VIS. SIGNAL:
Blue&Me™ communicates the re-
ceipt of a new SMS message only visually through the instrument panel
display. The message received can be
read later (see READ LAST MESSAGE
RECEIVED and INBOX paragraphs).
❒
READER OFF:
Blue&Me™deactivates the SMS
Message Reader so that the receipt
of a new SMS message will not be indicated at all, and the message will not
be forwarded system on receipt.
Using manual interaction, activate
the Blue&Me™ Main Menu, select
?
the MESS.READER option then
press SRC/OK or ß/MENU. Select the option SIGNAL TYPE and
scroll through the three available
options with the buttons NorO,
select the desired option and press
SRC/OK or ß/MENU.
Or, using voice interaction:
}
Press ‘and say “Message reader“; after the signal say “Notification type“; Blue&Me™ will list the
available options to you and you can
make a selection by saying “Reader
off” or “Visual and acoustic signal” or “Visual signal only”.
27
Page 29

MEDIA PLAYER (MP) FUNCTIONS
The MEDIA PLAYER (MP) menu is
used to:
❒
display tracks stored on your USB device/iPod connected to the USB port
❒
play the audio files stored on your USB
device/iPod connected to the USB port
Note
Before using Media Player, read the COMPATIBLE USB STORAGE DEVICES section or the paragraph regarding iPods in
order to make sure that your USB device
is compatible with Blue&Me™.
CONNECTING A USB DEVICE
TO Blue&Me™
To connect your USB device to Blue&
Me™, proceed as follows:
❒
Copy the tracks onto your USB device.
❒
USB devices without USB cable: simply connect the USB device (directly or
with an extension lead) to the USB port
on the car (see fig. 1).
❒
USB devices with USB cable: use the cable to connect the USB device to the
USB port on the car (see fig. 1).
❒
Turn the ignition key to MAR. Blue&
Me™ will automatically start to play
your digital tracks, selecting them from
the library that is created when the USB
device is connected.
❒
If AUTOPLAY is set to “ON”, Blue&
Me™ will start playback automatically.
For more information refer to the
chapter “SETTING FUNCTIONS – MEDIA PLAYER”.
When the creation of the multimedia library is over, it is possible to use Blue&
Me™ to display and select the tracks present and to activate playback.
Note
For the best use of Blue&Me™ it is recommended to use USB devices with maximum capacity of 32 GB.
28
Page 30

MANAGING THE MEDIA
LIBRARY
With the media player you can select the
digital audio on your USB device, using
voice recognition or the steering wheel
controls.
You can scroll through the audio files by
folder, artist, genre, album or playlist. You
can use voice recognition to choose one
of these categories. Once you have selected the category that you want, use the
manual controls to select a file.
Enter multimedia data for each track (e.g.
title, artist, album, genre) to make browsing your media library easier.
Note
Not all formats can contain multimedia
data. Of the formats recognised by
Blue&Me™, .mp3, .wma and .mp4 can
contain multimedia information while the
.wav format cannot. It may also be the case
that multimedia information has not been
entered for an audio file that supports it.
In these cases, scrolling through audio files
can only take place by folder (if organised
in folders).
For more information, refer to the sec-
tion PRACTICAL TIPS FOR USING THE
MEDIA PLAYER.
Selection by folder
If your USB device has folders containing
tracks saved on it, they will be visible in
the menu FOLDERS (function not available for iPods).
To select tracks contained in folders
through manual interaction, proceed
?
as follows:
Activate the Main Menu, select the
MEDIA PLAYER option then press
SRC/OK or
Select USB OPTIONS then press
SRC/OK or
Select the FOLDERS option then
press SRC/OK or
Scroll through the available folders.
To play the entire contents of the
folders, select PLAY ALL then
press SRC/OK or
display tracks in the selected folder,
press SRC/OK or ß/MENU.
Scroll through the tracks contained
in the selected folder.
To play a track, select the title and
press SRC/OK or
/MENU.
ß
/MENU.
ß
/MENU.
ß
/MENU. To
ß
/MENU.
ß
29
Page 31

Or, using voice interaction:
}
Press
‘
and say “Media Player”
then “USB options” and finally
“Folders”.
Scroll through the available folders
manually.
To play all tracks contained in the
folders, select PLAY ALL and then
press SRC/OK or
display tracks in the selected folder,
press SRC/OK or ß/MENU.
Scroll through the tracks contained
in the selected folder.
To play a track, select the title and
press SRC/OK or
For further details on customising
the FOLDERS menu, see PRACTICAL TIPS FOR USING THE MEDIA PLAYER.
/MENU. To
ß
/MENU.
ß
Selection by artist
To select all the tracks by a particular artist, using manual interaction:
?
Activate the Main Menu, select the
MEDIA PLAYER option then press
SRC/OK or
Select USB OPTIONS then press
SRC/OK or
Select the ARTISTS option then
press SRC/OK or
Scroll through the artists available.
To select the displayed artist, press
SRC/OK or
Scroll through the albums by artist.
To play all the albums of an artist,
select the PLAY ALL option and
press SRC/OK or
To play an album, select the album
then press SRC/OK or ß/MENU.
To play a track of an artist, select
the title then press SRC/OK or
/MENU.
ß
/MENU.
ß
/MENU.
ß
/MENU.
ß
/MENU.
ß
/MENU.
ß
Or, using voice interaction:
}
Press ‘and say “Media Player”
then “USB options” and finally
“Artists”.
Scroll through the albums by artist
manually.
To listen to all the artist’s albums,
select the PLAY ALL option, then
press SRC/OK or ß/MENU. To
play an album, select the album then
press SRC/OK or ß/MENU.
To play a track of an artist, select
the title then press SRC/OK or
/MENU.
ß
Note
If your USB device contains many audio
files, the ARTISTS menu may be subdivided into alphabetical submenus. An alphabetical submenu may display just the
first letter of the tracks that it contains
(e.g. A-F), or it may display the first two
letters (e.g. Aa-Ar).
30
Page 32

Selection by genre
To select all the tracks of a particular genre using manual interaction,
?
proceed as follows:
Activate the Main Menu, select the
MEDIA PLAYER option then press
SRC/OK or ß/MENU.
Select USB OPTIONS then press
SRC/OK or ß/MENU.
Select GENRES then press SRC/
OK or
Scroll through the available genres.
To play all the tracks of the displayed genre, press SRC/OK or
ß
Or, using voice interaction:
Press ‘and say “Media Player”
}
then “USB options” and finally
“Genres”.
Manually scroll through the available
genres.
To play all the tracks of the displayed genre, press SRC/OK or
ß
Note
If your USB device contains many audio
files, the GENRES menu may be subdivided into alphabetical submenus.
An alphabetical submenu may display just
the first letter of the tracks that it contains
(e.g. A-F), or it may display the first two letters (e.g. Aa-Ar).
ß
/MENU.
/MENU.
/MENU.
Selection by album
To select an album using manual interaction, proceed as follows:
?
Activate the Main Menu, select the
MEDIA PLAYER option then
press SRC/OK or
Select USB OPTIONS then press
SRC/OK or
Select the ALBUMS option then
press SRC/OK or
Scroll through the available albums.
To select the album displayed, press
SRC/OK or
Scroll through the tracks in the album. To play all tracks in an album,
select the PLAY ALL option and
press SRC/OK or
To play an album, select the album
then press SRC/OK or ß/MENU.
To play just one track in an album,
select the track title and press
SRC/OK or
ß
ß
ß
/MENU.
ß
/MENU.
/MENU.
ß
/MENU.
/MENU.
ß
/MENU.
Or, using voice interaction:
}
Press ‘and say “Media Player”
then “USB options” and finally
“Albums”.
Manually scroll through the available
albums.
To select the album displayed, press
SRC/OK or ß/MENU.
Scroll through the tracks in the album. To play the whole album, select the PLAY ALL option and
press SRC/OK or ß/MENU.
To play just one track in an album,
select the track title and press SRC/
OK or ß/MENU.
Note
If your USB device contains many audio
files, the ALBUMS menu may be subdivided into alphabetical submenus.
An alphabetical submenu may display just
the first letter of the tracks that it contains
(e.g. A-F), or it may display the first two
letters (e.g. Aa-Ar).
31
Page 33

Selection by playlist
Playlists stored on your USB device can be
displayed with the PLAYLISTS menu.
To select a playlist using manual interaction, proceed as follows:
?
Activate the Main Menu, select the
MEDIA PLAYER option then press
SRC/OK or
Select USB OPTIONS then press
SRC/OK or
Select the option PLAYLISTS then
press SRC/OK or
Scroll through the available playlists.
To play the playlist displayed, press
SRC/OK or
Or, using voice interaction:
}
Press
‘
then “USB options” and finally
“Playlists”.
Manually scroll through the available
playlists.
To play the displayed playlist, press
SRC/OK or
For more information on creating playlists,
refer to the PRACTICAL TIPS FOR USING
MEDIA PLAYER chapter.
/MENU.
ß
/MENU.
ß
/MENU.
ß
/MENU.
ß
and say “Media Player”
/MENU.
ß
PLAYING AUDIO TRACKS
For the complete list of voice commands
that can be used with the Media Player, refer to the LIST OF AVAILABLE VOICE
COMMANDS.
For managing audio files on iPod or iPhone
devices, see “TECHNOLOGIES SUPPORTED BY Blue&Me™”, “Managing
audio files from iPod devices” paragraph.
Random playback of the whole
media library
The “PLAY ANYTHING” option is
used to quickly play the whole contents
of your media library in a random order.
To start the “PLAY ANYTHING”
function, using manual interaction,
?
proceed as follows:
Activate the Main Menu, select the
MEDIA PLAYER option then press
SRC/OK or
Select USB OPTIONS then press
SRC/OK or
Select the PLAY ANYTHING
option then press SRC/OK or
/MENU.
ß
/MENU.
ß
/MENU.
ß
Or, using voice interaction:
}
Press
then “USB options” and finally
“Play anything”.
For more information on digital audio file playback, refer to the chapter DIGITAL AUDIO SELECTION.
If the “AUTOPLAY”, function is
on, connect your USB device to
Blue&Me™ and track playback will
start automatically.
PLAYER
You can also select the required
audio file then press SRC/OK or
ß
and say “Media Player”
‘
SETTING FUNCTIONS – MEDIA
.
/MENU to start playing it.
32
Page 34

Now playing (track data)
With the NOW PLAYING function you
can display current track data for 15 seconds.
This function is only available with
voice interaction:
}
Press
Note
When a digital audio track starts playing,
the information on the track will be automatically shown on the display.
and say “Now playing”.
‘
Pause
To pause the track you are listening to:
press
&/ESC
the front of the stereo.
To resume listening to a track that you
have paused: press
button on the front of the stereo.
Stop
To stop playing a track: say “Stop”.
To resume, say “Play”.
Note
The “Play” command is only available if
playback has been stopped using the
“Stop” command.
or the MUTE button on
or the MUTE
&/ESC
Next track
To play the next track using manual interaction, proceed as follows:
?
Whilst listening to a digital track,
press N(steering wheel controls)
or ˙(car radio control).
Or, using voice interaction:
}
While listening to a digital track
press ‘and say “Next”.
Previous track
To play the previous track using
manual interaction, proceed as
?
follows:
Whilst listening to a track press
(steering wheel controls) or ¯(car
radio control).
Or, using voice interaction:
}
While playing a digital track press
and say “Previous”.
‘
Note
If the command “Previous track” is given
manually after the first three seconds of
the track, the same track will be played
again. If it is given within the first 3 seconds, the previous track will be played.
O
33
Page 35

Changing audio source
To change the active audio source (Radio,
CD, CD Changer, Media Player), press
SRC/OK or the specific buttons on the
front panel of the car radio (see specific
manual).
PRACTICAL TIPS FOR USING
MEDIA PLAYER
Sliding
❒
To optimise scrolling through the
FOLDERS menu, organise the folders
on your USB device before connecting
it to Blue&Me™. To facilitate and
optimise selection in the FOLDERS
menu, organise your tracks in folders
with names that mean something to
you.
Organising media files
❒
In order to select music on Blue&
Me™ based on particular selection cri-
teria (author, album, genre, etc.) information contained in multimedia files
must be present and up-to-date. To update the information for each file, follow
the instructions in the documentation
for your multimedia file management
software.
❒
If certain items in your library have no
Artist, Album, Title and Genre data,
Blue&Me™ will show UNKNOWN
in the ALBUMS and GENRES menus.
To enter information in a digital audio
file, follow the instructions in the documentation for your multimedia file
management software.
34
Page 36

Creating a media library
on Blue&Me™
❒
Creating the media library may require
several minutes. If the time required is
excessive, you can intervene by reducing the number of audio files stored on
your USB device.
❒
While creating the library, it is however possible to play a selection of tracks.
Blue&Me™ will continue to create
the library while playing music.
Creating a playlist for Blue&Me™
To create a .wpl playlist for Blue&Me™ us-
ing Microsoft
®
Windows Media®Player,
proceed as follows:
❒
Copy all the songs that you want to put
in the playlist, into a new folder or onto your USB storage device.
❒
Open Microsoft®Windows Media
Player. From the menu, choose File,
Open.
❒
Scroll through the content of the USB
device connected to your computer
and select the audio file that you want
to put in the playlist.
❒
Click on Open.
❒
Move to “File” and select “Save
Playlist As...” .... Enter a name for
your playlist in the “File name” field
then, in the “Save as” field, set the
type .wpl.
❒
Click on Save.
After this, a new .wpl file will be created.
USB SETTINGS
Autoplay
When Autoplay is on, Blue&Me™ will
start to play the audio files on your USB
device as soon as you turn the ignition key
to MAR. Once you activate this option,
the first time you use the player, playback
®
will start automatically.
35
Page 37

To change the Autoplay setting
using manual interaction, proceed as
?
follows:
Enter the Main Menu, select
DIA PLAYER
TOPLAY then press SRC/OK or
/MENU.
ß
To activate Autoplay, select AUTOPLAY ON and press SRC/OK
or ß/MENU. To deactivate Autoplay, select AUTOPLAY OFF
and press SRC/OK or ß/MENU.
Or, using voice interaction:
}
Press
‘
or “Autoplay off”.
Note
If you change the Autoplay setting after
connecting a USB device, the new setting
will only be activated the next time that
you connect a different USB device (or
the same USB device with updated track
library).
, SET USB, AU-
and say “Autoplay on”
ME-
Shuffle
Use the Shuffle option to change the digital audio playback sequence. With Shuf-
fle on, Blue&Me™ will play digital audio
files in a random order.
To change the Shuffle setting using manual interaction, proceed as
?
follows:
Activate the Main Menu, select
MEDIA PLAYER, SET USB,
SHUFFLE then press SRC/OK
or
/MENU.
ß
To activate the Shuffle function, select SHUFFLE ON and press SRC/
OK or
function, select SHUFFLE OFF
and press SRC/OK or ß/MENU.
Or, using voice interaction:
}
Press
“Shuffle off”.
/MENU. To deactivate the
ß
and say “Shuffle on” or
‘
Track loop
When the Track loop is activated, a track
is played back repeatedly.
To activate Track loop using manual interaction:
?
Activate the Main Menu, select
MEDIA PLAYER, SET USB,
TRACK LOOP then press SRC/
OK or
To activate the Track loop function,
select LOOP ON and press
SRC/OK or
vate the function, select LOOP OFF
and press SRC/OK or ß/MENU.
Or, using voice interaction:
}
Press
or “Track loop off”.
Note
With Track loop on, use the previous
and next track functions to go to the previous or next audio track which will be
looped.
/MENU.
ß
/MENU. To deacti-
ß
and say “Track loop on”
‘
36
Page 38

SETTING FUNCTIONS
The SETTINGS menu lets you perform
the following functions:
❒
Pairing a mobile phone
❒
Managing user data
❒
Advanced options.
To perform functions and adjustments in
the SETTINGS menu, you may use the
steering wheel controls or voice commands when the car is at a standstill.
When the car is moving, you can use voice
commands only. Instructions are provided for both methods.
If you encounter difficulties with any of
the Blue&Me™ settings functions, refer
to the chapter TROUBLESHOOTING.
PAIRING A MOBILE PHONE
You must create a pairing relationship before you can use your mobile phone with
the hands-free function on your car.
During the pairing procedure, the handsfree system attempts to detect a phone
with Bluetooth
It is finds one, it establishes a connection
using a Personal Identification Number
(PIN). After a pairing relationship is established, you can use the hands-free system to operate the phone.
IMPORTANT The mobile phone pairing
PIN is a special PIN generated randomly
at each new pairing. It is therefore not
necessary to memorise it and losing it will
not impair the operation of the hands-free
system.
The pairing procedure will only need to be
performed once for your mobile phone.
After this procedure Blue&Me™ will
automatically connect to your phone
each time you get into the car and turn
the ignition key to MAR.
®
technology within range.
You can pair your mobile phone using the
option PAIRING in the SETTINGS
menu.
To create a pairing relationship using manual interaction, proceed as
?
follows:
Activate the Main Menu by pressing
/MENU and select SETTINGS
ß
by pressing SRC/OK or ß/MENU.
Select PAIRING then press SRC/
OK or
start the pairing procedure.
The system shows the mobile phone
pairing PIN on the instrument panel display and repeats it out loud.
Please note that this is a PIN used
solely for this operation, it is not
your SIM card PIN.
For the next two stages, consult your
mobile phone manual for the pairing
and connecting mode through Blue-
tooth
/MENU. The system will
ß
®
devices.
37
Page 39

On your mobile phone, search for
devices with Bluetooth®technology that are within range (this option on your mobile phone might be
called Search, New Device, etc).
View the list of Bluetooth®technology enabled devices and select
“Blue&Me” (name that identifies
Blue&Me™ on your car).
When prompted by the mobile
phone, enter the PIN number shown
on the instrument panel display. If
pairing is successful, the system will
say “Connecting” then the display will show the paired mobile
phone’s ID.
It is important to wait until this confirmation message is displayed since
pressing
forehand may cancel the pairing
process. If pairing fails, an error
message will be displayed and the
pairing procedure will have to be
repeated.
/MENU or &/ESC be-
ß
At the first pairing, the system will
provide a welcome message immediately after connecting. This message will not be repeated for the
subsequent connection procedures
for the same phone.
The system asks if you would like to
copy the phonebook of the phone
that you have just paired. Copying
the phonebook is recommended.
To copy the phonebook, press
SRC/OK or
wise, press &/ESC. You can download your phonebook later using
the SETTINGS, USER DATA,
PHONEBOOK option.
For certain mobile phones the
phonebook is not copied automatically; in this case you must transfer the contacts using your mobile
phone keypad (see the “Adding contacts” paragraph).
/MENU. Other-
ß
Or, using voice interaction:
}
Press ‘and say “Settings” then
at the end of the message supplied
by the system say “Pairing”.
The system displays the pairing PIN
on the instrument panel display and
repeats it out loud.
For the next two stages, consult
your mobile phone manual for the
pairing and connecting mode
through Bluetooth®devices.
On your mobile phone, search for
devices with Bluetooth®technology that are within range (this option on your mobile phone might be
called Search, New Device, etc).
View the list of Bluetooth®technology enabled devices and select
“Blue&Me” (name that identifies
the hands-free system of your car).
When prompted by the mobile
phone, enter the PIN shown on the
control panel display using your mobile phone keypad. If pairing is successful, the system will say “Con-
necting” then the display will show
the paired mobile phone’s ID.
38
Page 40

It is important to wait until this confirmation message is displayed since
pressing ß/MENU or &/ESC beforehand may cancel the pairing
process. If pairing fails, an error
message will be displayed and the
pairing procedure will have to be
repeated.
At the first pairing, the system will say
“Welcome” immediately after connecting. This message will no longer
be heard for subsequent connection
procedures for the same phone.
The system will ask whether you
would like to copy the phonebook
for the phone that you have just
paired. Copying the phonebook onto the system is recommended. To
copy the phonebook, say “Yes”. To
not copy the phonebook, say “No”.
For certain mobile phones the
phonebook is not copied automatically; in this case you must transfer the contacts using your mobile
phone keypad (see the “Adding contacts” paragraph).
Tips
To improve the voice recognition of your
phonebook entries and Blue&Me™ pronunciation accuracy, try to enter contacts
and store them using the following criteria:
❒
Avoid abbreviations.
❒
Write foreign names according to the
way in which they are pronounced according to the rules of the Blue&Me™
language set on your car. For example,
enter “Tanja” as “Tanya”, to improve
recognition accuracy and also to obtain
the correct pronunciation by the system.
❒
When adding or editing contact entries,
insert the appropriate accent marks
when the name requires these marks
to be properly pronounced and recognised by the system. For example, write
“Nicolo Rebora” as “Nicolò Rébora”
to obtain the correct pronunciation.
❒
When you add or amend names in the
phonebook, remember that some isolated upper-case letters can be read as roman numerals (e.g. V can be read as five).
❒
When calling contacts using voice recognition, do not include abbreviated names
or the middle initials of your contacts.
Notes
❒
You are only required to pair your mobile phone a single time.
❒
You can pair up to five mobile phones,
to be used one at a time.
❒
To connect a previously paired phone
to Blue&Me™ you must activate the
Bluetooth®setting on the phone to be
connected.
❒
Before you transfer the names from
your mobile phone to the hands-free
system, make sure the name of each
person is unique and clearly recognisable, so that the voice recognition system functions properly.
❒
The system will download only valid
contact entries, i.e. those with a name
and at least one telephone number.
39
Page 41

❒
If you want to re-pair your mobile phone,
delete the old pairing relationship first.
During this operation all user data will be
deleted. To delete the old pairing relationship,
DATA, DELETE USERS.
“Blue&Me” device from the list of
Bluetooth®devices on your mobile
phone, following the instructions in your
mobile phone manual.
❒
If you download a phonebook with
more than 1000 contacts, the system
may operate more slowly and voice
recognition of the names in your phonebook may be impaired.
❒
If the pairing relationship is accidentally deleted, the pairing procedure will
have to be repeated.
use the menu option USER
Delete the
MANAGING USER DATA
You can make adjustments to the user data saved in the hands-free system. Specifically, you can reset all user data for paired
phones, delete the phonebook or reset
both paired phone data and the phonebooks downloaded to the system. In this
way the system is restored to its initial settings. You can also download either the
entire phonebook or single contacts from
your mobile phone to the system, if you
chose not to download the phonebook
during the phone pairing procedure. You
can make adjustments to the data used
by the system with the option USER
DATA.
To open the USER DATA menu
using manual interaction, proceed as
?
follows:
Activate the Main Menu by pressing
/MENU and select SET-
ß
TINGS by pressing SRC/OK or
/MENU.
ß
Select the USER DATA option
then press SRC/OK or
Or, using voice interaction:
}
Press ‘and say “Settings” and at
the end of the message supplied by
the system say “User Data”.
In the menu USER DATA you can
perform the functions described
below.
ß
/MENU.
40
Page 42

Deleting paired users
In the menu USER DATA you can
delete the pairing relationships created.
After you delete the pairing relationship,
you cannot use an unpaired phone with
the hands-free system, nor its phonebook,
until you recreate a pairing relationship for
it. Bear in mind that this operation deletes
all the pairing relationships on the system.
To delete the pairing data of all users,
using manual interaction, proceed as
?
follows:
Select the DELETE USERS option
then press SRC/OK or
The system will display the message
DELETE USERS?. To delete the
user data, confirm by pressing SRC/
OK or
Or, using voice interaction:
}
Press ‘, say “Settings” and at the
end of the message provided by the
system say “Delete users”.
The system will ask “Delete all
paired users?”. To confirm, say
“Yes”.
/MENU.
ß
/MENU.
ß
Notes
❒
Always remember that, if a mobile
phone is paired with the system while
another phone is connected, the connection with the current phone is interrupted to establish the connection
with the new phone.
❒
It is not possible to delete a single pairing relationship, unless it is the only one.
❒
Deleting all paired users will entail
a new pairing procedure for the mobile
phone.
41
Page 43

Delete the phonebook
The phonebook downloaded to the system
can be deleted using the USER DATA
menu.
To delete the phonebook using manual interaction, proceed as follows:
?
Select the DELETE PHONE
BOOK option then press SRC/
OK or
The system will display the message
DEL. PHONEBOOK?. To confirm, press SRC/OK or
Or, using voice interaction:
}
Press
ter the message supplied by the system, say “Delete phonebook”.
The system will ask “Delete the
copy of the phonebook from
the car?” To confirm, say “Yes”.
/MENU.
ß
/MENU.
ß
, say “Settings” then, af-
‘
Copying the phonebook
If you chose not to download the phonebook during the phone pairing procedure,
or if you have recently deleted the phonebook, the USER DATA menu will contain the COPY PHONEBOOK option.
To download a paired mobile phone’s
phonebook using manual interaction,
?
proceed as follows:
Select the COPY PHONEBOOK
option then press SRC/OK or
/MENU.
ß
Or, using voice interaction:
}
Press
the message provided by the system
say “Download phonebook”.
, say “Settings” and after
‘
Adding contacts
If your mobile phone does not support
automatic downloading during phone
pairing, the USER DATA menu will
contain the ADD CONTACTS option.
To copy contacts from your mobile
phone to the hands-free system us-
?
ing manual interaction, proceed as
follows:
Select the ADD CONTACTS
option then press SRC/OK or
/MENU.
ß
Or, using voice interaction:
}
Press
the message supplied by the system,
say “Add Contacts”.
Then follow the instructions in your mobile phone manual on transferring contacts
from the phone to another device.
, say “Settings” then, after
‘
42
Page 44

Resetting user data
To restore the hands-free system’s
initial setting, reset all user data and
?
phonebooks/contacts for paired
phones using manual interaction,
proceed as follows:
Select the DELETE ALL option
then press SRC/OK or
The system will display the message
Delete all?. To delete all data,
confirm by pressing SRC/OK or
/MENU.
ß
Or, using voice interaction:
}
Press
the message supplied by the system,
say “Reset all”.
The system will ask “Delete all
data saved by users from the
system?”. To confirm, say “Yes”.
, say “Settings” and after
‘
/MENU.
ß
ADVANCED OPTIONS
To access the ADV. OPTIONS
menu using manual interaction, pro-
?
ceed as follows:
Access the Main Menu, press
MENU and select the SETTINGS
option by pressing SRC/OK or
/MENU.
ß
Select the ADVANCED OPTIONS option then press SRC/
OK or
Or, using voice interaction:
}
Press
“Advanced options”.
In the ADV. OPTIONS menu you
can access technical information on
your Blue&Me™ system.
/MENU.
ß
and say “Settings” then
‘
EXITING FROM THE SETTINGS
MENU
At the end of any operation, you can exit from the settings menu as described
below.
/
ß
To exit from the SETTINGS menu,
using manual interaction:
?
Select the EXIT option and press
SRC/OK or
Or, using voice interaction:
}
Press
‘
/MENU.
ß
and say “Exit”.
43
Page 45

TECHNOLOGIES SUPPORTED BY Blue&Me™
Blue&Me™ communicates with your
personal devices via Bluetooth®technology and USB.
To get updated information on the compatibility of personal devices with Blue&
Me™, contact a Abarth Dealership or go
to the dedicated area on www.fiat.com.
MOBILE PHONES WITH
Bluetooth
Blue&Me™ supports most mobile
phones supporting the Bluetooth
®
TECHNOLOGY
®
2.0
specification and hands-free profile 1.5 (refer to Bluetooth®connection specifications given in your mobile phone user
manual).
As a result of the different software versions available on the market for different models of mobile phone, some additional functions (e.g. second call management, call transfer from hands-free system
to mobile phone and vice versa, etc.) may
not correspond exactly to the description
in the user manual. In any case, the possibility of having a hands-free conversation
is not compromised.
Mobile phones with phonebook
management function
If your phone is provided with a function
for automatically transmitting the phonebook via Bluetooth
®
technology, the en-
tire phonebook will automatically be
copied to Blue&Me™ during the pairing
Mobile phones with single contact
management function
If your phone has a function for sending
single phonebook contacts via Blue-
tooth
be asked to transfer names from the
phonebook using your phone.
procedure.
To see the list of supported mobile phones
and functions, consult the
dedicated site www.fiat.com, Blue&Me™
section, or call Customer Services on
00800.222784.00.
Here, you can find:
❒
a quick guide with tips for use;
❒
a mobile phone pairing guide:
❒
tips for connecting an iPod;
❒
the ten available voice recognition lan-
Mobile phones with SMS message
management (not all mobile
phones support the incoming SMS
message reading function)
If your mobile phone has a function for
transmitting SMS messages using Blue-
tooth
sages can be read by the Blue&Me™
hands-free system. The messages can be
stored in a specific inbox or deleted.
guage files that can be downloaded alternatively onto Blue&Me™ (Italian,
French, English, German, Spanish, Portuguese, Dutch, Polish, Brazilian, Turkish).
®
, technology, during pairing you will
®
technology, incoming SMS mes-
44
Page 46

SUPPORTED USB STORAGE DEVICES
USB STORAGE DEVICES
Media Player supports most USB 1.0, 1.1
or 2.0 storage devices that can be configured as an external disk (mass storage
device).
Notes
It is advisable not to use USB devices provided with “password” function. If the USB
device is equipped with this function, always ensure that the function is disabled.
Media Player supports just one media library. When a new USB device is connected, Blue&Me™ will generate a new
library, replacing the existing one.
MANAGING AUDIO FILES
FROM iPod devices
What you can do
❒
Listen to tracks in digital quality
❒
Select tracks (by Artist, Album, Genre
etc.) by voice commands or using the
controls on the steering wheel
❒
Display information about the track being played (song title, singer, etc.) on the
instrument panel.
❒
Recharge the iPod via USB.
Notes
The device must be in playback mode or
paused to start playing a track on some
iPod/iPhone models.
Load the tracks onto the iPod/iPhone device using the corresponding management
program.
It is advisable to keep telephones and
iPods updated to the most recent release
for optimal operation of the Blue&Me™
system.
45
Page 47

Supported digital audio files
Media Player supports the playback of audio files with the following formats:
Extension Audio encoding
.wma
.mp3
.wav
.M4A
MP4
Note
Media Player does not support audio files compressed with other formats. If there are unsupported audio files on the USB device
they will be ignored.
It supports the WMA version 1 and WMA version 2 standards. (WMA2 = 353, WMA1 = 352).
Supports WMA Voice audio formats.
MPEG–1 Layer 3 files (sampling frequencies 32 kHz, 44.1 kHz and 48 kHz) and MPEG–2 layer 3
(16 kHz, 22.05 kHz and 24 kHz). The following bit rates are supported: 16 kbps, 32 kbps, 64 kbps,
96 kbps, 128 kbps, and 192 kbps.
It also supports the Fraunhofer MP2.5 extension (sampling frequencies 8 kHz, 11.025 kHz and 12 kHz).
Audio in digital format, without data compression.
MPEG-4 files
(sampling frequencies between 22.05 kHz and 48 kHz)
The following bit rates are supported: 8 kbps – 256 kbps
46
Page 48

Supported playlist formats
Media Player supports the playback of
playlists in the following formats:
.wpl – files based on Windows®which
contain a playlist. (the capacity limit of the
playlist in this format is 300 kb). You can
create .wpl playlists by using Microsoft
®
Windows Media®Player.
Media Player does not support nested or
connected playlists. Both relative and absolute paths to songs are supported in the
playlists.
Media Player does not support playlists
generated by a software application based
on criteria or special preferences.
Media Player will play playlists that include
paths that lead to digital audio files in the
folder.
For more information on creating playlists
for Blue&Me™, refer to the PRACTICAL TIPS FOR USING MEDIA PLAYER
SECTION.
Note on brands
Microsoft®and Windows®are registered trademarks of Microsoft Corporation.
Sony®is a registered trademark of Sony Corporation.
®
Ericsson
Orange™is a registered trademark of Orange Personal Communications Services Limited.
Lexar™and JumpDrive®are registered trademarks of Lexar Media, Inc.
SanDisk®and Cruzer™are registered trademarks of SanDisk Corporation.
is a registered trademark of Telefonaktiebolaget LM Ericsson.
Motorola®is is registered trademark of Motorola, Inc.
Nokia®is a registered trademark of Nokia Corporation.
Siemens®is a registered trademark of Siemens AG.
Audiovox®is a registered trademark of Audiovox Corporation.
Bluetooth®is a registered trademark of Bluetooth®SIG, Inc.
iPod, iTunes and iPhone are registered trademarks of Apple Inc.
All other trademarks are the property of their respective owners.
Apple is not responsible for the operation of this
device and of its conformity with the safety rules
and standards.
47
Page 49

LIST OF AVAILABLE VOICE COMMANDS
The following tables list the voice commands available on Blue&Me™. For each command the “main” voice command and synonyms that can be used are shown.
TABLE OF ALWAYS AVAILABLE VOICE COMMANDS
• Help
• Cancel
• Repeat
Activates the “Help” function which provides the list of voice commands available for the current level
Cancels voice and/or manual interaction and deactivates the voice recognition system
Repeats the last voice message provided by the system
48
Page 50

TABLE OF HANDS-FREE VOICE COMMANDS
• Dial a number
• Dial
• Call
Activates the voice recognition
of a phone number
• One
• Two
• Three
• Four
• Five
• Six
• Seven
• Eight
• Nine
• Zero
• Plus
Enters digit “1”
Enters digit “2”
Enters digit “3”
Enters digit “4”
Enters digit “5”
Enters digit “6”
Enters digit “7”
Enters digit “8”
Enters digit “9”
Enters digit “0”
Enters symbol “+”
• Hash
• Pound
• Delete
• Back
• Delete/Back
• Start over
• Repeat
• Call
• Dial
Enters symbol “#”
Deletes the last group
of digits entered
Deletes all groups of digits entered
with possibility of inserting a new
number
Repeats the telephone number
entered and recognised by
the hands-free system
Calls the number entered by voice
• Star
Enters symbol “*”
continued
➯
49
Page 51

➯
continued
• Call [Name]“/
• Call [Name]’/
• Call [Name] (at/on)
Work/Home/Mobile]
Starts calling a name in the
phonebook/mobile phone contact
transferred to the hands-free
system
• Telephone
• Phone
• Callback
• Redial
• Last call
• Recall
Opens the last calls list
• Work
• Nome• [Name]
Calls a contact.
The Name keyword represents
the name of a contact as stored
in your phonebook/mobile
phone contacts
Activates phone function and provides voice instructions for using the hands-free system
Dials the phone number of the last caller
Dials the last phone number called
• Outgoing
• Incoming
Dials the last number called
Dials the number of the last person that called you
• Home
• Mobile
• Cellular
• Cell
Calls the selected contact at: “Work”/“Office”
Calls the selected contact at: “Home”
Calls the selected contact on: “Mobile”
50
Page 52

TABLE OF SMS MESSAGE READER VOICE COMMANDS
• Read last one/Read last
• Read last message
• Read message
• Read last SMS text/Read last text
• Read text/Read SMS texts
Reads last message received
• Message reader
• Messages
• SMS reader
• SMS
Activates the menu
SMS MESSAGE READER
• Read last one/Read last
• Read last message
• Read message
• Read last SMS text/Read last text
• Read text/Read SMS texts
Reads last message received
• Inbox
• Received
Opens the received messages inbox,
the system will display the first
message in the list
• Delete all/Delete messages
• Delete texts
• Delete
Delete all messages in the inbox,
the system will ask for confirmation
before deleting
• Signal type
• Signal
Activates the function
Signal settings
• Read
• Read again
• Call
• Dial
• Delete
• Delete message
• Next
• Forward
• The one after
• Previous/Back
• Backwards/
The one before
• Reader off
• Switch reader off
• Deactivate reader
• Visual and acoustic
signal
• Visual and audible
• Acoustic
• Visual plus acoustic
• Visual signal only
• Visual
• Visual only
Reads the selected message in the inbox
Calls the number of the selected
message
Cancels the call to the number
of the selected message
Goes to the next message
Goes to the previous message
Turns the SMS message reader off; when
a new SMS message is received, there will
be no notification and nothing will be
transmitted to the system
Signals both visually, using the
display on the instrument panel,
and audibly, through a beep,
the arrival of a new SMS message
Signals only visually, using the display on
the instrument panel, the arrival of a
new SMS message
51
Page 53

TABLE OF MEDIA PLAYER VOICE COMMANDS
• Media player
• Media
• Music
• Play
• Play music
• Play media
• Stop
• Stop music
• Stop media
• Next
• Next track
• Next song
• The one after
• Forward
• Previous
• Previous track
• Previous song
• The one before
Activates the MEDIA PLAYER MENU
Starts playing digital audio files
Stops playing digital audio files
Next track
Goes to the previous track
➠
(*)
52
• Shuffle on
• Shuffle off
• Random order off
Turns the shuffle function on
Turns the shuffle function off
continued
➯
Page 54

continued
➯
• Loop
• Loop track
• Cycle
• Loop on
• Loop track on
• Loop off
• Loop track off
• Cycle off
• Cycle off
• Autoplay on
• Autoplay media on
• Autoplay music on
• Autoplay
• Autoplay off
• Autoplay media on
• Autoplay music on
• Autoplay
• Now playing
• What’s playing
• What is playing
• What’s this track
Turns the loop function on
Turns the loop function off
Automatically starts audio playback when a USB device is plugged in
Stops automatically playing the audio track when the USB device is plugged in
Shows information on the track being played
continued
➯
53
Page 55

➯
continued
• Folders
• Folder
• Browse folders
• Artists
• Artist
• Browse artists
Opens the Media Player FOLDERS menu
Opens the Media Player ARTISTS menu
54
(*)
➠
(*)
➠
• Advanced USB options
• Other options
• Play anything
• Random
• Play something
• USB media settings
• USB settings
• Genres/Genre
• Browse genres/Type of music
• Styles/Music styles
• Types/Music types
• Albums
• Browse albums
• Playlists
• Playlist
• Browse playlists
Starts playing all digital audio tracks
Opens the MEDIA PLAYER settings menu
Opens the Media Player GENRES menu
Opens the Media Player ALBUMS menu
Opens the Media Player PLAYLISTS menu
Page 56

Table of setting functions voice commands
• Setup
• Setup menu
• Settings
Opens the SETTINGS menu
of the hands-free system
• Media file settings
Opens the MEDIA PLAYER
menu
• User data
Open the USER DATA MENU
• Pairing
• Pair
Activates new mobile phone pairing procedure
• Advanced options
Opens the ADVANCED OPTIONS menu
• Delete users
• Delete phonebook
• Download phonebook
• Add contacts
• Reset all
Deletes user data for the pairing relationships
of all users
Deletes current phonebook
Downloads phonebook from connected mobile
phone to hands-free system
Note Function available on phones with
phonebook management only (*)
Transfers contacts from connected mobile
phone to hands-free system
Note Function available on phones with single
contact management only (**)
Deletes pairing data and phonebooks/contacts
of all paired telephones and restores
the hands-free system default settings
(*) If your phone is provided with a function for automatically transmitting the phonebook via Bluetooth®technology, the en-
tire phonebook will be automatically copied to the hands-free system during the pairing procedure.
(**) If your phone has a function for transmitting single phonebook contacts via Bluetooth®, technology, during pairing you will
be asked to transfer names from the phonebook using your phone.
55
Page 57

TROUBLESHOOTING
HANDS-FREE
General cases
Problem Probable Cause Possible Solution
The display shows: NO PHONEBOOK
56
Mobile phones with phonebook
management
❒
When the system asked
“The data from the phonebook will
now be copied onto the system.
Continue?“, you replied “No”.
❒
You did not download the
phonebook using the SETTINGS
menu.
❒
The downloaded phonebook has
been deleted.
For mobile phones with single
contacts management
❒
When the system asked “The data
from the phonebook will now be
copied onto the system. Continue?“,
you replied “No”.
❒
You have not transferred contacts to
the system using the ADD
CONTACTS PROCEDURE.
❒
The downloaded phonebook has
been deleted.
For mobile phones with phonebook
management
❒
Use the option PHONEBOOK
in the SETTINGS menu to
download the phonebook.
❒
Enter the contacts data in your
mobile’s phonebook and then
download the phonebook.
SETTING FUNCTIONS
– MANAGING USER DATA
AND PHONEBOOK
For mobile phones with single contact
management
❒
Use the ADD CONTACTS
option in the SETTINGS menu to
transfer contacts in the phonebook
on your mobile phone to the system.
SETTING FUNCTIONS
– MANAGING USER DATA
AND PHONEBOOK
Page 58

Problem Probable Cause Possible Solution
The display shows:
PHONEBOOK EMPTY
For mobile phones with phonebook
management
❒
You answered “Yes” to “The data
from the phonebook will now be
copied onto the system. Continue?”
but the downloaded phonebook
does not contain valid contacts.
❒
You have used the option
PHONEBOOK in the SETTINGS
menu, but the mobile phone
phonebook does not contain valid
contacts.
For mobile phones with single contact
management
❒
When the system asked “The data
from the phonebook will now be
copied onto the system. Continue?”,
you answered “Yes” but did not
transfer any valid contacts during
the ADD CONTACTS
procedure.
❒
You used the ADD CONTACTS
option but did not transfer any valid
contacts to the system.
For mobile phones with phonebook
management
❒
Enter valid names (a name and at
least one phone number) in the
phonebook of your mobile phone
then download the phonebook
SETTING FUNCTIONS
– MANAGING USER DATA
AND PHONEBOOK
For mobile phones with single contact
management
❒
Download the phonebook again and
make sure to send valid contacts to
the system using your mobile phone
when prompted.
❒
Use the option ADD CONTACTS
in the SETTINGS menu to send
contacts from your mobile phone to
the hands-free system.
SETTING FUNCTIONS
– MANAGING USER DATA AND
PHONEBOOK
57
Page 59

Problem Probable Cause Possible Solution
The display shows: NO PHONE
The display shows: TEL. DISCONN
The display shows: PAIR. FAILED
❒
The paired mobile phone is turned
off.
❒
The paired mobile phone is not
within range of the system
(the mobile phone should be
located within approximately 10 m
of the system).
❒
The connection using Bluetooth
technology between the system
and mobile has been disabled on
your mobile phone (identification
“Blue&Me”).
❒
The pairing relationship has been
deleted
❒
An error occurred with the mobile
phone’s Bluetooth®technology
connection.
❒
During a phone conversation,
the mobile phone was taken out of
the system’s range.
❒
An error occurred during the pairing procedure.
❒
Turn the mobile phone on
❒
Make sure that your phone has
been paired.
❒
Make sure that the Bluetooth
technology connection on your
mobile phone is active
®
(“Blue&Me” ID)
❒
Make sure that the mobile phone
that you have paired with the system
is within its range.
❒
Turn the mobile phone off and on
to restore the connection with
Blue&Me™.
❒
Reset Blue&Me™ by turning
the ignition key to STOP then
back to MARor pressß/MENU
❒
Check that the PIN is correct
and try to enter it again
❒
Turn the mobile phone off and on,
then repeat the pairing procedure.
SETTING FUNCTIONS – PAIRING
YOUR MOBILE PHONE
®
58
Page 60

Problem Probable Cause Possible Solution
The display shows: PAIR. FAILED
The display shows:
PRIVATE NUMBER
The system does not download
the phonebook automatically after
connecting the mobile phone to
Blue&Me™
❒
The user has not entered the PIN
code provided by the system into
their mobile phone within three
minutes
❒
The caller is not recognised as
a name stored in the phonebook,
and the paired mobile phone does
not have a caller ID feature.
❒
The caller has blocked caller ID to
prevent the display of their name
and/or phone number.
❒ The maximum number of failed
phonebook downloading attempts
has been exceeded
❒ The Blue&Me™ syncML profile
configuration on the mobile phone
is not present or not correct
Repeat the pairing procedure. When
entering the PIN, check that the PIN
you are entering on the mobile phone
is the same shown on the instrument
panel display.
SETTING FUNCTIONS – PAIRING
YOUR MOBILE PHONE
Enter a contact in your mobile
phonebook for the incoming call, then
download the phonebook/contact again.
In this case, nothing can be done
and the message will always appear.
Check whether your mobile phone
is supported in the Blue&Me™/
Compatibility/Supported phone list
section on the www.fiat.com web site
Or, configure syncML on your mobile
phone following the corresponding
instructions and setting it according to
the suggestions shown on the above
web site
Delete users using the settings
Or manually download the phonebook
(see SETTING FUNCTIONS paragraph)
59
Page 61

Problem Probable Cause Possible Solution
The display shows:
ONLY WHEN STATIONARY
❒
Some Blue&Me™ functions,
which require the user to pay
attention to the instrument panel
display, are only available when
the car is stopped.
❒
Even occasional glances at the
instrument panel display can
be dangerous and divert your
attention from driving.
Stop your car and attempt to perform
the function again manually, or continue
driving and perform the function using
the voice recognition system.
60
Page 62

Problem Probable Cause Possible Solution
The system did not respond to
a voice command or key press
❒
If you do not speak within
a sufficiently brief time after
pressing ‘, the system interrupts
the voice interaction
❒
If you are speaking too far away
from the car’s microphone
(for example, if you are sitting in
the back seat), the system may not
recognise your voice command.
❒
If you do not wait for the audible
signal after pressing ‘, the system
will receive only a part of the voice
command and will not recognise it.
❒
If you do not press ‘before
pronouncing a voice command,
the system will not activate voice
recognition and therefore will not
recognise your voice commands.
❒
If you do not press ß/MENU to
enter the Main Menu, it will not be
possible to access the Blue&Me™
function management menu
manually.
❒
If you do not act within eight
seconds from pressing ß/MENU,
the system will no longer respond
to the pressing of the buttons
❒
Press ‘and give the voice com-
mand again.
Make sure that you speak clearly at
a normal volume.
❒
Press ß/MENU and try again
manually. Make sure that you act
within approximately eight seconds
after pressing
/MENU.
ß
61
Page 63

Problem Probable Cause Possible Solution
If you try and register a phone that has
already been registered, the display
shows: Registration unsuccessful
After downloading the phonebook from
the mobile phone, contacts’ middle
names/initials, titles or suffixes are not
recognised by the voice recognition
system.
The mobile phone has already been
paired
When calling contacts by voice, the
voice recognition system does not
support the use of titles, suffixes
or middle names/initials.
Remember that the pairing procedure
only needs to be performed once for
your mobile phone. After this
procedure, Blue&Me™ will
automatically connect to your phone
each time you get into the car and turn
the ignition key to MAR.
If you need to pair a phone again, select
DELETE USERS then repeat the
pairing process.
SETTING FUNCTIONS
– MANAGING USER DATA
AND PHONEBOOK
SETTING FUNCTIONS – PAIRING
YOUR MOBILE PHONE
When you call a name in the mobile
phonebook using voice recognition,
say the name without using titles,
suffixes or middle initials.
If you have two entries with similar first
and/or last names in your phonebook,
modify one of the entries in the mobile
phone to make it unique.
Then, download the phonebook
to the hands-free system again.
62
Page 64

Problem Probable Cause Possible Solution
In some cases it is not possible to call
phone numbers that contain an
international prefix (e.g. +39 Italy,
+44 UK, +33 France etc.).
To see the list of supported mobile phones and functions, consult the dedicated site www.fiat.com, Blue&Me™ section, or call
Customer Services on 00800.222784.00.
Here, you can find:
❒
a quick guide with tips for use;
❒
a mobile phone pairing guide:
❒
tips for connecting an iPod;
❒
the ten available voice recognition language files that can be downloaded alternatively onto Blue&Me™ (Italian, French, English,
German, Spanish, Portuguese, Dutch, Polish, Brazilian, Turkish).
On certain mobile phones, when
downloading names and/or phone
numbers to the hands-free system,
the sign “+” is omitted.
Replace “+” with “00”
(e.g. +39 becomes 0039).
63
Page 65

SMS MESSAGE READER
Problem Probable Cause Possible Solution
SMS messages are received on the mobile
phone but not on Blue&Me™
The SMS messages received from the
network operator’s service centre
display the sender’s name or number
incorrectly
Blue&Me™has stopped receiving
messages from your mobile phone
Some SMS messages, on your mobile
phone, are not displayed in the
Blue&Me™ SMS inbox
Not all mobile phones support the
transfer of SMS messages to
Blue&Me™
Not all mobile phones support the correct transfer to Blue&Me™of the name
of the network operator which
sent the SMS message
You may have entered the option
READER OFF by mistake from
the Signal settings menu
Blue&Me™ can read and store
the last 20 SMS messages received
while the mobile phone is connected
to the system.
Messages received in other contexts
will not be transferred to Blue&Me™
Check that your mobile phone supports
the function of transferring SMS
messages via Bluetooth
information, refer to the LIST OF
PHONES SUPPORTED BY
BLUE&ME™ section or the
Blue&Me™ section of www.fiat.com.
In the signal settings menu,
set VIS.+ACOUST or VIS. SIGNAL
®
–
or, for more
SMS MESSAGE READER FUNCTIONS
– SIGNAL SETTING
IT IS possible to delete SMS messages
saved by Blue&Me™.
SMS MESSAGE READER FUNCTIONS,
MANAGING SMS MESSAGES and
DELETING ALL SMS MESSAGES
PARAGRAPHS
64
Page 66

Problem Probable Cause Possible Solution
Some SMS messages or parts of them
are not read or are not read correctly
by the Blue&Me™ hands/free system
The Blue&Me™ SMS message reader
displays the sender’s phone number
rather than the name
Sometimes it is not possible to call
the sender of the SMS message received
Some “special” characters in the SMS
message received, cannot be
interpreted by Blue&Me™
Probably, in the mobile phone pairing
phase, you decided not to download
the phonebook, or if your mobile
phone only supports the management
of individual contacts, you decided to
download only some contacts
Some SMS messages, for example
those sent by a network operator,
do not have the sender’s number
associated with them, therefore
the option CALL cannot be used.
–
To download the phonebook for your
mobile phone, refer to the appropriate
item on the settings menu
SETTINGS FUNCTIONS,
PAIRING A MOBILE PHONE
and MANAGING USER DATA
paragraphs.
–
65
Page 67

MEDIA PLAYER
Problem Probable Cause Possible Solution
Displayed message: NO MEDIA
❒
There are no digital audio files on the
USB storage device.
❒
If the power supply is interrupted,
(e.g. the car battery is disconnected),
Blue&Me™ will lose power
temporarily. In this event the media
library must be recreated.
❒
Load the digital audio files onto your
USB storage device following the
instructions in your multimedia file
management software.
The display reads:
“No USB device found”
Or Blue&Me™ says:
“No USB device found”
After connecting your USB device
and turning the ignition key to MAR,
no music is heard.
After having inserted a USB device
and turned the ignition key to MAR,
there are malfunctions in Blue&Me™
(e.g. failure to play music tracks or
no voice messages)
66
❒
No USB device is connected to the
USB port in the car.
❒
Your USB storage device is not
supported by Blue&Me™
Creating the media library may require
a few minutes
You may have used a USB device with
PASSWORD function activated
❒
Follow the instructions to connect
your USB device to Blue&Me™
❒
Remove the USB device from the
USB port in the vehicle and reinsert it.
The media library will be recreated.
Wait for the library to be created.
If creating the library takes too long,
you can intervene by reducing the
number of audio files stored on your
USB device.
Disable this function on the USB
device.
Page 68

Problem Probable Cause Possible Solution
Displayed message:
NO PLAYLISTS
Displayed message:
INVALID
Displayed message:
EMPTY PLAYLIST
Displayed message:
BAD MEDIA
You have attempted to play a
playlist, but no playlist is stored on
the USB device.
The playlist is corrupt or invalid.
❒
The playlist does not contain
multimedia files
❒
The .wpl file is too big for the
memory of Blue&Me™.
❒
The playlist does not contain references
to multimedia files on your USB
device
The digital audio is corrupt or
invalid
Create a playlist on your computer
timedia file management software
your USB device.
❒
Make sure that the playlist is in .wpl format.
❒
Create the playlist again following the instructions
given in CREATING PLAYLISTS FOR
Blue&Me™ – PRACTICAL TIPS.
❒
If the problem persists, delete the playlist
from your USB device.
❒
Delete the playlist from your USB device or
add the multimedia files to the playlist, using
your multimedia file management software.
❒
Reduce the number of songs in the playlist,
using your multimedia file management software.
If the digital audio is corrupt, delete it from your
USB device
using your mul-
then copy it to
67
Page 69

Problem Probable Cause Possible Solution
Car radio display shows:
MEDIAPLAYER without USB
device connected to the USB port
on the vehicle
Displayed message:
PROTECTED
Blue&Me™ does not play
all the digital audio files in
a playlist
The USB device has been removed
from the car USB port with the
ignition key at STOP.
The audio track that you have
selected for playback is protected by
DRM and cannot be played on
the Media Player.
Your playlist probably contains files
protected by DRM, which are not
played; or it contains invalid
multimedia file references.
❒
Press SRC/OK or the dedicated buttons FM,
AM, CD on the front panel of the car radio to
change the active audio source.
❒
With the key at MAR insert and remove the
USB device from the USB port on the car.
❒
To prevent the MEDIAPLAYER indication
from displaying in the absence of USB device,
always remove the device when the ignition
key is on MAR, or stop playback (with the
voice command STOP) before removing the
USB device rom the car’s USB port.
–
For more information see the section
“SUPPORTED USB STORAGE DEVICES“
68
Page 70

Problem Probable Cause Possible Solution
The multimedia library does not show all
the digital audio files on my USB device
After giving a command, Blue&Me™
says: “Command not available”
❒
Your collection of music tracks
contains files protected by DRM,
which are skipped during playback
❒
Your music track collection may
exceed the maximum number
of audio files that can be imported
into the library (the maximum
number can vary from 12,000 to
16,000 files, depending on
the file type)
❒
Your music track collection on the
USB device includes folders nested
more than 20 folders deep
The digital audio files in these nested
folders will not be imported into the
library
Some commands are not available
while the track is paused or while
the CD player is playing
–
If the track is paused,
to resume. Then give the voice
command again.
press &/ESC
69
Page 71

Problem Probable Cause Possible Solution
The same USB memory device previously
inserted takes more than 10 seconds
to resume playback on Blue&Me™
You removed the USB memory device
from the PC before it was ready.
To restore the USB storage device using
Microsoft®Windows®XP, click on
My Computer in the Start menu,
right-click on the USB storage device,
select Properties, select Tools, click
on “Check now” in the
section, select the option
fix file system errors” then click on
Start.
To avoid this problem in the future,
remove the USB device using the
“Safely remove hardware” option.
“Error-checking”
“Automatically
70
Page 72

iPod
Problem Probable Cause Possible Solution
With iPods or USB keys the system
continues playing the same track or the
“forward” button has to be pressed to
move on to the next track.
The iPod connected to the Blue&Me™
is not charged.
The track loop function may have
inadvertently been activated.
When the ignition key is turned to
MAR, the car recharges the iPod
unless the iPod is completely run
down.
There is a specific item in the menu,
like “Track loop” or “Cycle”,
which must be deactivated.
To deactivate:
❒
press the command activation
button on the steering wheel
❒
when requested by the system,
say “TRACK LOOP OFF” in a clear
tone of voice.
❒
wait for voice confirmation by the
system which will say “TRACK
LOOP DEACTIVATED”.
Remember to keep your iPod at least
minimally charged or wait a few
minutes until the system recharges it.
71
Page 73

PERSONAL DATA PROTECTION
The functions provided by the Blue&Me™ device involve the handling of personal data. In order to protect and to prevent unauthorised access to personal data, the device has been created so that:
❒
Personal data associated with hands-free functions (phonebook and last calls) can only be accessed after automatic recognition
of your Bluetooth®technology mobile phone;
❒
Stored personal data can be deleted using the specific Blue&Me™ functions.
For more information on how to delete personal data, refer to the chapter SETTING FUNCTIONS – MANAGING USER DATA.
IMPORTANT Take into account that when leaving your car at a service centre, personal data stored on Blue&Me™ (phonebook
and last calls) may be disclosed or may be subject to improper use. Before leaving your car at the service centre you can delete stored
data and the phonebook from Blue&Me™.
For more information on how to delete personal data and phonebook, refer to the chapter SETTING FUNCTIONS – MAN-
AGING USER DATA.
72
Page 74

WARNINGS ON THE USE OF THE SYSTEM’S SOFTWARE
This system contains software licensed by Fiat Auto S.p.A. according to a license agreement. Any removal, reproduction, reverse
engineering, or other unauthorised use of the software for this system in violation of the license is strictly prohibited.
IMPORTANT Illegal access within the Blue&Me™ device or installing unauthorised software may invalidate the warranty and
compromise the security of the information stored.
END USER LICENSE AGREEMENT FOR THE USE OF THE SOFTWARE (“EULA“)
– You have purchased a system (“SYSTEM“) containing software licensed by Fiat Auto S.p.a. for one or more software licensers (‘Soft-
ware Suppliers to Fiat Auto S.p.a.’). Such software products, in the same way as the multimedia elements, printed materials and
“online” or electronic documentation (“SOFTWARE“) are protected by law and international treaties on the protection of intellectual property. The SOFTWARE is licensed, not sold. All rights are reserved.
– IF YOU DO NOT ACCEPT THIS END USER LICENSE AGREEMENT (“EULA“), YOU ARE REQUESTED NOT TO USE THE
SYSTEM AND NOT TO COPY THE SOFTWARE. INSTEAD, WE ASK YOU TO CONTACT FIAT AUTO S.p.A. AS SOON AS
POSSIBLE REGARDING THE RETURN OF THE UNUSED SYSTEM. ANY USE OF THE SOFTWARE, INCLUDING, BUT
NOT LIMITED TO, USE OF THE SYSTEM, WILL CONSTITUTE YOUR ACCEPTANCE OF THIS EULA (OR
CONFIRMATION OF ANY APPROVALS PREVIOUSLY GRANTED).
GRANTING OF THE SOFTWARE LICENSE. This EULA grants you the following license:
– You can use the SOFTWARE as installed on the SYSTEM.
DESCRIPTION OF OTHER RIGHTS AND RESTRICTIONS
– Voice recognition. If the SOFTWARE contains one or more components with voice recognition, remember that voice recog-
nition is an intrinsically statistical process, and that errors in voice recognition are part of the process itself. Neither Fiat Auto S.p.A.
nor its suppliers will be liable for any damage resulting from errors in the voice recognition process.
– Restrictions on Reverse Engineering, Decompilation and Disassembly. You are not authorised to carry out reserve en-
gineering on the SOFTWARE, nor to decompile it or disassemble it, except as expressly permitted by applicable law notwithstanding this limitation.
73
Page 75

– Single EULA. The documentation relating to this SYSTEM and intended for the final user may contain multiple versions of this
EULA, such as for example several translations and/or several multimedia versions (that is, in the documentation and in the software). Even if you receive several versions of the EULA, your user license will apply to one (1) copy of the SOFTWARE only.
– Leasing prohibited. Without authorisation by Fiat Auto S.p.A., hiring, renting, leasing or loaning the SOFTWARE is prohibited.
– Transfer of the SOFTWARE. Pursuant to this EULA, you can definitively transfer all your rights only and exclusively by sell-
ing or transferring the SYSTEM, provided that you do not retain any copies, and transfer the entire SOFTWARE (including all its
components, the printed and IT material and any updates, this EULA and, if applicable, the Certificate of Authenticity), and that
the recipient accepts the terms of this EULA. If the SOFTWARE is an update, the transfer must include all previous versions of
the SOFTWARE.
– Termination. Without prejudicing each other’s rights, Fiat Auto S.p.A. or the Software Suppliers to Fiat Auto S.p.A. can termi-
nate the EULA if you do not respect the terms and conditions contained within it. In this case, you will have to destroy all copies
of the SOFTWARE and all its components.
– Data usage consent. You consent to the Software Suppliers for Fiat Auto S.p.A., their related companies and/or their appoint-
ed representative obtaining and using technical information collected by them in any manner within the framework of the assistance services for the SOFTWARE. The Software Suppliers of Fiat Auto S.p.A., their related companies and/or their appointed representative may use such information only in order to improve their products or to provide you with personalised services or technology. The Software Suppliers of Fiat Auto S.p.A., their related companies and/or their appointed representative may reveal this
information to others, but not in such a way that you can be identified.
– Components of Internet-Based Services. The SOFTWARE may contain components that allow and facilitate the use of In-
ternet based services. You understand and accept that the Software Suppliers to Fiat Auto S.p.A., their related companies and/or
their appointed representative could automatically check the version of the SOFTWARE used by you, and/or its components, and
could provide updates or supplements to the SOFTWARE, which may even be automatically downloaded onto your SYSTEM.
74
Page 76

– Software/Additional Services The SOFTWARE will be able to allow Fiat Auto S.p.A., the Software Suppliers for Fiat Auto S.p.A.,
their related companies and/or their appointed representative to provide you with or make available to you updates, supplements, complements or components of Internet based services for your SOFTWARE after the date when you obtained your first
copy of the SOFTWARE (“Additional Components“).
– If Fiat Auto S.p.A. provides you with or makes available Additional Components without providing any other EULA conditions,
the terms of this EULA will also apply to them.
– If Software Suppliers to Fiat Auto S.p.A., their related companies and/or their appointed representative make additional com-
ponents available to you, and together with them no other EULA condition is provided, then the terms of this EULA would apply to them, except for the fact that the Suppliers Software to Fiat Auto S.p.A., or their subsidiary that provides the Additional
Components will be considered as the licenser for the Additional Component.
– Fiat Auto S.p.A., the Software Suppliers to Fiat Auto S.p.A., and their related companies and/or their appointed representative
reserve the right to terminate any service based on the Internet provided to you or made available through the use of the
SOFTWARE.
– Links to Third-Party Websites. The SOFTWARE may give you the possibility, through the use of the SOFTWARE, to access
third party websites. Third party websites do not fall within the framework of control by the Software Suppliers to Fiat Auto S.p.A.,
their related companies and/or their appointed representative. Neither the Software Suppliers of Fiat Auto S.p.A. nor their related companies or their appointed representative shall be responsible for (i) the content of any third-party websites, any links contained in such sites, or any changes or updates to third-party sites, or for (ii) broadcasts via the Internet or of any other type received from any third party. If the SOFTWARE provides links to third-party websites, such links are made available only for your
convenience: the inclusion of a link does not imply approval of the third-party website by Software Suppliers of Fiat Auto S.p.A.,
their related companies and/or their appointed representative.
FORMATS FOR UPDATES AND RESTORATION
– If the SOFTWARE is provided by Fiat Auto S.p.A., separately from the SYSTEM on formats such as ROM chip, CD ROM or with
downloads from the Internet or by other means, and if it is labelled ‘Only For Update’, you can install one (1) copy of the SOFTWARE on the SYSTEM, to replace the existing SOFTWARE, and can use it in accordance with this EULA, including any additional terms for the EULA annexed to the SOFTWARE update.
75
Page 77

INTELLECTUAL PROPERTY RIGHTS
All the intellectual property titles and rights to the SOFTWARE (including, but not limited to, images, photographs, animations, video
files, audio files, music, texts and applets, built into the SOFTWARE), the relevant printed material and any copy of the SOFTWARE are the property of the Software Suppliers of Fiat Auto S.p.A., their related companies or suppliers. The SOFTWARE is licensed, not sold. Copying the printed material attached to the SOFTWARE is not permitted. All the intellectual property titles and
rights on the content to which the SOFTWARE gives access are the property of the respective owners of the content, and are
protected by the current laws and treaties applicable to reproduction rights and intellectual property. This EULA does not give you
any right to use such content. All rights not expressly provided with this EULA are retained by the Software Suppliers of Fiat Auto
S.p.A., their related companies and suppliers. The use of any online service to which the SOFTWARE gives access will be regulated
by the terms of use for these services. If this SOFTWARE contains documentation provided only in electronic form, you may print
a copy of such documentation.
EXPORT RESTRICTIONS
You agree that the SOFTWARE is subject to the jurisdiction on exports from the US and the European Union. You undertake to
respect all national and international laws applicable to the SOFTWARE, including US Export Administration Regulations and the
restrictions for the end user, the end use and the destination issued by the US and other governments.
– TRADEMARKS. This EULA does not grant you any right regarding trademarks or commercial brands of the Software Suppli-
ers to Fiat Auto S.p.A., their related companies or suppliers.
– PRODUCT ASSISTANCE. Product assistance for the SOFTWARE is not provided by the Software Suppliers to Fiat Auto
S.p.A. or their related companies or subsidiaries. For product support, we ask you to refer to the bodies suggested by Fiat Auto
S.p.A. and indicated in the SYSTEM manual. For any questions concerning this EULA, or if you want to contact Fiat Auto S.p.A.
for any other reason, please refer to the suggestions indicated in the SYSTEM documentation.
– Exclusion of Liability for Certain Damages. EXCEPT WHERE PROHIBITED BY LAW, THE SOFTWARE SUPPLIERS TO
FIAT AUTO S.p.A. AND THEIR SUBSIDIARIES WILL NOT BE LIABLE FOR ANY INDIRECT, SPECIAL, NON-CONTRACTUAL OR ACCIDENTAL DAMAGE DERIVING FROM OR RELATED TO THE USE OR MANAGEMENT OF THE SOFTWARE.
THIS RESTRICTION WILL ALSO APPLY IN THE EVENT THAT ANY REMEDY FAILS IN ITS MAIN INTENTION. UNDER NO
CIRCUMSTANCES WILL THE SOFTWARE SUPPLIERS OF FIAT AUTO S.p.A. AND/OR THEIR SUBSIDIARIES BE LIABLE FOR
SUMS EXCEEDING TWO HUNDRED AND FIFTY US DOLLARS (250.00 USD).
– FOR ANY APPLICABLE RESTRICTED WARRANTIES AND SPECIAL RULES OF ITS OWN JURISDICTION,
WE ASK YOU TO REFER TO YOUR WARRANTY BOOKLET, WHICH IS INCLUDED IN THE PACKAGE OR
WAS PROVIDED TO YOU WITH THE SOFTWARE’S PRINTED MATERIAL.
76
Page 78

NOTES
..................................................................................................................................................................................................................................
..................................................................................................................................................................................................................................
..................................................................................................................................................................................................................................
..................................................................................................................................................................................................................................
..................................................................................................................................................................................................................................
..................................................................................................................................................................................................................................
..................................................................................................................................................................................................................................
..................................................................................................................................................................................................................................
..................................................................................................................................................................................................................................
..................................................................................................................................................................................................................................
..................................................................................................................................................................................................................................
..................................................................................................................................................................................................................................
..................................................................................................................................................................................................................................
..................................................................................................................................................................................................................................
..................................................................................................................................................................................................................................
Page 79

..................................................................................................................................................................................................................................
..................................................................................................................................................................................................................................
..................................................................................................................................................................................................................................
..................................................................................................................................................................................................................................
..................................................................................................................................................................................................................................
..................................................................................................................................................................................................................................
..................................................................................................................................................................................................................................
..................................................................................................................................................................................................................................
..................................................................................................................................................................................................................................
..................................................................................................................................................................................................................................
..................................................................................................................................................................................................................................
..................................................................................................................................................................................................................................
..................................................................................................................................................................................................................................
..................................................................................................................................................................................................................................
..................................................................................................................................................................................................................................
..................................................................................................................................................................................................................................
Page 80

..................................................................................................................................................................................................................................
..................................................................................................................................................................................................................................
..................................................................................................................................................................................................................................
..................................................................................................................................................................................................................................
..................................................................................................................................................................................................................................
..................................................................................................................................................................................................................................
..................................................................................................................................................................................................................................
..................................................................................................................................................................................................................................
..................................................................................................................................................................................................................................
..................................................................................................................................................................................................................................
..................................................................................................................................................................................................................................
..................................................................................................................................................................................................................................
..................................................................................................................................................................................................................................
..................................................................................................................................................................................................................................
..................................................................................................................................................................................................................................
..................................................................................................................................................................................................................................
Page 81

Fiat Group Automobiles S.p.A. - Parts & Services - Technical Services - Service Engineering
Largo Senatore G. Agnelli, 3 - 10040 Volvera - Torino (Italia)
Print No. 603.95.987 – 04/2012 – 1 Edition
Page 82

ENGLISH
The data contained in this publication is intended merely as a guide. Abarth reserves the right to modify the models and
versions described in this booklet at any time for technical and commercial reasons.
If you have any further questions please consult your Abarth dealer.
Printed in recycled paper without chlorine.
 Loading...