

Page 1

Page 2

SSUUMMMMAARRY
Y
INTRODUCTION................................................................... 3
Suggestions ............................................................................... 3
Technical specifications .......................................................... 5
QUICK GUIDE......................................................................... 6
Steering wheel controls ......................................................... 9
General information ............................................................... 10
FUNCTIONS AND ADJUSTMENTS ................................. 12
Turning the car radio on ....................................................... 12
Turning the car radio off ....................................................... 12
Selecting the Radio functions ................................................ 12
Selecting the CD function ...................................................... 12
Audio source memory function ........................................... 12
Volume adjustment ................................................................. 12
Mute/Pause function ............................................................... 12
Audio adjustments .................................................................. 13
Tone adjustment ..................................................................... 13
Balance adjustment ................................................................. 13
Fader adjustment ..................................................................... 14
Loudness adjustment .............................................................. 14
Menu ........................................................................................... 15
Telephone preparation .......................................................... 19
Antitheft protection................................................................. 20
RADIO (TUNER)..................................................................... 21
Introduction ............................................................................. 21
Selecting a frequency band .................................................... 21
Preselection buttons ............................................................... 21
Storing the last station listened to ....................................... 22
Automatic tuning ..................................................................... 22
Manual tuning ........................................................................... 22
AutoSTore function ................................................................ 23
Emergency alarm reception .................................................. 24
EON function ........................................................................... 24
Stereophonic broadcasters ................................................... 24
CD PLAYER ............................................................................. 25
Introduction ............................................................................. 25
CD player selection ................................................................ 25
CD loading/ejection ................................................................ 25
Display readings ....................................................................... 26
Track selection.......................................................................... 27
Fast forward/fast rewind ........................................................ 27
Pause function .......................................................................... 27
CD MP3 PLAYER .................................................................... 28
Introduction ............................................................................. 28
MP3 mode ................................................................................. 28
Page 3

Display readings ....................................................................... 29
Selecting the next/
previous folder with hybrid discs.......................................... 29
Structure of the folders ......................................................... 29
TROUBLESHOOTING ......................................................... 30
General ...................................................................................... 30
CD player ................................................................................. 30
MP3 File reading ...................................................................... 30
Page 4
The radio has been designed according to
the passenger compartment’s specific
characteristics and with a personalised design that is incorporated perfectly in the
style of dashboard.
The instructions for use are given below.
We recommend that you read them carefully.
IINNTTRROODDUUCCTTIIOON
SUGGESTIONS
Road safety
Familiarise yourself with the various car
radio functions (for example, store the stations) before starting to drive.
Reception conditions
Reception conditions change constantly
while driving. Reception may be interfered
with by the presence of mountains, buildings or bridges, or when you are far away
from the broadcaster.
IMPORTANT The volume may be increased when receiving traffic bulletins.
N
If the volume is too high this
can be a risk for the driver
and for other people on the
road. Always adjust the volume so that
you can still hear background noises.
INTRODUCTION
QUICK
GUIDE
FUNCTIONS AND
ADJUSTMENTS
RADIO
CD PLAYER
CD MP3
PLAYER
3
Page 5

INTRODUCTION
QUICK
GUIDE
FUNCTIONS AND
ADJUSTMENTS
RADIO
CD PLAYER
Care and maintenance
Only clean with a soft, anti-static cloth.
Cleaning and polishing products could
damage the surface.
CDs
Dirt, scratches or any distortions on CDs
could cause problems when playing and
poor sound quality. Follow this advice for
optimum conditions:
❒ only use CDs with the following brand;
❒
clean every CD thoroughly removing
any fingermarks or dust using a soft
cloth. Hold CDs by the outside and
clean them from the middle outwards;
❒
never use chemical products (e.g. antistatics or thinners or sprays) for cleaning as they could damage the surface of
the CDs;
❒
after listening to them place CDs back
in their casings to avoid damage to them;
❒
do not expose CDs to direct sunlight,
high temperatures or dampness for long
periods;
❒
do not stick labels on the surface of the
CD and do not write on the recorded
surface using pens or pencils;
❒
do not use CDs that are very
scratched, flawed, distorted, etc. Using discs like this will result in malfunctions or damage to the player;
❒
the use of original CD supports is required for the best quality audio production. If CD-R/RWs that have not
been correctly mastered and/or with
a maximum capacity above 650 MB are
used, correct operation is not guaranteed;
❒
do not use the protective sleeves sold
for CDs or discs with stabilizers, etc.
because they could get stuck in the internal mechanism and damage the disc;
CD MP3
PLAYER
4
Page 6

❒ if copy protected CDs are used, it may
take a few seconds before the system
starts playing them. The CD player cannot be guaranteed to play all protected discs. The fact that the CD is protected from being copied is often
shown in very small letters or is difficult
to read on the actual CD cover where
it may be, for example, “COPY CONTROL”, “COPY PROTECTED”, “THIS
CD CANNOT BE PLAYED ON A
PC/MAC”, or it may be identified
through the use of symbols, such as, for
example:
❒ The CD player is capable of reading
most compression systems currently in
use (e.g.: LAME, BLADE, XING,
FRAUNHOFER) but, following the development of these systems, the reading of all compression formats is not
guaranteed.
TECHNICAL
CHARACTERISTICS
Basic level audio equipment
Front speakers
❒ 2 x Ø 38 mm tweeters installed in the
door handle trims;
❒ 2 x Ø 165 mm mid-woofers installed in
the door frames
Rear speakers
❒ 2 x Ø 130 mm full-range speakers in-
stalled in the rear side panels (3-door
versions) or in the door frames (5-door
versions)
High level audio equipment (MP3)
Front speakers
❒ 2 x Ø 38 mm tweeters installed in the
door handle trims;
❒ 2 x Ø 165 mm mid-woofers installed in
the door frames
Rear speakers
❒ 2 x Ø 130 full-range speakers installed
in the rear side panels (3-door versions)
or in the door frames (5-door versions)
Hi-Fi audio equipment
(for versions/markets where provided)
Front speakers
❒ 2 x tweeters installed in the door han-
dle trims;
❒ 2 x Ø 165 mm mid-woofers installed in
the door frames
Rear speakers
❒ 2 x Ø 130 mm full-range speakers in-
stalled in the rear side panels (3-door
versions) or in the door frames (5-door
versions)
❒ 1 x sub-woofer box in the luggage com-
partment (RH side)
❒ 1 ASP multichannel audio amplifier in-
stalled under the dashboard (passenger
side).
INTRODUCTION
QUICK
GUIDE
FUNCTIONS AND
ADJUSTMENTS
RADIO
CD PLAYER
CD MP3
PLAYER
5
Page 7
INTRODUCTION
QUICK
GUIDE
FUNCTIONS AND
ADJUSTMENTS
RADIO
QQUUIICCKKGGUUIIDDE
E
F0U0524m
CD PLAYER
CD MP3
PLAYER
6
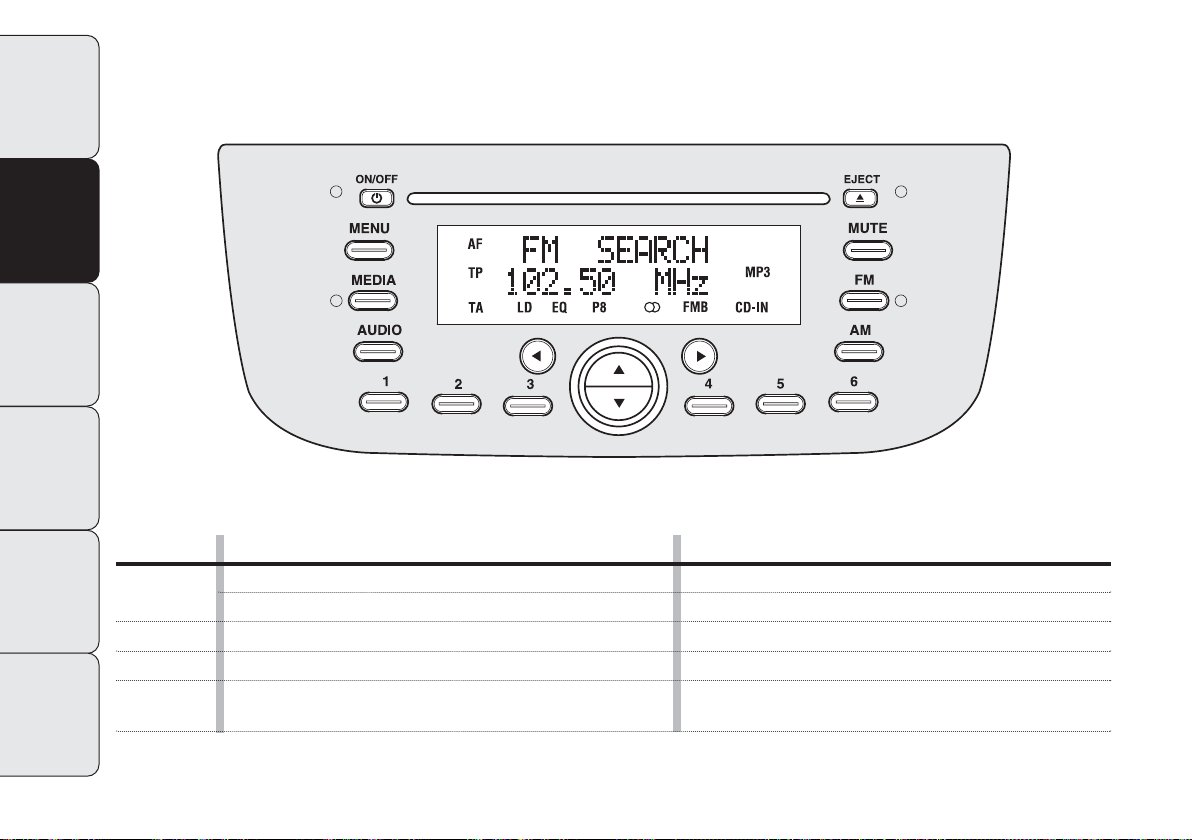
Button
ON/OFF
g
FM AS
AM
MEDIA
GENERAL FUNCTIONS
On
Off
Selection of radio source FM1, FM2, FM Autostore
Selection of radio source MW1, MW2
Selection of CD/Media Player source
(only with Blue&Me™)
Mode
Short button press
Long button press
Short cyclical button press
Short cyclical button press
Short cyclical button press
Page 8

Button
MUTE
AUDIO
MENU
Button
GENERAL FUNCTIONS
Volume activation/deactivation (Mute/Pause)
Audio adjustments: low tones (BASS), high tones (TREBLE),
left/right balance (BALANCE), front/rear balance (FADER)
Advanced functions adjustment
Volume adjustment
RADIO FUNCTIONS
Mode
Short button press
Menu activation: short button press
Selection of type of adjustment: pressing buttons ▲ or ▼
Adjustment of values: pressing buttons ¯ or ˙
Menu activation: short button press
Selection of type of adjustment: pressing buttons ▲ or ▼
Adjustment of values: pressing buttons ¯ or ˙
Left/right rotation of turning control
Mode
INTRODUCTION
QUICK
GUIDE
FUNCTIONS AND
ADJUSTMENTS
▲
¯˙
▼
1 2 3 4 5 6
Radio station search:
– Automatic search
– Manual search
Programming current radio station
Stored station recall
Automatic search: pressing buttons ¯ or ˙
(long press for fast forward)
Manual search: pressing buttons ▲ or ▼
(long press for fast forward)
Long button press for memory preset
1 to 6
Short button press for
memory preset 1 to 6
RADIO
CD PLAYER
CD MP3
PLAYER
7
Page 9

INTRODUCTION
QUICK
GUIDE
Button
˚ EJECT
¯˙
▲▼
CD FUNCTIONS
CD ejection
Play previous/next track
CD track fast forward/rewind
Play previous/next folder (for CD-MP3)
Mode
Short button press
Short button press ¯ or ˙
Long button press ¯ or ˙
Short button press ▲ or ▼
FUNCTIONS AND
ADJUSTMENTS
RADIO
CD PLAYER
CD MP3
PLAYER
8
Button
▲▼
¯˙
Media Player FUNCTIONS
(only with BlueMe™)
Selecting folder/artist/genre/previous/
next album according to the selection method activated
Play previous/next track
Mode
Short button press
Short button press
Page 10
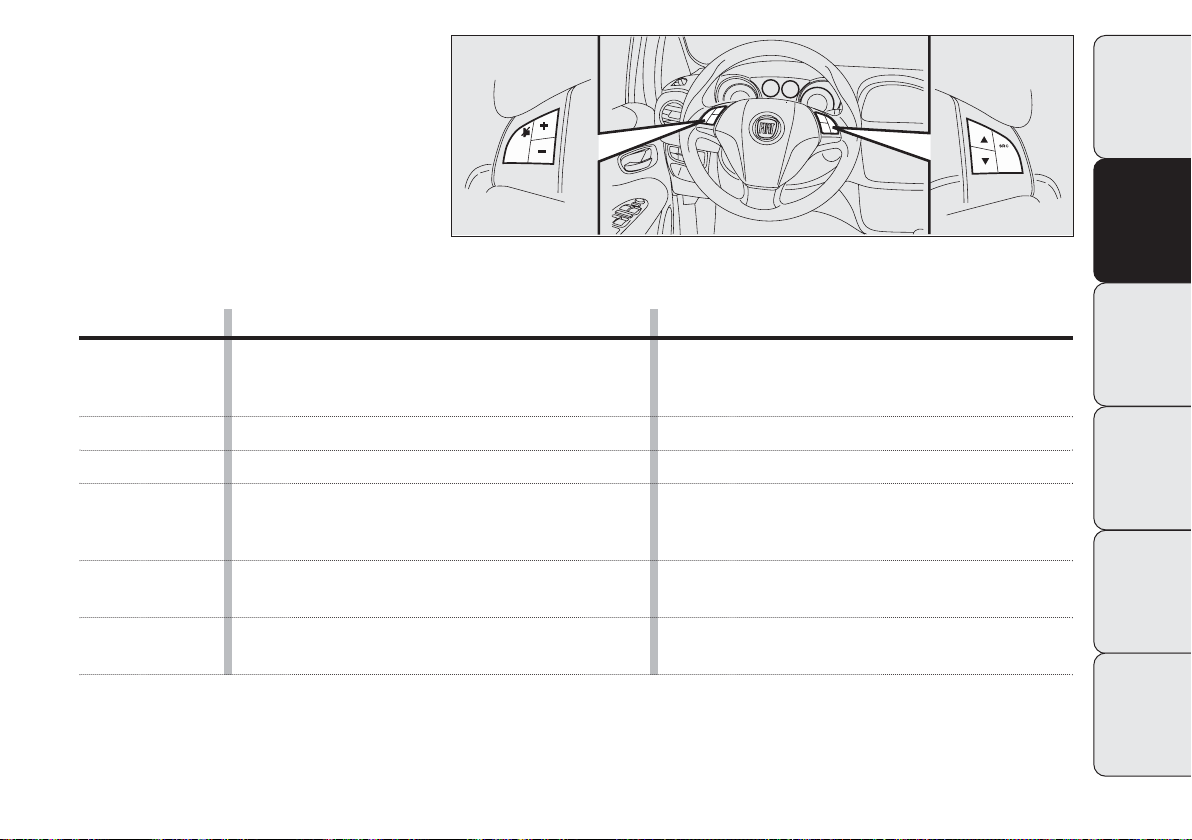
CONTROLS ON THE STEERING
WHEEL
(for versions/markets where provided)
F0U0518m
INTRODUCTION
QUICK
GUIDE
Button
&
+
–
SRC
▲
▼
FUNCTION
AudioMute on/off (Radio mode) or Pause function
(MP3 or Media Player mode)
(only with BlueMe™)
Turn up volume
Turn down volume
Selection of Radio frequency range (FM1, FM2, FMT,
FMA, MW1, MW2) or listening sources
(Radio, MP3 or Media Player (only with BlueMe™)
Radio: recall programmed stations (from 1 to 6)
CD/CD MP3: selection of next track
Radio: recall programmed stations (from 1 to 6)
CD/CD MP3: selection of previous track
Mode
Short button press
Button press
Button press
Button press
Button press
Button press
FUNCTIONS AND
ADJUSTMENTS
RADIO
CD PLAYER
CD MP3
PLAYER
9
Page 11
INTRODUCTION
QUICK
GUIDE
FUNCTIONS AND
ADJUSTMENTS
RADIO
CD PLAYER
GENERAL INFORMATION
The radio has the following functions:
Radio section
❒
PLL tuning with frequency bands
FM/AM/MW;
❒
RDS (Radio Data System) with TA
(traffic information) - TP (traffic programs) - EON (Enhanced Other Network) - REG (regional programs) functions;
❒
AF: alternative frequency search selection in RDS mode;
❒
emergency alarm presetting;
❒
automatic/manual station tuning;
❒
FM Multipath detector;
❒
manual programming of 30 stations: 18
on FM band (6 on FM1, 6 on FM2, 6 on
FMT), 12 on MW band;
❒
automatic storage (AUTOSTORE function) of 6 stations in the dedicated FM
band;
❒
SPEED VOLUME function: automatic
volume adjustment based on vehicle
speed;
❒
automatic Stereo/Mono selection.
CD section
❒
Direct disc selection;
❒
Track selection (forward/backward);
❒
Fast track search (forward/backward);
❒
CD Display function: display of disc
name/time elapsed since start of the
track;
❒
Playing audio CD, CD-R and CD-RW.
On multimedia CDs, besides
audio tracks, there are data
tracks too. Playing this type
of CD could cause hissing at
a volume that could jeopardise road
safety as well as causing damage to
the final stages and the speakers.
CD MP3
PLAYER
10
Page 12

CD MP3 section
❒
MP3-Info function (ID3-TAG);
❒
Select folder (previous/next);
❒
Track selection (forward/backward);
❒
Fast track search (forward/backward);
❒
MP3 Display funciton: display of name
of folder, ID3-TAG information, time
elapsed since the start of the track, file
name);
❒
Audio or data CDs, CD-R and CD-RW
playback.
Audio section
❒
Mute/Pause function;
❒
Soft Mute function;
❒
Loudness function;
❒
7 band graphic equalizer;
❒
Separate bass/treble adjustment;
❒
Right/left channel balancing.
Media Player section
(only with Blue&Me™)
See the description in the Blue&Me™
Supplement for the operation of the Media Player.
INTRODUCTION
QUICK
GUIDE
FUNCTIONS AND
ADJUSTMENTS
RADIO
CD PLAYER
CD MP3
PLAYER
11
Page 13

INTRODUCTION
TURNING THE CAR RADIO ON
The car radio comes on by briefly pressing button g(ON/OFF).
QUICK
GUIDE
FUNCTIONS AND
ADJUSTMENTS
RADIO
CD PLAYER
CD MP3
PLAYER
When the car radio is turned on the volume is limited to 5 if the value was higher than this when the radio was last used.
When the radio is turned on with the key
extracted from the ignition, it switches off
automatically after about 20 minutes. After it turns off automatically, it can be
turned on again for an additional 20 minutes by pressing button g(ON/OFF).
TURNING THE CAR RADIO OFF
Keep button g(ON/OFF) pressed.
FFUUNNCCTTIIOONNSSAANNDDAADDJJUUSSTTMMEENNTTS
SELECTING THE
RADIO FUNCTIONS
By pressing the FMas button briefly and
repeatedly, the following audio sources
can be selected cyclically:
– TUNER (“FM1”, “FM2”, “FMA”).
By pressing the AM button quickly and repeatedly, the following audio sources can
be selected cyclically:
– TUNER (“MW”).
SELECTING THE CD FUNCTION
By pressing the MEDIA button briefly it
is possible to select the CD function.
AUDIO SOURCE MEMORY
FUNCTION
If another function (e.g. the radio) is selected whilst listening to a CD, playing is
interrupted and is resumed from the same
point when returning to the CD source.
If another function is selected whilst listening to the radio, the last station selected is tuned into when returning to the
Radio source.
VOLUME ADJUSTMENT
To adjust the volume, turn the rotating
control fig. 1.
If the volume level is changed during the
transmission of a traffic update, the new
setting will only be maintained until the update is finished.
MUTE/PAUSE FUNCTION
(zeroing the volume)
Press the MUTE button briefly to activate
the Mute function. The volume will gradually decrease and the words “RADIO
Mute” will appear on the display (in radio
mode) or “PAUSE” (in CD mode).
Press the MUTE button again to deactivate the Mute function. The volume will
gradually increase until it reaches the level set previously.
When the volume is changed using the
dedicated controls, the Mute function is
deactivated and the volume is adjusted to
the new level selected.
With the Mute function activated, it will
be ignored when there is an incoming traffic alert (if the TA function is activated) or
if an emergency alarm is received. The
function will be reactivated when the announcement is over.
S
12
Page 14

AUDIO ADJUSTMENTS
The functions in the audio menu are different depending on the status activated:
AM/FM/CE/Media Player (only with
Blue&Me™).
Press the AUDIO button briefly to change
the Audio functions. After the AUDIO
button is first pressed, the display will
show the bass level value for the source
activated at that time (e.g. in FM mode the
display will show “FM Bass + 2”).
To scroll through the Menu functions use
button ▲ or ▼. To change the setting of
the selected function, use the buttons ¯
or ˙.
The current status of the function selected will be shown on the display.
The functions managed by the Menu are:
❒ BASS (bass adjustment);
❒ TREBLE (treble adjustment);
❒ BALANCE (right/left balance adjust-
ment);
❒ FADER (front/rear balance adjustment);
❒ LOUDNESS (LOUDNESS function
on/off);
❒ EQUALIZER (activation and selection
of factory equaliztion settings);
❒ USER EQUALIZER (customised equal-
ization setting).
TONE ADJUSTMENT
(bass/treble)
Proceed as follows:
❒ Use button ▲ or▼ to set the “Bass” or
“Treble” in the AUDIO menu;
❒ press the button ¯ or ˙ to in-
crease/decrease the bass or treble settings.
By pressing the buttons briefly there is a
gradual change in steps. By pressing them
down longer, the levels will change quickly.
BALANCING ADJUSTMENT
Proceed as follows:
❒ Use button ▲ or ▼ to set the “Bal-
ance” in the AUDIO menu;
❒ press button ¯ to increase the sound
from the right speakers or the button
˙ to increase the sound from the left
speakers.
By pressing the buttons briefly there is a
gradual change in steps. By pressing them
down longer, the levels will change quickly.
Select the “¯ or ˙” value to set the right
and left audio outputs at the same value.
INTRODUCTION
QUICK
GUIDE
FUNCTIONS AND
ADJUSTMENTS
RADIO
CD PLAYER
CD MP3
PLAYER
13
Page 15

FADER ADJUSTMENT
INTRODUCTION
QUICK
GUIDE
FUNCTIONS AND
ADJUSTMENTS
RADIO
CD PLAYER
Proceed as follows:
❒Use button ▲ or ▼ to set the “Fader”
❒press button ¯ to increase the sound
By pressing the buttons briefly there is a
gradual change in steps. By pressing them
down longer, the levels will change quickly.
Select “¯ or ˙” to set the same level for
the front and rear audio outputs.
in the AUDIO menu;
coming from the rear speakers or button ˙ to increase the sound coming
from the front speakers.
LOUDNESS FUNCTION
The Loudness function improves the volume of the sound whilst listening at low
volumes, increasing the bass and treble.
To activate/deactivate the function, select
the Loudness setting of the AUDIO menu
using the ¯ or ˙ button. The function status (on or off) is shown on the display for
a few seconds by the words Loudness On
or Loudness Off.
PRESET/USER*/
CLASSIC/ROCK/JAZZ
functions (
equalizer on/off)
The built-in equalizer can be activated/deactivated. When the equalizer function is off, the audio settings can only be
changed by adjusting the bass and treble
settings, whereas when the function is on,
the acoustic curves can be adjusted. To
turn off the equalizer, select the “EQ Preset” function using the ¯ or ˙ buttons.
To turn on the equalizer, use the ¯ or ˙
buttons to select one of the adjustments:
❒“FM/AM/CD...EQ User” (adjustment of
7 equalizer bands that can be changed by
the user);
❒“Classic” (optimum predefined adjust-
ment of equalizer for listening to classical music);
❒“Rock” (optimum predefined adjust-
ment of equalizer for listening to rock
and pop music);
❒“Jazz” (optimum predefined adjustment
of equalizer for listening to jazz music);
When one of the equalizer adjustments is
activated the letters “EQ” light up.
CD MP3
PLAYER
14
Page 16

*USER EQ SETTINGS function
(equalizer settings only if the USER
setting has been
selected)
To set a customized equalizer adjustment,
set either the ▲ or ▼ button to User and
press the MENU button.
A graph with 7 bars will appear on the display, where each bar represents a frequency. Select the bar to adjust using buttons¯ or ˙; the bar selected will start to
flash and can be adjusted using buttons ▲
or ▼.
Press the AUDIO button again to memorize the setting. The display will show the
source activated at the time followed by
the word User. If the mode is, for example, FM, then the display will show “FM EQ
User”.
MENU
MENU button functions
Press the MENU button briefly to activate
the Menu function. The display will show
the first menu item that can be adjusted
(AF) (AF Switching On on the display).
To scroll through the Menu functions use
button ▲ or ▼. To change the setting of
the selected function, use the buttons ¯
or ˙.
The current status of the function selected will be shown on the display.
The functions managed by the Menu are:
❒ AF SWITCHING (ON/OFF);
❒ TRAFFIC INFORMATION (ON/OFF);
❒ REGIONAL MODE regional programs
(ON/OFF);
❒ MP3 DISPLAY (CD MP3 display set-
ting);
❒ SPEED VOLUME (automatic volume
control based on speed);
❒ EXTERNAL AUDIO (telephone vol-
ume adjustment);
❒ RADIO OFF (off mode);
❒ SYSTEM RESET.
Press the MENU button again to exit the
Menu function.
IMPORTANT The AF SWITCHING,
TRAFFIC INFORMATION and REGIONAL MODE adjustments are only possible
on FM.
INTRODUCTION
QUICK
GUIDE
FUNCTIONS AND
ADJUSTMENTS
RADIO
CD PLAYER
CD MP3
PLAYER
15
Page 17

AF SWITCHING function
(alternative frequency search)
INTRODUCTION
QUICK
GUIDE
FUNCTIONS AND
ADJUSTMENTS
RADIO
CD PLAYER
CD MP3
PLAYER
The radio can operate in two different
modes in the RDS system:
❒ “AF Switching On”: search for alterna-
❒ “AF Switching Off”: search for alterna-
Proceed as follows to switch the function
on/off:
❒ press the MENU button and select “AF
❒ press the ¯ / ˙ buttons to turn the
With the function activated, the radio automatically tunes into the station with the
strongest signal broadcasting the same
program. While driving, you can continue to listen to the same station without
having to change the frequency when you
change zones.
Obviously, it must be possible to receive
the station that you are listening to in the
area you are driving through.
tive frequencies activated (the letters
“AF” appear on the display);
tive frequencies not activated.
Switching On”;
function on/off.
If the AF function is activated, “AF” will
light up on the display.
If the AF function has been activated and
the radio is not able to receive the tuned
station, the radio activates the automatic
search, during which “FM Search” appears
on the display (only for top of the range
radios).
With the AF function deactivated, the remaining RDS functions, such as the display
of the station name, still remain active.
The AF function can only be activated on
FM bands.
TRAFFIC INFORMATION
function
(traffic information)
Some stations on the FM band (FM1, FM2
and FMA) can transmit information about
traffic conditions. In this case the letters
“TA” will appear on the display.
Proceed as follows to switch the TA function on/off:
❒ press the MENU button and select
“Traffic Info”;
❒ press the ¯ / ˙ buttons to turn the
function on/off.
If the TA function is activated, “TA” will
light up on the display.
IMPORTANT If the TA function is activated with an audio source other than
Tuner (Radio) (CD, MP3, Telephone or
Mute/Pause), the radio can carry out an
automatic search and therefore it is possible, when reactivating the Tuner (Radio)
source, that the frequency tuned into will
be different from the one set previously.
With the TA function, it is possible to:
❒ search only for RDS stations that
broadcast on the FM band, which are
enabled to transmit traffic information;
❒ receive traffic information even if the
CD player is on;
❒ receive traffic information at a minimum
preset volume even with the radio volume zeroed.
16
Page 18

IMPORTANT In some countries there are
radio stations that do not broadcast traffic information even with the TP function
activated (“TP” in the display).
If the radio is working on the AM band,
when the TA function is activated it will
switch to the last station tuned into on the
FM1 band.
The volume at which the traffic update is
transmitted depends on the reception volume:
❒ listening volume below 5: traffic news
volume 5 (fixed value);
❒ listening volume above 5: traffic news
volume equal to listening volume +1.
If the volume is changed during a traffic update, the level will not be shown on the
display; the new level will only be maintained during the update.
The display will show the words TRAFFIC
INFORMATION whilst a traffic update is
being received.
The TA function can be interrupted by
pressing any button on the car radio.
REGIONAL MODE function
(reception of regional broadcasts)
Some national broadcasters will transmit
regional programs at certain times of the
day (that vary from region to region). This
function makes it possible to tune into local (regional) broadcasters automatically
(see EON function paragraph).
If you want the radio to automatically tune
into the regional stations being broadcast
on the network selected, the function
must be activated.
To turn the function on/off, use the buttons¯ or ˙.
The current status of the function will appear on the display:
❒ “Regional On”: function activated;
❒ “Regional Off”: function deactivated.
If the function is deactivated and you have
tuned into a regional station working in a
given area and you enter a different area,
then the regional station received in the
new area will be broadcast.
WARNING If the AF and REG functions
are on at the same time, once a border
between two regions is crossed, the radio
may not switch correctly to a valid alternative frequency.
MP3 DISPLAY FUNCTION
(Compact Disc MP3 data display)
This function makes it possible to select
the information shown by the display
when listening to a CD containing MP3
tracks.
The function can only be selected if a CD
MP3 is inserted: in this case “MP3 Display”
will appear on the display.
To change the function, use the ¯or ˙
buttons.
The following settings are available:
❒ Title (track title, the ID3-TAG if avail-
able);
❒ Author (track author, the ID3-TAG if
available);
❒ Album (track album, the ID3-TAG if
available);
❒ Folder name (folder name);
❒ File name (MP3 file name).
INTRODUCTION
QUICK
GUIDE
FUNCTIONS AND
ADJUSTMENTS
RADIO
CD PLAYER
CD MP3
PLAYER
17
Page 19

SPEED VOLUME function
(volume change based on speed)
INTRODUCTION
QUICK
GUIDE
FUNCTIONS AND
ADJUSTMENTS
RADIO
CD PLAYER
This function allows the volume level to
be adjusted automatically depending on
the speed of the vehicle, increasing it as
the speed increases to maintain the same
balance with the noise level inside the passenger compartment. To turn the function
on/off, press the ¯ / ˙ buttons. The
words Speed volume should appear on the
display followed by the current status of
the function:
❒ Off: function deactivated
❒ Low: function activated
❒ High: function activated
(low setting)
(high setting).
RADIO ON VOL function
(radio volume maximum limit activation/deactivation)
This function makes it possile to activate/deactivate the maximum volume limit when turning the radio on.
The display shows the function status:
❒ “Radio on vol – Limit on”: when the ra-
dio is switched on the volume level will
be:
– if the volume level is equal to or high-
er than the maximum value, the radio will come on at the maximum
volume;
– if the volume level is between the
minimum and maximum values, the
radio will come on at the same volume as before it was switched off;
– if the volume level is equal to or low-
er than the minimum value, the radio
will come on at the minimum volume.
❒ “Radio on vol – Limit off”: the radio will
come on at the volume level it was at
before switching off. The volume may
be between 0 and 40.
Use the ¯ / ˙ buttons to change the setting.
NOTES
❒ Using the Menu it is only possible to ad-
just the activation/deactivation of the
function and not the minimum or maximum volume setting.
❒ If the “TA” or “TEL” functions or an
outside audio source are activated
when the radio is turned on, the radio
will come on at the volume set for
these sources. When the outside audio
source is deactivated, the volume can
be adjusted between the minimum and
maximum levels.
❒ If the battery charge is low, it will not
be possible to adjust the volume between the minimum and maximum levels.
CD MP3
PLAYER
18
Page 20

EXTERNAL AUDIO function
(telephone volume adjustment)
This function makes it possible to adjust
(settings from 1 to 40), by turning the control fig. 1 or pressing the ¯ / ˙ buttons
or exclude (OFF setting) the volume of the
Telephone, the Blue&Me™ (except the
Media Player function).
The display shows the current function
status:
❒ “EXT Audio Off”: function deactivated.
❒ “EXT Audio Volume 23”: function acti-
vated with volume setting 23.
RADIO OFF function
(on and off mode)
This function is used to select the mode
of turning off the radio between two different procedures. To activate the function, use the ¯ or ˙ buttons.
The selected mode will appear on the display:
❒ “00 MIN”: the radio turns off automat-
ically in connection with the ignition
key; the radio turns off automatically as
soon as the key is turned to the STOP
position;
❒ “20 MIN”: the radio turns off indepen-
dently from the ignition key; the radio
remains on for a maximum period of 20
minutes after the key has been turned
to the STOP position.
TELEPHONE PREPARATION
If a hands-free kit is installed on the car,
when there is an incoming phonecall the
radio audio will be connected to the telephone output. The telephone volume is
always fixed, but it can be adjusted during a conversation using the rotating control fig. 1.
The fixed telephone audio volume can be
adjusted using the “EXT Audio” function
in the Menu. The word PHONE will appear on the display during the deactivation
of the audio for the phonecall.
INTRODUCTION
QUICK
GUIDE
FUNCTIONS AND
ADJUSTMENTS
SYSTEM RESET function
This function is used to restore all settings
to the factory values. The options are:
❒ NO: no restore intervention;
❒ YES: the default parameters are re-
stored. The display will show Resetting
during this operation. At the end of the
operation, the source does not change
and the previous situation will be displayed.
RADIO
CD PLAYER
CD MP3
PLAYER
19
Page 21

ANTI-THEFT PROTECTION
INTRODUCTION
QUICK
GUIDE
FUNCTIONS AND
ADJUSTMENTS
RADIO
CD PLAYER
CD MP3
PLAYER
The radio is equipped with an anti-theft
protection system based on the exchange
of information between the radio and the
electronic control unit (Body Computer)
on the vehicle.
This system guarantees maximum security and avoids the secret code having to be
entered every time after the radio power supply is disconnected.
If the outcome of the check is positive, the
radio will start to work, whilst if the codes
compared are not the same or if the electronic control unit (Body Computer) is replaced, the equipment will notify the user
of the need to enter the password following the procedure in the paragraph below.
Entering the password
When the radio is switched on, if the password is requested, the display will show
“Radio code” for about 2 seconds followed by four dashes “- - - -”.
The password is made up of four numbers
from 1 to 6, each corresponding to one of
the dashes.
To enter the first number, press the button corresponding to the preset stations
(from 1 to 6). Enter the other code numbers in the same way.
If the four digits are not entered within 20
seconds, the display will show “Enter code
- - - -”. This event is not considered an incorrect entering of the code.
After entering the fourth digit (within 20
seconds), the car radio will start to work.
If an incorrect code is entered, the radio
will emit a sound and the display will show
“Radio blocked/wait” to notify the user of
the need to enter the correct code.
Each time the user enters an incorrect
code, the waiting time will gradually increase (1 min, 2 min, 4 min, 8 min, 16 min,
30 min,1h, 2h, 4h, 8h, 16h, 24h) up to a
maximum of 24 hours. The waiting time
will be shown on the display by “Radio
blocked/wait”. After the message disappears, the code entering procedure may
be started again.
Code card
This document certifies ownership of the
car radio. The Code Card contains the
model of the radio, the serial number and
the password.
IMPORTANT Keep the Code Card somewhere safe so that the authorities can be
supplied with the relevant information if
the radio is stolen.
20
Page 22

INTRODUCTION
When the radio is turned on the last function selected before it was switched off
is activated: Radio, CD, CD MP3 or Media Player (only with Blue&Me™).
To select the Radio function when another audio source is being listened to,
briefly press the FMas or AM buttons depending on the desired band.
Once the Radio mode has been activated,
the display will show the name (RDS stations only) and the frequency of the selected radio station, the frequency band
selected (e.g. FM1) and the preselect button number (e.g. P1).
RRAADDIIOO((TTuunneerr)
FREQUENCY BAND
SELECTION
With the Radio mode active, press the
FMas or AM button briefly and repeatedly to select the desired reception band.
Each time the button is pressed the following bands are selected cyclically:
❒ Pressing the FMas button: “FM1”,
“FM2” o “FMA”;
❒ Pressing the AM button: “MW”.
Each band is highlighted by the name in the
display. The last station selected on the respective frequency band will be tuned into.
The FM band is divided into sections: FM1,
FM1 or “FMA”; the FMA reception band
is reserved for broadcasters stored automatically using the AutoSTore function.
)
PRESELECTION BUTTONS
The buttons numbered from 1 to 6 are
used to set the following preselections:
❒ 18 on the FM band FM (6 on FM1, 6 on
FM2, 6 on FMT or “FMA” (on some
versions);
❒ 12 on the MW band;
To listen to a preset station, select the desired frequency band and then briefly press
the corresponding preset button (from 1
to 6).
By pressing the preset button for more
than 2 seconds, the tuned station will be
stored. The storing phase is confirmed by
an acoustic signal.
INTRODUCTION
QUICK
GUIDE
FUNCTIONS AND
ADJUSTMENTS
RADIO
CD PLAYER
CD MP3
PLAYER
21
Page 23

INTRODUCTION
QUICK
GUIDE
FUNCTIONS AND
ADJUSTMENTS
RADIO
CD PLAYER
STORING THE LAST STATION
LISTENED TO
The radio automatically stores the last station that was selected for each reception
band, which is then tuned into when the
radio is turned on or when the reception
band is changed.
AUTOMATIC TUNING
Briefly press the ¯ or ˙ button to start
the automatic tuning search for the next
station that can be received in the selected direction.
If the ¯ or ˙ button is pressed down
longer, the fast search starts. When the
button is released, the tuning will stop at
the next station that can be received.
If the TA function (traffic information) is
on, the tuner will only search for stations
that broadcast traffic updates.
MANUAL TUNING
This allows the manual search for stations
on the preselected band.
Select the desired frequency band and
then press the ▲ or ▼ button briefly and
repeatedly to start to the search in the desired direction. If the ▲ or ▼ button is
pressed longer, the fast search will start
and then stop when the button is released.
CD MP3
PLAYER
22
Page 24

AUTOSTORE FUNCTION
(automatic station
storage)
To activate the AutoSTore function, press
down on the FMas button until you hear
the acoustic confirmation signal. With this
function, the radio automatically stores the
6 stations with the strongest signal in a decreasing order on the FMA frequency
band.
During the automatic storing process,
“Autstore” will appear flashing on the display.
To interrupt the AutoSTore function,
press the FMas button again: the radio will
return to tuning into the station listened
to before the activation of the function.
When the AutoSTore function has finished,
the radio will automatically tune into the
first preset station on the FMA band stored
on the preset 1 side.
The stations that have a strong signal at
that moment are then automatically stored
in the preselected band in the buttons
numbered 1 to 6.
When the AutoSTore function is activated within the MW band, the FMA band is
automatically selected and the function is
performed.
IMPORTANT Sometimes the AutoSTore
function does not manage to find 6 stations with a strong signal. In this case, the
strongest stations will be duplicated in the
free preset buttons.
IMPORTANT When the AutoSTore function is activated, the stations that were
previously stored on the FMA band are
deleted.
INTRODUCTION
QUICK
GUIDE
FUNCTIONS AND
ADJUSTMENTS
RADIO
CD PLAYER
CD MP3
PLAYER
23
Page 25

INTRODUCTION
QUICK
GUIDE
FUNCTIONS AND
ADJUSTMENTS
RADIO
CD PLAYER
EMERGENCY ALARM
RECEPTION
The radio can receive emergency announcements in RDS mode in exceptional circumstances where dangerous situations are threatened (earthquakes, floods,
etc.) if these are being transmitted by the
broadcaster tuned into.
This function is activated automatically and
cannot be turned off.
The word Alarm will be shown in the display during the transmission of an emergency announcement. The volume of the
radio will change during this announcement in the same way as during a traffic
bulletin.
EON FUNCTION (Enhanced
Other Network)
In some countries, there are circuits that
group multiple broadcasters that transmit
traffic information together. In this case,
the program of the station that is being listened to will be temporarily interrupted
to:
❒ receive traffic information (only with
the TA function on);
❒ listen to regional transmissions each
time they are transmitted by one of the
broadcasters in the same circuit.
STEREOPHONIC
BROADCASTERS
If the incoming signal is weak, the reproduction is automatically switched from
Stereo to Mono.
CD MP3
PLAYER
24
Page 26

INTRODUCTION
This chapter describes the variants regarding the operation of the CD player: as
far as the operation of the radio is concerned, refer to the description in the
“Functions and Adjustments” chapter.
CCDDPPLLAAYYEER
CD PLAYER SELECTION
To activate the CD player built-into the
equipment, proceed as follows:
❒ load a CD with the equipment switched
on: the first track will start to play;
or
❒ if a CD has already been loaded, turn
on the car radio and then briefly press
the CD button to select the “CD” function mode: the last track listened to will
start to play.
It is advisable to use original CDs to ensure optimum playing. If CD-R/RWs are
used, we recommend using good quality
media that are burned at the slowest
speed possible.
R
CD LOADING/EJECTION
To load the CD, insert it gently into the
slot to activate the motorized loading system, which will position it correctly.
The CD can be loaded with the radio
switched off and the ignition key in the
MAR position: in this case the radio will
remain off. When the radio is turned on,
the last source listened to prior to switching off will be activated.
When a CD is loaded the display will show
“CD-IN” and the words “CD Reading”.
They will remain displayed for the entire
time required for the radio to read the
CD tracks. When this time has elapsed the
radio will automatically start playing the
first track.
INTRODUCTION
QUICK
GUIDE
FUNCTIONS AND
ADJUSTMENTS
RADIO
CD PLAYER
CD MP3
PLAYER
25
Page 27

INTRODUCTION
QUICK
GUIDE
FUNCTIONS AND
ADJUSTMENTS
RADIO
CD PLAYER
Press the ˚ button (EJECT) with the radio on to activate the motorized ejection
of the CD. After ejection, the last audio
source listened to before playing the CD
will be heard.
If the CD is not removed from the radio,
it will automatically be reloaded about 20
seconds later and the Tuner mode will be
tuned into (Radio).
The CD cannot be ejected if the radio is
off.
If the ejected CD is loaded without having removed it completely from the slot,
the radio will not switch to the CD
source.
Possible error messages
If the CD loaded cannot be read (e.g. a CD
ROM has been inserted or the CD is inserted the wrong way round or there is
reading error) the display will show the
words “CD Disc error”.
The CD will then be ejected and the audio source activated prior to the CD
mode selection will be heard.
With an outside audio source activated
(TA, ALARM or Phone), the CD that cannot be read will be not be ejected until
these functions are over. At the end, with
the CD mode activated, the display will
show the words “CD Disc error” for a
few seconds and then the CD will be
ejected.
DISPLAY INFORMATION
When the CD player is working, the display will show information which has the
following meaning:
❒ “CD Track 5”: indicates the numer of
the CD track;
❒ “03.42”: indicates the time elapsed since
the start of the track (if the relevant
Menu function is activated).
CD MP3
PLAYER
26
Page 28

TRACK SELECTION
(forward/backward)
Briefly press the ¯ button to play the previous CD track and the ˙ button to play
the next track. The tracks are selected
cyclically: the first track is selected after
the last track and vice versa.
If the track has been played for more than
3 seconds, pressing the button ˙ will
cause the track to be started again from
the beginning. In this case, if you want to
play the previous track, press the button
twice consecutively.
TRACK FAST
FORWARD/REWIND
Keep the ˙ button pressed down to fast
forward the selected track and keep the
button ¯ pressed down to fast rewind the
track. The fast forward/back will stop once
the button is released.
PAUSE FUNCTION
To pause the CD player, press the MUTE
button. The words “CD Pause” will appear on the display.
To resume listening to the track, press the
MUTE button again.
If another audio source is selected, the
pause function is turned off.
INTRODUCTION
QUICK
GUIDE
FUNCTIONS AND
ADJUSTMENTS
RADIO
CD PLAYER
CD MP3
PLAYER
27
Page 29

INTRODUCTION
QUICK
GUIDE
FUNCTIONS AND
ADJUSTMENTS
RADIO
CD PLAYER
INTRODUCTION
This chapter only describes the variants
regarding the operation of the CD MP3
player: as far as the operation of the radio
is concerned, refer to the description in
chapters “4” and “6”.
NOTE MPEG Layer-3 audio decoding
technology licensed from Fraunhofer IIS
and Thomson multimedia.
CCDDMMPP33PPLLAAYYEER
MP3 MODE
In addition to playing normal audio CDs,
the radio is also capable of playing CDROMs on which MP3 format compressed
audio files are recorded. The radio works
according to the modes described in chapter “5” when an ordinary audio CD is inserted.
The use of good quality media burnt at the
slowest possible speeds is recommended
for optimum quality.
The files on the MP3 CD are in folders,
with sequential lists of all the folders containing MP3 tracks (folders and sub-folders are all on the same level) and folders
that do not contain MP3 tracks cannot be
selected.
R
The operating conditions and specifications for playing MP3 files are as follows:
❒ the CD-ROMs used must be burned in
compliance with the Specification
ISO9660;
❒ the music files must have an “.mp3” ex-
tension: files with a different extension
cannot be played;
❒ the following sampling frequencies can
be played: 44.1 kHz, stereo (96 to 320
kbit/s) - 22.05 kHz, mono or stereo (32
to 80 kbit/s);
❒ tracks with variable bit-rates can be
played.
IMPORTANT The names of tracks should
not contain the following characters:
spaces, ‘ (apostrophes), ( e ) (open and
close brackets). When a CD MP3 is being burned, make sure that the file names
do not contain these characters; otherwise, the car radio will not be able to play
those tracks.
CD MP3
PLAYER
28
Page 30

SELECTING MP3 SESSIONS
WITH HYBRID DISCS
If a hybrid disc is inserted (Mixed Mode,
Enhanced, CD-Extra) also containing MP3
files, the radio automatically starts playing the audio session. It is possible to move
to the MP3 session whilst playing by keeping the MEDIA button pressed for more
than 2 seconds.
IMPORTANT When the function is activated the radio may take a few seconds to
start playing. Whilst checking the disc the
display will show “CD Reading”. If no MP3
files are detected, the radio will resume
playing the audio session from the point
where it was interrupted.
DISPLAY INFORMATION
Id3-tag information
display
In addition to the information relating to
the time elapsed, the name of the folder
and the name of the file, the radio is also
capable of display ID3-TAG information
relating to the Title track, Artist and Author.
The name of the MP3 folder shown on the
display corresponds to the name with
which the folder was stored on the CD,
followed by an asterisk.
Example of a complete MP3 folder name:
BEST OF *.
If you wish to display one of the ID3-TAG
pieces of information (Title, Artist, Album)
and this information has not been recorded for the track played, the information
will be replaced by information relating to
the name of the file.
SELECTION OF
NEXT/PREVIOUS FOLDER
Press the ▲ button to select the next folder or the ▼ button to select the previous folder. The display will show the number and the name of the folder (e.g. “DIR
2 XXXXXX”).
XXXXXX: name of the folder (the display
will only show the first 8 characters).
The folders are selected cyclically: the first
folder is selected after the last folder and
vice versa.
If no other folder/track is selected during
the next 2 seconds, the first track contained in the new folder will be played.
If the last track on the folder currently selected is being played, the next folder will
be played.
STRUCTURE OF THE FOLDERS
The radio with MP3 player:
❒ only recognizes the folders that effec-
tively contain MP3 format files
❒ if the MP3 files on a CD-ROM are
structured in “sub-folders”, their structure is compressed to a single level
structure where the “sub-folders” are
taken to the level of the main folders.
INTRODUCTION
QUICK
GUIDE
FUNCTIONS AND
ADJUSTMENTS
RADIO
CD PLAYER
CD MP3
PLAYER
29
Page 31

TTRROOUUBBLLEESSHHOOOOTTIINNG
G
GENERAL
Sound volume low
The Fader function should be adjusted to
“F” (front) values to prevent the reduction
in radio output power and the cancelling
of the volume if the Fader level adjustment
is R+9.
Source cannot be selected
Nothing has been loaded. Load the CD or
CD MP3 to be played.
CD PLAYER
The CD does not play
The CD is dirty. Clean the CD.
The CD is scratched. Try and use another CD.
The CD cannot be loaded.
A CD is already loaded. Press the ˚ button and remove the CD.
MP3 FILE PLAYBACK
Tracks jump during mp3 file playback
The CD is scratched or dirty. Clean the
CD, referring to what is described in the
“CD” paragraph in the “INTRODUCTION” chapter.
The duration of the mp3 tracks is not
shown correctly
In some cases (due to the recording
mode) the duration of the MP3 tracks may
be displayed incorrectly.
30
Page 32

NNOOTTEES
S
Page 33

Fiat Group Automobiles S.p.A. - Customer Services - Technical Services - Service Engineering
Largo Senatore G. Agnelli, 5 - 10040 Volvera - Torino (Italia)
Print no. 603.97.285 - 07/2009 -1 edition
Page 34

 Loading...