


Operating & Installation Manual
The Becton MK 3
Range of Gas Stoves
(Becton 7 MK 3 Gas Stove)
PLEASE RETAIN THESE INSTRUCTIONS FOR FUTURE REFERENCE
Aarrow Fires Ltd |
|
The Fireworks |
|
Bridport |
|
Dorset, DT6 3BE |
|
Great Britain |
FOR USE IN COUNTRIES |
|
|
Tel. (44) 01308 427234 |
GB & IE |
|
|
Fax. (44) 01308 427441 |
Rev 11 |
www.aarrowfires.com |
Part No. AFS1125 |

Congratulations on your choice of an Aarrow Stove.
More than 20 years experience has been put into the development of our Becton Family to ensure ultimate performance and years of trouble free enjoyment.
Every detail on the fire has been carefully engineered and designed which is why we are so confident in the reliability of our product that we offer a Lifetime Guarantee.
Should you have any questions about our Becton Stoves that are not covered in this manual, please contact the Aarrow dealer in your area, or call our Technical support department on
01308 427234
Flaming Good Fires!
© COPYRIGHT March 2004
Aarrow Fires Ltd
This booklet has copyright & may not be copied in whole or part or used for any purpose other than that for which it is supplied without express written consent from Aarrow Fires Ltd.
Becton Bunny & Becton 7 mk3 Gas stoves

CONTENTS
INTRODUCTION |
Page |
|
|
Safety Notices |
4 |
General Information |
4 |
Statutory Requirements |
5 |
OPERATING INSTRUCTIONS |
|
Technical Data |
6 |
Fire Dimensions |
6 |
Fitting the Lining Panels |
7 |
Arranging the Coals |
8 |
Lighting & Controlling The Fire |
9-10 |
INSTALLATION
Installing The Fire |
11 |
Fitting The Feet |
11 |
Flue System |
11-13 |
Fire Location |
13 |
Combustible Shelf Clearances |
14 |
Hearth Requirements |
15 |
Connecting The Gas Supply |
15 |
Pressure Test Sequence |
15 |
Fire Testing |
16 |
Installation Check List |
17 |
SERVICING |
Page |
|
|
Details of Pilot Assembly |
18 |
Door Trim |
19 |
Fire Door Glass & Seal |
19 |
Burner Assembly |
20 |
Regular Service |
20 |
Annual Service |
21 |
Cleaning Outer Services |
21 |
Cleaning Door Glass |
21 |
Fault Diagnosis |
22 |
SPARE PARTS |
|
General Components |
23 |
Accessories and Options |
23 |
Notes |
24-25 |
Spare Parts List |
26-28 |
GUARANTEE |
|
Lifetime Guarantee |
29 & 31 |
Customer Registration |
29 |
SERVICE RECORD |
|
Service Record |
30 |
Lifetime Guarantee |
31 |
Final Factory Checklist |
32 |
Becton Bunny & Becton 7 mk3 Gas stoves |
3 |

INTRODUCTION
References in this manual to British Standards and Statutory Regulations and Requirements apply only to the United Kingdom. For Ireland the rules in force must be used.
Before installation, check that the local distribution conditions, nature of the gas, pressure and the adjustment of the appliance are compatible.
The manual is an important part of the appliance and must by law be handed to the end user on completion of the installation.
SAFETY NOTICES
•Do not attempt to burn rubbish or any other material in this appliance.
•This fire must only be operated with the fire door shut and secured.
•Do not use the appliance if the glass is cracked or broken.
•Do not make any unauthorised
modifications to the appliance.
•It is recommended that the fire be guarded to protect the young and infirm using a fireguard complying with BS8423:2002.
•Coal set -The coal set contains Refractory Ceramic Fibres (R.C.F), which are man made vitreous silicate fibres. Excessive exposure to these materials may cause temporary irritation to the eyes, skin and respiratory tract. Care must be taken when handling these items to ensure the release of dust particles is kept to a minimum. To ensure that the release of fibre from these items is kept to a minimum, during installation and servicing it is recommended that a vacuum cleaner fitted with H.E.P.A. filters is used to remove any dust, soot or any other debris accumulated in and around the appliance. This should be performed
before and after the installation. It is recommended that any replacement item(s) are not broken up but sealed within a heavy duty polythene bag and clearly labelled "R.C.F. waste". This is not classified as "hazardous waste" and may be disposed of at a tipping site licensed for the disposal of industrial waste. Protective clothing is not required when handling these items but it is recommended that gloves are worn and
normal hygiene rules are followed. Always wash your hands before eating or drinking.
•In the event of a gas emergency, consult the telephone directory and ask for your local
gas supplier.
_________________________________________
GENERAL INFORMATION
All materials, appliances and equipment used should be fit for their purpose, be of suitable quality and workmanship and should comply with the applicable British Standards.
Before continuing any further with the installation of this appliance please read the following guide to manual handling.
•Always obtain assistance when lifting the appliance.
•When lifting always keep your back straight. Bend your legs not your back.
•Avoid twisting at the waist. It is better to reposition your feet.
•Avoid upper body/top heavy bending. Do not lean forwards or sideways when
handling the fire.
•Always grip with the palms of your hands. Do not use fingertips for support.
•Always keep the stove as close to the body as possible. This will minimise the cantilever action.
•Use gloves to provide additional grip.
4 |
Becton Bunny & Becton 7 mk3 Gas stoves |

INTRODUCTION
IMPORTANT NOTICES
A qualified gas engineer must carry out the installation and servicing of this appliance in accordance with these instructions and in compliance with current Building Regulations.
Such person must be a registered CORGI engineer.
This appliance is designed to run on natural gas only. Warning - Only use the appliance with the specified gas.
The fire is fitted with a safety device to shut down the appliance if there is inadequate flue draw. If the fire shuts down for no apparent reason check chimney and air inlets to the room. In all cases the fire must not be re-lit until the safety aspects have been checked by a qualified gas engineer.
Please note the following;
•The safety device must never be put out of action.
•Sealed components must not be interfered with.
•Servicing instructions and part identification numbers are given towards the back of the manual.
•Only use genuine Aarrow parts for replacements.
•Ventilation, purpose built ventilation is not normally required for either appliance, normal adventitious room ventilation being sufficient.
•Coal Set, see safety notice on page 4.
All surfaces except the control knob, the control door handle and control door are considered to be working surfaces.
Warning: Under no circumstances must the fire be operated if the glass is cracked or broken.
Warning: If it is known or suspected that an operational or ignition fault exists on the appliance, it must not be used until it has been investigated and corrected by a qualified gas engineer.
Warning: THIS GAS APPLIANCE MUST BE SERVICED EVERY TWELVE MONTHS BY A QUALIFIED GAS ENGINEER.
STATUTORY REQUIREMENTS
The current Gas Safety (Installation and Use) Regulations (as amended).
The Building Regulations for England and Wales 2000 ref Approved Document J 2002 edition (issued by the DTLR).
The Building Standards (Scotland) (Consolidation)
Regulations.
Detailed recommendations are outlined in the current issue of the following British Standards:- BS5440 parts 1 and 2, BS5871 part 1 and BS6891.
Any Manufacturer's Instructions must not be taken as overriding statutory requirements.
_________________________________________
CERTIFICATION
This appliance is CE certificated for performance and safety. Therefore, it is important that no alteration is made to the appliance.
Any alteration not approved by Aarrow Fires Ltd. will invalidate the guarantee.
Becton Bunny & Becton 7 mk3 Gas stoves |
5 |
OPERATING INSTRUCTIONS
TECHNICAL DATA
Category I2H For use in GB and IE at a supply pressure of 20mbar
|
|
|
|
|
|
|
|
|
|
|
|
|
Becton |
|
|
|
Becton 7 |
||||||||||||
|
|
|
|
|
|
|
|
|
|
|
|
|
Bunny |
|
|
|
Natural |
||||||||||||
|
|
|
|
|
|
|
|
|
|
|
Natural Gas |
|
|
|
|
Gas |
|||||||||||||
|
|
|
|
|
|
|
|
|
|
|
|
|
|
|
|
|
|
|
|
||||||||||
|
|
|
|
|
|
|
|
|
|
|
|
|
|
|
|
|
|||||||||||||
|
|
|
|
|
|
|
|
|
|
|
Aeromatic |
|
|
|
|
|
|
||||||||||||
|
|
Main Burner |
|
|
|
|
|
|
|
|
|
Aeromatic |
|||||||||||||||||
|
|
|
|
|
|
|
AC13/112511 |
|
|
|
|
|
AC13/112511 |
|
|||||||||||||||
|
|
|
|
|
|
|
|
|
|
|
|
|
|
||||||||||||||||
|
|
|
|
|
|
|
|
|
|
|
(mod 334) |
|
|
|
(mod 334) |
|
|||||||||||||
|
|
|
|
|
|||||||||||||||||||||||||
|
|
|
|
|
|
|
|
|
|
|
|
|
|
|
|
|
|
|
|
|
|
|
|
|
|
|
|
|
|
|
|
|
|
|
|
|
|
|
|
|
|
|
|
|
|
|
|
|
|
|
|
|
|
|
|
|
|
|
|
|
|
|
|
|
|
|
|
|
|
|
|
|
|
|
|
|
|
|
|
|
|
|
|
|
|
|
|
|
|
|
|
|
|
|
|
|
|
|
|
|
|
|
|
|
|
|
|
||||||||||||
|
Injector |
|
|
|
|
|
|
|
|
Bray 82-700 |
|||||||||||||||||||
|
|
|
|
|
|
|
|
|
|
|
|
|
|
|
Bray 82-700 |
||||||||||||||
|
|
|
|
|
|
|
|
|
|
|
|
|
|
|
|
|
|
|
|
|
|
|
|
|
|
|
|
|
|
|
|
|
|
|
|
|
|
|
|
|
|
|
|
|
|
|
|
|
|
|
|
|
|
|
|
|
|
|
|
|
|
|
|
|
|
|
|
|
|
|
|
|
|
|
|
|
|
|
|
|
|
|
|
|
|
|
|
|
|
|
|
|
|
|
|
|
|
|
|
|
|
|
|
|
|
|
|
|
|
|
|
|
|
|
|
|
|
||
|
Max. Heat |
|
|
|
|
|
|
|
|
|
|
|
|
|
|
|
|
|
|
|
|
|
|
|
|
|
|||
|
Setting |
|
|
|
|
|
|
|
|
|
|
|
|
|
|
|
|
|
|
|
|
|
|
|
|
|
|||
|
Heat Input |
|
|
|
|
|
|
|
|
|
|
|
|
|
|
|
|
|
|
|
|
|
|
|
|
|
|||
|
|
|
|
|
|
|
|
|
3.7 kW |
|
|
|
|
|
|
|
|
|
|
|
|
|
|
|
|||||
|
|
|
|
|
|
|
|
|
|
|
|
|
|
|
|
|
5.0 kW |
|
|
|
|
||||||||
|
(net) |
|
|
|
|
|
|
|
|
|
|
|
|
|
|
|
|
|
|
|
|
||||||||
|
|
|
|
|
|
|
|
|
|
|
|
|
|
|
|
|
|
|
|
|
|
|
|
|
|
||||
|
|
|
|
|
|
|
|
|
|
|
|
|
|
|
|
|
|
|
|
|
|
|
|
|
|
|
|
|
|
|
|
|
|
|
|
|
|
|
|
|
|
|
|
|
|
|
|
|
|
|
|
|
|
|
|
|
|
|
|
|
|
|
|
|
|
|
|
|
|
|
|
|
|
|
|
|
|
|
|
|
|
|
|
|
|
|
|
|
|
|
|
|
|
|
|
|
|
|
|
|
|
|
|
|
|
|
|
|
|
|
|
|
|
|
|
|
|
|
|
|
|
|
|
|
|
|
|
|
|
|
|
|
|
|
|
|
|
|
|
|
|
|
|
|
|
|
|||
|
Gas Rate |
|
|
|
|
|
|
|
|
|
|
|
|
|
|
|
|
|
|
|
|
|
|
|
|
|
|
||
|
|
|
|
|
|
|
|
|
|
|
|
|
|
|
|
|
|
|
|
|
|
|
|
|
|
|
|||
|
|
|
|
|
|
|
|
0.391m3/hour |
|
|
|
|
0.529m3/hour |
|
|
||||||||||||||
|
|
|
|
|
|
|
|
|
|
|
|
|
|
|
|
|
|||||||||||||
|
|
|
|
|
|
|
|||||||||||||||||||||||
|
|
|
|
|
|
|
|
|
|
|
|
|
|
|
|
|
|
|
|
|
|
|
|
|
|
|
|
|
|
|
|
|
|
|
|
|
|
|
|
|
|
|
|
|
|
|
|
|
|
|
|
|
|
|
|
|
|||
|
Cold Setting |
|
|
|
|
|
|
|
|
1.5mb |
|
|
|
|
|
|
|
|
|
|
|
|
|
|
|
|
|||
|
|
|
|
|
|
|
|
|
|
|
|
|
|
|
|
|
|
|
|
3.5mb |
|
|
|
||||||
|
Pressure |
|
|
|
|
|
|
|
|
|
|
|
|
|
|
|
|
|
|
|
|
||||||||
|
|
|
|
|
|
|
|
|
|
|
|
|
|
|
|
|
|
|
|
|
|
|
|
|
|
||||
|
|
|
|
|
|
|
|
|
|
|
|
|
|
|
|
|
|
|
|
|
|
|
|
|
|
|
|
|
|
|
|
|
|
|
|
|
|
|
|
|
|
|
|
|
|
|
|
|
|
|
|
|
|
|
|
|
|
|
|
|
|
|
|
|
|
|
|
|
|
|
|
|
|
|
|
|
|
|
|
|
|
|
|
|
|
|
|
|
|
|
|
|
|
|
|
|
|
|
|
|
|
|
|
|
|
|
|
|
|
|
|
|
|
|
|
|
|
|
|
|
Min. Heat |
|
|
|
|
|
|
|
|
|
|
|
|
|
|
|
|
|
|
|
|
|
|
|
|
|
|||
|
Setting |
|
|
|
|
|
|
|
|
|
|
|
|
|
|
|
|
|
|
|
|
|
|
|
|
|
|||
|
|
|
|
|
|
|
|
|
|
|
|
|
|
|
|
|
|
|
|
|
|
|
|
|
|
||||
|
|
|
|
|
|
|
|
|
|
|
|
|
|
|
|
|
|
|
|
|
|
|
|||||||
|
Heat Input |
|
|
|
|
|
|
|
|
2.4 kW |
|
|
|
|
|
|
|
|
3.3 kW |
|
|
|
|||||||
|
(net) |
|
|
|
|
|
|
|
|
|
|
|
|
|
|
|
|
|
|
|
|
|
|
|
|
|
|||
|
|
|
|
|
|
|
|
|
|
|
|
|
|
|
|
|
|
|
|
|
|
|
|
|
|
|
|
|
|
|
|
|
|
|
|
|
|
|
|
|
|
|
|
|
|
|
|
|
|
|
|
|
|
|
|
|
|
|
|
|
|
|
|
|
|
|
|
|
|
|
|
|
|
|
|
|
|
|
|
|
|
|
|
|
|
|
|||
|
|
|
|
|
|
|
|
|
|
|
|
|
|
|
|
|
|
|
|
|
|
|
|
|
|
|
|
|
|
|
Gas Rate |
|
|
|
|
|
|
0.254 m3/hour |
|
|
|
0.349 m3/hour |
|
|
|||||||||||||||
|
|
|
|
|
|
|
|
|
|
|
|
|
|
||||||||||||||||
|
|
|
|
|
|
|
|
|
|
|
|
|
|
|
|
|
|
|
|
|
|
|
|
|
|
|
|
|
|
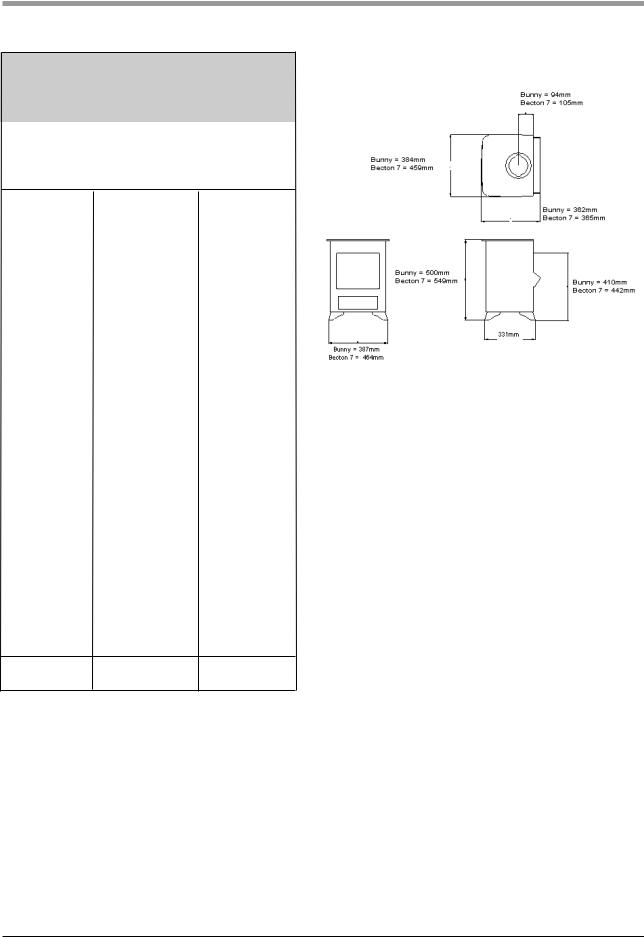
FIRE DIMENSIONS
Fig. 2
NOx CLASS |
|
CLASS 4 |
|
CLASS 4 |
|
|
|
|
|
6 |
Becton Bunny & Becton 7 mk3 Gas stoves |

OPERATING INSTRUCTIONS
FITTING THE LINING PANELS
Becton 7 only. The lining panels supplied are to be installed into the fire before the coal matrix is fitted. Note: The lining panels are reversible (brick or plain pattern)
Ensure the appliance is cold.
With the fire door open, the glass retaining frame and the coal set removed, proceed as follows:
Do not force the linnings into position.
1. Position the rear lining face down at the rear of the fire. Ensure the cutout faces the rear of the fire.
Fig. 3a Positioning the rear lining
2. Locate side lining in the right hand side of the fire. First position the tall edge into the radius at the front of the fire.(See Fig.3b below)
Fig. 3b Fitting the R/H side lining
3. Then rotate the rear edge until the top faces match up the angle faces at the rear of the fire. (See Fig. 3c) Repeat exercise for the left hand side.
Fig. 3c Fitting the side linings
4. Rotate the rear lining to bring it vertical (Fig. 3d)
Fig. 3d Rotating the rear lining
5. Centre the assembly. Line up each end of the rear lining with the edges of the fixed matrix plate. (See Fig. 3e)
Fig. 3e Liner panels assembled in the fire.
Once the lining panels are fitted, arrange the coals. See “Arranging the coals” on page 8.
Becton Bunny & Becton 7 mk3 Gas stoves |
7 |
OPERATING INSTRUCTIONS
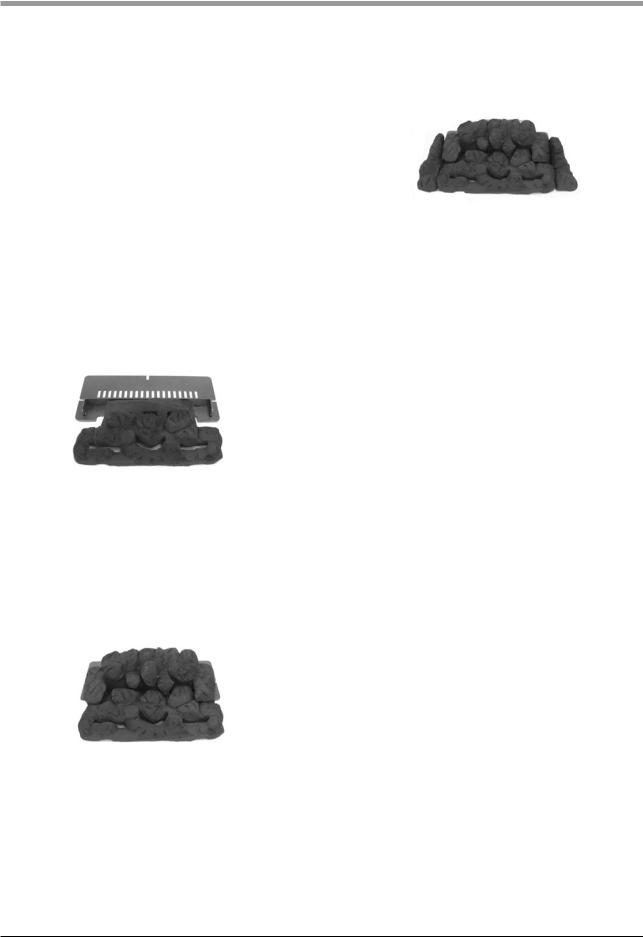
ARRANGING THE COALS
Safety Notice - Please see SAFETY NOTICES ref. Coal set page 4.
Warning: The coals and the coal matrices are fragile ensure they are handled carefully. Ensure location is correct. Do not force the matrix into position. If the coals and/or the coal matrices are damaged they must be replaced with genuine Aarrow replacement sets. Warning: An incorrect coal layout may cause soot to build up inside the fire and therefore invalidate the guarantee.
Ensure the appliance is cold.
Step 1 Place the base matrix on the matrix plate centrally between the end tabs of the location bar. (Fig 4a)
Step 3 Becton 7 only. Locate 2 off end coals each side of the base matrix. (See underside of coals for hand identification) (Fig 4c).
Fig 4c
Fig 4a
Step 2 Place the rear matrix cut out section over the base matrix and centralise the assembly between the end tabs of the location bar. Ensure the rear matrix is pushed back against the location bar. (Fig 4b)
Fig 4b
8 |
Becton Bunny & Becton 7 mk3 Gas stoves |

OPERATING INSTRUCTIONS
LIGHTING & CONTROLLING THE FIRE
Under no circumstance must the fire be operated if the glass is cracked or broken.
Open the gas control access door situated at the bottom of the appliance. Always use the control door HANDLE.
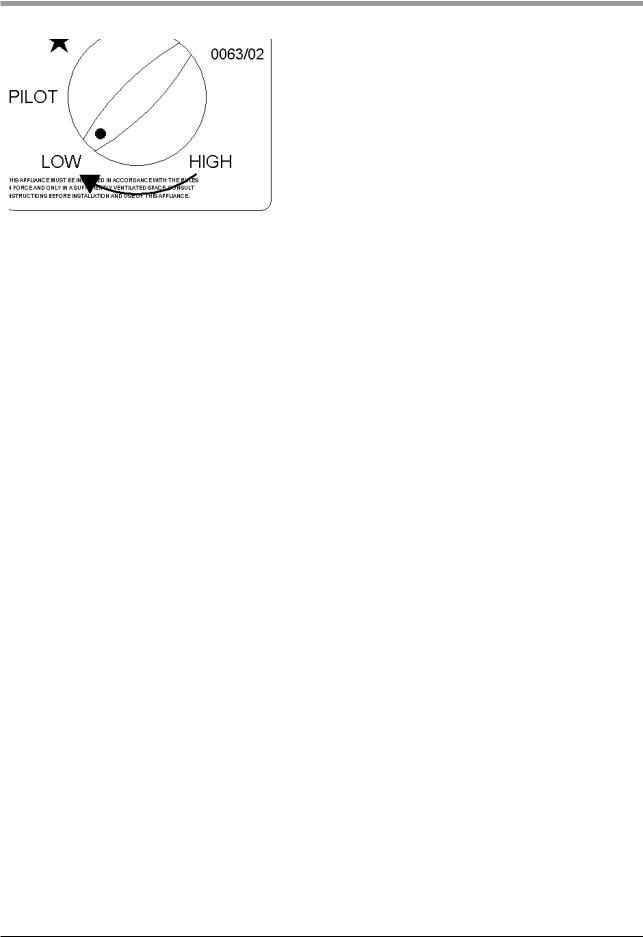
Step 1a. To ignite the pilot push the control knob in, turn anti-clockwise towards the spark position and hold in for 15 seconds. (Fig 5a)
The pilot can be viewed through the L/H & centre front slots in the base matrix.
Fig 5a
Step 1b. Keep the control knob pressed in and turn
anti-clockwise to the pilot position. (Fig 5b)
Fig 5b
Step 1c. Keep the control knob pressed in for a further 15 seconds and then release. The pilot will remain alight.
If pilot does not remain alight repeat this procedure.
Please note that when purging the gas supply it is usual to have to keep the control knob depressed in the spark position for longer periods of time.
Step 2. To ignite the main burner, rotate the control knob anti-clockwise to the HIGH position (fig 5c)
Fig 5c
For maximum heat output leave the control knob at the high position
For minimum heat output, rotate the control knob clockwise to the LOW position. (Fig 5d)
Becton Bunny & Becton 7 mk3 Gas stoves |
9 |
OPERATING INSTRUCTIONS
Fig 5d
Fig 5e
Step 3. To turn the main burner off while keeping the pilot alight, rotate the operating knob back to the PILOT position. (Fig 5e)
Fig 5f
Step 4. To extinguish the pilot, turn the control knob to the OFF position. (Fig 5f)
Incorporated into the pilot assembly is a flame failure device designed to shut off the gas supply in the event of the pilot flame being extinguished while the fire is unattended.
Should the pilot flame blow out accidentally or intentionally whilst the fire is running, no attempt should be made to re-light the gas for at least three minutes.
To restart the fire turn the control knob to the off position and repeat the lighting & controlling the fire instructions.
The flame failure device is a safety feature required by law and must not be put out of action by the installer. If this device or any of its parts are to be replaced, only original manufacturer's parts are to be used.
Repeated operation of the flame failure device indicates that there maybe a problem with the flue draw. In this situation no more attempts at operating the appliance should take place and your qualified gas engineer should be contacted to investigate and rectify the problem.
10 |
Becton Bunny & Becton 7 mk3 Gas stoves |
 Loading...