


INSTRUCTION MANUAL / INSTRUKTIONSBOK
ENGLISH 3- 27 SVENSKA 28-53
2

ENGLISH
Congratulations to your new Aarke Carbonator.
A few minutes spent on reading this book will enable you to get the very best out of this excellent soda maker. Carbonating water at home is convenient, affordable and environmentally friendly. The other advantage with a carbonator over bottled mineral water is that you can choose your own level of carbonation. You will soon get to know your carbonator and learn how you should operate it to get the perfect level of carbonation. Some people like a real carbonation bite and some want a milder effervescent taste.
The Aarke Carbonator is carefully crafted in the finest materials, designed and tested for best possible quality and safety. However, products that include gas and high pressures should always be handled with care. It is, therefore, important that the product is used as intended. Please read through the safety section of this book carefully before using it.
Welcome to Aarke!
3
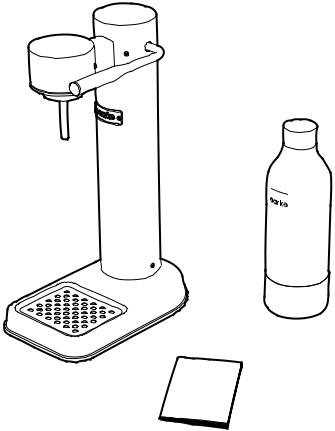
INCLUDED IN THE BOX
Water bottle
Carbonator
This book
4

ENGLISH
PRODUCT COMPONENTS
Lever
Water bottle socket
|
Gas cylinder |
Nozzle |
compartment |
Spill tray grid
Spill tray
Foot
5

6

ENGLISH
1
GETTING STARTED
ATTACHING THE GAS CYLINDER
ATTACHING CYLINDER
Remove the spill tray grid and then carefully lay the carbonator down on the side with the lever upwards.
Unscrew the plastic sealing from the cylinder top. Carefully insert the gas cylinder through the hole at the bottom. Don’t drop the cylinder into the hole. When you feel that it reaches the bottom, begin screwing the cylinder clockwise until it is fastened. Don’t screw too hard since this might break the threads holding the gas cylinder in place.
1
2
DETACHING CYLINDER
When you need to replace the gas cylinder, lay the carbonator down on the side with the lever pointing up and unscrew it counterclockwise and then carefully pull it out of the compartment.
7
2
GETTING STARTED
THE CARBONATION PROCESS
H O 4°C
H2O 4 C
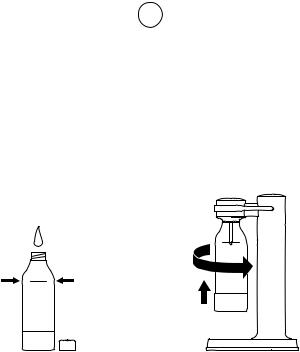
1. FILL THE WATER BOTTLE
Rinse the water bottle with luke warm water before you use it for the first time.
Fill the water bottle with cold, clean water up to the marked filling line. If you fill too much you will get a lot of water in the spill tray during carbonation.
2. ATTACH THE WATER BOTTLE
Screw the water bottle into the water bottle socket.
Screw counterclockwise if viewed from above.
Don’t screw extremely hard
- just make sure the water bottle sits properly.
8
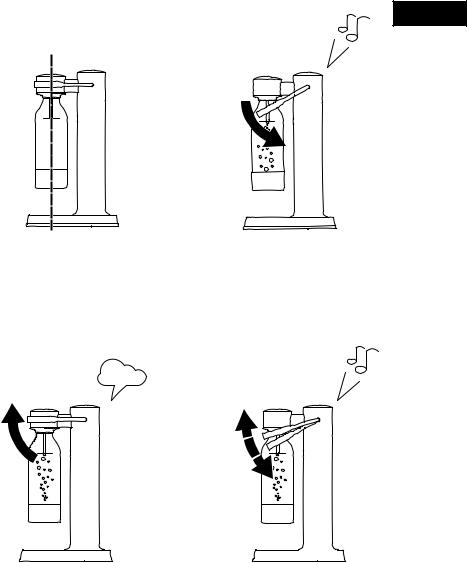
3. CORRECTLY ATTACHED BOTTLE
Make sure the water bottle is attached correctly, in complete vertical position.
5. VENTILATE
Release the lever back to horizontal position. The remaining pressure in the water bottle will be released with a puff sound.
ENGLISH
4. CARBONATE
Pull the lever downwards until you hear a buzzing sound.
6. MORE CARBONATION
To add more carbonation, repeat the carbonation cycle a few times before unscrewing the water bottle.
9
3
GETTING STARTED
DEGREE OF CARBONATION
With the Aarke Carbonator you can easily learn how to adjust the degree of carbonation, or, how much bubbles you want.
The level of carbonation depends on many factors such as the temperature of the water and the amount of gas in the gas cylinder.
We encourage you to experiment with the level of carbonation to find your own preference. Some people want a real carbonation bite and some want a milder effervescent (less bubbly) taste.
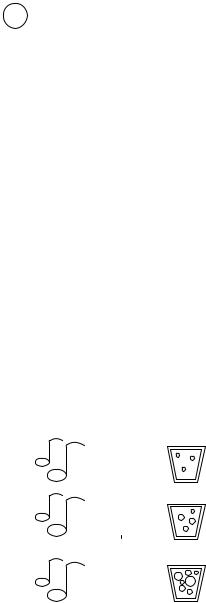
HOW WOULD YOU LIKE YOUR SODA WATER?
You will add more carbonation to the water by repeating the carbonating process.
The process will consume less gas if you lift the lever half-ways (enough to quiet the buzzing sound but before relieving the pressure from the bottle) between the carbonation cycles.
x 1 =
x 2 =
x 3 =
10
ENGLISH
4
GETTING STARTED
FLAVORING THE WATER
Essences, syrups, fruits and infusions. There are virtually endless possibilities to make carbonated water even more refreshing and inspiring. Below is a quick and easy recipe for classic lemonade.
CLASSIC LEMONADE
2dl sugar (or other sweetener such as agave syrup or cane sugar) 2dl water
2dl fresh lemon juice Zest from 1/2 lemon
Put the water and the sugar into a pan and heat the mixture while stirring until the sugar is completely dissolved.
Let the syrup cool a bit before pouring it into a suitable glass container with a lid.
Add the lemon juice and the zest.
Mix 1 part syrup with about 3 parts of cool, carbonated water. First, add the flavouring substance inte a glass or pitcher, then gently add the carbonated water. Serve with lots of ice and a lemon slice.
The lemonade syrup can be stored in the fridge for a couple of weeks.
11

MAINTENANCE
HOW TO TAKE CARE OF YOUR CARBONATOR.
12

ENGLISH
1
MAINTENANCE
KEEPING YOUR CARBONATOR
BEAUTIFUL AND CLEAN
POLISHED VERSION
This carbonator is made of polished stainless steel. Stainless steel gets its lustre from the chrome and its stainless quality from the nickel. Adhering to the maintenance tips will ensure that you enjoy (the look of) your Aarke Carbonator for a long time.
To clean your carbonator we recommend using a micro fibre cloth and water. If needed you could use some mild soap. Do not use strong detergents or cleanser with abrasive substance.
LACQUERED VERSION
The lacquered Aarke Carbonators are made of polished stainless steel that have been industrially painted in various colours and finishes.
To clean your glossy lacquered Aarke Carbonator we recommend using a micro fibre cloth and water. If needed you could use some mild soap.
To clean you matte lacquered Aarke Carbonator we recommend using a soft cloth or sponge and water. If needed you could use some mild soap.
Never use strong detergents or cleanser with abrasive substance.
13

2
MAINTENANCE
EMPTYING THE SPILL TRAY
Water accumulated in the spill tray is simply removed with a dish-cloth.
WHY IS THERE WATER IN THE SPILL TRAY?
Water that flushes through the machine during the carbonating process ends up in the spill tray. This is often a result of too much water in the water bottle. Make sure the water is not filled above the filling line.
Letting the lever up more gently when the carbonation is finished, is another way of preventing water from coming out into the tray.
14

ENGLISH
3
MAINTENANCE
RINSING THE WATER BOTTLE
To clean the Aarke water bottle use clean lukewarm water with a mild detergent. If using a dishwasher brush, make sure the brush is intended to be used for cleaning plastic bottles and do not leave any scratches.
Do not use solvents, strong detergents or cleanser with abrasive substances.
Never wash the Aarke water bottles in a dishwasher. The Aarke water bottles can withstand a maximum temperature of 40 degrees Celsius.
15

SAFETY GUIDELINES
THINGS YOU SHOULD NOT DO WITH YOUR CARBONATOR
16
ENGLISH
SAFETY GUIDELINES
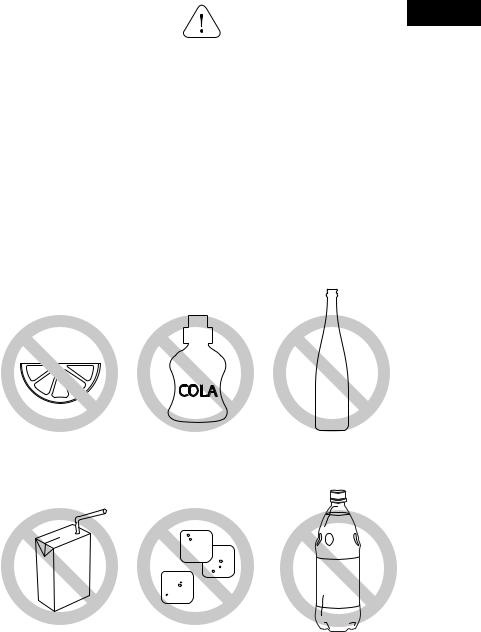
DO NOT CABONATE ANY LIQUIDS
OTHER THAN PLAIN WATER
When carbonating, a small amount of liquid could bubble up through the valves. If the water contains sugar or other compounds the valves could start malfunction and the product could potentially be dangerous to use. Never add fruit slices, ice and flavours in the water bottle. Use a pitcher or mix it directly in your glass. Rinse the water bottle carefully before filling it with water.
Don’t put fruits, |
Don’t put flavours |
Don’t carbonate wine! |
vegetables or herbs in |
or syrup into the |
We recommend buying |
the water bottle before |
water bottle before |
champagne. |
carbonating. |
carbonating. |
|
Don’t carbonate juice |
Don’t carbonate |
Don’t give new life |
or milk. |
with ice in the water |
to old flat soda. |
(Even if it is tempting) |
bottle! |
|
|
17 |
|
 Loading...