

Page 1

BatteryFREE Wireless Optical Mouse
User’s Manual
Model:NB-60
www.a4tech.com
Page 2

THIS DEVICE COMPLIES WITH PART 15 OF THE FCC RULES. OPERATION IS SUBJECT TOTHE FOLLOWING TWO
CONDITIONS: (1) THIS DEVICE MAY NOT CAUSE HARMFUL INTERFERENCE AND (2) THIS DEVICE MUST ACCEPT ANY
INTERFERENCE RECEIVED, INCLUDING INTERFERENCE THAT MAY CAUSE UNDESIRED OPERATION.
Federal Communications Commission Requirements
The equipment has been tested and found to comply with the limits for Class B Digital Device, pursuant to part 15
of the FCC Rules. These limits are designed to provide reasonable protection against harmful interference in a
residential installation. This equipment generates, uses and can radiate radio frequency energy and, if not installed
and used in accordance with the instruction, may cause harmful interference to radio communication. However,
there is no guarantee that interference will not occur in a particular installation. If this equipment does cause harmful
interference to radio or television reception, which can be determined by turning the equipment off and on, the user
is encouraged to try to correct the interference by one or more of the following measures:
l Reorient of relocate the receiving antenna.
l Increase the separation between the equipment and receiver.
l Connect the equipment into an outlet on a circuit different from that to which the receiver is connected.
l Consult the dealer or an experienced radio/TV technician for help.
THE CHANGES OR MODIFICATIONS NOT EXPRESSLY APPROVED BY THE PARTY RESPONSIBLE FOR COMPLIANCE
COULD VOID THE USER’S AUTHORITY TO OPERATE THE EQUIPMENT.
This device complies with Part 15 of the FCC Rules. Operation is subject to the following two conditions:
(1). this device may not cause harmful interference, and
(2). this device must accept any interference received, including interference that may cause undesired operation.
Introduction
Congratulations on your purchase.
Your new BatteryFREE Wireless Optical Mouse will offer you wireless freedom, yet no battery is required.
Whilst saving you the cost of batteries, it assures wrist comfort, light, easy operation and no- RF interference.
Page 3

Setting up your mouse pad and mouse is just a second away:
PWR
RUN LED
TUNE
1. Plug the Mouse Pad’s USB plug to your computer’s USB port.
2. PWR LED on the Mouse Pad will be flashing in “RED”
3. Put the MOUSE onto the center of the MOUSE PAD.
4. PWR LED on the Mouse Pad will stop flashing become steady “RED”
5. Press the button “TUNE” to obtain the frequency for best performance. Do not move the mouse while the RUN
LED is flashing in “GREEN”
6. You may move the mouse around once the RUN LED stopped flashing in “GREEN”
7. If the cursor doesn’t move smoothly, please repeat steps 5 to 7.
8. RUN LED should light up with steady “GREEN” while mouse is circulating on the mouse pad.
NOTE:
1. Do not use this product on any metal table or surface. The metal surface may interfere with the cross induction
and have an adverse effect on the mouse operation.
2. Keep working temperature under 0 to 50 degree Celsius (0°– 5°C).
3. Frequency: 119 KHz-135 KHz
4. Keep your credit cards and ATM cards away from RFID Mouse Pad to prevent the card’s magnetic stripe
from losing its efficiency.
5. Our RFID Mouse Pad will not erase any data in the memory stick. So don’t worry if your memory stick is
close to the inductive RFID mouse pad.
Page 4
Installing the Battery Free Mouse Software
By installing the 6K-Works, it enables various functions provided for the scrolling wheel(s) and buttons.
STEP ONE: HOW TO INSTALL 6K-WORKS SOFTWARE
*****For Windows Me / 2000 / 2003 / XP
1. MUST: Please uninstall any previous mouse driver before installing the 6K-Works
2. MUST: Make sure you have completely finished setting up your mouse pad and mouse
3. Insert the included Compact Disc (CD) into your CD-ROM
4. Click “Install Driver”. Select model: NB-60 Battery Free Mouse
5. Click the button on the right to install driver
6. Follow the on screen instruction to complete your installation
7. Restart your computer after the driver has been installed
8. You will see a mouse icon “ ” appear on the bottom right
of your task bar (near the clock area)
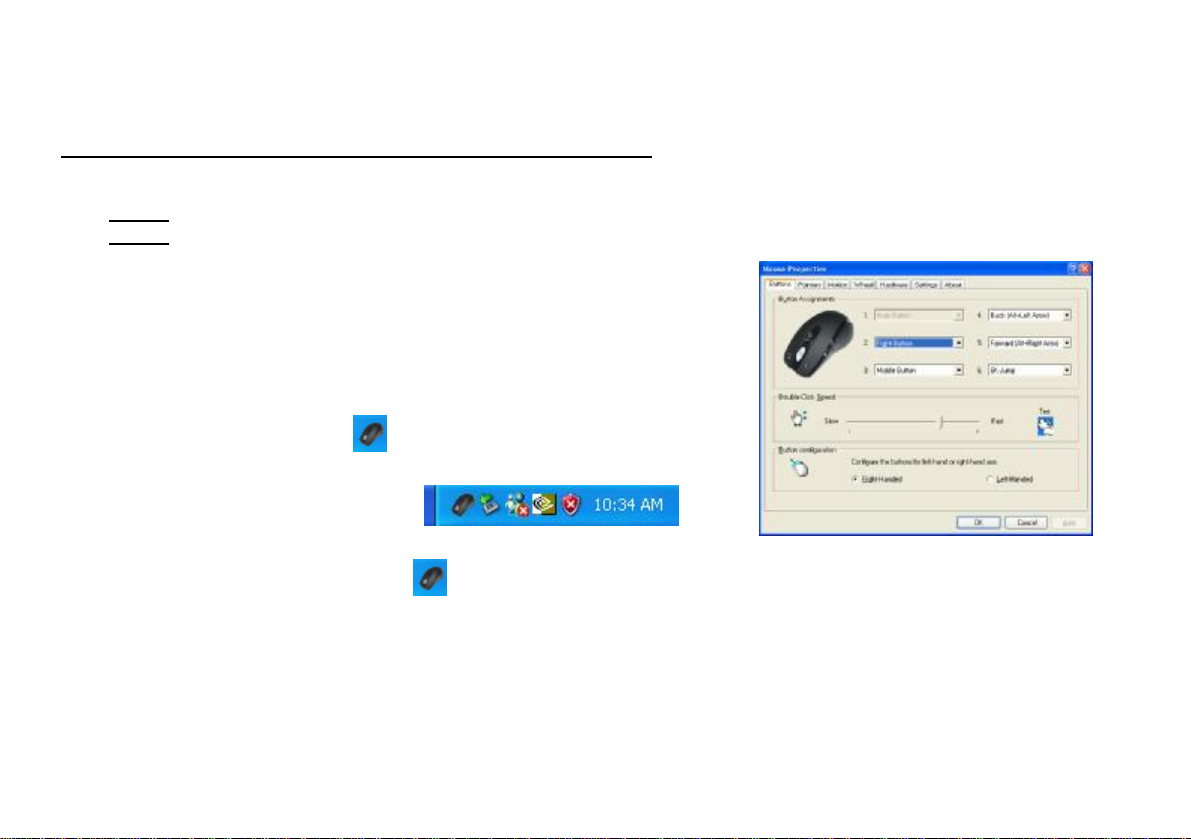
Mouse Properties Window
9. Double click on the mouse icon “ ” will bring you the mouse property (figure on the right)
If the mouse image appears in the mouse properties menu looks exactly the same as the mouse on hand, then this
means that you have successfully installed the 6K-Works.
Page 5

STEP TWO: HOW TO PROGRAM YOUR MOUSE BUTTONS
Main Button will be #2 button.
l Open your Mouse Properties.
First Tab: Button
Section I: Button Assignment
1. The mouse image that appears in the first section is a key to numbers
listed to the right. For example, button #1 has been assigned as “Main
Button” by default and it’s not programmable.
2. The rest of the buttons from #2 to # 6 are programmable.
Section II: Double-Click Speed Section III: Button Configuration
MOUSE Properties
Keyboard Property
Adjust your double-click speed If you select “Left-Handed”, your
Before we go further to setting up your mouse buttons with game commands,
we want to make sure your keyboard properties has the character repeat
setting correct. Follow the steps below to get to Keyboard Properties:
1) Go to Control Panel
2) Click on Keyboard
3) For Repeat Delay: Most right (SHORT)
4) For Repeat Rate: Most right (FAST)
5) Apply >> OK
Page 6

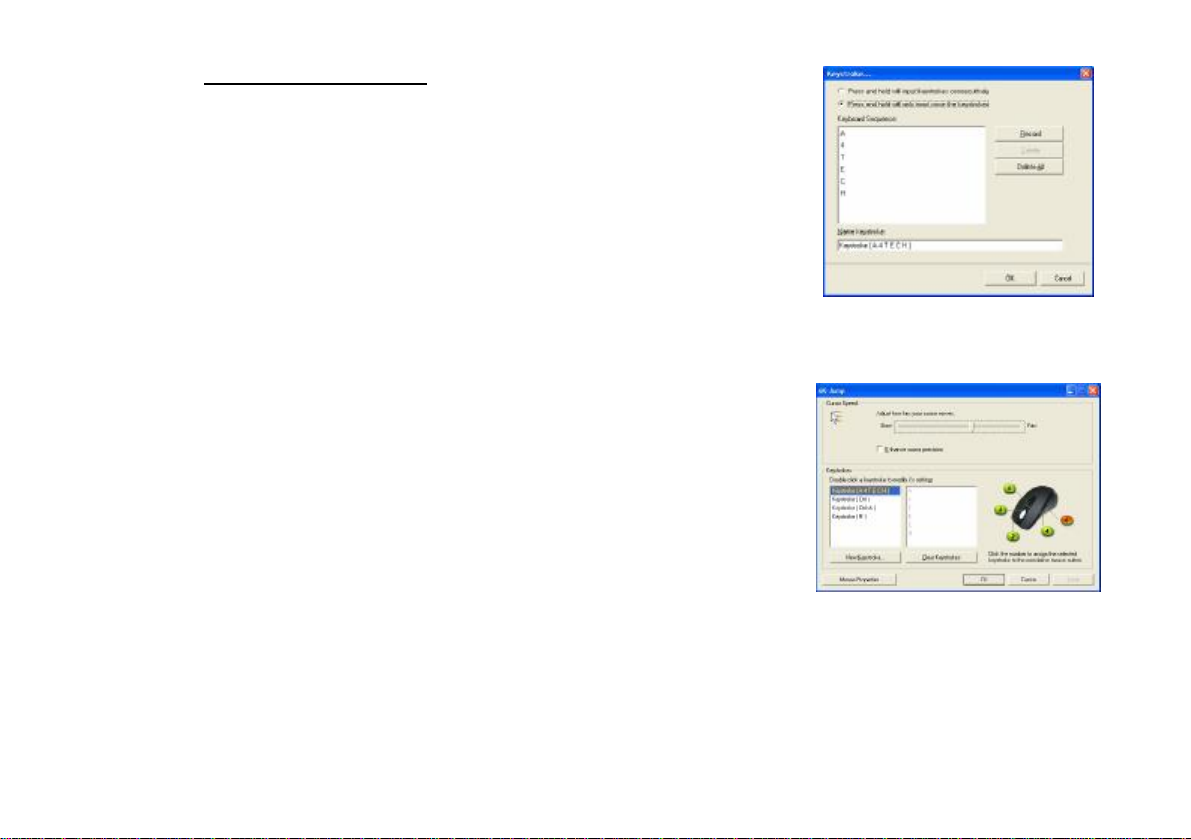
STEP THREE: HOW TO CONFIGURE AND SET YOUR MOUSE WITH GAME COMMANDS
By default, the 6th Button has been preset as the function “X6-Jump”.
Note: The function X6-Jump may be set in any of the buttons from # 2 to # 6.
1. Click on X6-Jump and you’ll see the pop up window (Image: left, top)
Section I: Cursor Speed
Adjust the speed of your cursor by clicking on the block or using your
scrolling wheel.
Section II: Keystrokes
To ADD keystrokes: Click on the button “New Keystroke” and you’ll see a
“Keystroke” Window pops up (Image: left, bottom)
Here you will see 2 radio buttons:
l Press and hold will input keystrokes consecutively
l Press and hold will only input once the keystrokes
If you select the 1st radio button, it means you would like to have the mouse
completely simulates keyboard’s keystroke – when you press and hold a key on
the keyboard, it will input a character consecutively. If you select the 2nd radio
button, it means you would like to have the mouse partially simulates keyboard’s
keystroke – when you press and hold a key on the keyboard, it will only input
X6-Jump Window
once unless you lift it and press it again.
Page 7

Let’s do some example together…
B
Example 1: Select 1st Radio Button
1. Click on “Record” (Reference: Image A)
2. Press “Ctrl” on the Keyboard
3. Click “OK”
4. It will bring you back to previous page (Image B)
5. Now click on “Keystroke (Ctrl)”, the one you just created
A
6. Select the Mouse Button (green icon) on the Mouse Image to your right to
store the “Keystroke (Ctrl)”.
7. Green icon will turn red once it’s been selected. (Image C)
8. Click “Apply” >> “OK”
We have stored it in Mouse Button # 4.
Let’s try it on game application (Counter Strikes)
l Press and hold your mouse button # 4.
In Counter Strike, “Keystroke (Ctrl)” means to hunker down
Did you see yourself stayed hunker down until the minute you release
button # 3? If yes, you have successfully created a command.
Page 8

Example 2: Select 1st Radio Button
1. Click on “Record” (Image A)
1. Press “R” on the Keyboard
2. Click “OK”
3. It will bring you back to previous page
4. Now click on “Keystroke(R)”, the one you just created
5. Select the Mouse Button (green icon) on the Mouse Image to your right to
store the “Keystroke (R)”.
6. Green icon will turn red once it’s been selected. (Image B)
7. Click “Apply”, then “OK”
We have stored it in Mouse Button # 3.
Let’s try it on regular word document and on game application.
l Try it on Word Document. Press and hold your mouse button #3.
Did you see the character “rrrrrrrrrrrrrrrrrr” inputted consecutively?
l Try it on Game Application. Press and hold your mouse button # 3.
In Counter Strike, “Keystroke (R)” means to add bullets. Did you see
it adding bullets? If yes, you have successfully created a command.
(Image A)
(Image B)
Page 9

Example 3: Select 2nd Radio Button
1. Click on “Record” (Reference: Image C)
2. Press “Ctrl” on the Keyboard
3. Click “Stop” to stop recording
4. Click “OK”
5. It will bring you back to previous page (Image D)
6. Now click on “Keystroke (Ctrl)”, the one you just created
7. Select the Mouse Button (green icon) on the Mouse Image to your right to
store the “Keystroke (Ctrl)”.
8. Green icon will turn red once it’s been selected. (Image D)
9. Click “Apply” >> “OK”
We have stored it in Mouse Button # 4.
Let’s try it on game application (Counter Strikes)
l Press and hold your mouse button # 4.
In Counter Strike, “Keystroke (Ctrl)” means to hunker down
l Did you see yourself hunker down only once? If yes, you have
successfully created a command with
2nd Radio Button “Press and hold will only input once the keystrokes”
(Image C)
(Image D)
Page 10
Example 4: Select 2nd Radio Button
1. Click on “Record”
2. Press “A4TECH” the Keyboard (Image E)
3. Click “Stop” to stop recording >> then click “OK”
4. It will bring you back to previous page (Image F)
5. Now click on “Keystroke(A4TECH)”, the one you just created
6. Select the Mouse Button (green icon) on the Mouse Image to your right to
store the “Keystroke(A4TECH)”.
1. Green icon will turn red once it’s been selected. (Image F)
2. Click “OK”
We have stored it in Mouse Button # 5.
Let’s try it on regular word document or on game application.
7. Try it on Word Document. Press and hold your mouse button #5.
Did you see the only character “A4TECH” even though you have press and
hold? This is partially simulation. You may store your most frequently
used word, for instance, you first name.
8. Try it on Game Application. Press and hold your mouse button # 5.
In Counter Strike, “Keystroke (A4TECH)” means nothing. So when you try it
in counter strike, it will do nothing.
(Image E)
(Image F)
Page 11

TECH SUPPORT
For tech support, please visit our website at www.a4tech.com or email us at
support@a4tech.com
WARRANTY
All A4 Tech products come with 1 year limited warranty.
 Loading...