

4G Systems XS Jack T2 User Manual

®
XSJack T2
user manual
version 2.0

user manual

XSJackT2
Welcome
Thank you for choosing our product XSJackT2.
The compact XSJackT2 is suitable for permanent wall mounting as well as for
mobile use. Besides a telephone can be connected to XSJackT2. This manual will
help you to easily understand the possibilities and functions that XSJackT2 has to
offer.
Scope of delivery
Your XSJack T2 package contains:
■ 1 XSJackT2 with 2 RJ-11 connectors
■ 1 power supply with connection cable to connect to the mains supply
■ 1 GSM antenna
■ 1 user manual
3

user manual
Safety instructions
Please observe the following instructions when handling and using XSJackT2 to prevent damage to
yourself and to the device:
■ XSJackT2 is a device which is designed for use only in heated and dry pla-
ces. It may not be exposed to either fire or flames and may not be used in
areas with a potentially explosive atmosphere.
■ The device may not be mounted or set up in a place which is exposed to
direct sunlight or direct heat impact. The slits and vents serve to ventilate the
device. These vents should not be covered. The device must not come into
contact with liquids, as this could lead to electric shocks, short-circuits or
amongst other things destruction of the device.
■ Do not open the housing of XSJackT2. This could lead to damage for the
user and for the device.
■ Dispose of XSJackT2 according to legal regulations. Current disposal guide-
lines for electrical devices are available at every recycling centre (see also
“Disposal information” on page 25).
■ Please use only the power supply unit supplied.
4

Table of contents
Welcome 3
Scope of delivery 3
Safety instructions 4
Table of contents 5
Introduction 7
Operating elements and status indicator 7
Reset to default settings 8
First Steps 9
Step 1 - Insert the SIM card 9
Step 2 - Connect the external antenna 10
Step 3 - Connecting electricity 10
Step 4 - Connecting telephone 10
SIM card 11
Activating the SIM card 11
Unblocking the SIM card 12
XSJackT2
5

user manual
Telephoning 13
Emergency calls 13
Dialling delay 14
Call back on busy 14
Area code (Prefix) 14
Direct call 15
Blocking outgoing calls 15
Service: Call forwarding (CF) 15
Service: Call waiting, call hold, three party conference 17
Caller Identification (caller ID) 18
Fax operation 20
Appendix 21
Technical Data 21
Measurements for wall mounting 22
FAQ 23
Tone signals 25
Information about conformity 26
Disposal information 26
6

Introduction
Operating elements and status indicator
When XSJackT2 is switched on, the LEDs indicate the status of different functions.
1. Power LED
LED lights up green
LED is off
LED flashes green
The device is supplied with electricity
The device is not supplied with electricity
Please enter PUK
XSJackT2
2. Status LED
LED lights up red
LED flashes red
The device has successfully logged into the mobile network
and a voice connection or a fax connection has been made.
Request to input PIN
1
2
3. LED bar display
The bar display shows the GSM signal strength.
3 LEDs light up green The strength of the GSM signal strength is good
2 LEDs light up green The strength of the GSM signal strength is fairly good
1 LEDs lights up green
No LED lights up You have no coverage or the device is not switched on
The strength of the GSM signal strength is poor
3
7
user manual
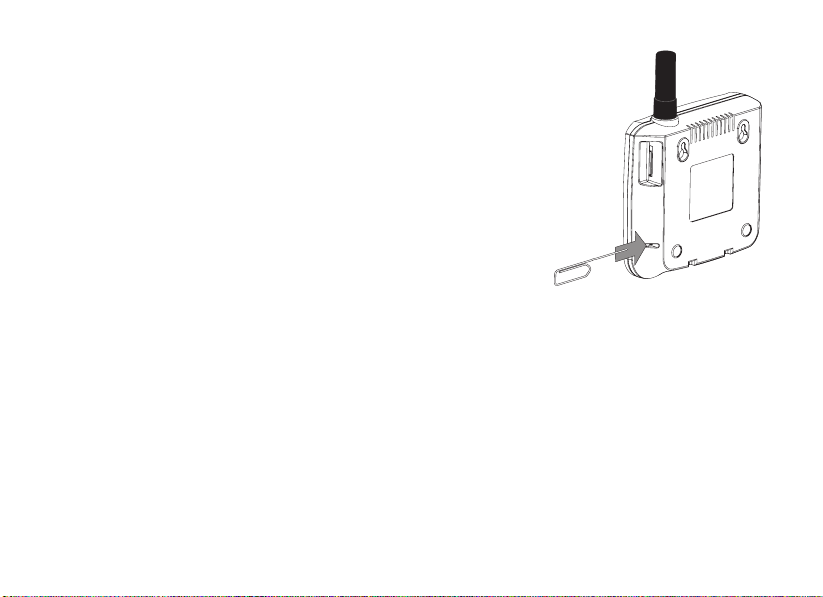
Reset to default settings
You can reset XSJackT2 to the default setting. Doing so
deletes the PIN which has been stored and all changes
made by you will be reset. To do this you will need a
pointed object, e.g. a paperclip:
1. Insert the pointed object carefully into the small hole
underneath the SIM card slot, where the reset button
is.
2. Briefly press the reset button with the pointed object.
8
 Loading...