


XSJack® T3i
XSJack® T3e
User Manual
2
Introduction
Thank you for choosing the XSJackT3e or XSJackT3i - henceforth both referred to as XSJackT3. With the XSJackT3 a fax machine and a telephone can be connected and used in a GSM mobile network.
Scope of delivery
■XSJackT3e or XSJackT3i
■Power supply
■GSM antenna (XSJackT3e only)
■User manual
Safety information
To protect yourself and the device from damage, please observe the following when using and handling the XSJackT3:
■The XSJackT3 is designed solely for use in dry heated rooms.
■It must be kept away from fire and flames!
■Do not use the XSJackT3 in areas with potentially explosive atmospheres.
■Prevent the device from exposure to direct sunlight or heat.
■The slots and openings serve to ventilate the device and must not be covered.
■The device must not come into contact with liquid as this could result in electric shock, short-circuiting or total destruction of the device or worse.
■Do not open the housing of the XSJackT3. This could cause a hazard to the user or damage the device.
■Dispose of the XSJackT3 in accordance with statutory requirements. The current disposal guidelines for electrical equipment can be obtained from any recycling centre. Please also refer to page 30.
■Please use the original 4G Systems power supply only.
3
Table of contents
Introduction |
3 |
Scope of delivery |
3 |
Safety information |
3 |
Table of contents |
4 |
Getting to know your XSJackT3 |
6 |
Initial Setup |
7 |
Step 1: Inserting the SIM card |
7 |
Step 2: Connecting the antenna |
7 |
Step 3: Connecting a telephone, a fax machine, or both |
8 |
Step 4: Connecting the power supply |
9 |
Step 5: Entering the PIN of your SIM card |
9 |
Entering service codes |
10 |
Telephone operation |
11 |
Making telephone calls |
11 |
Call waiting, call holding and conferences |
12 |
Fax operation |
14 |
Fax setup |
14 |
Fax transmission |
14 |
Fax reception |
15 |
Resetting the fax memory |
15 |
Fax and SIM card types |
16 |
SMS operation |
17 |
Advanced functions |
18 |
Definition of a default area code |
18 |
Roaming |
18 |
Blocking device for outgoing calls |
19 |
SIM card PIN / PUK operations |
19 |
Resetting factory settings |
19 |
Additional network functions |
20 |
Acoustic Monitoring / Babyphone |
21 |
Automatic dial mode |
23 |
4
Appendix |
24 |
Signal tones |
24 |
FAQ |
26 |
Technical data |
28 |
Dimensions for wall mounting |
29 |
Conformity |
30 |
Disposal information |
30 |
5
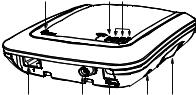
Getting to know your XSJackT3
F |
G H |
|
A |
RJ11 jack to connect |
|
|
|
|
telephone and/or fax |
|
|
|
|
machine |
|
|
|
B |
Connector for external |
|
|
|
|
antenna (XSJackT3e only) |
|
|
|
C Connector for power supply |
|
A |
B C |
D E |
D |
Reset button |
|
|
|
E |
SIM card drawer |
FPower LED (green)
GStatus LED (red)
H3 LEDs for signal strength and SIM requests (green)
Off |
No power |
On |
Device is powered up |
Regular flashing |
An error has occurred |
Irregular flashing |
Fax memory is full (page 15) |
|
|
Off |
Idle mode |
On |
Ongoing voice or fax connec- |
|
tion to GSM network |
Flashing |
There are received faxes and/or |
|
SMS in the memory ready for |
|
delivery (page 15 and 17) |
|
|
All 3 LEDs off |
Not yet logged into a GSM net- |
|
work |
1 LED on |
Low GSM signal strength |
2 LEDs on |
Medium GSM signal strength |
3 LEDs on |
High GSM signal strength |
Left LED flashing |
The SIM card is blocked, defect |
|
or not available |
Middle LED |
SIM PUK entry is required |
flashing |
(page 19) |
Right LED flashing |
SIM PIN entry is required |
|
(page 9) |
6

Initial Setup
Step 1: Inserting the SIM card
Insert the SIM card into the pull-out SIM card drawer of the XSJackT3. Then push the drawer in until you hear it snap into place. If you are unable to open the drawer by hand, use a coin as a tool.
In case the SIM card drawer is completely pulled out of the device, carefully reinsert the drawer into the XSJackT3 while not containing the SIM card. Note that the tray of the drawer must face to the back of the XSJackT3
Note: Never remove or insert the SIM card while the device is connected to the power supply. This could lead to unexpec-
ted behaviour and even permanent damage to the device or the SIM card. Disregarding this warning causes a warranty breach.
Step 2: Connecting the antenna
This step only applies for the XSJackT3e. Please screw the supplied external antenna to the corresponding connector of the XSJackT3e as shown.
7
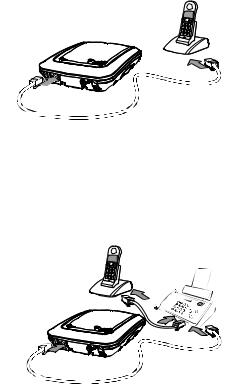
Step 3: Connecting a telephone, a fax machine, or both
Telephone or fax machine:
Connect one end of your RJ-11
telephone cable to the telephone or fax machine and the other end into the RJ-11 jack of the
XSJackT3. If you want to use the XSJackT3 for fax only, it is
nevertheless recommended to carry out this initial setup procedure with a telephone, as it could
be difficult to enter the required service codes on a fax machine due to the absence of a telephone receiver or dedicated button to go off hook. If you do not have an analogue telephone available, refer to page 10.
Telephone and fax machine:
If both a telephone and a fax
machine are to be connected, first connect the fax machine to the
XSJackT3 as described above. Afterwards, connect the telephone to an available RJ-11 jack of the fax machine. You may want to refer to
the fax machine's user manual for more information. Please note that
in certain countries the fax machi-
nes may not have this option. In these cases, a country specific adapter cable is needed.
Note: All connected end devices must support dual tone multiple frequency dialling (DTMF). Modems for data connections cannot be connected to the XSJackT3.
8
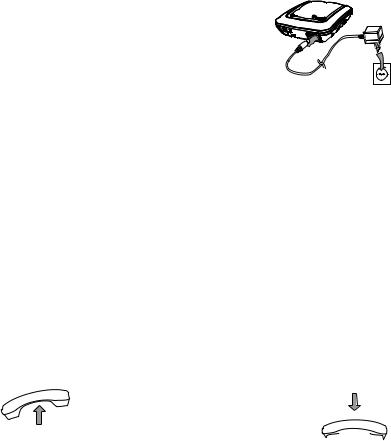
Step 4: Connecting the power supply
Connect the power supply unit to the XSJackT3 and the other end into a mains socket.
Step 5: Entering the PIN of your SIM card
Your XSJackT3 will now start up and may require the PIN of your SIM card to be entered, if this security feature is enabled on your card. The necessity of entering the PIN will be indicated by the rightmost LED flashing (refer to page 6). If so, lift the telephone receiver, wait for the corresponding dial tone, press the # key, enter your PIN, and confirm by pressing the # key again. Depending on if the entered PIN was correct or not, you will hear a positive or negative acknowledgment tone. In the latter case, try to enter the PIN again. Check the LEDs and signal tones since it may also be necessary to enter the PUK now (refer to page 19). Refer to page 24 for an overview of all tones. The PIN remains stored in the XSJackT3.
After you have entered the correct PIN code or if your SIM is not PINsecured at all, the device will automatically log onto the GSM network, which may take up to 45 seconds. When the signal strength is shown and a continued dial tone can be heard in the receiver, the XSJackT3 is ready for operation.


 , , PIN, ,


Note: To minimize interference, you should position the XSJackT3, the antenna, your telephone, and all their cables as far apart as possible. Ensure an adequate distance between the device and potential sources of interference such as microwaves or electrical devices with metal housings or metal objects in general.
9
Entering service codes
Your XSJackT3 is operated and configured using special sequences of digits you have to enter to the keypad of your connected telephone or fax machine (0 - 9, *, #).
Fax machines without telephone receiver sometimes feature a dedicated button to go offhook and onhook, which may be indicated by an icon like a telephone receiver or loudspeaker. Refer to the manual of your fax machine for additional information.
On devices with telephone receiver or dedicated offhook/onhook button, proceed as follows:
■Lift the telephone receiver or press the corresponding button on your fax machine.
■Wait for a continuous dial tone audible in the telephone receiver or from the loudspeaker of the fax machine.
■Enter the sequence as specified by the format described in the corresponding tables within this manual. Replace placeholders written in capital letters inside the format specifications by the desired numerical values.
■Wait for a positive or negative command response tone. Some service codes are provided to query information about specific settings from the XSJackT3. These codes will answer using the 'Enabled' or 'Disabled' response codes and some will additionally show you numerical values on the display of your phone via CLIP after going back onhook.
■Put down the telephone receiver again or press the corresponding button on your fax machine.
Note: Refer to page 24 for an overview of all possible dial tones and response tones.
10
 Loading...