


OWNER’S MANUAL
Overview
1)Operating conditions
2)Articles in the box
3)Charging
4)App setup
5)Wearing the device
6)Cleaning the device
7)Screen operation
8)Device operation
a)Time/date interface
b)Activity
c)Heart rate
d)Timer
e)APPs
f)Reminders
g)Goals
9)Customer support
10)Troubleshooting
11)Supported devices
12)Product specifications
13)Remarks
1
1. Operating Conditions
Operating temperature
-13°F to 131°F (-25°C to 55°C)
Water resistance
The 3Plus Lite is IP67 water resistant rated. This means that the band can be used during daily cleansing or in midst of rain. We do not recommend wearing the band in the shower or submerging it under water. Day-to-day waterproof functionality.
Battery
Up to 7 days of battery life.
2
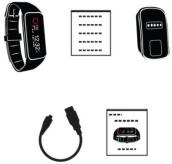
2. Articles in the Box
A B C
D E
A HR Tracker Device
B Quick Start Guide
C Charging cradle
D Micro-USB cable
E Owner’s Manual
3
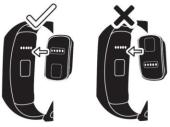
3. Charging
1. Position the charging cradle to the back of your device while making sure the pins match the contact points on the device and the charging cradle. The magnetic attraction should then snap them together in place.
2. Insert the micro-USB cable into the charging cradle, and then connect the USB plug into a power source. A "Charging" icon will be shown on the screen and will indicate the current charge level.
Tip: Make sure to completely charge your device before first use. A full charge will take approximately two hours (depending on the power source).
4

4. App Setup
To pair your band with a mobile device, you must first download and install the 3Plus Elite Series App from either the Apple APP store or Google Play store.
Connecting the APP
1.Turn on the Bluetooth on your mobile device (if not already on).
2.Open the 3Plus Elite Series App on your mobile device.
a.If you are a new member, you will need to register a new account. Be sure to enter your personal information accurately in the given prompts.
b.If you are an existing member, you can just input your login email address and password.
3.After logging in, choose the 3PLUS-HR option to start the pairing process.
4.Select the detected HR # code. This should be the same code that shows up on your HR device's screen. (Note: The tracker must be near your mobile phone in order for it to detect it.)
5
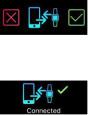
5.A connection request will be shown on your tracker with the image below. Tap on the green check mark to confirm the Bluetooth pairing.
6.When the tracker is connected successfully, both your tracker and mobile device will receive a notification.
If the connection is not successful, please repeat the same steps to try again.
Note: The Bluetooth pairing is a one-time process. If you would like to connect the band with a different account, you must un-pair the existing connection first through the App settings.
6

5. Wearing the Device
1.Wrap the device around your wrist and pull the band through the hole in the buckle.
2.Pull the band until the device feels tight and secure on your wrist.
3.Insert the buckle pin through one of the band's holes to secure the band in place.
4.You may use the two clamps to further secure the bands
together.
7
6. Cleaning the Device
Keep it clean!
It is strongly recommended to regularly clean your band after workouts or prolonged use. Moisture from sweat and dirt from other means can build up underneath the band and can cause skin irritation.
Use water or rubbing alcohol
DO NOT use soaps, sanitizers, or household cleaners to clean the band.
Dry the band before use
Make sure to clean and dry the band well before putting it back on.
8

7. Screen Operation
Double tap the display sensor area to wake up the screen.
The band will only respond when the specific sensor area is tapped.
The band screen will stay off when not in use.
To make sure that the band will respond accurately to your tapping, we recommend that you use your finger tip instead of your finger nail.
9
All screen operations can be performed by touching the screen with your finger tip.
Slide left or right on the screen's surface to change the screen and menu options.
10
 Loading...