

Page 1

3
Ultimate FX Full Facepiece Reusable Respirator
Ultimate FX Full Facepiece Reusable Respirator
User Instructions for 3M™ Ultimate FX Full Facepiece FF-401, Small, 3M™ Ultimate FX Full Facepiece FF-402, Medium, 3M™
Ultimate FX Full Facepiece FF-403, Large
IMPORTANT: Before use, the wearer must read and understand these User Instructions. Keep these instructions for reference.
This respirator has dual approval as a United States (US) National Institute for Occupational Safety and Health (NIOSH) full facepiece
respirator and as Brazil Ministry of Labor full face piece respirator.
Specic information is provided where applicable. All other information is common to both standards.
FR
Respirateur à masque complet réutilisable ultra FX
Directives d’utilisation pour respirateur à masque complet ultra FX FF-401 3MMC, petit, respirateur à masque complet ultra FX FF-402
3MMC, moyen, respirateur à masque complet ultra FX FF-403 3MMC, grand
REMARQUE IMPORTANTE : Avant de se servir du produit, l’utilisateur doit lire et comprendre les présentes directives d’utilisation.
Conserver ces directives à titre de référence.
Ce respirateur a une double homologation comme respirateur à masque complet par le National Institute for Occupational Safety and
Health (NIOSH) des États-Unis et comme respirateur à masque complet par le ministère du Travail du Brésil.
Des renseignements spéciques sont fournis le cas échéant. Tous les autres renseignements sont communs aux deux normes.
User Instructions
ES
Respirador reutilizable de pieza facial de cara completa Ultimate FX
Instrucciones para la Pieza facial de cara completa 3M™ Ultimate FX, FF-401, pequeña; Pieza facial de cara completa 3M™ Ultimate
FX, FF-402, mediana; y Pieza facial de cara completa 3M™ Ultimate FX, FF-403, grande.
IMPORTANTE: Antes de usar el producto, el usuario debe leer y entender estas Instrucciones. Conserve estas instrucciones para
referencia futura.
Este respirador cuenta con una aprobación dual como un respirador de pieza facial de cara completa por el Instituto Nacional de
Seguridad y Salud Ocupacional (NIOSH por sus siglas en inglés) de Estados Unidos y por la Secretaría del trabajo de Brasil.
Si aplica, se proporciona información especíca. La demás información es común para ambas normas.
PT
Respirador Reutilizável Peça Facial Inteira FX
Instruções de Uso para 3M™ Peça Facial Inteira FF-401 FX, Pequeno, 3M™ Peça Facial Inteira FF-402 FX, Médio, 3M™ Peça Facial
Inteira FF-403 FX, Grande
IMPORTANTE: Antes de usar, o usuário deve ler e compreender estas Instruções de Uso. Guarde estas instruções para consulta.
Este respirador tem dupla aprovação, como um respirador facial pelo Instituto Nacional para Saúde e Segurança Ocupacional (NIOSH)
dos Estados Unidos (EUA) e como respirador facial pelo Ministério do Trabalho do Brasil.
Informações especícas são fornecidas quando aplicáveis. Todas as outras informações são comuns a ambas as normas.
98-0060-0135-2_6
34-8723-6751-0
Page 2
3
(English)
Ultimate FX Full Facepiece Reusable Respirator
User Instructions
W WARNING
This respirator helps protect against certain airborne contaminants. Misuse may result in sickness or death. For correct use,
consult supervisor and User Instructions or call 3M in U.S.A. at 1-800-243-4630. In Canada, call Technical Service at
1-800-267-4414.
FOREWARD
These User Instructions provide information about facepiece use only. Important information is provided in the User Instructions with each of the air
ltration systems that are used with 3M™ Full Facepiece FF-401, FF-402 and FF-403. Read all User Instructions and warnings before using. Keep
these User Instructions for reference. If you have questions regarding these products contact 3M Technical Service.
In United States:
Internet: www.3M.com/workersafety
Technical Assistance: 1-800-243-4630
Intended Use
The 3M™ Ultimate FX Full Facepiece FF-400 Series Respirators (FF-401, FF-402 and FF-403) are designed to help provide respiratory protection
against certain airborne contaminants when used in accordance with all use instructions and limitations and applicable safety and health regulations.
FF-400 series facepieces meet the requirements of the ANSI Z87.1-2010 standard for face and eye protection. These products provide limited eye
and face protection against ying particles.
Properly selected, used, and maintained respirators help protect against certain contaminants by reducing airborne concentrations
below the Occupational Exposure Limit (OEL). It is essential to follow all instructions and government regulations on the use of this
product, including wearing the complete respirator system during all times of exposure in order for the product to help protect the
wearer. Misuse of respirators may result in overexposure to contaminants and lead to sickness or death. For correct use,
consult supervisor and User Instructions, or contact 3M Technical Service.
In Canada:
Website: www.3M.ca/Safety
Technical Assistance: 1-800-267-4414
W WARNING
List of Warnings and Cautions within these User Instructions
W WARNING
Failure to follow these instructions may reduce respirator performance, expose you to contaminants above the OEL, and may result
in sickness or death.
• To help maintain a good seal between the face and the faceseal, the respirator faceseal must be clear of obstructions at all times. Do
not use with beards or facial hair that prevent direct contact between the face and the respirator faceseal. Do not use with corrective
eyeglasses. If corrective eyeglasses are required, a 3M™ Spectacle Kit must be used inside the respirator.
• Do not clean respirator with solvents. Cleaning with solvents may degrade some respirator components and reduce respirator
effectiveness.
• Inspect all respirator components before each use to ensure proper operating condition.
• Do not alter, misuse, or abuse this respirator.
CAUTION
Failure to properly dispose of spent cartridges, lters, or respirators contaminated by hazardous materials can result in personal exposures as well
as environmental harm. Handling, transportation and disposal of spent cartridges, lters, or respirators must comply with all applicable federal,
state, provincial, and local laws and regulations.
NIOSH Cautions and Limitations for Negative Pressure Usage
The following restrictions may apply. See NIOSH Approval Label. If you are using the FF-400 series facepiece as part of a Supplied Air Respirator
conguration, refer to the User Instructions that accompanies your air control device for information on NIOSH Cautions and Limitations.
A - Not for use in atmospheres containing less than 19.5 percent oxygen.
B - Not for use in atmospheres immediately dangerous to life or health.
C - Do not exceed maximum use concentrations established by regulatory standards.
H - Follow established cartridge and canister change schedules or observe ESLI to ensure that cartridges and canisters are replaced before breakthrough
occurs.
J - Failure to properly use and maintain this product could result in injury or death.
L - Follow the manufacturer’s User’s Instructions for changing cartridges, canister and/or lters.
1
Page 3
(English)
M - All approved respirators shall be selected, tted, used, and maintained in accordance with MSHA, OSHA, and other applicable regulations.
N - Never substitute, modify, add, or omit parts. Use only exact replacement parts in the conguration as specied by the manufacturer.
O - Refer to User’s Instructions, and/or maintenance manuals for information on use and maintenance of these respirators.
S - Special or critical User’s Instructions and/or specic use limitations apply. Refer to User’s Instructions before donning.
S - Special or Critical User’s Instructions
3M™ Organic Vapor Service Life Indicator Cartridges (6001i and 60921i) are equipped with a passive 3M™ End of Service Life Indicator (ESLI). The
indicator must be readily seen when wearing the respirator. If you cannot readily see the ESLI, use a mirror to observe the ESLI; rely on a co-worker
who can see the ESLI; or go to a clean area, remove the respirator and view the ESLI. Do not rely solely on the organic vapor ESLI unless your
employer has determined that it is appropriate for your workplace. See 6001i or 60921i User Instructions for more information, including Special
Instructions regarding the ESLI.
3M™ Mercury Vapor, Organic Vapor and Acid Gas Cartridges (6007 and 60927) must be discarded within 50 hours of use against mercury vapor.
3M™ Particulate Filter P95, Hydrogen Fluoride, with Nuisance Level Acid Gas Relief, 2076HF and 3M™ Particulate Filter P100, Hydrogen Fluoride,
with Nuisance Level Acid Gas Relief, 7093C are recommended for relief against nuisance levels of acid gases or organic vapors. Nuisance level refers
to concentrations not exceeding OSHA PEL or applicable government occupational exposure limits, whichever is lower. Do not use for respiratory
protection against acid gases or organic vapors except hydrogen uoride.
To assemble 3M™ Dual Airline Combination Breathing Tubes with 3M™ Cartridges/Filters, the facepiece inhalation valves must be removed.
If the facepiece is to be used in air-purifying mode (without using the 3M™ Breathing Tubes SA-1600 or SA-2600), the inhalation valves must be
replaced in the facepiece before use.
Respirator Program Management
Occupational use of respirators must be in compliance with applicable health and safety standards. By law U.S. employers must establish a written
respiratory protection program meeting the requirements of the OSHA Respiratory Protection Standard 29 CFR 1910.134 and any applicable OSHA
substance specic standards. In Canada, CSA standard Z94.4 requirements must be met and/or requirements of the applicable jurisdiction, as
appropriate. In Brazil, follow the Respiratory Protection Program of the Ministry of Labor.
For additional information on this standard contact OSHA at www.OSHA.gov. Consult an industrial hygienist or call 3M Technical Service with
questions concerning applicability of these products to your job requirements.
Table 1: Major Sections of OSHA 29 CFR 1910.134
Section Description
A Permissible Practice
B Denitions
C Respiratory Protection Devices
D Selection of Respirators
E Medical Evaluations
F Fit Testing
G Use of Respirators
H Maintenance and Care of Respirators
I Breathing Air Quality and Use
J Identication of Cartridges, Filters, and Canisters
K Training and Information
L Program Evaluation
M Recordkeeping
Assigned Protection Factors
Table 2: Assigned Protection Factors
Type of Respirator APF
Full Facepiece Negative Pressure Air Purifying Respirator 10/50
Full Facepiece Supplied Air Respirator (SAR) Continuous Flow 1000
1
The respirator wearer must be t tested using a quantitative t test method in order to use an assigned protection factor greater than 10 when used
as a negative pressure air purifying respirator.
In Brazil, according to the Respiratory Protection Program of the Ministry of Labor, do not use quantitatively t tested full facepiece respirators when
concentrations of contaminants are greater than 100 times the permissible exposure limit in air-purifying mode.
1
2
Page 4
(English)
OPERATING INSTRUCTIONS
Unpacking
Inspect the package contents for shipping damage and ensure all components are present (Refer to Fig. 27). The product should be inspected before
each use following the procedures in the “Inspection” section of this User Instruction.
Assembly
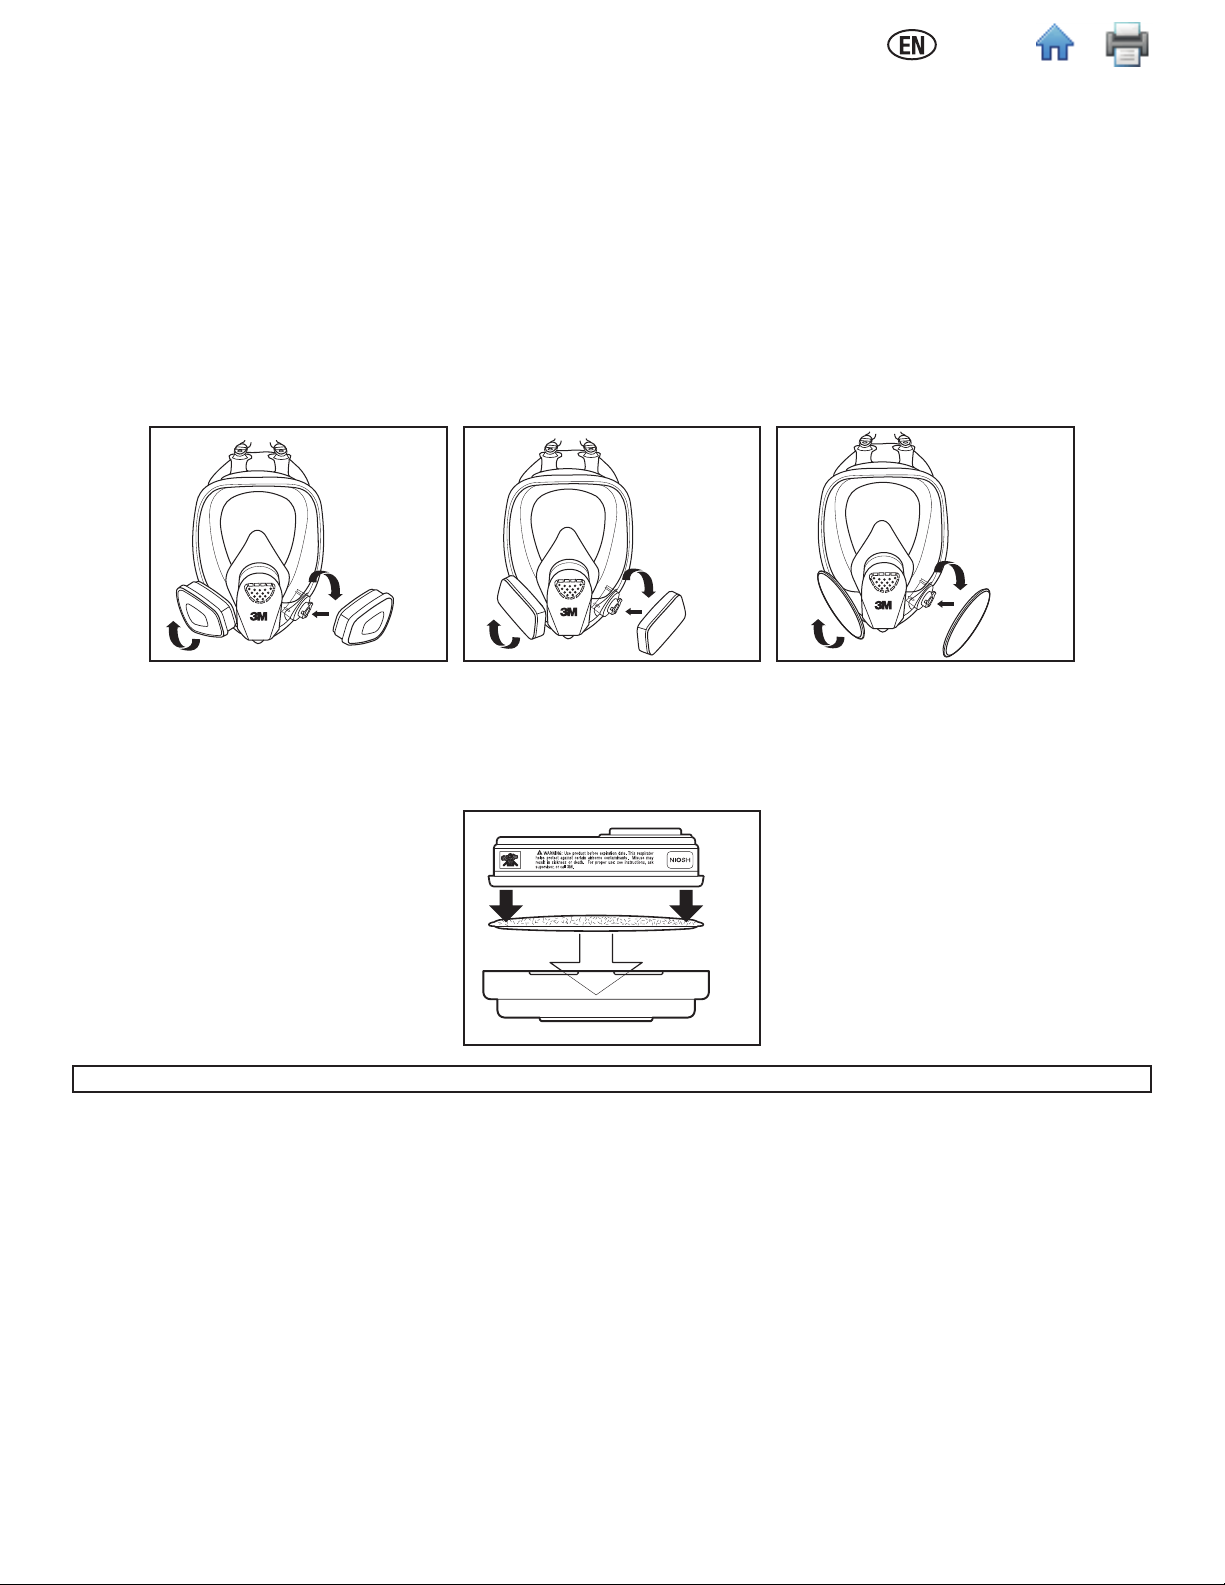
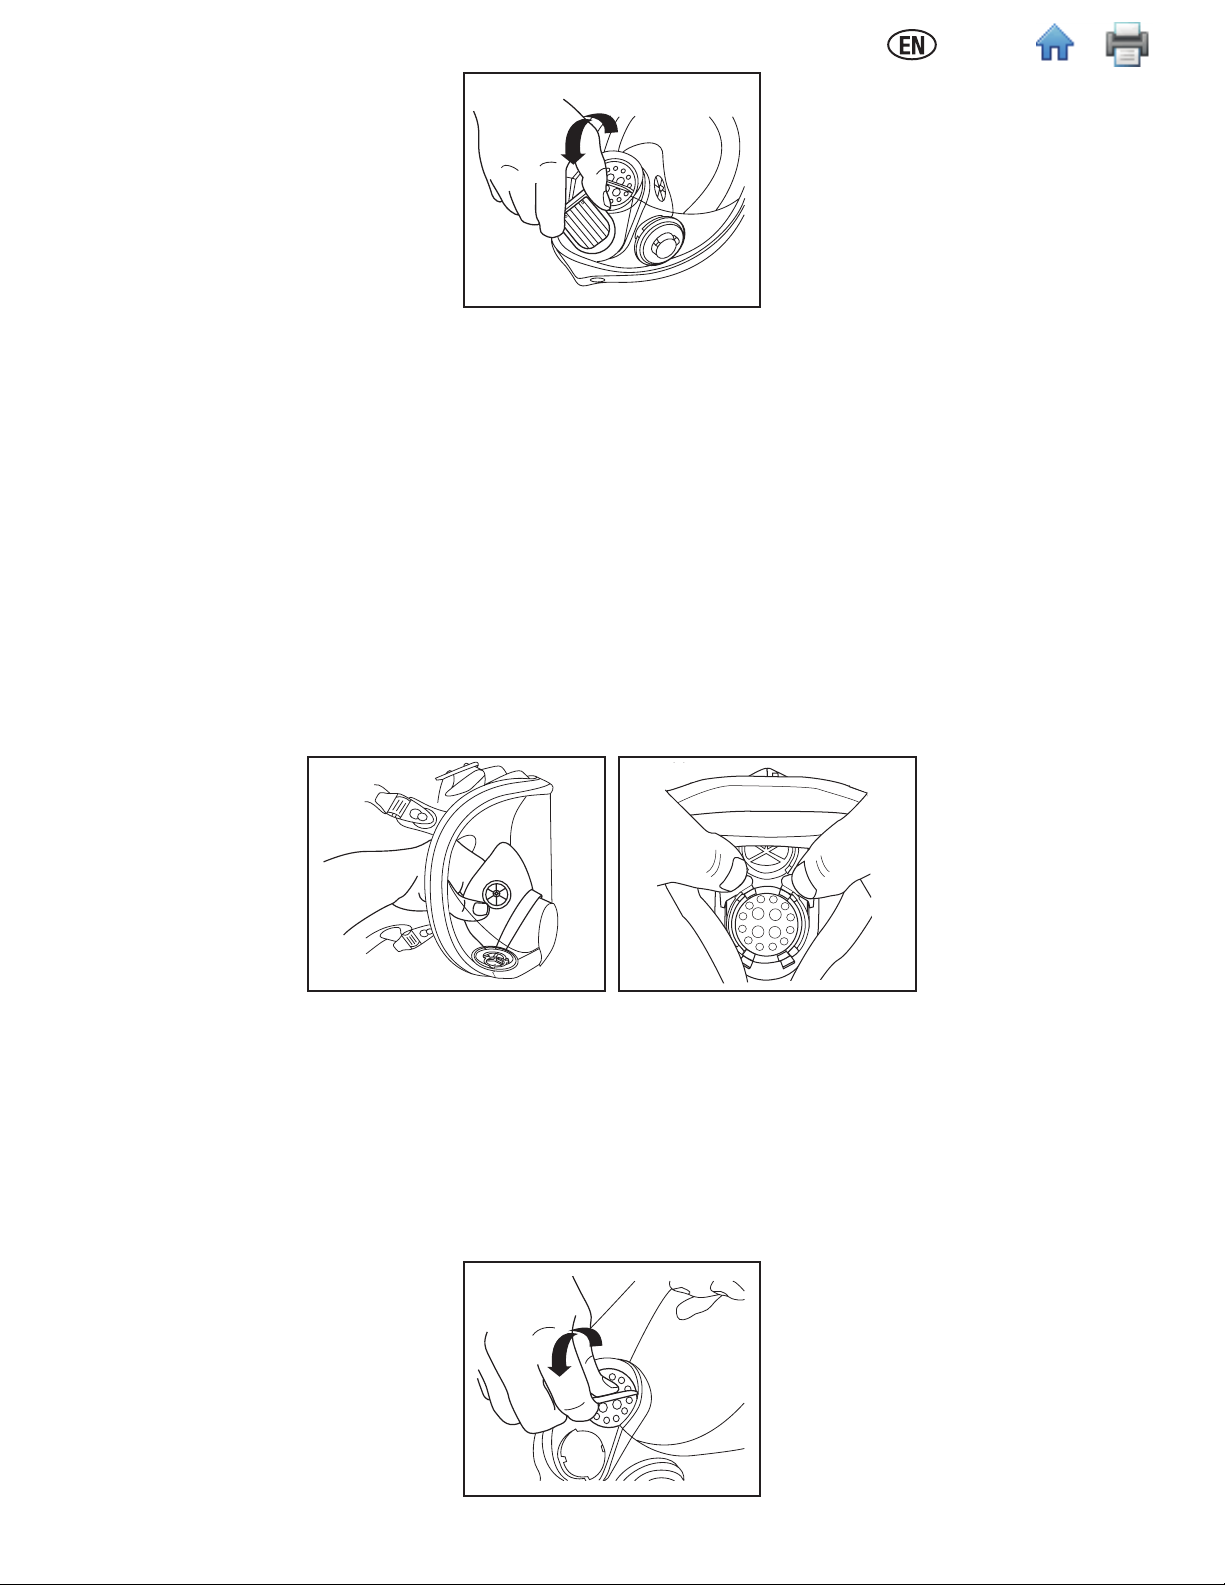
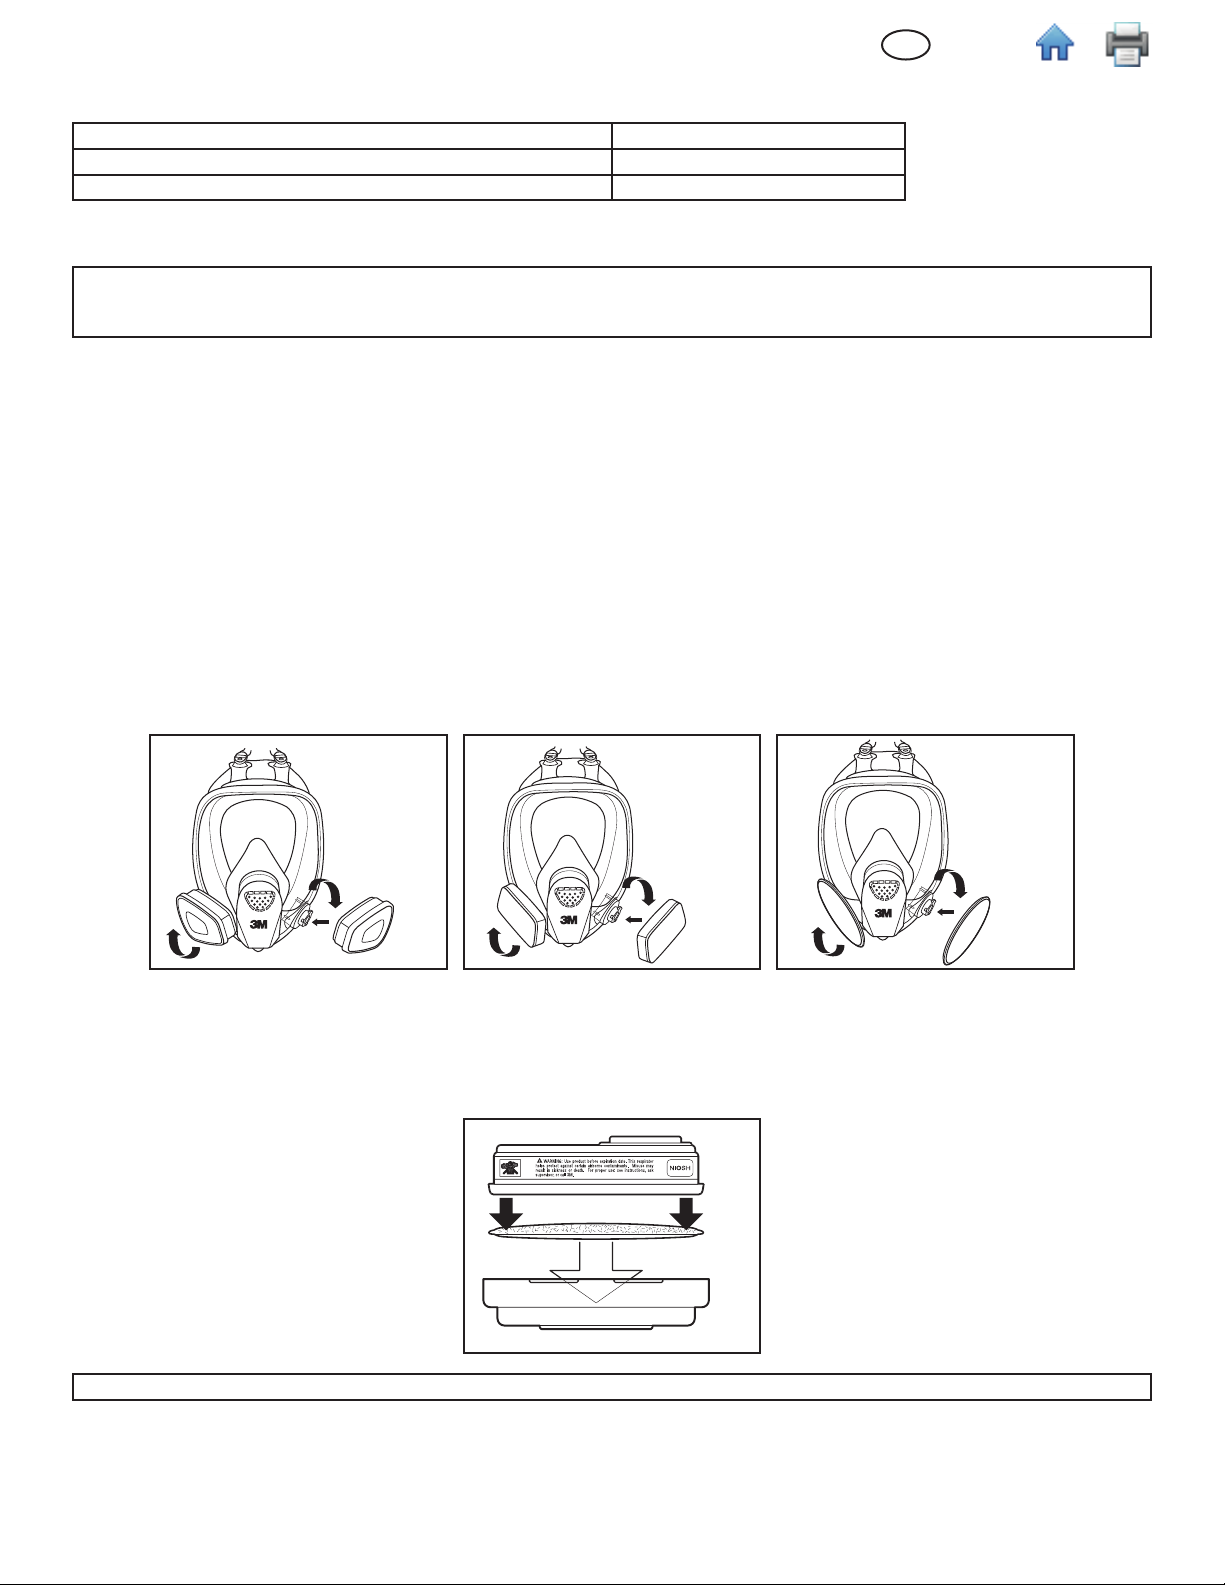
3M™ Cartridge 6000 Series, Filter 7093, and Cartridge/Filter 7093C Assembly (Fig. 1, 2)
1. Align the cartridge or lter notch with the small solid bayonet lug on facepiece and push together.
2. Turn cartridge or lter clockwise until it is rmly seated and cannot be further turned (about 1/4 turn).
3. Repeat with second cartridge or lter.
3M™ Filter 2000 Series (Fig. 3)
1. Align opening of lter with lter attachment on facepiece and push together.
2. Turn lter clockwise until it is rmly seated and cannot be further turned.
3. Repeat for second lter.
Fig. 1 Fig. 2 Fig. 3
3M™ Filters 5N11 and 5P71
1. Place lter into 3M™ Retainer 501 so printed side of lter faces the cartridge.
2. Press cartridge into lter retainer. It should snap securely into lter retainer. When correctly installed, lter should completely cover face of cartridge
(Fig. 4).
3. To replace lter, remove retainer by lifting on tab.
Fig. 4
In Brazil, the 3M™ Filter 5935BR can be used with the 3M™ Filter Retainer 501 on the 3M™ Full Facepiece FF-400 Series.
3M™ Adapter Assembly 502
1. Align adapter over cartridge. Engage front snap by squeezing front of cartridge and adapter together, placing thumbs of both hands over top of
adapter and ngers along bottom sides of cartridge (Fig. 5).
2. Engage back snap by squeezing back side of cartridge and adapter together using the same hand positions. An audible click should be heard as each
snap is engaged (Fig. 6).
3. Place lter onto the lter holder so that lter comes into even contact with gasket. Twist clockwise a quarter turn until it is rmly seated and lter
cannot be turned further. Repeat for second lter.
3
Page 5
(English)
Fig. 5 Fig. 6
IMPORTANT: The 3M™ Adapter Assembly 502, once installed on a 3M™ Cartridge 6000 Series, is not to be removed or reused. Removal or
reuse may result in leakage, overexposure, sickness or death.
3M™ Filter Adapter 603 and Filters 5N11 and 5P71
1. Align notch on edge of 603 adapter with facepiece mark as shown (Fig. 7).
2. Turn adapter 1/4 turn clockwise to stop. To remove adapter, turn 1/4 turn counterclockwise (Fig. 8).
3. Place lter into 501 retainer with lter printing facing towards the 603 adapter. Snap together and ensure the lter seal is free from creases or gaps
(Fig. 9).
1
1
2
Fig. 7
2
Fig. 8
Fig. 9
In Brazil, the 3M™ Filter 5935BR can be used with the 603 Filter Adaptor and the 501 Filter Retainer on the 3MTM Full Facepiece, FF-400 Series.
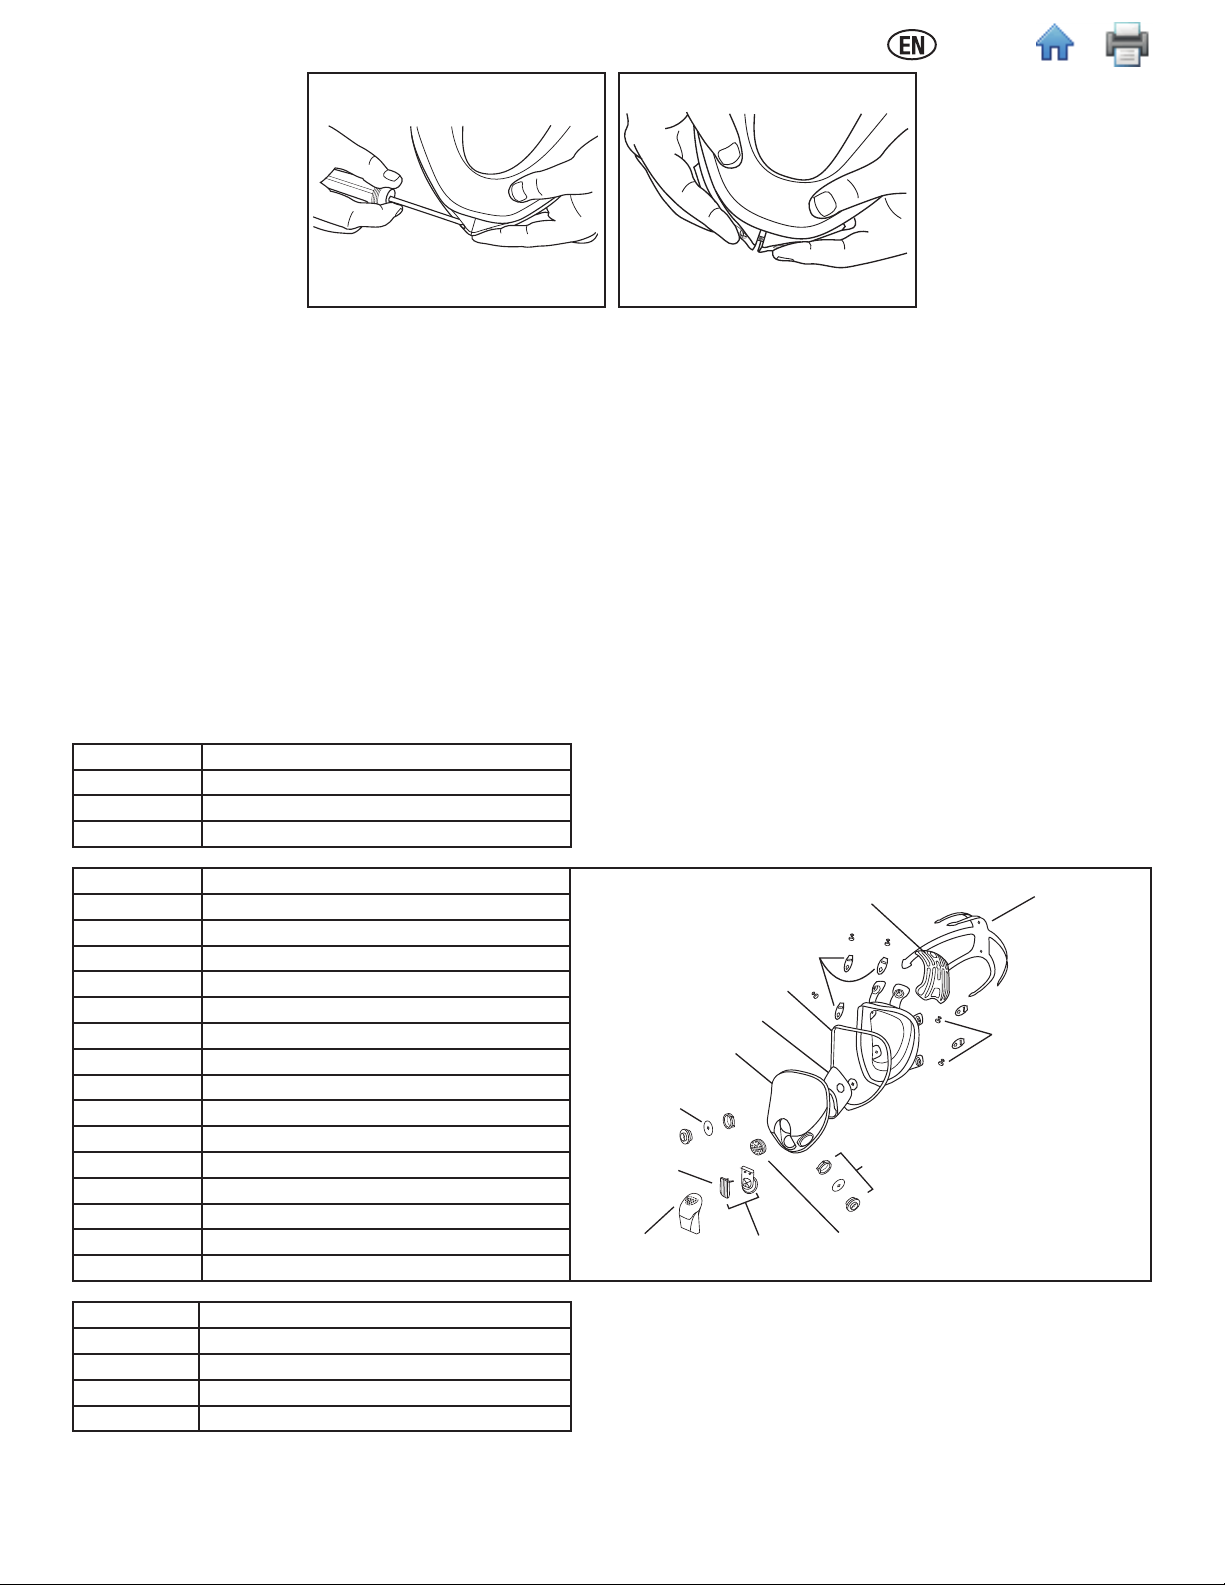
3M™ Dual Airline Respirator Assembly
User must follow Dual Airline Supplied Air Respirator User Instructions provided with the 3M™ Dual Airline Supplied Air Respirators.
Assembly of Dual Airline Breathing Tubes
1. Hold the facepiece in front of you so that the 3M logo is facing you. Align the two branches of the breathing tube over the two bayonet mounts on
facepiece (Fig. 10). For 3M™ Breathing Tubes SA-1500 or SA-1600, make sure that 3M logo on breathing tube and on facepiece are both facing
towards you. For 3M™ Breathing Tubes SA-2500 or SA-2600, make sure that the 3M logo on breathing tube is facing in opposite direction to 3M logo
on facepiece.
2. Twist each branch of breathing tube clockwise a quarter turn until it is rmly seated in the bayonet and cannot be turned further (Fig. 11 and 12). Do
not forcibly overturn as the bayonet could be damaged. SA-1500/SA-2500 shown.
3. Attach airline to approved air regulators per pressure schedules in dual airline, supplied air respirators User Instructions.
Fig. 10 Fig. 11 Fig. 12
Assembly of 3M™ Combination Dual Airline Breathing Tubes with Cartridges and/or Filters
The SA-1600 (front-mounted) and SA-2600 (back-mounted) versions of the 3M™ Dual Airline Breathing Tubes allow use of selected,
NIOSH-approved 3M™ Cartridge 6000 Series and 3M™ Filter 2000 Series. For the listing of approved cartridges and lters, reference the NIOSH
Approval Label included with 3M™ Dual Airline Adapter kits.
1. Attach SA-1600 or SA-2600 breathing tubes to facepiece per the procedures outlined previously. The procedure is identical to the SA-1500 and
SA-2500 models.
2. Make a selection of cartridges and/or lters that meets your respiratory protection requirements, and attach to the outer bayonets of SA-1600 or
SA-2600 breathing tubes.
4
Page 6
(English)
3. Don facepiece per procedures outlined in “Donning Respirator” section of instructions.
4. After being properly t tested, perform a positive and negative pressure user seal check each time the respirator is donned per procedures outlined in
“User Seal Check” section of instructions.
If you cannot achieve a proper t, DO NOT enter contaminated area. See your supervisor.
To assemble 3M™ Dual Airline Combination Breathing Tubes with 3M™ Cartridges/Filters, the facepiece inhalation valves must be removed.
IMPORTANT: If the facepiece is to be used in air-purifying mode (without using the SA-1600 or SA-2600 breathing tubes), the inhalation valves must
be replaced in the facepiece before use.
Using the 3M™ Combination Dual Airline Breathing Tubes without Cartridges and/or Filters
To use the Combination Dual Airline Breathing Tubes (SA-1600 and SA-2600) without cartridges or lters, attach a 3M™ Bayonet Cap 6880 to each
outer bayonet mount on the dual airline breathing tube. When used as a Type C, continuous ow supplied air full facepiece respirator, the Assigned
Protection Factor is 1000 times the PEL or other occupational exposure limit.
FITTING INSTRUCTIONS
W WARNING
Failure to follow these instructions may reduce respirator performance, expose you to contaminants above the OEL, and may result
in sickness or death.
• To help maintain a good seal between the face and the faceseal, the respirator faceseal must be clear of obstructions at all times. Do
not use with beards or facial hair that prevent direct contact between the face and the respirator faceseal. Do not use with corrective
eyeglasses. If corrective eyeglasses are required, a 3M™ Spectacle Kit must be used inside the respirator.
These instructions MUST be followed each time respirator is worn.
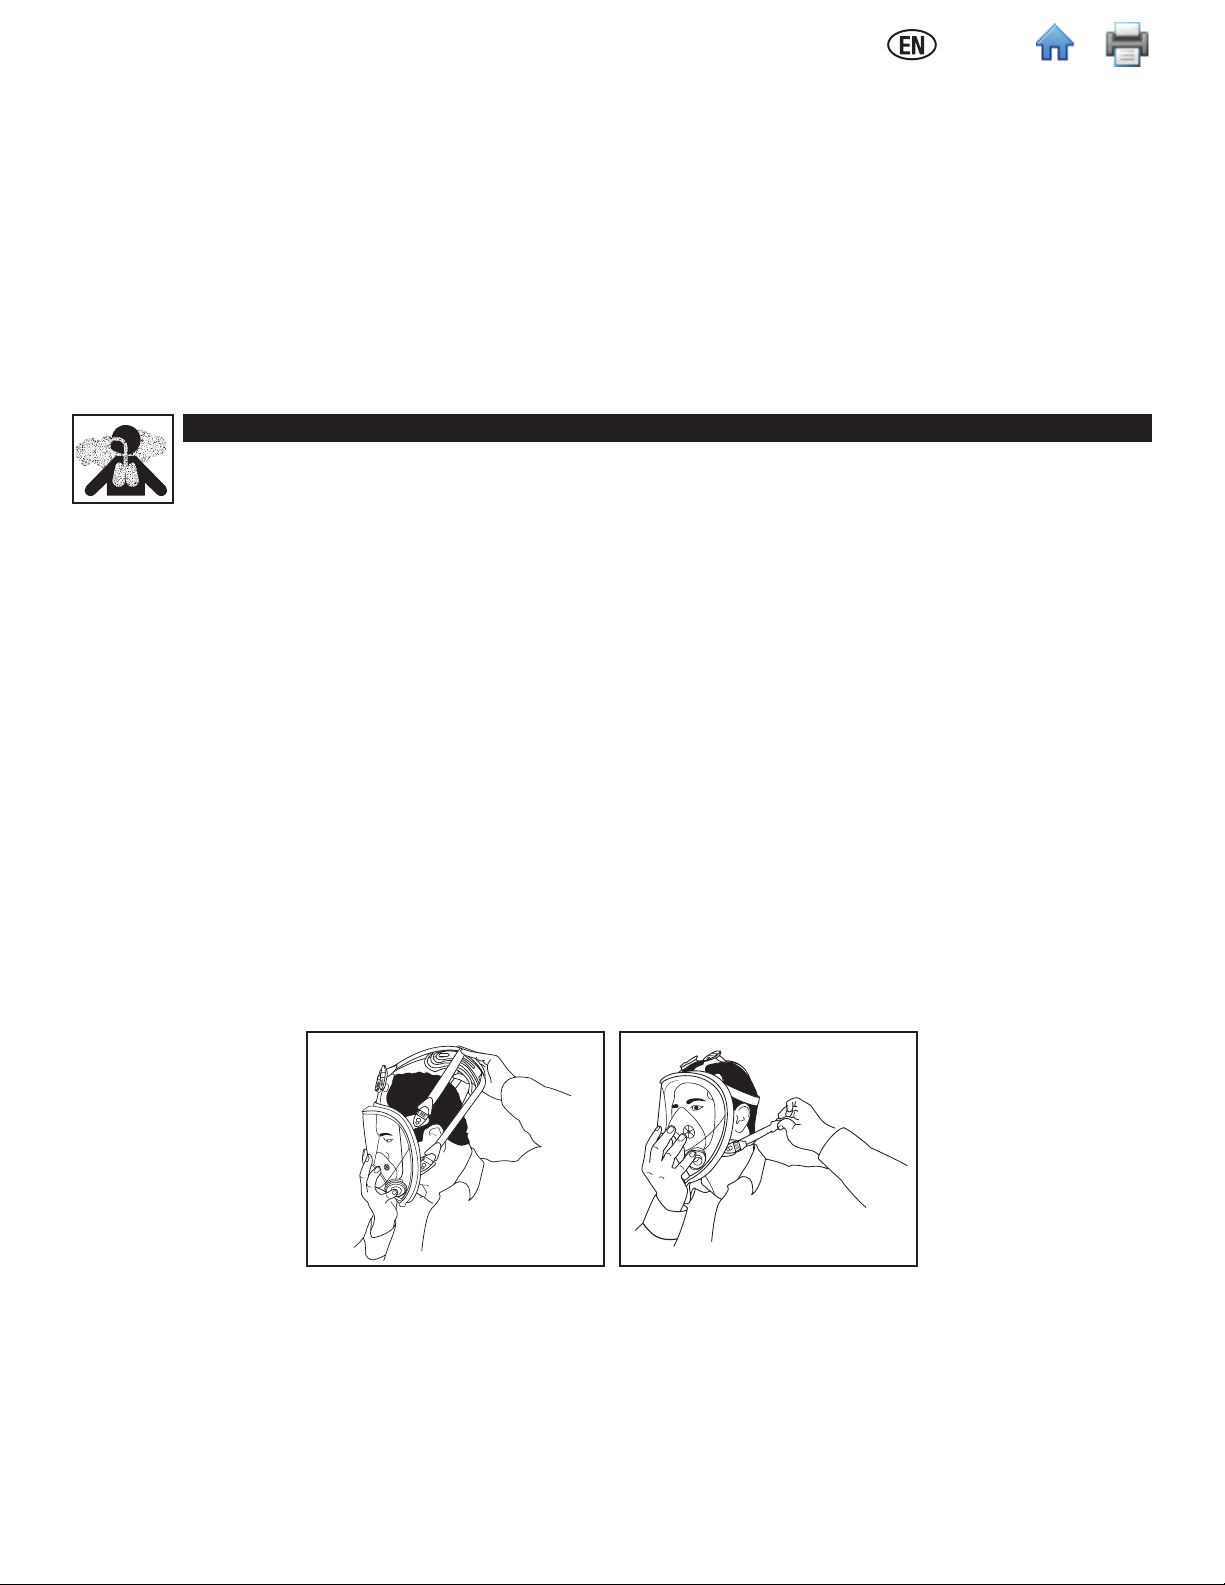
Donning Respirator
NOTE: Two key factors in effective donning are placing the nose in the nose cup initially to center the respirator on the face and to tighten
the straps twice following steps 4, 5, 6, rst to snug the respirator then repeating steps 4, 5, 6 a second time to secure the facepiece seal.
Care must be taken to not over tighten bottom straps on the rst turn.
1. Fully loosen all six headstraps.
2. Hold the front of the facepiece with one hand and the straps/comfort cradle away from the facepiece with the other hand, creating an opening for the
head. Pull the respirator assembly down over the head and face through the opening. Place the nose in the nose cup and chin in the chin cup area
then press the facepiece rmly and evenly against the face (Fig. 13).
3. Pull head harness to back of head (Fig. 13).
NOTE: Repeat the sequence of steps 4-6 twice, once to snug the straps and take up slack and a second time to secure and seal the respirator
facepiece to the face.
4. Tighten the bottom straps one at a time. Be careful to tighten both sides equally (Fig. 14).
5. Tighten the middle straps one at a time. Be careful to tighten both sides equally.
6. Tighten the top straps one at a time. Be careful to tighten both sides equally.
7. Recheck all straps to ensure that they are tight and evenly tensioned so that the head harness is centered on the back of your head. Ensure that the
straps and tabs lay at against your head.
If possible, have a partner verify that you have donned your respirator properly. Perform a user seal check as described in these User Instructions.
Fig. 13
Fig. 14
Initial Selection of Small, Medium or Large Facepieces
More than one facepiece size may need to be donned before you determine the best size for your face.
After donning verify the following.
1. Nothing (e.g. hair, jewelry, etc.) comes between the face and the sealing surface of the respirator. Facial hair or sideburns may have to be trimmed.
2. Bottom straps and middle straps do not cut into ears.
3. Eyes are looking between center and top 1/3 of the lens.
4. Respirator does not press so tightly against face that eyes are partly closed.
5. Bottom of the mask assembly does not cut into throat.
5
Page 7
(English)
6. No visible gaps between the face seal and the face.
7. Skin in front of ear is not wrinkled.
8. Nosecup does not obscure vision.
9. Ensure that other safety equipment does not interfere with buckles or t of respirator.
If any of these criteria are not met, it is possible that the respirator may not t you adequately. Selecting a different size facepiece may provide you
with a more adequate t. More than one facepiece size may need to be donned before you determine the best size for your face. A t test can conrm
adequate t. If you have further questions, see your supervisor.
User Seal Checks
Always check the seal of the respirator on your face before entering a contaminated area according to the instructions provided below for your
specic respirator conguration. The positive pressure seal check is the primary and preferred method for verication of a good seal for all cartridge
and lter congurations. The positive pressure seal check is the only method for this respirator with Filters 2000 Series. The negative pressure user
seal check can also be done for additional verication of a good seal for this respirator with Cartridges 6000 Series and Filters 7093/7093C. Be
careful not to disturb the respirator seal by pressing too forcefully during negative pressure seal checks.
IMPORTANT: If you cannot achieve a proper seal, DO NOT enter the contaminated area. See your supervisor. Before assigning any respirator
to be worn in a contaminated area, a qualitative or quantitative t test MUST be performed per OSHA Standard 1910.134, CSA Standard
Z94.4 or Brazil Respiratory Protection Program of the Ministry of Labor.
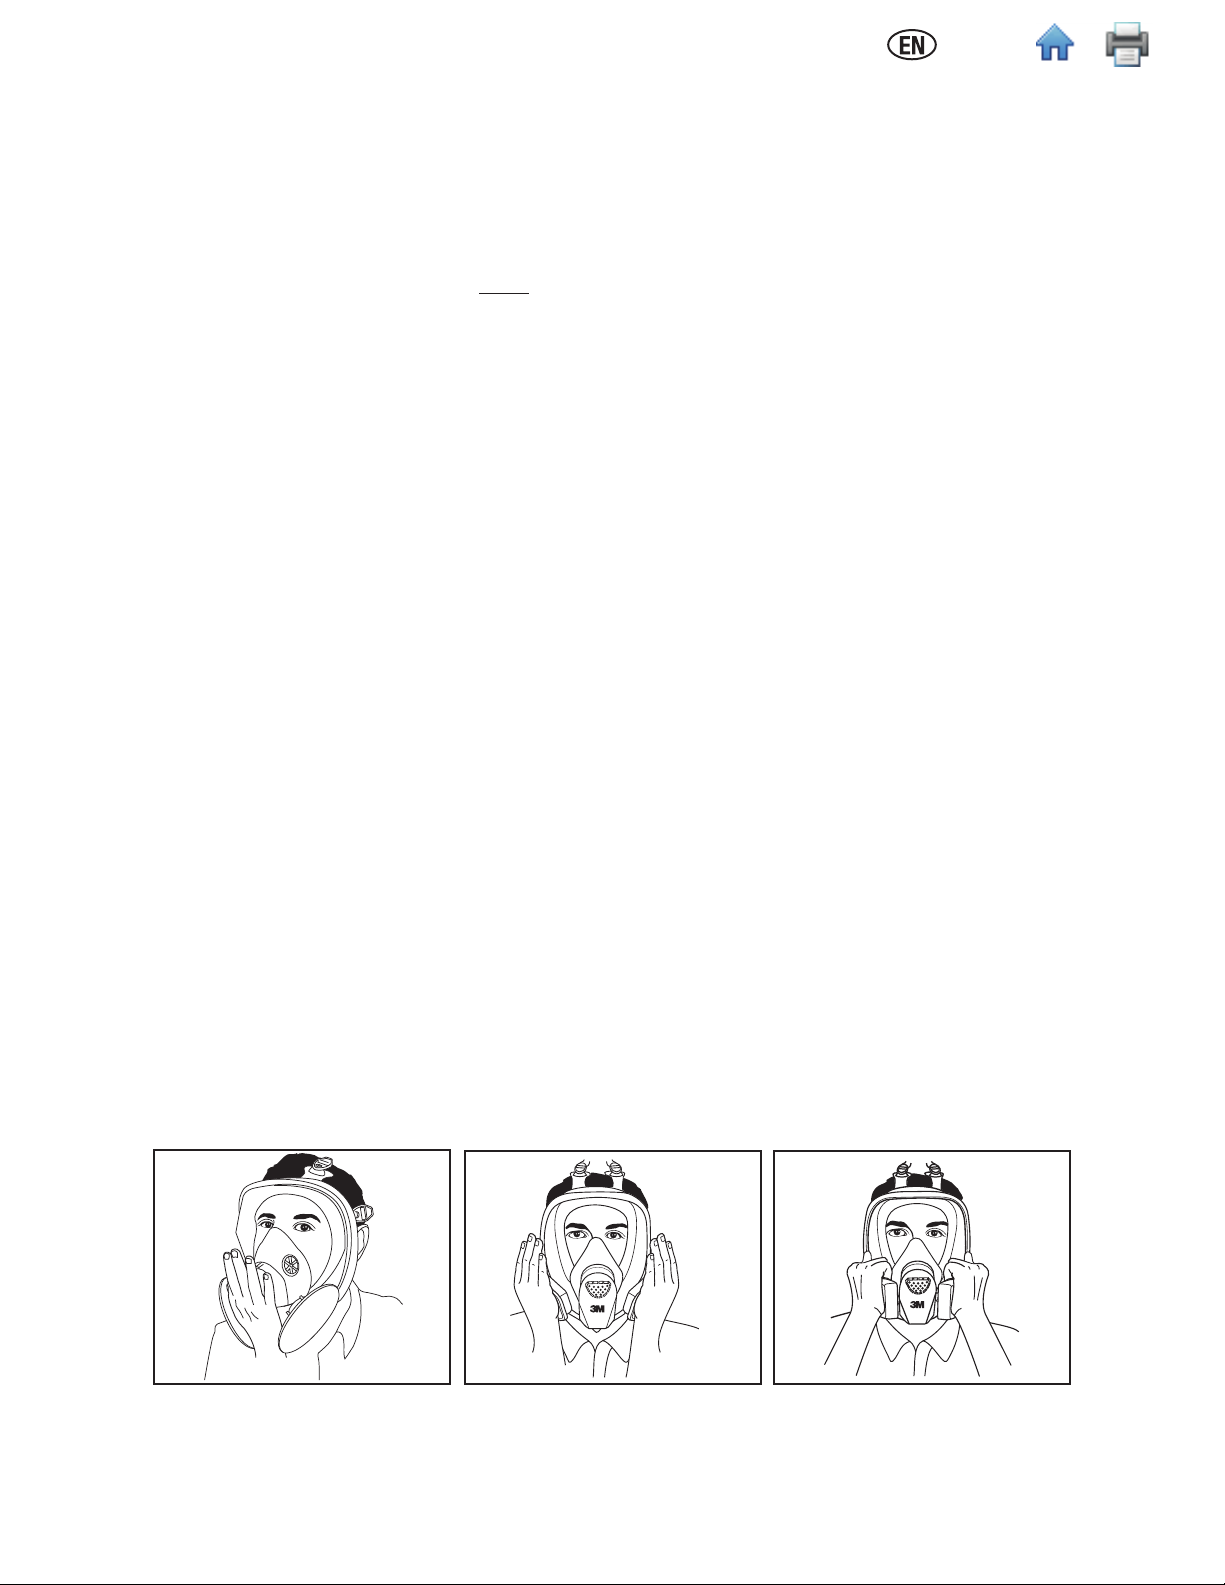
Positive Pressure User Seal Check for all approved congurations and required for Filters 2000
Series
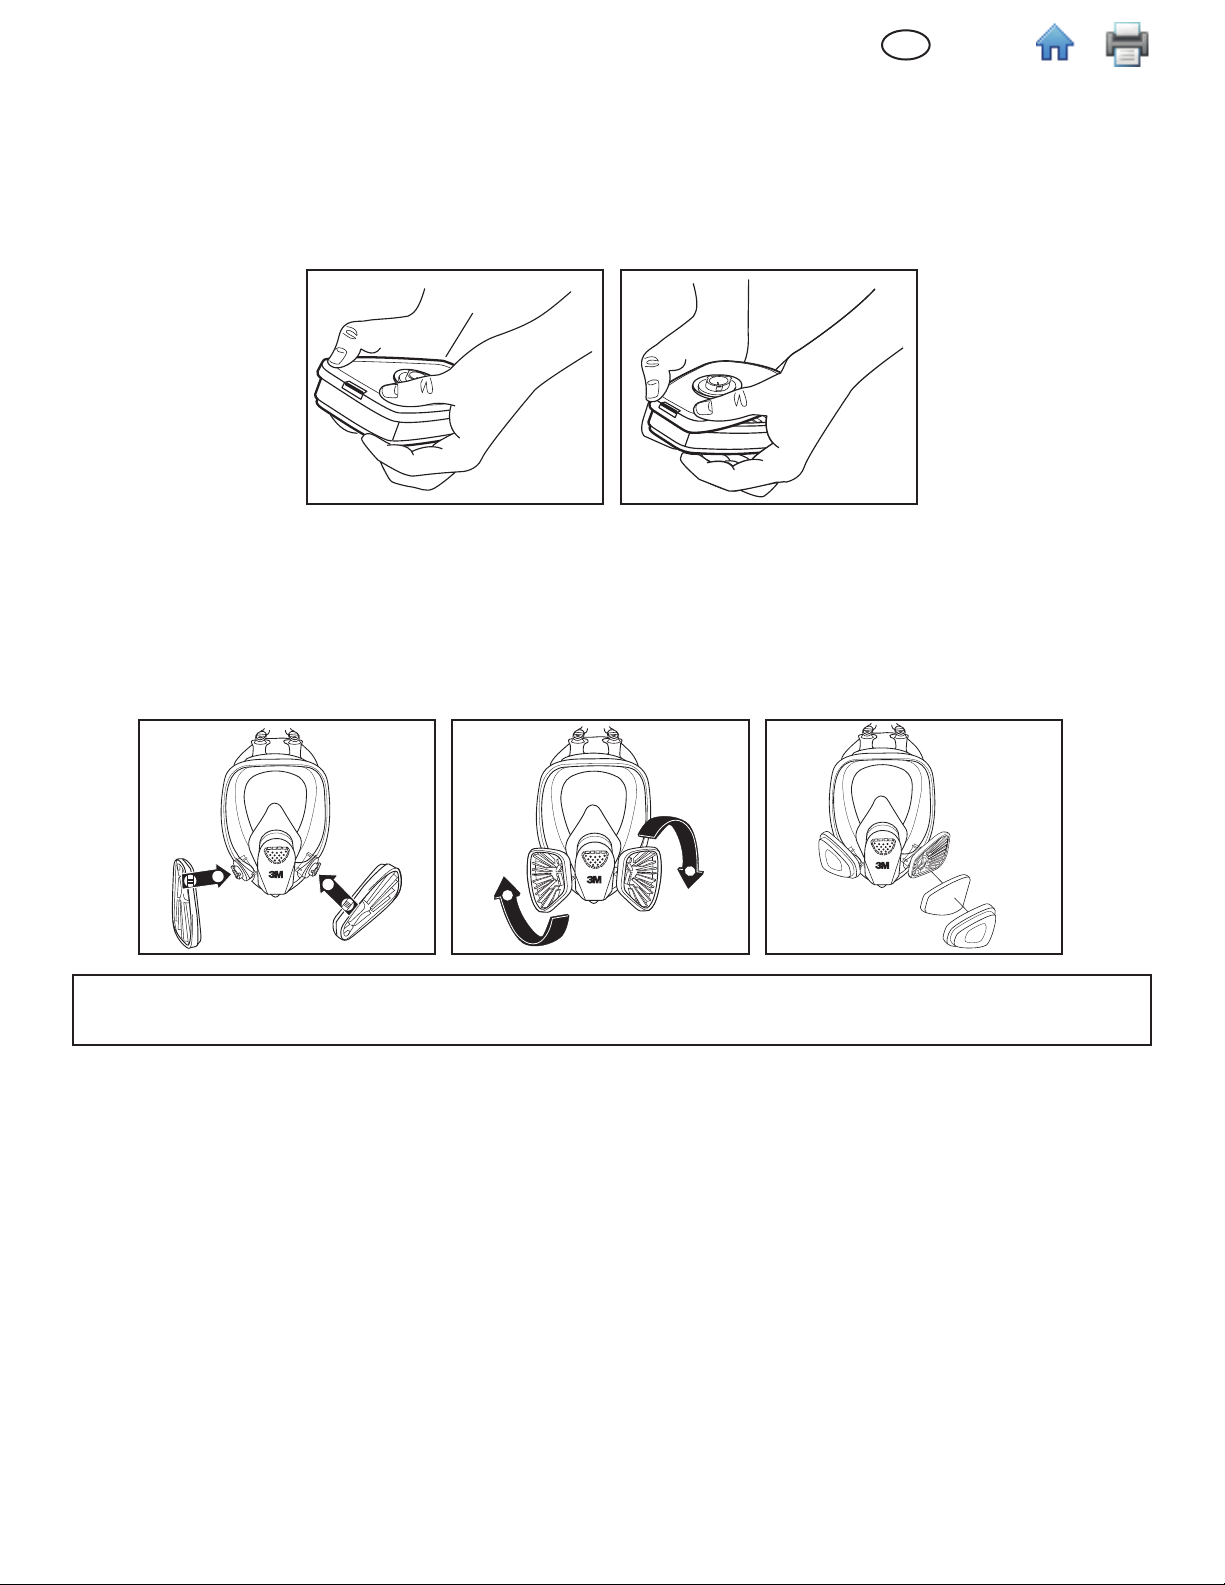
1. Remove the exhalation valve cover by depressing bottom of cover with thumb and sliding cover up, parallel with lens.
2. Place the palm of your hand over the exhalation valve and exhale gently (Fig. 15). Care must be taken to ensure a good seal of the exhalation valve. To
do this, cover the entire face of the blue valve with the base of the palm.
3. If the facepiece bulges slightly and no air leaks are detected between the face and the facepiece, a proper seal has been obtained.
4. If faceseal air leakage is detected, reposition the respirator on your face and/or readjust the tension of the straps to eliminate leakage and
recheck seal.
5. Replace exhalation valve cover by placing open end at top of exhalation valve assembly, guide tabs underneath valve cover assembly and slide
downward until the valve cover snaps in place.
If faceseal air leakage is detected, reposition the respirator on your face and/or readjust the tension of the straps to eliminate the leakage and recheck
seal. Care must be taken when performing the positive pressure seal check not to exhale too hard. The aim is to check the seal, not disturb the seal
between the mask and the face.
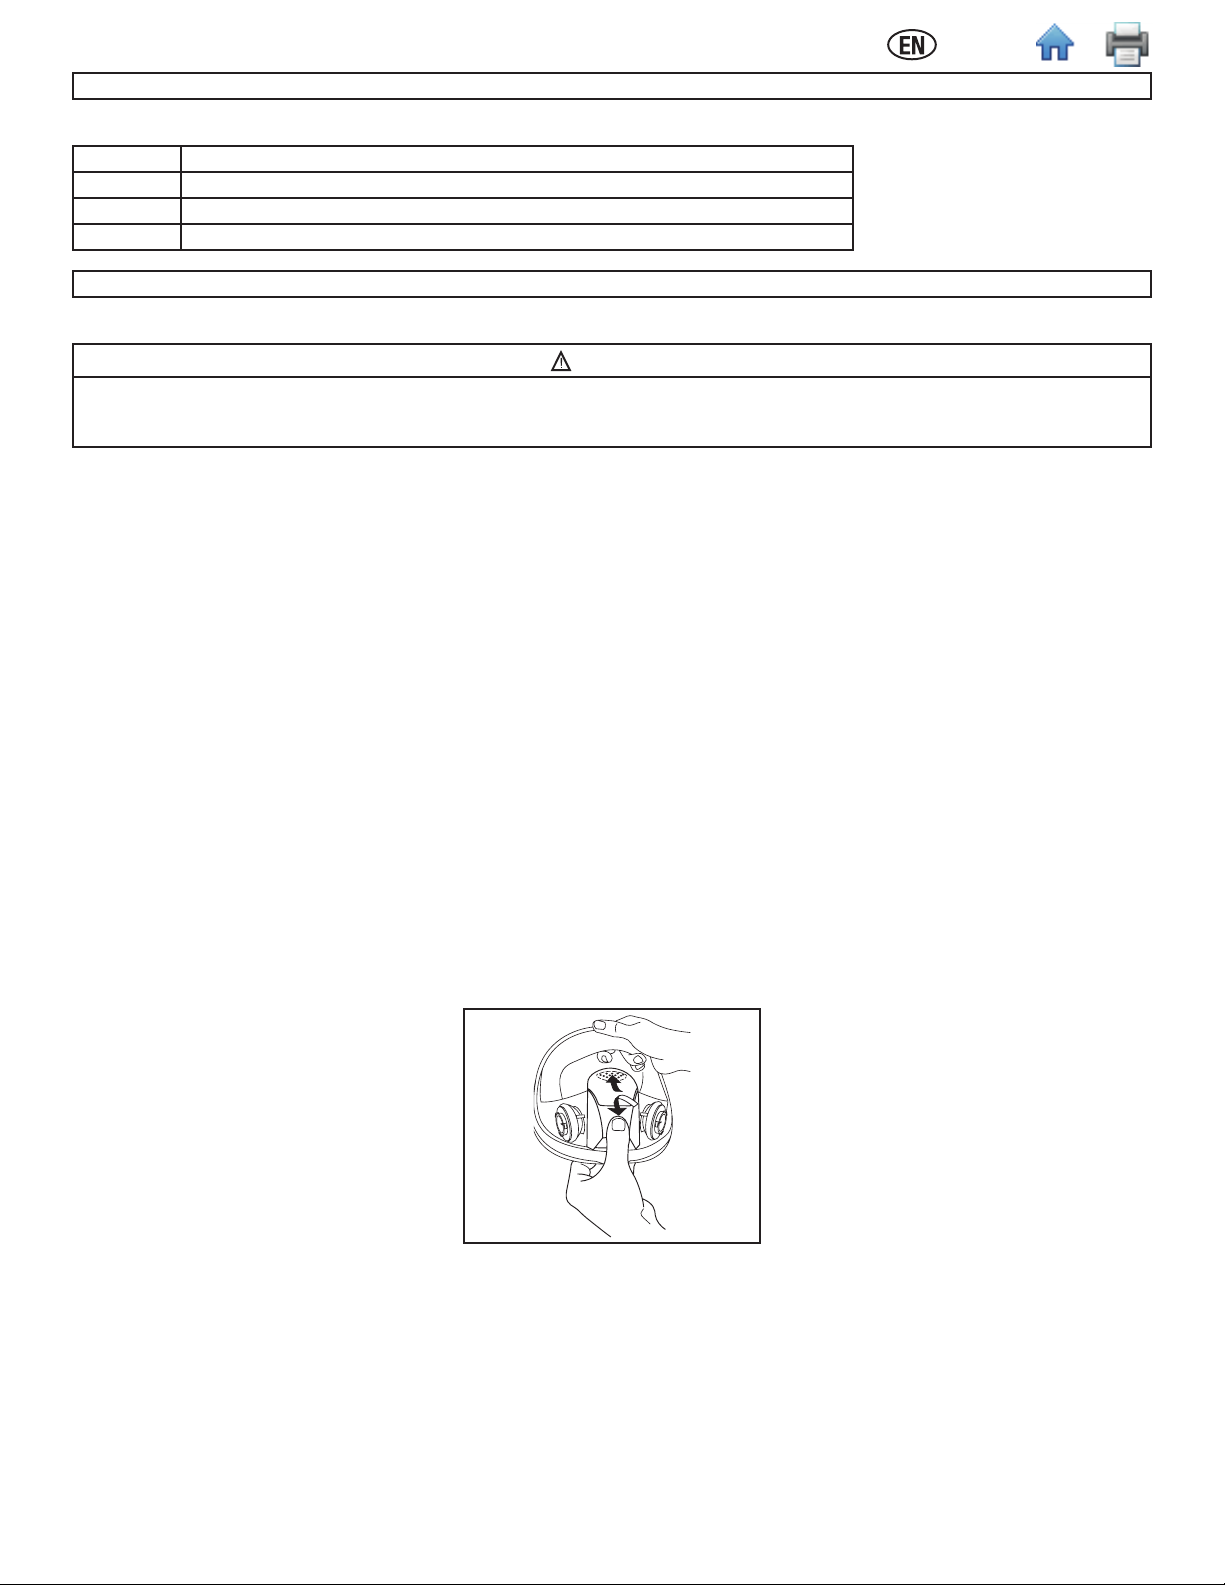
Negative Pressure User Seal Check with Cartridges 6000 Series
1. Place palms of hands to cover face of cartridge or open area of 3M™ Filter Retainer 501and inhale gently. If you feel the facepiece collapse slightly
and pull closer to your face with no leaks between the face and facepiece, a proper seal has been obtained (Fig. 16).
2. If faceseal air leakage is detected, reposition the respirator on your face and/or readjust the tension of the straps to eliminate leakage and
recheckseal.
Be careful not to disturb the respirator seal by pressing too forcefully during negative pressure seal checks.
NOTE: Use of lter retainer 501 may aid respirator wearer in conducting a negative pressure user seal check.
Negative Pressure User Seal Check with Filters 7093/7093C
1. Using hands squeeze or press lter covers toward facepiece and inhale gently. If you feel the facepiece collapse slightly and pull closer to your face
with no leaks between the face and facepiece a proper seal has been obtained (Fig. 17).
2. If faceseal air leakage is detected, reposition the respirator on your face and/or readjust the tension of the straps to eliminate the leakage and recheck
seal.
Be careful not to disturb the respirator seal by pressing too forcefully during negative pressure seal checks.
Fig. 15
Fig. 16
Fig. 17
Negative Pressure User Seal Check with Dual Airline
1. Disconnect airline hose from air control valve.
2. With breathing tube still connected to the air control valve inhale gently. If you feel facepiece collapse slightly and pull closer to your face with no leaks
between the face and facepiece, a proper seal has been obtained.
6
Page 8

(English)
3. For combination dual airline where cartridges or lters are attached perform user seal check as described above under the appropriate cartridge or
lter that is being used.
4. If faceseal air leakage is detected, reposition the respirator on your face and/or readjust the tension of the straps to eliminate the leakage and recheck
seal.
IMPORTANT: If you cannot achieve a proper seal, DO NOT enter the contaminated area. See your supervisor. Before assigning any
respirator to be worn in a contaminated area, a qualitative or quantitative t test MUST be performed per OSHA Standard 1910.134, or CSA
StandardZ94.4.
RESPIRATOR REMOVAL
1. Fully loosen all six head straps by lifting up on buckles.
2. Remove respirator by pulling straps over head.
FIT TESTING
The effectiveness of a respirator will be reduced if it is not tted properly. Therefore, either qualitative or quantitative t testing must be conducted
prior to the respirator being used. Fit testing is a U.S. Occupational Safety and Health Administration (OSHA), a Canadian CSA and a Brazilian
BMOL requirement. Respirators should also be t tested while wearing any personal protective equipment (PPE) the wearer may use in their work
environment that may affect the t of the respirator (e.g. hoods, hardhats, hearing protectors, etc.). For further information concerning t testing,
contact 3M Technical Service.
Quantitative Fit Testing
Quantitative Fit Testing (QNFT) can be conducted using a 3M™ Fit Test Adapter 601 and P100 lters such as the 3M™ Particulate Filters 2091
or 7093.
Qualitative Fit Testing
Qualitative Fit Testing (QLFT) with the 3M™ Qualitative Fit Test Apparatus FT-10 or FT-30 can be conducted using any of the NIOSH approved
particulate lters.
Entering and Exiting a Contaminated Area
• Airborne contaminants which can be dangerous to your health include those that are so small you may not be able to see or smell them.
• Always conduct a user seal check before entering a contaminated area.
• Leave the contaminated area immediately if any of the following conditions occur:
• Any part of the respirator becomes damaged,
• Breathing becomes difcult,
• You feel dizzy or your vision is impaired,
• You taste or smell contaminants,
• Your face, eyes, nose or mouth become(s) irritated,
• You suspect that the concentrations of contaminants may have reached levels at which this respirator may no longer provide adequate
protection.
• Do not wear this respirator in areas where:
• Atmospheres are oxygen decient,
• Contaminant concentrations are unknown,
• Contaminant concentrations are Immediately Dangerous to Life or Health (IDLH),
• Contaminant concentrations exceed the Maximum Use Concentration (MUC) determined using the Assigned Protection Factor (APF) for the
specic respirator system or the APF mandated by specic government standards, whichever is lower.
INSPECTION, CLEANING, AND STORAGE
W WARNING
Failure to follow these instructions may reduce respirator performance, expose you to contaminants above the OEL, and may
result in sickness or death.
• Do not clean respirator with solvents. Cleaning with solvents may degrade some respirator components and reduce respirator
effectiveness.
• Inspect all respirator components before each use to ensure proper operating condition.
Inspection Procedure
This respirator must be inspected before each use to ensure that it is in good operating condition. Any damaged or defective parts must be replaced
before use. Do not enter a contaminated area with damaged or defective parts. The following inspection procedure is recommended.
1. Check facepiece for cracks, tears and dirt. Be certain facepiece, especially faceseal area, is not distorted.
2. Examine inhalation valves for signs of distortion, cracking or tearing.
3. Make sure that head straps are intact and have good elasticity.
4. Examine all plastic parts for signs of cracking or fatiguing. Ensure bayonet gaskets are in good condition.
5. Remove exhalation valve cover and examine exhalation valve and valve seat for signs of dirt, distortion, cracking or tearing. Replace exhalation valve
cover.
6. Inspect lens for any damage that may impair respirator performance or vision.
7
Page 9
(English)
Cleaning and Storage
Cleaning is recommended after each use.
1. Remove cartridges, lters and/or breathing tubes, and nose cup. The exhalation valve cover, exhalation valve assembly, speaking diaphragm, bayonet
assembly, lens and faceseal can also be disassembled if necessary.
2. Clean facepiece (excluding lters and cartridges), by immersing in warm cleaning solution, water temperature not to exceed 120°F (49°C), and scrub
with soft brush until clean. Add neutral detergent if necessary. Do not use cleaners containing lanolin or other oils.
3. Disinfect facepiece by soaking in a solution of quaternary ammonia disinfectant or sodium hypochloride (1oz. [30 mL] household bleach in 2gallons
[7.5 L] of water), or other disinfectant.
4. Rinse in fresh, warm water and air dry in non-contaminated atmosphere. Do not replace nose cup until facepiece is completely dry.
5. Respirator components must be inspected prior to each use. A respirator with any damaged or deteriorated components should be repaired or
discarded.
6. The cleaned respirator should be stored away from contaminated areas when not in use.
SPECIFICATIONS
Contact 3M Technical Service for technical specications (e.g. weight, materials of construction, etc). This product contains no components made
from natural rubber latex.
Cartridge and Filter Selection and Approvals
Before using any of these products, the user must read the specic “Use For”, “Use Limitations and Warning” information in the User Instructions and
product documentation or call 3M Technical Service. Do not exceed maximum use concentrations established by local regulatory agencies.
3M™ 6000 Series Cartridges
NIOSH Approvals
Certain Organic Vapors X X X X X X X X X X X X X
Chlorine X X X X X X X X X
Hydrogen Chloride X X X X X X X
Sulfur Dioxide X X X X X X X X X
Chlorine Dioxide X X X X
Hydrogen Sulde X X X X X X X X X
Hydrogen Fluoride X X X X X
Formaldehyde X X X X
Ammonia X X X X
Methylamine X X X X
Mercury Vapor X X
Particulate Filter P100 X X X X X X X X X
** 3M Recommended for use against methylbromide or radioiodine up to 5ppm with daily cartridge replacement.
NOTE: Not NIOSH approved for use against methylbromide or radioiodine.
NIOSH Approvals
P100 X X X X X X X X
P95 X X X X
N95 X X
HF X X
6001
2071
6001i
6002
2078**
6003
6004
2076 HF
2091
6005
6006
3M™ Filters
2096
2097**
6007
2291
60921
60921i
2296
60922
2297**
5N11
60923
60924
5P71
60925
60926
7093
60927
7093C
60928**
5935BR
Nuisance level relief*
Acid gases X X X X X
Organic Vapors X X X X
* 3M recommended for relief against nuisance levels of acid gas or organic vapors. Nuisance level refers to concentrations not exceeding OSHA PEL
or applicable exposure limits, whichever is lower. Do not use for respiratory protection against acid gas/organic vapors.
** 3M recommended for ozone protection up to 10 times the OSHA PEL or applicable government occupational exposure limits, whichever is lower.
NOTE: Not NIOSH approved for use against ozone.
8
Page 10
(English)
In Brazil, the 5935BR lter is approved as a NIOSH N95 lter and a BMOL P3 lter.
3M™ Filter Adapters and Retainers
Number Description
501 Filter Retainer for use with Cartridge 6000 Series and Filters 5N11 and 5P71
502 Filter Adapter for use with Cartridge 6000 Series and Filters 2000 and 7093/7093C
603 Filter Adapter for use with Filters 5N11 and 5P71
In Brazil, the 3M™ Filter 5935BR can be used with the Filter Adaptor 603 and the Filter Retainer 501 on the 3M™ Full Facepiece, FF-400 Series.
Service Life of Chemical Cartridges and Particulate Filters
CAUTION
Failure to properly dispose of spent cartridges, lters, or respirators contaminated by hazardous materials can result in personal exposures as well
as environmental harm. Handling, transportation and disposal of spent cartridges, lters, or respirators must comply with all applicable federal,
state, provincial, and local laws and regulations.
Time Use Limitations
1. Cartridges and lters must be used before expiration date on packaging.
2. Particle lters must be replaced if they become damaged, soiled or if an increase in breathing resistance occurs. N-series lters should not be used
in environments containing oils. R-series lters may be limited to 8 hours of continuous or intermittent use if oil aerosols are present. In environments
containing only oil aerosols, P-series lters should be replaced after 40 hours of use or 30 days, whichever is rst.
3. Service life of gas/vapor cartridges will depend upon activity of wearer (breathing rate); specic contaminant and concentration; and environmental
conditions such as humidity, pressure, and temperature. Cartridges must be replaced in accordance with an end of service life indicator, established
change schedule or earlier if smell, taste or irritation from contaminants is detected. Please see 3M Service Life Software at
www.3M.com/sls.
4. The 6007 and 60927 mercury vapor cartridges must be discarded within 50 hours of use against mercury vapor; or according to organic vapor,
chlorine, hydrogen sulde or sulfur dioxide service life, or when odors of vapors or gases become noticeable, whichever occurs rst. Mercury vapor
has no odor.
REPLACEMENT PARTS INSTRUCTIONS
3M™ Ultimate FX Full Facepiece Assembly FF-400
The facepiece assembly consists of the head harness assembly, nose cup assembly, speaking diaphragm assembly, exhalation valve assembly, lens
assembly, faceseal (small, medium or large), frame assembly (frame, nut and screw), bayonet assemblies and exhalation valve cover. To disassemble
lens assembly from faceseal, remove the Phillips screw from frame, pull the frame away from the faceseal and remove faceseal from lens assembly.
Valve Cover Replacement
1. Remove valve cover by depressing bottom of cover with thumb and sliding cover up, parallel with lens (Fig. 18).
2. Replace valve cover by placing open end at top of exhalation valve assembly, guide tabs underneath valve cover assembly and slide downward until
the valve cover snaps in place.
Fig. 18
Exhalation Valve Assembly Replacement
1. Remove valve cover by depressing bottom of cover with thumb and sliding cover up, parallel with lens (Fig. 18).
2. Remove exhalation valve assembly by turning counter clockwise 1/4 turn (Fig. 19).
3. Replace exhalation valve assembly by aligning lugs with exhalation valve assembly opening in lens and turning clockwise 1/4 turn until rm stop.
4. Replace valve cover assembly.
9
Page 11
(English)
Fig. 19
Exhalation Valve Replacement
1. Remove valve cover by depressing bottom of cover with thumb and sliding cover up, parallel with lens (Fig. 18).
2. Remove exhalation valve assembly by turning counter clockwise 1/4 turn (Fig. 19).
3. Grasp valve and pull each valve stem out from valve seat.
4. Inspect valve seat making certain it is clean and in good condition.
5. Place new exhalation valve replacement over the exhalation port by inserting stems and pulling through from the opposite side until they are both
snapped in place. Push laterally on valve stems to ensure they are properly seated.
6. Replace exhalation valve assembly.
7. Replace valve cover.
NOTE: Conduct a negative pressure user seal check to ensure exhalation valve is functioning properly.
Nose Cup Assembly Replacement
The nose cup assembly consists of a nose cup and inhalation valves. It is designed to install directly to the lens and comfortably t over the respirator
wearer’s mouth and nose to aid in purging exhaled breath and prevent lens fogging.
1. Remove the nose cup assembly by grasping the nose cup below the inhalation valve and gently pulling up and away from lens assembly (Fig. 20).
2. To replace, position nose cup assembly onto lens assembly by aligning hard plastic ring on nose cup with lens assembly and pressing rmly on center
tabs until bottom nose cup tabs snap in place (Fig. 21).
3. Press down on top of nose cup ring until tabs snap in place.
Fig. 20 Fig. 21
Speaking Diaphragm Assembly Replacement
1. Remove the nose cup assembly by grasping the nose cup below the inhalation valve and gently pulling up and away from lens assembly (Fig. 20).
2. Remove valve cover by depressing bottom of cover with thumb and sliding cover up, parallel with lens (Fig. 18).
3. Remove exhalation valve assembly by turning counter clockwise 1/4 turn.
4. Remove speaking diaphragm assembly by turning counter clockwise 1/4 turn (Fig. 22).
5. Replace speaking diaphragm assembly by aligning speaking diaphragm lugs with speaking diaphragm opening in lens assembly.
6. Turn clockwise 1/4 turn until rm stop.
7. Replace exhalation valve assembly.
8. Replace valve cover assembly.
9. Replace nose cup assembly (Fig. 21).
Fig. 22
10
Page 12

(English)
Bayonet Assembly Replacement
The bayonet assembly consists of the bayonet ring, bayonet, and inhalation gasket.
1. Remove the nose cup assembly by grasping the nose cup below the inhalation valve and gently pulling up and away from lens assembly (Fig. 20).
2. Remove bayonet ring by rotating counter clockwise 1/4 turn (Fig. 23).
3. Remove bayonet from lens assembly (Fig. 24).
4. Align key on new bayonet with slot on lens assembly and hold rmly in place.
5. Align lugs on ring with slots on bayonets and rotate clockwise 1/4 turn until rm stop.
6. Replace nose cup assembly (Fig. 21).
Fig. 23 Fig. 24
Inhalation Valve Replacement
Inhalation valves are located on bayonet assemblies at the facepiece inhalation ports and inside the nose cup inhalation ports. These valves should be
inspected before each respirator use and replaced whenever valves become damaged or lost.
1. Remove existing valve(s) by grasping valve and pulling valve stem out from valve seat.
2. Install new valve(s) onto valve seat(s) by pushing through valve stem seat(s). Be certain valve stem(s) is fully engaged through valve seat(s), lays at,
and moves freely (spins).
Head Harness Assembly Replacement
1. Remove existing head harness by unsnapping each buckle from the buttons (Fig. 25).
2. Pull the end tabs of the head harness, at an angle, out through the buckles. Note the orientation of the head harness tabs and buckles for
re-assembly.
3. Place the head harness down on a at surface with the 3M logo facing up (Fig. 26).
4. Thread the end tabs of the head harness through the buckles and pull each through until the end tab is completely through the buckle.
5. Place the facepiece lens down on a at surface and lay the new head harness and buckle assembly over the facepiece. The head harness should be
assembled with the 3M logo facing up.
6. Snap each buckle into corresponding button, ensuring that straps are not twisted.
Fig. 25 Fig. 26
Lens Frame Assembly Replacement
The lens frame assembly consists of a lens frame, nut, and screw.
1. Remove the Phillips screw from frame. Pull the frame away from the faceseal (Fig. 27).
2. Position new frame, aligning marks top and bottom. Install and securely tighten screw. Make certain alignment marks are properly aligned top and
bottom with all components (Fig. 28).
11
Page 13
(English)
Fig. 27 Fig. 28
Lens Assembly Replacement
The lens assembly consists of a hard-coated polycarbonate lens.
1. Remove the nose cup assembly by grasping the nose cup below the inhalation valve and gently pulling up and away from lens assembly (Fig. 20).
2. Remove the valve cover by depressing bottom of cover with thumb and sliding cover up, parallel with lens (Fig. 18).
3. Remove exhalation valve assembly by turning counter-clockwise 1/4 turn and withdrawing from lens center port (Fig. 19).
4. Remove speaking diaphragm by turning counter clockwise 1/4 turn (Fig. 22).
5. Remove bayonet assemblies by rotating bayonet rings counter clockwise 1/4 turn (Fig. 23) and removing bayonets from the lens assembly (Fig.24).
6. Remove the Phillips screw from frame. Pull the frame away from the faceseal (Fig. 27).
7. Remove faceseal from lens.
8. Place new lens and faceseal together aligning marks at top and bottom. Position frame, again aligning marks top and bottom. Install and securely
tighten screw. Make certain alignment marks are properly aligned top and bottom with all components (Fig.28).
9. Install speaking diaphragm.
10. Install exhalation valve assembly.
11. Replace exhalation valve cover.
12. Replace bayonet assemblies.
13. Replace nose cup assembly (Fig. 21).
3M™ Ultimate FX Full Facepiece FF-400 Replacement Parts and Accessories
Number Description
FF-401 Small
FF-402 Medium
FF-403 Large
Number Description
FF-400-01 Head Harness Buckle
FF-400-02 Head Harness Button
FF-400-03 Lens Assembly
FF-400-04 Head Harness
FF-400-05 Frame Assembly w/ Screw
FF-400-06 Comfort Cradle
FF-400-07 Exhalation Valve Assembly
FF-400-08 Bayonet Assembly Inhalation Valve
FF-400-09 Exhalation Valve Cover (Standard)
FF-400-10 Exhalation Valve Cover (Solid)
FF-400-11 Nose Cup Assembly
FF-400-13 Speaking Diaphragm Assembly
FF-400-20 Spectacle Kit
7582 Inhalation Valve
7583 or 6583 3M™ Cool Flow™ Exhalation Valve
FF-400-03
7582
7583
6583
FF-400-09
FF-400-10
FF-400-05
FF-400-11
3
FF-400-07
FF-400-06
FF-400-01
FF-400-08
FF-400-13
FF-400-04
FF-400-02
Fig. 29
Number Description
FF-400-15 Lens Cover
FF-400-17 Semi-Permanent Lens Cover
504 Respirator Cleaning Wipes
601 Quantitative Fit Test Adapter
12
Page 14
(English)
For Compliance in Brazil NOTE:
1. In Brazil, according to the Respiratory Protection Program of the Ministry of Labor, do not use quantitatively t tested full facepiece respirators when
concentrations of contaminants are greater than 100 times the permissible exposure limit in air-purifying mode.
2. Do not use in decient or enriched oxygen atmospheres.
3. Storage, Transportation and Care: store in a clean and dry place and away from contaminants and extreme temperature and humidity.
4. The components of this respirator are made of materials which are not expected to cause adverse health effects.
5. It is necessary to have special care to use this product in explosives atmospheres.
6. In Brazil do not use powered air-purifying respirators if airow is less than 120 lpm for tight tting facepieces or 170 lpm for hoods and/or helmets.
Product Manufacturing Date
The parts of the product show markings that bring information of manufacturing date, and its reading is described as in the example below:
Date Code = 12th month 2019 (12/19)
12
11 1
10
9
8
7
FOR MORE INFORMATION
In United States, contact:
Website: www.3M.com/workersafety
Technical Assistance: 1-800-243-4630
For other 3M products:
1-800-3M-HELPS or 1-651-737-6501
1 9
6
2
3
4
5
13
98-0060-0135-2_6
34-8723-6751-0
Page 15

3
FR
(Français)
Respirateur à masque complet réutilisable ultra FX
Directives d’utilisation
W MISE EN GARDE
Ce respirateur protège contre certains contaminants en suspension dans l’air. Une mauvaise utilisation peut provoquer des
problèmes de santé ou la mort. Pour tout renseignement sur l’utilisation adéquate de ce produit, consulter son superviseur, lire
les directives d’utilisation ou communiquer avec 3M, aux États-Unis, au 1 800 243-4630. Au Canada, communiquer avec le Service
technique au 1 800 267-4414.
AVANT
Ces directives d’utilisation fournissent uniquement des renseignements relatifs à l’utilisation des masques. Des renseignements importants sont
inclus dans les directives d’utilisation de chaque système de ltration d’air utilisé avec les masques complets FF-401, FF-402 et FF-403 3MMC. Lire
toute les directives d’utilisation et les mises en garde avant d’utiliser ce produit. Conserver ces directives d’utilisation à titre de référence. Pour toute
question sur ces produits, communiquer avec le Service technique de 3M.
États-Unis :
Internet : www.3M.com/workersafety
Service technique : 1 800 243-4630
Usage prévu
Les Respirateurs à masque complet ultra FX 3MMC de Série FF-400 (FF-401, FF-402 et FF-403) sont conçus pour offrir une protection respiratoire
contre certains contaminants en suspension dans l’air lorsqu’on les utilise conformément à toutes les directives et restrictions d’utilisation,
ainsi qu’aux règlements applicables en matière de santé et de sécurité. Les masques de Série FF-400 répondent aux exigences de la norme
Z87.1-2010 de l’ANSI en matière de protection des yeux et du visage. Ces produits offrent une protection limitée des yeux et du visage contre la
projection departicules.
Canada :
Site Web : www.3M.ca/Safety
Assistance technique : 1 800 267-4414
W MISE EN GARDE
Les respirateurs qui sont bien choisis, utilisés et entretenus aident à protéger contre certains contaminants en réduisant les
concentrations de contaminants en suspension dans l’air sous la limite d’exposition permise en milieu de travail. Il est essentiel
de suivre toutes les directives d’utilisation et les réglementations gouvernementales portant sur l’utilisation de ce produit, ce qui
comprend le port du système de protection respiratoire complet pendant tout le temps d’exposition an que le produit puisse aider
à protéger l’utilisateur. Une mauvaise utilisation des respirateurs peut résulter en une surexposition de l’utilisateur aux
contaminants et causer des problèmes de santé ou la mort. Pour tout renseignement sur l'utilisation adéquate de ce produit,
consulter son superviseur, lire les directives d'utilisation ou communiquer avec le Service technique de 3M.
Liste des mises en garde et des avertissements énoncés dans les présentes directives d’utilisation
W MISE EN GARDE
Tout manquement à ces directives peut réduire le rendement du respirateur, vous surexposer à des contaminants au-dessus de la
limite d’exposition permise en milieu de travail et peut causer des problèmes de santé ou la mort.
• Pour aider à maintenir une bonne étanchéité entre le visage et la membrane d’étanchéité faciale, la membrane d’étanchéité faciale
doit être exempte de toute obstruction en tout temps. Ne pas utiliser si l’on porte la barbe ou des poils susceptibles d’empêcher un
contact direct entre le visage et la membrane d’étanchéité faciale. Ne pas utiliser avec des lunettes de correction de la vue. Si l’on
doit porter des lunettes, utiliser la trousse pour lunettes 3MMC à l’intérieur du respirateur.
• Ne pas nettoyer le respirateur à l’aide de solvants. Le nettoyage du respirateur avec des solvants peut endommager certains de ses
composants et en réduire l’efcacité.
• Inspecter tous les composants du respirateur avant chaque utilisation an de s’assurer qu’il est en bon état de fonctionnement.
• Ne pas modier ni utiliser le respirateur de façon abusive ou incorrecte.
AVERTISSEMENT
Le fait de ne pas mettre convenablement au rebut les cartouches, les ltres et les respirateurs usés et contaminés par des substances dangereuses
peut entraîner une exposition personnelle et des dommages environnementaux. La manipulation, le transport et la mise au rebut des cartouches,
des ltres et des respirateurs usés doivent être conformes aux lois fédérales, provinciales et municipales applicables.
1
Page 16
FR
(Français)
Avertissements et restrictions du NIOSH pour une utilisation par pression négative
Les restrictions suivantes peuvent s’appliquer. Consulter l’étiquette d’homologation du NIOSH. Lorsqu’on utilise le masque FF-400 comme
composante d’une conguration de respirateur à adduction d’air, consulter les directives d’utilisation qui accompagnent le dispositif de ltration d’air
pour obtenir des renseignements sur les avertissements et les restrictions du NIOSH.
A - Ne pas utiliser lorsque la concentration ambiante en oxygène est inférieure à 19,5%.
B - Ne pas utiliser si l’atmosphère présente un danger immédiat pour la vie ou la santé.
C - Ne pas utiliser en présence de concentrations supérieures au taux établi par la réglementation.
H - Se conformer aux horaires de changement établis des cartouches et boîtiers ltrants ou tenir compte de l’indicateur de n de durée utile (IFDU) pour
s’assurer de remplacer la cartouche et les boîtiers ltrants avant la n de leur durée de protection.
J - L’utilisation et l’entretien inadéquats de ce produit peuvent provoquer des blessures ou la mort.
L - Pour le changement des cartouches, des boîtiers ltrants et/ou des ltres, suivre les directives d’utilisation du fabricant.
M - Tous les respirateurs homologués doivent être sélectionnés, ajustés, portés et entretenus conformément aux règlements de la MSHA, de l’OSHA et à
tout autre règlement en vigueur.
N - Ne jamais substituer ou modier ce produit ni lui ajouter ou lui enlever des pièces. N’utiliser que les pièces de rechange exactes indiquées par le
fabricant.
O - Consulter les directives d’utilisation et/ou les manuels d’entretien pour obtenir des renseignements sur l’utilisation et l’entretien de ces respirateurs.
S - Des directives d’utilisation spéciales ou d’importance capitale et/ou des restrictions d’utilisation spéciques s’appliquent. Consulter les directives
d’utilisation avant de porter ce produit.
S - Directives d’utilisation spéciales ou d’importance capitale
Les Cartouches contre les vapeurs organiques 3MMC (6001i et 60921i) sont dotées d’un Indicateur de n de durée utile 3MMC (IFDU) passif.
L’indicateur doit être facilement visible par celui qui porte le respirateur. Si on ne peut pas voir facilement l’IFDU, utiliser un miroir pour l’observer
ou se er à un collègue qui peut le voir, ou aller dans un endroit propre, retirer le respirateur et observer l’IFDU. Ne pas se er uniquement à l’IFDU
de la cartouche contre les vapeurs organiques à moins que l’employeur ait déterminé qu’il convient au milieu de travail. Consulter les Directives
d’utilisation des cartouches 6001i ou 60921i pour obtenir de plus amples renseignements, y compris des directives spéciales concernant l’IFDU.
Les Cartouches contre les vapeurs de mercure, les vapeurs organiques et les gaz acides 3MMC (6007 et 60927) doivent être mises au rebut après 50
heures d’utilisation contre les vapeurs de mercure.
Le Filtre P95 contre les particules, le uorure d’hydrogène avec protection contre les concentrations nuisibles de gaz acides 2076HF 3MMC et le Filtre
P100 contre les particules, le uorure d’hydrogène avec protection contre les concentrations nuisibles de gaz acides 7093C 3MMC sont recommandés
pour la protection contre les concentrations nuisibles de gaz acides ou de vapeurs organiques. Par concentrations nuisibles, on entend les concentrations
inférieures à la limite d’exposition admissible de l’OSHA ou à la limite d’exposition en milieu de travail établie par le gouvernement, selon la valeur la
moins élevée. Ne pas utiliser pour la protection respiratoire contre les gaz acides ou les vapeurs organiques, sauf le uorure d’hydrogène.
Avant d’effectuer le montage des ltres et cartouches 3MMC sur les tuyaux de respiration combinés à deux arrivées d’air 3MMC, retirer le masque et
les soupapes d’inhalation.
Remettre les soupapes d’inhalation dans le masque avant chaque utilisation si on utilise le masque en mode d’épuration d’air (sans tuyau de
respiration SA-1600 ou SA-2600 3MMC).
Programme de gestion du respirateur
L’utilisation professionnelle des respirateurs doit être conforme avec les normes de santé et de sécurité applicables. Selon la loi, les employeurs
américains doivent établir un programme de protection respiratoire écrit qui satisfaits aux exigences de la norme de protection respiratoire 29 CFR
1910.134 de l’OSHA et toute norme de l’OSHA applicable à une substance spécique. Au Canada, se conformer à la normeZ94.4 de la CSA et/ou aux
exigences de l’autorité compétente, tel qu’approprié. Au Brésil, suivre le programme de protection respiratoire du ministère du Travail.
Pour tout renseignement supplémentaire sur cette norme, communiquer avec l’OSHA à l’adresse www.OSHA.gov. Consulter un hygiéniste industriel
ou appeler le Service technique de 3M pour toute question concernant l’application de ces produits aux exigences de votre travail.
Tableau 1 : Sections principales de la norme 29 CFR 1910.134 de l’OSHA
Section Description
A Pratique admissible
B Dénitions
C Appareils de protection respiratoire
D Sélection des respirateurs
E Évaluations médicales
F Essai d’ajustement
G Utilisation des respirateurs
H Maintenance et entretien des respirateurs
I Qualité de l’air respirable et utilisation
J Identication des cartouches, ltres et contenants
K Formation et informations
L Évaluation du programme
M Tenue des dossiers
2
Page 17
FR
(Français)
Facteurs de protection caractéristiques
Tableau2 : Facteurs de protection caractéristiques
Type de respirateur Facteur de protection assigné
Respirateur à épuration d’air à pression négative avec masque complet 10/50
Respirateur à adduction d’air à débit continu avec masque complet 1000
1
L’utilisateur du respirateur doit subir un essai d’ajustement réalisé à l’aide d’une méthode d’essai d’ajustement quantitatif an d’obtenir un facteur
de protection assigné supérieur à 10 lorsqu’utilisé comme respirateur d’épuration d’air à pression négative.
Au Brésil, conformément au programme de protection respiratoire du ministère du Travail, ne pas utiliser de respirateurs à masque complet qui ont
subi un essai d'ajustement quantitatif si les concentrations de contaminants sont supérieures à 100 fois la limite d'exposition admissible en mode
d'épuration d'air.
1
DIRECTIVES D’OPÉRATION
Déballage
Inspecter le contenu de l’emballage pour vérier s’il a été endommagé pendant l’expédition et s’assurer que tous les composants sont présents
(consulter la Fig. 27). Le produit doit être inspecté avant chaque utilisation conformément aux procédures décrites dans la section « Inspection » de
ces directives d’utilisation.
Assemblage
Cartouche 3MMC de série 6000, ltre 7093 et ensemble cartouche/ltre 7093C 3MMC (Fig. 1, 2)
1. Aligner l’encoche de la cartouche ou du ltre avec la patte rigide du raccord du dispositif de verrouillage du masque et les enclencher en poussant.
2. Tourner le ltre dans le sens des aiguilles d’une montre jusqu’à ce qu’il soit bien inséré et qu’il arrête de tourner (environ 1/4 de tour).
3. Répéter avec le second ltre ou la seconde cartouche.
Filtre 3MMC de série 2000 (Fig. 3)
1. Aligner l’ouverture du ltre avec le dispositif de xation de ltre situé sur le masque et les enclencher en poussant.
2. Faire tourner le ltre dans le sens des aiguilles d’une montre jusqu’à ce qu’il soit immobilisé et ne puisse tourner davantage.
3. Suivre les mêmes directives pour le second ltre.
Fig. 1 Fig. 2 Fig. 3
Filtres 5N11 et 5P71 3M
1. Placer le ltre dans le dispositif de retenue501 3MMC, côté imprimé face à la cartouche.
2. Enfoncer la cartouche dans le dispositif de retenue de ltre. S’assurer qu’elle est parfaitement insérée dans le dispositif de retenue. Lorsqu’il est
parfaitement inséré, le ltre couvre entièrement la surface de la cartouche (Fig.4).
3. Pour replacer le ltre, retirer le dispositif de retenue en soulevant la languette.
MC
Fig. 4
Au Brésil, le ltre 5935BR 3MMC peut être utilisé sur le dispositif de retenu 501 3MMC sur le masque complet 3MMC de série FF-400.
3
Page 18
FR
(Français)
Montage de l’adaptateur 502 3M
MC
1. Aligner l’adaptateur sur la cartouche. Enclencher l’encoche avant dans la cartouche en comprimant ensemble l’avant de la cartouche et l’adaptateur.
Pour ce faire, placer les pouces sur la partie supérieure de l’adaptateur et les doigts le long de la partie inférieure de la cartouche (Fig.5).
2. Enfoncer l’encoche arrière de la même façon, en plaçant les pouces et les doigts de la même manière. Un déclic se fait entendre lorsque chaque
languette est enclenchée (Fig. 6).
3. Insérer le ltre dans le dispositif de retenue de ltre de manière qu’il soit en contact uniforme avec le joint d’étanchéité. Faire tourner le ltre de
un quart de tour dans le sens des aiguilles d’une montre jusqu’à ce qu’il soit bien inséré et qu’il ne puisse tourner davantage. Suivre les mêmes
directives pour le second ltre.
Fig. 5 Fig. 6
REMARQUE IMPORTANTE : L’ensemble adaptateur 502 3MMC, une fois installé sur une cartouche 3MMC de série6000, ne doit pas être enlevé
ni réutilisé. Le retirer ou le réutiliser peut entraîner des fuites, une surexposition, des problèmes de santé ou la mort.
Adaptateur pour ltres 603 et ltres 5N11 ou 5P71 3MMC
1. Aligner l’encoche sur le bord de l’adaptateur 603 avec la marque du masque comme l’indique l’illustration (Fig. 7).
2. Tourner l’adaptateur d’un quart de tour dans le sens des aiguilles d’une montre. Pour retirer l’adaptateur, tourner d’un quart de tour dans le sens
contraire des aiguilles d’une montre (Fig. 8).
3. Placer le ltre dans le dispositif de retenue 501 en s’assurant que le côté imprimé soit face à l’adaptateur 603. Les enclencher ensemble et s’assurer
que le joint du ltre est exempt de plis ou de vides (Fig. 9).
1
1
2
Fig. 7
2
Fig. 8
Fig. 9
Au Brésil, le Filtre 5935BR 3MMC est homologué par le NIOSH et le ministère du Travail du Brésil en tant que ltre N95 et en tant que ltre P3,
respectivement. Il peut être utilisé avec l'adaptateur pour ltre 603 et le dispositif de retenue du ltre 501 sur le Respirateur à demi-masque 3MMC
de Série 6000.
Montage du respirateur à deux arrivées d’air 3M
MC
L’utilisateur doit suivre les directives d’utilisation fournies avec les respirateurs à deux arrivées d’air 3MMC.
Montage des tuyaux de respiration à deux arrivées d’air
1. Tenir le masque, logo 3M face à soi. Aligner les deux extrémités du tuyau de respiration avec les deux supports à baïonnette situés sur le masque (Fig.
10). Pour les tuyaux de respiration SA-1500 ou SA-1600 3MMC, s’assurer que le logo 3M qui se trouve sur le tuyau de respiration et sur le masque
soient tous deux face à soi. Pour les tuyaux de respiration SA-2500 et SA-2600 3MMC s’assurer que le logo 3M situé sur le tuyau de respiration soit
opposé au logo 3M situé sur le masque.
2. Tourner d’un quart de tour les deux extrémités du tuyau de respiration dans le sens des aiguilles d’une montre jusqu’à ce qu’elles s’enclenchent
fermement dans les raccords de verrouillage et ne puissent plus tourner (Fig. 11 et 12). Ne pas trop tourner, car cela risque d’endommager le
dispositif de verrouillage. Tuyaux de respiration SA-1500/SA-2500 illustrés.
3. Relier le tuyau d’air comprimé aux dispositifs de régulation d’air homologués, en se conformant aux pressions énoncées dans les directives
d’utilisation des systèmes à adduction d’air à deux arrivées d’air.
4
Page 19

FR
(Français)
Fig. 10 Fig. 11 Fig. 12
Montage des tuyaux de respiration combinés à deux arrivées d’air 3MMC avec cartouches et/ou
ltres
Les tuyaux de respiration à deux arrivées d’airSA-1600 (monté à l’avant) et SA-2600 (monté à l’arrière) 3MMC permettent l’utilisation de certaines
cartouches 3MMC de série6000 et de certains ltres 3MMC de série2000 homologués par le NIOSH. Pour obtenir la liste des cartouches et des ltres
homologués, consulter l’étiquette d’homologation du NIOSH comprise dans les trousses d’adaptateur à deux arrivées d’air 3MMC.
1. Relier le tuyau de respiration SA-1600 ou SA-2600 au masque, conformément aux directives énoncées précédemment. Ce sont les mêmes directives
que pour les modèles SA-1500 et SA-2500.
2. Choisir les cartouches et/ou les ltres convenant aux besoins en matière de protection respiratoire et les xer aux dispositifs de verrouillage externes
du tuyau de respirationSA-1600 ou SA-2600.
3. Porter le masque selon les directives indiquées à la section « Mise en place du respirateur ».
4. Une fois le respirateur correctement ajusté, effectuer les vérications de l’ajustement par pression positive et négative avant chaque utilisation,
conformément aux directives indiquées à la section « Vérifcation de l’ajustement ».
Si l’on ne peut obtenir un ajustement parfaitement étanche, ne pas pénétrer dans la zone contaminée. Consulter son superviseur.
Avant d’effectuer le montage des ltres et cartouches 3MMC sur les tuyaux de respiration combinés à deux arrivées d’air 3MMC, retirer le masque et
les soupapes d’inhalation.
REMARQUE IMPORTANTE : Replacer les soupapes d’inhalation dans le masque avant chaque utilisation si on utilise le masque en mode d’épuration
d’air (sans tuyau de respirationSA-1600 ou SA-2600).
Utilisation des tuyaux de respiration combinés à deux arrivées d’air 3MMC sans cartouches ni ltres
Pour utiliser les tuyaux de respiration SA-1600 et SA-2600 combinés à deux arrivées d’air sans les cartouches ou les ltres, xer un Capuchon
à baïonnette 6880 3MMC à chacun des supports de baïonnette extérieurs sur le tuyau de respiration à deux arrivées d’air. Lorsque le masque
complet est utilisé comme respirateur à adduction d’air à débit continu de type C, son facteur de protection caractéristique est de 1000 fois la limite
d’exposition admissible ou une autre limite d’exposition en milieu de travail.
DIRECTIVES D’AJUSTEMENT
W MISE EN GARDE
Tout manquement à ces directives peut réduire le rendement du respirateur, vous surexposer à des contaminants au-dessus de la
limite d’exposition permise en milieu de travail et peut causer des problèmes de santé ou la mort.
• Pour aider à maintenir une bonne étanchéité entre le visage et la membrane d’étanchéité faciale, la membrane d’étanchéité faciale
doit être exempte de toute obstruction en tout temps. Ne pas utiliser si l’on porte la barbe ou des poils susceptibles d’empêcher un
contact direct entre le visage et la membrane d’étanchéité faciale. Ne pas utiliser avec des lunettes de correction de la vue. Si l’on
doit porter des lunettes, utiliser la trousse pour lunettes 3MMC à l’intérieur du respirateur.
On DOIT suivre ces directives chaque fois que l’on utilise le respirateur.
Mise en place du respirateur
REMARQUE : Deux facteurs sont essentiels pour la mise en place du respirateur. Ils consistent à placer, au début, le nez dans la coquille
nasale pour centrer le respirateur sur le visage et de serrer les courroies deux fois en suivant les étapes 4, 5 et 6, en premier pour ajuste le
respirateur, puis de répéter les étapes 4, 5 et 6 une seconde fois pour sécuriser la membrane d’étanchéité faciale. Il faut faire attention de
ne pas trop serrer les courroies inférieures la première fois.
1. Desserrer complètement les six courroies de tête.
2. Tenir l’avant du masque avec une main et les courroies éloignées du masque avec l’autre main an de créer une ouverture pour la tête. Pousser
l’ensemble respirateur vers le bas au-dessus de la tête et du visage, à travers l’ouverture. Placer le nez dans la coquille nasale et le menton dans la
mentonnière puis appuyer le masque de façon ferme et uniforme contre le visage (Fig. 13).
3. Tirer le harnais à l’arrière de la tête (Fig. 13).
REMARQUE : Répéter les étapes 4 à 6 deux fois, une fois pour serrer les courroies et éliminer le jeu et une deuxième fois pour sécuriser et sceller le
masque du respirateur sur le visage.
4. Serrer les courroies inférieures du respirateur, une à la fois. S’assurer de serrer les deux côtés de façon égale (Fig. 14).
5
Page 20

FR
(Français)
5. Serrer les courroies du milieu du respirateur, une à la fois. S’assurer de serrer les deux côtés de façon égale.
6. Serrer les courroies supérieures du respirateur, une à la fois. S’assurer de serrer les deux côtés de façon égale.
7. Vérier à nouveau toutes les courroies pour s’assurer qu’elles sont bien serrées et qu’elles ont la même tension de façon à ce que le harnais de tête
soit centré au dos de la tête. S’assurer que les courroies et les languettes sont disposées à plat sur la tête.
Dans la mesure du possible, demander à une autre personne de vérier si le respirateur a été mis en place correctement. Vérier l’ajustement comme
décrit dans ces directives d’utilisation.
Fig. 13
Fig. 14
Sélection initiale du masque – petit, moyen ou grand
Essayer plus d’une taille de masque avant de déterminer celui qui est le plus confortable sur le visage.
Après la mise en place, procéder aux vérications ci-dessous.
1. Rien (p. ex., pilosité, bijoux) ne doit s’interposer entre la surface de scellement du masque et le visage. Il est possible qu’on doive tailler la barbe ou les
favoris.
2. Les courroies inférieures et intermédiaires ne doivent pas passer par-dessus les oreilles.
3. Les yeux doivent être situés entre le centre et le tiers supérieur des lentilles.
4. Le respirateur ne doit pas être serré au point d’empêcher d’ouvrir complètement les yeux.
5. Le bas de l’ensemble masque ne doit pas trop serrer la gorge.
6. Aucun espace ne doit être visible entre la membrane d’étanchéité faciale et le visage.
7. La peau devant l’oreille ne doit pas plisser.
8. La coquille nasale ne doit pas nuire pas à la vision.
9. S’assurer qu’aucun autre équipement de protection n’interfère avec les boucles ou l’ajustement du respirateur.
Tout manquement à ces critères signie peut-être que le respirateur n’est pas adéquatement ajusté. Il est possible qu’une autre taille de masque soit
plus adéquate. Essayer plus d’une taille de masque avant de déterminer celui qui est le plus confortable sur le visage. Un essai d’ajustement peut
conrmer que l’ajustement est adéquat. Pour toute question, consulter son superviseur.
Vérication de l’ajustement par l’utilisateur
Toujours vérier l’ajustement du respirateur sur son visage avant d’entrer dans une zone contaminée conformément aux directives fournies
ci-dessus pour la conguration spécique à son respirateur. La vérication de l’ajustement par pression positive est la méthode à privilégier pour la
vérication d’un bon ajustement pour toutes les congurations de ltre et cartouche. La vérication de l’ajustement par pression positive est la seule
méthode pour ce respirateur avec les ltres de la série 2000. La vérication de l’ajustement par pression négative peut être également être effectuée
pour vérier une fois de plus le bon ajustement de ce respirateur avec les cartouches de série 6000 et les ltres 7093/7093C. Faire attention de ne
pas modier l’ajustement du respirateur en appuyant trop fort pendant les vérications d’ajustement par pression négative.
REMARQUE IMPORTANTE : Si l’on ne peut obtenir un ajustement parfaitement étanche, NE PAS pénétrer dans la zone contaminée.
Consulter son superviseur. Effectuer un essai d’ajustement quantitatif ou qualitatif avant de choisir quel respirateur porter dans une zone
contaminée, conformément à la norme 1910.134 de l’OSHA, à la norme Z94.4 de la CSA ou au programme de protection respiratoire du
ministère du Travail au Brésil.
Vérication de l’ajustement de l’utilisateur par pression positive pour toutes les congurations
approuvées et requise pour les ltres de série 2000
1. Retirer le couvercle de la soupape d’exhalation en appuyant sur le bas du couvercle avec le pouce et en le faisant glisser, parallèlement avec la
lentille.
2. Placer la paume de la main sur la soupape d’exhalation et expirer doucement (Fig. 15). Prendre bien soin de s’assurer du bon ajustement de la
soupape d’exhalation. Pour ce faire, la face complète de la soupape bleue avec la base de la paume.
3. Si le masque gone légèrement et que l’on ne détecte aucune fuite d’air entre le visage et le masque, l’ajustement est bon.
4. Si l’on détecte une fuite d’air, replacer le respirateur sur le visage et/ou rajuster la tension des courroies an d’éliminer les fuites et vérier de nouveau
l’ajustement.
5. Replacer le couvercle de la soupape d’exhalation en plaçant l’extrémité ouverte au haut de l’ensemble de soupape d’exhalation, en orientant les
languettes sous l’ensemble de soupape d’exhalation et en glissant vers le bas jusqu’à ce que le couvercle de la soupape s’enclenche en place.
Si l’on détecte une fuite d’air, replacer le respirateur sur le visage et/ou rajuster la tension des courroies an d’éliminer les fuites, puis vérier de
nouveau l’ajustement. Faire attention de ne pas exhaler trop fort lorsqu’on effectue la vérication d’ajustement par pression positive. L’objectif est de
vérier l’ajustement sans modier l’ajustement entre le masque et le visage.
6
Page 21

FR
(Français)
Vérication de l’ajustement par pression négative avec les cartouches de série6000
1. Placer les paumes de la main sur la surface de la cartouche ou sur la région ouverte du dispositif de retenue de ltre501 3MMC et inhaler doucement.
Si le masque s’affaisse légèrement, qu’il se resserre sur le visage et que l’on ne détecte aucune fuite d’air entre le visage et le masque, l’ajustement
est bon (Fig. 16).
2. Si l’on détecte une fuite d’air, replacer le respirateur sur le visage et/ou rajuster la tension des courroies an d’éliminer les fuites et vérier de nouveau
l’ajustement.
Faire attention de ne pas modier l’ajustement du respirateur en appuyant trop fort pendant les vérications d’ajustement par pression négative.
REMARQUE : L’utilisation du dispositif de retenue de ltre501 3MMC peut faciliter l’exécution de l’essai d’ajustement par pression négative.
Vérication de l’ajustement par pression négative avec les ltres7093/7093C
1. Appuyer ou exercer une pression avec les mains sur les couvercles de ltre en direction du masque et inhaler doucement. Si le masque s’affaisse
légèrement, qu’il se resserre sur le visage et que l’on ne détecte aucune fuite d’air entre le visage et le masque, l’ajustement est bon (Fig. 17).
2. Si l’on détecte une fuite d’air, replacer le respirateur sur le visage et/ou rajuster la tension des courroies an d’éliminer les fuites, puis vérier de
nouveau l’ajustement.
Faire attention de ne pas modier l’ajustement du respirateur en appuyant trop fort pendant les vérications d’ajustement par pression négative.
Fig. 15
Fig. 16
Fig. 17
Vérication de l’ajustement par pression négative pour les respirateurs à deux arrivées d’air
1. Débrancher le tuyau d’air comprimé de la soupape de régulation d’air.
2. Avec le tuyau de respiration toujours raccordé à la soupape de régulation d’air, inhaler doucement. Si le masque s’affaisse légèrement, qu’il se
resserre sur le visage et que l’on ne détecte aucune fuite d’air entre le visage et le masque, l’ajustement est bon.
3. Pour les systèmes combinés à deux arrivées d’air munis de cartouches ou de ltres, effectuer une vérication de l’ajustement conformément aux
directives ci-dessus en fonction de la cartouche ou du ltre approprié utilisé.
4. Si l’on détecte une fuite d’air, replacer le respirateur sur le visage et/ou rajuster la tension des courroies an d’éliminer les fuites, puis vérier de
nouveau l’ajustement.
REMARQUE IMPORTANTE : Si l’on ne peut obtenir un ajustement parfaitement étanche, NE PAS pénétrer dans la zone contaminée. Consulter
son superviseur. Avant de porter un respirateur dans une zone contaminée, on DOIT procéder à un essai d’ajustement qualitatif ou
quantitatif conformément à la norme 1910.134 de l’OSHA ou Z94.4 de la CSA.
RETRAIT DU RESPIRATEUR
1. Desserrer complètement les six courroies de tête en tirant vers le haut sur les boucles.
2. Retirer le respirateur en faisant passer les courroies par-dessus la tête.
ESSAI D’AJUSTEMENT
Un mauvais ajustement du respirateur en diminue l’efcacité. C’est pourquoi on doit effectuer un essai d’ajustement quantitatif ou qualitatif avant
d’utiliser le respirateur. L’essai d’ajustement est une exigence de l’Occupational Safety and Health Administration (OSHA) aux États-Unis, de
la CSA au Canada et du ministère du Travail du Brésil. Les respirateurs doivent être soumis à un essai d’ajustement avec le matériel de protection
individuelle qu’on prévoit porter dans son milieu de travail et qui pourrait affecter l’ajustement du respirateur (p. ex., cagoules, casques durs,
dispositifs de protection de l’ouïe, etc.). Pour obtenir de plus amples renseignements au sujet des essais d’ajustement, communiquer avec le Service
technique de 3M.
Essai d’ajustement quantitatif
On peut faire l’essai d’ajustement quantitatif à l’aide d’un adaptateur pour essai d’ajustement 601 3MMC et de ltres P100 comme les ltres 2091 ou
7093 3MMC contre les particules.
Essai d’ajustement qualitatif
On peut réaliser l’essai d’ajustement qualitatif à l’aide des appareils d’essai d’ajustement qualitatif FT-10 ou FT-30 3MMCet de tout ltre contre les
particules homologué par le NIOSH.
7
Page 22

FR
(Français)
Entrer dans une zone contaminée et en sortir
• Les contaminants en suspension dans l’air qui peuvent être dangereux pour la santé englobent ceux qui sont tellement petit que vous pourriez ne pas
être en mesure de les voir ou de les sentir.
• Toujours effectuer un essai d’ajustement avant d’entrer dans une zone contaminée.
• Quitter immédiatement la zone contaminée si l’une ou l’autre des conditions ci-dessous survient :
• Une partie du respirateur est endommagée.
• La respiration devient difcile.
• On éprouve des étourdissements ou des problèmes de vision.
• On décèle un goût ou une odeur de contaminants.
• On ressent une irritation au visage, aux yeux, au nez ou à la bouche.
• On pense que la concentration des contaminants a atteint un niveau tel que le respirateur ne fournit plus une protection adéquate.
• Ne pas porter ce respirateur en présence des conditions ci-dessous :
• Atmosphères décientes en oxygène.
• Atmosphères où les concentrations des contaminants sont inconnues.
• Atmosphères où les concentrations des contaminants présentent un danger immédiat pour la vie ou la santé (DIVS).
• Les concentrations de contaminants qui dépassent la concentration maximale d’utilisation, telle que déterminée en utilisant le facteur de
protection caractéristique du système de protection respiratoire ou le facteur de protection caractéristique exigé par les normes spéciques du
gouvernement, selon la valeur la moins élevée.
INSPECTION, NETTOYAGE ET ENTREPOSAGE
W MISE EN GARDE
Tout manquement à ces directives peut réduire le rendement du respirateur, vous surexposer à des contaminants au-dessus de la
limite d’exposition permise en milieu de travail et peut causer des problèmes de santé ou la mort.
• Ne pas nettoyer le respirateur à l’aide de solvants. Le nettoyage du respirateur avec des solvants peut endommager certains de ses
composants et en réduire l’efcacité.
• Inspecter tous les composants du respirateur avant chaque utilisation an de s’assurer qu’il est en bon état de fonctionnement.
Méthode d’inspection
Inspecter ce respirateur avant chaque utilisation an de s’assurer qu’il est en bon état de fonctionnement. Remplacer toute pièce endommagée
ou défectueuse avant l’utilisation. Ne pas pénétrer dans une zone contaminée si le masque comporte une pièce endommagée ou défectueuse. On
recommande la méthode d’inspection ci-dessous.
1. S’assurer que le masque ne comporte ni ssures, ni déchirures, ni saletés. S’assurer que le masque, et plus particulièrement le joint d’étanchéité,
n’est pas déformé.
2. Examiner les soupapes d’inhalation et s’assurer qu’elles ne comportent pas de déformation, de ssures ou de déchirures.
3. S’assurer que les courroies de tête sont en bon état et qu’elles n’ont pas perdu leur élasticité.
4. Examiner toutes les pièces en matière plastique et vérier si elles présentent des signes de déchirure ou d’usure. S’assurer que les joints à baïonnette
sont en bonne condition.
5. Retirer le couvercle de la soupape d’exhalation et s’assurer que la soupape d’exhalation et son réceptacle ne comportent pas de saletés et qu’ils ne
présentent pas de signe de déchirure, de ssure ou de déformation. Replacer le couvercle de la soupape.
6. Examiner la lentille et s’assurer qu’elle est exempte de dommages pouvant diminuer le rendement du respirateur ou la vision de l’utilisateur.
Nettoyage et entreposage
On recommande de nettoyer le respirateur après chaque utilisation.
1. Retirer les cartouches, les ltres et/ou les tuyaux de respiration et la coquille nasale. Le couvercle de la soupape d’exhalation, l’ensemble soupape
d’exhalation, la membrane phonique, l’ensemble baïonnette, la lentille et la membrane d’étanchéité faciale peuvent également être démontés au
besoin.
2. Nettoyer le masque (à l’exception des cartouches et des ltres) en le plongeant dans une solution de nettoyage tiède et en le frottant à l’aide
d’une brosse à poils souples. La température de l’eau ne doit pas dépasser 49°C (120°F). Ajouter un détergent neutre au besoin. Ne pas utiliser de
nettoyants à base d’huile ou de lanoline.
3. Désinfecter le masque en le trempant dans une solution désinfectante d’ammonium quaternaire ou d’hypochlorite de sodium [30mL (1oz) dans
7,5L (2gallons) d’eau] ou d’un autre désinfectant.
4. Rincer à l’eau propre et tiède et laisser sécher à l’air dans un endroit non contaminé. Attendre que le masque soit complètement sec pour replacer la
coquille nasale.
5. Inspecter les composants du respirateur avant chaque utilisation. Réparer ou mettre au rebut les respirateurs dont certaines pièces sont
endommagées ou usées.
6. Entreposer le respirateur propre à l’abri des zones contaminées lorsqu’on ne l’utilise pas.
FICHE TECHNIQUE
Communiquer avec le Service technique de 3M pour obtenir des spécications techniques (c.-à-d. poids, construction des matériaux, etc.) Ce produit
ne contient aucun composant en latex de caoutchouc naturel.
8
Page 23

FR
(Français)
Guide de sélection et homologation des cartouches et des ltres
Avant d’utiliser ces produits, l’utilisateur doit lire les directives et restrictions d’utilisation ainsi que les mises en garde fournies dans les directives
d’utilisation et la documentation sur le produit ou communiquer avec le Service technique de 3M. Ne pas dépasser les concentrations maximales
d’utilisation établies par les organismes de réglementation locaux.
Cartouches 3MMC de série6000
Homologations du NIOSH
Protège contre certaines vapeurs organiques X X X X X X X X X X X X X
Chlore X X X X X X X X X
Chlorure d’hydrogène X X X X X X X
Dioxyde de soufre X X X X X X X X X
Dioxyde de chlore X X X X
Sulfure d’hydrogène X X X X X X X X X
Fluorure d’hydrogène X X X X X
Formaldéhyde X X X X
Ammoniac X X X X
Méthylamine X X X X
Cartouche contre les vapeurs de mercure
Filtre contre les particules P100
** Recommandée par 3M pour la protection contre les concentrations d’au plus5ppm de bromométhane ou d’iode radioactif avec un remplacement
quotidien de la cartouche.
REMARQUE : N’est pas homologué par le NIOSH contre le bromométhane et l’iode radioactif.
Homologations du NIOSH
P100 X X X X X X X X
P95 X X X X
N95 X X
FH X X
2071
2078**
2076 HF
2091
6001
2096
6001i
6002
Filtres3M
2097**
2291
6003
6004
MC
2296
6005
6006
6007
60921
60921i
60922
60923
X X
X X X X X X X X X
2297**
5N11
5P71
7093
7093C
5935BR
60924
60925
60926
60927
60928**
Protection contre les
concentrations nuisibles
Gaz acides X X X X X
Vapeurs organiques X X X X
* Recommandé par 3M contre les concentrations nuisibles de gaz acides ou de vapeurs organiques. On entend par concentrations nuisibles, les
concentrations inférieures à la limite d’exposition admissible de l’OSHA ou aux limites d’exposition permises, selon la moins élevée. Ne pas utiliser
pour la protection respiratoire contre les gaz acides et les vapeurs organiques.
** Recommandé par 3M pour la protection contre l’ozone jusqu’à 10 fois la limite d’exposition admissible de l’OSHA ou les limites d’exposition
professionnelle établies par les autorités gouvernementales, selon la valeur la moins élevée.
REMARQUE : N’est pas homologué par le NIOSH pour la protection contre l’ozone.
Au Brésil, le ltre 5935BR est homologué comme ltre N95 par le NIOSH et comme ltre P3 par le ministère du Travail du Brésil.
Adaptateurs et dispositifs de retenue de ltre 3M
Numéro Description
501 Dispositif de retenue de ltre à utiliser avec la cartouche de série 6000 et les ltres 5N11 et 5P71
502 Adaptateur de ltre à utiliser avec la cartouche de série 6000 et les ltres 2000 et 7093/7093C
603 Adaptateur de ltre à utiliser avec les ltres 5N11 et 5P71
Au Brésil, le ltre 5935BR 3MMC peut être utilisé avec l’adaptateur de ltre 603 et le dispositif de retenue de ltre 501 sur le masque complet 3MMC
de série FF-400.
MC
9
Page 24

FR
(Français)
Durée utile des cartouches chimiques et des ltres contre les particules
AVERTISSEMENT
Le fait de ne pas mettre convenablement au rebut les cartouches, les ltres et les respirateurs usés et contaminés par des substances dangereuses
peut entraîner une exposition personnelle et des dommages environnementaux. La manipulation, le transport et la mise au rebut des cartouches,
des ltres et des respirateurs usés doivent être conformes aux lois fédérales, provinciales et municipales applicables.
Durée maximale d’utilisation
1. Les cartouches et les ltres doivent être utilisés avant la date d’expiration indiquée sur l’emballage.
2. Remplacer les ltres contre les particules s’ils sont endommagés, encrassés ou si la respiration devient difcile. Ne pas utiliser les ltres de Série
N en présence d’huile. Utiliser les ltres de Série R en présence d’aérosols à base d’huile pendant un maximum de 8 heures d’utilisation continue
ou intermittente. Si l’on utilise les ltres dans un milieu qui contient uniquement des aérosols à base d’huile, les mettre au rebut après 40 heures
d’utilisation ou après 30 jours, selon la première éventualité.
3. La durée utile des cartouches contre les gaz/vapeurs dépendra du degré d’activité de l’utilisateur (fréquence respiratoire), du contaminant particulier
et de la concentration et des conditions ambiantes comme l’humidité, la pression et la température. Remplacer les cartouches selon un indicateur
de n de durée utile, un programme de remplacement préétabli ou plus tôt si on décèle un goût ou une odeur de contaminant, ou si une irritation se
manifeste. Veuillez consulter le logiciel de durée utile 3M à l’adresse www.3M.com/sls.
4. Les cartouches contre les vapeurs de mercure 6007 et 60927 doivent être mises au rebut après 50 heures d’utilisation contre les vapeurs de
mercure; selon leur durée utile contre les vapeurs organiques, le chlore, le sulfure d’hydrogène ou le dioxyde de soufre ou lorsque des odeurs de
vapeurs ou de gaz deviennent perceptibles, selon la première éventualité. Les vapeurs de mercure sont inodores.
DIRECTIVES RELATIVES AUX PIÈCES DE RECHANGE
Ensemble à masque complet ultra FX FF-400 3M
Le masque consiste en l’ensemble harnais de tête, l’ensemble coquille nasale, l’ensemble membrane phonique, l’ensemble soupape d’exhalation,
l’ensemble lentille, le masque (petit, moyen ou grand), l’ensemble monture (cadre, écrous, vis), l’ensemble baïonnette et le couvercle de la soupape
d’exhalation. Pour démonter l’ensemble lentille du masque, retirer la vis cruciforme de la membrane d’étanchéité faciale, éloigner la monture de la
membrane d’étanchéité faciale et retirer la membrane d’étanchéité faciale de l’ensemble lentille.
MC
Remplacement du couvercle de la soupape
1. Retirer le couvercle de la soupape en appuyant sur le bas du couvercle avec le pouce et en le faisant glisser, parallèlement avec la lentille (Fig. 18).
2. Replacer le couvercle de la soupape en plaçant l’extrémité ouverte au haut de l’ensemble de soupape d’exhalation, en orientant les languettes sous
l’ensemble de soupape et en glissant vers le bas jusqu’à ce que le couvercle de la soupape s’enclenche en place.
Fig. 18
Remplacement de l’ensemble soupape d’exhalation
1. Retirer le couvercle de la soupape en appuyant sur le bas du couvercle avec le pouce et en le faisant glisser, parallèlement avec la lentille (Fig. 18).
2. Retirer l’ensemble soupape d’exhalation en tournant de 1/4 de tour dans le sens contraire des aiguilles d’une montre (Fig.19).
3. Replacer l’ensemble soupape d’exhalation en alignant les pattes rigides du raccord avec l’ensemble l’ouverture de l’ensemble soupape d’exhalation
qui se trouve dans la lentille et en tournant de 1/4 de tour dans le sens des aiguilles d’une montre jusqu’à un arrêt ferme.
4. Replacer l’ensemble couvercle de la soupape.
10
Fig. 19
Page 25

FR
(Français)
Remplacement de la soupape d’exhalation
1. Retirer le couvercle de la soupape en appuyant sur le bas du couvercle avec le pouce et en le faisant glisser, parallèlement avec la lentille (Fig. 18).
2. Retirer l’ensemble soupape d’exhalation en tournant de 1/4 de tour dans le sens contraire des aiguilles d’une montre (Fig.19).
3. Saisir la soupape et en déloger la tige du siège de cette dernière.
4. Inspecter le siège de la soupape et s’assurer qu’il est propre et en bon état.
5. Placer la soupape d’exhalation de rechangeneuve dans l’orice d’exhalation en y insérant les tiges et en la tirant du côté opposé jusqu’à ce que les
deux tiges s’enclenchent. Pousser latéralement sur les tiges de la soupape pour vous assurer qu’elles sont correctement installées.
6. Replacer l’ensemble soupape d’exhalation.
7. Replacer le couvercle de la soupape.
REMARQUE : Effectuer une vérication de l’ajustement par pression négative pour s’assurer que la soupape d’exhalation fonctionne
correctement.
Remplacement de l’ensemble coquille nasale
L’ensemble coquille nasale se compose d’une coquille nasale et de soupapes d’inhalation. Il est conçu pour se placer directement sur la lentille et
s’ajuster confortablement sur la bouche et le nez de l’utilisateur du respirateur an d’aider à purger le soufe exhalé et à prévenir la formation de
buée sur la lentille.
1. Retirer l’ensemble coquille nasale en prenant la coquille nasale sous la soupape d’inhalation et en la tirant délicatement vers le haut et à distance de
l’ensemble lentille (Fig. 20).
2. Pour replacer, placer l’ensemble coquille nasale dans l’ensemble lentille en alignant l’anneau en plastique dur sur la coquille nasale avec l’ensemble
lentille et en appuyant fermement sur les languettes centrales jusqu’à ce que les languettes inférieures de la coquille nasale s’enclenchent en place
(Fig. 21).
3. Appuyer sur le haut de l’anneau de la coquille nasale jusqu’à ce que les languettes s’enclenchent en place.
Fig. 20 Fig. 21
Remplacement de la membrane phonique
1. Retirer l’ensemble coquille nasale en prenant la coquille nasale sous la soupape d’inhalation et en la tirant délicatement vers le haut et à distance de
l’ensemble lentille (Fig. 20).
2. Retirer le couvercle de la soupape en appuyant sur le bas du couvercle avec le pouce et en le faisant glisser, parallèlement avec la lentille (Fig. 18).
3. Retirer l’ensemble soupape d’exhalation en tournant de 1/4 de tour dans le sens contraire des aiguilles d’une montre.
4. Retirer l’ensemble membrane phonique en tournant de 1/4 de tour dans le sens contraire des aiguilles d’une montre (Fig. 22).
5. Replacer l’ensemble membrane phonique en alignant les pattes rigides du raccord de la membrane phonique avec l’ouverture de l’ensemble lentille.
6. Tourner de 1/4 de tour dans le sens des aiguilles d’une montre jusqu’à un arrêt ferme.
7. Replacer l’ensemble soupape d’exhalation.
8. Replacer l’ensemble couvercle de la soupape.
9. Replacer l’ensemble coquille nasale (Fig. 21).
Fig. 22
Remplacement de l’ensemble baïonnette
L’ensemble baïonnette comprend l’anneau de la baïonnette, la baïonnette et le joint d’inhalation.
1. Retirer l’ensemble coquille nasale en prenant la coquille nasale sous la soupape d’inhalation et en la tirant délicatement vers le haut et à distance de
l’ensemble lentille (Fig. 20).
2. Retirer l’anneau de la baïonnette en tournant de 1/4 de tour dans le sens contraire des aiguilles d’une montre (Fig. 23).
11
Page 26

FR
(Français)
3. Retirer la baïonnette de l’ensemble lentille (Fig. 24).
4. Aligner la clé de la nouvelle baïonnette avec la fente de l’ensemble lentille et tenir fermement en place.
5. Aligner pattes rigides du raccord de l’anneau avec les fentes des baïonnettes et tourner de 1/4 de tour dans le sens des aiguilles d’une montre
jusqu’à un arrêt ferme.
6. Replacer l’ensemble coquille nasale (Fig. 21).
Fig. 23 Fig. 24
Remplacement des soupapes d’inhalation
Les soupapes d’inhalation sont situées sur les ensembles baïonnettes des orices d’inhalation du masque et à l’intérieur des orices d’inhalation de
la coquille nasale. Inspecter les soupapes avant chaque utilisation du respirateur et les remplacer si elles sont endommagées ou manquantes.
1. Retirer les soupapes déjà en place en les prenant et en tirant la tige de la soupape à l’extérieur du siège de la soupape.
2. Installer les nouvelles soupapes dans le siège des soupapes en poussant sur le siège des tiges des soupapes. S’assurer que les tiges des soupapes
sont bien insérées dans leur siège, qu’elles reposent à plat et qu’elles bougent librement (tourner).
Remplacement de l’ensemble harnais de tête
1. Retirer le harnais de tête existant en détachant chaque boucle des boutons (Fig. 25).
2. Tirer les languettes d’extrémité du harnais de tête, selon un certain angle, pour les sortir des boucles. Noter l’orientation des languettes et des boucles
du harnais de tête pour faciliter le réassemblage.
3. Placer le harnais de tête vers le bas sur une surface plane avec le logo 3M vers le haut (Fig. 26).
4. Enler les languettes d’extrémité du harnais de tête à travers les boucles et tirer sur chacune d’entre elles jusqu’à ce que la languette d’extrémité
passe complètement à travers la boucle.
5. Déposer la lentille du masque contre une surface plane et placer le nouveau harnais de tête et l’ensemble de la boucle sur le masque. Assembler le
harnais de tête en s’assurant que le logo 3M soit vers le haut.
6. Encliqueter chaque boucle dans le bouton correspondant, en s’assurant que les courroies ne sont pas torsadées.
Fig. 25 Fig. 26
Remplacement de l’ensemble monture de la lentille
L’ensemble monture de la lentille comprend la monture de la lentille, l’écrou et la vis.
1. Retirer la vis cruciforme de la monture. Éloigner la monture de la membrane d’étanchéité faciale (Fig. 27).
2. Positionner la nouvelle monture, en alignant les repères supérieurs et inférieurs. Installer et bien serrer les vis. S’assurer que les repères situés sur
tous les composants sont adéquatement alignés (Fig. 28).
Fig. 27 Fig. 28
12
Page 27

FR
(Français)
Remplacement de l’ensemble lentille
L’ensemble lentille comprend des lentilles en polycarbonate avec revêtement dur.
1. Retirer l’ensemble coquille nasale en prenant la coquille nasale sous la soupape d’inhalation et en la tirant délicatement vers le haut et à distance de
l’ensemble lentille (Fig. 20).
2. Retirer le couvercle de la soupape en appuyant sur le bas du couvercle avec le pouce et en le faisant glisser, parallèlement avec la lentille (Fig. 18).
3. Retirer l’ensemble soupape d’exhalation de l’orice central de la lentille en le faisant tourner de un quart de tour dans le sens contraire des aiguilles
d’une montre (Fig. 19).
4. Retirer la membrane phonique en tournant de 1/4 de tour dans le sens contraire des aiguilles d’une montre (Fig.22).
5. Retirer les ensembles baïonnettes en tournant les anneaux de la baïonnette de 1/4 de tour dans le sens contraire des aiguilles d’une montre (Fig. 23)
et en retirant les baïonnettes de l’ensemble lentille (Fig. 24).
6. Retirer la vis cruciforme de la monture. Éloigner la monture de la membrane d’étanchéité faciale (Fig. 27).
7. Retirer le joint facial de la lentille.
8. Placer une lentille et un joint facial neufs en alignant les repères supérieurs et inférieurs. Positionner la monture, en alignant les repères supérieurs et
inférieurs. Installer et bien serrer les vis. S’assurer que les repères situés sur tous les composants sont adéquatement alignés (Fig. 28).
9. Installer la membrane phonique.
10. Installer l’ensemble soupape d’exhalation.
11. Replacer le couvercle de la soupape.
12. Replacer les ensembles baïonnettes.
13. Replacer l’ensemble coquille nasale (Fig. 21).
Accessoires et pièces de rechange du respirateur à masque complet réutilisable ultra FX FF-400
MC
3M
Numéro Description
FF-401 Petit
FF-402 Moyen
FF-403 Grand
Numéro Description
FF-400-01 Boucle de harnais de tête
FF-400-02 Bouton de harnais de tête
FF-400-03 Ensemble lentille
FF-400-04 Harnais de tête
FF-400-05 Ensemble monture avec vis
FF-400-06 Courroie confort
FF-400-07 Ensemble soupape d’exhalation
FF-400-08 Ensemble baïonnette pour soupape d’inhalation
FF-400-09 Couvercle de soupape d’exhalation (standard)
FF-400-10 Couvercle de soupape d’exhalation (solide)
FF-400-11 Ensemble coquille nasale
FF-400-13 Ensemble membrane phonique
FF-400-20 Trousse pour lunettes
7582 Soupape d’inhalation
7583 et 6583 Soupape d’exhalation Cool FlowMC 3M
MC
Numéro Description
FF-400-15 Protège-lentille
FF-400-17 Protège-lentille semi-permanent
504 Chiffons de nettoyage pour respirateur
601 Adaptateur pour essai d’ajustement quantitatif
FF-400-03
7582
7583
6583
FF-400-09
FF-400-10
FF-400-11
3
FF-400-01
FF-400-05
FF-400-07
FF-400-06
FF-400-13
FF-400-04
FF-400-02
FF-400-08
Fig. 29
13
Page 28

FR
(Français)
REMARQUE relative à la conformité au Brésil :
1. Au Brésil, conformément au programme de protection respiratoire du ministère du Travail, ne pas utiliser de respirateurs à masque complet qui ont
subi un essai d'ajustement quantitatif si les concentrations de contaminants sont supérieures à 100 fois la limite d'exposition admissible en mode
d'épuration d'air.
2. Ne pas utiliser dans des atmosphères décientes en oxygène ou enrichies d’oxygène.
3. Entreposage, transport et entretien : Entreposer dans un endroit propre et sec et loin des contaminants et des températures et taux d’humidité
extrêmes.
4. Les composants de ce respirateur sont faits de matériaux qui ne devraient pas causer d’effets indésirables pour la santé.
5. On doit faire preuve d’une prudence accrue lorsqu’on utilise ce produit dans des atmosphères explosives.
6. Ne pas utiliser de respirateurs d’épuration d’air propulsé si le débit d’air est inférieur à 120 L/min en ce qui a trait aux masques à ajustement serré
ou de 170 L/min en ce qui a trait aux cagoules et/ou aux casques.
Date de fabrication du produit
Les pièces du produit sont dotées d’inscriptions qui offrent des renseignements sur la date de fabrication, et leur lecture est décrite dans l’exemple
ci-dessous :
Code de date = 12e mois de 2019 (12/19)
12
11 1
10
9
8
7
POUR OBTENIR DE PLUS AMPLES RENSEIGNEMENTS/
FOR MORE INFORMATION
Au Canada, communiquer avec/In Canada, contact :
Site Web/Website : www.3M.ca/Safety
Assistance technique/Technical Assistance :
1 800 267-4414
Centre communication-client/Customer Care Center :
1 800 364-3577
1 9
6
2
3
4
5
14
98-0060-0135-2_6
34-8723-6751-0
Page 29

3
ES
(Español)
Respirador reutilizable de pieza facial de cara completa
Instrucciones
Ultimate FX
W ADVERTENCIA
Este respirador brinda protección contra ciertos contaminantes transportados por aire. El uso inadecuado puede causar
enfermedades o la muerte. Para usarlo correctamente, consulta a tu supervisor y sigue las Instrucciones de uso, o llama a 3M en
Estados Unidos al 1-800-243-4630. En México llame al 01-800-712-0646. O contacte a 3M en su país.
FRENTE
Estas Instrucciones ofrecen información sólo del uso de la pieza facial. En las Instrucciones de cada uno de los sistemas de ltración de aire usados
con las Piezas faciales de cara completa 3M™ FF-401, FF-402 y FF-403 se incluye información importante. Antes de usar el producto, lea las
Instrucciones y advertencias. Conserve estas Instrucciones para referencia futura. Si tiene alguna duda sobre estos productos contacte al Servicio
Técnico 3M.
En Estados Unidos:
Internet: www.3M.com/workersafety
Ayuda técnica: 1-800-243-4630
Uso previsto
Los respiradores serie FF-400 con máscara facial de cara completa Ultimate FX 3M™ (FF-401, FF-402 y FF-403) están diseñados para ayudar a
proporcionar protección respiratoria contra ciertos contaminantes transportados por aire, siempre que se usen siguiendo todas las instrucciones y
limitaciones de uso y las normas de seguridad y salud vigentes. Las máscaras faciales de la serie FF-400 cumplen con los requisitos de la norma
Z87.1-2010 del Instituto Nacional Estadounidense de Estándares (ANSI) para la protección facial y ocular. Estos productos proporcionan protección facial y
ocular limitada contra partículas en el aire.
En Canadá:
Internet: www.3M.ca/Safety
Ayuda técnica: 1-800-267-4414
W ADVERTENCIA
Los respiradores bien seleccionados, usados y mantenidos ayudan a proteger contra ciertos contaminantes al reducir las
concentraciones en el aire menores al Límite de Exposición Ocupacional (OEL). Es importante seguir todas las instrucciones y
regulaciones gubernamentales sobre el uso de este producto, además de usar el sistema respirador completo durante la exposición
para que el producto ayude a proteger al usuario. El mal uso de los respiradores puede provocar una sobreexposición a los
contaminantes y ocasionar enfermedad o incluso la muerte. Para un uso correcto, consulta al supervisor y las Instrucciones de
uso, o bien comunícate con el Servicio Técnico de 3M.
Lista de advertencias y precauciones dentro de estas Instrucciones
W ADVERTENCIA
No seguir estas instrucciones puede reducir el desempeño del respirador, provocar exposición a los contaminantes superior al OEL, y
ocasionar enfermedad o incluso la muerte.
• Para ayudar a mantener un buen sello entre la cara y el sello facial, el sello del respirador no debe tener ninguna obstrucción. No
use con barba u otro vello facial u otra condición que evite el buen sello entre la cara y la supercie del sello facial. No use lentes
con aumento. Si requiere utilizar lentes con aumento, debe usar un Kit de anteojos 3M™ en el interior del respirador.
• No limpie el respirador con solventes. Limpiar el respirador con solventes puede degradar los componentes de éste y reducir su
efectividad.
• Antes de cada uso, revise los componentes del respirador para asegurar las condiciones adecuadas de funcionamiento.
• No altere ni maltrate ni haga mal uso de este respirador.
PRECAUCIÓN
No eliminar de manera adecuada los cartuchos, ltros o respiradores usados y contaminados con materiales peligrosos puede ocasionar
exposiciones personales, al igual que daño ambiental. El manejo, transporte y la disposición de cartuchos, ltros o respiradores usados debe
cumplir con todas las leyes y regulaciones federales, estatales y locales.
Precauciones y limitaciones NIOSH para uso de presión negativa
Es posible que apliquen las siguientes restricciones. Consulte la etiqueta de aprobación del Instituto Nacional de Seguridad y Salud Ocupacional
(NIOSH por sus siglas en inglés). Si usa una pieza facial serie FF-400 como parte de una conguración de Respirador con suministro de aire, consulte
las Instrucciones incluidas con el Dispositivo para control de aire para obtener información sobre las precauciones y limitaciones del NIOSH.
A - No use en atmósferas con menos de 19.5% de oxígeno.
B - No use en atmósferas inmediatamente peligrosas para la vida o salud.
1
Page 30

(Español)
ES
C - No exceda el uso máximo de concentraciones establecidas por las normas regulatorias.
H - Siga los programas de cambio establecidos para cartuchos y cánister u observe el indicador de tiempo de vida útil (ESLI por sus siglas en inglés)
para asegurarse que el cartucho y cánister sean reemplazados antes de que ocurra una fuga.
J - No usar ni mantener adecuadamente este producto puede ocasionar lesiones o incluso la muerte.
L - Siga las Instrucciones del fabricante para cambiar cartuchos, cánister y/o ltros.
M - Todos los respiradores aprobados deberán seleccionarse, ajustarse, usarse y mantenerse de acuerdo con las normas de la Administración de
Seguridad y Salud Minera (MSHA por sus siglas en inglés), OSHA y otras regulaciones aplicables.
N - Nunca sustituya, modique, añada ni omita partes. Sólo use las partes de repuesto exactas en la conguración, según las instrucciones del
fabricante.
O - Remítase a las Instrucciones y/o al manual de mantenimiento para obtener información sobre el uso y mantenimiento de estos respiradores.
S - Aplican las Instrucciones especiales o importantes y/o limitaciones de uso especícas. Antes del uso del equipo consulte las Instrucciones.
S-Instrucciones de uso especiales o críticas
Los cartuchos para vapores orgánicos con indicadores de vida útil 3M™ (6001i y 60921i) están equipados con un indicador de n de vida útil (ESLI)
pasivo 3M™. El indicador debe verse fácilmente cuando se usa el respirador. Si no puedes ver fácilmente el ESLI, utiliza un espejo para observar
el ESLI; confía en un compañero de trabajo que pueda ver el ESLI, o bien dirígete a un área limpia, sácate el respirador y mira el ESLI. No confíes
únicamente en el ESLI para vapores orgánicos, a menos que tu empleador haya determinado que es apropiado para tu lugar de trabajo. Consulta las
Instrucciones de uso de los productos de la serie 6001i o 60921i para obtener más información, incluidas instrucciones especiales sobre el ESLI.
Los cartuchos para vapores de mercurio, vapores orgánicos y gases ácidos 3M™ (6007 y 60927) se deben desechar dentro de las 50 horas de uso
contra el vapor de mercurio.
Para mitigar los niveles molestos de gases ácidos o vapores orgánicos, se recomiendan los siguientes ltros: ltro para partículas tipo P95 3M™;
ltro 2076HF para uoruro de hidrógeno con mitigación de los niveles molestos de gases ácidos y el ltro para partículas tipo P100 para uoruro de
hidrógeno con mitigación de los niveles molestos de gases ácidos 3M™ 7093C. Los niveles molestos hacen referencia a concentraciones que no
exceden los límites de exposición permitidos por la OSHA o los límites de exposición ocupacional del gobierno aplicables, la que sea menor. No use
como protección respiratoria contra gases ácidos o vapores orgánicos, excepto uoruro de hidrógeno.
Para ensamblar la Combinación de tubos de respiración para línea de aire dual 3M™ con Cartuchos/Filtros 3M™, debe quitar las válvulas de
inhalación de la pieza facial.
Si va a utilizar la pieza facial en modo de puricación de aire, sin tubos de respiración 3M™ SA-1600 o SA-2600, debe volver a colocar las válvulas
de inhalación antes de utilizar la pieza facial.
Administración del programa del respirador
El uso ocupacional de respiradores debe cumplir con las normas de salud y seguridad aplicables. Por ley en Estados Unidos el patrón debe establecer
un programa de protección respiratoria por escrito que cumpla con los requerimientos de la Norma de protección respiratoria 29 CFR 1910.134
de la Administración de Seguridad y Salud Ocupacional (OSHA por sus siglas en inglés) y cualquier norma para sustancias especícas de la misma
administración. En Canadá, se debe cumplir con los requisitos de la norma CSA Z94.4, o los requisitos de la jurisdicción aplicable, según corresponda.
En Brasil siga el Programa de Protección Respiratoria de la Secretaría del trabajo.
Para mayores informes sobre esta norma contacte a OSHA en www.OSHA.gov Consulte un higienista industrial o llame al Servicio Técnico 3M sobre
la aplicación de estos productos a sus requerimientos de trabajo.
Tabla 1: Secciones principales de OSHA 29 CFR 1910.134
Sección Descripción
A Práctica permitida
B Deniciones
C Dispositivos para protección respiratoria
D Selección de respiradores
E Evaluación médica
F Prueba de ajuste
G Uso de respiradores
H Mantenimiento y cuidado de respiradores
I Calidad y uso del aire respirable
J Identicación de cartuchos, ltros y cánisters
K Capacitación e información
L Evaluación del programa
M Registro
2
Page 31

(Español)
ES
Factores de protección asignados
Tabla 2: Factores de protección asignados
Tipo de respirador APF
Respirador Puricador de Aire de Pieza Facial de Cara Completa con Presión Negativa 10/50
Respirador con Suministro de Aire de (SAR) Pieza Facial de Cara completa, ujo continuo 1000
1
El usuario del respirador debe realizar una prueba de ajuste con un método de prueba de ajuste cuantitativo para usar un factor de protección
asignado mayor a 10 cuando se usa como un respirador puricador con presión negativa.
En Brasil, de acuerdo con el programa Protección Respiratoria del Ministerio de Trabajo, los respiradores de máscara facial de cara completa
probados de manera cuantitativa a los nes de ajuste no se deben usar cuando las concentraciones de contaminantes sean superiores a 100 veces
el límite de exposición permitido en modo de puricación de aire.
1
INSTRUCCIONES DE OPERACIÓN
Desempacado
Revise el contenido del empaque para ver si no está dañado y asegúrese de contar con todos los componentes (Consulte la Fig. 27). Antes de cada uso
debe revisar el producto de acuerdo con los procedimientos señalados en la sección de “Inspección” de estas Instrucciones.
Armado
Ensamble de Cartucho Serie 6000, Filtro 7093 y Cartucho/Filtro 7093C 3M™ (Fig. 1, 2)
1. Alinee la muesca del ltro o cartucho con la pequeña pestaña de la conexión de tipo bayoneta en la pieza facial y presione.
2. Gire el cartucho o ltro en sentido de las manecillas del reloj hasta que quede rmemente asentado y no pueda girar más (cerca de 1/4 de vuelta).
3. Repita lo anterior con el segundo cartucho o ltro.
Filtro 3M™ Serie 2000 (Fig. 3)
1. Alinee la abertura del ltro con el anexo de ltro en la pieza facial y presione.
2. Gire el ltro en sentido de las manecillas del reloj hasta que quede rmemente asentado y no pueda girar más.
3. Repita lo anterior para el segundo ltro.
Fig. 1 Fig. 2
Fig. 3
Filtros 5N11 y 5P71 3M™
1. Coloque el ltro en el Soporte 3M™ 501 de modo que el lado impreso del ltro quede hacia el cartucho.
2. Presione el cartucho en el soporte de ltro. Debe entrar y quedar jo en el soporte de ltro. Instalado correctamente, el ltro debe cubrir por completo
la cara del cartucho (Fig. 4).
3. Para remplazar el ltro, quite el soporte y levante la lengüeta.
Fig. 4
En Brasil el ltro 5935BR 3M™ puede usarse con Soporte de ltro 501 3M™ en la Pieza facial de cara completa 3M™ Serie FF-400.
3
Page 32

(Español)
ES
Ensamble de adaptador 3M™ 502
1. Alinee el adaptador en el cartucho. Enganche el broche frontal de presión al apretar juntos el frente del cartucho y adaptador, colocando los pulgares
de ambas manos sobre el adaptador y los dedos a lo largo de los lados inferiores del cartucho (Fig. 5).
2. Enganche el broche posterior de presión al apretar juntos el lado posterior del cartucho y adaptador con la misma posición de las manos. Se debe
escuchar un clic conforme el broche de presión se engancha (Fig. 6).
3. Coloque el ltro en el portaltro de modo que el ltro tenga contacto uniforme con el empaque. Gire el ltro en sentido de las manecillas del reloj un
cuarto de vuelta hasta que quede rmemente asentado y no pueda girar más. Repita lo anterior para el segundo ltro.
Fig. 5 Fig. 6
IMPORTANTE: Una vez instalado en un Cartucho 3M™ 502 Serie 6000, no debe quitar o reutilizar el ensamble de adaptador 3M™ 502. La
remoción o reutilización puede ocasionar fuga, sobreexposición, enfermedad o incluso la muerte.
Adaptador de ltro 3M™ 603 y ltros 5N11 o 5P71
1. Alinee la muesca en la orilla del adaptador 603 con la marca de la pieza facial, como se muestra (Fig. 7).
2. Gire el adaptador 1/4 de vuelta en sentido de las manecillas del reloj hasta que se detenga. Para quitar el adaptador, gire 1/4 de vuelta en sentido
contrario a las manecillas del reloj (Fig. 8).
3. Coloque el ltro en el soporte 501 con la impresión del ltro mirando hacia el adaptador 603. Abróchelos y asegúrese que el sello del ltro no esté
arrugado o tenga espacios (Fig. 9).
1
En Brasil, el ltro 5935BR 3M™ está aprobado como ltro tipo N95 de NIOSH y como ltro BMOL P3. Se puede usar con el adaptador de ltro 603 y
el retenedor de ltro 501 en los respiradores de máscara facial media cara 3M™ serie 6000.
1
Fig. 7
2
2
Fig. 8
Fig. 9
Ensamble de respirador con línea de aire dual 3M™
El usuario debe seguir las Instrucciones del Respirador con suministro de aire con línea de aire dual incluido con los Respiradores con suministro de
aire con línea de aire dual 3M™.
Ensamble de tubos de respiración para línea de aire dual
1. Sostenga la pieza facial frente a usted, de modo que el logotipo de 3M quede mirando hacia usted. Alinee las dos derivaciones del tubo de respiración
sobre los dos montajes tipo bayoneta en la pieza facial (Fig. 10). Para los Tubos de respiración 3M™ SA-1500 o SA-1600, asegúrese que el logotipo
de 3M en el tubo de respiración y en la pieza facial de media cara queden mirando hacia usted. Para los Tubos de respiración 3M™ SA-2500 o
SA-2600, asegúrese que el logotipo 3M en el tubo de respiración quede mirando en la dirección opuesta al logotipo 3M en la pieza facial.
2. Gire cada derivación del tubo de respiración un cuarto de vuelta en sentido de las manecillas del reloj hasta que quede bien asentado en la bayoneta
y no pueda girar más (Fig. 11 y 12). No gire a la fuerza, ya que puede dañar la bayoneta. SA-1500/SA-2500 mostrado.
3. Anexe la línea de aire a los reguladores de aire aprobados conforme los programas de presión en la línea de aire dual, suministrados en las
Instrucciones de respiradores de aire.
4
Page 33

(Español)
ES
Fig. 10 Fig. 11 Fig. 12
Ensamble de Combinación de tubos de respiración con línea de aire dual 3M™ con Cartuchos
y/oltros
Las versiones SA-1600 (montaje frontal) y SA-2600 (montaje posterior) de los Tubos de respiración con línea de aire dual 3M™ permiten el uso de
Cartuchos 3M™ Serie 6000 y Filtros 3M™ Serie 2000 seleccionados y aprobados por el NIOSH. Para obtener la lista de los cartuchos y ltros aprobados,
consulte la etiqueta de aprobación del NIOSH incluida con los kits de adaptador para línea dual 3M™.
1. Anexe los tubos de respiración SA-1600 o SA-2600 a la pieza facial de acuerdo con los procedimientos señalados con anterioridad. El procedimiento
es idéntico al de los modelos SA-1500 y SA-2500.
2. Seleccione los cartuchos y/o ltros que cumplan con sus requerimientos de protección respiratoria, y anexe las conexiones exteriores tipo bayoneta
de los tubos de respiración SA-1600 o SA-2600.
3. Coloque la pieza facial de acuerdo con los procedimientos establecidos en la sección “Colocación del respirador” en las instrucciones.
4. Después de haber realizado la prueba de ajuste, verique el sello de presión positiva y negativa cada vez que use el respirador según los
procedimientos señalados en la sección “Revisión del sello” en las instrucciones.
NO entre en el área contaminada si NO PUEDE lograr un buen sello. Consulte a su supervisor.
Para ensamblar la Combinación de tubos de respiración para línea de aire dual 3M™ con Cartuchos/Filtros 3M™, debe quitar las válvulas de
inhalación de la pieza facial.
IMPORTANTE: Si va a utilizar la pieza facial en modo de puricación de aire, sin tubos de respiración SA-1600 o SA-2600, debe volver a colocar las
válvulas de inhalación antes de utilizar la pieza facial.
Uso de Combinación de tubos de respiración con línea de aire dual 3M™ con Cartuchos
y/oltros
Para usar los tubos de respiración de combinación de línea de aire dual (SA-1600 y SA-2600) sin cartuchos o ltros, coloca una tapara de bayoneta 6880
3M™ en cada montura externa de bayoneta en el tubo de respiración de línea de aire dual. Cuando se usa como un respirador de máscara facial de
cara completa con ujo continuo de aire tipo C, el factor de protección asignado es 1000 veces el límite de exposición ocupacional (PEL) u otro límite de
exposición ocupacional.
INSTRUCCIONES DE AJUSTE
W ADVERTENCIA
No seguir estas instrucciones puede reducir el desempeño del respirador, provocar exposición a los contaminantes superior al OEL, y
ocasionar enfermedad o incluso la muerte.
• Para ayudar a mantener un buen sello entre la cara y el sello facial, el sello del respirador no debe tener ninguna obstrucción. No
use con barba u otro vello facial u otra condición que evite el buen sello entre la cara y la supercie del sello facial. No use lentes
con aumento. Si requiere utilizar lentes con aumento, debe usar un Kit de anteojos 3M™ en el interior del respirador.
DEBE seguir estas instrucciones durante el tiempo que use el respirador.
Colocación del respirador
NOTA: Dos factores en la colocación efectiva son poner la nariz en la copa nasal inicialmente para centrar el respirador en la cara y ajustar
las bandas dos veces después de los pasos 4, 5, y 6; primero para ajustar el respirador, luego repita los pasos 4, 5, y 6 una segunda vez
para asegurar el sello de la pieza facial. Debe tener cuidado de no apretar demasiado las bandas inferiores en la primera vuelta.
1. Aoje las seis bandas para la cabeza.
2. Sostenga el frente de la pieza facial con una mano y aleje las bandas/el arnés de la pieza facial con la otra mano, creando una abertura para la
cabeza. Jale el ensamble del respirador hacia abajo sobre la cabeza y cara a través de la abertura. Coloque la nariz en la copa nasal y la barbilla en la
copa para barbilla, luego presione la pieza facial con rmeza y de manera uniforme contra la cara (Fig. 13).
3. Jale el Arnés para la cabeza hacia la parte posterior de la cabeza (Fig. 13).
NOTA: Repita dos veces la secuencia de los pasos 4-6; una vez para apretar las bandas y eliminar lo que esté ojo y una segunda vez para asegurar
y sellar la pieza facial del respirador en la cara.
4. Apriete las bandas inferiores, una a la vez. Fíjese que ambos lados queden igual de justos (Fig. 14).
5. Apriete las bandas medias, una a la vez. Fíjese que ambos lados queden igual de justos.
5
Page 34

(Español)
ES
6. Apriete las bandas superiores, una a la vez. Fíjese que ambos lados queden igual de justos.
7. Vuelva a revisar las bandas para asegurarse que estén justas y con la misma tensión, de modo que el Arnés para la cabeza quede centrado en la
parte posterior de la cabeza. Asegúrese que las bandas y lengüetas queden planas contra la cabeza.
Si es posible, pide a un compañero que compruebe si el respirador está colocado de forma correcta. Realiza una comprobación de sello de usuario
como se describe en estas Instrucciones de uso.
Fig. 13
Fig. 14
Selección de piezas faciales, pequeña, mediana o grande
Es posible que sea necesario colocarse más de una pieza facial antes de determinar el mejor tamaño para su cara.
Después de la colocación revise lo siguiente:
1. Que no haya nada (e.g. cabello, joyería, etc.) entre la cara y la supercie del sello del respirador. Es posible que deba cortar el vello facial o las patillas.
2. Que las bandas inferiores y las bandas medias no corten las orejas.
3. Que los ojos vean en el centro y 1/3 de la parte superior del lente.
4. Que el respirador no presione demasiado la cara de modo que los ojos queden parcialmente cerrados.
5. Que el fondo del ensamble de mascarilla no corte la garganta.
6. No debe haber espacios visibles entre el sello facial y la cara.
7. Que la piel en la frente no quede arrugada.
8. Que la copa nasal no obstruya la visión.
9. Asegúrese que el resto del equipo de seguridad no interera con los broches o el ajuste del respirador.
Si no cumple alguno de estos criterios, es probable que el respirador no ajuste de manera adecuada. Seleccionar una pieza facial de distinto tamaño
puede ofrecerle un ajuste más adecuado. Es posible que sea necesario colocarse más de una pieza facial antes de determinar el mejor tamaño para
su cara. Una prueba de ajuste puede comprobar el ajuste adecuado. Si tiene dudas, consulte a su supervisor.
Revisión del sello
Siempre revise el sello del respirador en su cara antes de entrar al área contaminada, de acuerdo con las instrucciones a continuación
para su conguración especíca de respirador. La revisión de sello de presión positiva es el método principal y de preferencia para vericar un
buen sello para todas las conguraciones de cartucho y ltro. La revisión de sello de presión positiva es el único método para este respirador con
Filtros Serie 2000. La revisión de sello del usuario de presión negativa también puede realizarse para una vericación adicional de un buen sello con
este respirador con Cartuchos Serie 6000 y Filtros 7093/7093C. Tenga cuidado de no alterar el sello del respirador al presionar demasiado durante las
revisiones de sello de presión negativa.
IMPORTANTE: NO entre en el área contaminada si NO PUEDE lograr un buen sello. Consulte a su supervisor. Antes de asignar algún
respirador para su uso en un área contaminada, SE DEBE realizar una prueba cualitativa o cuantitativa de ajuste de acuerdo con la norma
de OSHA 1910.134 o la norma de CSA Z94.4 o en Brasil debe ser de acuerdo con el Programa de protección respiratoria de la Secretaría
deltrabajo.
Revisión de sello con presión positiva para todas las conguraciones aprobadas y requerida para
Filtros Serie 2000
1. Quite la cubierta de la válvula al pulsar el botón de la cubierta con el pulgar y deslizarla hacia arriba, paralela con el visor.
2. Coloque la palma de la mano sobre la válvula de exhalación y exhale con cuidado (Fig. 15). Debe tener cuidado de asegurar el buen sello de la válvula
de exhalación. Para llevar a cabo esto, cubra toda la cara de la válvula azul con la base de la palma.
3. Ha logrado un ajuste adecuado, si la pieza facial se abulta un poco y no se detectan fugas de aire entre la carra y el sello facial.
4. Si detecta una fuga de aire en el sello facial, vuelva a posicionar el respirador en la cara y/o vuelva a ajustar la tensión de las bandas elásticas para
eliminar la fuga.
5. Remplace la cubierta de válvula de exhalación al colocar el extremo abierto en la parte superior del ensamble de válvula de exhalación, guíe las
lengüetas por debajo del ensamble de cubierta de válvula y deslice hacia abajo hasta que la cubierta de válvula abroche y quede asentada en
sulugar.
Si detecta una fuga de aire en el sello facial, vuelva a posicionar el respirador en la cara y/o vuelva a ajustar la tensión de las bandas elásticas para
eliminar la fuga. Al realizar la revisión de sello de presión positiva debe tener cuidado de no exhalar muy fuerte. El objetivo es revisar el sello no alterar
el sello entre la máscara y la cara.
6
Page 35

(Español)
ES
Revisión de sello con presión negativa con Cartuchos Serie 6000
1. Coloque las palmas de las manos de modo que cubran la cara del cartucho o el área abierta del Soporte del ltro 3M™ 501 e inhale con suavidad.
Ha logrado un ajuste adecuado, si siente que la pieza facial se colapsa un poco y se pega a su cara sin ninguna fuga entre la cara y la pieza facial
(Fig. 16).
2. Si detecta una fuga de aire en el sello facial, vuelva a posicionar el respirador en la cara y/o vuelva a ajustar la tensión de las bandas elásticas para
eliminar la fuga.
Tenga cuidado de no alterar el sello del respirador al presionar demasiado durante las revisiones de sello de presión negativa.
NOTA: Usar el soporte de ltro 501 puede ayudar al usuario del respirador a realizar la revisión del sello con presión negativa.
Revisión de sello con presión negativa con Filtros Serie 7093/7093C
1. Presione las cubiertas de ltro con ambas manos hacia la pieza facial e inhale con suavidad. Ha logrado un ajuste adecuado, si siente que la pieza
facial se colapsa un poco y se pega a su cara sin ninguna fuga entre la cara y la pieza facial (Fig. 17).
2. Si detecta una fuga de aire en el sello facial, vuelva a posicionar el respirador en la cara y/o vuelva a ajustar la tensión de las bandas elásticas para
eliminar la fuga.
Tenga cuidado de no alterar el sello del respirador al presionar demasiado durante las revisiones de sello de presión negativa.
Fig. 15
Fig. 16
Fig. 17
Revisión de la presión negativa con línea de aire dual
1. Desconecte la manguera de línea de aire de la válvula para control de aire.
2. Inhale con suavidad con el tubo de respiración todavía conectado a la válvula para control de aire. Ha logrado un ajuste adecuado, si siente que la
pieza facial se colapsa un poco y se pega a su cara sin ninguna fuga entre la cara y la pieza facial.
3. Para combinación de línea de aire dual con cartuchos y ltros anexos, realice una revisión de sello como se indica en las instrucciones del cartucho o
ltro correspondiente.
4. Si detecta una fuga de aire en el sello facial, vuelva a posicionar el respirador en la cara y/o vuelva a ajustar la tensión de las bandas elásticas para
eliminar la fuga.
IMPORTANTE: NO entre en el área contaminada si NO PUEDE lograr un buen sello. Consulte a su supervisor. Antes de asignar algún
respirador para su uso en un área contaminada, se debe realizar una prueba cualitativa o cuantitativa de ajuste de acuerdo con la norma
de OSHA 1910.134 o la norma de CSA Z94.4.
REMOCIÓN DEL RESPIRADOR
1. Aoje bien las seis bandas para la cabeza al levantar los broches.
2. Quítese el respirador al jalar las bandas sobre la cabeza.
PRUEBA DE AJUSTE
La efectividad de un respirador se reducirá si no se logra el ajuste correcto. Por lo tanto, debe realizar una prueba de ajuste cuantitativa o cualitativa
antes de asignar el respirador. La prueba de ajuste es un requerimiento de OSHA, CSA y BMOL. Los respiradores deben someterse a pruebas de
ajuste en conjunto con cualquier equipo de protección personal (EPP) que el usuario pueda usar en su entorno de trabajo, el cual pueda afectar el
ajuste del respirador (por ejemplo, capuchas, cascos, gafas de seguridad, protectores auditivos, etc.). Para más información relacionada con la prueba
de ajuste, comunícate con el Servicio Técnico de 3M.
Prueba cuantitativa de ajuste
La prueba cuantitativa de ajutes (QNFT) puede realizarse con un Adaptador para prueba de ajuste 3M™ 601 y Filtros P100, como los Filtros para
partículas 3M™ 2091 ó 7093.
Prueba cualitativa de ajuste
La prueba cualitativa de ajuste (QLFT) son el Equipo de prueba cualitativa de ajuste 3M™ FT-10 o FT-30 puede realizarse con cualquiera de los ltros
para partículas aprobados por el NIOSH.
7
Page 36

(Español)
ES
Entrada y salida del área contaminada
• Los contaminantes suspendidos en el aire que pueden ser peligrosos para su salud incluyen aquellos tan pequeños que no puede verlos u olerlos.
• Siempre realice una prueba de sello antes de entrar al área contaminada.
• Abandone de inmediato el área contaminada si ocurre alguna de las siguientes condiciones:
• Si se daña cualquier parte del sistema.
• Si se le diculta la respiración.
• Si siente mareos o si se ve afectada su visión.
• Si percibe los contaminantes por el gusto u olfato.
• Si siente irritación en cara, ojos, nariz o boca.
• Si sospecha que la concentración de los contaminantes puede haber alcanzado los niveles en los que el respirador ya no proporcione una
protección adecuada.
• No use este respirador para entrar a áreas donde:
• Las atmósferas sean decientes de oxígeno.
• Las concentraciones de los contaminantes sean desconocidas.
• Las concentraciones de los contaminantes sean inmediatamente peligrosas para la vida o salud.
• Las concentraciones de contaminantes excedan la MUC determinada con el APF para el sistema respirador especíco o el APF estipulado por
las normas gubernamentales correspondientes, lo que sea menor.
INSPECCIÓN, LIMPIEZA Y ALMACENAMIENTO
W ADVERTENCIA
No seguir estas instrucciones puede reducir el desempeño del respirador, provocar exposición a los contaminantes superior al OEL, y ocasionar
enfermedad o incluso la muerte.
• No limpie el respirador con solventes. Limpiar el respirador con solventes puede degradar los componentes de éste y reducir su efectividad.
• Antes de cada uso, revise los componentes del respirador para asegurar las condiciones adecuadas de funcionamiento.
Procedimiento de inspección
Revise el respirador antes de cada uso para asegurarse que está en buenas condiciones de operación. Antes de cada uso debe remplazar cualquier
parte dañada o defectuosa. No entre en el área contaminada si el respirador tiene alguna parte dañada o defectuosa. Se recomienda el siguiente
procedimiento de inspección.
1. Revise que la pieza facial no tenga grietas, rasgaduras o polvo. Asegúrese que la pieza facial, en especial el área de sello, no esté distorsionada.
2. Revise que las válvulas de inhalación no estén distorsionadas, agrietadas o rasgadas.
3. Revise que las bandas para la cabeza estén intactas y tengan buena elasticidad.
4. Revise que todas las partes plásticas esten agrietadas o se haya aojado. Asegúrese que los empaques de las conexiones tipo bayoneta estén en
buenas condiciones.
5. Quite la cubierta de la válvula de exhalación y revise que la válvula y el asiento de ésta no estén sucios, distoricionados, agrietados o rasgados.
Reemplace la cubierta para válvula de exhalación.
6. Revise que el visor no tenga daños que impidan el desempeño del respirador o diculten la visión.
Limpieza y mantenimiento
Se recomienda limpiar el respirador después de cada uso.
1. Quite los cartuchos, ltros y/o tubos de respiración y copa nasal. Si es necesario, también puede desarmar la cubierta de la válvula de exhalación, el
ensamble de válvula de exhalación, el diafragma para comunicación, el ensamble tipo bayoneta, el visor y el sello facial.
2. Con excepción de los ltros y cartuchos, limpie la pieza facial al sumergir en solución de limpieza con agua tibia, sin que ésta exceda 49°C (120°F),
y talle con un cepillo suave hasta que quede limpia. Si es necesario, agregue detergente neutro. No use limpiadores que contengan lanolina u otro
aceite.
3. Desinfecte la pieza facial al humedecerla en una solución de amoníaco cuaternario o hipocloruro de sodio (30 ml [1oz] de blanqueador doméstico en
7.5 l [2 galones] de agua) u otro desinfectante.
4. Lave en agua fresca y tibia, y deje secar al aire en una atmósfera no contaminada. No vuelva a colocar la copa nasal hastsa que la pieza facial esté
totalmente seca.
5. Antes de cada uso debe revisar los componentes del respirador. Debe eliminar cualquier componente dañado o deteriorado.
6. Debe almacenar el respirador limpio lejos de áreas contaminadas.
ESPECIFICACIONES
Contacte al Servicio Técnico 3M para obtener las especicaciones técnicas, como peso, materiales de construcción, entre otros. Este producto no
contiene componentes de látex de hule natural.
Selección y aprobación de cartucho y ltro
Antes de usar cualquiera de estos productos, el usuario debe leer el uso especíco, las limitaciones de uso e información de advertencia incluidos
en las Instrucciones y la literatura del producto, o llame al Servicio Técnico. No exceda el uso máximo de concentraciones establecidas por las
normasregulatorias.
8
Page 37

Cartuchos 3M™ Serie 6000
ES
(Español)
Aprobación NIOSH
Ciertos vapores orgánicos X X X X X X X X X X X X
Cloro X X X X X X X X X
Cloruro de hidrógeno X X X X X X
Dióxido de azufre X X X X X X X X X
Dióxido de cloro X X X
Ácido sulfhídrico X X X X X X X X
Fluoruro de hidrógeno X X X X
Formaldehído X X X
Amoníaco X X X
Metilamina X X X
Vapor de mercurio X X X
Filtro para partículas tipo P100 X X X X X X X X X
** Sugerido por 3M para uso contra metilbromuro o yoduro de radio hasta 5ppm con remplazo diario de cartucho.
NOTA: No está aprobado por NIOSH para uso contra metilbromuro o yoduro de radio.
Aprobación NIOSH
P100 X X X X X X X X
P95 X X X X
N95 X X
HF X X
6001
2071
6001i
2078**
6002
2076 HF
6003
6004
2091
6005
6007
Filtros 3M™
2096
2097**
6009S
60921
2291
60921i
60922
2296
60923
2297**
60924
5N11
60925
5P71
60926
7093
60927
60928**
7093C
5935BR
Alivio para niveles
molestos*
Gases ácidos X X X X X
Vapores orgánicos X X X X
* Sugerido por 3M para alivio contra niveles molestos de gas ácido y vapores orgánicos. Niveles molestos se reere a concentraciones que no
excedan el PEL de OSHA o los límites gubernamentales de exposición ocupacional, lo que sea menor. No use para protección respiratoria contra
gases ácidos/vapores orgánicos.
** Sugerido por 3M para protección contra ozono hasta 10 veces el PEL de OSHA o los límites de exposición permitidos correspondientes, lo que sea
menor.
NOTA: No aprobado por el NIOSH para uso contra ozono.
En Brasil, el ltro 5935BR está aprobado como un ltro N95 por NIOSH y un ltro P3 por BMOL.
Adaptadores y Soportes para ltro 3M™
Número Descripción
501 Soporte de ltro para uso con Cartucho Serie 6000 y Filtros 5N11 y 5P71.
502 Adaptador de ltro para uso con Cartucho Serie 6000 y Filtros 2000 y 7093/7093C.
603 Adaptador de ltro para uso con Filtros Serie 5N11 y Filtros 5P71.
En Brasil, el Filtro 5935BR 3M™ puede usarse con Adaptador de ltro 603 y Soporte de ltro 501 en la Pieza facial de cara completa
3M™Serie6000.
Vida útil de los cartuchos químicos y ltros para partículas
PRECAUCIÓN
No eliminar de manera adecuada los cartuchos, ltros o respiradores usados y contaminados con materiales peligrosos puede ocasionar
exposiciones personales, al igual que daño ambiental. El manejo, transporte y la disposición de cartuchos, ltros o respiradores usados debe
cumplir con todas las leyes y regulaciones federales, estatales y locales.
9
Page 38

(Español)
ES
Limitaciones del tiempo de uso
1. Los cartuchos y ltros deben usarse antes de la fecha de vencimiento en el empaque.
2. Los ltros para partículas se deben reemplazar si se dañan, ensucian o si se detecta una mayor resistencia a la respiración. Los ltros de la serie N
no se deben usar en entornos con presencia de aceites. Es posible que el uso de los ltros de la serie R deba limitarse a 8 horas de uso continuo o
intermitente si hay presencia de aerosoles. En entornos con presencia de aerosoles aceitosos, los ltros de la serie P deben reemplazarse después de
40 horas de uso o después de 30 días de haber empezado a usarlo, lo que ocurra primero.
3. La vida útil de estos cartuchos para gases/vapores dependerá de la actividad del usuario (frecuencia respiratoria), del tipo especíco y la
concentración de contaminantes y de las condiciones ambientales, como humedad, presión y temperatura. Debes remplazar los cartuchos de
acuerdo con las indicaciones de vida útil y según un programa de cambio establecido o antes, si detectas olor, sabor o irritación proveniente de
agentes contaminantes. Consulta el software 3M Service Life en www.3M.com/sls.
4. Los cartuchos para vapor de mercurio 6007 y 60927 deben desecharse dentro de las 50 horas de uso contra el vapor de mercurio, o bien de acuerdo
con la vida útil del producto para vapores orgánicos, cloro, sulfuro de hidrógeno o dióxido de azufre, o cuando los olores de los vapores o gases se
vuelven perceptibles, lo que ocurra primero. El vapor de mercurio no tiene olor.
INSTRUCCIONES PARA REEMPLAZO DE PARTE
Ensamble de pieza facial de cara completa 3M™ Ultimate FX FF-400
El ensamble de pieza facial consiste de ensamble de arnés para la cabeza, ensamble de copa nasal, ensamble de diafragma para comunicación,
ensamble de válvula de exhalación, ensamble de visor, sello facial (pequeño, mediano o grande), ensamble de marco (marco, tuerca y tornillo),
ensamble tipo bayoneta y cubierta para válvula de exhalación. Para desarmar el ensamble de visor del sello facial, quite el tornillo Phillips del marco,
retire el marco del sello facial y quite el sello del ensamble de visor.
Reemplazo de cubierta de válvula
1. Quite la cubierta de la válvula al pulsar el botón de la cubierta y deslizarla hacia arriba, paralela con el visor (Fig. 18).
2. Remplace la cubierta de válvula al colocar el extremo abierto en la parte superior del ensamble de válvula de exhalación, guíe las lengüetas por
debajo del ensamble de cubierta de válvula y deslice hacia abajo hasta que la cubierta de válvula abroche y quede asentada en su lugar.
Fig. 18
Reemplazo del ensamble de válvula de exhalación
1. Quite la cubierta de la válvula al pulsar el botón de la cubierta y deslizarla hacia arriba, paralela con el visor (Fig. 18).
2. Quite el ensamble de válvula de exhalación al girar en sentido contrario de las manecillas del reloj 1/4 de vuelta (Fig. 19).
3. Remplace el ensamble de válvula de exhalación al alinear las orejetas con la abertura del ensamble de válvula de exhalación en el visor y gire en
sentido de las manecillas del reloj 1/4 de vuelta hasta que se detenga.
4. Remplace el ensamble de cubierta de la válvula.
Fig. 19
Reemplazo de válvula de exhalación
1. Quite la cubierta de la válvula al pulsar el botón de la cubierta y deslizarla hacia arriba, paralela con el visor (Fig. 18).
2. Quite el ensamble de válvula de exhalación al girar en sentido contrario de las manecillas del reloj 1/4 de vuelta (Fig. 19).
3. Tome la válvula y jale para sacar cada vástago de ésta del asiento de la válvula.
4. Revise el asiento de la válvula para vericar que esté limpia y en buenas condiciones.
5. Coloque el repuesto nuevo de la válvula de exhalación sobre el puerto de exhalación al insertar los vástagos y jale desde el lado opuesto hasta que
ambos hayan quedado abrochados en su lugar. Empuja lateralmente sobre los vástagos de la válvula para asegurarte de que estén bienasentados.
10
Page 39

(Español)
ES
6. Remplace el ensamble de válvula de exhalación.
7. Remplace la cubierta de válvula.
NOTA: Realice una revisión de presión negativa para asegurarse que la válvula de exhalación funcione de manera correcta.
Reemplazo del Ensamble de copa nasal
El Ensamble de copa nasal consiste de copa nasal y válvulas de inhalación. Está diseñado para su instalación directa en el visor y para colocación
cómoda sobre la boca y nariz del usuario del respirador para ayudar a purgar el aire exhalado y prevenir el empañamiento del visor.
1. Quite el ensamble de copa nasal al tomar la copa justo debajo de la válvula de inhalación y sacarla con suavidad del ensamble del visor (Fig. 20).
2. Para remplazar, coloque el ensamble de copa nasal en el ensamble del visor al alinear el anillo de plástico rígido en la copa nasal con el ensamble del
visor y presionar con rmeza en las lengüetas centrales hasta que la copa nasal quede abrochada y asentada en su lugar (Fig. 21).
3. Presione el anillo superior de la copa nasal hasta que las lengüetas queden abrochadas en su lugar.
Fig. 20 Fig. 21
Reemplazo del Ensamble de diafragma para comunicación
1. Quite el ensamble de copa nasal al tomar la copa justo debajo de la válvula de inhalación y sacarla con suavidad del ensamble del visor (Fig. 20).
2. Quite la cubierta de la válvula al pulsar el botón de la cubierta y deslizarla hacia arriba, paralela con el visor (Fig. 18).
3. Quite el ensamble de válvula de exhalación al girar en sentido contrario de las manecillas del reloj 1/4 de vuelta.
4. Quite el ensamble de diafragma para comunicación al girar en sentido contrario de las manecillas del reloj 1/4 de vuelta (Fig. 22).
5. Remplace el diafragma para comunicación al alinear las orejetas de éste con la abertura del diafragma en el ensamble del visor.
6. Gire en sentido de las manecillas del reloj 1/4 de vuelta hasta que quede rme y se detenga.
7. Remplace el ensamble de válvula de exhalación.
8. Remplace el ensamble de cubierta de la válvula.
9. Remplace el ensamble de copa nasal (Fig. 21).
Fig. 22
Reemplazo del Ensamble tipo bayoneta
El Ensamble tipo bayoneta consiste del anillo tipo bayoneta, la conexión tipo bayoneta y el empaque de inhalación.
1. Quite el ensamble de copa nasal al tomar la copa justo debajo de la válvula de inhalación y sacarla con suavidad del ensamble del visor (Fig. 20).
2. Quite el anillo tipo bayoneta al girar en sentido contrario a las manecillas del reloj 1/4 de vuelta (Fig. 23).
3. Quite la bayoneta del ensamble de visor (Fig. 24).
4. Alinee la llave en la nueva bayoneta con ranura en el ensamble del visor y sostenga con rmeza.
5. Alinee las orejetas con las ranuras en las bayonetas y gire en sentido de las manecillas del reloj 1/4 de vuelta hasta el tope.
6. Remplace el ensamble de copa nasal (Fig. 21).
11
Page 40

(Español)
ES
Fig. 23 Fig. 24
Reemplazo de válvula de inhalación
Las válvulas de inhalación están ubicadas en ensambles tipo bayoneta en los puertos de inhalación de la pieza facial y dentro de los puertos de
inhalación de la copa nasal. Antes del uso de cada respirador debe revisar estas válvulas y cambiarlas cada vez que sea necesario o si están
dañadas.
1. Quite las válvulas existentes al tomar la válvula y sacar el vástago de ésta del asiento de la válvula.
2. Instale válvulas nuevas en el asiento de válvula al presionar el vástago de la válvula a través del a asiento. Asegúrese que el vástago de la válvula esté
bien enganchado en el asiento, que esté plano y que se mueva con libertad; es decir, que gire.
Reemplazo del Ensamble de arnés para la cabeza
1. Quite el Arnés para la cabeza existente al zafar el broche de los botones (Fig. 25).
2. Jale las lengüetas del arnés para la cabeza hacia un ángulo y fuera de los broches. Note la orientación que tienen las lengüetas y los broches del
Arnés para la cabeza para volverlo a ensamblar.
3. Coloque el arnés para la cabeza hacia abajo en una supercie plana con el logotipo de 3M mirando hacia arriba (Fig. 26).
4. Entrelace las lengüetas del arnés para la cabeza a través de los broches y jale cada una hasta que su extremo haya pasado por completo por el
broche.
5. Coloque el visor de la pieza facial en una supercie plana y coloque el nuevo arnés para la cabeza y abroche el ensamble en la pieza facial. El arnés
para la cabeza debe ensamblarse con el logotipo de 3M mirando hacia arriba.
6. Abroche cada broche en el botón correspondiente y asegúrese que las bandas no queden torcidas.
Fig. 25 Fig. 26
Reemplazo del Ensamble de marco de visor
El Ensamble de marco de visor consiste de un marco de visor, una tuerca y un tornillo.
1. Quite el tornillo Phillips del marco. Saque el marco del sello facial (Fig. 27).
2. Coloque el marco nuevo, alinee las marcas superiores e inferiores. Instale y apriete bien el tornillo. Asegúrese que las marcas de alineación estén bien
alineadas en la parte superior e inferior (Fig. 28).
Fig. 27 Fig. 28
Reemplazo del Ensamble de visor
El Ensamble de visor consiste de un lente rígido de policarbonato.
1. Quite el ensamble de copa nasal al tomar la copa justo debajo de la válvula de inhalación y sacarla con suavidad del ensamble del visor (Fig. 20).
2. Quite la cubierta de la válvula al pulsar el botón de la cubierta y deslizarla hacia arriba, paralela con el visor (Fig. 18).
12
Page 41

(Español)
ES
3. Quite el ensamble de válvula de exhalación al girar en sentido contrario a las manecillas del reloj 1/4 de vuelta y quitar el puerto central del visor (Fig.
19).
4. Quite el ensamble de diafragma para comunicación al girar en sentido contrario de las manecillas del reloj 1/4 de vuelta (Fig. 22).
5. Quite los ensambles tipo bayoneta al girar los anillos de bayoneta en sentido contrario a las manecillas del reloj 1/4 de vuelta (Fig.23) y quitar las
bayonetas del ensamble de visor (Fig. 24).
6. Quite el tornillo Phillips del marco. Saque el marco del sello facial (Fig. 27).
7. Quite el sello facial del visor.
8. Coloque un nuevo visor y sello facial al alinear las marcas superiores e inferiores. Coloque el marco nuevo, alinee las marcas superiores e inferiores.
Instale y apriete bien el tornillo. Asegúrese que las marcas de alineación estén bien alineadas en la parte superior e inferior (Fig. 28).
9. Instale el diafragma para comunicación.
10. Instale el ensamble de válvula de exhalación.
11. Reemplace la cubierta para válvula de exhalación.
12. Remplace los Ensamble tipo bayoneta
13. Remplace el ensamble de copa nasal (Fig. 21).
Partes de repuesto y accesorios para Pieza facial de cara completa 3M™ Ultimate FX FF-400
Número Descripción
FF-401 Pequeño
FF-402 Mediano
FF-403 Grande
Número Descripción
FF-400-01 Broche de arnés para la cabeza
FF-400-02 Botón de arnés para la cabeza
FF-400-03 Ensamble de visor
FF-400-04 Arnés para la cabeza
FF-400-05 Ensamble de marco c/tornillo
FF-400-06 Arnés cómodo
FF-400-07 Conjunto de válvula de exhalación
FF-400-08 Válvula de inhalación de ensamble tipo bayoneta
FF-400-09 Cubierta de válvula de exhalación (estándar)
FF-400-10 Cubierta para válvula de exhalación (sólida)
FF-400-11 Ensamble de copa nasal
FF-400-13 Ensamble de diafragma para comunicación
FF-400-20 Kit de gafas
7582 Válvula de inhalación
7583 y 6583 Válvula de exhalación 3M™ Cool Flow™
Número Descripción
FF-400-15 Mica protectora del visor
FF-400-17 Mica protectora del visor semipermanente
504 Paños para limpieza del respirador
601 Adaptador para prueba cuantitativa de ajuste
FF-400-03
7582
7583
6583
FF-400-09
FF-400-10
FF-400-11
3
FF-400-01
FF-400-05
FF-400-07
FF-400-06
FF-400-13
FF-400-04
FF-400-02
FF-400-08
Fig. 29
13
Page 42

(Español)
ES
NOTA para cumplimiento en Brasil:
1. En Brasil, de acuerdo con el programa Protección Respiratoria del Ministerio de Trabajo, los respiradores de máscara facial de cara completa
probados de manera cuantitativa a los nes de ajuste no se deben usar cuando las concentraciones de contaminantes sean superiores a 100 veces
el límite de exposición permitido en modo de puricación de aire.
2. No use el producto en atmósferas decientes o demasiado de oxígeno.
3. Almacenamiento, transporte y cuidado: Almacene en un área limpia y seca, lejos de contaminantes y temperaturas o humedad extremas.
4. Los componentes de este respirador están hechos de materiaels que no se espera causen daños a la salud.
5. Es necesario tener cuidado especial al usar este producto en atmósferas explosivas.
6. En Brasil, no use respiradores puricadores de aire forzado si el ujo de aire es menor a 4 cfm (120 lpm) para piezas faciales de ajuste apretado o 6
cfm (170 lpm) para capuchas y/o cascos.
Fecha de manufactura del producto
Las partes del producto muestras marcas con información de la fecha de manufactura, en el ejemplo a continuación se describe su lectura:
Código de fecha: mes 12 de 2019 (12/19)
12
11 1
10
9
8
7
PARA OBTENER MÁS INFORMACIÓN
En Estados Unidos:
Internet: www.3M.com/workersafety
1 9
6
2
3
4
5
Internet: www.3m.com.mx/saludocupacional
O llame a 3M en su localidad.
14
98-0060-0135-2_6
34-8723-6751-0
Page 43

3
(Português)
PT
Respirador Reutilizável Peça Facial Inteira FX
Instruções de uso
W ADVERTÊNCIA
Este respirador ajuda a proteger contra certos contaminantes transportados pelo ar. O uso inadequado pode resultar em
enfermidade ou morte. Para o uso correto consulte um supervisor e as Instruções de Uso ou telefone para a 3M nos EUA pelo
número 1-800-243-4630. No Brasil, entre em contato pelo número: 0800-0132333.
IMPORTANTE
Estas Instruções de Uso fornecem informações somente sobre o uso da peça facial. Informações importantes são fornecidas nas Instruções de Uso,
com cada um dos sistemas de ltração que são usados com a Peça Facial Inteira 3M™ FF-401, FF-402 e FF-403. Leia completamente todas as
Instruções de Uso e advertências antes de usar. Guarde estas Instruções de Uso para consulta. Se você tiver perguntas com relação a estes produtos
entre em contato com o Serviço Técnico 3M.
Nos Estados Unidos:
Website: www.3M.com/workersafety
Assistência Técnica: 1-800-243-4630
Uso Previsto
Os Respiradores de Peça Facial Inteira Ultimate FX da Série FF-400 (FF-401, FF-402 e FF-403) 3M™ foram projetados para ajudar na proteção
respiratória contra certos contaminantes dispersos no ar quando usados de acordo com todas as instruções e restrições de uso e os regulamentos
de saúde e segurança aplicáveis. As peças faciais da série FF-400 atendem às exigências da norma ANSI Z87.1-2010 para proteção facial e ocular.
Esses produtos fornecem proteção facial e ocular limitada contra partículas projetadas no ar.
Respiradores selecionados, utilizados e mantidos adequadamente ajudam a proteger contra certos contaminantes ao reduzir as
concentrações de partículas transportadas pelo ar abaixo do Limite Ocupacional de Exposição (OEL). É essencial seguir todas as
instruções e regulamentações do governo a respeito do uso deste produto, incluindo a utilização do sistema completo de respirador
durante todo o tempo de exposição a m de que o produto ajude a proteger o usuário. O uso incorreto dos respiradores pode
resultar em sobre-exposição aos contaminantes e levar a doenças ou morte. Para o uso correto, consulte o seu supervisor e as
Instruções de Uso ou entre em contato com o Serviço Técnico da 3M.
No Brasil:
Website: www.3Mepi.com.br
Assistência Técnica: 0800-0132333
W ADVERTÊNCIA
Lista de Avisos e Precauções dentro destas Instruções de Uso
W ADVERTÊNCIA
O não cumprimento destas instruções poderá reduzir o desempenho do respirador, expondo-o a contaminantes acima do OEL, e
pode resultar em doenças ou morte.
• Para ajudar a manter uma boa vedação entre o rosto e a vedação facial, esta deve estar livre de obstruções em todos os momentos.
Não use com barba ou pêlos faciais que impeçam o contato direto entre o rosto e a vedação facial do respirador. Não use com
óculos de lentes corretivas. Se for necessária a utilização de óculos com lentes corretivas, deve ser usado um Kit de Óculos 3M™
dentro do respirador.
• Não limpe o respirador com solventes. A limpeza com solventes pode degradar alguns componentes do respirador e reduzir a
eciência domesmo.
• Inspecione todos os componentes do respirador antes de cada uso para assegurar uma condição operacional adequada.
• Não altere, faça mau uso ou não tenha cuidado com este respirador.
PRECAUÇÃO
Falha em descartar adequadamente cartuchos, ltros usados ou respiradores contaminados por materiais perigosos pode resultar em exposições
pessoais bem como dano ambiental. O manuseio, o transporte e o descarte de cartuchos, ltros ou respiradores usados devem cumprir todas as
leis e regulamentos federais, estaduais, provinciais e locais aplicáveis.
Limitações e Precauções NIOSH para Uso em Pressão Negativa
Podem ser aplicadas as seguintes restrições. Veja a Etiqueta de Aprovação NIOSH. Se você estiver utilizando a peça facial série FF-400 como parte
de uma conguração de Respirador de Suprimento de Ar, consulte as Instruções de Uso que acompanha o seu dispositivo de controle de ar para
informação sobre Precauções e Limitações NIOSH.
A - Não deve ser usado em atmosferas contendo menos do que 19,5% de oxigênio.
B - Não deve ser usado em atmosferas imediatamente perigosas à vida ou à saúde.
C - Não exceder as concentrações máximas de uso estabelecidas pelas normas regulamentadoras.
H - Siga o programa estabelecido para troca do ltro e canister ou observe a ESLI para assegurar que o cartucho e os canister sejam substituídos antes
de ocorrer alguma ruptura.
1
Page 44

(Português)
PT
J - Falha em usar ou fazer manutenção adequadamente neste produto pode resultar em ferimentos ou morte.
L - Siga as Instruções de Uso do fabricante quanto a troca de cartuchos, canister e/ou ltros.
M - Todos os respiradores aprovados devem ser selecionados, ajustados, usados e mantidos de acordo com MSHA, OSHA ou outras regulamentações
aplicáveis.
N - Nunca substitua, modique, adicione ou omita partes. Use somente as peças de reposição na conguração como especicado pelo fabricante.
O - Consulte as Instruções de Uso, e/ou manuais de manutenção, para informação sobre o uso e manutenção destes respiradores.
S - Aplicam-se Instruções de Uso em situações especiais ou críticas e/ou limitações especícas de uso. Consulte as Instruções de Uso antes da
colocação.
Instruções de Uso S-Especiais ou Críticas
Os Cartuchos de Vapor Orgânico com Indicador de Vida Útil (6001i e 60921i) 3M™ são equipados com um Indicador de Vida Útil (ESLI) passivo 3M™.
O indicador deve ser visível quando se usa o respirador. Caso não consiga visualizar prontamente o ESLI, use um espelho para isso; conte com um
colega de trabalho que possa visualizar o ESLI; ou vá até uma área limpa, remova o respirador e visualize o ESLI. Não dependa exclusivamente do
ESLI de vapor orgânico, a menos que seu empregador tenha determinado que ele é adequado para o seu local de trabalho. Consulte as Instruções do
Uso de 6001i ou 60921i para mais informações, incluindo Instruções Especiais referentes ao ESLI.
Cartuchos de Vapor de Mercúrio, Vapor Orgânico e Gás Ácido (6007 e 60927) 3M™ devem ser descartados dentro de 50 horas de uso contra vapor
de mercúrio.
Filtro para Particulado P100, Fluoreto de Hidrogênio, com Alívio para Baixas Concentrações de Gases Ácidos 2076HF 3M™ e o Filtro para Particulado
P100, Fluoreto de Hidrogênio, com Alívio para Baixas Concentrações de Gases Ácidos 7093C 3M™, são recomendados apenas para baixas
concentrações de gases ácidos ou vapores orgânicos. Baixas concentrações referem-se a concentrações que não excedem o PEL OSHA ou os limites
aplicáveis de exposição ocupacional do governo, prevalecendo as inferiores. Não use para proteção respiratória contra gases ácidos ou vapores
orgânics, exceto uoreto de hidrogênio.
Para montar as Traquéias Duplas de Linha de Ar 3M™ com Cartuchos/Filtros 3M™, devem ser removidas as válvulas de inalação da peça facial.
Se a peça facial deve ser usada no modo puricador de ar (sem usar as Traquéias 3M™, SA-1600 ou SA-2600), as válvulas de inalação devem ser
recolocadas na peça facial antes do uso.
Gerenciamento do Programa do Respirador
O uso ocupacional dos respiradores deve estar em concordância com as normas aplicáveis de saúde e segurança. Pela lei dos Estados Unidos, os
empregadores devem estabelecer um programa por escrito de proteção respiratória que obedeça os requisitos do Padrão de Proteção Respiratória
OSHA 29 CFR 1910.134 e quaisquer normas aplicáveis de substância especíca do OSHA. No Canadá, os requisitos da norma CSA Z94.4 devem ser
seguidos e/ou os requisitos da jurisdição aplicável, como apropriado. No Brasil, siga o Programa de Proteção Respiratória do Ministério do Trabalho.
Para informação adicional sobre esta norma, entre em contato com OSHA em www.OSHA.gov. Consulte um Higienista Industrial ou entre em contato
com o Serviço Técnico 3M com questões a respeito da aplicabilidade destes produtos com relação aos seus requisitos de trabalho.
Tabela 1: Principais Seções da OSHA 29 CFR 1910.134
Seção Descrição
A Prática Permissível
B Denições
C Dispositivos de Proteção Respiratória
D Seleção de Respiradores
E Avaliações Médicas
F Ensaio de Vedação
G Uso de Respiradores
H Manutenção e Cuidado com os Respiradores
I Uso e Qualidade do Ar Respirável
J Identicação de Cartuchos, Filtros, e Canisters
K Treinamento e Informação
L Avaliação do Programa
M Manutenção de Registros
Fatores de Proteção Atribuídos
Tabela 2: Fatores de Proteção Atribuídos (FPA)
Tipo de Respirador FPA
Respirador de Peça Facial Completa para Puricação de Ar a Pressão Negativa 10/50
Respirador de Suprimento de Ar (SAR) tipo Peça Facial Completa de Fluxo Contínuo 1000
1
O usuário do respirador deve testar o ajuste com um método de ensaio de vedação quantitativo a m de usar um fator de proteção atribuído maior
que 10 quando usado como respirador puricador de ar a pressão negativa.
2
1
Page 45

(Português)
PT
No Brasil, de acordo com o Programa de Proteção Respiratória do Ministério do Trabalho, não use respiradores de peça facial inteira testados
quantitativamente caso as concentrações de contaminantes sejam maiores que 100 vezes o limite de exposição permissível.
INSTRUÇÕES DE OPERAÇÃO
Desembalar
Inspecione o conteúdo da embalagem quanto a danos de transporte e assegure-se de que todos os componentes estão presentes (Consulte a
Fig.27). O produto deve ser inspecionado antes de cada uso seguindo os procedimentos na seção “Inspeção” desta Instruções de Uso.
Montagem
Montagem de Cartucho 3M™ Série 6000, Filtro 7093, e Cartucho/Filtro 7093C (Fig. 1, 2)
1. Alinhe o encaixe do cartucho ou ltro com o pequeno ressalto sólido de baioneta na peça facial e empurre em conjunto.
2. Gire o cartucho ou ltro no sentido horário até estar rmemente assentado e não puder ser mais girado (cerca de 1/4 de volta).
3. Repita com o segundo cartucho ou ltro.
Filtro 3M™ Série 2000 (Fig. 3)
1. Alinhe a abertura do ltro com o ltro anexo na peça facial e aperte em conjunto.
2. Gire o ltro no sentido horário até encaixar rmemente e não puder ser girado mais.
3. Repita para o segundo ltro.
Fig. 1 Fig. 2
Fig. 3
Filtros 5N11 e 5P71 3M™
1. Coloque o ltro no Retentor 3M™ 501 de modo que o lado impresso do ltro esteja voltado para o cartucho.
2. Pressione o cartucho para dentro do retentor de ltro. Ele deve prender rmemente com um estalo dentro do retentor de ltro. Quando corretamente
instalado, o ltro deve cobrir completamente a face do cartucho (Fig. 4).
3. Para substituir o ltro, remova o retentor erguendo a lingueta.
Fig. 4
No Brasil, o Filtro 3M™ 5935BR pode ser usado com o Retentor de Filtro 3M™ 501 na Peça Facial Inteira 3M™ Série FF-400.
Montagem do Adaptador 3M™ 502
1. Alinhe o adaptador sobre o cartucho. Encaixe o adaptador sobre a frente do cartucho, colocando os polegares de ambas as mãos sobre o topo do
adaptador e os dedos ao longo das laterais inferiores do cartucho (Fig. 5).
2. Engate o encaixe traseiro apertando a lateral de trás do cartucho e o adaptador juntos, usando a mesma posição das mãos. Deve ser escutado um
clique quando cada encaixe for engatado (Fig. 6).
3. Coloque o ltro em direção ao suporte do ltro de modo que o ltro venha em contato uniforme com a junta. Gire no sentido horário em um quarto de
volta até assentar rmemente e o ltro não possa mais ser girado. Repetir para o segundo ltro.
3
Page 46

(Português)
PT
Fig. 5 Fig. 6
IMPORTANTE: O conjunto do adaptador de Filtro 3M™ 502, uma vez instalado em um Cartucho 3M™ Série 6000, não deverá ser removido ou
reutilizado. A remoção ou reutilização pode resultar em vazamento, superexposição, doenças ou morte.
Adaptador de Filtro 603 e Filtros 5N11 ou 5P71 3M™
1. Alinhe o encaixe na borda do adaptador 603 com a marca da peça facial como mostrado (Fig. 7).
2. Gire o adaptador um quarto de volta no sentido horário até parar. Para remover o adaptador, gire um quarto de volta no sentido anti-horário (Fig. 8).
3. Coloque o ltro no retentor 501 com a impressão do ltro voltada para o adaptador 603. Pressione o retentor sobre o adaptador e assegure que a
vedação do ltro está livre de vincos ou folgas (Fig. 9).
1
1
2
Fig. 7
2
Fig. 8
Fig. 9
En Brasil, el ltro 3M™ 5935BR se puede usar con el adaptador de ltro 603 y el retenedor de ltro 501 en las máscaras faciales de cara completa
3MTM serie FF-400.
Montagem do Respirador de Linha de Ar Dupla 3M™
O usuário deve seguir as Instruções de Uso do Respirador de Ar Suprido de Linha de Ar Dupla, fornecidas junto com os Respiradores de Ar Suprido de
Linha de Ar Duplada 3M™.
Montagem das Traquéias Duplas de Linha de Ar
1. Segure a peça facial na sua frente de modo que o logo 3M que voltado para você. Alinhe os dois ramos da traquéia sobre os dois suportes de
baioneta na peça facial (Fig. 10). Para Traquéias 3M™ SA-1500 ou SA-1600, certique-se de que o logotipo 3M na traquéia e na peça facial estejam
ambos voltados para você. Para Traquéias 3M™ SA-2500 ou SA-2600, certique-se de que o logotipo 3M na traquéia está virado na direção oposta
ao logotipo 3M na peça facial.
2. Torça cada ramo da traquéia um quarto de volta no sentido horário até que que rmemente assentado na baioneta e não possa ser girado (Fig. 11 e
12). Não force para que a baioneta não se danique. É mostrado o modelo SA-1500/SA-2500.
3. Prenda a linha de ar aos reguladores de ar aprovados conforme os esquemas de pressão nas Instruções de Uso dos respiradores de suprimento de
ar, linha de ar dupla.
Fig. 10 Fig. 11 Fig. 12
4
Page 47

(Português)
PT
Montagem das Traquéias Duplas de Linha de Ar 3M™ em Combinação com Cartuchos
e/ou Filtros
As versões SA-1600 (montagem frontal) e SA-2600 (montagem traseira) das Traquéias Duplas de Linha de Ar 3M™ permitem o uso de Cartuchos
Série 6000 e Filtros Série 2000 3M™, com aprovação NIOSH. Para listagem dos cartuchos e ltros aprovados, consulte a etiqueta de aprovação
NIOSH inclusa com os kits de Traquéias Duplas de Linha de Ar 3M™.
1. Conecte as traquéias SA-1600 ou SA-2600 na peça facial de acordo com os procedimentos descritos anteriormente. O procedimento é idêntico aos
modelos SA-1500 e SA-2500.
2. Faça uma seleção dos cartuchos e/ou ltros que satisfazem os seus requisitos de proteção respiratória, e prenda nas baionetas externas das
traquéias SA-1600 ou SA-2600.
3. Vista a peça facial de acordo com os procedimentos descritos na seção de “Colocação do Respirador” nas instruções.
4. Depois que o ajuste tenha sido adequadamente testado, execute um ensaio de vedação com pressão positiva e negativa cada vez que o respirador
for usado, de acordo com os procedimentos descritos na seção “Verifcação de Vedação” nas instruções.
Se você não conseguir um ajuste adequado, NÃO entre na área contaminada. Consulte o seu supervisor.
Para montar as Traquéias Duplas de Linha de Ar 3M™ em Combinação com Cartuchos/Filtros 3M™, as válvulas de inalação da peça facial devem
ser removidas.
IMPORTANTE: Se a peça facial for usada no modo de puricação de ar (sem usar as traquéias SA-1600 ou SA-2600), as válvulas de inalação devem
ser recolocadas na peça facial antes do uso.
Uso das Traquéias Duplas de Linha de Ar 3M™ sem Cartuchos ou Filtros
Para usar os Traqueia Dupla Combinada (SA-1600 e SA-2600) sem cartuchos ou ltros, monte uma Tampa para Baioneta 6880 3M™ em cada local de
montagem externo da baioneta da Traqueia Dupla. Quando usado como respirador de peça facial inteira com ar fornecido em uxo contínuo Tipo C, o
Fator de Proteção Atribuído equivale a 1000 vezes o PEL ou outro limite de exposição ocupacional.
INSTRUÇÕES DE AJUSTE
W ADVERTÊNCIA
Falha em seguir estas instruções pode reduzir o desempenho do respirador, expô-lo a contaminantes acima do OEL, e pode resultar
em doenças ou morte.
• Para ajudar a manter uma boa vedação entre o rosto e a vedação facial, esta deve estar livre de obstruções em todos os momentos.
Não use com barba ou pêlos faciais que evitem o contato direto entre o rosto e a vedação facial do respirador. Não use com
óculos de lentes corretivas. Se for necessário usar óculos com lentes corretivas, deve ser usado um Kit de Óculos 3M™ dentro do
respirador.
Estas instruções DEVEM ser seguidas a cada vez em que o respirador for usado.
Colocação do Respirador
NOTA: Dois fatores chave na colocação eciente são colocar inicialmente o nariz na copa nasal para centralizar o respirador na face
e apertar os tirantes duas vezes seguindo as etapas 4, 5, 6, primeiro para acomodar o respirador e a seguir repetir as etapas 4, 5, 6
uma segunda vez para xar a vedação da peça facial. Deve ser tomado cuidado para não apertar em demasia os tirantes de baixo na
primeiravez.
1. Afrouxe totalmente os seis tirantes da cabeça.
2. Segure a frente da peça facial com uma mão e os tirantes/suporte de conforto longe da peça facial com a outra mão, criando uma abertura para a
cabeça. Puxe o conjunto do respirador para baixo sobre a cabeça e face através da abertura. Coloque o nariz no copo de nariz e o queixo na área do
copo de queixo e a seguir aperte a peça facial de modo rme e uniforme contra o rosto (Fig. 13).
3. Puxe o suporte de cabeça para a parte de trás da cabeça (Fig. 13).
NOTA: Repita a sequência das etapas 4 a 6 duas vezes, uma vez para acomodar os tirantes e eliminar a folga, e uma segunda vez para prender e
vedar a peça facial do respirador no rosto.
4. Aperte os tirantes do fundo um por vez. Tenha cuidado para apertar ambos os lados de modo igual (Fig. 14).
5. Aperte os tirantes do meio um por vez. Tenha cuidado para apertar ambos os lados de modo igual.
6. Aperte os tirantes de cima um por vez. Tenha cuidado para apertar ambos os lados de modo igual.
7. Verique novamente todos os tirantes para assegurar que estão apertados e uniformemente tensionados de modo que o suporte da cabeça esteja
centralizado sobre a parte de trás da cabeça. Assegure-se de que os tirantes e abas permanecem planas contra sua cabeça.
Caso seja possível, certique-se de que alguém verique se você colocou o respirador corretamente. Realize uma vericação de vedação do usuário
conforme essas Instruções de Uso.
5
Page 48

(Português)
PT
Fig. 13
Fig. 14
Seleção Inicial de Peças Faciais Pequenas, Médias ou Grandes
Pode ser necessário experimentar mais de uma peça facial antes de determinar o melhor tamanho para o seu rosto.
Depois de colocar, verique o seguinte:
1. Nada (por exemplo cabelo, jóias, etc.) pode estar entre o rosto e a superfície de vedação do respirador. Barba ou costeletas podem ter que ser
aparados ou cortados.
2. Os tirantes inferiores e médios não devem ferir as orelhas.
3. Os olhos devem apontar entre o centro e 1/3 do topo da lente.
4. O respirador não deve car tão apertado contra o rosto de modo que os olhos quem parcialmente fechados.
5. A parte inferior do conjunto da máscara não deve ferir a garganta.
6. Não devem existir folgas visíveis entre a vedação e o rosto.
7. A pele em frente as orelhas não deve car enrugada.
8. O copo de nariz não deve atrapalhar a visão.
9. Assegure-se de que outros equipamentos de segurança não interram com as velas ou o ajuste do respirador.
Se qualquer um destes critérios não for cumprido, é possível que o respirador não se encaixe adequadamente a você. Selecionar uma peça facial de
tamanho diferente pode proporcionar um ajuste mais adequado. Pode ser necessário experimentar mais de uma peça facial antes de determinar o
melhor tamanho para o seu rosto. Um teste de ajuste pode conrmar o ajuste adequado. Se você tiver mais perguntas, fale com seu supervisor.
Vericação de Vedação
Sempre verique a vedação do respirador no seu rosto antes de entrar em uma área contaminada de acordo com as instruções fornecidas
abaixo para a sua conguração especíca de respirador. A vericação de pressão positiva é o principal e preferido método para vericação de uma
boa vedação para todas as congurações de cartucho e ltro. A vericação de vedação positiva é o único método para este respirador com Filtros
Série 2000. A vericação de vedação com pressão negativa também pode ser feita como uma vericação adicional de uma boa vedação para este
respirador com Cartuchos Série 6000 e Filtros 7093/7093C. Tome cuidado para não prejudicar a vedação do respirador ao apertar com muita força
durante as vericações de pressão negativa.
IMPORTANTE: Se você não puder conseguir uma vedação adequada, NÃO entre na área contaminada. Consulte o seu supervisor. Antes de
designar qualquer respirador a ser usado em uma área contaminada, DEVE ser executado um teste de vedação qualitativo ou quantitativo
de acordo com a norma OSHA 1910.134, Norma CSA Z94.4 ou o Programa de Proteção Respiratória do Ministério do Trabalho do Brasil.
Vericação de Vedação com Pressão Positiva para todas as congurações aprovadas e necessárias
para os Filtros Série 2000
1. Remova a tampa da válvula de exalação apertando o fundo da tampa com o polegar e deslizando a tampa para cima, em paralelo com a lente.
2. Coloque a palma da sua mão sobre a válvula de exalação e expire levemente (Fig. 15). Deve-se tomar cuidado para assegurar uma boa vedação da
válvula de exalação. Para fazer isto, cubra toda a face da válvula azul com a base da palma.
3. Se a peça facial inchar ligeiramente e não for detectado nenhum vazamento de ar entre o rosto e a peça facial, foi obtida uma vedação adequada.
4. Se for detectado vazamento de ar, reposicione o respirador sobre seu rosto e/ou reajuste a tensão dos tirantes para eliminar o vazamento, e verique
novamente a vedação.
5. Recoloque a tampa da válvula de exalação colocando a extremidade aberta no topo do conjunto da válvula de exalação, as abas de guia por baixo do
conjunto da tampa da válvula e deslize para baixo até que tampa da válvula trave com um estalo no lugar.
Se for detectado vazamento de ar na vedação da face, reposicione o respirador sobre seu rosto e/ou reajuste a tensão dos tirantes para eliminar o
vazamento e verique novamente a vedação. Deve-se tomar cuidado ao executar a vericação de vedação com pressão positiva para não exalar com
muita força. O objetivo é vericar a vedação, não atrapalhar a vedação entre a máscara e o rosto.
Vericação de Vedação com Pressão Negativa com Cartuchos Série 6000
1. Coloque as palmas das mãos para cobrir a face do cartucho ou área aberta do Retentor de Filtro 3M™ 501 e inale gentilmente. Se você sentir a peça
facial murchar ligeiramente e puxar para mais próximo ao seu rosto sem vazamentos entre o rosto e a peça facial, então foi obtida uma vedação
adequada (Fig. 16).
2. Se for detectado vazamento de ar, reposicione o respirador sobre a face e/ou reajuste a tensão dos tirantes para eliminar o vazamento de ar e
verique novamente a vedação.
Tome cuidado para não atrapalhar a vedação do respirador ao apertar com muita força durante as vericações de vedação com pressão negativa.
6
Page 49

(Português)
PT
NOTA: O uso de Retentor de Filtro 501 pode ajudar o usuário do respirador a conduzir uma vericação de vedação com pressão negativa.
Vericação de Vedação com Pressão Negativa com Filtros 7093/7093C
1. Usando as mãos, aperte ou esprema as tampas dos ltros em direção à peça facial e inale gentilmente. Se você sentir a peça facial murchar
levemente e puxar mais próximo ao seu rosto sem vazamentos entre o rosto e a peça facial, foi obtida uma vedação adequada (Fig. 17).
2. Se for detectado vazamento de ar na peça facial, reposicione o respirador sobre a face e/ou reajuste a tensão dos tirantes para eliminar o vazamento
e verique novamente a vedação.
Tome cuidado para não atrapalhar a vedação do respirador ao apertar com muita força durante as vericações de vedação com pressão negativa.
Fig. 15
Fig. 16
Fig. 17
Vericação de Vedação com Pressão Negativa com Linha de Ar Dupla
1. Desconecte a mangueira de ar da válvula de controle.
2. Com a traquéia ainda conectada à válvula de controle de ar inale levemente. Se você sentir a peça facial murchar levemente e puxar mais próximo ao
seu rosto sem vazamentos entre o rosto e a peça facial, foi obtida uma vedação adequada.
3. Para linha de ar dupla com combinação onde os cartuchos e ltros estão presos, execute a vericação de vedação como descrito acima sob o ltro
ou cartucho adequado que está sendo usado.
4. Se for detectado vazamento de ar na peça facial, reposicione o respirador sobre a face e/ou reajuste a tensão dos tirantes para eliminar o vazamento
e verique novamente a vedação.
IMPORTANTE: Se você não conseguir um ajuste adequado, NÃO entre na área contaminada. Consulte o seu supervisor. Antes de designar
qualquer respirador a ser usado em uma área contaminada, DEVE ser executado um teste de vedação qualitativo ou quantitativo de acordo
com a Norma OSHA 1910.134 ou a Norma CSA Z94.4.
REMOÇÃO DO RESPIRADOR
1. Afrouxe totalmente todos os seis tirantes de cabeça erguendo nas velas.
2. Remova o respirador puxando os tirantes sobre a cabeça.
ENSAIO DE VEDAÇÃO
A ecácia de um respirador será reduzida se não estiver vedado adequadamente. Portanto, deve ser executado um teste de vedação quantitativo ou
qualitativo antes que o respirador seja usado. O ensaio de vedação é um requisito da Occupational Safety and Health Administration (OSHA)/
Administração da Saúde e Segurança Ocupacional dos Estados Unidos, da CSA Canadense e do Ministério do Trabalho do Brasil. Os
respiradores devem ser testados quanto à vedação durante o uso de qualquer equipamento de proteção individual (EPI) que o usuário poderá utilizar
no seu ambiente de trabalho que possa afetar o ajuste do respirador (ex., capuzes, capacetes, óculos de segurança, protetores auriculares, etc.). Para
mais informações acerca dos testes de aptidão, entre em contato com o Serviço Técnico da 3M.
Ensaio de Vedação Quantitativo
O Ensaio de Vedação Quantitativo (QNFT) pode ser conduzido usando um Adaptador de Ensaio de Vedação 601 3M™ e ltros P100 tais como Filtros
de Partículas 3M™ 2091 ou 7093.
Ensaio de Vedação Qualitativo
O Ensaio de Vedação Qualitativo (QLFT) com o Kit de Ensaio Qualitativo 3M™ FT-10 ou FT-30 e pode ser conduzido usando qualquer um dos ltrosde
Partículas com aprovação NIOSH.
Entrada e Saída de uma Área Contaminada
• Contaminantes transportados pelo ar podem ser perigosos para sua saúde incluindo aqueles tão pequenos que não possam ser vistos ou sentido o
cheiro.
• Sempre faça uma vericação de vedação antes de entrar na área contaminada.
• Deixe a área contaminada imediatamente se ocorrer qualquer uma das seguintes condições:
• Qualquer parte do respirador for danicada.
• A respiração se tornar difícil.
• Sentir tontura ou sua visão car prejudicada.
• Sentir gosto ou cheiro de contaminantes.
• Seu rosto, olhos, nariz ou boca carem irritados.
• Você suspeitar que as concentrações de contaminantes possam ter atingido níveis nos quais este respirador não possa mais proporcionar
uma proteção adequada.
7
Page 50

(Português)
PT
• Não use este respirador em áreas onde:
• Atmosferas são decientes em oxigênio.
• Concentrações de contaminantes são desconhecidas.
• Concentrações de contaminantes estão Imediatamente Perigosas à Vida ou Saúde (IPVS).
• Concentrações de contaminantes excedem a Concentração Máxima de Uso (MUC). determinada usando o Fator de Proteção Atribuído (FPA)
para o sistema especíco de respirador ou o APF delegado pelos padrões governamentais especícos, o que for menor.
INSPEÇÃO, LIMPEZA E ARMAZENAGEM
W ADVERTÊNCIA
Falha em seguir estas instruções pode reduzir o desempenho do respirador, expô-lo a contaminantes acima do OEL, e pode resultar
em doença ou morte.
• Não limpe o respirador com solventes. A limpeza com solventes pode degradar alguns componentes do respirador e reduzir a
eciência do respirador.
• Inspecione todos os componentes do respirador antes de cada uso para assegurar a condição operacional adequada.
Procedimento de Inspeção
Este respirador deve ser inspecionado antes de cada uso para assegurar que está em boa condição operacional. Quaisquer peças defeituosas ou
danicadas devem ser substituídas antes do uso. Não entre na área contaminada com peças danicadas ou defeituosas. Recomenda-se o seguinte
procedimento de inspeção.
1. Verique a peça facial quanto a trincas, rasgos e sujeira. Certique-se de que a peça facial, especialmente a vedação de face, não esteja deformada.
2. Examine as válvulas de inalação quanto a sinais de deformação, trincas ou rasgos.
3. Certique-se de que os tirantes de cabeça estejam intactos e tenham boa elasticidade.
4. Examine todas as partes de plástico quanto a sinais de trincas ou fadiga. Assegure-se de que as juntas de baioneta estejam em boa condição.
5. Retire a tampa da válvula de exalação e examine a válvula de exalação e o assento da válvula quanto a sinais de sujeira, deformação, trincas ou
rasgos. Recoloque a tampa da válvula de exalação.
6. Inspecione a lente quanto a qualquer dano que possa prejudicar o desempenho do respirador ou a visão.
Limpeza e armazenagem
A limpeza é recomendada após cada uso.
1. Remova os cartuchos, ltros e/ou tubos de respiração, e a copa nasal. A tampa da válvula de exalação, o conjunto da válvula de exalação, o
diafragma de fala, conjunto de baioneta, lente e vedação de face também podem ser desmontados se necessário.
2. Limpe a peça facial (excluindo ltros e cartuchos) mergulhando em uma solução de limpeza morna, a temperatura da água não deve exceder 120°F
(49°C), e esfregue com uma escova macia até limpar. Adicione detergente neutro se necessário. Não use produtos de limpeza contendo lanolina ou
outros óleos.
3. Desinfete a máscara facial mergulhando-a em uma solução de desinfetante de amônia quaternária ou alvejante caseiro de hipoclorito de sódio (1
onça [30 mL] em 2 galões [7,5 L] de água), ou outro desinfetante.
4. Enxague em água morna fresca e seque com ar em uma atmosfera não contaminada. Não recoloque a copa nasal até que a peça facial esteja
completamente seca.
5. Os componentes do respirador devem ser inspecionados antes de cada uso. Um respirador com quaisquer componentes danicados ou deteriorados
deve ser reparado ou descartado.
6. O respirador limpo deve ser armazenado longe de áreas contaminadas quando não estiver em uso.
ESPECIFICAÇÕES
Entre em contato com o serviço técnico 3M quanto a especicações técnicas (por exemplo, peso, materiais de construção, etc). Este produto não
contém componentes feitos de latex de borracha natural.
Aprovações e Seleção de Filtro e Cartucho
Antes de usar qualquer um destes produtos, o usuário deve ler as informações de uso especíco, limitações de uso e advertência nas Instruções de
Uso e documentação do produto, ou ligue para o Serviço Técnico da 3M. Não exceda as concentrações máximas de uso estabelecidas pelas agências
reguladoras locais.
8
Page 51

Cartuchos 3M™ Série 6000
(Português)
PT
Aprovações NIOSH
Certos Vapores Orgânicos X X X X X X X X X X X X X
Cloro X X X X X X X X X
Ácido Clorídrico X X X X X X X
Dióxido de Enxofre X X X X X X X X X
Dióxido de Cloro X X X X
Ácido Sulfídrico X X X X X X X X X
Fluoreto de Hidrogênio X X X X X
Formaldeído X X X X
Amônia X X X X
Metilamina X X X X
Vapor de Mercúrio X X
Filtro para Particulado
P100
** Recomendado pela 3M para uso contra brometo de metila ou iodo radioativo até 5 ppm com substituição diária do cartucho.
NOTA: Sem aprovação NIOSH para uso contra brometo de metila ou iodo radioativo.
Aprovações NIOSH
P100 X X X X X X X X
P95 X X X X
N95 X X
HF X X
6001
2071
6001i
6002
2078**
6003
6004
2076 HF
2091
6005
Filtros 3M
2096
2097**
6006
6007
60921
60921i
60922
60923
60924
X X X X X X X X X
2291
2296
2297**
5N11
5P71
60925
7093
60926
7093C
5935BR
60927
60928**
Alívio de nível
incômodo*
Gases ácidos X X X X X
Vapores Orgânicos X X X X
* Recomendado pela 3M para alívio contra níveis incômodos de gás ácido ou vapores orgânicos. O nível incômodo se refere a concentrações que não
excedam PEL OSHA ou os limites aplicáveis de exposição, o que for menor. Não use para proteção respiratória contra gás ácido/vapores orgânicos.
** Recomendado pela 3M para proteção de ozônio até 10 vezes o PEL OSHA ou limites governamentais de exposição ocupacional aplicáveis, o que
for menor.
NOTA: Sem aprovação NIOSH para uso contra ozônio.
No Brasil, o ltro 5935BR é aprovado como um ltro NIOSH N95 e um ltro BMOL P3.
Retentores e Adaptadores de Filtro 3M™
Número Descrição
501 Retentor de Filtro para uso com Cartucho Série 6000 e Filtros 5N11 e 5P71
502 Adaptador de Filtro para uso com Cartucho Série 6000 e Filtros 2000 e 7093/7093C
603 Adaptador de Filtro para uso com Filtros 5N11 e 5P71
No Brasil, o Filtro 5935BR 3M™ pode ser usado com o Adaptador de Filtro 603 e o Retentor de Filtro 501 na Peça Facial Completa 3M™, Série
FF-400.
Vida Útil 3M™ de Cartuchos Químicos e Filtros para Partículas
PRECAUÇÃO
Falha em descartar adequadamente cartuchos e ltros usados ou respiradores contaminados por materiais perigosos podem resultar em exposição
pessoal bem como danos ambientais. O manuseio, o transporte e o descarte de cartuchos, ltros ou respiradores usados devem cumprir todas as
leis e regulamentos federais, estaduais, provinciais e locais aplicáveis.
9
Page 52

(Português)
PT
Restrições de Tempo de Uso
1. Os cartuchos e ltros devem ser usados antes da data de validade na embalagem.
2. Os ltros de partículas devem ser substituídos caso sofram danos, quem sujos ou ocorra um aumento da resistência respiratória. Os ltros da série
N não devem ser usados em ambientes que contenham óleos. Os ltros da série R podem ser limitados a 8 horas de uso contínuo ou intermitente
caso haja aerossóis de óleo. Em ambientes contendo apenas aerossóis de óleo, os ltros da série P devem ser trocados após 40 horas de uso ou 30
dias, prevalecendo o que ocorrer primeiro.
3. A vida útil dos cartuchos de gás/vapor dependerá da atividade do usuário (taxa de respiração), contaminante e concentração especícos e condições
ambientais, como umidade, pressão e temperatura. Os cartuchos devem ser substituídos de acordo com um indicador de vida útil, cronograma de
troca estabelecido ou antes, caso sinta-se cheiro, gosto ou irritação de contaminantes. Consulte o Software Service Life da 3M em
www.3M.com.br/softwarevidautil.
4. Os cartuchos de vapor de mercúrio 6007 e 60927 devem ser descartados dentro de 50 horas de uso contra o vapor de mercúrio, ou de acordo com
a vida útil para vapor orgânico, cloro, sulfeto de hidrogênio ou dióxido de enxofre ou quando os odores de vapores ou gases tornarem-se perceptíveis;
prevalecendo o que ocorrer primeiro. O vapor de mercúrio é inodoro.
INSTRUÇÕES DE PEÇAS DE REPOSIÇÃO
Conjunto de Peça Facial Inteira FX 3M™ FF-400
O conjunto de peça facial consiste do conjunto de suporte da cabeça, conjunto da copa nasal, conjunto do diafragma de voz, conjunto da válvula de
exalação, conjunto da lente, vedação de face (pequeno, médio ou grande), conjunto de estrutura (estrutura, porca e parafuso), conjuntos de baioneta e
tampa da válvula de exalação. Para desmontar o conjunto de lente da vedação de face, remova o parafuso Phillips da estrutura, puxe a estrutura para
fora da vedação de face e remova a vedação de face do conjunto de lente.
Substituição da Tampa da Válvula
1. Remova a tampa da válvula apertando o fundo da tampa com o polegar e deslizando a tampa para cima, paralela com a lente (Fig. 18).
2. Recoloque a tampa da válvula colocando a extremidade aberta no topo do conjunto da válvula de exalação, as linguetas de guia por baixo do conjunto
da tampa da válvula e deslize para baixo até a tampa da válvula estalar no lugar.
Fig. 18
Substituição do Conjunto da Válvula de Exalação
1. Remova a tampa da válvula apertando o fundo da tampa com o polegar e deslizando a tampa para cima, paralela com a lente (Fig. 18).
2. Remova o conjunto da válvula de exalação girando 1/4 de volta no sentido anti-horário (Fig. 19).
3. Substitua o conjunto da válvula de exalação alinhando os ressaltos com a abertura no conjunto da válvula de exalação na lente e gire 1/4 de volta no
sentido horário até parar com rmeza.
4. Recoloque o conjunto da tampa da válvula.
Fig. 19
Substituição da Válvula de Exalação
1. Remova a tampa da válvula apertando o fundo da tampa com o polegar e deslize para baixo, paralelo com a lente (Fig. 18).
2. Remova o conjunto da válvula de exalação girando 1/4 de volta no sentido anti-horário (Fig. 19).
3. Pegue a válvula e puxe cada haste de válvula a partir do assento de válvula.
4. Inspecione o assento da válvula certicando-se de que está limpo e em boa condição.
5. Coloque a nova reposição da válvula de exalação sobre a abertura de exalação inserindo as hastes e puxando através a partir do lado oposto até que
estejam ambos presos no lugar com um estalo. Pressione lateralmente as hastes da válvula para assegurar que estejam devidamente xadas.
10
Page 53

(Português)
PT
6. Recoloque o conjunto da válvula de exalação.
7. Recoloque a tampa da válvula.
NOTA: Faça uma vericação de pressão negativa para assegurar que a válvula de exalação está funcionando adequadamente.
Substituição do Conjunto da Copa Nasal
O conjunto da copa nasal consiste em uma peça que envolve nariz e possui válvulas de inalação. É desenhado para instalar diretamente na lente e
se acomodar confortavelmente sobre a boca e nariz do usuário do respirador para ajudar a eliminar a respiração exalada e evitar o embaçamento
dalente.
1. Retire o conjunto da copa nasal apertando a copa nasal abaixo da válvula de inalação e puxando gentilmente para cima e fora do conjunto da lente
(Fig. 20).
2. Para recolocar, posicione o conjunto da copa nasal sobre o conjunto da lente alinhando o anel de plástico rígido na copa nasal com o conjunto da
lente e aperte rmemente nas guias centrais até o fundo da copa nasal estalar no lugar (Fig. 21).
3. Pressione o topo do anel da copa nasal até as guias estalarem no lugar.
Fig. 20 Fig. 21
Substituição do Conjunto de Diafragma de Voz
1. Remova o conjunto da copa nasal pegando a copa nasal abaixo da válvula de inalação e gentilmente puxando para cima e para fora do conjunto da
lente (Fig. 20).
2. Remova a tampa da válvula pressionando o fundo da tampa com o polegar e deslizando a tampa para cima, paralelo com a lente (Fig. 18).
3. Remova o conjunto da válvula de exalação girando 1/4 de volta no sentido anti-horário.
4. Remova o conjunto do diafragma de voz girando 1/4 de volta no sentido anti-horário (Fig. 22).
5. Troque o conjunto do diafragma de voz alinhando os ressaltos do diafragma de voz com a abertura do diafragma de voz no conjunto da lente.
6. Gire 1/4 de volta no sentido horário até parar rmemente.
7. Recoloque o conjunto da válvula de exalação.
8. Recoloque o conjunto da tampa da válvula.
9. Recoloque o conjunto da copa nasal (Fig. 21).
Fig. 22
Substituição do Conjunto de Baioneta
O conjunto de baioneta consiste em anel de baioneta, baioneta e junta de inalação.
1. Remova o conjunto da copa nasal pegando a copa nasal abaixo da válvula de inalação e puxando gentilmente para cima e para fora do conjunto da
lente (Fig. 20).
2. Remova o anel de baioneta girando 1/4 de volta no sentido anti-horário (Fig. 23).
3. Remova a baioneta do conjunto de lente (Fig. 24).
4. Alinhe a chaveta na nova baioneta com a fenda no conjunto de lente e mantenha rmemente no lugar.
5. Alinhe os ressaltos no anel com as fendas nas baionetas e gire 1/4 de volta no sentido horário até parar rmemente.
6. Recoloque o conjunto do copo de nariz (Fig. 21).
11
Page 54

(Português)
PT
Fig. 23 Fig. 24
Substituição da Válvula de Inalação
As válvulas de inalação estão localizadas nos conjuntos de baioneta nas aberturas de inalação da peça facial e dentro das aberturas de inalação
da copa nasal. Estas válvulas devem ser inspecionadas antes de cada uso do respirador e substituídas sempre que as válvulas se daniquem ou
sejamextraviadas.
1. Remova a(s) válvula(s) existente(s) pegando a válvula e puxando a haste da válvula para fora do assento da válvula.
2. Instale válvula(s) nova(s) no(s) assento(s) de válvula empurrando-a(s) através do(s) assento(s) de válvula. Certique-se de que a(s) haste(s) de
válvula esteja(m) totalmente encaixada(s) através do(s) assento(s) da válvula, ca(m) plana(s) e se move(m) livremente (gira(m)).
Substituição do Conjunto de Suporte da Cabeça
1. Remova o suporte existente desencaixando cada vela dos botões (Fig. 25).
2. Puxe as linguetas das extremidades do suporte, em ângulo, para fora através das velas. Note a orientação das linguetas e velas do suporte de
cabeça para a remontagem.
3. Coloque o suporte de cabeça para baixo em uma superfície plana com o logotipo 3M voltado para cima (Fig. 26).
4. Passe as linguetas das extremidades do suporte de cabeça através das velas e puxe cada um através delas até que a lingueta da extremidade
esteja completamente colocada através da vela.
5. Coloque a lente da peça facial para baixo em uma superfície plana e coloque o novo conjunto de vela e suporte de cabeça sobre a peça facial. O
suporte de cabeça deve ser montado com o logotipo 3M voltado para cima.
6. Encaixe cada vela no botão correspondente, assegurando que os tirantes não estejam torcidos.
Fig. 25 Fig. 26
Substituição do Conjunto da Estrutura da Lente
O conjunto de estrutura da lente consiste de uma estrutura de lente, porca e parafuso.
1. Remova da estrutura o parafuso Phillips. Puxe a estrutura para fora da vedação facial (Fig. 27).
2. Posicione a nova estrutura, alinhando as marcas do topo e do fundo. Instale e aperte rmemente o parafuso. Certique-se de que as marcas de
alinhamento estão adequadamente alinhadas no topo e no fundo com todos os componentes (Fig. 28).
Fig. 27 Fig. 28
12
Page 55

(Português)
PT
Substituição do Conjunto de Lente
O conjunto de lentes consiste em uma lente de policarbonato com revestimento rígido.
1. Remova o conjunto da copa nasal pegando a copa nasal abaixo da válvula de inalação e puxando gentilmente para cima e para fora do conjunto da
lente (Fig. 20).
2. Remova a tampa da válvula pressionando o fundo da tampa com o polegar e deslizando a tampa para cima, paralelo com a lente (Fig. 18).
3. Remova o conjunto da válvula de exalação girando 1/4 de volta no sentido anti-horário e retirando a partir da abertura central da lente (Fig. 19).
4. Remova o conjunto do diafragma de voz girando 1/4 de volta no sentido anti-horário (Fig. 22).
5. Remova os conjuntos de baioneta girando os anéis de baioneta no sentido anti-horário 1/4 de volta (Fig. 23) e removendo as baionetas do conjunto da
lente (Fig. 24).
6. Remova da estrutura o parafuso Phillips. Puxe a estrutura para fora da vedação facial (Fig. 27).
7. Remova a vedação facial da lente.
8. Coloque a lente nova e a vedação facial juntas alinhando as marcas no topo e no fundo. Posicione a estrutura, alinhando novamente as marcas no
topo e no fundo. Instale e aperte o parafuso rmemente. Certique-se de que as marcas de alinhamento estão adequadamente alinhadas no topo e
no fundo com todos os componentes (Fig. 28).
9. Instale o diafragma de voz.
10. Instale o conjunto da válvula de exalação.
11. Recoloque a tampa da válvula de exalação.
12. Recoloque os conjuntos de baioneta.
13. Recoloque o conjunto de copo de nariz (Fig. 21).
Peças de Reposição e Acessórios da Peça Facial Inteira FX 3M™ FF-400
Número Descrição
FF-401 Pequeno
FF-402 Médio
FF-403 Grande
Número Descrição
FF-400-01 Fivela do Suporte de Cabeça
FF-400-02 Botão do Suporte de Cabeça
FF-400-03 Conjunto da Lente
FF-400-04 Suporte da Cabeça
FF-400-05 Conjunto da Estrutura c/Parafuso
FF-400-06 Base de Conforto
FF-400-07 Conjunto da Válvula de Exalação
FF-400-08 Válvula de Inalação do Conjunto de Baioneta
FF-400-09 Tampa da Válvula de Exalação (Padrão)
FF-400-10 Tampa da Válvula de Exalação (Sólida)
FF-400-11 Conjunto da Copa Nasal
FF-400-13 Conjunto do Diafragma de Voz
FF-400-20 Kit de Armação de Óculos
7582 Válvula de Inalação
7583 e 6583 Válvula de Exalação 3M™ Cool Flow™
Número Descrição
FF-400-15 Tampa da Lente
FF-400-17 Tampa de Lente Semi-Permanente
504 Lenços de Limpeza do Respirador
601 Adaptador de Ensaio de Vedação Quantitativo
FF-400-03
7582
7583
6583
FF-400-09
FF-400-10
FF-400-11
3
FF-400-01
FF-400-05
FF-400-07
FF-400-06
FF-400-13
FF-400-04
FF-400-02
FF-400-08
Fig. 29
13
Page 56

(Português)
PT
NOTA de Adequação para o Brasil:
1. No Brasil, de acordo com o Programa de Proteção Respiratória do Ministério do Trabalho, não use respiradores de peça facial inteira testados
quantitativamente caso as concentrações de contaminantes sejam maiores que 100 vezes o limite de exposição permissível.
2. Não use em atmosferas decientes ou ricas em oxigênio.
3. Armazenagem, Transporte e Cuidados: armazene em um local limpo e seco, e longe de contaminantes e temperatura e umidades extremas.
4. Os componentes deste respirador são feitos de materiais que não se espera que causem efeitos adversos à saúde.
5. É necessário ter cuidado especial para usar este produto em atmosferas explosivas.
6. No Brasil não use respiradores motorizados de puricação do ar se a vazão do ar for menor do que 120 lpm para peças faciais apertadas ou
170lpm para capuzes e/ou capacetes.
Data de Fabricação do Produto
As peças deste produto apresentam marcas que trazem informação sobre a data de fabricação, e sua leitura está descrita no exemplo abaixo:
Código de Data = 12º mês de 2019 (12/19)
12
11 1
10
9
8
7
Para mais informações
No Brasil, entre em contato:
0800-0132333
falecoma3M@mmm.com
www.3Mepi.com.br
www.youtube.com/3Mepi
1 9
6
2
3
4
5
14
98-0060-0135-2_6
34-8723-6751-0
Page 57

3M PERSONAL SAFETY DIVISION
3M CENTER, BUILDING 0235-02-W-70
ST. PAUL, MN 55144-1000
3M is a trademark of 3M or its afliates, used under license in Canada.
3M PSD products are occupational use only.
3M PERSONAL SAFETY DIVISION
3M CANADA COMPANY
P.O. BOX 5757
LONDON, ONTARIO N6A 4T1
DIVISION DES PRODUITS DE PROTECTION INDIVIDUELLE DE 3M COMPAGNIE 3M CANADA
C.P. 5757
LONDON ONTARIO N6A 4T1
3M est une marque de commerce de 3M ou de ses sociétés afliées, utilisée sous licence au Canada.
Les produits de la Division des produits de protection individuelle de 3M sont destinés uniquement à un usage en milieu de travail.
3M MÉXICO S.A. DE C.V.
AV. SANTA FE NO. 190
COL. SANTA FE, DEL. ÁLVARO OBREGÓN
MÉXICO, CIUDAD DE MÉXICO, C.P. 01210
3M es una marca comercial de 3M o sus liales.
Los productos PSD de 3M son para uso ocupacional solamente.
3M DO BRASIL LTDA.
VIA ANHANGUERA, KM 110 - SUMARE - SP
CNPJ 45.985.371/0001-08
3M é uma marca registrada da 3M ou de suas aliadas.
Produtos de PSD da 3M para uso ocupacional somente.
© 3M 2019
98-0060-0135-2_6
34-8723-6751-0
 Loading...