

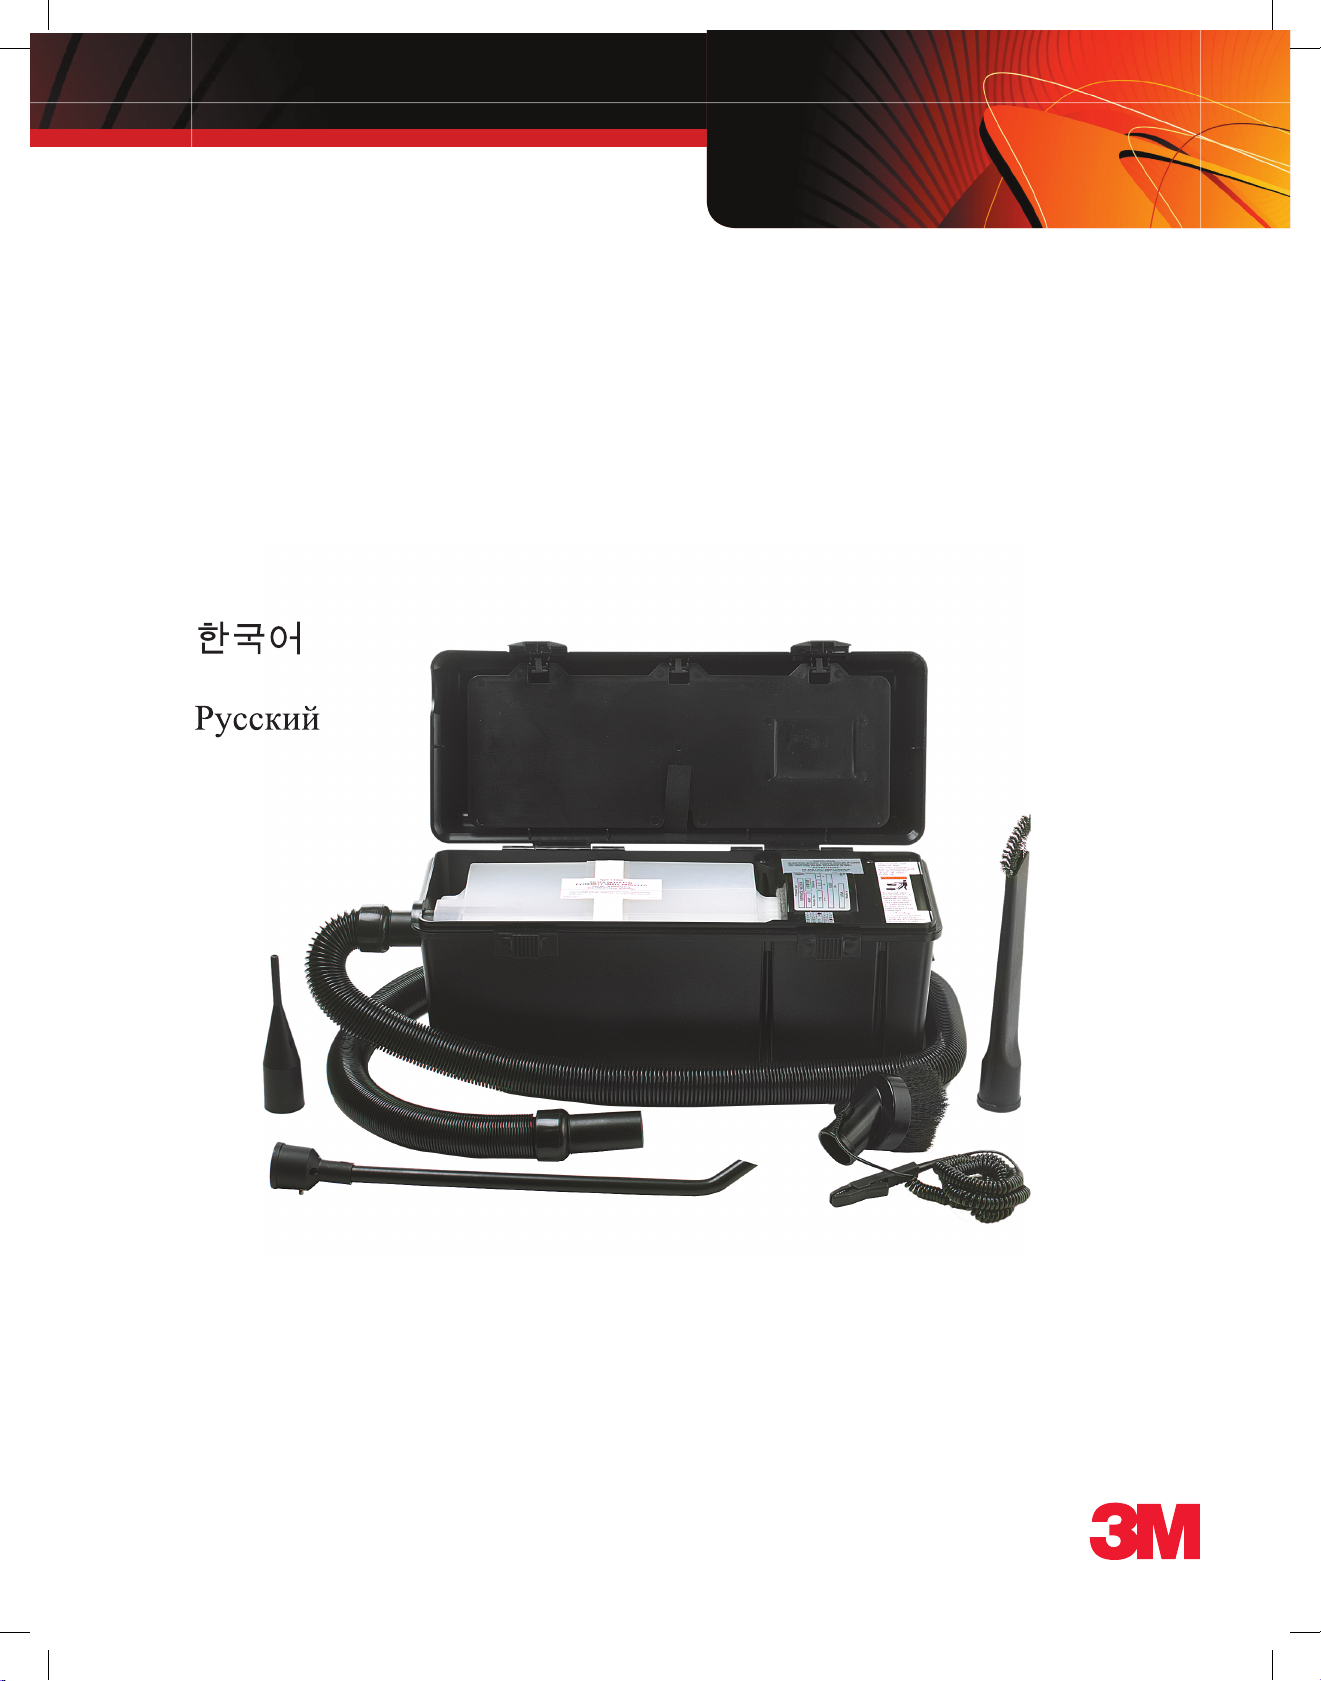
3m Sv-497abf, Sv-497ajm Owner's Manual
English
Deutsch
Español
Français
Italiano
Norsk
中文版
3M™ Vacuum Operating Instructions
International Service 497 (AB) & Electronic Service 497 (ABF)
Vacuum Guide_REVISION.indd 3 12/9/09 4:48:25 PM

© 3M 2009
Vacuum Guide_REVISION.indd 4 12/9/09 4:48:26 PM

1
3M™ International Electronic/Service Vacuum Operating Instructions
© 3M 2009
This 3M™ Vacuum is Intended for Commercial Use Only
Important Safety Instructions —
Save These Instructions
Read all instructions before using the vacuum.
When using an electrical appliance, always use basic precautions,
including the following:
TO REDUCE THE RISK OF FIRE, ELECTRIC SHOCK
OR INJURY, FOLLOW THESE SAFETY RULES:
1. Use only as described in this manual. Use only manufacturer’s recommended attachments.
2. Do not use this machine to vacuum hazardous dust.
3. Connect to a properly grounded outlet only. See Grounding Instructions.
4. Do not use without lter in place.
5. Do not leave appliance plugged in when not in use. Unplug from outlet when not in use and before servicing.
6. Turn off all controls before unplugging.
7. Do not unplug by pulling on cord. To unplug, grasp the plug, not the cord.
8. Do not handle plug or appliance with wet hands.
9. Do not use appliance outdoors or on wet surfaces. Electric shock could occur.
10. Do not use with damaged cord or plug. If appliance is not working as it should, has been dropped or damaged,
left outdoors, or dropped in water, discontinue use.
11. Do not pull or carry by cord, use cord as a handle, close a door on cord or pull cord around sharp edges and
corners. Do not run appliance over cord. Keep cord away from heated surfaces.
12. Do not put any object into openings. Do not use with any opening blocked. Keep openings free of dust, lint,
hair, and anything that may reduce air ow.
13. Keep hair, loose clothing, ngers, and all body parts away from openings and moving parts.
14. Do not pick up anything that is burning or smoking, such as cigarettes, matches or hot ashes.
15. Do not use to pick up ammable or combustible liquids, such as gasoline, and do not use in areas where these
may be present.
16. Do not allow to be used as a toy. Close attention is necessary when used near children.
WARNING
!
Vacuum Guide_REVISION.indd 5 12/9/09 4:48:27 PM
2
3M™ International Electronic/Service Vacuum Operating Instructions
© 3M 2009
Grounding/Earthing
Instructions
Specifications
This appliance must be grounded/
earthed.
The wires in this main lead are
colored in accordance with the
following code:
Green/Yellow: Earth
Blue: Neutral
Brown: Live
As the colors may not correspond
with the colored markings identifying
the terminals in your plug, proceed as
follows:
The wire which is colored Green/
Yellow must be connected to the
terminal in the plug which is marked
with the letter “E” or by the ground/
earth symbol “ ” or colored Green
or Green/Yellow.
The wire which is colored Blue must
be connected to the terminal in the
plug which is marked with the letter
“N” or colored Black or Blue.
The wire which is colored Brown
must be connected to the terminal in
the plug which is marked with the
letter “L” or colored Brown or Red.
Electrical
220-240 V
50/60 Hz
3.7 amps
Dimensions
Length 17-13/16 in.
Width 7-3/4 in.
Height 9-1/4 in.
Certification
Meets VDE RFI 0875 Conducted
Limits.
Motor
1 H.P.
Continuous duty rated with one sealed
ball bearing and one sleeve bearing
lubricated for life. Internal thermal
breaker opens at 221°F [105°C] and
automatically closes when motor cools
(after about 30 minutes).
BSI: Internal thermal breaker opens
at 274°F [120°C] and automatically
closes when motor cools (after about 30
minutes).
Conforms to EMC Requirements Defined in:
EUROPEAN STANDARD EN 55014 (1993) - Conducted Emissions
CISPR 14 Third Edition (1993-01) - Conducted Emissions
EN60555-3 - Harmonic Current Emissions (Class A)
IEC 1000-3-2 - Harmonic Current Emissions (Class A)
EUROPEAN STANDARD EN 50082-1 (1992), Immunity
IEC Publication 801-2 (1991) - ESD, Contact Discharge, Severity Level 4
- ESD, Air Discharge, Severity Level 4
IEC Publication 801-3 (1991) - Radiated Immunity, Severity Level 2
IEC Publication 801-4 (1998) - EFT, Severity Level 3
prIEC Draft 801-5 - Surge, Severity Level 3
DANGER
!
Vacuum Guide_REVISION.indd 6 12/9/09 4:48:28 PM

3
3M™ International Electronic/Service Vacuum Operating Instructions
© 3M 2009
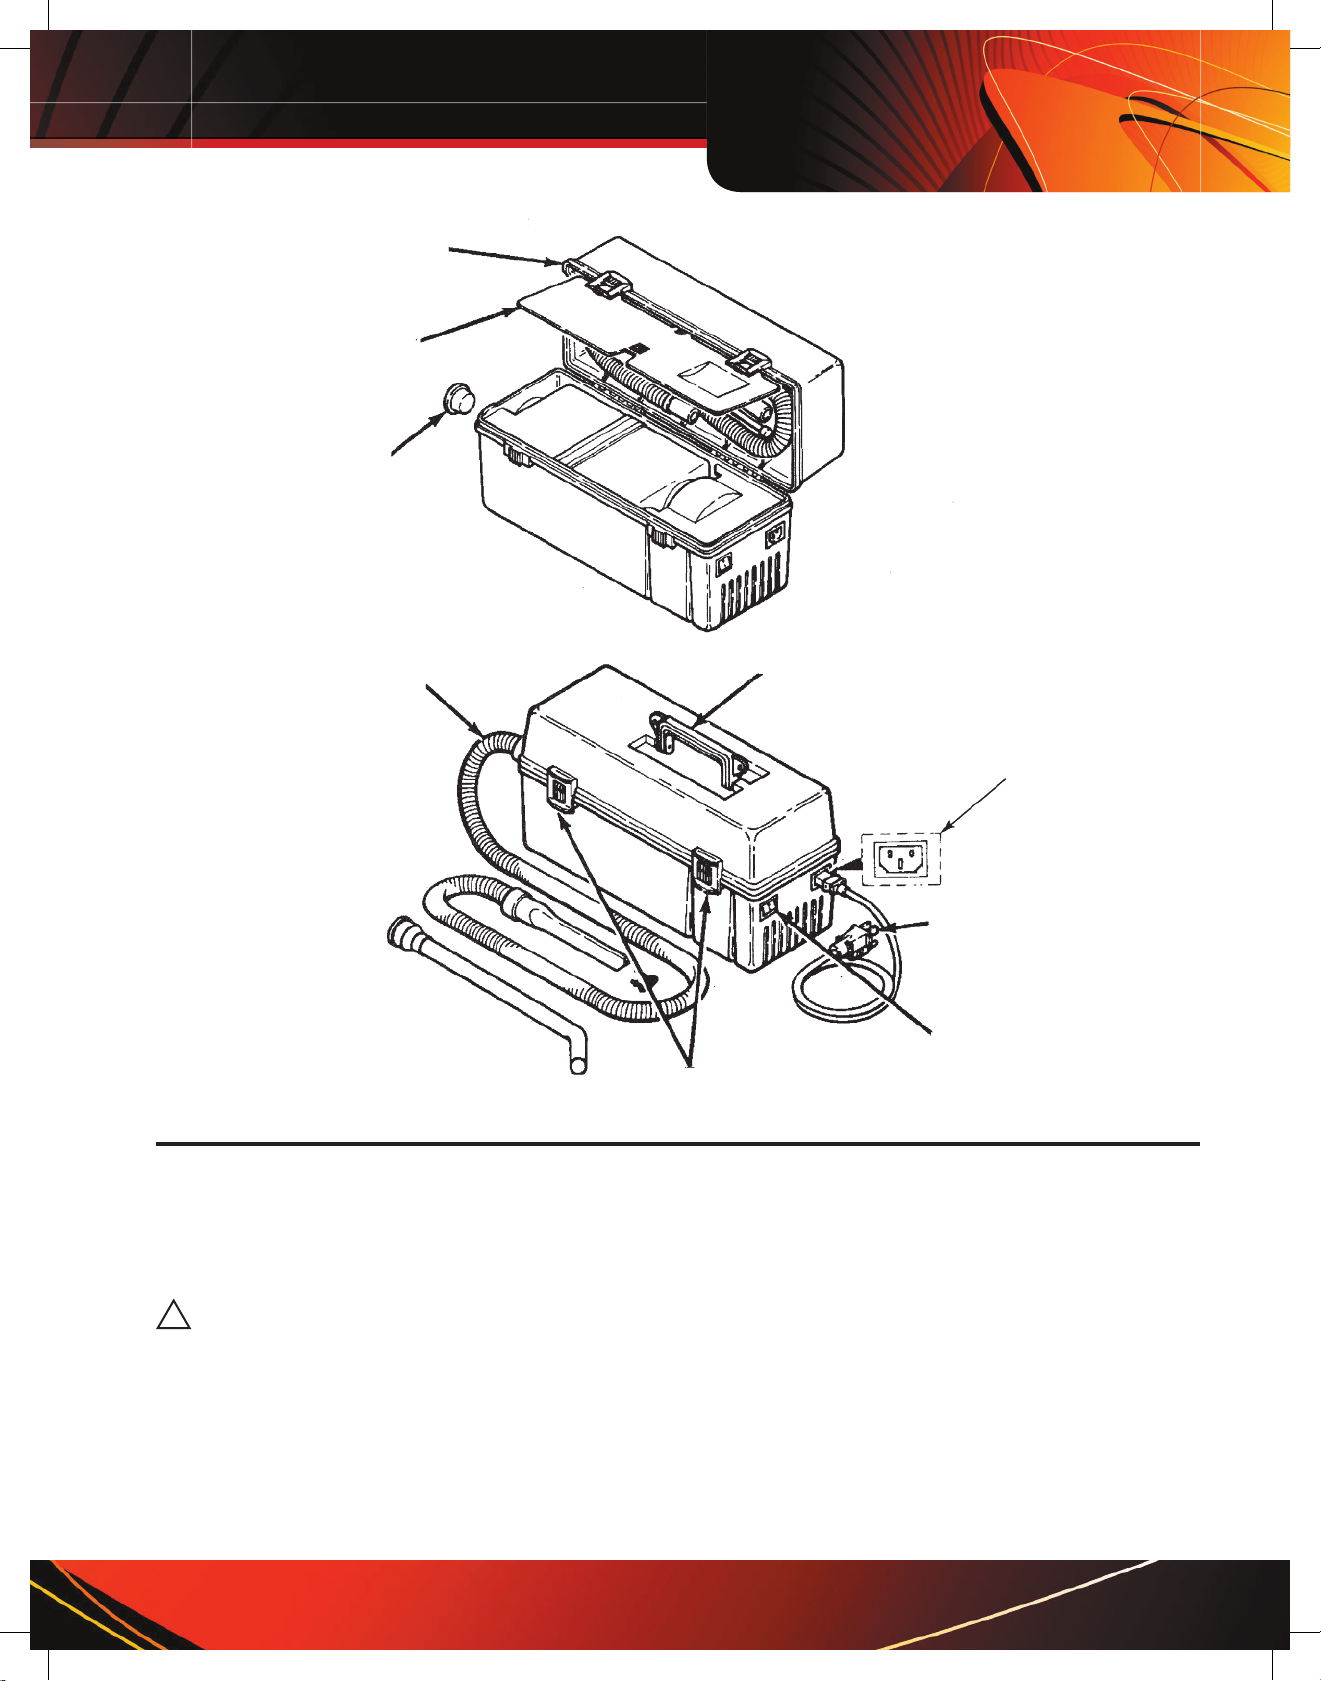
To Operate
Step 1
Release latches
and open lid.
Step 2
Unfasten accessory
door and remove vacuum
hose, electrical cord and
hose attachments.
Step 3
Remove filter plug from
vacuum inlet (always
replace when repacking for
transport).
Step 4
Attach selected
accessory to hose (insert
crevice brush as shown).
Insert other end of hose
into inlet.
Step 5
Place remaining accessory and
filter plug in lid. Close lid.
Step 8
Plug cord into
power receptacle.
Step 9
Turn on power switch.
Step 6
Latch lid securely.
Step 7
Insert hooded end
of power cord in power
cord receptacle on
vacuum as shown.
Follow the steps in the illustration.
DO NOT OPERATE WHEN FILTER
IS FULL. A lack of exhaust air, or
diminished suction, indicates a full filter.
ELECTRIC SHOCK COULD
OCCUR IF USED OUTDOORS
OR ON WET SURFACES.
1. Release the latches and open the lid.
2. Unfasten the accessory door and
remove the vacuum hose, electrical
cord and hose attachments.
3. Remove the L-15X filter plug from
the vacuum inlet (always replace
when the vacuum is not in use or
repacking for transport).
4. Attach the selected accessory to the
hose (insert the crevice brush as
shown). Insert the hose into the inlet.
5. Place the other accessories and plug in
the lid. Close the lid.
6. Latch the lid securely.
7. Plug the cord into the vacuum.
8. Plug the cord into the power
receptacle.
9. Turn on the power switch.
Note
The motor has a thermal breaker that
opens and stops the motor if it
overheats. This usually occurs if the
filter is full and needs to be replaced.
The motor will restart automatically
when it cools (after about 30 minutes).
WARNING
!
Vacuum Guide_REVISION.indd 7 12/9/09 4:48:29 PM
4
3M™ International Electronic/Service Vacuum Operating Instructions
© 3M 2009
To Store Attachments
for Transport
To Replace Filter
1. Unplug the power cord from the
outlet and the vacuum.
2. Open the lid and retrieve the L-15X
filter plug.
3. Remove the hose from the inlet and
insert the L-15X filter plug.
4. Detach the hose nozzle from the base.
5. Place the hose, power cord and
attachments into the lid and close the
accessory door.
6. Close the lid and securely fasten the
latches.
The 3M
™
Vacuum is designed for use
with disposable 3M™ Filters. The 3M
Filters must be replaced on a regular
basis. Frequency of lter replacement
depends on the type and frequency of
use of the Service Vacuum.
1. Release the latches and open the lid.
2. Remove either the L-15X lter plug
or hose. Save the plug for use later
(see note below).
3. Grasp the lter and pull it straight up.
4. Insert the L-14X lter plug in the
lter.
5. Dispose of the lter in a suitable
manner.
6. Remove the L-14X plug from the new
lter and position lter in the vacuum
with the lter hole to your left. Save
the L-14X plug for use in disposing
the lter (see note below).
7. Verify that the gasket between the
lter and the motor ts tightly.
8. Insert the L-15X lter plug or hose.
9. Close and latch the lid.
Note: The L-15X plug (longer plug) is
used to cover the lter inlet for storage
when the vacuum cleaner is not in use.
This plug comes with the lter in a
new vacuum cleaner. The L-14X plug
(shorter plug) is used to cover the lter
inlet for disposal. This plug comes with
each new replacement lter.
ELECTRIC SHOCK COULD
OCCUR IF USED OUTDOORS
OR ON WET SURFACES!
Do not operate when filter
is full. A lack of suction or
exhaust is an indication of a
full filter.
To avoid risk of fire, filter
must be installed properly
and replaced regularly. Do
not open filter, reuse filter or
attempt to replace components
within filter.
WARNING
!
CAUTION
!
CAUTION
!
Vacuum Guide_REVISION.indd 8 12/9/09 4:48:30 PM
5
3M™ International Electronic/Service Vacuum Operating Instructions
© 3M 2009
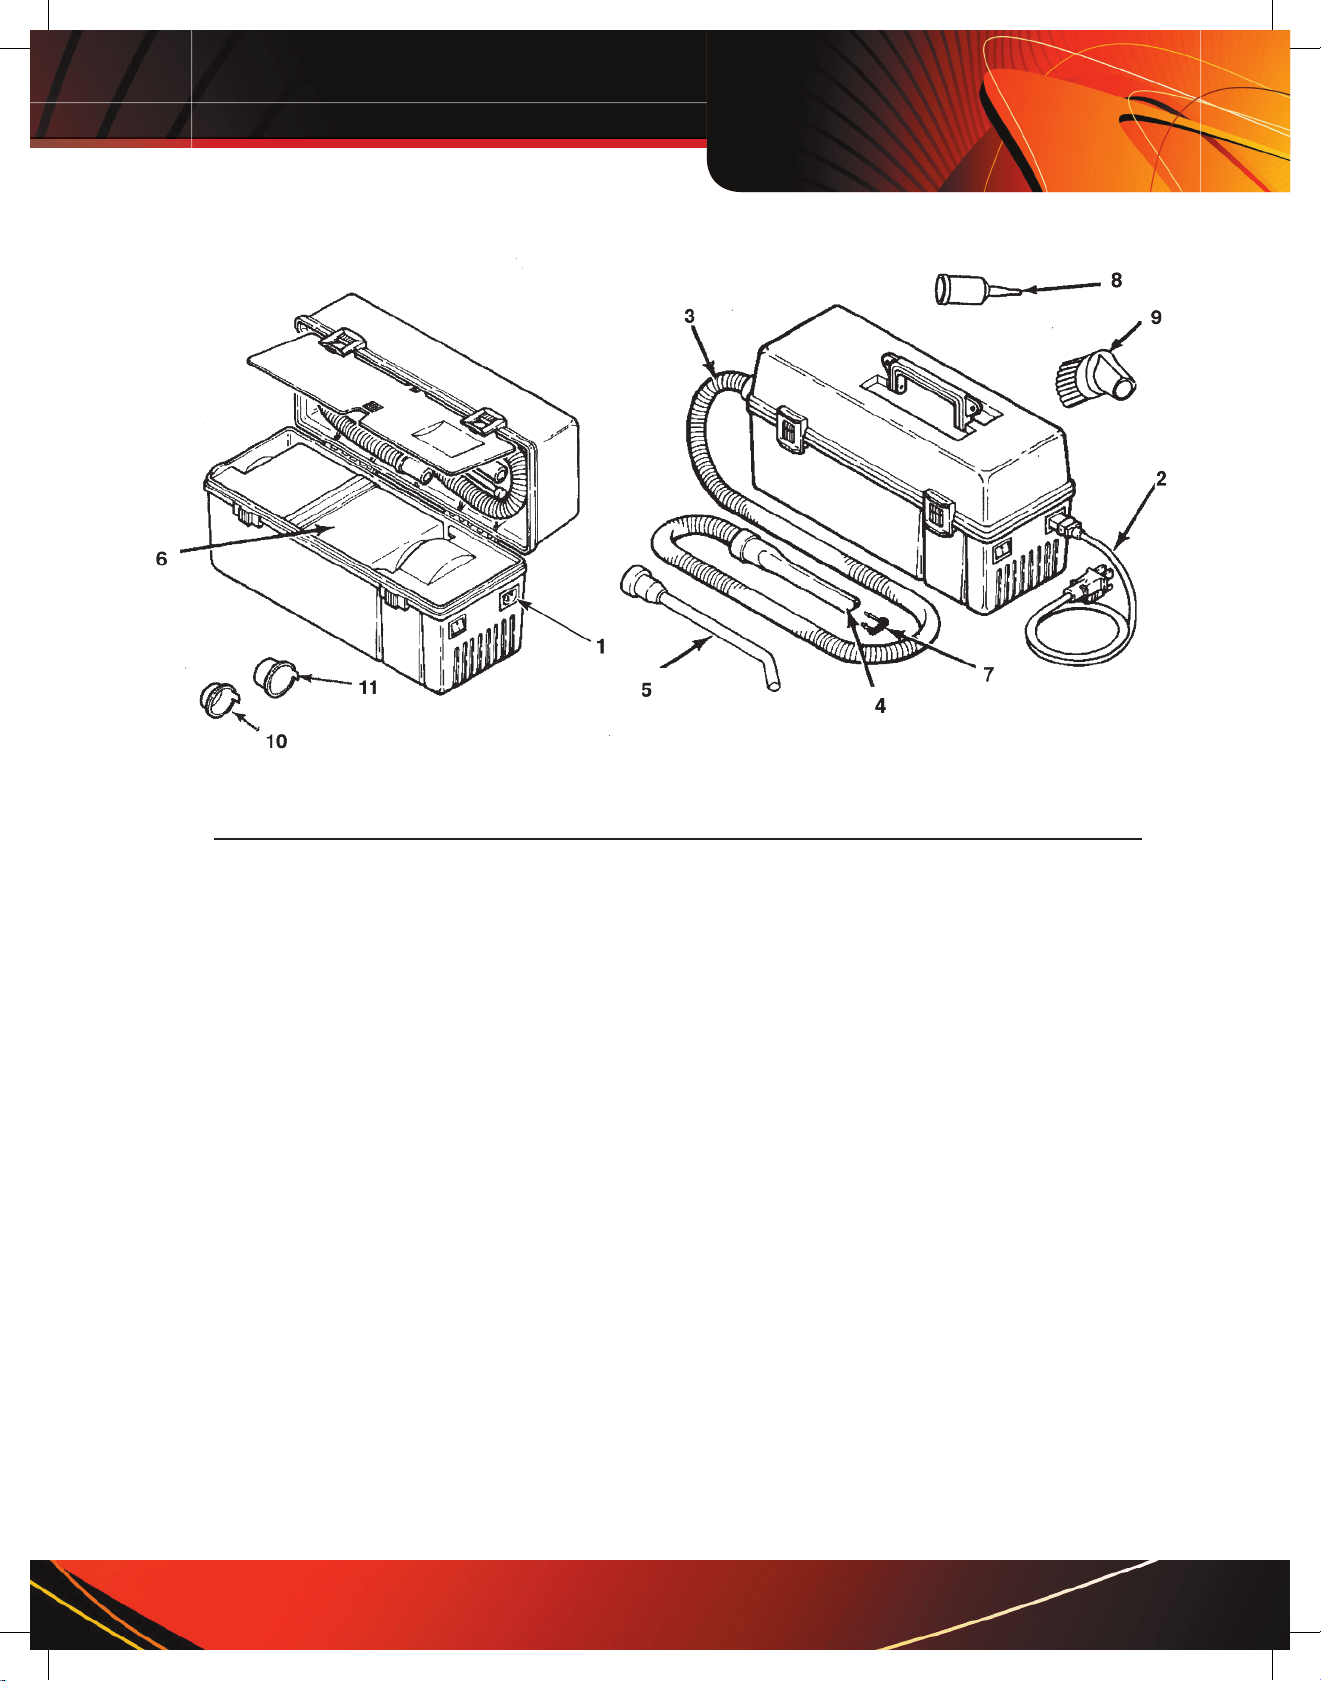
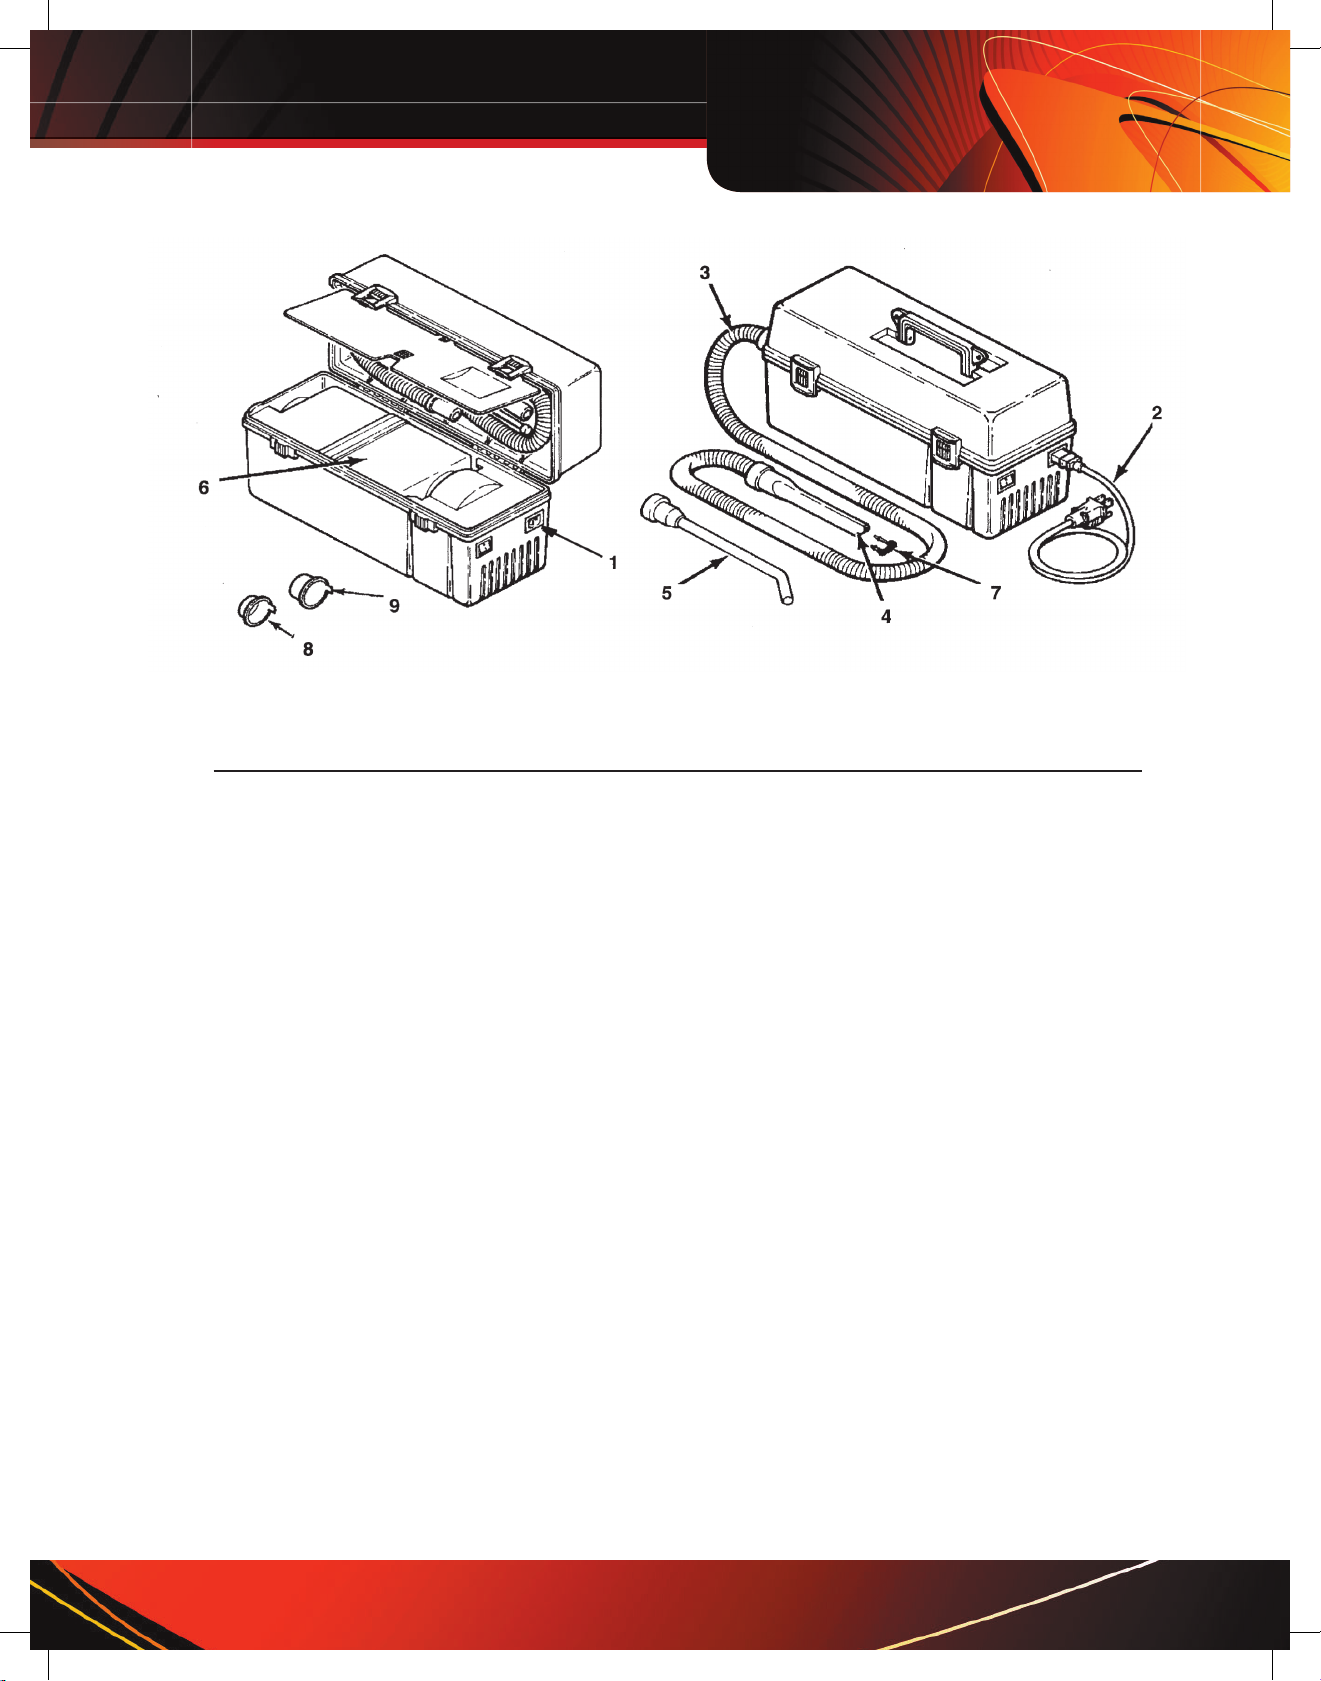
Parts List
Item Part Number Description Type of Vacuum
1 78-8063-1943-6 Receptacle, 220V (SV-PCR6) Service/Electronics
2 26-1011-8421-1 Power Cord, 250V, 10 amp Service/Electronics
3 78-8063-2418-8 Vacuum Hose Assembly (SV-SH32) Service/Electronics
4 80-6104-7958-8 Crevice Nozzle (SV-CN1) Service/Electronics
5 78-8063-1540-0 Curved Wand Nozzle (SV-WA2) Service/Electronics
6 78-8005-5350-1 Type 2 Filter, Toner/Dust (SV-MPF2) Service/Electronics
7 80-6104-7957-0 Crevice Brush (SV-CB1) Service/Electronics
8 78-8079-9435-1 Needle Nose Nozzle (SV-NN) Electronics
9 80-6104-7960-4 Dusting Brush (SV-DBSD1) Electronics
10 80-6104-7640-2 Short Red Filter Plug L-14X (SV-SRP) Service/Electronics
11 80-6104-7639-4 Long Red Filter Plug L-15X (SV-LRP) Service/Electronics
Important
Power cord must be VDE SEMKO approved 250 V, 10 amp
Vacuum Guide_REVISION.indd 9 12/9/09 4:48:32 PM

6
3M™ International Electronic/Service Vacuum Operating Instructions
© 3M 2009
Professional’s Guide to
Filter Selection
Now you have a choice of two distinctly
different filters designed to do distinctly
different jobs with your 3M Service
Vacuum Cleaner. Make a professional
decision on which filter meets your in-
house or client clean-up requirements.
• Type I Filter for extremely fine
particles
• Type 2 Filter for toners and
dust
The two filters described in this
“Professional’s Guide to Filter
Selection” are completely disposable.
Replacements are easy and clean.
Type 1 Filter, Fine Particle
A thinner, more concentrated weave
(HEPA media) for trapping extremely
fine particles to 0.3 microns. Typical
applications are color laser printers,
color copiers and highly sensitive
equipment.
Type 2 Filter, Toner/Dust
Specifically designed for trapping
unwanted toner from copiers and laser
printers. Also ideal for cleaning data
processing equipment.
3M Service Vacuum Cleaner
Limited Warranty and Limitation of Liability
Limited Warranty: To the rst user purchasing this 3M Service Vacuum Cleaner. 3M warrants that the 3M Service
Vacuum will be free of defects in material and manufacture for a period of three (3) years from the time of purchase.
Should any failure to conform to this warranty appear within this period upon notice to 3M within said three (3) years
from the time of purchase and upon proof of purchase. 3M shall, at its option, either repair or replace the defective
product. It will be the purchaser’s responsibility to return the product, freight prepaid, to the service location specied
by 3M. These remedies are the purchaser’s exclusive remedies for breach of this warranty.
Exclusions to Warranty Coverage: The above warranty shall not apply to any 3M Service Vacuum Cleaner that has
been modied without the approval of 3M, or has been damaged by negligence, misuse, accident, failure to follow
3M’s written operating instructions or use of any lter which does not meet 3M specications. Consumable supplies,
such as lters, are not covered by the above warranty.
Disclaimer of Warranty: 3M MAKES NO OTHER WARRANTIES WITH RESPECT TO THE 3M SERVICE
VACUUM CLEANER. EXPRESS OR IMPLIED, INCLUDING BUT NOT LIMITED TO ANY IMPLIED
WARRANTY OF MERCHANTABILITY OR FITNESS FOR A PARTICULAR PURPOSE.
Limitation or Liability: 3M SHALL NOT BE LIABLE UNDER ANY CIRCUMSTANCES FOR ANY
INCIDENTAL, SPECIAL, OR CONSEQUENTIAL DAMAGES, OR ECONOMIC LOSS, BASED UPON
BREACH OF WARRANTY, BREACH OF CONTRACT, NEGLIGENCE, STRICT LIABILITY IN TORT OR
ANY OTHER LEGAL THEORY, EVEN IF 3M HAS BEEN ADVISED OF THE POSSIBILITY OF SUCH
DAMAGES INCLUDING, BUT NOT LIMITED TO LOSS OF PROFITS, REVENUE, EQUIPMENT USE, DATA
OR INFORMATION OF ANY KIND. THE LIABILITY OF 3M SHALL NOT UNDER ANY CIRCUMSTANCES,
EXCEPT AS EXPRESSLY PROVIDED HEREIN, EXCEED THE PRICE OF THE 3M SERVICE VACUUM
CLEANER. These limitations do not apply to damages caused by breach of the implied warranties of title and against
infringement, nor to claims for personal injury. Some states have laws which require liability rights different from
those stated above. In such states, the minimum required liability terms shall apply.
Vacuum Guide_REVISION.indd 10 12/9/09 4:48:32 PM

1
Bedienungsanleitung – Internationaler Wartungs-Staubsauger
© 3M 2009
Dieser Staubsauger ist nur für gewerbliche Zwecke zugelassen!
Wichtige Sicherheitshinweise —
Diese Hinweise gut aufbewahren
Bitte alle Hinweise vor Gebrauch des Staubsaugers sorgfaltig lesen.
Beim Umgang mit elektrischen Geräten sind immer grundlegende Vorsichtsmaßnahmen zu treffen.
Dazu gehören auch die nachstehend aufgeführten:
ZUR VERRINGERUNG DER GEFAHR VON FEUER, ELEKTRISCHEM
SCHLAG UND VERLETZUNGEN ALLE SICHERHEITSHINWEISE BEACHTEN.
1. Gerät nur den vorliegenden Anweisungen entsprechend betreiben. Nur vom Hersteller empfohlenes Zubehör
verwenden.
2. Dieses Gerät ist nicht für die Absaugung gesundheitsschädlicher Staubpartikel geeignet.
3. An eine ordnungsgemäß geerdete Steckdose anschließen. Siehe Erdungshinweise.
4. Das Gerät nur mit eingesetztem Filter betreiben.
5. An das Stromnetz angeschlossene Geräte nicht unbeaufsichtigt lassen. Nach Gebrauch oder vor der Wartung
Stecker ziehen.
6. Stecker erst ziehen, nachdem alle Schalter ausgeschaltet wurden.
7. Gerät nicht am Kabel aus der Steckdose ziehen. Das Kabel nur am Stecker herausziehen.
8. Stecker und Gerät nicht mit nassen Händen anfassen.
9. Gerät nicht im Freien oder auf nassen Flächen verwenden, da die Gefahr eines Stromschlags besteht.
10. Nicht mit beschädigtem Kabel oder Stecker betreiben. Wenn das Gerät nicht ordnungsgemäß funktioniert, es
fallen gelassen, beschädigt, im Freien stehen gelassen oder ins Wasser getaucht wurde, darf das Gerät nicht
mehr verwendet werden.
11. Nicht am Kabel ziehen und Kabel nicht als Tragegriff verwenden. Kabel nicht unter Türen quetschen oder an
scharfen Kanten und Ecken vorbeiführen. Kabel von beheizten Flächen fernhalten.
12. Keine Gegenstände in die Öffnungen einführen. Nicht verwenden, wenn die Öffnungen verstopft sind.
Öffnungen von Staub, Stoffasern, Haaren und sonstigen Objekten, die den Luftstrom beeinträchtigen könnten,
freihalten.
13. Kleidungsstücke, Finger oder sonstige Körperteile von den Öffnungen und sich in Bewegung bendenden
Teilen fernhalten.
14. Keine brennenden oder rauchenden Gegenstände, wie Zigaretten, Streichhölzer oder heiße Asche aufsaugen.
15. Keine entammbaren oder brennbaren Flüssigkeiten, wie Benzin, aufnehmen. Gerät nicht in deren Nähe
verwenden.
16. Das Gerät ist kein Spielzeug! Beim Gebrauch durch Kinder oder in der Nähe von Kindern ist höchste
Aufmerksamkeit erforderlich.
ACHTUNG
!
Vacuum Guide_REVISION.indd 11 12/9/09 4:48:34 PM

2
Bedienungsanleitung – Internationaler Wartungs-Staubsauger
© 3M 2009
Erdungshinweis
Technische Daten
Dieses Gerät muß geerdet sein.
Die Drähte des Hauptkabels sind wie
folgt farbcodiert:
Grün-gelb: Schutzleiter
Blau: Neutralleiter
Braun: Stromleiter
Da diese Farbcodierung
möglicherweise nicht mit der
Farbkennung an den Klemmen Ihres
Steckers übereinstimmt, muß wie
folgt vorgegangen werden:
Der grün-gelbe Draht muss an die mit
“E” bzw. “ ” (Erdungssymbol)
gekennzeichnete Steckerklemme oder
an eine grüne bzw. grün-gelbe
Klemme angeschlossen werden.
Der blaue Draht muss an die mit “N”
gekennzeichnete oder an eine
schwarze bzw. blaue Steckerklemme
angeschlossen werden.
Der braune Draht muss an die mit
“L” gekennzeichnete oder an eine
braune bzw. rote Steckerklemme
angeschlossen werden.
Stromversorgung:
220-240 V
50/60 Hz
3,7 A
Abmessungen:
Länge 45,2 cm
Breite 19,7cm
Höhe 23,5 cm
Genehmigung:
Entspricht VDE RFI 0875Bestimmungen zur Funkentstörung
Motorleistung:
1 PS
Dauerleistung mit versiegeltem
Kugellager und Gleitlager,
dauergeschmiert. Interne
Thermosicherung öffnet bei 105° C und
schließt automatisch, wenn der Motor
abgekühlt ist (nach ca. 30 Minuten).
BSI: Interne Thermosicherung öffnet
bei 105°C und schließt automatisch,
wenn der Motor abgekühlt ist (nach ca.
30 Minuten).
Enstpricht den Bestimmungen zur Störungsfreheit gemäß:
EUROPÄISCHE NORM EN 55014 (1993)
CISPR 14 dritte Ausgabe (1993-01)
EN60555-3
IEC 1000-3-2
EUROPÄISCHE NORM EN 50082-1 (1992)
IEC Veröffentlichung 801-2 (1991)
IEC Veröffentlichung 801-3 (1991)
IEC Veröffentlichung 801-4 (1998)
prIEC Entwurf 801-5
GEFAHR
!
Vacuum Guide_REVISION.indd 12 12/9/09 4:48:34 PM
3
Bedienungsanleitung – Internationaler Wartungs-Staubsauger
© 3M 2009
Bedienungsanleitung – Internationaler Wartungs-Staubsauger
Bedienungsschritte
Schritt 1
Verschlüsse entriegeln
und Deckel öffnen.
Schritt 2
Zubehörklappe öffnen und
Anschlusskabel und Zubehör
entnehmen.
Schritt 3
Filterstöpsel dem
Filtereinlass entnehmen
(bei Nichtgebrauch oder
zum Transport wieder
anbringen).
Schritt 4
Gewähltes Zubenhör
auf Schlauch stecken
(Bürste wie gezeigt
anschließen). Schlauch
in Einlass stecken.
Schritt 5
Übriges Zubehör und Stöpsel im
Deckel verstauen. Klappe und Deckel
schließen.
Schritt 8
Stecker in Steckdose
stecken.
Schritt 9
Geräteschalter
einschalten
Schritt 6
Deckel fest verriegeln.
Schritt 7
Kabel in Staubsauger
stecken.
Folgen Sie den in der Abbildung
angegebenen Anweisungen. BENUTZEN
SIE DAS GERÄT NICHT, WENN DER
FILTER VOLL IST. Zu geringe Abluft
oder eine verringerte Saugkraft deutet
darauf hin, dass der Filter voll ist.
BEI GEBRAUCH IM FREIEN
ODER AUF NASSEN FLÄCHEN
BESTEHT DIE GEFAHR EINES
ELEKTRISCHEN SCHLAGS.
1. Entriegeln Sie die beiden
Schnappverschlüsse an der Vorderseite
und öffnen Sie den Deckel.
2. Öffnen Sie die Zubehörklappe
und entnehmen Sie den
Staubsaugerschlauch, das
Anschlusskabel und die Schlauchdüsen.
3. Entnehmen Sie den Stöpsel aus dem
Filtereinlass. (Bei Nichtgebrauch oder
Transport des Gerätes Stöpsel stets
anbringen.)
4. Stecken Sie entweder das Saugrohr
oder die Schlitzdüse auf den Schlauch.
Sie können auch die Staubbürste
gemäß Abbildung anschließen. Das
andere Ende des Schlauchs stecken Sie
in den Filtereinlass.
5. Verstauen Sie das übrige Zubehör
und den Filterstöpsel im Deckel und
schließen Sie Zubehörklappe und
Deckel.
6. Lassen Sie den Gerätedeckel fest
einschnappen.
7. Stecken Sie das Anschlußkabel in die
Steckbuchse am Staubsauger.
8. Stecken Sie den Stecker in eine
Netzsteckdose.
9. Schalten Sie den Geräteschalter ein.
Hinweis
Der Motor in Ihrem Wartungsstaubsauger
hat eine Thermosicherung, die bei
Überhitzung betätigt wird und den Motor
abschaltet. Das geschieht im allgemeinen,
wenn der Filter voll ist und ausgewechselt
werden muß. Wenn der Motor abgekühlt
ist, schaltet er sich automatisch wieder
ein (nach ca. 30 Minuten).
ACHTUNG
!
Vacuum Guide_REVISION.indd 13 12/9/09 4:48:36 PM

4
Bedienungsanleitung – Internationaler Wartungs-Staubsauger
© 3M 2009
Aufbewahrung der
Zubehörteile für den
Transport
Austausch des Filters
1. Ziehen Sie die Stecker aus der
Steckdose und dem Staubsauger.
2. Öffnen Sie den Deckel und
entnehmen Sie den L-15x
Filterstöpsel.
3. Ziehen Sie den Schlauch aus dem
Filtereinlass und verschließen Sie den
Einlass mit dem L-15x Filterstöpsel.
4. Ziehen Sie die Düse vomSchlauch.
5. Schlauch, Netzkabel und Zubehör im
Deckel verstauen und die Zubehörtür
schließen.
6. Schließen und verriegeln Sie den
Deckel.
Der 3M Service Staubsauger wurde
für die Verwendung mit 3M™ Filter
entwickelt. Die 3M Filter müssen
regelmäßig ersetzt werden. Die
Häugkeit des Filteraustauschs hängt
von der Art und der Häugkeit des
Gebrauchs des Service Staubsauger ab.
1. Die Schnappverschlüsse lösen und
den Deckel öffnen.
2. Den L 15X Filterstopfen oder den
Schlauch entfernen. Den Stopfen für
die spätere Verwendung aufbewahren
(siehe Hinweis unten).
3. Den Filter fassen und gerade nach
oben ziehen.
4. Den L 14X Filterstopfen in den Filter
einsetzen.
5. Den Filter ordnungsgemäß entsorgen.
6. Den L 14X Stopfen aus dem neuen
Filter nehmen und den Filter mit
der Öffnung nach links in den
Staubsauger einsetzen. Den L-14X
Stopfen für die spätere Verwendung
bei der Entsorgung des Filters
aufbewahren (siehe Hinweis unten).
7. Sicherstellen, dass die Dichtung
zwischen dem Filter und dem Motor
dicht ist.
8. Den L 15X Filterstopfen oder den
Schlauch einsetzen.
9. Den Deckel schließen und die
Schnappverschlüsse verschließen.
Hinweis: Der L 15X Stopfen
(längerer Stopfen) wird benutzt, um
den Filtereinlass für die Lagerung zu
verschließen, wenn der Staubsauger
nicht in Gebrauch ist. Dieser Stopfen
wird mit dem Filter in einem neuen
Staubsauger geliefert. Der L 14X
Stopfen (kürzerer Stopfen) wird benutzt,
den Filtereinlass für die Entsorgung zu
verschließen. Dieser Stopfen wird mit
jedem neuen Ersatzlter geliefert.
BEI VERWENDUNG IM
FREIEN ODER AUF NASSEN
OBERFLÄCHEN BESTEHT DIE
GEFAHR EINES ELEKTRISCHEN
SCHLAGS!
Bei vollem Filter nicht
verwenden. Mangelnde Saugoder Gebläseleistung ist ein
Zeichen für einen vollen Filter.
Zur Vermeidung eines
Brandrisikos muss der Filter
ordnungsgemäß eingebaut
werden und regelmäßig ersetzt
werden. Den Filter nicht
öffnen, wieder verwenden oder
versuchen Komponenten im
Filter auszutauschen.
!
WARNUNG
!
ACHTUNG
!
ACHTUNG
Vacuum Guide_REVISION.indd 14 12/9/09 4:48:36 PM
5
Bedienungsanleitung – Internationaler Wartungs-Staubsauger
© 3M 2009
Teileliste
Artikel Teilnummer Beschreibung
1 78-8063-1943-6 Steckdose, 220 V (SV-PCR)
2 26-1011-8421-1 Netzkabel, 250 V, 10 A
3 78-8063-2418-8 Vakuumschlauch, komplett (SV-SH32)
4 80-6104-7958-8 Fugendüse (SV-CNI)
5 78-8063-1540-0 Düse mit gewinkeltem Rohr (SV-WA2)
6 78-6969-6211-3 Filter Typ I, Feine Partikel (SV-SPFI)
78-8005-5350-1 Filter Typ 2, Toner/Staub (SV-MPF2)
7 80-6104-7957-0 Fugenbürste (SV-CB I)
8 80-6104-7640-2 Kurzer roter Filterstopfen L-14X (SV-SRP)
9 80-6104-7639-4 Langer roter Filterstopfen L 15X (SV-LRP)
Wichtig
Das Netzkabel muß nach VDE SEMKO zugelassen
und für 250 V, 10 A ausgeführt sein.
Vacuum Guide_REVISION.indd 15 12/9/09 4:48:38 PM

© 3M 2009
6
Bedienungsanleitung – Internationaler Wartungs-Staubsauger
Anleitung zur Auswahl
des richtigen Filters für
den professionellen
Einsatz
Jetzt stehen Ihnen zwei verschiedene
Filter für Ihren 3M Service Staubsauger
zur Verfügung, die beide für unterschiedliche Arbeiten ausgeführt sind.
Die folgenden Informationen sollen
Ihnen helfen, den richtigen Filter für
Ihren hausintemen oder Kundenbedarf
zu wählen.
• Typ 1 Filter für besonders feine
Partikel
• Typ 2 Filter für Toner und
Staub
Alle zwei in dieser Anleitung zur
Auswahl des richtigen Filters für den
professionellen Einsatz beschriebenen
Filter sind vollkommen abbaubar. Das
Auswechseln der Filter ist problemlos
und sauber.
Filter Typ 1, Feine Partikel
Ein dünneres, konzentrierteres Gewebe
(HEPA-Medium) für äußerst feine
Partikel bis zu 0,3 Mikron. Typische
Anwendungsbereiche sind
Laserfarbdrucker, Farbkopierer und
hochempfindliche Geräte.
Filter Typ 2, Toner/Stau
Dieser Filter wurde speziell zum
Aufsaugen von überschüssigem Toner
aus Kopiergeräten und Laserdruckern
entwickelt. Er eignet sich auch optimal
für die Reinigung von EDV-Geräten.
3M Betriebsstaubsauger
Bescnränkte Garantie und Haftungsbescnränkung
Beschränkte Garantie: Die 3M garantiert gegenüber dem Erstbenutzer/-käufer dieses 3M Betriebsstaubsaugers für
eine Frist von drei (3) Jahren ab Kaufzeitpunkt, dass der Betriebsstaubsauger frei von Material- bzw.
Verarbeitungsmängeln ist. Sollte sich innerhalb dieser Frist und nach Benachrichtigung der 3M innerhalb der genannten
drei (3) Jahre ab Kaufzeitpunkt und Vorlage des entsprechenden Kaufsnachweises herausstellen, dass das Gerät dieser
Garantie nicht entspricht, wird die 3M nach eigenem Ermessen das mangelhafte Produkt entweder reparieren oder
ersetzen. Der Käufer ist dafür verantwortlich, das Produkt mit vorausbezahlter Fracht an die von der 3M bestimmte
Servicestelle zurückzusenden. Diese Maßnahmen sind die exklusiven Rechtsmittel, die dem Käufer im Fall einer
Garantieverletzung zur Verfügung stehen.
Garantieausschluss: Die vorstehende Garantie ist ungültig für Betriebsstaubsauger, die ohne Genehmigung der 3M
abgeändert wurden, oder die durch Nachlässigkeit, Mißbrauch, Zufall, Nichtbefolgen der schriftlichen 3M
Bedienungsanleitung oder Verwendung eines Filters, der 3M-Spezikationen nicht entspricht, beschädigt wurden.
Verbrauchsgüter wie z.B. Filter sind in der vorstehenden Garantie nicht eingeschlossen.
Abstandserklärung: DIE 3M GIBT KEINE ZUSÄTZLICHEN AUSDRÜCKLICHEN ODER
STILLSCHWEIGENDEN GARANTIEN IN HINSICHT AUF DEN 3M BETRIEBSSTAUBSAUGER,
EINSCHLIESSLICH, JEDOCH NICHT BESCHRÄNKT AUF EINE STILLSCHWEIGENDE GARANTIE DER
VERKÄUFLICHKEIT ODER EIGNUNG FÜR EINEN BESTIMMTEN ZWECK.
Haftungsbeschränkung: DIE 3M IST UNTER KEINEN UMSTÄNDEN FÜR IRGENDWELCHE ZUFÄLLIGEN,
BESONDEREN ODER NACHFOLGENDEN SCHÄDEN ODER WIRTSCHAFTLICHE VERLUSTE HAFTBAR,
DIE
AUF GARANTIEVERLETZUNG, VERTRAGSBRUCH, NACHLÄSSIGKEIT, STRIKTE DELIKTSHAFTUNG
ODER SONSTIGE RECHTSTHEORIE ZURÜCKZUFÜHREN SIND, AUCH WENN DIE 3M VON DER
MÖGLICHKEIT DERARTIGER SCHÄDEN IN KENNTNIS GESETZT WURDE, EINSCHLIESSLICH, JEDOCH
NICHT BESCHRÄNKT AUF GEWINNVERLUST, VERLORENES EINKOMMEN, AUSFALL DER
NUTZNIESSUNG DES GERÄTES ODER IRGENDWELCHER DATEN ODER INFORMATIONEN. AUSSER WIE
AUSDRÜCKLICH IN DIESER GARANTIE BESTIMMT ÜBERSCHREITET DIE HAFTBARKEIT DER 3M
UNTER KEINEN UMSTÄNDEN DEN PREIS DES 3M BETRIEBSSTAUBSAUGERS. Diese Beschränkungen
beziehen sich nicht auf Schäden, die durch eine Verletzung der stillschweigenden Garantie des Eigentums- bzw.
Patentrechtes entstanden sind, noch auf Ersatzansprüche wegen Körperbeschädigung. Unter den Gesetzen einiger
Staaten/Länder sind die Haftbarkeitsrechte verschieden von den vorstehend genannten. In diesen Fällen sind die minimal
erforderlichen Haftbarkeitsbestimmungen gültig.
Vacuum Guide_REVISION.indd 16 12/9/09 4:48:39 PM

Aspiradora de servicio internacional Instrucciones de operación
© 3M 2009
1
Aspiradora de uso exclusivamente comercial
Instrucciones de seguridad —
Guárdelas como referencia
Lea todas las instrucciones antes de usar la aspiradora.
Al usar aparatos eléctricos, siempre es necesario tomar ciertas
precauciones básicas, entre las que se incluyen:
PARA REDUCIR EL RIESGO DE INCENDIO, DESCARGAS ELÉCTRICAS O LESIONES
SIGA LAS PAUTAS DE SEGURIDAD ENUMERADAS A CONTINUACIÓN:
1. Utilice la aspiradora sólo de la manera indicada en este manual. Utilice sólo los accesorios recomendados.
2. No utilice este aparato para aspirar polvo peligroso.
3. Enchúfelo a un tomacorriente con descarga a tierra. Consulte Instrucciones para la conexión a tierra.
4. No utilice la aspiradora sin tener el ltro instalado.
5. No la deje enchufada cuando no la esté utilizando. Desenchúfela una vez que termine de usarla y antes de
realizar tareas de mantenimiento.
6. Apague todos los controles antes de desenchufar la aspiradora.
7. No la desenchufe tirando del cable, hágalo tomando el enchufe.
8. No toque el enchufe ni la aspiradora con las manos húmedas.
9. No utilice la aspiradora a la intemperie ni en supercies húmedas. En tales condiciones, es posible que se
originen descargas eléctricas.
10. No utilice la aspiradora si observa que el cable o el enchufe están dañados. Tampoco la utilice si no
funciona como es debido, si se ha caído o dañado, si la ha dejado a la intemperie o si la aspiradora se cayó
al agua.
11. No la mueva tirando del cable de alimentación, no use el cable como si fuese un asa, no atrape el cable con
las puertas ni permita que quede tirante contra esquinas o bordes losos. Mantenga el cable alejado de
supercies calientes.
12. No introduzca ningún objeto en los oricios de la aspiradora ni la utilice si alguno de los oricios estuviese
tapado. Mantenga dichos oricios limpios de polvo, pelusas, cabellos o cualquier otro elemento que pudiese
interferir con el libre paso de aire.
13. Mantenga el cabello, las prendas holgadas, los dedos y cualquier otra parte de su cuerpo alejados de los
oricios y partes móviles de la aspiradora.
14. No aspire objetos que estén ardiendo o desprendan humo, como cigarrillos, cerillas o cenizas calientes.
15. No la utilice para recoger líquidos inamables o combustibles, como por ejemplo gasolina, ni en zonas donde
pueda haber dichos líquidos.
16. No permita que se la use como un juguete. Tenga sumo cuidado cuando la utilice cerca de niños.
ADVERTENCIA
!
Vacuum Guide_REVISION.indd 17 12/9/09 4:48:40 PM

2
Aspiradora de servicio internacional Instrucciones de operación
© 3M 2009
Instrucciones para la
conexión a tierra
Especificaciones
Este aparato debe estar conectado a
tierra.
Los cables del conector principal
están codificados con los siguientes
colores:
Amarillo/verde: tierra
Azul: neutro
Marrón: vivo
Como tal vez los colores no
coincidan con las marcas
identificadoras de las terminales en
su enchufe, proceda de la siguiente
manera:
El cable de color verde/amarillo debe
ser conectado a la terminal del
enchufe identificada con la letra “E”
o con el símbolo de descarga a tierra
“ ”, o de color verde o verde/
amarillo.
El cable azul debe ser conectado a la
terminal del enchufe identificada con
la letra “N” o de color negro o azul.
El cable marrón debe ser conectado a
la terminal del enchufe identificada
con la letra “L” o de color marrón o
rojo.
Eléctricas
220-240 V~
50/60 Hz
3,7 A
Dimensiones
Longitud 45,2 cm (17-13/16 pulg.)
Ancho 19,7 cm (7-3/4 pulg.)
Alto 23,5 cm (9-1/4 pulg.)
Certificación
Cumple los límites conductivos de la
norma VDE RFl 0875
Motor
1 H.P.
Este motor no requiere mantenimiento
y cuenta con un cojinete de bolas
sellado y un cojinete de manguito
lubricado de por vida. El termostato
interno se abre a los 105°C (221°F) y se
cierra automáticamente al enfriarse el
motor (después de aproximadamente
unos 30 minutos).
BSI: El termostato interno se abre
a los 120°C (274°F) y se cierra
automáticamente al enfriarse el motor
(después de aproximadamente unos 30
minutos).
Cumple con las normas EMC definidas en:
NORMAS EUROPEAS EN 55014 (1993) - Emisiones conductivas
ClSPR 14, tercera edición (1993-01) - Emisiones conductivas
EN60555-3 - Emisiones armónicas actuales (clase A)
IEC 1000-3-2 - Emisiones armónicas actuales (clase A)
NORMA EUROPEA EN 50082-1 (1992), Inmunidad
lEC Publication 801-2 (1991) - ESD, descarga por contacto, nivel de gravedad 4
IEC Publication 801-3 (1991) - ESD, descarga por aire, nivel de gravedad 4
IEC Publication 801-4 (1998) - Inmunidad radiada, nivel de gravedad 2
prIEC Draft 801-5 - Sobretensión, nivel de gravedad 3
IMPORTANTE
!
Vacuum Guide_REVISION.indd 18 12/9/09 4:48:41 PM

3
Aspiradora de servicio internacional Instrucciones de operación
© 3M 2009
Funcionamiento
Paso 1
Desenganche los cerrojos
y abra la tapa.
Paso 2
Abra la puerta de accesorios
y saque el tubo, el cable de
alimentación y los accesorios.
Paso 3
Retire el tapón del filtro de la toma
de aspiración (siempre vuelva a
colocarlo en su lugar cuando el
aparato no esté en uso o lo prepare
pa el transporte).
Paso 4
Acople el accesorio deseado
al tubo de aspiración (acople el
cepillo para polvo tal como se
indica). Inserte el otro extremo del
tubo en la toma de aspiración.
Paso 5
Coloque los demás accesorio
y el tapón del filtro en la tapa. Cierre la tapa.
Paso 8
Enchufe el cable de
alimentación en un tomacorriente.
Paso 9
Coloque el interruptor en la
posición de encendido.
Paso 6
Enganche los cerrojos de la
tapa firmemente.
Paso 7
Inserte el enchufe del
cable de alimentación en
la toma de la aspiradora.
Siga los pasos indicados. NO UTILICE EL
APARATO CON EL FILTRO LLENO.
Una indicación de que el filtro está lleno es
la falta de aire de escape o una disminución
en la succión.
EXISTE PELIGRO DE
DESCARGAS ELÉCTRICAS
CUANDO SE UTILIZA LA
ASPIRADORA A LA INTEMPERIE
O SOBRE SUPERFICIES
HÚMEDAS.
l. Desenganche los cerrojos y abra la tapa.
2. Abra la puerta de accesorios y saque
el tubo de aspiración, el cable de
alimentación y los accesonos.
3. Retire el tapón del filtro de la toma de
aspiración (siempre vuelva a colocarlo
en su lugar cuando el aparato no esté en
uso o lo prepare para el transporte).
4. Acople el accesorio deseado al tubo
de aspiración (acople el cepillo para
polvo tal como se indica). Inserte el
otro extremo del tubo en la toma de
aspiración.
5. Coloque los demás accesorios y el tapón
del filtro en la tapa. Cierre la tapa.
6. Enganche los cerrojos de la tapa
firmemente.
7. Inserte el enchufe del cable de
alimentación en la toma de la
aspiradora.
8. Enchufe el cable de alimentación en
un tomacorriente.
9. Coloque el interruptor en la posición de
encendido.
Nota
El termostato del motor se abre y detiene
el motor cuando éste se recalienta. Esta
condición ocurre normalmente cuando el
filtro está lleno y debe ser reemplazado.
El motor arrancará automáticamente al
enfriarse (después de aproximadamente
30 minutos).
ADVERTENCIA
!
Vacuum Guide_REVISION.indd 19 12/9/09 4:48:42 PM

4
Aspiradora de servicio internacional Instrucciones de operación
© 3M 2009
Almacenamiento de
accesorios para el
transporte
Cambio del filtro
1. Desenchufe el cable de
alimentación del tomacorriente y de
la aspiradora.
2. Abra la tapa y retire el tapón del ltro
L-15X.
3. Retire el tubo de aspiración de la
toma de aspiración y coloque el tapón
del ltro L-15X en su lugar.
4. Quite la boquilla del tubo de
aspiración.
5. Coloque el tubo de aspiración,
el cable de alimentación y los
accesorios en la tapa, y cierre la
puerta de accesorios.
6. Cierre la tapa y enganche los cerrojos
rmemente.
La Aspiradora de Servicio 3M está
diseñada para usarla con los ltros
desechables 3M™. Los ltros 3M
deben remplazarse regularmente. La
frecuencia del cambio de ltro depende
el tipo y frecuencia de uso de la
Aspiradora de Servicio.
1. Desbloquee los pestillos y abra la
tapa.
2. Retire el tapón o el manguito del ltro
L-15X. Guarde el tapón para usarlo
después (vea nota más abajo).
3. Agarre el ltro y tire de él hacia
arriba.
4. Inserte el tapón del ltro L-14X en el
ltro.
5. Deseche el ltro adecuadamente.
6. Retire el tapón L-14X del nuevo ltro
y coloque el ltro en la aspiradora con
el agujero del ltro hacia su izquierda.
Guarde el tapón L-14X para usarlo
cuando se deshaga del ltro (ver nota
más abajo).
7. Verique que la junta entre el ltro y
el motor encaja perfectamente.
8. Inserte el tapón o el manguito del
ltro L-15X.
9. Cierre y bloquee la tapa.
Nota: El tapón L-15X (tapón largo)
se usa para cubrir la entrada del ltro
durante su almacenamiento cuando la
aspiradora no está siendo usada. Este
tapón viene con el ltro en una nueva
aspiradora. El tapón L-14X (tapón
corto) se usa para cubrir la entrada del
ltro para su desecho. Este tapón viene
con un nuevo ltro de reemplazo.
SE PUEDE PRODUCIR UN
CHOQUE ELÉCTRICO SI SE
USA EN EL EXTERIOR O SOBRE
UNA SUPERFICIE HÚMEDA!
No lo ponga en marcha si el
filtro está lleno. La falta de
succión o el agotamiento son
indicaciones de un filtro lleno.
Para evitar el riesgo de
fuego, el filtro debe instalarse
adecuadamente y ser
remplazado regularmente. No
abra el filtro, no lo reutilice
ni intente reemplazar los
componentes dentro del filtro.
!
AVISO
!
PRECAUCIÓN
!
PRECAUCIÓN
Vacuum Guide_REVISION.indd 20 12/9/09 4:48:43 PM
 Loading...