

Page 1

3M™ Speedglas™ 9100
User Instructions
Bedienungsanleitung
Notice d’instructions
Инструкция по
эксплуатации
Інструкція з експлуатації
Instruzioni d’uso
Gebruiksaanwijzing
Instrucciones de uso
Instruções de uso
Bruksanvisning
Bruksanvisning
Brugsanvisning
Käyttöohjeet
Kasutusjuhend
Vartotojo žinynas
Lietošanas instrukcija
Instrukcja obsługi
Pokyny
Használati utasítás
Instrucţiuni de utilizare
Navodila za uporabo
Užívatel’ská príručka
Upute za uporabu
Қолданушының
нұсқаулығы
Инструкции за
използване
Kullanıcı Talimatları
Οδηγίες Xρήσης
ךותירה תכסמב שומיש תוארוה
Page 2

Page 3

Parts List
536100
5360 00
5362 00
68015
5320 00
4220 00
5260 00
5270 00
5270 70
5000 05
5000 15
5000 25
5310 00
1710 20
1710 21
1710 22
1710 23
5280 05
5280 15
5280 25
5330 00
1690 05 1691 00
501190
5018 90
5320 15
1690 10
Page 4

User manual 3M™ Speedglas™ 9100
0196
Notifi ed body 0196 DIN CERTCO
Prüf- und Zertifi zierungszentrum Aalen
Augenschutz und Persönliche Schutzausrüstung
Gartenstraße 133, 73430 Aalen, Germany
1ï
User Instructions ............................................... page 1-8
3 Bedienungsanleitung .............................................. Seite 9-18
2 Notice d’instructions ............................................... page 19-26
r ɂɧɫɬɪɭɤɰɢɹ ɩɨ ɷɤɫɩɥɭɚɬɚɰɢɢ ....................... ɫɬɪɚɧɢɰɚ 27-35
u ȱɧɫɬɪɭɤɰɿɹ ɡ ɟɤɫɩɥɭɚɬɚɰɿʀ ................................. ɫɬɨɪɿɧɤɚ 36-43
4 Instruzioni d’uso ................................................... Pagina 44-51
6 Gebruiksaanwijzing .............................................. pagina 52-59
5 Instrucciones de uso ............................................ página 60-67
- Instruções de uso ................................................. página 68-76
9 Bruksanvisning ......................................................... side 77-83
7 Bruksanvisning ......................................................... sida 84-90
8 Brugsanvisning ......................................................... side 91-98
0 Käyttöohjeet .............................................................. sivu 99-106
/ User Instruction ....................................................... page 107-114
é Kasutusjuhend .............................................................. lk. 115-122
| Vartotojo žinynas ............................................... puslapis 123-131
l Lietošanas instrukcija ........................................ lappuse 132-139
H Instrukcja obsáugi .................................................. strona 140-148
F Pokyny .................................................................... strana 149-156
J Használati utasítás ................................................... oldal 157-164
L InstrucĠiuni de utilizare ......................................... pagina 165-173
S Navodila za uporabo ................................................ stran 174-181
D Užívatel’ská príruþka ............................................. strana 182-189
A Upute za uporabu ................................................ stranica 190-197
k Ԕɨɥɞɚɧɭɲɵɧɵԙ ɧԝɫԕɚɭɥɵԑɵ ................................... ɛɟɬ 198-207
K ɂɧɫɬɪɭɤɰɢɢ ɡɚ ɭɩɨɬɪɟɛɚ .......................................... ɫɬɪ. 208-217
: KullanÕcÕ TalimatlarÕ ................................................ Sayfa 218-225
= ȅįȘȖȓİȢ XȡȒıȘȢ .................................................... ȈİȜȓįĮ 226-234
i ʪʥʺʩʸʤ ʺʫʱʮʡ ʹʥʮʩʹ ʺʥʠʸʥʤ ..................................... ʭʩʣʥʮʲ 235-241
Page 5

1 ï
Instruction 3M™ Speedglas™ 9100
Welding Shield
BEFORE WELDING
For your own protection read these instructions carefully before using the
Speedglas 9100 welding shield.
The complete assembly is illustrated in fi gure A:1.
Adjust the welding shield according to your individual requirements to
reach the highest comfort. (see fi gure B:1 - B:4).
Shade number should be chosen according to table on page 250.
The Speedglas 9100 welding shield gives permanent protection (shade 13
equivalent) against harmful UV- and IR-radiation, regardless of whether
the fi lter is in the light or dark state or whether the auto-darkening function
is operational.
Two lithium batteries are used as the power source. (3V CR2032)
WARNING!
When used in accordance with these user instructions, this product is
•
designed to help protect the wearer‘s eyes and face from harmful radiation
including visible light, ultra-violet radiation (UV), infra-red radiation (IR)
and sparks and spatter resulting from certain arc/gas welding processes
where shade 5, 8, 9-13 is recommended.
Use of this product in any other application such as laser welding/cutting
•
may result in permanent eye injury and vision loss.
Do not use any welding product without appropriate training.
•
Use only with original Speedglas brand spare parts such as inner and
•
outer protection plates according to the part numbers provided in these
instructions. The use of substitute components or modifi cations not
specifi ed in these user instructions might impair protection and may
invalidate claims under the warranty or cause the shield to be noncompliant with protection classifi cations and approvals.
The Speedglas 9100 welding shield is not designed for heavy duty
•
overhead welding/cutting operations due to the risk of burns from falling
molten metal.
1
Page 6

1 ï
•
The manufacturer is not responsible for any modifi cations to the welding
fi lter or use with welding shields other than the Speedglas 9100 welding
shield. Protection may be seriously impaired if unsuitable modifi cations
are made.
•
Wearers of ophthalmic spectacles should be aware that in the case of
severe impact hazards the deformation of the shield might cause the
inside of the shield to come into contact with the spectacles creating a
hazard for the wearer.
APPROVALS
Speedglas 9100 has been shown to meet the Basic Safety Requirements
under Article 10 of the European Directive 89/686/EEC and is thus CE
marked. The product complies with the harmonized European Standards
EN 175, EN 166, EN 169 and EN 379. The product was examined at the
design state by DIN Certco Prüf- und Zertifi erungszentrum (Notifi ed body
number 0196).
Markings
The welding fi lter is marked with the shade range and optical
classifi cations.
The following is an example (EN 379):
3 / 5, 8 / 9 -1 3 3M 1 / 1 / 1 / 2 / EN379 CE
Light shade
Dark shade(s)
Manufacturer identifi cation
Optical class
Diffusion of light class
Variations in Luminous transmittance class
Angle dependency class (optional marking)
Certifi cation mark or number of standard
Note! The above is an example. Valid classifi cation is marked on the
welding fi lter.
The markings on the welding shield and the protection plates, indicate
safety class for protection against high speed particles. S stands for the
basic requirement for increased robustness, F stands for low energy impact
and B stands for medium energy impact.
2
Page 7
1 ï
If the protection meets the requirements at extremes of temperature (-5°C
to +55°C) the marking is completed with the letter T. Additional markings
on the product refer to other standards.
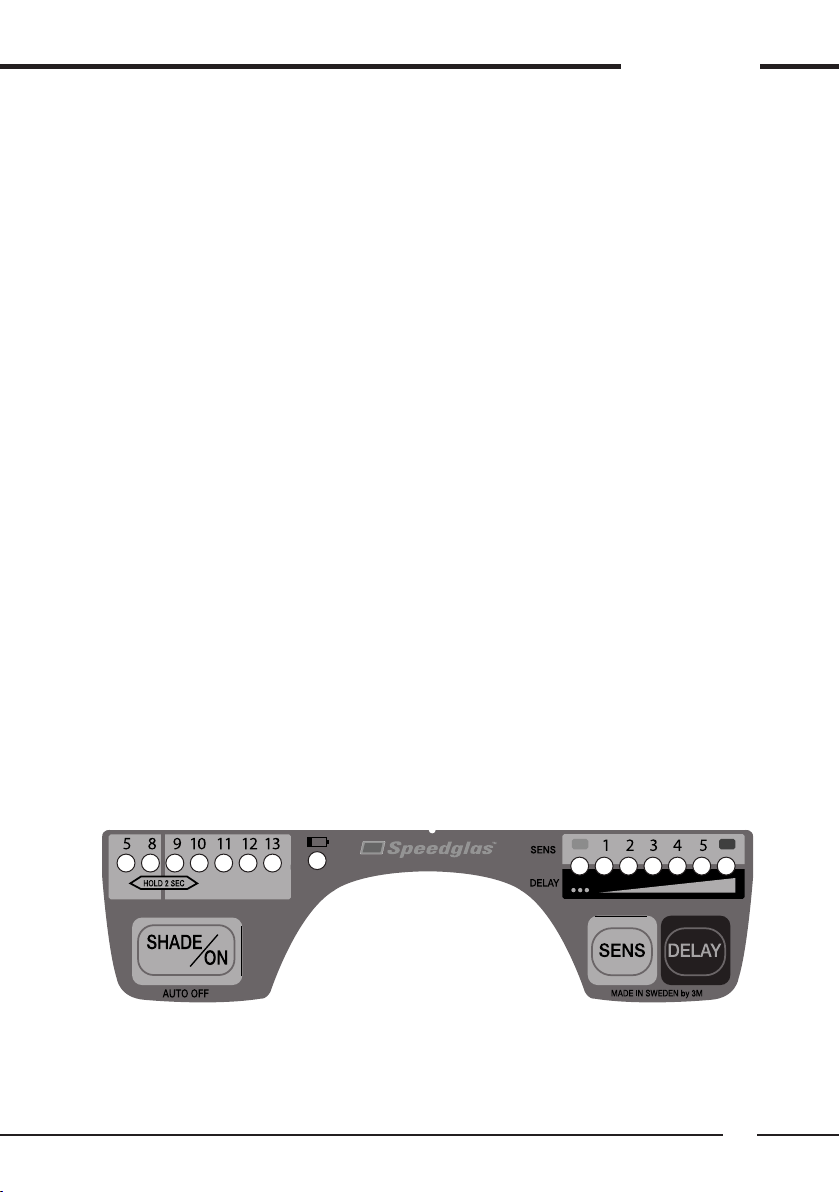
FUNCTIONS
On/Off
To activate the welding fi lter, press the SHADE/ON button. The welding
fi lter automatically turns OFF after 1 hour of inactivity.
The welding fi lter has three photo sensors (see fi g A:2) that react
independently and cause the fi lter to darken when a welding arc is struck.
The welding fi lter may not go to dark position if the sensors are blocked or
the welding arc is totally shielded.
Flashing light sources (e.g. safety strobe lights) can trigger the welding
fi lter making it fl ash when no welding is occurring. This interference can
occur from long distances and/or from refl ected light. Welding areas must
be shielded from such interference.
Shade
Seven different Shade Number settings, split into two groups, 5, 8 and
9-13 are available in the dark state. In order to see the current Shade
Number setting, momentarily press the SHADE/ON button. To select
another Shade Number, press the SHADE/ON button repeatedly while the
LED indicators on the display are fl ashing. Move the fl ashing LED to the
desired Shade Number. To shift between the two shade groups (shade 5,8)
and (shade 9-13) hold the SHADE/ON button down for 2 seconds.
In all welding processes the arc should only be viewed with the
recommended dark shade. See table page 250.
3
Page 8

1 ï
Sensitivity
The programming and sensitivity of the photo detector system (which
responds to the light from the welding arc) can be adjusted to accommodate
a variety of welding methods and workplace conditions. In order to see the
current sensitivity setting, momentarily press the SENS button. To select
another setting, press the SENS button repeatedly until the LED shows the
desired setting.
Position
Used for grinding
Position 1 Least sensitive setting. Used if there is interference
from other welders’ arcs in the vicinity.
Position 2 Normal position. Used for most types of welding
indoors and outdoors.
Position 3 Position for welding with low current or with stable
welding arcs. (eg TIG welding)
Position 4 Suitable for very low current welding, use of inverter-
type TIG welding machines.
Position 5 Most sensitive setting. Used for TIG welding where
part of the arc is obscured from view.
Position
passive welding fi lter.
Locked in light state (shade 3) at all times
Locked in selected dark state. Same function as a
Position locked light state
This setting could be used for grinding or other non-welding activities. When
the welding fi lter is locked in the light state (shade 3) the LED under the
symbol will fl ash every 8 seconds to alert the user. The welding fi lter must be
unlocked before arc welding is performed, by choosing a sensitivity setting
for welding. When the welding fi lter turns OFF (after 1 hour inactivity), it will
automatically leave the locked state and go to sensitivity setting 2.
Position 1-5
If the fi lter does not darken during welding as desired, increase the
sensitivity until the welding fi lter switches reliably. Should the sensitivity
be set too high, the fi lter may remain in the dark state after welding is
complete due to ambient light. In this case, adjust the sensitivity downward
to a setting where the welding fi lter both darkens and lightens as desired.
4
Page 9

1 ï
Position locked dark state
When the welding fi lter is locked in the dark state and the welding fi lter
turns OFF (after 1 hour inactivity), it will automatically reset to sensitivity
setting 2.
Delay
The delay function should be used to set the recovery delay from dark to
light of the welding fi lter according to welding method and current. See
table on page 250.
Comfort mode for tack welding.
This setting may help reduce eye fatigue resulting from the eye constantly
adjusting to differing light levels during tack welding. Tack welding mode
uses an intermediate light state (shade 5). If an arc is not struck within 2
seconds the welding fi lter will switch to the normal light state (shade 3).
Note that the Sensitivity and Delay function are using the same LED
indicators on the display.
Low battery indicator
The batteries should be replaced when the low battery indicator fl ashes or
LEDs do not fl ash when the buttons are pressed.
WARNING
Should the Speedglas 9100 welding shield fail to switch to the dark state
in response to an arc, stop welding immediately and inspect the welding
fi lter as described in these instructions. Continued use of a welding fi lter
that fails to switch to the dark state may cause temporary vision loss. If the
problem cannot be identifi ed and corrected, do not use the welding fi lter,
contact your supervisor, distributor or 3M for assistance.
MAINTENANCE
Replacement of outer protection plate.
Remove silver front cover. (see fi gure C:1)
Remove the used outer protection plate and place the new outer protection
plate on the welding fi lter. (see fi gure C:2)
Silver front cover must always be used (see fi gure C:3).
5
Page 10

1 ï
Replacement of welding fi lter
The welding fi lter can be removed and replaced according to fi gure C:1
and E:1 - E:2.
Replacement of inner protection plate
The welding fi lter must be removed to replace the inner protection plate.
The used inner protection plate is removed as illustrated in fi gure D:1. The
new inner protection plate should be inserted after the protective fi lm is
removed as illustrated in fi gure D:2.
Magnifying lens (accessory) mounting (see fi gure D:3).
Replacement of batteries
The welding fi lter must be dismounted from the welding shield to access
the battery compartments. Take out the battery holders (use a small
screwdriver if necessary). Insert new batteries in the battery holders
according to fi gure G:1. Slide each battery holder into the welding fi lter
until it snaps in position. Note that all settings will be reset to the original
manufacturing setting.
Speedglas 9100V and Speedglas 9100X has a solar panel (see fi g A:3) to
assist the batteries.
Replacement of headband
The headband can be replaced according to fi gure F:1-F:2.
Replacement of sweatband
The sweatband can be replaced according to fi gure F:3.
CAUTION
The used batteries/worn out product parts should be disposed of according
to local regulations. The welding fi lter should be disposed of as electronic
waste.
Extended coverage
Extended head and neck cover (accessory) mounting (see fi gure H:1 –
H:2).
6
Page 11

1 ï
Temperature range
The recommended operating temperature range for the product is -5°C to
+55°C. Store in a clean and dry environment, temperature range -30°C to
+70°C and relative humidity less than 90%.
Inspection
The sensors (see fi g A:2) on the welding fi lter must be kept clean and
uncovered at all times for correct function.
To check that the electronics and buttons are working, press the buttons
and the LED indicators will fl ash.
WARNING
Carefully inspect the complete Speedglas 9100 welding shield assembly
•
before each use. Check for cracks in the shield and look for light leaks.
Cracked, pitted or scratched fi lter glass or protection plates reduce vision
and can seriously impair protection. All damaged components should be
replaced immediately.
To avoid damage to the product do not use solvents for cleaning. Clean
•
the welding fi lter and protection plates with a lint-free tissue or cloth.
Clean the welding shield with a mild detergent and lukewarm water. Do
not immerse in water or spray directly with liquids.
The welding shield is heat resistant and approved against standard
•
requirements for fl ammability but can catch fi re or melt in contact with
open fl ames or very hot surfaces. Keep the shield clean to minimize this
risk.
Materials that come into contact with skin may cause allergic reactions
•
to susceptible persons.
7
Page 12

1 ï
Parts List 3M™ Speedglas™ 9100
Part no. Description
Spare parts
50 00 05 SPEEDGLAS 9100V Auto darkening Welding Filter 5, 8/9-13
50 00 15 SPEEDGLAS 9100X Auto darkening Welding Filter 5, 8/9-13
50 00 25 SPEEDGLAS 9100XX Auto darkening Welding Filter 5, 8/9-13
50 11 90 SPEEDGLAS 9100 Shield without headband
50 18 90 SPEEDGLAS 9100 SW Shield without headband
53 20 00 SPEEDGLAS 9100 Silver front
53 30 00 SPEEDGLAS 9100 Headband including assembly parts
53 60 00 SPEEDGLAS 9100 Pivot mechanism, left and right for
headband
53 10 00 SPEEDGLAS 9100 Welding fi lter battery holder pkg of 2
53 61 00 SPEEDGLAS 9100 Headband front part
53 62 00 SPEEDGLAS 9100 Headband back part
Consumables
52 60 00 SPEEDGLAS 9100 Outside protection plate standard pkg of 10
52 70 00 SPEEDGLAS 9100 Outside protection plate scratch pkg of 10
52 70 70 SPEEDGLAS 9100 Outside protection plate heat pkg of 10
16 80 15 SPEEDGLAS 9100 Sweatband pkg of 3
52 80 05 SPEEDGLAS 9100V Inner protection plate pkg of 5 marked
117x50
52 80 15 SPEEDGLAS 9100X Inner protection plate pkg of 5 marked
117x61
52 80 25 SPEEDGLAS 9100XX Inner protection plate pkg of 5 marked
117x77
42 20 00 Battery pkg of 2
Accessories
16 90 05
16 90 10
16 91 00 Hood throat/head in TecaWeld
53 20 15
17 10 20 Magnifying Lens 1.0
17 10 21 Magnifying Lens 1.5
17 10 22 Magnifying Lens 2.0
17 10 23 Magnifying Lens 2.5
SPEEDGLAS 9100 Extended coverage crown in TecaWeld
SPEEDGLAS 9100 Extended coverage neck & ear in TecaWeld
SPEEDGLAS 9100 Coverplate SW
8
Page 13

Technical Specifi cation
Weight:
Welding shield with SideWindows
(excl headband and welding fi lter): 265 g
Welding shield w/o SideWindows
(excl headband and welding fi lter): 240 g
Headband 120 g
Welding fi lter:
Speedglas 9100V 150 g
Speedglas 9100X 160 g
Speedglas 9100XX 185 g
Viewing area:
Welding fi lter:
Speedglas 9100V 45 x 93 mm
Speedglas 9100X 54 x 107 mm
Speedglas 9100XX 73 x 107 mm
UV/IR protection: According to shade number 13
(permanent)
Switching time light to dark: 0.1 ms (+23°C)
Opening time dark to light (delay) see Recovery Delay table
Light state: shade no 3
Dark state: shade no 5, 8, 9-13
Fail safe state: shade no 5
Battery type: 2 x CR2032 (Lithium 3V)
Operating temperature: -5°C to + 55°C
Battery life:
Speedglas 9100V 2800 hours
Speedglas 9100X 2500 hours
Speedglas 9100XX 2000 hours
Head sizes: 50-64
Material
Shield: PPA
Silver front: PA
Welding fi lter: PA
SideWindows: PC
Headband: PA, PP, TPE, PE
Protection plate: PC
242
Page 14

A:2
A:1
A:3
B:1
243
Page 15

B:2
1. 2. 3.
B:3
244
Page 16

B:4
245
Page 17

C:1
C:2
C:3
246
Page 18

D:1
E:1
D:3
D:2
E:2
247
Page 19

F:1
F:3
F:2
248
Page 20

G:1
H:1
H:2
249
Page 21

Recommended shade numbers
according to EN 379:2003
Delay (recovery delay)
Delay
Shade
) comfort mode for tack welding is described in the User Instruction
*
250
)
*
40 40 60 90 130
5
40 40 60 100 150
8
40 40 60 100 150 200 300
9
40 40 70 150 200 300 300
10
50 50 80 200 300 375 325
11
50 50 90 250 400 475 325
12
60 60 100 300 450 525 325
13
d 1 d 2 d 1 d 2
∑∑
200 300
250 400
375 625
500
425 625
600
475 625
700
575 625
800
675 625
850
1000
1050
1100
1200
1300
shade3
shade3
shade 12
shade 12
0,1 ms
0,
delay
shade 12
shade3
1 ms
d 1
shade 12
d 2
shade5
∑
shade3
Page 22

1 3M United Kingdom PLC
3M Centre, Cain Road
Bracknell, Berkshire RG12 8HT
Tel: 0870 60 800 60
www.3m.com/uk/ohes
ï 3M Ireland
3M House, Adelphi Centre
Upper Georges Street
Dun Laoghaire, Co. Dublin
Tel: 1800 320 500
www.3m.com/uk/ohes
3 3M Deutschland GmbH
In der Heubrach 16
63801 Kleinostheim
Tel: 0 60 27 / 46 87 - 0
arbeitsschutz.de@mmm.com
www.3marbeitsschutz.de
% 3M Östereich GmbH
Brunner Feldstraße 63
2380 Perchtoldsdorf
Tel: 01/86 686-0
arbeitsschutz-at@mmm.com
www.3m.com/at/arbeitsschutz
$ 3M Schweiz AG
Eggstrasse 93, 8803 Rüschlikon
Tél: 044 724 92 21
Fax: 044 724 94 40
www.3marbeitsschutz.ch
2 3M France
Bd de l’Oise,
95006 Cergy Pontoise Cedex
Tél: 01 30 31 65 96
3m-france-epi@mmm.com
www.3m.com/fr/securite
r 3М Россия
125445 Москва
yл. Cмольнaя, дом 24/Д
Бизнес-центр “Меpидиaн”
Тел: (095) 784-74-74
Факс: (095) 784-74-75
u 3М Україна
Бiзнес-центр “Подiл Плаза”
Вул. Спаська, 30-а, офiс 7-3Б
04070 Київ, Україна’
тел. +38 044 490 57 77
Факс: +38 044 490 57 75
siz.ua@mmm.com
www.3m.com/ua/siz
4 3M Italia S.p.A.
Via San Bovio 3, Loc San Felice,
20090 Segrate (MI),
Tel: 02-70351
Numero verde: 800-012410
www.3msicurezza.it
6 3M Nederland B.V.
Industrieweg 24,
2382 NW Zoeterwoude
Tel: 071-5450365
3Msafety.nl@mmm.com
www.3msafety.nl
^ 3M Belgium N.V./S.A.
Hermeslaan 7, 1831 Diegem
Tel: 02-722 53 10
Fax: 02-722 50 11
www.3Msafety.be
5 3M España, S.A.
Juan Ignacio Luca de Tena 19-25,
28027 Madrid
Tel: 91 321 62 81
www.3m.com/es/seguridad
- 3M Portugal
Rua do Conde de Redondo, 98
1169-009 Lisboa
Tel: 213 134 505
Fax: 213 134 693
9 3M Norge A/S
Avd. Verneprodukter
Postboks 100, Hvamveien 6,
2026 Skjetten
Tlf: 06384 - Fax 63 84 17 88
www.3m.com/no/verneprodukter
7 3M Svenska AB
Bollstanäsvägen 3,
191 89 Sollentuna
Tel: 08 92 21 00
www.personskydd.se
8 3M a/s
Fabriksparken 15,
DK-2600 Glostrup
Tel: 43480100 - Fax: 43968596
3Mdanmark@mmm.com
www.3Msikkerhed.dk
0 Suomen 3M Oy
PL 90, Lars Sonckin kaari 6,
02601 Espoo
Puh: 09-52 521
www.3m.com/fi /tyosuojelutuotteet
/
é 3M Eesti fi liaal
Mustamäe tee 4, 10621 Tallinn
Tel: 6 115 900, Faks: 6 115 901
innovation.ee@mmm.com
| 3M atstovybė
Švitrigailos g. 11b,
LT-03228 Vilnius, Lietuva
Tel: +370 5 216 07 80
Faks: +370 5 216 02 63
l 3M pārstāvniecība Latvijā
K. Ulmaņa gatve 5, LV-1004 Rīga
Tālr.: +371 7 066 120
Fakss: +371 7 066 121
H 3M Poland
Aleja Katowicka 117, Kajetany
05-830 Nadarzyn
Tel: (22) 739-60-00
Fax: (22) 739-60-01
F 3M Česko, spol. s.r.o.
Vyskočilova 1, 140 00 Praha 4
Tel: 261 380 111
Fax: 261 380 110
J 3M Hungária Kft.
1138 Budapest,
Váci út 140
Tel: (1) 270-7713
L 3M România SRL
Bucharest Business Park, corp D,
et. 3, Str. Menuetului nr. 12,
sector 1, Bucureşti
Telefon: (021) 202 8000
Fax: (0 21) 317 3184
www.mmm.com/ro
S 3M (East) AG
Produžnica v Ljubljani
Cesta v Gorice 8,
SI-1000 Ljubljana
Tel: 01/2003-630,
Faks: 01/2003-666
D 3M (East) AG
Obchodné zastupitel’stvo
Vajnorská 142,
831 04 Bratislava 3, Slovakia
Tel: +421 2 49 105 230, 238
Fax: +421 2 44 454 476
innovation.sk@mmm.com
www.3m.com/sk/oopp
A 3M (East) AG Predstavništvo
Žitnjak bb, 10000 Zagreb
Tel: 01/2499 750
Fax: 01/2371 735
k 3M (East) AG rep. offi ce in
Kazakhstan
4140 Dostyk Ave., 3rd fl oor,
050051, Almaty
tel. +7 (327) 2374737,
2374729 direct
fax +7 (327) 2374727
e-mail: innovation.kz@mmm.com
K 3M Търговско
представителство България
1766 София,
Младост 4 Бизнес парк, бл. 4
Тел.: 960 19 11, 960 19 14
Факс: 960 19 26
: 3M Sanayi ve Ticaret A.Ş.,
Türkiye
İş Güvenliği ve Çevre Koruma
Ürünleri
Nisbetiye Caddesi Akmerkez,
Blok 3 Kat: 5, Etiler 80600
İstanbul
Tel: (212) 350 77 77,
Faks: (212) 282 17 41
= 3M Hellas Limited
Κηψισίας 20
151 25 Μαρούσι,
ΑΘήνα-Μαρσύοι
Τηλ : 210/68 85 300
www.3m.com/gr/occsafety
i מ״עב לארשי 3M
91 םידוהיה תנידמ ׳חר
46120 הילצרה 2042 ד.ת
09 – 9615000 :לט
09 – 9615050 :סקפ
© 3M 2005. All rights reserved. Speedglas and Adfl o are trademarks of 3M. DV-9663-0029-0 / 047101 / 11-2007 / GB-IE-DE-FR-RU-UA-IT-NL-ES-PT-NO-SE-DK-FI-AE
EE-LT-LV-PL-CZ-HU-RO-SI-SK-HR-KZ-BG-TR-GR-IL
 Loading...