

Page 1
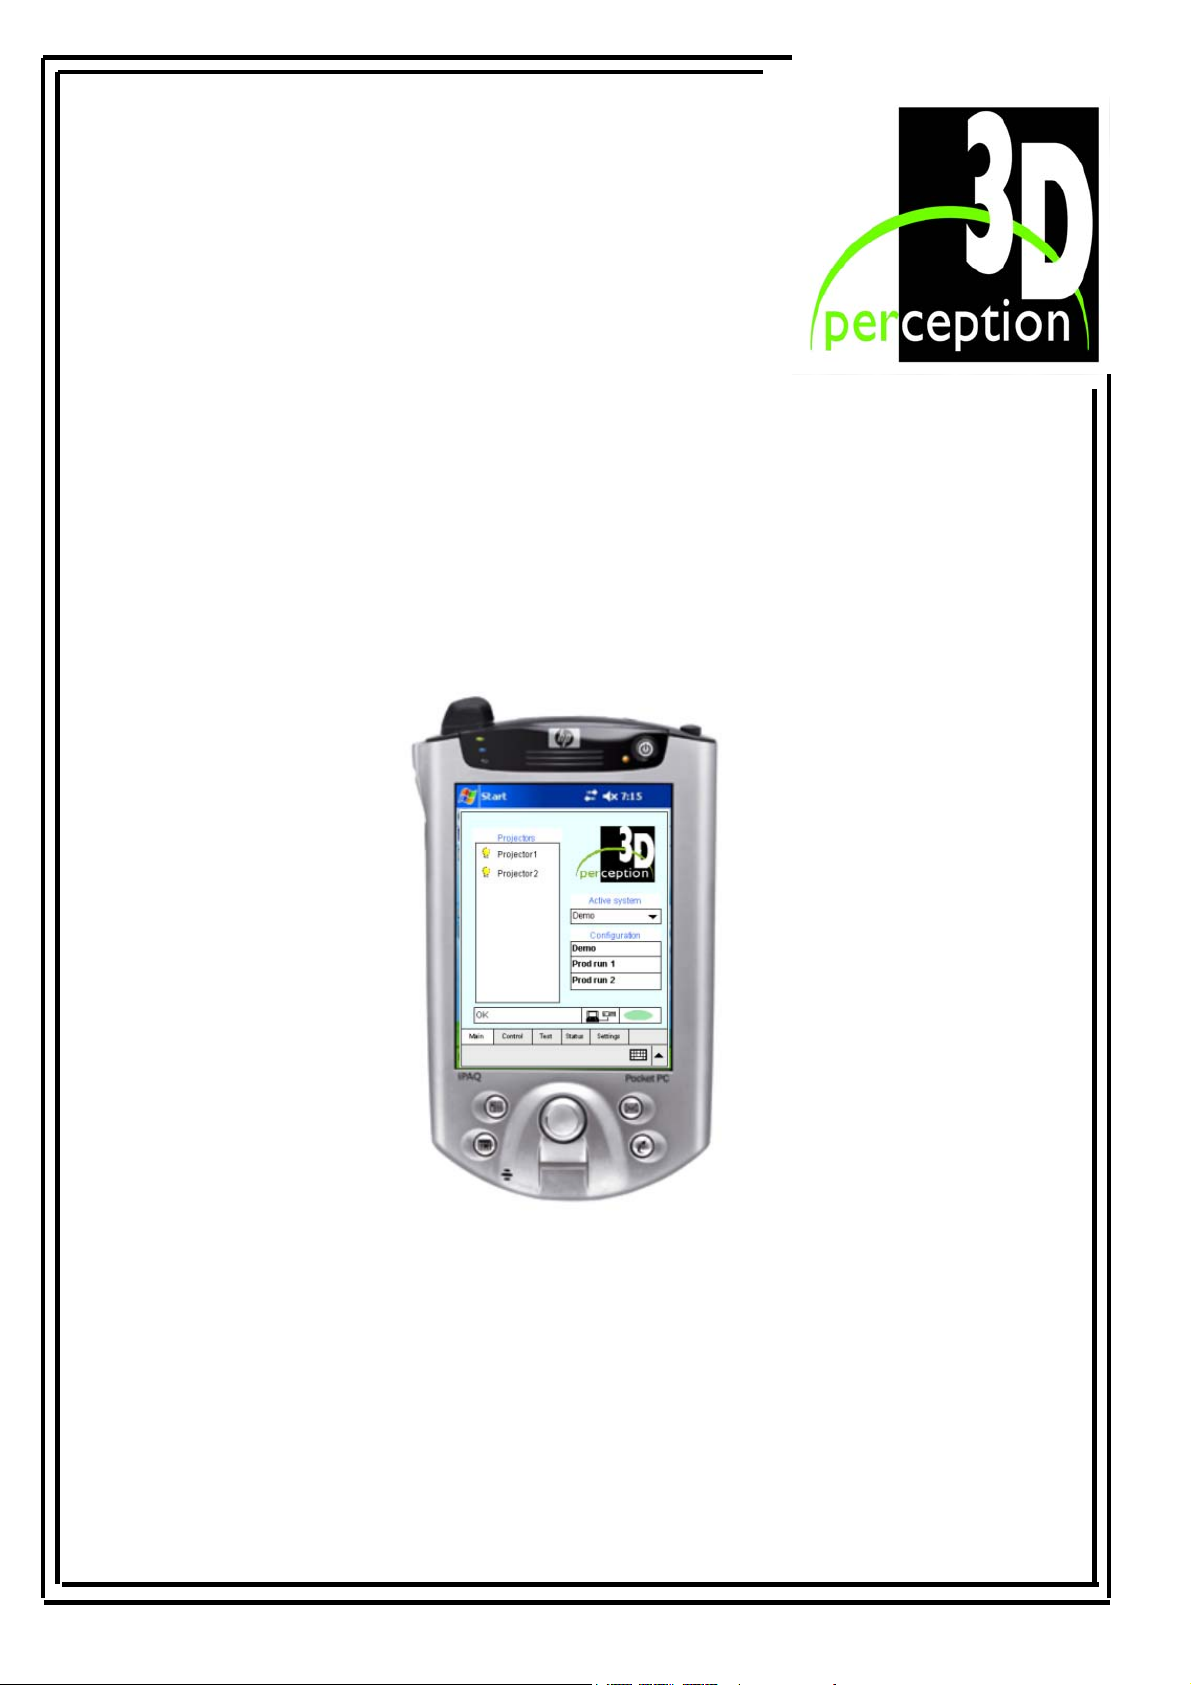
CompactPocket
USER MANUAL
2004 3D Perception AS All rights reserved.
The copyright of this document is the property of 3D Perception AS. The document is supplied on the
express terms that it is to be treated as confidential. No part of this document may be reproduced or
transmitted in any form or by any means, electronic or mechanical for any purpose, without the
express written permission of 3D Perception AS. The information in this document is subject to
change without notice and is provided ‘AS IS’.
Page 2
3D Perception CompactPocket
Release 1 User Manual
DOCUMENT STATUS
Revision Month Year Paragraph(s) Prepared by Description of
Change
1 February 2004 All A F Rotheram Initial release
ii
Page 3

3D Perception CompactPocket
Release 1 User Manual
T
ABLE OF CONTENTS
1. I
2. K
3. I
NTRODUCTION ........................................................................................................................1
NOW YOUR COMPACTPOCKET ..............................................................................................2
NSTALLATION.........................................................................................................................3
3.1 Add CompactLink option ............................................................................................. 3
3.2 Install CompactPocket on the iPAQ PDA....................................................................5
4. USE.........................................................................................................................................9
4.1 Getting started...............................................................................................................9
4.2 Main menu....................................................................................................................9
4.2.1 Active system .............................................................................................................10
4.2.2 Configuration..............................................................................................................10
4.2.3 Projectors ....................................................................................................................10
4.2.4 Status bar ....................................................................................................................10
4.3 Settings .......................................................................................................................11
4.3.1 Configuration..............................................................................................................11
4.4 Control ........................................................................................................................12
4.4.1 Command target .........................................................................................................12
4.4.2 Projector control .........................................................................................................12
4.4.3 Signal source...............................................................................................................13
4.4.4 Light level...................................................................................................................13
4.5 Test .............................................................................................................................13
4.5.1 Command target .........................................................................................................14
4.5.2 Test patterns................................................................................................................ 14
4.5.3 Disable adjustments.................................................................................................... 15
4.6 Status ..........................................................................................................................15
4.6.1 System ........................................................................................................................15
4.6.2 Projectors ....................................................................................................................16
4.6.3 Communication ..........................................................................................................16
5. L
IMITED WARRANTY, ‘FCC STATEMENT’ AND ‘TRADEMARKS COPYRIGHT’ .......................17
6. CONTACT US..........................................................................................................................19
iii
Page 4

3D Perception CompactPocket
Release 1 User Manual
1. INTRODUCTION
The 3D Perception CompactPocket is a wireless device for the remote control of the
CompactDesigner/CompactControl software. This gives the user complete freedom to move
about in a theatre, without the cumbersome restriction of a Lap Top or PC, when performing
day-to-day operations.
CompactDesigner/CompactControl software must first be loaded to your Lap Top or PC and
theatres must be fully configured regarding the positioning of projectors, screens, eye points etc
prior to using your CompactPocket.
Once a theatre has been set up in the software and the CompactPocket has been configured to
match it will offer users the following facilities:
• Standby ON/OFF
• Selection of configuration
• Automatic set-up
• Enable/Disable adjustments
• Test pattern ON/OFF
• Scenario light level interpolation
• Projector and system status
• Communication status
• Lamp status
1
Page 5

3D Perception CompactPocket
Release 1 User Manual
2. KNOW YOUR COMPACTPOCKET
Before starting to install any set-ups or installations on your CompactPocket it is highly
recommended that you read the accompanying manufacturers getting started booklet and fully
familiarize yourself with your hp iPAQ Pocket PC.
The following illustration indicates some of the more commonly used components of the front
panel.
1
4
5
1 Wireless LAN Indicator
Green flash = wireless link
Amber flash = no wireless link
2 Power Button
Turn unit On and Off
3 Power Indicator
Amber flash = charging
Amber solid = charged
Green flash = alarm, calendar, event
4 Start
Tap for drop-down menu to switch between programs
5 5-Way Navigation Button
Scroll right, left, up and down and push to select.
2
3
2
Page 6

3D Perception CompactPocket
Release 1 User Manual
3. INSTALLATION
3.1 Add CompactLink option
Add the CompactLink option to CompactDesigner or CompactControl on your PC.
NOTE: If the CompactDesigner software has not yet been loaded to your PC do so now
following the directions in the CompactDesigner/CompactControl Software Manual.
Step 1.
Run the CompactDesigner installation software once again and on the Welcome page select
the Modify option.
3
Page 7
3D Perception CompactPocket
Release 1 User Manual
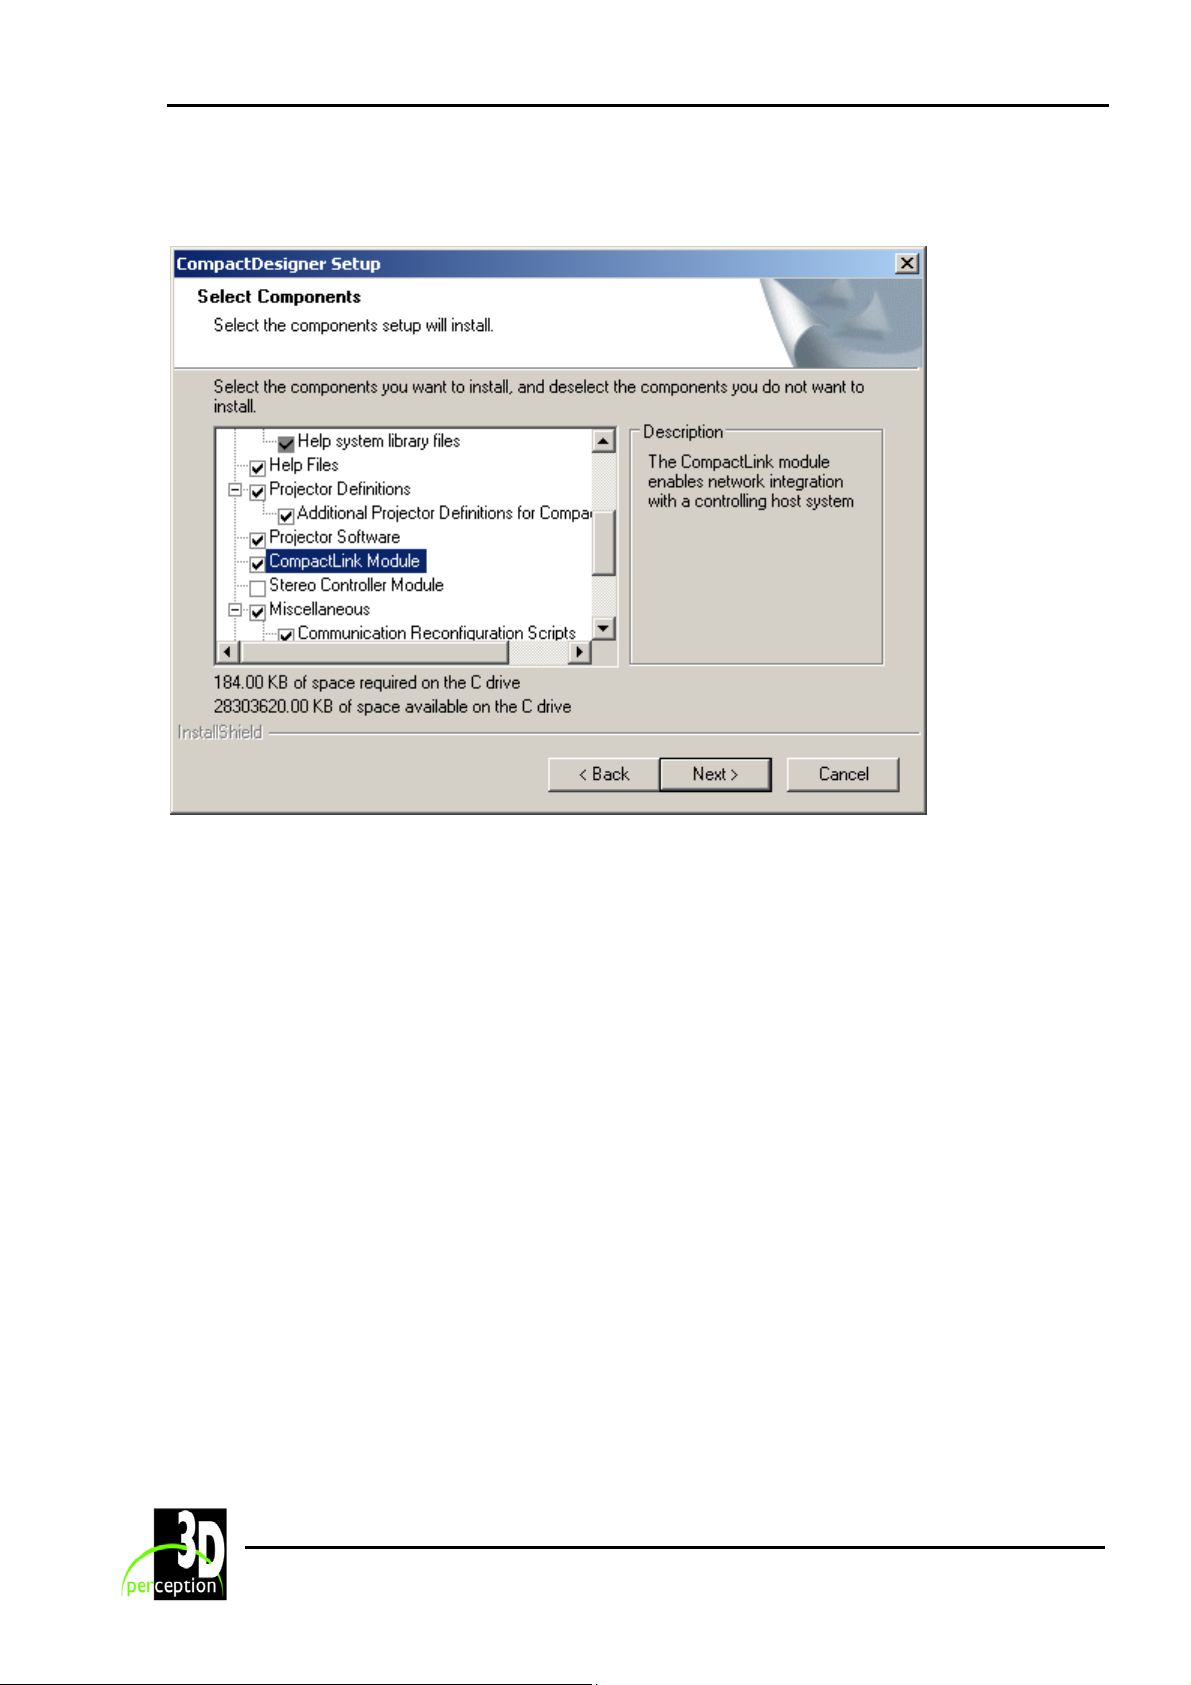
Step 2.
On the Select Components page under Projector Definitions select CompactLink Module.
NOTE: This can also be achieved during the initial installation of the
CompactDesigner/CompactControl software by selecting ‘Components’
4
Page 8
3D Perception CompactPocket
Release 1 User Manual
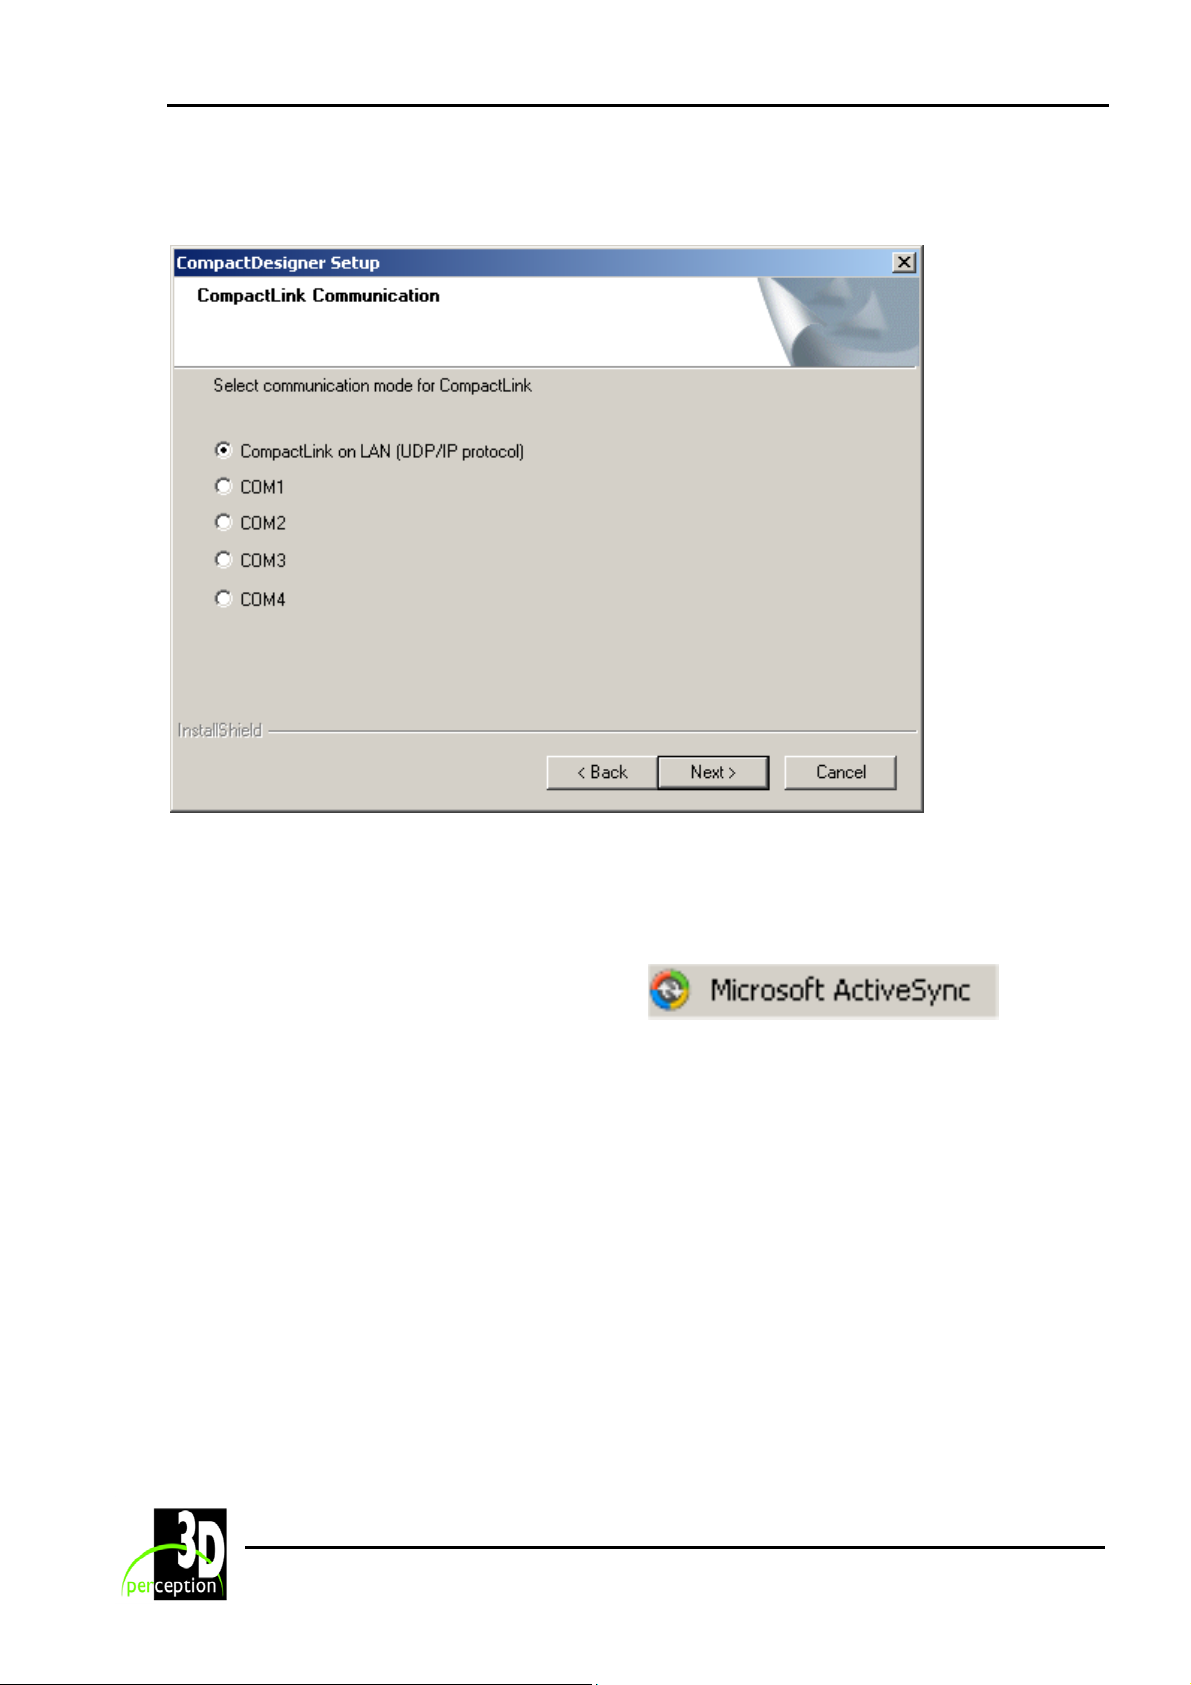
Step 3.
On the CompactLink Communication page select CompactLink on LAN (UDP/IP protocol)
3.2 Install CompactPocket on the iPAQ PDA.
Run the installation program for Microsoft
Active Sync from the Programs list on your
PC.
5
Page 9
3D Perception CompactPocket
Release 1 User Manual
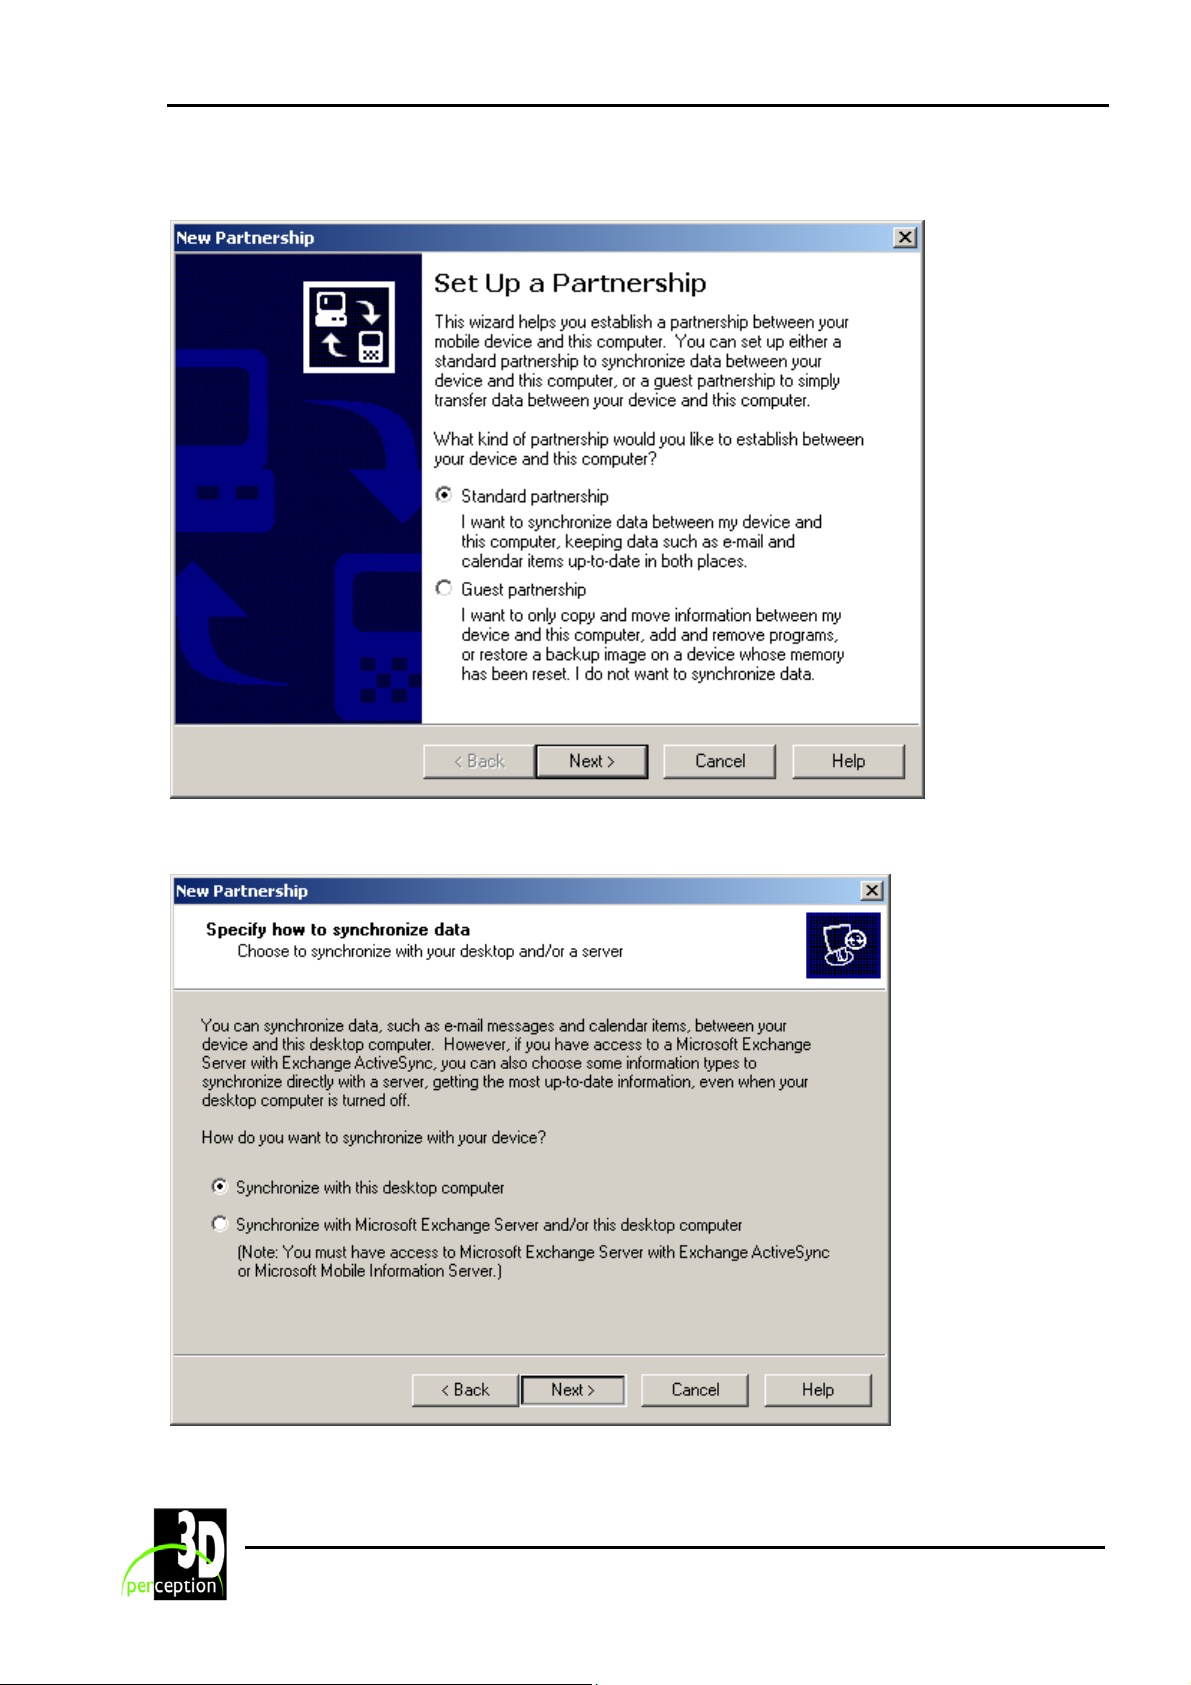
Step 1
On the Set Up a Partnership page select Standard partnership
Step 2
On the Specify how to synchronize data page select Synchronize with this desktop computer
6
Page 10
3D Perception CompactPocket
Release 1 User Manual
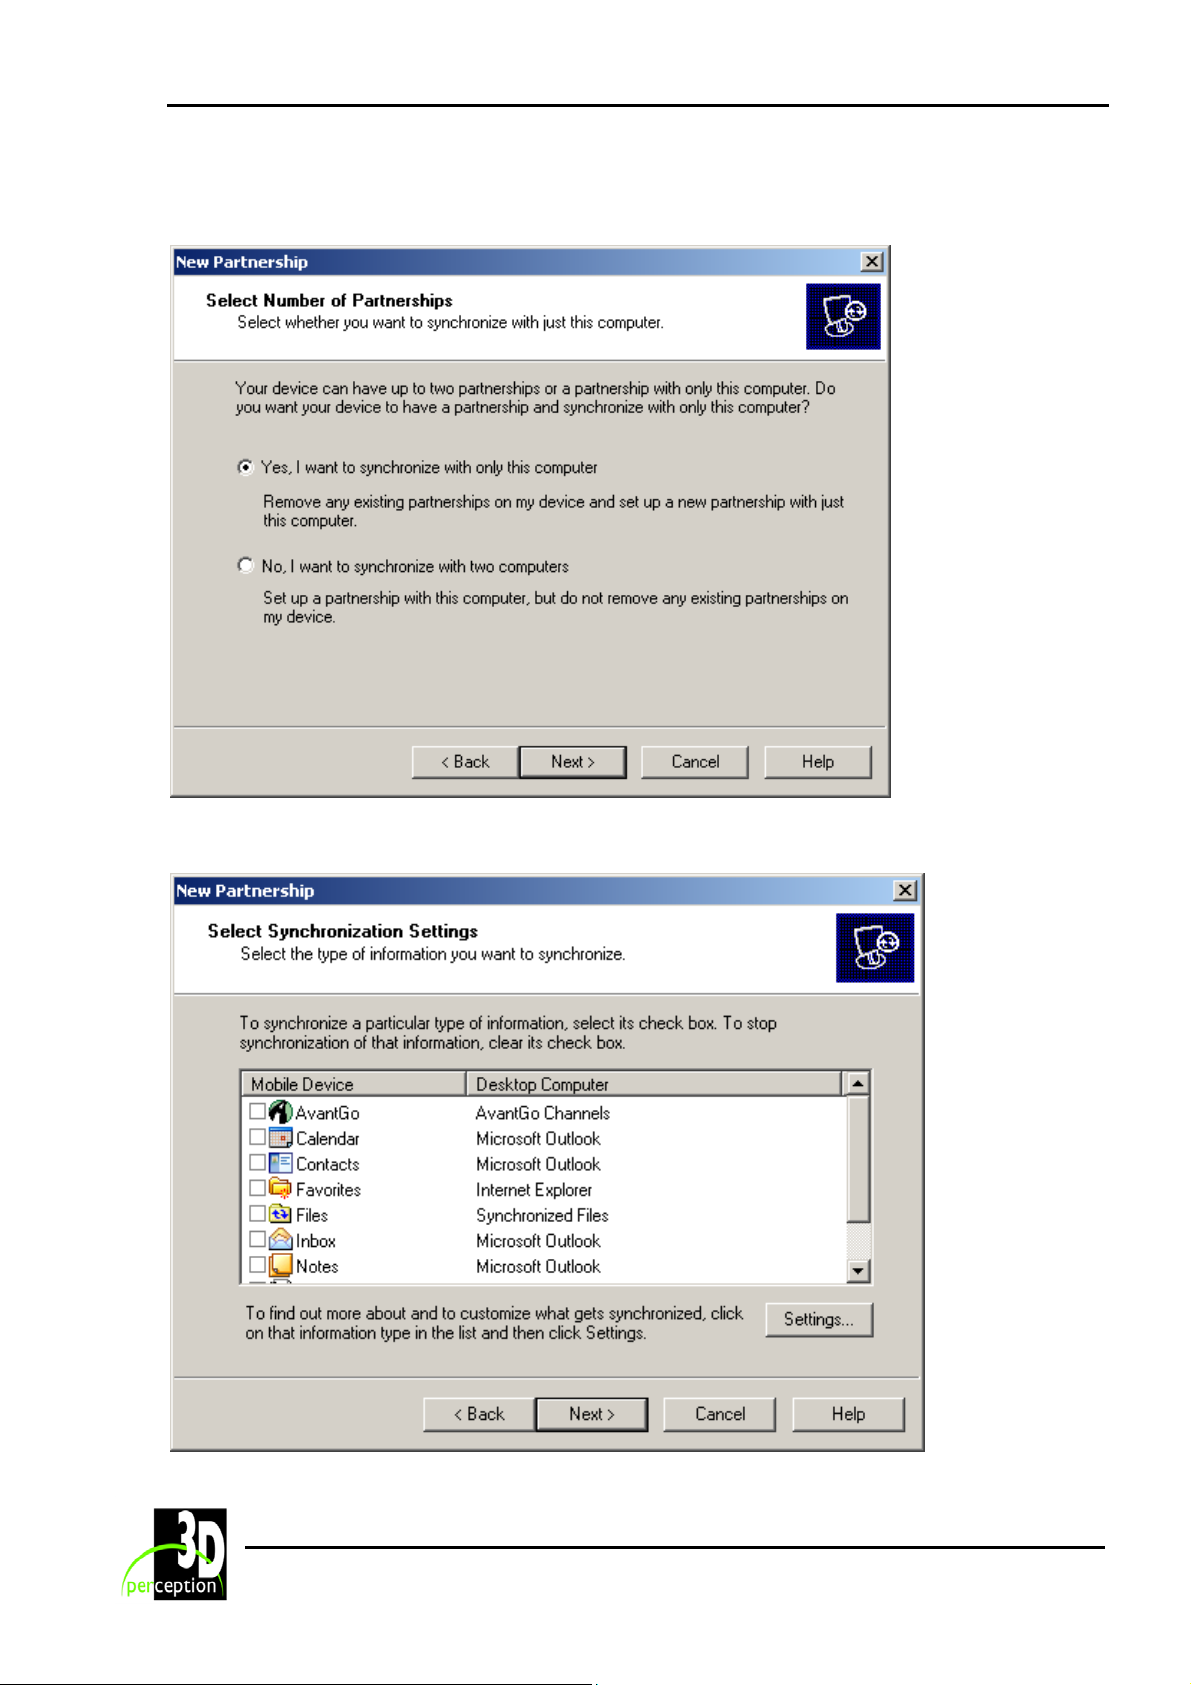
Step 3
On the Select Number of Partnerships page select Yes, I want to synchronize with only this
computer
Step 4
On the Select Synchronization Settings page remove any options not required.
7
Page 11

3D Perception CompactPocket
Release 1 User Manual
Use Microsoft Active Sync to transfer the ‘compactpocket.cab’ file on the CompactPocket CD to
the iPAQ PDA. (For instructions on how to make the transfer, consult the iPAQ PDA online
instructions). Once transferred to the PDA, open the transferred file from the PDA to install.
NOTE: The iPDQ PDA device and the computer running CompactControl must be set up in the
same network.
8
Page 12
3D Perception CompactPocket
Release 1 User Manual
4. USE
4.1 Getting started
Ensure that CompactDesigner/CompactControl is running with a configuration file open in a
system.
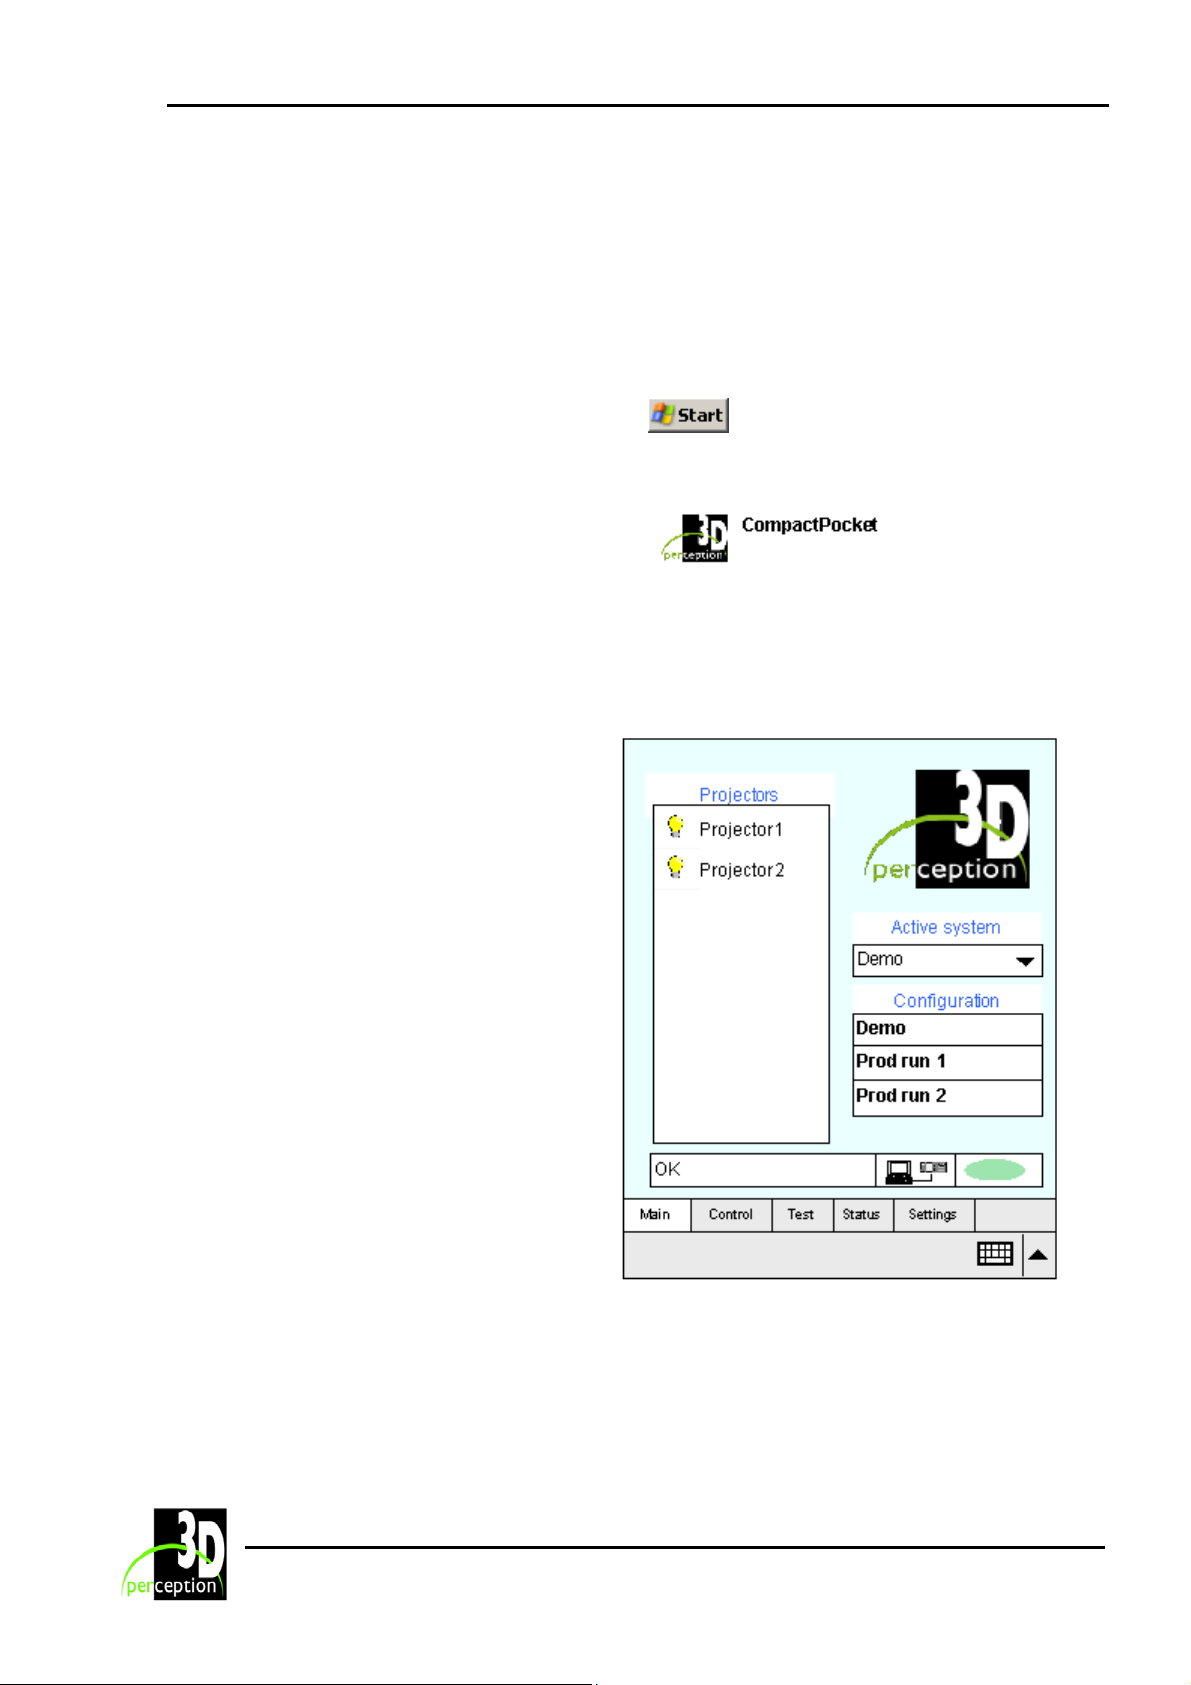
Tap Start at the top left of your
CompactPocket screen
Select the CompactPocket option from the
drop-down menu to connect to your
CompactDesigner/CompactControl software.
NOTE: This will only be available if you have correctly configured your Start Menu. You should
consult your on-line iPAQ manual for detailed instructions.
4.2 Main menu
The Main menu is divided into:
• Active system
• Configuration
• Projectors
• Status bar
9
Page 13
3D Perception CompactPocket
Release 1 User Manual
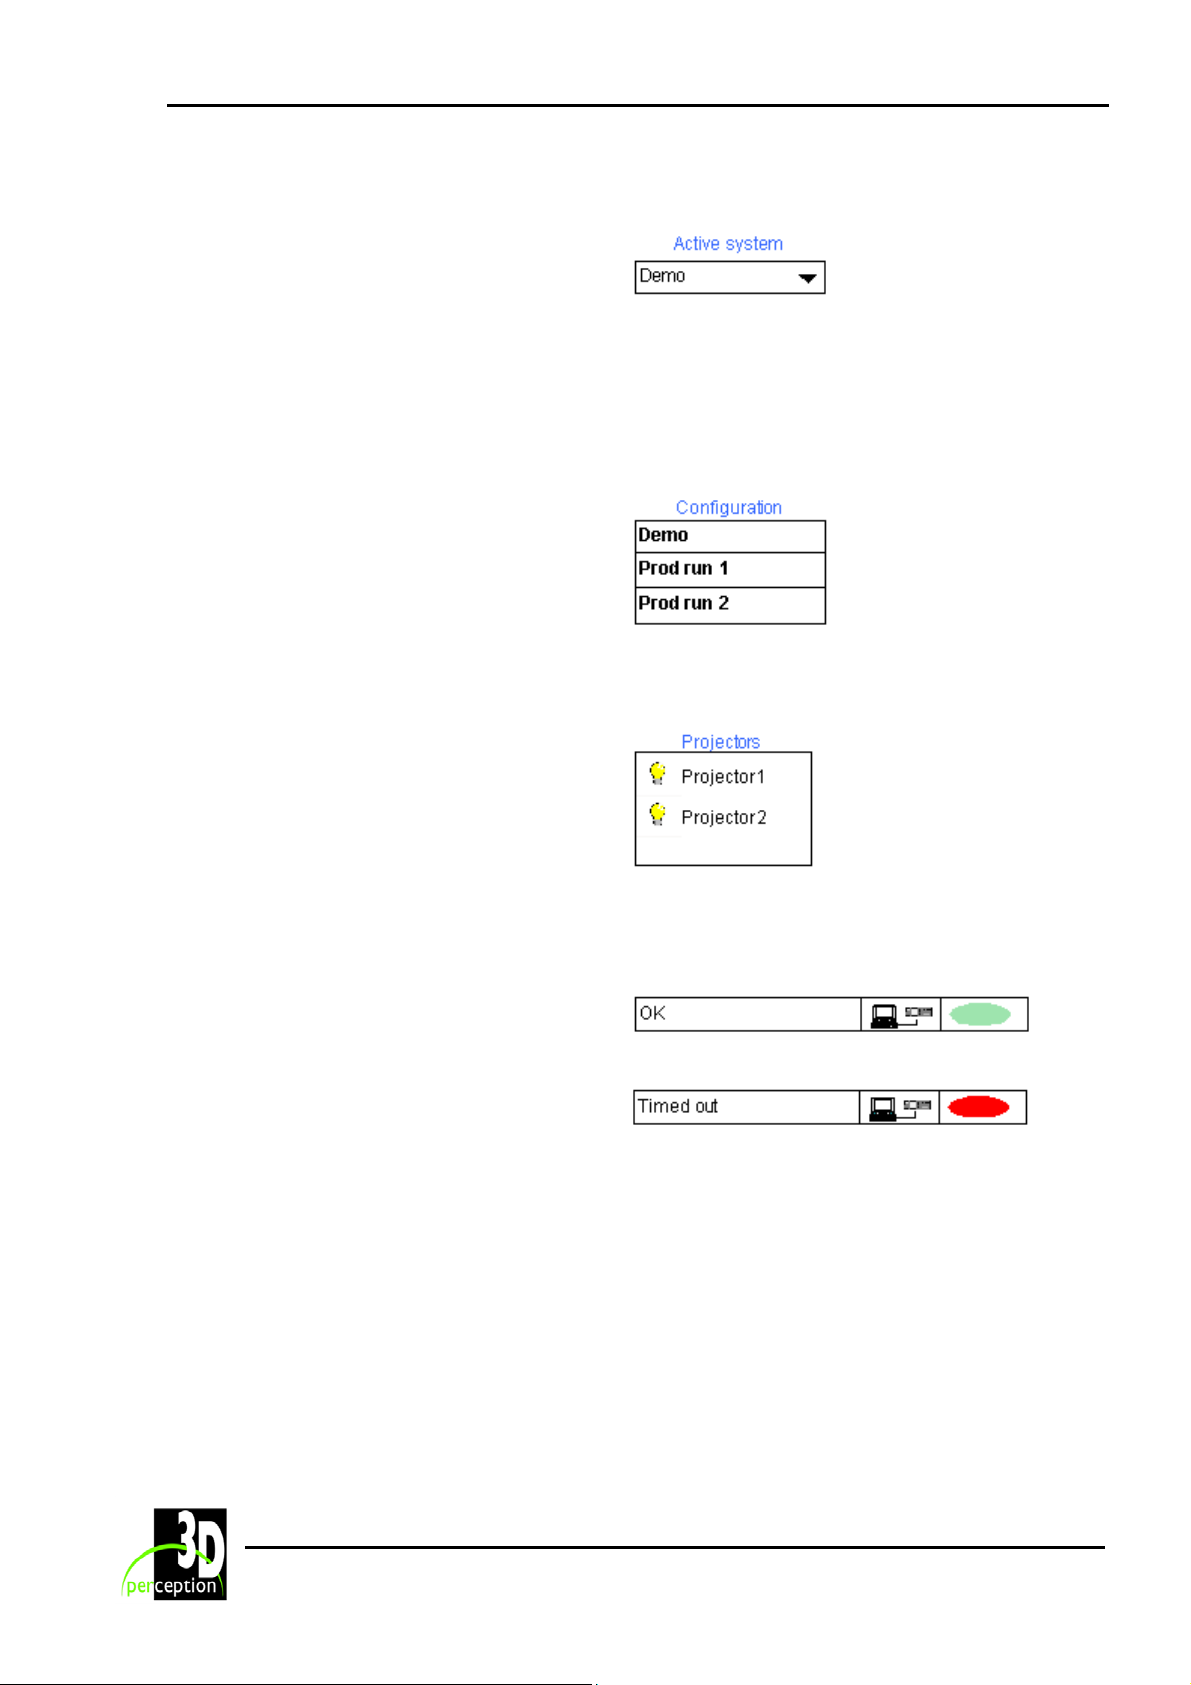
4.2.1 Active system
You will see an IP address in the ‘Active
system’ dialogue by pressing the down
arrow. Mark this IP address.
You may also assign a name by pressing
the down arrow once more and select
<Name...>.
4.2.2 Configuration
There are 3 configuration buttons to which
configurations can be allocated.
See Settings – Assign to button for details.
4.2.3 Projectors
The projectors for the selected
configuration, with an icon indicating their
status, can be seen in the projector area
4.2.4 Status bar
The status bar indicates the status of the
connection between the iPAQ PDA and
your PC.
If the connection is interrupted, the status
bar will indicate this.
10
Page 14
3D Perception CompactPocket
Release 1 User Manual
4.3 Settings
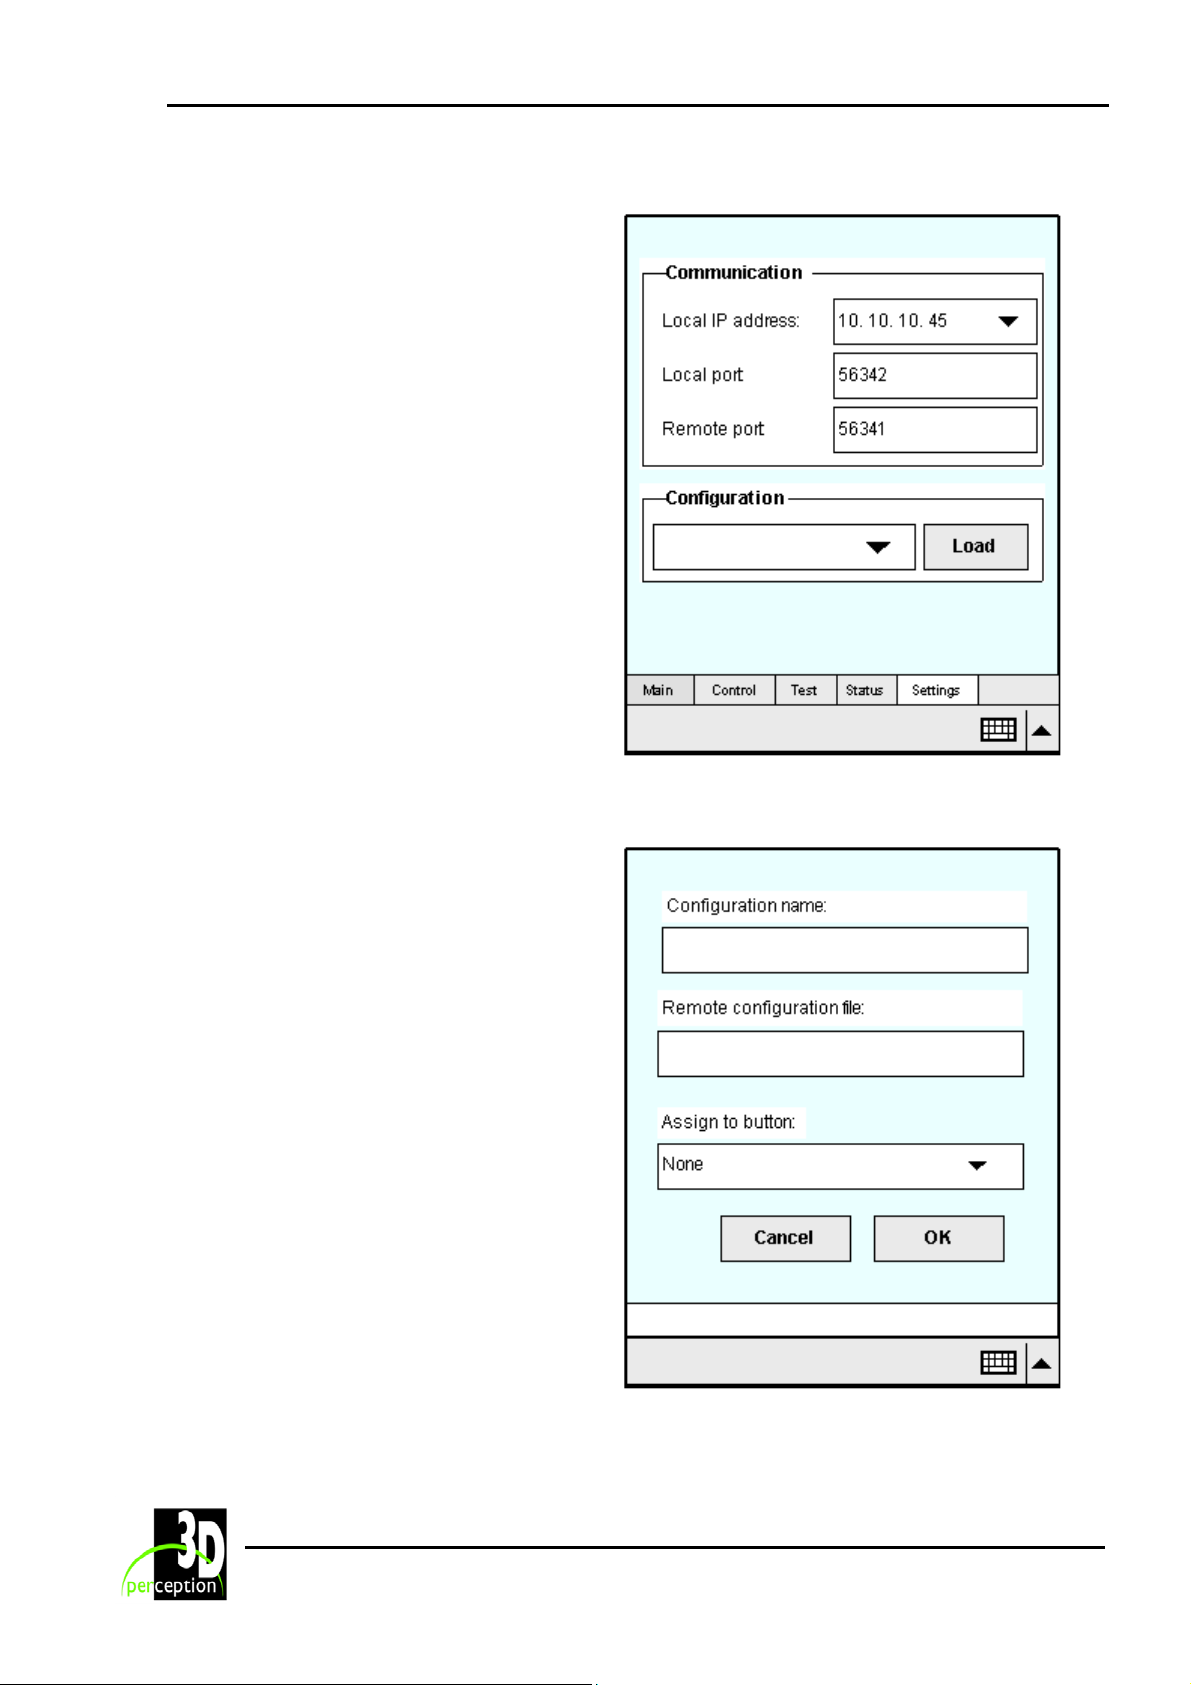
Select Settings to configuring the System
settings.
Leave the communication ports as they are
unless you need to specify other ports.
When specifying other ports it must also be
done in the registry of CompactControl.
Choose your IP address as required by
your system.
Press the down arrow in the Configuration
window to Select, add a New, Edit or Delete
a configuration.
4.3.1 Configuration
To add <New...>. or <Edit…> a
configuration
Give the configuration a name.
Type in the local path of the .cvd design file
you use for your system
(e.g. C:\design files\test.cvd).
Assign a button (e.g. button1).
The button corresponds to the
Configuration button on the Main page.
Press OK to confirm.
11
Page 15
3D Perception CompactPocket
Release 1 User Manual
4.4 Control
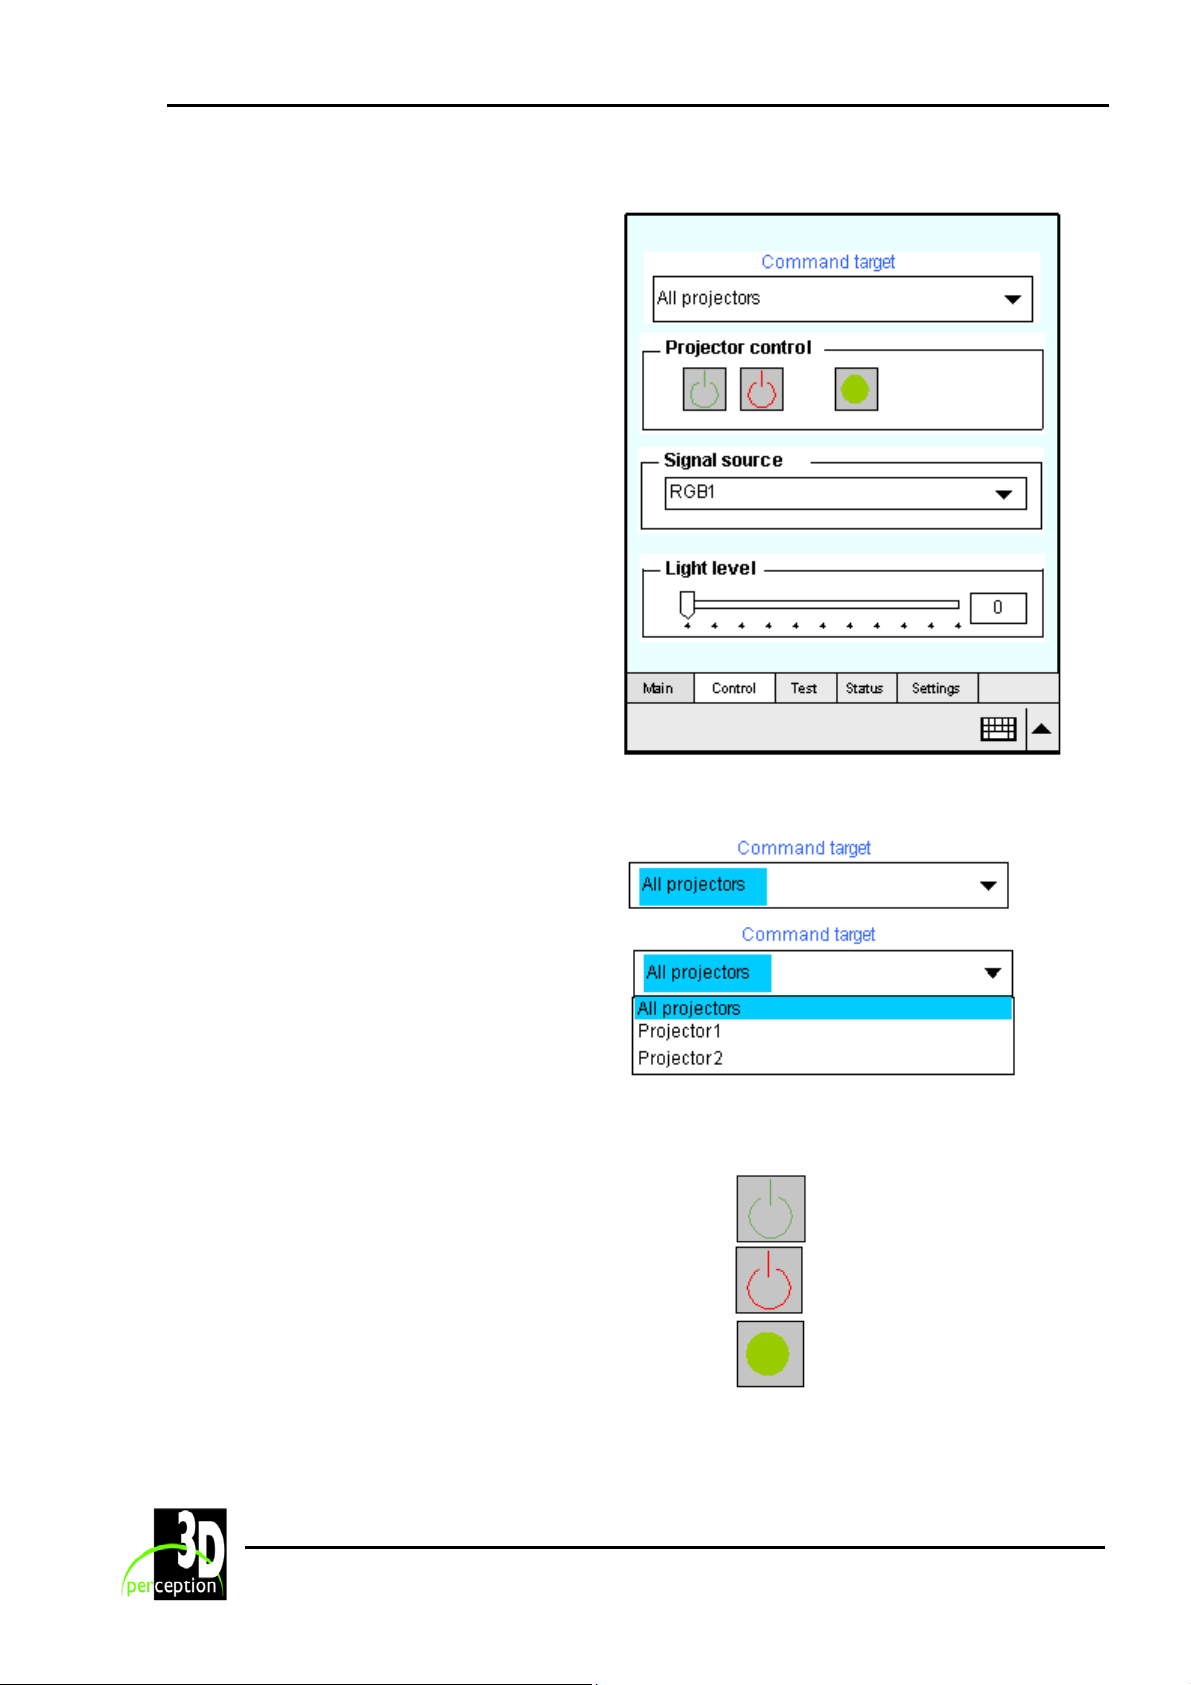
Control is the area from where you can
send commands to your system regarding
projectors. The commands are:
Command target
Projector control
Signal source
Light level
4.4.1 Command target
Select All projectors if you wish the
commands to apply to all projectors in the
system.
Click on the down arrow to select a single
projector to apply the commands to.
4.4.2 Projector control
Turn On the selected projector(s)
Turn Off the selected projector(s)
Send auto-sync command
NOTE: never do this after system set-up as it can
cause the projectors to change sync properties
12
Page 16
3D Perception CompactPocket
Release 1 User Manual
4.4.3 Signal source
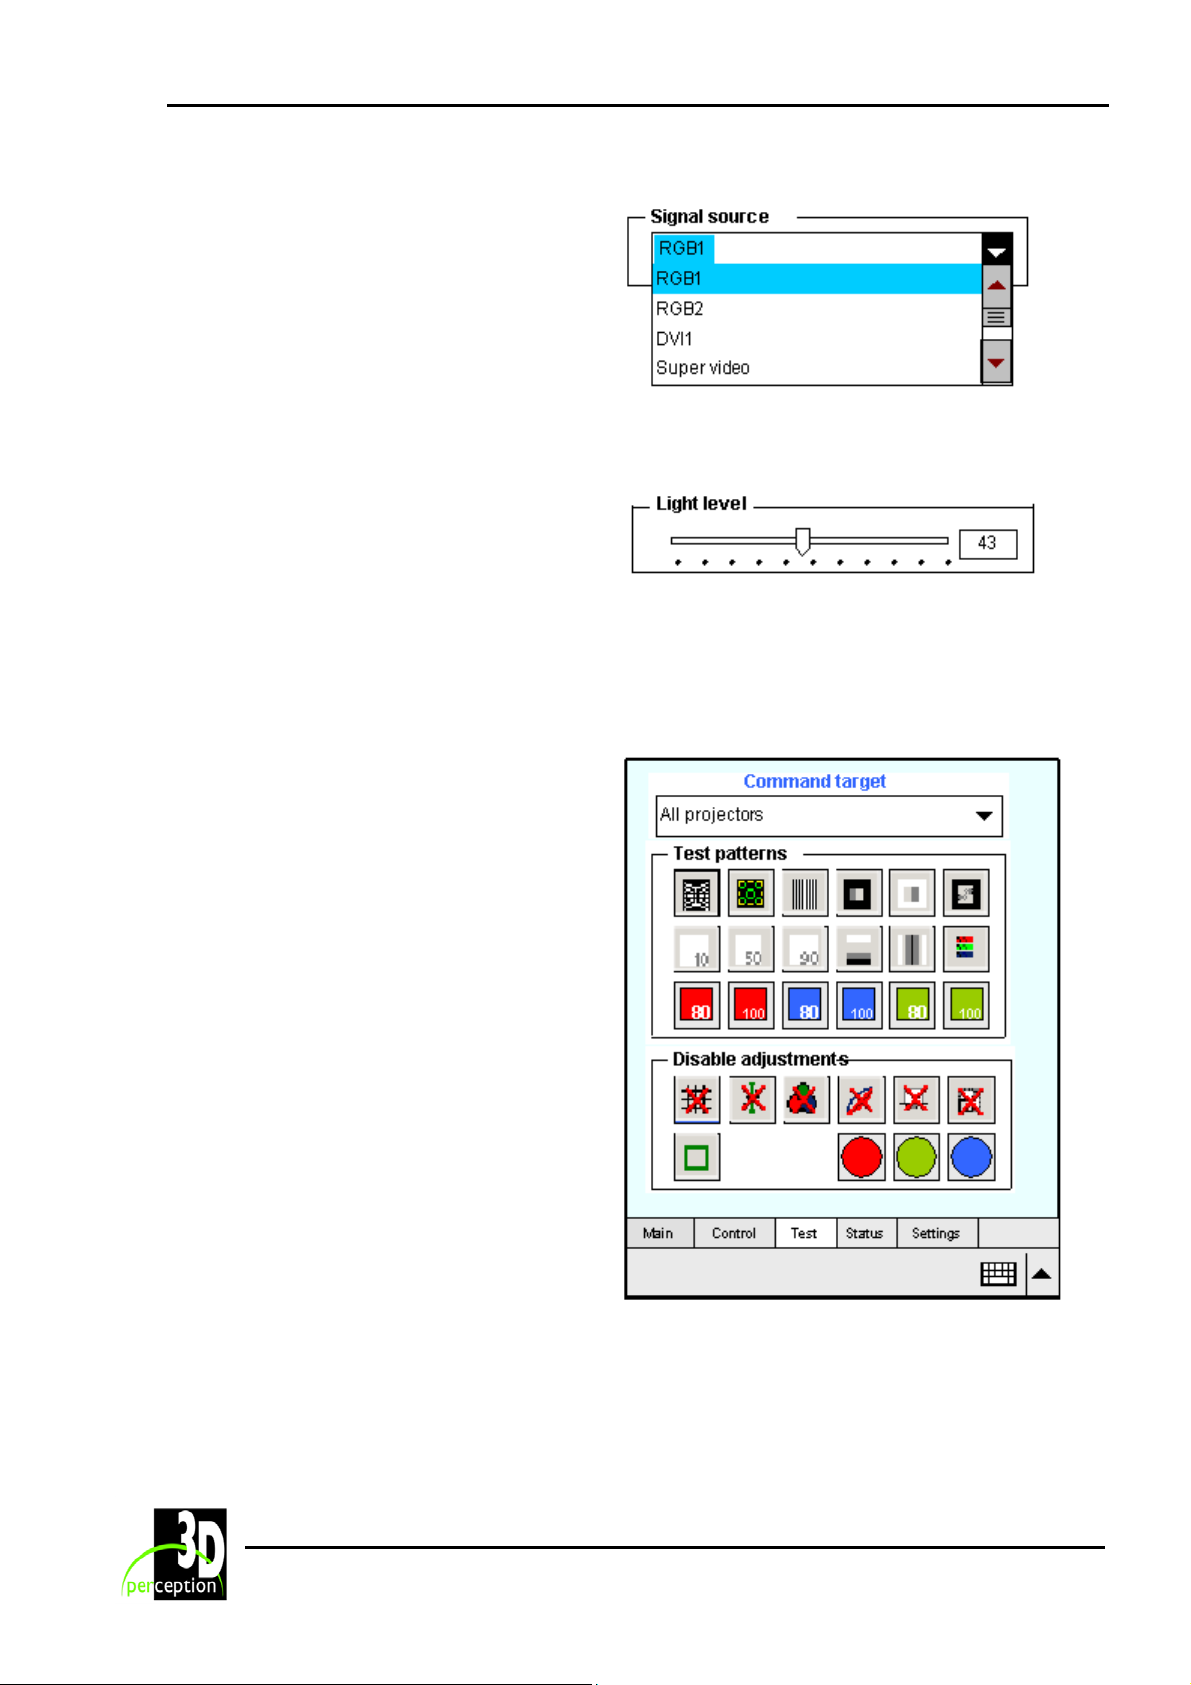
Click on the down arrow and select a Signal
source.
Click on the up and down arrows on the
sliding scale for more signal sources.
4.4.4 Light level
Adjust the light level for the Scenario
Manager by moving the slide left and right.
For details of the Scenario Manager see the
CompactDesigner/CompactControl User
Manaual.
4.5 Test
Test is the area from where you can send
commands to your system regarding Test
patterns and Disabling adjustments.
13
Page 17
3D Perception CompactPocket
Release 1 User Manual
4.5.1 Command target
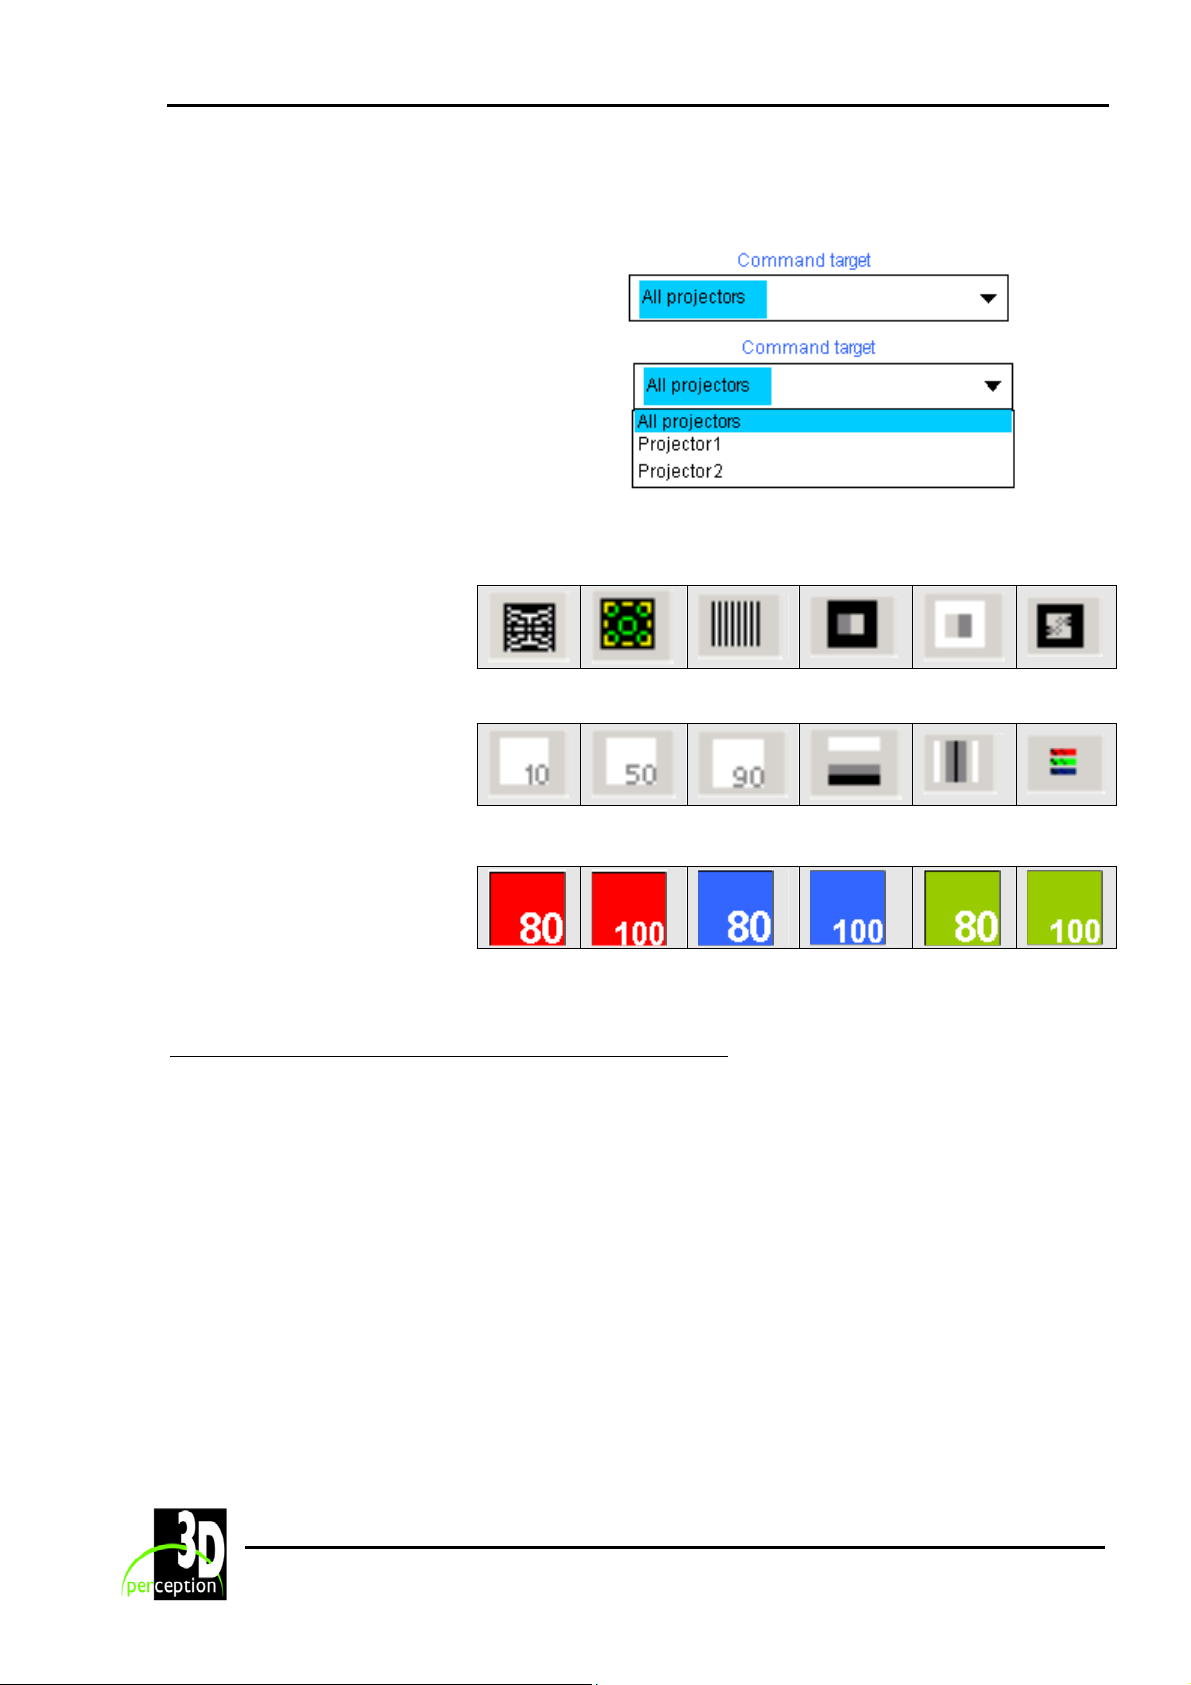
Select All projectors if you wish the
commands to apply to all projectors in the
system.
Click on the down arrow to select a single
projector to apply the commands to.
4.5.2 Test patterns
Enable and/or disable test
patterns.
NOTE: For the test pattern
3D
Geometry
Edge
finder
Pinstripe Black level
White
level
Gamma
program to work, you must
have the Test Pattern
generator installed on your
image generators or your
CompactUTM*. You can find
this under the Tools and
10%
white
50% white 90% white Horizontal Vertical
RGB
bars
Utilities program on the
CompactControl CD, or you
can download it from the
following link:
80% red 100% red 80% blue 100% blue
80%
green
100%
green
http://www.3d-perception.com/files/ToolsandUtilities4.exe
You must also provide the IP addresses of the image generators in the CompactControl design
file if using Test Pattern on your image generators.
* - The following CompactUTM models have a built-in test pattern generator therefore the test
pattern generator can be run locally on them.
• CompactUTM basic XGA plus • CompactUTM basic SXGA plus
• CompactUTM zero XGA plus • CompactUTM zero SXGA plus
• CompactUTM zero UXGA plus • CompactUTM zero UXGA vpi
14
Page 18
3D Perception CompactPocket
Release 1 User Manual
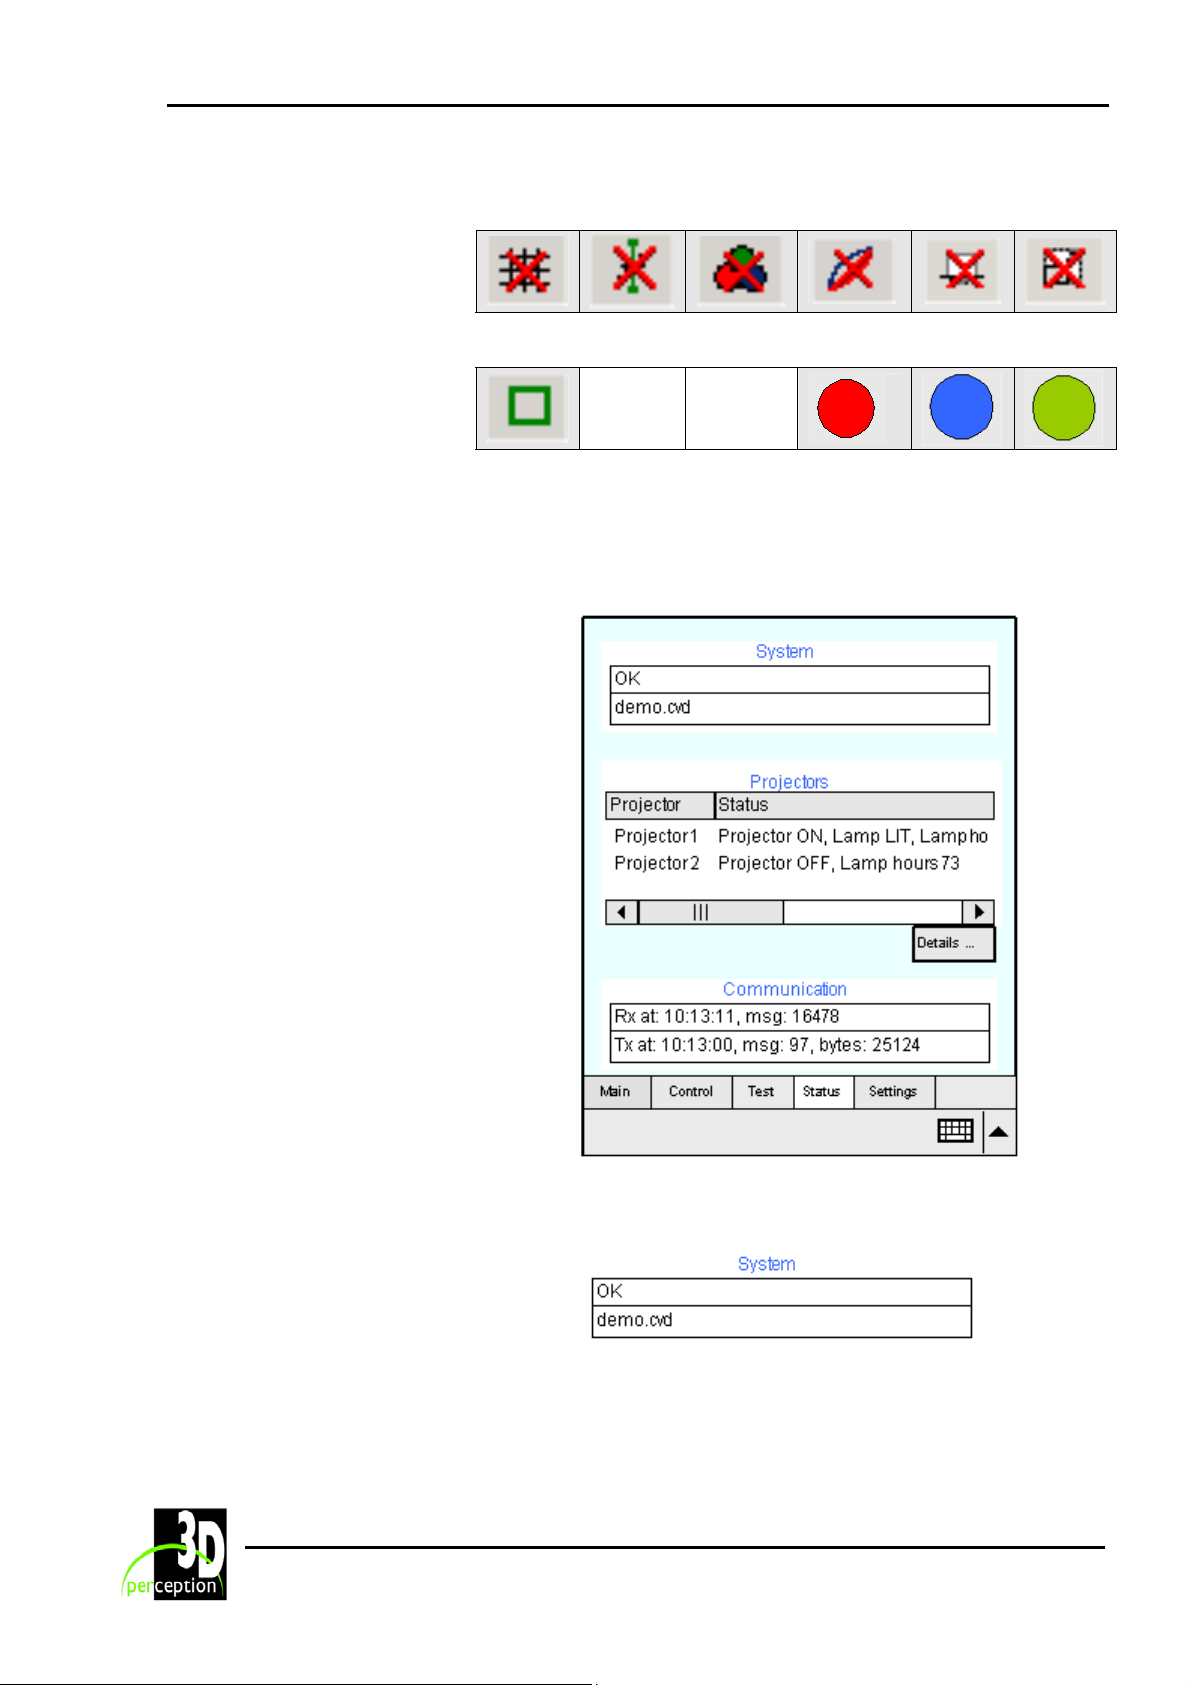
4.5.3 Disable adjustments
Enable and/or Disable
Geometry Edge Colour Gamma Mask Scaling
adjustments by clicking on the
appropriate icon.
Outer
edge of
image
4.6 Status
The Status area provides information
regarding:
System
Projectors
Communication
Switch
On/Off
red
Switch
On/Off
blue
Switch
On/Off
green
4.6.1 System
System shows the status of the
configuration and its file name.
15
Page 19
3D Perception CompactPocket
Release 1 User Manual
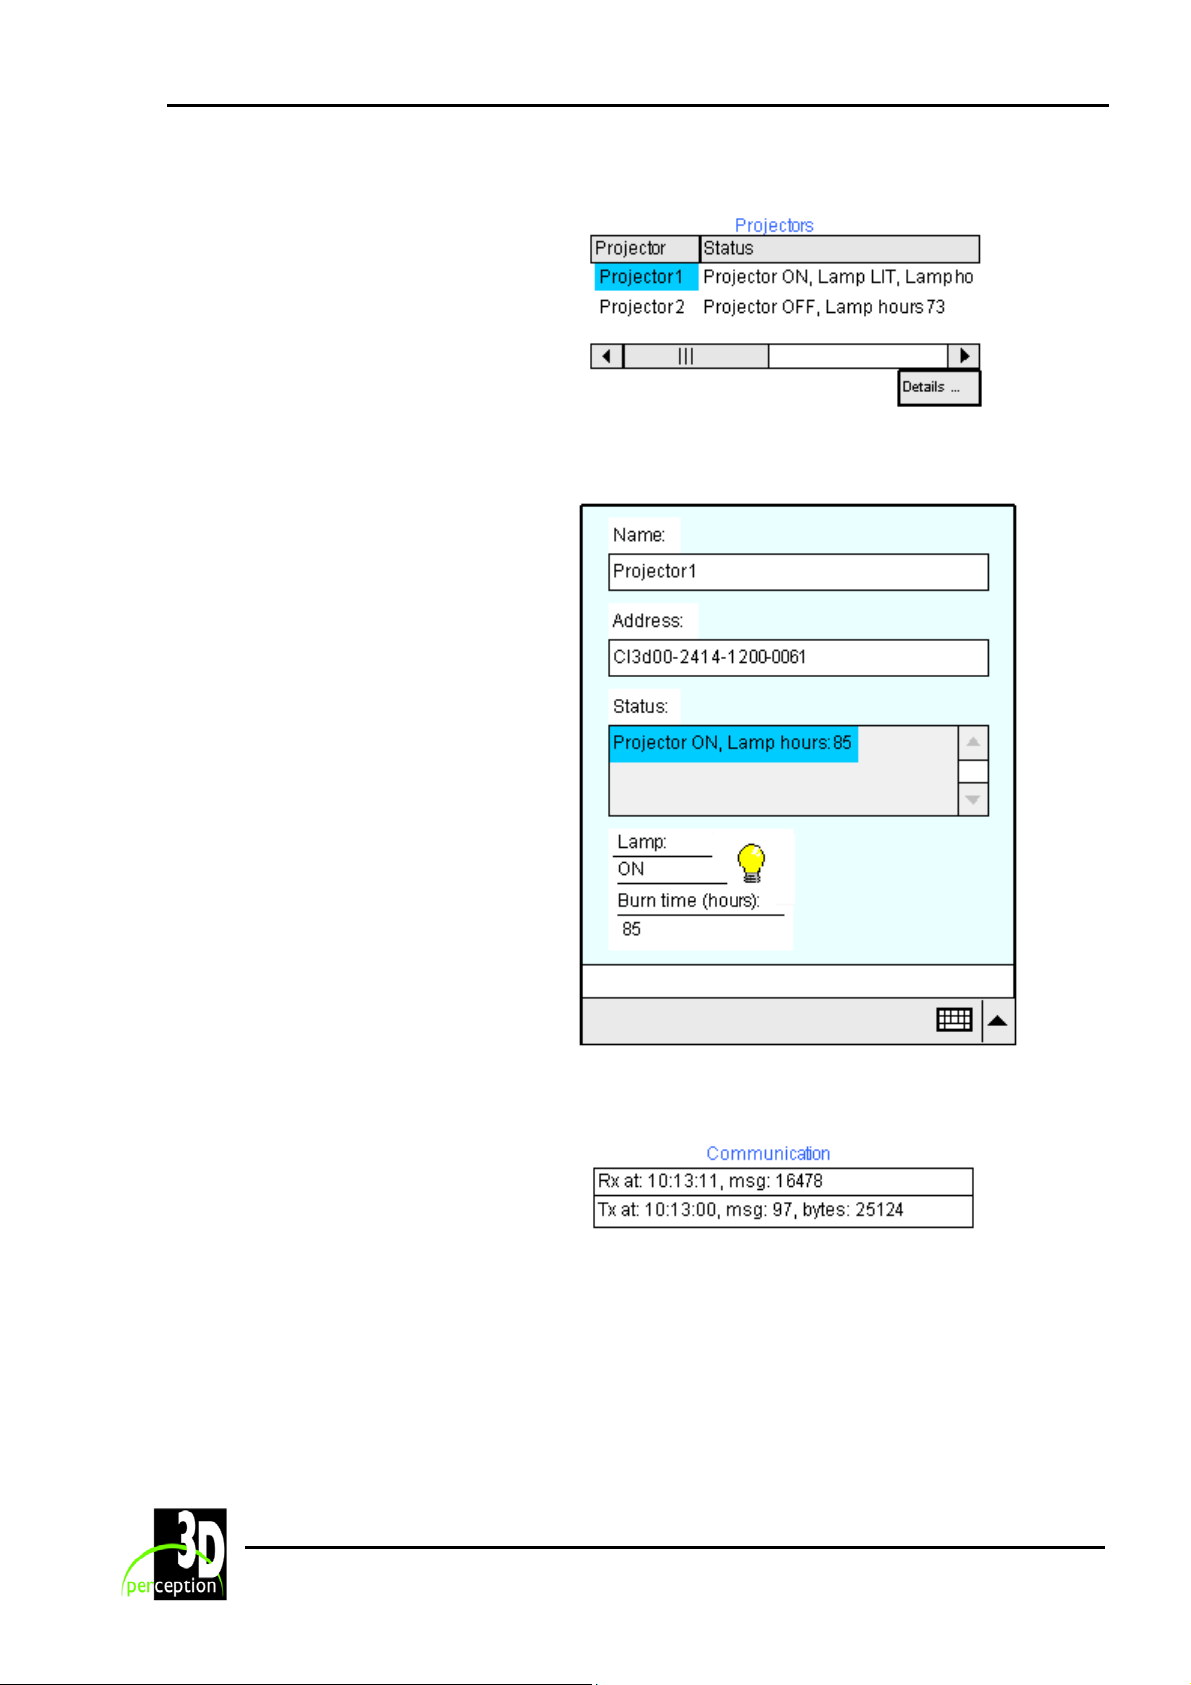
4.6.2 Projectors
Projectors lists the projectors in the
configuration and gives a brief status
report.
Select an individual projector and press
‘Details...’ for more detailed
information.
4.6.2.1 Detailed Information
Detailed Information shows:
Name
The name of the projector
Address
The address of the projector
Status
Status details of the projector
Lamp
Lamp details, On/Off and burn time (in
hours).
4.6.3 Communication
Communication shows details of the
received (Rx) and transmitted (Tx)
messages, giving time of message and
message ID.
16
Page 20

3D Perception CompactPocket
Release 1 User Manual
5. LIMITED WARRANTY, ‘FCC STATEMENT’ AND ‘TRADEMARKS
COPYRIGHT’
Limited Warranty
Except as otherwise stated herein, 3D Perception warrants to the first end-user (‘Customer’)
who purchases a CompactPocket from a Value Added Reseller that the CompactPocket is free
from defects in parts and labour under normal use during the warranty period. The warranty
period means the 12-month period from the date of the Customer’s purchase of the
CompactPocket from a Value Added Reseller.
During the warranty period, 3D Perception will, at its option and in its sole discretion, repair or
replace defective parts, including replacement of the entire CompactPocket, at no additional
charge to the Customer. However, the Customer is responsible for all shipping and insurance
costs incurred in returning any CompactPocket to the Customer which does not require any
repair or replacement work, as determined by 3D Perception in its sole discretion. This limited
warranty does not extend to any 3D Perception product that has been damaged as a result of
accident, misuse, or abuse. Nor does it extend to the use of parts not manufactured or sold by
3D Perception, by unauthorised modification of the CompactPocket, or as a result of servicing
by unauthorised personnel. This limited warranty extends only to the Customer, and is not
transferable or applicable to any other third party or user, including any one who purchases a
used CompactPocket. Any person asserting a claim under this limited warranty must establish
to 3D Perception’ satisfaction the date of purchase and that the CompactPocket was purchased
new.
Other warranty and liability limitations
Aside from this standard published warranty, 3D Perception makes no warranty of any kind,
express or implied, including without limitation, those of merchantability and of fitness for a
particular purpose. Without limiting the generality of the foregoing, any description of the
CompactPocket is for the sole purpose of identifying it, is not part of the basis of any bargain,
and does not constitute a warranty that the item sold shall conform to that description. The use
of any sample or model is for illustrative purposes only, it is not part of the basis of any bargain,
and it is not to be construed as a warranty that the CompactPocket will conform to the sample or
model.
No affirmation of fact or promise made by 3D Perception shall constitute a warranty that the
CompactPocket will conform to the affirmation or promise. 3D Perception makes no warranty
that the goods are free from claims of infringement of patents, trademarks, or copyrights. This
limited warranty shall be the exclusive remedy. 3D Perception shall not be liable to customers or
others for incidental, consequential, or special damages, or lost profits. Under no circumstance
shall 3D Perception liability or customer’s remedy for damages against 3D Perception exceed
its cost for the CompactPocket.
17
Page 21

3D Perception CompactPocket
Release 1 User Manual
Procedure for claims
Any and all questions or claims concerning the CompactPocket shall be made to 3D Perception
authorised personnel. In no case shall the CompactPocket be returned without first securing the
authority of 3D Perception or its authorised personnel. Any damages to, defects in, loss of, non
conformities in, or any other claim concerning the CompactPocket which could be discovered by
inspection upon delivery must be reported to the delivering carrier, and in writing to 3D
Perception at: the following address, promptly and in no event later than thirty (30) days after
delivery.
3D Perception AS
Solbråveien 41
P.O. Box 455
N-1373 Asker
Norway
In the case of any such claim, inspection shall be promptly arranged with 3D Perception or it’s
authorised personnel, and where appropriate, representatives of the carrier. Any other claim or
action respecting the condition or conformity of the CompactPocket or any other matter affecting
the CompactPocket must be submitted in writing to 3D Perception promptly upon discovery and
in no event later than expiration of the Warranty Period. Any part of the CompactPocket which is
subject of any claim shall be set aside and protected, without further processing or use, until 3D
Perception or its authorised personnel have an opportunity to inspect it and advice the
Customer of the disposition, if any to be made thereof. Failure to give timely written notice of
any claim shall bar any remedy.
Technical advice
3D Perception, or its authorised personnel, may furnish technical advice with reference to the
use of the CompactPocket, but there is no obligation to furnish such advice. If any advice or
assistance is furnished, it shall be given and accepted at Customer’s risk, 3D Perception shall
not be responsible or liable for the advice or assistance given or the results thereof.
FCC Statement
The CompactPocket has been tested and found to comply with the limits for a 'Class A' digital
device, pursuant to Part 15 of the FCC rules. These limits are designed to provide reasonable
protection against harmful interference when it is operated in a commercial environment. The
CompactPocket generates, uses and can radiate radio frequency energy and, if not used in
accordance with the instruction manual, may cause harmful interference to radio
communications. Operation of the CompactPocket in a residential area is likely to cause harmful
interference in which case the user will be required to correct the interference at own expense.
Trademarks Copyright
3D P
ERCEPTION IS A REGISTERED TRADEMARK. OTHER TRADEMARKS ARE THE PROPERTY OF THEIR
RESPECTIVE OWNERS
. NORWEGIAN AND FOREIGN PATENTS ARE PENDING.
18
Page 22

3D Perception CompactPocket
Release 1 User Manual
6. CONTACT US
3D PERCEPTION AS
Solbråveien 41
P. O. Box 455
N1373 Asker, Norway
Tel: +47 66 98 70 70
Fax: +47 66 98 70 71
Web site www.3d-perception.com
19
 Loading...