

Page 1
3B SCIENTIFIC
®
PHYSICS
Van de Graaff Generator with Discharge Electrode (115 V, 50/60 Hz)
Van de Graaff Generator with Discharge Electrode (230 V, 50/60 Hz)
1002963 / U15300-115
1002964 / U15300-230
Instruction Sheet
04/12 Alf
1. Safety instructions
Caution! Sensitive electronic equipment can be damaged by voltage flashovers.
• Persons who are at risk (e.g. those with heart
pacemakers) may not stand close to the equipment when it is in operation.
• Do not use Van der Graaff generators near elec-tronic
equipment such as computers, digital me-ters etc..
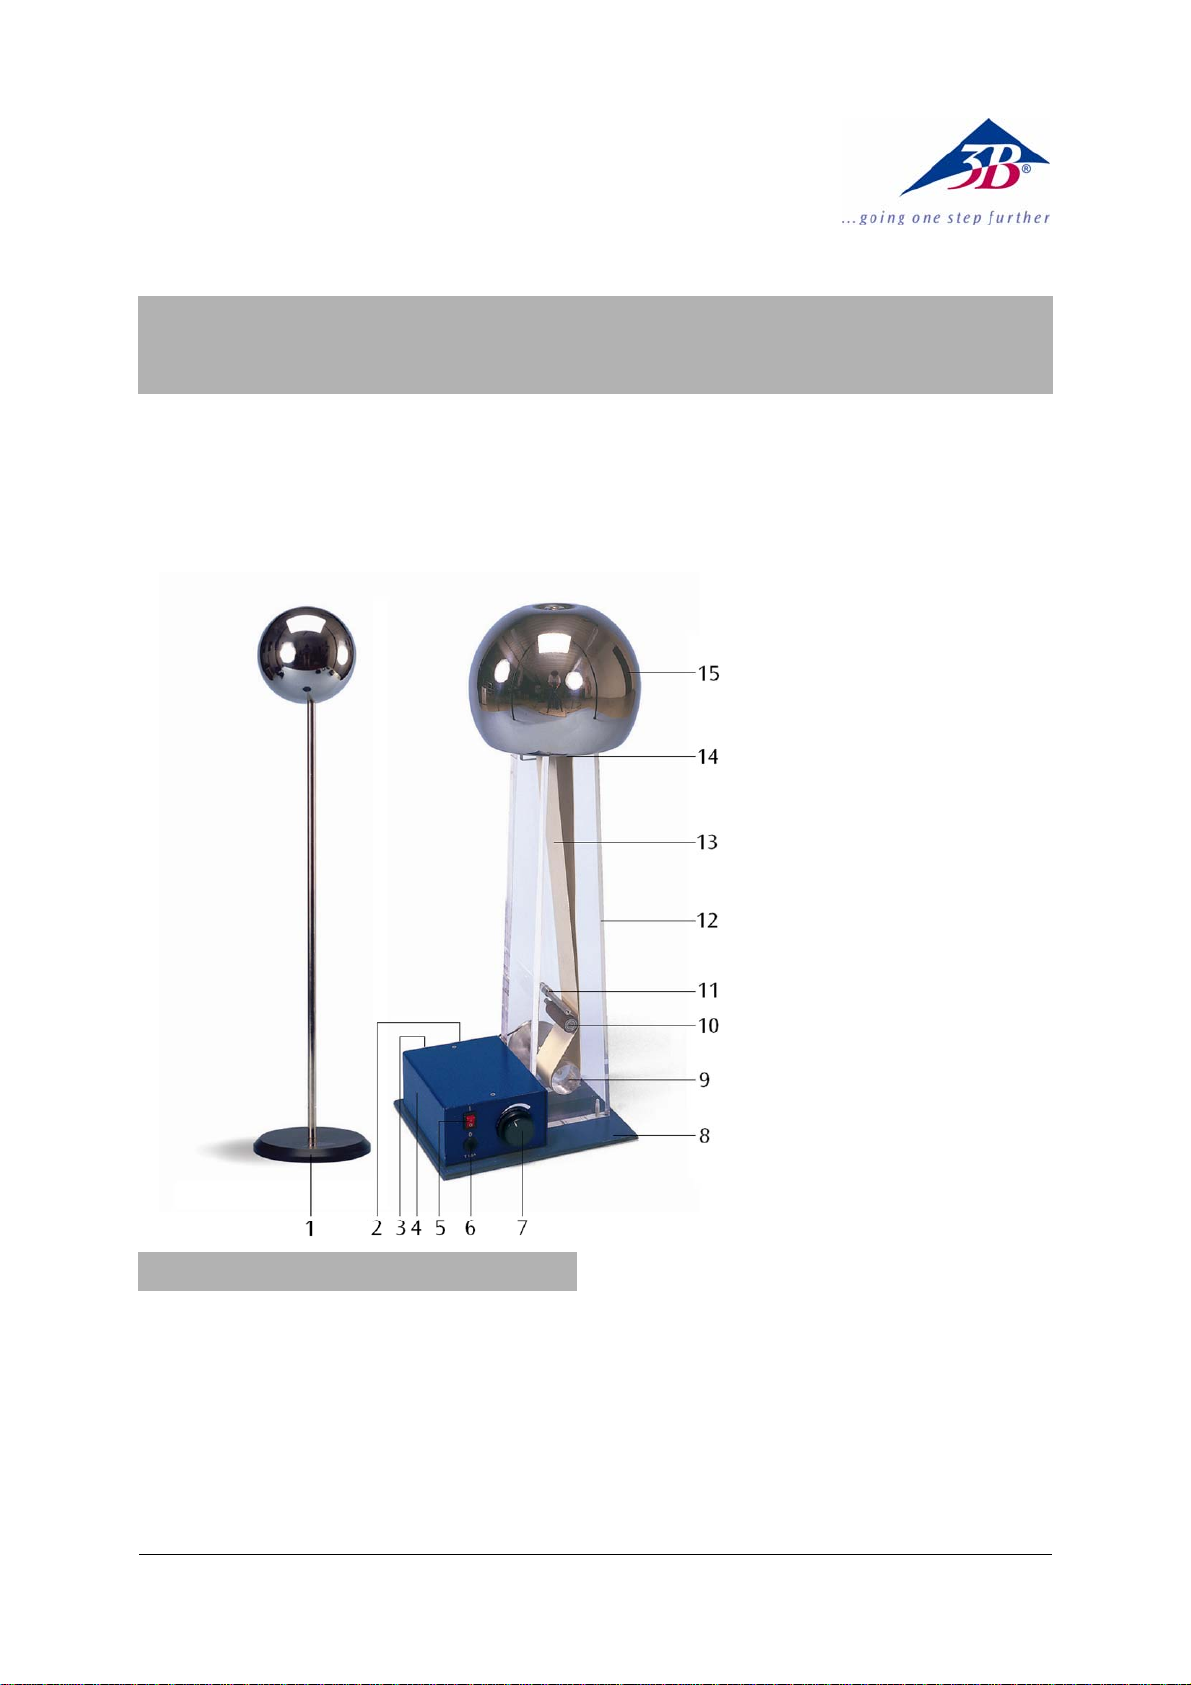
1 Conductor sphere on metal rod
with 4 mm ground socket
2 4 mm ground socket (backside)
3 Appliance plug with integrated
holder for primary fuse (backside)
4 Housing for drive motor
5 On-Off switch with control lamp
6 Fuse holder
7 Speed control for drive motor
8 Base plate
9 Drive pulley for rubber belt,
acrylic glass
10 Idler pulley for rubber belt, plastic
11 Bottom metal edge with 4 mm
ground socket
12 Insulator, acrylic glass
13 Rubber belt for charge transport
14 Deflection pulley for rubber belt,
plastic, and top metal edge (not
visible)
15 Metal sphere with 4 mm socket
The way the equipment operates can cause unavoidable HF interference
• Avoid using for inordinately long periods of time.
• Do not use leads of longer than 1 m for the re-
quired connections.
• Before using the Van de Graaff generator for the
first time, confirm that the specifications printed
on the rear side of the housing are compatible
with the local mains voltage.
1
Page 2

• Only use in dry rooms where there is no risk of
explosion.
• Do not operate the machine if there is any visi-
ble damage.
• The instrument may only be connected to the
mains via a socket that has an earth connection.
• Assemble circuits completely before switching on
the Van de Graaff generator.
• Do not touch the circuits while running the gen-
erator.
• Replace a faulty fuse only with one matching the
specifications stated at the rear of the housing.
• Disconnect the equipment from the mains be-
fore replacing a fuse.
• Never short the fuse or the fuse holder.
2. Description
The Van de Graaff generator serves as a electrostatic
charge generator for high DC voltages (up to 100 kV
if the experimental conditions are ideal) with low
current (not contact hazardous) for numerous experiments in the area of electrostatics.
The Van de Graaff generator is made up of a base
plate on which the drive motor with controllable
speed and the acrylic glass insulator are mounted.
The detachable metal sphere with 4 mm socket, for
tapping voltage, is mounted on the insulator. The
rubber belt runs between the drive pulley and the
deflection pulley. The deflection pulley and the top
metal edge are height adjustable (only required for
retensioning the rubber belt). The metal edge is
connected to the metal rod on which the sphere is
mounted. The idler pulley and the bottom metal
edge with 4-mm socket are located above the drive
pulley. The conductor sphere on metal rod is used to
demonstrate the flashover.
The Van de Graaff Generator 1002963 / U15300-115
is for operation with a mains voltage of 115 V (±10%),
and the 1002964 / U15300-230 unit is for operation
with a mains voltage of 230 V (±10%).
3. Equipment supplied
1 Van de Graaff generator
1 Condutor sphere on rod
1 Mains power lead
1 Dust cover
4. Spare parts
Rubber Belt for
Van de Graaff Generator 1002965 / U15301
5. Technical data
Voltage: up to approx. 100 kV
Short circuit current: 15 µA
Drive motor:
Mains connection: 115 V, 50/60 Hz resp.
230 V, 50/60 Hz
Power consumption: 13 VA
Primary protection: fuse T 160 mA
Dimensions:
Generator: 240 x 190 x 620 mm
3
Metal sphere: 190 mm dia.
Conductor: 90 mm dia.
Height: 460 mm
Weight:
Generator: 5.8 kg
Conductor: 0.5 kg
6. Operation
6.1 General information
The performance of a Van der Graaff generator can
be adversely affected by humidity, sudden temperature fluctuations (precipitation) or dirt. To keep the
machine working properly, all dirt (dust or grease,
e.g. fingerprints) must be removed from the side
walls, the spheres, the rollers and the rubber belt.
• Before switching on the Van de Graaff generator
remove the metal sphere by lifting it straight up.
• Clean the surface of the pulleys with warm water
and some dish washing liquid and dry them
thoroughly (with a hair dryer). Never use solvents.
• Align the metal edges as shown in Fig. 1. Posi-
tion them as close to the belt as possible without
touching it.
• Put the metal sphere back on.
• Ground the sockets at the bottom metal edge
and the conductor.
• Switch on the drive motor and choose the drive
speed.
• Move the conductor slowly to the metal sphere
to demonstrate charge balancing across a spark
gap.
• In case of high humidity dry the Van de Graaff
generator with warm air (hair dryer).
2
Page 3

6.2 Replacing the primary fuse
• Pull the mains plug.
• Pry out the insert with holder for the primary
fuse and spare fuse with a broad screw driver.
• Check the data plate on base plate and replace
defective fuse using the spare fuse in the holder.
• Place a new fuse in the holder for the spare fuse.
• Put the insert back into its place.
6.3 Retensioning the rubber belt
• Remove the metal sphere by lifting it straight
up.
• Loosen Phillips-head screws and retension the
rubber belt by moving the bracket for the deflection pulley.
• Retighten the screws, align the metal edges and
mount the metal sphere.
7. Storage and maintenance
• Clean the van de Graaff generator with warm
water and some dish washing liquid and dry it
thoroughly (with a hair dryer). Never use solvents.
• In case the generator is not in use for a longer
period of time, remove the rubber belt and store
it in a dark place.
• Store the Van de Graaff generator at a dry place
and always cover it with the dust cover. Do not
expose the generator to direct heat sources (sun,
radiator).
8. Rectifying errors leading to insufficient charging
Cause Measures
Damp
Dry out the generator with dry air
(e.g. using a hair dryer).
Rollers, insulators, conductor
Dirt
spheres and rubber belt should be
cleaned and then dried.
Metal edge
positions
Check the metal edges. Set them
up as close as possible to the belt
without actually touching it
4
2
1
3
Fig.1 Positioning the edges (1 Idler pulley, 2 Bottom metal
edge, 3 Top metal edge, 4 Deflection pulley)
4
3
5
2
3
1
Fig. 2 Retensioning the rubber belt (1 Rubber belt, 2 Deflection pulley, 3 Phillips-head screws, 4 Bracket for deflection pulley, 5 Top metal edge)
9. Disposal
• The packaging should be disposed of at local
recycling points.
• Should you need to dispose of the equipment
itself, never throw it away in normal domestic
waste. Local regulations for the disposal of electrical equipment will apply.
Juddering of
the belt
Tighten up the belt as described
under 6.3.
3B Scientific GmbH • Rudorffweg 8 • 21031 Hamburg • Germany • www.3bscientific.com
Subject to technical amendments
© Copyright 2012 3B Scientific GmbH
Page 4

 Loading...