

Page 1
3B SCIENTIFIC® PHYSICS
U45052 Vacuum set for students
Instruction Sheet
8/03 ALF
®
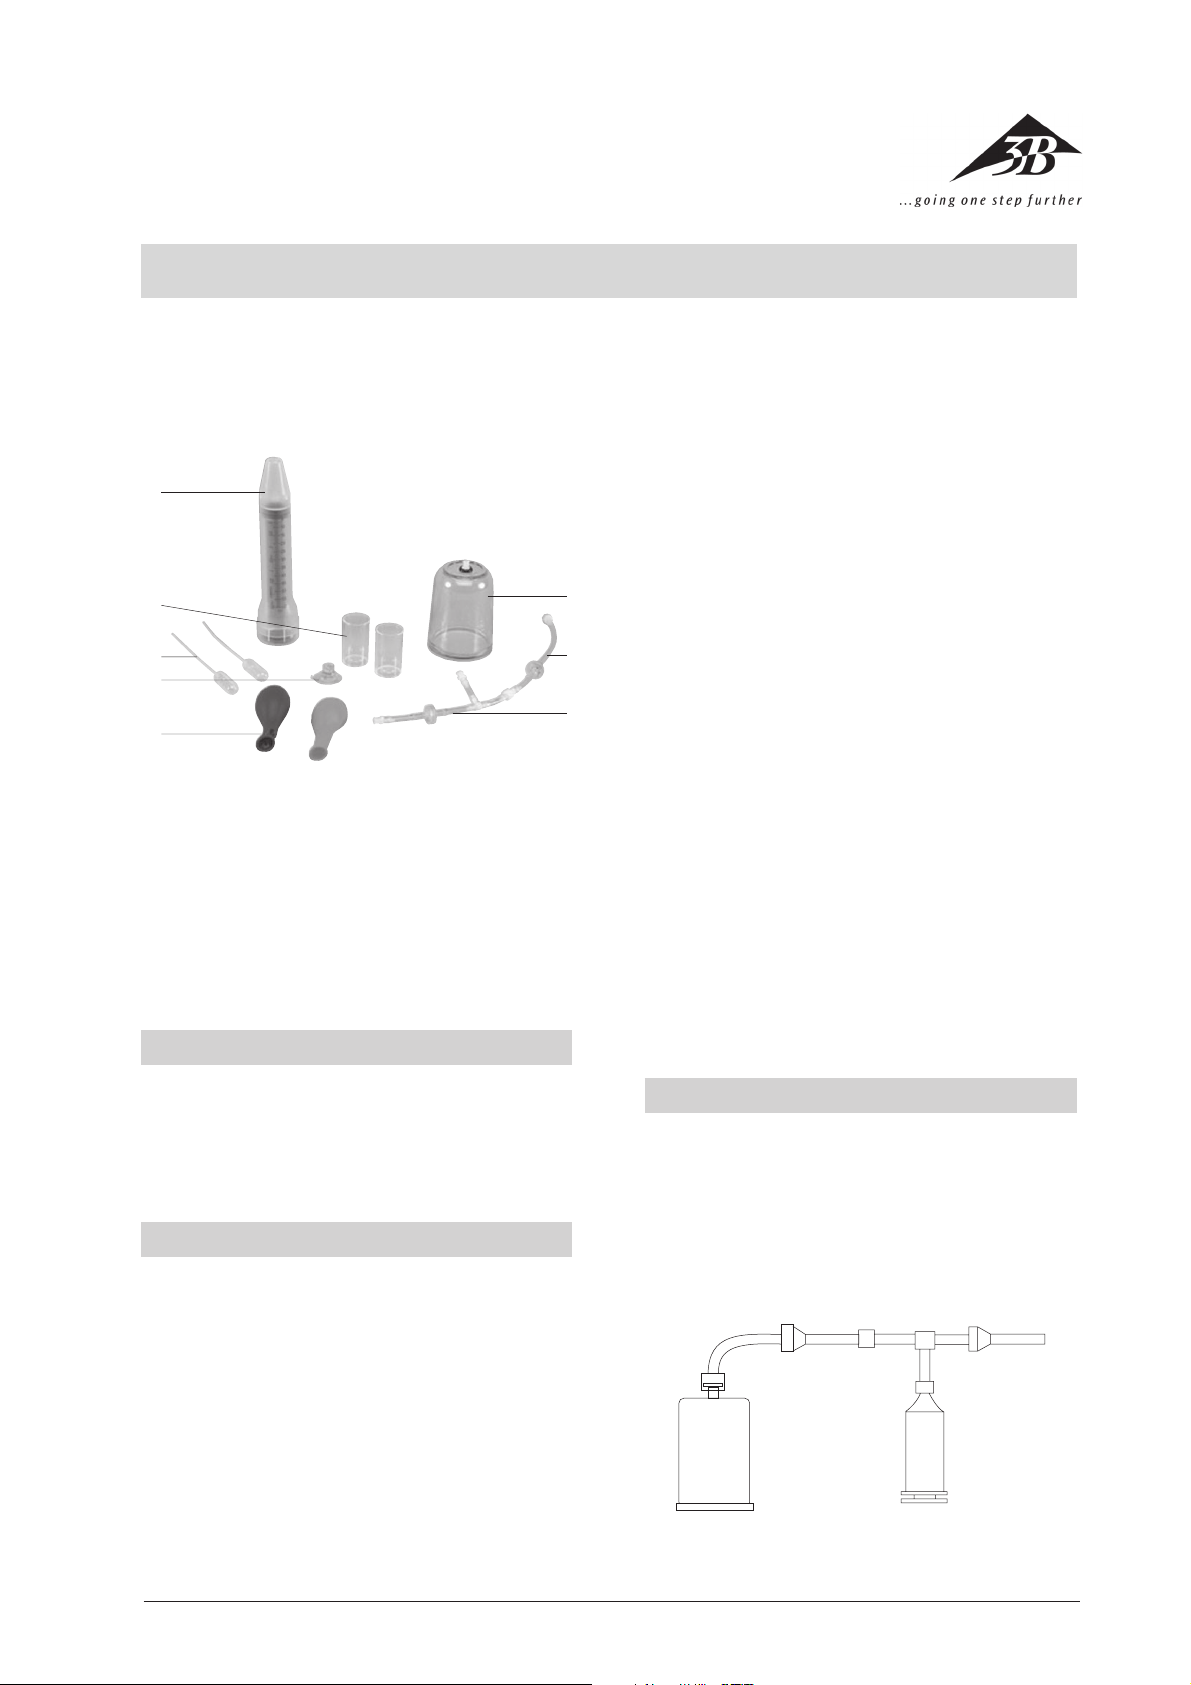
4
5
6
7
8
Equipment set for practical experiments introducing the
basics of vacuum physics. Subjects that may be studied
experimentally may include, for example:
• Determining the mass of air evacuated and its density.
• Effect of air pressure on a partially inflated balloon
and a miniature bellows.
• Lowering of boiling point of liquids by reduced air
pressure.
1. Safety instructions
• When attaching hoses do not use excessive force. Do
not exert more than the pressure of your fingertips
on the hose connectors when joining them together.
• To clean, use only warm water with a small amount
of washing-up liquid. Never use solvents.
2. Description, technical data
A complete set of equipment consisting of an experiment plate incorporating a rubber ring and a bell jar that
can be joined together with a recipient to enclose a coarse
vacuum. The bell jar is equipped with a hose connection
for attaching a plastic hose with a built-in valve. Evacuation is achieved using a simple hand pump. Beakers,
bellows and balloons are provided for the experiments.
All components are made of transparent plastic.
Experiment plate: 70 mm Ø approx.
Bell jar: 90 mm high approx.
3
2
1
1 Hose with T-piece and valve
2 Hose with valve
3 Recipient (Experiment plate and bell jar)
4 Hand pump in case
5 Beaker
6 Pipettes
7 Mini bellows
8 Balloon
2.1 Scope of delivery
1 Experiment plate with sealing ring
1 Bell jar
1 Hose with valve
1 Hose with T-piece and valve
1 Simple hand pump in case
1 Mini bellows
2 Balloons
2 Beakers
2 Plastic pipettes
3. Operation
3.1 Set-up of experimental apparatus
• Connect the hand pump to the bell jar via a hose as
shown in the illustration.
• Slip the hose connectors inside one another and
secure by turning with slight pressure from the fingertips.
3
Page 2

4. Sample experiments
4.1 Lowering of the boiling point of liquids
• Set up the apparatus as in the illustration.
• Fill the beaker with warm water and measure its
temperature.
• Put the beaker on the experiment plate and place
the bell jar over the top of them.
• Press the jar onto the plate and operate the pump
until the liquid visibly starts to boil.
• Loosen the hose connection to the jar to let in air.
• Measure the temperature of the liquid once again.
• Compare the two temperatures and discuss.
4.2 Effect of reduced air pressure on a balloon
• Set up the apparatus as in the illustration.
• Put a partially inflated balloon on the experiment
plate and place the bell jar over the top of them.
• Press the jar onto the plate and operate the hand
pump 10-15 times.
• The balloon inflates.
• Alternative experiments can be performed using a
mini bellows or a small quantity of shaving foam in
a beaker.
4.3 Determining the mass and density of air
Also required:
1 set of scales measuring to the nearest 0.01 g
1 measuring beaker
• Press the bell jar and experiment plate together. Attach hose 2 and determine the total weight.
• Connect the hand pump and evacuate the recipient.
• Loosen the connection between hoses 1 and 2
and measure the total weight of evacuated jar and
hose connection.
• The difference in weight indicates the mass of air
pumped out.
• Let air into the bell jar.
• Re-attach hose 2 to determine the volume.
• Fill the recipient and hose 2 with water adding a
bung or holding your finger over the end of the hose.
• Pour the water into a measuring beaker and read off
the volume.
• Determine the density of air by dividing the mass by
the volume.
4.4 Filling a pipette without touching it
• Set up the apparatus as in the illustration.
• Fill a beaker with water and place it on the experi-
ment plate.
• Put the open end of the pipette in the beaker and
place the bell jar over the lot.
• Press the jar onto the plate and operate the hand
pump a few times.
• Air disappears from the pipette.
• Let air into the recipient and the pipette will fill with
water.
3B Scientific GmbH • Rudorffweg 8 • 21031 Hamburg • Germany • www.3bscientific.com • Technical amendments are possible
4
 Loading...