


INSTALLATION INSTRUCTIONS
MX88
EIGHT ZONE – EIGHT SOURCE
AUDIO & AUDIO/VIDEO CONTROLLER/AMPLIFIER

Page: 2 |
Model MX88 |
IMPORTANT SAFETY INSTRUCTIONS - READ BEFORE OPERATING EQUIPMENT
CAUTION: TO REDUCE THE RISK OF ELECTRIC SHOCK,
DO NOT REMOVE COVER (OR BACK)
NO USER-SERVICEABLE PARTS INSIDE
REFER SERVICING TO QUALIFIED SERVICE PERSONNEL
The lightning flash with arrowhead symbol, within an equilateral triangle, is intended to alert the user to the presence of un-insulated “dangerous voltage” within the product‟s enclosure that may be of sufficient magnitude to constitute a risk of electric shock to persons.
The exclamation point within an equilateral triangle is intended to alert the user to the presence of important operating and maintenance (servicing) instructions in the literature accompanying the appliance.
WARNING TO REDUCE THE RISK OF FIRE OR ELECTRIC SHOCK, DO NOT EXPOSE THIS APPLIANCE TO RAIN OR MOISTURE.
This product was designed and manufactured to meet strict quality and safety standards. There are, however, some installation and operation precautions, which you should be particularly aware of.
1.Read Instructions – All the safety and operating instructions should be read before the appliance is operated.
2.Retain Instructions – The safety and operating instructions should be retained for future reference.
3.Heed Warnings – All warnings on the appliance and in the operating instructions should be adhered to.
4.Follow Instructions – All operating and use instructions should be followed.
5.Water and Moisture – The appliance should not be used near water – for example, near a bathtub, washbowl, kitchen sink, laundry tub, in a wet basement, or near a swimming pool, etc.
6.Carts and Stands – The appliance should be used only with a cart or stand that is recommended by the manufacturer. An appliance and cart combination should be moved with care. Quick stops, excessive force, and uneven surfaces may cause the appliance and cart combination to overturn.
7.Wall or Ceiling Mounting – The appliance should be mounted to a wall or ceiling only as recommended by the manufacturer.
8.Ventilation – The appliance should be situated so that its location or position does not interfere with its proper ventilation. For example, the appliance should not be situated on a bed, sofa, rug, or similar surface that may block the ventilation openings; or, placed in a built-in installation, such as a bookcase or cabinet that may impede the flow of air through the ventilation openings.
9.Heat – Do not install near any heat sources such as radiators, heat registers, stoves, or other apparatus (including amplifiers) that produce heat.
10.Power Sources – The appliance should be connected to a power supply only of the type described in the operating instructions or as marked on the appliance.
11.Grounding or Polarization – Do not defeat the safety purpose of the polarized or grounding-type plug. A polarized plug has two blades with one wider than the other. A grounding type plug has two blades and a third grounding prong. The wide blade or the third grounding prong are provided for your safety. If the provided plug does not fit into your outlet, consult an electrician for replacement of the obsolete outlet.
12.Power-Cord Protection – Powersupply cords should be routed so that they are not likely to be walked on or pinched by items placed upon or against them, paying particular attention to cords at plugs, convenience receptacles, and the point where they exit from the appliance.
©2011 Xantech Corporation
Model MX88 |
Page: 3 |
13.Cleaning – Clean only with dry cloth.
14.Power Lines – An outdoor antenna should be located away from the power lines.
15.Nonuse Periods – The power cord of the appliance should be unplugged from the outlet when left unused for a long period of time.
16.Accessories: Only use attachments/accessories specified by the manufacturer.
17.Object and Liquid Entry – Care should be taken so that objects do not fall and liquids are not spilled into the enclosure through openings.
18.Damage Requiring Service – The appliance should be serviced by qualified service personnel when:
A.The Power-supply cord or the plug has been damaged; or
B.Objects have fallen, or liquid has spilled into the appliance; or
C.The appliance has been exposed to rain; or
D.The appliance does not appear to operate normally or exhibits a marked change in performance; or
E.The appliance has been dropped, or the enclosure damaged.
19.Servicing – The user should not attempt to service the appliance beyond that described in the operating instructions. All other servicing should be referred to qualified service personnel.
© 2010 Xantech LLC

Page: 4 |
Model MX88 |
Section 1: General Information & Features
GENERAL INFORMATION
The Xantech MX88 System sets a new standard in whole-house audio/video distribution, audio amplification, and control/automation. The MX88 System consists of the MX88 controller/amplifier, keypads (such as MRKP1/1E or MRKP2/2E) or touch-panels (such as the Xantech SmartPanel™) to control each zone, and wireless or wired web-enabled devices such as the Apple® iPad® for controlling all zones and the entire system. When combined with IR, RS232, or IP controlled (IP on select models only) meta-data-rich audio/video sources and home automation components, the MX88 becomes a powerful system capable of controlling virtually everything within a household.
The MX88 can be used as a stand-alone unit or in conjunction with another MX88 to provide 16 Zones of A/V/Control distribution.
MX88 models include:
MX88vi: Audio/Video/Control distribution, IP-enabled
MX88ai: Audio/Control distribution, IP-enabled
MX88a: Audio/Control distribution (no IP)
Each MX88 package contains :
One MX88 Controller/Amplifier
Eight IR Emitters part no. 283D
One part no. 05913410 gray-colored DB9 male-to-female programming cable to connect to the RS232 serial port on your PC
Two part no. 05913665 DB15 male to DB9 female cables for connecting MX88 rear ports 1 and 2 to RS232 devices
One part no. 05913555 male DB15 to male DB15 cable with null modem for linking two MX88 Controllers in Expansion Mode
Eight speaker WECO connector plugs
Two rack ears
Three sets of screws and washers for attaching the rack ears to MX88
One US AC Cord
One European AC Cord
One UK AC Cord
One Australia/New Zealand AC Cord
Companion products available for the MX88 (sold separately):
Keypads: MRKP1, MRKP1E, MRKP2, MRKP2E, MRC88KP/MRC88DJKP (limited availability)
Touch-panels: Xantech SmartPanel™ SP35G, (C)SP43, (C)SP70, (C)SPLCD39, (C)SPLCD64
MREM (simple card type remote – no programming required)
MRC44CB1 Connecting Block
CSM1 Current Sensing Module
RS2321X8 Router: Serial Router expanding a single MX88 RS232 output to 8 Serial Ports
Part no. 05913560: Black-colored DB9 male-to-male Null-Modem cable to connect to the RS232 serial port of an external device (that requires a null-modem connection) to the MX88, through the DB15 to DB9 cables that are included withn the MX88.
ZAIP Zone Audio Input Kit: For use with Zone Audio Inputs. Send and Receive Stereo Audio over CAT5
External IR Receivers: Xantech IR Receiver models, such as DL/HL/ML/WL85, or DL/HL/ML/WL95
©2011 Xantech Corporation
Model MX88 |
Page: 5 |
IMPORTANT NOTES:
1. The MX88 System can be a single controller with keypads for up to Eight zones or two connected controllers and keypads for up to Sixteen zones.
All the set up details for a MX88 are stored in a file called “Project”.
The MX88 can be set up without a PC, using the QuickConfig protocol, via the keypad or touchpanel connected to the Zone 1 keypad port of the MX88. By using QuickConfig, you can set up an eight zone or an expanded 16 zone MX88 system without ever having to hook up a PC.
However, please note that Projects created by QuickConfig cannot be retrieved and/or edited in Universal Dragon.
The MX88 can also be set up and customized using Xantech‟s Universal Dragon Windows® software.
There are two different setup modes in the Universal Dragon:
-The Advanced mode allows customization of system configuration for functions such as zone linking, monitor lockout, unique IR programming by zone, etc.
-The Expanded mode allows programming of systems with more than eight zones using two linked MX88 Controllers.
Each section of this manual will indicate which sections apply to the different programming modes and setups.
In the Expanded mode, the controller for zones 1-8 will be referred to as the PRIMARY CONTROLLER. The controller for zones 9-16 will be referred to as the SECONDARY CONTROLLER.
2. All programming and features of the MX88 directly apply to all models except:
Video Distribution and Video Sensing applies to MX88vi models only
Ethernet/IP applies to MX88vi or MX88ai
© 2010 Xantech LLC
Page: 6 |
Model MX88 |
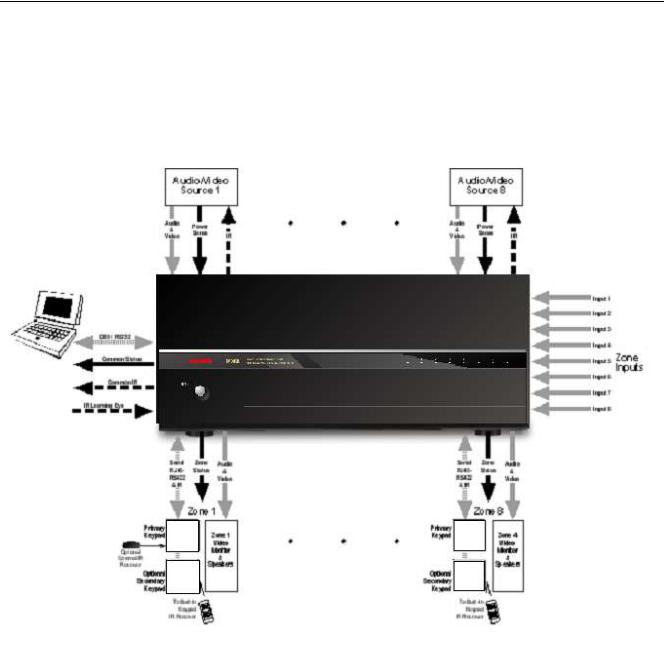
SYSTEM OVERVIEW
In a MX88-based whole house audio/video/control system, the MX88 controller/amplifier acts as the server and the keypads, touch-panels, and compatible web-enabled devices (such as the Apple® iPad®) act as the clients. The end users interact with these clients in order to control all aspects of audio/video distribution and control.
This system allows the end user to accomplish the following: 1) Distribute amplified audio and video from eight independent Sources to eight separate zones. 2) Control the volume, mute, bass, treble, and balance for each of the eight zones. 3) Control most standard source components via IR and/or RS232 and/or IP (certain MX88 models only) commands. Two MX88s can be linked to create systems with up to sixteen zones.
Figure 1 - System Block Diagram
There are many ways in which the MX88 can be controlled or to control audio, video and home control systems:
By pressing the buttons on the MX88 keypad or touch-panel
From signals received from an Infrared (IR) remote at the keypads IR Receiver eye
From RS232 control from a touch screen panel or other RS232 controller device
©2011 Xantech Corporation
Model MX88 |
Page: 7 |
Via IP (MX88vi amd MX88ai only), using almost any web-enabled device with a browser, such as an Apple® iPad®, a Windows® or Android™ tablet, or a PC.
There are three types of commands that can be associated with the MX88 Keypad buttons:
Source component commands such as BluRay Player Power, Play, Track Skip, etc.
MX88 Controller/Amplifier “INTERNAL AMPLIFIER COMMANDS” such as Zone Source Select, Zone
Power, VOL+, VOLetc.
RS232 Command Strings for controlling sophisticated control systems such as Lighting, HVAC, etc. utilizing the MX88 Controller‟s RS232 COM PORT output
RS232-over-IP (MX88vi and MX88ai only) Command Strings for controlling sophisticated control systems such as Lighting, HVAC, etc. utilizing the MX88 Controller‟s IP PORT – This feature is currently in use on a very limited basis, and is reserved for future upgrades.
© 2010 Xantech LLC

Page: 8 |
Model MX88 |
CONTROLLER/AMPLIFIER FEATURES
•Zones: Eight, expandable to sixteen-zones with the addition of a second MX88 and additional keypads
•Sources: Eight audio (MX88a or MX88ai) or eight audio/video (MX88vi). Any zone can select any source.
Any source can be selected in multiple zones. Several modes of control:
-Whole-house mode – selection and control of any source from any zone.
-Priority mode – any zone can select and monitor a source, but only the first zone to select that source can control it.
-Link mode – multiple zones can be linked together to act as a single zone for source selection and control. Each zone maintains independent volume and mute controls.
-Monitor lockout – prevents certain zones from selecting certain sources.
•Local Zone Audio Inputs: Eight zone-specific audio inputs. When activated, overrides source-one audio inputs allowing each zone to have its own dedicated Audio Source by selecting source-one.
•IR Learning: IR commands can be learned from external hand-held remotes through the Controller/Amplifier‟s built-in IR learning eye or they can be generated from the MX88‟s built-in IR code library.
Internal IR Code Library: Built in IR Code Library. Contains all Major Brand Component IR commands. No need to „learn‟ commands.
•Macros: can be built using IR, audio control, RS232, repeat or delay commands and associated with a specific button or event. They can be triggered by a keypad button press, an RC68+ IR code, an MX88 compatible keypad command, control sense status, video sense status or by RS232. Up to 40 IR commands can be issued in a single Macro.
•Audio/Video loop-through on all eight source inputs (video applies to MX88vi only)
•Power Management: Keeps all components‟ power states in sync with Zone Power Status
All eight video source inputs have built-in NTSC/PAL sync sensing (MX88v only)
All eight sources have current sense inputs for use with a CSM1 Current Sensor.
•Preamp level audio outputs for all eight zones
Frequency response: 12 Hz to 55KHz (±3dB)
THD: <0.08%.
Signal-to-noise ratio: > 96dB A-weighted
•Amplification: Zones 1 through 8 have built-in stereo audio amplifiers at 50 Watts per channel
Zones 7 and 8 are also designed to be used with external amplifiers in case higher power output is desired. CO1 and CO2 Control Outputs provide on/off or mute trigger signals to external amps used for zones 7 and 8.
•Video outputs for all eight zones (MX88vi only)
•IR Emitter Outputs: Eight source-specific IR emitter outputs
One common IR emitter output
Eight zone-specific IR emitter outputs
© 2011 Xantech Corporation
Model MX88 |
Page: 9 |
Eight in-the-zone IR emitter outputs via a MX88-compatible keypad rear panel emitter output - permitting IR commands originating in the zone to be looped back to the zone allowing the MX88 to control components physically located in the zone.
•Status Outputs: Eight zone-specific 12V status outputs
One common 12V status output (Labeled Control Out)
•RS232/USB programming ports (Front Panel): Communications port used to program the system using Universal Dragon software.
RS232 COM PORTs 1 and 2 (Rear): Allow the MX88 to be controlled by a PC or another RS232 device, or to control other devices that communicate via RS232 such as certain home theater components, lighting or HVAC devices. These ports facilitate connection to another MX88 for 16 Zones of seamless control.
Keypad connections: One for each zone – RJ45 connector, CAT5/5e/6/7 cable.
Ethernet port: RJ45 connector, standard Ethernet cable (MX88vi or MX88ai only).
© 2010 Xantech LLC
Page: 10 |
Model MX88 |
MX88 CONTROLLER/AMPLIFIER PANEL AND FEATURE DESCRIPTIONS
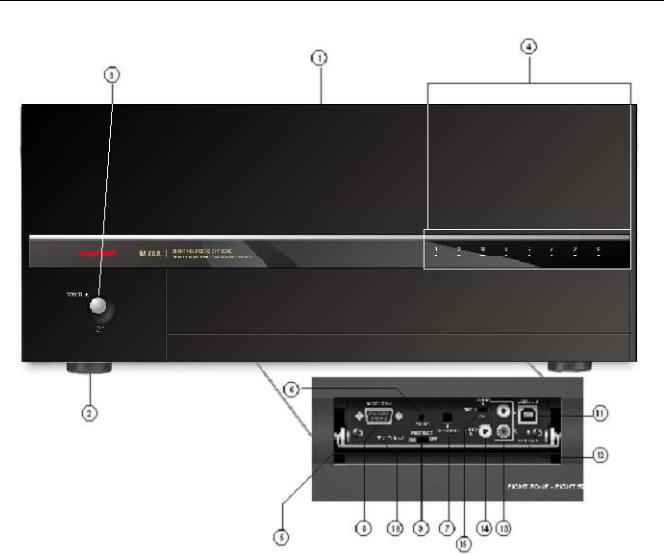
Figure 2 – The Model MX88 Controller/Amplifier – Front Panel Features and Functions
MX88 FRONT PANEL FEATURES AND CONNECTIONS:
1.Front Panel.
2.Chassis Feet. Set high enough to provide through-chassis cooling by natural convection.
3.Master AC Line On/Off Switch. Turns AC power On/Off to the entire unit.
4.Power and Status LED Indicators. Eight indicators, one for each Zone, provide the following status information:
System Status (Power-Up Mode)
a)Slow Pink Blink – indicates general initialization is occurring.
b)Fast White Blink – indicates that a keypad on the associated zone is currently being initialized.
c)Fast Red Blink – indicates that the master keypad on the associated zone is not responding to initialization.
d)Fast Pink Blink – indicates that the slave keypad on the associated zone is not responding to initialization.
e)All Lights Off – initialization is done, system is ready for operation.
©2011 Xantech Corporation
Model MX88 |
Page: 11 |
Zone Status (Active-Operational Mode)
a)Steady White – indicates that the Zone is Active (Keypad ON), is not muted and is not within 5 dB of MAX-V (Maximum Volume).
b)Steady Red – indicates that the Zone is Active, is not muted and is within 5 dB of MAX-V.
c)Slow White Blink – indicates that the Zone is in the Active, is muted and is not within 5 dB of MAX-V.
d)Slow Red Blink – indicates that the Zone is Active, is muted and is within 5 dB of MAX-V.
e)Fast White Blink – indicates that Zone is Active, is being Ramped Up or Down and is not within 5 dB of MAX-V.
f)Fast Red Blink – indicates that the Zone is Active, is being Ramped Up or Down and is within 5 dB of MAX-V.
f)Off to indicate that Zone is in Not Active (Keypad OFF).
5.Front Panel Access Door. Push gently on lower half of door to open. Allows access to programming connections, Level Reset and Front Panel Source 8 A/V Input.
6.Level Reset. Pressing this button twice within 1 second restores all of the Factory Default Settings for all zones. The Factory Defaults are as follows:
Mute Off
Treble and Bass FlatBalance Centered
Z-Adjust Treble and Bass FlatZ-Adjust Balance Centered
Z-Adjust Max-V Cleared
Z-Adjust Max-On-V ClearedTrim Levels Cleared
IR Code Group set to A8
NOTE: The MX88 will always return to last set values (plus any unaltered factory defaults) after main power shut down or after any power interruptions.
7.IR Learning Eye. The IR Eye on the MX88 Controller front panel allows teaching IR Codes to Dragon Drop-IR™ via the Control Amp when connected to a PC „s com port.
8.RS232 Com Port. DB9 Connector. Used to program the MX88 Controller or perform firmware updates from a PC, using the Xantech Universal Dragon Software.
9.PROTECT On/Off Switch. Selects between Programming Mode (OFF position) and PROTECT (ON) position to keep program secure in memory.
10.STATUS A Led. Green Activity LED, lights during Program Download from Universal Dragon Software, during IR Learning and for firmware updates when using the RS232 Port located on the front panel
11.USB Com Port. Used to program the MX88 Controller or perform firmware updates from a PC, using the Xantech Universal Dragon Software.
12.STATUS B Led. Green Activity LED, lights during Program Download from Universal Dragon Software, during IR Learning and for firmware updates when using the USB Port located on the front panel.
13.Source 8 AUDIO IN L/R. Front panel Source 8 line level audio input. Gold-plated RCA Jacks for use with any desired A/V source component such as camcorder, video game console, or other.
14.Source 8 VIDEO IN (MX88vi only). Front panel Source 8 composite video input. Gold-plated RCA Jacks for use with any desired A/V source component such as camcorder, video game console, or other.
15.Source 8 Front/Rear Selector Switch. Selects whether the Source 8 Audio/Video inputs will come from the Front (F) or Rear (R) panel jacks.
©2010 Xantech LLC

Page: 12 |
Model MX88 |
Figure 3 – The Model MX88 Controller/Amplifier – Rear Panel Connections and Functions
MX88 REAR PANEL FEATURES AND CONNECTIONS:
16.Keypad Terminals (8). Each Zone has one RJ-45 jack for Keypad Interface. Each connector interfaces the following: Power (Enough for 1 Primary & up to 4 Secondary Keypads per Zone), RS-485 Data I/O, and IR Input.
17.Speaker Terminals (8). Plug-in 4-terminal screw type connectors for zones 1 thru 6, permit speaker wire sizes up to 12AWG.
18.Composite Video Output (8). RCA type connector sends zone selected, source video to the composite video input on a zone TV or modulator (applies to MX88v(i) only).
19.Status Out (8). Provides a control output of +12 VDC that turns on and off with the zone to drive voltage sensing relay modules and AC strips.
20.Control Out (8). Mono 3.5mm Mini Phone Jack provides a Control Output that goes high (+12 volts) when any Zone is first turned ON and goes low (0 volts) when the last Zone is turned OFF. [Tip=+VDC; Shield=GND]
21.Remote Amp Control Out (CO1 & CO2). Stereo 3.5mm Mini Phone Jack connects to CONTROL IN jack of Remote Amp PA435X or PA4100X. Provides STANDBY and MUTE Control of remote Amp from Zone 7 (CO1) and Zone 8 (CO2). [Tip = STANDBY Logic; Ring = MUTE Logic; Shield = GND]
22.Source Component Input Connections (8)
a)Source Audio Inputs. Gold-plated RCA Jacks for Stereo/Dolby Pro line level audio input from source components.
b)Source Video Inputs. Gold-plated RCA Jacks for composite video input from source components (Applies to MX88 only).
c)Sense Inputs. 3.5mm Stereo Mini Phone Jacks for use with the CSM1 MX88 Current Sense Module.
©2011 Xantech Corporation
Model MX88 |
Page: 13 |
23.Source Loop-Thru Connections (8).
a)Audio Loop-Thru. Parallel Connection to Audio Inputs for connecting Audio Source to another MRC88 in Expanded Mode or to other local devices. This is not an active output.
b)Video Loop-Thru (MX88vi only). Buffered Video Connection for connecting Input Video Source to another MX88vi in Expanded Mode or to other local devices. NOTE: Since this is a Buffered video connection, this loop-thru is not active when POWER is removed from the MX88vi.
24.Zone Audio Inputs (8). 3.5mm stereo mini phone jack for zone specific stereo audio source Inputs. Zone Audio Inputs override rear panel, Source 1 connection. Allows each of the 8 zones to have a dedicated source output by selecting Source 1 on keypad.
25.Zone Audio Pre-Amp Out (8). Gold-plated RCA jacks for connecting Zone Audio Output to an external amplifier. For use with applications where either more power is required for zone or passing to a Dolby Surround compatible receiver for theater quality audio in zone.
26.IR Emitters (1-8). 3.5mm mono mini phone jacks. These mini jacks are for the connection of IR emitters to control individually the eight source components. These jacks are “steerable” with Universal Dragon Software for IR Routing and Priority Lockout. IR received from a Zone will be routed to the emitter port corresponding to that zone‟s active source selection. Can also be configured as 8 common emitter ports using Universal Dragon.
27.IR Emitter (Common). 3.5mm mono mini phone jacks. Single Common IR output that can be used to control devices such as Multi Zone Audio Server, motorized drapery systems, TV lifts and lighting systems or any other IR controlled component. IR Received from any zone keypad will be output the Common emitter port regardless of source selection.
28.Zone IR Out (8). 3.5mm mono mini phone jacks. IR received from a zone will always be passed to the corresponding Zone IR output. This can be used to control Zone Specific components not located in the zone.
29 and 30. Com Ports 1 and 2. DB15 (DB15-to-DB9 adaptors included) Bi-Directional RS232 Ports allow full control of all Internal Amplifier Commands of the MX88 Controller and the ability to trigger programmed IR Macros for control of devices connected to the Controllers emitter ports, from an external PC. The Com Ports can also be used to send ASCII/Hex commands out to control an external RS232 device directly from the MX88 Keypad and/or handheld remote, and receive status information and metadata from the device. Port 1 is also used for system expansion, where the port 1‟s of two MX88‟s allow them to be connected together, via included Expansion Cable, to provide an 8 Source/16 Zone system with full control between units.
31.User Replaceable Fuse. 10 AMP L 250 VAC.
32.AC Power Input. Standard IEC 3-Conductor AC line cord to be used with a 3-conductor power line cord.
33.Grounding Screw. “Knurled Screw” provides a means for chassis connection to earth ground or to other
Audio/Video products to aid in the reduction of system noise.
34.Power On/Off LED. This LED will be lit in white when the MX88 is on.
35.Ethernet Port (MX88vi and MX88ai only): Connects to a Local Area Network, and allows the control of all the zones of a MX88vi or ai from almost any wired or wireless IP-enabled device with web browsing capabilities, such as the Apple® iPad®, Windows® and Android™ tablets, and PCs. It also allows for some limited 2-way external device interface, subject to expansion in the future. This port is also used for setting configuring the IP address and performing firmware updates for the MX88vi/MX88ai‟s built-in web server, using the Xantech MRIP Installer Software.
©2010 Xantech LLC

Page: 14 |
Model MX88 |
Section 2: Installation & Connections
INSTALLATION
Installing an MX88 system involves completely planning the system from hardware, installation, and programming standpoint, before the actual installation begins.
We strongly recommend, before physical installation begins, that all the actual components to be used as part of the MX88 system are physically connected and tested individually first, and then tested again as a system with a fully programmed and configured MX88. This added effort can become a valuable investment in quick and effective troubleshooting in case any issues are encountered after installation.
We also recommend that all installed wiring is checked thoroughly and systematically for continuity and integrity, using proper test equipment designed for the specific type of wiring.
OPERATION: OUT-OF-THE-BOX PRE-TEST
The MX88 is shipped to operate basic functions „Out-Of-The-Box‟ without any programming. Simply by plugging in keypads via standard CAT-5 RJ45 terminated patch cable and powering the controller „on‟, you can control Source Selection, Volume Up/Down and speaker Mute capabilities.
Completing the Out-Of-The-Box Pre-Test will verify that all sources and zone components are working properly to select and distribute audio and video prior to programming via QuickConfig or with the Universal Dragon. This will ensure that the unit is indeed functioning correctly „prior‟ to fixed installation and allow proper troubleshooting procedures if a problem is encountered. Instructions regarding full programming for specific components and features will follow.
Notes:
-For Expanded, 16-zone configuration, test both units individually as outlined below.
-For simplicity of test set-up, only one Source Component, one pair of speakers, and one TV/Video Monitor will be necessary.
For the pre-test the MX88, you will need the following:
8-RJ45 Terminated CAT5 cables. (Pre test cables prior to use – See  Caution below)
1-Audio/Video Source Component (i.e. BluRay or DVD player, etc.) [Will be used to test ALL Source Inputs]
1 Audio/Video RCA Harness (Capable of Audio Left/Right and Video)
1-Pair of speakers with Speaker Cable properly terminated into the included 4 conductor WECO-style plug [Will be used to test Speaker outputs]
1-TV or Video Monitor [Will be used to test ALL Video Outputs – MX88 only]
8-283D Blink Emitter
All 8 MX88-compatible keypads or touch-screens
AC Cord
1.Connect MX88 Controller/Amplifier as shown in Figure 6 to:
a)All MX88 keypads via CAT5 Cables
c)Audio/Video Source to SOURCE 1 Audio Left/Right and Video Input terminals
d)TV or Monitor to Video Out 1 (MX88 Only).
e)Speakers to Speaker Output #1
f)All 8 IR emitters to IR Emitter Ports 1 thru 8 (Figure 3, item 26)
g)AC Power for MX88 Controller and Audio/Video Source Component
© 2011 Xantech Corporation
 Loading...