


TABLE OF CONTENTS
INTRODUCTION


 1 IMPORTANT SAFEGUARDS


 1 PACKAGE CONTAINS:


 1 NAMES OF PARTS


 2 INSTALLATION BEFORE USE


 3 CONTROL PANEL AND LCD DISPLAY


 5 CONTROL PANEL FUNCTIONS


 6 OPERATION USING CONTROL PANEL


 7 OPERATION USING REMOTE CONTROLLER


 8 CONDENSATE WATER DRAINAGE


 11 MAINTENANCE


 12 TROUBLESHOOTING


 14 TECHNICAL SPECIFICATIONS


 15 DISCLAIMER


 15 CONTACT INFORMATION


 15 ELECTRIC PRINCIPLE DRAWING


 16 WARRANTY


 17
17
INTRODUCTION
Thank you for purchasing the Soleus Air KY32U portable air-conditioner. This unit is designed for improvinglivingandworkingcomfortbyprovidingcooling,dehumidifyingandfanfunctionsonlywitha minimum installation required. With its whisper quite operation and attractive design, you will enjoy the convenience and comfort that this unit provides for many years to come.
When operating as an air conditioner, this unit is designed for spot cooling or cooling for a room no larger than 350 square feet with the standard ceiling height.
IMPORTANT SAFEGUARDS
Before you use your portable air conditioner, please read this operation manual carefully.
1)Never use or store gasoline or other flammable vapor or liquid near this unit.
2)Maintain at least 10” (25 CM) clearance space from this unit. Avoid air inlet or outlet grilles from being covered or closed off.
3)The power supply must be properly grounded.
4)Do not use an adapter plug or extension cord.
5)Do not use the unit in the immediate surroundings of a bath, a shower or a swimming pool.
6) Do not let children play near this unit.
PACKAGE CONTAINS:
Mobile Air Conditioner
Air Exhaust Duct
Exhaust Duct Window Kit Adapter
Remote Controller
AAA Batteries (2)
Window Kit - 3 Sliding Panels
Window Kit Fastener Screws (4)
Continuous Drainage Tubing Pipe
Exhaust Outlet Wall Cover
User Manual
 1
1
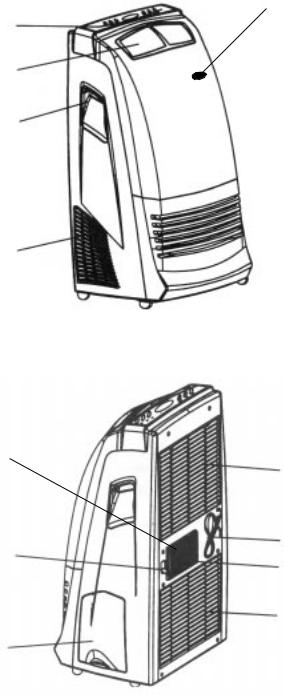
NAMES OF PARTS
Front View
Signal
Receptor
control panel
upper air outlet
handle
lower air inlet grille
Back View
Exhaust Duct
Terminal upper air inlet grill with filter
power cord
continuous
drainage hot air exhaust outlet
lower air
inlet grille
water tank
 2
2
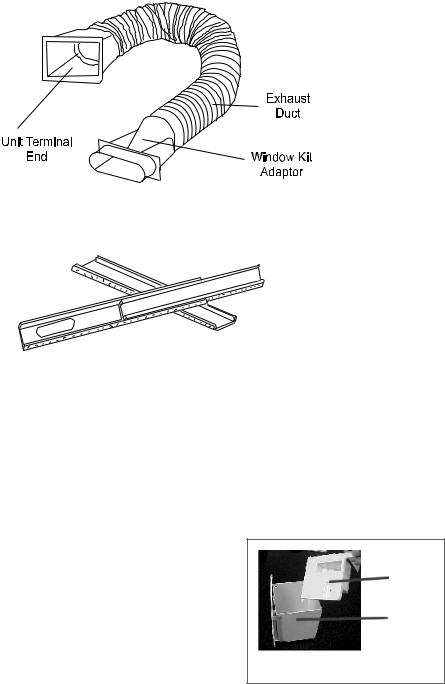
ExhaustDuct
Window Kits
INSTALLATION BEFORE USE
1)Condensate Water Tank Float Lid
You must install the water tank float lid before first use of the portable air conditioner following these procedures:
a)Hold the water tank and draw it out slowly.
b)Remove water tank float lid and packing material from the water tank.
Floater
Water
Tank
Fig.1 b)
c)Insert the float lid into the water tank by inserting one side of the hinge into the hinge holder on the water tank and then sliding the other side into its place. The
 3
3
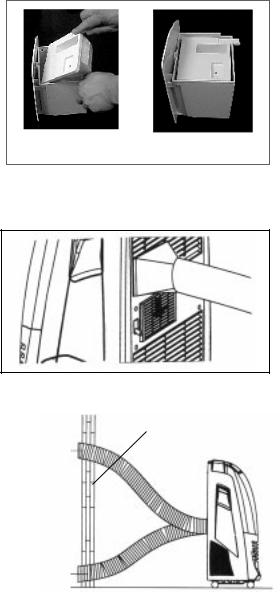
water tank float lid should be able to move up and down freely after correct installment.
d)Insert the complete water tank back to the air conditioner unit.
2) ExhaustDuct |
Fig.1 c) |
When you use the unit as an air conditioner, the hot exhaust air must be directed out of the room. The exhaust duct is used to allow the hot air out. DO NOT INSTALL OR USE THE EXHAUST DUCT WHEN THE UNIT IS OPERATED AS A DEHUMIDIFIER OR FAN.
a)Slid exhaust connector all the way down over the discharge opening of the unit.
b)Mount the external end of the exhaust duct
onto a hole of 5 ¼” (132 mm) on the wall for |
|
optional wall hot air outlet installation, or |
Fig.2 a) |
|
c.) Connect the window kit adaptor to the external end of the exhaust duct for a window or sliding door hot air outlet installation.
NOTE: In order to increase the efficiency, the exhaust duct should be keep as short and straight as possible. The exhaust hose can be cut shorter by unthreading either end of the exhaust duct counter clockwise. It is not recommended to increase the manufacturer’s length of the exhaust hose. This may impede or damage the unit.
Window, slidingdoor or Wall
3) |
Window Kit Installation |
Fig.2 b)-c) |
a)Open window or sliding door for approximately 5 inches (130 mm)
b)Adjust the length of the window kit to the same length of the window or the sliding door. Use all three panels if necessary.
c)Use screws to affix the window kit length.
d)Place the window kit to the window or sliding door. Close the window or door as far as it goes.
e)Mount the window kit extension of the exhaust host onto the window kit.
 4
4
 Loading...