

FlavorSelect
10 cup coffeemaker
KF 140
KF 140 auto-off
KF 145
Type/Modèle/Modelo 3111
Type/Modèle/Modelo 3111
Type/Modèle/Modelo 3111
FlavorSelect
12 cup coffeemaker
KF 152
KF 157
Coffeemaker
Cafetière
Cafetera
Use Instructions
Mode d’emploi
Instrucciones de uso
Type/Modèle/Modelo 3113
Type/Modèle/Modelo 3114
For household use
Pour usage ménager
Para uso doméstico
4
8
12
USA
Service / Warranty 15
Canada
Service / Warranty 16
Service après-vente / Garantie 17
Mexico
Servicio al consumidor 18
3-111-163 / 00/X-00
USA/CDN/Mex.
Printed in Mexico
Imprimé au Mexique
Impreso en México

English
IMPORTANT SAFEGUARDS
When using electrical appliances, basic safety precautions should always be followed
including the following:
1. Read all instructions.
2. Do not touch hot surfaces.
Use handles or knobs.
3. To protect against electric shock,
do not place cord, plugs, or appliance
in water or other liquid.
4. Close supervision is necessary when
any appliance is used by or near
children.
5. Unplug from outlet when not in use
and before cleaning. Allow to cool
before putting on or taking off parts,
and before cleaning the appliance.
6. Do not operate any appliance with a
damaged cord or plug or after the
appliance malfunctions, or has been
damaged in any manner. Return appliance to an authorized service facility
for examination, repair or adjustment.
7. The use of an accessory not recommended for use with this appliance
may cause injuries.
8. Do not use outdoors.
9. Do not let cord hang over edge of
table or counter, or touch hot surfaces.
10. Do not place on or near a hot gas or
electric burner, or in a heated oven.
11. Do not use appliance for other than
intended use.
12. Scalding may occur if the lid is
removed during the brewing cycle.
13. The carafe is designed for use with
this appliance. It must never be used
on a range top.
14. Do not set a hot carafe on a wet or
cold surface.
15. Do not use a cracked carafe or a
carafe having a loose or weakened
handle.
16. Do not clean carafe with cleansers,
steel wool pads, or other abrasive
material.
Please note the Warning on the bottom of the appliance:
«To reduce the risk of fire or electrical
shock, do not remove this cover.
No user serviceable parts inside.
Repair should be done by authorized
service personnel only.»
SAVE THESE INSTRUCTIONS
SHORT CORD INSTRUCTIONS
A short power cord is provided to reduce
risks resulting from becoming entangled
in or tripping over a longer cord.
Longer detachable power supply cords
or extension cords are available and may
be used if care is exercised in their use.
If an extension cord is used follow these
guidelines:
A. The marked electrical rating should be
at least as great as the electrical rating
of the appliance.
B. If the appliance is of the grounded
type, the extension cord should be a
grounding-type 3-wire cord.
C. The longer cord should be arranged
so that it will not drape over the countertop or table top where it can be
pulled on by children or tripped over.
INTENDED FOR HOUSEHOLD USE ONLY
2
4a 44b
5
6
3
7
8
i
2
f
r
e
t
a
w
a
No.4
9
1
b
10a
4…max. min…3
10
c
e
10b
f
flavor selector
d
10
9
8
7
6
5
4
3
3
Our products are engineered to meet the highest
12344a4b567891010a
10b
standards of quality, functionality and design.
We hope you thoroughly enjoy the new Braun
coffeemaker.
Maximum cups
KF 140, KF 145 – 10 cups ( 0.125 l / 4.4 fl. oz per cup)
KF 152, KF 157 – 12 cups ( 0.125 l / 4.4 fl. oz per cup)
Caution
Read all instructions carefully before using this
product.
Keep this appliance out of children‘s reach!
Before plugging into an outlet, check whether the
line voltage (120 volt ~) corresponds to the voltage
printed on the bottom of the appliance.
This appliance has a polarized plug (one blade is
wider than the other). As a safety feature, this plug
will fit in a polarized outlet only one way. If the plug
does not fit fully in the outlet, reverse the plug.
If it still does not fit, contact a qualified electrician.
Do not attempt to defeat this safety feature.
The hotplate heats up when the appliance is
9
switched on. Avoid touching it and never let the cord
come into contact with it.
Braun electric appliances meet applicable safety
standards. Repairs on electric appliances must only
be done by authorized service personnel. Faulty,
unqualified repair work may cause damage or serious injury to the user.
The cord of this appliance can only be changed by
an official service dealer since it requires a special
tool.
Important
This appliance was constructed to process normal
household quantities. Always use cold water to make
coffee. Warm water or other liquids could cause
damage to the coffeemaker.
Before using the first time, or when the coffeemaker
has not been used for some time, fill the tank to the
maximum number of cups with cold water and without
coffee grounds and without a filter.
Turn on and allow the water to flow through, then
discard and fill with clean water.
After a brewing cycle is finished, switch off the
appliance and allow the coffeemaker to cool down
for 5 minutes approximately. Otherwise steam can
develop when pouring cold water into the water tank
which might cause scalding.
Your Braun FlavorSelect coffeemaker is designed
to use any filter size 4. However
, only Braun reusable
filters designed for the FlavorSelect series will fit
properly. Caution – other brand reusable filters may
not be properly sized to your Braun FlavorSelect coffeemaker.
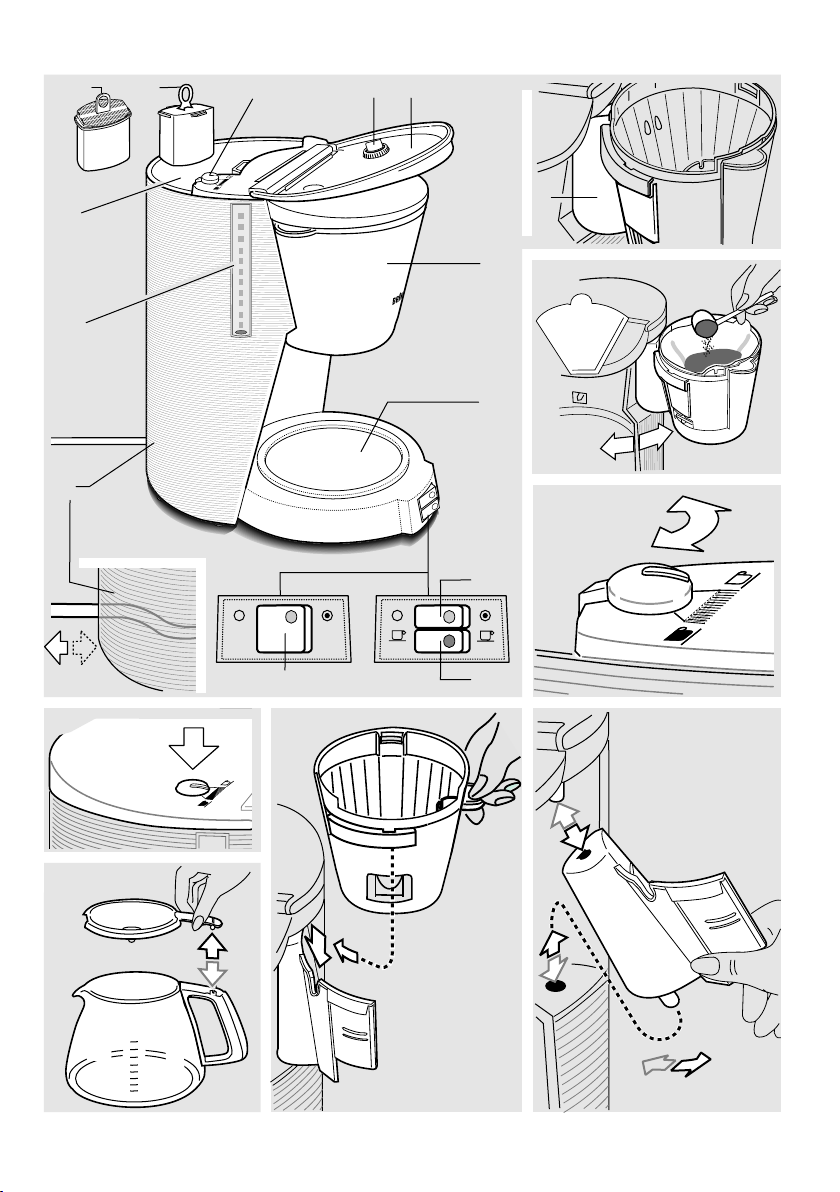
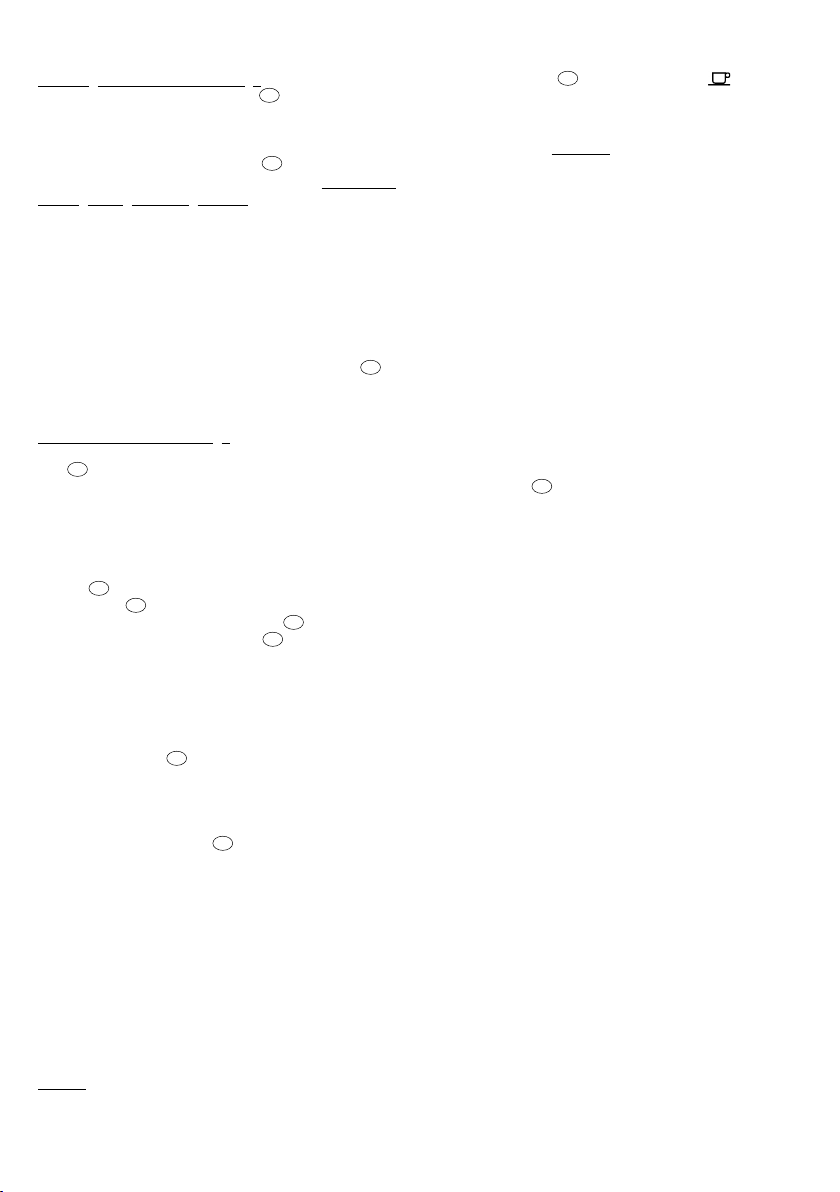
Description
Cord storage
Water level indicator
Tank
Space compensator
Water filter cartridge
(only with KF 145 and KF 157 models)
Dial for water filter exchange
Flavor selector
(mild taste = / robust taste = )
Tank cover
Filter support bracket
Filter basket
Hotplate
On/off switch – KF 140 and KF 152
(with red pilot light)
On/off switch – KF 145 and KF 157
(with red pilot light)
Cups selector – KF 145 and KF 157
(with yellow pilot light)
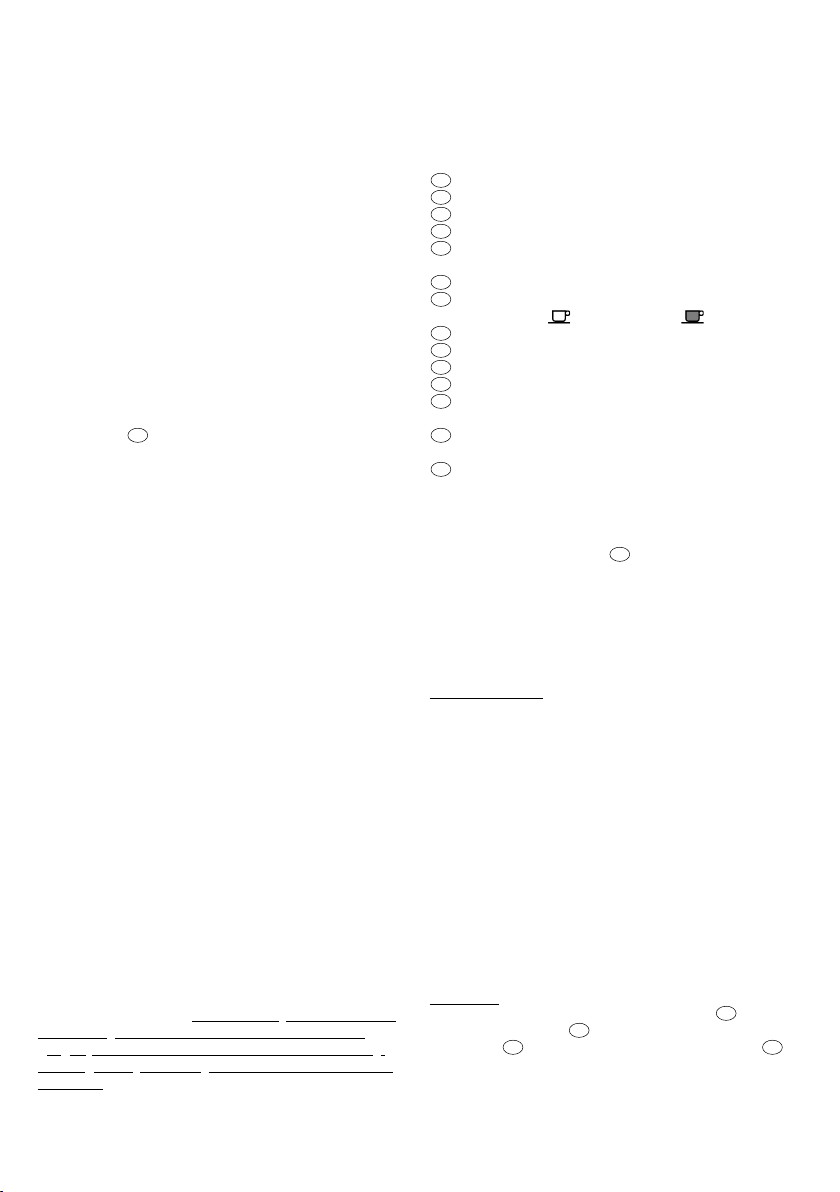
Filling with coffee grounds
Swing out the filter basket (a) and insert a
8
No. 4 filter.
Put coffee grounds (not ground too finely) into the
filter. Measure coffee grounds according to the
strength desired. Close the filter basket again (a),
letting it snap in place.
—————————————————————————
Permanent fi
lters
Gold or gold-screen filters which may be used
instead of paper filters are available as accessories.
Please, note the following:
Your coffee grind should be medium; a very fine
grind could cause the filter to overflow.
Put the ground coffee into the center of the filter
and prepare your coffee as described.
For cleaning rinse the filter under running water.
After using it for some time, clean with a soft brush
or a soft sponge – do not use abrasive cleansers or
pads. The gold filter and the gold-screen filter can be
washed in the dishwasher.
—————————————————————————
Filling with water
Important: When filling with water and during coffee
preparation either the space compensator or the
water filter cartridge have to be installed in the
water tank . Otherwise the water level indicator
3 2
4a
4
will not function correctly and the carafe may overflow.
4
Pour cold water into the tank to the number of
9
cups of coffee desired. To do this, lift the tank cover
6
and pour the cold water into the tank.
The amount of water is shown on the water level indi-
2
cator (KF 140, KF 145 – maximum 10 cups;
3
KF 152, KF 157 – maximum 12 cups).
Pre-selecting the taste – flavor selector
By adjusting the flavor selector , you can adjust the
5
taste of your coffee to suit your personal preference
– milder with less bitter aftertaste or stronger, but
always with the same full flavor. Set the flavor selector under the tank cover before turning on the coffeemaker.
If you prefer milder coffee with less bitter aftertaste,
turn the flavor selector in the direction of the
5
symbol (b). Should you prefer a more robust taste,
turn the flavor selector towards the symbol.
Regardless of the position you select, the coffee will
always have the same full flavor.
Controls
Flavor selector
5
Mild taste =
Robust taste =
On
/off switch – KF 140, KF 152
10
On = (the red pilot light is on)
Off =
On
/off switch – KF 145, KF 157
10a
On = (the red pilot light is on)
Off =
The red pilot light lights up when the coffeemaker is
switched on; it goes out when the appliance is
switched off.
Cups selector
10b
– (KF 145, KF 157)
min-3 (cups):
Even small quantities (to 3 cups) will maintain the
right temperature and flavor. The yellow pilot light
lights up.
4-max (cups):
Larger quantities (4 and more cups) will maintain the
right temperature and flavor.
should be immediately returned to the hotplate after
pouring to prevent the filter basket from overflowing.
To make coffee, the carafe with the lid snapped on
(d) must be set on the hotplate and the filter bas-
8
ket must be snapped in place (a). Due to a built-in
9
overflow protection feature, the liquid in the filter will
flow directly into the carafe if you forget to snap the
filter basket in place or put the lid on. The carafe
must be on the hotplate for the overflow protection
to work.
Remove the filter basket to empty grounds (see
8
«Cleaning»).
Keeping the coffee hot
The carafe rests on the hotplate which begins to
heat up when the coffeemaker is switched on and
will keep the coffee hot until the coffeemaker is
switched off (red pilot light goes out).
KF 145, KF 157:
4 cups of coffee hot, set the cups selector to
position 4-max, or less
If you want to keep more than
10b
than 4 cups to position
min-3. In this way even small quantities will be kept
at the right temperature and the flavor will be protected.
For KF 140 auto-of
f only:
Auto-off feature
The appliance is protected against overheating by
several special safety components and an automatic
shut off feature. This means that the coffeemaker
will automatically be switched off after 2 hours and
the red pilot light will go out. If you want to start your
coffeemaker again, first turn the switch to off = «»
and then turn the appliance on. The red pilot light
will light up again.
Space compensator
The space compensator in the tank takes
up the space which is intended for the water filter
cartridge . Unless the water filter cartridge is
4a
4 3
installed in the tank, the space compensator must
always be inside the tank when filling with water and
brewing to avoid overfilling. Kee
p the space compensator as it has to be installed in the tank if you
have to decalcify your coffeemaker.
Making coffee
Place the carafe with the lid onto the hotplate and
snap the filter basket in place. Switch the coffee-
8
maker on (see on/off switch). Brewing time is approx.
50 seconds per cup (including dripping). The pause
and serve feature allows you to pour a cup in midbrewing cycle and prevents coffee from dripping on
the hotplate when removing the carafe from the
hotplate. The brewing, however, continues when the
pause and serve feature is activated. The carafe
9
Water filter cartridge
(only with KF 145 and KF 157 models)
This water filter cartridge is only to be used with
4a
municipally treated tap or well water that is regularly
tested to be microbiologically safe (max. 85°F).
It gives you purer tasting coffee by removing chlorine,
bad tastes and odors as well as scale. Provided the
cartridge is regularly replaced, it provides not only
better tasting coffee, but also can increase the life of
your coffeemaker by preventing calcification.
5
Installing the water filter cartridge
3
Unpack the water filter cartridge . Then put the fil-
4a
ter cartridge for 10 minutes in a receptacle filled with
water.
Remove the space compensator from the tank
4
and replace it by the water filter cartridge. Make sur
to keep the space compensator as it could be needed
if you do not use the water filter any longer at a future
point in time or for decalcification.
After having installed a new water filter cartridge
always run a cycle of the maximum number of cups
of clean cold water through the unit before brewing
coffee.
In order to ensure the proper functioning of the
filter cartridge, exchange it after 2 months of regularly using the coffeemaker. In order to remind you
to replace the filter in time, you may set the dial
4b
incorporated in the tank cover to the month when
the cartridge has to be exchanged.
The flavor selector must be set to the symbol
5
for decalcifying.
You can either use a commercially available decalcifying agent which does not
affect aluminum or white
distilled vinegar (available at foodstores).
e
1. Follow the instructions of the manufacturer of the
decalcifying agent.
2. Repeat this procedure as many times as
necessary until the flow rate returns to normal
(approx. 50 seconds per cup including dripping).
Use a newly prepared decalcifying solution for
each cycle.
3. After decalcifying run at least two cycles of the
maximum number of cups of clean cold water
through the unit before brewing coffee.
Dial for water fi
After having installed a new filter cartridge, set the
4b
dial for 2 months later by turning it from the
lter exchange
reverse side of the tank cover.
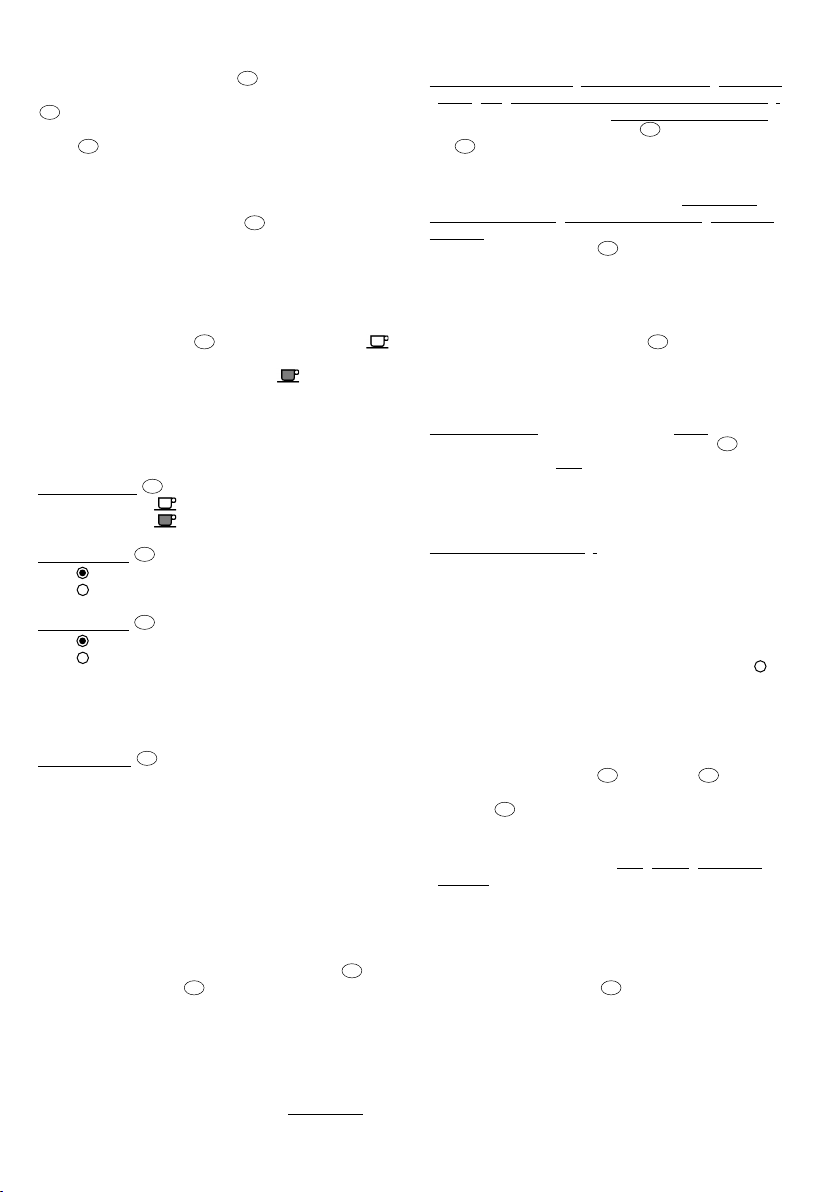
Cleaning
Always turn the coffeemaker off and pull the plug
out of the outlet before cleaning. Swing out the filter
8
basket and pull it off upwards from the filter support bracket (e). To replace, set the rectangular
opening in the rim of the filter basket on top of the
nose of the filter support bracket until the filter
7
8
7
basket snaps in place (e).
To wash, take the lid off the carafe (d). The carafe, lid
and filter basket can be cleaned in the dishwasher.
All other parts should be cleaned with a damp cloth
only. After cleaning, put the lid back on the carafe
(d).
Clean the hotplate with liquid cleansers only. Do
9
not use abrasive cleansers. The coffeemaker must
never be cleaned under running water and must
never be immersed in water.
The filter support bracket can be taken off for
7
cleaning. Swing it out, push it up and pull it off diagonally downwards (f). To replace, insert the top first.
Decalcifying
If you have hard water and you use your coffeemaker
without a water filter, it should be decalcified regularly. When using the water filter cartridge and
exchanging it regularly, you normally will not need to
decalcify. However, if your coffeemaker takes much
longer than normal to brew, the appliance should be
decalcified.
If you are using white distilled vinegar, please proceed as follows:
1. Fill the tank to the 6 cup level with the white
distilled vinegar. Do not mix the vinegar with
water or any other liquid.
2. Set the carafe with the lid in place on the hot-
plate, snap the filter basket (without a filter) in place
and turn on the appliance.
3. Allow half of the vinegar to flow through.
4. Switch off the appliance and leave for 10 minutes.
5. Switch on the appliance again and allow the rest
of the vinegar to flow through.
6. Repeat this procedure as many times as neces-
sary until the flow rate of the coffeemaker returns
to normal (approx. 50 secs. per cup). Use fresh
vinegar for each cycle.
7. After decalcifying run at least two cycles of the
maximum number of cups of clean cold water
through the unit before brewing coffee.
Specifications are subject to change without notice.
Notice:
Replace the water filter with the space
compensator for any decalcifying procedure.
6

Français
PRÉCAUTIONS IMPORTANTES
Lors de l’utilisation d’appareils électriques, toujours prendre les précautions nécessaires :
1. Lire toutes les directives.
2. Eviter de toucher les surfaces chaudes.
Utiliser les manivelles ou les interrupteurs.
3. Pour se protéger contre le risque
l’électrocution, ne pas placer la corde
ou la cafetière dans l’eau ou autres
liquides.
4. Débrancher l’appareil lorsqu’il n’est
pas utilisé, avant d’y placer ou y retirer
des pièces et avant de le nettoyer.
5. Débrancher la cafetière avant tout
nettoyage ou quand la cafetière n’est
pas en marche.
6. Ne pas faire fonctionner un appareil
dont le fil ou la fiche est endommagé
ou après que l’appareil ait mal fonctionné, qu’il ait été échappé ou
endommagé d’une façon quelconque.
Retourner l’appareil au centre de service autorisé le plus près pour fin de
vérification ou réparation.
7. L’utilisation d’accessoires non recom-
mandés ou non vendus par les fabriquant peut causer des blessures.
8. Ne pas l’utiliser à l’extérieur.
9. Ne pas laisser le fil pendre de la table
ou d’un comptoir et éviter qu’il touche
à une surface chaude.
10. Ne pas placer sur ou près d’un poêle
chaud ou dans un four chaud.
11. Ne pas utiliser la cafetière autre que
pour son utilisation intentionelle.
12. L’échaudage peut se produire si le
couvercle est enlevé durant l’infusion.
13. La carafe est dessein pour la cafetière
seulement.
14. Ne pas placer la carafe sur une surface chaude ou froide.
15. Ne pas utiliser une carafe brisée ou
avec un manche affaiblissant.
16. Ne pas nettoyer la carafe avec des
recurants abrasifs.
Lire l’avertissement sous la base de la
cafetière :
« Pour se protéger contre le risque d’électrocution, ne pas enlever ce couvercle.
Les réparations doivent être éffectuer
par le personnel d’un centre de service
authorisé».
CONSERVER CES DIRECTIVES
RENSEIGNEMENTS SUR LE CORDON D’ALIMENTATION
L’appareil est muni d’un cordon d’alimen-
tation court afin d’éviter que quelqu’un
s’empêtre dans un cordon trop long ou
trébuche sur celui-ci. Il existe des cordons d’alimentation amovibles plus longs
et des rallonges que peuvent être utilisés
si l’on fait preuve de prudence.
Lors de l’utilisation d’une rallonge, suivre
ces directives :
A. La valeur électrique nominale indiquée
sur le cordon doit être au moins aussi
élevée que celle de l’appareil.
B. Si l’appareil est mis à la terre, la ral-
longe doit être un cordon à trois fils de
type mise à la terre.
C. Le cordon long doit être placé de
façon à ce qu’il ne pende pas du
comptoir ou de la table afin d’éviter
que des enfants tirent dessus ou que
quelqu’un trébuche.
POUR USAGE DOMESTIQUE SEULEMENT
7

Nos produits sont conçus et fabriqués selon les nor-
12344a4b567891010a
10b
mes les plus rigoureuses de qualité, de conception
et de fonctionnalité. Nous espérons que vous profiterez au maximum des nombreux avantages de
votre nouvelle cafetière Braun.
Avertissement
Lire attentivement toutes les directives avant
d’utiliser cet appareil.
Tenir cet appareil hors de la portée des enfants !
Avant de le brancher, vérifier si la tension inscrite
sous l’appareil correspond à celle de la prise de
courant (120 V ~).
Cet appareil est muni d’une fiche d’alimentation
polarisée (une des deux broches est plus large que
l’autre). Per mesure de sécurité, il n’y a qu’une seule
façon d’insérer cette fiche dans une prise de courant
polarisée. Si le branchement n’est pas complet,
inverser la fiche. Si le branchement est toujours
incomplet, communiquer avec un électricien qualifié.
Ne pas forcer ce dispositif de sécurité.
La plaque chauffante fonctionne lorsque l’appareil
9
est mis sous tension. Éviter de toucher la plaque
chauffante et ne jamais laisser le cordon entrer en
contact avec celle-ci.
Les appareils électriques Braun sont conformes aux
normes de sécurité applicables. Toute réparation de
ces appareils électriques doit être effectuée par des
techniciens autorisés seulement. Les mauvaises
réparations et les réparations effectuées par des
personnes non qualifiées peuvent causer des
dommages ou des blessures graves.
Le remplacement du cordon de l’appareil, qui nécessite un outil spécial, peut être effectué seulement à
un centre de service après-vente agréé Braun.
Important
Cet appareil est conçu pour des quantités domestiques normales. Toujours utiliser de l’eau froide pour
préparer le café. L’eau chaude ou d’autres liquides
peuvent endommager la cafetière.
Avant d’utiliser la cafetière pour la première fois,
ou lorsque celle-ci n’a pas servi pendant un certain
temps, remplir le réservoir d’eau froide jusqu’au
nombre maximal de tasses, sans mouture de café ni
filtre. Mettre l’appareil sous tension et laisser l’eau
s’écouler. Jeter ensuite l’eau écoulée et remplir le
réservoir d’eau froide fraîche.
Une fois que le cycle d’infusion est terminé, mettre
l’appareil hors tension et laisser refroidir pendant
environ cinq minutes. Sinon, de la vapeur peut se former lorsque l’on verse l’eau froide dans le réservoir
et causer des brûlures.
La cafetière FlavorSelect de Braun est conçue pour
une utilisation avec tout filtre de format 4. Ce
pendant, seuls les filtres réutilisables de Braun conçus
pour la gamme FlavorSelect conviennent parfaitement.
Avertissement – Le format des filtres réutilisables
d’une autre marque peut ne pas convenir à la cafetière FlavorSelect de Braun.
Nombre maximal de tasses
KF 140, KF 145 – 10 tasses ( 0,125 L / 4,4 oz liq.
par tasse)
KF 152, KF 157 – 12 tasses ( 0,125 L / 4,4 oz liq.
par tasse)
Description
Range-cordon
Indicateur de niveau d’eau
Réservoir
Compensateur d’espace
Cartouche de filtration d’eau
(pour les modèles KF 145 et KF 157 uniquement)
Cadran pour le remplacement
de la cartouche de filtration d’eau
Sélecteur de saveur
(doux = / fort = )
Couvercle du réservoir à eau
Porte-filtre
Panier-filtre
Plaque chauffante
Interrupteur marche-arrêt – KF 140 et KF 152
(avec témoin rouge)
Interrupteur marche-arrêt – KF 145 et KF 157
(avec témoin rouge)
Sélecteur du nombre de tasses –
KF 145 et KF 157 (avec témoin jaune)
Remplissage de café moulu
Faire pivoter le panier-filtre (a) et insérer un filtre
8
nº 4. Mettre la mouture de café (pas trop fine) dans
le filtre. Doser la quantité de mouture de café en
fonction de l’arôme désiré. Refermer le panier-filtre
(a) en s’assurant qu’il est bien enclenché.
—————————————————————————
Filtr
es permanents
Les filtres plaqué or ou à tamis doré peuvent
remplacer les filtres papier. Ils comptent parmi les
accessoires.
À noter : La mouture de café doit être moyenne.
Une mouture très fine peut causer le débordement
du filtre. Mettre le café moulu au centre du filtre et
préparer le café tel qu’il est indiqué.
Pour le nettoyage, rincer le filtre à l’eau courante.
Après un certain temps d’utilisation, nettoyer le filtre
à l’aide d’une brosse ou d’une éponge douce – ne
pas employer de nettoyants ni de tampons abrasifs.
Les filtres plaqué or et à tamis doré vont au lavevaisselle.
—————————————————————————
Remplissage d’eau
Important : Lors du remplissage d’eau et de la préparation de café, le compensateur d’espace ou la
cartouche de filtration d’eau doit être installé(e)
dans le réservoir à eau . Sinon, l’indicateur de
niveau d’eau ne fonctionne pas correctement et la
2
4a
3
4
verseuse risque de déborder.
8

Remplir le réservoir d’eau froide jusqu’au
10b
4a
nombre de tasses de café désiré. Pour ce faire,
soulever le couvercle du réservoir et y verser
3
6
de l’eau froide.
La quantité d’eau est indiquée sur l’indicateur
de niveau d’eau (KF 140, KF 145 – maximum
2
10 tasses ; KF 152, KF 157 – maximum 12 tasses).
Choix de l’arôme à l’aide du sélecteur de saveur
Il est possible de régler l’arôme désiré, plus doux et
moins amer ou plus fort, mais toujours en obtenant
une qualité optimale, à l’aide du sélecteur de saveur
5
. Régler le sélecteur de saveur sous le couvercle
du réservoir avant de mettre la cafetière sous tension.
Pour un café plus doux et moins amer, tourner le
sélecteur de saveur vers le symbole (b). Pour
5
un café plus fort, tourner le sélecteur de saveur vers
le symbole . Quelle que soit la sélection, le café
aura un arôme délicieux.
Réglage
Sélecteur de saveur
5
Doux =
Fort =
Interrupteur mar
che-arrêt – KF 140, KF 152
10
Marche = (le témoin rouge s’allume)
Arrêt=
Interrupteur mar
che-arrêt – KF 145, KF 157
10a
Marche = (le témoin rouge s’allume)
Arrêt=
Le témoin rouge s’allume lorsque la cafetière est
mise sous tension ; il s’éteint lorsque l’appareil est
mis hors tension.
Sélecteur du nombr
e de tasses – (KF 145, KF 157)
10b
min-3 (tasses) :
Même de petites quantités (jusqu’à 3 tasses) maintiennent la température adéquate et conservent
toute la saveur. Le témoin jaune s’allume.
4-max (tasses) :
De plus grandes quantités (4 tasses et plus) maintiennent la témperature adéquate et conservent
toute la saveur.
Préparation du café
Placer la verseuse munie de son couvercle fermé sur
la plaque chauffante et remettre le panier-filtre
9 8
en place, en s’assurant qu’il est bien enclenché.
plaque chauffante immédiatement après avoir versé
le café afin d’éviter que le panier-filtre ne déborde.
Pour préparer le café, la verseuse munie de son couvercle fermé (d) doit être placée sur la plaque chauf-
9 8
fante et le panier-filtre doit être en place et
enclenché (a). Grâce à un mécanisme antidébordement intégré, le liquide dans le filtre s’écoule directement dans la verseuse si l’on oublie d’enclencher le
panier-filtre ou de mettre le couvercle. La verseuse
doit être sur la plaque chauffante pour que le mécanisme antidébordement fonctionne.
Retirer le panier-filtre pour vider la mouture
8
(voir la section « Nettoyage »).
Conservation du café chaud
La verseuse est posée sur la plaque chauffante
9
qui commence à chauffer lorsque la cafetière est
mise sous tension et conserve le café chaud jusqu’à
ce que cette dernière soit mise hors tension
(le témoin rouge s’éteint).
KF 145, KF 157
: Si l’on désire conserver plus de
4 tasses de café chaud, régler le sélecteur du nombre de tasses à la position 4-max ; pour moins
de 4 tasses, le régler à la position min-3. De cette
façon, même les petites quantités de café seront
conservées à la bonne température et l’arôme sera
protégé.
Uni
quement pour KF 140 auto off:
Dispositif d’arrêt automatique
L’appareil est protégé contre la surchauffe par de
plusieurs systèmes de sécurité et par le dispositif
d’arrêt automatique. Si l’appareil est laissé sous tension, celui-ci se met automatiquement hors tension
après 2 heures et le voyant lumineux s’éteint. Pour
faire opérer la cafetière de nouveau, d’abord mettre
l’interrupteur marche-arrêt en position arrêt = «»,
puis mettre l’appareil en marche. Le voyant lumineux
s’allumera alors.
Compensateur d’espace
Le compensateur d’espace du réservoir
occupe l’espace réservé à la cartouche de filtration
4a
d’eau . À moins que la cartouche de filtration d’eau
4 3
ne soit en place dans le réservoir, le compensateur
d’espace doit toujours être à l’intérieur du réservoir
lors du remplissage d’eau et du cycle d’infusion
afin d’éviter le remplissage excessif. Laisser le
compensateur d’espace en place dans le réservoir
si la décalcification de la cafetière est nécessaire.
Mettre la cafetière sous tension (voir l’interrupteur
marche-arrêt). La durée du cycle d’infusion est
d’environ 50 secondes par tasse (y compris l’égouttement). La fonction « pause-verser » permet de verser
une tasse pendant le cycle d’infusion et empêche
les gouttes de café de tomber sur la plaque chauffante lorsque l’on retire la verseuse. Le cycle d’infusion se poursuit même si la fonction « pause-verser » est activée. Il faut r
emettre la verseuse sur la
Cartouche de filtration d’eau
(pour les modèles KF 145 et KF 157 uniquement)
Cette cartouche de filtration d’eau ne doit être
utilisé que pour de l’eau du robinet ou de puits traitée
par la municipalité, testée régulièrement afin de
s’assurer qu’elle est sécuritaire sur le plan microbiologique (max 85 °F). Elle permet d’obtenir un café au
goût plus pur en éliminant le chlore, les mauvais goûts,
les mauvaises odeurs et le tartre. Le remplacement
9

régulier de la cartouche assure non seulement un café
plus savoureux mais peut également accroître la durée
de la cafetière en prévenant la calcification.
Installation de la cartouche de filtration d’eau
Déballer la cartouche de filtration d’eau .
4a
Placer ensuite la cartouche de filtration dans un récipient rempli d’eau et l’y laisser pendant 10 minutes.
Retirer le compensateur d’espace du réservoir et
4
le remplacer par la cartouche de filtration d’eau.
S’assur
er de conserver le compensateur d’espace,
car il sera nécessaire plus tard si la cartouche de filtration n’est plus utilisée ou lors de la décalcification.
Après l’installation d’une nouvelle cartouche de
filtration d’eau, toujours laisser s’écouler la quantité
d’eau froide requise pour le nombre maximal de
tasses à travers la cafetière avant l’infusion de café.
Afin d’assurer le fonctionnement adéquat de la cartouche de filtration, il est nécessaire de la remplacer
après 2 moins d’utilisation régulière de la cafetière.
Afin de penser à remplacer la cartouche de filtration
à temps, il suffit de régler le cadran intégré au
4b
couvercle du réservoir au mois auquel la cartouche
doit être remplacée.
Cadran
pour le remplacement de la cartouche
de filtration d’eau
Après avoir installé une nouvelle cartouche de filtration, régler le cadran à 2 mois plus tard en
4b
le tournant par l’envers du couvercle du réservoir.
Nettoyage
Toujours mettre la cafetière hors tension et la
débrancher avant de la nettoyer.
Faire pivoter le panier-filtre et le retirer du porte-
7
filtre en soulevant (e). Pour le replacer, placer
l’ouverture rectangulaire située sur le bord du
panier-filtre au-dessus du bec du porte-filtre
8 7
8
et veiller à ce que le panier-filtre s’enclenche (e).
Pour nettoyer, retirer le couvercle de la verseuse (d).
La verseuse, le couvercle et le panier-filtre peuvent
être lavés au lave-vaisselle. Toutes les autres pièces
doivent être nettoyées à l’aide d’un chiffon humide
seulement. Après le nettoyage, remettre le couvercle sur la verseuse (d).
Nettoyer la plaque chauffante à l’aide de net-
9
toyants liquides seulement. Ne pas utiliser de nettoyants abrasifs. La cafetière ne doit jamais être net-
toyée sous l’eau courante ni être immergée dans l’eau.
Le porte-filtre peut être enlevé pour le nettoyage.
7
Le faire pivoter, le pousser vers le haut et le déloger
en tirant vers le bas en diagonale (f). Pour le replacer, insérer le haut en premier.
Décalcification
Si l’eau est dure et que la cafetière est utilisée
sans cartouche de filtration d’eau, il faut décalcifier
la cafetière régulièrement. Lorsqu’on utilise une
cartouche de filtration d’eau et qu’on la remplace
10
régulièrement, il n’est normalement pas nécessaire
de décalcifier la cafetière. Cependant, si la cafetière
prend beaucoup plus de temps que d’habitude pour
l’infusion, l’appareil doit être décalcifié.
Note
: Remplacer la cartouche de filtration d’eau par
le compensateur d’espace lors de la décalcification.
Le sélecteur de saveur doit être réglé au symbole
5
pour la décalcification.
Pour la décalcification, on peut se servir d’un agent
décalcifiant vendu sur le marché dont les propriétés
n’endommagent pas
l’aluminium, ou de vinaigre
blanc distillé (vendu dans les magasins d’alimentation).
1. Suivre le mode d’emploi recommandé par le
fabricant de l’agent décalcifiant.
2. Répéter l’opération autant de fois qu’il le faut,
jusqu’à ce que le cycle d’infusion redevienne normal (environ 50 secondes par tasse y compris
l’égouttement). Utiliser une nouvelle solution
décalcifiante pour chaque cycle.
3. Après la décalcification, laisser s’écouler, au
moins deux fois, la quantité d’eau froide requise
pour le nombre de tasses maximal à travers la
cafetière avant l’infusion de café.
Si on se sert de vinaigre blanc distillé, procéder
comme suit :
1. Remplir le réservoir de vinaigre blanc distillé
3
jusqu’au repère de niveau 6 tasses. Ne pas
mélanger le vinaigre avec de l’eau ni avec aucun
autre liquide.
2. Placer la verseuse munie de son couvercle fermé
sur la plaque chauffante, enclencher le panierfiltre (sans filtre) et mettre l’appareil sous tension.
3. Faire s’écouler la moitié du vinaigre.
4. Mettre l’appareil hors tension et laisser reposer
10 minutes.
5. Remettre l’appareil sous tension et laisser
s’écouler le reste du vinaigre.
6. Répéter cette opération autant de fois qu’il est
nécessaire jusqu’à ce que le cycle d’infusion
normal de la cafetière soit restauré (environ
50 secondes par tasse). Changer le vinaigre pour
chaque cycle.
7. Après la décalcification, laisser s’écouler, au
moins deux fois, la quantité d’eau froide requise
pour le nombre de tasses maximal à travers la
cafetière avant l’infusion de café.
Caracteristiques sous réserve de modifications sans
préavis.

Español
PRECAUCIONES IMPORTANTES
Siempre que use aparatos electrodomésticos deberán tomarse en cuenta las precauciones de seguridad básicas incluyendo las siguientes:
1. Lea todas las instrucciones.
2. No toque superficies calientes, tómelo
de las asas o de algún botón ó perilla.
3. Para protegerse de alguna descarga
eléctrica, no ponga nunca el cable,
la clavija o el aparato dentro del agua
o cualquier otro líquido.
4. Manténgase fuera del alcance
de los niños.
5. Desconecte el aparato cuando no
lo esté usando y antes de limpiarlo.
Deje que el aparato se enfrie antes de
poner o quitar partes.
6. Jamás ponga a funcionar ningún
aparato si el cable o la clavija están
dañados o si el aparato no funciona
correctamente, o si ha sido dañado de
alguna manera. Lleve el aparato al
servicio Braun autorizado para que lo
revisen, lo reparen o lo ajusten.
7. El uso de algún accesorio no indicado
para utilizarse con este aparato, podría
causarle serios daños.
8. No se use en exteriores.
9. No permita que el cable cuelgue
sobre la orilla de la mesa o escritorio,
o que quede en contacto con alguna
superficie caliente.
10. No lo coloque cerca de la estufa o
sobre el horno caliente.
11. No utilice el aparato si no es para el
uso específico para el cual está diseñado.
12. Si se retira la tapa durante el ciclo de
elaboración del café, hay riesgo de
sufrir alguna quemadura.
13. La jarra está diseñada para uso exclusivo de está cafetera. Jamás deberá
usarse sobre la estufa o parrilla eléctrica.
14. No coloque la cafetera cerca o sobre
papel, tela o cualquier otro material
flamable.
15. No use la jarra si está estrellada,
o si el asa está débil.
16. No lave la jarra con limpiadores concentrados o materiales abrasivos.
Favor de ver la advertencia que se
encuentra en la base del aparato,
la cual dice:
«Para reducir el riesgo de fuego o
descargas eléctricas, no destape está
cubierta. No contiene partes que
puedan ser de utilidad para el usuario.
Cualquier reparación deberá Ilevarse a
cabo por personal autorizado de los
centros de servicio Braun».
INSTRUCCIONES DE CABLE CORTO
Un cable corto de poder viene incluido
para reducir los riesgos de tropezarse
o enredarse, como con un cable largo.
Cables suplementarios de poder más
grandes ó extensión de cables están disponibles y pueden utilizarse con cuidado
en su uso.
Si una extensión de cable es utilizado siga
los siguientes pasos:
A. El voltaje eléctrico marcado deberá ser
por lo menos tan alto como el nivel
eléctrico del aparato.
B. Si el aparato es de tierra, la extensión
del cable deberá ser de 3 alambres de
tierra.
C. El largo del cable deberá utilizarse de
tal modo que no cuelgue de la mesa en
donde pueda ser jalado por los niños
o puedan tropezarse.
ENFOCADO UNICAMENTE PARA USO DOMESTICO
11

Nuestros productos han sido diseñados para cumplir
12344a4b567891010a
10b
con las más altas normas de calidad, funcionalidad y
diseño. Esperamos que disfrute totalmente de su
nueva cafetera Braun.
Precaución
Lea todas las instrucciones cuidadosamente
antes de utilizar este producto.
¡ Mantenga este aparato fuera del alcance de los
niños !
Antes de enchufarlo en un tomacorriente, verifique
que el voltaje de línea (120 voltios) corresponda al
voltaje impreso en la parte inferior del aparato.
sean del tamaño correcto para su cafetera Braun
FlavorSelect.
Características eléctricas
Potencia nominal: 1200 W
Frecuencia de operación: 60 Hz
Tensión de alimentación: 120 V ~
Número máximo de tazas
KF 140, KF 145 – 10 tazas ( 0.125 l / 4.4 onzas fluidas
por taza)
KF 152, KF 157 – 12 tazas ( 0.125 l / 4.4 onzas fluidas
por taza)
Este aparato tiene un enchufe polarizado (una clavija
es más ancha que la otra). Como una característica
de seguridad, este enchufe se adapta a un tomacorriente polarizado de una sola manera. Si el enchufe
no cabe totalmente en el tomacorriente, déle vuelta
al enchufe. Si todavía no cabe, llame a un electricista capacitado. No intente neutralizar esta característica de seguridad.
La placa calefactora se calienta cada vez que se
9
prende el aparato. Evite tocarla, y nunca deje que el
cable entre en contacto con la misma.
Los aparatos eléctricos Braun cumplen con las normas de seguridad correspondientes. Las reparaciones de los aparatos eléctricos deben ser realizadas
por personal de servicio autorizado. Las reparaciones efectuadas en forma defectuosa, por personas
no capacitadas, pueden causar daños o lesiones
serias al usuario.
El cable de este aparato sólo puede ser cambiado
por un agente de servicio autorizado, ya que requiere
una herramienta especial.
Importante
Este aparato fue diseñado para procesar cantidades
caseras normales. Utilice siempre agua fría para preparar café. El agua tibia u otro líquido podrían causar
daños a la cafetera.
Antes de utilizarla por primera vez, o cuando no se
ha utilizado la cafetera por algún tiempo, llene el
recipiente hasta el número máximo de tazas con
agua fría y sin granos de café y sin un filtro. Préndala
y deje que el agua fluya por la cafetera. Luego descarte el agua y llene la cafetera con agua limpia.
Después de que un ciclo de preparación de café
se termine, apague la cafetera y deje que se enfríe
5 minutos aproximadamente. De lo contrario,
cuando ponga agua fría en el depósito de agua
podría formar vapor que puede causar quemaduras.
Su cafetera Braun FlavorSelect está diseñada para
utilizar cualquier filtro tamaño 4. Sin embar
go, sólo
filtros reutilizables Braun diseñados para la serie
FlavorSelect se adaptarán debidamente. Precaución
– filtros reutilizables de otra marca puede que no
Descripción
Cavidad para el cable
Indicador del nivel de agua
Recipiente
Compensador de espacio
Cartucho del filtro de agua
(modelos KF 145 y KF 157 únicamente)
Botón selector para cambiar
el filtro de agua
Selector de sabor
(sabor suave = / sabor robusto = )
Tapa del recipiente
Ménsula de apoyo del filtro
Portafiltros
Placa calefactora
Interruptor de encendido/apagado –
KF 140 y KF 152 (con luz piloto roja)
Interruptor de encendido/apagado –
KF 145 y KF 157 (con luz piloto roja)
Selector de tazas –
KF 145 y KF 157 (con luz piloto amarilla)
Llenado de granos de café
Gire el portafiltros hacia afuera (a) e inserte
8
un filtro de papel Nº– . 4. Ponga los granos de café
(no café molido demasiado fino) dentro del filtro.
Mida los granos de café de acuerdo a lo fuerte que
desee el café. Cierre el portafiltros de nuevo (a),
dejándolo que se asiente a presión en su lugar.
—————————————————————————
Filtr
os permanentes
Están disponibles como accesorios filtros dorados o
con tamiz dorado que pueden ser utilizados en vez
de filtros de papel.
Favor tomar nota de lo siguiente:
El café debe molerse mediano; si se muele fino
puede que cause que el filtro se desborde. Coloque
el café molido dentro del centro del filtro y prepare
su café según de describe. Para límpiar, enjuague el
filtro debajo de agua corriente. Después de utilizarlo
por algún tiempo, límpielo con un cepillo suave o una
esponja suave – no utilice limpiadores o almohadillas abrasivas. El filtro dorado y el filtro con tamiz
dorado puede ser lavado en la lavadora de platos.
—————————————————————————
12

Llenado de agua
4a
Importante : Al llenar con agua y durante la preparación del café, el compensador de espacio o el cartucho del filtro de agua deben ser instalados en
el recipiente de agua . De otra forma, el indicador
del nivel de agua no funcionará debidamente y la
4a
3
2
jarra puede que se desborde.
Vierta agua fría dentro del recipiente al número de
tazas deseadas. Para hacer esto, levante la tapa del
recipiente y vierta el agua fria dentro del recipiente. La cantidad de agua se muestra en el indicador del nivel de agua , (KF 140, KF 145 – máximo
6
2
4
3
de 10 tazas; KF 152, KF 157 – máximo de 12 tazas).
Preselección del sabor – selector del sabor
Al ajustar el selector de sabor , usted puede ajus-
5
tar el sabor de su café para adaptarse a su preferencia personal – más suave con menos dejo amargo,
o más fuerte, pero siempre con la misma intensidad
total. Ajuste el selector de sabor que se encuentra
debajo de la tapa del recipiente antes de prender la
cafetera.
Si prefiere café más suave con un dejo menos
amargo, gire el selector de sabor en la dirección
5
del símbolo (b). Si prefiere un sabor más
robusto, gire el selector de sabor hacia el símbolo
. No importa la posición que escoja, el café siem-
pre tendrá la misma intensidad total.
Controles
Selector de sabor
5
Sabor suave =
Sabor robusto =
Interru
ptor de encendido/apagado
10
– KF 140, KF 152
Encendido = (se enciende la luz piloto roja)
Apagado =
Interru
ptor de encendido/apagado
10a
– KF 145, KF 157
Encendido = (se enciende la luz piloto roja)
Apagado =
La luz piloto roja se enciende cuando la cafetera se
prende; se apaga cuando se apaga el aparato.
Selector de tazas
10b
– (KF 145, KF 157)
min-3 (tazas):
Aún pequeñas cantidades (hasta 3 tazas) se mantendrán a temperatura y sabor óptimos. Se enciende
la luz piloto amarilla.
4-max (tazas):
Cantidades más grandes (4 tazas o más) se mantendrán a temperatura y sabor óptimos.
Preparación del café
Coloque la jarra (con la tapa puesta) en la placa
calefactora y coloque el portafiltros a presión
9 8
en su lugar. Encienda la cafetera (vea interruptor de
encendido/apagado). El tiempo de colado es aproximadamente 50 segundos por taza (incluyendo el
goteo). La función de pausar y servir le permite servirse una taza en medio del ciclo de colado e impide
que el café se gotee en la placa calefactora al retirar
la jarra de la placa calefactora. Sin embargo, el
colado continúa cuando se activa la función de pausar y servir. La
jarra debe ser devuelta inmediatamente a la placa calefactora después de servir para
impedir que el portafiltros se desborde. Para preparar el café, la jarra con la ta
su debido lugar (d) debe ser colocada en la placa
calefactora y el portafiltros debe colocarse a
9 8
pa asentada a presión en
presión en su debido lugar (a). Debido a una función
de protección de desborde integrada, el liquido en el
filtro fluirá directamente dentro de la jarra si a usted
se le olvida colocar a presión el portafiltros en su
debido lugar o poner la tapa. La
jarre debe estar en
la placa calefactora para que la protección de desborde funcione.
Quite el portafiltros para vaciar los granos
8
(vea « Limpieza »).
Para mantener su café caliente
La jarra descansa sobre la placa calefactora que
9
empieza a calentarse cuando se enciende la cafetera y mantendrá el café caliente hasta que se apague la cafetera (se apaga la luz piloto roja).
KF 145, KF 157:
4 tazas de café, ajuste el selector de tazas en la
Si quiere mantener caliente más de
10b
posición 4-max, o ajústelo en la posición min-3 si
desea mantener caliente menos
de 4 tazas. De esta
forma, hasta las cantidades más pequeñas se mantendrán a la debida temperatura, y el sabor será
protegido.
Sólo
para KF 140 auto-off:
Apagado automático
El aparato está protegido contra sobrecalentamiento por medio de varios componentes especiales
de seguridad y por el dispositivo de apagado automático. Si deja el aparato encendido, éste se apagará automáticamente después de 2 horas igual
que la luz piloto. Para poner la cafetera en servicio
de nuevo, ponga el interruptor en la posición
apagado = «». Después, encienda la cafetera.
La luz piloto se encendera.
Compensador de espacio
El compensador de espacio en el recipiente
4 3
ocupa el espacio destinado para el cartucho del
filtro de agua . A menos que el cartucho del filtro
de agua esté instalado en el recipiente, el compensador de espacio debe estar siempre dentro del recipiente al llenar con agua y colar para evitar Ilenar
demasiado. Guar
de el compensador de espacio,
ya que será necesario instalarlo en el recipiente en
caso de que tenga que descalcificar su cafetera.
13

Cartucho del filtro de agua
(modelos KF 145 y KF 157 únicamente)
Este filtro de agua solamente debe utilizarse con
4a
agua de grifo proveniente de la red de distribución
municipal o con agua de pozo sujeta a pruebas sistemáticas de seguridad microbiológica (max. 85°F).
Le brinda un café con sabor más puro, ya que
remueve el cloro, los sabores y olores malos, y las
incrustaciones. Si se reemplaza el cartucho con
regularidad, no sólo le brindará un café con mejor
sabor sino que puede prolongar la vida de su cafetera impidiendo la calcificación.
Cómo instalar el cartucho del fi
ltro de agua
Desembale el cartucho del filtro de agua. Luego
ponga y deje el cartucho del filtro en un envase lleno
de agua y por 10 minutos.
Quite el compensador de espacio del recipiente
4
y reemplázelo con el cartucho del filtro de agua.
Ase
gúrese de guardar el compensador de espacio,
ya que posiblemente lo necesitará si en algún
momento en el futuro deja de utilizar el filtro de
agua o para la descalcificación. Después de haber
instalado o nuevo cartucho del filtro de agua, siempre deje fluir un ciclo del número máximo de tazas
con agua fría limpia por la unidad antes de colar café.
A fin de asegurar el debido funcionamiento del cartucho del filtro, cámbielo después de 2 meses de utilizar
la cafetera con regularidad. Para recordarle cuando
debe cambiar el filtro, usted puede ajustar el botón
selector incorporado en la tapa del recipiente al
4b
mes cuando el cartucho debe ser cambiado.
Botón selector
Después de haber instalado un nuevo cartucho
del filtro, ajuste el botón selector 2 meses
para cambiar el filtro de agua
4b
hacia adelante girándolo por el lado reverso de
la tapa del recipiente.
Limpieza
Siempre apague la cafetera y desconecte el aparato
antes de limpiarlo. Gire el portafiltros hacia afuera,
levántelo y sáquelo de la ménsula de apoyo del filtro
7
(e). Para volver a colocarlo, coloque la abertura
rectangular en el borde del portafiltros encima de
la nariz de la ménsula de apoyo del filtro hasta que
8
8
7
el portafiltros se asiente a presión en su lugar (e).
Para lavarlo, quite la tapa de la jarra (d). La jarra, la
tapa y el portafiltros pueden ser limpiados en la lavadora de platos. Todas las otras piezas deben ser
limpiadas sólo con un trapo húmedo. Después de
limpiar, vuelva a colocar la tapa en la jarra (d). Limpie
la placa calefactora sólo con limpiadores líquidos.
9
No utilice limpiadores abrasivos. Nunca se debe limpiar la cafetera con agua corriente y nunca se debe
sumergir en agua. La ménsula de apoyo del filtro
7
puede quitarse para limpiar. Gírela hacia afuera, levántela y sáquela halando diagonalmente hacia abajo
(f). Para volver a colocarla, inserte la tapa primero.
Descalcificación
Si usted tiene agua dura y utiliza su cafetera sin un
filtro de agua, debería descalcificarla con regularidad. Cuando utiliza el cartucho del filtro de agua y
lo cambia con regularidad, normalmente no es necesario descalcificar. Sin embargo, si su cafetera toma
mucho más tiempo de lo normal para colar, debería
descalcificar el aparato.
A
viso: Reemplace el filtro de agua con el compensador de espacio para cualquier procedimiento de
descalcificación. El selector de sabor debe ser
5
ajustado al símbolo para descalcificar.
Usted puede utilizar un agente descalcificador
comercialmente disponible que no
afecta el
aluminio o vinagre destilado blanco (se puede
comprar en tiendas de comestibles).
1. Siga las instrucciones del fabricante del agente
descalcificador.
2. Repita el procedimiento cuantas veces sea nece-
sario hasta que la velocidad de flujo vuelva a lo
normal (aproximadamente 50 segundos por taza,
incluyendo el goteo). Prepare una nueva solución
descalcificadora para cada ciclo.
3. Después de descalcificar, deje fluir por lo menos
dos ciclos del número máximo de tazas con agua
fría limpia por la unidad antes de colar café.
Si usa vinagre destilado blanco, favor siga los
siguientes pasos:
1. Llene el recipiente hasta el nivel de 6 tazas con
3
el vinagre destilado blanco. No mezcle el vinagre
con agua o con cualquier otro líquido.
2. Coloque la jarra con la tapa puesta en la placa
calefactora, coloque a presión el portafiltros
(sin un filtro) en su lugar y prenda el aparato.
3. Permita que la mitad del vinagre fluya por el apa-
rato.
4. Apague el aparato y déjelo reposar por 10 minutos.
5. Vuelva a prender el aparato y permita que el resto
del vinagre fluya por el aparato.
6. Repita este procedimiento cuantas veces sea
necesario hasta que la velocidad del flujo de la
cafetera vuelva a lo normal (aproximadamente
50 segundos por taza). Utilice vinagre nuevo para
cada ciclo.
7. Después de descalcificar, deje fluir por lo menos
dos ciclos del número máximo de tazas con agua
fría limpia por la unidad antes de colar café.
Las especificaciones están sujetas a cambios sin
aviso previo.
14

For USA only
How to obtain service in the USA
Should your Braun product require service, please call
1-800-BRAUN 11 (272-8611) to be referred to the
Authorized Braun Service Center closest to you.
To obtain service:
A. Carry the product in to the Authorized Braun
Service Center of your choice or,
B. Ship the product to the Authorized Braun Service
Center of your choice.
Pack the product well. Ship the product prepaid
and insured (recommended). Include a copy of
your proof of purchase to verify warranty
coverage, if applicable.
To obtain original Braun replacement parts and
accessories:
Contact a Braun Authorized Service Center.
Please call 1-800-BRAUN 11 (272-8611) to be referred
to the Authorized Braun Service Center closest to you.
To speak to a Braun Consumer Service
Representative:
Please call 1-800-BRAUN 11 (272-8611).
service performed or attempted by unauthorized
service agencies, failure to provide reasonable and
necessary maintenance, including recharging, or units
that have been modified or used for commercial
purposes.
ALL IMPLIED WARRANTIES, INCLUDING ANY
IMPLIED WARRANTY OF MERCHANTABILITY OR
FITNESS FOR ANY PARTICULAR PURPOSE, ARE
LIMITED IN DURATION TO ONE YEAR FROM DATE
OF ORIGINAL PURCHASE. IN NO EVENT WILL
BRAUN BE RESPONSIBLE FOR CONSEQUENTIAL
DAMAGES RESULTING FROM THE USE OF THIS
PRODUCT.
Some states do not allow the exclusion or limitation of
incidental or consequential damages, so the above
limitation may not apply to you.
This warranty gives you specific legal rights, and you
may have other legal rights which vary from state to
state.
Limited Warranty
Braun warrants this Braun Appliance to be free of
defects in material and workmanship for a period of
one year from the date of original purchase at retail.
If the appliance exhibits such a defect, Braun will, at
its option, repair or replace it without cost for parts
and labor. The product must be carried in or shipped,
prepaid and insured (recommended), to an Authorized
Braun Service Center. Proof of date of original
purchase is required.
The cost to ship the product to an Authorized Service
Center is the responsibility of the consumer, the cost
to return the product to the consumer is the
responsibility of Braun.
This warranty does not cover finishes, normal wear,
nor does it cover damage resulting from accident,
misuse, dirt, water, tampering, unreasonable use,
15

For Canada only
How to obtain service in Canada
Should your Braun product require service, please call
1-800-387-6657 to be referred to the Authorized
Braun Service Center closest to you.
To obtain service:
A. Carry the product in to the Authorized Braun
Service Center of your choice or,
B. Ship the product to the Authorized Braun Service
Center of your choice.
Pack the product well. Ship the product prepaid
and insured (recommended).
Include a copy of your proof of purchase to verify
warranty coverage, if applicable.
To obtain original Braun replacement parts &
accessories:
Contact a Braun Authorized Service Center.
Please call 1-800-387-6657 to be referred to the
Authorized Braun Service Center closest to you.
To speak to a Braun Service Representative:
Please call 1-800-387-6657.
Limited 1-Year Warranty
In the event a Braun Appliance fails to function within
the specified warranty period because of defects in
material or workmanship, and the consumer returns
the unit to an authorized service centre, Braun Canada
will, at its option either repair or replace the unit
without additional charge to the consumer. This
warranty does not cover any product which has been
damaged by dropping, tampering, servicing
performed or attempted by unauthorized service
agencies, misuse or abuse. This warranty excludes
units which have been modified or used for
commercial purposes.
To the extent allowed by law, Braun Canada shall not
be responsible for loss of the product, loss of time,
inconvenience, commercial loss, special or
consequential damages.
The provisions of this warranty are in addition to and
not a modification of or subtraction from the statutory
warranties and other rights and remedies contained in
applicable provincial legislation.
16

Service après-vente au Canada
Pour obtenir des services après-vente pour un produit
Braun, veuillez composer le 1 800 387-6657 afin
d’être dirigé vers le centre de service après-vente
agréé Braun le plus proche.
Pour obtenir des services après-vente :
A. Veuillez remettre le produit au centre de service
après-vente agréé Braun de votre choix. Ou:
B. Veuillez expédier le produit au centre de service
après-vente agréé Braun de votre choix.
Assurez-vous de bien emballer le produit.
Expédiez le produit, port payé et assuré
(recommandé). N’oubliez pas d’inclure une copie
de votre preuve d’achat afin de confirmer la
couverture de la garantie, le cas échéant.
Pour obtenir des pièces et accessoires de rechange
Braun d’origine,
communiquez avec un centre de service après-vente
agréé Braun.
Veuillez composer le 1 800 387-6657 afin d’être dirigé
vers le centre de service après-vente agréé Braun le
plus proche.
Pour communiquer avec un représentant du Service
après-vente Braun,
veuillez composer le 1 800 387-6657.
Garantie limitée
En l'occurrence d'un défaut à un appareil Braun au
cours de la période de garantie mentionnée, soit par
suite d'un vice de matières ou de fabrication, et du
renvoi de l'appareil par le consommateur à un centre
de service après-vente, Braun Canada se réserve le
choix de réparer ou remplacer l'appareil sans aucuns
frais supplémentaires pour le consommateur. Cette
garantie devient invalide si le produit est endommagé
par une chute, une modification, un abus, une
utilisation incorrecte ou s'il a été soumis à un entretien
ou à des tentatives d'entretien par des centres de
service après-vente non agréés. Cette garantie exclut
les appareils modifiés ou utilisés à des fins
commerciales.
Dans la mesure permise par la loi, Braun Canada n'est
pas responsable pour une perte d'utilisation, une
perte de temps, un inconvénient, une perte
commerciale, un dommage spécial ou indirect,
causés par l'appareil.
Les clauses de cette garantie constituent une addition
et non une modification ou soustraction aux garanties
statutaires et autres droits et recours contenus dans
la provinciale applicable.
17

Servicio al consumidor en México
Braun de México y Cia. de C.V.,
Calle Cuatro No 4
Fracc. Industrial Alce Blanco,
Naucalpan de Juarez 53370,
Estado de Mexico,
Para cualquier información adicional,
por favor llame sin costo
al 01 800 50 858 00 del interior de la República y
al 3871941 del área metropolitana.
“ (525) 387-1900
HECHO EN MEXICO POR:
Braun de México y Cía. de C.V.,
Calle Cuatro # 4,
Fracc. Industrial Alce Blanco,
Naucalpan de Juárez,
Edo. de México,
C.P. 53370,
Tel.: 3-87-19-00,
R.F.C. BME 830701 4Z0
 Loading...