

Škoda Superb 2013 Owner's Manual
SIMPLY CLEVER
ŠKODA Superb
Owner's Manual
Layout of this Owner's Manual (explanations)
This Owner's Manual has been systematically designed to make it easy for you to
search for and obtain the information you require.
Chapters, table of contents and subject index
The text of the Owner's manual is divided into relatively short sections which are
combined into easy-to-read chapters. The chapter you are reading at any particular
moment is always specified on the bottom right of the page.
The Table of contents is arranged according to the chapters and the detailed Sub-
ject index at the end of the Owner's Manual helps you to rapidly find the information you are looking for.
Direction indications
All direction indications such as “left”, “right”, “front”, “rear” relate to the direction of
travel of the vehicle.
Units of measurement
All values are expressed in metric units.
Explanation of symbols
Denotes a reference to a section with important information and safety
advice in a chapter.
Denotes the end of a section.
Denotes the continuation of a section on the next page.
Indicates situations where the vehicle must be stopped as soon as possi-
ble.
® Denotes a registered trademark.
Indicates the texts displayed in the MAXI DOT screen.
Indicates the texts shown in the segment display.
Display
In this owner's manual, the screen on the MAXI DOT display is used as the display
illustration, provided it is not otherwise stated.
Notes
WARNING
The most important notes are marked with the heading WARNING. These
WARNING notes draw your attention to a serious risk of accident or injury.
CAUTION
A Caution note draws your attention to the possibility of damage to your vehicle
(e.g. damage to gearbox), or points out general risks of an accident.
For the sake of the environment
An Environmental note draws your attention to environmental protection aspects.
This is where you will, for example, find tips aimed at reducing your fuel consumption.
Note
A normal Note draws your attention to important information about the operation
of your vehicle.
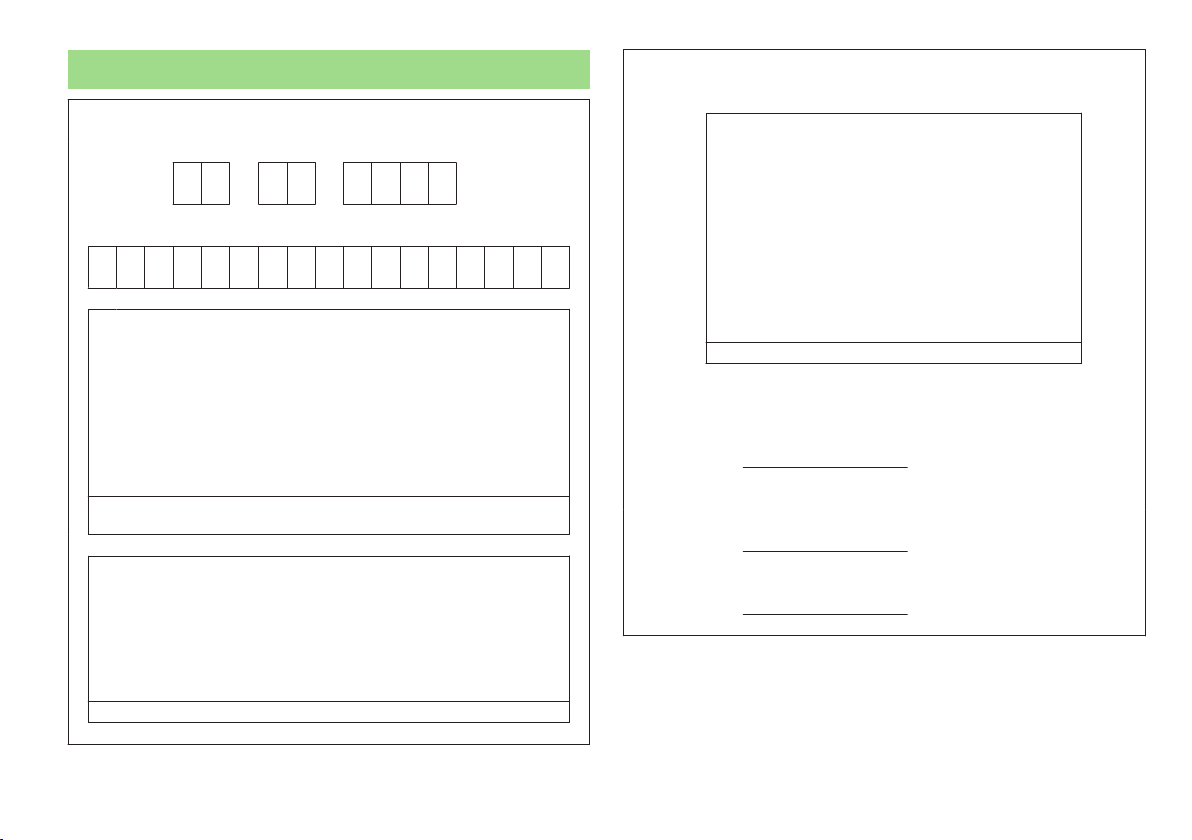
Documentation for date of delivery
Date of delivery/vehicle registrationa) (VIN)
Vehicle identification number
I confirm that I have taken delivery of the specified vehicle in good condition, have been shown how to operate it correctly, and the terms of the
warranty have been explained to me.
a)
(Whichever comes first).
Stamp and signature of the seller
ŠKODA partner
Signature of the customer
ŠKODA extended warranty
Limits of the ŠKODA extended warranty
Years:
or
km:
a)
(Whichever comes first).
Stamp of ŠKODA partner
Valid from:
a)

Preface
You have opted for a ŠKODA – our sincere thanks for your confidence in us.
You have received a vehicle with the latest technology and range of amenities. Please read this Owner's
Manual carefully, because the operation in accordance with these instructions is a prerequisite for proper use
of the vehicle.
If you have any questions about your vehicle, please contact a ŠKODA Partner.
We hope you enjoy driving your ŠKODA, and wish you a pleasant journey at all times.
Your ŠKODA AUTO a.s. (hereinafter referred to only as ŠKODA or manufacturer)

Terms used
The on-board literature contains the following terms relating to the service work
for your vehicle.
“Specialist garage” - A Workshop that carries out specialist service tasks for
›
ŠKODA vehicles. A specialist garage can be a ŠKODA partner, a ŠKODA service
partner or an independent workshop.
“ŠKODA service partner” - A Workshop that has been contractually authorized
›
by the manufacturer ŠKODA AUTO a.s. or its sales partner to perform service
tasks on ŠKODA vehicles and to sell ŠKODA Genuine Parts.
“ŠKODA partner” - A company that has been authorized by the manufacturer
›
ŠKODA AUTO a.s. or its sales partner to sell new ŠKODA vehicles and, when applicable, to service them using ŠKODA Genuine Parts and sell ŠKODA Genuine
Parts.
Owner's Manual
These operating instructions apply to all body variants of the vehicle and all related models.
The manual describes all possible equipment variants without identifying them
as special equipment, model variants or market-dependent equipment.
Consequently, this vehicle does not need to contain all of the equipment compo-
nents described in this owner's manual.
The scope of equipment of your vehicle relates to your purchase contract for the
vehicle. More information is available from the ŠKODA Partner from whom you
bought the vehicle.
The illustrations can differ in minor details from your vehicle; they are only intended for general information.
Table of Contents
Materials defect liability and ŠKODA warranty for
new cars 5
Mobility warranty and ŠKODA extended
warranty
Abbreviations
Using the system
Cockpit
Overview
Instruments and Indicator Lights 10
Instrument cluster
Warning Lights
Information system 23
Driver information system
Multifunction display (MFA) 25
MAXI DOT display
Service Interval Display
Unlocking and opening 32
Unlocking and locking
KESSY 37
Anti-theft alarm system
Luggage compartment lid
Electric boot lid (Superb Combi) 41
Electric power windows
Electric sliding/tilting roof 47
Panoramic sliding roof (Superb Combi)
Lights and visibility
Lights 51
Interior lights
Visibility 59
28
30
32
38
39
44
48
Windscreen wipers and washers 61
Rear mirror 63
Seats and useful equipment 66
Adjusting the seats 66
Seat features 70
Practical equipment 74
6
Luggage compartment 84
Removable light (Superb Combi) 90
Variable loading floor in the luggage
compartment (Estate) 92
Extending variable loading floor with integrated
aluminium rails and faseting elements (Superb
Combi) 92
9
Net partition (Superb Combi)
8
Roof rack system
Air conditioning system 98
10
Heating, ventilation and cooling
14
Air conditioning system (manual air conditioning
system)
23
Climatronic (automatic air conditioning
system)
Auxiliary heating (auxiliary heating and
ventilation) 107
Communication and multimedia
General information
Universal telephone preinstallation GSM II 113
Universal telephone preinstallation GSM IIl
WLAN 119
Voice control
Multimedia
Driving
51
Starting-off and Driving
Steering
57
Starting and stopping the engine using the
key
Starting and stopping the engine - KESSY
Brakes 137
Manual gear changing and pedals 138
Automatic transmission 139
Running in 142
Economical driving and environmental
sustainability
Avoiding damage to your vehicle 147
Driving abroad 148
Assist systems 150
Brake assist systems 150
Parking aid 152
Park assist 153
Cruise Control System 157
95
START-STOP
96
Fatigue detection (break recommendation)
Towing a trailer 162
98
Towing device
Trailer 165
100
Safety
103
Passive Safety
General information
Correct seated position 170
110
110
Seat belts
Using seat belts 173
115
Inertia reels and belt tensioners
Airbag system
122
Description of the airbag system 178
126
Airbag overview
Deactivating airbags 183
Transporting children safely
130
Child seat
130
Fastening systems 188
131
133
143
159
161
162
169
169
173
176
178
179
186
186
Table of Contents
3
General Maintenance
Car care 191
Service intervals 191
Services, modifications, and technical
alterations 193
Washing your car 196
Taking care of your vehicle exterior 198
Taking care of the interior 201
Inspecting and replenishing 204
Fuel 204
Engine compartment 206
Engine oil 210
Coolant
Brake fluid 214
Vehicle battery
Wheels
Tyres and wheel rims 220
Winter operation
212
215
220
226
Do-it-yourself
Emergency equipment and self-help 227
Emergency equipment
Changing a wheel
Tyre repair 232
Jump-starting
Towing the vehicle 236
Radio remote control
Emergency unlocking/locking
Emergency operation of the sliding/tilting roof 241
Replacing windscreen wiper blades
Fuses and light bulbs 244
Fuses
Bulbs
227
229
234
238
240
242
244
247
Technical data
Technical data 252
Vehicle data 252
Index
4
Table of Contents

Materials defect liability and ŠKODA warranty for new cars
Materials defect liability
Your ŠKODA partner, as a vendor, is liable to you for material damage to your new
ŠKODA car, ŠKODA Genuine Parts or ŠKODA Genuine Accessories in accordance
with statutory regulations and the purchase agreement.
ŠKODA warranty for new cars
As well as the materials defect liability, ŠKODA AUTO a.s. grants you the ŠKODA
warranty for new cars (hereafter referred to as “ŠKODA warranty),” according to
the terms described later.
As part of the ŠKODA warranty, ŠKODA AUTO a.s. will guarantee the following
services:
Repair of damage to your vehicle that occurs within two years from the start of
›
the ŠKODA warranty;
Repair of paint damage to your vehicle that occurs within three years from the
›
start of the ŠKODA warranty;
Repair of rust perforation to the bodywork of your vehicle that occurs within
›
twelve years from the start of the warranty. Only rust perforation on the inside
and the outside of body sheets is included in the rust perforation to bodywork
definition and covered by the ŠKODA warranty.
The start of the warranty is the date on which the original purchaser acquires the
vehicle upon purchasing it from the ŠKODA partner or the date of first registration. Whichever one occurs first and is recorded by the ŠKODA partner in the service schedule accordingly is the one that applies.
Repairs may either occur by replacing the faulty part or by restoring it. Replaced
parts become the property of the ŠKODA service partner.
There are no other entitlements arising from the ŠKODA warranty. In particular,
there are no entitlements for replacement, cancellation, provision of a courtesy
vehicle for the duration of repairs or compensation for damages.
If your ŠKODA vehicle was purchased from a ŠKODA partner in a country of the
European Economic Area (i.e. the countries of the European Union, Norway, Iceland and Liechtenstein) or in Switzerland, claims arising from the ŠKODA warranty
must also be made through a ŠKODA service partner in one of these countries.
If your ŠKODA vehicle has been purchased from a ŠKODA partner outside the European Economic Area and Switzerland, claims arising from the ŠKODA warranty
must also be made through a ŠKODA service partner outside the European Economic Area and Switzerland.
One of the conditions of a service from the ŠKODA guarantee is that you have
carried out all service works in a timely and adequate manner and in accordance
with the manufacturer's provisions. You must prove that service works have been
carried out properly and in accordance with the manufacturer's provisions when
raising a claim from the ŠKODA warranty. In case of a missed service or in case of
a failure to carry out a service according to the manufacturer's provisions, you
may still be entitled to warranty claims as long as you can prove that the missed
service or the failure to carry out a service according to the manufacturer's provisions was not the cause of the defect.
Natural wear and tear of your vehicle is not covered by the ŠKODA warranty. The
ŠKODA warranty also does not cover defects to bodywork, installations and conversions provided by third-parties, nor vehicle defects caused by these. The same
goes for accessories which are not factory installed and/or delivered.
In addition, this warranty does not apply if the defect was caused by one of the
following:
unauthorized use, improper handling (e.g. use in racing competitions or over-
›
loading), improper care and maintenance, or unapproved modification to your
vehicle;
Non-compliance with provisions in the service schedule and the Owner's man-
›
ual or other factory-supplied instructions;
External causes or influences (e.g. accidents, hail, flooding, etc.);
›
parts fitted or installed on the vehicle, whose use is not approved by ŠKODA
›
AUTO a.s., or modification of the vehicle in a manner not approved by ŠKODA
AUTO a.s. (e.g. tuning);
damage caused by you which was not immediately seen to by specialist garage
›
or was not fixed properly.
It is the customer's responsibility to prove that it was not the cause.
This ŠKODA guarantee does not affect the purchaser's statutory rights arising
from liability to defects from the vehicle vendor and other potential claims from
product liability laws.
Materials defect liability and ŠKODA warranty for new cars
5

Mobility warranty and ŠKODA extended warranty
Mobility warranty
Mobility warranty provides a sense of security when travelling in your vehicle.
Should your car break down when you're on the move one day as a result of an
unexpected fault, you will be eligible for services to ensure your continued mobility as part of the mobility warranty, which includes the following: Breakdown service at the breakdown location and towing off to the ŠKODA service partner, technical assistance by phone or on-site operation.
If your vehicle is not repaired on the same day, the ŠKODA service partner may
provide further services as required, such as replacement transportation (bus,
train, etc.), a courtesy vehicle, etc.
You can obtain more information regarding terms and conditions for the provision
of mobility warranty for your vehicle from your ŠKODA partner. Here you will also
be given detailed terms and conditions for the mobility warranty with respect to
your vehicle. In the event that there is no mobility warranty coverage available for
your vehicle, you should check with any ŠKODA service partner about the possibility of a subsequent agreement.
Note
The mobility warranty is only available for some countries.
Optional ŠKODA extended warranty
If you received an extended ŠKODA warranty when purchasing your new car, the
two-year ŠKODA warranty for damages to your ŠKODA vehicle will be extended
by the time you chose or until the chosen mileage limit has been reached.
The previously mentioned paint warranty and the warranty against rust perforation stay unaffected by the extended warranty.
Detailed conditions for the extended warranty are included in the extended warranty terms and conditions, which your ŠKODA partner will have given to you
upon purchasing your new vehicle.
Note
The mobility guarantee and optional extended warranty ŠKODA are only available
for some countries.
6
Mobility warranty and ŠKODA extended warranty
Abbreviations
Abbreviation Definition
rpm Engine revolutions per minute
ABS Anti-lock brake system
AF Multi-purpose vehicles
AHL Adaptive headlights
AG Automatic gearbox
APN Access Point Name - the name of an access point for the WiFi
network
TCS Traction control
CO2 in g/km discharged quantity of carbon dioxide in grams per driven kilo-
meter
DPF Diesel particle filter
DSG Automatic double clutch gearbox
DSR Active driver-steering recommendation
EDL Electronic differential lock
ECE Economic Commission for Europe
EPC EPC fault light
ESC Electronic Stability Control
EU European Union
FSI Stratified petrol direct injection
GSM Groupe Spécial Mobile - a digital network of mobile devices for
the transmission of voice and data
HFP Hands-free profile - connection of a mobile device by means of
its Bluetooth® profile
kW Kilowatt, measuring unit for the engine output
MG Manual gearbox
MFD Multifunction display
N1 Panel van intended exclusively or mainly for the transporta-
tion of goods
Nm Newton meter, measuring unit for the engine torque
Abbreviation Definition
PIN Personal Identification Number - personal identification num-
ber for the connection of electronic devices using Bluetooth
or WiFi
rSAP Remote SIM Access Profile - remote transmission of SIM data
SSP simple security pairing - connection of two devices using Blue-
tooth® profile
TDI CR Diesel engine with turbocharging and common rail injection
system
TDI PD Diesel engine with injection system and unit injector injection
system
TSI Petrol engine with turbocharging and direct injection
UMTS Universal Mobile Telecommunication System - the next evolu-
tion of the GSM network (3G)
WLAN Wireless Local Area Network - wireless connection of elec-
tronic devices for data transfer (WiFi)
®
Abbreviations
7
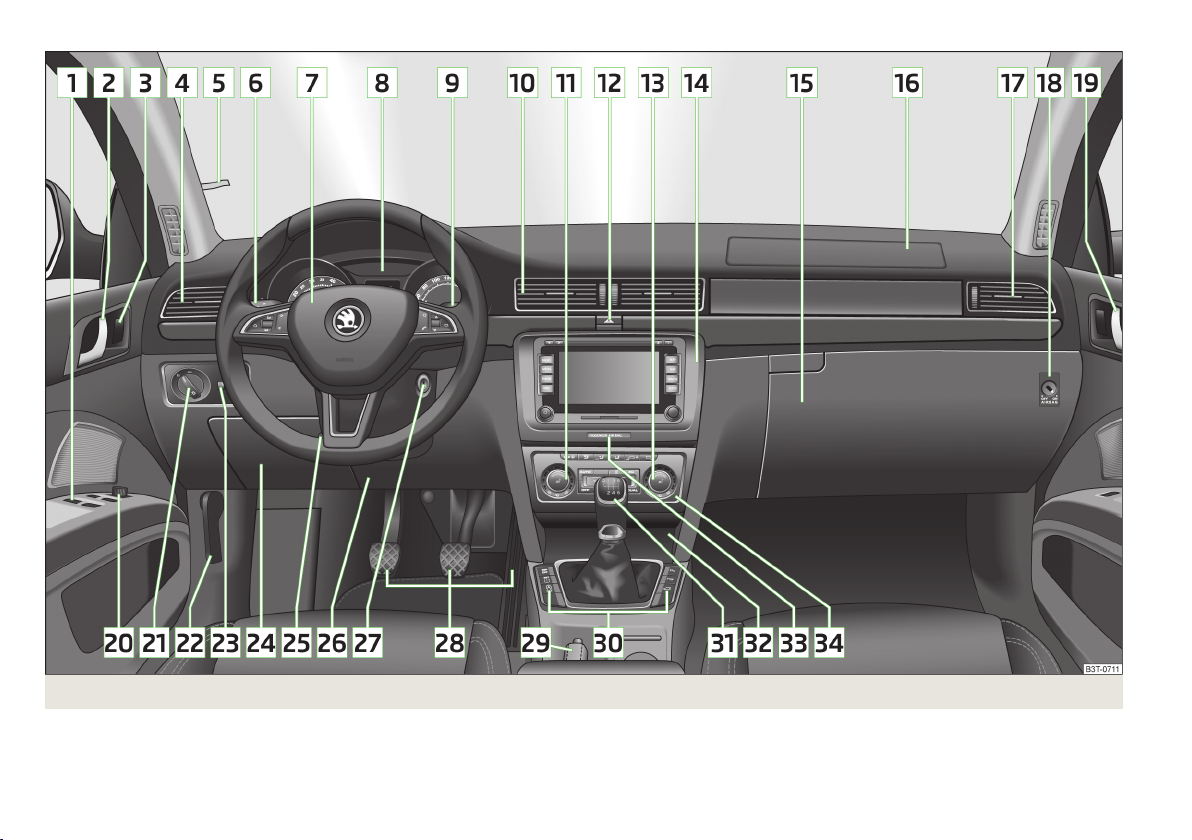
Fig. 1
8
Using the system
Cockpit
Using the system
Cockpit
Overview
1
Electric windows 44
2
Door opening lever 37
3
Central locking system 36
4
Air outlet 99
5
Parking ticket holder
6
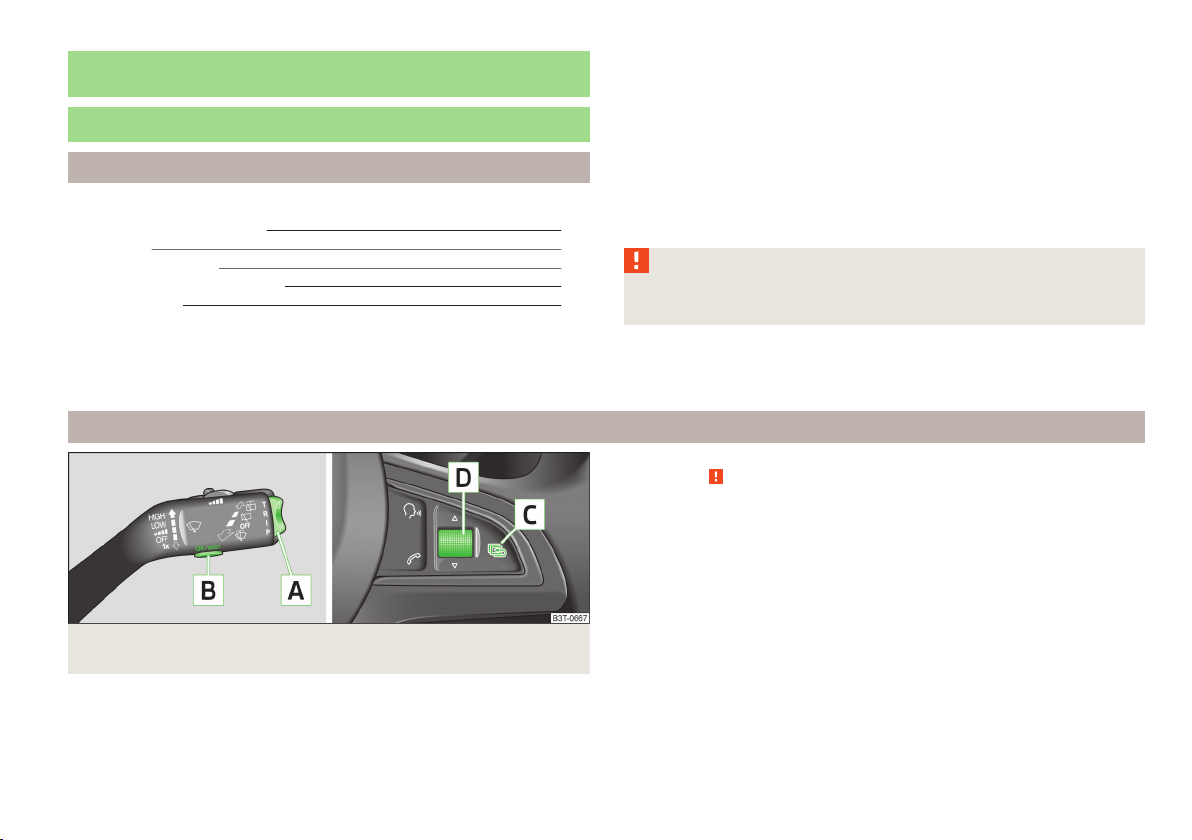
Operating lever:
Turn signal light, headlight and parking light, headlight flasher 53
›
Speed regulating system
›
7
Steering wheel:
With horn
›
With driver’s front airbag
›
with pushbuttons for radio, navigation system phone and infor-
›
mation system 111, 126
8
Instrument cluster: Instruments, warning lights and display 10
9
Operating lever:
Information system
›
Windscreen wiper and wash system 61
›
10
Air outlets in the central part of the dash panel
11
Regulator for left seat heating 70
12
Button for hazard warning light system
13
Regulator for right seat heating 70
14
Depending on equipment fitted:
Radio
›
Navigation system
›
15
Storage compartment on the front passenger side
16
Front passenger airbag 180
17
Air outlet
18
Key switch for switching off the front passenger airbag (in front
passenger storage compartment) 184
19
Door opening lever
20
Electric exterior mirror adjustment 65
21
Light switch 51
22
Bonnet release lever 208
23
Regulator for the instrument lighting and regulator for the headlight beam range adjustment 52, 52
24
Storage compartment on the driver's side 75
25
Lever for adjusting the steering wheel 130
26
Driver’s knee airbag 181
27
Ignition lock 132
28
Pedals 139
29
Handbrake 138
30
Bars with buttons depending on the equipment fitted:
START STOP 159
›
Tyre control display 21
›
Traction control TCS 151
›
Electronic Stability Control ESC 150
157
180
23
99
56
›
Park Assist
›
Parking aid 152
›
Tailgate operation (Superb Combi) 42
›
31
Depending on equipment fitted:
Gearshift lever (manual gearbox) 138
›
Selector lever (automatic gearbox)
›
32
Depending on equipment fitted:
Ashtrays 77
›
Storage compartment
›
33
Warning light for the deactivated front seat passenger airbag 184
34
Depending on equipment fitted:
Operating controls for the air conditioning system
›
Operating controls for Climatronic
›
Note
The arrangement of the controls and switches and the location of some items on
right-hand drive models may differ from that shown in » Fig. 1. The symbols on
80
the controls and switches are the same as for left-hand drive models.
99
37
153
139
76
100
103
Cockpit
9
Instruments and Indicator Lights
Instrument cluster
Introduction
This chapter contains information on the following subjects:
Overview
Engine revolutions counter 11
Speedometer 11
Coolant temperature gauge display 11
Display 12
Fuel gauge 12
Counter for distance driven
Digital clock 13
Display of the second speed
Display in rear centre console
Auto Check Control 13
Fault display
If there is a fault in the instrument cluster, the Error message will appear in the
display. Have the fault rectified as soon as possible by a specialist garage.
WARNING
■
Concentrate fully at all times on your driving! As the driver you are fully re-
sponsible for road safety.
■
Never operate the controls in the instrument cluster while driving, only
when the vehicle is stationary!
Overview
10
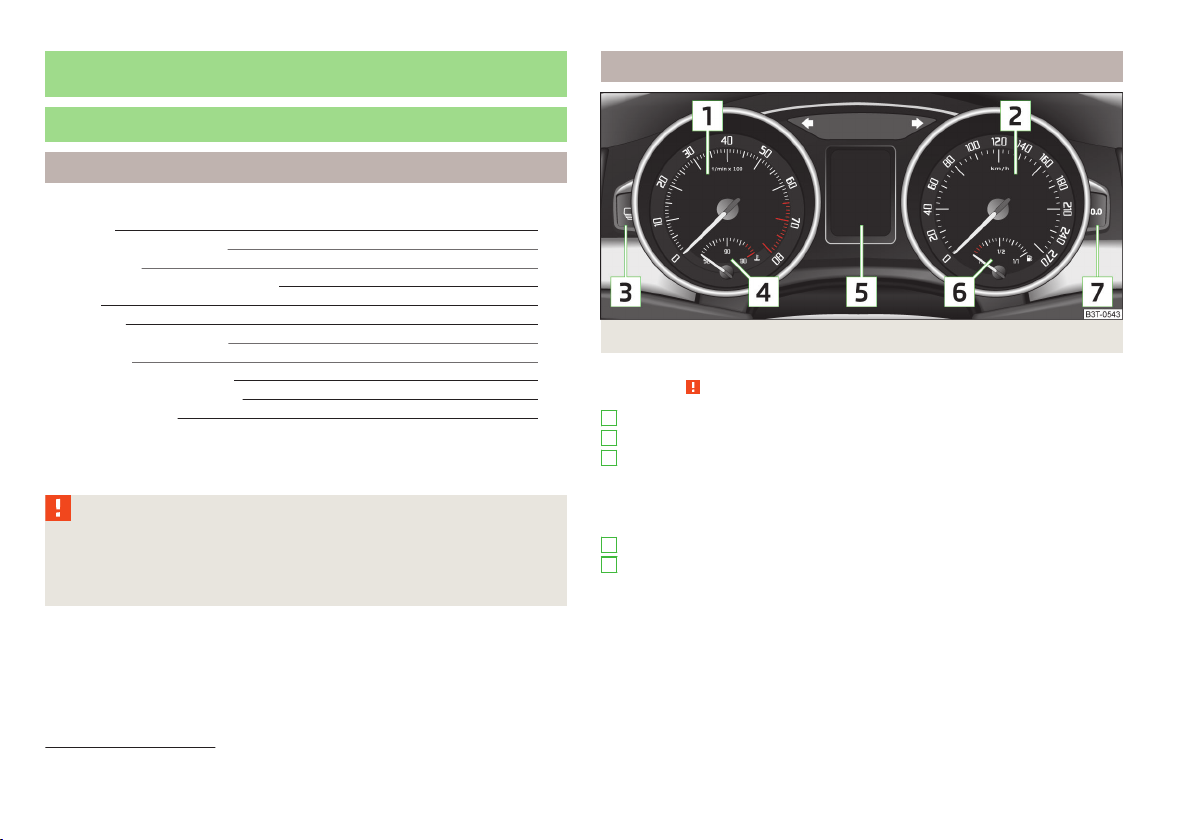
Fig. 2 Instrument cluster
12
13
13
1
Revolutions counter with warning lights » page 11
2
Speedometer with warning lights » page 11
3
Button for display mode:
›
›
›
4
Coolant temperature gauge » page 11
5
Display» page 12:
›
›
›
›
›
First read and observe the introductory information and safety warnings on page 10.
Setting the hours/minutes » page 13
Enable / disable the display of the second speed1) » page 13
Service intervals - Display of the number of days and kilometres remaining
until the next service1) » page 30
With counter for distance driven » page 12
With service interval display » page 30
With digital clock » page 13
with multifunction display (MFA) » page 25
with information system » page 23
1)
Applies to vehicles with a segment display.
10
Using the system
6
Fuel gauge » page 12
7
Button for:
Reset trip counter for the distance driven » page 12
›
Set hours/minutes
›
enable / disable the mode selected by means of the 3 key
›
Engine revolutions counter
First read and observe the introductory information and safety warnings on page 10.
The red scale of the rev counter 1 » Fig. 2 on page 10 indicates the range in
which the system begins to limit the engine speed. The system automatically restricts the engine speed to a steady limit.
You should shift into the next higher gear before the red scale of the revolution
counter is reached, or select mode D on the automatic gearbox.
Follow the recommended gear to prevent engine speeds that are too high or too
low » page 24.
For the sake of the environment
Correct shifting up has the following advantages.
■
It helps to reduce fuel consumption.
■
It reduces the operating noise.
■
It protects the environment.
■
It benefits the durability and reliability of the engine.
Speedometer
First read and observe the introductory information and safety warnings on page 10.
Warning against excessive speeds
An audible warning signal will sound when the vehicle speed exceeds 120 km/h1).
The audible warning signal is switched off when the vehicle speed falls below
120 km/h.
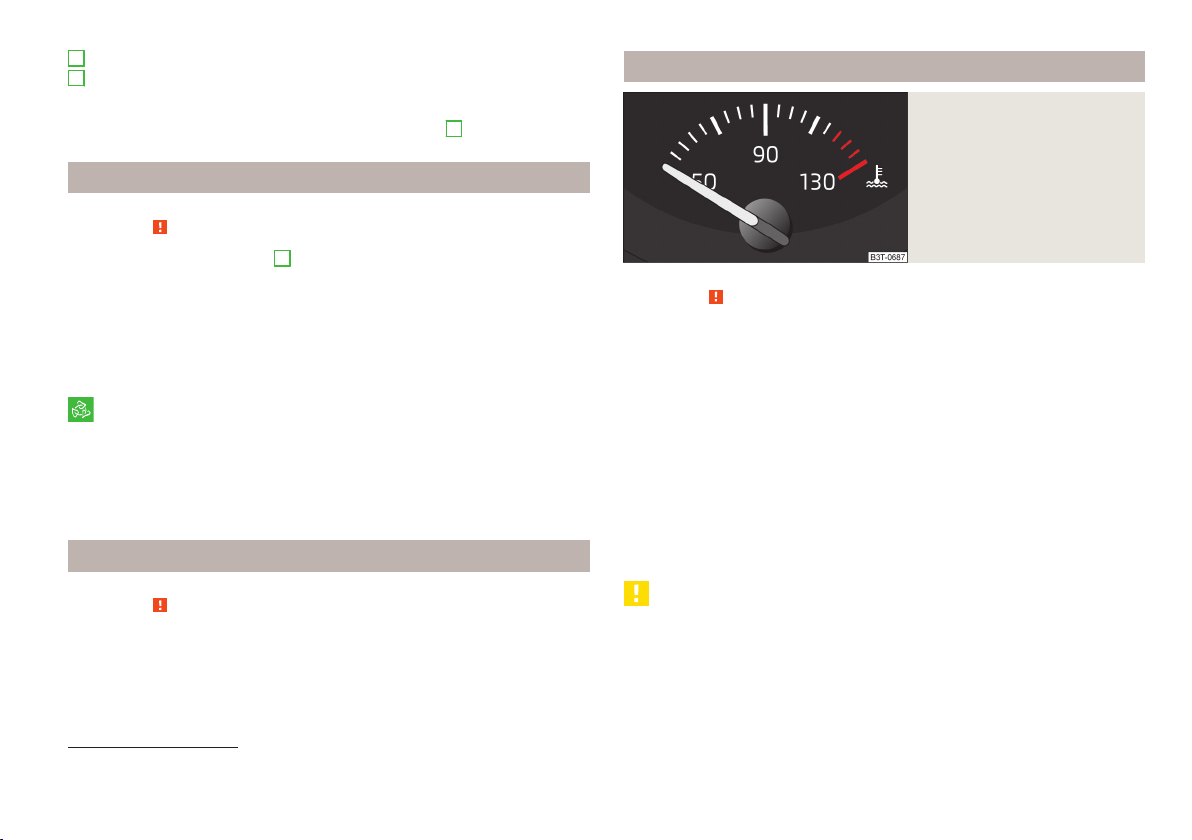
Coolant temperature gauge display
First read and observe the introductory information and safety warnings on page 10.
The coolant temperate display » Fig. 3 only operates when the ignition is switched on.
Cold range
If the pointer is still in the left area of the scale it means that the engine has not
yet reached its operating temperature. Avoid high speeds, full throttle and high
engine loads. This prevents possible damage to the engine.
The operating range
The engine has reached its operating temperature as soon as the pointer moves
into the mid-range of the scale. At very high ambient temperatures or heavy engine loads, the pointer may move even further to the right.
High temperature range
If the pointer reaches the red area of the scale, the coolant temperature is too
high. Further information » page 16.
Fig. 3
Coolant temperature gauge
CAUTION
Additional headlights and other attached components in front of the air inlet impair the cooling efficiency of the coolant.
1)
This function is only valid for some countries.
Instruments and Indicator Lights
11
Display
Fig. 4
Display types
First read and observe the introductory information and safety warnings on page 10.
The instrument cluster can have one of the following types of display » Fig. 4.
Segment display, indicated in the text with the symbol
MAXI DOT display, indicated in the text with the symbol
CAUTION
Pull out the ignition key if coming in contact with the display (e.g. when cleaning)
to prevent any possible damage. On vehicles with the KESSY system, switch off
the ignition and open the driver's door.
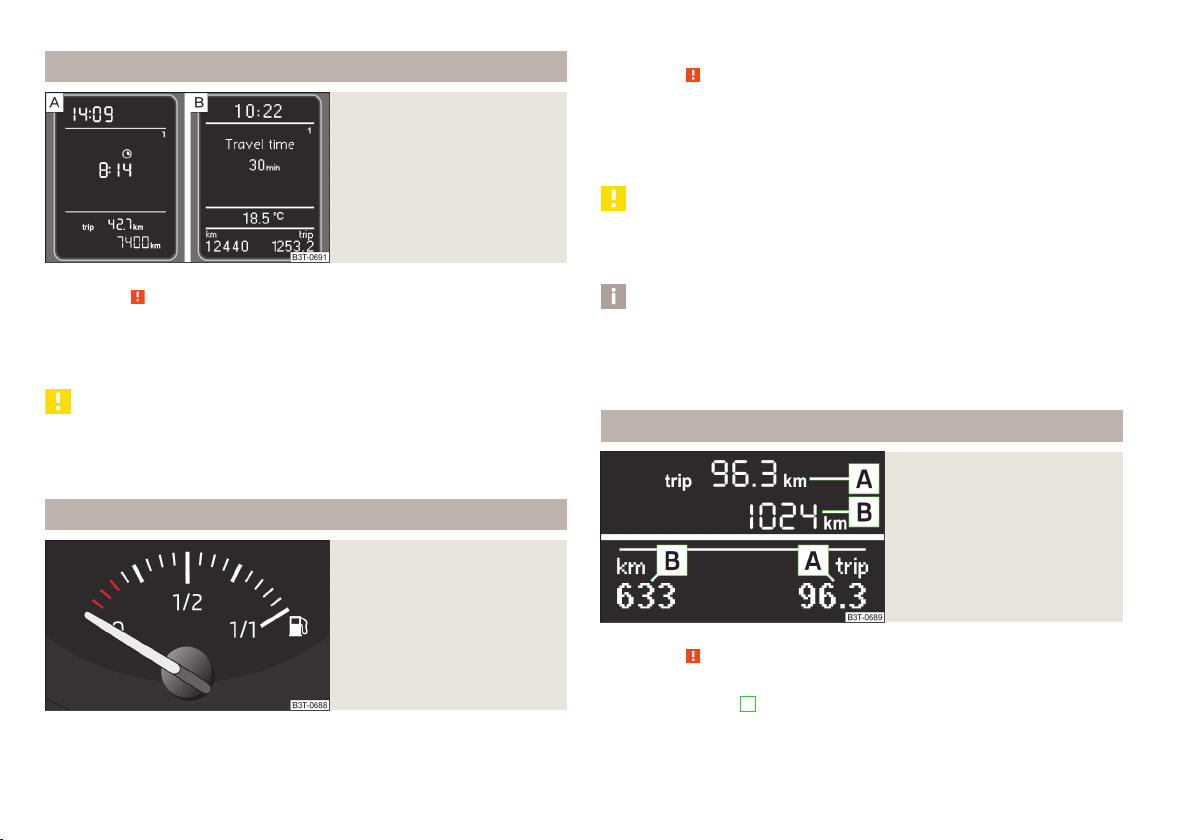
Fuel gauge
Fig. 5
Fuel gauge
First read and observe the introductory information and safety warnings on page 10.
The fuel gauge » Fig. 5 only operates if the ignition is switched on.
The fuel tank has a capacity of about 60 litres. The indicator light in the instru-
ment cluster lights up when the pointer reaches the reserve marking » page 20 .
CAUTION
Never drive until the fuel tank is completely empty! The irregular supply of fuel
can cause misfiring. This can result in considerable damage to parts of the engine
and the exhaust system.
Note
After filling up, it can occur that during dynamic driving (e.g. numerous curves,
braking, driving downhill and climbing a steep hill) the fuel gauge indicates approx. a fraction less. When stopping or during less dynamic driving, the fuel gauge
displays the correct fuel level again. This is not a fault.
Counter for distance driven
Fig. 6
Segment display / MAXI DOT display
12
Using the system
First read and observe the introductory information and safety warnings on page 10.
Daily trip counter (trip)
The daily trip counter A » Fig. 6 indicates the distance which you have driven
since it was last reset - in steps of 100 metres or 1/10 of a mile.
Reset trip counter for the distance driven
Press and hold the 7 » Fig. 2 on page 10 button.
›
Odometer
The odometer B » Fig. 6 indicates the total distance the vehicle has travelled.
Note
If the second speed display is enabled on vehicles with a segment display, this
speed will be shown instead of the odometer.
Digital clock
First read and observe the introductory information and safety warnings on page 10.
The clock is set with the buttons 3 and 7 » Fig. 2 on page 10.
Select the display that you wish to change with the button 3 and carry out the
change with the button 7.
In vehicles equipped with the MAXI DOT display, it is also possible to set the clock
in the Time menu » page 29.
Display of the second speed
First read and observe the introductory information and safety warn-
on page 10.
ings
The display can show the current speed in mph1).
This feature is provided for driving in countries with different speed units.
Maxi DOT display
The display of the second speed can be set in the menu item settings » page 29,
Settings.
Segment display
Press the 3» Fig. 2 on page 10 key repeatedly, until the odometer display flash-
›
es » page 12.
Press the 7 key while the display flashes.
›
The second speed is displayed instead of the odometer.
The display of the second speed can be disabled in the same way.
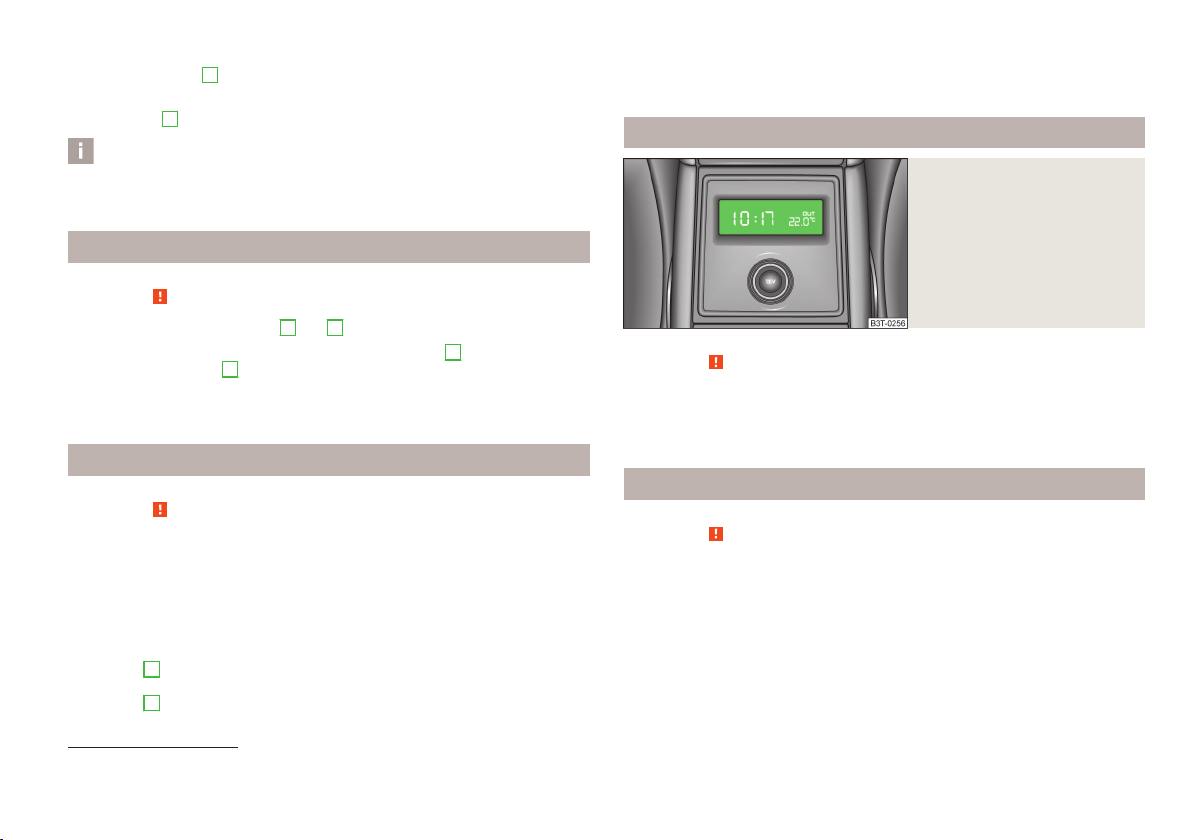
Display in rear centre console
Fig. 7
First read and observe the introductory information and safety warnings on page 10.
The time and the outside temperature is displayed on the display in the rear cen-
tre console when the ignition is switched on » Fig. 7.
The values are taken over by the instrument cluster.
Centre console at rear: Display
Auto Check Control
First read and observe the introductory information and safety warn-
on page 10.
ings
Vehicle condition
Certain functions and conditions of individual vehicle systems are checked continuously when the ignition is switched on and also while driving.
Some error messages and other information are displayed in the MAXI DOT display. The messages are displayed simultaneously with the symbols in the MAXI
DOT display or with the warning lights in the instrument cluster » page 14.
1)
For models with the speedometer in mph, the second speed is displayed in km/h.
Instruments and Indicator Lights
13
The menu item Vehicle status is shown in the main menu of the MAXI DOT display whenever at least one fault message exists. After selecting this menu, the
first of the error messages is displayed. Several error messages are shown on the
display under the message e.g. 1/3. This indicates that the first of a total of three
error messages is being displayed.
Warning symbols in the MAXI DOT display
Problem with the engine oil pressure
If the symbol is shown in the MAXI DOT display, you must have your vehicle
checked immediately by a specialist garage. The information about the maximum
permissible engine speed is displayed together with this symbol.
Clutches of the automatic gearbox are too hot
A symbol in the MAXI DOT display indicates that the temperature of the automatic gearbox clutches is too high.
The following message is shown in the MAXI DOT display.
do not continue to drive! Stop the vehicle, switch off the engine, and wait until
the icon goes out – risk of gearbox damage! You can continue your journey as
soon as the symbol disappears.
Engine oil pressure too low » page 16
Clutches of the automatic gearbox are too
hot
Check engine oil level,
engine oil sensor faulty
Thickness of brake pads » page 21
Problem with engine oil pressure » page 14
Gearbox overheated. Stop! Log book!
» page 14
» page 18
WARNING
If you have to stop for technical reasons, then park the vehicle at a safe distance from the traffic, switch off the engine and activate the hazard warning
light system » page 56.
Note
■
If the MAXI DOT display shows warning messages, these messages must be
confirmed in order to access the main menu » page 23 .
■
As long as the operational faults are not rectified, the symbols are always indicated again. After they are displayed for the first time, the symbols continue to be
indicated without any extra messages for the driver.
Warning Lights
Introduction
This chapter contains information on the following subjects:
Handbrake 15
Brake system 15
Seat belt warning light 15
Generator
Open door
Engine oil pressure 16
Coolant 16
Bonnet 17
Boot lid
Power steering/steering lock (KESSY system)
Engine oil level 18
Traction Control System (ASR) 18
Electronic Stability Control (ESC) 18
Antilock brake system (ABS)
The rear fog light
Bulb failure 19
Adaptive headlights
Exhaust inspection system
Glow plug system (diesel engine)
EPC fault light (petrol engine)
Diesel particulate filter (diesel engine) 20
Fuel reserve
Airbag system
Tyre pressure
20
20
16
16
17
17
19
19
19
19
19
21
21
14
Using the system
Windscreen washer fluid level 21
Pads
Turn signal system 21
Low beam
Fog lights 22
Cruise control system
Selector lever lock/starting (KESSY system)
Main beam
The indicator lights show certain functions/faults and may be accompanied by audible signals.
22
22
22
22
WARNING
■
If illuminated indicator lights and the corresponding descriptions and warning notes are not observed, this may result in severe injuries or major vehicle
damage.
■
The engine compartment of your car is a hazardous area. There is a risk of
injuries, scalding, accidents and fire when working in the engine compartment, e.g. inspecting and replenishing oil and other fluids. It is essential to observe safety notes » page 206, Engine compartment.
Handbrake
First read and observe the introductory information and safety warnings
The indicator light comes on if the handbrake is applied. An audible warning is
also given if you drive the vehicle for at least 3 seconds at a speed of more than
6 km/h.
The following message is shown in the MAXI DOT display.
Release parking brake!
on page 14.
21
Brake system
First read and observe the introductory information and safety warnings on page 14.
The indicator light illuminates if the brake fluid level in the braking system is
too low or there is a fault in the ABS.
The following message is shown in the MAXI DOT display.
Brake fluid: Log book!
Stop the vehicle, switch off the engine, and check the level of the brake fluid » page 214 »
.
WARNING
■
If you have to stop for technical reasons, then park the vehicle at a safe distance from the traffic, switch off the engine and activate the hazard warning
light system » page 56.
■
The following guidelines should be observed when opening the bonnet and
checking the brake fluid level » page 206, Engine compartment.
■
If the warning light is displayed simultaneously with warning light
» page 19, Antilock brake system (ABS), do not continue your jour-
ney! Seek help from a specialist garage.
■
A fault to the ABS system or the braking system can increase the vehicle's
braking distance – risk of accident!
Seat belt warning light
First read and observe the introductory information and safety warnings on page 14.
The indicator light comes on after the ignition is switched on as a reminder for
the driver and front passenger to fasten the seat belt. The indicator light only
goes out if the driver or front passenger has fastened his seat belt.
If the seat belt has not been fastened by the driver or front passenger, a permanent warning signal sounds at vehicle speeds greater than 20 km/h and simultaneously the indicator light flashes.
If the seat belt is not fastened by the driver or front passenger during the next
90 seconds, the warning signal is deactivated and the indicator light lights up
permanently.
Instruments and Indicator Lights
15
Generator
First read and observe the introductory information and safety warnings on page 14.
If the indicator light lights up when the engine is running, the vehicle battery is
not being charged.
Seek help from a specialist garage. The electrical system requires checking.
WARNING
If you have to stop for technical reasons, then park the vehicle at a safe distance from the traffic, switch off the engine and activate the hazard warning
light system » page 56, Hazard warning light system.
The following message is shown in the MAXI DOT display.
Oil pressure: Log book!
Stop the vehicle, switch off the engine, and check the level of the engine
oil » page 211.
Even if the oil level is correct, do not drive any further if the indicator light is
flashing . Also do not leave the engine running at an idling speed.
Seek help from a specialist garage.
WARNING
If you have to stop for technical reasons, then park the vehicle at a safe distance from the traffic, switch off the engine and activate the hazard warning
light system » page 56.
CAUTION
If the warning light (cooling system fault) lights up in addition to the warning light while driving, do not continue to drive! Stop the engine - there is a
risk of engine damage!
Open door
First read and observe the introductory information and safety warnings on page 14.
The indicator light comes on, if one or several doors are opened.
WARNING
If you have to stop for technical reasons, then park the vehicle at a safe distance from the traffic, switch off the engine and activate the hazard warning
light system » page 56.
Engine oil pressure
First read and observe the introductory information and safety warnings on page 14.
When the indicator light is flashing , the engine oil pressure is too low.
16
Using the system
Coolant
First read and observe the introductory information and safety warnings on page 14.
If the indicator light lights up or flashes, either the coolant temperature is too
high or the coolant level is too low.
The following message is shown in the MAXI DOT display.
Check coolant! Log book!
Stop the vehicle, switch off the engine, check the level of the coolant » page 213,
and refill the coolant if necessary » page 214.
If the coolant is within the specified range, the increased temperature may be
caused by an operating problem at the radiator fan. Check the fuse for the radiator fan, replace if necessary » page 246, Fuses in the engine compartment.
Do not continue driving if the warning light is lit, even though the coolant level
is correct and the fuse for the fan is in working order !
Seek help from a specialist garage.

WARNING
■
If you have to stop for technical reasons, then park the vehicle at a safe distance from the traffic, switch off the engine and activate the hazard warning
light system » page 56.
■
Carefully open the coolant expansion bottle. If the engine is hot, the cooling
system is pressurized - risk of scalding! It is therefore best to allow the engine
to cool down before removing the cap.
■
Do not touch the radiator fan. The radiator fan may switch itself on automatically even if the ignition is off.
Bonnet
First read and observe the introductory information and safety warnings
The indicator light comes on if the bonnet is unlocked.
on page 14.
WARNING
If you have to stop for technical reasons, then park the vehicle at a safe distance from the traffic, switch off the engine and activate the hazard warning
light system » page 56.
Power steering/steering lock (KESSY system)
First read and observe the introductory information and safety warnings on page 14.
Power steering
If the indicator light lights up, this indicates a partial failure of the power steering and the steering forces can be greater. Seek help from a specialist garage.
If the indicator light lights up, this indicates a complete failure of the power
steering and the steering assist has failed (significantly higher steering forces).
Seek help from a specialist garage.
Steering lock (KESSY system)
While the indicator light is flashing, the steering lock cannot be released. Fur-
›
ther information » page 37, KESSY.
If the warning light flashes, a signal tone sounds, and the following message
›
appears in the MAXI DOT-display Steering column lock: Workshop!), the electrical steering lock is faulty. Seek help from a specialist garage.
If the warning light flashes, a beep sounds and in the MAXI DOT display the
›
message Steering lock defective appears, then the electric steering lock is broken. Park the car, do not continue the journey. After switching off the ignition, it is then no longer possible to lock the steering, to activate the electrical
components (e.g. radio, navigation system), to switch on the ignition again and
to start the engine. Seek help from a specialist garage.
Boot lid
First read and observe the introductory information and safety warn-
on page 14.
ings
The indicator light comes on if the boot lid is opened.
WARNING
If you have to stop for technical reasons, then park the vehicle at a safe distance from the traffic, switch off the engine and activate the hazard warning
light system » page 56.
WARNING
If you have to stop for technical reasons, then park the vehicle at a safe distance from the traffic, switch off the engine and activate the hazard warning
light system » page 56.
Note
If the vehicle battery has been disconnected and reconnected, the yellow indicator light comes on after switching on the ignition. The indicator light must go
out after driving a short distance. Visit a specialist garage if the yellow warning
light stays on after having started the engine again and driving a short dis-
tance.
Instruments and Indicator Lights
17
Engine oil level
First read and observe the introductory information and safety warnings on page 14.
The indicator light lights up (oil quantity too low)
The following message is shown in the MAXI DOT display.
Check oil level!
Stop the vehicle, switch off the engine, and check the level of the engine
oil » page 211.
The indicator light will go out if the bonnet is left open for more than 30 seconds.
If no engine oil has been replenished, the indicator light will come on again after
driving about 100 km.
The indicator light flashes (engine oil level sensor faulty)
The following message is shown in the MAXI DOT display.
Oil sensor: Workshop!
If the engine oil level sensor is faulty, the indicator light flashes several times
and an audible signal sounds when the ignition is turned on.
Seek help from a specialist garage.
WARNING
If you have to stop for technical reasons, then park the vehicle at a safe distance from the traffic, switch off the engine and activate the hazard warning
light system » page 56.
Traction Control System (ASR)
First read and observe the introductory information and safety warnings on page 14.
The indicator light flashes to show that the ASR is currently operating.
If the indicator light comes on immediately after starting the engine, the ASR
can be switched off for technical reasons. Switch the ignition off and on again. If
the indicator light does not light up after you switch the engine back on, the ASR
is fully functional again.
If the indicator light lights up, there is a fault in the ASR.
The following message is shown in the MAXI DOT display.
Error: Traction control (ASR)
Seek help from a specialist garage.
Further information » page 151, Traction Control System (TCS).
Note
If the vehicle's battery has been disconnected and reconnected, the indicator
light comes on after switching on the ignition. The indicator light should go out
after driving a short distance.
Electronic Stability Control (ESC)
First read and observe the introductory information and safety warnings on page 14.
The indicator light flashes to show that the ESC is currently operating.
If the indicator light comes on immediately after you start the engine, the ESC
might be switched off due to technical reasons. Switch the ignition off and on
again. If the indicator light does not light up after you switch the engine back on,
the ESR is fully functional again.
If the warning light lights up there is a fault in the ESC system.
The following message is shown in the MAXI DOT display.
Error: Electronic Stability Control (ESC)
Seek help from a specialist garage.
Further information » page 150, Electronic Stability Control (ESC).
Note
If the vehicle's battery has been disconnected and reconnected, the indicator
light comes on after switching on the ignition. The indicator light must go out
after driving a short distance.
18
Using the system

Antilock brake system (ABS)
First read and observe the introductory information and safety warnings on page 14.
If the indicator light lights up, there is a fault in the ABS.
The following message is shown in the MAXI DOT display.
Error: ABS
The vehicle will only be braked by the normal brake system without the ABS.
Seek help from a specialist garage.
WARNING
■
If you have to stop for technical reasons, then park the vehicle at a safe distance from the traffic, switch off the engine and activate the hazard warning
light system » page 56.
■
If the warning light » page 15 is displayed together with warning light ,
do not continue your journey! Seek help from a specialist garage.
■
A fault to the ABS system or the braking system can increase the vehicle's
braking distance – risk of accident!
The rear fog light
First read and observe the introductory information and safety warnings
The warning light comes on when the rear fog lights are operating » page 55.
Bulb failure
The indicator light comes on if a bulb is faulty:
within a few seconds of the ignition being switched on;
›
when a light with a defective bulb is turned on.
›
on page 14.
First read and observe the introductory information and safety warnings on page 14.
The following message, for example, may be shown in the MAXI DOT display.
INFORMATION Check front right low beam!
Adaptive headlights
First read and observe the introductory information and safety warnings on page 14.
If the indicator light flashes for 1 minute while driving or after switching on the
ignition, there is a problem with the adaptive headlights » page 54.
The following message is shown in the MAXI DOT display.
Cornering light (AFS) has no function. Log book!
Exhaust inspection system
First read and observe the introductory information and safety warnings
If the indicator light lights up, there is a fault in the exhaust inspection system.
The engine control unit allows the vehicle to run in emergency mode.
Seek help from a specialist garage.
Glow plug system (diesel engine)
The indicator light comes on after the ignition has been switched on. The engine can be started immediately after the pre-glow indicator light goes out.
There is a fault in the glow plug system if the indicator light does not come on
at all or lights up continuously.
If the indicator light begins to flash while driving, a fault exists in the engine
control. The engine control unit allows the vehicle to run in emergency mode.
Seek help from a specialist garage.
on page 14.
First read and observe the introductory information and safety warnings on page 14.
Instruments and Indicator Lights
19
EPC fault light (petrol engine)
First read and observe the introductory information and safety warnings on page 14.
If the indicator light lights up, there is a fault in the engine control. The engine
control unit allows the vehicle to run in emergency mode.
Seek help from a specialist garage.
Diesel particulate filter (diesel engine)
First read and observe the introductory information and safety warnings on page 14.
The diesel particulate filter separates the soot particles from the exhaust. The
soot particles collect in the diesel particulate filter where they are burnt on a regular basis.
If the indicator light lights up, soot has accumulated in the filter.
In order to clean the filter, and where traffic conditions permit »
should be driven at an even speed of at least 60 km/h at engine speeds of 1 800 2 500 rpm for at least 15 minutes or until the warning light goes out with the 4th
or 5th gear engaged (automatic gearbox: position S) when the traffic situation
permits it.
The indicator light only goes out after the diesel particulate filter has been
successfully cleaned.
If the filter is not properly cleaned, the indicator light does not go out and the
indicator light begins to flash.
The following message is shown in the MAXI DOT display.
Diesel particulate filter: Log book!
The engine control unit allows the vehicle to run in emergency mode. After
switching the ignition off and on again the indicator light, the indicator light
also lights up.
Seek help from a specialist garage.
, the vehicle
WARNING
■
The diesel particle filter achieves very high temperatures. Therefore do not
park in areas where the hot filter can come into direct contact with dry grass
or other combustible materials – there is the risk of fire!
■
Always adjust your speed to suit weather, road, region and traffic conditions. The recommendations indicated by the indicator light must not tempt
you to disregard the national regulations for road traffic.
CAUTION
As long as the indicator light lights up, one must take into account an increased fuel consumption and in certain circumstances a power reduction of the
engine.
Note
■
To assist the combustion process of the soot particles in the filter, we recom-
mend that regularly driving short distances be avoided.
■
Using diesel fuel with an increased sulphur content can considerably reduce the
lifespan of the filter. A ŠKODA service partner will be able to tell you which countries use diesel fuel with a high sulphur content.
■
If the engine is turned off during the filter cleaning process or shortly after-
wards, the cooling fan may turn on automatically for a few minutes.
Fuel reserve
First read and observe the introductory information and safety warnings on page 14.
The indicator light will come on if the fuel level is less than 9 litres.
The following message is shown in the MAXI DOT display.
Please refuel. Range: ... km
Note
The text in the display goes out only after refuelling and driving a short distance.
20
Using the system

Airbag system
First read and observe the introductory information and safety warnings on page 14.
If the indicator light lights up, there is a fault in the airbag system.
The following message is shown in the MAXI DOT display.
Error: Airbag
The functionality of the airbag system is monitored electronically even if one of
the airbags is switched off.
If a front, side or head airbag or belt tensioner has been switched off using the
vehicle system tester:
The indicator light lights up for around 4 seconds after the ignition is switch-
›
ed on and then flashes for around 12 seconds.
The following message is shown in the MAXI DOT display.
Airbag/belt tensioner deactivated.
If the air bag was switched off using the key-operated switch on the side of the
dash panel on the passenger side:
The indicator light comes on for around 4 seconds after the ignition has been
›
switched on.
The deactivated air bag is indicated by the illumination of the warning
›
light » page 184
in the middle of the dash panel .
WARNING
If there is a fault, have the airbag system checked immediately by a specialist
garage. Otherwise, there is a risk of the airbag not being activated in the
event of an accident.
Tyre pressure
First read and observe the introductory information and safety warnings on page 14.
The indicator light lights up, if there is a substantial drop in inflation pressure
in one of the tyres. Check and adjust the pressure in all tyres » page 221, Service
life of tyres.
If the indicator light lights up, there is a fault in the system.
Seek help from a specialist garage.
Further information » page 223, Tyre pressure monitor.
Note
If the battery has been disconnected, the indicator light illuminates after the
ignition is switched on. The indicator light must go out after driving a short dis-
tance.
Windscreen washer fluid level
First read and observe the introductory information and safety warnings on page 14.
If the windscreen washer fluid level is too low, the indicator light comes on.
The following message is shown in the MAXI DOT display.
Top up wash fluid!
Top up with liquid » page 209, Windscreen washer system.
Pads
First read and observe the introductory information and safety warnings on page 14.
If the indicator light is slit, the brake pads are worn.
The following message is shown in the MAXI DOT display.
Check brake wear!
Seek help from a specialist garage.
Turn signal system
First read and observe the introductory information and safety warnings on page 14.
Either the left or right indicator light flashes depending on the position of
the turn signal lever.
Instruments and Indicator Lights
21
If a turn signal light fails, the indicator light flashes at twice its normal rate.
Switching off the hazard indicator light system is switched on will cause all of the
turn signal lights as well as both indicator lights to flash.
Further information » page 53, Turn signal and main beam.
Low beam
First read and observe the introductory information and safety warnings on page 14.
The indicator light comes on when low beam is selected » page 51.
Fog lights
First read and observe the introductory information and safety warnings on page 14.
The indicator light comes on when the fog lights are operating » page 55.
Cruise control system
First read and observe the introductory information and safety warnings
The indicator light comes on when the cruise control is operating » page 157.
Selector lever lock/starting (KESSY system)
If the indicator light lights up, operate the brake pedal. This is necessary to
move the selector lever from position P and N » page 140or to start the engine in
vehicles with the KESSY system » page 135.
on page 14.
First read and observe the introductory information and safety warnings on page 14.
Main beam
First read and observe the introductory information and safety warnings on page 14.
The indicator light comes on when the main beam or headlight flasher are selected » page 53.
22
Using the system
Information system
Driver information system
Introduction
This chapter contains information on the following subjects:
Using the information system
Ice warning 24
Gear recommendation 24
Door, boot lid or bonnet warning 25
Compass display 25
The information system provides the driver with alerts and messages about individual vehicle systems. This information and advice is shown in the instrument
cluster display or indicated by the lighting up of the corresponding warning light
in the instrument cluster.
Using the information system
23
The information system provides the following information.
Ice warning » page 24.
›
Recommended gear » page 24.
›
Door, boot lid or bonnet warning » page 25.
›
Compass display » page 25.
›
Multi-function display (MFA) » page 25.
›
Warning against excessive speed » page 27.
›
MAXI DOT display » page 28.
›
Service interval display » page 30.
›
Auto Check Control » page 13.
›
Selector lever positions for an automatic gearbox » page 140.
›
WARNING
Concentrate fully at all times on your driving! As the driver, you are fully responsible for the operation of your vehicle.
First read and observe the introductory information and safety warnings on page 23.
On vehicles with a segment display of the multi-function display
(MFA) » page 25 the information system can be controlled with the lever.
On vehicles with a MAXI DOT display » page 28 the information system can be
operated with the control lever and the buttons on the multifunction steering
wheel.
Fig. 8 Buttons/dial: on the operating lever / on the multifunction steering
wheel
Information system
23
Description of the operation
Button/wheel Action Operation
push up or down briefly Select data
A
B
C
D
push up or down briefly Set data values
Press and hold button Call up main menu of the MAXI DOT display
press briefly Show data
press briefly Confirm data
Press and hold button Call up main menu of the MAXI DOT display
press briefly to go back one level in the menu of the MAXI DOT display
Turn upwards or downwards Select data
Turn upwards or downwards Set data values
press briefly Show data
press briefly Confirm data
Ice warning
First read and observe the introductory information and safety warnings on page 23.
Prompt in the MAXI DOT display
If the outside temperature while driving drops to below +4°C, the following icon
appears on the display in front of the temperature display . An audible signal is
emitted.
If the outside temperature is already below +4°C when turning the ignition on,
the icon appears immediately. An audible signal is emitted.
Prompt in the segment display
If the outside temperature while driving drops to below +4°C, the temperature
display » page 26, Outside temperature will show up with the following icon in
front . An audible signal is emitted.
If the outside temperature is already below +4°C when turning the ignition on,
the temperature display and the icon appear immediately. An audible signal is
emitted.
After pressing button
last is indicated.
24
Using the system
A
» Fig. 8 on page 23, the information which was shown
WARNING
Even at temperatures of around +4 °C, black ice may still be on the road surface! You should therefore not only rely on the outside temperature display
for accurate information as to whether there is ice on the road.
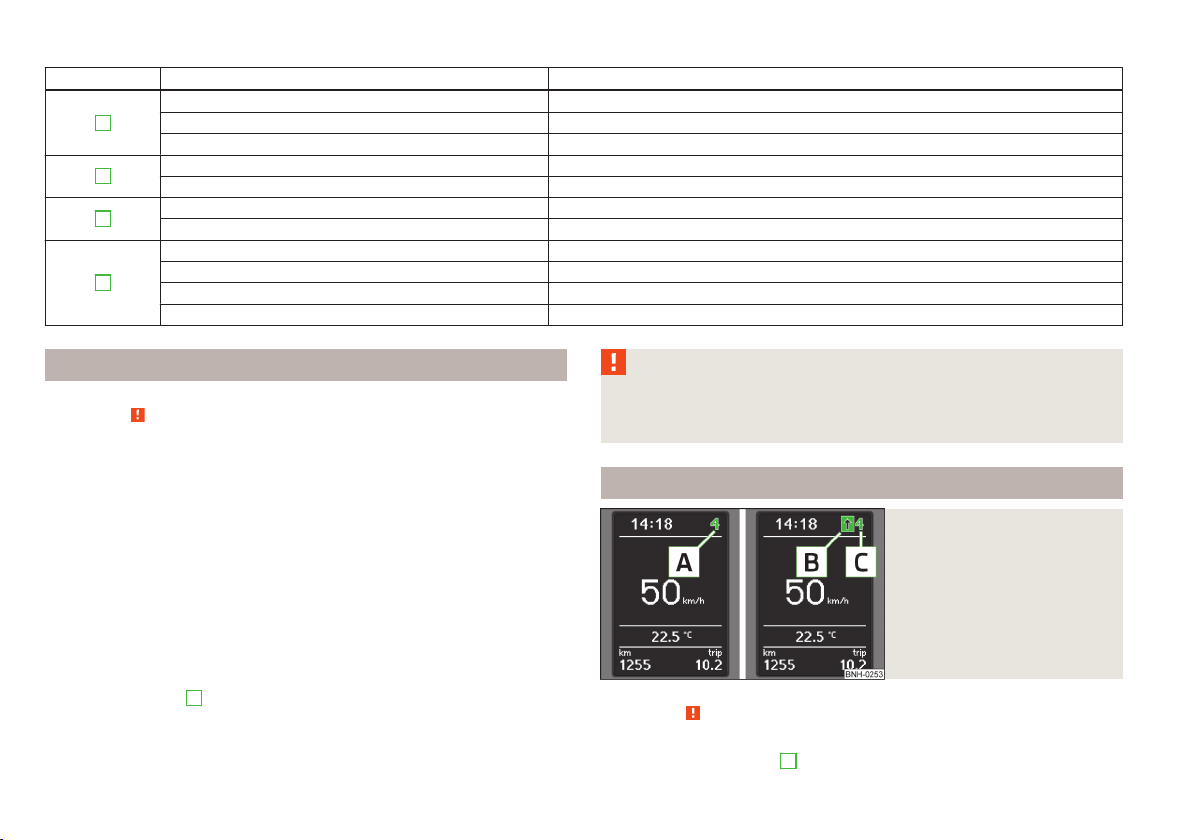
Gear recommendation
Fig. 9
Information on the selected
gear / Gear recommendation
First read and observe the introductory information and safety warnings on page 23.
Information on the selected gear
The currently engaged gear A is shown in the display » Fig. 9.
Recommended gear
In order to minimise the fuel consumption, a recommendation for shifting into another gear is indicated in the display.
1)
If the system recognises that it is beneficial to change gear, an arrow
played. The arrow points up or down, depending on whether you should shift into
a higher or lower gear.
The gear recommendation is intended only for vehicles with a manual transmission or for vehicles with an automatic transmission in manual shift mode (Tiptronic).
For vehicles with manual gearshifting, C indicates the recommended gear.
B
is dis-
Compass display
First read and observe the introductory information and safety warnings on page 23.
For vehicles with a factory fitted navigation system, an abbreviation for each
point of the compass (depending on the current direction of travel) is shown on
the top left-hand corner of the 2)display.
The abbreviation for each point of the compass is displayed only when the ignition is on.
CAUTION
The driver is always responsible for selecting the correct gear in different driving
situations, such as overtaking.
Door, boot lid or bonnet warning
First read and observe the introductory information and safety warnings
Vehicles with a MAXI DOT display
If at least one door, the boot or bonnet is open, the display indicates the relevant
open door, boot or bonnet vehicle icon.
An acoustic signal will also sound if you drive the vehicle above 6 km/h.
Vehicles with a segment display
If at least one door or the boot or bonnet is open, the indicator lights or and
come on in the instrument cluster » page 14, Warning Lights .
1)
On vehicles with a segment display, the B arrow is displayed behind the C specification.
2)
Applies to vehicles using the MAXI DOT display.
on page 23.
Multifunction display (MFA)
Introduction
This chapter contains information on the following subjects:
Memory 26
Information overview 26
Warning against excessive speeds
The driving data is displayed on the multifunction display.
The multifunction display can only be operated when the ignition is switched on.
After the ignition is switched on, the function that was last selected before
switching off the ignition is displayed.
For vehicles with a MAXI DOT display, the menu item MFA must be selected and
confirmed in the main menu » page 28, MAXI DOT display.
On vehicles with a MAXI DOT display, there is an option to fade out some of the
information » page 29, Settings.
Information system
28
25
WARNING
■
Concentrate fully at all times on your driving! As the driver, you are fully re-
sponsible for the operation of your vehicle.
■
Even at temperatures of around +4 °C, black ice may still be on the road surface! You should therefore not only rely on the outside temperature display
for accurate information as to whether there is ice on the road.
Note
■
In certain national versions the displays appear in the Imperial system of meas-
ures.
■
If the display of the second speed is activated in mph, the current speed is not
indicated in km/h on the display.
■
The amount of fuel consumed will not be indicated.
Memory
Fig. 10
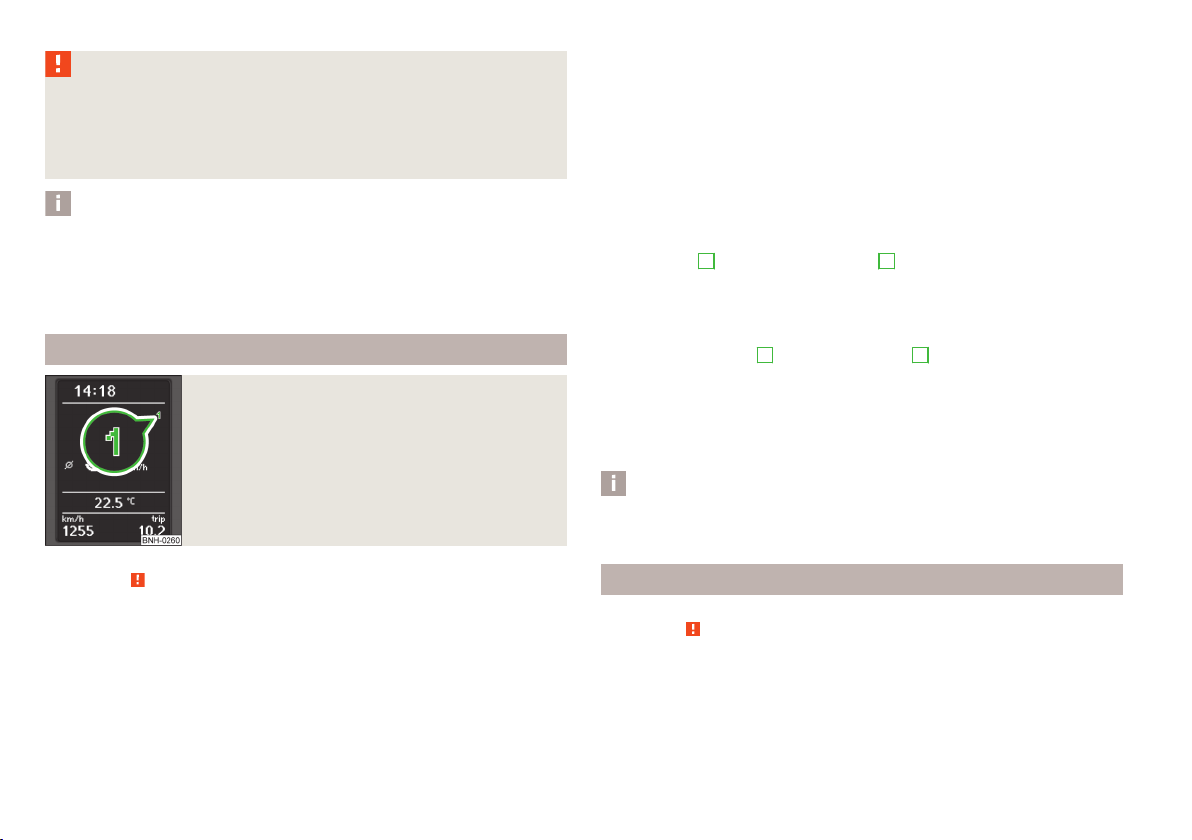
Multi-function display - Display example of the memory
First read and observe the introductory information and safety warnings on page 25.
The multifunction display is equipped with two automatic memories, 1 and 2. The
selected memory is shown in the Display » Fig. 10.
Single-trip memory (memory 1)
The single-trip memory collates the driving information from the moment the ignition is switched on until it is switched off. New data will also flow into the calculation of the current driving information if the trip is continued within 2 hours
after switching off the ignition. If the trip is interrupted for more than 2 hours,
the memory is automatically erased.
Total-trip memory (memory 2)
The total trip memory collates the data from any number of individual trips up to
a total of 19 hours and 59 minutes or a 1999 km distance or, for vehicles with a
MAXI DOT display, 99 hours and 59 minutes, or a 9999 km distance. The memory
is deleted when either of these limits is reached and the calculation starts all over
again.
Unlike the single-trip memory, the total-trip memory is not deleted after a period
of interruption of driving of 2 hours.
Select memory
Select the corresponding element of the multi-function display » page 23, Using
›
the information system.
Press button B or the adjustment wheel D» Fig. 8 on page 23 briefly.
›
Reseting
Select the corresponding element of the multi-function display » page 23, Using
›
the information system.
Select the desired memory.
›
Press and hold button B or adjustment wheel D » Fig. 8 on page 23.
›
The following values of the selected memory are set to zero.
Average fuel consumption.
›
Distance driven.
›
Average speed.
›
Driving time
›
Note
All information in the memory 1 and 2 is erased if the battery of the vehicle is disconnected.
Information overview
First read and observe the introductory information and safety warnings on page 25.
Outside temperature
The current outside temperature is displayed.
For vehicles with a MAXI DOT display this information is always shown.
26
Using the system

Driving time
The driving time which has elapsed since the memory was last erased appears in
the display. If you want to measure the time travelled from a particular moment in
time on, at this moment, reset the memory by setting the button to
zero » page 26, Memory.
The maximum time indicated in both memories is 19 hours and 59 minutes and on
vehicles which are fitted with a MAXI DOT display, it is 99 hours and 59 minutes.
The indicator is set back to zero if this period is exceeded.
Current fuel consumption
The current fuel consumption level is displayed in litres/100 km1). You can use this
information to adapt your driving style to the desired fuel consumption.
The display appears in litres/hour if the vehicle is stationary or driving at a low
speed2).
Average fuel consumption
The average fuel consumption since the memory was last erased is displayed in
litres/100 km1).
If you wish to determine the average fuel consumption over a certain period of
time, you must set the memory at the start of the new measurement to
zero » page 26, Memory. After erasing the memory, no value is displayed until you
have driven approx. 300 m.
The display is updated regularly while you are driving.
Range
The estimated range is displayed in kilometres. It indicates the distance you can
still drive with your vehicle based on the level of fuel in the tank and the same
style of driving.
The display is shown in steps of 10 km. After lighting up of the indicator light
the display is shown in steps of 5 km.
The fuel consumption over the last 50 km is used to calculate the information.
The range will increase if you drive in a more economical manner.
If the memory is set to zero (after disconnecting the battery), a fuel consumption
of 10 l./100 km is calculated for the range; afterwards the value is updated ac-
cording to the style of driving.
Distance travelled
The distance travelled since the memory was last erased is displayed » page 26,
Memory. If you want to measure the distance travelled from a particular moment
in time on, at this moment, reset the memory by setting the button to
zero » page 26, Memory.
The maximum distance indicated in both memories is 1 999 km or 9 999 km on
vehicles with a MAXI DOT display. The indicator is set back to zero if this period is
exceeded.
Average speed
The average speed since the memory was last erased is displayed in km/
hour » page 26, Memory. To determine the average speed over a certain period of
time, set the memory to zero at the start of the measurement » page 26, Memory.
After erasing this data, no value appears in the display until you have driven approx. 300 m.
The display is updated regularly while you are driving.
Current speed
The current speed, which is identical to the display of the speedometer
2
» Fig. 2
on page 10 is displayed.
Oil temperature
3)
The current engine oil temperature is displayed. If the oil temperature is lower
than 50 °C or if a fault in the system for checking the oil temperature is present,
only - -.- is displayed instead of the oil temperature.
Warning against excessive speeds
The warning that the speed limit is being exceeded can be enabled / disabled » page 28, Warning against excessive speeds in the display.
1)
On some models in certain countries, the display appears in kilometres/litre.
2)
On some models in certain countries, - -.- km/ltr. is displayed when the vehicle is stationary.
3)
Applies to vehicles using the MAXI DOT display.
Information system
27
 Loading...