

Škoda Rapid 2016 Owner's Manual
SIMPLY CLEVER
OWNER´S MANUAL
OWNER´S MANUAL
ŠKODA Rapid

5JA012720AK

Preface
You have opted for a ŠKODA – our sincere thanks for your confidence in us.
The description of the vehicle operation, important information about safety,
vehicle care, maintenance and self-help, as well as technical vehicle data,
are given in this Owner's Manual.
For vehicles with Infotainment, some functions and vehicle systems are operated via Infotainment.
Please do not read just this Owner's Manual, but also read the Infotainment
Owner's Manual carefully. The procedure in accordance with the two instructions is a prerequisite for the correct use of the vehicle.
When using the vehicle, the general binding country-specific legal requirements (e.g. transporting children, deactivating the airbag, tyre use, road traffic, etc.) must always be observed.
Please always pay attention when driving! As the driver you are fully responsible for road safety.
We hope you enjoy driving your ŠKODA, and wish you a pleasant journey at
all times.
Your ŠKODA AUTO
5JA012720AK

Table of Contents
materials defect liability and ŠKODA warranty
for new cars 4
On-board literature 6
Notes 7
Structure of the Owner's Manual and further
information 8
Abbreviations
Safety
Passive Safety
General information 10
Correct and safe seated position 10
Seat belts 12
Using seat belts 12
Inertia reels and belt tensioners 14
Airbag system 15
Description of the airbag system 15
Airbag deactivation 18
Transporting children safely 19
Child seat 19
Fastening systems 22
Using the system
Cockpit 27
Overview
Instruments and warning lights
Instrument cluster
Warning lights
Information system
Driver information system
Operation of the information system
26
28
28
29
37
37
39
Driving data (Multifunction display) 39
MAXI DOT display 41
Service interval display 42
SmartGate 43
Unlocking and opening 45
Unlocking and locking 45
Anti-theft alarm system 49
Luggage compartment lid 50
Window operation 51
Lights and visibility 53
Lights 53
Interior lighting 57
Visibility 58
10
Windscreen wipers and washers 59
Rear view mirror 61
Seats and head restraints 62
Front seats 62
Rear seats 63
Headrests 64
Seat heaters 65
Useful features 66
Interior fittings 66
Tablet holder 73
Transport of cargo 74
Luggage compartment and transporting
objects 74
Transportation on the roof rack 78
Heating and ventilation 79
Heating, manual air conditioning system,
Climatronic 79
Driving
Starting-off and Driving 83
Starting and stopping the engine 83
START-STOPsystem 85
Brakes and parking 86
Manual gear changing and pedals 88
Automatic gearbox 89
Running in and economical driving 91
Avoiding damage to your vehicle 92
Assist systems 93
General information 93
Braking and stabilisation systems 93
Parking aid (ParkPilot) 96
Reversing camera 98
Cruise Control System 100
Speed limiter 101
Front Assist 102
Fatigue detection 105
Tyre pressure monitoring 106
Towing device and trailer 108
Hitch 108
Use the towing device 112
General Maintenance
Care and maintenance 115
Service work, adjustments and technical
alterations 115
Service intervals 117
Cleaning and care 119
Inspecting and replenishing 123
Fuel 123
Engine compartment 125
Engine oil 128
Coolant 129
Brake fluid 130
Vehicle battery 131
Wheels 133
Wheels and tyres 133
Operating in winter conditions 136
2
Table of Contents

Do-it-yourself
Emergency equipment and self-help 138
Emergency equipment 138
Changing a wheel 139
Breakdown kit 143
Jump-starting 145
Towing the vehicle 146
Remote - change battery 148
Emergency unlocking / unlocking of doors 148
Replacing windscreen wiper blades 149
Fuses and light bulbs 151
Fuses 151
Bulbs 154
Technical data
Technical data
Basic vehicle data 160
Vehicle-specific details per engine type 165
160
Index
Table of Contents
3

materials defect liability and ŠKODA warranty for new cars
Materials defect liability
Your ŠKODA Partner, as a vendor, is liable to you for material damage to your
new ŠKODA car, ŠKODA Genuine Parts or ŠKODA Genuine Accessories in accordance with statutory regulations and the purchase agreement.
ŠKODA warranty for new cars
As well as the materials defect liability, ŠKODA AUTO grants you the ŠKODA
warranty for new cars (hereinafter referred to as “ŠKODA warranty),” according
to the conditions described below.
As part of the ŠKODA warranty, ŠKODA AUTO will provide the following services.
▶
Free repair of faulty components or vehicle defects that occur within two
years from the start of the ŠKODA warranty.
▶
Free repair of paint work defects on your vehicle that occur within three
years from the start of the ŠKODA warranty.
▶
Free repair of corrosion caused by rust on the bodywork of your vehicle that
occurs within twelve years from the start of the warranty. Only corrosion of
body panels from the inside to the outside is included in the definition of corrosion caused by rust on the bodywork and covered by the ŠKODA warranty.
The start of warranty is the date on which the new car is handed over to the
initial purchaser by the ŠKODA Partner1). This date must be noted down by the
ŠKODA Partner in the Owner's Manual for your vehicle » in the section on the
documentation of the vehicle handover.
Vehicle repairs may be carried out either by replacing the faulty part or by repairing it. Replaced parts become the property of the ŠKODA Service Partner.
There shall be no further claims arising from the ŠKODA warranty. In particular,
there shall be no claims for replacement, cancellation, provision of a courtesy
vehicle for the duration of repairs or compensation for damages.
If your ŠKODA vehicle was purchased from a ŠKODA Partner in a country of the
European Economic Area (i.e. the countries of the European Union, Norway,
Iceland and Liechtenstein) or in Switzerland, claims arising from the ŠKODA
warranty must also be made through a ŠKODA Service Partner in one of these
countries.
If your ŠKODA vehicle was purchased from a ŠKODA Partner outside the European Economic Area and Switzerland, claims arising from the ŠKODA warranty
must also be made through a ŠKODA Service Partner outside the European
Economic Area and Switzerland.
A prerequisite for carrying out work under the ŠKODA warranty is that all service work has been carried out in a timely and technically correct manner and in
accordance with the ŠKODA AUTO provisions. It must be proven that service
work has been carried out properly and in accordance with the ŠKODA AUTO
provisions when making a claim on the ŠKODA warranty. In the event of a
missed service or failure to carry out a service according to the ŠKODA AUTO
provisions, you may still be entitled to warranty claims as long as you can
prove that the missed service or the failure to carry out a service according to
the ŠKODA AUTO provisions was not the cause of the defect.
Natural wear and tear to your vehicle is not covered by the ŠKODA warranty.
The ŠKODA warranty also does not cover faults to bodywork, installations or
conversions provided by third parties, or vehicle faults caused as a result. The
same applies to accessories that were not installed and/or delivered ex-factory.
In addition, this warranty does not apply if the defect was caused by one of
the following:
▶
Unauthorised use, improper handling (e.g. use in racing competitions or overloading), improper care and maintenance or unauthorised modifications to
your vehicle.
▶
Non-compliance with instructions in the Owner's Manual or other factorysupplied instructions.
▶
External causes or influences (e.g. accidents, hail, flooding etc.).
1)
Due to the requirements of the generally binding country-specific regulations, the date of first registration can be given instead of the date of the
vehicle handover.
4
materials defect liability and ŠKODA warranty for new cars

▶
Parts fitted on or in the vehicle, whose use has not been approved by ŠKODA
AUTO, or modification of the vehicle in a manner not approved by ŠKODA
AUTO (e.g. tuning).
▶
Damage caused by you that was not immediately seen to by a specialist garage or was not rectified properly.
It is the customer's responsibility to prove that s/he is not the cause of the
damage.
This ŠKODA warranty does not affect the purchaser's statutory rights from materials defect liability from the vehicle vendor and other potential claims from
product liability laws.
Mobility warranty
The mobility warranty provides a sense of security when travelling in your vehicle.
If your vehicle breaks down on the road due to an unexpected failure, services
are provided under the mobility guarantee to keep you moving, which include
the following: Breakdown assistance at the roadside and towing to ŠKODA
Service partners, technical assistance on the phone or on-site commissioning.
If your vehicle is not repaired on the same day, the ŠKODA Service Partner may
provide further services as required, such as replacement transportation (bus,
train etc.) or a courtesy vehicle etc.
More information regarding terms and conditions for the provision of a mobility
warranty for your vehicle can be obtained from your ŠKODA Partner. They will
also provide you with detailed terms and conditions for the mobility warranty
with respect to your vehicle. In the event that there is no mobility warranty
coverage in place for your vehicle, you should check with any ŠKODA Service
Partner about the possibility of a supplementary agreement.
Optional ŠKODA extended warranty
If you opted for a ŠKODA extended warranty when purchasing your new car,
the two-year ŠKODA warranty with regards to carrying out all warranty repairs
is extended by the period you chose or until the chosen mileage limit has been
reached, whichever occurs first.
The paint warranty and the warranty against corrosion described above are
unaffected by the ŠKODA extended warranty.
The ŠKODA extended warranty does not apply to external and internal foils.
The information on the detailed conditions of the ŠKODA extended warranty is
provided by your ŠKODA partner.
Note
The ŠKODA extended warranty is only available in some countries.
materials defect liability and ŠKODA warranty for new cars
5

On-board literature
You will always find this Owner's Manual in the on-board literature. Depending
on the equipment installed, the on-board literature may also contain the Own-
er's Manual - Infotainment.
Owner´s Manual
These Owner´s Manual apply to all body variants of the vehicle and all related
model versions as well as all equipment levels.
This Owner's Manual describes all possible equipment variants without identifying them as special equipment, model variants or market-dependent equipment. Consequently, this vehicle does not contain all of the equipment com-
ponents described in this Owner's Manual.
The range of equipment installed in your vehicle depends on the purchase
contract for the vehicle. For questions regarding the scope of equipment,
please contact a ŠKODA Partner, if required.
The Pictures in this Owner's Manual are for illustrative purposes only. The illustrations can differ in minor details from your vehicle; they are only intended
to provide general information.
ŠKODA AUTO pursues a policy of ongoing product and model development
with all vehicles. Changes in terms of supply scope are possible at any time
with regard to design, equipment and technology. The information listed in
this Owner's Manual corresponds to the information available at the time of
going to press.
Therefore legal claims cannot be made based on the technical data, illustrations and information contained in this Owner's Manual.
We recommend that web pages that are referred to in this Owner's Manual are
displayed using the classic view. Not all necessary information may be displayed correctly if the mobile view is chosen.
Infotainment Owner´s Manual
The Infotainment Owner's Manual contains a description of the Infotainment
service and possibly also some functions and vehicle systems.
Online user manuals
Fig. 1
On-board literature online at the
ŠKODA websites
Todisplay on-board literature online proceed as follows.
1. Read the QR-Code » Fig. 1 using the corresponding application in your external device (e.g. telephone, tablet) or Enter the following address into
your web browser.
http://go.skoda.eu/owners-manuals
The website is opened with a model overview for the ŠKODA brand.
2. Select the desired model - a menu for the user manuals is displayed.
3. Select the construction period as well as the language.
4. Select one of the following manual types.
File in pdfformat
On-line-Version of the instructions
Variant for the mobile device - Application My ŠKODA App
6
On-board literature

Notes
Terms used
“Specialist garage”
ŠKODA vehicles. A specialist garage can be a ŠKODA partner, a ŠKODA
service partner or an independent workshop.
“ŠKODA Service Partner”
by ŠKODA AUTO or its sales partner to service ŠKODA vehicles and to
sell ŠKODA Genuine Parts.
“ŠKODA Partner”
sales partner to sell new ŠKODA vehicles and, when applicable, to service them using ŠKODA Genuine Parts and sell ŠKODA Genuine Parts.
Text notes
- Short press (e.g. a button) within 1 s
“Press”
- Long press (e.g. a button) for more than 1 s
“Hold”
Explanation of symbols
Reference to the introductory module of a chapter with important infor-
mation and safety warnings
Situations in which the vehicle must be stopped as soon as possible
® Trademark
Telephone operation in the MAXI DOT display
Text display in the segment display
→ Marker to the next operation step
WARNING
Texts with this symbol draw attention to threats of a serious accident, injury or loss of life.
CAUTION
Texts with this symbol draw attention to the risk of vehicle damage or possible
inoperability of some systems.
Note
Texts with this symbol contain additional information.
- a workshop that carries out specialist service tasks for
- A Workshop that has been contractually authorised
- A company that has been authorised by ŠKODA AUTO or its
Notes
7

Structure of the Owner's Manual and further information
Structure of the manual
The Owner's Manual is hierarchically divided into the following areas.
■
Section (e.g. operating instructions) - the title of the section is shown down
in the left-hand corner
■
Main chapter (e.g. checking and refilling) - the title of the main chapter is
shown down in the right-hand corner
■
Chapter (e.g. engine oil)
■
Introductory information - Module overview within the chapter, in-
troductory information about the chapter content and, where appropriate, information relevant to the whole chapter
■
Module (e.g. checking and refilling)
Information Search
When searching for information in the Owner´s Manual, we recommend using
the Index at the end of the manual.
Direction indications
All direction indications such as “left”, “right”, “front”, “rear” relate to the forward direction of travel of the vehicle.
Units
The volume, weight, speed and length data are given in metric units, unless
otherwise indicated.
Display
In this Owner's Manual, the screen on the MAXI DOT display is used as the display illustration, provided nothing is otherwise stated.
Help in an emergency
In case of breakdown, the breakdown service contact information required can
be found in the following places.
▶
Contact details for the ŠKODA Partner (e.g. window sticker)
▶
Infotainment (Telephone - breakdown service / information service menu)
▶
ŠKODA mobile application
▶
ŠKODA web pages
8
Structure of the Owner's Manual and further information

Abbreviations
Abbreviation Definition
rpm Engine revolutions per minute
ABS Anti-lock brake system
AG Automatic gearbox
AGM Vehicle battery type
TCS Traction control
CO
COC Declaration of conformity
DSG Automatic double clutch gearbox
EDL Electronic differential lock
ECE Economic Commission for Europe
EPC EPC fault light
ESC Electronic Stability Control
ET Rim depth
EU European Union
HBA Hydraulic brake assist
HHC Uphill start assist
KESSY Keyless unlocking, starting and locking
kW Kilowatt, measuring unit for output
LED Lighting element type
MCB Multi-collision brake
MG Manual gearbox
MPI Gasoline engine with a multi-point fuel injection
MSR Engine drag torque control
N1
Nm Newton meter, measuring unit for the engine torque
PIN personal identification number
TDI CR
TSA Trailer stabilisation
Carbon dioxide
2
Panel van intended exclusively or mainly for the transportation of goods
Diesel engine with turbo charging and common rail injection
system
Abbreviation Definition
TSI Petrol engine with turbo charging and direct injection
VIN Vehicle identification number
W Watt, unit of power
Wi-Fi wireless data network
Abbreviations
9

Safety
Passive Safety
General information
Introduction
This chapter contains information on the following subjects:
Before setting off
Driving safety 10
In this section of the instructions you will find important information on the
subject of passive safety. We have combined everything here which you
should be familiar with, for example, regarding seat belts, airbags, safety of
children and anything similar.
Other important safety information can also be found in the subsequent sections of this Owner's Manual. The Owner's Manual should therefore always be
kept in the vehicle.
Before setting off
For your own safety and the safety of the people travelling with you, please
pay attention to the following points before setting off.
▶
Check the lights and turn signal lights are functioning correctly.
▶
Check the wiper function and the wiper blades for wear. Check the windscreen washer fluid level.
▶
Ensure that all of the windows offer good visibility to the outside.
▶
Adjust the rear-view mirror so that vision to the rear is guaranteed. Ensure
that the mirrors are not covered.
▶
Check the tyre inflation pressure.
▶
Check the engine oil, brake fluid and coolant level.
▶
Secure all items of luggage.
▶
Do not exceed the permissible axle loads and permissible gross weight of the
vehicle.
▶
Close all doors as well as the bonnet and boot lid.
▶
Ensure that no objects can obstruct the pedals.
▶
Protect children using a suitable child seat » page 19, Transporting children
safely.
▶
Adopt the correct seated position. Tell your passengers to assume the correct seated position » page 10, Correct and safe seated position.
Driving safety
For safety in traffic, the following precautions must be observed.
▶
Do not become distracted from concentrating on the traffic situation, (e.g. by
your passengers or mobile phone calls).
10
▶
Never drive when your driving ability is impaired, (e.g. due to medication, alcohol, drugs or similar).
▶
Keep to the traffic regulations and the permissible speed limit.
▶
Always adjust the driving speed to the road, traffic and weather conditions.
▶
Take regular breaks on long journeys (at least every two hours).
Correct and safe seated position
Introduction
This chapter contains information on the following subjects:
The correct seating position for the driver
Adjusting the steering wheel position
Correct seating position for the front passenger
Correct seating position for the passengers in the rear seats
Always assume the correct seated position before setting off and do not
change this position while driving. Also advise your passengers to adopt the
correct seated position and not to change this position while the car is moving.
The following list contains instructions for the Passenger which, if not observed, may cause serious injuries or death.
▶
Do not lean against the dash panel.
▶
Do not put your feet on the dash panel.
The following list contains instructions for all Passengers which, if not observed, may cause serious injuries or death.
▶
Do not sit only on the front part of the seat.
▶
Do not sit facing to one side.
▶
Do not lean out of the window.
▶
Do not put your limbs out of the window.
▶
Do not put your feet on the seat cushion.
11
11
12
12
10
Safety
WARNING
■
The front seats and all head restraints must be adjusted to match the
body size at all times and the seat belt must always be fastened properly to
provide the most effective levels of protection to the passengers.
■
Each occupant must correctly fasten the seat belt belonging to the seat.
Children must be fastened » page 19, Transporting children safely with a
suitable restraint system.
■
The seat backrests must not be tilted too far back when driving, as this
will impair the function of the seat belts and of the airbag system – risk of
injury!
WARNING
By sitting incorrectly, the occupant is risking life-threatening injuries.
The correct seating position for the driver
Fig. 2
Correct seated position for the driver/correct steering wheel posi-
tion
Read and observe on page 11 first.
For your own safety and to reduce the risk of injury in the event of an accident,
the following instructions must be observed.
Adjust the driver’s seat in the forward/back direction so that the pedals
can be fully depressed with slightly bent legs.
Adjust the seat backrest so that the highest point of the steering wheel
can be reached with your arms at a slight angle.
Adjust the steering wheel so that the distance between the steering
wheel and your chest is at least 25 cm » Fig. 2 - A.
Adjust the headrest so that the top edge of the headrest is at the same
level as the upper part of your head (not for seats with integrated headrests) » Fig. 2 - B.
Correctly fasten the seat belt » page 12, Using seat belts.
WARNING
■
A distance of least 25 cm to the steering wheel should be maintained,
otherwise the airbag system will not be able to protect you - hazard!
■
When driving, hold the steering wheel with both hands firmly on the outer edge in the “9 o'clock” and “3 o'clock” position » Fig. 2. Never hold the
steering wheel in the “12 o'clock” position or in any other way (e.g. in the
middle, inner edge of the steering wheel or similar). Otherwise, you could
sustain serious injury to the arms, hands and head if the airbag is activated.
■
Ensure there are no objects in the driver's footwell as they may get behind the pedals while driving. You would then no longer be able to operate
the clutch, brake or acceleration pedals.
Adjusting the steering wheel position
Fig. 3 Adjusting the steering wheel position
Read and observe on page 11 first.
The height and forward/back position of the steering wheel can be adjusted.
Swing the safety lever under the steering wheel in the direction of arrow
›
» Fig. 3.
Adjust the steering wheel to the desired position. The steering wheel can be
›
adjusted in direction of arrow 2.
Pull the holder until it stops in arrow direction 3.
›
1
Passive Safety
11

WARNING
■
Never adjust the steering wheel when the vehicle is moving only when
the vehicle is stationary!
■
The safety lever must always be locked so that the steering wheel cannot
accidentally change position – risk of accident!
Correct seating position for the front passenger
Read and observe on page 11 first.
For passenger safety and to reduce the risk of injury in an accident, the following instructions must be observed.
Position the front passenger seat back as far as possible. The front pas-
senger must maintain a distance of at least 25 cm to the dash panel so
that the airbag offers the greatest possible safety if it is deployed.
Adjust the headrest so that the top edge of the headrest is at the same
level as the upper part of your head » Fig. 2 on page 11 B (not for seats
with integrated headrests).
Correctly fasten the seat belt » page 12.
WARNING
■
A distance of least 25 cm to the dashboard should be maintained, other-
wise the airbag system will not be able to protect you - hazard!
■
Always keep your feet in the footwell when the car is being driven – never place your feet on the instrument panel, out of the window or on the
surface of the seats! You will be exposed to increased risk of injury if it becomes necessary to apply the brake or in the event of an accident. If an airbag is deployed, you could suffer fatal injuries by adopting an incorrect
seated position!
Correct seating position for the passengers in the rear seats
Read and observe
For the safety of the passengers in the rear seats, and to reduce the risk of
injury in an accident, the following instructions must be observed.
Adjust the headrest such that the top edge of the headrest is at the same
level as the upper part of the head » Fig. 2 on page 11 B.
Correctly fasten the seat belt » page 12, Using seat belts.
on page 11 first.
Seat belts
Using seat belts
Introduction
This chapter contains information on the following subjects:
Correct routing of seat belt 13
Fastening and unfastening seat belts 14
Seat belts that are fastened correctly offer good protection in the event of an
accident. They reduce the risk of an injury and increase the chance of survival
in the event of a major accident.
The seat belts reduce the kinetic energy (energy of motion) to a considerable
extent. They also prevent uncontrolled movements which, in turn, may well result in severe injuries.
When transporting a child the following instructions must be observed
» page 19, Transporting children safely.
WARNING
■
Fasten seat belts before every ride! This also applies to other passengers
- there is a danger of injury!
■
Maximum seat belt protection is only achieved if you are correctly seated
» page 10, Correct and safe seated position.
■
The seat backrests of the front seats must not be tilted too far to the rear
otherwise the seatbelts can lose their effectiveness.
WARNING
Information on dealing with the safety belts
■
The belt webbing must not be jammed in-between at any point or twis-
ted, or chafe against any sharp edges.
■
Make sure you do not catch the seat belt in the door when closing it.
WARNING
Information on the proper use of the safety belts
■
Adjust the height of the belt in such a way that the shoulder part of the
belt is roughly positioned across the middle of your shoulder – on no account across your neck.
12
Safety
WARNING (Continued)
■
No two persons (also not children) should ever use a single seat belt to-
gether.
■
The lock tongue should only be inserted into the lock which is the correct
one for your seat. Wrong use of the safety belt will reduce its capacity to
protect and the risk of injury increases.
■
Many layers of clothing and loose clothing (e. g. a winter coat over a jacket) do not allow you to be correctly seated and impairs proper operation of
the seat belts.
■
Do not use clamps or other objects to adjust seat belts (e.g. for shortening the belts for smaller persons).
■
The seat belts for the rear seats can only fulfil their function reliably
when the seat backrests are correctly locked into position » page 63.
WARNING
Information on the care and maintenance of the safety belts
■
The belt webbing must always be kept clean. Soiled belt webbing may impair proper operation of the inertia reel » page 122.
■
The seat belts must not be removed or changed in any way. Do not attempt to repair the seat belts yourself.
■
Check the condition of all the seat belts on a regular basis. If damage to
the parts of the seat belt system (e.g. the strap, the belt connectors, the
retractor, the lock or similar) are detected, the seat belt in question must
be replaced immediately by a specialist.
■
Seat belts which have been subjected to stress in an accident should be
replaced by a specialist garage. The anchorage points for the belts should
also be checked.
Correct routing of seat belt
Fig. 4 Routing of belt webbing over the shoulders and the lap belt/Routing of belt webbing for an expectant mother
Fig. 5 Seat belt height adjusters for front seats
Read and observe on page 12 first.
It is important that the belt is properly routed to ensure seat belts offer the
maximum protection.
The shoulder belt should be positioned approximately over the middle of your
shoulder (on no account across your neck) and lie flush to the chest » Fig. 4 -
.
The lower part of the belt should run across the pelvis (it should not lie on top
of the stomach) and must always fit snugly » Fig. 4 - .
For pregnant women, the lower part of the belt must be positioned as low
down as possible across the pelvis, to avoid exerting any pressure on the lower abdomen » Fig. 4 - .
Seat belts
13
Seat belt height adjusters for front seats
Push the return pulley upwards in the direction of arrow » Fig. 5 - .
›
Or: push together the mechanism in the direction of arrows 1 and push the
›
return pulley downwards in the direction of arrow 2 » Fig. 5 - .
Then pull firmly on the belt to ensure that the seat belt height adjuster has
›
correctly locked in place.
WARNING
■
Always ensure that the webbing of the seat belts is properly routed. Seat
belts which are not correctly adjusted can themselves cause injuries even
in minor accidents.
■
A seat belt which is hanging too loose can result in injuries as your body is
moved forward by the kinetic energy produced in an accident and is then
suddenly held firm by the belt.
■
The belt webbing must not run across solid or fragile objects (e.g. pencils,
spectacles, pens, keys etc.). Such objects can cause injury.
Fastening and unfastening seat belts
Fig. 6 Fastening/unfastening the seat belt
Read and observe
Before fastening the belt
Adjust the headrest properly (does not apply to seats with integrated headr-
›
ests).
Adjust the seat (applies to the front seats).
›
Adjust the belt height (applies to the front seats).
›
Fasten
Use the lock tongue to slowly pull the webbing over your chest and pelvis.
›
on page 12 first.
Insert the lock tongue into the belt buckle for the seat » Fig. 6 - until it
›
audibly clicks into place.
Pull on the belt to check that it has engaged correctly in the lock.
›
Release
Grip the lock tongue and press the red button in the buckle » Fig. 6 - , the
›
lock tongue pops out.
Guide the belt back by hand so that the seat belt does not twist and the
›
webbing rolls up fully.
WARNING
The reel opening for the lock tongue must not be blocked otherwise the
lock tongue will not lock into place properly.
Inertia reels and belt tensioners
Introduction
This chapter contains information on the following subjects:
Inertia reels
Belt tensioners 14
Inertia reels
Each seat belt is equipped with an inertia reel.
When pulling slowly on the seat belt, the belt can move freely. When pulling
sharply on the seat belt, the movement is locked by the inertia reel. The belts
also lock when full braking, when the car accelerates, when driving downhill
and when cornering.
WARNING
If the seat belt does not lock when pulling sharply on it, have it inspected
immediately by a specialist garage.
Belt tensioners
Safety for the driver and front passenger wearing their seat belts is enhanced
by the belt tensioners fitted to the inertia reels of the front three-point seat
belts.
14
14
Safety

If there is a collision of a certain severity, the seat belts are tightened by the
belt tensioner so that unwanted body motion is prevented.
Belt tensioners are not activated in the event of minor collisions, in the case
of a roll-over and also not in accidents in which no major forces are produced.
WARNING
■
Any work on the belt tensioner system, including the removal and installation of system components because of other repair work, must only be
carried out by a specialist garage.
■
If the belt tensioners have been deployed, it is then necessary to replace
the entire system.
Note
■
The belt tensioners can also be deployed if the seat belts are not fastened.
■
Smoke is generated when the belt tensioners are deployed. This is not an in-
dication of a fire in the vehicle.
Airbag system
Description of the airbag system
Introduction
This chapter contains information on the following subjects:
System description 15
Airbag deployment 16
Safety instructions 17
The airbag system provides, as a supplement to the seat belts, additional occupant protection during severe frontal and side-on collisions.
The airbag will only provide optimum protection in conjunction with wearing
the seat belt - the airbag is not a substitute for the seat belts.
The functional status of the airbag system is indicated by the indicator light
in the instrument cluster » page 32.
System description
Fig. 7 Airbag installation points
Airbag installation points » Fig. 7
A
Front airbags
B
Side airbags
C
Head airbags
Airbag system
15
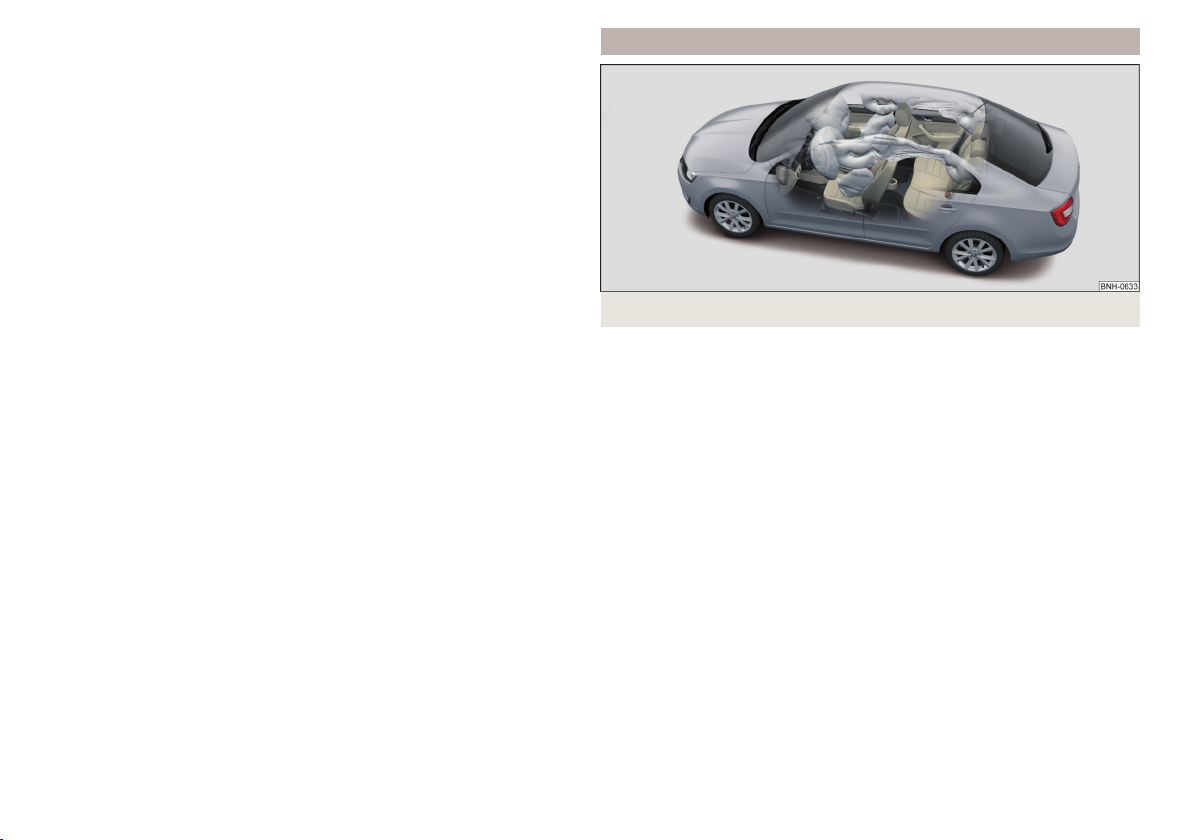
Front airbags - the forward thrust of the driver and of the front passenger is
cushioned when they make contact with the fully-inflated airbag, and the risk
of injury to head and chest is thus reduced.
The front airbags can be identified by the lettering
featured on the steer-
ing wheel and on the dashboard on the passenger side.
Side airbags - the load of the occupants is cushioned when plunged into the
fully inflated airbag. The risk of injury to the entire upper body (chest, stomach
and pelvis) is reduced on the side facing the door.
The side airbags can be identified by a label with the lettering
marked on
the front seat backrests.
Head airbags - the forward movement of the body is cushioned when it makes
contact with the fully inflated airbag, and the risk of injury to head and chest is
thus reduced.
The head airbags are provided with the lettering
marked on the B-pillar
cladding.
Depending on the vehicle equipment, the airbag system consists of the
following parts.
▶
Individual airbags.
▶
Warning light in the instrument cluster » page 32.
▶
Key switch for the front passenger airbag » page 18.
▶
Warning light for the front passenger airbag in the middle of the dash panel
» page 18.
Airbag deployment
Fig. 8 Inflated airbags
The airbag system is only functional when the ignition is switched on.
When triggered, the airbag fills with gas and unfolds. The inflation of the airbag is carried out in a fraction of a second.
When the airbag inflates, smoke is released. This is not a sign of a fire in the
vehicle.
Triggering conditions
It is not possible to generally determine which deployment conditions apply to
the airbag system in every situation. The important factors here are the hardness of the object with which the vehicle collides, the angle of impact, vehicle
speed etc.
A decisive factor in the deployment of the airbags is the degree of deceleration
at the time. If the vehicle deceleration which occurs and is measured during
the collision remains below the prescribed reference values specified in the
control unit, the airbags are not deployed although the vehicle may well suffer
severe damage to the bodywork as a consequence of the accident.
The following airbags will be deployed in the event of a severe frontal
collision.
▶
Driver’s front airbag.
▶
Front passenger airbag.
16
Safety

The following airbags will be deployed in the event of a severe side collision.
▶
Front side airbag.
▶
Head airbag.
When an airbag is deployed, the following events occur.
▶
The hazard warning lights are switched on.
▶
All the doors are unlocked.
▶
The fuel supply to the engine is interrupted.
▶
The interior light comes on (if the automatic operation of the interior light is
switched on - position ).
When there is no air bag deployment?
With minor frontal and side collisions, rear collision, overturning of the vehicle
or vehicle roll-over there is no airbag deployment.
Safety instructions
Fig. 9
Safe distance from the steering
wheel and dashboard
WARNING
General information
■
The seat belts and the airbag system can only offer optimum protection
if the driver and passengers are seated properly » page 10.
■
The airbag unleashes enormous force when triggered, which can lead to
serious injuries or fatalities if the driver and passengers are not seated
properly. This applies in particular to children who are transported without
using a suitable child safety seat » page 21.
■
If there is a fault, have the airbag system checked immediately by a specialist garage. Otherwise, there is a risk of the airbag not being activated in
the event of an accident.
■
If the airbag has been deployed, the airbag system must then be replaced.
■
The surface of the steering wheel and the dashboard should only be
cleaned with a dry or slightly dampened cloth in the area of the front airbags.
WARNING
Information about the front airbags
■
For the driver and front passenger, it is important to maintain a distance
of at least 25 cm to the steering wheel or to the dashboard » Fig. 9 - A, If
you do not keep this distance, the airbag system cannot protect you There is a risk to life! The front seats and the head restraints must always
also be correctly adjusted to match the body size of the occupant.
■
The front passenger airbag must be deactivated if using a rear-facing
child seat on the front passenger seat » page 18, Airbag deactivation. If
this is not done, there is a risk of the child suffering severe or even fatal
injuries if the front passenger airbag is deployed.
■
No other persons, animals or objects should be placed in front of the occupants in the front seats in the deployment area of the front airbags.
■
The steering wheel and the surface of the dashboard on the passenger
side must not be stickered, covered or modified in any way. No parts (e.g.
cup holders, mobile phone mounts and the like) may be mounted near the
airbag installation points and in the airbag deployment area.
■
Never place objects on the surface of the dashboard on the passenger
side.
WARNING
Information about for side and head airbags
■
No objects (e.g. sun visors turned towards the windows) should be located in the deployment area of the side and head airbags. No accessories
(e.g. cup holders etc.) should be fitted to the doors - risk of injury!
■
Hang only light clothing on the hooks in the vehicle, do not leave any
heavy or sharp objects in the pockets. Do not use hangers to hang up the
clothes.
■
No excessive force, e.g. through blows, kicks etc. should be applied to the
seat backrests - there is a risk of damage to the side airbags. The side airbags would not be deployed in such a case!
■
Any seat or protective covers which you fit to the driver or front passenger seats must only be of a type expressly authorised by ŠKODA AUTO. In
view of the fact that the airbag inflates out of the backrest of the seat, use
of non-approved seat or protective covers would considerably impair the
protective function of the side airbag.
■
Any damage to the original seat covers or stitching at the installation
points for the side airbags should be immediately repaired by a specialist
company.
Airbag system
17
WARNING
Information on the use of the airbag system
■
Any work on the airbag system, including the installation and removal of
system components due to other repair work (e.g. removal of the steering
wheel), must only be carried out by a specialist garage. Further information
» page 116.
■
No changes of any sort should be made to parts of the airbag system, the
front bumper or the bodywork.
■
Do not manipulate individual parts of the airbag system, as this might result in the airbag being deployed.
Airbag deactivation
Introduction
This chapter contains information on the following subjects:
Deactivating airbags
Deactivating the front passenger airbag 18
Deactivating airbags
The front passenger airbag can be switched off with the key-operated switch
» Fig. 10 on page 18 - .
We recommend that you ask a ŠKODA service partner to deactivate any other
airbags.
A warning light indicates that the airbag has been deactivated» page 32.
Deactivating an airbag should be considered in cases such as the ones below.
▶
If a child seat must be used on the front passenger seat, where the child is
transported facing towards the rear» page 19.
▶
If it is not possible to maintain a distance of at least 25 cm between the middle of the steering wheel and chest, despite the driver's seat being correctly
adjusted.
▶
If special attachments are required in the area of the steering wheel because
of a physical disability.
▶
If different seats have been fitted (e.g. orthopaedic seats without side airbags).
WARNING
If an airbag is deactivated at the time of the vehicle being sold, the purchaser must be informed!
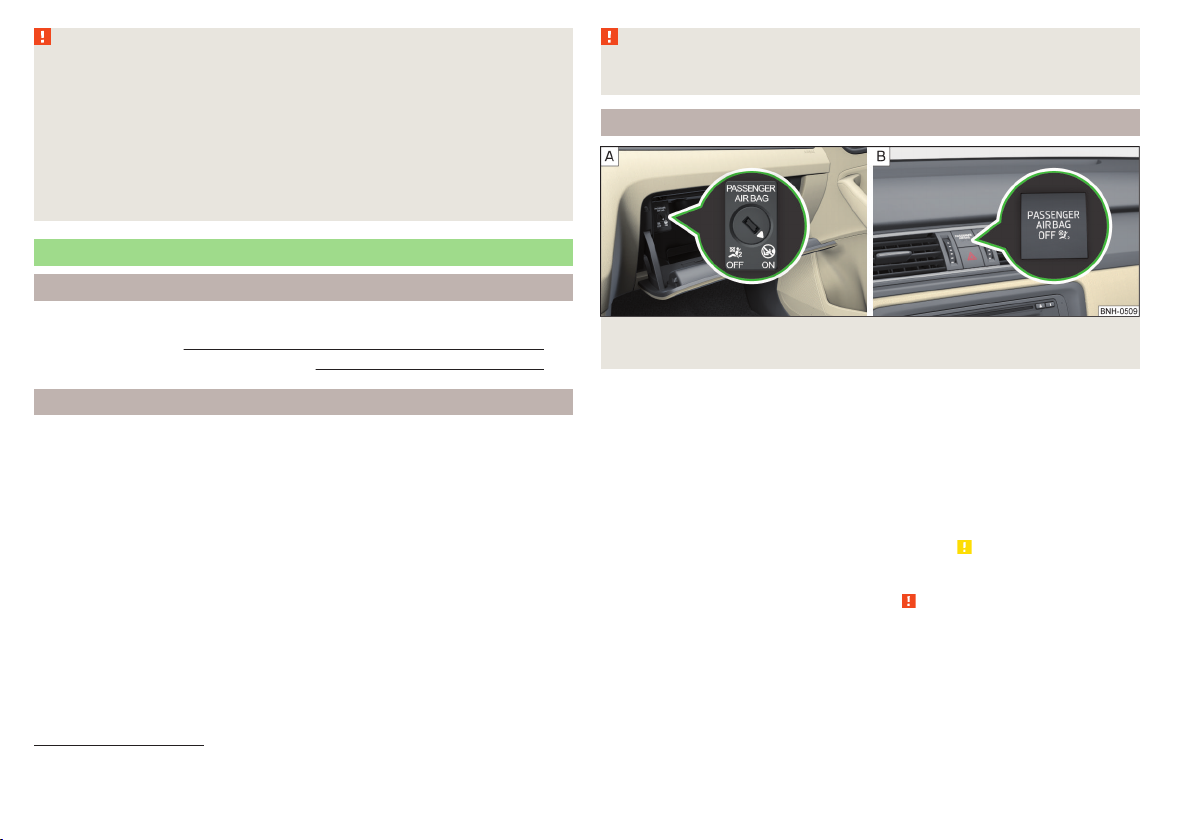
Deactivating the front passenger airbag
Fig. 10 Key-operated switch for the front passenger airbag / warning
18
light for front seat passenger airbag deactivation
Switch positions » Fig. 10 -
The front passenger airbag has been deactivated - the warning light
» Fig. 10lights up after switching on the ignition-
The front passenger airbag is activated - the warning light does not light
up when the ignition is turned on
Switch off
Switch off the ignition.
›
Open the storage box on the front passenger's side.
›
Fold the key bit out completely for the radio key » .
›
Carefully insert the key into the key slot in the key switch as far as the stop.
›
Use the key to turn the slot of the key switch carefully into the position
›
Pull the key out of the slot in the switch » .
›
Close the storage compartment on the front passenger side.
›
Check that the warning light
›
Switching on
Switch off the ignition.
›
Open the storage box on the front passenger's side.
›
lights up after the ignition is switched on.
1)
.
1)
The warning light comes on for a few seconds after the ignition is switched on, goes out for about
1 second and then comes on again.
18
Safety

Fold the key bit out completely for the radio key » .
›
Carefully insert the key into the key slot in the key switch as far as the stop.
›
Use the key to turn the slot of the key switch carefully into the position .
›
Pull the key out of the slot in the key switch » .
›
Close the storage compartment on the front passenger side.
›
Check that the warning light
›
switched on.
WARNING
■
The key cannot be inserted into the key switch while driving. Shocks can
cause the key to turn in the slot and trigger the airbag! The airbag could be
triggered unexpectedly in an accident - it may result in injury or death!
■
The driver is responsible for whether the airbag is switched on or switched off.
■
Only switch off the airbag when the ignition is switched off! Otherwise a
fault can occur in the system for deactivating the airbag.
■
If the
be deployed in an accident! Have the airbag system checked by a specialist
garage immediately.
CAUTION
An insufficiently folded out key bit can damage the key switch!
warning light is flashing, the front passenger airbag will not
does not light up after the ignition is
Transporting children safely
Child seat
Introduction
To reduce the risk of injury in an accident, children should only be transported
in child seats!
This chapter contains information on the following subjects:
Use of a child seat on the front passenger seat 20
Use of a child seat on the front seat 21
Child safety and the side airbag 21
Classification of child seats 21
Use of child safety seats which are secured using a seat belt 21
Please refer to the instructions in this Owner's Manual and the child seat manufacturer's instructions with regard to the installation and use of the child
seat.
For safety reasons, we recommend that you always transport children on the
rear seats. Only transport a child on the passenger seat in exceptional circumstances.
Child seats complying with the ECE-R 44 Economic Commission for Europe
standard must be used.
Child seats that comply with the ECE-R 44 standard are identified with a test
mark that cannot be removed: a large E within a circle with the test number
below.
WARNING
■
One should never carry children, and also not babies! - on one's lap.
■
When leaving the vehicle, do not leave children unattended in the vehicle.
In an emergency, they might not be able to get out of the vehicle on their
own or help themselves. Can be fatal at very high or very low temperatures!
■
The child must be secured in the vehicle during the entire journey! Otherwise, the child would be thrown through the vehicle in the event of an accident, causing fatal injuries to both the child and other occupants.
Transporting children safely
19
WARNING (Continued)
■
Children are exposed to an increased risk of injury in the event of an accident if they lean forward or adopt an incorrect seated position when the
vehicle is moving. This particularly applies to children who are transported
on the front passenger seat as they can suffer severe, or even fatal injuries
if the airbag system is deployed!
■
Pay particular attention to the information provided by the manufacturer
of the child safety seat regarding the correct routing of the belt. Seat belts
which are not correctly adjusted can themselves cause injuries even in minor accidents.
■
Safety belts must be checked to ensure that they are running properly.
One should also ensure that the belt is not damaged by sharp-edged fittings.
■
When installing the child seat on the back seat, the corresponding front
seat must be adjusted so that there is no contact between the front seat
and the child seat or the child being transported in a child seat.
■
When installing a child seat in which the child faces forward, adjust the
head restraints so that they are as high as possible.
■
If the headrests still prevent the child seat from being installed, even in
the highest position, you will need to remove them » page 64. After removing the child seat, refit the head restraints.
Note
We recommend that you use child seats from ŠKODA Original Accessories.
These child seats were developed and also tested for use in ŠKODA vehicles.
They meet the ECE-R 44 standard.
Use of a child seat on the front passenger seat
Does not apply to Taiwan
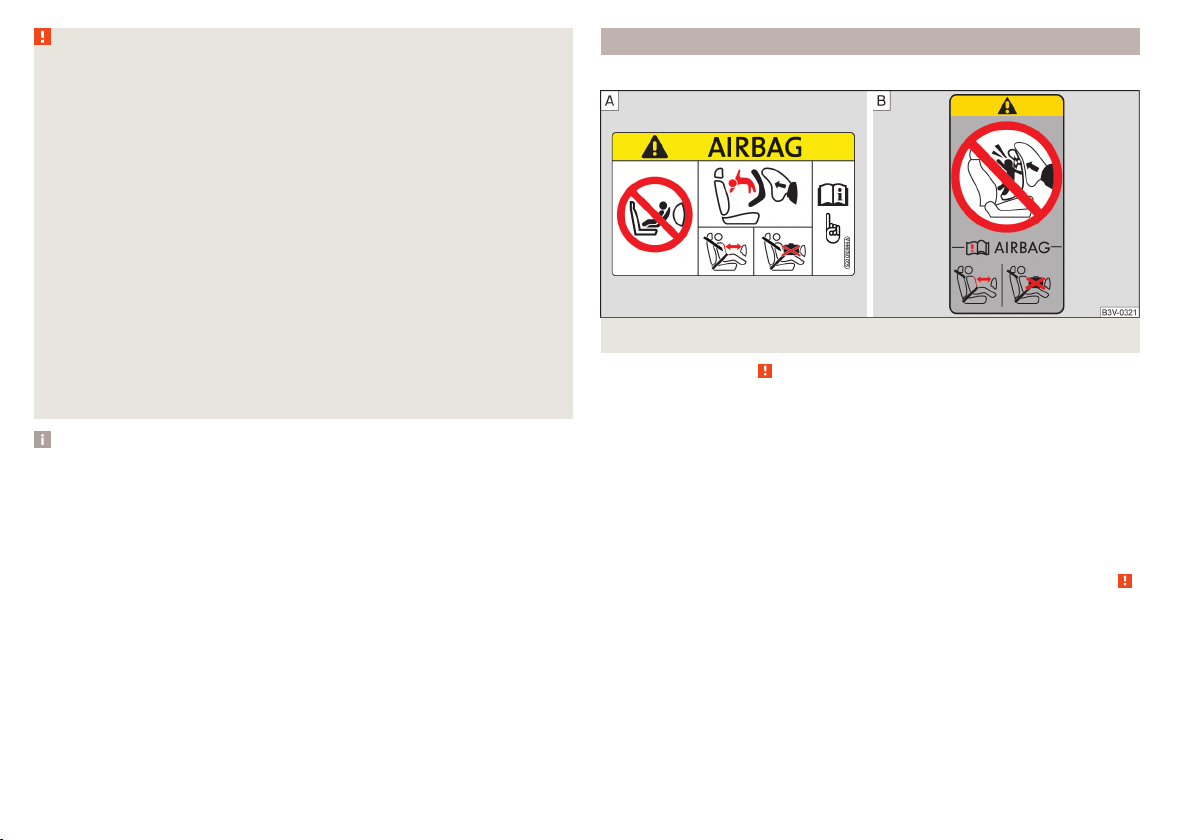
Fig. 11 Warning labels
Read and observe on page 19 first.
Never use a rearward-facing child restraint system on a seat which is protected by an active airbag. This could cause serious injury to the child, even
death.
This warning is also given on stickers that are located in the following places.
▶
On the passenger sun visor » Fig. 11 - .
▶
On the B-column on the front passenger side » Fig. 11 – .
The following instructions must be followed when using a child seat on the
front passenger seat.
▶
It is essential to deactivate the front passenger airbag if using a child seat in
which the child is transported with its back facing the direction of travel »
▶
If possible, adjust the front passenger seat backrest so that it is as vertical,
so as to ensure secure contact between the passenger seat backrest and the
back of the child seat.
▶
If possible, move the front passenger seat backwards so that there is no contact between the front passenger seat and the child seat behind it.
▶
Set the height-adjustable front passenger seat as high up as possible.
▶
Set the front passenger seat belt as high up as possible.
▶
With child safety seats in groups 2 and 3, make sure that the loop-around fittings attached to the child seat headrest is positioned in front of or at the
same height as the loop-around fittings on the B pillar on the passenger side.
.
20
Safety
Adjust the height of the front passenger seat belt so that the belt does not
“jam” in the return pulley. In the event of an accident, there is the risk of injury to the neck of the child carried due to the seat belt!
WARNING
■
Never use a rear-facing child seat on the front passenger seat if the passenger airbag is activated. This child safety seat is positioned in the deployment area of the front passenger airbag. The airbag may cause the child severe, or even fatal injuries, in the event of it being deployed.
■
Once a child seat in which the child is transported with its back to the direction of travel is no longer being used on the passenger seat, the front
passenger airbag should be reactivated.
Use of a child seat on the front seat
Applies to Taiwan
Fig. 12
Warning labels
Read and observe on page 19 first.
No babies, infants or children are to be carried on the passenger seat.
A label to this effect can also be found on the passenger's sun visor » Fig. 12.
Child safety and the side airbag
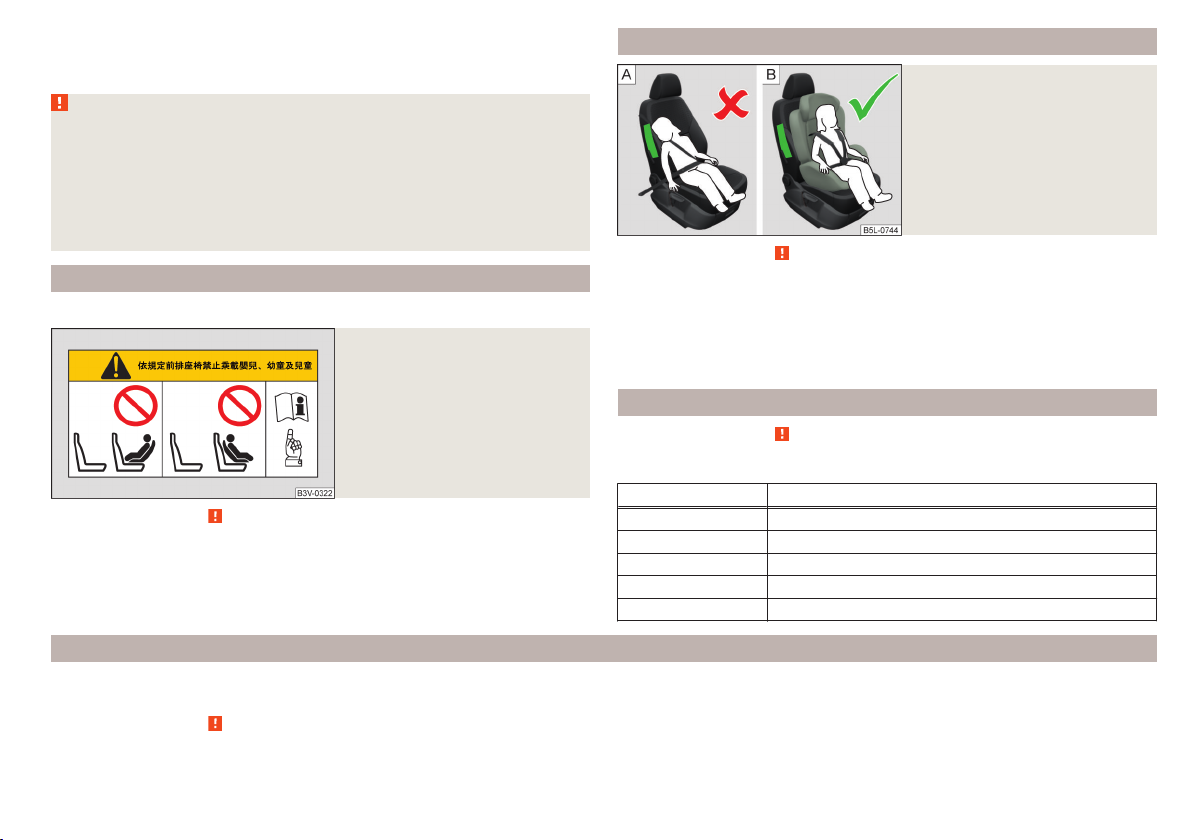
Fig. 13
Incorrect seated position of a
child who is not properly secured
– risk from the side airbag/Child
properly protected by safety seat
Read and observe on page 19 first.
The child must not be positioned in the deployment area of the side airbag
» Fig. 13 - .
There must be sufficient room between the child and the deployment area of
the side airbag to ensure that the airbag can provide as much protection as
possible » Fig. 13 - .
Classification of child seats
Read and observe
Classification of child seats according to the ECE-R 44 standard.
Group Weight of the child
0 up to 10 kg
0 up to 13 kg
1 9-18 kg
2 15-25 kg
3 22-36 kg
on page 19 first.
Use of child safety seats which are secured using a seat belt
Never use a rear-facing child seat on the front passenger seat if the passenger airbag is activated. This child safety seat is positioned in the deployment area of
the front passenger airbag. The airbag may cause the child severe, or even fatal injuries, in the event of it being deployed.
Read and observe on page 19 first.
Overview of the usability of child seats fastened with a seat belt on each of the seats in accordance with the ECE-R 16 standard.
Transporting children safely
21
Group
0
up to 10 kg
0
up to 13 kg
1
9-18 kg
2
15-25 kg
3
22-36 kg
a)
If the middle rear seat is not provided with a headrest, then a child seat of Group 2 or 3 is only to be used
if this has its own built-in headrest. If the child seat of Group 2 or 3 does not have its own built-in headrest, the child seat must be attached to the outer rear seat.
U
“Universal” child seat category - a child seat designed to be attached to
Front passenger
seat
U U U
U U U
U U U
U U U
U U U
Rear seats
External
Rear seat
Centre
a)
a)
the seat using the seat belt.
Fastening systems
Introduction
This chapter contains information on the following subjects:
Attachment points of the
Use of child safety seats with the
Attachment points of the
-system
system
-system
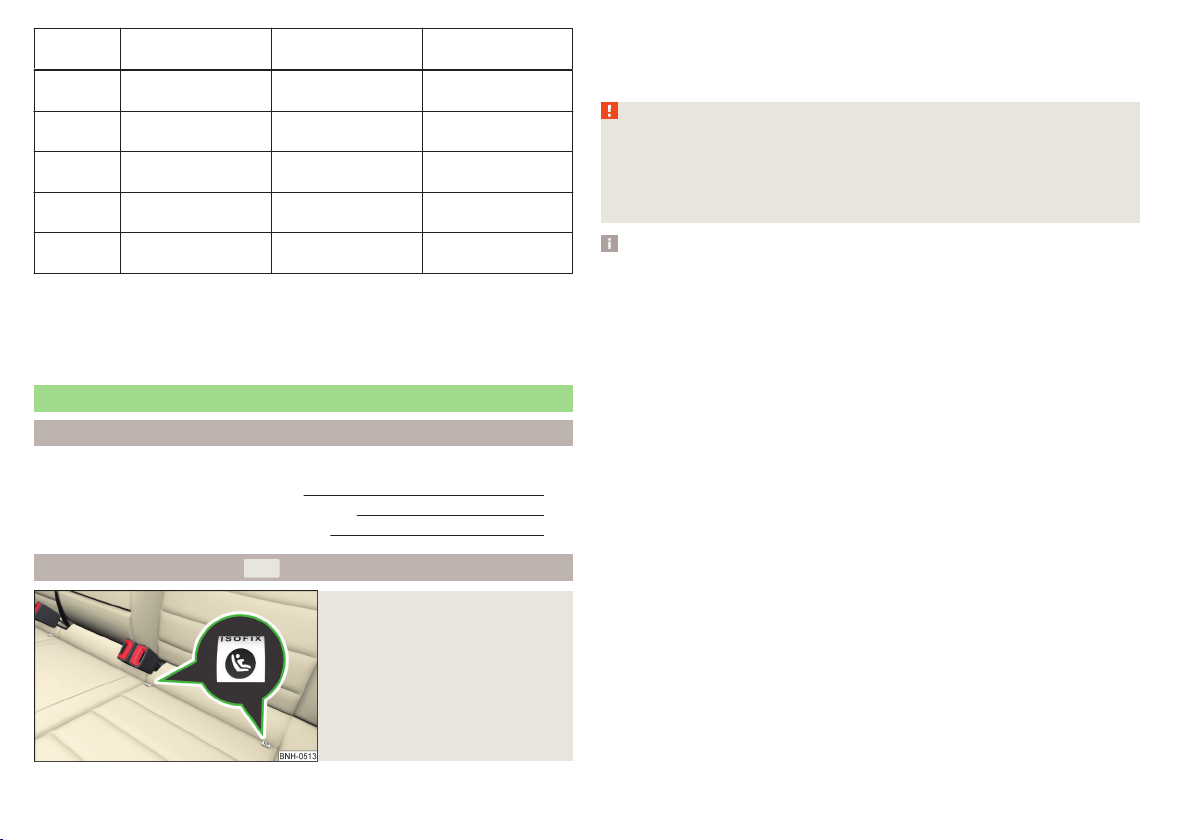
is a system for securing child seats quickly and safely.
There are two locking eyes between the rear exterior seats for fixing the child
in place using the
-system » Fig. 14.
WARNING
■
Always refer to the instructions from the manufacturer of the child seat
when installing and removing a child seat with the -system.
■
Never attach other child seats, belts or objects to the attachment points
eyes intended for the installation of a child seat with the
of death!
Note
■
A child seat fitted with the system can only be mounted in a vehicle fitted with a system if the child seat has been approved for this type of vehicle. Further information is available from a ŠKODA Partner.
■
Child seats with the
-system can be purchased from ŠKODA Original Ac-
cessories.
22
23
24
-system – risk
Attachment points of the
22
Safety
-system
Fig. 14
Labels of the system
Use of child safety seats with the system
Never use a rear-facing child seat on the front passenger seat if the passenger airbag is activated. This child safety seat is positioned in the deployment area of
the front passenger airbag. The airbag may cause the child severe, or even fatal injuries, in the event of it being deployed.
Overview of the usefulness of child seats fastened with the -system on each of the seats in accordance with the ECE-R 16 standard.
Group
0
up to 10 kg
0
up to 13 kg
Size class of
the child seat
a)
Front passenger seat Outer rear seats Rear seat middle
E X IL-SU X
E
X IL-SU XD
C
D
1
9-18 kg
C
B
X
B1
IL-SU
IUF
X
A
2
15-25 kg
3
22-36 kg
a)
The size category is shown on the label attached to the child seat.
- X IL-SU X
- X IL-SU X
IL-SU The seat is suitable for the use of approved child seats in in the “Semi-Universal”category. The “Semi-Universal” category means that the child seat
with the
-system is approved for your vehicle. Observe the list of vehicles that comes with the child seat.
IUF The seat is suitable for the installation of a child seat with “Universal” approval and attachment with the system belt.
X The seat is not fitted with -system attachment points.
Transporting children safely
23

Attachment points of the -system
Fig. 15
Attachment points of the
-system
is a fastening system, which restricts the movement of the upper part
of the child seat.
The locking eyes A for attaching the belt of a child seat with the
tem are located on the rear side of the outer rear seat backrests » Fig. 15.
WARNING
■
Always refer to the instructions from the manufacturer of the child seat
when installing and removing a child seat with the -system.
■
Only use child seats with the
-system on the seats with the lock-
ing eyes.
■
Only ever attach one belt from the child seat to a locking eye.
sys-
24
Safety

Transporting children safely
25
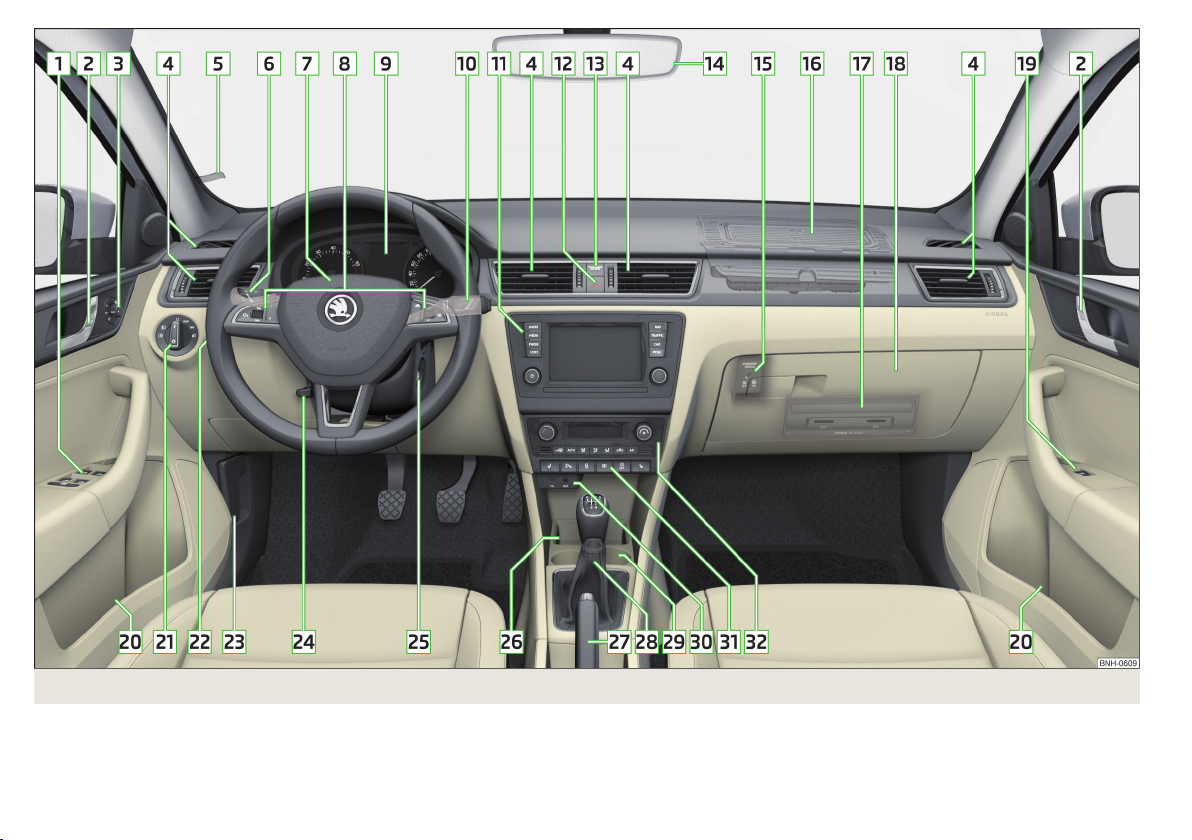
Fig. 16 Cockpit example for LHD models
26
Using the system

Using the system
Cockpit
Overview
1
Electric windows 52
2
Door opening lever 48
3
Electric exterior mirror adjustment 62
4
Air outlet nozzles 82
5
Ticket holder 66
6
Operating lever (depending on equipment):
▶
Direction and high beam 55
▶
Speed regulating system
▶
Speed limiter
7
Steering wheel with horn / with driver's front airbag 15
8
Buttons for operating the information system 37
9
Instrument cluster 28
10
Operating lever:
▶
Windscreen wipers and washers 60
▶
Information system
11
Depending on equipment fitted:
▶
Storage compartment 67
▶
Infotainment » Owner's Manual for Infotainment
12
Button for hazard warning light system
13
Warning light for the front passenger airbag 18
14
Interior rear-view mirror 61
15
Key switch for switching off the front passenger airbag (in front
passenger storage compartment) 18
16
Front passenger airbag 15
17
External Infotainment module (in the front passenger storage
compartment) » Owner's Manual - Infotainment
18
Storage compartment on the front passenger side 71
19
Electric window in the front passenger door 52
20
Storage compartments 67
21
Light switch 54
22
Headlight range control (in the dashboard) 54
23
Bonnet release lever 126
24
Steering wheel locking lever 11
25
Depending on equipment fitted:
▶
Ignition lock 84
▶
Starter button 84
26
Storage compartment 67
27
Handbrake lever 87
28
Depending on equipment fitted:
▶
Gearshift lever (manual gearbox) 88
▶
Selector lever (automatic gearbox) 89
29
Cup holder 68
30
AUX / USB input 67
31
100
101
37
Bar with keys depending on the equipment fitted:
▶
Left seat heating
▶
Traction control (TCS) 94
▶
Parking aid 96
▶
Central locking system 47
▶
Rear window heater 59
▶
START STOP 85
▶
Windscreen heater 59
▶
Right seat heating 65
32
Controls for heating / air conditioning 79
Note
The layout of the controls on right-hand drive vehicles differs partially from
57
that shown in this layout» Fig. 16.
65
Cockpit
27
Instruments and warning lights
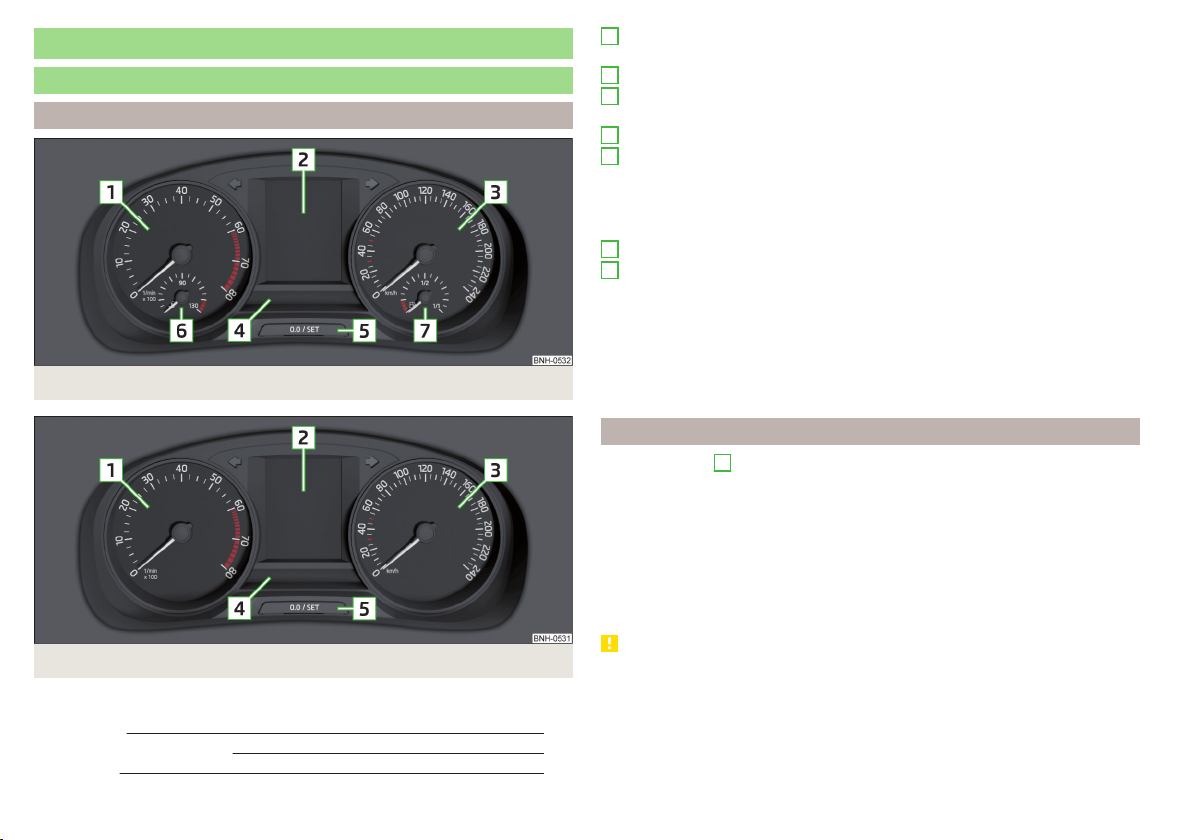
Instrument cluster
Introduction
Fig. 17
Instrument cluster - Version 1
Fig. 18
Instrument cluster - Version 2
This chapter contains information on the following subjects:
Rev counter 28
Coolant temperature gauge 29
Fuel gauge 29
1
Engine revolutions counter » page 28
▶
with indicator lights » page 29
2
Display » page 37
3
Speedometer
▶
with indicator lights » page 29
4
Bar with indicator lights » page 29
5
Operation key:
▶
Set the time » page 38
▶
Reset counter for distance travelled (trip) » page 37
▶
Displaying the distance and days until the next service interval
» page 42
6
Coolant temperature gauge » page 29
7
Fuel gauge » page 29
The brightness of the instrument illumination is set automatically depending
on the ambient lighting throughout. If the visibility is poor and the lights are
not on, the brightness of the instrument lighting reduces to alert the driver to
switch on the lights in due time.
The brightness of the instrument lighting can be activated/deactivated in the
» Owner´s Manual - Infotainment.
Rev counter
The tachometer 1 » Fig. 17 on page 28 or » Fig. 18 on page 28 shows the actual engine speed per minute.
The beginning of the red scale range of the tachometer indicates the maximum permitted engine speed of a driven-in and operating warm engine.
You should shift into the next highest gear before the red scale of the revolution counter is reached, or select mode D / S on the automatic gearbox.
The gear recommendation is important to note in order to maintain the optimum engine speed » page 38.
CAUTION
The rev counter pointer may only move into the red area for a short time - otherwise risk of engine damage!
28
Using the system
 Loading...