

Page 1
ŠkodaAuto
RADIO NAVIGATION SYSTEM SatCompass
SIMPLY CLEVER
Page 2

Introduction
s2ck7book
Page1Friday
April202007
12:38
PM
You have opted for a Škoda vehicle, which is fitted with a radio navigation system SatCompass, (designated
in the following as navigation system ) - we thank you for your confidence in us.
We recommend that you read this Owner's Manual attentively to enable you to become familiar with your navigation system and all that it offers as quickly as possible.
Please do not hesitate to contact your Škoda Service Partner or importer should you have any further questions
regarding any problems with your navigation system which may arise.
Any national legal provisions which vary from the information contained in this Owner's Manual take precedence
over the information contained herein.
We wish you much pleasure with your navigation system and pleasant motoring at all times.
Yo ur Škoda Auto
Page 3

Contents2
s2ck7book
Page2Friday
April202007
12:38
PM
Contents
Layout of this Owner's Manual
(explanations)
. . . . . . . . . . . . . . . . . . . . . . . . . .
General comments . . . . . . . . . . . . . . . . . . .
General view . . . . . . . . . . . . . . . . . . . . . . . . . . . . . . . . . .
Radio navigation system SatCompass . . . . . . . .
Important information . . . . . . . . . . . . . . . . . . . . . . . .
Changing the navigation CD . . . . . . . . . . . . . . . . . .
Functional description of the buttons . . . . . . . .
Display . . . . . . . . . . . . . . . . . . . . . . . . . . . . . . . . . . . . . . . .
Basic settings of the navigation system . . . . . . .
Anti-theft protection . . . . . . . . . . . . . . . . . . . . . . . . . .
Audio . . . . . . . . . . . . . . . . . . . . . . . . . . . . . . . . . . . . . . .
Radio mode . . . . . . . . . . . . . . . . . . . . . . . . . . . . . . . . . . .
Radio mode with RDS . . . . . . . . . . . . . . . . . . . . . . . . .
Switch on radio mode . . . . . . . . . . . . . . . . . . . . . . . .
Set and store station . . . . . . . . . . . . . . . . . . . . . . . . . .
Retrieving the stored stations . . . . . . . . . . . . . . . . .
Replay recorded traffic information . . . . . . . . . .
CD mode . . . . . . . . . . . . . . . . . . . . . . . . . . . . . . . . . . . . . .
Navigation . . . . . . . . . . . . . . . . . . . . . . . . . . . . . . .
3
Overview of navigation basic menu . . . . . . . . . .
Enter . . . . . . . . . . . . . . . . . . . . . . . . . . . . . . . . . . . . . . . . . .
4
Enter destination - Town . . . . . . . . . . . . . . . . . . . . . .
Enter destination - Street - Intersection . . . . . .
4
Enter destination - Town centre . . . . . . . . . . . . . .
5
Destination entry - Special destination . . . . . . .
6
Enter destination - From destination memory
7
Enter destination - Flagged destination . . . . . .
7
Route options . . . . . . . . . . . . . . . . . . . . . . . . . . . . . . . . .
9
Route guidance . . . . . . . . . . . . . . . . . . . . . . . . . . . . . . .
11
Destination memory . . . . . . . . . . . . . . . . . . . . . . . . . .
15
Bypass a jam . . . . . . . . . . . . . . . . . . . . . . . . . . . . . . . . . .
TOUR LIST . . . . . . . . . . . . . . . . . . . . . . . . . . . . . . . . . . . . .
16
Tra vel g uide . . . . . . . . . . . . . . . . . . . . . . . . . . . . . . . . . . .
16
16
Glossary . . . . . . . . . . . . . . . . . . . . . . . . . . . . . . . . . . .
16
Description . . . . . . . . . . . . . . . . . . . . . . . . . . . . . . . . . . .
16
17
Index . . . . . . . . . . . . . . . . . . . . . . . . . . . . . . . . . . . . . . .
17
18
20
20
21
21
23
24
25
26
27
29
31
32
34
35
35
37
37
39
Page 4
Layout of this Owner's Manual (explanations)
s2ck7book
Page3Friday
April202007
12:38
PM
The Owner's Manual has been systematically designed, in order to make it easy for
you to find and absorb the information you require.
Chapters, table of contents and subject index
The text of the booklet are divided into short sections which are combined into
easy-to-read chapters.
The Table of contents is arranged according to the chapters and the detailed
Subject index at the end of this booklet helps you to rapidly find the information
you are looking for.
Brief information and instructions
Each section has a Heading.
This is followed by Brief information (in large italic lettering), which tells you the
subject which is dealt with in this section.
Most of the illustrations are accompanied by an Instruction (in large letters) which
explains to you in a straightforward way the action you have to take. Work steps
which have to be carried out begin with a hyphen.
Special equipment
Equipment which is marked * is only standard on certain vehicle model versions or
only suppliable as special equipment for certain models.
Notes
All three kinds of notes (WARNING! Caution! and Note), which are contained in the
text, are stated at the end of the respective section.
Layout of this Owner's Manual (explanations) 3
Caution
A Caution! note draws your attention to the possibility of damage to your vehicle
or points out general risks of an accident.
Note
A normal Note draws your attention in a general way to important information for
the operation of your unit.
WARNING
The most important notes are marked with the heading WARNING!. These
Warning notes draw your attention to a serious risk of accident or injury.
Page 5
General comments4
A
A
A
A
A
A
A
A8A
s2ck7book
Page4Friday
April202007
12:38
PM
General comments
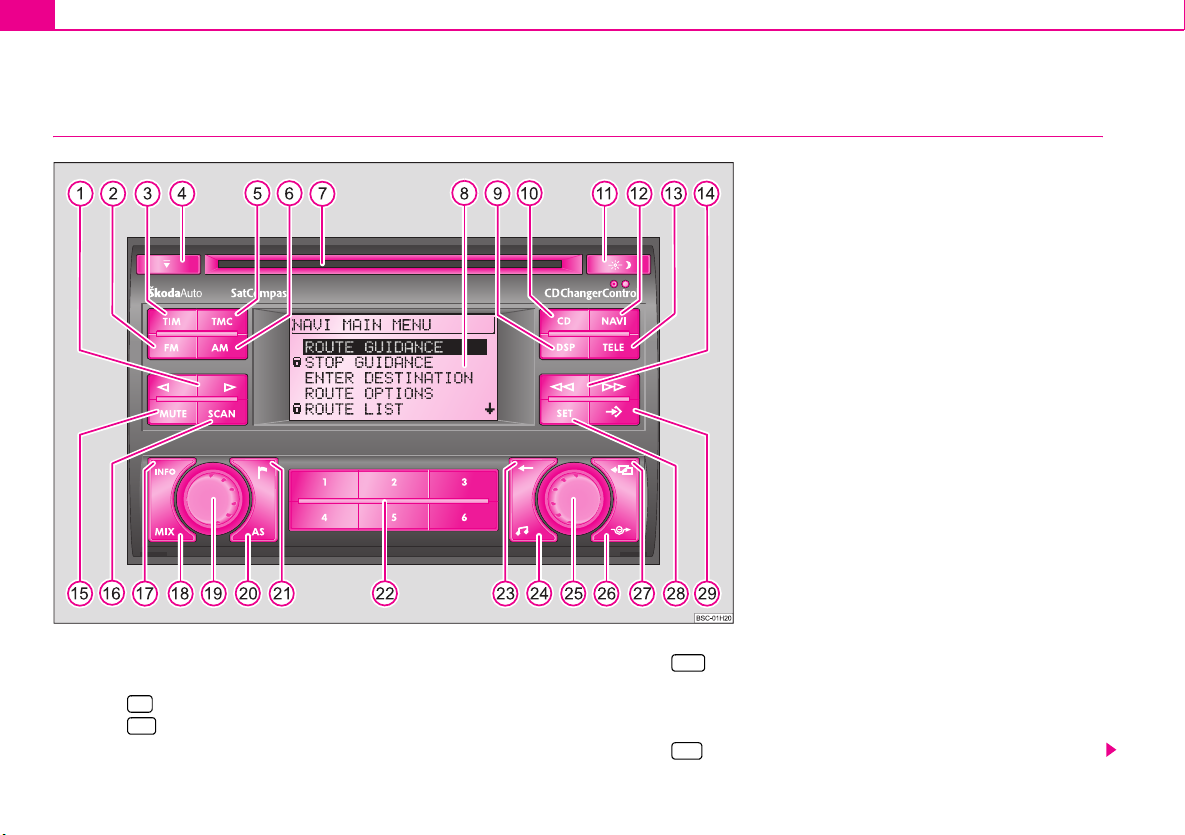
General view
1
Button for manual station tuning FM, AM, TIM and TMC and to select the track
in the CD mode
2 FM
Button to activate the FM radio mode
3 TIM
Button (Traffic Information Memo) to quickly retrieve the stored traffic
announcements
4
CD - eject button
Fig. 1 General view
5 TMC
Button (Traffic Message Channel) to activate the TMC radio mode
6
Button AM to activate the AM radio mode
7
CD-case
Display - screen
9 DSP
Button for setting the display contrast
Page 6

A
10 CD
A
A
A
A14A
A
A
A
A19A
A
A
A
A
A25A
A
A
A
s2ck7book
Page5Friday
April202007
12:38
PM
Button to activate the CD and CD changer mode*
11
Button for manual switch over between day and night display
12 NAVI
Button calls up the navigation basic menu
13 TELE
Button displays the traffic reports received via TMC
Radio mode
− retrieving the stored station
− automatic station finding in AM waveband
− fast station finding (audible) TIM
− fast station finding in CD mode
15 MUTE
Button for switching on/off the mute function of the audio sources
radio, CD und CD changer*
16 SCAN
Button
− for a brief playing (ten seconds) of all stored stations (TP,FM and AM) - in
radio mode
− Playing all tracks on a CD one after the other
17 INFO
Button displays continuous information
18 MIX
Button plays the tracks on a CD in random order
Rotary/push knob for switching on and off (press) the navigation system,
volume control (turn)
20 AS
Button automatically stores the station
21
Button for storing the current vehicle position as flagged destination
22
Station selection buttons in radio mode and CD direct selection buttons in CD
changer mode*
23
Delete button for deleting entries in the editing field
24
Button sound for adjusting the sound and volume distribution
Menu knob for selecting and confirming the menu points
26
Button for calculating an alternative route in case of traffic congestion
27
Button to exit a menu.
28 SET
Button calls up the SETUP menu
29
Macro button, programmable function key
General comments 5
Radio navigation system SatCompass
Special equipment
The navigation system SatCompass offers you an easy handling of the convenience
equipment radio, CD player and navigation system in the vehicle. The system can
be equipped with an original 6-compartment CD changer*.
Navigation
The navigation system is your “intelligent front passenger”. You can reach the
desired destination quickly, easily and reliably without time-consuming map
searching from the starting point of your trip. In unknown locations it saves you
time by guiding you to the next filling station. You can make an intermittent stop on
the road, in order e.g. to go and eat in a restaurant or to visit a sight. The system uses
the data stored on the navigation CD for the calculation of the trip destination.
During the guidance you will receive via different screen displays information about
vehicle position; notes regarding turns (direction and distance until the turn) and
the arrival time at the trip destination.
Announcement of the ŠkodaAuto navigation system
Under certain requirements the system must be announced, as it is equipped with
a radio unit.
How does the navigation system function?
The current vehicle position is determined using satellites. The distance travelled is
measured by the ABS. The direction of travel is determined using a gyroscope. The
navigation system is provided with this information and compared with the stored
data.
Outside the densely populated areas it is possible that this type of locating does not
permit exact position definition. In this case the locating is performed via satellites.
Thi s typ e of lo catin g is re ferred to as Global Positioning System (GPS) - global satel-
lite locating system.
Page 7

General comments6
s2ck7book
Page6Friday
April202007
12:38
PM
Important information
Warran ty
The same warranty terms apply for the equipment as for new vehicles.
Note
A damage in the sense of the warranty must not be the result from improper
handling of the system or from unprofessional repair attempts. In addition, no
external damage must be present.
Replacement possibility
After the expiration of the warranty, a unit in need of repair will be replaced inexpensively with a reconditioned, original unit with spare part warranty. However it is
required that there is no housing damage and no unauthorised repair attempts
have been made.
Note
In the case of a warranty or a replacement service, the Škoda Service Partner must
be presented with the unit card with code number and serial number! The unit
card can be found at the back of the operating instructions.
Information on how to operate the navigation system
The requirements of today's street traffic demand from the driver that he always
concentrates fully when driving.
The extensive and fastidious equipment details of this system offer - besides the
possibilites of entertainment - also a wide range of information which will help you
reach the trip destination quickly and reliably.
Only if the traffic situation allows it, should you operate the navigation system
with its wide range of possibilites.
The volume settings must be selected in such a way that acoustic signals from the
outside, such as e.g. a Martins horn from utility vehicles (police cars, ambulances
and fire brigade), can be heard at any time.
WARNING
Please always pay full attention to the traffic situation around you! As the
driver you are fully responsible for the traffic safety. Only use the functions
in such a way that you always maintain the control over your vehicle in all
traffic situations!
Anti-theft coding
After removing the unit, the anti-theft coding prevents electronically the use of the
unit by an unauthorised person.
If the information “SAFE” appears in the display after switching on the unit, it can
only be operated again by entering the correct code ⇒ page 15.
Before using the navigation system
• Please observe the respective traffic regulations when driving.
• Street and location names can be changed. There are exceptional cases in
which the names stored on the CD might not correspond to the changed names.
• The route calculated by the navigation system is a recommendation for
reaching the trip destination. While driving please pay attention to stopping restrictions, traffic lights, one-way streets, toe change restrictions, channels and ferries.
WARNING
The road traffic legislation (StVO) is always applicable, also if a driving
recommendation does not comply with the StVO.
Page 8

General comments 7
A25A4A
A19A
s2ck7book
Page7Friday
April202007
12:38
PM
Calibration after tyre change
After a tyre change it may be necessary to calibrate the navigation
system again.
– Mark and confirm the menu point “TYRE CHANGE” in the menu
“SETUP-NAVIGATION” with the menu knob .
After confirming the safety question the calibration is automatically started. An
information for the calibration procedure is shown in the display.
Note
During the calibration other functions of the navigation are not possible.
Care of the display
Carefully handle the display because dents and scratches can occur through pressure of the finger or contact with sharp objects.
The display can be cleaned with a soft cloth and finger marks can be wiped away
with pure alcohol.
Note
Do not use solvent such as turpentine or petrol as they will corrode the display
surface.
Changing the navigation CD
Description
– Carefully insert the new navigation CD with the in scription upwards as
far as possible into the CD case until it can be drawn in automatically
by the unit.
Caution
Only clean CDs without scratches and damages should be used, in order to guarantee a proper functioning of the navigation system.
• Store the non-used navigation CD in the bag provided for this.
• Never expose CDs to direct sun rays!
• Please never write or affix the CDs!
Functional description of the buttons
Switching the system on and off
– The system is switched on or off by pressing the rotary/push knob .
The audio source or the navigation status (if the last route guidance dates back
more than 30 minutes) which was active before switching the system off is activated.
If the key is pulled out of the ignition lock when the system is switched on, the
system switches off autmatically. You can switch on the system again by pressing
the rotary/push knob . If the engine is switched off, the system (protection of the
vehicle battery before discharging) switches off automatically after approx. one
hour. This process can be repeated as often as desired.
If the system is switched off and the ignition key is withdrawn, a flashing LED indicates that this is a system with an active anti-theft coding.
19
– Press the CD eject button to change the CD. The navigation CD is
ejected.
Note
• Change the volume to the right or to the left by turning the rotary/push knob
19
.
Page 9

General comments8
A
A
A
A25A
A
A
A
A
A15A
s2ck7book
Page8Friday
April202007
12:38
PM
• If the information “SAFE” appears in the display after switching on the unit, it
can only be operated again by entering the correct code ⇒ page 15.
Button
With the navigation system there is the possibility to record traffic information over
a period of 2 and/or 24 hours. Up to nine traffic reports with a total duration of
maximum 4 minutes can be automatically recorded.
The TP stations always record traffic reports during operation, also if the play function is aborted by pressing the button . In the case of EON stations, also the
recording is aborted.
If the system is switched off, the reports are only recorded if the function TIM is activated.
Activate 24 hour TIM readiness
TIM
FM
2
• If the system is switched off and the ignition key is withdrawn, hold the button
TIM
3
pressed for a few seconds.
Activate 2 hour TIM readiness
• Withdraw the ignition key when the system is switched on and the vehicle is
stationary. The recording readiness is deactivated by switching the system on.
Note
• The 24 hour TIM readiness leads to an increased power consumption over 24
hours. This can lead to problems with the voltage of the vehicle battery, if the
vehicle is only driven on short distances. In this case the 24 hour TIM readiness
should not be activated.
• The oldest traffic information will be overwritten if the traffic information
memory is full. If a report lasts more than four minutes, the beginning of this report
is overwritten.
Button
DSP
– Press the button .
DSP
– The contrast can be set by pressing the menu knob .
– Confirm the set value by pressing the menu knob .
Button
With the button incoming traffic reports can be displayed in the display
via the TMC (Traf fic Message Channel - traffic message channel). These reports are
used by the navigation system for the dynamic route guidance, if this option is
active ⇒ page 29.
The number of received traffic reports is shown below the display “TMC” through
corresponding points.
If the button is pressed, a text appears in the display. In the standard field
- background - of the display ⇒ page 9, fig. 2 the number of the indicated report
and the number of stored reports is shown behind “TRAFFIC INFO”.
To change in-between individual reports, turn the menu knob .
TELE
TELE
TELE
13
13
25
25
Note
The TMC function is only available if a navigation CD has been inserted. Reports are
deleted after 15 minutes, if they are not received again. If there is no report, a corresponding note is displayed in the display.
Button
Mute the audio sources by pressing the button . “AUDIO OFF”
MUTE
MUTE
15
is shown on the display.
– Press the button again or turn the rotary/push knob to
MUTE
19
switch the mute function on/off.
The display contrast can be set with the button .
DSP
9
Page 10

General comments 9
A
A
A
A
A17A
s2ck7book
Page9Friday
April202007
12:38
PM
Button
SCAN
All receivable stations in each band can be played for 5 seconds with the
function radio scan.
FM
– Select with the buttons , or the band in
2 TMCA5 AMA6
which you wish to carry out the scan finding.
SCAN
– Press the button briefly.
– If you wish to select the scanned station, press again the button
16
.
16
SCAN
Note
If you have selected no station, the function radio scan is repeated after a frequency
process.
Button
– Press the button to receive more information about the
INFO
INFO
17
current destination or the list entries, which are marked with continuation points.
After pressing the button the current destination is shown in the standard
field - foreground - of the display ⇒ fig. 2 and a repetition of the last voice response
of the navigation is performed if the route guidance function is active.
A detailed display of the list entries shown with continuation points is given in list
menus.
Other list entries can be retrieved by pressing the menu knob .
INFO
25
Note
If further information is available on your navigation CD, it can be called up in the
menu “TRAVEL GUIDE”.
Display
Display
Fig. 2 Layout of the display
The functions and menus displayed on the display result from the following
standard fields ⇒ fig. 2:
Background
If the navigation is active the status of the functions radio, CD or CD changer* is
displayed at the top of the display. In radio or CD mode the function of the navigation active at this moment in time is displayed.
Foreground
In case of active navigation, the optical driving recommendations are shown in the
foreground. In radio mode the station or the frequency is shown in this standard
field, in CD mode “TRACK” and the current track number.
Status range
The display appears only in audio mode.
The status range serves as display of the current audio source and the traffic radio
readiness.
Page 11
General comments10
AAABACA
AEAFAGA
AIA
s2ck7book
Page10Friday
April202007
12:38
PM
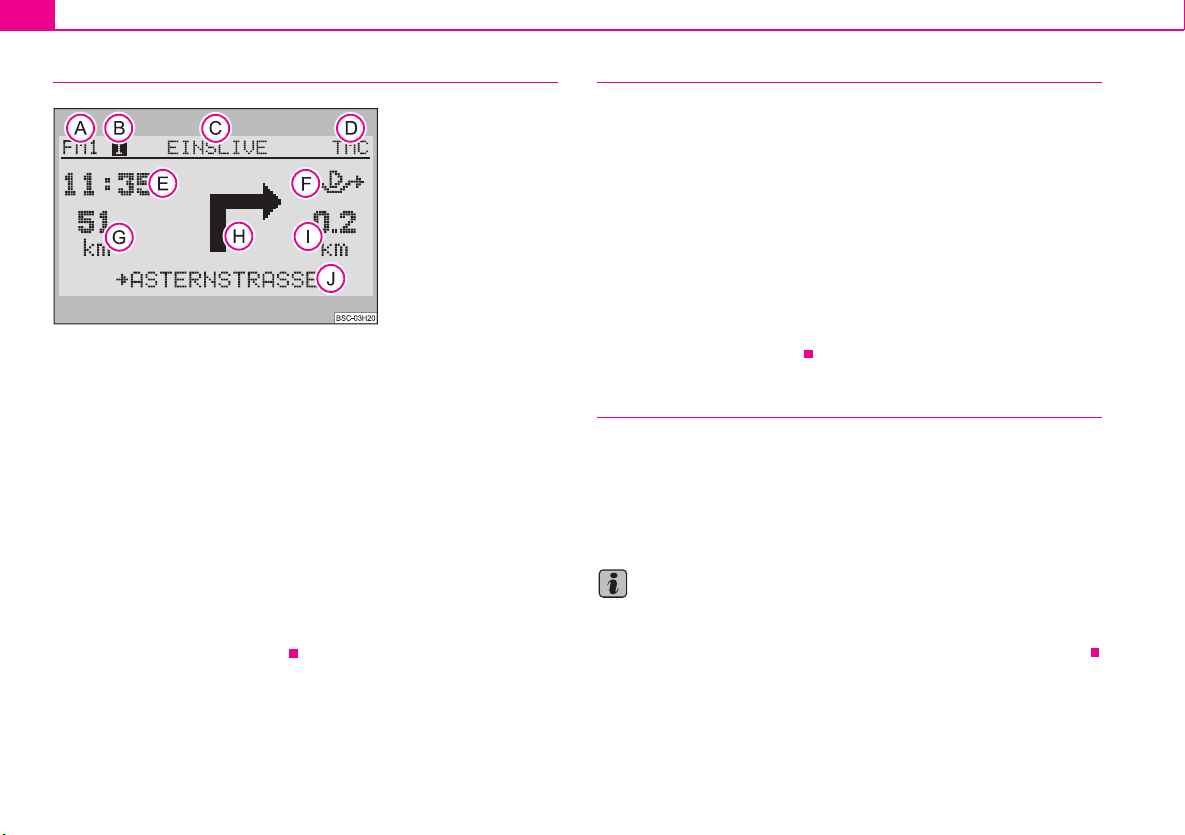
Display contents
Fig. 3 Display overview
The display shows the following content:
selected audio source,
selected memory space,
name of the selected station,
D
display that the set station is a TMC station as well as the number of received
traffic reports,
arrival time,
selected route option (here dynamic),
distance to destination,
H
direction arrow,
distance to the next decision point,
J
name of the currently driven road.
Alarm
If your navigation system receives a disaster announcement, “ALARM” is displayed
in the standard field - foreground - of the display. The display appears in the
standard field - background during active route guidance.
The play function of the active audio source is interrupted and the navigation
system switches over to the corresponding radio station that is receiving the
disaster announcement.
The play function of the announcement is perfomed with the volume ⇒ page 13
set for traffic information.
At the end of the announcement it switches back automatically to the last active
audio source.
You can end the traffic information at any time by switching over to another audio
source or setting another station.
Te le p h o n e
If your vehicle is equipped with a “hands-free system*”, the voice play function of
the telephone is performed via the navigation system.
If the telephone is activated, the audio sources are switched to mute. “PHONE” is
displayed on the display.
After the end of the conversation, the audio play function is continued.
Note
If the navigation system is switched off, it switches on automatically when activating
the telephone. The display is not switched on. You can phone as before. After the
end of the conversation, the navigation system automatically switches off again.
Page 12
General comments 11
A
A
A25A
A
A25A25A
A
A
s2ck7book
Page11Friday
April202007
12:38
PM
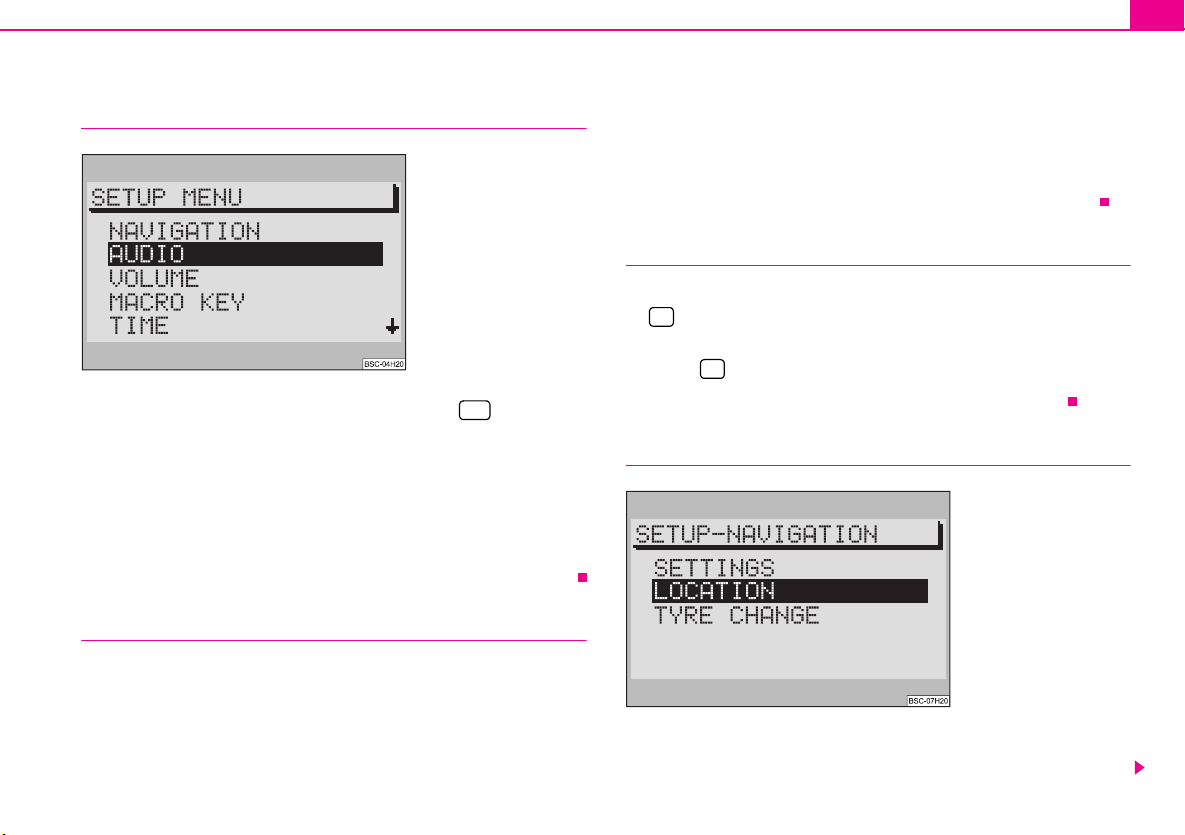
Basic settings of the navigation system
SETUP MENU
Fig. 4 Layout of the menu
SET
– Call up the “SETUP MENU” by pressing the button .
All basic functions of your navigation system are set in the “SETUP MENU” ⇒ fig. 4.
The display contents of the menu are divided into menu title and menu points.
If one menu contains more than five menu points, thus the other menu points are
not within the illustrated range. Such menus are marked by arrows on the right.
Other menu points are shown if the selection marking is moved before the last or
second menu point of the list. After a further actuation of the menu knob the
selection marking remains at the point and the other menu points are displayed.
Selecting and confirming menu points
28
25
If the selection has been confirmed, the next sub-menu will be displayed. The
selection marking remains on the first menu point. The menu title is shown in the
standard field - background - of the display. Mark and confirm the menu point to
be changed by using the menu knob . The setting can be carried out.
Change the settings
The menu point you wish to change is circled. The setting is changed by turning the
menu knob . Confirm the changed setting by pressing the menu knob .
25
Exit the menu
– If you do not wish to take over the changed setting, press the button
27
.
– If you wish to change to the previous menu, press once again the
button .
27
– To exit a basic menu, select another function, e.g. FM or CD.
Navigation settings
Select and operate the menu points by using the menu knob .
– To move the selection marking upwards or downwards, turn the menu
25
knob to the right or left. The selected menu is displayed inversely.
– Confirm the selection by pressing the menu knob .
25
Fig. 5 Navigation settings
– Call up the menu “SETUP-NAVIGATION” by selecting the menu point
“NAVIGATION” in the “SETUP MENU”.
Page 13
General comments12
s2ck7book
Page12Friday
April202007
12:38
PM
“SETTINGS”
Here you will reach a sub-menu for determining the system settings:
• “TIME INFO” - here you can select if the “ARRIVAL TIME” at destination or the
“REMAINING TRAVEL TIME” to the destination should be displayed.
• “LANGUAGE” - if the route guidance should be performed without voice
response, then select the option “OFF”. In case of deactivated voice response, the
route guidance can only be performed with optical driving recommendations on
the display or the instrument cluster.
• “REMEMB. DEST.” - automatically stores the last 10 destinations in the
memory “LAST DESTINATIONS” switch on or off.
• “DRIVING SYMBOLS” - if you wish the display of optical driving recommenda-
tions only in the instrument cluster, then select the option “OFF”.
“LOCATION”
If no GPS reception ⇒ page 5 is possible, the location can be entered here manually.
“TYRE CHANGE”
If new tyres were mounted ⇒ page 7, select this menu point.
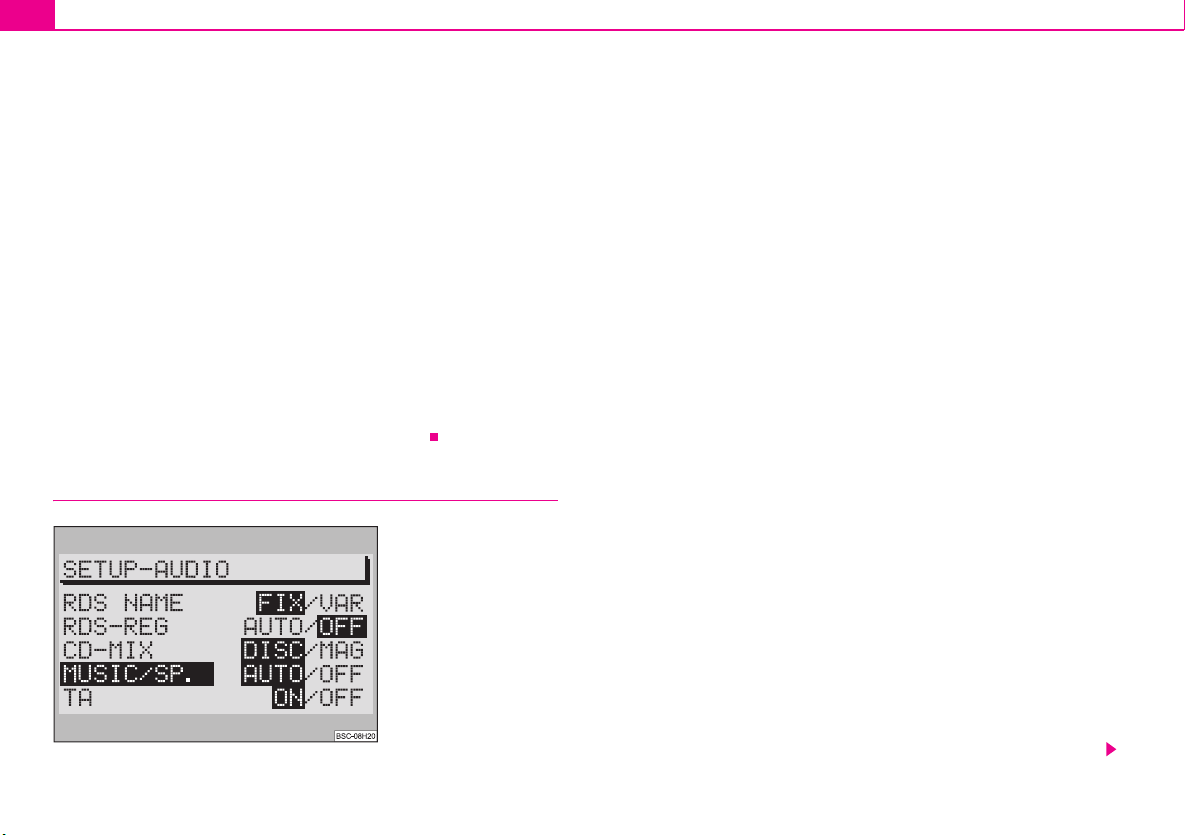
Audio settings
Fig. 6 Audio settings
The settings for the audio mode can be carried out in the menu “SETUP AUDIO”
⇒ fig. 6.
“RDS NAME”
Certain stations use RDS not only to transmit their name but also for advertisement.
Here you can set if the name of a station called up out of the memory should be set
fixed in the display “FIX” or if alternative news, e.g. advertisement, should be
displayed “VAR”.
“RDS-REG”
Here you can select if the navigation system should also set RDS stations, which
transmit another regional program than the currently heard one. This setting may
be necessary, if the reception is so weak, that there is a risk of a “program loss”
⇒ page 16.
• “AUTO” - when selecting this setting the change to regional “related” station
frequencies is only performed if there is a risk of a “program loss”.
• “OFF” - a regional related station frequency can be set manually. No automatic
change is carried out.
“CD-MIX”
This menu point can only be activated in combination with CD changer *.
• Set the “DISC”, if first all tracks of the active CD and then all tracks of another CD
should be played in random order.
• Set the “MAG” (Magazine), in order to hear all tracks of the entire magazine in
random order.
“MUSIC/SP.”
RDS stations have the possibility to transmit a signal which in case of text messages
switches over the frequency input of your navigation system to the voice play function, to do so e.g. treble is decreased. The voice play function is clearer and can be
heard better.
• “AUTO” - the frequency response of the voice play function is automatically
changed when the corresponding signal is received.
• “OFF” - select, if you do not wish an automatic adaptation of the frequency
response.
Page 14

General comments 13
A
s2ck7book
Page13Friday
April202007
12:38
PM
“TA”
Here you can set if your navigation system should replay incoming traffic information.
• “ON” - all incoming traffic information is replayed. If TA is switched on, only TP
stations can be set.
• “OFF” - Traffic information is not replayed.
Volume settings
Fig. 7 Volume settings
“VOL-ON” - Setting the switch on volume of the system.
“TA MIN” - setting the minimum volume for traffic information.
“NAV-MIN” - setting the minimum volume for the voice response of the navigation.
“TELEPHONE” - if your vehicle is equipped with a hands-free system*, a call is
replayed via the navigation system. Here you can set the volume, with which you
can hear your conversation partner.
“GALA” - the volume of your navigation system is increased automatically with
increasing speed and thus high exterior noises. Here you can set the degree of
accentuation.
Note
If at a particular time of a traffic information or voice response the system volume
is higher than “TA MIN” or “NAV-MIN”, this is also performed in the system
volume.
Macro button settings
Fig. 8 Macro button settings
The macro button can be assigned to one of the following functions:
29
• “ROUTE GUIDANCE” - activates the route guidance, if a destination has already
been defined.
• “ROUTE OPTIONS” - calls up the menu for selecting the route calculation.
• “ROUTE LIST” - calls up the route list during an active route guidance.
• “LAST DESTINATIONS” - shows the content of the memory - LAST
DESTINATIONS - of the navigation.
• “ALPH.DEST.MEMORY” - calls up the alphabetically classified destination
memory.
• “GPS STATUS” - shows the number of current GPS satellite receptions and the
geographic position.
• “TOGGLE TIME INFO” - allows the switch-over between arrival time and
remaining travel time.
Page 15

General comments14
A25A25A
A
A
s2ck7book
Page14Friday
April202007
12:38
PM
• “SHOW LOCATION” - the route guidance is performed under the information
of all directions, where the destination is located and if necessary the name of the
driven road.
Note
When calling up the menu the selection marking is on the menu point “ROUTE
GUIDANCE”. The current assignment of the macro button is marked with an
arrow.
Time settings
Fig. 9 Time settings
• The menu point “GPS TIME” cannot be set. It serves for the calculation of the
system time for GPS reception. If the “GPS TIME” is available, the “SYSTEM TIME”
cannot be set manually.
• “TIME ZONE” - here you can enter the difference of the time zone in which you
are at the moment to the world standard time - UTC.
• “DAYL. SAV.” - select “ON”, if you are in a country, in which daylight saving
applies at the time of the setting.
• “SYSTEM TIME” -select and confirm the menu point “SYSTEM TIME” with the
menu knob . Now the time can be set by pressing the menu knob . In order
to change to minutes, press once again the menu knob . End the setting by
pressing once again the menu knob .
25
25
Note
• The system time can only be changed, if no GPS Time can be received.
Language
The displays and the announcements of the navigation can be selected in the
following languages:
• Czech
• German
• English (Imperial) - Measurements given in yards
• English (Metric) - Measurements given in metres
• Spanish
• French
• Italian
• Dutch
Factory settings
Here you can reset all settings of the SETUP menus and the sound settings to the
factory setting. Language setting and calibration are exempt.
If you select and confirm the menu point “FAC TORY SETT ING S” after pressing the
SET
button you will be requested once again to confirm your selection. If you
have selected and confirmed the menu point “YES”, the factory settings are reset
(language setting and calibration are exempt). The navigation system switches off
briefly and then on again.
If you do not wish to reset the navigation system, select the menu point “NO”.
28
Page 16

General comments 15
A22A
A25A1A
s2ck7book
Page15Friday
April202007
12:38
PM
Note
If the navigation CD is inserted there is the possibility beforehand to delete the
stored destinations. If you wish to delete the stored destinations, select the menu
point “YES”, if not, select “NO”.
Anti-theft protection
Anti-theft coding
The anti-theft coding of your navigation system prevents an operation of the
system after a voltage interruption, e.g. during a vehicle repair or after theft.
After disconnecting the battery, after separating the navigation system from the onboard voltage of the vehicle and after a defective protection, the entry of the code
is required when operating.
In such cases “SAFE” is shown in the display after switching on.
Caution
• This code number is affixed together with the unit number on the “Unit card”,
which is located behind the instructions.
• The “unit card” must be disconnected and stored outside the vehicle.
Note
The code is normally stored in the instrument cluster. Through this the navigation
system is automatically decoded (convenience coding). A manual entry of the code
is normally not necessary.
Code entry
– Switch on the navigation system - after the start screen with the
display “SAFE” the request for entry of the code number is displayed
after 2 seconds “1000” is shown on the display.
– Continue pressing the station selection button 1 until the first digit
of the code number is shown in the display.
– Insert the other digits of the code number by repetitively pressing the
station selection button 2, and/or 3 or 4 .
22
– If the entire code number was entered, press the menu knob or the
button or the button for at least 2 seconds.
14
Entry of an incorrect code number
If inadvertently an incorrect code number was confirmed when entering, “SAFE” is
shown again in the display. First of all flashing and then permanent. “WRONG
TRIES: 1” is shown on the display.
Now the entire process can be repeated once again.
If the code number is entered incorrectly for the second time, the navigation system
will be blocked for approx. one hour. It is only possible to repeat the entry of the
code number after an hour has expired and while the navigation system is switched
on and the ignition key remains in the ignition lock.
If once again two non-valid attempts are undertaken, the navigation system will be
blocked again for an hour.
The cycle - two attempts, blocked for an hour - furthermore applies.
Note
Please do not hesitate to contact your Škoda Service Partner should you have lost
the “unit card”.
The electronical lock is cancelled by entering the correct code. The order
of the following operating steps must be maintained:
Page 17

Audio16
A
A1A
A
s2ck7book
Page16Friday
April202007
12:38
PM
Audio
Radio mode
Radio mode with RDS
The function RDS is always active for the navigation system.
More and more USW broadcasting companies transmit RDS information in addition to the program. E.g the station name and the traffic status of the set station
belong to this information.
Alternative frequency AF
The function alternative frequency ensures that the best receivable frequency of
the selected station is automatically and precisely set.
The replay of the broadcast can be muted briefly during the search process
according to the best receivable frequency.
If no alternative frequency of the set station can be found and the station no longer
offers a satisfactory quality, then please select another station.
TMC (Traffic Message Channel)
Certain radio stations transmit digital traffic announcements in addition to their
programme. The announcements are received by your navigation system and used
for a dynamic route guidance ⇒ page 29. If a station has TMC at its disposal, “TMC”
is shown in the standard field - status range - of the display. These stations can be
stored on two memory levels TC1 and TC2.
RDS regional
Certain programs of the broadcasting companies are divided into regional
programs at specific times.
First of all the unit attempts to set only alternative frequencies of the selected
station.
If the quality is however so low, that there is a risk of a “program loss”, the navigation
system accepts also frequencies, which are “related” to the station. As this station
emits temporarily different programs and due to such a change in frequency also
the programme from one of the “related” stations can be heard ⇒ page 12.
Switch on radio mode
FM
Press the button , or in order to switch on the
2 TMCA5 AMA6
radio mode. After pressing the button the last set station, if receiveable, is
selected.
Note
If FM is changed to TMC or vice versa, the set station is taken over in the selected
level.
Set and store station
Manual station tuning
– Press one of the buttons in order to manually tune a station. At
every press the frequency changes to fixed, defined steps upwards or
downward.
Automatic station tuning
– Press one of the buttons for a station finding, in a frequency range,
upwards or downwards. The next or the previous station is automatically set and selected.
– If you hold the button pressed, the station continues quickly to the
next station.
14
14
Page 18

Audio 17
A
A
A
A
A
A
A
A
A
A
A3A1A
s2ck7book
Page17Friday
April202007
12:38
PM
Store station
FM
– Select the desired range and the level using the button ,
5 AMA6
or
2 TMC
–Set a station.
– Hold the station selection button pressed on the station which
22
should be stored, until the station is switched to mute.
Automatically store station
– Select the memory level (FM, TMC or AM), in which the stations
should automatically be stored.
AS
– Hold the button pressed until the automatic storing begins
20
and “A-STORE” is shown in the standard field - status range - of the
display. Additionally a progress display in percentage is shown in the
standard field - foreground - of the display.
– The stations with the strongest reception are stored automatically on
level 2 (FM2, TC2 or. AM2) of the set range. The order of the stored
stations depends on their station code.
Note
• In the current range you can select up to six stations with the strongest recep-
AS
tion using the button .
20
• An Autostore for TMC stations can take 10 minutes, as all receiveable stations
are checked for their TMC compatibility. At this time no radio mode is possible.
Retrieving the stored stations
FM
– Select the desired range and the level using the button ,
5 AMA6
or
– Briefly press the station selection button under which you have
22
stored the station.
2 TMC
You can also call up the stored stations by pressing the button .
14
Note
• If a stored FM station is no longer receivable and the TA function is activated in
the “SETUP AUDIO”, “TP-SEEK” is shown in the display after pressing the station
selection button , a finding is started and the radio play function is switched to
mute. If no TP station is receivable, a signal tone sounds and “NO TP” is shown in
the display In such a case the function TA switches off ⇒ page 13.
22
• If a stored TMC station is no longer receivable, “TMC-SEEK” is shown in the
display. If no TMC stations are receivable, “NO TMC” is shown in the display. In such
a case select an FM station.
• If no TMC stations are received, a dynamic route guidance is not possible.
Replay recorded traffic information
After pressing the button , “TRACK” and the number of the last
recorded information is shown in the standard field - foreground - of the
display. In the standard field - status range - of the display the time of the
recording is shown next to the source display. If no information was
recorded, “NO MESSAGE” is shown in the standard field - foreground - of
the display.
Select recorded traffic information
– Press one of the buttons while replaying a recorded traffic infor-
mation, in order to listen to the previous or the next one.
Fast station finding (audible)
– In order to play the information faster, press one of the buttons
while replaying.
TIM
14
Page 19

Audio18
A
A
A
A
A1A
A
A
s2ck7book
Page18Friday
April202007
12:38
PM
Deleting traffic information
– Trafffic information is automatically deleted six seconds after end of
readiness.
Ending TIM function
TIM
– Press again the button to end the TIM function.
3
Note
• The TIM function is automatically ended after replaying all information.
• If the TIM function was called up from the menu “ROUTE GUIDANCE”, it can be
TIM
shown again by pressing the button .
3
CD mode
Internal CD drive
Your navigation system gives you the possibility to play audio CDs in the
internal drive. In addition a CD changer * can be connected.
Inserting the CD
– Slide the CD with the written side facin g up int o th e CD cas e. I nse rt t he
CD as far as possible until it can be drawn in automatically by the navigation system.
– After the CD was drawn in, the navigation system automatically
switches over to CD play function. The play function begins, system
oriented after a few seconds with the first track of the CD.
–“TRACK” and the current track number are shown in the standard field
- foreground - of the display.
Starting CD mode
CD
– If a CD has already been inserted, press the button . The play
10
function begins at the point where it was last interrupted. If the CD is
ready to play, the play function starts from the beginning.
Note
• The CD mode in the internal drive is possible if an audio CD for the navigation
CD was inserted. If no navigation CD has been inserted, only a “NO MAP” route
guidance is possible ⇒ page 31.
• Do not make an attempt to insert the CD with force.
• If a CD changer * is connected, this one is selected first by pressing the button
CD
10
.
CD functions (internal drive)
Select track
– For selecting a track, press the right or left button upwards or
downwards.
Fast station finding (audible)
– Press the right or left button for a fast station finding upwards or
downards.
Playing all tracks on a CD (SCAN)
– Press the button . All tracks on a CD are briefly played in
SCAN
ascending order (10 seconds). “SCAN” is shown in the standard field background - of the display.
– Press once again the button to interrupt this function.
Listening to all tracks of a CD in the random sequence
– Press the button .
MIX
14
16
18
Page 20

MIX
A
A
A
A
A
A
A
A
s2ck7book
Page19Friday
April202007
12:38
PM
– Press the button once again to interrupt this function.
18
Taking out the CD
CD
– Press the button , the CD is driven to the initial position. Care-
10
fully remove the CD.
End CD mode
– Select the desired range or allow the CD to eject with the button
2 TMCA5 AMA6
, or
FM
Audio 19
Note
Di rt o r dam age o f a C D can lead to d iffi cult ies when “readi ng” the information. The
difficulty in reading the error depends on the dirt or on the severity of the mechanica l damag e. Seve re scratc hes cau se read ing erro rs which can make the CD jump or
“get stuck”. All CDs must be treated carefully and always be stored in a protective
case.
Audio settings
Information on how to use a CD
CD to jump
Uneven road surfaces and strong vibrations may cause the CD to jump. In such
cases wait with the CD mode until there is a better road surface to drive on.
Formation of condensation
When it is cold and after rain showers, moisture can deposit in the CD drive
(condensation). This can effect the CD jump or impair the play function. In such
cases wait until the moisture has dissipated.
Notes for the care of the CDs
If a CD is soiled, please never clea n the CD in the direction of a circle but rather with
a soft fluffly cloth from inside to outside. In case of severe layers of dirt we recommend to clean the CD with a commercially available CD cleaner. Also in this case do
not clean the CD in the direction of a circle but rather from inside to outside and
then let it dry off.
Caution
• Never use liquids such as gasoline, paint thinner or disk cleaner, otherwise the
surface of the CD could get damaged.
• Never expose CDs to direct sun rays!
• Please never write or affix the CD!
The treble and the bass as well as the volume distribution left/right
(balance) and front/rear (fader) can be set in the sound menu.
– Press the button , to call up the sound menu.
24
– You can select the menu points to be selected one after each other
with the menu knob .
– Set and confirm the new values with the menu knob .
– The setting is reset by pressing the button .
25
25
27
– After all settings have been carried out, exit the sound menu by
pressing the button or a an audio source button CD, FM, AM
27
or TMC.
Note
• The settings for treble and bass can be carried out and stored individually for
each audio source, the settings for balance and fader apply to all audio sources.
• The fader setting is only available if loudspeakers are installed in the vehicle
tailgate.
Page 21

Navigation20
A
A
A
A
s2ck7book
Page20Friday
April202007
12:38
PM
Navigation
Overview of navigation basic menu
Call up navigation basic menu
Fig. 10 Navigation basic
menu
NAVI
– Press the button .
If still no destination is entered, the selection marking is on the menu point “SHOW
LOC ATI ON”.
If a destination has already been entered, the selection marking is on the menu
point “ROUTE GUIDANCE” ⇒ fig. 10.
In the navigation basic menu the following menus can be called up:
12
• “ROUTE GUIDANCE” ⇒ page 31
• “STOP GUIDANCE” ⇒ page 32
• “ENTER DESTINATION” - carry out via entry of destina tion address or from the
destination memory⇒ page 21
• “ROUTE OPTIONS” - select the dynamic route guidance or display the route
list⇒ page 29
• “ROUTE LIST” - calculate or display the route list ⇒ page 30
• “SHOW LOCATION” - display location determination, North and if necessary
the name of the driven road
• “DEST. MEMORY” - store, edit or delete destinations in the destination
memory
• “TOU RLIS T” ⇒ page 35
• “TRAVEL GUIDE” - Provide travel information (e.g. overnight price for hotels) to
destinations ⇒ page 35
• “GPS STATUS” - shows the number of current GPS satellite receptions and the
geographic position.
Note
• Select and confirm the menu points with the menu knob .
25
• You can return from the sub-menus, lists and types of display to the navigation
NAVI
basic menu by pressing the button .
• If you press the button during an active route guidance, you can
change between the route guidance and the navigation basic menu.
NAVI
12
12
• Unavailable menu points are marked with a lock.
Page 22

Navigation 21
A
s2ck7book
Page21Friday
April202007
12:38
PM
Enter
Overview
Call up the destination entry menu directly in the navigation basic
menu.
Fig. 11 Enter destination Fig. 12 Town as destination
You can select via the menu points between the following possibilities of the
destination entry:
• “DEST. FROM MEMORY”
• “SPECIAL DESTINATION”
• “FLAG DEST.”
• “TOWN ”
• “STREET”
• “TOWN CENTRE”
Enter destination - Town
Select a town as destination
You can first of all enter the desired town and then determine the
destination with the menu point “TOWN”
– Select the menu point “TO WN” from ⇒ fig. 12 in the destina tion entry
menu with the menu knob .
– If you confirm the menu point “TOW N”, first of all you can enter the
desired village and then determine the destination in the sub-menu
“ADDRESS ENTRY”, to do so use one of the menu points “STREET”,
“TOWN CENTRE” or “CLOSE TO ADDRESS”.
25
Page 23

Navigation22
AAABACA
A
ACADA
ADA
A
s2ck7book
Page22Friday
April202007
12:38
PM
Editor
Carry out with the editor all entries of names and numbers, which are
required for the navigation.
Fig. 13 Editing menu
• Destination entry of e.g. town and street names
• Entry of a short name when storing a destination in the destination memory
• Entry of a short name for a flagged destination
The editing menu consists of:
• a register with letters, characters and digits ,
• the control field ,
• the editing field with standard names or the cursor ,
• the area with a list entry (editing list) ,
• the magnifying glass , here the currently marked letter is enlarged.
E
D
Entering a town name
Fig. 14 Entering a town
name
Enter the initial letters of the name of the desired village in the editing
field . With each new letter the next suitable entry is called up from the
list and shown in the editing list . You have the possibility to quickly
select the desired village without entering the complete name.
– To do so mark and confirm the desired characters with the menu knob
25
.
The character is entered into the editing field. Simultaneously the cursor jumps to
a point towards the right. The next suitable entry is shown in the editing list .
Note
• In case of an incorrect entry, you can delete the entered character with the
23
button .
• Only names stored on the CD can be entered. Characters are faded out and
indicated accordingly in the register .
A
Page 24

Navigation 23
A
A
A25A
A
A
A
A
A25A
s2ck7book
Page23Friday
April202007
12:38
PM
Call up list
The desired town is selected as destination with the aid of a list.
You have two possibilities to call up the list via the editing menu.
– Press the menu knob more than two seconds or
– mark and confirm the control field with the menu knob .
Select street names from the list
Select and confirm the desired entry with the menu knob .
25
25
Note
• Scroll the list: by turning the menu knob first move the selection marking
onto the arrow and then over the first or last entry.
25
• Scroll line by line by moving the selection marking onto the arrow and then
press the menu knob .
• With the button you can completely display a shortened list entry
with ...
Determine the destination exactly
The sub-menu “ADDRESS ENTRY” is displayed, if the destination town is determined.
In this sub-menu you can determine your destination:
25
INFO
17
• “STREET” - allows the selection of a street and an intersection stated below,
• “TOWN CENT RE” - allows the selection of a town centre of the selected village,
• “CLOSE TO ADDRESS” - allows the selection of a destination close to the last
entered destination. The selection is performed via columns, e.g. motorway
connection point or shopping centre. The requirement is that the corresponding
data is available on the navigation CD.
Enter destination - Street - Intersection
Select a street as destination
Fig. 15 Select street as destination
– Mark and confirm the menu point “STREET” in the menu “ENTER
DESTINATION” or in the following menu “ADDRESS ENTRY” with the
menu knob .
Enter the street name in the editing menu:
– Enter the street names in the editing field.
– Then call up the list by pressing on the menu knob or
– mark and confirm the control field with the menu knob .
Select street name from the list
– To do so mark and confirm the desired entry with the menu knob .
The street sub-menu is called up.
25
25
25
Page 25

Navigation24
A
A
s2ck7book
Page24Friday
April202007
12:38
PM
Note
• Scroll the list: by turning the menu knob first move the selection marking
onto the arrow and then beyond the first or last entry.
25
• If the selected street name exists several times in a town, then a sub-menu is
called up, from which the desired entry can be selected.
• In order to facilitate the search for long (consisting of several words) street
names, these can be stored in some versions with different writing - full text search.
Enter intersection as destination
Fig. 16 Select intersection as
destination
The destination address can be precisely determined in the street sub-menu:
• “INTERSECTION” - calls up the editing menu/the list for selecting an intersec-
tion,
• “HOUSE NUMBER” - calls up the editing menu/the list for selecting a house
number,
• “CON TI NUE ” - the menu ends and the navigation basic menu is called up.
If the destination entry is concluded, you can start the “ROUTE GUIDANCE”
⇒ page 31.
Note
If the menu point “HOUSE NUMBER” cannot be marked, data for this house
number does not exist on the navigation CD.
Enter destination - Town centre
Select town centre (part of the town) as destination
Fig. 17 Select town centre as
destination
For large towns you can enter the town centre of part of a town as destination using the menu point “TOWN C ENTRE”. For small towns and
villages this menu field is used for the entry of the town centre, as it is only
possible to restrictively enter the destination via the menu field “STREET”.
Select menu point “TOWN CENTRE”
– Mark and confirm the menu point “TOW N CE NTR E” in the destination
entry menu with the menu knob . Then a list (with maximum 20
entries) or the editing menu (with more than 20 entries) is called up.
25
Page 26

Navigation 25
A
s2ck7book
Page25Friday
April202007
12:38
PM
Selecting town centre
– Enter the name of the desired town centre in the editing field or
confirm an existing entry.
– Select a list.
– Mark and confirm the desired town centre in the list with the menu
25
knob . Then the navigation basic menu is called up.
– Change to “ROUTE GUIDANCE” ⇒ page 31.
Note
• For large towns also parts of the town are displayed in the list.
• If the selected town name (or name for part of the town) exists several times,
then a sub-menu is called up, from which the desired entry can be selected.
Destination entry - Special destination
Enter special destinations
Fig. 18 Enter special destinations
Select menu field “SPECIAL DESTINATION”
– Mark and confirm the menu point “SPECIAL DESTINATION” in the
destination entry menu.
Special destinations are:
• “CLOSE TO ADDRESS” - Destinations close to the selected destination address
(e. g. Car parks, Filling stations, Škoda Service Partner etc.)
• “SUPREAREGIONAL DESTINATIONS” - Destinations which have not been
assigned to any specific village (e.g. border crossings, airports etc.),
• “CLOSE TO LOCATION” - Destinations close to the vehicle position. This type of
special destination is suitable e.g. for the search of the next filling station or a Škoda
Service Partner.
The destination entry is made via columns which are stored in alphabetical order.
Partially different columns as a selection are offered for the individual “SPECIAL
DESTINATION”.
Columns are e.g.:
• Exhibition regions,
• Motorway service,
• Car park/multi-storey car park,
• Škoda Service Partner.
Columns, to which there is no data, are not shown.
After selecting the column you can determine the desired address via the editing
menu and the list.
Note
In case of more than 20 entries for one column, first of all the editing menu is called
up. Enter here the desired name or its initial letter and then call up the list.
Page 27

Navigation26
A
A
A
A25A
s2ck7book
Page26Friday
April202007
12:38
PM
Enter destination - From destination memory
Store destination in the destination memory
Select menu point “STORE DESTINATION”
– Confirm the menu point “STORE DESTINATION”. Then the editing
menu is called up for the entry of a short name.
Enter short name
– Enter the short name into the editing menu (e. g. “AT HOME”).
– Press the menu knob more than two seconds or
– mark and confirm the control field with the menu knob .
25
25
Note
• A destination must first of all be stored in the destination memory, so that it can
be used for a later destination entry.
• First of all a destination is stored in the alphabetical destination memory. Here
the destination entries are alphabetically classified according to the short name (if
you have given them a name); town name, street name, intersection etc... house
number are stored.
• The destinations can be shown either in the order of their entry or alphabeti-
cally.
• A memory “LAST DESTINATIONS” is available for the destination entry from
the destination memory. The last 10 destinations of the route guidance are stored
here automatically.
• You can assign a short name (e.g. first name) to a destination. This makes it
easier for you to later on fetch out the destination entry from the destination
memory.
• If the destination memory can no longer take any other destinations, “DESTI-
NATION MEMORY IS ASSIGNED” is displayed. Then you must delete one or
several destinations.
Sort destinations in memory
Fig. 19 Edit destinations in
memory
If you wish to use certain destinations frequently, it may be advantageous
to store them according to classified criteria.
– Confirm the menu point “SORT DESTINATIONS” in the menu
“DESTINATION MEMORY”. A list displays the destinations to be
sorted.
– Mark and confirm a destination to be moved with the menu knob .
25
– Move the marked destination to the desired position by turning the
menu knob .
– Confirm the new position with the menu knob .
25
Page 28

Navigation 27
A
s2ck7book
Page27Friday
April202007
12:38
PM
Select destination from the memory
Fig. 20 Destination entry
Fig. 21 Select destination
from the memory
– By marking and confirming the menu point “DESTINATION ENTRY”
in the navigation basic menu ⇒ fig. 20 call up the destination entry
menu.
– As standard the selection marking is on the menu point “DEST. FROM
MEMORY”. Confirm this menu point. A sub-menu is called up
⇒ fig. 21.
– Mark and confirm the desired memory in the sub-menu.
– The desired memory name is shown in the standard field - back-
ground - of the display.
– Confirm your selection; then call up the navigation basic menu.
– Change to “ROUTE GUIDANCE” ⇒ page 31.
Enter destination - Flagged destination
Set flagged destination
During the route guidance you can set your current position as flagged
destination by pressing the button , if you wish to return to it later.
Under the condition that a navigation CD is inserted. A flagged destination can be an interesting location, which you wish to visit at a later time.
As confirmation “SET FLAG” is displayed with the entry time in the display.
Note
Only insert a flagged destination, if the name of the driven street is shown in the
display. Otherwise it is possible that one cannot drive to the flagged destination.
21
Page 29

Navigation28
A
A
A
s2ck7book
Page28Friday
April202007
12:38
PM
Store flagged destination
Fig. 22 Store flagged destination
– Mark and confirm the menu point “DESTINATION MEMORY” in the
navigation basic menu.
– Mark and confirm the menu point “STORE FLAG”.
Then the editing menu is called up for the entry of the flagged destination.
Name flagged destination
Take over standard name
– Confirm the entry “FLAGGED DESTINATION (hh:mm)” ⇒ fig. 23 by
pressing the menu knob for more than two seconds.
25
Enter your own position names
– Enter a position name with the aid of the register. The standard name
is deleted when entering the first characters.
– Confirm the entry by pressing the menu knob for more than two
25
seconds.
Select flagged destination as destination
– Call up the destination entry menu by marking and confirming the
menu point “ENTER DESTINATION” in the navigation basic menu.
– Mark and confirm the menu point “FLAGGED DESTINATION” in the
destination entry menu. The navigation basic menu is called up.
– Change to “ROUTE GUIDANCE” ⇒ page 31.
Note
Only one destination is in the flag memory. If a flagged destination was not stored
in the alphabetical memory, it is replaced by the new flagged destination by
pressing the button .
21
Fig. 23 Name flagged destination
Page 30

Navigation 29
A
A25A
s2ck7book
Page29Friday
April202007
12:38
PM
Route options
Plan route
After entry of a destination you can plan the route in the navigation
basic menu.
Fig. 24 Plan route
– Mark and confirm the menu point “ROUTE OPTIONS” in the naviga-
tion basic menu with the menu knob .
The menu for determining the route options is called up.
25
Determine route options
Fig. 25 Route options
– Confirm the desired menu point with the menu knob .
– Select another setting by pressing the menu knob .
You can select among the following menu points:
25
• “DYNAMIC” - select here “ON”, perform the route calculation by taking into
account the current traffic situations. The other menu points are then marked by a
lock and not selectable.
• “ROUTE” - here you can select if the fast or short route should be calculated.
• “MOTORWAYS” - here you can select if you wish to drive motorways or avoid
them.
• “FERRIES” - here you can select if you wish to use ferries or avoid them.
• “TOLL ROAD ” - here you can select if you wish to drive on toll roads or avoid
them.
Note
The selected route option is shown in the route guidance screen by one of the
following symbols:
• dynamic route,
Page 31

Navigation30
A
A
A
s2ck7book
Page30Friday
April202007
12:38
PM
• fast route,
• short route.
To exit the route options
Fig. 26 To exit the route
options
– Press the button , in order to exit the route option menu again.
27
Now you have the possibility to store the selected route options as
standard value ⇒ fig. 26.
– Select and confirm the menu point “YES”.
Note
• The selected route options apply to each route guidance.
• If you have selected the menu point “NO”, only the current route calculation
with the selected route options is calculated.
• The stored route options are applicable after the route guidance or expiration
of the readiness.
Calculate route list
Fig. 27 Route list
– Select and confirm the menu point “ROUTE LIST” in the navigation
basic menu.
The calculation process can last several seconds depending on the length of the
route. Then the route list is displayed.
The route list is displayed permanently on the display, but it is not dynamic (i.e. it
does not adapt itself to the distance travelled while driving).
The entries are shown with distance information. The route list must be re-calculated when changing route. In the list the stretches of the journey to be driven are
shown with the corresponding length indication.
Note
NAVI
• If the route guidance is active, press the button or the button
in order to reach the navigation basic menu.
12 A27
• If no route list can be calculated, then a corresponding message is shown.
• Press the button , the navigation basic menu is shown.
27
Page 32

Navigation 31
A
A
s2ck7book
Page31Friday
April202007
12:38
PM
Route guidance
Begin guidance
Fig. 28 Start guidance
After destination entry and possible determing the route options you can start the
route guidance by confirming the menu point“ROUTE GUIDANCE” ⇒ fig. 28.
The distance to the trip destination, the estimated arrival time at the trip destination, the display of the direction of travel and the distance markings to the intersection/junction is shown in the display.
Route guidance with driving symbols
If the menu point “DRIVING SYMBOLS: ON” is set in the menu “SETUP NAVIGA-
TION”, the optical driving recommendations are shown in the display.
The display of the active audio source and audio functions is performed in the
standard field - background - of the display. During the route guidance you can use
the audio sources as available, except the internal CD drive.
Route guidance without driving symbols
If the option “DRiVING SYMBOLS: OFF” is set, the optical driving recommendations are only shown on the information display of the instrument clusterwerden
die optischen Fahrempfehlungen nur am Informationsdisplay des Kombiinstruments angezeigt. The information on the destination is shown on the information
display. If your vehicle ist not fitted with an informatio display in the instrument
cluster, the navigation system uses on the voice response.
Indicate extensive destination information
INFO
After pressing the button the current destination is show and the last
audible driving recommendation is repeated.
17
Note
If the menu point “LANGUAGE: ON” was set in the menu “SETUP NAVIGATION”,
the route guidance performs in addition to the optical driving recommendations by
means of voice response. The last voice responce can be repeated at any time by
pressing the button .
INFO
17
Route guidance - “OFF MAP”
If an entered desination or the current vehicle position is not within the digital map
basis on the navgation CD, the route guidance performs “OFF MAP”.
The points of the compass, which point to the destination is shown in the display.
Here the distance of the air traffic line to the destination is given.
Route guidance - “OFF ROAD”
If the vehicle position cannot be assigned to any street on the used navigation CD,
the route guidance performs “OFF ROAD”.
Im Display wird die Himmelsrichtung, in der das Ziel liegt, angezeigt. Dazu wird die
Luftlinienentfernung bis zum Ziel angegeben.
Route guidance - “NO MAP”
You can also perform a route guidance without navigation CD. Then the route guidance performs without map. The direction and the distance of the air traffic line to
the destinations are shown. No voice response is carried out.
Page 33

Navigation32
A
A
s2ck7book
Page32Friday
April202007
12:38
PM
This function is intended for large motoway drives, whereby as a rule less information is required from the navigation system.
You will reach the “NO MAP” route guidance, by removing the navigation CD from
the navigation system during the route guidance. After re-inserting the navigation
CD, the route guidance continues if the route guidance was previously active.
Note
• For technical reasons this can last several minutes, until the route guidance
continues audibly and with driving symbols after re-inserting the navigation CD.
This time is necessary in order to clearly determine the current location.
• In narrowly built-ip areas with dense road network this can lead to error
locating until the navigation system has clearly and properly orientated itself. Insert
the navigation CD, if possible, once again on the motorway, in order to accelerate
the orientation process.
Reached your destination
Fig. 29 Ziel erreicht
If the destination is not within the digital area (only possible in case of flagged destination) and close to a digital street, the route guidance for this street is performed
and it indicates the message: “You have reached your destination”.
If the destination is further away from a digitalized street the message indicates:
“You have reached your destination”. Then “OFF ROAD”, a direction arrow and the
distance to the destination is shown in the display.
Cancel active route guidance
You can cancel at any time an active route guidance by calling up the navigation basic menu.
NAVI
– Press the button or the button .
12 A27
– Select the menu point “STOP GUIDANCE” in the navigation basic
menu and confirm your choice with the menu knob .
The route guidance is cancelled.
25
Destination memory
Overview
If you have reached your destination, a “destination band” and the destination
names is shown on the display ⇒ fig. 29. After five seconds the navigation basic
menu is shown.
Fig. 30 Destination memory
Page 34

Navigation 33
A25A
A
A
A25A
A
s2ck7book
Page33Friday
April202007
12:38
PM
The destination memory menu calls up directly from the navigation basic menu via
the menu point “DESTINATION MEMORY”.
The destinations can be stored, edited, classified and deleted in the destination
memory.
In the memory of the destinations according to classificatio n, the destination of the
alphabetical destination memory can be shown in one of their particular order.
In the memory of the last destinations, the last 10 destinations of the navigation are
stored in chronological order. The automatic storage of the destinations can be
deactivated ⇒ page 11.
Short names, which you can determine, help you in finding much faster a destination in the destination memory. The short name is always in front of the destination
names. A short name can e.g. be a first name or a term.
The destination memory menu contains the following menu points:
• “STORE DESTINATION” - Storing a destination of the navigation in the destina-
tion memory ⇒ page 26.
• “STORE FLAG” - Storing and editing a pre-set flagged destination ⇒ page 28.
• “CHANGE SHORT NAME” - Change short names in the destination memory
⇒ page 33.
• “DEL. DESTINATIONS” - delete last destinations, single destinations or all
destinations ⇒ page 34;
• “SORT DESTINATIONS” - sort out the destination memory for creating a list of
destinations according to classification ⇒ page 33.
Change short name
– Mark and confirm the field “CHANGE SHORT NAME” with the menu
knob . The alphabetical destination memory is called up. Now you
can mark and confirm the desired entry with the menu knob .
Subsequently the editing menu is called up.
– With the aid of the the register (with letters, characters and digits)
enter a short name. The entry to be named is shown in the inversely
illustrated line.
25
– Confirm the entry by pressing the menu knob .
25
Sorting destinations again
Fig. 31 Sorting destinations
again
– Mark and confirm the field “SORT DESTINATIONS” with the menu
25
knob .
– Select and confirm the entry to be moved. A movement marking
(double arrow) is shown in front of the selected entry.
– Move the marked entry to the desired place with the menu knob
and confirm the change by pressing the menu knob .
Now you can select another entry. If you press the button , the menu
“DESTINATION MEMORY” is called up again.
25
27
Page 35

Navigation34
A
s2ck7book
Page34Friday
April202007
12:38
PM
Delete destinations
Fig. 32 Delete destinations
You can no longer delete any necessary destinations from the destination memory.
• “LAST DESTINATIONS” - the memory of the last destinations is deleted. Only
available if the memory of the last destinations is activated.
• “SINGLE DESTINATIONS” - single destinations are deleted from the memory.
Only available if the memory of the last destinations is activated.
• “ALL DESTINATIONS” - the destination memory is completely deleted.
Note
After selecting a menu point, a confirmation which is asked for is shown. When
opening the confirmation the selection marking is on “CANCEL”.
Bypass a jam
Call up “TRAFFIC MENU”
– During the active route guidance press the button for calculating
an alternative route. The “TRAFFIC MENU” is displayed.
26
With this menu you can exclude a stretch of the momentary route ahead. Select via
the menu points the stretch affected by the jam. On this basis the navigation system
calculates an alternative route to the destination, in order to bypass as far as
possible the blocked stretch of the road. The guidance continues with the new
route .
The maximum length of the blocked stretch of the road is determined by the navigation system. The stretch to bypass the jam becomes longer in the central area, as
there is less road density than in the town.
Select alternative route
You have two possibilites to enter a jam manually.
Fig. 33 Select alternative
route
“JAM AHEAD”
– You can block a stretch of the route ahead by specifying the start of the
jam and the end of the jam relating to the vehicle position.
– Mark and confirm the menu points “FROM” and “TO” and determine
through this the stretch of the road to be bypassed. The length of the
stretch of the road to be bypassed is specified by the navigation
system.
Page 36

Navigation 35
A
A
s2ck7book
Page35Friday
April202007
12:38
PM
“BLOCK ROUTE”
– The route list is displayed. You can block individual roads.
– Mark and confirm with the menu knob the start and end point of
25
the stretch of the road to be bypassed. The blocked stretch of the road
is marked by a black bar in front of the route list.
Note
• There are not always alternative routes for the stretch of the route ahead.
• Blocked stretches of the road remain stored until the end of the drive.
• If the “TRAFFIC MENU” is used repetitively, the already blocked stretch of the
road is deleted and the new stretch of the road is stored in relation to the momentary route.
• If there is an alternative route; the voice response performs:“Continue to follow
the route”.
Automatic tailback function
As an alternative to the manually blocked stretch with the “TRAFFIC MENU”, a
convenient possibility to bypass a jam is available to you with TMC (Traffic Message
Channel = traffic message channel) and the dynamic route guidance. With TMC
your navigation system receives from the TMC radio stations current, digital traffic
information, which is intended for the route planning. Under the condition that the
TMC station was ⇒ page 16 selected in radio mode and the dynamic route guidance is activated ⇒ page 29.
Note
For automatic tailback function the navigation system always calculates a time optimized route; i.e. if a tailback leads to detours, the navigation system can under
these circumstances guide through the tailback. This depends on the length and
type of the reported tailback and the length of the possible detour.
TOURL IST
Description
With the tourlist you have the possibility to combine several destinations to one
tour and then to call it up. This function is meaningful if you wish to visit e.g. the
sight of a city.
Travel guide
Description
Fig. 34 Travel guide
In order to use the travel guide, a navigation CD with travel guide is
required.
– Mark and confirm the menu point “TRAVEL GUIDE”⇒ fig. 34 in the
navigation basic menu with the menu knob . The travel guide basic
menu is called up.
With the travel guide you can call up the travel information to destinations stored
under columns.
25
Page 37

Navigation36
A
A
s2ck7book
Page36Friday
April202007
12:38
PM
Columns are e.g.:
• Sight,
• Business,
• Sport centre.
Note
• If only one travel guide is available on your navigation CD, then the name of the
travel guide is shown directly in the navigation basic menu. If several travel guides
are available, first of all a selection menu of the travel guide is shown.
• Travel information can be price information, equipment and telephone/fax
numbers of hotels.
Selecting destination
– Mark and confirm the desired menu point with the menu knob .
The entries of the travel guide menu depend on the selected travel guide and may
vary. For this reason only examples for possible entries are given, e.g. location
name, golf place, overnight stay or entertainment.
Select column and destination
The selection of destinations and the take-over in the route guidance is performed
by the register menus and lists.
You can return to the column list with the button .
27
25
Page 38

Glossary
s2ck7book
Page37Friday
April202007
12:38
PM
Glossary 37
Description
ABS
Antilock Brake System ⇒ page 5
AF
Alternative frequency ⇒ page 16
AM
Amplitude modulation, middle waveband, MW ⇒ page 4, ⇒ page 16, ⇒ page 17,
⇒ page 17, ⇒ page 19, ⇒ page 19
AS
Auto-Store - automatically stores the stations with the strongest reception in the
selected waveband ⇒ page 17
BALANCE
Volume ratio of left/right loudspeaker is adjusted ⇒ page 19
CD
Compact Disc ⇒ page 4, ⇒ page 6, ⇒ page 7, ⇒ page 8, ⇒ page 9, ⇒ page 12,
⇒ page 14, ⇒ page 18, ⇒ page 18, ⇒ page 19, ⇒ page 22
EON
Enhanced Other Networks; traffic information of other stations can also be transmitted by the navigation system during play function of an audio source
EON is a RDS function, which ensures that all traffic information of a broadcasting
company is transmitted in the TP mode ⇒ page 8.
FAD ER
Volume ratio of front/rear loudspeaker is adjusted ⇒ page 19
FM
Frequency modulation, ultra short waveband, USW ⇒ page 4, ⇒ page 8,
⇒ page 9, ⇒ page 11, ⇒ page 16, ⇒ page 17, ⇒ page 17, ⇒ page 19, ⇒ page 19
GALA
Speed dependent volume adaptation - ⇒ page 13
GPS
Global Positioning System - global satellite locating system ⇒ page 5
MENU
Menu ⇒ page 4, ⇒ page 11
MUTE
Mute switch ⇒ page 4, ⇒ page 8, ⇒ page 16
NO MESSAGE
No news ⇒ page 17
NO TMC
No Traffic Message Channel - no traffic message channel is available ⇒ page 17
NO TP
No Traffic Program - no station with traffic information is available ⇒ page 17
RDS
Radio Data System - Radio station data system, coded data transfer of USW station
⇒ page 12, ⇒ page 12
SAFE
Secured ⇒ page 6
SCAN
Brief playing of all stations with the strongest reception in the selected waveband
or all tracks on a CD ⇒ page 4, ⇒ page 9, ⇒ page 18.
Page 39

Glossary38
s2ck7book
Page38Friday
April202007
12:38
PM
SET
Setup - Setting ⇒ page 4
SETUP
Set-up ⇒ page 4, ⇒ page 11, ⇒ page 11, ⇒ page 14
TA
Traffic Annoucement - Traffic information, priority switch-over for traffic information ⇒ page 13
TIM
Traffic Information Memo ⇒ page 4, ⇒ page 8, ⇒ page 17
TMC
TMC (Traffic Message Channel)
The traffic reports are not audibly emitted by different broadcasting stations in
addition to the radio program via a Traffic Message Channel (TMC). The navigation
system receives this data via a separate TMC box and evaluates it ⇒ page 4,
⇒ page 8, ⇒ page 9, ⇒ page 10, ⇒ page 16, ⇒ page 16, ⇒ page 17, ⇒ page 17,
⇒ page 17, ⇒ page 19, ⇒ page 19, ⇒ page 35
TMC-SEEK
Traffic message channel search ⇒ page 17
TP
Traffic Program - TP in the display shows that a radio station is received ⇒ page 8,
⇒ page 13, ⇒ page 17.
TP-SEEK
Traffic program search ⇒ page 17
TRACK
Tra ck o n a C D ⇒ page 9, ⇒ page 17, ⇒ page 18
UTC
Universal Time, Coordinated ⇒ page 14
USW
Ultre short wave, designated as FM ⇒ page 16
Page 40

Index
s2ck7book
Page39Friday
April202007
12:38
PM
Index 39
A
Alarm . . . . . . . . . . . . . . . . . . . . . . . . . . . . . . . . . . . . . . . . 10
Audio . . . . . . . . . . . . . . . . . . . . . . . . . . . . . . . . . . . . . 12, 19
B
Buttons . . . . . . . . . . . . . . . . . . . . . . . . . . . . . . . . . . . . . . . . 4
C
Calibration . . . . . . . . . . . . . . . . . . . . . . . . . . . . . . . . . . . . . 7
CD
Navigation . . . . . . . . . . . . . . . . . . . . . . . . . . . . . . . . . . 7
Replay . . . . . . . . . . . . . . . . . . . . . . . . . . . . . . . . . . . 18
Switching on . . . . . . . . . . . . . . . . . . . . . . . . . . . . . . 18
CD Care . . . . . . . . . . . . . . . . . . . . . . . . . . . . . . . . . . . . . 19
Change short name . . . . . . . . . . . . . . . . . . . . . . . . . . . 33
Code . . . . . . . . . . . . . . . . . . . . . . . . . . . . . . . . . . . . . . 6, 15
Entry . . . . . . . . . . . . . . . . . . . . . . . . . . . . . . . . . . . . . 15
incorrect . . . . . . . . . . . . . . . . . . . . . . . . . . . . . . . . . 15
D
Destination
Enter destination . . . . . . . . . . . . . . . . . . . . . . . . . . 21
Intersection . . . . . . . . . . . . . . . . . . . . . . . . . . . . . . . 24
Memory . . . . . . . . . . . . . . . . . . . . . . . . . . . . . . . . . . 26
Selection . . . . . . . . . . . . . . . . . . . . . . . . . . . . . . . . . 27
sort . . . . . . . . . . . . . . . . . . . . . . . . . . . . . . . . . . . . . . 26
Street . . . . . . . . . . . . . . . . . . . . . . . . . . . . . . . . . . . . 23
Town . . . . . . . . . . . . . . . . . . . . . . . . . . . . . . . . . . . . 21
Town centre . . . . . . . . . . . . . . . . . . . . . . . . . . . . . . 24
Destination memory . . . . . . . . . . . . . . . . . . . . . . . 26, 32
Destinations . . . . . . . . . . . . . . . . . . . . . . . . . . . . . . . . . 32
delete . . . . . . . . . . . . . . . . . . . . . . . . . . . . . . . . . . . . 34
sort . . . . . . . . . . . . . . . . . . . . . . . . . . . . . . . . . . . . . . 33
Display . . . . . . . . . . . . . . . . . . . . . . . . . . . . . . . . . . . . . 7, 9
E
Explanations . . . . . . . . . . . . . . . . . . . . . . . . . . . . . . . . . . . 3
F
Factory settings . . . . . . . . . . . . . . . . . . . . . . . . . . . . . . 14
Flagged destination . . . . . . . . . . . . . . . . . . . . . . . . 27, 28
G
Guidance . . . . . . . . . . . . . . . . . . . . . . . . . . . . . . . . . . . . 31
I
Intersection . . . . . . . . . . . . . . . . . . . . . . . . . . . . . . . . . . 24
J
Jam . . . . . . . . . . . . . . . . . . . . . . . . . . . . . . . . . . . . . . 34, 35
L
Language . . . . . . . . . . . . . . . . . . . . . . . . . . . . . . . . . . . . 14
N
Navigation . . . . . . . . . . . . . . . . . . . . . . . . . . . . . . . . . 5, 11
Basic menu . . . . . . . . . . . . . . . . . . . . . . . . . . . . . . . 20
Navigation CD . . . . . . . . . . . . . . . . . . . . . . . . . . . . . . . . . 7
O
Operation . . . . . . . . . . . . . . . . . . . . . . . . . . . . . . . . . . . . . 6
R
Radio
Retrieve station . . . . . . . . . . . . . . . . . . . . . . . . . . . 17
Store station . . . . . . . . . . . . . . . . . . . . . . . . . . . . . . 16
switch on . . . . . . . . . . . . . . . . . . . . . . . . . . . . . . . . . 16
Replacement service . . . . . . . . . . . . . . . . . . . . . . . . . . . . 6
Route . . . . . . . . . . . . . . . . . . . . . . . . . . . . . . . . . . . . . . . . 29
List . . . . . . . . . . . . . . . . . . . . . . . . . . . . . . . . . . . . . . 30
Possibilities . . . . . . . . . . . . . . . . . . . . . . . . . . . . . . . 29
Route guidance
Cancel . . . . . . . . . . . . . . . . . . . . . . . . . . . . . . . . . . . 32
NO MAP . . . . . . . . . . . . . . . . . . . . . . . . . . . . . . . . . 31
OFF MAP . . . . . . . . . . . . . . . . . . . . . . . . . . . . . . . . . 31
OFF ROAD . . . . . . . . . . . . . . . . . . . . . . . . . . . . . . . 31
Page 41

Index40
s2ck7book
Page40Friday
April202007
12:38
PM
S
Select destination . . . . . . . . . . . . . . . . . . . . . . . . . . . . . 27
Select track . . . . . . . . . . . . . . . . . . . . . . . . . . . . . . . . . . . 18
Special destination . . . . . . . . . . . . . . . . . . . . . . . . . . . 25
Special equipment . . . . . . . . . . . . . . . . . . . . . . . . . . . . . 5
Street . . . . . . . . . . . . . . . . . . . . . . . . . . . . . . . . . . . . . . . . 23
Switching the system off . . . . . . . . . . . . . . . . . . . . . . . 7
Switching the system on . . . . . . . . . . . . . . . . . . . . . . . . 7
T
Telephone . . . . . . . . . . . . . . . . . . . . . . . . . . . . . . . . . . . 10
Time . . . . . . . . . . . . . . . . . . . . . . . . . . . . . . . . . . . . . . . . . 14
Town . . . . . . . . . . . . . . . . . . . . . . . . . . . . . . . . . . . . . . . . 21
Town centre . . . . . . . . . . . . . . . . . . . . . . . . . . . . . . . . . . 24
Traffic information . . . . . . . . . . . . . . . . . . . . . . . . . . . . 17
Travel guide . . . . . . . . . . . . . . . . . . . . . . . . . . . . . . . . . . 35
Tyre change . . . . . . . . . . . . . . . . . . . . . . . . . . . . . . . . . . . 7
V
Volume . . . . . . . . . . . . . . . . . . . . . . . . . . . . . . . . . . . . . . 13
W
Warranty . . . . . . . . . . . . . . . . . . . . . . . . . . . . . . . . . . . . . . 6
Page 42

Škoda Auto is constantly working on the further development of all types and models. Please understand that, for this reason, changes to the scope of supply in terms of shape, equipment and engineering may be introduced at any time. It is therefore not possible
to derive any claims from the information, illustrations and descriptions contained in this Owner ´s Manual .
Reprinting, reproduction, translation or any other use of this document, in whole or in parts, is not permitted without the written
consent of Škoda Auto.
Škoda Auto expressly reserves all rights in respect of copyright.
Subject to modification.
Published by
ŠKODA AUTO a.s.
© ŠKODA AUTO a.s. 2005
This paper was manufactured from pulp bleached without using chlorine.
Page 43

www.skoda-auto.com Radionavigační systém SatCompass
Škoda Auto anglicky 05.06
S00.5610.45.20
3U0 012 151 CM
 Loading...