

ŠkodaOctavia
SIMPLY CLEVER
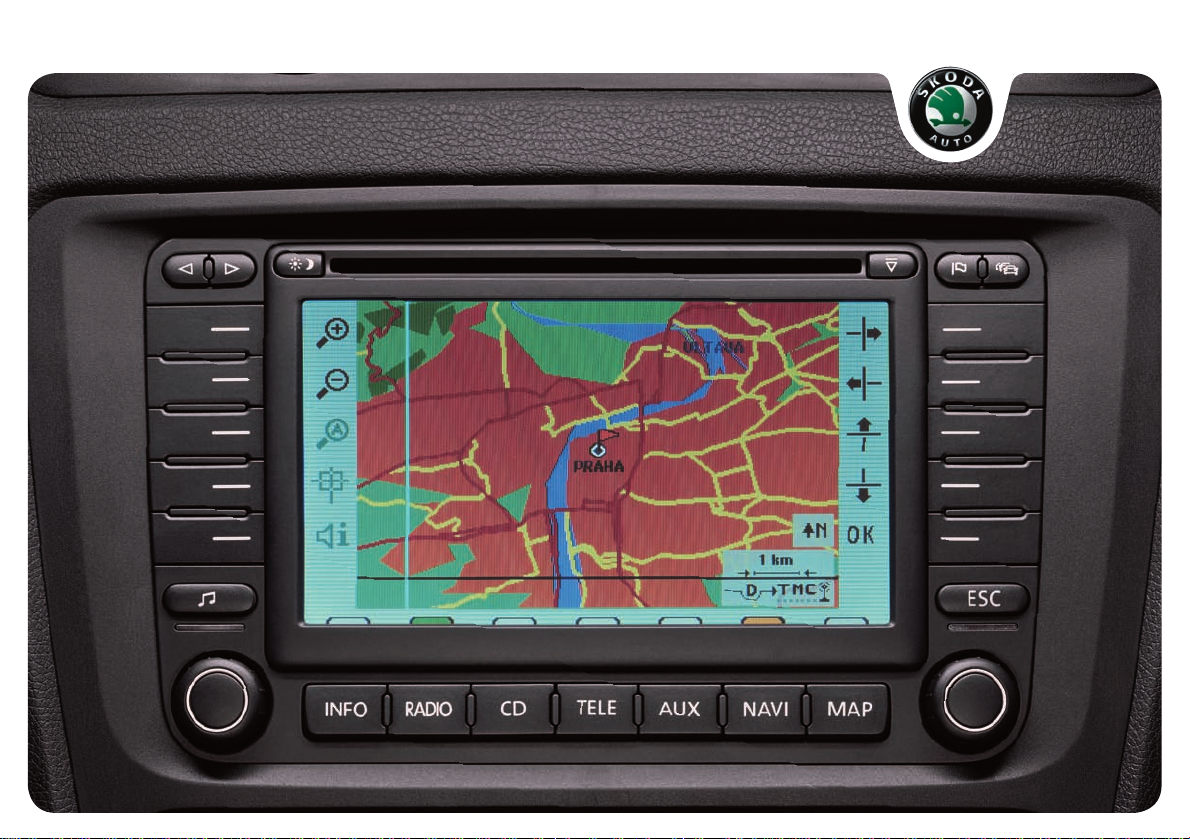
RADIO NAVIGATION SYSTEM NEXUS
About this Owner´s Manual
s3f06book
PageiiThursday
November32005
10:31
AM
This Owner´s Manual contains important information, tips, suggestions
and warnings on using the radio navigation system. The other Owner´s
Manual in the vehicle wallet contain further information which you should
be aware of for your own safety and for the safety of your passengers.
Ensure that the complete vehicle wallet is always in the vehicle. This is
especially important when you lend or sell the vehicle to others.
This manual describes the scope of vehicle equipment at the time of
publication. Some of the equipment described here will not be available
until a later date, or is available only in certain markets.
Illustrations may vary from your vehicle in details. For this reason you
should regard illustrations as a general guide.
Directions and positions (e.g. right, left, front, rear) are always relative
to the direction of travel of the vehicle unless otherwise stated.
Some sections of this booklet do not apply to all vehicles. If this is the
case, a text at the start of the section indicates to which vehicles it
applies, e. g. “Applies to vehicles with CD changer”.
® Registered trademarks are marked ®. However, the absence of this
symbol does not constitute a waiver of the rights concerning any term.
The section is continued on the next page.
Indicates the end of a section.
WARNING
Texts with this symbol contain information on safety. They help
protect you from accidents and injury.
Caution
Texts with this symbol draw your attention to potential sources of damage
to your vehicle.
For the sake of the environment
Texts with this symbol contain additional information on the protection of
the environment.
Note
Texts with this symbol contain additional information.

Contents
s3f06book
Page1Thursday
November32005
10:31
AM
Contents 1
Quick Reference Guide . . . . . . . .
Control elements . . . . . . . . . . . . . . . . . . . . . . .
Display elements on the screen . . . . . . . . .
Switching on and off . . . . . . . . . . . . . . . . . . . .
Radio/CD/Sound . . . . . . . . . . . . . . . .
Radio . . . . . . . . . . . . . . . . . . . . . . . . . . . . . . . . .
CD . . . . . . . . . . . . . . . . . . . . . . . . . . . . . . . . . . .
Sound, sound focus and volume . . . . . . . . .
Navigation . . . . . . . . . . . . . . . . . . . . . . . .
Overview . . . . . . . . . . . . . . . . . . . . . . . . . . . . . .
Destination entry . . . . . . . . . . . . . . . . . . . . . . .
Destination memory . . . . . . . . . . . . . . . . . . . .
Parameters for route calculation . . . . . . . . .
Map and symbol displays . . . . . . . . . . . . . . .
Route guidance . . . . . . . . . . . . . . . . . . . . . . . .
Information and system
settings
Information . . . . . . . . . . . . . . . . . . . . . . . . . . . .
System settings . . . . . . . . . . . . . . . . . . . . . . . .
. . . . . . . . . . . . . . . . . . . . . . . . . . . .
2
External units . . . . . . . . . . . . . . . . . . . .
2
Calling up external units . . . . . . . . . . . . . . . .
4
4
Index . . . . . . . . . . . . . . . . . . . . . . . . . . . . . . .
6
6
10
12
14
14
17
23
27
32
38
41
41
42
44
44
45
Quick Reference Guide2
A
s3f06book
Page2Thursday
November32005
10:31
AM
Quick Reference Guide
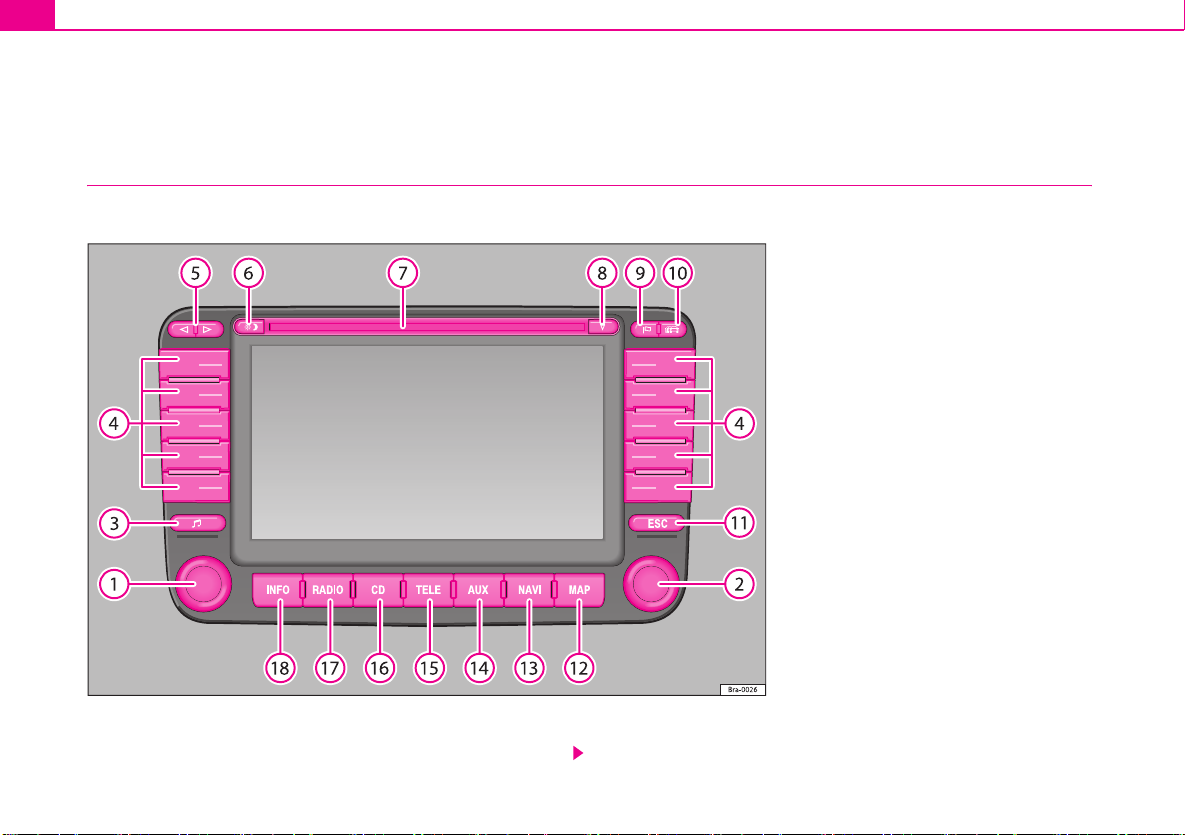
Control elements
This overview will help you to quickly familiarise yourself with the control elements.
1
On/off knob (push) and volume control (turn). The volume
control will regulate the volume of the audio source currently
Fig. 1 Overview of the control elements
Quick Reference Guide 3
A
A
A
A
A
A
A
A
A
A
A
A
A
A
A
A
A
s3f06book
Page3Thursday
November32005
10:31
AM
selected. A column will indicate the volume level. The
volume of a telephone conversation can also be regulated
using the volume control.
2
Entries in the screen menus can be made using the menu
button. Turn to mark a function or a sub-menu. Press to
select a function or a sub-menu.
3
Sound and sound centre settings . . . . . . . . . . . . . . . . . .
4
Left and right of the screen - 5 function/station keys.
− The term function key is used because the keys have
different functions depending on the menu being shown in
the display. If the text says, for example, “Press
Dest. on map
”, then press the function key next to where
the text “Dest. on map” appears on the screen.
− Station keys: The upper 6 function keys are used as
station buttons in the radio mode. Stations can be stored
on these keys. The upper 6 function keys can be used to
select the inserted CDs in CD changer mode.
5
Backwards/forwards keys, apply to the active audio
source
− press briefly: radio mode: station change in the memory;
CD mode: changes track
− press longer: radio mode: station change in the station
listing; CD mode: fast forward/backward search
6
Switches between day and night display or darkens the
screen display . . . . . . . . . . . . . . . . . . . . . . . . . . . . . . . . . . .
7
Slot for an audio or navigation CD. . . . . . . . . . . . . . . . . . . .
8
CD eject button. The ejected CD will be pulled back into
the unit if it is not fully withdrawn within 10 seconds.
9
Set flagged destination. The unit will store the current
vehicle position when this button is pressed. When this
button is pressed again, the flagged destination will be overwritten if it has not been stored in the destination memory. .
12
42
10
17, 23
10
The traffic jam button calls up the input menu to exclude
route sections in a route list or to enter traffic jam information
manually . . . . . . . . . . . . . . . . . . . . . . . . . . . . . . . . . . . . . . .
11 ESC
12 MAP
Back to previous menu.
Map display when Navigation CD is inserted / Switch
to symbol display. . . . . . . . . . . . . . . . . . . . . . . . . . . . . . . . .
13 NAVI
14 AUX
15 TELE
16 CD
17 RADIO
18 INFO
Calls up the Navigation main menu. . . . . . . . . . . . .
Switches to other auxiliary audio or video units. . . . .
reserved for additional functions at a later date
CD and CD changer control 1) . . . . . . . . . . . . . . . . . .
Radio menu . . . . . . . . . . . . . . . . . . . . . . . . . . . . . .
Call up system settings, traffic reports, position
displays . . . . . . . . . . . . . . . . . . . . . . . . . . . . . . . . . . . . . . . .
WARNING
Adjust the volume so that you can still hear signals coming from
outside the vehicle, such as fire brigade, ambulances or police
cars.
Caution
The screen is not a touch screen. Do not press on the surface. The screen
can be cleaned with a soft cloth (and alcohol, if necessary). Do not use
solvents such as turpentine or petrol to clean the surface as they will
corrode the material.
1)
You will find a description in the corresponding Owner´s Manual.
30
39
16
44
10
6
41
Quick Reference Guide4
AAABACADA
A
A
s3f06book
Page4Thursday
November32005
10:31
AM
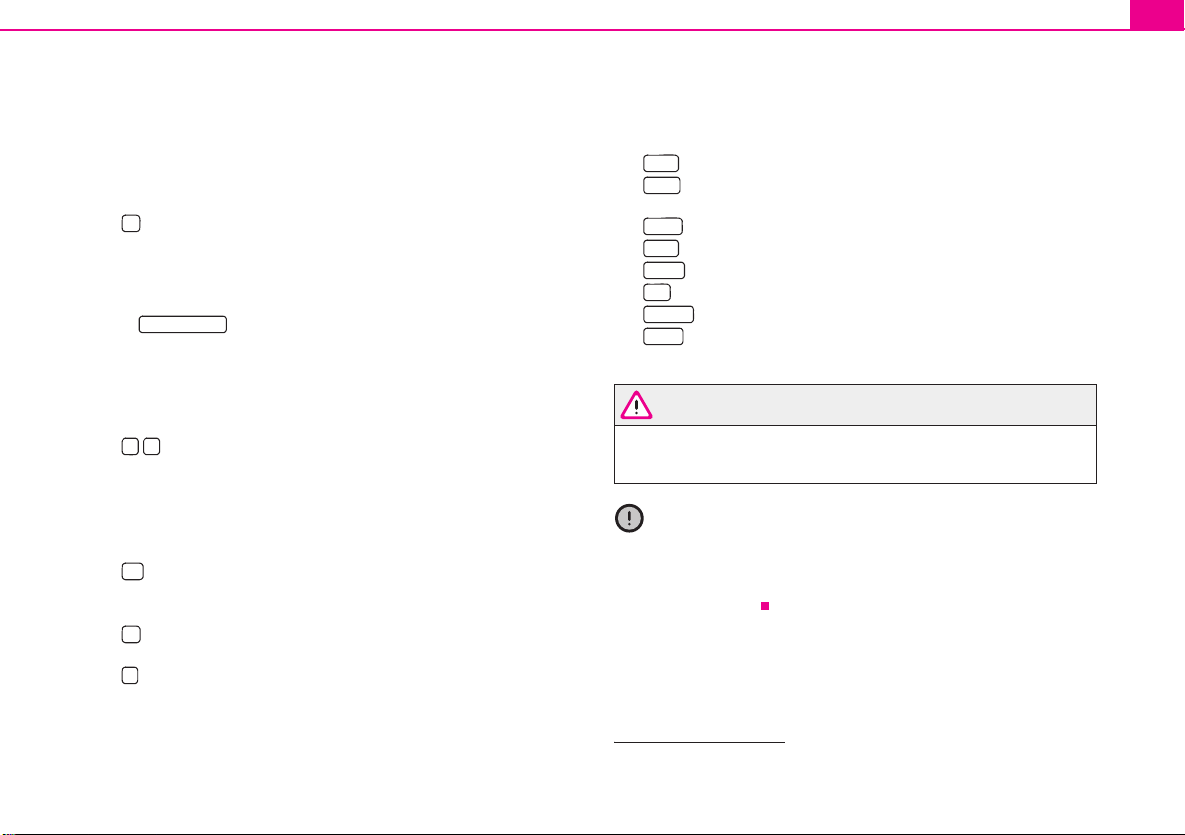
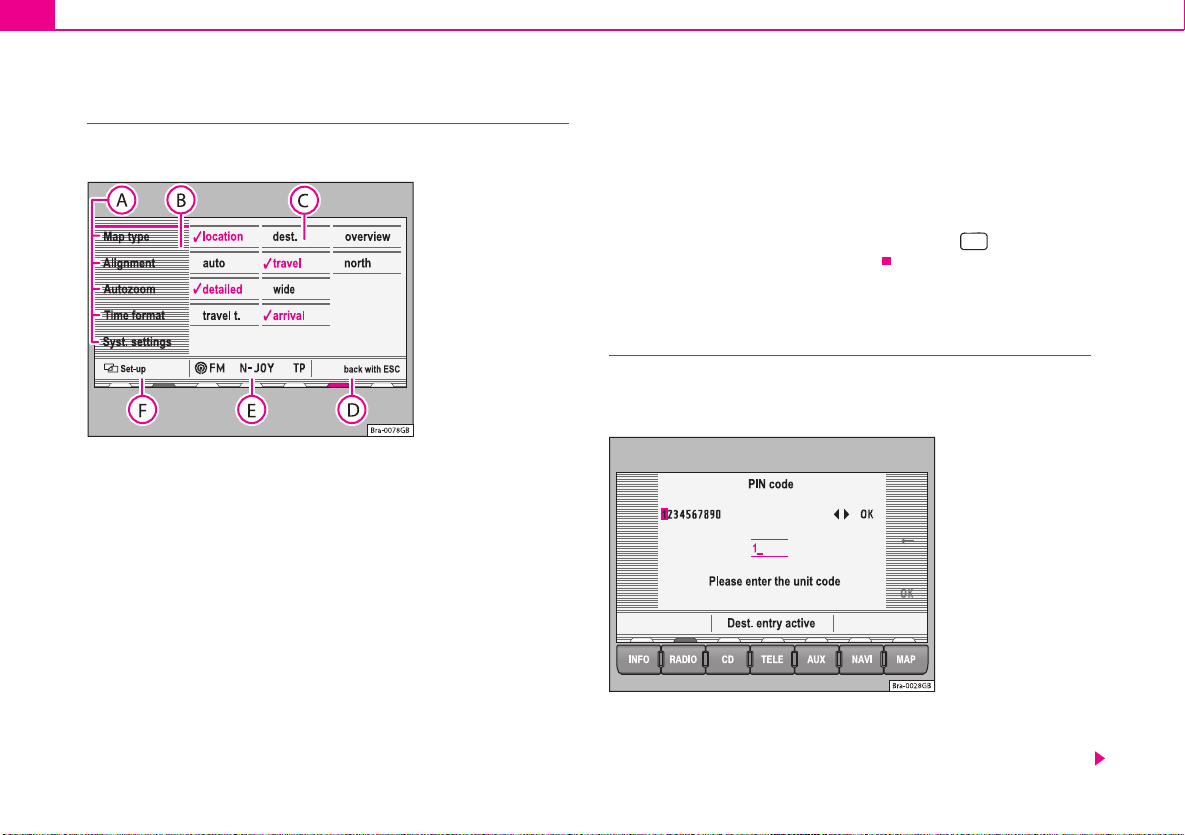
Display elements on the screen
This section describes the elements seen in the display.
Fig. 2 Display
elements
The functions or sub-menus shown on the screen can be called up by
pressing the function key situated directly next to them. This can also
be carried out by first turning the menu knob and then pressing it.
The orange selection box can be moved using the menu knob. It will
disappear from the screen if the unit is not used for 30 seconds and
will appear again if the menu knob is turned.
The selection of the function characteristics, such as destin. or
overview, can only be reached by pressing and turning the menu
knob.
The right part of the status bar contains additional information or the
option “back with ESC”
E
Details of the active audio source or navigation status are shown in
the centre part of the status bar.
F
The left part of the status bar shows the current menu.
Below the status bar
An orange marking indicates which source is active. Press the key
beneath it to call up the main menu for this source.
A green marking indicates which source is still active in the background
(the radio in this example). Press the key beneath it to call up the main
menu for this source.
If the text CD ? is displayed in the marking above the button, the CD
inserted in the CD drive can not be read.
CD
Switching on and off
A safety code made up of four characters must be entered
when switching on for the first time.
Fig. 3 Entering the
safety code
Switching on/off
– Press the rotary/push knob ⇒ page 2, fig. 1 .
1

Quick Reference Guide 5
s3f06book
Page5Thursday
November32005
10:31
AM
– Press the rotary/push knob again to switch the unit off.
Entering the safety code
– The safety code can be found on the unit card.
– Enter the characters by turning and pressing the menu knob
⇒ page 4, fig. 3.
– Press if you wish to change incorrect entries.
– Once the safety code as entered corresponds to the code
given on the unit card, press .
The last menu used and also the last audio source used before switching
off will be selected automatically when the unit is switched on again. The
radio navigation system will be switched off if the ignition is turned off. The
unit can be switched on again using the rotary/push knob when the ignition is switched off. It will be switched off automatically after an hour to
stop the vehicle battery from running down.
The following text might appear if there is no CD in the CD slot and the
safety code has been entered and you have pressed : No CD is
inserted. Please insert a ŠkodaAuto Navigation RNS CD.
If you do not wish to use the navigation system immediately, you can still
select a different audio source by pressing the appropriate button.
Comfort Coding
If you have not received a security code for your radio, it means that your
car is fitted with comfort coding system, which does not require a code. In
case of disconnection and reconnection of car battery, first switch on the
power by the starting key, then switch on the radio. If you need a code,
contact your Škoda service.
OK
OK
Note
The unit will be blocked for one hour if an incorrect code is entered three
times. The code can be entered again after this one hour has elapsed.
Radio/CD/Sound6
s3f06book
Page6Thursday
November32005
10:31
AM
Radio/CD/Sound
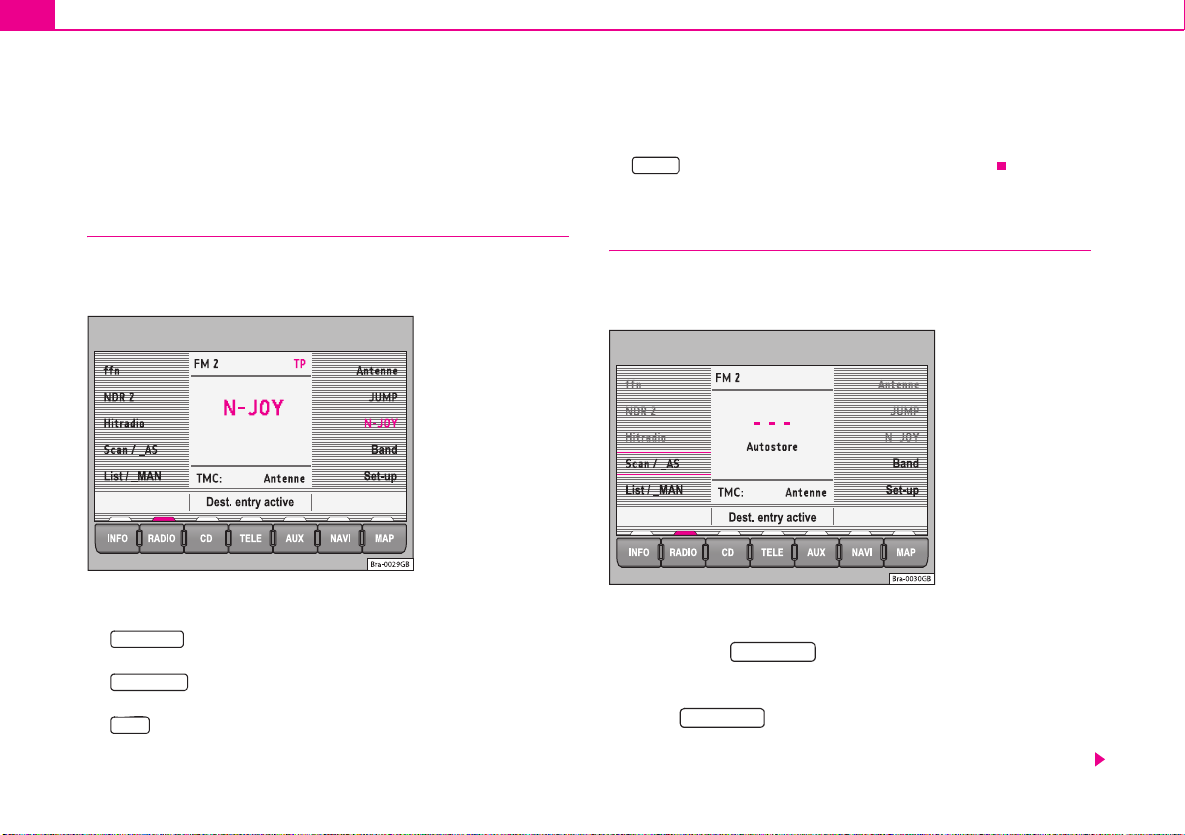
Radio
Set-up
• – Set-up for RDS functions ⇒ page 9 Settings.
Overview
Information is given here on how to select and store
stations.
Fig. 4 Radio main
menu
The following radio functions are selected via the function keys:
Scan / _AS
• – Scans stations or stores those stations with the strongest
reception ⇒ page 6, “Scan/AS”,
List / _MAN
• – Calls up station list or manual frequency input ⇒ page 8,
“Station selection from a list (FM only)”,
Band
• – Sets the waveband and traffic radio, mute function ⇒ page 7,
“Setting waveband/Muting”,
Scan/AS
The stations with the strongest reception are either
scanned or stored automatically.
Fig. 5 Autostore AS
Playing stations briefly
– Briefly press ⇒ fig. 5.
Autostore on the second memory level (FM2 or AM2)
– Press for longer than 2 seconds to allocate those
stations with the strongest reception in the selected waveband
(FM2 or AM2) to the upper 6 function keys.
Scan / _AS
Scan / _AS
Radio/CD/Sound 7
s3f06book
Page7Thursday
November32005
10:31
AM
Autostore for all memory levels (Initial Autostore)
– Press for longer than 10 seconds to allocate those
Scan / _AS
stations with the strongest reception in all wavebands to the
upper 6 function keys.
The selected function will be shown on the screen and can be stopped by
pressing again.
A scan in the FM waveband will play through the list of registered stations.
A scan in AM will play all stations with a high quality reception. Each
station scan lasts 8 seconds. Press the menu knob or if you
would like to stop at the station currently being played.
Scan / _AS
Scan / _AS
Note
Use the function “Initial Autostore” if you are using the unit for the first time
or when selecting new stations in the waveband. Any station names on the
station keys will be overwritten. The process of searching for and storing
the station names takes a few seconds.
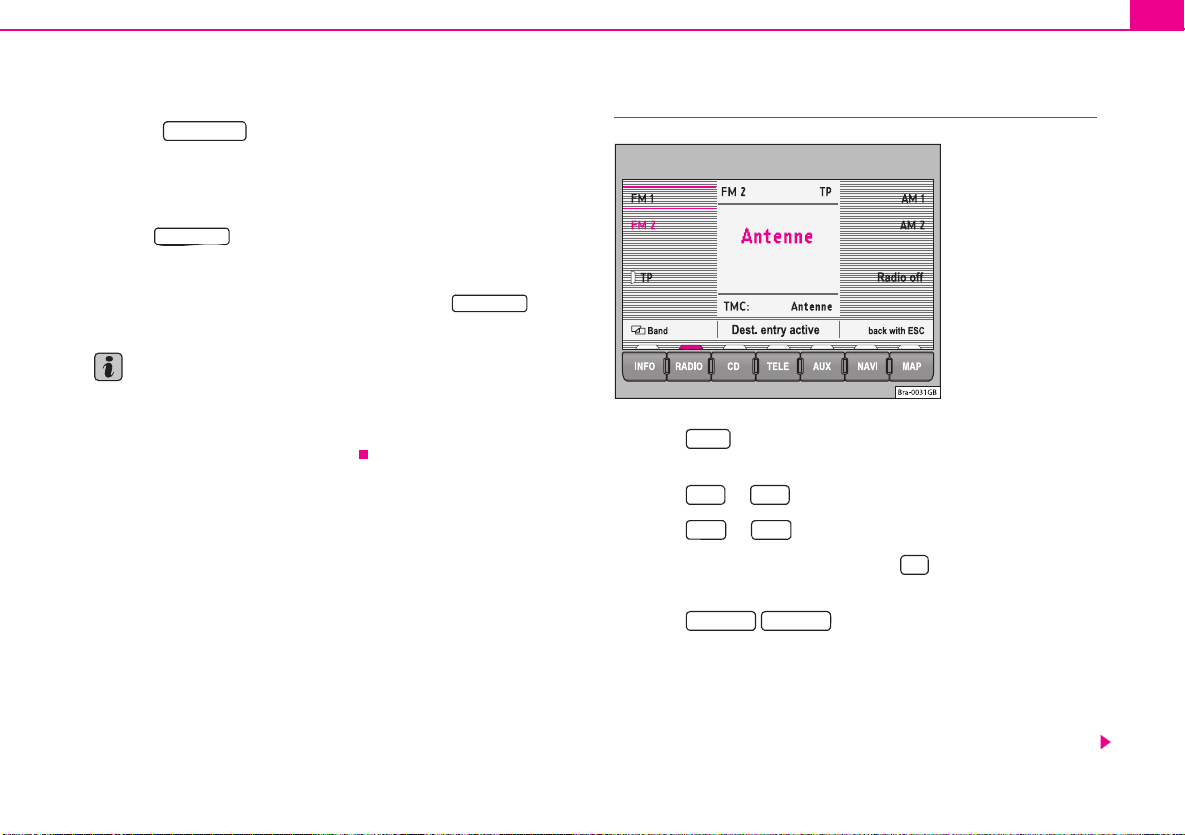
Setting waveband/Muting
Fig. 6 Radio waveband
– Press in the radio main menu ⇒ page 6, fig. 4 to see
– Press or to receive VHF stations.
– Press or to receive medium wave stations.
– When in FM1 or FM2 mode, press to receive traffic infor-
– Press / to mute the radio or to switch the
Band
the frequencies.
FM1 FM2
AM1 AM2
TP
mation reports.
Radio off Radio on
mute function off/on.
The last heard station will be played for the waveband selected. Traffic
information reports will be relayed even when the radio has been muted.
The TP function must be active for this purpose (white column next to the
field). When TP is active, the letters TP are lit up in orange. The increased

Radio/CD/Sound8
A
s3f06book
Page8Thursday
November32005
10:31
AM
volume level for the traffic announcement can be lowered by pressing the
INFO
button .
Station selection from a list (FM only)
The radio navigation system will automatically compile
and store a list of receivable FM stations after the unit is
switched on.
Fig. 7 List of stations
– Press in the radio main menu ⇒ page 6, fig. 4 to
– Select a station by turning and pushing the menu knob or by
List / _MAN
see the stored stations.
using the right-hand function keys.
– Select a station from the list by turning and pushing the menu
knob. You can scroll through several pages of the list using the
scroll markers , , and and confirm your selection
by pressing .
OK
– You can also select the stations stored in the list by pressing
the button or for more than 2 seconds.
Station selection from memory or by entering
frequency
Station selection from memory
– Briefly press button or to listen to the stored station.
Station selection by entering frequency
– Press the button ⇒ page 2, fig. 1 and hold it
pressed for more than 2 seconds. As soon as the information
regarding the frequency appears with an orange frame and
the word manual in the middle of the display, you can manually enter the frequency. The station finding starts in the
selected direction in steps of 0.1 MHz (FM) or 9 kHz (AM). You
can set in this way one of your known station frequencies. You
can also change the frequency by turning the menu knob.
– For fine tuning press the button or .
List / _MAN
5
Radio/CD/Sound 9
A
s3f06book
Page9Thursday
November32005
10:31
AM
Allocating the stations to the station buttons
Stations can be allocated to the buttons to make it easier
to select them quickly.
– Press one of the upper 6 station buttons until you hear a signal
⇒ page 2, fig. 1 . The station you are listening to is now
stored on the button.
A total of six stations can be stored on the station buttons for each mode;
FM1, FM2 or AM1 or AM2. The short form of the station name or the
station frequency will appear next to the button. Press one of the buttons
if you wish to listen to one of the stored stations.
Note
The memory on a button will be overwritten if a new station is stored
there.
4
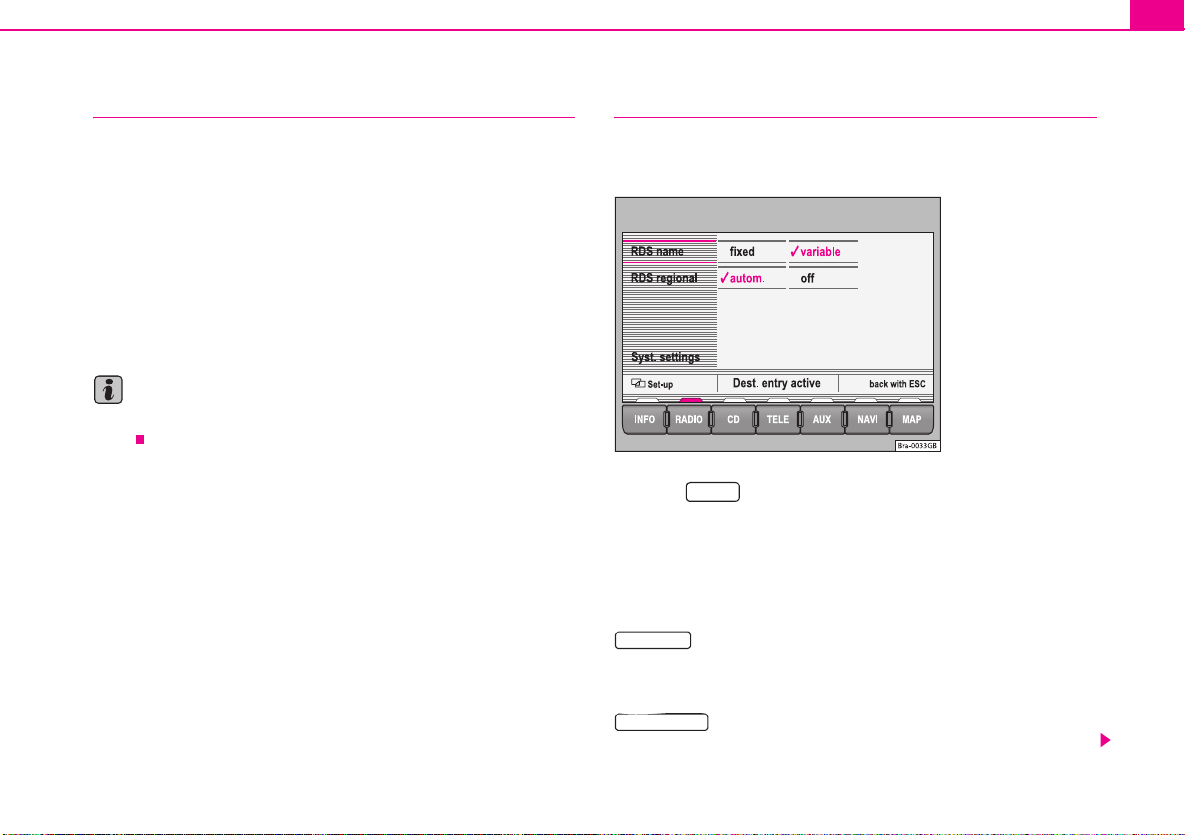
RDS settings
Some stations transmit text and information in addition to
the station name.
Fig. 8 RDS functions
– Press in the Radio main menu ⇒ page 6, fig. 4.
Further text information as running text will not be displayed on the
screen, in addition to the station name, for all RDS stations.
A tick
Function keys
RDS Name
Set-up
will indicate which options have been selected.
• fixed: Only the station name will be shown.
• variable: Text information is shown as running text.
RDS Regional
broadcasting over a wide area will continue to be displayed even when
– autom.: The selected regional programme of a station
Radio/CD/Sound10
A
s3f06book
Page10Thursday
November32005
10:31
AM
you enter the broadcasting area of another regional programme of the
same station.
Syst. settings
⇒ page 42
WARNING
Your attention must, however, always be concentrated on road
traffic as an absolute priority. Do not allow yourself to be distracted
by the RDS running text.
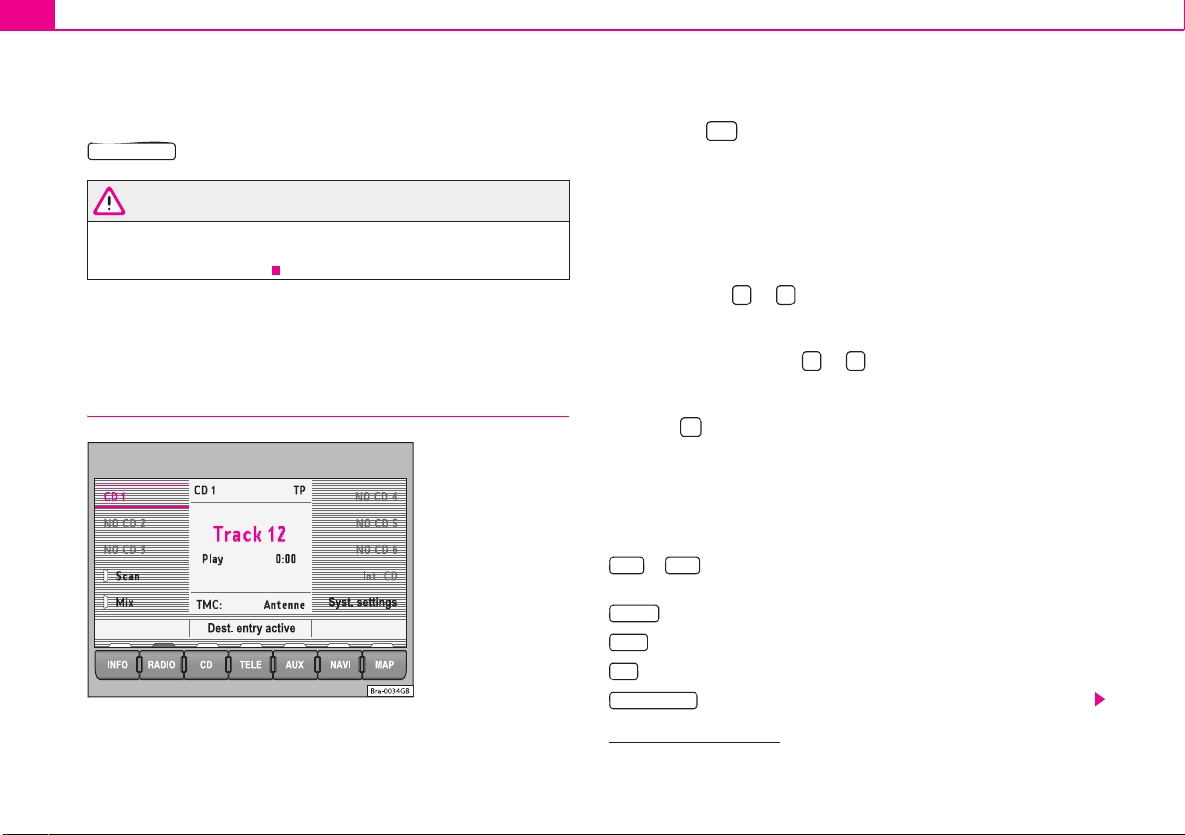
CD
Listening to an audio CD
Fig. 9 Main menu CD
Listening to a CD
– Press the button ⇒ page 2, fig. 1. If a CD is already in the
CD
player, the last played track will be selected. Otherwise the
following will appear briefly on the screen: “No Audio CD”.
– Insert a standard 12 cm audio CD. The play function will start
automatically.
Playing the previous or next track
– Press button or briefly.
Fast forward/reverse
– Press and hold button or .
Ejecting a CD
–Press ⇒ page 2, fig. 1 .
The number of the track and its length are shown on the screen. TP lights
up in orange if traffic reports are to be received and TMC indicates
whether TMC stations are being received ⇒ fig. 9.
Function keys during the play function:
CD1 CD6
connected 2).
Int. CD
Scan
Mix
Syst. settings
... – Selects the corresponding CD in the CD changer if
– Selects the CD that is in the unit.
– All tracks on the CD will be played for 8 seconds at a time.
– The tracks on the CD will be played in a random order.
⇒ page 42
8
2)
You will find a description in the corresponding Owner´s Manual.
Radio/CD/Sound 11
s3f06book
Page11Thursday
November32005
10:31
AM
WARNING
The CD player is a class 1 laser product. If it is opened, or is faulty
or damaged, there is a risk of invisible laser beams escaping from
the unit. The CD player contains no parts that have to be serviced.
Any repair work that needs to be done should, therefore, be carried
out by Škoda Service exclusively.
Caution
• Only 12 cm standard CDs should be used, not 8 cm single CDs. Only
round CDs should be inserted in the CD slot. “Special shape CDs” can not
be played and they will damage the CD player.
• Slide the CD with the printed side up into the CD slot up to the point
where it is drawn in automatically. Hold the CD at the sides. Avoid leaving
fingerprints on the CD. Clean the CD with a dry, lint-free cloth. When doing
this, wipe the CD from the centre outwards. Do not clean the CDs using
alcohol or solvents. Do not place the CDs near heat sources or in the
direct sunlight. Do not write on the CDs and do not attach stickers to them.
Note
• The upper 6 function keys are only active if a CD changer has been
connected.
• CD-R and CD-RW formats can also be played, depending on the
quality of the blanks.
• If the text CD ? is displayed in the small marking above the button,
the CD inserted in the CD drive can not be read.
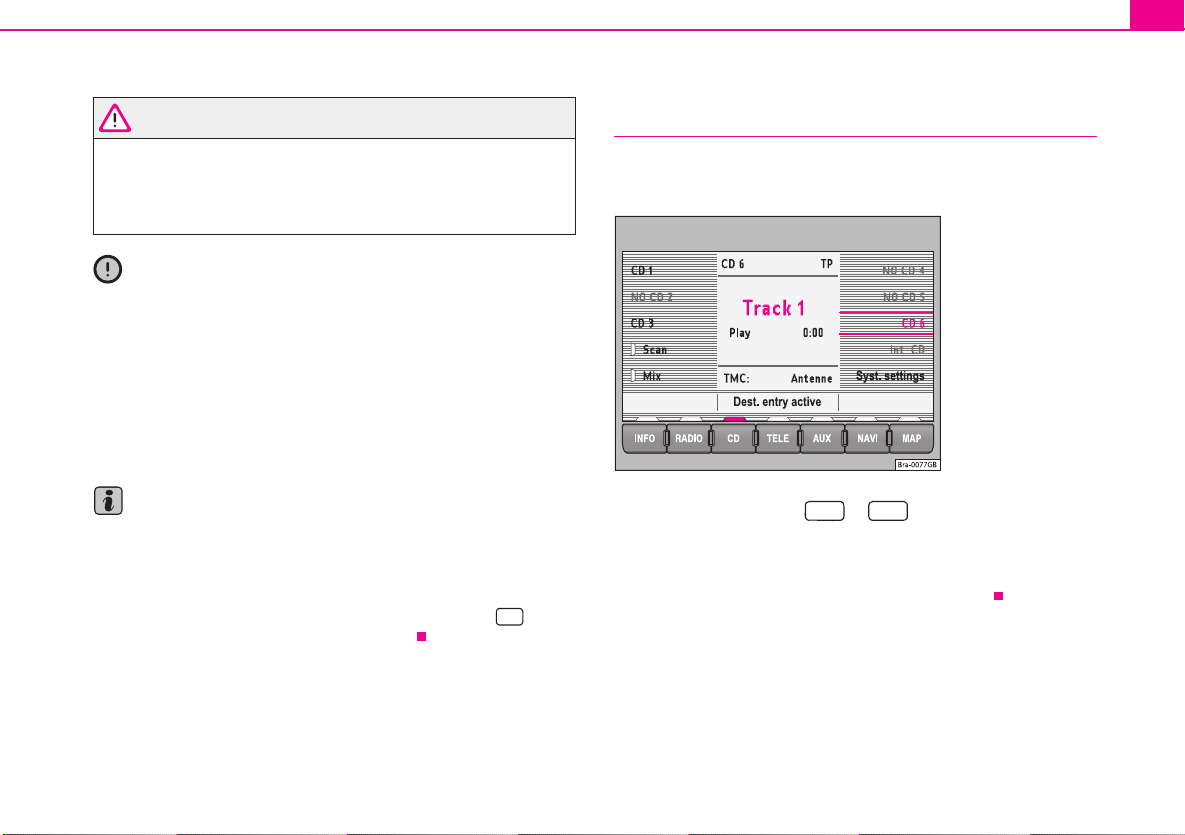
CD
Applies to vehicles: with CD changer
Playing a CD from the CD changer
How to use the radio navigation system to select a CD in
the CD changer.
Fig. 10 CDs currently
in the changer
– Use the function keys to to select a CD from the
changer.
Uneven road surfaces and strong vibrations may cause the CD to jump.
The CD play function should be switched off in this case.
CD1 CD6
Radio/CD/Sound12
A
A
A
s3f06book
Page12Thursday
November32005
10:31
AM
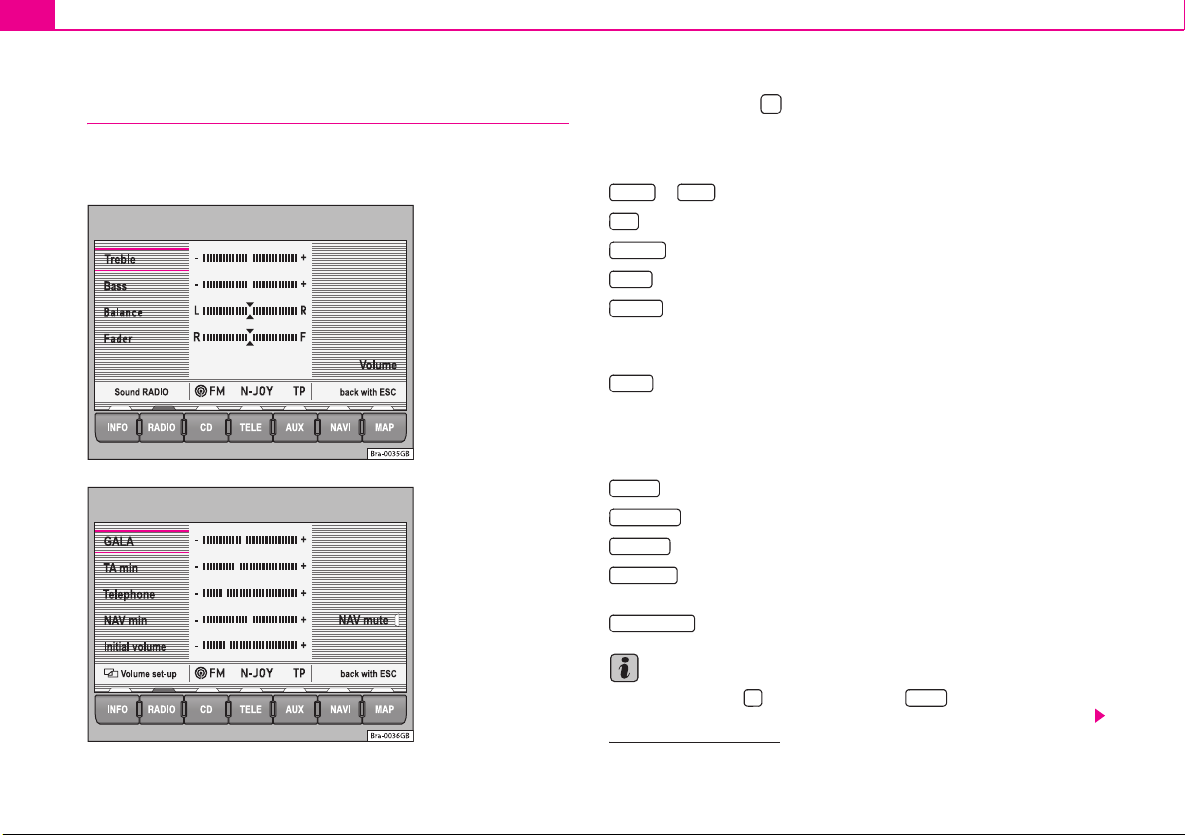
Sound, sound focus and volume
This section describes how the sound character and the
volume of different sound sources can be set individually.
Fig. 11 Sound main
menu
Fig. 12 Volume
settings
– Press the button ⇒ page 2, fig. 1 to open the Sound
3
main menu.
Function keys in Sound main menu:
Treble Bass
or – Treble or Bass settings ⇒ fig. 11
3)
Mid
– Volume setting for the mid-range frequencies
Balance
– Sound focus setting left/right
Fader
– Sound focus setting front/rear
Vol ume
– Opens the volume set-up where individual volume settings can
be made for the different audio sources ⇒ fig. 12.
Function keys in the volumes set-up function:
GALA
– The setting for the sensitivity of the speed-dependent volume
adjustment (GALA). The volume of the audio source will be increased
automatically by GALA as the road noise increases at higher speeds. The
volume will be increased more the further the control is set towards the
right.
TA M in
– Minimum volume for traffic announcements
Telephone
NAV Min
NAV mute
– Minimum volume for telephone conversations
– Minimum volume for navigation system announcements
– The traffic announcements are muted as long as a orange
bar can be seen next to the function key.
Initial volume
– Sets the minimum volume for when the unit is switched on.
Note
By pressing buttons ⇒ page 2, fig. 1 , and status button
10
at the same time, you can reset the radio navigation system to the
3)
Vehicles with a sound system
3 TELEA15

factory settings. The message, Default settings being made. Please
s3f06book
Page13Thursday
November32005
10:31
AM
wait! is shown.
Radio/CD/Sound 13

Navigation14
s3f06book
Page14Thursday
November32005
10:31
AM
Navigation
Overview
How does the navigation system work, and how is it
operated?
An optimal route is defined using sensors, satellites and
traffic reports and the driver is then guided to his or her
destination.
The current vehicle position is determined using a system of satellites
(GPS - Global Positioning System). Sensors in the vehicle measure
distances that have been driven. Measured values are compared using
the detailed map material on the navigation CD and corrected with the
assistance of TMC traffic announcements as necessary. An optimal route
to the destination is determined in this way.
Navigation announcements and direction arrows shown on the screen
and in the combi-instrument guide you safely and conveniently to your
destination. You can drive to a given address in towns you are unfamiliar
with, or drive to the nearest garage or be guided to a hotel.
In this chapter, answers can be found to the following questions:
• What rules do I have to keep to when using the navigation system?
⇒ page 14, “Safety”
• How do I use the navigation CD? ⇒ page 15, “The navigation CD”
• Can I listen to music when using the navigation system? ⇒ page 15,
“General notes”
• What happens if I leave the recommended route? ⇒ page 15,
“General notes”
• Can a navigation announcement be repeated? ⇒ page 39,
“Announcement of navigation recommendations”
• How does the radio navigation system respond when driving in an
underground car park or a tunnel? ⇒ page 15, “General notes”
• How do I enter destinations? ⇒ page 17, “Destination entry”
• How can I enter garages, restaurants or hotels as destinations?
⇒ page 21, “Special destinations close to the address”
• Can I store destinations in a memory? ⇒ page 23, “Destination
memory”
• What parameters can I set for route calculation? ⇒ page 27, “Param-
eters for route calculation”
• What can I see on the screen? ⇒ page 32, “Map and symbol displays”
• Can I stop the route guidance function before I reach my destination?
⇒ page 38, “Route guidance”
Safety
The navigation system determines the position of the vehicle, the direction
and distance and the route to a selected destination without taking traffic
regulations into account. Navigation recommendations are given as
announcements by the system. Direction arrows are also shown on the
screen. The destination is entered when the vehicle is stationary. The
route guidance function is designed for cars and is thus unsuitable for
larger commercial vehicles.

Navigation 15
A
s3f06book
Page15Thursday
November32005
10:31
AM
WARNING
• Please observe the laws of road traffic legislation when
following the recommendations made by your navigation system.
• Route guidance is subject to constant changes despite the
information about one-way streets, pedestrian zones etc. stored on
the navigation CD. Information on traffic lights, stop and right of
way signs, parking and stopping restrictions as well as lane
constrictions is not included in the navigation system. Traffic signs
and legislation always have priority over the recommendations
made by the system.
• Adjust your speed to suit road traffic conditions and also
weather and visibility conditions. Do not drive faster in fog, for
example, if the navigation system tells you to do so.
The navigation CD
Inserting the navigation CD
– Press the button ⇒ page 2, fig. 1 to eject any CD in the
CD slot.
– Remove the CD and insert the navigation CD with the written
side facing up.
– Push the CD into the slot until the radio navigation system
pulls it in. The program stored on the navigation CD is loaded.
Do not remove the navigation CD before the loading process
is finished.
8
The navigation CD contains a digitalised road map. The extent to which
small villages, streets and house numbers are contained on the CD
depends on the CD version.
The content of the CD is constantly being updated. You will receive information on new updates at your next Škoda Service. You will need a new
navigation CD for every country that you travel to.
Note
If the text CD ? is displayed in the small marking above the button,
the CD inserted in the CD drive can not be read.
CD
General notes
You can continue to listen to the radio or CD (via the CD changer) whilst
you are being guided to your destination.
When entering an address (town, street), only those letters or symbols
which make up a logical entry will be presented. A list of possible names
will be shown. Do not forget to enter the blank space in names made up
of more than one word, such as High Wycombe.
The route will be recalculated if you leave or disregard the route that was
originally calculated. This process takes only a few seconds.
The last announcement made can be repeated. The volume of a navigation recommendation can be changed whilst it is being made.
A variety of different information on the route can be called up during
active route guidance. The scroll function can be used to page through
lists shown on the screen, either line by line or page by page.
If the display Off Road appears on the screen, it means you are located
on a non-digitalised street, e.g. on a farm track. The GPS satellites will not
be able to reach your antenna when you are in a tunnel or underground

Navigation16
A
s3f06book
Page16Thursday
November32005
10:31
AM
garage, meaning that the unit orientates itself via the wheel sensors. If you
try to carry out a route calculation in this situation you may hear the
announcement: “You are located on a non-digitalised street”. Drive on until
the display Off Road disappears.
Main menu - Navigation
Fig. 13 Main menu
Navigation
– Press the key to enter the Navigation main menu
⇒ page 2, fig. 1 .
Function keys in the Navigation main menu
Start route gd.
this button again will stop the route guidance function ⇒ page 38, “Route
guidance”.
Destination
entry”
NAVI
13
– Starts route guidance to the entered destination. Pressing
– Field for entering your destination ⇒ page 17, “Destination
Stopover
– Field for entering a stopover destination. A stopover destination is entered in the same way as a destination. A stopover destination is
deleted from the screen as soon as it has been reached. It will, however,
remain in the memory Last dest. ⇒ page 17, “Destination entry”. If the
stopover destination is reached, you will be informed that you have
reached your destination, and route guidance to the final destination is
started automatically. If the stopover destination is not reached exactly,
e.g. because it is not located directly on a road, you will be informed that
you have reached the destination area. Route guidance to the next destination is not started automatically.
Route opt.
– Defines the parameters for route calculation ⇒ page 27,
“Parameters for route calculation”.
Set-up
– Enter your location manually or start a demonstration
⇒ page 28, “Settings”.

Destination entry
A
s3f06book
Page17Thursday
November32005
10:31
AM
Starting destination entry
Two addresses can be entered for the route calculation;
the address of the destination and the address of the stopover destination.
Navigation 17
Fig. 15 Stopover destination
Fig. 14 Destination
– Press the key to enter the Navigation main menu
NAVI
13
⇒ page 2, fig. 1.
– Press or in the Navigation main menu
Destination Stopover
⇒ page 16, fig. 13 to select between the destination entry
options.
You will see a message that states that a destination has not yet been
defined if the destination is being entered for the first time. The last used
destination will be displayed if a destination has already been entered.
There are various methods of entering a destination or a stopover destination. The procedure for entering the stopover destination is the same as
for the destination.
New Address
⇒ page 18, “Entering a new address (town, street, house number)”.
Last dest. From dst. mem.
tions that have already been stored ⇒ page 19, “Last destinations”.
– Enter the destination using town and street names
or – Select a destination from a list of destina-

Navigation18
A
s3f06book
Page18Thursday
November32005
10:31
AM
Special dests.
– Enter a restaurant, a garage, an airport, border crossing
etc. as a destination ⇒ page 21, “Special destinations close to the
address”.
To flagged dst.
pressed button ⇒ page 2, fig. 1 is entered as the destination.
Dest. on map
– The position were you were located when you last
9
– Mark your destination on a map using a crosshair
⇒ page 21, “Destination on the map”.
Position dest.
– Enter the longitude and latitude of a destination
⇒ page 22, “Position destination”.
Additional De...
– Select a destination from the travel guide. A travel guide
is only available on certain navigation CDs. Further search functions
depend on the content of the travel guide.
Edit memory
– Store, delete or edit destinations in the destination memory
⇒ page 23, “Destination memory”.
Del. stopover
– Deletes the entered stopover destination.
Entering a new address (town, street, house number)
Fig. 16 Entering a new
address
Fig. 17 Entering a
town name
– Press , or to enter the name
To wn Street House number
using the letter selection function.

Navigation 19
s3f06book
Page19Thursday
November32005
10:31
AM
– Enter the letters or numbers by turning and pressing the menu
knob.
– You will see a list of names or numbers in the lower half of the
screen. Press to enter the list.
OK
– Select a name from the list by turning and pushing the menu
knob. You can scroll through several pages of the list using the
scroll markers , , and and confirm your selection
by pressing .
– Press to select a special destination close to the
Close to addr.
OK
destination address (town, street etc.) that you have already
entered.
and mark characters and deleted characters.
will display language-specific characters as necessary.
The term “Town” is used regardless of how many people live there. Both
a village of 100 inhabitants and a city with 1 million are named as towns.
A list of names to choose from will appear for town names which are used
more than once. The system will automatically switch to street entry after
town entry and then to house number entry. The centre of the town will be
offered as a destination if the town is so small that none of the streets have
been digitally mapped.
The keys and will not be active if a town name has
not been entered.
Street House number
Note
Enter an intersection and house number as described.
Last destinations
The last destinations that have been used will be stored
automatically.
Fig. 18 Last destinations
Fig. 19 Deleting last
destinations

Navigation20
s3f06book
Page20Thursday
November32005
10:31
AM
Making a selection from the last destinations
– Press ⇒ page 17, fig. 14 to make a selection from
Last dest.
the list of the last used destinations ⇒ page 17.
– Turn the menu knob to make a selection from the list of the last
used destinations ⇒ page 19, fig. 18. Press to make an
address fully visible if it cannot be read fully.
– Press the menu knob to select the address marked in orange.
The Navigation main menu will appear with your selected
address after a few seconds.
Deleting the list of last destinations
– Starting in the Navigation main menu ⇒ page 16, fig. 13 press
the following function keys: , and
Delete last dest.
– Select or when confirmation is asked for. If
Cancel Delete
you select , all of the last destinations, including the
.
Delete
Destination Edit memory
current destination, will be deleted.
The addresses collected in the Last dest. memory can only be deleted all
at once, not individually.
A total of 14 last destinations can be stored in the memory. A destination
will not be stored in Last dest. until route guidance has started. If you are
not able to store any more destinations, the destination memory is full.
Delete either the last destinations memory or destinations from the destination memory ⇒ page 26.
Addresses from the destination memory
Fig. 20 Complete
destination address
–Press ⇒ page 17, fig. 14 to see a list of the
– You can move a orange column by turning the menu knob.
– The address marked in orange will be activated if the menu
You will be shown a message if the destination memory is full. Some of
the destinations should then be deleted manually.
From dst. mem.
stored destinations.
Press to make an address marked in this way fully visible if
it cannot be read fully.
knob is pressed. The Navigation main menu will appear with
your selected address after a few seconds.

Navigation 21
s3f06book
Page21Thursday
November32005
10:31
AM
Special destinations close to the address
Special destinations close to the destination can be
selected from a list.
Fig. 21 Special destinations close to the
address
– Press ⇒ page 18, fig. 16 to select a special
Close to addr.
destination close to the destination address (town, street etc.)
that you have already entered.
Special destinations of the same category, e.g. restaurants, will be
displayed in a list. The nearest destination will be shown in the first position.
Note
• If you have not changed your destination address entry, the area close
to this last destination will be analysed and the special destinations there
will be listed.
• The type and number of special destinations will be determined by the
content of the Navigation CD.
Destination on the map
A crosshair can be used to mark a destination on the map.
Fig. 22 Destination on
map
– Press ⇒ page 17, fig. 14 .
– Use the right-hand function keys to move the crosshair to your
required destination.
– Use or to alter the scale to suit your search strategy
⇒ page 33, “Changing the scale”.
Dest. on map

Navigation22
s3f06book
Page22Thursday
November32005
10:31
AM
Note
The next section of the map will be shown after a few seconds when the
crosshair is moved to the side of the screen.
Position destination
A destination can be entered using the exact coordinates
for longitude and latitude.
Fig. 23 Position destination
– Press ⇒ page 17, fig. 14 if you want to enter
your destination using coordinates.
– Turn the menu button to set the figure.
Position dest.
– Move the orange frame to the arc minutes and then to the
hundredth of an arc minute.
– Press the menu knob again and enter the required figure.
Great Britain, for example, lies between 50° and 59° northern latitude and
2° and 8° eastern longitude. The route guidance function cannot be
started if the figures entered are not within this area and the navigation CD
for Great Britain has been entered. Use the following data to estimate the
position of your location:
for latitude, 1° corresponds to approximately 111 km, 1 arc minute approximately 1.85 km and 1 hundredth of an arc minute approximately 18.5 m
for longitude, 1° corresponds to approximately 69 km, 1 arc minute
approximately 1.15 km and 1 hundredth of an arc minute approximately
11.5 m
Note
If you set the longitude higher than 180° or lower than 0°, the E will be
replaced by a W (western longitude). Latitudes can be set from 90°N via
0° to 90°S and back only.
– Press the menu knob. The orange square will disappear and
a orange frame appears.

Destination memory
s3f06book
Page23Thursday
November32005
10:31
AM
Storing destination, stopover destination, flagged
destination or location
Storing the different destinations means giving them a
name and storing them in the radio navigation system.
Navigation 23
Fig. 25 Storing the
destination
– After entering a new address, press (starting from the Naviga-
tion main menu) ⇒ page 16, fig. 13 , .
Destination Edit memory
Fig. 24 Editing the
memory
– Press to open the letter input menu.
Save dest.
– Enter a name for your destination, e.g. “Mr. Smith” or “Holiday
home”.
– Press to save the destination with the name.
The destination can now be called up from the memory as you need it. The
name should be short and clear. You can also use the names that are
suggested.
You enter the destination name in the same way used for entering a street
name ⇒ page 18.
OK

Navigation24
A
s3f06book
Page24Thursday
November32005
10:31
AM
Renaming destination
Fig. 26 Renaming a
destination
– Starting in the Navigation main menu ⇒ page 16, fig. 13 press
Destination Edit memory
Rename destination
– Turn the menu knob to move the orange bar to the name that
you wish to change.
– Press the menu button to call up the entry function for the
letters.
followed by then
.
– Edit the name ⇒ page 18.
– If, however, you wish to keep the original name and not the
new one, press the button ⇒ page 2, fig. 1 . Your
ESC
11
alterations will not be stored.

Sorting destinations
A
s3f06book
Page25Thursday
November32005
10:31
AM
The various different addresses in the destination memory
are stored chronologically according to their entry date
and can be sorted at a later date according to your requirements.
Fig. 27 Sort: Select
Navigation 25
Fig. 28 Sort: Store
– Starting in the Navigation main menu ⇒ page 16, fig. 13 press
Destination Edit memory Sort destinations
followed by then .
– Turn the menu knob to move the orange bar to the destination
that you would like to move to another position.
– Press the menu knob. Sort: Store now appears at the top of
the screen. You can now move the address up or down by
turning the menu knob.
– Press to store the address in the new position. Sort:
OK
Select now appears again at the top of the screen.
– Press the button ⇒ page 2, fig. 1 to close the sort
ESC
11
function.
The other destinations will be moved down if you move a destination to a
position that is already occupied.

Navigation26
s3f06book
Page26Thursday
November32005
10:31
AM
Deleting individual destinations or the entire
destination memory
You can, in contrast to the "last destination" memory,
delete individual destinations from the destination
memory.
Fig. 29 Deleting destination memory
Fig. 30 Selecting entry
to delete
Deleting an individual entry
– Starting in the Navigation main menu ⇒ page 16, fig. 13 press
Destination Edit memory Delete destination
followed by then .
– Turn the menu knob to move the orange bar to the destination
that you would like to delete and then press the menu knob.
– When asked for confirmation, press . If you do not wish
to delete the destination, press .
Delete
Cancel
Deleting the entire destination memory
– Starting in the Navigation main menu press
followed by then .
– When asked for confirmation, press . If you do not wish
Edit memory Clear dest. memory
Delete
to clear the destination memory, press .
Destination
Cancel

Navigation 27
s3f06book
Page27Thursday
November32005
10:31
AM
Parameters for route calculation
Route options
Fig. 31 Route options
Fig. 32 Symbols for
traffic problems
– Press in the Navigation main menu ⇒ page 16,
Route opt.
fig. 13.
A short route might be quicker for your purpose in larger towns or cities
where there are a lot of traffic jams. Route options can be altered whilst
the route guidance function is active. The changed parameters will be
used as a basis for the calculation of the remaining journey.
Function keys in the route option menu
Route
• fast or short: Determines whether a fast or short route should be
calculated.
• dynam.: Dynamic route guidance responds to traffic reports broadcast
by TMC stations. This function will automatically guide you round traffic
jams or blocked roads.
Motorway Ferry Tol l
roads should be used. These options will, however, be used for calculation
if there is no other logical route to the destination (e.g. an island is to be
used without using a ferry).
by default
Dynamic route guidance
An announcement that there are traffic jams on your route will be made if
a traffic jam is registered. You will also be warned directly before the traffic
jam itself.
Once the dynamic route guidance function has been activated you will be
informed that the route is being recalculated due to traffic problems if any
have been registered.
Traffic problems are indicated by a symbol on the map:
, or – Determines whether motorways, ferries or toll
– Stores the selected settings for future route guidance usage.

Navigation28
A
A
A
s3f06book
Page28Thursday
November32005
10:31
AM
Traffic jam ⇒ page 27, fig. 32
Slow-moving traffic
Road closed
The navigation system will calculate the quickest possible route when the
dynamic route guidance option is active. The system might well guide you
through a traffic jam if the diversion would be longer.
B
C
A
Note
• The dynamic route guidance option will only function if you are
receiving at least one TMC radio station.
• The radio navigation system will automatically look for a new TMC
station if you leave the reception area of the one you are using. The station
you are listening to, however, does not have to be a TMC station.
• The dynamic route guidance option will always use motorways, ferries
and toll roads.
• The quality of the dynamic route guidance depends on the information
contained in the traffic announcements. The radio stations broadcasting
this information are responsible for the content.
Settings
The vehicle position can be entered manually and you can
then start a demonstration journey.
Fig. 33 Settings in the
Navigation main menu
Fig. 34 Position
settings

Navigation 29
A
s3f06book
Page29Thursday
November32005
10:31
AM
Entering your position
– Press in the Navigation main menu ⇒ page 16, fig. 13
Set-up
to enter the vehicle position.
– Press . The entry window for the town
Position location
appears. The entry for the street is made after you make your
entry and confirm it with . After confirming the name of the
OK
street you will see a list of the streets which have an intersection with the named street.
– Select the intersection and confirm your choice by pressing
the menu knob.
– Now enter your position either before or after this intersection
in metres and also enter the direction of travel using the points
of the compass.
– Confirm your entry by pressing . The screen display will
OK
return to the Navigation main menu.
Entering your position on the map
– Press and then to see your set position
Set-up Position map
on the map. The scale of the map can be altered using the two
top left-hand function keys.
– Press the button ⇒ page 2, fig. 1 twice to return to
ESC
11
the Navigation main menu.
Starting the demonstration
– Press and then select active. The navigation system is
Demo
activated.
– The radio navigation system will now travel along the route
virtually from start to finish if the route guidance function is
started. You can listen to announcements and look at displays.
The navigation system will need some time for an exact definition of your
position if you have transported your vehicle using the train or a ferry. Your
position can be entered manually if the automatic definition is not
successful.
The manual position input can be used to calculate a route between any
two points regardless of where the vehicle is actually located.

Navigation30
A
s3f06book
Page30Thursday
November32005
10:31
AM
Manually excluding stretches of the journey
Stretches of the journey ahead and/or parts of the route list
can be blocked manually.
Fig. 35 Blockage and
traffic jam
Menu for blocking and traffic jams
– Press the traffic jam button ⇒ page 2, fig. 1 if you want to
10
block a stretch of the route ahead.
Entering traffic jam information
–Press ⇒ fig. 35.
Congest. ahead
– Turn the menu button to enter the length of the traffic jam.
– Press the menu knob. The display will be switched to the map.
You will hear an announcement “The route is being calculated”. The excluded stretch of the route will be shown as a
dotted blue line on the map.
–Press Cancel exclusion option to include this stretch of the
route in the navigation option again.
Blocking part of the route list
– Press . You will see a part of your route list.
Enter exclusion
– Using the menu knob, move the orange bar to a line that starts
with + or -. The stretches of the route are broken down into
sections and can be opened or closed by pressing or .
– Turn the menu knob to move the orange bar to the start of the
section that you wish to exclude from the navigation. Press the
menu knob. The entry is now green.
Fig. 36 Blocking a
stretch of the journey

– Turn the menu knob. All stretches of the route that are blocked
s3f06book
Page31Thursday
November32005
10:31
AM
will appear in green. Press the menu knob once you have
marked the route section in question. The display will be
switched to the map. You will hear an announcement that the
route is being calculated. The excluded stretch of the route will
be shown as a dotted blue line on the map.
Navigation 31
– Press to delete the blocking function.
You will be guided through a blocked area if there is no logical alternative
to travelling through it.
Cancel exclusion option
Note
If you use a map CD which contains only major routes, you will have less
alternative routes than if you use a CD which contains minor roads. To
ensure that you do not have to make unnecessary detours, you should
use a map CD containing all roads when you wish to be guided around
congestion on the route.

Navigation32
A
AAA
ACA
A
A
s3f06book
Page32Thursday
November32005
10:31
AM
Map and symbol displays
Information in the map and symbol displays
Information on the route will be shown in the map or
symbol displays if the route guidance function is active.
Fig. 38 Symbol display
Fig. 37 Map display
– Press the button ⇒ page 2, fig. 1 . The screen will
MAP
12
switch between map and symbol displays.
Map display
Autozoom active ( in orange). The scale of the map will, for
example, be larger for motorway driving and more detailed when
making a turn.
B
Journey time or arrival time
Distance to destination or stopover
D
Road name
E
Vehicle position - The black arrow points in the direction of travel. The
route ahead is shown as a blue line.
F
Route options and TMC:
− If the dynamic route guidance option is active, the horizontal arrow
is shown with a D, and blocked roads are shown as .

Navigation 33
AGA
A
ABA
A
AEA
A
s3f06book
Page33Thursday
November32005
10:31
AM
− TMC: The number of TMC reports received is shown by the black
dots.
Map scale
H
North
Traffic problems are indicated by a symbol on the map:
slow-moving traffic
traffic jam
closed road
Symbol display
A
The number of GPS satellites
Route option (in this example dynamic route guidance D)
C
Arrival time or journey time
D
Distance to destination or stopover
Turn arrow, above it the name of the street you are turning into.
F
Current road
G
The proximity bar shows how far away the turning point is. The
distance to the next change of direction will be shown in the display
after you have turned.
Changing the scale
You can choose from a total of 13 different scales.
Fig. 39 Changing the
scale
– Press or .
when the button is pressed ⇒ fig. 39
when the button is pressed.
The selected scale will be shown once the menu knob is pressed or after
3 seconds.
– More details. A scale display appears in the top left-hand corner
– Large overview. A scale display appears in the top left-hand corner

Navigation34
A
A
s3f06book
Page34Thursday
November32005
10:31
AM
Changing display options
The map type and display can be selected, although some
settings cannot be seen until active route guidance has
started.
Fig. 40 Display
options
– Press ⇒ page 32, fig. 37 to change the display options.
Map type
• location – Shows your position on the map.
• destin. – Shows the area surrounding your destination.
• overview – Shows the entire route.
The map will always be shown in the direction North at the top if you have
chosen the map type overview or destin.. In the map display option auto,
a detail map (up to 2 km per cm) with the direction of travel at the top and
an overview map (as of 5 km per cm) with North at the top will be shown.
Alignment
• auto – The system selects the map display.
• travel – The display always adjusts to the direction of travel.
• north – North is always at the top of the display.
Autozoom
• high – Smaller scales are given priority for the automatic scale selec-
tion.
• low – Larger scales are given priority for the automatic scale selection.
The settings for Autozoom will only take effect if is pressed in the map
display ⇒ page 32, fig. 37 .
Time format
A
• travel t. – Shows the remaining travel time.
• arrival – Shows the estimated arrival time ⇒ page 32, fig. 37 .
B

Navigation 35
s3f06book
Page35Thursday
November32005
10:31
AM
Traffic reports display
Short texts of traffic reports that have been received can
be called up from a list.
Fig. 41 Traffic reports
– Press in the map display ⇒ page 32, fig. 37.
– Or press and .
– Turn the menu knob to move the orange bar to the traffic
– Press to see the full text of the traffic report.
INFO Travel info
report you are interested in.
Moving the map section using the crosshair
Fig. 42 Crosshair
– Press in the map display ⇒ page 32, fig. 37 to call up the
– Using the right-hand function keys or by turning/pressing the
– Use the scale modifications to adapt the display to suit your
The neighbouring map section will be displayed if you move the crosshair
to the side of the screen. This procedure can take some seconds.
shift function.
menu knob, move the the crosshair to the destination of your
choice.
requirements ⇒ page 33.

Navigation36
s3f06book
Page36Thursday
November32005
10:31
AM
Augmenting map contents
A range of symbols can be used to display additional map
content.
Fig. 43 Map contents
– Press in the map display ⇒ page 32, fig. 37.
– Turn the menu knob or use the right-hand function keys to
– Press the menu button or . A "tick" will appear next to the
You can lose the overview of the map if too many map details are
selected.
move the orange bar to the map detail you are interested in.
OK
map detail.
Note
Route list
The route list is a list of all route sections which will be travelled through with active route guidance.
Fig. 44 Route list from
the map
– Press in the map display ⇒ page 32, fig. 37 to see the
The route list is updated during the journey. It shows the roads that you
have not yet reached. Route sections that you have already travelled will
be deleted from the route list.
It takes some seconds after route guidance has started for the route list to
be compiled so that it can be displayed.
route sections of your current journey.
Note

Navigation 37
AAA
A
s3f06book
Page37Thursday
November32005
10:31
AM
Position display
The current information on the position of the vehicle is
shown here.
Fig. 45 Position
display
GPS status (number of satellite receptions, positioning mode)
including the direction and distance to destination (with active route
guidance).
B
Direction of travel
C
Altitude (GPS altitude). If too few satellites are received to calculate
the altitude, the display is green.
GPS position (longitude)
GPS position (latitude)
The direction of travel is shown in degrees and also in the form of a
compass.
The GPS status shows the number of satellites as dots and also shows
the positioning mode (NO FIX, 2D FIX, 3D FIX).
• NO FIX – The GPS reception is not sufficient to fix the position of the
vehicle.
• If the position definition for NO FIX is only possible using the wheel
sensors (underground garage etc), the GPS coordinates will be displayed
in green. The GPS coordinates will no longer be shown following a long
distance with NO FIX in the display or if it is not possible to determine the
position.
• 2D FIX – The horizontal position of the vehicle can be determined, but
not the altitude (altitude display is green).
• 3D FIX – Position and altitude can be determined.
The altitude given is accurate to ±15 m at altitudes between 0 m and
+5000m. The system will be less accurate if the GPS reception is bad or
weather conditions are poor.
The direction to the destination is shown in the form of a marking outside
the compass. If the destination is not in the area displayed by the compass
(i.e. to the side or behind the vehicle), the marking is shown as an arrow
to the side in question.

Navigation38
s3f06book
Page38Thursday
November32005
10:31
AM
Route guidance
Starting/stopping route guidance
Fig. 46 Ending route
guidance
– Press . You will hear an announcement that the
– Press the button to return to the Navigation main menu.
– Press if you wish to stop the route guidance
The route guidance function can only be started if you have already
entered a destination.
Start route gd.
route is being calculated. The radio navigation system will
automatically switch to the map display.
NAVI
Stop route gd.
function before you have reached your destination.
Note
• You should drive on a bit further if the system makes the announce-
ment that you are not on a digitalised street before starting route guidance.
The unit might have to orientate itself using the next main road.
• The active route guidance function will be interrupted if a stopover
destination is entered.

Navigation 39
A
s3f06book
Page39Thursday
November32005
10:31
AM
Announcement of navigation recommendations
Navigation recommendations are made as spoken
announcements and also in the display.
Fig. 47 Map display
Fig. 48 Symbol display
– Press the button ⇒ page 2, fig. 1 .
– Press if you want to hear the current navigation recom-
MAP
12
mendation ⇒ .
You will hear the first announcement after the route has been calculated.
Up to three announcements will be made before a turn has to be made to
ensure that you are informed in time. A proximity bar will be shown in the
display on the right-hand side of the turn arrow shortly before the last
announcement is made. The proximity bar shows how far away the
turning point is. The distance to the next change of direction will be shown
in the display after you have turned.
You will receive a recommendation for a lane on roads with more than one
lane that then separate off in different directions.
You will also be told which exit to use off a roundabout before you enter it,
e.g. that you should leave by the second exit. This announcement will then
be repeated when you are travelling round the roundabout.
An announcement will be made when you reach your destination. You will
be informed that you have reached your destination if it is on a digitalised
road. If it is not on a digitalised road, you will be informed that you have
reached the destination area. The latter may occur if you have entered the
destination using coordinates and it is not on a road.
WARNING
You, as the driver, must concentrate on the spoken announcements and also on the traffic around you. The recommendations
made on the basis of the information on the CD may differ from
what you actually see due to incomplete data or a different road
layout (e.g. due to road works). Please keep to traffic regulations
and ignore the navigation recommendations if necessary.
• Traffic signs and legislation always have priority over the
recommendations made by the system.

Navigation40
s3f06book
Page40Thursday
November32005
10:31
AM
WARNING (continued)
• Please observe the important safety warnings ⇒ page 14,
“Safety”.
Note
The direction arrow in the map display will be faded out if you are travelling
in the same direction for an extended period.

Information and system settings
A
A
s3f06book
Page41Thursday
November32005
10:31
AM
Information
The radio navigations system stores text and spoken
announcements made by the radio stations and draws up
a route list whilst the route guidance function is active.
Information and system settings 41
Fig. 50 Setting the TIM
time
Fig. 49 Info main menu
– Press button ⇒ page 2, fig. 1 to enter the Info main
INFO
18
menu.
Function keys in the Info main menu
The function keys TIM messages, Travel inform., Route list and TMC
stations are green if no further information is available.
TIM messages
ESC
The TIM messages are stored chronologically. The latest message is at
the top of the list. The selection bar will spring automatically to the next
message once the first message has been played. The system will return
to the main menu after the last message has been played and will then
reactivate the audio source that was being used. The oldest announcement will be overwritten if the memory is full.
– Plays back recorded traffic reports (Stop by pressing
⇒ page 2, fig. 1 ).
11

Information and system settings42
s3f06book
Page42Thursday
November32005
10:31
AM
TMC stations
whose traffic reports should be played if you happen to be listening to
another radio station. A different station will be chosen automatically if the
selected station can no longer be received.
Travel inform.
Syst. settings
System Info
tion system.
Route list
Use the menu knob to page through the street lists that are on your navigation route. Press if an entry is not fully displayed.
Position display
Set-up
– Displays a list of receivable TMC stations. Select a station
– Displays a list of the latest traffic reports ⇒ page 35.
⇒ page 42
– Displays the software version installed in the radio naviga-
– Displays a list of the streets on the route to the destination.
⇒ page 37
• TIM time 1 and TIM time 2: Two different departure times can be
entered here, e.g. 7.00 a.m. and 5.30 p.m. The unit will start recording
traffic reports 1.5 hours before your departure. This means that you will
have up to date traffic information right from the start of your journey.
• TIM standby – Traffic reports will be recorded for two hours after you
have switched off the unit.
Note
The list of announcements cannot be opened whilst a traffic announcement is being made, as it is also being recorded.
System settings
In the system settings menu, you can select different
languages for the displays and spoken announcements,
and adjust the screen brightness.
Fig. 51 System
settings
– In the Info main menu, press ⇒ page 41, fig. 49
to see which settings can be made. You can also call up the
system settings from the Radio main menu by pressing
Set-up
⇒ page 6, fig. 4 or from the CD main menu
⇒ page 10, fig. 9.
Function keys in the Settings menu
Language
spoken announcements. Select a language by turning and pressing the
menu knob. You will see a display text in the chosen language. Do not
press any further keys until the loading sequence is finished.
– Shows a list of available languages for display texts and
Syst. settings

Information and system settings 43
A
s3f06book
Page43Thursday
November32005
10:31
AM
Day / Night
light conditions when the headlights are switched on.
– You can set the screen brightness to be adjusted to suit the
• auto: The night display will automatically be selected when the head-
lights are switched on.
• manual: Press ⇒ page 2, fig. 1 to switch between the day and
night displays.
Contrast day Contrast night
night display.
Time
– The clock can be set here by turning and pushing the menu knob
if the time has not be taken over from the clock in the combi-instrument.
The data for the arrival time is oriented towards this time if the route guidance function is active.
and – Sets the screen settings for the day and
Note
The language can only be changed if the navigation CD has been
inserted.
13

External units44
A
s3f06book
Page44Thursday
November32005
10:31
AM
External units
Calling up external units
Fig. 52 Main menu
AUX
Calling up external units
– Press the key ⇒ page 2, fig. 1 to enter the AUX
AUX
main menu.
Function keys in the AUX main menu
AV (A/V)
– Switches over to an external audio (A) or video (V) source.
AUX (A)
– Switches to an audio unit which is connected to the system.
Set-up
– Settings for the units connected to the system:
• A+V: The unit AV1 or AV2 delivers audio and video signals (sound and
picture).
• AUDIO: The unit delivers audio signals only.
14
• VIDEO: The unit delivers video signals only.
• OFF: There is no unit connected.

Index
s3f06book
Page45Thursday
November32005
10:31
AM
Index 45
A
Allocating the radio stations
Radio . . . . . . . . . . . . . . . . . . . . . . . . . . . . . 9
AM
Medium wave . . . . . . . . . . . . . . . . . . . . . . . 7
Announcements . . . . . . . . . . . . . . . . . . . . . . 39
AS . . . . . . . . . . . . . . . . . . . . . . . . . . . . . . . . . . 6
Autozoom . . . . . . . . . . . . . . . . . . . . . . . . . . . 34
AUX . . . . . . . . . . . . . . . . . . . . . . . . . . . . . . . . 44
AV . . . . . . . . . . . . . . . . . . . . . . . . . . . . . . . . . 44
B
Back/Forwards
Radio station selection . . . . . . . . . . . . . . . . 8
Balance . . . . . . . . . . . . . . . . . . . . . . . . . . . . . 12
Blocking stretches of the journey . . . . . . . . . 30
C
CD . . . . . . . . . . . . . . . . . . . . . . . . . . . . . . . . . 10
Ejection . . . . . . . . . . . . . . . . . . . . . . . . . . 10
Fast forward/reverse . . . . . . . . . . . . . . . . 10
Playing a CD from the CD changer . . . . . 11
Comfort Coding . . . . . . . . . . . . . . . . . . . . . . . . 5
Control elements . . . . . . . . . . . . . . . . . . . . . . . 2
Coordinates . . . . . . . . . . . . . . . . . . . . . . . . . . 22
Crosshair . . . . . . . . . . . . . . . . . . . . . . . . . . . . 21
D
Day/night display . . . . . . . . . . . . . . . . . . . . . . 42
Default settings . . . . . . . . . . . . . . . . . . . . . . . 13
Delete
Destinations in the destination memory . . 26
Last destinations . . . . . . . . . . . . . . . . . . . 20
Letters, symbols, numbers . . . . . . . . . . . . 19
Demonstration . . . . . . . . . . . . . . . . . . . . . . . . 28
Destination . . . . . . . . . . . . . . . . . . . . . . . . . . . 17
Renaming . . . . . . . . . . . . . . . . . . . . . . . . . 24
Sorting . . . . . . . . . . . . . . . . . . . . . . . . . . . 25
Storing . . . . . . . . . . . . . . . . . . . . . . . . . . . 23
Destination entry . . . . . . . . . . . . . . . . . . . . . . 17
Destination memory . . . . . . . . . . . . . . . . . 20
Destination on the map . . . . . . . . . . . . . . 21
Intersection, centre . . . . . . . . . . . . . . . . . . 19
Last destinations . . . . . . . . . . . . . . . . . . . 19
Position destination . . . . . . . . . . . . . . . . . 22
Special destinations . . . . . . . . . . . . . . . . . 21
Town, street, house number . . . . . . . . . . 18
Destination memory . . . . . . . . . . . . . . . . . . . . 23
E
ESC . . . . . . . . . . . . . . . . . . . . . . . . . . . . . . . . . 3
F
Factory settings . . . . . . . . . . . . . . . . . . . . . . . 13
FM
VHF . . . . . . . . . . . . . . . . . . . . . . . . . . . . . . 7
Function keys . . . . . . . . . . . . . . . . . . . . . . . . . . 3
G
GALA . . . . . . . . . . . . . . . . . . . . . . . . . . . . . . . 12
I
INFO . . . . . . . . . . . . . . . . . . . . . . . . . . . . . . . 41
Information . . . . . . . . . . . . . . . . . . . . . . . . . . . 41
Initial Autostore . . . . . . . . . . . . . . . . . . . . . . . . 7
K
Keys
Quick reference guide . . . . . . . . . . . . . . . . 3
L
Language setting . . . . . . . . . . . . . . . . . . . . . . 42
Last destinations . . . . . . . . . . . . . . . . . . . . . . 19
Latitude . . . . . . . . . . . . . . . . . . . . . . . . . . . . . 22
List of stations . . . . . . . . . . . . . . . . . . . . . . . . . 8
Location . . . . . . . . . . . . . . . . . . . . . . . . . . . . . 28

Index46
s3f06book
Page46Thursday
November32005
10:31
AM
Longitude . . . . . . . . . . . . . . . . . . . . . . . . . . . 22
M
Main menu
AUX . . . . . . . . . . . . . . . . . . . . . . . . . . . . . 44
AV . . . . . . . . . . . . . . . . . . . . . . . . . . . . . . 44
CD . . . . . . . . . . . . . . . . . . . . . . . . . . . . . . 10
Navigation . . . . . . . . . . . . . . . . . . . . . . . . 16
Radio . . . . . . . . . . . . . . . . . . . . . . . . . . . . . 6
Sound . . . . . . . . . . . . . . . . . . . . . . . . . . . 12
MAP . . . . . . . . . . . . . . . . . . . . . . . . . . . . . . . 32
Map
Alignment . . . . . . . . . . . . . . . . . . . . . . . . 34
Map contents . . . . . . . . . . . . . . . . . . . . . . . . 36
Map display . . . . . . . . . . . . . . . . . . . . . . . . . . 32
Display options . . . . . . . . . . . . . . . . . . . . 34
Map section . . . . . . . . . . . . . . . . . . . . . . . . . 35
Map type . . . . . . . . . . . . . . . . . . . . . . . . . . . . 34
Menu knob . . . . . . . . . . . . . . . . . . . . . . . . . . . 3
Mix . . . . . . . . . . . . . . . . . . . . . . . . . . . . . . . . 10
Muting
Navigation recommendations . . . . . . . . . 12
Radio . . . . . . . . . . . . . . . . . . . . . . . . . . . . . 7
N
Navigation . . . . . . . . . . . . . . . . . . . . . . . . . . . 14
Navigation CD . . . . . . . . . . . . . . . . . . . . . . . . 15
Navigation recommendations . . . . . . . . . . . . 39
P
Parameters for route calculation . . . . . . . . . . 27
Position . . . . . . . . . . . . . . . . . . . . . . . . . . . . . 28
Position display . . . . . . . . . . . . . . . . . . . . . . . 37
Q
Quick reference guide . . . . . . . . . . . . . . . . . . . 2
R
Radio . . . . . . . . . . . . . . . . . . . . . . . . . . . . . . . . 6
Muting . . . . . . . . . . . . . . . . . . . . . . . . . . . . 7
Radio station selection . . . . . . . . . . . . . . . . 8, 9
From list . . . . . . . . . . . . . . . . . . . . . . . . . . . 8
RDS . . . . . . . . . . . . . . . . . . . . . . . . . . . . . . . . 9
Route guidance . . . . . . . . . . . . . . . . . . . . 29, 38
Route list . . . . . . . . . . . . . . . . . . . . . . . . . 36, 42
Route options . . . . . . . . . . . . . . . . . . . . . . . . 27
S
Safety code . . . . . . . . . . . . . . . . . . . . . . . . . . . 5
Scale . . . . . . . . . . . . . . . . . . . . . . . . . . . . . . . 33
Scan . . . . . . . . . . . . . . . . . . . . . . . . . . . . . . . 10
Radio stations . . . . . . . . . . . . . . . . . . . . . . 6
Screen
Darkened . . . . . . . . . . . . . . . . . . . . . . . . . . 3
Setting the clock . . . . . . . . . . . . . . . . . . . . . . 42
Settings
Radio . . . . . . . . . . . . . . . . . . . . . . . . . . . . . 6
Settings at time of delivery . . . . . . . . . . . . . . 13
Software version . . . . . . . . . . . . . . . . . . . . . . 42
Sound . . . . . . . . . . . . . . . . . . . . . . . . . . . . . . 12
Special characters . . . . . . . . . . . . . . . . . . . . . 19
Spoken announcements . . . . . . . . . . . . . . . . 41
Station keys . . . . . . . . . . . . . . . . . . . . . . . . . . . 3
Status bar . . . . . . . . . . . . . . . . . . . . . . . . . . . . 4
Stopover destination . . . . . . . . . . . . . . . . . . . 17
Switching off . . . . . . . . . . . . . . . . . . . . . . . . . . 4
Switching on . . . . . . . . . . . . . . . . . . . . . . . . . . 4
Switch-on volume . . . . . . . . . . . . . . . . . . . . . 12
Symbol display . . . . . . . . . . . . . . . . . . . . . . . 33
System info . . . . . . . . . . . . . . . . . . . . . . . . . . 42
System settings . . . . . . . . . . . . . . . . . . . . . . . 42
T
Text reports . . . . . . . . . . . . . . . . . . . . . . . . . . 41
TIM . . . . . . . . . . . . . . . . . . . . . . . . . . . . . . . . 41
Time format . . . . . . . . . . . . . . . . . . . . . . . . . . 34
Traffic
Text announcements . . . . . . . . . . . . . . . . 35
Traffic information reports . . . . . . . . . . . . . . . . 7
Traffic jam function . . . . . . . . . . . . . . . . . . . . 30
Traffic reports
Spoken announcements . . . . . . . . . . . . . 41

U
s3f06book
Page47Thursday
November32005
10:31
AM
Unit card . . . . . . . . . . . . . . . . . . . . . . . . . . . . . 5
V
Video . . . . . . . . . . . . . . . . . . . . . . . . . . . . . . . 44
Volume . . . . . . . . . . . . . . . . . . . . . . . . . . . . . 12
W
Waveband
Setting . . . . . . . . . . . . . . . . . . . . . . . . . . . . 7
Index 47

Škoda Auto is constantly working on the further development of all types and models. Please understand that, for this reason, changes to the scope of supply in terms of shape, equipment and engineering may be introduced at any time. It is therefore not possible
to derive any claims from the information, illustrations and descriptions contained in this Owner ´s Manual .
Reprinting, reproduction, translation or any other use of this document, in whole or in parts, is not permitted without the written
consent of Škoda Auto.
Škoda Auto expressly reserves all rights in respect of copyright.
Subject to modification.
Published by ŠKODA AUTO a.s.
© ŠKODA AUTO a.s. 2004
This paper was manufactured from pulp bleached without using chlorine.

www.skoda-auto.com Radionavigační systém Nexus
Octavia anglicky 12.05
S00.5610.28.20
1Z0 012 151 C
 Loading...