

OWNER´S MANUAL
ŠKODA KAROQ
Your Owner’s Manual
Electronic version available on the Internet
http://go.skoda.eu/owners-manuals
ŠKODA KAROQ 07.2019
Angličtina/English
57A012720AE

Documentation of vehicle delivery
Vehicle Identification Number (VIN)
Date of vehicle delivery ____ / ____ / ________
ŠKODA Partner
Stamp and signature of the vendor
I confirm that I have taken delivery of the vehicle in good condition, have received information on how to
operate it correctly, and have had the terms of the warranty explained to me.
Signature of the customer
Does the vehicle have an extended warranty?
YES
NO
Limitations of the ŠKODA extended warranty
a)
_______________
or
_______________
or
_______________
a)
Depending on which comes first.
Years:
km/mileage:
Miles:
Reprinting, duplicating, translating and any other use, either in whole or in part, is not permitted without the
written consent of ŠKODA AUTO a.s.
ŠKODA AUTO a.s. expressly reserves all rights relating to copyright laws.
Subject to change.
Issued by: ŠKODA AUTO a.s.
© ŠKODA AUTO a.s. 2019
57A012720AE

Vehicle owner
57A012720AE
First Vehicle owner Second Vehicle owner
This vehicle with the registration plate
__________________________________________
belongs to:
Title, name/company:
__________________________________________
__________________________________________
Address:
__________________________________________
__________________________________________
__________________________________________
Telephone:
__________________________________________
ŠKODA Partner:
Service consultant:
__________________________________________
Telephone:
__________________________________________
Vehicle owner
1

2
Table of Contents
Table of Contents
1 Vehicle owner
5 About the Owner's Manual
5 About the Owner's Manual
6 Explanations
7 Vehicle overviews
7 Front vehicle area
8 Rear vehicle area
9 Driver's seat
9 Centre console and passenger seat
10 Engine compartment
10 Indicator lights
10 Functionality
10 Indicator light overview
14 Correct and safe
14 Introductory notes for correct use
14 New vehicle or new parts
14 Regular checks
14 No improper vehicle adjustments
14 Keeping sensors and cameras in working
order
15 Engine compartment
15 Vehicle battery
15 Using electrical sockets in the vehicle
15 Before your journey
17 Safe driving
18 Emergency call
19 After an accident
20 Keys, locks and alarm system
20 Key
20 Memory function of the key
21 Central locking
22 Keyless locking (KESSY)
23 Alarm system
24 Doors, windows and boot lid
24 Doors
24 Child safety lock on the rear doors
25 Window - with electrical operation
26 Sliding/tilting roof
27 Sunblind - with electrical operation
27 Sun visors
27 Heated windscreen
28 Boot lid - with manual operation
28 Boot lid - with electrical control
29 Electrically operated contactless boot lid
30 Unlocking the boot lid
31 Seats, steering wheel and mirror
31 Front seat - with manual operation
31 Front seat - with electrical operation
31 Memory function of the seat
32 Rear seats
32 VarioFlex rear seats
35 Headrests
36 Front armrest
36 Rear armrest
36 Load-through device
36 Seat heating
37 Steering wheel
37 Heated steering wheel
38 Interior rear-view mirror
38 Exterior mirror
39 Restraint systems and airbags
39 Seat belts
40 Child seat
42 Fasteners for child seats
44 Airbags
45 Key switch for the front passenger airbag
46 Lighting, windscreen wipers and
washers
46 Exterior lighting
48 COMING HOME, LEAVING HOME exterior
lighting
48 Light Assist high-beam assist system
49 Replace light bulbs
52 Interior lighting
52 Interior ambient light
52 Windscreen wipers and washers
54 Heating and air conditioning system
54 Manual air conditioning
55 Climatronic automatic air conditioning system
56 Auxiliary heating and ventilation
58 Driver information system
58 Analogue instrument panel
59 Digital instrument cluster
60 Instrument cluster display
61 Driving data
62 Speed limit warning
62 Vehicle condition
63 Stopwatch in the instrument cluster
63 Stopwatch in the Infotainment
64 Information Sport
64 Personalisation
65 Infotainment Swing
65 Infotainment overview
65 System
66 Screen
66 Infotainment keyboard
67 Radio
69 Media
72 Mobile device management
74 Telephone
75 SmartLink
77 ŠKODA Connect online services
80 Infotainment Bolero
80 Infotainment overview

Table of Contents
3
80 System
81 Screen
82 Infotainment keyboard
83 Voice control
84 Radio
86 Media
89 Images
91 Mobile device management
92 Telephone
94 SmartLink
96 ŠKODA Connect online services
99 Infotainment Amundsen
99 Infotainment overview
99 System
100 Screen
101 Infotainment keyboard
102 Voice control
103 Radio
106 Media
109 Images
110 Media Command
112 Mobile device management
113 Telephone
115 Wi-Fi
116 Data connection
117 SmartLink
119 ŠKODA Connect online services
121 Navigation
127 Infotainment Columbus
127 Infotainment overview
127 System
128 Screen
129 Keypad
130 Voice control
131 Radio
134 Media
138 Images
140 Video DVD
141 Media Command
143 Mobile device management
146 Telephone
148 Wi-Fi
149 Data connection
150 SmartLink
152 ŠKODA Connect online services
154 Navigation
160 Starting and driving
160 Starting with the key
161 Start at the push of a button
161 Starting issues
162 START STOP
162 Manual gearbox
163 Automatic gearbox
164 Vehicle driving mode
165 Economical driving style
166 Towing a trailer
167 Towing eye and towing procedure
168 Brakes
169 Electric parking brake
170 Auto Hold automatic holding function
170 Driver assist systems
170 Braking and stabilising systems
171 Front Assist
172 Pedestrian detection system
172 Speed limiter
173 Cruise control system
174 Adaptive Cruise Control (ACC)
176 Lane Assist
177 Trac jam assistant
177 Lane change assist system Side Assist
178 Trac sign recognition
179 Crew Protect Assist proactive occupant
protection
179 Driver Alert fatigue detection assistant
180 Emergency situation assist systemEmergency
Assist
180 Hill descent assistant
181 Park Assist systems
181 Park Pilot parking aid
182 Rear view camera
182 Rear Trac Alert
183 Park steering assistant
185 Engine, exhaust system and fuel
185 Bonnet
185 Engine oil
186 Coolant
187 Engine electronics
187 Particle filter
188 Exhaust control system
188 Fuel filter
188 Fuel filler flap
188 AdBlue
189 Petrol
190 Diesel
192 Vehicle battery and fuses
192 Vehicle battery
193 Using the jump-starting cable
193 Fuses
194 Fuses in the dash panel
195 Fuses in the engine compartment
196 Wheels
196 Tyres and rims
197 All-season or winter tires
198 Snow chains
198 Spare and emergency spare wheel
199 Changing the wheel and raising the vehicle
200 Breakdown kit
201 Tyre pressure
202 Tyre pressure monitoring system
202 Wheel bolt cover caps
203 Full wheel frame

4
Table of Contents
203 Storage space and interior equipment
203 Equipment in the boot
203 Emergency equipment
204 Fasteners in the boot
205 Fastening nets
205 Sliding hooks
205 Net partition
205 Double-sided floor covering
205 Flooring in the luggage compartment
206 Removable light
206 Rigid boot cover
207 Roll-up luggage compartment cover
207 Variable loading floor in the boot
208 Through-loading bag
209 Overview of passenger compartment
210 Storage compartment under the front seat
210 Storage compartment for an umbrella
210 Phonebox
210 Cup holder
211 Waste container
211 Ashtray and cigarette lighter
211 Folding table
212 Multifunction holder
212 Tablet holder
213 12-Volt power socket
213 230-Volt power socket
214 Roof rack and hitch
214 Roof rack
214 Swivelling hitch
216 Maintaining and cleaning
216 Service events
216 Service work, adjustments and technical
changes
217 Interior
217 Exterior
219 Technical data and specifications
219 Requirements for the technical data
219 Vehicle identification data
220 Maximum permissible weights
220 Operating weight
221 Vehicle dimensions
221 Engine specifications
223 Event Data Recorder
223 Information about the radio systems in the
vehicle
224 Rights arising from defective performance,
ŠKODA Warranty for new cars, ŠKODA
Mobility Warranty and Optional ŠKODA
Extended Warranty
226 Index

About the Owner's Manual
5
About the Owner's Manual
General
This Owner's Manual applies to all chassis variants
of the vehicle, including all models and trim levels.
All possible trim levels are described here without
identifying them as special trims, model variants or
market-dependent equipment. This means that not
all the trim components described in this Owner's
Manual are available in your vehicle.
The images in this Owner’s Manual are for illustrative purposes only. The images may dier from your
vehicle; these are for general information purposes
only.
ŠKODA AUTO is constantly working on the further
development of all vehicles. It is therefore possible
for changes to be made at any time to the scope of
delivery in terms of shape, equipment and technology. The information contained in this Owner's Manual corresponds to the information available at the
time of going to press.
No legal claims can therefore be derived from the
technical data, illustrations and information in this
Owner’s Manual.
Electronic version of the Owner's Manual
The printed Owner’s Manual contains the most important information regarding vehicle operation and
vehicle maintenance.
Complete information is included in the electronic
version of the Owner's Manual. This is available on
the ŠKODAweb pages as well as in the mobile application MyŠKODA, which can be downloaded.
About the Owner's Manual
General
This Owner's Manual applies to all chassis variants
of the vehicle, including all models and trim levels.
All possible trim levels are described here without
identifying them as special trims, model variants or
market-dependent equipment. This means that not
all the trim components described in this Owner's
Manual are available in your vehicle.
The images in this Owner’s Manual are for illustrative purposes only. The images may dier from your
vehicle; these are for general information purposes
only.
ŠKODA AUTO is constantly working on the further
development of all vehicles. It is therefore possible
for changes to be made at any time to the scope of
delivery in terms of shape, equipment and technology. The information contained in this Owner's Manual corresponds to the information available at the
time of going to press.
No legal claims can therefore be derived from the
technical data, illustrations and information in this
Owner’s Manual.
http://go.skoda.eu/owners-manuals
▶

6
Explanations
Explanations
Terms used
“Specialist garage”
specialist service tasks for ŠKODA vehicles. A
specialist can be a ŠKODA Partner, a ŠKODA
Service Partner, or an independent workshop.
“ŠKODA Service Partner”
been contractually authorised by ŠKODA AUTO
or its distribution partner to perform service
work on ŠKODA vehicles and to sell ŠKODA
Genuine Parts.
“ŠKODA Partner”
tractually authorised by ŠKODA AUTO or its distribution partner to sell new ŠKODA vehicles
and, when applicable, to service them using
ŠKODA Genuine Parts and sell ŠKODA Genuine
Parts.
Text notes
“Press”
“Hold”
Direction indications
All direction indications, such as “left”, “right”,
“front”, “rear”, relate to the forwards direction of
travel of the vehicle.
Texts with this symbol indicate dangerous situations
which, if the safety instructions are not observed,
will result in death or serious injury.
Texts with this symbol indicate dangerous situations
which, if the safety instructions are not observed,
could result in death or serious injury.
Texts marked with this symbol indicate dangerous
situations which, if the safety instructions are not
observed, could result in minor or moderate injury.
Texts with this symbol indicate situations which, if
the corresponding instructions are not observed, will
result in damage to the vehicle.
tion.
- short press (e.g. a button) within 1 second
- long press (e.g. a button) for more than 1
second
DANGER
WARNING
CAUTION
NOTICE
Texts with this symbol contain additional informa-
- A workshop that carries out
- A workshop that has
- A company that has been con-

Vehicle overviews
Front vehicle area
Under the windscreen
A
Camera for assist systems
▶
Light sensor for automatic driving light circuit » page 46
▶
Rain sensor for automatic wiping » page 52
▶
Bonnet release lever (on the inside of the flap) » page 185
B
Headlight washers » page 52
C
Front radar sensor for assist systems
D
Cover for screw-in towing eye socket » page 167
E
Ultrasonic sensors for assist systems
F
Door handles
G
Open the door » page 24
▶
Keyless locking (KESSY) » page 22
▶
Roof rails » page 214
H
Keep the sensors and cameras for the assist systems clean » page 14.
›
Vehicle overviews › Front vehicle area
7
8
Vehicle overviews › Rear vehicle area
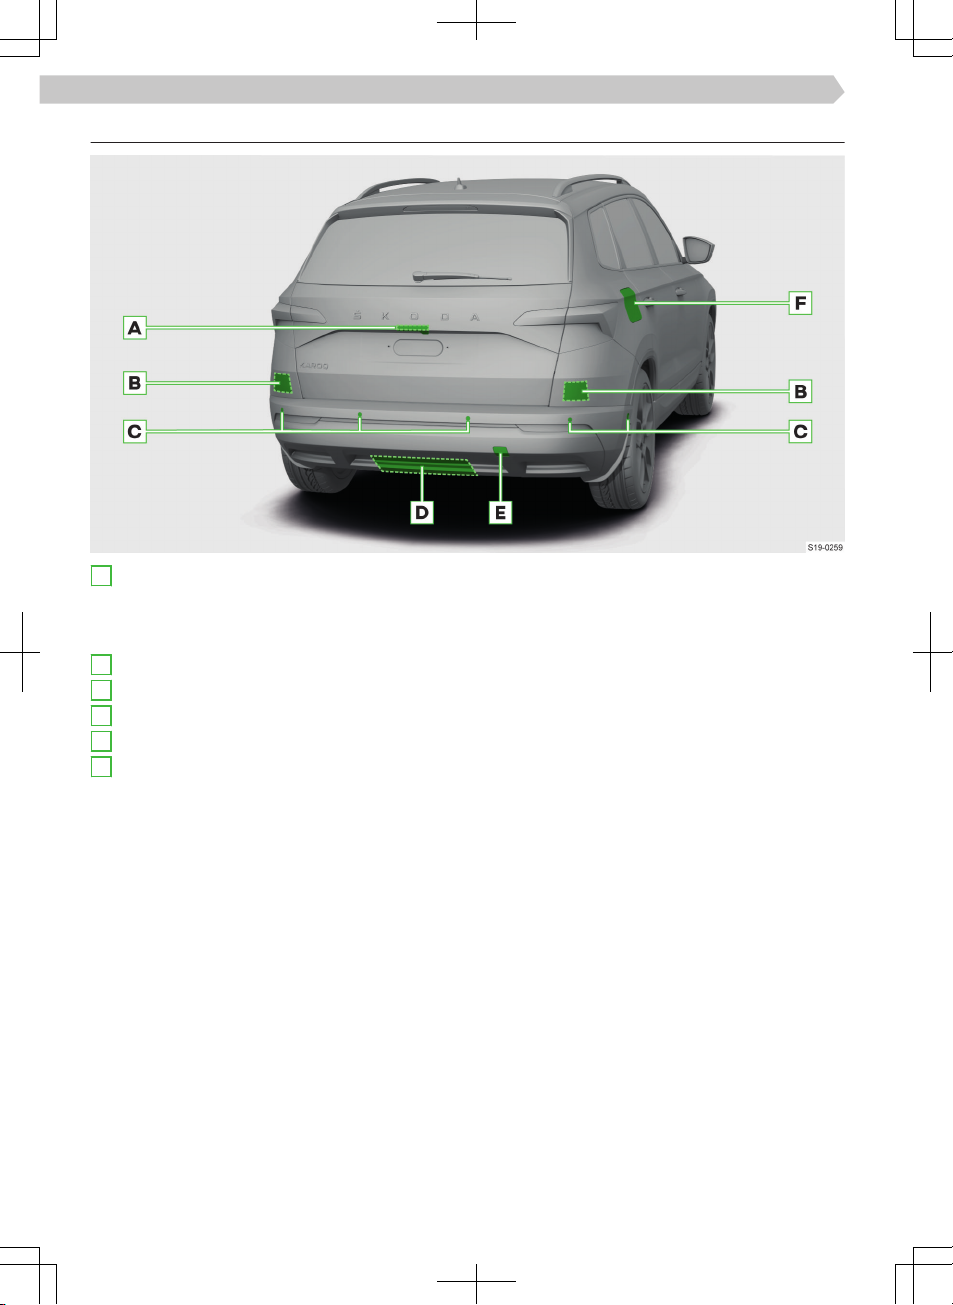
Rear vehicle area
Handle of the boot lid
A
Manually operated boot lid » page 28
▶
Electrically operated boot lid » page 28
▶
Camera for assist systems
▶
Radar sensors for assist systems (in the bumper)
B
Ultrasonic sensors for assist systems
C
Swivelling hitch » page 214
D
Cover for screw-in towing eye socket » page 167
E
Fuel filler flap » page 188
F
Sticker with tyre pressures » page 201
▶
Sticker with prescribed fuel
▶
Ice scraper
▶
▶
Filler neck of the AdBlue®tank » page 188
Keep the sensors and cameras for the assist systems clean » page 14.
›

Vehicle overviews › Driver's seat
9
Driver's seat
Door opening lever » page 24
A
Side Assist lane change assist system indicator
B
light » page 177
Light switch » page 46
C
Air outlet nozzle
D
Control lever:
E
Flashing and high beam » page 46
▶
Cruise control » page 174
▶
Speed limiter » page 173
▶
High-beam assist system » page 48
▶
Buttons/dials on the multifunction steering
F
wheel » page 60
Depending on the equipment:
G
Analogue instrument cluster » page 58
▶
Digital instrument cluster » page 59
▶
Control lever:
H
Windscreen wipers and washers » page 52
▶
Information system » page 60
▶
Depending on the equipment:
I
Ignition lock » page 160
▶
Starter button » page 161
▶
Steering wheel with horn/with driver's front air-
J
bag » page 44
Safety lever for steering wheel adjust-
K
ment » page 37
Operation of the automatic distance con-
L
trol » page 175
Bonnet release lever » page 185
M
Button for the electric boot lid » page 28
N
Exterior mirror operation » page 38
O
Window operation » page 25
P
Centre console and passenger seat
Infotainment (depending on trim level):
A
Columbus » page 127
▶
Amundsen » page 99
▶
Bolero » page 80
▶
Swing » page 65
▶
Air outlet nozzle
B
External Infotainment module (in the passenger
C
storage compartment) » page 127
Side Assist lane change assist system indicator
D
light » page 177
Door opening lever » page 24
E
Window operation in the passenger
F
door » page 25
Operation (depending on the trim level):
G
Heating
▶
Manual air conditioning » page 54
▶
Climatronic » page 55
▶
Buttons/warning lights (depending on the speci-
H
fication)
Buttons:
▶
START-STOP » page 162
▶
Park Assist » page 183
▶
Park Pilot » page 181
▶
Hazard warning light system » page 46
▶
Central locking » page 21
Indicator lights:
▶
Front passenger airbag
Buttons (depending on the trim level):
I
▶
Driving mode selection » page 164
▶
Auto Hold » page 170
▶
Parking brake » page 169
▶
Stabilisation Control ESC / Traction Control
ASR » page 170
▶
Oroad mode » page 164
/ » page 45
10
Indicator lights › Engine compartment
Depending on the equipment:
J
Shift lever (manual transmission) » page 162
▶
Selector lever (automatic transmis-
▶
sion) » page 163
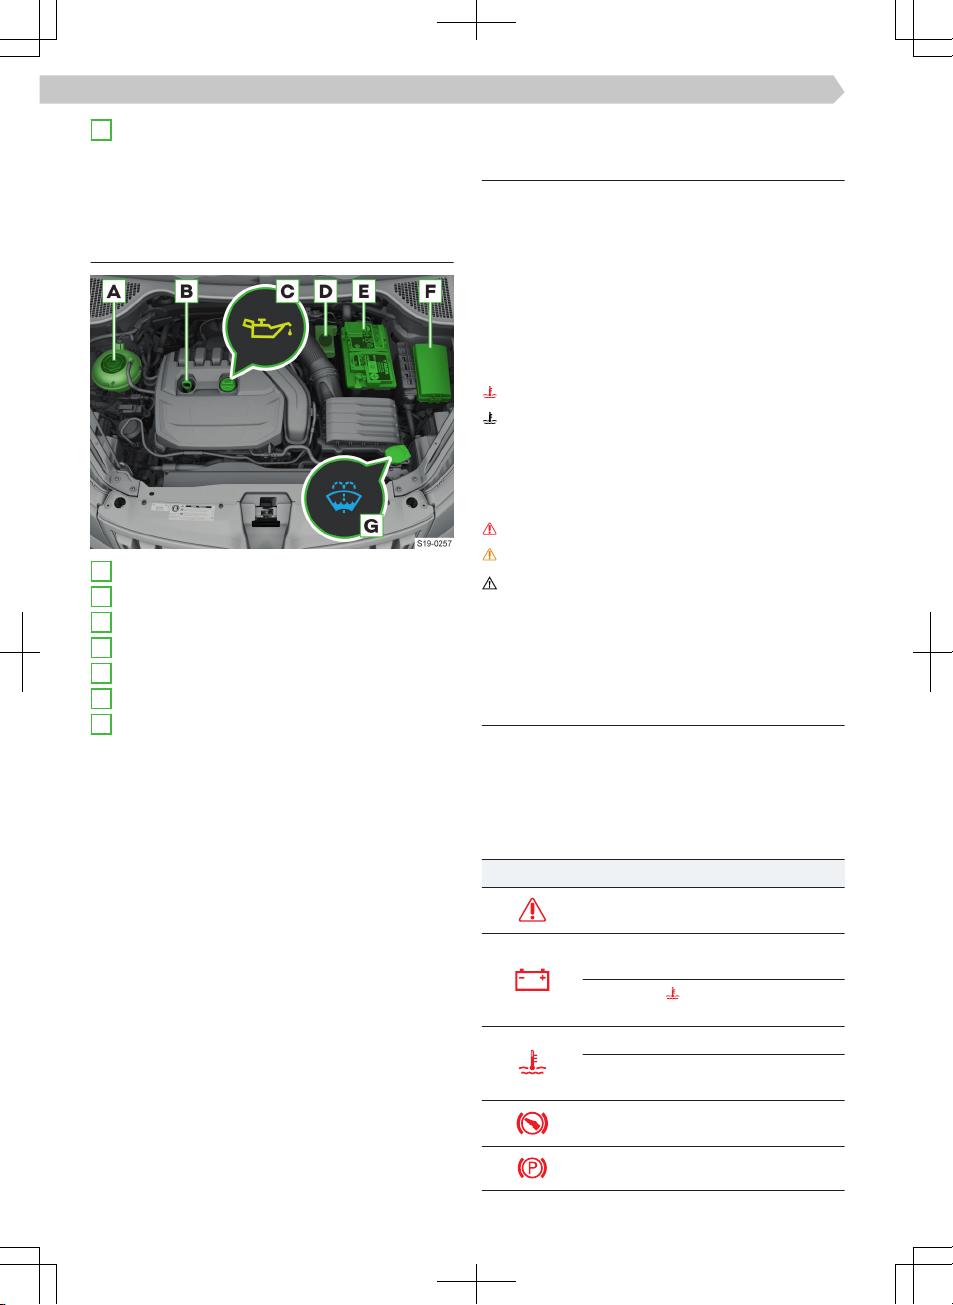
Engine compartment
Coolant expansion tank » page 186
A
Engine oil dipstick » page 185
B
Engine oil filler opening » page 185
C
Brake fluid reservoir » page 168
D
Vehicle battery » page 192
E
Fuse box » page 195
F
Windscreen washer fluid reservoir » page 53
G
Indicator lights
Functionality
The indicator lights in the instrument cluster indicate
the current status of certain functions or faults.
The illumination of some of the indicator lights may
be accompanied by acoustic signals and messages in
the instrument cluster display.
Colour display of the indicator lights
Depending on the vehicle equipment, the colour
scheme of the indicator lights may vary. The coolant
indicator light can, e.g. be shown in colour as follows.
- colour display
- black and white display
Additional indicator lights
Depending on the meaning, the additional indicator
light will also light up in the display along with some
of the indicator lights.
- Danger
- Warning
WARNING
Ignoring the illuminated indicator lights and associated messages on the instrument cluster display may
result in accidents, serious injury or damage to the
vehicle.
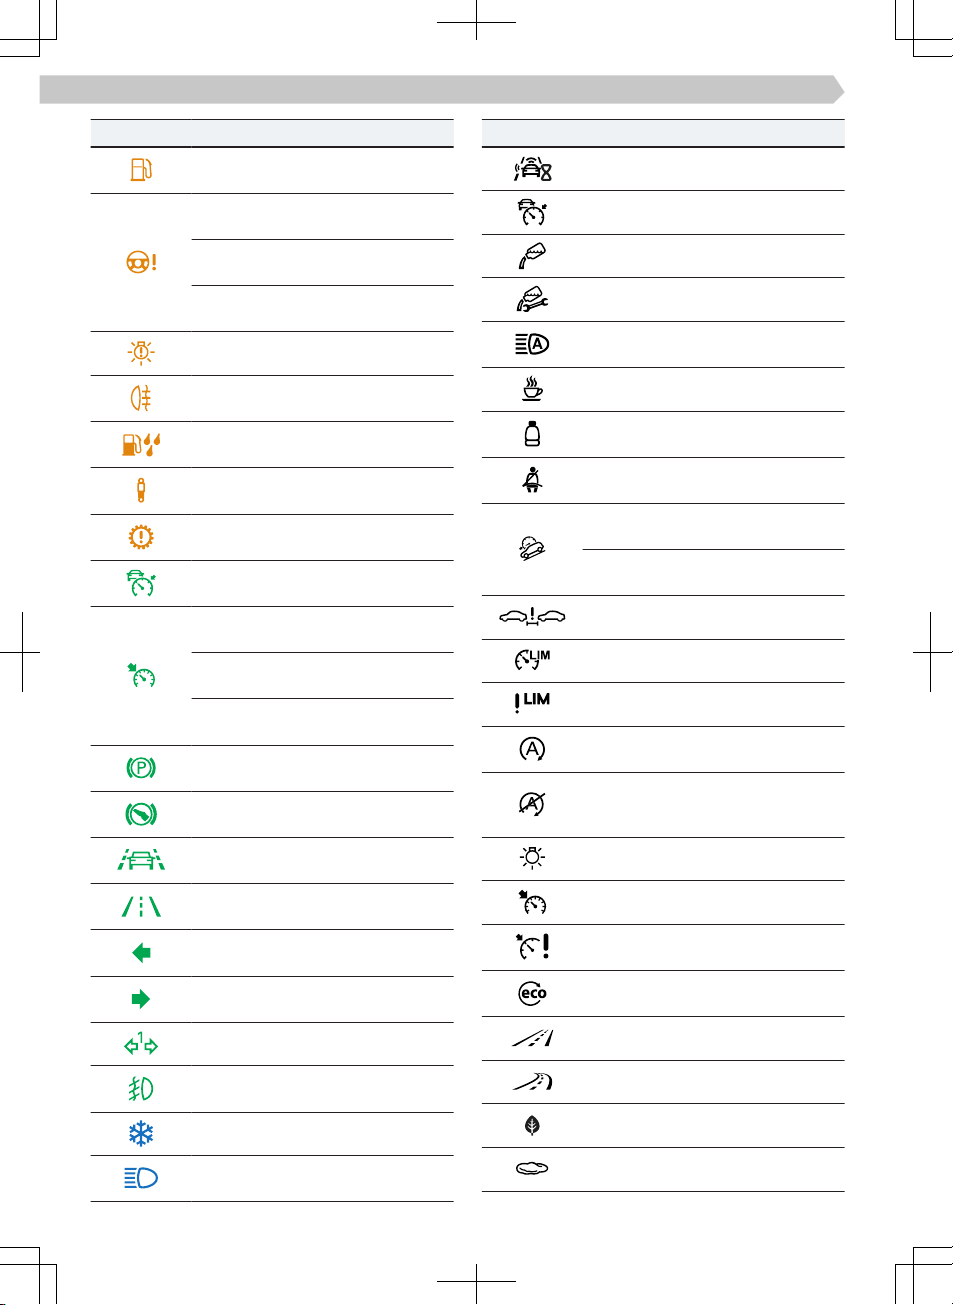
Indicator light overview
After switching on the ignition, some indicator lights
for the functional test of the vehicle systems light up
briefly. If the tested systems are in order, the respective indicator lights go out a few seconds after the
ignition is switched on or after the engine has been
started.
Symbol Meaning
Indicates a warning together with
another warning light » page 10.
Vehicle battery is not charging » page 192.
Along with - Engine
fault » page 187, » page 192.
Coolant level is too low » page 187.
Coolant temperature too
high » page 187.
ACC does not decelerate sucient-
ly » page 174.
Parking brake on » page 169.

Indicator lights › Indicator light overview
11
Symbol Meaning
Automatic gearbox overheated » page 164.
Automatic gearbox impaired » page 164.
Front seat belt not fastened » page 39.
Brake fluid level is too
low » page 168.
Together with - Brake system and
ABS faulty » page 171.
Parking on a slope with too much inclination » page 169.
Parking brake faulty » page 169.
Warning if there is a risk of a colli-
sion » page 171.
Engine oil level too low » page 186.
Engine oil pressure too
low » page 186.
Flashing - Steering lock faulty » page 37.
Illuminates - Power assisted steering
faulty » page 37.
Indicates a warning along with another warning light » page 10.
ACC not available » page 176.
Flashing - Diesel engine control faulty » page 187.
illuminates, if relevant, does not illuminate after switching on the ignition - Diesel preheating system faulty » page 187.
Front passenger airbag switched
o » page 45.
Front passenger airbag switched
on » page 45.
Flashes together with - Key
switch for airbag deactivation faulty » page 45.
Symbol Meaning
Airbag system faulty » page 45.
Illuminates 4 s - Front passenger air-
bag deactivated with key
switch » page 45.
Illuminates for 4 seconds and then
flashes - Airbag or belt tensioner deactivated with diagnostic device » page 45.
Crew Protect Assist faulty » page 179.
ESC Oroad is activated » page 165.
ASR deactivated » page 171.
ESC Sports enabled » page 171.
Worn brake pads » page 169.
ABS faulty » page 171.
Illuminates - ESC or ASR faulty » page 171.
Flashing - ESC or ASR is engaged » page 170.
Clogged particle filter » page 187.
Front Assist deactivated » page 172.
Petrol engine control faulty » page 187.
Tyre pressure
change » page 197, » page 202.
Tyre pressure control system faulty » page 202.
Emission control system faulty » page 188.
Lane Assist is activated, but not
ready to intervene » page 176.
Lane Assist is activated, but not
ready to intervene » page 176.
Engine oil level too high or engine oil
level sensor impaired » page 186.
Ball rod not locked » page 215.
Windscreen washer fluid level too
low » page 53.
Automatic gearbox overheated » page 164.
12
Indicator lights › Indicator light overview
Symbol Meaning
The fuel supply has reached the reserve area. » page 190, » page 191.
Illuminates - Power assisted steering
faulty » page 37.
Flashing - Steering lock not unlocked » page 37.
Flashing - Steering lock faulty » page 37.
Bulb faulty » page 48.
Rear fog light switched
on » page 47.
Water in the diesel fuel fil-
ter » page 188.
Adaptive suspension faulty » page 165.
Automatic gearbox impaired » page 164.
ACC controls the driving
speed » page 174.
Speed limiter controls the driving
speed » page 172.
The cruise control system controls
the driving speed » page 174.
ACC controls the driving
speed » page 174.
Vehicle is secured by Auto
Hold » page 170.
The selector lever is
locked » page 163.
Lane Assist is ready to intervene or is
currently intervening » page 176.
Lane Assist is ready to intervene or is
currently intervening » page 176.
Turn signal light,
left » page 46, » page 48.
Turn signal light,
right » page 46, » page 48.
Trailer turn signal light » page 48.
Symbol Meaning
Front Assist is started » page 172.
ACC activated » page 174.
AdBlue®level too low » page 189.
AdBlue®system impaired » page 189.
High beam Assist System switched
on » page 48.
Break recommendation » page 179.
Rear seat belt not fastened » page 39.
A rear seat belt is fastened » page 39.
The Hill Descent Assist System is activated » page 180.
Hill Descent Assist System intervenes » page 180.
Safety distance too small » page 171.
Speed limiter activated » page 172.
Speed limiter faulty » page 173.
Engine was switched o automatically by START-STOP » page 162.
Engine was not automatically
switched o via STARTSTOP » page 162.
No light is switched on » page 46.
Cruise control activated » page 174.
Cruise control system faulty » page 174.
Consumption-friendly driving » page 166.
Driving mode Normal » page 164.
Front fog lights switched
on » page 47.
Low outside temperature » page 60.
High beam or flasher activated » page 46.
Driving mode Sport » page 164.
Driving mode Eco » page 164.
Comfort Driving Mode » page 164.

Symbol Meaning
Snow Driving Mode » page 165.
Oroad Driving Mode » page 165.
Driving mode Individual » page 165.
Indicator lights › Indicator light overview
13

14
Correct and safe › Introductory notes for correct use
Correct and safe
Introductory notes for correct use
Read this Owner's Manual carefully, as proceeding
▶
in accordance with this manual is a prerequisite for
the correct use of the vehicle. This Owner's Manual
should therefore always be in the vehicle.
When using the vehicle, the generally binding legal
▶
provisions that are specific to the country must be
observed. Such as those for transporting children,
switching o airbags, using tyres, road trac and
the like.
Do not exceed the maximum permissible weights
▶
and loads.
Do not exceed the maximum permissible roof load.
▶
Use the specified fuel and operating fluids.
▶
Drive on roads that meet the technical vehicle pa-
▶
rameters. Obstacles that exceed the ground clearance of the vehicle can damage the vehicle when
driving over them.
Care must be taken during operations related to
▶
operation, maintenance and self-help to avoid
damage to the vehicle or injury. If required, seek
the help of a specialised garage.
All work on the vehicles and safety systems e.g. on
▶
the seatbelts or the airbag system, may only be
carried out by a specialist garage.
When using accessories, please note the instruc-
▶
tions in the accessory manufacturer’s instruction
manual. These include child seats, roof racks, compressors etc.
Please note the service intervals.
▶
Regular checks
What should be taken into account before driving?
A vehicle with technical defects can increase the risk
of accidents and injuries.
Eliminate any defects before driving. If required,
seek the help of a specialised garage.
Pay special attention to the following points.
Is the tyre undamaged?
▶
Is the tyre tread sucient?
▶
Is the tyre pressure sucient?
▶
Do the headlamps, brake and turn signals work?
▶
Is the windscreen in good condition?
▶
Is the engine oil, brake fluid and coolant level OK?
▶
Is the air intake in the engine compartment free
▶
from obstruction?
Are the air outlet nozzles or air intake in front of
▶
the windscreen free from obstruction?
Are the windscreen wiper and washer system and
▶
windscreen wiper blades functional?
Is the windscreen washer fluid level sucient?
▶
Are the windscreen wiper blades in good condi-
▶
tion?
Are all seatbelt system components in good work-
▶
ing order? Are the seatbelts clean and have the
buckles been unclogged?
Is the spoiler working properly?
▶
Are parts and components of the vehicle still visi-
▶
bly attached?
Are there no oil stains or other operating fluids un-
▶
der the vehicle?
New vehicle or new parts
New vehicle - Running in the engine
Driving style during the first 1500 km determines the
quality of the engine run-in process.
During the first 1000 km, rev the engine to max.
▶
3/4 of the highest permissible engine speed and
avoid using a trailer.
Over the next 500 km, the engine speed can be
▶
slowly increased.
Depending on driving style and operating conditions,
the engine consumes some oil, up to 0.5 l / 1000 km.
Consumption may be higher over the next 5000 km.
New brake pads
New brake pads do not provide the optimum braking
eect during the first 200 km, they have to be worn
in first. Therefore, drive very carefully.
New tyres
New tyres do not have optimum grip for the first
500 km. Therefore, drive very carefully.
No improper vehicle adjustments
Improper modifications can cause interference and
aect safety-related functions and other functions
of the vehicle.
Adjustments and technical modifications to the ve-
▶
hicle should only be carried out by a specialist garage.
Do not cover the engine with additional insulation
▶
materials, e.g. a blanket.
Keeping sensors and cameras in working order
Some functions of your vehicle are supported by
sensors and cameras inside and outside the vehicle.
The rear-mounted accessories, e.g. bike rack, may
aect system and camera functionality.
Do not cover or put a sticker over the sensors and
▶
cameras and keep them clean.

Correct and safe › Engine compartment
15
If there is damage suspected to the sensors or
▶
cameras, seek the help of a specialist garage.
Engine compartment
Before opening the engine compartment flap
Risk of scalding! Do not open the engine compartment flap if steam or coolant comes out of the engine compartment.
Stop the engine and allow it to cool.
▶
Remove the ignition key. On vehicles with a key-
▶
less unlocking system, open the driver's door.
When working in the engine compartment
Keep children away from the engine compartment.
▶
Do not touch the radiator fan. The radiator fan can
▶
turn itself on, even when the ignition is o.
Do not touch electrical cables. Avoid short circuits
▶
in the electrical system, especially on the vehicle
battery.
Do not smoke near the engine and refrain from
▶
handling open flames or sparks.
If you need to work in the engine compartment
▶
with the engine running, be mindful of rotating engine parts and electrical equipment.
Do not leave any objects in the engine compart-
▶
ment.
Handling operating fluids
Your vehicle needs various fuels to operate that can
aect health or the environment when they are
emitted. These include fuel, oils, battery acid, coolant
and brake fluid or AdBlue®.
Only use operating fluids outdoors or in well-venti-
▶
lated areas. If required, wear protective equipment.
Do not use or check operating fluids with the en-
▶
gine running.
In the event of contact with operating fluids, wash
▶
aected areas with warm water. If required, seek
medical help.
The leaked engine oil in the engine compartment
▶
can cause a fire, so wipe it o with a cloth.
Store soiled cloths in a well-ventilated area until
▶
disposal. Cloths with residues of engine oil can ignite and cause a fire.
Vehicle battery
Handling the vehicle battery
Battery acid is highly corrosive. Improper handling of
the vehicle battery can cause an explosion, fire,
chemical burns or poisoning!
When handling the vehicle battery, eye and skin
▶
protection must be worn.
Do not tilt the vehicle battery, as it may leak bat-
▶
tery acid.
If battery acid comes into contact with skin, wash
▶
the aected areas with water for a few minutes.
Get medical help without delay.
Do not charge a frozen or thawed vehicle battery.
▶
Replace a frozen vehicle battery.
Do not use a damaged vehicle battery.
▶
Short circuit! Do not connect the battery terminals.
▶
Using electrical sockets in the vehicle
Improper handling of sockets can lead to life-threatening electric shock or fire.
The sockets may get hot during operation. Do not
▶
touch hot sockets.
Protect sockets from liquids.
▶
If moisture gets into the socket, let the socket dry
▶
before reusing it.
Do not insert any objects into the socket contacts.
▶
Before your journey
Adults and children, cargo and objects - everything
has its place in the vehicle. Observe the following instructions so that all occupants are protected in the
best possible way in the event of an accident.
Before you go
Ensure that you have a good view of outside the
▶
vehicle.
Adjust the rearview mirrors.
▶
Close all doors and the engine compartment and
▶
boot flap.
Take the correct seating position and put on the
▶
seatbelt properly. Ensure that passengers do likewise. Always leave the seatbelt on while driving.
Only one person can be secured with a seatbelt.
▶
Make sure that the seatbelts are not trapped, e.g.
▶
in the door or in the seat.
Check seatbelts, their locks and attachment points
▶
for damage.
Sitting safely
For the safety of the occupants and to reduce the
risk of injury in the event of an accident, the following instructions must be observed.
Stand the backrests upright. If the front passenger
▶
seat backrest has been folded forward, only the
seat behind the driver's seat may be used for transporting passengers.
Engage the rear seat backrests correctly.
▶
Adjust the height-adjustable headrest so that the
▶
top of the headrest is as close as possible to the
top of the head.

16
Correct and safe › Before your journey
Keep your feet in the footwell.
▶
Use the entire seat.
▶
Do not lean forward or sit to the side.
▶
Do not hold your limbs out the window.
▶
Adjust the driver's seat
›
in the longitudinal direction so that the
pedals can be fully
pushed through with
slightly bent legs.
Adjust the steering
›
wheel so that the distance
A between the
steering wheel and
sternum is at least 25
cm.
For vehicles with driver's knee airbag, adjust the
›
driver's seat longitudinally so that the distance
from the legs to the dash panel in the area of the
knee airbag is at least 6 cm.
Adjust the angle of the backrest so that the steer-
›
ing wheel can be reached at the top with your arms
slightly bent.
Move the passenger seat back as far as possible.
›
The front passenger must maintain a minimum distance of 25 cm from the dash panel.
Correct belt webbing arrangement
The webbing arrangement is extremely important for the seatbelts to
oer the best possible
protection.
The shoulder belt part
▶
must run over the middle of the shoulder and
rest firmly on the body.
The lap belt part must
▶
be placed in front of the pelvis and fit tightly.
In pregnant women, the lap belt part must be as
▶
low as possible on the pelvis, so that no pressure is
exercised on the abdomen.
The webbing must not be pinched or twisted and
▶
rub against sharp edges.
The tongue may only be inserted into the buckle of
▶
the associated seat.
The webbing must be tight. Therefore, do not at-
▶
tach clamps or similar items to the webbing for adjusting the seatbelt according to body size.
Correct steering wheel position
Hold the steering
▶
wheel with both hands
on the outer edge in
the "9 o'clock" and "3
o'clock" position. Otherwise, you may experience serious injury to
the arms, hands and
head when deploying
the airbag.
Be mindful of the eect of the airbag system
Airbag systems can only properly protect if all occupants have been secured and they are in the correct
seating position.
No persons, animals or objects such as cup holders
may be in the deployment area of the air-
B
bags » page 44.
Do not cover or stick anything over the steering
▶
wheel or the dash panel. The front airbags were
not able to deploy.
The front passenger airbag should be switched o in
some situations » page 45.
Securing children properly
Do not carry a child on your lap, and secure the
▶
child and yourself with a seatbelt.
Only transport children in a suitable child
▶
seat » page 41.
Children under 150 cm tall will not be properly protected without a child seat. Children that have been
inadequately secured can be thrown through the vehicle in the event of an accident or a sudden manoeuvre. You can cause life-threatening injuries to
yourself and other occupants.
If children lean forward or assume a wrong sitting
position while driving, they are more likely to be injured in the event of an accident. This is especially
true for children who are carried in the passenger
seat - when the airbag system triggers, they can be
seriously injured or killed!
A child that has been incorrectly secured in the
wrong sitting position - endangered by the side
airbag
The child should not be
in the deployment area
of the side airbag.

Correct and safe › Safe driving
17
A child that has been properly secured in a child
seat
There must be enough
room between the child
and the exit area of the
side airbag for the side
airbag to oer the best
possible protection.
Transporting objects safely
When moving heavy objects, there is a shift in emphasis. Thus, the driving behaviour of the vehicle
changes.
Adjust driving speed and driving style to this
▶
changed driving behaviour.
Unsecured or misplaced items may be thrown
around in the event of an accident or sudden manoeuvre. There is a risk of serious injury and loss of
control of the vehicle!
In a rear-end collision at 50 km/h unsecured objects
are thrown forward with up to 50 times their weight.
A 1.5 litre water bottle is thrown up to 75 kg.
Transport objects securely.
▶
Stow objects so they do not hinder the driver.
▶
Keep the driver footwell clear.
Stow small items in the storage compartments.
▶
Do not leave lockable storage compartments open.
▶
Do not let items protrude out of the slots. This
▶
note does not apply to bottles in bottle trays.
Do not place any objects on the dash panel or on
▶
the luggage compartment cover.
Do not exceed the maximum permissible load of
▶
fasteners and shelves.
Distribute the load evenly in the luggage compart-
▶
ment and fasten it so it cannot slip.
Place heavy objects in the luggage compartment
▶
as far forward as possible.
Safe driving
Introductory notes
Pay attention when you are driving! As a driver, you
▶
are fully responsible for road safety.
Always adjust driving speed to the road conditions
▶
as well as the trac and weather conditions.
Paying attention to warning signals
The driver information system warns you with indicator lights and messages in the event of any faults.
Failure to follow the warnings may increase the risk
of accidents and injuries.
If the vehicle issues a warning signal, then park the
▶
vehicle safely and follow the information in the instrument cluster, and in this manual.
Using assistance systems in a clever way
The assistance systems are only for support and do
not absolve you from your responsibility for driving
the vehicle.
The assistance systems are subject to physical and
technical limitations. Therefore, in certain situations,
system reactions may be perceived as undesirable or
delayed.
Stay alert and be ready to intervene.
▶
Familiarise yourself with the assistance systems,
▶
their limitations and operating conditions.
Activate, deactivate and adjust the assistance sys-
▶
tems so that you have full control of the vehicle in
any trac situation.
Driving with a substitute spare wheel or emergency wheel
A substitute spare wheel or emergency wheel is only
used to reach the nearest specialist garage.
Inflate the wheel with the max. prescribed inflation
▶
pressure.
Follow the instructions on the warning label on the
▶
rim.
Do not cover the warning sign.
▶
Avoid full accelerations, strong braking and fast
▶
cornering.
Do not drive with more than one mounted spare
▶
wheel.
Avoid using snow chains on the temporary spare
▶
wheel.
Driving with a loaded roof rack
When transporting objects on the roof rack, the vehicle’s driving behaviour changes.
Adapt your speed and driving style to this.
▶
Towing a trailer
The vehicles handling characteristics change with a
trailer. The assistance systems may behave dierent-
ly.
Drive more slowly, excessive speed can lead to loss
▶
of control of the vehicle.
Keep a larger distance from the vehicle in front.
▶
Do not exceed the max. vertical load and the per-
▶
missible trailer load.
Driving through water
There must be no water ingress into the vehicle systems e.g. into the engine’s air intake system!
Therefore, determine the water depth before driv-
▶
ing through water. The water level must not exceed the lower edge of the lower beam.

18
Correct and safe › Emergency call
Drive at max. walking speed. Otherwise, a wave
▶
may form in front of the vehicle, increasing the water level.
Never stop in the water, do not drive backwards
▶
and never stop the engine.
Vehicle operation in dierent weather conditions
If you wish to operate your vehicle in countries with
dierent weather conditions from those specified,
please contact a ŠKODA Partner. They will advise
you if certain precautions need to be taken to ensure
the full functioning of the vehicle or to prevent damage (e.g. coolant, battery replacement, etc.).
Is something wrong?
Pay attention to changes in vehicle handling.
▶
If in doubt about safety, stop driving and seek the
▶
help of a specialist garage.
Unusual vibrations or the vehicle ‘pulling’ to the
▶
side may indicate a puncture.
If tyre pressure loss is very quick, try to stop the
▶
vehicle carefully without heavy steering or heavy
braking.
Immediately remove foreign bodies stuck in the
▶
tyre tread.
Do not remove foreign objects that have penetra-
▶
ted into the tyre. Check the tyre pressure and seek
the help of a specialised garage.
Immediately remove any objects jammed under
▶
the floor of the vehicle. These can damage the vehicle or ignite and cause a fire.
Parking the vehicle safely
A vehicle that has not been secured may roll away
and cause accidents.
For parking, look for a place with suitable ground.
▶
Do not park the vehicle on flammable materials
such as dried leaves, spilt fuel. Hot vehicle parts
can cause a fire.
Carry out the following activities in the specified order when parking.
Stop the vehicle and keep the brake pedal de-
›
pressed.
Secure the vehicle with the parking brake.
›
For vehicles with an automatic gearbox, put the se-
›
lector lever in the
Turn o the engine.
›
For vehicles with manual transmission, engage
›
position.
1st gear or reverse gear.
Release the brake pedal.
›
Exiting the vehicle
Do not leave children unattended in the vehicle!
Children may injure themselves when handling the
▶
seats, releasing the parking brake etc.
In emergency situations, children are not able to
▶
leave the vehicle on their own or help themselves.
At very high or very low temperatures, there is
▶
danger to life!
When locking the vehicle, the SAFE function
▶
switches on. As a result, no doors or windows can
be opened from the inside. Turn o the SAFE function if people are left behind in the locked vehicle » page 21.
Emergency call
WARNING
Availability of a mobile network is indispensable for
establishing a connection to the emergency number.
WARNING
This emergency service is only available in some
countries.
WARNING
If the vehicle is located in an area without a functioning emergency call system infrastructure, no vehicle
data shall be transmitted to the emergency call centre.
After the start of the conversation, the emergency
call centre also contains information as to the accident location and the severity of the accident, the
number of occupants with seatbelts on and the vehicle identification number (VIN).
Once the connection has been established, communication with the emergency call centre takes place
via the loudspeaker and microphone installed in the
vehicle.
Personal data
Personal customer data is collected, processed and
used by ŠKODA AUTO in accordance with the provisions of the generally binding legal provisions in the
area of personal data protection.
The current declaration on the protection of personal data can be found on the following website: http://
www.skoda-auto.com/data-privacy/.
Serious accident - automatic call
In the event of an accident where the airbag or belt
tensioner activates, a call is automatically started
with the emergency call centre.
Minor accident - call option
The infotainment screen displays the option to set
up a connection to the emergency call centre or
breakdown service.

Manual call
Keep the
›
key press-
ed down.
Confirm the connec-
›
tion to the emergency
call centre in the Infotainment screen.
Starting a manual conversation can then be
used, for example, if you
also report an accident in
which you are not directly involved.
Indicator light
The system state is displayed after the ignition
is switched on by the
warning light
A illumi-
nating.
Green - lit up - the sys-
▶
tem is functional.
Green - flashing - a call
▶
is being made to the
emergency call centre.
Red - lit up - if there is a system failure, immediate-
▶
ly seek the help of a specialist garage.
Not lit up - the system is out of order due to a long
▶
term unavailable mobile network, if this circumstance persists, the system will require the assistance of a specialist garage.
WARNING
If there is a system fault, no emergency call is possible.
Correct and safe › After an accident
19
After an accident
Safety systems
After an accident, the safety systems of the vehicle,
e.g. seatbelts and airbag system, may be out of action.
Have the vehicle's safety systems checked by a
▶
specialist garage, even if no load or trip has occurred.
Have damaged, loaded or triggered components of
▶
the safety systems replaced by a specialist garage.

20
Keys, locks and alarm system › Key
Keys, locks and alarm system
Key
Key Overview
Locking the vehicle
Operate the boot lid
Unlocking the vehi-
cle
Battery status warn-
A
ing lamp
Locking button for
B
folding the key bit
in/out
NOTICE
Protect the key from moisture and strong vibra-
▶
tions.
Keep the grooves in the key clean.
▶
The eective range of the key is about 30m. The
eective range of the key can be reduced, e.g. due to
signal interference from other transmitters.
Troubleshooting
The battery in the key is almost empty
After pressing a button on the key, the warning
▶
light does not flash.
Or:
A message stating it is necessary to change the
▶
battery will be displayed.
Replace the battery » page 20.
›
The vehicle cannot be unlocked or locked with the
remote control
There may be the following reasons.
The battery in the key is empty.
▶
Replace the battery » page 20.
›
The key is not synchronized.
▶
Synchronize the key as follows.
Press one of the buttons on the key.
›
Unlock the door within 1 minute with the key via
›
the locking cylinder » page 22.
If necessary, the key must be synchronized if one
of the buttons on the key has been repeatedly pressed outside of the eective range of the remote control.
Changing the key battery
The new battery must comply with the specification
of the original battery.
Fold out the key bit.
›
Release the battery
›
cover with your
thumbnail or by inserting a flat-head screwdriver at the marked
points.
Open the battery cov-
›
er.
Remove the battery.
›
Press any button on
›
the remote key to reset the key.
Insert the new battery.
›
Fit the battery cover
›
and press until it clicks
into place.
Memory function of the key
Functionality
Applies to vehicles that do not have the personalisation function.
Each time the vehicle is locked, the driver's seat and
exterior mirror position settings are saved.
The saved setting is then assigned to the key used to
lock the vehicle.
Operation
Retrieve stored position
Unlock the vehicle and open the driver's door.
›
The driver's seat and the exterior mirrors occupy the
position assigned in the memory to the key used to
unlock the vehicle.
Stop position change
Press any button on the seat to be adjusted.
›
Or:
Press the
›
Settings
Activate and deactivate the memory function of
the key
The function is activated or deactivated in the following menu in the Infotainment system.
Or:
button on the key.

Keys, locks and alarm system › Central locking
21
Storing driver's seat and exterior mirror position
for driving forwards
Storing takes place automatically every time the vehicle is locked.
The seat position can be stored if the angle of inclination of the seat back relative to the seat surface
is less than approximately 110° and the seat is not in
any of the end positions.
Storing front passenger´s exterior mirror position
for reversing
Unlocking the vehicle with the key.
›
Turn on the ignition.
›
Activate the folding function of the mirror in the
›
Infotainment in the following menu.
Or:
Turn the exterior mirror knob to the position .
›
Engage reverse gear.
›
Adjust the mirror to the desired position.
›
Disengage reverse gear.
›
The set mirror position is saved.
Central locking
Functionality
Central locking system
The system unlocks and locks all doors, the fuel filler
flap and the boot lid at the same time.
Unlock indicator: double flashing of the indicator
lights.
Lock indicator: single flashing of the indicator lights.
The warning light in the driver's door will flash for
about 2 seconds in quick succession after the vehicle
is locked, then it will start flashing regularly at longer
intervals.
If none of the doors or the boot lid is opened
within 45 seconds of unlocking, the vehicle automatically locks again.
SAFE function
Depending on the equipment, the SAFE function can
be integrated into the central locking system.
The SAFE function prevents the doors from opening
from the inside once the vehicle is locked.
The SAFE function switches on when the vehicle is
locked.
In the display of the instrument cluster after the ignition is switched o, a message regarding the SAFE
function is displayed.
DANGER
Risk of death!
When the vehicle is locked and the SAFE function is
switched on, nobody is allowed to remain in the vehicle.
Turn o the SAFE function
By double locking within 2 seconds.
▶
Or:
Together with the deactivation of the interior mon-
▶
itoring » page 24, Settings.
The warning light in the driver's door will flash for
about 2 seconds in quick succession after the vehicle
is locked, then goes out and starts flashing regularly
at longer intervals after about 30 secs.
When the SAFE function is switched o, the door
can be opened from the inside by pulling once on the
opening lever.
The SAFE function is switched on again after unlocking and locking the vehicle.
Operation
Ways in which central locking operates
Depending on the equipment:
Key » page 20
▶
Keyless locking (KESSY) » page 22
▶
Central locking button
▶
Central locking button
The button locks all of the doors and the boot lid.
Locking and unlocking
Press the button in the centre console.
›
The symbol in the button comes on when locked.
Unlocking of the vehicle also takes place when opening a door from the inside or when removing the key
from the ignition.
WARNING
A locked vehicle with a central locking button makes
it dicult for responders to enter the vehicle in an
emergency.
Setting the unlocking and locking function
The lock and unlock functions are set in the following menu in the Infotainment system.
Or:
All doors
Unlocking of all doors, the boot lid and the fuel filler
flap.

22
Keys, locks and alarm system › Keyless locking (KESSY)
Single door
Using the button on the key, the driver's door and
the fuel filler flap are unlocked.
In vehicles equipped with a keyless unlocking system, the door near to which the key is located and
the fuel filler flap are unlocked by touching the door
handle.
When unlocked again, the other doors and the boot
lid are unlocked.
Doors on a vehicle side
Using the button on the key, the doors on the driver’s side and the fuel filler flap are unlocked.
In vehicles equipped with a keyless unlocking system, the doors on the passenger’s side near to which
the key is located and the fuel filler flap are unlocked
by touching the door handle.
When unlocked again, the other doors and the boot
lid are unlocked.
Automatic locking after starting
After starting, all doors and the boot lid are locked
when a speed of 15 km/h is reached.
Unlocking of the vehicle takes place when opening a
door from the inside or when removing the key from
the ignition.
WARNING
An automatically locked vehicle makes it dicult for
responders to enter the vehicle in an emergency.
Troubleshooting
Central locking fault
The warning light in the driver's door first flashes
▶
for 2 secs in quick succession.
Then it lights up continuously.
▶
After 30 secs, it flashes slowly.
▶
Seek the help of a specialist garage.
›
Emergency unlocking and emergency locking
of the door
Unlocking and locking the door with the lock cylinder
Remove the cover
Pull on the door handle
›
of the vehicle and hold
it.
Insert the key into the
›
recess on the underside of the cover.
Open the cover in the
›
direction of the arrow.
Release the door handle.
›
Locking and unlocking
Left-hand drive: Insert
›
the key with the buttons facing upwards
into the lock cylinder
and unlock or lock.
Right-hand drive: In-
›
sert the key with the
buttons facing down-
wards into the lock
lock.
Install cover
Pull on the door handle and hold it.
›
Replace the cover.
›
Release the door handle.
›
Locking the door without the lock cylinder
Open the door.
›
For vehicles with a panel over the opening, remove
›
the panel.
Insert the key or a flat-head screwdriver into the
›
slot.
Turn the key or flat-head screwdriver towards the
›
outside of the vehicle (spring-loaded position).
After closing, the door is locked.
cylinder and unlock or
Keyless locking (KESSY)
Usage
The keyless locking system, KESSY, enables unlocking and locking of the vehicle without actively using
the remote control key.
Operation
Keep the key with you when unlocking and locking.
The sensors on the handle are intended to be operat-
ed with bare hands, e.g. wearing gloves may aect
the function of the sensors.

Keys, locks and alarm system › Alarm system
23
Unlocking
Grab the door handle.
›
Open the door.
›
Lock
Touch the sensor.
›
After locking, it is not
possible to unlock
within 2 seconds by
touching the door handle. This can be used to
check whether the vehicle is locked.
Unlocking the boot lid
Press the handle of the boot lid.
›
Protection against accidentally locking the key inside the vehicle
If the key is locked inside the vehicle, the vehicle will
unlock itself automatically. If no door is opened within 45 seconds, the vehicle automatically locks again.
If the key is locked in the luggage compartment, the
luggage compartment lid will automatically unlock itself.
Deactivating keyless unlocking and locking
Lock the vehicle with the button on the key.
›
Within 5 s, touch the sensor on the door handle
›
with your finger.
Deactivation is confirmed by a single flash of the
direction indicators.
To check the deactivation, wait at least 10 seconds
›
and then pull the door handle.
The door must remain locked.
Keyless unlocking and locking is automatically activated once again after the vehicle is unlocked.
Troubleshooting
The vehicle cannot be unlocked or locked using
the sensors on the handle
Lock or unlock the vehicle with the button on the
›
key.
Then try to unlock or lock the vehicle using the
›
sensors on the handle.
If keyless locking does not work, seek the help of a
›
specialist garage.
Alarm system
Functionality
The alarm system triggers audible and visual signals
during a break-in or towing attempt.
The alarm system is activated automatically approximately 30 seconds after the vehicle is locked.
The alarm system is automatically deactivated after
the vehicle is unlocked.
Alarm triggering
The activated alarm system triggers an alarm when
one of the following events occurs.
Opening the bonnet.
▶
Opening the boot lid.
▶
Opening the door.
▶
Manipulation of the ignition lock.
▶
Towing the vehicle.
▶
Movement in the vehicle.
▶
Sudden and significant voltage drop of the electri-
▶
cal system.
Uncoupling the trailer.
▶
Opening the door unlocked via the lock cylinder.
▶
Switching o the triggered alarm
Unlock the vehicle.
›
Or:
Switch on the ignition.
›
Operating conditions
For the correct functioning of the alarm system, all
windows and the glasses compartment must be
closed.
A trailer is integrated into the alarm system under
the following conditions.
✓ The vehicle is factory-fitted with a towing device.
✓ The trailer is electrically connected to the vehicle
via the trailer socket.
✓ The trailer is not equipped with LED taillights.
If the electrical connection to the trailer is interrup-
ted on a vehicle with an activated alarm system,
warning signals are triggered.
Disable the alarm before connecting or discon-
necting a trailer.

24
Doors, windows and boot lid › Doors
Settings
The following functions of the alarm system can be
deactivated once.
Interior monitoring.
▶
Towing protection.
▶
Deactivation will also switch o the SAFE function » page 21, Functionality.
Deactivation
By double locking within 2 seconds.
▶
Or:
In Infotainment, in the
▶
menu
Or:
In Infotainment, in the
▶
toring
menu
The functions of the alarm system must be deactivated if the vehicle is being towed or transported,
for example.
The functions of the alarm system are reactivated
after the vehicle is unlocked and locked again.
Interior monitoring
Interior moni-
Doors, windows and boot lid
Doors
Opening/closing the door
Opening from the outside
Unlock the vehicle and
›
pull on the door handle.
Opening from the inside
Pull the door opening
›
lever and push the
door away from you.
Closing from the inside
Grasp the pull handle and close the door.
›
Child safety lock on the rear doors
Operation
The child lock prevents the rear doors from being
opened from the inside.
Switching on and o
Turn the fuse with the vehicle key or a flat-head
›
screwdriver.
A Child lock switched o
B
Child lock switched on

Doors, windows and boot lid › Window - with electrical operation
25
Electrically operated fuse
Press the left button to switch on/o the fuse in
›
the left rear door.
Press the right button to switch on/o the fuse in
›
the right rear door.
The fact that the fuse is switched on can be seen by
the illuminated
After the fuse is switched on, the electric window
regulator in the respective door is also blocked.
displayed in the button.
Window - with electrical operation
What you should be mindful of
Force limiter
To reduce the risk of pinch injuries when closing the
windows, the vehicle has a force limiter.
If there is an obstacle, the window closing process is
stopped and the pane retracts by several centimetres.
If the obstacle prevents the it from being closed for
the next 10 seconds, the closing process is interrupted once again and the window goes down by several centimetres.
If you attempt to close the window again within
10 seconds of the window being moved down for
the second time, even though the obstacle was not
yet been removed, the closing process is only stopped. During this time, it is not possible to automatically close the windows by pulling the button all the
way. The force limiter is, however, switched on.
The force limiter is only not operational if you attempt to close the window again within the next
10 seconds – the window will now close with full
force! If you wait longer than 10 seconds, the force
limiter is switched on again.
CAUTION
Risk of injury!
Close the windows carefully, even though they
▶
have a force limiter.
Overview of the operating buttons on the
driver's door
Depending on the equipment:
Front door left
A
Front door right
B
Rear door, left
C
Rear door, right
D
Deactivation/activation of the buttons in the
E
rear doors
Deactivation / activation of the key in the left
F
rear door (part of the child safety lock with electric operation)
Deactivation / activation of the key in the right
G
back door (part of the child safety lock with
electric operation)
Operation
Opening
Press the corresponding button slightly down-
›
wards and hold it until the window has reached the
desired position.
Or:
Press the corresponding button until it stops; the
›
window opens automatically. Pressing the button
again will stop the opening process.
Closing
To close, pull gently upwards on the top edge of
›
the corresponding button and hold until the window has reached the desired position.
Or:
Pull the corresponding button until it stops; the
›
window closes automatically. By pressing the button again, the closing process is stopped.
After switching o the ignition, the windows can
still open and close for about 10 minutes so long as
none of the doors are opened.
Open all of the windows at the same time
Press and hold the
›
Or:
button on the key.

26
Doors, windows and boot lid › Sliding/tilting roof
Turn o the ignition, open the driver's door, and
›
hold down the driver's window button until it
stops.
Depending on the setting, only the driver’s win-
dow can be opened in this way.
Close all of the windows at the same time
Press and hold the button on the key.
›
Or:
Turn o the ignition, open the driver's door, and
›
pull upwards on the driver's window button until it
stops.
Or:
For vehicles with a keyless unlocking system, hold
›
one finger on the sensor on the outside of the handle on the front door.
Depending on the setting, only the driver’s win-
dow can be closed in this way.
Settings
The window operation is set in the following menu in
the Infotainment system.
Or:
Window operations
Window operation
Sliding/tilting roof
What you should be mindful of
Force limiter
To reduce the risk of pinch injuries when closing the
tilt/slide sunroof, the vehicle has a force limiter.
If there is an obstacle, the glass panel closing process is stopped and the pane retracts by several centimetres.
If the obstacle is not removed, the force limiter will
be disabled during the third closing attempt. The
sliding/tilting roof will then close with full force.
CAUTION
Risk of injury!
Close the sliding/tilting roof carefully, even though
▶
there is a force limiter.
NOTICE
During winter time, if necessary, remove any ice
▶
and snow around the area of the sliding/tilting roof
before opening.
Always close the sliding/tilting roof before discon-
▶
necting the battery.
Operating conditions
✓ The ignition is switched on.
✓ The temperature is higher than -20 °C.
Troubleshooting
The window regulator has stopped working after
repeated opening and closing
The window regulator mechanism could have overheated.
Allow the window regulator mechanism to cool
›
down.
The automatic window operation does not work
after disconnecting the vehicle battery
Enable automatic window operation » page 26.
›
Activation after disconnecting the vehicle
battery
Activate automatic window operation
Turn on the ignition.
›
Pull the corresponding button upwards and the
›
window closes.
Release the button.
›
Pull up the respective button and hold for 1 second.
›
Operation
Gradual opening
A
Complete opening
B
Gradually reset
C
Fully reset
D
Gradual opening
A
Full opening
B
Gradual closing
C
Complete closing
D
After moving the switch to the position B the
sliding/tilting roof is in the low-noise position (at a
speed of about 80 km/h).

Doors, windows and boot lid › Sunblind - with electrical operation
27
After another movement to position B the sliding/
tilting roof opens completely.
After switching o the ignition, the sliding/tilting
roof can still open and close for about 10 minutes so
long as none of the doors are opened.
Comfort operation of the tilting/sliding sunroof
The comfort operation makes it possible to lock the
sliding/tilting roof with the key if necessary.
Press and hold the button to turn it o.
›
Press and hold the button
›
On vehicles with a keyless unlocking system, it is
possible to move the sliding/tilting roof over the sensor in the door handle of the front door to close it.
Hold one finger on the sensor on the outside of the
›
handle on the front door.
to close it.
Troubleshooting
Operation of the sliding/tilting sunroof does not
work after disconnecting the vehicle battery
Activating operation of the sliding/tilting sun-
›
roof » page 27.
Activation after disconnecting the vehicle
battery
Activating operation of the sliding/tilting sunroof
Sunblind - with electrical operation
Operation
To open
Closing
Press or hold the but-
›
ton to move the roller
blind.
Press or release the
›
button to stop the roller blind from moving.
Activation after disconnecting the vehicle
battery
Turn on the ignition.
›
Keep the
›
blind opens and closes again.
Release the button.
›
key pressed down. The sun protection
Sun visors
Folding up and folding down
Turn on the ignition.
›
Pull the switch all the way down and hold it down.
›
After about 10 secs, the sliding/tilting roof opens
and closes again.
Release the switch.
›
Swivel the front visor towards the windscreen
1
Swivel the visor towards the door
2
Heated windscreen
Usage
Windscreen heating is used for defrosting or ventilating the windscreen.
Conditions
✓ The engine is running.

28
Doors, windows and boot lid › Boot lid - with manual operation
Operation
Heated rear window
Press the key to turn on the heated rear win-
›
dow.
Heated windscreen
Applies to Climatronic.
Press the
›
Windscreen heating switches o automatically after
10 minutes.
key to turn on the heated windscreen.
Setting
Automatic heated windscreen
Applies to Climatronic.
The heated windscreen switches on automatically if
the windscreen mists up.
This function is set in the following menu in the Infotainment system.
Press the
›
panel , tap the functional surface on the Infotainment screen.
Or:
Tap the functional surface on the In-
›
fotainment screen.
button on the Climatronic control
Troubleshooting
The indicator light in the button or below the button flashes
The heating does not work as the battery charging
level is low.
Boot lid - with manual operation
Operation
To open
Press the handle and
›
lift the lid.
Closing
Grasp the fixture
›
and pull the lid down.
CAUTION
Danger of opening the lid while driving!
Ensure that the lock is properly engaged after clos-
▶
ing the lid.
A
Set a delayed lid lock
If the lid is unlocked with the button on the key,
the lid is automatically locked again after closing.
The period after which the lid is locked automatically
can be extended by a specialist garage.
Boot lid - with electrical control
Operation
CAUTION
Risk of injury!
Only operate the tailgate when nobody is within
▶
swivel range.
CAUTION
Danger of opening the lid while driving!
Ensure that the lock is properly engaged after clos-
▶
ing the lid.
NOTICE
Do not manually close the tailgate when moving.
▶
Before operating the tailgate, check that there are
▶
no objects in the swivel area that could damage the
tailgate. Also check that there are no objects within the immediate vicinity of the vehicle that could
damage the vehicle interior and the transported
objects.
If the tailgate hits an obstacle when closing, it
stops and an audible signal sounds.
When automatically closing the tailgate, e.g. un-
der the weight of snow, a broken beep sounds.
The option to open by pressing the handle is deactivated once a speed of 5 km/h is reached. This is activated again after the vehicle has stopped and a door
is opened.

Doors, windows and boot lid › Electrically operated contactless boot lid
29
Handle in the tailgate
Press the handle to
›
open, close or stop the
movement of the tailgate.
The option to open by
pressing the handle is
deactivated once a
speed of 5 km/h is
reached. This is activated
again after the vehicle
is opened.
Button in the tailgate
Button in the door
release the button.
Button on the key
gate.
The tailgate can also be closed by pulling it briefly
downwards.
has stopped and a door
Press the button to
›
open, close or stop the
movement of the tailgate.
To open the tailgate,
›
pull and hold the button until the tailgate
starts to open.
To close the tailgate,
›
pull and hold the button until the tailgate is
fully closed.
To stop the movement
›
of the tailgate, pull or
Press the button to
›
open, close or stop the
movement of the tailgate.
The option to lock exists
only on vehicles with a
keyless unlocking system. The key must not
be in the vehicle and
must be at a distance of
max. 2 m from the tail-
Settings
Set the uppermost position of the tailgate and
store it
It makes sense to set the top position of the tailgate,
e.g. setting for the opening of the tailgate in a limited
space due to the garage height.
Stop the lid in the desired position.
›
Press the button and hold down on the lower
›
edge of the tailgate until an audible signal sounds.
Re-adjusting the top starting position of the lid
Carefully raise the flap manually to the limit.
›
Press the
›
edge of the tailgate until an audible signal sounds.
button and hold down on the lower
Troubleshooting
The tailgate does not react to the opening signal
There is a possible obstacle, e.g. snow; remove it.
›
Or:
Press the handle in the tailgate and lift the lid.
›
Or:
Unlock the tailgate » page 30.
›
The tailgate does not react to the closing signal
Close the tailgate manually.
›
NOTICE
Close the tailgate slowly, push down the tailgate
▶
and push in the lock on the centre of the rear edge
of the tailgate.
Electrically operated contactless boot lid
Operating conditions
✓ Ignition o.
✓ You have the vehicle key with you.
✓ No trailer or other accessory is connected to the
trailer socket.

30
Doors, windows and boot lid › Unlocking the boot lid
Operation
Opening/closing the lid
Quickly swing a foot under the rear bumper in the
›
sensor area.
If the lid doesn’t move, wait a few seconds and repeat the swing motion.
Closing display
When you close the lid, audible signals are sounded.
Stopping/ restoring lid movement
The lid movement can be stopped by a rapid swinging motion with your foot. Lid movement is restored
by a subsequent swinging motion with your foot.
Restriction
The system function may be restricted in the following cases.
Downpour.
▶
Dirty rear bumper.
▶
Unlocking the boot lid
Unlocking
Insert a screwdriver in-
›
to the opening in the
panel.
Release the flap by
›
moving it in the direction of the arrow.
Settings
Activating and deactivating
The function is activated and deactivated in the following menu in the Infotainment.
Or:
We recommend that the function is deactivated in
the following cases:
Installation of a roof rack.
▶
Coupling a trailer or another accessory to the hitch.
▶
Car wash.
▶
Maintenance and repair work in the back of the ve-
▶
hicle.

Seats, steering wheel and mirror › Front seat - with manual operation
31
Seats, steering wheel and mirror
Front seat - with manual operation
Controls on the seat
Adjusting the seat in the longitudinal direction -
A
after releasing the operating lever, the lock must
audibly click into place
Adjusting the height
B
Adjusting the angle of the backrest - do not lean
C
against the backrest during adjustment
Adjusting the extent of the curvature of the lum-
D
bar support
After a certain time, play can develop within the adjustment mechanism of the backrest angle.
Folding passenger seat backrest
Folding down
Pull on the operating
›
lever.
Fold the backrest for-
›
wards until it clicks into place.
Front seat - with electrical operation
Controls on the seat
Adjusting the seat
Adjust in a longitudi-
A
nal direction
Adjust the inclination
B
Adjusting the height
C
Adjusting the seat back
Adjust the inclination
A
Adjusting the lumbar support
Set the position of
A
the curvature
Set the extent of the
B
curvature
Folding back up
Pull on the operating lever.
›
Press the backrest backwards until it audibly clicks
›
into place.
Memory function of the seat
Functionality
Valid for vehicles with electrically adjustable driver's
seat.
Each of the memory buttons on the driver's seat can
be used to store and recall the set driver's seat and
exterior mirror position.
Operation
Retrieve stored position
With the ignition o and the driver’s door open,
›
press the desired memory button.
In other instances, hold the key for example with
›
the ignition switched on or the driver's door closed.

32
Seats, steering wheel and mirror › Rear seats
Stop position change
With the ignition o and the driver's door open,
›
press any button on the seat to be adjusted.
Or:
Press the button on the key.
›
In other cases, release the held memory button.
›
Settings
Storing driver's seat and exterior mirror position
for driving forwards
Turn on the ignition.
›
Adjust the seat and the
›
exterior mirrors.
Press the button
›
and within 10 seconds
one of the memory
buttons B .
Storing is confirmed by
an acoustic signal.
The seat position can be stored if the angle of inclination of the seat back relative to the seat surface
is less than approximately 110° and the seat is not in
any of the end positions.
Storing front passenger´s exterior mirror position
for reversing
Turn on the ignition.
›
Activate the folding function of the mirror in the
›
Infotainment in the following menu.
Or:
Turn the exterior mirror knob to the position .
›
Engage reverse gear.
›
Adjust the mirror to the desired position.
›
Disengage reverse gear.
›
The set mirror position is saved.
When changing the stored seat and exterior mirror position for forward driving, the passenger exterior mirror position for reverse driving must be restored.
A
Rear seats
Fold the seat backs forwards
Before folding down
Insert the rear headrests as far as they will go or
›
remove them.
Adjust the position of the front seats in such a way
›
that they are not damaged by the folded-down
seat backrests.
Pull the outer seat belt to the side trim.
›
Folding forwards from the passenger compartment
Press the release han-
›
dle and fold the seat
forwards.
Folding forwards from the luggage compartment
Pull on the lever.
›
The seat back is unlocked and partly folded forwards.
Folding back up
Pull the outer seat belt
›
to the side trim.
Fold the seat backrest
›
back up.
The release handle must
audibly click into place.
Check that the seat
›
backrest has locked in
place. The pin
not be visible.
A must
VarioFlex rear seats
What you should be mindful of
Plugs and sockets under the seats
Depending on the equipment, plugs may be located
on the underside of the seats and sockets with
hinged protective plates may be located under the
seats.

Seats, steering wheel and mirror › VarioFlex rear seats
33
NOTICE
Risk of damage or restriction to functionality of the
plugs and sockets!
Check the plugs or sockets for dirt before instal-
▶
ling the seats. Remove dirt using a vacuum cleaner;
clean the plugs and contacts with a cloth moistened in alcohol.
If the seats are folded up or removed, carefully
▶
stack the items in the luggage compartment and
do not load the sockets point by point.
Folding up the seat with the seat heating switched
on
If the outer seat is folded up when the seat heating is
switched on, the heater is interrupted. The heating
can be switched on again after switching the ignition
on and o.
Adjusting the seats
Move seats in a longitudinal direction
Pull on the lever A and
›
move the seat.
The seat must audibly
click into place.
Adjusting the inclination of the seat backrests
Pull on the loop A and
›
adjust the inclination of
the seat backrests.
The rest must click into place.
Folding the backrests forwards and folding up
the seats
Before folding the backrests forwards
Insert the belt buckle
›
of the seat belt into
the opening in the side
panel.
Move the seats back-
›
wards as far as they
will go.
Insert the headrests as
›
far as they will go.
Fold the backrests forwards
Pull on the loop
›
hold.
Fold the backrest for-
›
wards until it clicks into place.
Let go o the loop.
›
The middle seat back, which is folded forwards,
can be used as an armrest.
Before folding up the outer seat
Move the seat back as far as it will go and fold the
›
seat back.
Switch o the seat heating.
›
Fold up the outer seat
Pull the lever and care-
›
fully fold up the seat.
A and
Before folding up the middle seat
Removing the headrest.
›

34
Seats, steering wheel and mirror › VarioFlex rear seats
Pull on the loop A and press the seat back into the
›
position shown in green, about 4 cm deep into the
seat.
Let go o the loop.
›
NOTICE
Risk of damage to centre console components!
If the seat touches the centre console when folded
up, the seat back is in the yellow or red position.
Fold the seat back and push the seat back again in-
▶
to the position shown in green.
Folding up the middle seat
Pull the lever and care-
›
fully fold up the seat.
Close the cover cap for
›
the socket in the floor.
Lock the seats with the fastening strap on the loop
›
at the rear of the front seat backrest.
WARNING
If one of the rear seats is folded up, passengers cannot be carried in the remaining rear seats.
NOTICE
Risk of damage to the front seat backrests!
Only keep the seats folded for as long as necessa-
▶
ry.
Folding back seats
Before folding back the middle seat, open the cov-
›
er cap for the socket outlet in the floor.
Carefully fold the raised seat into the horizontal
›
position until it clicks into place.
Pull on the loop.
›
Press the backrest
›
backwards until it audibly clicks into place.
Fold up the upholstered seats
Lock the seats to the front headrest guide bar with
›
the fastening strap.
Removing and inserting seats
Before removal
Move the outer seat backwards as far as it will go
›
and fold up.
On the centre seat, remove the headrest and fold
›
up the seat.
Unlock and remove
Unlock the seat by
›
pressing on the seat
locks.
Remove the seat from
›
the carrying handle.

Seats, steering wheel and mirror › Headrests
35
After removing the
›
middle seat, close the
cover cap for the socket outlet in the floor.
Before inserting
The outer seats are not mutually interchangeable.
Insert the seat marked with the letter L in the rear
›
on the left and the seat marked with the letter R in
the rear on the right.
Before inserting the middle seat, open the cover
›
cap for the socket outlet in the floor.
Insert and lock
Place the seat on the
›
guide rods and lock in
place using the seat
locks.
Make sure that the
›
seat cannot be removed.
Folding back seats
Carefully fold the raised seat into the horizontal
›
position until it clicks into place.
Pull on the loop.
›
Press the backrest
›
backwards until it audibly clicks into place.
Moving
Fold up the outer seat
›
and release it by pressing the seat locks.
Move seat on the guide
›
rods towards the middle of the vehicle up to
the stop.
Lock the seat at the
›
end of the guide rods
by pressing the seat
locks.
Make sure that the
›
seat cannot be removed.
Carefully fold the
›
raised seat into the
horizontal position until
it clicks into place.
Folding back into the starting position is accomplished in the reverse order.
Headrests
Adjusting the height of the headrests
Front headrests
Hold the safety button
›
and move the headrest
in the desired direction.
Move outer seats in the transverse direction
Before moving
Take out the middle seat.
›
Close the cover cap for the socket in the floor.
›
Rear headrests
Move the headrest in
›
the desired direction.
When pushing down,
press and hold the
safety button.

36
Seats, steering wheel and mirror › Front armrest
Removing and inserting the rear headrests
Removing
Move the headrest up
›
to the stop.
Hold safety button
›
and, at the same time,
push safety button B
into the opening with a
flat-head screwdriver
and remove the headrest.
To remove the support
for the middle VarioFlex seat, press the fuse button
A and remove the support.
Inserting
Insert the headrest into the seat backrest.
›
The safety button must click into place.
›
Front armrest
Settings
Adjusting the height
Raise the backrest to
›
one of the locked positions.
Folding down
Raise the backrest be-
›
yond the highest
locked position and
fold it down again.
direction
Move the backrest to the desired position.
›
Adjust in a longitudinal
Rear armrest
Settings
Fold down the armrest.
›
The folded-down armrest can be used as a
storage table.
Load-through device
Open and close
Open from the passenger compartment
Fold down the armrest.
A
Open from the luggage compartment
Closing
Fold back the lid from the passenger compartment
›
until it clicks into place.
After closing, the red mark on the back of the cov-
er above the safety button must not be visible.
WARNING
The through-loading channel is only intended for
transporting skis in a secured through-loading bag.
›
Press the lid in the up-
›
per area and pull on the
handle.
Open the lid.
›
Press the store button.
›
Open the lid.
›
Seat heating
What you should be mindful of
WARNING
Risk of burns!
Do not switch on the seat heater for persons with
▶
limited perception of pain or temperature.
NOTICE
Risk of seat damage!
Do not kneel on the seats or otherwise puncture
▶
them.
Do not turn on the heater in the following situa-
▶
tions.
▶
The seat is not occupied.
▶
There are objects on the seat, such as a child
seat.
▶
There are additional seat covers or protective
covers on the seat.

Seats, steering wheel and mirror › Steering wheel
37
Conditions
✓ The engine is running.
Operation
Press the or key to switch on the seat heating.
›
The seat heating is switched on with maximum heating output. By repeatedly pressing the button, the
heating output is reduced until it is switched o.
The heat output is determined by the number of illuminated indicator lights that are shown in the key or
in the Climatronic display.
Steering wheel
Adjust the steering wheel
WARNING
Risk of an accident!
Do not adjust the steering wheel while driving.
▶
Swing the safety lever
›
downwards.
Adjust the steering
›
wheel to the desired
position.
illuminates - partial failure of the power assisted steering, possible reduction in power
steering
Turn o the ignition, start the engine and drive a
›
few meters.
If the
›
Steering column lock faulty
umn lock
›
›
After switching o the ignition, it is then no longer
possible to switch on the ignition, to lock the steering and to switch on the electrical consumers.
›
Steering column lock not unlocked
wheel movement
›
›
indicator light does not go out, continue
driving, exercising appropriate caution. Seek the
help of a specialist garage.
flashing
Message regarding a fault in the steering col-
Stop the vehicle.
Seek the help of a specialist garage.
flashing
Message regarding a fault in the steering lock
You may continue driving, exercising appropriate
caution. Seek the help of a specialist garage.
flashing
Message concerning the required steering
Move the steering wheel slightly back and forth.
If the steering does not unlocked, stop the vehicle
and seek the help of a specialist garage.
Press the safety lever
›
as far as it will go.
Troubleshooting
Power assisted steering faulty
illuminates - total failure of the power assisted
steering, failure of steering assistance
Turn o the ignition, start the engine and drive a
›
few meters.
indicator light does not go out, stop driv-
If the
›
ing. Seek the help of a specialist garage.
Heated steering wheel
Conditions
✓ The engine is running.
Operation
Turn steering wheel heating on/o
Applies to Climatronic.
Press the key on the Climatronic, tap the /
›
on the Infotainment screen to turn on steering
wheel heating.
Or:
tap / in the Infotainment screen, to
›
turn on steering wheel heating.
Adjust the heating output of the heated steering
wheel
Heated steering wheel
Tap
›
to adjust the heating level.
on the Infotainment screen

38
Seats, steering wheel and mirror › Interior rear-view mirror
The output level of the heating is indicated by the
number of illuminated warning lights in the
switch.
Settings
Steering wheel heating together with driver's seat
heating
Applies to Climatronic.
When the function is switched on, pressing the button for the driver's seat heating also turns steering
wheel heating on or o.
Press the
›
Infotainment screen and select the menu item for
coupling the seat and steering wheel heating.
Or:
Tap on in the Infotainment screen and
›
select the menu item for the coupling of the seat
and steering wheel heating.
When the function is switched on, the function sur-
is displayed in the Infotainment screen. This
face
can be used to switch steering wheel heating on or
o.
button on the Climatronic in the
Interior rear-view mirror
Operation
Interior mirror with manual darkening
Mirror is not dark-
A
ened
Mirror darkens
B
Interior mirror with automatic darkening
Darkening of the mirror is automatically controlled
through the sensors in the mirror once the engine is
started.
CAUTION
Risk of an accident!
A glowing display e.g. a mobile phone or navigation
device may aect the function of the automatic mirror darkening.
Do not attach these devices close to the mirror.
▶
Exterior mirror
Operation
Positions of the rotary knob and adjustment of the
mirror surface
The mirrors can be folded manually or electrically,
depending on the equipment.
Adjust the left mirror
Switch o operation
Adjust the right mir-
ror
Fold mirror in elec-
trically (to fold back
out, select a dier-
ent position)
when the engine is running
Adjusting the mirror surface
Select position or .
›
Turn the rotary knob in the direction of the arrows.
›
Folding electrically folding mirrors automatically
The mirrors fold in when the vehicle is locked and
fold back out when the vehicle is unlocked, if this
feature is activated.
Locking of the vehicle is not indicated by the fact
that the mirrors fold in. Locking of the vehicle is indicated by the turn signal lights flashing.
Manually foldable mirrors
Fold the mirror towards the side window by apply-
›
ing pressure with your hand.
Setting the mirror surfaces synchronously
When adjusting the mirror surface of the driver's
mirror, the mirror surface of the front passenger's
mirror is adjusted at the same time if this function is
activated.
Mirror with memory function
Valid for vehicles with electrically adjustable driver's
seat.
The current setting for the exterior mirror surfaces
can be stored in the memory of the driver's
seat » page 32 or the remote key » page 20.
Lower the passenger mirror surface when reversing
Valid for vehicles with electrically adjustable driver's
seat.
The mirror surface of the passenger mirror takes in
the memory of the driver's seat » page 32 or the remote key » page 20 stored position to improve visibility when reversing.
Conditions
✓ The function can be activated in Infotainment.
Heat the mirror

Restraint systems and airbags › Seat belts
39
✓ The mirror position is saved.
✓ The reverse gear is engaged.
✓
The adjustment knob is in the position.
The mirror automatically resumes the home position
when driving forward at speeds above 15 km/h or after the ignition is switched o.
WARNING
Risk of an accident!
The exterior mirrors make objects appear farther
away. Use the rear-view mirror to determine the distance from vehicles behind.
NOTICE
Danger of mirror damage!
If the electrically foldable mirror is swung out by external influences (e.g. due to an impact during manoeuvring), fold the mirror in using the rotary knob
and wait for an audible folding sound.
Settings
Activation or deactivation of the automatic folding
of the exterior mirrors, the synchronous adjustment
of the mirror surfaces as well as the lowering of the
passenger-side mirror surface when reversing are
carried out in the Infotainment in the following
menu.
Or:
Troubleshooting
Electric mirror operation impaired
Adjust the mirror surface by pressing it lightly with
›
your finger.
CAUTION
Risk of burns!
Do not touch heated exterior mirror surfaces.
Restraint systems and airbags
Seat belts
Functionality
Seat belts that are fastened correctly oer very
good protection in the event of an accident. They reduce the risk of an injury and increase the chance of
survival in the event of a major accident.
WARNING
The seat belts must not be removed or altered in
▶
any other way.
Do not attempt to repair the seat belts yourself.
▶
Have a damaged seat belt replaced immediately by
a specialist garage.
Automatic belt retractor
The automatic belt retractor locks the belt when the
belt is pulled jerkily or when the belt is being rolled
up violently.
WARNING
If the seat belt does not lock when pulled jerkily,
have the retractor checked by a specialist garage.
Belt tensioners
The safety of the driver, front passenger and passengers on the outer rear seats who are wearing their
seat belts is enhanced by the belt tensioners fitted
to the inertia reels on the front and rear external seat
belts.
If there is a collision with a certain severity, the seat
belt is tightened by the belt tensioner so that unwanted body movement is prevented.
The belt tensioner can also be deployed when the
seat belt is not fastened.
Belt tensioners are not activated in the event of a
roll-over, minor collisions or in accidents in which no
major forces are produced.
Smoke is released when the belt tensioner is de-
ployed. This does not indicate a vehicle.
Reversible belt tensioner
Vehicles with a proactive occupant protection system include reversible belt tensioners » page 179.
The reversible belt pretensioners increase safety for
the belted driver and front passenger by automatically tightening the seat belt tightly over the body in
critical driving situations and then releasing it again.
Status display in the instrument cluster display
- front seat belt not fastened
- a rear seat belt is not fastened
- a rear seat belt is fastened

40
Restraint systems and airbags › Child seat
Operation
Fastening the seat belt
Grasp the buckle latch
›
and slowly pull the belt
over the chest and pelvis towards the buckle.
Insert the buckle latch
›
into the buckle until
there is an audible
click.
Pull on the belt to en-
›
sure that the buckle is
securely fastened.
Unfastening the seat belt
Grasp the buckle latch
›
and release it by pressing the red button.
Hold the belt so it does
›
not twist when rolling
up.
Put on belt with two buckle latches and put down
Pull the belt slowly by the buckle latch A to put it
›
on.
Insert the buckle latch A
›
there is an audible click.
Use the buckle latch B to slowly pull the belt over
›
your chest and pelvis.
Insert the buckle latch B
›
until there is an audible click.
Pull on the belt to ensure that the buckle latch is
›
securely fastened.
To take it o take the buckle latch A
›
by pressing the red button.
Grasp the buckle latch B and release it by pressing
›
the red button.
Hold the belt so it does not twist when rolling up.
›
into the buckle until
into the second buckle
and release
Setting
Move the seat belt
›
height adjuster upwards to increase the
height.
Press the safety button
›
and move the seat belt
height adjuster down
to reduce the height.
After adjustment, firm-
›
ly pull on the belt to
ensure that the seat
belt height adjuster has
correctly locked in
place and that the belt
is locked securely.
Troubleshooting
Blocked belt retractor
Grasp the strap in the
›
middle and pull quickly
in the direction of the
arrow.
Hold the strap and let
›
it roll up slowly.
Pull on the strap to see
›
if the retractor is
working properly.
If the strap is still
›
locking procedure once or twice.
If the strap is still blocked, seek the help of a spe-
›
cialist garage.
blocked, repeat the un-
Child seat
What you should be mindful of
For how to install and use the child seat, please note
the instructions in this Owner's Manual as well as the
instructions of the child seat manufacturer.
For safety reasons, we always recommend that children are transported on the back seats. Carry children on the front passenger seat only in exceptional
cases.
Child seats according to standard ECE-R 44 the European Economic Commission.

Restraint systems and airbags › Child seat
41
Child seats according to standard ECE-R 44 are
marked with the test symbol: large E in a circle, with
the test number below.
We recommend using child seats from the ŠKODA
Genuine Accessories range. These child seats have
been developed and tested for use in ŠKODA vehicles. They meet the standard ECE-R 44.
WARNING
When installing the child seat on the rear seat, ad-
▶
just the front seat so that there is no contact between the front seat and the child seat or the child
carried in the child seat.
Before installing a forward-facing child seat, adjust
▶
the headrest so that it is as low as possible.
If the headrest prevents the child seat from being
▶
fitted, adjust the headrest to the highest position.
If using a separate child seat cushion, adjust the
▶
headrest so that the child's head is flush with, but
not protruding above the height of the top edge of
the headrest.
Using a child seat on the front passenger seat
Never use a child seat in which the child is carried
with his or her back to the direction of travel on a
seat protected by an active airbag placed in front of
the seat. This could cause serious injury to the child,
even death.
This is also indicated by the following stickers.
Sticker on the passenger
sun visor.
The following instructions must be followed when
using a child seat on the front passenger seat.
When using a rear-facing child seat, the front pas-
▶
senger airbag must be deactivated.
If possible, adjust the front passenger seat back-
▶
rest so that it is vertical, to ensure that there is secure contact between the backrest and the child
seat.
If possible, move the front passenger seat back-
▶
wards so that there is no contact between the
front passenger seat and the child seat behind it.
Adjust the height-adjustable front passenger seat
▶
as much as possible.
Adjust the front passenger seat belt as high up as
▶
possible.
WARNING
Risk of the seat belt causing a neck injury to the
transported child!
For child seats in groups 2 and 3, ensure that the
▶
guide fitting attached to the child seat headrest is
positioned in front of or at the same height as the
seat belt height adjuster on the central body pillar.
Adjust the height of the front passenger seat belt
▶
so that the belt passes through the guide fitting
without kinking and is not bent over the edge of
the guide fitting.
WARNING
As soon as the rear-facing child seat is no longer being used on the front passenger seat, activate the
front passenger airbag again.
Sticker on the central
body pillar on the passenger side.
Recommended child seats
Grouping of child seats according to standard ECE-R 44.

42
Restraint systems and airbags › Fasteners for child seats
Group Weight of the child
0 up to 10 kg
0+ up to 13 kg
1 9-18 kg
2 15-25 kg
3 22-36 kg
Recommended child seats
Group Manufacturer Type Attachment Order number
0+
up to 13 kg
1
9-18 kg
2-3
15-36 kg
a)
For optimum protection, especially in the event of a side impact, it is recommended that you use this child
Britax Römer Baby Safe Plus Isofix base frame 1ST019907 04 301146
Britax Römer Duo Plus TT
Britax Römer
Kidfix XP
ISOFIX and TOP
a)
TETHER
DDA000006 04 301133
ISOFIX 000019906K 04 301198
Britax Römer Kidfix II XP ISOFIX 000019906L 04 301323
Approval number
(E1 ...)
seat complete with the backrest.
Fasteners for child seats
Use of child seats
Overview of usability of child seats according to standard ECE-R 16.
Child seats that use the ISOFIX System
Passenger seat
with deactiva-
ted front airbag
b)
Outer rear seats
-
b)
c)
Middle rear seat
Group
0
up to 10 kg
0+
up to 13 kg
Size category of
child seat
E X X IL X
E
C
a)
Passenger seat
with activated
front airbag
X X IL XD
D
B1
C
B
X X IL X
1
9-18 kg
A
2
15-25 kg
3
22-36 kg
a)
The size category of the child seat is indicated on the child seat plate.
b)
If the passenger seat is equipped with ISOFIX system retaining eyes, it is suitable for the installation of an
- X X IL X
- X X IL X
ISOFIX child seat with “Semi-Universal" approval.
c)
The seat is suitable for an ISO / R3 fixing.
IL The seat is suitable for the ISOFIX child seats with "Semi-Universal" approval.
X The seat is not equipped with eyelets for the ISOFIX System.

Restraint systems and airbags › Fasteners for child seats
i-Size
Passenger seat with acti-
vated front airbag
Passenger seat with deac-
tivated front airbag
Outer rear seats Middle rear seat
X X i-U X
i-UF The seat is suitable for forward- and backward-facing i-Size child seats of the "Universal” category.
X The seat is not suitable for i-Sizechild seats of the "Universal" category.
Child seat fastened with a safety belt
Group
0
up to 10 kg
0+
up to 13 kg
1
9-18 kg
2
15-25 kg
3
22-36 kg
Passenger seat with
activated front air-
bag
X U U U
X U U U
UF U U U
UF U U U
UF U U U
Passenger seat with
deactivated front air-
bag
Outer rear seats Middle rear seat
U The seat is suitable for the child seat category "Universal” and is permitted for use in this weight group.
UF The seat is suitable for forward-facing child seats in the "Universal” category and is permitted for use in
this weight group.
X The seat is not suitable for children in this weight group.
43
Overview
ISOFIX
WARNING
Do not attach any other child seats, straps or ob-
▶
jects to the holding eyelets provided for the installation of a child seat using the ISOFIX system.
The ISOFIX system allows for the fast and secure installation of the child seat. The eyelets for installing
the child seat using the ISOFIX system are located
on the outer rear seats and possibly on the front passenger seat.
A child seat that uses the ISOFIX system can only be
installed in the vehicle if it is approved for this vehicle type. Further information can be obtained from a
ŠKODA partner or from a list of vehicles enclosed
with the child seat.
Holding eyes for installing the child seat using
the ISOFIX system.
TOP TETHER
WARNING
Child seats that use the TOP TETHER system
▶
should only be used on those seats that are fitted
with holding eyes bearing the TOP TETHER symbol.
Only attach one fastening strap on the child seat to
▶
the holding eyelet in the TOP TETHER system.
When attaching the child seat with the TOP TETH-
▶
ER system, no other object must be attached to
the TOP TETHER system holding eyelet.

44
Restraint systems and airbags › Airbags
Holding eyelets on the rear seats
Holding eyelets on the VarioFlex rear seats
The belt fastened into the TOP TETHER system restricts the movement of the upper part of the child
seat.
The holding eyelets for attaching the belt are located
on the outer rear seats A
, as well as on the middle
rear seat B when necessary.
Airbags
Usage
The airbag system oers additional occupant protection in the event of severe frontal and side collisions,
as a supplement to the seat belts.
The best possible protective eect of the airbag is
achieved only when the seat belt is also worn. The
airbag system is no substitute for the seat belts.
Functionality
When sinking into the inflated airbag, the forward
movement of the body is damped and the risk of injury is reduced.
As the airbags inflate, smoke is released. This
does not indicate a vehicle.
Function condition
✓ Ignition switched on.
Airbag deployment in the event of an accident
Airbag deployment is influenced by many factors.
The deceleration rate at the time of impact is crucial.
WARNING
Danger of serious or fatal injuries!
Maintain the correct seating position.
▶
Do not keep your limbs in the deployment area of
▶
the airbags.
In the following situations, no airbags are deployed.
Minor frontal and side collisions.
▶
Rear-end collision.
▶
Vehicle rollover.
▶
If the measured deceleration rate is below the reference values programmed into the control unit, the
airbags will not be deployed despite possible serious
vehicle damage.
Airbag overview
Front airbags
A
Side airbags - front
B
Head airbags
C
Side airbags - rear
D
Driver's knee airbag
E
The installation location of the airbags is marked
with the lettering .
WARNING
Danger of a functional restriction of the side airbags!
Do not exert excessive forces, e.g. impacts, on the
▶
seat backs.
Have damaged seat covers at the installation loca-
▶
tion of the side airbags repaired by a specialist garage.
Deactivating the airbags
We recommend having airbags other than the front
passenger airbag deactivated » page 45, Opera-
tionby a ŠKODA service partner.
Deactivation of the airbags is provided for the following cases, for example.
If the driver's seat adjustment is correct, the dis-
▶
tance of at least 25 cm between the centre of the
steering wheel and the sternum can not be maintained.

Restraint systems and airbags › Key switch for the front passenger airbag
45
Additional operating controls for a physically disad-
▶
vantaged driver are installed in the vehicle.
The vehicle has special seats, e.g. orthopaedic
▶
seats without side airbags.
illuminates for 4 seconds after the ignition is
switched on and then flashes for 12 seconds Airbag or belt tensioner deactivated with the diagnostic device
Message regarding the deactivated airbag or belt
tensioner
WARNING
If an airbag is deactivated during the sale of the vehicle, inform the buyer!
Troubleshooting
Airbag system faulty
illuminates
Message regarding an airbag fault
Seek the help of a specialist garage.
›
Key switch for the front passenger airbag
Usage
Deactivation of the front passenger airbag is provided for the following cases, for example.
A rear-facing child seat is mounted on the front
▶
passenger seat.
The vehicle has special seats, e.g. orthopaedic
▶
seats without side airbags.
What you should be mindful of
WARNING
Danger of fault in the passenger airbag deactivation
system!
Only deactivate the airbag when the ignition is
▶
switched o!
WARNING
Danger of unexpected deployment of the passenger
airbags in an accident!
If the front passenger airbag has been deactivated
▶
with the key, do not leave the key in the key switch
while driving. Vibrations can cause the key to turn
in the slot and activate the airbag!
Switch front passenger front airbag
›
›
›
›
To Switch on, carefully rotate the key switch into
›
the position .
Remove the key bit from the slot.
›
Close the passenger door.
›
Turn on the ignition and check that the front pas-
›
senger airbag warning lights are lit up.
Status display in the instrument cluster display
lights up 4 secs after the ignition is switched
on – passenger front airbag switched o
Indicator lights
After switching on the igni-
▶
tion, the two indicator lights
light up briefly.
If the system is OK, both of
▶
the indicator lights go out.
One of the indicator lights then lights up again de-
▶
pending on the position of the key switch.
Lights up - front passenger airbag switched o
Lights up 65 secs after the ignition is
switched on
switched on – passenger front airbag
on/o
Switch o the ignition.
Open the passenger
door.
Insert the key bit into
the slot in the key
switch as far as it will
go.
To Switch o, carefully
rotate the key switch
into the position .
Troubleshooting
Key switch for airbag deactivation is faulty
ployed in the event of an accident!
›
and flash together
The front passenger airbag will not be de-
Have the airbag system checked by a specialist garage immediately.
Operation
Before switching on/o the front passenger airbag
Completely fold out the key bit.
›

46
Lighting, windscreen wipers and washers › Exterior lighting
Lighting, windscreen wipers and washers
Exterior lighting
Functionality
Unless otherwise stated, the light works when the
ignition is switched on.
Daytime running lights
The daytime running lights illuminate the area in
front of the vehicle.
For vehicles for certain markets, they also illuminate
the rear vehicle area.
Operating conditions
✓
The lights switch is in position , or .
Switching the low beam on/o automatically
The low beam is automatically switched on or o depending on the lighting conditions.
Operating conditions
✓
The light switch is in the
The automatic headlight circuit is indicated by the illumination of the symbol in the light switch.
Switching low beam on/o automatically in rain
Operating conditions
✓
The light switch is in the position.
✓ The function is activated.
✓ The windscreen wipers are switched on for lon-
ger than 30 seconds.
The automatic headlight circuit is indicated by the illumination of the
Full LED headlights
When the light switch is in position , the headlights provide the best possible beam of light in front
of the vehicle.
CORNER function
The CORNER function ensures the illumination of
the area near the vehicle in the turning direction.
Operating conditions
✓ The turn signal is switched on or the front wheels
are steered sharply.
✓ The low beam is switched on.
✓ The fog lights are not switched on.
✓ The driving speed is lower than 40 km/h.
When no light is switched on
The symbol
the instrument cluster, indicating that it is necessary
to switch on the light.
illuminates
Switch on the light.
›
symbol in the light switch.
in the light switch may also light up in
position.
Operation
Switching o the
lights except the
daytime running
lights
Switching the low
beam on/o automatically
Switching on the
parking lights
Switching on the low
beam
Main beam
The high beam works when the low beam is on.
Switch on main
A
beam - lights up
Switch o high
B
beam - goes out /
Switch on flasher - illuminates
CAUTION
Risk of an accident!
Do not dazzle other road users with the high beam.
▶
Turn signal
Switch on right turn
A
signal - flashing
Switch on left turn
B
signal - flashing
Turn signal - convenience signalling
Convenience signalling enables three flashes of the
turn signal lights without having to move the lever
up or down.
Tap the control lever up or down.
›
The corresponding turn signal lights flash three
times.
Tap the lever in the opposite direction ahead of
time to stop signalling.

Lighting, windscreen wipers and washers › Exterior lighting
47
Fog light
Fog light - lights up
1
Rear fog light - lights
2
up
Turn the light switch to
›
position . or .
Pull the light switch to
›
the appropriate position.
The rear fog light does not illuminate when an ac-
cessory is connected to the trailer socket.
Hazard warning light system
To switch on or o, press the button in the cen-
›
tral part of the dash panel.
When the hazard warning system is on and the turn
signal is switched on, the hazard warning lights will
be switched o temporarily and only the turn signal
will flash on the relevant side of the vehicle.
The hazard warning lights can be switched on automatically during hard braking. The hazard warning
lights are then switched o again automatically
when starting o or accelerating.
One-sided parking light
The one-sided parking light allows one side of the
parked vehicle to be illuminated through activation
of the corresponding sidelights.
Switch on the side-
A
lights on the right
Switch on the side-
B
lights on the left
Switch o the ignition.
›
Move the lever to the
›
appropriate position.
Lock the vehicle.
›
When the parking light is
warning signal sounds and the driver's door is
opened. After a few seconds or after the driver's
door is closed, the warning signal will stop.
Double-sided parking light
The two-sided parking light allows the parked vehicle to be illuminated through activation of the sidelights.
Turn on the ignition.
›
Turn the light switch to position
›
Switch o the ignition.
›
Lock the vehicle.
›
The light may switch o automatically if the battery
is low. If the two-sided parking light is switched on
switched on, an acoustic
.
when the ignition is switched
switch o automatically.
When the parking light is switched on, an acoustic
warning signal sounds after the ignition is switched
o and the driver's door is opened. After a few seconds or after the driver's door is closed, the warning
signal will stop.
o, the light will not
Settings
Activating/deactivating the automatic headlights
system in rain
The function is activated or deactivated in the following menu in the Infotainment system.
Or:
Activating/deactivating convenience signalling
The function is activated or deactivated in the following menu in the Infotainment system.
Or:
Headlight range control of the Halogen headlights
The headlight range control is carried out in the Infotainment system in the following menu.
Or:
Select the position of the control according to the
›
vehicle's current load status.
Front seats occupied, luggage compartment
empty
All seats occupied, luggage compartment empty
All seats occupied, luggage compartment loaded
Driver's seat occupied, luggage compartment
loaded
In the event of another vehicle loading condition, the
positions
control is adjusted automatically.
Risk of an accident!
An incorrectly adjusted headlight range can cause insucient vehicle lighting or can dazzle other road
users.
▶
Converting the Full LED headlights for the opposite direction of trac
›
. . can be used.
For the Full LED headlights, the headlight range
WARNING
Adjust the headlight range correctly.
Switch on travel mode in the Infotainment in the
following menu.

48
Lighting, windscreen wipers and washers › COMING HOME, LEAVING HOME exterior lighting
Or:
Troubleshooting
Turn signal light defective
flashes faster - turn signal light on the right defective
Check the turn signal light on the right.
›
flashes faster - turn signal light on the left defective
Check the turn signal light on the left.
›
does not flash when the trailer is hitched trailer turn signal light defective
Check the trailer lighting.
›
Light bulb or LED bulb is defective
the aected lights.
Replace the defective bulb.
›
In case of a defective LED lights, contact a special-
›
ist garage for help.
The headlights are misted up on the inside
Inside the headlights, moisture may occur. This is not
a defect.
Malfunction of the automatic headlight circuit
Clean the windscreen in the area of the rain/light
›
sensor.
Beam of light in front of the vehicle has shortened
Headlight defective.
Seek the help of a specialist garage.
›
Driving lights defective
If a message regarding the failed driving lights is displayed, the light will work in emergency mode.
Drive on, exercising appropriate caution.
›
Seek the help of a specialist garage.
›
illuminates
or
Information appears in the display regarding
Operating conditions
✓ Visibility has worsened.
✓
The light switch is in the position.
Settings
This function is set in the following menu in the Infotainment system.
Or:
Light Assist high-beam assist system
Functionality
The high beam assist system automatically switches
the high beam on and o.
WARNING
Risk of an accident!
If necessary, manually switch the high beam on or
▶
o.
Operating conditions
✓ The system is activated.
✓
The light switch is in the
✓ The driving speed is higher than 30 km/h (for
some countries, higher than 60 km/h).
✓ The low beam is switched on.
Operation
Switching on
position.
Push the lever in the
›
direction of the arrow.
in the instrument
cluster lights up.
COMING HOME, LEAVING HOME exterior lighting
Functionality
The COMING HOME function turns on the light after
turning o the ignition and opening the driver's door.
The LEAVING HOME function switches on the light
when unlocking the vehicle with the wireless remote
control.
Switching o
Manually switch the high beam on or o.
›
Settings
Activation/deactivation
The function is activated or deactivated in the following menu in the Infotainment system.
Or:

Lighting, windscreen wipers and washers › Replace light bulbs
49
Replace light bulbs
What you should be mindful of
DIY replacement of the following bulbs is possible.
Have the remaining light sources replaced by a specialist garage.
The new bulb must conform to the specification of
the original light bulb. The name of the bulb is
marked on the bulb socket.
After changing a bulb in the low beam light, the main
beam or fog light, have the headlights adjusted by a
specialist garage.
CAUTION
Halogen lamps are pressurised and can burst during
replacement!
Wear gloves and safety goggles.
▶
NOTICE
Contamination of the halogen lamp reduces the life
of the lamp!
Do not touch the glass of the light bulb with your
▶
bare fingers.
NOTICE
Danger of headlight damage due to the ingress of
water and dirt!
Always fit the protective cap on the headlight cor-
▶
rectly after changing a bulb.
Low beam and high beam
Press the locking lugs
›
and remove the base
with the bulb.
Change the bulb in the
›
socket.
Insert the socket with
›
the bulb into the headlight until the locking
lugs engage.
Fit the protective cap
›
on the headlight again.
Protective caps on the
headlight:
Low beam
A
Main beam
B
Remove the associated
›
protective cap.
Conditions for changing a bulb
✓ Ignition switched o.
✓ Light switched o.
Front parking light
Remove the protective
›
cap from the headlight.
Press the locking lug
›
and remove the base
with the bulb.
Change the bulb in the
›
socket.
Insert the socket with
›
the new light bulb into
the headlight, so that
the fixing lug
pointing up.
Insert the socket until
›
it clicks into place.
Fit the protective cap
›
on the headlight again.
A is

50
Lighting, windscreen wipers and washers › Replace light bulbs
Rear turn signal and reversing lights
Loosen and remove the light
Open the relevant cover in the luggage compart-
›
ment.
Cover on the left
Cover on the right - vehicle with standard rear
seats
Cover on the right - vehicle with VarioFlex rear
seats
Unscrew the screw.
›
Remove the light.
›
Replacing the light bulb
Unlock and remove the
›
lamp holder
Change the bulb in the
›
socket.
The base for the bulb
›
in the turn signal light
is marked with
The base for the bulb
in the reverse light is
marked with .
Check that the plug A
›
securely connected.
Insert the bulb holder into the light and snap into
›
place.
NOTICE
Risk of damage to the electrical system!
Make sure that no cables are pinched when insert-
▶
ing the holder into the light.
Insert and fix the light
Insert the connector into the light until it clicks into
›
place.
Push in the slightly pulled out locking device on the
›
plug.
A .
.
Slightly pull out the
›
lock A at the plug.
Press the safety button
›
and remove the plug.
Insert the lamp with the strips A into the grooves
›
B in the bodywork and push in carefully until it
stops.
NOTICE
Risk of damage to the electrical system due to water
ingress!
Make sure that the seal is inserted correctly when
▶
installing the light C
.

Lighting, windscreen wipers and washers › Replace light bulbs
51
NOTICE
Risk of damage to the electrical system!
Make sure that the cables between the light and
▶
the body are not pinched when the light is inserted.
Screw the light into place.
›
Close and lock the cap.
›
Fog lights
Removing the cover cap from the wheel housing
Adjust the front wheels so that the cover cap is ac-
›
cessible.
Insert the bracket from
›
the tool kit into the recess in the cover cap.
Remove the cover by
›
pulling on the bracket.
Removing the defective light bulb
Remove the rubber
›
protective cap from
the headlight.
Inserting a new bulb and cover cap in the wheel
arch
Insert the plug into the new bulb until it clicks into
›
place.
Insert the new bulb into the headlight so that the
›
guide lugs on the bulb are aligned with the corresponding openings in the headlight.
Turn the bulb clockwise to secure.
›
Replace the rubber protective cap on the headlight.
›
Insert the cover in the wheel arch and lock into
›
place.
Front turn signal
Remove the protective
›
cap from the headlight.
Remove the base with
›
the bulb.
Turn the bulb and re-
›
move it.
Release the connector
›
and remove it from the
bulb.
Change the bulb in the
›
socket.
Insert the socket with
›
the light bulb into the
light so that the fixing
fit into the re-
lugs A
cesses on the headlight.
Fit the protective cap
›
on the headlight again.

52
Lighting, windscreen wipers and washers › Interior lighting
Interior lighting
Operation
Operation of the lighting
Switching on
Rear lighting
Switching o
Reading lights
/ central position of the switch (no symbol
available)
ic switch on and switch o
Depending on the equipment, the rear light can be
switched on and o automatically together with the
front light.
When the front light is switched o, the rear light
can be switched on and o manually.
Switching on automatically
The light switches on when one of the following
events occurs.
The vehicle is unlocked.
▶
One of the doors is opened.
▶
The ignition key is removed.
▶
Automatic switch o
The light switches o when one of the following
events occurs.
The vehicle is locked.
▶
The ignition is switched on.
▶
About 30 seconds after all the doors have been
▶
closed.
Automatic switching on/o of the footwell lighting
The lighting only works when the dipped or parking
lights are on.
The lighting is also switched on automatically after
opening the door (e.g. when getting in or out).
Automat-
The lighting only works when the dipped or parking
lights are on.
The lighting is also switched on automatically after
opening the door (e.g. when getting in or out).
Settings
The ambient lighting is set in the Infotainment system, in the following menu.
Or:
Windscreen wipers and washers
Operating conditions
✓ Engine compartment flap closed.
✓ Boot door closed.
✓ Ignition is switched on.
Operation
WARNING
Risk of an accident!
At low temperatures, windscreen washer fluid can
freeze on the windscreen and restrict visibility.
Only use the windscreen washer when the wind-
▶
screen is warm.
Wipe and wash the windscreen
Settings
The footwell lighting is set in the following menu in
the Infotainment system.
Interior lighting
Or:
Interior lighting
Interior ambient light
Usage
The ambient lighting ensures that various areas of
the vehicle interior are lit.
Fast wiping
Slow wiping
Depending on the equipment:
Intermittent wiping
▶
Automatic wiping controlled by the rain sensor
▶
Switching o
Tip-wiping (spring-loaded position)
A
Setting the wiping speed for the position
Washing and wiping (spring-loaded position)

Lighting, windscreen wipers and washers › Windscreen wipers and washers
53
Depending on the vehicle equipment, the windscreen washer nozzles of the windscreen can be
heated automatically after starting the engine.
Clean headlights
When the headlights are switched on, they are
cleaned the first time and after every tenth wash of
the windscreen. The cleaning interval can be set by a
specialist company.
Wipe and wash the rear window
Washing and wiping the window (spring-loaded
position)
Washing the reversing camera (spring-loaded
position)
Wiping
Switching o
Automatic rear window wiping
When the windscreen wipers are switched on, the
rear window is automatically wiped when the reverse gear is engaged.
Settings
Activating/deactivating automatic wiping
The functions for automatic rear window wiping and
automatic wiping in the rain can be activated and deactivated in the following menu in the Infotainment
system.
Or:
Refilling windscreen washer fluid
WARNING
Risk of an accident!
Use windscreen washer fluid that is suitable for the
▶
weather conditions.
NOTICE
Risk of damage to the windscreen washer system!
When refilling the washer fluid, do not remove the
▶
strainer from the neck of the container.
NOTICE
Risk of damage to the headlights!
Only use washer fluid that does not attack polycar-
▶
bonates.
NOTICE
Risk of damage to engine compartment components!
Close the container after refilling the windscreen
▶
washer fluid.
The windscreen washer tank is located in the engine
compartment » page 10.
The container can hold a volume of 3 litres and 5 litres for vehicles with a headlight cleaning system.
Troubleshooting
Windscreen washer fluid level too low
or illuminates
Top up the windscreen washer fluid.
›
Frozen windscreen wipers
Carefully remove frozen windscreen wipers from
›
the windscreen before switching on the ignition
and free them from snow and ice.
Folding down windscreen wiper arms and
replacing windscreen wiper blades
Fold the windscreen wiper arms away from the
windscreen
NOTICE
Risk of damage to the windscreen wipers and the
engine compartment flap!
Close the engine compartment flap before the
▶
windscreen wiper arms are folded away from the
windscreen.
Do not turn on the ignition when the windscreen
▶
wiper arms are folded away.
Switch the ignition on and o again.
›
Within 10 seconds,
›
press the control lever
down and hold for
about 2 seconds.
The windscreen wiper
arms are in the folded
position.
Fold the windscreen
›
wiper arms away from
the windscreen.

54
Heating and air conditioning system › Manual air conditioning
Replace the windscreen wiper blade
CAUTION
Risk of an accident!
Change the windscreen wiper blades once or twice
▶
a year.
Fold the windscreen wiper arm away from the
›
windscreen.
Press the catch and re-
›
move the wiper blade.
Insert the new wiper
›
blade until it clicks into
place.
Fold the windscreen
›
wiper arm back onto
the windscreen.
Turn on the ignition
›
and push the control
lever down.
Heating and air conditioning system
Manual air conditioning
What you should be mindful of
We recommend a dierence of max. 5°C between
▶
the outside temperature and the interior temperature.
We recommend switching the cooling system o
▶
about 10 minutes before the end of the journey to
prevent odour formation.
Annual disinfection of the air conditioning is rec-
▶
ommended.
WARNING
Danger of misting!
Always keep the fan on.
▶
Operating conditions for the cooling system
✓ The outside temperature is below 2 °C.
✓ The engine is running.
✓ The blower is switched on.
Overview of the controls for the manual air
conditioning
Set the temperature
A
Set the blower speed
B
Set the direction of the air outlet
C
Switch recirculated air mode on/o
Switch the cooling system on/o
After pressing the button, the indicator light
in the button illuminates, even if the conditions for
switching on the cooling system are not met. The
cooling system switches on when the conditions for
switching on the cooling system are met.
During operation of the air conditioning system,
there may be an automatic increase in the engine idle
speed.
Automatic activation of the cooling system
Automatic activation of the cooling system prevents
the windows from misting up. The system switches
on in the following cases.

Heating and air conditioning system › Climatronic automatic air conditioning system
55
When the fan is on and the air distribution control-
▶
ler is in the position.
In this case, the recirculation mode is switched o.
If the air distribution controller is not in the posi-
▶
tion, and recirculated air mode is switched on.
Recirculated air mode
The recirculation mode prevents contaminated outside air getting into the interior of the vehicle.
Briefly switching on recirculation mode can increase
the cooling eect.
Under certain circumstances, the recirculation
mode may be switched on or o automatically.
WARNING
Risk of an accident!
In recirculation mode, there is no fresh air supply
from the outside. This can result in loss of driver attention and fogging up of windows.
Keep the recirculation mode switched on for a
▶
short time only.
Troubleshooting
Water under the vehicle
When the cooling system is switched on, water can
drip o the air conditioning system. This is not a leak.
Fogging
Increase the blower speed and switch on the cool-
›
ing system.
Automatic switch-o of the cooling system
If the coolant temperature is too high, the cooling
system may switch o automatically. This ensures
sucient engine cooling.
Climatronic automatic air conditioning system
What you should be mindful of
We recommend a dierence of max. 5°C between
▶
the outside temperature and the interior temperature.
We recommend switching the cooling system o
▶
about 10 minutes before the end of the journey to
prevent odour formation.
Annual disinfection of the air conditioning is rec-
▶
ommended.
WARNING
Danger of misting!
Always keep the fan on.
▶
Operating conditions for the cooling system
✓ The outside temperature is below 2 °C.
✓
The engine is running.
✓ The blower is switched on.
Operation
Set the temperature for the left side
A
Set the temperature for the right side
B
Set the direction of the air outlet
C
Set the blower speed
D
Set the temperature for the left side
E
Set the temperature for the right side
F
Depending on the equipment:
G
▶
Switch auxiliary heating and ventilation
on/o
▶
Switching Climatronic system o
Interior temperature sensor
H
Switch recirculated air mode on/o
Switch the windscreen ventilation/defrosting
mode on/o
Operate Climatronic in the Infotainment sys-
tem
Switch maintenance of the interior tempera-
ture on/o according to the temperature setting for the driver's side
Press - Switch on automatic mode
This function keeps the temperature constant
and prevents the windows from misting.
Hold - Maintain the interior temperature in ac-
cordance with the temperature setting for the
driver side (SYNC function)
Switch the cooling system on/o
With a temperature setting outside of the number
range, one of the following icons will be displayed in
the Climatronic display.
LO
Maximum cooling power
HI
Maximum heating power
During operation of the air conditioning system,
there may be an automatic increase in the engine idle
speed.
Recirculated air mode
The recirculation mode prevents contaminated outside air getting into the Interior of the vehicle.

56
Heating and air conditioning system › Auxiliary heating and ventilation
Briefly switching on recirculation mode can increase
the cooling eect.
WARNING
Risk of an accident!
In recirculation mode, there is no fresh air supply
from the outside. This can result in loss of driver attention and fogging up of windows.
Keep the recirculation mode switched on for a
▶
short time only.
Settings
Displaying the settings menu
Tap the button on the Climatronic.
›
Or:
Tap on in the Infotainment screen.
›
Set the temperature for the left side
A
Set the temperature for the right side
B
Set operating power in automatic mode
C
Select Climatronic mode
D
Cooling system, switching circulating air oper-
E
ation on/o, setting blower speed and air distribution
Switch Climatronic on/o
Switch maintenance of the interior tempera-
ture on/o according to the temperature setting for the driver's side
The function reduces the penetration of pollutants into the vehicle interior. At the same
time, the air is both circulated and cleaned.
The air purification process is displayed in the
Infotainment.
For proper operation, the doors and windows
must be closed.
active
To turn on/o, tap
›
Further Climatronic settings
To make further settings, press the button on
›
the Climatronic , tap on in the Infotainment
screen.
Applies to Infotainment Swing.
▶
Climate profile
matic mode.
- Setting the operating power in auto-
.
Automatic air recirculation
▶
mode on/o.
Automatic supplementary heater
▶
on/o.
Automatic windscreen heating
▶
screen heating on/o.
- Automatic re-circulated air
- Switch fast interior heating
- Switch automatic wind-
Troubleshooting
Water under the vehicle
When the cooling system is switched on, water can
drip o the air conditioning system. This is not a leak.
Fogging
Increase the blower speed and switch on the cool-
›
ing system.
Automatic switch-o of the cooling system
If the coolant temperature is too high, the cooling
system may switch o automatically. This ensures
sucient engine cooling.
Auxiliary heating and ventilation
Usage
The auxiliary heater heats the vehicle interior and the
engine.
The auxiliary ventilation makes it possible to supply
fresh air to the vehicle interior when the engine is
switched o. As a result, the interior temperature is
lowered, e.g. when the vehicle is parked in the sun.
What you should be mindful of
DANGER
Risk of poisoning!
The auxiliary heater must not be operated in en-
▶
closed spaces.
DANGER
Risk of fire!
Switch o the auxiliary heater before refuelling.
▶
The exhaust pipe for the auxiliary heater is located
▶
on the underside of the vehicle. Therefore, do not
stop the vehicle in places where the exhaust gases
could come into contact with easily flammable materials, e.g. dry grass, spilled fuel etc.
Functionality
The system heats or ventilates the vehicle interior
depending on the settings of the air conditioning
system and the air outlet nozzles before the ignition
is switched o.
The system consumes fuel from the fuel tank when
operating the heating.

Heating and air conditioning system › Auxiliary heating and ventilation
57
Operating conditions
✓ The battery charge is sucient.
✓ The fuel supply is sucient, the instrument clus-
ter does not light up
.
Operation
Switching on/o via the control panel of the air
conditioning system
Press the button.
›
Switch on/o with the radio remote control
Hold down the corresponding key.
›
Indicator light
A
Antenna
B
Switching o
Switching on
Hold the radio remote control with the antenna
facing upwards.
Keep a distance of at least 2 m from the vehicle.
NOTICE
Protect the remote control from moisture, strong vibrations and direct sunlight.
Display of the radio remote control indicator light
Lit up green for 2 seconds - switch on.
▶
Lit up red for 2 seconds - switch o.
▶
Range of the radio remote control
The range of the wireless remote control is a few
hundred meters when the battery is full. For example, obstacles or weather conditions can reduce the
range.
Set automatic switch on
Show the menu for vehicles with manual air conditioning
The automatic switching on is set in the following
menu in the Infotainment system.
Or:
Show menu for vehicles with Climatronic
Press the key on the Climatronic control pan-
›
el , tap in the Infotainment screen.
Settings and information in the Infotainment
screen
Day and time when the vehicle is to be ready for
A
use
Setting the heating/ventilation
B
List of pre-selected times, activation / deactiva-
C
tion of the preset time
Set the selected choice of time and the duration
D
(10-60 minutes)
When the heating is running, the windows are
E
displayed in red
When ventilation is running, the windows are
displayed in blue
Currently displayed preset time
F
Activation of the currently displayed preset time
G
Setting the departure time
H
When selecting the day in the preset time, there is
an option between Sunday and Monday without the
specified day. When selecting this position, the vehicle is ready for operation at the selected time without having to select a day.
When automatic switching on is activated, the warning light in the
nition is turned o.
Only one preset time can be active. The activated
preset time will be deactivated again after it has
started automatically. For the next start, activate one
of the preset times.
symbol button lights up after the ig-
Troubleshooting
Steam in the engine compartment
In the engine compartment, steam may form during
the operation of the heater. This is not a defect.

58
Driver information system › Analogue instrument panel
Running the auxiliary heater after stopping the engine
After switching o the system, the coolant pump
and the auxiliary heating will continue running a little
while longer in order to burn the remaining fuel in
the heating.
Indicator light in the radio remote control
Flashes green in a slow sequence - the switch-on
▶
signal was not received.
Flashes red in a slow sequence - the switch-o sig-
▶
nal was not received.
Flashes green in rapid succession - the system is
▶
locked.
Check the level of fuel.
›
If the fuel quantity is OK, seek the help of a spe-
›
cialist company.
If the indicator is orange or flashing - the battery is
▶
almost discharged.
Change the battery in the remote control
Use a thin screwdriver
›
to remove the cover in
the marked area.
Open the cover and
›
push it out.
Use a screwdriver to
›
loosen the battery in
the marked area.
Replace the battery.
›
Insert the guard and
›
push it until it audibly
locks into place.
Driver information system
Analogue instrument panel
Overview
Tachometer with indicator lights
A
Display with indicator lights
B
Speedometer with indicator lights
C
Bar with warning lights
D
Multifunction button:
E
Setting the time
▶
Reset counter for distance travelled (trip)
▶
Show distance and days until next service ap-
▶
pointment
Coolant temperature gauge
F
Fuel gauge
G
In poor visibility and with dipped headlights o,
the brightness of the instrument cluster lighting is
reduced to remind the driver to turn on the light.
Settings
Setting the language
The language is set in the following menu in the Infotainment system.
Resetting the odometer
Briefly press the button in the instrument
›
cluster.
Set time
Press and hold the button in the instru-
›
ment cluster until the Time menu item is
shown in the display.
Release the button, the display shows the hour set-
›
ting.
Press the button repeatedly to set the hours.
›
Wait 4 seconds, the display shows the minute set-
›
ting.
Press the key repeatedly to set the minutes.
›

Driver information system › Digital instrument cluster
59
Wait 4 seconds, the display shows the initial set-
›
ting.
The time is set in the Infotainment system in the following menu.
Setting the brightness of the instrument cluster
lighting
The brightness of the instrument lighting is adjusted
automatically according to the given lighting conditions.
When low beam is switched on, the brightness of
the instruments lighting can be adjusted in the following menu in the Infotainment system.
Or:
Digital instrument cluster
Overview
Set time
The time is set in the following menu in the Infotainment system.
Setting the brightness of the instrument cluster
lighting
The brightness of the instrument lighting is adjusted
automatically according to the given lighting conditions.
When low beam is switched on, the brightness of
the instruments lighting can be adjusted in the following menu in the Infotainment system.
Or:
Set the variant of the display
Press the button on the multifunction steer-
›
ing wheel to change the variant of the display presentation.
Select displayed variants
Press and hold the button on the multifunc-
›
tion steering wheel.
Select the menu item
›
Select one of the following variants of the display
›
and confirm.
Display layout
and confirm.
Bar with indicator lights
A
Coolant temperature gauge
B
Fuel gauge
C
Display - 5 possible display variants
D
Additional Information
E
Central display area
F
Settings
Setting the language
The language is set in the following menu in the Infotainment system.
Resetting the odometer
The odometer is reset in the following menu in the
Infotainment system.
Or:
Classic display
A
Advanced display
B
Modern display
C
Basic display
D
Sporty display
E
Choose display of additional information
Press and hold the
›
tion steering wheel.
Select and confirm one of the following prefix op-
›
tions (the scope of the prefix options depends on
the type of Infotainment).
▶
Auto - Information depending on the selected
driving mode
button on the multifunc-

60
Driver information system › Instrument cluster display
▶
Classic - Information about the selected gear
and the current speed
▶
adjustable pre-selection options
Setting the pre-selection option for the display of
additional information
The pre-selection option for displaying additional information is set in the Infotainment system in the
following menu.
Virtual Cockpit
Or:
Select the desired additional information in the A
›
Virtual Cockpit
areas.
The desired function area for the preselection op-
›
tion in the area
B hold to save the selection (the
scope of the preset options depends on the type
of Infotainment).
Main menu items
Driving data » page 61
▶
Assist systems - Activate/deactivate assist sys-
▶
tems
Navigation - e.g. Display driving recommendations,
▶
compass, list of destination
Audio - Using radio and media
▶
Telephone - Call list, accept or reject an incoming
▶
call
Vehicle - Vehicle condition » page 62
▶
Laptimer - Stopwatch » page 63
▶
Operation
Operation via the control lever
Press - Switch be-
A
tween menu
items/set values
Hold - Show main
menu
Press - Confirm the
menu item
Operation via the multifunction steering wheel
B
Instrument cluster display
Display overview and overview of the menu
items in the main menu
Depending on the equipment, the following information is shown in the display.
Time
A
Compass direction
B
display
Selected gear/gear
recommendation
Automatic gearbox
selector lever positions
Detected trac
signs
Menu, indicator lights and information
C
Outside temperature
D
or - low outside temperature
Total distance travelled
E
Trip - Distance travelled after resetting the
F
memory
Switch voice control on/o
Rotate - Adjust the volume
A
Press - Switch the sound o/on
Switch to the next track/station
Switch to the previous track/station
Show menu of assist systems
Depending on the equipment:
Press - Show previous menu (if one has been
▶
selected) / Show telephone menu
Or:
Press - Change the display
▶
Hold - Display the menu of preset options
▶
with additional information
Rotate - Switch between menu items/Set val-
B
ues/Manually change map scale
Press - Confirm the menu item
Turn and press - Activate automatic map scale
changing

Driver information system › Driving data
61
Press - Return to the menu one level higher
Hold - Show main menu
Driving data
Overview
The driving data display works with the ignition
switched on.
In the instrument cluster display
Range - Travel distance that can be covered with
▶
the existing tank fill level and the same driving style
▶
AdBlue®-range - Travel distance that can be covered with the existing AdBlue® tank fill level and the
same driving style
Average fuel consumption
▶
Current fuel consumption
▶
Oil temperature - If the temperature is less than
▶
50°C or if there is a system error --- is displayed
Speed limit warning » page 62
▶
Trac Sign Recognition » page 178
▶
Current driving speed
▶
Average speed
▶
Distance travelled
▶
Driving time
▶
Comfort consumers - Information on the total
▶
consumption of comfort consumers in l/h and a list
of three consumers that account for the largest
share of fuel consumption
In infotainment
Memory
The system saves the driving data in the following
memories.
From start or "1" (depending on display type)
Driving data from the time of switching on the ig-
▶
nition until the ignition is switched o again is stored in the memory. If the journey is interrupted for
more than 2 hours, the memory will be reset.
Long term or "2" (depending on display type)
The driving data of all trips up to a total of 99
▶
hours and 59 minutes driving time or 9999 km
driving distance is stored in the memory. If one of
the listed values is exceeded, the memory is reset.
From refuelling or "3" (depending on display type)
Driving data from the time the fuel tank was last
▶
filled is stored in the memory. The memory is reset
the next time the tank is filled.
Operation
Display driving data in the display of the instrument cluster via the operating lever
The menu item
›
display of the instrument cluster.
Display driving data in the display of the instrument cluster via the multi-functional steering
wheel
The menu item
›
display of the instrument cluster.
driving data
in the main menu in the
A
B
driving data
in the main menu in the
A
Press - Select infor-
mation/Set values
Press - Confirm in-
formation
Rotate - Select information/Set values
Press - Confirm in-
formation
Distance travelled
A
Driving time
B
Average speed
C
Average fuel consumption
D
Evaluation of driving economy - Drive
E
GreenFunction (depending on Infotainment
type) » page 165
Graphical fuel gauge - If the expected range is
F
less than 300 km, the vehicle slowly approaches
the symbol
Range
G
Displaying driving data in the infotainment system
The driving data is displayed in the menu in the infotainment system.
Driving data
Or:
Driving data

62
Driver information system › Speed limit warning
Select and reset the memory for driving data in
the display of the instrument cluster using the
control lever
To set the memory for
›
the displayed driving
data, press button
repeatedly.
To reset the memory,
›
A
.
Select memory for driving data in the display of
the instrument cluster via the multifunction steering wheel and reset it
Selecting the memory in the infotainment system
To select the memory, use the functional areas
in the following menu in the infotainment system.
Driving data
Or:
Resetting the memory in the infotainment system
The memory is reset in the following menu in the infotainment system.
Or:
Driving data
press and hold button
To set the memory for
›
the displayed driving
data, press selection
wheel A repeatedly.
To resetthe memory ,
›
hold the dial A.
A
Speed limit warning
Usage
The system oers the possibility to set a speed limit
beyond which an acoustic warning signal will sound
and the following warning message appears in the
display of the instrument cluster.
Setting
Setting the speed limit
Select and confirm the Warning menu item at or
›
(depending on display type).
When the vehicle is stationary, set the desired
›
speed limit and confirm.
While driving, drive at the desired speed and con-
›
firm it as the speed limit.
Resetting the speed limit
Select and confirm the Warning menu item at or
›
(depending on display type).
To reset the speed limit, confirm the stored value.
›
If the journey is interrupted for more than 2 hours,
the set limit is deactivated, but the set value remains
stored.
Vehicle condition
Display
The vehicle status is displayed in the following menu
in the Infotainment system.
Vehicle status
Or:
Vehicle status
Settings
Select driving data to be displayed
The driving data to be displayed is selected in the
following Infotainment menu:
Or:
Setting units
The units are set in the following infotainment menu:
Or:
Vehicle areas displayed in colour indicate associ-
A
ated warnings.
B
No notification
Warning messages regarding the vehicle con-
dition and their quantity
C
Display of information about the condition
of the START-STOP system

Driver information system › Stopwatch in the instrument cluster
63
▶
Activation/deactivation of information
regarding the messages of the START-STOP
system in another screen display
Functionality
In the event of a system fault, messages regarding
the fault in question are displayed on the instrument
cluster display when the ignition is switched on.
Messages in relation to faults can also be displayed in
the Infotainment.
The warning messages will continue to be displayed until the malfunctions have been remedied.
After the message is displayed for the first time, only
the indicator lights
(Hazard) or (Warning) re-
main displayed.
Stopwatch in the instrument cluster
Usage
The function Laptimer oers the possibility to use up
to 11 lap times, e.g. when driving on a race track, to
measure and display in the display of the instrument
cluster.
Operation
The menu item
›
play of the instrument cluster.
Displaying functions via the control lever
laptimer
in the main menu in the dis-
Press - Select infor-
A
mation/Set values
Press - Confirm in-
B
formation
Statistics - Evaluate and reset the measured times
▶
▶
Fastest - the fastest lap
▶
Slowest - the slowest lap
▶
Average - the average lap time
▶
Overall time - the total of all the lap times
▶
Reset - reset all measured times
New lap - Start measurement of the next lap time
▶
Split time - show the split time
▶
Stop - interrupt the time measurement
▶
▶
Continue - Continue measurement of the current
lap time
▶
New lap - Start measurement of the next lap
time
▶
Abort lap - cancel the time without saving the
measured time
▶
Exit - cancel the time and save the measured
time
Stopwatch in the Infotainment
Overview
The stopwatch display is shown in the menu in the
Infotainment.
Sport
Or:
Sport
Displaying functions via the multifunction steering
wheel
Rotate - Select in-
A
formation/Set values
Press - Confirm in-
formation
Overview of functions
Start time - start the timing manually / continue
▶
the interrupted measurement
Since start - Start the timer automatically upon
▶
start-up
Overall time
A
B
Start the measurement
Stop the measurement
Current lap time
C
D
Evaluate/reset split times
End the measurement (the current lap time is
not stored)
Start measurement of the next lap time
E
F
The split time is briefly shown in the display A
End the measurement (the current lap time is
stored)

64
Driver information system › Information Sport
Information Sport
Settings
The Sport information display is shown in the menu
in the Infotainment.
Sport
Or:
A swipe of the finger vertically across the screen allows three of the following displays to be shown.
Charge pressure.
▶
Acceleration.
▶
Output.
▶
Coolant temperature.
▶
Oil temperature.
▶
Sport
Personalisation
Usage
The personalization feature allows each vehicle key
to be assigned a user account.
In the user account, settings can be assigned regarding e.g. light function, driver's seat and exterior mirror position, assistance systems, radio, navigation,
etc.
Vehicle status
Or:
Vehicle status
The account changes e.g. when changing drivers
while traveling. This avoids unwanted re-setting of
the personalized functions in the active user account.
Settings
This function is set in the following menu in the Infotainment system.
Or:
Key assignment - Options for assigning the recog-
▶
nised key to the active user account
▶
Manual - the key must be manually assigned to
the active account
▶
Automatic - detected key automatically assigned
to a dierent account of the active account
Assign the key to the current user account -
▶
Manual assignment of the key to the active account
To maintain the assignment of the selected user
account to the selected key, we recommend that
you select the manual key assignment.
Functionality
After opening the driver's door, all the personalised
functions are adjusted according to the user account
that is assigned to the key which was used to unlock
the vehicle.
There are three user accounts and a guest account.
A change to the set personalised functions is auto-
matically stored in the active user account.
Change user account
WARNING
Risk of an accident!
Carry out the account change while the vehicle is
▶
stationary.
In the instrument cluster display
Switching to a dierent user account is
›
in the instrument cluster display within
10 seconds after turning on the ignition.
In infotainment
The system settings are made in the Infotainment
›
in the following menu.

Infotainment Swing
Infotainment overview
Touchscreen
A
SD card slot
B
Rotary control on the left
Press: Switch Infotainment on/o
▶
Turn: Adjust Volume
▶
Rotary control on the right
Press: Confirm menu item
▶
Turn: select menu item/set value
▶
Radio menu
Media menu
Phone menu
Infotainment settings menu
SmartLink menu
Press: Display menu
▶
Hold: switch voice control for the SmartLink
▶
application on/o
Sound settings
Information about vehicle settings
System
Restriction
For safety reasons, operation of some Infotainment
functions while driving is not possible or is restricted.
The Infotainment system indicates this by means of
a message in the screen.
Infotainment Swing › Infotainment overview
Units.
▶
Restore factory settings.
▶
Sound settings
The Infotainment sound is set in the menu
Sound
.
The following menu items can be set.
Setting the maximum volume when Infotainment is
▶
turned on.
Volume adjustment of individual Infotainment
▶
functions.
Setting the equalizer.
▶
Adjusting the volume ratio.
▶
Depending on the equipment, the following advanced sound settings can be set.
Setting the sound system.
▶
Setting the sound space optimisation for the driv-
▶
er.
Turn on/o and adjust the subwoofer volume.
▶
Configuration wizard
The configuration wizard helps to set certain Infotainment functions.
The configuration wizard is automatically displayed
if, after switching on the Infotainment system, there
are at least two menu items that have not been set
or if a new user account has been selected.
To switch o the automatic display, tap on
›
show again
when the configuration wizard is displayed.
For manual display, tap on
›
Configuration wizard
Don't
.
Safely disconnect the connected USB device
NOTICE
Risk of damage to the data on the connected device!
To safely disconnect/remove the device, proceed as
follows.
Tap
›
Select the desired device.
›
Disconnect/remove the device.
›
Remove safely
.
Troubleshooting
Infotainment not responding
The Infotainment system must be restarted.
for more than 10 s.
Press
›
Wait for the restart to complete.
›
65
Basic settings
Setting basic functions
The following Infotainment functions are set in the
menu .
Time and date.
▶
Language.
▶
System update
We recommend having the system update carried
out by a specialist company.
The system update ensures optimal function of the
Infotainment system, e.g. compatibility with new
phones.

66
Infotainment Swing › Screen
Determine system version
›
Tap
System information
.
Manual update
For information on available updates, please refer to
the ŠKODA internet pages.
http://go.skoda.eu/updateportal
▶
Visit available updates.
›
Save the update to a USB source.
›
Insert the USB source into the front USB input.
›
Tap
›
Select the connected USB device as the update
›
System information
Update software
.
source.
Go to the update file and confirm the update.
›
Confirm any messages and wait for the update
›
process to be completed.
Screen
Overview
Settings
The following basic screen functions are set in the
Screen
menu.
Brightness level of the screen.
▶
Switch o the screen.
▶
Display the time.
▶
Confirmation sounds and animations.
▶
Infotainment keyboard
Keypad overview
The arrangement of the keypad characters depends
on the Infotainment language that has been set.
In Infotainment, the following types are used, depending on the context.
Alphanumeric.
▶
Numeric.
▶
Keypad for input.
▶
Keypad for search.
▶
Status bar
A
Bar with the functional surfaces of the displayed
B
menu
Other pages of the menu
C
Operation
NOTICE
Danger of screen damage!
The Infotainment screen is operated by touching it
▶
lightly with your finger.
In principle, operation by touch is identical to the operation of a mobile phone.
The following operating modes are specific to the Infotainment system.
Keypad example
Input line
A
▶
Delete characters before the cursor
▶
Tap: delete the last character
▶
Hold: delete all characters in sequence
▶
Show list of searched entries
Keypad functional surfaces
B
▶
Change to lowercase
▶
Switch to the first capital letter, followed by
lowercase letters
▶
/ Switch to the language keypad
▶
Switch to the numeric and character key-
pad
▶
Show additional keypad languages
▶
Insert a space
▶
Hold: Show additional character variants
▶
Move cursor to the left
▶
Move cursor to the right
▶
Confirm the characters that have been en-
tered

Infotainment Swing › Radio
67
Numeric keypad
Keypad example
Input line
A
▶
Delete characters before the cursor
▶
Tap: delete the last character
▶
Hold: delete all characters
Keypad functional surfaces
B
Confirm the characters that have been entered
▶
If context-sensitive, alphanumeric characters can
be entered by holding a functional surface with a
digit.
Operation
The Infotainment keypad is used to enter characters,
letters and numbers.
The keypad will be automatically displayed when Infotainment prompts for characters.
Find
During the character input, a search for corresponding entries takes place.
The entry to be searched can be entered, including
diacritics.
The keypad will only provide characters that match
the stored entries.
To display the searched entries, tap
›
Show additional keypad languages
To use the additional keypad languages, the desired
languages must be set first.
Tap or repeatedly tap the flag symbol until the
›
desired language keypad is displayed.
Further character variants
Press and hold the sign with the symbol .
›
Select the desired symbol.
›
.
Radio
Overview
Display main menu
Tap on .
›
Analogue and digital radio reception
Select frequency range
A
Depending on the frequency range
B
FM: Radio text
DAB: Name of the station group
Preset buttons for preferred stations
C
List of available stations
Manual station search
Display information about the station (applies to
DAB)
Settings
Infotainment supports digital radio reception in
DAB and DAB+ formats.
List of available stations
To display, tap .
›
Played station
Station stored on the presets
A trac radio station is set
DAB signal is not available
The DAB station reception is not stable
Filtering the stations in the list according to the
programme type.
To filter the FM stations, the RDS and AF function must be switched on.
To filter the DAB stations, the alphabetical sorting function of the stations must be activated.
Manual update of the station list
In the FM station list, information about the programme type and the type of the regional station
can be displayed.
Setting additional keypad languages
Tap
›
Additional keypad languages
.

68
Infotainment Swing › Radio
Operation
Select station
Tap or at the top of the screen.
›
SCAN function
The function plays receivable stations of the selected frequency range in succession for a few seconds
each.
To start automatic play press
›
rotary control .
To end automatic play press or the right rotary
›
control .
Find stations manually
In the Radio main menu, tap .
›
To search in sequence, tap or next to the dis-
›
played frequency range scale.
Or:
Hold down the scroll mark on the frequency range
›
scale and move it to the desired value.
Or:
Turn the right rotary control .
›
Scan
or the right
Restriction
Car parks, tunnels, tall buildings or mountains can
▶
restrict radio reception.
In the rear side windows, there are antennas for re-
▶
ceiving the radio signal.
Covering the panes with foils or metal-coated la-
bels may aect the reception of the radio signal.
Settings
Save the station currently being listened to as a favourite from the Radio main menu
Hold the desired station key for preferred stations
›
until the station is stored.
Save station to favourites from the list of available
stations
Hold the line with the name of the desired station.
›
Tap the desired preset button.
›
Delete favourites
In the Radio main menu , tap
›
To delete one preset button for preferred stations,
›
tap the desired station button and confirm the deletion.
To delete all preset buttons for preferred stations,
›
tap
All
and confirm the deletion.
Buttons
Applies to AM, FM and DAB frequency ranges.
The variant for changing stations using buttons
in the Radio main menu is set as follows.
In the Radio main menu, tap
›
Choose the change variant.
›
Trac reception (TP) for FM stations on/o
Applies to the FM frequency range.
In the Radio main menu, tap
›
Switch trac reception for DAB stations on/o
Applies to the DAB frequency range.
In the Radio main menu, turn on menu item
›
fic Radio (TP)
In the Radio main menu, tap
›
trac programme announcements (TP)
Assign station logo from an external source
Applies to AM, FM and DAB frequency ranges.
Infotainment oers the option to assign logos from
the pictures on an external source to the station buttons.
For station logos, images in jpg, png format with a
maximum resolution of 400x240 pixels can be used.
In the Radio main menu, tap
›
Tap the desired preset button.
›
Select the external source with the logo.
›
Find the desired logo and confirm.
›
Delete station logos
Applies to AM, FM and DAB frequency ranges.
In the Radio main menu, tap
›
To delete a logo, tap the desired preset button and
›
confirm the deletion.
To delete all logos, tap on
›
tion.
Turn on/o radio text reception
Applies to the FM and DAB frequency ranges.
When the function is switched on and station presets are displayed, detailed information about the
broadcast content of the FM station being listened
to, or the name of the station group for the DAB station, is displayed.
In the Radio main menu, tap
›
.
Delete presets
Arrow buttons:
Trac program (TP)
Advanced settings
on/o.
Station logos
Station logos:
All
and confirm the dele-
Radio text
.
.
.
.
.
.
Traf-
DAB

Infotainment Swing › Media
69
Switch automatic frequency control (AF) on/o
Applies to the FM frequency range.
When the function is switched on and the signal of
the FM station currently being listened to is weak,
Infotainment automatically sets the same station to
a dierent frequency with a better signal.
In the Radio main menu, tap on
›
Automatic frequency control (AF)
Sort stations in the list of available stations
Applies to the FM frequency range.
In the Radio main menu, tap on
▶
Sort station list:
Select the sorting of stations in alphabetical order
▶
or by group.
Automatic change of frequency to a regionally
linked FM station
Applies to the FM frequency range.
Infotainment provides the option of automatically
switching to a regionally linked FM station in case of
signal loss of the FM station being listened to.
In the Radio main menu, tap on
›
RDS Regional:
Select one of the following menu items.
›
Fixed
▶
must be set manually.
Automatic
▶
the best signal reception.
If reception is lost in the given region, Infotainment
will automatically set another available region.
Switch RDS on/o
Applies to the FM frequency range.
The menu item is only available for some countries.
In the Radio main menu, tap
›
Data System (RDS)
If the RDS function is disabled, the following menu
items in FM station settings are not available.
Trac programme (TP).
▶
Radio text.
▶
RDS Regional.
▶
Automatic frequency change (AF).
▶
Switch additional DAB announcements on/o
Applies to the DAB frequency range.
When the function is switched on, other announcements are received as trac announcements. For example, weather news, sports reports, financial news,
etc.
In the Radio main menu, tap on
›
Other DAB announcements
.
.
- If there is a loss of signal, another station
- automatic selection of the station with
.
.
.
Advanced settings
Advanced settings
Advanced settings
Advanced settings
Advanced settings
Radio
Enable/disable automatic programme tracking of a
DAB station
Applies to the DAB frequency range.
When the function is switched on and the DAB station is lost, Infotainment automatically changes to
the same station with a better signal in a dierent
DAB station group.
In the Radio main menu, tap on
›
DAB - DAB station tracking
Turn on/o automatic switching from a DAB station to the same FM station
Applies to the DAB frequency range.
When the function is switched on and the DAB station being listened to is lost, Infotainment automatically changes to the same FM station. The symbol
(FM) is displayed after the station name.
When the corresponding DAB station can be received again, the station automatically changes from
FM to DAB.
In the Radio main menu, tap on
›
Automatic DAB - FM switching
.
.
Advanced settings
Advanced settings
Media
What you should be mindful of
Do not save any important data or that which has
▶
not been backed up on the connected audio sources. ŠKODA assumes no responsibility for lost or
damaged files or connected audio sources.
When changing or connecting an audio source, this
▶
may cause sudden changes in volume. Reduce the
volume before changing or connecting an audio
source.
When connecting an audio source, the source in-
▶
formation messages can be displayed. These messages must be observed and, if necessary, con-
firmed.
The national copyright laws that apply in your
▶
country must be observed.
Overview
Display main menu
Tap on .
›

70
Infotainment Swing › Media
Select source
A
Manage files / multimedia database
Settings
Operation
Operation - Basics
Album image / symbol of the connected source
A
Tap: display available albums
Tap: start playback
Tap: pause
Within 3 seconds of starting playback, tap: play
the previous song
After 3 seconds from the start of playback, tap
to play the current title from the beginning
Hold: fast rewind within the title
Tap: play the next song
Hold: fast forward within the title
Movement within the title is also possible by dragging the finger over the timeline.
Extended operation
Turn repeat playback of the current track on/o
Turn repeat playback of the current album/folder on/o
Turn random playback of the current album/
folder on/o
Settings
Turn title playback including subfolders on/o
In the Media main menu, tap on
›
subfolders
.
Mix/Repeat including
Trac
To turn on/o the trac monitoring during the
›
playback of media files, go to the Media main menu
and tap on Trac programme (TP).
Safely disconnect the connected device
NOTICE
Risk of damage to the data on the connected device!
To safely disconnect/remove the device, proceed as
follows.
In the Media main menu, tap
›
Select the desired device.
›
Disconnect/remove the device.
›
Bluetooth® player
Infotainment allows audio files of a connected Bluetooth® player to play using the A2DP and AVRCP audio profile.
With Infotainment, multiple devices can be paired
using Bluetooth®, but only one of them can be used
as a Bluetooth® player.
For connecting the Bluetooth® player, pair and
›
connect the device via Bluetooth®.
In the Media main menu , tap on
›
devices
.
In the list, choose the device with the symbol .
›
If a device is connected to Infotainment using
Apple CarPlay or Android Auto, then it cannot be
connected using Bluetooth®.
SD card
NOTICE
Risk of damaging the SD card reader!
Do not use SD cards with a broken slide for write
▶
protection.
To insert the SD card, with the bevelled corner to
›
the right, push into the slot in the external module
until it snaps into place.
To remove, first disconnect the SD card safely. To
›
do this in the Media main menu, tap
and select the SD card.
Press on the inserted SD memory card.
›
The SD card moves to the eject position.
NOTICE
When using an SD card with an adapter, vehicle vibrations might cause the card to fall out of the
adapter.
USB device
To connect, insert the USB device into the appro-
›
priate port.
To play audio files, use USB ports that support data
transfer.
Safely remove:
Bluetooth
Remove safely:
.
paired

Infotainment Swing › Media
71
To disconnect disconnect the USB device first. To
›
do this in the Media main menu, tap
ly:
and select the USB device.
Disconnect the USB device.
›
A USB device can be connected directly to the
USB port or via a connection cable.
We recommend that you use extension cables from
ŠKODA Original Accessories.
USB extension cables or reducers may aect the
playback function of the connected device.
Load USB audio source
After connecting the USB device, charging will start
automatically when the following conditions are met.
Remove safe-
✓ The ignition is switched on.
✓ The USB device allows charging.
The charging eciency can be dierent compared to
the charging from the usual mains power supply.
Depending on the type of the connected USB device
and the frequency of use, the charging current may
not be sucient to charge the battery of the connected device.
Some connected audio sources may not be recognised and cannot be charged.
Supported sources and files
Source Interface Type Specification File system
SD card SD card reader Standard size
USB
Bluetooth® player Bluetooth® -
Supported sources
USB 1.x; 2.x 3.x
or higher with USB
2.x support
MSC
MTP
Apple
(without special soft-
USB devices that use
the USB mass storage
Devices running the An-
droid or Windows Phone
operating system that
Devices with an iOS op-
Bluetooth® protocols
A2DP and AVRCP (1.0 -
SD
SDHC
SDXC
USB stick
HDD
ware)
support protocol
support the Media
Transfer Protocol
erating system
1.5)
FAT16
FAT32
exFAT
HFS+
-
The GPT standards (GUID partition table) method structured audio sources are not supported by Infotainment.
Viewing images on the Infotainment screen is not supported by connected Apple devices.
Compatibility of mobile devices
It is possible to check the ŠKODA web pages to see if Infotainment is compatible with the selected mobile
device being tested. This check is carried out by using the following reference or by reading the QR code.
http://go.skoda.eu/compatibility
▶

72
Infotainment Swing › Mobile device management
Compression for-
mat
MPEG
WMA
Supported audio files
Files that are protected by the DRM- and iTunes® methods are not supported by Infotainment.
Supported playlists
Codec type File exten-
MPEG 1 Layer 3 mp3 32 - 320 32, 44, 48
MPEG 2 Layer 3
MPEG 2.5 Layer 3 8, 11, 12
Windows Media
Audio 9 and 9.1
Windows Media
Audio 9.2
Windows Media
Audio 10
Codec type File extension
M3U m3u
PLS pls
WPL wpl
ASX asx
sion
mp3 8 - 160
wma
Max. bit rate
[kbps]
8 - 384
8 - 320
8 - 384
Max. sam-
pling rate
[kHz]
16, 22, 24 Mono,
8, 11, 12, 16,
22, 32, 44,
48
32, 44, 48,
96
Mobile device management
Overview
Multi channels
Mono, dual mono,
Stereo, Joint
Stereo
Stereo, Joint
Stereo
Mono, Stereo,
Joint stereo
Mobile device management
In the Telephone main menu , tap on the functional surface
›
In the list of paired mobile devices, the following symbols may appear for the individual devices.
White icon - the device can be connected as a telephone.
Green icon - the device is connected as a telephone.
White icon - the device can be connected as a Bluetooth® player.
Green icon - the device is connected as a Bluetooth® player.
Possible functions of the connected mobile device
The functions of a device connected via over the HFP Bluetooth profile depends on the following connection
types.
First device
Main phone
incoming / outgoing calls
Telephone contacts
Bluetooth® player
With Infotainment only a mobile device can be connected as a Bluetooth® player.
Bluetooth
paired devices
Second device
Additional phone
Bluetooth® player
.

Infotainment Swing › Mobile device management
73
Limitations of mobile devices and applications
Availability of features
The availability of certain features depends on the
type of mobile device, as well as that of the applications installed.
Connection restrictions
With Infotainment, a max. of 20 mobile devices are
▶
paired.
The range of the connection of the mobile device
▶
to Infotainment is limited to the passenger compartment.
After reaching the maximum number, the pairing
▶
of the next mobile device will replace that of the
device that has not been used for the longest period of time.
Compatibility of mobile devices
It is possible to check the ŠKODA web pages to see
if Infotainment is compatible with the selected mobile device being tested. This check is carried out by
using the following reference or by reading the QR
code.
http://go.skoda.eu/compatibility
▶
Bluetooth® compatibility of mobile devices
Due to the large number of mobile devices, it is not
possible to guarantee total Bluetooth® compatibility
with Infotainment. Bluetooth® compatibility depends
on the Bluetooth® version as well as the implementation of Bluetooth® protocols by the manufacturer of
the mobile device.
Applications in mobile devices
Mobile devices can be used to install applications
that allow you to view additional information on the
Infotainment screen, or to operate the Infotainment
system.
Due to the variety of applications, as well as their ongoing development, the available applications may
not function on all mobile devices. ŠKODA AUTO assumes no liability for their proper functioning.
The scope of available applications and their functionality is dependent on the type of Infotainment, as
well as the vehicle and country.
Connection set-up
Connect a mobile device to Infotainment
Turn on the ignition.
›
Turn on the Bluetooth® on the mobile device.
›
Turn on the Bluetooth® on Infotainment
›
tooth
Bluetooth
.
Blue-
Turn on the Bluetooth® visibility of the Infotain-
›
ment
Find available Bluetooth® devices in the mobile de-
›
vice.
Select the Infotainment Bluetooth® unit.
›
The name of the unit can be found by tapping
Bluetooth
Confirm the PIN; enter it if necessary and then
›
confirm.
The mobile device is connected to the Infotainment
or just paired, depending on the number of devices
that are already connected.
Connect Infotainment to a non-paired mobile device
Turn on the ignition.
›
Turn on the Bluetooth® on the mobile device.
›
Turn on the Bluetooth® on Infotainment
›
tooth
Tap on
›
Select the desired device from the list of Blue-
›
tooth® devices.
Confirm the PIN; enter it if necessary and then
›
confirm.
If two devices are connected to the Infotainment,
›
select the device to be replaced.
Connect Infotainment to a mobile device that is
not already paired
The connection with an already coupled mobile device is made automatically after switching on the ignition; if necessary the device can be connected
manually as follows.
Turn on the ignition.
›
Turn on the Bluetooth® on the mobile device.
›
Turn on the Bluetooth® on Infotainment
›
tooth
Tap
›
In the device list, select the desired device and the
›
Bluetooth® profile.
Confirm the PIN; enter it if necessary and then
›
confirm.
If two devices are connected to the Infotainment,
›
select the device to be replaced.
Disconnect from a mobile device
Tap
›
Tap on the Bluetooth® profile icon of the desired
›
mobile device.
Delete a paired mobile device
Tap
›
To delete a mobile device, tap
›
deletion.
To delete all mobile devices, tap on
›
firm the deletion.
Bluetooth
Name:
Bluetooth
.
Bluetooth
.
Bluetooth
Bluetooth
Bluetooth
Visibility:
.
Bluetooth
Paired devices
Paired devices
Paired devices
Visible
.
Search for devices
.
.
.
.
and confirm the
Delete all
Blue-
Blue-
and con-

74
Infotainment Swing › Telephone
Telephone
Telephone main menu
Display main menu
Tap on .
›
Name of the connected telephone
A
Tap: Show list of previously connected phones
▶
Preset buttons for preferred contacts
B
Choice of storage group for the preferred con-
C
tacts
Name of telephone service providers
D
Enter telephone number
Contact list
Call lists
Switch on voice control for the connected tele-
phone
Settings
Conditions for connecting a telephone with
Infotainment
✓ The ignition is switched on.
✓ The Bluetooth® function of the Infotainment and
the telephone needs to be switched on.
The Bluetooth® function of the Infotainment is
switched on in the menu item
tooth
.
✓ Visibility of the Infotainment is switched on.
The visibility of the Infotainment is switched on in
the menu item
✓ The telephone is within signal range of the Info-
tainment's Bluetooth® unit.
✓ The telephone is compatible with Infotainment.
✓ Through Infotainment, no mobile device can be
connected using Apple CarPlay.
Bluetooth
Telephone operation
Enter telephone number
In the Telephone main menu, tap .
›
Bluetooth
Visibility: Visible
Blue-
.
Enter the telephone number using the numeric
›
keypad that is displayed.
The displayed numeric keypad can also be used
for searching for contacts.
If, for example, the digits 32 are entered, contacts
with the letter sequence DA, FA, EB etc. are displayed next to the numeric keypad.
List of telephone contacts
The list of telephone contacts is imported from the
connected main telephone.
To display the contact list in the telephone main
›
menu, tap
To find details within the list, tap
›
Enter the details you wish to find.
›
To establish a connection with a contact, tap the
›
functional area showing the desired contact.
If a contact has multiple telephone numbers, select
the telephone number from the displayed list.
To display the details for a contact, tap
›
Telephone conversation
Depending on the context of the telephone conversation, the following functions can be selected.
End connection / reject incoming call / end call
Answer an incoming call / return to the held call
Switch the ringer o / on
/
Hold a call
Switch the microphone o / on
/
Show details of the caller
To switch the call tone from the speakers to the
›
telephone, go to the telephone main menu and tap
on
To switch the call tone from the telephone to the
›
speakers, tap
hands-free
.
Find
.
.
.
.
Settings for Infotainment telephone functions
Manage preset buttons for preferred contacts
To save the desired preset button, press and hold.
›
Select a contact from the displayed list.
›
If the contact contains multiple telephone num-
›
bers, choose the desired telephone number.
To delete tap on Telephone
›
vourites
in the main menu.
To delete one preset, tap on the list entry and con-
›
firm the deletion.
Or:
To delete all presets, tap on
›
deletion.
User profile Manage fa-
Delete all
and confirm the

Infotainment Swing › SmartLink
75
Import telephone contacts
After first connecting the main telephone with Infotainment, telephone contacts will start to be imported into the Infotainment memory.
Infotainment can import up to 2000 telephone contacts together with contact pictures. Each contact
can include max. 5 telephone numbers.
Depending on the type of telephone, import confir-
mation may be required.
Update telephone contacts
When re-connecting the telephone with Infotainment, an automatic update of the list is carried out.
For a manual update of the list in the telephone
›
main menu, tap on
Sort contacts in the phone book
In the Telephone main menu, tap on
›
Sort by:
.
Select the type by which to sort.
›
Ringer
Some phones do not allow the use of the telephone
ringtone; instead, the Infotainment ringtone is used.
To set the Infotainment ringer in the Telephone
›
main menu, tap on
Select the ringtone.
›
Simultaneous calls
This applies to some countries.
Depending on the connected telephone, it is possible
to answer the next incoming call and hold the previous call.
To switch on/o simultaneous calls, tap on tele-
›
phone
Simultaneous calls
User profile
User profile
.
Import contacts
User profile
Select ringtone
.
.
SmartLink
Functionality
SmartLink oers the ability to display and operate
certified applications from a connected mobile de-
vice in the Infotainment screen.
Certification may be conditional upon the use of the
latest update to the particular SmartLink application.
Applications include, for example, apps for route
guidance, telephoning, listening to music, etc.
Mobile devices can be connected via a USB cable.
Supported connection types
SmartLink supports the following connection types.
Android Auto.
▶
Apple CarPlay.
▶
MirrorLink.
▶
Overview of the SmartLink connection
Main menu SmartLink
Tap on .
›
Previously connected device
A
Currently connected device
B
Display information about SmartLink
Separation of the active connection
Settings for the SmartLink menu
Android Auto
Navigation applications
Telephone applications
Overview of running applications, phone calls, in-
coming text messages, and more.
Music applications
Display of other available applications as well as
the option to return to the SmartLink main menu
Turn on voice control (Google Voice)
Apple CarPlay
List of available applications
A
Depending on the duration of operation:
Tap: Return to the Apple CarPlay main menu
▶

76
Infotainment Swing › SmartLink
Hold: Switch on voice control (Siri)
▶
MirrorLink
It is not possible to operate the application while
driving
Return to the SmartLink main menu
List of running applications
Display of the last running application in connec-
ted mobile devices
Settings
Connection conditions
General connection conditions
✓ The mobile device supports the following Smar-
tLink connection types: Android Auto. Apple CarPlay and MirrorLink.
✓ Mobile devices, as well as the type of Smar-
tLinkconnection, are supported in the respective
market.
✓ Some connected mobile devices require the mo-
bile device to be “unlocked”.
Conditions for Android Auto
✓ The device to be connected must have Android
AutoSupport.
A list of devices, supported regions and applica-
tions that the Android Auto connection supports
can be found on the websites of Google Inc..
✓ The Android Auto application needs to be instal-
led on the mobile device.
✓ Some applications require the data connection in
the mobile device to be turned on.
Conditions for Apple CarPlay
✓ The device to be connected must have Apple
CarPlaySupport.
A list of devices, supported regions and applica-
tions that the Apple CarPlay connection supports
can be found on the websites of Apple Inc..
✓ Siri voice control is on.
✓ The data connection is switched on in the mobile
device.
Conditions for MirrorLink
✓ The device to be connected must have Mirror-
LinkSupport.
A list of devices and applications that the Mirror-
Link connection supports can be found on the
websites of Car Connectivity Consorcium®.
✓ The MirrorLink application needs to be installed
on the mobile device.
✓ Some applications require the data connection in
the connected mobile device to be turned on.
Operation
Operation of the running MirrorLink application
Move the functional areas to the left edge of the
screen
Move the functional areas to the right edge of
the screen
Move the functional areas to the top of the
screen
Move the functional areas to the bottom of the
screen
Return to the MirrorLink main menu
Restriction
Restriction of SmartLink applications while driving
For safety reasons, operation of some SmartLinkapplications while driving is not possible or is restricted.
Functionality restriction of Infotainment with an
Android Auto connection
For the duration of the connection, the external de-
▶
vice cannot be used as an audio source in the Me-
dia menu.
By connecting the device, all currently connected
▶
Bluetooth® devices will be disconnected and the
device will automatically be connected as the main
telephone.
For the duration of the connection, no other Blue-
▶
tooth® devices can be connected to the Infotainment system.
Functionality restriction of Infotainment with an
Apple CarPlay connection
For the duration of the connection, the external de-
▶
vice cannot be used as an audio source in the Me-
dia menu.
Connecting the device disconnects all currently
▶
connected Bluetooth® devices.
For the duration of the connection, no Bluetooth®
▶
devices can be connected to the Infotainment system.

Infotainment Swing › ŠKODA Connect online services
77
Functionality restriction of Infotainment with an
MirrorLink connection
For the duration of the connection, the external de-
▶
vice cannot be used as an audio source in the Me-
dia menu.
By connecting the device, all currently connected
▶
Bluetooth® devices will be disconnected and the
device will automatically be connected as the main
telephone.
Depending on the device to be connected, a connection confirmation may be required.
Settings
Apple CarPlay - Connection via USB
Turn on the Infotainment.
›
Turn on the mobile device.
›
Connect the mobile device to the front USB input
›
using a cable.
Choose to connect via Apple CarPlay.
›
Apple CarPlay – Disconnection
In the Apple CarPlay main menu, tap on the “ŠKO-
›
DA” functional area.
Tap on
›
Android Auto - Connection via USB
Turn on the Infotainment.
›
Turn on the mobile device.
›
Connect the mobile device to the front USB input
›
using a cable.
Choose to connect via Android Auto.
›
Android Auto - Disconnection
In the main menu of Android Auto
›
turn to ŠKODA”.
Tap on
›
MirrorLink - Connection via USB
Turn on the Infotainment.
›
Turn on the mobile device.
›
Connect the mobile device to the front USB input
›
using a cable.
Choose to connect through MirrorLink.
›
MirrorLink - Disconnection
In the MirrorLink main menu, tap
›
Tap on .
›
Change to another device / connection type
Infotainment allows you to switch between currently
connected devices and the connection type.
Tap on
›
Select the desired device or connection type.
›
.
tap on “Re-
.
.
.
ŠKODA Connect online services
Functionality
ŠKODA Connect online service oer the option of
connecting the vehicle to the online world. They thus
represent an extension of the vehicle and Infotainment functions.
For the functionality of the ŠKODA Connect Online
Services, the vehicle must be within range of a mobile network through which the services are provided. The availability, the connection speed and the
technology used in the mobile network can be dier-
ent in the respective countries and are dependent on
the mobile network operator.
The ŠKODA Connect online services are not included
in the equipment of the vehicle. They can be ordered
separately on the ŠKODA Connect Portal website or
in the ŠKODA Connect application.
The oer of ŠKODA Connect online services depends on the type of vehicle and its trim level, Infotainment and country. Availability in each country
can be checked on the ŠKODA Connect website.
The rights and obligations of the Parties with respect
to the provision of these services are governed by a
separate agreement. Current legal documents regarding the online services can be found on the
ŠKODA Connect Portal as well as the ŠKODA Connect application.
ŠKODA Connect website
http://go.skoda.eu/skoda-connect
▶
For example, the ŠKODA Connect website contains the latest information
about the online services, a link to the
ŠKODA Connect Portal as well as the
nect application.
ŠKODA Connect Portal website
http://go.skoda.eu/connect-portal
▶
Information call
The information call may be used in the case of problems with the online services or for information regarding the products and services of the ŠKODA
brand.
✓ The functional condition represents the active
option of downloading the ŠKODA Con-
The ŠKODA Connect Portal website is
used, for example, for registration, activation and ordering of online services. It
also provides the option of remote access to the vehicle.
online ŠKODA Connect services.

78
Infotainment Swing › ŠKODA Connect online services
Press the button.
›
Breakdown call
The breakdown call can be used in the event of a
breakdown.
✓ The functional condition represents the active
online ŠKODA Connect services.
Press the button.
›
ŠKODA Connect Application
The ŠKODA Connect application enables remote access to the vehicle using a mobile device. It can also
be used for user registration and to activate and
configure the online services.
The application can be downloaded to the mobile device after scanning the following QR code or link.
http://go.skoda.eu/skodaconnectapp
▶
Settings
Registration and activation of online services
User registration, as well as the activation of the
ŠKODA Connect online services, is completed on the
ŠKODA Connect Portal website or in the ŠKODA
Connect application.
In order to complete user registration, you will need
to access your e-mails.
In order to activate ŠKODA Connect, proceed as follows.
Switch on the ignition and the Infotainment.
›
Tap
›
Enter and confirm the registration PIN you have re-
›
ceived during user and vehicle registration on the
ŠKODA Connect (online services)
Registration
.
ŠKODA Connect Portal website or in the ŠKODA
Connect application.
Wait for the registration completion message to
›
appear.
Confirm any messages on the screen.
›
Delete user
Switch on the ignition and the Infotainment.
›
Tap
›
Tap
›
Confirm the deletion.
›
By deleting the registered vehicle in the user account on the website ŠKODA Connect Portal the
user is also deleted in Infotainment.
Changing the user
Switch on the ignition and the Infotainment.
›
Tap
›
Tap
›
Enter and confirm the registration PIN code re-
›
ceived during registration of the new user and during vehicle registration on the ŠKODA Connect
Portal website.
If necessary, confirm the change by tapping the
›
function surface
Management of online services
In the service management, it is possible to display
information about the online services, the validity of
their licence, or to switch the services on/o.
Tap
›
manage services
To display the designations and the status of the
›
services, select the desired service.
For detailed information about the service tap
›
To switch the services on/o, tap the Checkbox.
›
Connection status of the online services
The connection status of the online services of ŠKODA Connect online services is indicated by an icon in
the status bar on the Infotainment screen.
A
B
ŠKODA Connect (online services)
Delete user
Delete
.
ŠKODA Connect (online services)
New owner
Change ownership
Change main users
ŠKODA Connect (online services)
.
The ŠKODA Connect online services are available.
At the same time the symbol of the data connection type can be displayed.
The ŠKODA Connect online services are not
available.
Registration
.
Registration
.
.
.
Privacy settings and
.

Infotainment Swing › ŠKODA Connect online services
79
Localisation services are restricted or disabled.
C
Detailed information about the online services
can be viewed in the Online Services Administration.
Localisation services are enabled.
D
Detailed information about the online services
can be viewed in the Online Services Administration.
Localisation services
For the complete functionality of some online services, activated localisation services are required.
Localisation services include, for example, information on the last parking position, area notification or
speed notification.
When localisation services are active, the symbol
will be displayed in the status line in the Infotainment
screen.
Switch Private mode function on/o
By switching the Private mode function on, the services relating to sending vehicle information and personal data, which are essential for the provision of
online services, are deactivated.
Tap
›
Private mode
NOTICE
The emergency call remains fully functional after
turning on the private mode feature.
The functions of the information and breakdown call
are limited.
Switch Care Connect function on/o
By switching the Care Connect services o, the services relating to sending vehicle information and personal data, which are essential for the provision of
Care Connect online services, are deactivated.
Tap
›
Care Connect
NOTICE
The emergency call remains fully functional after
turning o the Care Connect feature.
The functions of the information and breakdown call
are limited.
Switch online services on/o
It is possible to have the online services switched
o/on exclusively by a ŠKODA service partner.
After turning o the online services, none of the
ŠKODA Connect online services, including the
emergency calls are functioning.
ŠKODA Connect (online services)
.
ŠKODA Connect (online services)
.
Services Management
Services Management
To inform the vehicle
user that the ŠKODA
Connect online services
are out of order, the
service partner applies
the sticker at a visible point in the vehicle (e.g. on the
roof cladding).
This sticker must not be removedas long as the online services are o.
NOTICE
It should be noted that the emergency, information
and breakdown calls are not available after switching
o the online services.
For this reason, no automatic emergency call is made
in the event of a serious car accident.

80
Infotainment Bolero › Infotainment overview
Infotainment Bolero
Infotainment overview
Touchscreen
A
Rotary control on the left
Press: Switch Infotainment on/o
▶
Turn: Adjust Volume
▶
Rotary control on the right
Press: Confirm menu item
▶
Turn: select menu item/set value
▶
Radio menu
Media menu
Phone menu
Voice control
Infotainment settings
SmartLink menu
Information about vehicle settings
Overview of Infotainment menus
System
Infotainment Menus
MENU menu
The MENU menu contains all available Infotainment
menus.
To Display the menu tap .
›
The graphic display type for the MENU menu can be
set.
Grid display
List
Restriction
For safety reasons, operation of some Infotainment
functions while driving is not possible or is restricted.
The Infotainment system indicates this by means of
a message in the screen.
Basic settings
Setting basic functions
The following Infotainment functions are set in the
menu.
Time and date.
▶
Language.
▶
Units.
▶
Restore factory settings.
▶
Sound settings
The Infotainment sound is set in the menu
The following menu items can be set.
Setting the equalizer.
▶
Adjusting the volume ratio.
▶
Volume adjustment of individual Infotainment
▶
functions.
Some are adjustable, for example the following
menu items.
▶
Volume adjustment of voice commands.
▶
Setting the maximum volume when Infotainment
is turned on.
▶
Speed-dependent volume setting.
▶
Setting the Infotainment to mute with the parking aid switched on.
.

Infotainment Bolero › Screen
81
Depending on the equipment, the following advanced sound settings can be set.
Setting space optimisation.
▶
Setting the audio profiles according to genre.
▶
Adjusting the subwoofer volume.
▶
Configuration wizard
The configuration wizard helps to set certain Infotainment functions.
The configuration wizard is automatically displayed
if, after switching on the Infotainment system, there
are at least two menu items that have not been set
or if a new user account has been selected.
To switch o the automatic display, tap on
›
show again
when the configuration wizard is displayed.
For manual display, tap on
›
ard
.
Setting the MENU
The graphic display type for the MENU menu can be
set as follows.
Screen
›
Select one of the following menu items.
›
Grid display
▶
▶
Safely disconnect the connected USB device
Risk of damage to the data on the connected device!
To safely disconnect/remove the device, proceed as
follows.
›
›
›
- Grid display.
Horizont. Display
NOTICE
Tap
Select the desired device.
Disconnect/remove the device.
Menu:
- horizontal display.
Remove safely:
.
Don't
Configuration wiz-
Troubleshooting
Infotainment not responding
The Infotainment system must be restarted.
Press for more than 10 s.
›
Wait for the restart to complete.
›
System update
We recommend having the system update carried
out by a specialist company.
The system update ensures optimal function of the
Infotainment system, e.g. compatibility with new
phones.
Determine system version
Tap
›
System information
.
Manual update
For information on available updates, please refer to
the ŠKODA internet pages.
http://go.skoda.eu/updateportal
▶
Visit available updates.
›
Save the update to a USB source.
›
Insert the USB source into the front USB input.
›
Tap
›
Select the connected USB device as the update
›
source.
Go to the update file and confirm the update.
›
Confirm any messages and wait for the update
›
process to be completed.
System information
Update software
.
Screen
Overview
Status bar
A
Bar with the functional surfaces of the displayed
B
menu
Other pages of the menu
C
Operation
NOTICE
Danger of screen damage!
The Infotainment screen is operated by touching it
▶
lightly with your finger.
In principle, operation by touch is identical to the operation of a mobile phone.
The following operating modes are specific to the Infotainment system.

82
Infotainment Bolero › Infotainment keyboard
Dragging up or down with two fingers
Quickly review the list
▶
of phone contacts.
Pulling apart with two fingers
Enlarge image.
▶
Pulling together with two fingers
Minimize image.
▶
Settings
The following basic screen functions are set in the
Screen
menu.
Brightness level of the screen.
▶
Switch o the screen.
▶
Display the time.
▶
Confirmation sounds and animations.
▶
Keypad for search.
▶
Keypad example
Input line
A
▶
Delete characters before the cursor
▶
Tap: delete the last character
▶
Hold: delete all characters in sequence
▶
Show list of searched entries
Keypad functional surfaces
B
▶
Change to lowercase
▶
Switch to the first capital letter, followed by
lowercase letters
▶
/ Switch to the language keypad
▶
Switch to the numeric and character key-
pad
▶
Show additional keypad languages
▶
Insert a space
▶
Hold: Show additional character variants
▶
Move cursor to the left
▶
Move cursor to the right
▶
Confirm the characters that have been en-
tered
Numeric keypad
Infotainment keyboard
Keypad overview
The arrangement of the keypad characters depends
on the Infotainment language that has been set.
In Infotainment, the following types are used, depending on the context.
Alphanumeric.
▶
Numeric.
▶
Keypad for input.
▶
Keypad example
Input line
A
▶
Delete characters before the cursor
▶
Tap: delete the last character
▶
Hold: delete all characters
Keypad functional surfaces
B
Confirm the characters that have been entered
▶

Infotainment Bolero › Voice control
83
If context-sensitive, alphanumeric characters can
be entered by holding a functional surface with a
digit.
Operation
The Infotainment keypad is used to enter characters,
letters and numbers.
The keypad will be automatically displayed when Infotainment prompts for characters.
Find
During the character input, a search for corresponding entries takes place.
The entry to be searched can be entered, including
diacritics.
The keypad will only provide characters that match
the stored entries.
To display the searched entries, tap
›
Show additional keypad languages
To use the additional keypad languages, the desired
languages must be set first.
or repeatedly tap the flag symbol until the
Tap
›
desired language keypad is displayed.
Further character variants
Press and hold the sign with the symbol .
›
Select the desired symbol.
›
.
Setting additional keypad languages
Tap
›
Additional keypad languages
.
Voice control
Functionality
Voice control principle
Voice control works according to the principle of
dialogue between the user and the Infotainment system.
The user says a voice command. The Infotainment
system responds or executes the voice command.
Conditions
✓ Ignition is switched on.
✓ Infotainment is switched on.
✓ No telephone conversation can be held via Info-
tainment.
Operation
Voice control process
To turn on voice control, press the button on
›
the multifunction steering wheel.
Or:
Tap on .
›
After switching on, the icon is displayed.
Say a voice command.
›
During recognition of the voice command, the
is displayed.
The Infotainment system then executes the voice
command or plays the message. During the message,
the icon is displayed.
After the execution of the voice command, voice
control is switched o.
Correcting a voice command
During voice command input, press the button
›
on the multifunction steering wheel and say a new
voice command.
Stopping voice control
Stopping leaves more time for voice command input,
e.g. for searching for a phone contact.
Move your finger up or down over the Infotain-
›
ment screen.
Or:
pause
Say the “
›
Resuming stopped voice control
Press the button on the multifunction steering
›
wheel.
Or:
Tap on in the Infotainment screen.
›
Stopping the played back message
Press the button on the multifunction steering
›
wheel.
Ending voice control
Press and hold the button on the multifunction
›
steering wheel.
Or:
Say the voice command “
›
mand input.
” voice command.
cancel
” during voice com-
icon
Restriction
For some Infotainment languages, no voice control is
available. The Infotainment system will indicate this.
The messages are generated by the Infotainment
system. Flawless clarity (e.g. road or city name) cannot always be guaranteed.

84
Infotainment Bolero › Radio
You cannot use voice control while a phone call is in
progress.
Settings
The following voice control functions are set in the
menu
Confirmation tones.
▶
Display of sample commands.
▶
Voice control
.
Self-help
Starting acoustic help
If the Infotainment system is expecting a voice
›
command, say “
The “
Help
” voice command can be issued repeatedly
for further tips on voice control.
Activate/deactivate the display of example voice
commands in the Infotainment screen.
The system oers the option of displaying example
voice commands after switching on the voice control in the Infotainment screen.
To turn on/o
›
commands (Infotainment system)
Activate/deactivate display of example voice commands in the instrument cluster display
The system oers the option of displaying example
voice commands after switching on the voice control in the Instrument cluster screen.
To turn on/o
›
commands (Instrument cluster)
Help
”.
.
.
voice control
tap on
voice control
tap on
Example
Example
Depending on the frequency range
B
FM: Radio text
DAB: Name of the station group
Preset buttons for preferred stations
C
List of available stations
Manual station search
Display information about the station (applies to
DAB)
Settings
Infotainment supports digital radio reception in
DAB and DAB+ formats.
List of available stations
To display, tap
›
Played station
Station stored on the presets
A trac radio station is set
DAB signal is not available
The DAB station reception is not stable
To filter the FM stations into alphabetical order,
tap according to group or genre.
The prerequisite for the filtering option is ensuring RDS and AF functions are activated.
Manual update of the station list
In the FM station list, information about the programme type and the type of the regional station
can be displayed.
.
Operation
Select station
Radio
Overview
Display main menu
Tap on .
›
Or:
Tap on .
›
Analogue and digital radio reception
Select frequency range
A
Tap or at the top of the screen.
›
SCAN function
The function plays receivable stations of the selected frequency range in succession for a few seconds
each.
Scan
To start automatic play press
›
rotary control .
To end automatic play press or the right rotary
›
control .
Find stations manually
In the Radio main menu, tap
›
or the right
.

Infotainment Bolero › Radio
85
To search in sequence, tap or next to the dis-
›
played frequency range scale.
Or:
Hold down the scroll mark on the frequency range
›
scale and move it to the desired value.
Or:
Turn the right rotary control .
›
Restriction
Parking garages, tunnels, tall buildings or moun-
▶
tains can restrict radio reception.
In the rear side windows, there are antennas for re-
▶
ceiving the radio signal.
Covering the panes with foils or metal-coated la-
bels may aect the reception of the radio signal.
Settings
Save the station currently being listened to as a favourite from the Radio main menu
Hold the desired station key for preferred stations
›
until the station is stored.
Save station to favourites from the list of available
stations
Hold the line with the name of the desired station.
›
Tap the desired preset button.
›
Delete favourites
In the Radio main menu , tap
›
To delete one preset button for preferred stations,
›
tap the desired station button and confirm the deletion.
To delete all preset buttons for preferred stations,
›
All
and confirm the deletion.
tap
Buttons
Applies to AM, FM and DAB frequency ranges.
The variant for changing stations using buttons
in the Radio main menu is set as follows.
›
›
Trac reception (TP) for FM stations on/o
Applies to the FM frequency range.
›
Switch trac reception for DAB stations on/o
Applies to the DAB frequency range.
›
›
In the Radio main menu, tap
Choose the change variant.
In the Radio main menu, tap
In the Radio main menu, turn on menu item
fic Radio (TP)
In the Radio main menu, tap
trac programme announcements (TP)
.
Delete presets
Arrow buttons:
Trac program (TP)
Advanced settings
on/o.
.
.
.
Traf-
DAB
Assign station logo from an external source
Applies to AM, FM and DAB frequency ranges.
Infotainment oers the option to assign logos from
the pictures on an external source to the station buttons.
For station logos, images in jpg, gif, png, bmp format
with a maximum resolution of 500x500 pixels can be
used.
In the Radio main menu, tap
›
Tap the desired preset button.
›
Select the external source with the logo.
›
Find the desired logo and confirm.
›
The information for updating station logos is taken
from the ŠKODA web pages.
http://go.skoda.eu/updateportal
▶
Delete station logos
Applies to AM, FM and DAB frequency ranges.
In the Radio main menu, tap
›
To delete a logo, tap the desired preset button and
›
confirm the deletion.
To delete all logos, tap on
›
tion.
Activating / deactivating automatic station logo
assignment
Applies to the FM and DAB frequency ranges.
When the function is switched on, a station logo
from the Infotainment memory is assigned when the
station is stored on a preset.
In the Radio main menu, tap on
›
Autostore station logos
Regional FM station logo
Applies to the FM frequency range.
Infotainment provides the option of using countryspecific FM station logos.
In the Radio main menu, tap on
›
Region for station logo:
Choose the country.
›
Turn on/o radio text reception
Applies to the FM and DAB frequency ranges.
When the function is switched on and station presets are displayed, detailed information about the
broadcast content of the FM station being listened
to, or the name of the station group for the DAB station, is displayed.
In the Radio main menu, tap
›
.
.
Station logos
.
Station logos:
All
and confirm the dele-
Radio text
.
Advanced settings
Advanced settings
.

86
Infotainment Bolero › Media
Switch automatic frequency control (AF) on/o
Applies to the FM frequency range.
When the function is switched on and the signal of
the FM station currently being listened to is weak,
Infotainment automatically sets the same station to
a dierent frequency with a better signal.
In the Radio main menu, tap on
›
Automatic frequency control (AF)
Automatic change of frequency to a regionally
linked FM station
Applies to the FM frequency range.
Infotainment provides the option of automatically
switching to a regionally linked FM station in case of
signal loss of the FM station being listened to.
In the Radio main menu, tap on
›
RDS Regional:
Select one of the following menu items.
›
Fixed
▶
must be set manually.
Automatic
▶
the best signal reception.
If reception is lost in the given region, Infotainment
will automatically set another available region.
Switch RDS on/o
Applies to the FM frequency range.
The menu item is only available for some countries.
In the Radio main menu, tap
›
Data System (RDS)
If the RDS function is disabled, the following menu
items in FM station settings are not available.
Trac programme (TP).
▶
Radio text.
▶
RDS Regional.
▶
Automatic frequency change (AF).
▶
Regional station logo.
▶
Switch additional DAB announcements on/o
Applies to the DAB frequency range.
When the function is switched on, other announcements are received as trac announcements. For example, weather news, sports reports, financial news,
etc.
In the Radio main menu, tap on
›
Other DAB announcements
Enable/disable automatic programme tracking of a
DAB station
Applies to the DAB frequency range.
When the function is switched on and the DAB station is lost, Infotainment automatically changes to
the same station with a better signal in a dierent
DAB station group.
.
- If there is a loss of signal, another station
- automatic selection of the station with
.
.
.
Advanced settings
Advanced settings
Advanced settings
Advanced settings
Radio
In the Radio main menu, tap on
›
DAB - DAB station tracking
Turn on/o automatic switching from a DAB station to the same FM station
Applies to the DAB frequency range.
When the function is switched on and the DAB station being listened to is lost, Infotainment automatically changes to the same FM station. The symbol
(FM) is displayed after the station name.
When the corresponding DAB station can be received again, the station automatically changes from
FM to DAB.
In the Radio main menu, tap on
›
Automatic DAB - FM switching
Activating/deactivating reception of DAB transmitter in the L band
In some countries, the DAB radio reception is only
available as a so-called LBand.
In the Radio main menu, tap
›
Band:
.
If there is no DAB radio reception available in the
L-band in your country, we recommend turning the
L-band o.
The DAB channel scan is therefore faster.
.
.
Advanced settings
Advanced settings
Advanced settings
L-
Media
What you should be mindful of
Do not save any important data or that which has
▶
not been backed up on the connected audio sources. ŠKODA assumes no responsibility for lost or
damaged files or connected audio sources.
When changing or connecting an audio source, this
▶
may cause sudden changes in volume. Reduce the
volume before changing or connecting an audio
source.
When connecting an audio source, the source in-
▶
formation messages can be displayed. These messages must be observed and, if necessary, con-
firmed.
The national copyright laws that apply in your
▶
country must be observed.
Overview
Display main menu
Tap on .
›
Or:
Tap on .
›

Select source
A
Manage files / multimedia database
Settings
Operation
Operation - Basics
Album image / symbol of the connected source
A
Tap: display available albums
Tap: start playback
Tap: pause
Within 3 seconds of starting playback, tap: play
the previous song
After 3 seconds from the start of playback, tap
to play the current title from the beginning
Hold: fast rewind within the title
Tap: play the next song
Hold: fast forward within the title
Movement within the title is also possible by dragging the finger over the timeline.
Extended operation
Turn repeat playback of the current track on/o
Turn repeat playback of the current album/folder on/o
Turn random playback of the current album/
folder on/o
Settings
Turn title playback including subfolders on/o
In the Media main menu, tap on
›
subfolders
.
Mix/Repeat including
Infotainment Bolero › Media
Trac
To turn on/o the trac monitoring during the
›
playback of media files, go to the Media main menu
and tap on Trac programme (TP).
Safely disconnect the connected device
NOTICE
Risk of damage to the data on the connected device!
To safely disconnect/remove the device, proceed as
follows.
In the Media main menu, tap
›
Select the desired device.
›
Disconnect/remove the device.
›
Bluetooth® player
Infotainment allows audio files of a connected Bluetooth® player to play using the A2DP and AVRCP audio profile.
With Infotainment, multiple devices can be paired
using Bluetooth®, but only one of them can be used
as a Bluetooth® player.
For connecting the Bluetooth® player, pair and
›
connect the device via Bluetooth®.
In the Media main menu , tap on
›
devices
.
In the list, choose the device with the symbol .
›
If a device is connected to Infotainment using
Apple CarPlay or Android Auto, then it cannot be
connected using Bluetooth®.
SD card
NOTICE
Risk of damaging the SD card reader!
Do not use SD cards with a broken slide for write
▶
protection.
To insert the SD card, with the bevelled corner to
›
the right, push into the slot in the external module
until it snaps into place.
To remove, first disconnect the SD card safely. To
›
do this in the Media main menu, tap
and select the SD card.
Press on the inserted SD memory card.
›
The SD card moves to the eject position.
NOTICE
When using an SD card with an adapter, vehicle vibrations might cause the card to fall out of the
adapter.
USB device
To connect, insert the USB device into the appro-
›
priate port.
To play audio files, use USB ports that support data
transfer.
Safely remove:
Bluetooth
Remove safely:
.
paired
87

88
Infotainment Bolero › Media
To disconnect disconnect the USB device first. To
›
do this in the Media main menu, tap
ly:
and select the USB device.
Disconnect the USB device.
›
A USB device can be connected directly to the
USB port or via a connection cable.
We recommend that you use extension cables from
ŠKODA Original Accessories.
USB extension cables or reducers may aect the
playback function of the connected device.
Load USB audio source
After connecting the USB device, charging will start
automatically when the following conditions are met.
Remove safe-
✓ The ignition is switched on.
✓ The USB device allows charging.
The charging eciency can be dierent compared to
the charging from the usual mains power supply.
Depending on the type of the connected USB device
and the frequency of use, the charging current may
not be sucient to charge the battery of the connected device.
Some connected audio sources may not be recognised and cannot be charged.
Supported sources and files
Source Interface Type Specification File system
SD card SD card reader Standard size
USB
Bluetooth® player Bluetooth® -
Supported sources
USB 1.x; 2.x 3.x
or higher with USB
2.x support
MSC
MTP
Apple
(without special soft-
USB devices that use
the USB mass storage
Devices running the An-
droid or Windows Phone
operating system that
Devices with an iOS op-
Bluetooth® protocols
A2DP and AVRCP (1.0 -
SD
SDHC
SDXC
USB stick
HDD
ware)
support protocol
support the Media
Transfer Protocol
erating system
1.5)
FAT16
FAT32
exFAT
NTFS
HFS+
-
The GPT standards (GUID partition table) method structured audio sources are not supported by Infotainment.
Viewing images on the Infotainment screen is not supported by connected Apple devices.
Compatibility of mobile devices
It is possible to check the ŠKODA web pages to see if Infotainment is compatible with the selected mobile
device being tested. This check is carried out by using the following reference or by reading the QR code.
http://go.skoda.eu/compatibility
▶

Infotainment Bolero › Images
89
Compression for-
mat
MPEG
WMA
FLAC FLAC flac
OGG-Vorbis OGC-Vorbis ogg
ADTS
RIFF WAV wav 64 - 3072
Supported audio files
Codec type File exten-
MPEG 1 Layer 3 mp3 32 - 320 32, 44, 48
MPEG 2 Layer 3
MPEG 2.5 Layer 3 8, 11, 12
Windows Media
Audio 9 and 9.1
Windows Media
Audio 9.2
Windows Media
Audio 10
AAC LC
AAC HE
AAC HEv2
sion
mp3 8 - 160
wma
aac 16 - 400
Max. bit rate
[kbps]
8 - 384
8 - 320
8 - 768
defined by the
format
Approx. 5.5 Mbps
defined by the
format
Approx. 5.5 Mbps
Max. sam-
pling rate
[kHz]
16, 22, 24 Mono,
8, 11, 12, 16,
22, 32, 44,
48
32, 44, 48,
96
8, 11, 12, 16,
22, 24, 32,
44, 48, 64,
88, 96
8, 11, 12, 16,
22, 24, 32,
44, 48
22, 24, 32,
44, 48
16, 22, 24,
32, 44, 48
8, 11, 12, 16,
22, 24, 32,
44, 48, 96
Multi channels
Mono, dual mono,
Stereo, Joint
Stereo
Stereo, Joint
Stereo
Mono, Stereo,
Joint stereo
Mono, Stereo,
5.1, 7.1
Mono,
Stereo
Mono,
Stereo
Mono,
Stereo
Files that are protected by the DRM- and iTunes® methods are not supported by Infotainment.
Codec type File extension
M3U m3u
M3U8 m3u8
PLS pls
WPL wpl
ASX asx
Supported playlists
PLA pls
Images
Overview
Display main menu
Tap on .
›

90
Infotainment Bolero › Images
Select source
A
Manage files
Settings
Operation
Touch operation
Look at images
A
▶
Show the next image
▶
Show the previous image
▶
Start slideshow
▶
Stop slideshow
View image
B
▶
Turn to the left
▶
Turn to the right
▶
Display in initial size
Gesture control
Show the next image.
▶
Show the previous im-
▶
age.
Enlarge view.
▶
Zoom out.
▶
Maximize image/
▶
display image size.
Settings
The following Infotainment functions are set in the
menu.
Display image size.
▶
Display image duration during the slideshow.
▶
Slideshow repeat.
▶

Infotainment Bolero › Mobile device management
91
Supported sources and files
Source Interface Specifica-
Standard
SD card
USB
SD card
reader
USB 1.x; 2.x
3.x
or higher
with USB
2.x support
USB stick
(without
software)
tion
size
SD
SDHC
SDXC
HDD
special
File system
FAT16
FAT32
exFAT
NTFS
Supported sources
Codec type File extension Max. resolution
[Mpx]
BMP bmp 4
JPG; JPEG jpg; jpeg 4 (Progressive
Mode)
64
GIF gif 4
PNG png 4
Supported files
The maximum supported image size is 20 MB.
Mobile device management
Overview
Mobile device management
In the Telephone main menu , tap on the functional surface
›
In the list of paired mobile devices, the following symbols may appear for the individual devices.
Grey icon - the device can be connected as a telephone.
Green icon - the device is connected as a telephone.
Grey icon - the device can be connected as a Bluetooth® player.
White icon - the device is connected as a Bluetooth® player.
Possible functions of the connected mobile device
The functions of a device connected via over the HFP Bluetooth profile depends on the following connection
types.
Bluetooth
paired devices
.
First device
Main phone
Second device
Additional phone
incoming / outgoing calls
SMS
Telephone contacts
incoming calls
Bluetooth® player
Bluetooth® player
With Infotainment only a mobile device can be connected as a Bluetooth® player.
After reaching the maximum number, the pairing
Limitations of mobile devices and applications
Availability of features
The availability of certain features depends on the
type of mobile device, as well as that of the applications installed.
Connection restrictions
With Infotainment, a max. of 20 mobile devices are
▶
paired.
The range of the connection of the mobile device
▶
to Infotainment is limited to the passenger compartment.
▶
of the next mobile device will replace that of the
device that has not been used for the longest period of time.
Compatibility of mobile devices
It is possible to check the ŠKODA web pages to see
if Infotainment is compatible with the selected mobile device being tested. This check is carried out by
using the following reference or by reading the QR
code.
http://go.skoda.eu/compatibility
▶

92
Infotainment Bolero › Telephone
Bluetooth® compatibility of mobile devices
Due to the large number of mobile devices, it is not
possible to guarantee total Bluetooth® compatibility
with Infotainment. Bluetooth® compatibility depends
on the Bluetooth® version as well as the implementation of Bluetooth® protocols by the manufacturer of
the mobile device.
Applications in mobile devices
Mobile devices can be used to install applications
that allow you to view additional information on the
Infotainment screen, or to operate the Infotainment
system.
Due to the variety of applications, as well as their ongoing development, the available applications may
not function on all mobile devices. ŠKODA AUTO assumes no liability for their proper functioning.
The scope of available applications and their functionality is dependent on the type of Infotainment, as
well as the vehicle and country.
Connection set-up
Connect a mobile device to Infotainment
Turn on the ignition.
›
Turn on the Bluetooth® on the mobile device.
›
Turn on the Bluetooth® on Infotainment
›
Bluetooth
Bluetooth
.
Turn on the Bluetooth® visibility of the Infotain-
›
ment
Find available Bluetooth® devices in the mobile de-
›
vice.
Select the Infotainment Bluetooth® unit.
›
The name of the unit can be found by tapping
Bluetooth
Confirm the PIN; enter it if necessary and then
›
confirm.
The mobile device is connected to the Infotainment
or just paired, depending on the number of devices
that are already connected.
Connect Infotainment to a non-paired mobile device
Turn on the ignition.
›
Turn on the Bluetooth® on the mobile device.
›
Turn on the Bluetooth® on Infotainment
›
Bluetooth
Tap on
›
Select the desired device from the list of Blue-
›
tooth® devices.
Name:
Bluetooth
.
Bluetooth
.
Bluetooth
Visibility:
Visible
Search for devices
.
.
Confirm the PIN; enter it if necessary and then
›
confirm.
If two devices are connected to the Infotainment,
›
select the device to be replaced.
Connect Infotainment to a mobile device that is
not already paired
The connection with an already coupled mobile device is made automatically after switching on the ignition; if necessary the device can be connected
manually as follows.
Turn on the ignition.
›
Turn on the Bluetooth® on the mobile device.
›
Turn on the Bluetooth® on Infotainment
›
Bluetooth
Bluetooth
.
Tap
›
In the device list, select the desired device and the
›
Bluetooth® profile.
Confirm the PIN; enter it if necessary and then
›
confirm.
If two devices are connected to the Infotainment,
›
select the device to be replaced.
Disconnect from a mobile device
Tap
›
Tap on the Bluetooth® profile icon of the desired
›
mobile device.
Delete a paired mobile device
Tap
›
To delete a mobile device, tap and confirm the
›
deletion.
To delete all mobile devices, tap on
›
firm the deletion.
Bluetooth
Bluetooth
Bluetooth
Paired devices
Paired devices
Paired devices
.
.
.
Delete all
and con-
Telephone
Telephone main menu
Display main menu
Tap on .
›
Or:
Tap on .
›
Name of the connected telephone
A
Tap: Show list of previously connected phones
▶
Preset buttons for preferred contacts
B

Choice of storage group for the preferred con-
C
tacts
Name of telephone service providers
D
▶
If the symbol is displayed in front of the name,
roaming is active.
Symbol for the connection type
E
Status symbol of the phone
F
Change the main phone to the extension telephone
Enter the telephone number
Contact list
Text messages
Call lists
Settings
Conditions for connecting a telephone with
Infotainment
✓ The ignition is switched on.
✓ The Bluetooth® function of the Infotainment and
the telephone needs to be switched on.
The Bluetooth® function of the Infotainment is
switched on in the menu item
Bluetooth
.
✓ Visibility of the Infotainment is switched on.
The visibility of the Infotainment is switched on in
the menu item
✓ The telephone is within signal range of the Info-
tainment's Bluetooth® unit.
✓ The telephone is compatible with Infotainment.
✓ Through Infotainment, no mobile device can be
connected using Apple CarPlay.
Bluetooth
Visibility:
Bluetooth
.
Visible
Telephone operation
Enter telephone number
In the Telephone main menu, tap
›
Enter the telephone number using the numeric
›
keypad that is displayed.
The displayed numeric keypad can also be used
for searching for contacts.
If, for example, the digits 32 are entered, contacts
with the letter sequence DA, FA, EB etc. are displayed next to the numeric keypad.
List of telephone contacts
The list of telephone contacts is imported from the
connected main telephone.
To display the contact list in the telephone main
›
menu, tap
To find details within the list, tap
›
.
.
Find
.
Infotainment Bolero › Telephone
Enter the details you wish to find.
›
To establish a connection with a contact, tap the
›
functional area showing the desired contact.
If a contact has multiple telephone numbers, select
the telephone number from the displayed list.
To display the details for a contact, tap
›
Establish a connection to the voice mailbox number
In the Telephone main menu, tap .
›
Telephone conversation
Depending on the context of the telephone conversation, the following functions can be selected.
End connection / reject incoming call / end call
Answer an incoming call / return to the held call
Switch the ringer o / on
/
Hold a call
Switch the microphone o / on
/
Show details of the caller
Set up a conference call
To switch the call tone from the speakers to the
›
telephone, go to the telephone main menu and tap
hands-free
on
To switch the call tone from the telephone to the
›
speakers, tap .
Conference call
A conference call is a joint telephone conversation
with a minimum of three and a maximum of six participants.
.
Make the next call during an ongoing conversation/
›
conference.
Or:
Accept a new incoming call by tapping the function
›
area
To start a conference call, tap on the functional
›
area .
During an ongoing conference call, the following
functions can be selected depending on the context.
Hold the conference call and leave temporarily
(the conference will continue in the background)
Return to the conference being held
Switch the microphone o / on
/
End the conference
Show details of the conference call
In the details of the conference call, depending on
the connected telephone, the following functions
can be selected.
Show details of the conference call participants
End conversation with the conference call participant
Conversation with a participant outside of the
conference call
.
.
93
.

94
Infotainment Bolero › SmartLink
Send a text message
In the Telephone main menu, tap
›
sage
.
Write a text message and confirm; a view of the
›
message is displayed.
The message can be edited when the text area
within the view is tapped.
Consult or select the recipient of the message, if
›
necessary tap
Add more recipients or confirm selected recipi-
›
ents.
Tap on
›
Display received text messages
In the Telephone main menu, tap
›
To display the Message, select the desired mes-
›
sage.
The message content and the following menu with
functions is displayed.
Read the text message using the generated Infotainment voice.
Display the menu with the following functions
of an accepted message.
Option to answer the message by means of a
template.
Delete message.
Recognise phone numbers in the message.
Forward message, with the option to edit the
message before sending.
Reply to the sender by sending a message.
to enter the phone number.
.
New text mes-
E-mails
.
Depending on the type of telephone, import
mation may be required.
Update telephone contacts
When re-connecting the telephone with Infotainment, an automatic update of the list is carried out.
For a manual update of the list in the telephone
›
main menu, tap on
Show pictures on phone contacts
In the Telephone main menu, tap
›
pictures for contacts
Sort contacts in the phone book
In the Telephone main menu, tap on
›
Sort by:
.
Select the type by which to sort.
›
Ringer
Some phones do not allow the use of the telephone
ringtone; instead, the Infotainment ringtone is used.
To set the Infotainment ringer in the Telephone
›
main menu, tap on
Select the ringtone.
›
Number for the voice mailbox
To set the voice mailbox number in the Telephone
›
main menu, tap on
Enter the number of the voice mailbox.
›
Conference calls
To enable/disable the option for conference call
›
setup in the phone main menu, tap
User profile
Import contacts
.
User profile
Select ringtone
User profile Mailbox number:
confir-
.
User profile
User profile
.
.
conference
Show
.
Settings for Infotainment telephone functions
Manage preset buttons for preferred contacts
To save the desired preset button, press and hold.
›
Select a contact from the displayed list.
›
If the contact contains multiple telephone num-
›
bers, choose the desired telephone number.
To delete tap on Telephone
›
vourites
in the main menu.
To delete one preset, tap on the list entry and con-
›
firm the deletion.
Or:
To delete all presets, tap on
›
deletion.
Import telephone contacts
After first connecting the main telephone with Infotainment, telephone contacts will start to be imported into the Infotainment memory.
Infotainment can import up to 2000 telephone contacts together with contact pictures. Each contact
can include max. 5 telephone numbers.
User profile Manage fa-
Delete all
and confirm the
SmartLink
Functionality
SmartLink oers the ability to display and operate
certified applications from a connected mobile de-
vice in the Infotainment screen.
Certification may be conditional upon the use of the
latest update to the particular SmartLink application.
Applications include, for example, apps for route
guidance, telephoning, listening to music, etc.
Mobile devices can be connected via a USB cable.
Supported connection types
SmartLink supports the following connection types.
Android Auto.
▶
Apple CarPlay.
▶
MirrorLink.
▶
Overview of the SmartLink connection
Main menu SmartLink
Tap on .
›

Infotainment Bolero › SmartLink
95
Or:
Tap on
›
Previously connected device
A
Currently connected device
B
.
Display information about SmartLink
Separation of the active connection
Settings for the SmartLink menu
Android Auto
Navigation applications
Telephone applications
Overview of running applications, phone calls, in-
coming text messages, and more.
Music applications
Display of other available applications as well as
the option to return to the SmartLink main menu
Turn on voice control (Google Voice)
Apple CarPlay
List of available applications
A
Depending on the duration of operation:
Tap: Return to the Apple CarPlay main menu
▶
Hold: Switch on voice control (Siri)
▶
MirrorLink
It is not possible to operate the application while
driving
Return to the SmartLink main menu
List of running applications
Display of the last running application in connec-
ted mobile devices
Settings
Connection conditions
General connection conditions
✓ The mobile device supports the following Smar-
tLink connection types: Android Auto. Apple CarPlay and MirrorLink.
✓ Mobile devices, as well as the type of Smar-
tLinkconnection, are supported in the respective
market.
✓ Some connected mobile devices require the mo-
bile device to be “unlocked”.
Conditions for Android Auto
✓ The device to be connected must have Android
AutoSupport.
A list of devices, supported regions and applica-
tions that the Android Auto connection supports
can be found on the websites of Google Inc..
✓ The Android Auto application needs to be instal-
led on the mobile device.
✓ Some applications require the data connection in
the mobile device to be turned on.
Conditions for Apple CarPlay
✓ The device to be connected must have Apple
CarPlaySupport.
A list of devices, supported regions and applica-
tions that the Apple CarPlay connection supports
can be found on the websites of Apple Inc..
✓ Siri voice control is on.
✓ The data connection is switched on in the mobile
device.
Conditions for MirrorLink
✓ The device to be connected must have Mirror-
LinkSupport.

96
Infotainment Bolero › ŠKODA Connect online services
A list of devices and applications that the MirrorLink connection supports can be found on the
websites of Car Connectivity Consorcium®.
✓ The MirrorLink application needs to be installed
on the mobile device.
✓ Some applications require the data connection in
the connected mobile device to be turned on.
Operation
Operation of the running MirrorLink application
To display the following operation surfaces, press
›
the right rotary control
Display of control surfaces at the bottom
Display of control surfaces at the top
Return to the MirrorLink main menu
.
Restriction
Restriction of SmartLink applications while driving
For safety reasons, operation of some SmartLinkapplications while driving is not possible or is restricted.
Functionality restriction of Infotainment with an
Android Auto connection
For the duration of the connection, the external de-
▶
vice cannot be used as an audio source in the Me-
dia menu.
By connecting the device, all currently connected
▶
Bluetooth® devices will be disconnected and the
device will automatically be connected as the main
telephone.
For the duration of the connection, no other Blue-
▶
tooth® devices can be connected to the Infotainment system.
Functionality restriction of Infotainment with an
Apple CarPlay connection
For the duration of the connection, the external de-
▶
vice cannot be used as an audio source in the Me-
dia menu.
Connecting the device disconnects all currently
▶
connected Bluetooth® devices.
For the duration of the connection, no Bluetooth®
▶
devices can be connected to the Infotainment system.
Functionality restriction of Infotainment with an
MirrorLink connection
For the duration of the connection, the external de-
▶
vice cannot be used as an audio source in the Me-
dia menu.
If you wish to use the device to be connected in
▶
the Telephone menu, the device must be paired
with and connected to the Infotainment system by
Bluetooth® before establishing the MirrorLink connection.
Settings
Apple CarPlay - Connection via USB
Turn on the Infotainment.
›
Turn on the mobile device.
›
Connect the mobile device to the front USB input
›
using a cable.
Choose to connect via Apple CarPlay.
›
Apple CarPlay – Disconnection
In the Apple CarPlay main menu, tap on the “ŠKO-
›
DA” functional area.
Tap on
›
Android Auto - Connection via USB
Turn on the Infotainment.
›
Turn on the mobile device.
›
Connect the mobile device to the front USB input
›
using a cable.
Choose to connect via Android Auto.
›
Android Auto - Disconnection
In the main menu of Android Auto
›
turn to ŠKODA”.
Tap on .
›
MirrorLink - Connection via USB
Turn on the Infotainment.
›
Turn on the mobile device.
›
Connect the mobile device to the front USB input
›
using a cable.
Choose to connect through MirrorLink.
›
MirrorLink - Disconnection
In the MirrorLink main menu, tap
›
Tap on .
›
Change to another device / connection type
Infotainment allows you to switch between currently
connected devices and the connection type.
Tap on
›
Select the desired device or connection type.
›
.
tap on “Re-
.
.
ŠKODA Connect online services
Functionality
ŠKODA Connect online service oer the option of
connecting the vehicle to the online world. They thus
represent an extension of the vehicle and Infotainment functions.
For the functionality of the ŠKODA Connect Online
Services, the vehicle must be within range of a mobile network through which the services are provi-

Infotainment Bolero › ŠKODA Connect online services
97
ded. The availability, the connection speed and the
technology used in the mobile network can be dier-
ent in the respective countries and are dependent on
the mobile network operator.
The ŠKODA Connect online services are not included
in the equipment of the vehicle. They can be ordered
separately on the ŠKODA Connect Portal website or
in the ŠKODA Connect application.
The oer of ŠKODA Connect online services depends on the type of vehicle and its trim level, Infotainment and country. Availability in each country
can be checked on the ŠKODA Connect website.
The rights and obligations of the Parties with respect
to the provision of these services are governed by a
separate agreement. Current legal documents regarding the online services can be found on the
ŠKODA Connect Portal as well as the ŠKODA Connect application.
ŠKODA Connect website
http://go.skoda.eu/skoda-connect
▶
For example, the ŠKODA Connect website contains the latest information
about the online services, a link to the
ŠKODA Connect Portal as well as the
nect application.
ŠKODA Connect Portal website
http://go.skoda.eu/connect-portal
▶
Information call
The information call may be used in the case of problems with the online services or for information regarding the products and services of the ŠKODA
brand.
✓ The functional condition represents the active
Breakdown call
The breakdown call can be used in the event of a
breakdown.
option of downloading the ŠKODA Con-
The ŠKODA Connect Portal website is
used, for example, for registration, activation and ordering of online services. It
also provides the option of remote access to the vehicle.
online ŠKODA Connect services.
Press the
›
button.
✓
The functional condition represents the active
online ŠKODA Connect services.
Press the button.
›
ŠKODA Connect Application
The ŠKODA Connect application enables remote access to the vehicle using a mobile device. It can also
be used for user registration and to activate and
configure the online services.
The application can be downloaded to the mobile device after scanning the following QR code or link.
http://go.skoda.eu/skodaconnectapp
▶
Settings
Registration and activation of online services
User registration, as well as the activation of the
ŠKODA Connect online services, is completed on the
ŠKODA Connect Portal website or in the ŠKODA
Connect application.
In order to complete user registration, you will need
to access your e-mails.
In order to activate ŠKODA Connect, proceed as follows.
Switch on the ignition and the Infotainment.
›
Tap
›
Enter and confirm the registration PIN you have re-
›
ceived during user and vehicle registration on the
ŠKODA Connect Portal website or in the ŠKODA
Connect application.
Wait for the registration completion message to
›
appear.
Confirm any messages on the screen.
›
Delete user
Switch on the ignition and the Infotainment.
›
Tap
›
Tap
Delete user
›
Confirm the deletion.
›
By deleting the registered vehicle in the user account on the website ŠKODA Connect Portal the
user is also deleted in Infotainment.
ŠKODA Connect (online services)
ŠKODA Connect (online services)
Delete
.
Registration
Registration
.
.

98
Infotainment Bolero › ŠKODA Connect online services
Changing the user
Switch on the ignition and the Infotainment.
›
Tap
›
Tap
New owner
›
Enter and confirm the registration PIN code re-
›
ceived during registration of the new user and during vehicle registration on the ŠKODA Connect
Portal website.
If necessary, confirm the change by tapping the
›
function surface
Management of online services
In the service management, it is possible to display
information about the online services, the validity of
their licence, or to switch the services on/o.
Tap
›
and manage services
To display the designations and the status of the
›
services, select the desired service.
For detailed information about the service tap
›
To switch the services on/o, tap the Checkbox.
›
Connection status of the online services
The connection status of the online services of ŠKODA Connect online services is indicated by an icon in
the status bar on the Infotainment screen.
The ŠKODA Connect online services are availa-
A
ble.
At the same time the symbol of the data con-
nection type can be displayed.
The ŠKODA Connect online services are not
B
available.
Localisation services are restricted or disabled.
C
Detailed information about the online services
can be viewed in the Online Services Administration.
Localisation services are enabled.
D
Detailed information about the online services
can be viewed in the Online Services Administration.
Localisation services
For the complete functionality of some online services, activated localisation services are required.
ŠKODA Connect (online services)
Change ownership
Change main users
ŠKODA Connect (online services)
.
.
.
Registration
.
Privacy settings
Localisation services include, for example, information on the last parking position, area notification or
speed notification.
When localisation services are active, the symbol
will be displayed in the status line in the Infotainment
screen.
Switching Private mode function on/o
By switching the Private mode function on, the services relating to sending vehicle information and personal data, which are essential for the provision of
online services, are deactivated.
Tap
›
ment
turning on the private mode feature.
The functions of the information and breakdown call
are limited.
Switch Care Connect function on/o
.
By switching the Care Connect services o, the services relating to sending vehicle information and personal data, which are essential for the provision of
Care Connect online services, are deactivated.
Tap
›
ment
The emergency call remains fully functional after
turning o the Care Connect feature.
The functions of the information and breakdown call
are limited.
Switch online services on/o
It is possible to have the online services switched
o/on exclusively by a ŠKODA service partner.
After turning o the online services, none of the
ŠKODA Connect online services, including the
emergency calls are functioning.
point in the vehicle (e.g. on the roof cladding).
This sticker must not be removedas long as the on-
line services are o.
It should be noted that the emergency, information
and breakdown calls are not available after switching
o the online services.
For this reason, no automatic emergency call is made
in the event of a serious car accident.
Private mode
The emergency call remains fully functional after
Care Connect
NOTICE
NOTICE
ŠKODA Connect (online services)
.
ŠKODA Connect (online services)
.
To inform the vehicle
user that the ŠKODA
Connect online services
are out of order, the
service partner applies
the sticker at a visible
Services Manage-
Services Manage-
 Loading...