

Page 1

P-2302R-P1C
VoIP Station Gateway
Support Notes
Version 3.60
Oct. 2007
Page 2

P2302R-P1C Support Notes
2
INDEX
Application Notes ......................................................................................................... 6
General Application Notes .....................................................................................6
Internet Connection ........................................................................................ 6
Setup the the ZyXEL Device as a DHCP Relay .......................................... 11
Configure an Internal Server Behind SUA .................................................. 13
Configure a PPTP server Behind SUA ........................................................ 14
About Filter & Filter Examples ................................................................... 18
Using the Dynamic DNS (DDNS) ............................................................... 41
Network Management Using SNMP ........................................................... 42
Using SysLog ............................................................................................... 49
Using IP Alias .............................................................................................. 52
Using IP Multicast ....................................................................................... 56
Using Traffic Redirect Feature ..................................................................... 58
Using Universal Plug n Play (UPnP) ........................................................... 61
VoIP Application Notes ........................................................................................67
Setup SIP Account ....................................................................................... 67
Advanced voice settings configuration ........................................................ 71
Voice QoS .................................................................................................... 77
Phone port settings ....................................................................................... 78
Common Phone ............................................................................................ 79
Country Code ............................................................................................... 80
Call Forwarding ........................................................................................... 81
Call Hold ...................................................................................................... 84
Call Waiting ................................................................................................. 85
Three Way Conference ................................................................................ 86
Call Transfer ................................................................................................ 88
Internal Call ................................................................................................. 91
MWI ............................................................................................................. 91
Music on hold .............................................................................................. 92
Early Media .................................................................................................. 93
Call Park / Call Pickup ................................................................................. 94
Phone book Speed dial ................................................................................. 96
FAQ ............................................................................................................................. 99
ZyNOS FAQ ........................................................................................................99
What is ZyNOS? .......................................................................................... 99
All contents Copyright 2007 ZyXEL Communications Corporation.
Page 3

P2302R-P1C Support Notes
3
How do I access the embedded web configurator? ...................................... 99
What is the default LAN IP address and Password? Moreover, how do I
change it? ..................................................................................................... 99
How do I upload the ZyNOS firmware code via embedded web
configurator? .............................................................................................. 100
How do I upgrade/backup the ZyNOS firmware by using FTP client
program via LAN? ..................................................................................... 100
How do I upload or backup ROMFILE via web configurator? ................. 100
How do I backup/restore configurations by using FTP client program via
LAN?.......................................................................................................... 101
Why can't I make Telnet to The ZyXEL Device from WAN? .................. 101
What should I do if I forget the system password? .................................... 101
What is SUA? When should I use SUA? ................................................... 102
What is the difference between NAT and SUA? ....................................... 102
How many network users can the SUA/NAT support? ............................. 102
What are Device filters and Protocol filters? ............................................. 103
Why can't I configure device filters or protocol filters? ............................ 103
Product FAQ ......................................................................................................103
What is the ZyXEL Device Internet Access Sharing Router? ................... 103
Will the ZyXEL Device work with my Internet connection? .................... 103
What do I need to use the ZyXEL Device? ............................................... 104
What is PPPoE? ......................................................................................... 104
Does the ZyXEL Device support PPPoE? ................................................. 104
How do I know I am using PPPoE? ........................................................... 104
Why does my provider use PPPoE?........................................................... 104
Which Internet Applications can I use with the ZyXEL Device? .............. 104
How can I configure the ZyXEL Device? ................................................. 105
What network interface does the ZyXEL Device support? ....................... 105
What can we do with the ZyXEL Device? ................................................ 105
Does the ZyXEL Device support dynamic IP addressing? ........................ 105
What is the difference between the internal IP and the real IP from my ISP?
.................................................................................................................... 105
How does e-mail work through the ZyXEL Device? ................................ 105
What is the difference between the 'Standard' and 'RoadRunner' service? 106
Is it possible to access a server running behind SUA from the outside
Internet? If possible, how? ......................................................................... 106
What DHCP capability does the ZyXEL Device support? ........................ 106
All contents Copyright 2007 ZyXEL Communications Corporation.
Page 4

P2302R-P1C Support Notes
4
How do I used the reset button, more over what field of parameter will be
reset by reset button? ................................................................................. 106
What network interface does the new ZyXEL Device support? ................ 106
How does the ZyXEL Device support TFTP? ........................................... 107
Can the ZyXEL Device support TFTP over WAN? ................................... 107
How can I upload data to outside Internet over the one-way cable? ......... 107
How fast can the data go? .......................................................................... 107
My ZyXEL Device can not get an IP address from the ISP to connect to
the Internet, what can I do? ........................................................................ 108
What is BOOTP/DHCP?............................................................................ 110
What is DDNS?.......................................................................................... 110
When do I need DDNS service? ................................................................ 111
What DDNS servers does the ZyXEL Device support? ............................ 111
What is DDNS wildcard? ........................................................................... 111
Does the ZyXEL Device support DDNS wildcard? .................................. 111
Can the ZyXEL Device SUA handle IPsec packets sent by the VPN
gateway behind ZyXEL Device? ............................................................... 111
How do I setup my ZyXEL Device for routing IPsec packets over SUA? 112
VoIP FAQ ........................................................................................................... 112
What is Voice over IP? .............................................................................. 112
How does Voice over IP work? ................................................................. 112
Why use VoIP? .......................................................................................... 112
What is the relationship between codec and VoIP? ................................... 113
What advantage does Voice over IP can provide? ..................................... 113
What is the difference between H.323 and SIP? ........................................ 113
Can H.323 and SIP interoperate with one another? ................................... 113
What is voice quality? ................................................................................ 113
How are voice quality normally rated? ...................................................... 113
What is codec? ........................................................................................... 114
What is the relation of codec and VoIP? ................................................... 114
What codec does the ZyXEL Device support? .......................................... 114
Which codec should I choose? ................................................................... 114
What do I need in order to use SIP? .......................................................... 114
Unable to register with the SIP server?...................................................... 115
I can register but can not establish a call? .................................................. 115
I can make a call but the voice only goes one way not in both ways? ....... 115
I can receive a call but the voice only goes one way not bothway? .......... 115
All contents Copyright 2007 ZyXEL Communications Corporation.
Page 5

P2302R-P1C Support Notes
5
If all the about have been tried, but register still fail what should I do? .... 115
I suspect there is a hardware problem with my ZyXEL Device what should
I do? ........................................................................................................... 116
Trouble Shooting ...................................................................................................... 116
Unable to Get WAN IP from ISP ....................................................................... 116
Using Embedded Packet Trace .......................................................................... 119
Debug PPPoE Connection .................................................................................134
CLI Command List .................................................................................................. 145
All contents Copyright 2007 ZyXEL Communications Corporation.
Page 6
P2302R-P1C Support Notes
6
Application Notes
General Application Notes
Internet Connection
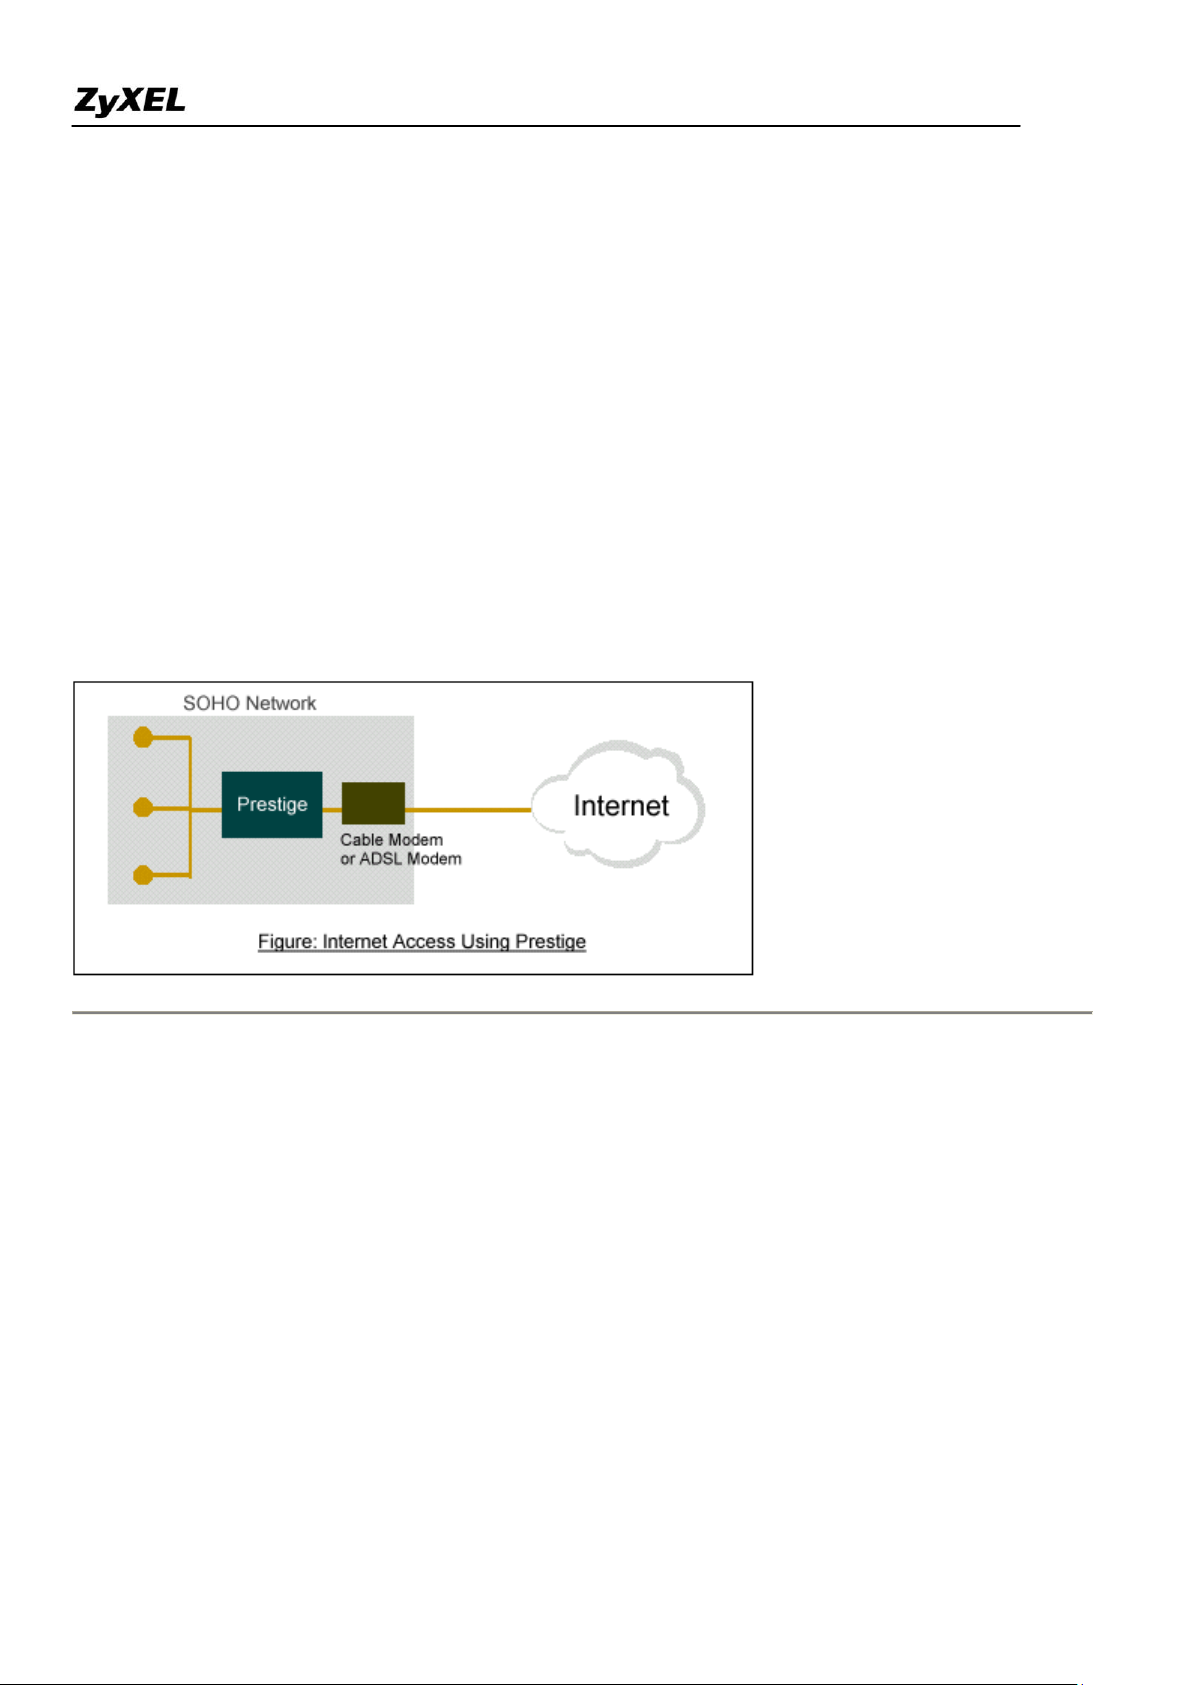
A typical Internet access application of the ZyXEL Device is shown below. For a small office, there are some
components needs to be checked before accessing the Internet.
Before you begin
Setting up the Windows
Setting up the ZyXEL Device
Troubleshooting
Before you begin
The ZyXEL Device is shipped with the following factory default:
1. IP address = 192.168.1.1, subnet mask = 255.255.255.0 (24 bits)
2. DHCP server enabled with IP pool starting from 192.168.1.33
3. Default SMT menu password = 1234
Setting up the PC (Windows OS)
1. Ethernet connection
All PCs must have an Ethernet adapter card installed.
All contents Copyright 2007 ZyXEL Communications Corporation.
Page 7

P2302R-P1C Support Notes
7
If you only have one PC, connect the PC's Ethernet adapter to the ZyXEL Device's LAN port with
a crossover (red one) Ethernet cable.
If you have more than one PC, both the PC's Ethernet adapters and the ZyXEL Device's LAN port
must be connected to an external hub with straight Ethernet cable.
2. TCP/IP Installation
You must first install TCP/IP software on each PC before you can use it for Internet access. If you have already
installed TCP/IP, go to the next section to configure it; otherwise, follow these steps to install:
In the Control Panel/Network window, click Add button.
In the Select Network Component Type windows, select Protocol and click Add.
In the Select Network Protocol windows, select Microsoft from the manufacturers, then select
TCP/IP from the Network Protocols and click OK.
3. TCP/IP Configuration
Follow these steps to configure Windows TCP/IP:
In the Control Panel/Network window, click the TCP/IP entry to select it and click Properties
button.
In the TCP/IP Properties window, select obtain an IP address automatically.
Note: Do not assign arbitrary IP address and subnet mask to your PCs, otherwise, you will not be able to access
the Internet.
Click the WINS configuration tab and select Disable WINS Resolution.
Click the Gateway tab. Highlight any installed gateways and click the Remove button until there
are none listed.
Click the DNS Configuration tab and select Disable DNS.
Click OK to save and close the TCP/IP properties window
Click OK to close the Network window. You will be prompted to insert your Windows CD or disk.
When the drivers are updated, you will be asked if you want to restart the PC. Make sure your
ZyXEL Device is powered on before answering Yes to the prompt. Repeat the above steps for
each Windows PC on your network.
Setting up the ZyXEL Device
All contents Copyright 2007 ZyXEL Communications Corporation.
Page 8
P2302R-P1C Support Notes
8
The following procedure is for the most typical usage of the ZyXEL Device where you have a single-user
account (SUA). The ZyXEL Device supports embedded web server that allows you to use Web browser to
configure it. Before configuring the router using Browser please be sure there is no Telnet or Console login.
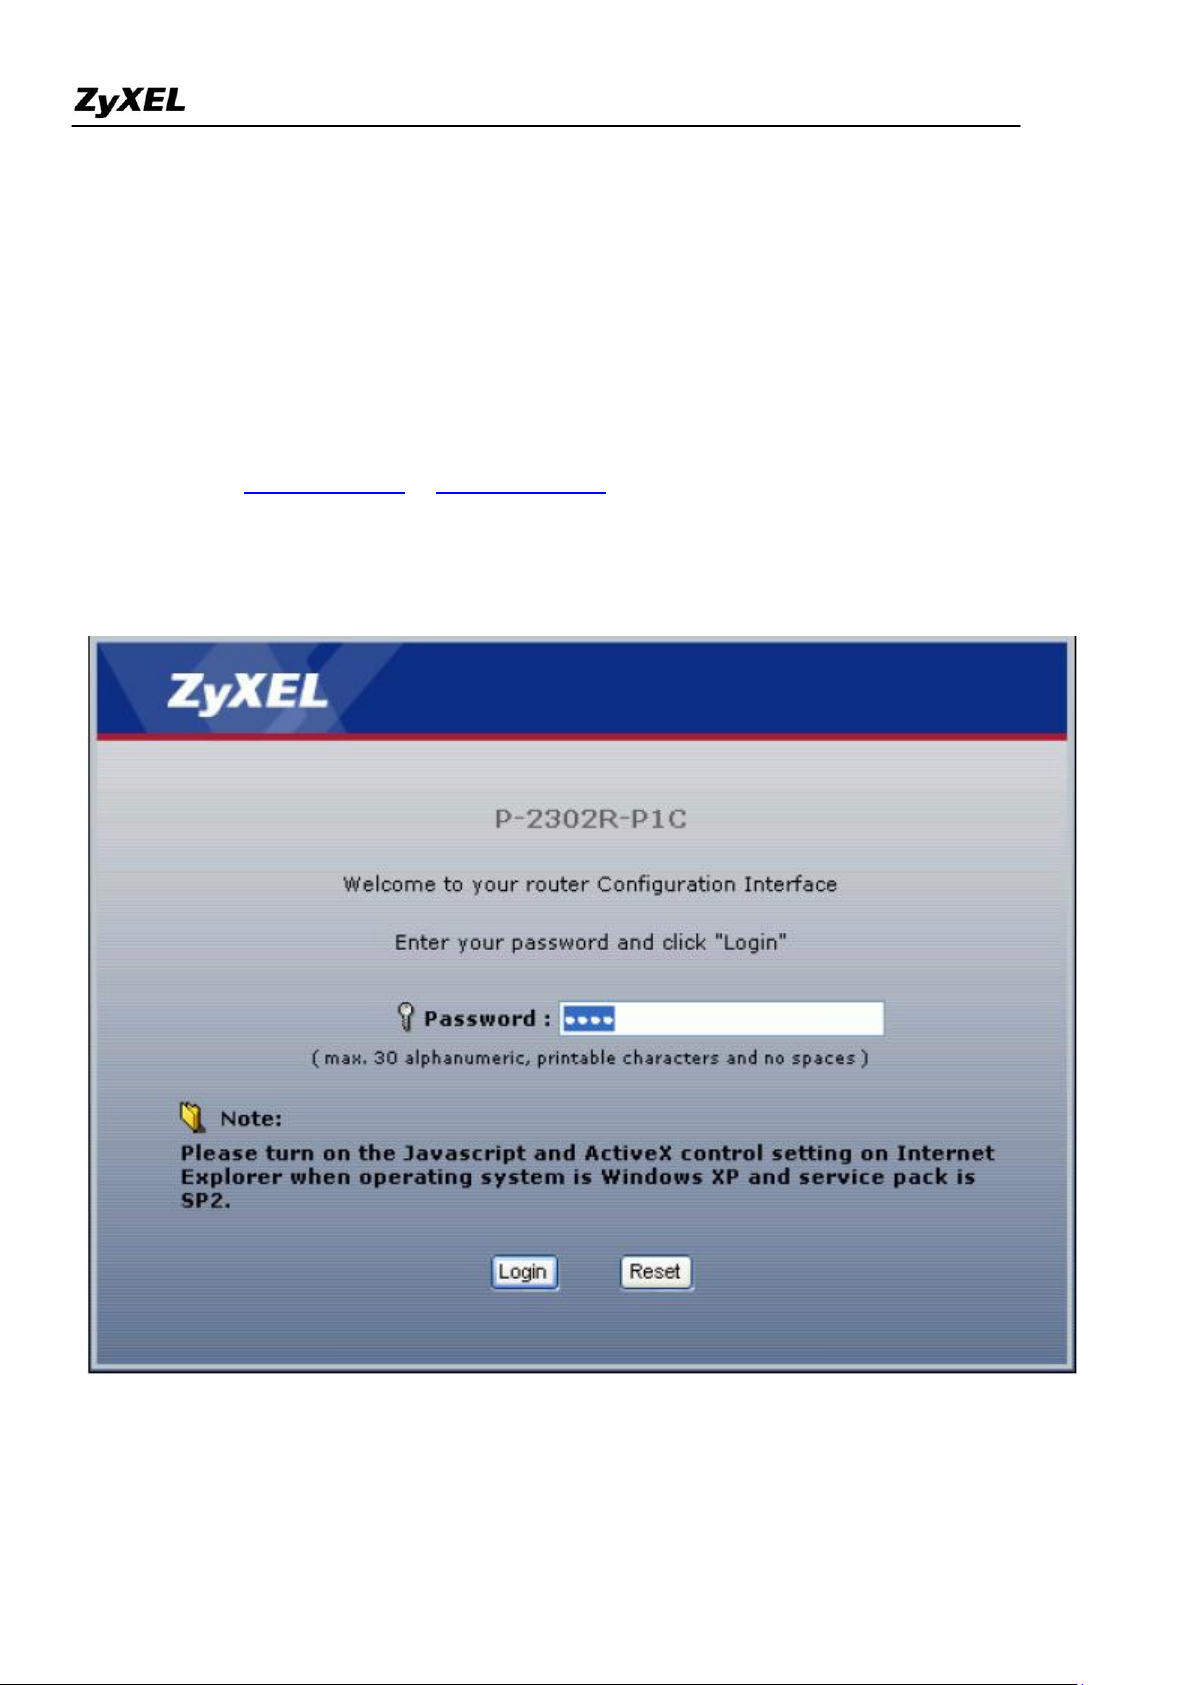
1. Retrieve ZyXEL Device Web
Please enter the LAN IP address of the ZyXEL Device in the URL location to retrieve the web screen from the
ZyXEL Device. The default LAN IP of the ZyXEL Device is 192.168.1.1. See the example below. Note that
you can either use http://192.168.1.1 or https://192.168.1.1
2. Login first
The default password is the default SMT password, '1234'.
All contents Copyright 2007 ZyXEL Communications Corporation.
Page 9
P2302R-P1C Support Notes
9
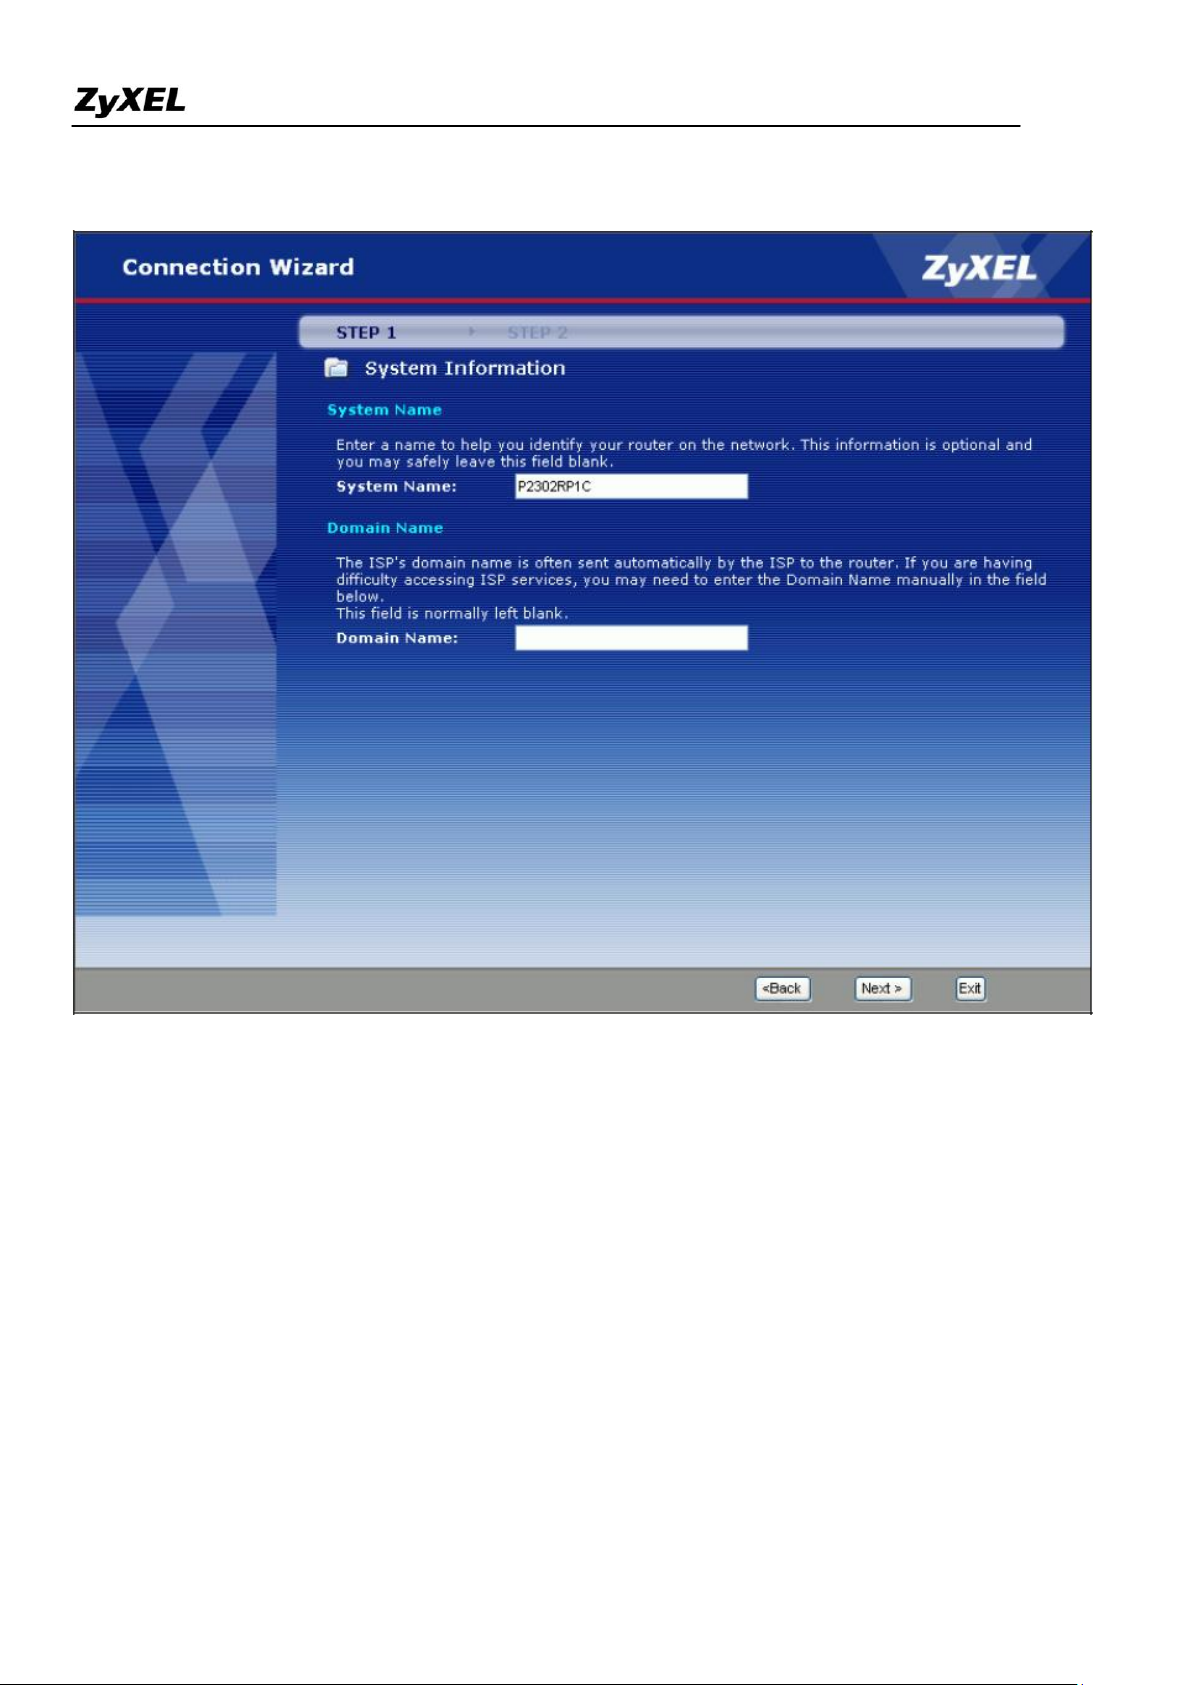
3. Configure the ZyXEL Device for Internet access by using WIZARD SETUP
All contents Copyright 2007 ZyXEL Communications Corporation.
Page 10
P2302R-P1C Support Notes
10
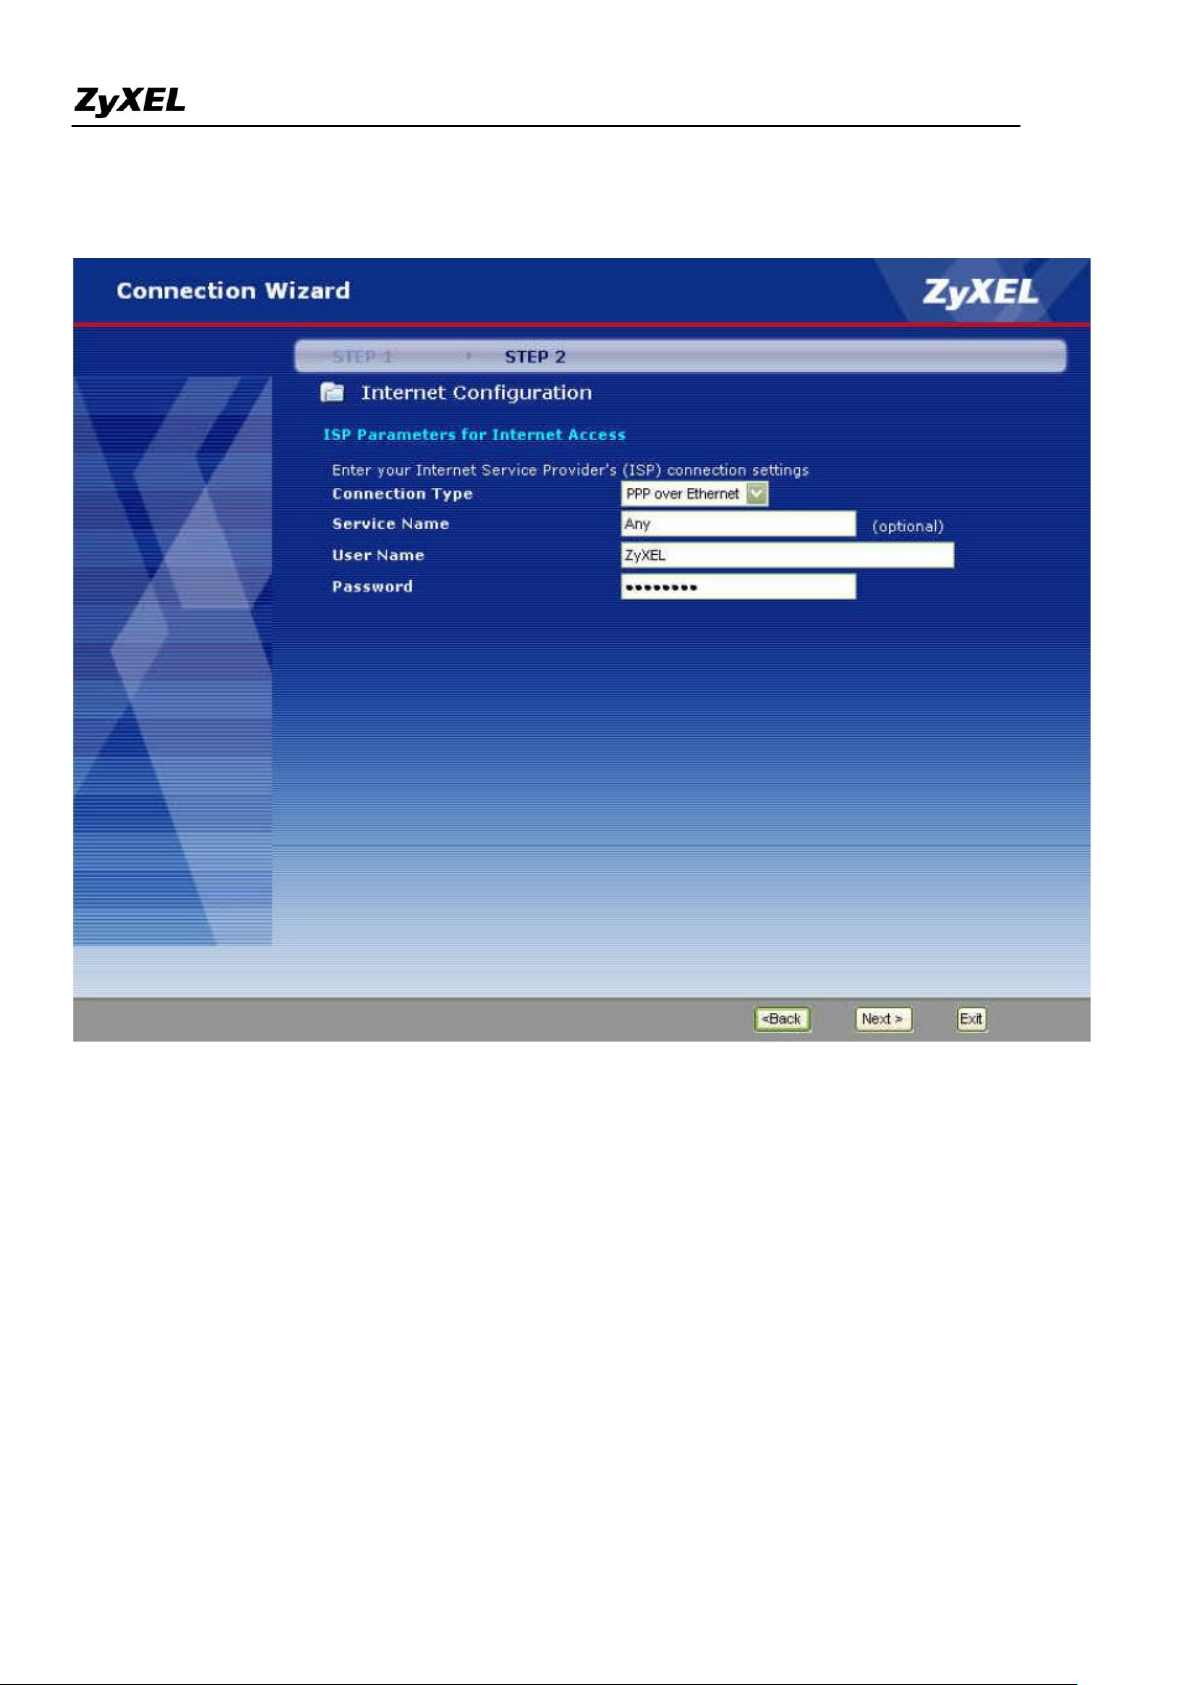
The Web screen shown below takes PPPoE as the example.
Select “Dynamic" if the ISP provides the IP dynamically, otherwise select “Use Fixed IP address" and
enter the static IP given by ISP in the box following“MY WAN IP Address"field.
All contents Copyright 2007 ZyXEL Communications Corporation.
Page 11

P2302R-P1C Support Notes
11
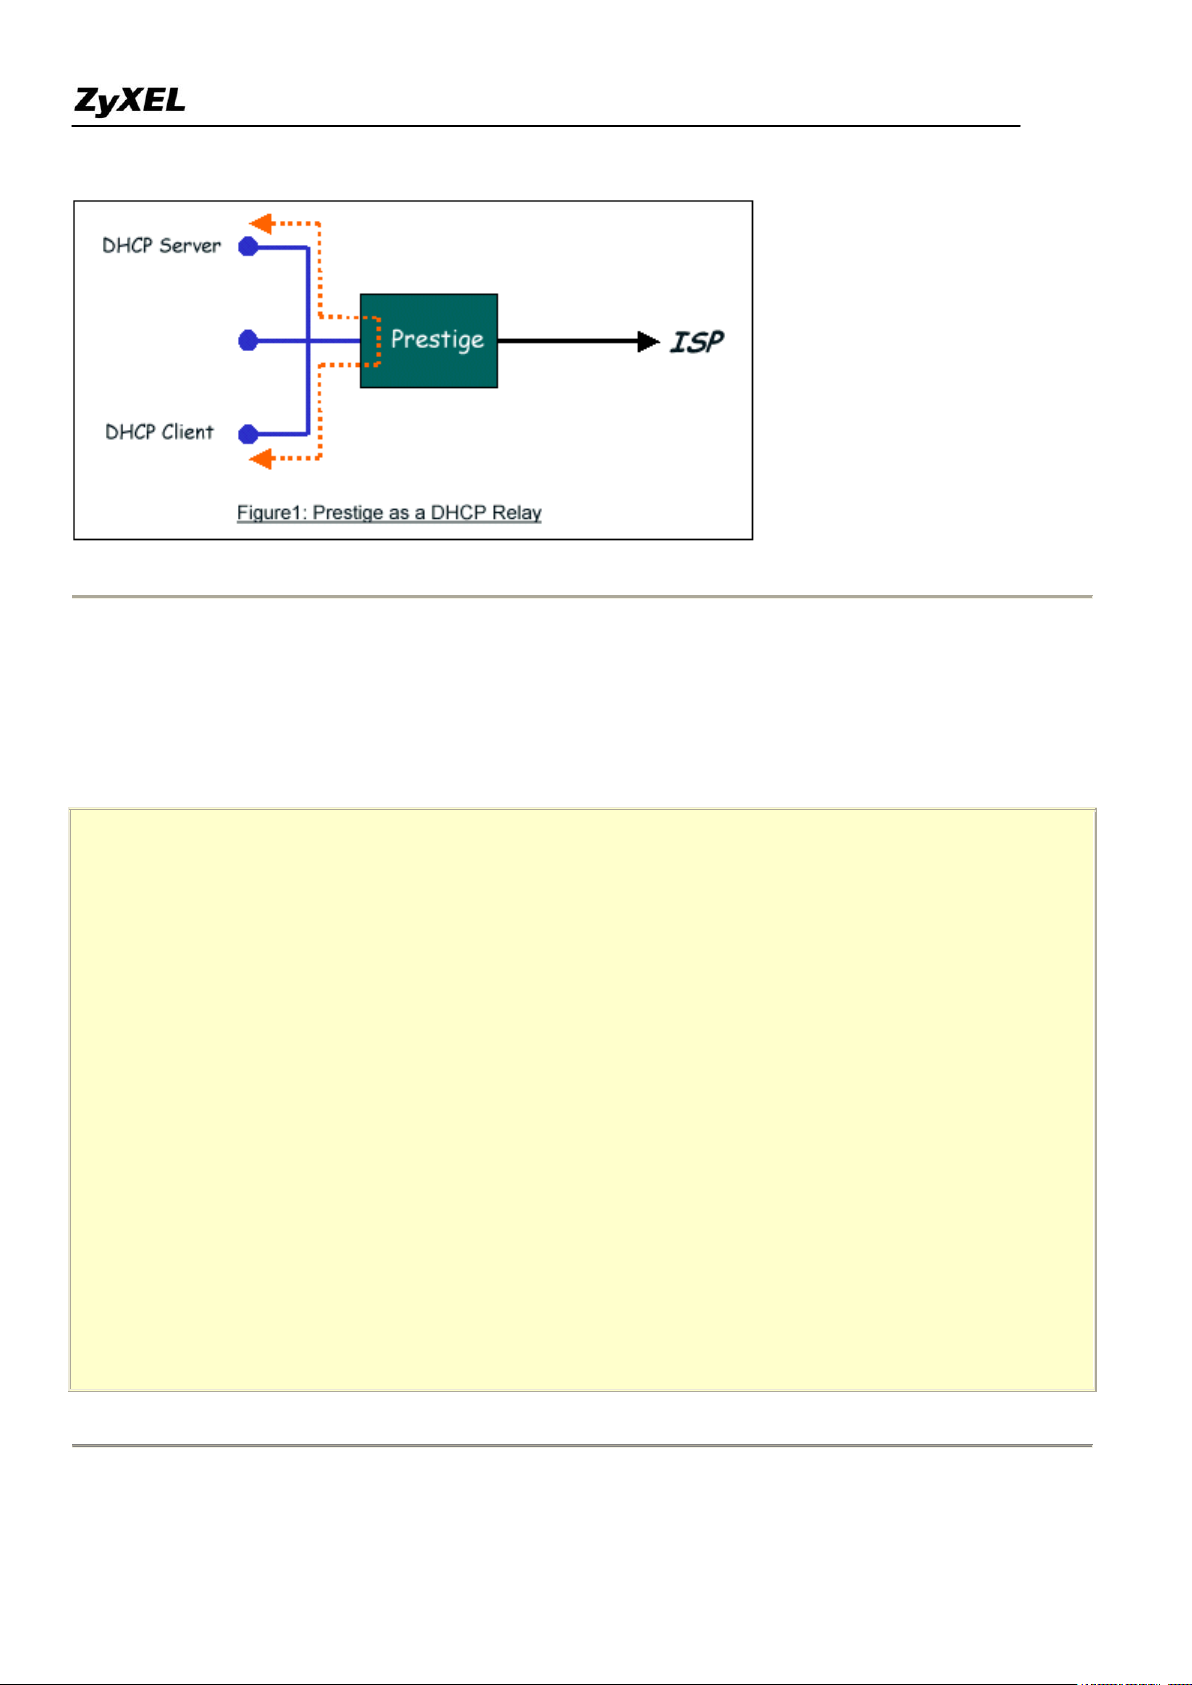
Setup the the ZyXEL Device as a DHCP Relay
What is DHCP Relay?
DHCP stands for Dynamic Host Configuration Protocol. In addition to the DHCP server feature, the P2302
supports the DHCP relay function. When it is configured as DHCP server, it assigns the IP addresses to the
LAN clients. When it is configured as DHCP relay, it is responsible for forwarding the requests and responses
negotiating between the DHCP clients and the server. See figure 1.
All contents Copyright 2007 ZyXEL Communications Corporation.
Page 12
P2302R-P1C Support Notes
12
Menu 3.2 - TCP/IP and DHCP Ethernet Setup
DHCP= Relay TCP/IP Setup:
Client IP Pool:
Starting Address= N/A IP Address= 192.168.1.1
Size of Client IP Pool= N/A IP Subnet Mask= 255.255.255.0
First DNS Server= N/A RIP Direction= Both
IP Address= N/A Version= RIP-1
Second DNS Server= N/A Multicast= None
IP Address= N/A Edit IP Alias= No
Third DNS Server= N/A
IP Address= N/A
DHCP Server Address= 192.168.1.2
Press ENTER to Confirm or ESC to Cancel:
Setup the ZyXEL Device as a DHCP Client
1. Toggle the DHCP to Relay in menu 3.2 and enter the IP address of the DHCP server in the 'Relay Server
Address' field.
All contents Copyright 2007 ZyXEL Communications Corporation.
Page 13
P2302R-P1C Support Notes
13
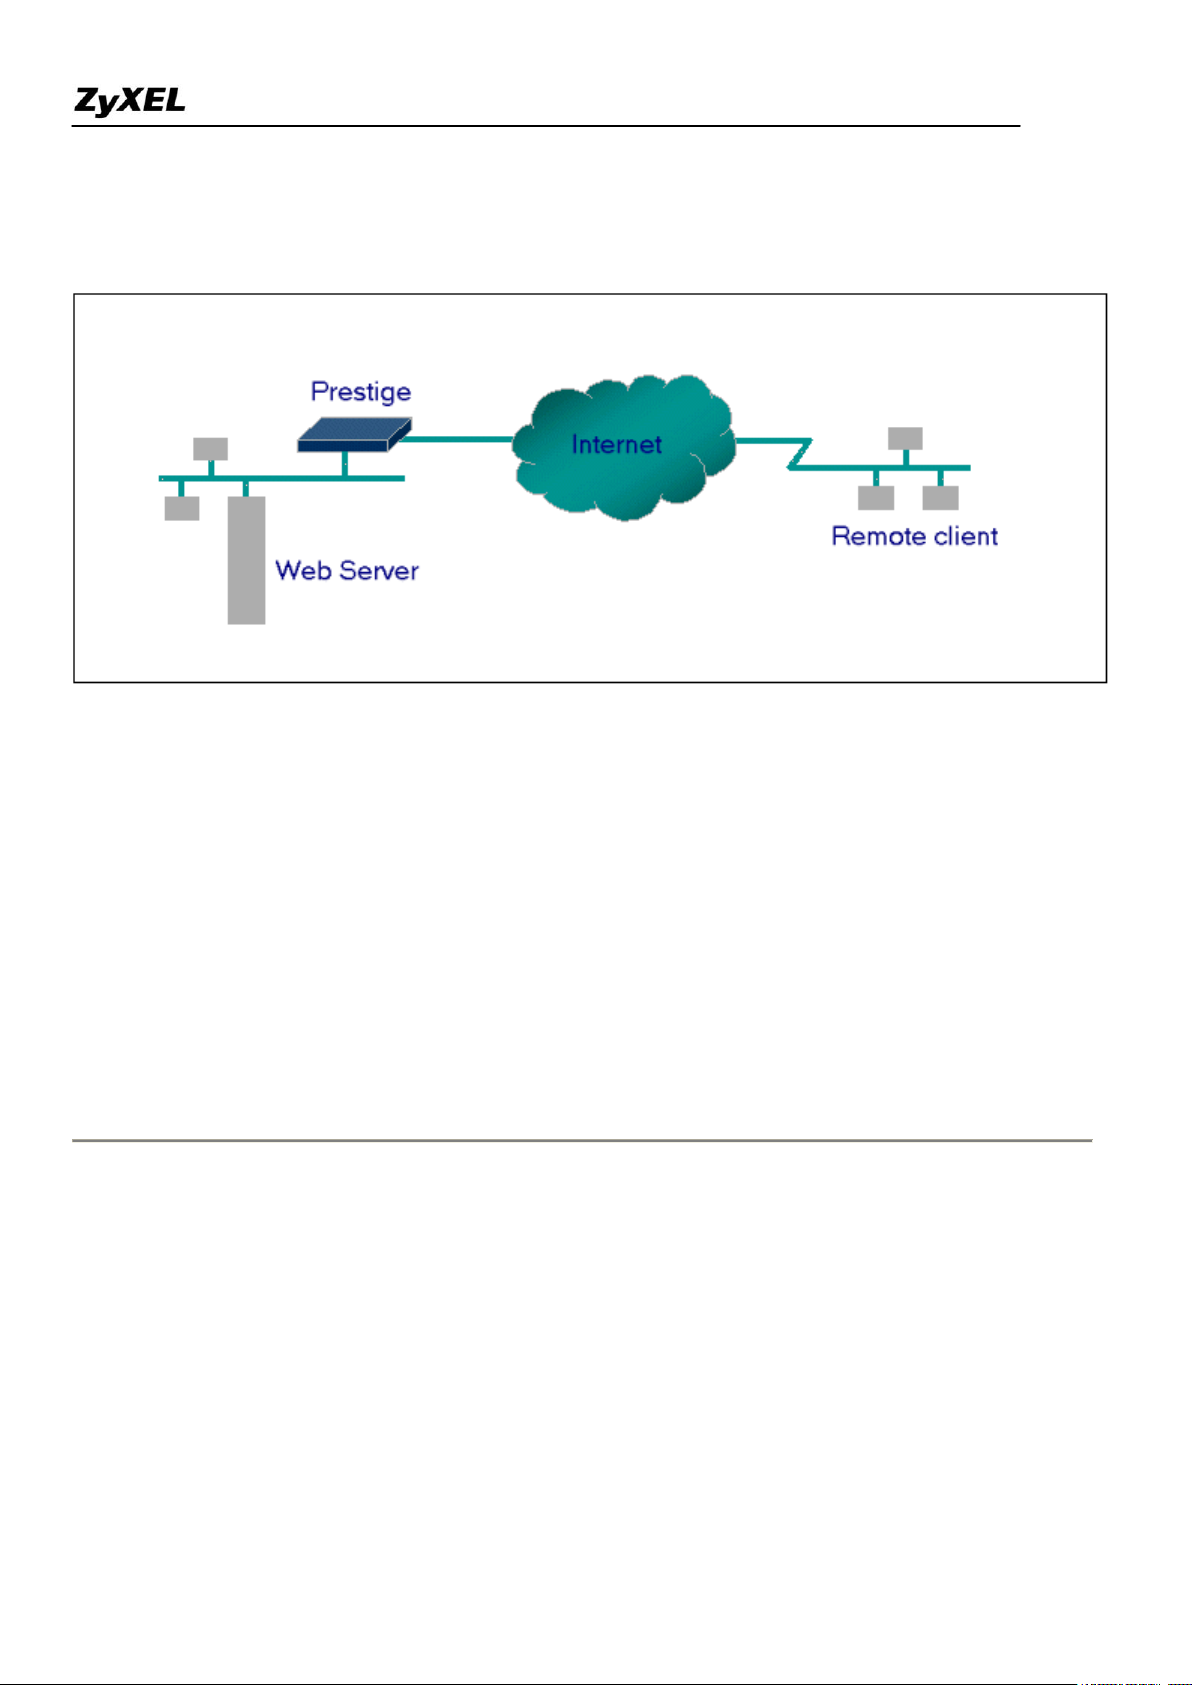
Configure an Internal Server Behind SUA
Introduction
If you wish, you can make internal servers (e.g., Web, ftp or mail server) accessible for outside users, even
though SUA makes your LAN appear as a single machine to the outside world. A service is identified by the
port number. Also, since you need to specify the IP address of a server in the ZyXEL Device, a server must
have a fixed IP address and not be a DHCP client whose IP address potentially changes each time it is powered
on.
In addition to the servers for specific services, SUA supports a default server. A service request that does not
have a server explicitly designated for it is forwarded to the default server. If the default server is not defined,
the service request is simply discarded.
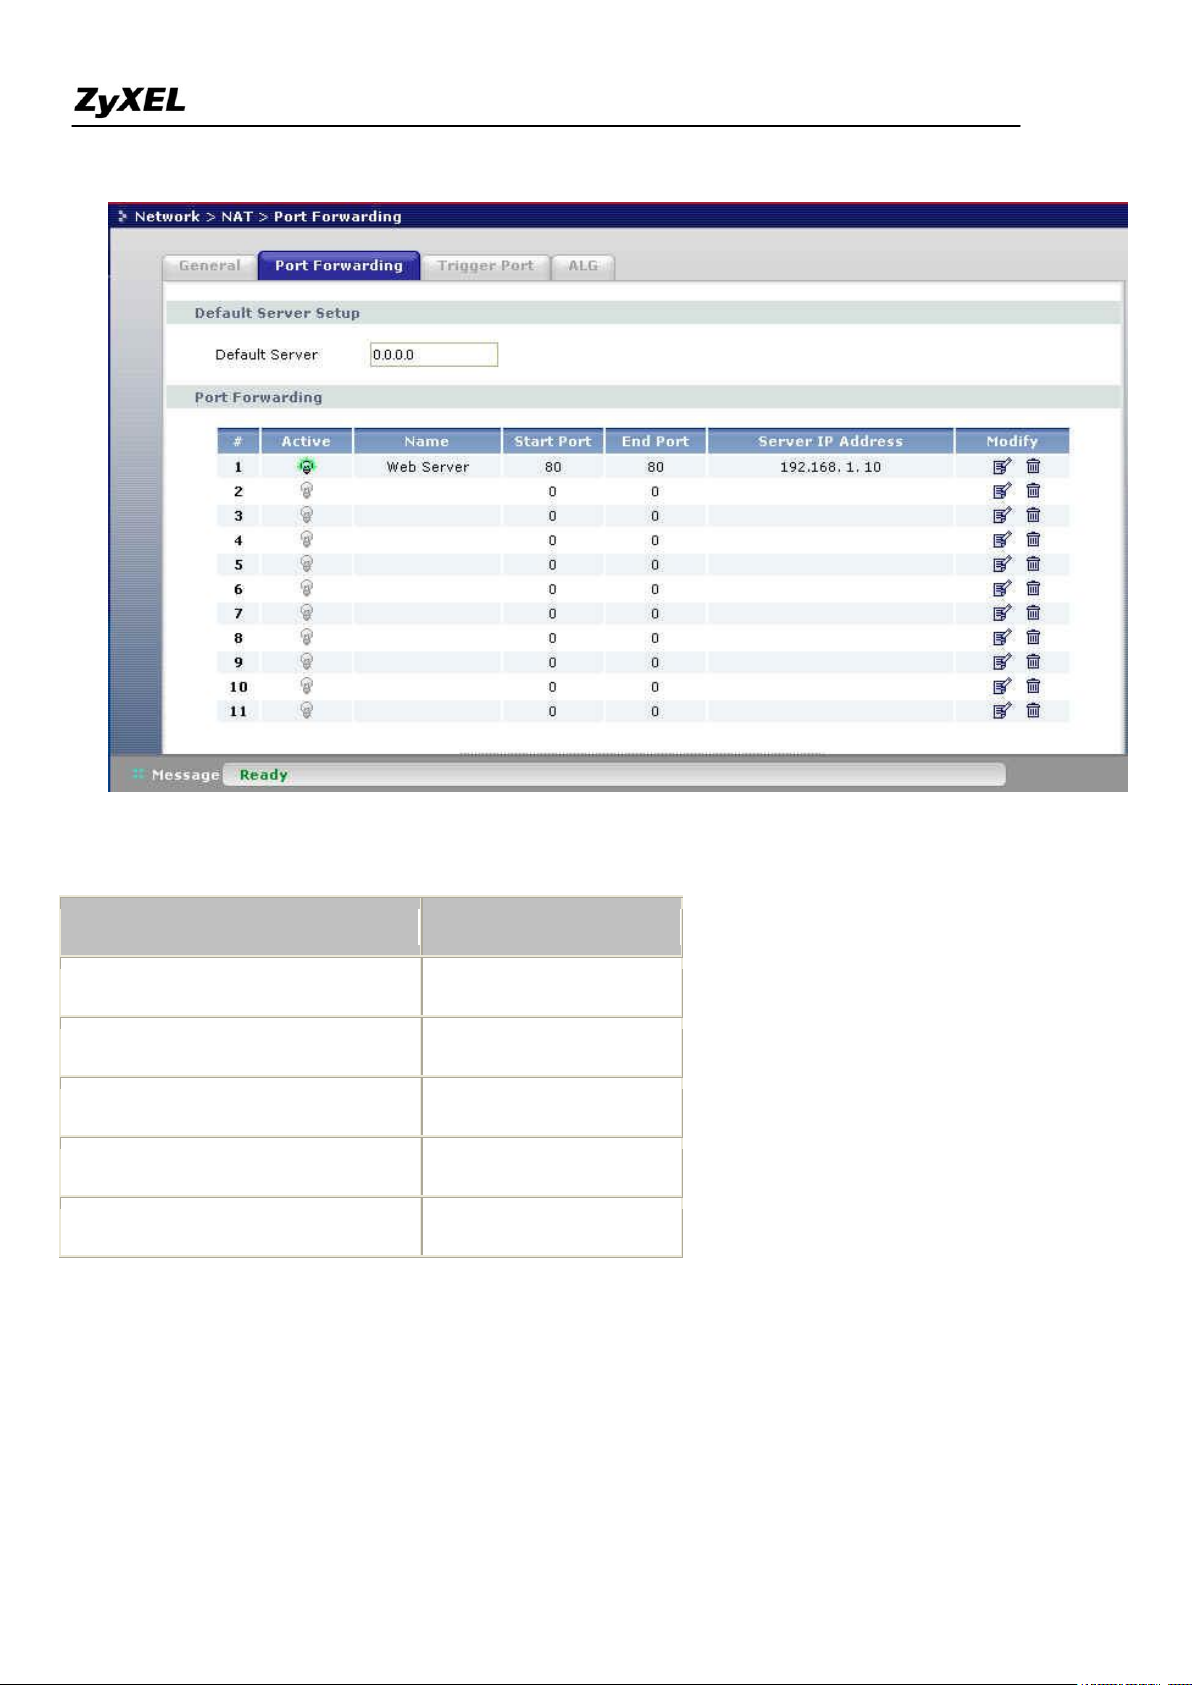
Configuration
To make a server visible to the outside world, specify the port number of the service and the inside address of
the server in 'Menu 15.2.1', Multiple Server Configuration. The outside users can access the local server using
the ZyXEL Device's
For example (Configuring an internal Web server for outside access) :
WAN IP
All contents Copyright 2007 ZyXEL Communications Corporation.
address which can be obtained from menu 24.1.
Page 14
P2302R-P1C Support Notes
14
Service
Port Number
FTP
21
Telnet
23
SMTP
25
DNS (Domain Name Server)
53
www-http (Web)
80
Port numbers for some services
Configure a PPTP server Behind SUA
Introduction
PPTP is a tunneling protocol defined by the PPTP forum that allows PPP packets to be encapsulated within
Internet Protocol (IP) packets and forwarded over any IP network, including the Internet itself.
All contents Copyright 2007 ZyXEL Communications Corporation.
Page 15
P2302R-P1C Support Notes
15
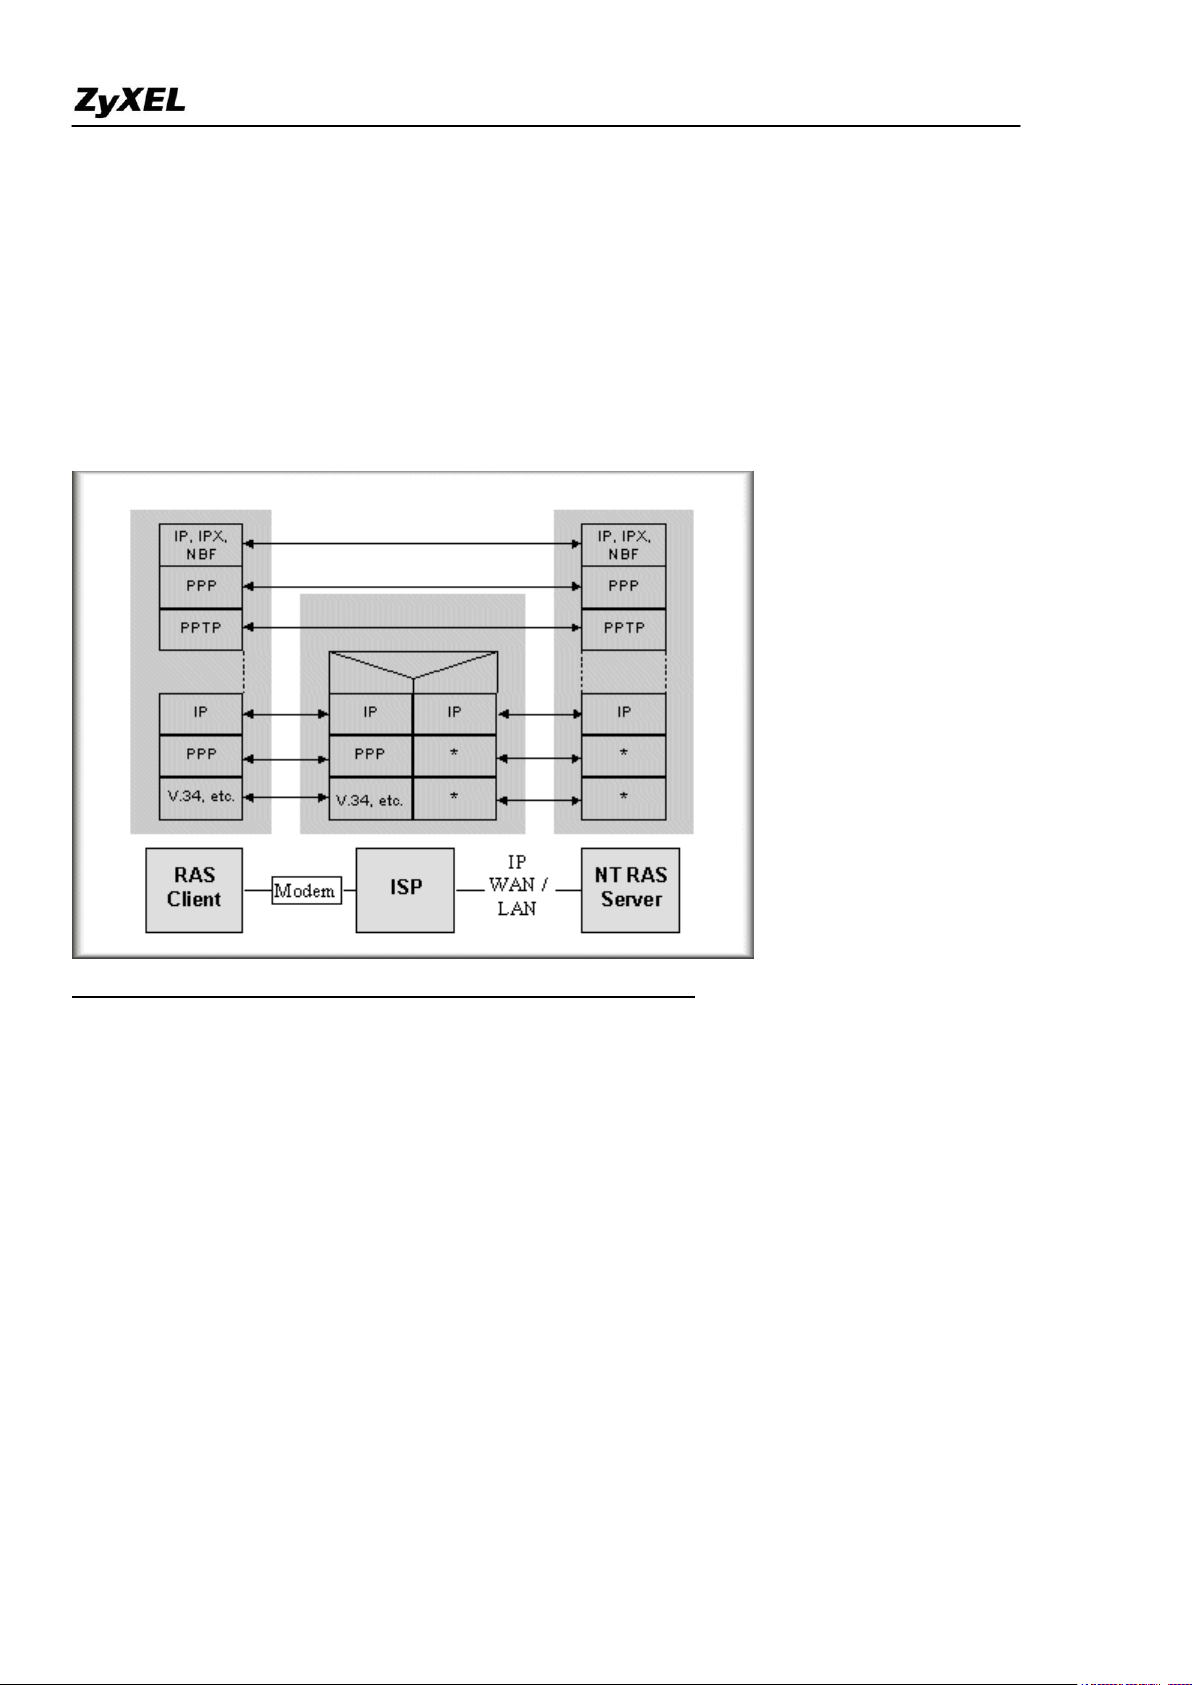
In order to run the Windows 9x PPTP client, you must be able to establish an IP connection with a tunnel server
such as the Windows NT Server 4.0 Remote Access Server.
Windows Dial-Up Networking uses the Internet standard Point-to-Point (PPP) to provide a secure, optimized
multiple-protocol network connection over dial-up telephone lines. All data sent over this connection can be
encrypted and compressed, and multiple network level protocols (TCP/IP, NetBEUI and IPX) can be run
correctly. Windows NT Domain Login level security is preserved even across the Internet.
Window98 PPTP Client / Internet / NT RAS Server Protocol Stack
PPTP appears as new modem type (Virtual Private Networking Adapter) that can be selected when setting up a
connection in the Dial-Up Networking folder. The VPN Adapter type does not appear elsewhere in the system.
Since PPTP encapsulates its data stream in the PPP protocol, the VPN requires a second dial-up adapter. This
second dial-up adapter for VPN is added during the installation phase of the Upgrade in addition to the first
dial-up adapter that provides PPP support for the analog or ISDN modem.
The PPTP is supported in Windows NT and Windows 98 already. For Windows 95, it needs to be upgraded by
the Dial-Up Networking 1.2 upgrade.
Configuration
This application note explains how to establish a PPTP connection with a remote private network in the ZyXEL
Device SUA case. In ZyNOS, all PPTP packets can be forwarded to the internal PPTP Server (WinNT server)
All contents Copyright 2007 ZyXEL Communications Corporation.
Page 16
P2302R-P1C Support Notes
16
behind SUA. The port number of the PPTP has to be entered in the SMT Menu 15 for ZyXEL Device to
forward to the appropriate private IP address of Windows NT server.
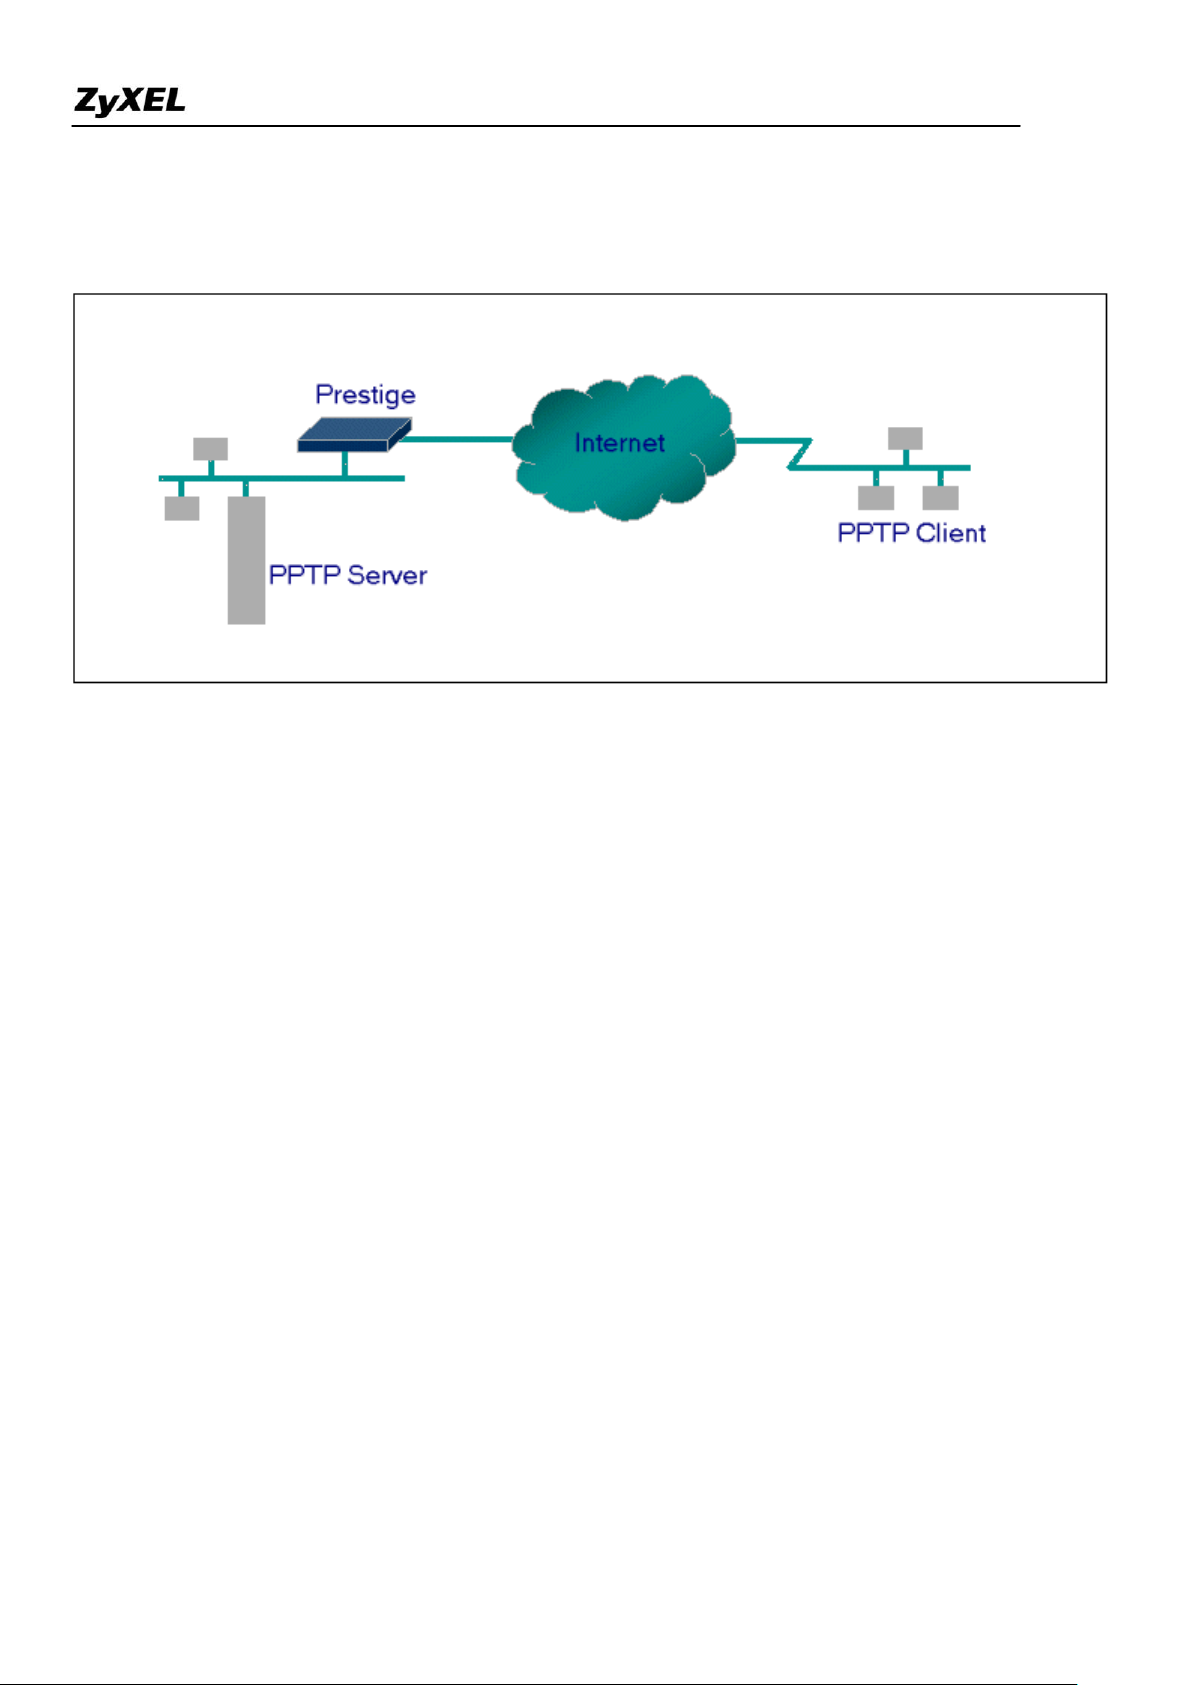
Example
The following example shows how to dial to an ISP via the ZyXEL Device and then establish a tunnel to a
private network. There will be three items that you need to set up for PPTP application, these are PPTP server
(WinNT), PPTP client (Win9x) and the ZyXEL Device.
o PPTP server setup (WinNT)
Add the VPN service from Control Panel>Network
Add an user account for PPTP logged on user
Enable RAS port
Select the network protocols from RAS such as IPX, TCP/IP NetBEUI
Set the Internet gateway to ZyXEL Device
o PPTP client setup (Win9x)
Add one VPN connection from Dial-Up Networking by entering the correct
username & password and the IP address of the ZyXEL Device's Internet IP
address for logging to NT RAS server.
Set the Internet gateway to the router that is connecting to ISP
o ZyXEL router setup
Before making a VPN connection from Win9x to WinNT server, you need to connect ZyXEL
router to your ISP first.
All contents Copyright 2007 ZyXEL Communications Corporation.
Page 17
P2302R-P1C Support Notes
17
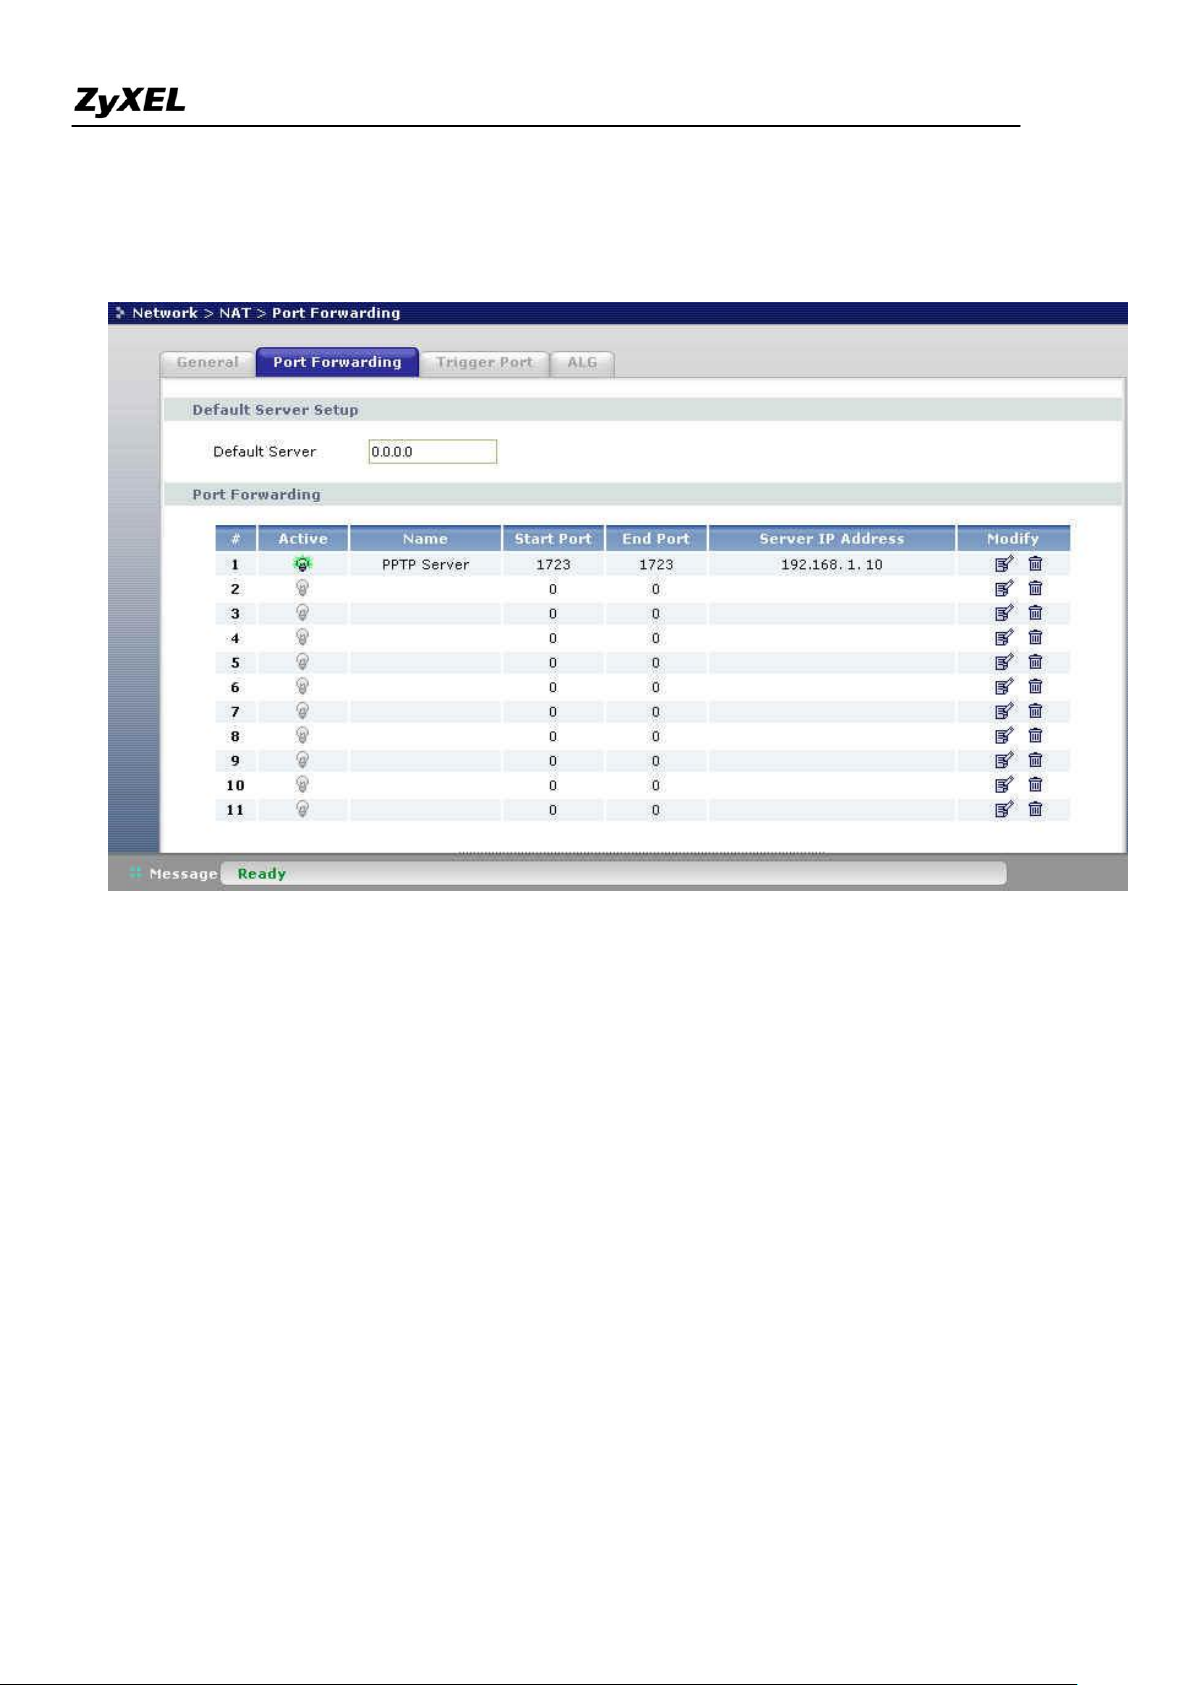
Enter the IP address of the PPTP server (WinNT server) and the port number for PPTP as shown
below.
When you have finished the above settings, you can ping to the remote Win9x client from
WinNT. This ping command is used to demonstrate that remote the Win9x can be reached across the
Internet. If the Internet connection between two LANs is achieved, you can place a VPN call from the
remote Win9x client.
For example:
C:\ping 203.66.113.2
When a dial-up connection to ISP is established, a default gateway is assigned to the router traffic
through that connection. Therefore, the output below shows the default gateway of the Win9x client
after the dial-up connection has been established.
Before making a VPN connection from the Win9x client to the NT server, you need to know the exact
Internet IP address that the ISP assigns to ZyXEL router in SUA mode and enter this IP address in the
VPN dial-up dialog box. You can check this Internet IP address from PNC Monitor or SMT Menu
All contents Copyright 2007 ZyXEL Communications Corporation.
Page 18
P2302R-P1C Support Notes
18
24.1. If the Internet IP address is a fixed IP address provided by ISP in SUA mode, then you can
always use this IP address for reaching the VPN server.
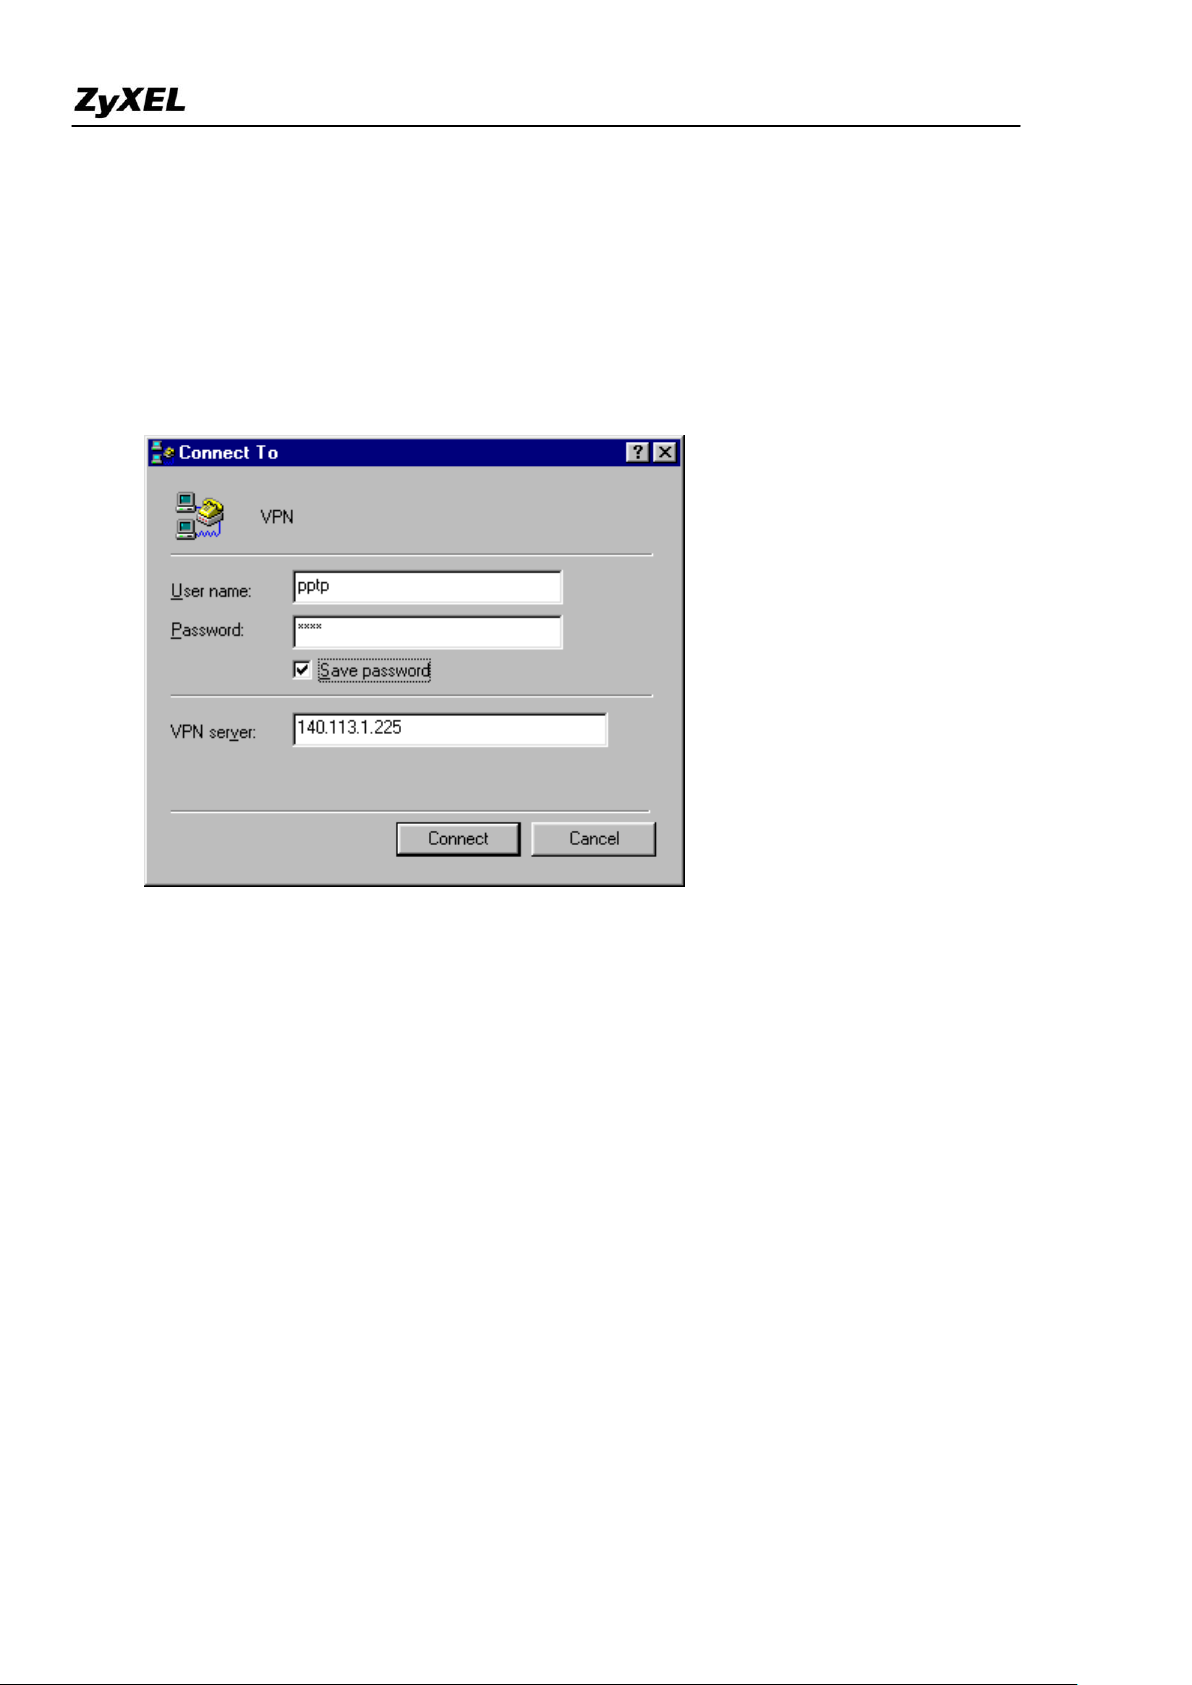
In the following example, the IP address '140.113.1.225' is dynamically assigned by ISP. You must
enter this IP address in the 'VPN Server' dialog box for reaching the PPTP server. After the VPN link is
established, you can start the network protocol application such as IP, IPX and NetBEUI.
About Filter & Filter Examples
How does ZyXEL filter work?
Filter Structure
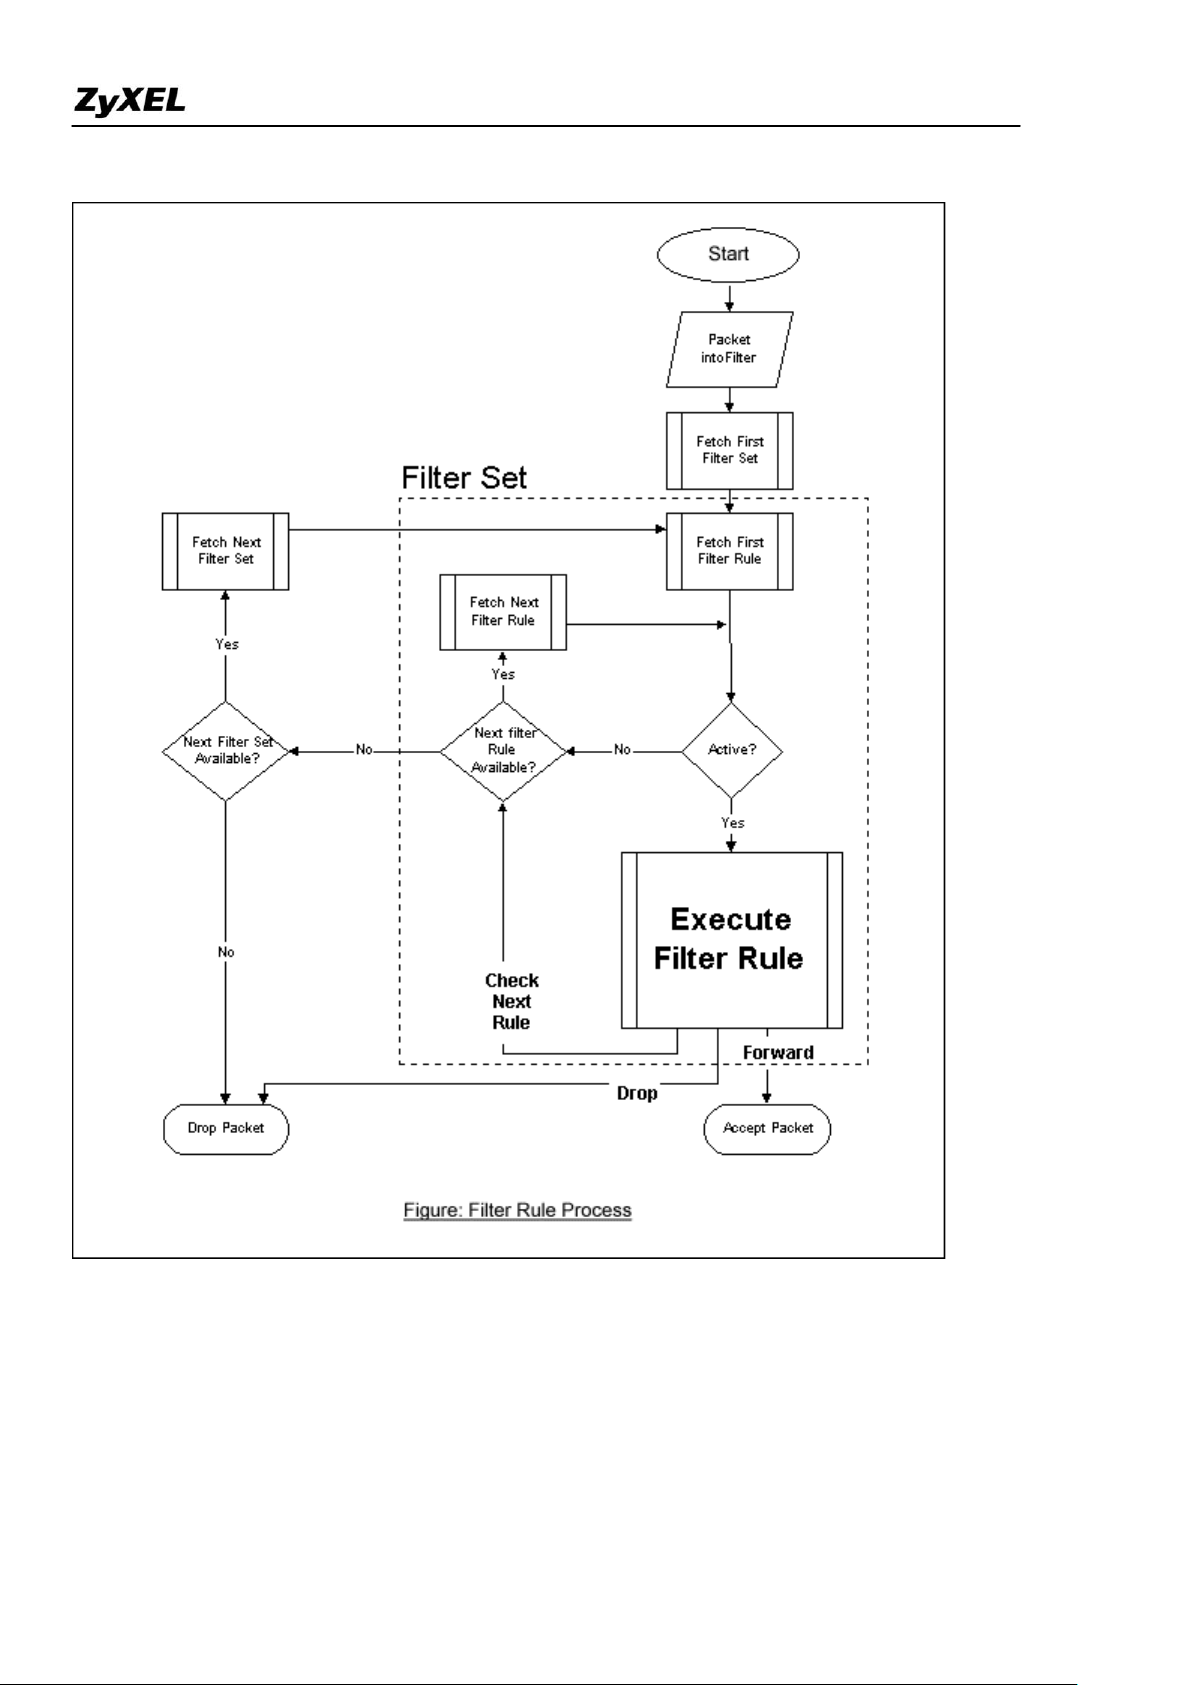
The ZyXEL Device allows you to configure up to twelve filter sets with six rules in each set, for a total of 72
filter rules in the system. You can apply up to four filter sets to a particular port to block multiple types of
packets. With each filter set having up to six rules, you can have a maximum of 24 rules active for a single port.
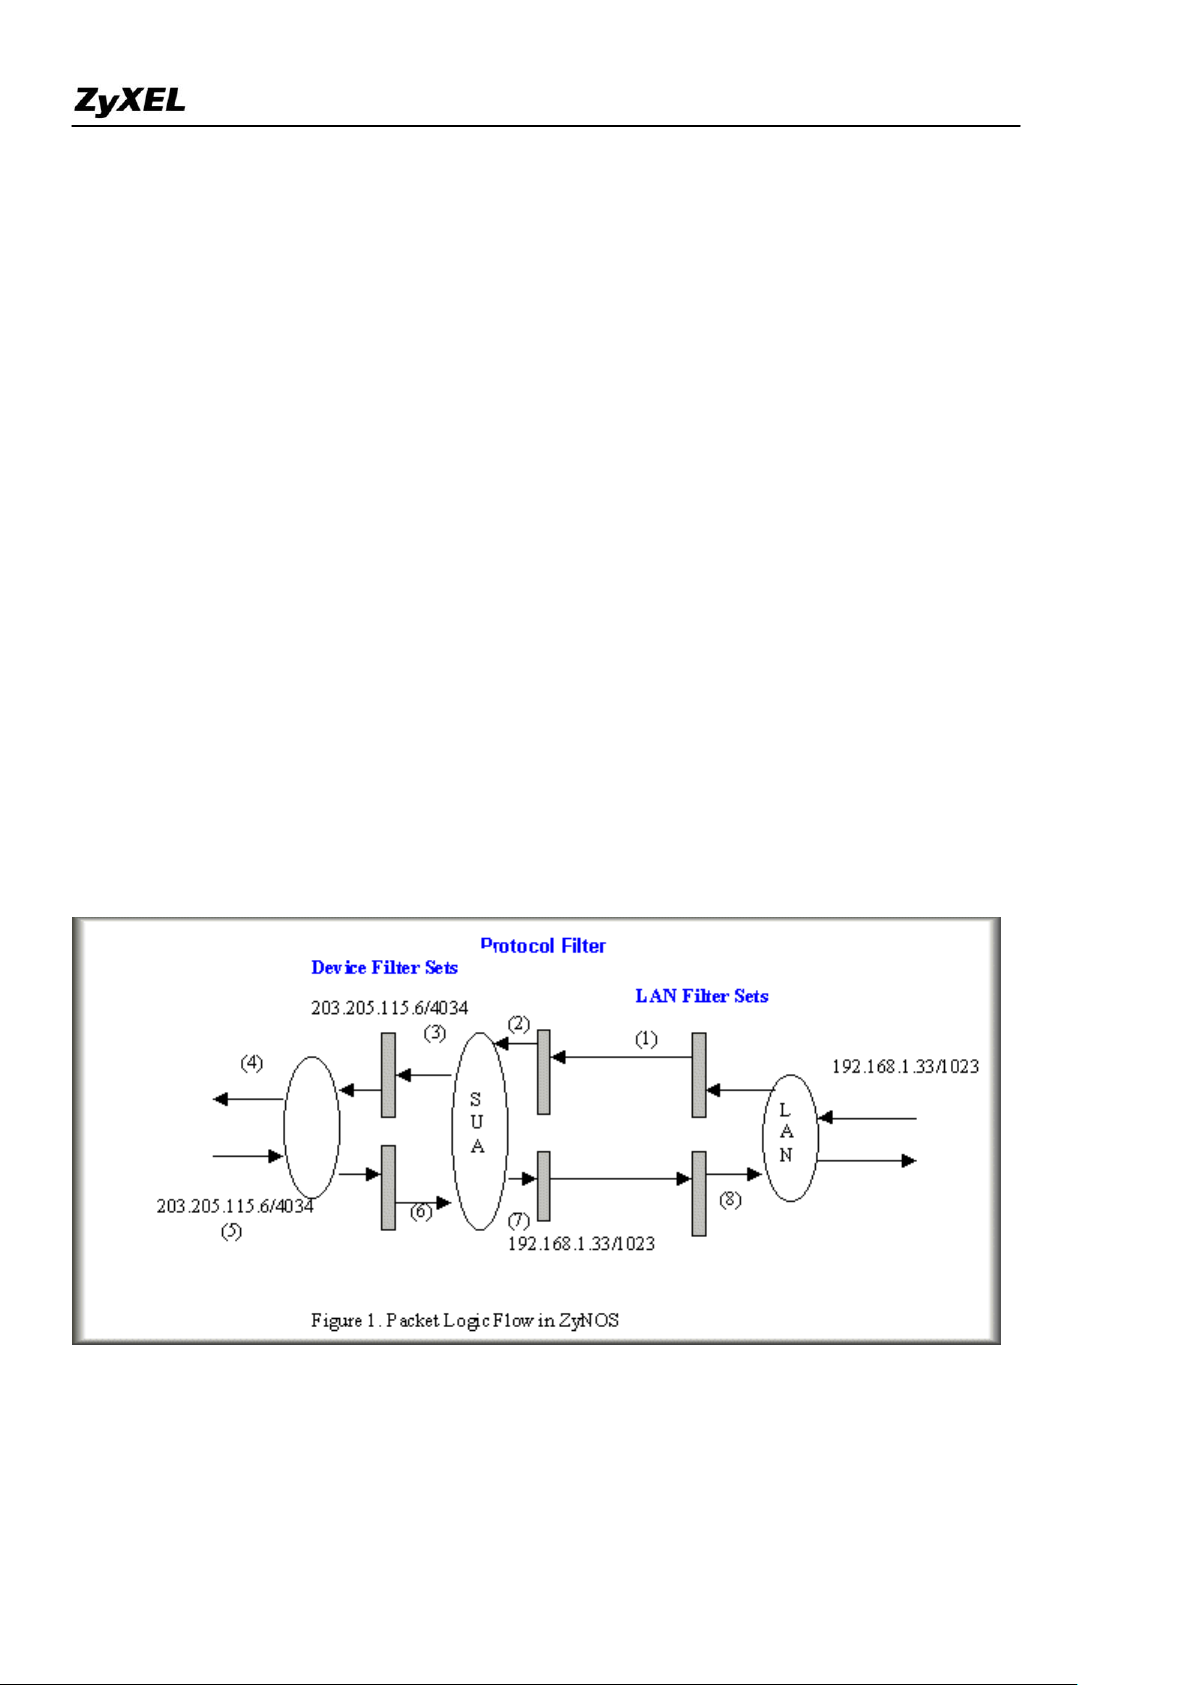
The following diagram illustrates the logic flow when executing a filter rule.
All contents Copyright 2007 ZyXEL Communications Corporation.
Page 19
P2302R-P1C Support Notes
19
Filter Types and SUA
Conceptually, there are two categories of filter rules: device and protocol. The Generic filter rules belong to the
device category; they act on the raw data from/to LAN and WAN. The IP and IPX filter rules belong to the
protocol category; they act on the IP and IPX packets.
All contents Copyright 2007 ZyXEL Communications Corporation.
Page 20
P2302R-P1C Support Notes
20
In order to allow users to specify the local network IP address and port number in the filter rules with SUA
connections, the TCP/IP filter function has to be executed before SUA for WAN outgoing packets and after the
SUA for WAN incoming IP packets. But at the same time, the Generic filter rules must be applied at the point
when the ZyXEL Device is receiving and sending the packets; i.e. the ISDN interface. So, the execution
sequence has to be changed. The logic flow of the filter is shown in Figure 1 and the sequence of the logic flow
for the packet from LAN to WAN is:
LAN device and protocol input filter sets.
WAN protocol call and output filter sets.
If SUA is enabled, SUA converts the source IP address from 192.168.1.33 to 203.205.115.6 and
port number from 1023 to 4034.
WAN device output and call filter sets.
The sequence of the logic flow for the packet from WAN to LAN is:
WAN device input filter sets.
If SUA is enabled, SUA converts the destination IP address from 203.205.115.6 to 92.168.1.33 and port
number from 4034 to 1023.
WAN protocol input filter sets.
LAN device and protocol output filter sets.
Generic and TCP/IP (and IPX) filter rules are in different filter sets. The SMT will detect and prevent the
mixing of different category rules within any filter set in Menu 21. In the following example, you will receive
an error message 'Protocol and device filter rules cannot be active together' if you try to activate a TCP/IP (or
IPX) filter rule in a filter set that has already had one or more active Generic filter rules. You will receive the
All contents Copyright 2007 ZyXEL Communications Corporation.
Page 21

P2302R-P1C Support Notes
21
Menu 21.1.1 - Generic Filter Rule
Filter #: 1,1
Filter Type= Generic Filter Rule
Active= Yes
Offset= 0
Length= 0
Mask= N/A
Value= N/A
More= No Log= None
Action Matched= Check Next Rule
Action Not Matched= Check Next Rule
Menu 21.1.2 - TCP/IP Filter Rule
Filter #: 1,2
Filter Type= TCP/IP Filter Rule
Active= Yes
IP Protocol= 0 IP Source Route= No
Destination: IP Addr= 0.0.0.0
IP Mask= 0.0.0.0
Port #= 0
Port # Comp= None
Source: IP Addr= 0.0.0.0
IP Mask= 0.0.0.0
Port #= 0
Port # Comp= None
TCP Estab= N/A
same error if you try to activate a Generic filter rule in a filter set that has already had one or more active
TCP/IP (or IPX) filter rules.
Menu 21.1.1:
Menu 21.1.2:
All contents Copyright 2007 ZyXEL Communications Corporation.
Page 22

P2302R-P1C Support Notes
22
More= No Log= None
Action Matched= Check Next Rule
Action Not Matched= Check Next Rule
Press ENTER to Confirm or ESC to Cancel:
Saving to ROM. Please wait...
Protocol and device rule cannot be active together
Menu 3.1 - General Ethernet Setup
Input Filter Sets:
protocol filters=
device filters=
Output Filter Sets:
protocol filters=
device filters=
Menu 11.1 - Remote Node Profile
Rem Node Name= LAN Route= IP
Active= Yes Bridge= No
Encapsulation= PPP Edit PPP Options= No
Incoming: Rem IP Addr= ?
Rem Login= test Edit IP/IPX/Bridge= No
Rem Password= ********
To separate the device and protocol filter categories; two new menus, Menu 11.5 and Menu 13.1, have been
added, as well as some changes made to the Menu 3.1, Menu 11.1, and Menu 13. The new fields are shown
below.
Menu 3.1:
Menu 11.1:
All contents Copyright 2007 ZyXEL Communications Corporation.
Page 23

23
Outgoing: Session Options:
My Login= testt Edit Filter Sets= Yes
My Password= *****
Authen= CHAP/PAP
Press ENTER to Confirm or ESC to Cancel:
Menu 11.5 - Remote Node Filter
Input Filter Sets:
protocol filters=
device filters=
Output Filter Sets:
protocol filters=
device filters=
Menu 11.5:
P2302R-P1C Support Notes
SMT will also prevent you from entering a protocol filter set configured in Menu 21 to the device filters field in
Menu 3.1, 11.5, or entering a device filter set to the protocol filters field. Even though SMT will prevent the
inconsistency from being entered in ZyNOS, it is unable to resolve the intermixing problems existing in the
filter sets that were configured before. Instead, when ZyNOS translates the old configuration into the new
format, it will verify the filter rules and log the inconsistencies. Please check the system log (Menu 24.3.1)
before putting your device into use.
In order to avoid operational problems later, the ZyXEL Device will disable its routing/bridging functions if
there is an inconsistency among its filter rules.
filter for blocking the web service
Configuration
Before configuring a filter, you need to know the following information:
All contents Copyright 2007 ZyXEL Communications Corporation.
Page 24

P2302R-P1C Support Notes
24
Menu 21 - Filter Set Configuration
Filter Filter
Set # Comments Set # Comments
------ ----------------- ------ -----------------
1 Web Request 7 _______________
2 _______________ 8 _______________
3 _______________ 9 _______________
4 _______________ 10 _______________
5 _______________ 11 _______________
6 _______________ 12 _______________
Enter Filter Set Number to Configure= 1
Edit Comments=
Press ENTER to Confirm or ESC to Cancel:
1. The outbound packet type (protocol & port number)
2. The source IP address
Generally, the outbound packets for Web service could be as following:
a. HTTP packet, TCP (06) protocol with port number 80
b. DNS packet, TCP (06) protocol with port number 53 or
c. DNS packet, UDP (17) protocol with port number 53
For all workstation on the LAN, the source IP address will be 0.0.0.0. Otherwise, you have to enter an IP
Address for the workstation you want to block. See the procedure for configuring this filter below.
o Create a filter set in Menu 21, e.g., set 1
o Create three filter rules in Menu 21.1.1, Menu 21.1.2, Menu 21.1.3
Rule 1- block the HTTP packet, TCP (06) protocol with port number 80
Rule 2- block the DNS packet, TCP (06) protocol with port number 53
Rule 3- block the DNS packet, UDP (17) protocol with port number 53
o Apply the filter set in menu 4
1. Create a filter set in Menu 21
All contents Copyright 2007 ZyXEL Communications Corporation.
Page 25

P2302R-P1C Support Notes
25
Menu 21.1.1 - TCP/IP Filter Rule
Filter #: 1,1
Filter Type= TCP/IP Filter Rule
Active= Yes
IP Protocol= 6 IP Source Route= No
Destination: IP Addr= 0.0.0.0
IP Mask= 0.0.0.0
Port #= 80
Port # Comp= Equal
Source: IP Addr= 0.0.0.0
IP Mask= 0.0.0.0
Port #=
Port # Comp= None
TCP Estab= No
More= No Log= None
Action Matched= Drop
Action Not Matched= Check Next Rule
Press ENTER to Confirm or ESC to Cancel:
Menu 21.1.2 - TCP/IP Filter Rule
Filter #: 1,2
Filter Type= TCP/IP Filter Rule
Active= Yes
IP Protocol= 6 IP Source Route= No
Destination: IP Addr= 0.0.0.0
IP Mask= 0.0.0.0
Port #= 53
Port # Comp= Equal
2. Rule one for (a). http packet, TCP(06)/Port number 80
3.Rule 2 for (b).DNS request, TCP(06)/Port number 53
All contents Copyright 2007 ZyXEL Communications Corporation.
Page 26

P2302R-P1C Support Notes
26
Source: IP Addr= 0.0.0.0
IP Mask= 0.0.0.0
Port #=
Port # Comp= None
TCP Estab= No
More= No Log= None
Action Matched= Drop
Action Not Matched= Check Next Rule
Press ENTER to Confirm or ESC to Cancel:
Menu 21.1.2 - TCP/IP Filter Rule
Filter #: 1,2
Filter Type= TCP/IP Filter Rule
Active= Yes
IP Protocol= 17 IP Source Route= No
Destination: IP Addr= 0.0.0.0
IP Mask= 0.0.0.0
Port #= 53
Port # Comp= Equal
Source: IP Addr= 0.0.0.0
IP Mask= 0.0.0.0
Port #=
Port # Comp= None
TCP Estab= No
More= No Log= None
Action Matched= Drop
Action Not Matched= Forward
Press ENTER to Confirm or ESC to Cancel:
4. Rule 3 for (c). DNS packet UDP(17)/Port number 53
5. After the three rules are completed, you will see the rule summary in Menu 21.
All contents Copyright 2007 ZyXEL Communications Corporation.
Page 27
P2302R-P1C Support Notes
27
Menu 21.1 - Filter Rules Summary
# A Type Filter Rules M m n
- - ---- -------------------------------------- - - -
1 Y IP Pr=6, SA=0.0.0.0, DA=0.0.0.0, DP=80 N D N
2 Y IP Pr=6, SA=0.0.0.0, DA=0.0.0.0, DP=53 N D N
3 Y IP Pr=17, SA=0.0.0.0, DA=0.0.0.0,DP=53 N D F
Menu 21 - Filter Set Configuration
Filter Filter
Set # Comments Set # Comments
------ ----------------- ------ -----------------
1 Block a client 7 _______________
2 _______________ 8 _______________
3 _______________ 9 _______________
4 _______________ 10 _______________
5 _______________ 11 _______________
6 _______________ 12 _______________
Enter Filter Set Number to Configure= 0
Edit Comments=
Press ENTER to Confirm or ESC to Cancel:
6. Apply the filter set to the 'Output Protocol Filter Set' in the remote node setup .
A filter for blocking a specific client
Configuration
1. Create a filter set in Menu 21, e.g., set 1
All contents Copyright 2007 ZyXEL Communications Corporation.
Page 28

P2302R-P1C Support Notes
28
Menu 21.1.1 - TCP/IP Filter Rule
Filter #: 1,1
Filter Type= TCP/IP Filter Rule
Active= Yes
IP Protocol= 0 IP Source Route= No
Destination: IP Addr= 0.0.0.0
IP Mask= 0.0.0.0
Port #=
Port # Comp= None
Source: IP Addr= 192.168.1.5
IP Mask= 255.255.255.255
Port #=
Port # Comp= None
TCP Estab= N/A
More= No Log= None
Action Matched= Drop
Action Not Matched= Forward
Press ENTER to Confirm or ESC to Cancel:
2. One rule for blocking all packets from this client
Key Settings:
Source IP addr................Enter the client IP in this field
IP Mask..........................here the IP mask is used to mask the bits of the IP address given in the 'Source IP
Addr=' field, for one workstation it is 255.255.255.255.
Action Matched................Set to 'Drop' to drop all the packets from this client
Action Not Matched.........Set to 'Forward' to allow the packets from other clients
3. Apply the filter set number '1' to the 'Output Protocol Filter Set' field in the remote node setup.
A filter for blocking a specific MAC address
All contents Copyright 2007 ZyXEL Communications Corporation.
Page 29

P2302R-P1C Support Notes
29
ras> sys trcp channel enet0 bothway
ras> sys trcp sw on
Now a client on the LAN is trying to ping Prestige………
ras> sys trcp sw off
ras> sys trcp disp
TIME: 37c060 enet0-RECV len:74 call=0
0000: [00 a0 c5 01 23 45] [00 80 c8 4c ea 63] 08 00 45 00
0010: 00 3c eb 0c 00 00 20 01 e3 ea ca 84 9b 5d ca 84
0020: 9b 63 08 00 45 5c 03 00 05 00 61 62 63 64 65 66
0030: 67 68 69 6a 6b 6c 6d 6e 6f 70 71 72 73 74 75 76
0040: 77 61 62 63 64 65 66 67 68 69
TIME: 37c060 enet0-XMIT len:74 call=0
0000: [00 80 c8 4c ea 63] [00 a0 c5 01 23 45] 08 00 45 00
0010: 00 3c 00 07 00 00 fe 01 f0 ef ca 84 9b 63 ca 84
0020: 9b 5d 00 00 4d 5c 03 00 05 00 61 62 63 64 65 66
0030: 67 68 69 6a 6b 6c 6d 6e 6f 70 71 72 73 74 75 76
0040: 77 61 62 63 64 65 66 67 68 69
+ Ethernet Version II
- Address: 00-80-C8-4C-EA-63 (Source MAC) ----> 00-A0-C5-23-45
(Destination MAC)
- Ethernet II Protocol Type: IP
This configuration example shows you how to use a Generic Filter to block a specific MAC address of the
LAN.
Before you Begin
Before you configure the filter, you need to know the MAC address of the client first. The MAC address can be
provided by the NICs. If there is the LAN packet passing through the ZyXEL Device you can identify the
uninteresting MAC address from the ZyXEL Device's LAN packet trace. Please have a look at the following
example to know the trace of the LAN packets.
The detailed format of the Ethernet Version II:
All contents Copyright 2007 ZyXEL Communications Corporation.
Page 30

P2302R-P1C Support Notes
30
+ Internet Protocol
- Version (MSB 4 bits): 4
- Header length (LSB 4 bits): 5
- Service type: Precd=Routine, Delay=Normal, Thrput=Normal, Reli=Normal
- Total length: 60 (Octets)
- Fragment ID: 60172
- Flags: May be fragmented, Last fragment, Offset=0 (0x00)
- Time to live: 32 seconds/hops
- IP protocol type: ICMP (0x01)
- Checksum: 0xE3EA
- IP address 202.132.155.93 (Source IP address) ---->
202.132.155.99(Destination IP address)
- No option
+ Internet Control Message Protocol
- Type: 8 - Echo Request
- Code: 0
- Checksum: 0x455C
- Identifier: 768
- Sequence Number: 1280
- Optional Data: (32 bytes)
TIME: 37c060 enet0-RECV len:74 call=0
0000: [00 a0 c5 01 23 45] [00 80 c8 4c ea 63] 08 00 45 00
0010: 00 3c eb 0c 00 00 20 01 e3 ea ca 84 9b 5d ca 84
0020: 9b 63 08 00 45 5c 03 00 05 00 61 62 63 64 65 66
0030: 67 68 69 6a 6b 6c 6d 6e 6f 70 71 72 73 74 75 76
0040: 77 61 62 63 64 65 66 67 68 69
Configurations
From the above first trace, we know a client is trying to ping request the ZyXEL router. And from the second
trace, we know the ZyXEL router will send a reply to the client accordingly. The following sample filter will
utilize the 'Generic Filter Rule' to block the MAC address [00 80 c8 4c ea 63].
1. First, from the incoming LAN packet we know the uninteresting source MAC address starts at the 7th Octet
2. We are now ready to configure the 'Generic Filter Rule' as below.
All contents Copyright 2007 ZyXEL Communications Corporation.
Page 31

P2302R-P1C Support Notes
31
Menu 21.1.1 - Generic Filter Rule
Filter #: 1,1
Filter Type= Generic Filter Rule
Active= Yes
Offset= 6
Length= 6
Mask= ffffffffffff
Value= 0080c84cea63
More= No Log= None
Action Matched= Drop
Action Not Matched= Forward
Key Settings:
Generic Filter Ruls
Set the 'Filter Type' to 'Generic Filter Rule'
Active
Turn 'Active' to 'Yes'
Offset (in bytes)
Set to '6' since the source MAC address starts at 7th octets we need to skip the first octets of the
destination MAC address.
Length (in bytes)
Set to '6' since MAC address has 6 octets.
Mask (in hexadecimal)
Specify the value that the ZyXEL Device will logically qualify (logical AND) the data in the
packet.
Since the Length is set to 6 octets the Mask for it should be 12 hexadecimal numbers. In this case,
we intent to set to 'ffffffffffff' to mask the incoming source MAC address, [00 80 c8 4c ea 63].
Value (in hexadecimal)
Specify the MAC address [00 80 c8 4c ea 63] that the ZyXEL Device should use to compare with
the masked packet. If the result from the masked packet matches the 'Value', then the packet is
considered matched.
All contents Copyright 2007 ZyXEL Communications Corporation.
Page 32

P2302R-P1C Support Notes
32
Menu 21.1.2 - Generic Filter Rule
Filter #: 1,2
Filter Type= Generic Filter Rule
Active= Yes
Offset= 6
Length= 6
Mask= ffffffffffff
Value= 0080c810234a
More= No Log= None
Action Matched= Drop
Action Not Matched= Forward
Menu 3.1 - General Ethernet Setup
Input Filter Sets:
protocol filters=
device filters= 1
Output Filter Sets:
protocol filters=
device filters=
Action Matched=
Enter the action you want if the masked packet matches the 'Value'. In this case, we will drop it.
Action Not Matched=
Enter the action you want if the masked packet does not match the 'Value'. In this case, we will
forward it. If you want to configure more rules please select 'Check Next Rule' to start configuring
the next new rule. However, please note that the 'Filter Type' must be also 'Generic Filter Rule' but
not others. Because the Generic and TCPIP (IPX) filter rules must be in different filter sets.
You can now apply it to the 'General Ethernet Setup' in Menu 3.1. Please note that the 'Generic Filter' can only
be applied to the 'Device Filter' but not the 'Protocol Filter' that is used for configuring the TCPIP and IPX
filters.
All contents Copyright 2007 ZyXEL Communications Corporation.
Page 33

P2302R-P1C Support Notes
33
Menu 21 - Filter Set Configuration
Filter Filter
A filter for blocking the NetBIOS packets
Introduction
The NETBIOS protocol is used to share a Microsoft comupter of a workgroup. For the security concern, the
NetBIOS connection to a outside host is blocked by ZyXEL router as factory defaults. Users can remove the
filter sets applied to menu 3.1 and menu 4.1 for activating the NetBIOS services. The details of the filter
settings are described as follows.
Configuration
The packets need to be blocked are as follows. Please configure two filter sets with 4 and 2 rules respectively
based on the following packets in SMT menu 21.
Filter Set 1:
o Rule 1-Destination port number 137 with protocol number 6 (TCP)
o Rule 2-Destination port number 137 with protocol number 17 (UDP)
o Rule 3-Destination port number 138 with protocol number 6 (TCP)
o Rule 4-Destination port number 138 with protocol number 17 (UDP)
o Rule 5-Destination port number 139 with protocol number 6 (TCP)
o Rule 6-Destination port number 139 with protocol number 17 (UDP)
Filter Set 2:
o Rule 1-Source port number 137, Destination port number 53 with protocol number 6
(TCP)
o Rule 2-Source port number 137, Destination port number 53 with protocol number 17
(UDP)
Before starting to set the filter rules, please enter a name for each filter set in the 'Comments' field first.
All contents Copyright 2007 ZyXEL Communications Corporation.
Page 34

P2302R-P1C Support Notes
34
Set # Comments Set # Comments
------ ----------------- ------ -----------------
1 NetBIOS_WAN 7 _______________
2 NetBIOS_LAN 8 _______________
3 _______________ 9 _______________
4 _______________ 10 _______________
5 _______________ 11 _______________
6 _______________ 12 _______________
Enter Filter Set Number to Configure= 1
Edit Comments=
Press ENTER to Confirm or ESC to Cancel:
Menu 21.1.1 - TCP/IP Filter Rule
Filter #: 1,1
Filter Type= TCP/IP Filter Rule
Active= Yes
IP Protocol= 6 IP Source Route= No
Destination: IP Addr= 0.0.0.0
IP Mask= 0.0.0.0
Port #= 137
Port # Comp= Equal
Source: IP Addr= 0.0.0.0
IP Mask= 0.0.0.0
Port #= 0
Port # Comp= None
TCP Estab= No
More= No Log= None
Action Matched= Drop
Action Not Matched= Check Next Rule
Press ENTER to Confirm or ESC to Cancel:
Configure the first filter set 'NetBIOS_WAN' by selecting the Filter Set number 1.
Rule 1-Destination port number 137 with protocol number 6 (TCP)
All contents Copyright 2007 ZyXEL Communications Corporation.
Page 35

P2302R-P1C Support Notes
35
Menu 21.1.2 - TCP/IP Filter Rule
Filter #: 1,2
Filter Type= TCP/IP Filter Rule
Active= Yes
IP Protocol= 17 IP Source Route= No
Destination: IP Addr= 0.0.0.0
IP Mask= 0.0.0.0
Port #= 137
Port # Comp= Equal
Source: IP Addr= 0.0.0.0
IP Mask= 0.0.0.0
Port #= 0
Port # Comp= None
TCP Estab= N/A
More= No Log= None
Action Matched= Drop
Action Not Matched= Check Next Rule
Press ENTER to Confirm or ESC to Cancel:
Menu 21.1.3 - TCP/IP Filter Rule
Filter #: 1,3
Filter Type= TCP/IP Filter Rule
Active= Yes
Rule 2-Destination port number 137 with protocol number 17 (UDP)
Rule 3-Destination port number 138 with protocol number 6 (TCP)
All contents Copyright 2007 ZyXEL Communications Corporation.
Page 36

P2302R-P1C Support Notes
36
IP Protocol= 6 IP Source Route= No
Destination: IP Addr= 0.0.0.0
IP Mask= 0.0.0.0
Port #= 138
Port # Comp= Equal
Source: IP Addr= 0.0.0.0
IP Mask= 0.0.0.0
Port #= 0
Port # Comp= None
TCP Estab= No
More= No Log= None
Action Matched= Drop
Action Not Matched= Check Next Rule
Press ENTER to Confirm or ESC to Cancel:
Menu 21.1.4 - TCP/IP Filter Rule
Filter #: 1,4
Filter Type= TCP/IP Filter Rule
Active= Yes
IP Protocol= 17 IP Source Route= No
Destination: IP Addr= 0.0.0.0
IP Mask= 0.0.0.0
Port #= 138
Port # Comp= Equal
Source: IP Addr= 0.0.0.0
IP Mask= 0.0.0.0
Port #= 0
Port # Comp= None
TCP Estab= N/A
More= No Log= None
Rule 4-Destination port number 138 with protocol number 17 (UDP)
All contents Copyright 2007 ZyXEL Communications Corporation.
Page 37

P2302R-P1C Support Notes
37
Action Matched= Drop
Action Not Matched= Check Next Rule
Press ENTER to Confirm or ESC to Cancel:
Menu 21.1.5 - TCP/IP Filter Rule
Filter #: 1,5
Filter Type= TCP/IP Filter Rule
Active= Yes
IP Protocol= 6 IP Source Route= No
Destination: IP Addr= 0.0.0.0
IP Mask= 0.0.0.0
Port #= 139
Port # Comp= Equal
Source: IP Addr= 0.0.0.0
IP Mask= 0.0.0.0
Port #= 0
Port # Comp= None
TCP Estab= No
More= No Log= None
Action Matched= Drop
Action Not Matched= Check Next Rule
Press ENTER to Confirm or ESC to Cancel:
Menu 21.1.6 - TCP/IP Filter Rule
Filter #: 1,6
Rule 5-Destination port number 139 with protocol number 6 (TCP)
Rule 6-Destination port number 139 with protocol number 17 (UDP)
All contents Copyright 2007 ZyXEL Communications Corporation.
Page 38

P2302R-P1C Support Notes
38
Filter Type= TCP/IP Filter Rule
Active= Yes
IP Protocol= 17 IP Source Route= No
Destination: IP Addr= 0.0.0.0
IP Mask= 0.0.0.0
Port #= 139
Port # Comp= Equal
Source: IP Addr= 0.0.0.0
IP Mask= 0.0.0.0
Port #= 0
Port # Comp= None
TCP Estab= N/A
More= No Log= None
Action Matched= Drop
Action Not Matched= Forward
Press ENTER to Confirm or ESC to Cancel:
Menu 21.2 - Filter Rules Summary
# A Type Filter Rules M m n
- - ---- --------------------------------------------- - - -
1 Y IP Pr=6, SA=0.0.0.0, DA=0.0.0.0, DP=137 N D N
2 Y IP Pr=17, SA=0.0.0.0, DA=0.0.0.0, DP=137 N D N
3 Y IP Pr=6, SA=0.0.0.0, DA=0.0.0.0, DP=138 N D N
4 Y IP Pr=17, SA=0.0.0.0, DA=0.0.0.0, DP=138 N D N
5 Y IP Pr=6, SA=0.0.0.0, DA=0.0.0.0, DP=139 N D N
6 Y IP Pr=17, SA=0.0.0.0, DA=0.0.0.0, DP=139 N D F
After the first filter set is finished, you will get the complete rules summary as below.
All contents Copyright 2007 ZyXEL Communications Corporation.
Page 39

P2302R-P1C Support Notes
39
Menu 21.2.1 - TCP/IP Filter Rule
Filter #: 2,1
Filter Type= TCP/IP Filter Rule
Active= Yes
IP Protocol= 6 IP Source Route= No
Destination: IP Addr= 0.0.0.0
IP Mask= 0.0.0.0
Port #= 53
Port # Comp= Equal
Source: IP Addr= 0.0.0.0
IP Mask= 0.0.0.0
Port #= 137
Port # Comp= Equal
TCP Estab= No
More= No Log= None
Action Matched= Drop
Action Not Matched= Check Next Rule
Press ENTER to Confirm or ESC to Cancel:
Menu 21.2.2 - TCP/IP Filter Rule
Filter #: 2,2
Filter Type= TCP/IP Filter Rule
Active= Yes
Apply the first filter set 'NetBIOS_WAN' to the 'Output Protocol Filter' in the remote node
setup.
Configure the second filter set 'NetBIOS_LAN' by selecting the Filter Set number 2.
Rule 1-Source port number 137, Destination port number 53 with protocol number 6 (TCP)
Rule 2-Source port number 137, Destination port number 53 with protocol number 17 (UDP)
All contents Copyright 2007 ZyXEL Communications Corporation.
Page 40

P2302R-P1C Support Notes
40
IP Protocol= 17 IP Source Route= No
Destination: IP Addr= 0.0.0.0
IP Mask= 0.0.0.0
Port #= 53
Port # Comp= Equal
Source: IP Addr= 0.0.0.0
IP Mask= 0.0.0.0
Port #= 137
Port # Comp= Equal
TCP Estab= N/A
More= No Log= None
Action Matched= Drop
Action Not Matched= Forward
Press ENTER to Confirm or ESC to Cancel:
Menu 21.2 - Filter Rules Summary
# A Type Filter Rules M m n
- - ---- ---------------------------------------------- - - -
1 Y IP Pr=6, SA=0.0.0.0, SP=137, DA=0.0.0.0, DP=53 N D N
2 Y IP Pr=17, SA=0.0.0.0, SP=137, DA=0.0.0.0, DP=53 N D F
Menu 3.1 - General Ethernet Setup
Input Filter Sets:
1. After the first filter set is finished, you will get the complete rules summary as below.
1. Apply the filter set 'NetBIOS_LAN' in the 'Input protocol filters=' in the Menu 3 for blocking
the packets from LAN
All contents Copyright 2007 ZyXEL Communications Corporation.
Page 41

P2302R-P1C Support Notes
41
protocol filters= 2
device filters=
Output Filter Sets:
protocol filters=
device filters=
Using the Dynamic DNS (DDNS)
1. What is DDNS?
The DDNS service, an IP Registry provides a public central database where information such as email
addresses, hostnames, IPs etc. can be stored and retrieved. This solves the problems if your DNS server uses an
IP associated with dynamic IPs.
Without DDNS, we always tell the users to use the WAN IP of the ZyXEL Device to access the internal server.
It is inconvenient for the users if this IP is dynamic. With DDNS supported by the ZyXEL Device, you apply a
DNS name (e.g., www.zyxel.com.tw) for your server (e.g., Web server) from a DDNS server. The outside users
can always access the web server using the www.zyxel.com.tw regardless of the WAN IP of the ZyXEL
Device.
When the ISP assigns the ZyXEL Device a new IP, the ZyXEL Device must inform the DDNS server the
change of this IP so that the server can update its IP-to-DNS entry. Once the IP-to-DNS table in the DDNS
server is updated, the DNS name for your web server (i.e., www.zyxel.com.tw) is still usable.
The DDNS server stores password-protected email addresses with IPs and hostnames and accepts queries based
on email addresses. So, there must be an email entry in the ZyXEL Device menu 1.
The DDNS servers the ZyXEL Device supports currently is WWW.DYNDNS.ORG where you apply the DNS
from and update the WAN IP to.
Setup the DDNS
Before configuring the DDNS settings in the ZyXEL Device, you must register an account from
the DDNS server such as WWW.DYNDNS.ORG first. After the registration, you have a hostname
for your internal server and a password using to update the IP to the DDNS server.
Visit 'Dynamic DNS' in the 'Maintenance>System' in the WEB GUI to configure the settings.
All contents Copyright 2007 ZyXEL Communications Corporation.
Page 42

P2302R-P1C Support Notes
42
Option
Description
Service Provider
Enter the DDNS server in this field. Currently, we support
WWW.DYNDNS.ORG.
Host
Enter the hostname you subscribe from the above DDNS server. For example,
zyxel.com.tw.
User
Enter the user name that
Password
Enter the password that the DDNS server gives to you.
Enable Wildcard
Enter the hostname for the wildcard function that the WWW.DYNDNS.ORG
supports. Note that Wildcard option is available only when the provider is
WWW.DYNDNS.ORG.
Key Settings for using DDNS function:
Network Management Using SNMP
1. SNMP Overview
All contents Copyright 2007 ZyXEL Communications Corporation.
Page 43

P2302R-P1C Support Notes
43
The
Simple Network Management Protocol
management information between network devices (e.g., routers). By using SNMP, network administrators can
more easily manage network performance, find and solve network problems. The SNMP is a member of the
TCP/IP protocol suite, it uses the UDP to exchange messages between a management Client and an Agent,
residing in a network node.
There are two versions of SNMP: Version 1 and Version 2. ZyXEL supports SNMPv1. Most of the changes
introduced in Version 2 increase SNMP's security capabilities. SNMP encompasses three main areas:
1. A small set of management operations.
2. Definitions of management variables.
3. Data representation.
The operations allowed are: Get, GetNext, Set, and Trap. These functions operate on variables that exist in
network nodes. Examples of variables include statistic counters, node port status, and so on. All of the SNMP
(SNMP) is an applications-layer protocol used to exchange the
management functions are carried out through these simple operations. No action operations are available, but
these can be simulated by the setting of flag variables. For example, to reset a node, a counter variable named
'time to reset' could be set to a value, causing the node to reset after the time had elapsed.
SNMP variables are defined using the OSI Abstract Syntax Notation One (ASN.1). ASN.1 specifies how a
variable is encoded in a transmitted data frame; it is very powerful because the encoded data is self-defining.
For example, the encoding of a text string includes an indication that the data unit is a string, along with its
length and value. ASN.1 is a flexible way of defining protocols, especially for network management protocols
where nodes may support different sets of manageable variables.
The net of variables that each node supports is called the
Management Information Base
(MIB). The MIB is
made up of several parts, including the Standard MIB, specified as part of SNMP, and Enterprise Specific MIB,
which are defined by different manufacturer for hardware specific management.
The current Internet-standard MIB, MIB-II, is defined in RFC 1213 and contains 171 objects. These objects are
grouped by protocol (including TCP, IP, UDP, SNMP, and other categories, including 'system' and 'interface.'
The Internet Management Model is as shown in figure 1. Interactions between the NMS and managed devices
can be any of four different types of commands:
6. Reads
Read is used to monitor the managed devices, NMSs read variables that are maintained by the devices.
All contents Copyright 2007 ZyXEL Communications Corporation.
Page 44

P2302R-P1C Support Notes
44
7. Writes
Write is used to control the managed devices, NMSs write variables that are stored in the managed
devices.
8. Traversal operations
NMSs use these operations to determine which variables a managed device supports and to sequentially
gather information from variable tables (such as IP routing table) in managed devices.
9. Traps
The managed devices to asynchronously report certain events to NMSs use trap.
2. SNMPv1 Operations
SNMP itself is a simple request/response protocol. 4 SNMPv1 operations are defined as below.
All contents Copyright 2007 ZyXEL Communications Corporation.
Page 45

P2302R-P1C Support Notes
45
Get
Allows the NMS to retrieve an object variable from the agent.
GetNext
Allows the NMS to retrieve the next object variable from a table or list within an agent. In
SNMPv1, when a NMS wants to retrieve all elements of a table from an agent, it initiates a Get
operation, followed by a series of GetNext operations.
Set
Allows the NMS to set values for object variables within an agent.
Trap
Used by the agent to inform the NMS of some events.
The SNMPv1 message contains two parts. The first part contains a version and a community name. The second
part contains the actual SNMP protocol data unit (PDU) specifying the operation to be performed (Get, Set, and
so on) and the object values involved in the operation. The following figure shows the SNMPv1 message
format.
The SNMP PDU contains the following fields:
PDU type Specifies the type of PDU.
Request ID Associates requests with responses.
Error status Indicates an error and an error type.
Error index Associates the error with a particular object variable.
All contents Copyright 2007 ZyXEL Communications Corporation.
Page 46

P2302R-P1C Support Notes
46
Variable-bindings Associates particular object with their value.
3. ZyXEL SNMP Implementation
ZyXEL currently includes SNMP support in some ZyXEL routers. It is implemented based on the SNMPv1, so
it will be able to communicate with SNMPv1 NMSs. For SNMPv1 operation, ZyXEL permits one community
string so that the router can belong to only one community and allows trap messages to be sent to only one
NMS manager.
Some traps are sent to the SNMP manager when anyone of the following events happens:
coldStart (defined in RFC-1215) :
If the machine coldstarts, the trap will be sent after booting.
warmStart (defined in RFC-1215) :
If the machine warmstarts, the trap will be sent after booting.
linkDown (defined in RFC-1215) :
If any link of IDSL or WAN is down, the trap will be sent with the port number . The port number is its
interface index under the interface group.
linkUp (defined in RFC-1215) :
If any link of IDSL or WAN is up, the trap will be sent with the port number . The port number is its
interface index under the interface group.
authenticationFailure (defined in RFC-1215) :
When receiving any SNMP get or set requirement with wrong community, this trap is sent to the manager.
1. whyReboot (defined in ZYXEL-MIB) :
When the system is going to restart (warmstart), the trap will be sent with the reason of restart before rebooting.
(i) For intentional reboot:
In some cases (download new files, CI command "sys reboot", ...), reboot is done intentionally. And traps with
the message "System reboot by user !" will be sent.
All contents Copyright 2007 ZyXEL Communications Corporation.
Page 47

P2302R-P1C Support Notes
47
(ii) For fatal error :
System has to reboot for some fatal errors. And traps with the message of the fatal code will be sent.
4. Configure the ZyXEL Device for SNMP
The SNMP related settings in the ZyXEL Device are configured in menu 22, SNMP Configuration. The
following steps describe a simple setup procedure for configuring all SNMP settings.
All contents Copyright 2007 ZyXEL Communications Corporation.
Page 48

P2302R-P1C Support Notes
48
Option
Descriptions
Get Community
Enter the correct Get Community. This Get Community must match the 'Get-' and
'GetNext' community requested from the NMS. The default is 'public'.
Set Community
Enter the correct Set Community. This Set Community must match the
'Set-community requested from the NMS. The default is 'public'.
Trusted Host
Enter the IP address of the NMS. The ZyXEL Device will only respond to SNMP
messages coming from this IP address. If 0.0.0.0 is entered, the ZyXEL Device will
respond to all NMS managers.
Trap
Community
Enter the community name in each sent trap to the NMS. This Trap Community must
match what the NMS is expecting. The default is 'public'.
Trap Destination
Enter the IP address of the NMS that you wish to send the traps to. If 0.0.0.0 is
entered, the ZyXEL Device will not send trap any NMS manager.
Key Settings:
All contents Copyright 2007 ZyXEL Communications Corporation.
Page 49

P2302R-P1C Support Notes
49
Using SysLog
4. ZyXEL Device Setup
Configuration:
1. Active, use the space bar to turn on the syslog option.
2. Syslog IP Address, enter the IP address of the UNIX server that you wish to send the syslog.
3. Log Facility, use the space bar to toggle between the 7 different local options.
UNIX Setup
1. Make sure that your syslogd starts with -r argument.
-r
, this option will enable the facility to receive message from the network using an Internet domain socket with
the syslog services. The default setting is not enabled.
2. Edit the file /etc/syslog.conf by adding the following line at the end of the /etc/syslog.conf file.
local1.* /var/log/zyxel.log
Where /var/log/zyxel.log is the full path of the log file.
3. Restart syslogd.
CDR log(call messages)
Format:
All contents Copyright 2007 ZyXEL Communications Corporation.
Page 50

P2302R-P1C Support Notes
50
Feb 14 16:57:17 192.168.1.1 ZyXEL Communications Corp.: board 0 line 0 channel 0, call 18, C01 Incoming
Call OK
Feb 14 17:07:18 192.168.1.1 ZyXEL Communications Corp.: board 0 line 0 channel 0, call 18, C02 Call Terminated
Jul 19 11:28:39 192.168.102.2 ZyXEL Communications Corp.: Packet Trigger: Protocol=1,
Data=4500003c100100001f010004c0a86614ca849a7b08004a5c020001006162636465666768696a6b6c6d6e6f7071727374
Jul 19 11:28:56 192.168.102.2 ZyXEL Communications Corp.: Packet Trigger: Protocol=1,
Data=4500002c1b0140001f06b50ec0a86614ca849a7b0427001700195b3e00000000600220008cd40000020405b4
sdcmdSyslogSend( SYSLOG_CDR, SYSLOG_INFO, String );
String = board xx line xx channel xx, call xx, str
board = the hardware board ID
line = the WAN ID in a board
channel = channel ID within the WAN
call = the call reference number which starts from 1 and increments by 1 for each new call
str = C01 Outgoing Call dev xx ch xx (dev:device No. ch:channel No.)
C01 Incoming Call xxxxBps xxxxx (L2TP,xxxxx means Remote Call ID)
C01 Incoming Call xxxx (means connected speed) xxxxx (means Remote Call ID)
L02 Tunnel Connected(L2TP)
C02 OutCall Connected xxxx (means connected speed) xxxxx (means Remote Call ID)
C02 CLID call refused
L02 Call Terminated
C02 Call Terminated
Example:
Packet triggered log
Format:
sdcmdSyslogSend( SYSLOG_PKTTRI, SYSLOG_NOTICE, String );
String = Packet trigger: Protocol=xx Data=xxxxxxxxxx
Protocol: (1:IP 2:IPX 3:IPXHC 4:BPDU 5:ATALK 6:IPNG)
Data: We will send forty-eight Hex characters to the server
Example:
All contents Copyright 2007 ZyXEL Communications Corporation.
Page 51

P2302R-P1C Support Notes
51
Jul 19 14:44:09 192.168.1.1 ZyXEL Communications Corp.: IP[Src=202.132.154.1 Dst=192.168.1.33 UDP
spo=0035 dpo=05d4]}S03>R01mF
Jul 19 14:44:13 192.168.1.1 ZyXEL Communications Corp.: IP[Src=192.168.1.33 Dst=202.132.154.1
ICMP]}S03>R01mF
Jul 19 11:43:25 192.168.1.1 ZyXEL Communications Corp.: ppp:LCP Starting
Jul 19 11:43:29 192.168.1.1 ZyXEL Communications Corp.: ppp:IPCP Starting
Jul 19 11:43:34 192.168.1.1 ZyXEL Communications Corp.: ppp:CCP Starting
Jul 19 11:43:38 192.168.1.1 ZyXEL Communications Corp.: ppp:BACP Starting
Jul 19 11:43:43 192.168.1.1 ZyXEL Communications Corp.: ppp:IPCP Opening
Filter log
This message is available when the 'Log' is enabled in the filter rule setting. The message consists of the packet
header and the log of the filter rules.
Format:
sdcmdSyslogSend(SYSLOG_FILLOG, SYSLOG_NOTICE, String );
String = IP[Src=xx.xx.xx.xx Dst=xx.xx.xx.xx prot spo=xxxx dpo=xxxx]S04>R01mD
IP[...] is the packet header and S04>R01mD means filter set 4 (S) and rule 1 (R), match (m) drop (D).
Src: Source Address
Dst: Destination Address
prot: Protocol (TCP,UDP,ICMP)
spo: Source port
dpo: Destination port
Example:
PPP Log
Format:
sdcmdSyslogSend( SYSLOG_PPPLOG, SYSLOG_NOTICE, String );
String = ppp:Proto Starting / ppp:Proto Opening / ppp:Proto Closing / ppp:Proto Shutdown
Proto = LCP / ATCP / BACP / BCP / CBCP / CCP / CHAP/ PAP / IPCP /IPXCP
Example:
All contents Copyright 2007 ZyXEL Communications Corporation.
Page 52

P2302R-P1C Support Notes
52
Jul 19 11:43:51 192.168.1.1 ZyXEL Communications Corp.: ppp:CCP Opening
Jul 19 11:43:55 192.168.1.1 ZyXEL Communications Corp.: ppp:BACP Opening
Jul 19 11:44:00 192.168.1.1 ZyXEL Communications Corp.: ppp:LCP Closing
Jul 19 11:44:05 192.168.1.1 ZyXEL Communications Corp.: ppp:IPCP Closing
Jul 19 11:44:09 192.168.1.1 ZyXEL Communications Corp.: ppp:CCP Closing
Jul 19 11:44:14 192.168.1.1 ZyXEL Communications Corp.: ppp:BACP Closing
Using IP Alias
What is IP Alias?
In a typical environment, a LAN router is required to connect two local networks. The ZyXEL Device can
connect three local networks to the ISP or a remote node, we call this function as 'IP Alias'. In this case, an
internal router is not required. For example, the network manager can divide the local network into three
networks and connect them to the Internet using ZyXEL Device's single user account. See the figure below.
The ZyXEL Device supports three virtual LAN interfaces via its single physical Ethernet interface. The first
network can be configured in menu 3.2 as usual. The second and third networks that we call 'IP Alias 1' and 'IP
Alias 2' can be configured in menu 3.2.1-IP Alias Setup.
There are three internal virtual LAN interfaces for the ZyXEL Device to route the packets from/to the three
networks correctly. They are enif0 for the major network, enif0:0 for the IP alias 1 and enif0:1 for the IP alias 2.
Therefore, three routes are created in the ZyXEL Device as shown below when the three networks are
All contents Copyright 2007 ZyXEL Communications Corporation.
Page 53

P2302R-P1C Support Notes
53
Copyright (c) 1994 - 2004 ZyXEL Communications Corp.
ras> ip ro st
Dest FF Len Interface Gateway Metric stat Timer Use
192.168.3.0 00 24 enif0:1 192.168.3.1 1 041b 0 0
192.168.2.0 00 24 enif0:0 192.168.2.1 1 041b 0 0
192.168.1.0 00 24 enif0 192.168.1.1 1 041b 0 0
ras>
Menu 3.2 - TCP/IP and DHCP Ethernet Setup
DHCP= Server TCP/IP Setup:
Client IP Pool:
Starting Address= 192.168.1.33 IP Address= 192.168.1.1
Size of Client IP Pool= 32 IP Subnet Mask= 255.255.255.0
First DNS Server= From ISP RIP Direction= Both
IP Address= N/A Version= RIP-1
Second DNS Server= From ISP Multicast= None
IP Address= N/A Edit IP Alias= Yes
Third DNS Server= From ISP
IP Address= N/A
DHCP Server Address= N/A
Press ENTER to Confirm or ESC to Cancel:
configured. If the ZyXEL Device's DHCP is also enabled, the IP pool for the clients can be any of the three
networks.
Two new protocol filter interfaces in menu 3.2.1 allow you to accept or deny LAN packets from/to the IP alias
1 and IP alias 2 go through the ZyXEL Device. The filter set in menu 3.1 is used for main network configured
in menu 3.2.
IP Alias Setup
1. Edit the first network in menu 3.2 by configuring the ZyXEL Device's first LAN IP address.
All contents Copyright 2007 ZyXEL Communications Corporation.
Page 54

P2302R-P1C Support Notes
54
DHCP Setup
If the ZyXEL Device's DHCP server is enabled, the IP pool for the clients can be any of
the three networks.
TCP/IP Setup
Enter the first LAN IP address for the ZyXEL Device. This will create the first route in
the enif0 interface.
Edit IP Alias
Toggle to 'Yes' to enter menu 3.2.1 for setting up the second and third networks.
Menu 3.2.1 - IP Alias Setup
IP Alias 1= Yes
IP Address= 192.168.2.1
IP Subnet Mask= 255.255.255.0
RIP Direction= None
Version= RIP-1
Incoming protocol filters=
Outgoing protocol filters=
IP Alias 2= Yes
IP Address= 192.168.3.1
IP Subnet Mask= 255.255.255.0
RIP Direction= None
Version= RIP-1
Incoming protocol filters=
Outgoing protocol filters=
Enter here to CONFIRM or ESC to CANCEL:
IP Alias 1
Toggle to 'Yes' and enter the second LAN IP address for the ZyXEL Device. This will
create the second route in the enif0:0 interface.
IP Alias 2
Toggle to 'Yes' and enter the third LAN IP address for the ZyXEL Device. This will
create the third route in the enif0:1 interface.
Key Settings:
2. Edit the second and third networks in menu 3.2.1 by configuring the ZyXEL Device's second and third LAN
IP addresses.
Key Settings:
All contents Copyright 2007 ZyXEL Communications Corporation.
Page 55

P2302R-P1C Support Notes
55
Time Service in ZyXEL Device
There is no RTC (Real-Time Clock) chip so the ZyXEL Device should launch a mechanism to get current time
and date from external server in boot time. Time service is implemented by the Daytime protocol(RFC-867),
Time protocol(RFC-868), and NTP protocol(RFC-1305). You have to assign an IP address of a time server and
then, the ZyXEL Device will get the date, time, and time-zone information from this server.
All contents Copyright 2007 ZyXEL Communications Corporation.
Page 56

P2302R-P1C Support Notes
56
Menu 3.2 - TCP/IP and DHCP Ethernet Setup
DHCP= Server TCP/IP Setup:
Client IP Pool:
Starting Address= 192.168.1.33 IP Address= 192.168.1.1
Size of Client IP Pool= 32 IP Subnet Mask= 255.255.255.0
First DNS Server= From ISP RIP Direction= Both
Using IP Multicast
What is IP Multicast ?
Traditionally, IP packets are transmitted in two ways - unicast or broadcast. Multicast is a third way to
deliver IP packets to a group of hosts. Host groups are identified by class D IP addresses, i.e., those with
"1110" as their higher-order bits. In dotted decimal notation, host group addresses range from 224.0.0.0 to
239.255.255.255. Among them, 224.0.0.1 is assigned to the permanent IP hosts group, and 224.0.0.2 is
assigned to the multicast routers group.
IGMP (Internet Group Management Protocol) is the protocol used to support multicast groups. The latest
version is version 2 (see RFC2236). IP hosts use IGMP to report their multicast group membership to any
immediate-neighbor multicast routers so the multicast routers can decide if a multicast packet needs to be
forwarded. At start up, the ZyXEL Device queries all directly connected networks to gather group membership.
After that, the ZyXEL Device updates the information by periodic queries. The ZyXEL Device implementation
of IGMP is also compatible with version 1. The multicast setting can be turned on or off on Ethernet and remote
nodes.
IP Multicast Setup
Enable IGMP in ZyXEL Device's LAN in menu 3.2:
All contents Copyright 2007 ZyXEL Communications Corporation.
Page 57

P2302R-P1C Support Notes
57
IP Address= N/A Version= RIP-1
Second DNS Server= From ISP Multicast= IGMP-v2
IP Address= N/A Edit IP Alias= No
Third DNS Server= From ISP
IP Address= N/A
DHCP Server Address= N/A
Press ENTER to Confirm or ESC to Cancel:
Menu 11.3 - Remote Node Network Layer Options
IP Address Assignment= Dynamic
Rem IP Addr= N/A
Rem Subnet Mask= N/A
My WAN Addr= N/A
Network Address Translation= SUA Only
Metric= 1
Private= No
RIP Direction= Both
Version= RIP-2B
Multicast= IGMP-v2
Enter here to CONFIRM or ESC to CANCEL:
Multicast
IGMP-v1 for IGMP version 1, IGMP-v2 for IGMP version 2.
Enable IGMP in ZyXEL Device's remote node in menu 11.3:
Key Settings:
All contents Copyright 2007 ZyXEL Communications Corporation.
Page 58

P2302R-P1C Support Notes
58
Using Traffic Redirect Feature
What is Traffic Redirect?
Traffic redirect forwards WAN traffic to a backup gateway when ZyXEL Device cannot connect to the Internet
through it's normal gateway. Thus make your backup gateway as an auxiliary backup of your WAN
connection. Once ZyXEL Device detects it's WAN connectivity is broken, ZyXEL Device will try to forward
outgoing traffic to backup gateway that users specify in traffic redirect configuration menu.
How to deploy backup gateway?
You can deploy the backup gateway on the WAN or LAN of ZyXEL Device. However, if you would like to
deploy the backup gateway on the WAN of ZyXEL Device, please make sure that your ZyXEL Device has a
static WAN IP address at first. Otherwise, we recommend you to deploy the backup gateway on the LAN of
ZyXEL Device.
Traffic Redirect on WAN port
When the ZyXEL Device has a dynamic IP address on it's WAN port, it may be easier to connect backup
gateway to the LAN of the ZyXEL Device.
All contents Copyright 2007 ZyXEL Communications Corporation.
Page 59

P2302R-P1C Support Notes
59
Menu 11.1 - Remote Node Profile
Menu 11.6 - Traffic Redirect Setup
Active= Yes
Configuration:
Backup Gateway IP Address= 192.168.1.50
Metric= 14
Check WAN IP Address= 202.13.154.1
Fail Tolerance= 5
Period(sec)= 30
Timeout(sec)= 3
Press ENTER to Confirm or ESC to Cancel:
Traffic Redirect on LAN port
Traffic Redirect Setup
Configure parameters that determine when The ZyXEL Device will forward WAN traffic to the backup
gateway using SMT Menu 11.6-Traffic Redirect Setup.
Key Settings:
All contents Copyright 2007 ZyXEL Communications Corporation.
Page 60

P2302R-P1C Support Notes
60
Active
Press [Space BAR] and select Yes (to enable) or No (to disable) traffic redirect setup.
Backup
Gateway IP
Address
The IP address of your backup gateway. The ZyXEL Device automatically forwards
outgoing traffic to this IP address if The ZyXEL Device's Internet connection terminates.
Metric
Enter a number from 1 to 15 to give your traffic redirect route a priority number. The
smaller the number, the higher priority the route has.
Check WAN IP
Address
Configure a reliable server on Internet (for example, your ISP's DNS server address) for
The ZyXEL Device to check it's WAN connectivity periodically. If you leave this field
as 0.0.0.0, The ZyXEL Device will check it's default gateway IP address instead.
Fail Tolerance
Specify the number of times your ZyXEL Device may attempt and fail to connect to
Internet before triggering traffic redirect connection.
Period
Specify the period that The ZyXEL Device would check it's WAN connectivity.
Timeout
Specify the seconds that The ZyXEL Device would wait for a response from the reliable
server.
You can also configure traffic redirect via web configuration. The configuration page is in
ADVANCED/WAN/Traffic Redirect.
All contents Copyright 2007 ZyXEL Communications Corporation.
Page 61

P2302R-P1C Support Notes
61
Using Universal Plug n Play (UPnP)
1. What is UPnP
UPnP (Universal Plug and Play) makes connecting PCs of all form factors, intelligent appliances, and wireless
devices in the home, office, and everywhere in between easier and even automatic by leveraging TCP/IP and
Web technologies. UPnP can be supported on essentially any operating system and works with essentially any
type of physical networking media – wired or wireless.
UPnP also supports NAT Traversal which can automatically solve many NAT unfriendly problems. By UPnP,
applications assign the dynamic port mappings to Internet gateway and delete the mappings when the
connections are complete.
The key components in UPnP are devices, services, and control points.
Devices: Network devices, such as networking gateways, TV, refrigerators, printers...etc, which
provides services.
Services: Services are provided by devices, such as time services provided by alarm clocks. In
UPnP, services are described in XML format. Control points can set/get services information from
devices.
Control points: Control points can manipulate network devices When you add a new control
point (in this case, a laptop) to a network, the device may ask the network to find UPnP-enabled
devices. These devices respond with their URLs and device descriptions.
All contents Copyright 2007 ZyXEL Communications Corporation.
Page 62

P2302R-P1C Support Notes
62
UPnP Operations
Addressing: UPnPv1 devices MAY support IPv4, IPv6, or both. For IPv4, each devices should have DHCP
client, when the device gets connected to the network, it will discover DHCP server on network to get an IP
address. If not, then Auto-IP mechanism should be supported so that the device can give itself an IP
address.(169.254.0.0/16)
Discovery: Whenever a device is added on the network, it will advertise it's service over the network.
Control point can also discover services provided by devices.
Description: Control points can get more detailed service information from devices' description in XML
format. The description may include product name, model name, serial number, vendor ID, and
embedded services...etc.
Control: Devices can be manipulated by control points through Control message.
Eventing: Devices can send event message to notify control points if there is any update on services
provided.
Presentation: Each device can provide their own control interface by URL link. So that users can go to
the device's presentation web page by the URL to control this device.
2. Using UPnP in ZyXEL devices
In this example, we will introduce how to enable UPnP function in ZyXEL devices. Currently, Microsoft MSN
is the most popular application exploiting UPnP, so we take Microsoft MSN application as an example in this
support note. You can learn how MSN benefit from NAT traversal feature in UPnP in this application note.
All contents Copyright 2007 ZyXEL Communications Corporation.
Page 63

P2302R-P1C Support Notes
63
In the diagram, suppose PC1 and PC2 both sign in MSN server, and they would like to establish a video
conference. PC1 is behind PPPoE dial-up router which supports UPnP. Since the router supports UPnP, we
don't need to setup NAT mapping for PC1. As long as we enable UPnP function on the router, PC1 will assign
the mapping to the router dynamically. Note that since PC1 must support UPnP, we presume that it's OS is
Microsoft WinME or WinXP.
Device: ZyXEL Router
Service: NAT function provided by Prestige Router
Control Point: PC1
1. Enable UPnP function in the ZyXEL device
Go to Management->UPnP, check two boxes, Enable UPnP service and Allow users to make configuration
changes through UPnP.
The first check box enables UPnP function in this device.
The second check box allow users' application to change configuration in this device. For instance, if you
enable this item, then user's MSN application can assign dynamic port mapping to the router. So that network
administrator don't need to setup SUA port mapping in the router.
All contents Copyright 2007 ZyXEL Communications Corporation.
Page 64

P2302R-P1C Support Notes
64
2. After getting IP address, you can go to open MSN application on PC and sign in MSN server.
All contents Copyright 2007 ZyXEL Communications Corporation.
Page 65

P2302R-P1C Support Notes
65
3. Start a Video conversation with one online user.
4. On the opposite side, your partner selects Accept to accept your conversation request.
All contents Copyright 2007 ZyXEL Communications Corporation.
Page 66

P2302R-P1C Support Notes
66
5. Finally, your video conversation is achieved.
All contents Copyright 2007 ZyXEL Communications Corporation.
Page 67

P2302R-P1C Support Notes
67
VoIP Application Notes
Setup SIP Account
VoIP is the sending of voice signals over the Internet Protocol. This allows you to make phone calls and send
faxes over the Internet at a fraction of the cost of using the traditional circuit-switched telephone network.
The Session Initiation Protocol (SIP) is an application-layer control (signaling) protocol that handles the setting
up, altering and tearing down of voice and multimedia sessions over the Internet. SIP signaling is separate from
the media for which it handles sessions. The media that is exchanged during the session can use a different path
from that of the signaling. SIP handles telephone calls and can interface with traditional circuit-switched
telephone networks.
The ZyXEL Device can hold up to two SIP account simultaneously please follow the below instruction to
configure the SIP account properly.
All contents Copyright 2007 ZyXEL Communications Corporation.
Page 68

P2302R-P1C Support Notes
68
Note: You should have a voice account already set up and have VoIP information from your VoIP service
provider prior to configure SIP account on to the unit.
With the account information your ITSP provided now you may start.
Step 1. Open the web browser from your workstation to connect to the ZyXEL Device by entering the
Management IP address of the ZyXEL Device (LAN IP address). The default management IP of The ZyXEL
Device is 192.168.1.1.
Step 2. Enter the administrator password (The default is '1234') on the login page and click on login.
Step 3. Click VoIP/SIP on the tree menu to bring you to SIP setting page. In the SIP Settings page, use the
account selector on right upper corner of the page to select the SIP account you will like to configure.
Step 4. Check Active Sip Account if you would like to activate this account. After that, fill in the account
information provided by ITSP. Normally that includes SIP number, SIP local port, SIP server address, SIP
server port, Register server port, Register server address, SIP service domain.
All contents Copyright 2007 ZyXEL Communications Corporation.
Page 69

P2302R-P1C Support Notes
69
Step 5. Fill in the User ID and password provided by ITSP in the Authentication session.
Step 6. Check Caller ID box if you wish to send caller ID.
Step 7. Associate each phone port with SIP account(s) for both outgoing call and incoming call. The ZyXEL
Device allows you to associate either one or both phone port to single SIP account. Base on SIP account, user
can decide which phone(s) should ring when an incoming call arrives.
All contents Copyright 2007 ZyXEL Communications Corporation.
Page 70

P2302R-P1C Support Notes
70
Label
Description
SIP Account
You can configure the ZyXEL Device to use multiple SIP accounts. Select
one to configure its settings on the ZyXEL Device.
SIP Number
A SIP account's Uniform Resource Identifier (URI) identifies the SIP
account in a way similar to the way an e-mail address identifies an e-mail
account. It is also known as a SIP identity or address. The format of a SIP
identity is SIP-Number@SIP-Srevice-Domain.
A SIP number is the part of the SIP URI that comes before the "@" symbol.
Enter your SIP number in this field. You can use up to 31 ASCII
characters.
SIP Local Port
Use this field to configure the ZyXEL Device’s listening port for SIP. Leave
this field set to the default if you were not given a local port number for SIP.
SIP Server
Address
Type the IP address of the SIP server in this field.
SIP Server
Port
Enter the SIP server’s listening port for SIP in this field. Leave this field set
to the default if your VoIP service provider did not give you a local port
number for SIP.
REGISTER
Server
Address
A SIP register server maintains a database of SIP identity-to-IP address
(or domain name) mapping. The register server checks your user name
and password when you register.
Enter the SIP register server’s address in this field.
If you were not given a register server address, then enter the
address from the SIP Server Address field again here.
Step 8. Click on Apply to save the setting and take effect. If you would like to configure the 2nd SIP account,
please select SIP2 by using the SIP account selector than follow step 1 to 8 to complete the 2nd account setup.
Note: If more than both SIP number are associated both phone port you will not be able to identify which
account is being called for the incoming call.
Each field's detail description on this page is listed below.
All contents Copyright 2007 ZyXEL Communications Corporation.
Page 71

P2302R-P1C Support Notes
71
REGISTER
Server Port
Enter the SIP register server’s listening port for SIP in this field.
If you were not given a register server port, then enter the port from
the SIP Server Port field again here.
SIP Service
Domain
A SIP service domain is the domain name that comes after the @ symbol
in a full SIP URI.
Enter the SIP service domain name in this field.You can use up to 127
ASCII Extended set characters.
Authentication
User ID
This is the user name for registering this SIP account with the SIP register
server. Type the user name exactly as it was given to you. Use ASCII
characters.
Authentication
Password
Type the password associated with the user name above. Use ASCII
Extended set characters.
Block Caller
ID
Select this check box to not show identification information when you make
the VoIP calls. Clear this check box to show identification information when
you make VoIP calls.
Apply to
Phone 1 and Phone 2 correspond to the ZyXEL Device’s physical PHONE
1 and 2 ports, respectively. Select whether you want to receive calls for
this SIP account on Phone 1, Phone 2 or both. If you select both, you will
not know which SIP account a call is coming in on.
Advanced
Settings
Click Settings to open a screen where you can configure the ZyXEL
Device’s advanced VoIP settings like SIP server settings, the RTP port
range and the coding type.
Apply
Click Apply to save your changes back to the ZyXEL Device.
Reset
Click Reset to begin configuring this screen afresh.
Advanced voice settings configuration
Advanced voice settings configuration allows user to modify SIP server related settings, RTP port range,
preferred compression type (codec), DTMF type and Message Waiting Indication (MWI).Click VoIP in the
navigation panel and then SIP to open the SIP Settings. Select a SIP account and then click Advanced Settings
to display the following screen.
All contents Copyright 2007 ZyXEL Communications Corporation.
Page 72

P2302R-P1C Support Notes
72
Label
Description
SIP Account
You can configure the ZyXEL Device to use multiple SIP accounts. Select
one to configure its settings on the ZyXEL Device.
SIP Server
Settings
URL Type
Select whether or not to include the SIP service domain name when the
ZyXEL Device sends the SIP number.
SIP - include the SIP service domain name
TEL - do not include the SIP service domain name.
Expiration
Enter the number of seconds your SIP account is registered with the SIP
register server before it is deleted. The ZyXEL Device automatically tries to
Each field is described in the following table.
All contents Copyright 2007 ZyXEL Communications Corporation.
Page 73

P2302R-P1C Support Notes
73
Duration
re-register your SIP account when one-half of this time has passed. (The
SIP register server might have a different expiration.)
Register Re-send
Timer
Enter the number of seconds the ZyXEL Device waits before it tries again to
register the SIP account, if the first try failed or if there is no response.
Session Expires
Enter the number of seconds the conversation can last before the call is
automatically disconnected. Usually, when one-half of this time has passed,
the ZyXEL Device or the other party updates this timer to prevent this from
happening.
Min-SE
Enter the minimum number of seconds the ZyXEL Device accepts for a
session expiration time when it receives a request to start a SIP session. If
the request has a shorter time, the ZyXEL Device rejects it.
RTP Port Range
Start Port
End Port
Enter the listening port number(s) for RTP traffic, if your VoIP service
provider gave you this information. Otherwise, keep the default values.
To enter one port number, enter the port number in the Start Port and End
Port fields.
To enter a range of ports,
• Enter the port number at the beginning of the range in the Start Port field
• Enter the port number at the end of the range in the End Port field.
Voice
Compression
Select the type of voice coder/decoder (codec) that you want the ZyXEL
Device to use. G.711 provides higher voice quality but requires more
bandwidth (64 kbps).
• G.711A is typically used in Europe.
• G.711u is typically used in North America and Japan.
In contrast, G.729 only requires 8 kbps.
The ZyXEL Device must use the same codec as the peer. When two SIP
devices start a SIP session, they must agree on a codec.
All contents Copyright 2007 ZyXEL Communications Corporation.
Page 74

P2302R-P1C Support Notes
74
Primary
CompressionType
Select the ZyXEL Device’s first choice for voice coder/decoder.
Secondary
Compression
Type
Select the ZyXEL Device’s second choice for voice coder/decoder. Select
None if you only want the ZyXEL Device to accept the first choice.
Third
Compression
Type
This field is disabled if Secondary Compression Type is None.
Select the ZyXEL Device’s third choice for voice coder/decoder. Select
None if you only want the ZyXEL Device to accept the first or second
choice.
DTMF Mode
Control how the ZyXEL Device handles the tones that your telephone
makes when you push its buttons. You should use the same mode your
VoIP service provider uses.RFC 2833 - send the DTMF tones in RTP
packets PCM - send the DTMF tones in the voice data stream. This method
works best when you are using a codec that does not use compression (like
G.711). Codecs that use compression (like G.729) can distort the tones.SIP
INFO - send the DTMF tones in SIP messages
STUN
Active
Select this if all of the following conditions are satisfied.
There is a NAT router between the ZyXEL Device and the SIP server
The NAT router is not a SIP ALG.
Your VoIP service provider gave you an IP address or domain name for a
STUN server. Otherwise, clear this field.
Server Address
Enter the IP address or domain name of the STUN server provided by your
VoIP service provider.
Server Port
Enter the STUN server’s listening port, if your VoIP service provider gave
All contents Copyright 2007 ZyXEL Communications Corporation.
Page 75

P2302R-P1C Support Notes
75
you one.Otherwise, keep the default value.
Use NAT
Active
Select this if you want the ZyXEL Device to send SIP traffic to a specific
NAT router. You must also configure the NAT router to forward traffic with
the specified port to the ZyXEL Device. This eliminates the need for STUN
or a SIP ALG.
Server Address
Enter the public IP address or domain name of the NAT router.
Server Port
Enter the port number that your SIP sessions use with the public IP address
of the NAT router.
Outbound Proxy
Active
Select this if your VoIP service provider has a SIP outbound server to
handle the voice calls. This allows the ZyXEL Device to work with any type
of NAT router and eliminates the need for STUN or a SIP ALG. Turn off any
SIP ALG on a NAT router in front of the ZyXEL Device to keep it from
retranslating the IP address (since this is already handled by the outbound
proxy server).
Server Address
Enter the IP address or domain name of the SIP outbound proxy server.
Server Port
Enter the SIP outbound proxy server’s listening port, if your VoIP service
provider gave you one. Otherwise, keep the default value.
NAT Keep Alive
Active
Select this to stop NAT routers between the ZyXEL Device and SIP server
(a SIP proxy server or outbound proxy server) from dropping the SIP
session. The ZyXEL Device does this by sending SIP notify messages to
the SIP server based on the specified interval.
Keep Alive with
SIP Proxy
Select this if the SIP server is a SIP proxy server.
Keep Alive with
Outbound Proxy
Select this if the SIP server is an outbound proxy server. You must enable
Outbound Proxy to use this.
Keep Alive
Interval
Enter how often (in seconds) the ZyXEL Device should send SIP notify
messages to the SIP server.
All contents Copyright 2007 ZyXEL Communications Corporation.
Page 76

P2302R-P1C Support Notes
76
MWI (Message
Waiting
Indication)
Enable
Select this if you want to hear a waiting (beeping) dial tone on your phone
when you have at least one voice message. Your VoIP service provider
must support this feature.
Expiration Time
Keep the default value, unless your VoIP service provider tells you to
change it.Enter the number of seconds the SIP server should provide the
message waiting service each time the ZyXEL Device subscribes to the
service. Before this time passes, the ZyXEL Device automatically
subscribes again.
Fax Option
This field controls how the ZyXEL Device handles fax messages.
G . 711 Fax
Passthrough
Select this if the ZyXEL Device should use G.711 to send fax messages.
The peer devices must also use G.711
T.38 Fax Relay
Select this if the ZyXEL Device should send fax messages as UDP or
TCP/IP packets through IP networks. This provides better quality, but it may
have interoperability problems. The peer devices must also use T.38
Call Forward
Call Forward
Table
Select which call forwarding table you want the ZyXEL Device to use for
incoming calls. You set up these tables in VoIP > Phone Book > Incoming
Call Policy.
Caller Ringing
Enable
Select the check box if you want to specify what tone people hear when
they call you. The ZyXEL Device provides a default tone
On Hold
Enable
Select the check box if you want to specify what tone people hear when you
put them on hold. The ZyXEL Device provides a default tone
<Back
Click this to return to the SIP Settings screen without saving your changes.
Apply
Click this to save your changes and to apply them to the ZyXEL Device.
Reset
Click this to set every field in this screen to its last-saved value.
All contents Copyright 2007 ZyXEL Communications Corporation.
Page 77

P2302R-P1C Support Notes
77
Label
Description
SIP TOS
Priority Setting
Enter the priority for SIP voice transmissions. The ZyXEL Device creates
Type of Service priority tags with this priority to voice traffic that it
transmits.
RTP TOS
Priority Setting
Enter the priority for RTP voice transmissions. The ZyXEL Device creates
Type of Service priority tags with this priority to RTP traffic that it
transmits.
Voice VLAN ID
Select this if the ZyXEL Device has to be a member of a VLAN to
communicate with the SIP server. Ask your network administrator, if you
are not sure. Enter the VLAN ID provided by your network administrator
in the field on the right. Your LAN and gateway must be configured to use
VLAN tags.Otherwise, clear this field.
Apply
Click this to save your changes and to apply them to the ZyXEL Device.
Cancel
Click this to set every field in this screen to its last-saved value.
Voice QoS
Quality of Service (QoS) refers to both a network's ability to deliver data with minimum delay, and the
networking methods used to provide bandwidth for real-time multimedia applications.
You can click VoIP -> SIP -> QoS to configure it.
Each field is described in the following table.
All contents Copyright 2007 ZyXEL Communications Corporation.
Page 78

P2302R-P1C Support Notes
78
Phone port settings
The ZyXEL Device allows you to configure the volume and echo cancellation setting for each individual phone
port.
To configure the phone port setting, please follow the below steps:
Step 1. Open the web browser on your workstation and connect to the ZyXEL device by entering the
management IP address of the ZyXEL device. The default management IP of the ZyXEL device is 192.168.1.1.
Step 2. Enter the administrator password on the page of login and click on login. The default is '1234'
Step 3. Select VoIP / Phone in the tree menu to navigate you to the Phone setting page.
Step 4. Select the phone port you wish to configure by using the phone port selector located on top right of the
phone port configuration page.
Step 5. Change the phone port parameter as desired and click Apply when you finish configuration and want to
apply the settings. To configure the 2nd phone port, use the phone port selector and select phone2 and follow
the steps 1 to 5 to complete the 2nd phone port setup.
Each field's detail description is listed below.
All contents Copyright 2007 ZyXEL Communications Corporation.
Page 79

P2302R-P1C Support Notes
79
Label
Description
Phone Port
Settings
Use this field to select the phone port that you want to configure.
Speaking
Volume
Use this field to set the loudness that the ZyXEL Device uses for the speech
signal that it sends to the peer device. -1 is the quietest and 1 is the loudest.
Listening
Volume
Use this field to set the loudness that the ZyXEL Device uses for the speech
signal that it receives from the peer device and sends to your phone. -1 is the
quietest and 1 is the loudest.
G.168 Active
Select this check box to cancel the echo caused by the sound of your voice
reverberating in the telephone receiver while you talk.
Dialing
Interval
Select
Enter the number of seconds the ZyXEL Device should wait after you stop
dialing numbers before it makes the phone call. The value depends on how
quickly you dial phone numbers. If you select Active Immediate Dial in VoIP
> Phone > Common, you can press the pound key (#) to tell the ZyXEL
Device to make the phone call immediately, regardless of this setting.
VAD
Support
Select this check box to use Voice Activity Detection (VAD) to reduce the
bandwidth that a call uses. The ZyXEL Device will generate and send comfort
noise when you are not talking.
Dialing
Interval
When you are dialing a telephone number the ZyXEL Device waits this long
after you stop pressing the buttons before initiating the call. Select how many
seconds you want the ZyXEL Device to wait after the last input on the
telephone’s keypad before dialing (making) a call.
Apply
Click Apply to save your changes back to the ZyXEL Device.
<Back
Cancel
Click this to return to the Analog Phone screen without saving your changes.
Click this to set every field in this screen to its last-saved value.
Common Phone
You can use the pound key (#) to tell the ZyXEL Device to make the phone call immediately, instead of waiting
the number of seconds you selected in the dialing interval.
Go to VoIP> Phone > Common. Where you can activate it.
All contents Copyright 2007 ZyXEL Communications Corporation.
Page 80

P2302R-P1C Support Notes
80
Label
Description
Active
Immediate
Dial
Select this if you want to use the pound key (#) to tell the ZyXEL Device to
make the phone call immediately, instead of waiting the number of seconds
you selected in the Dialing Interval Select in VoIP > Phone > Analog
Phone.If you select this, dial the phone number, and then press the pound
key. The ZyXEL Device makes the call immediately, instead of waiting. You
can still wait, if you want.
Apply
Click Apply to save your changes back to the ZyXEL Device.
Cancel
Click this to set every field in this screen to its last-saved value.
Label
Description
Each field is described in the following table.
Country Code
Use this screen to maintain settings that often depend on which region of the world the ZyXEL device is in.
To access this screen, click VoIP > Phone > Region.
Each field is described in the following table.
All contents Copyright 2007 ZyXEL Communications Corporation.
Page 81

P2302R-P1C Support Notes
81
Region
Settings
Select the place in which the ZyXEL Device is located. Do not select Default.
Call Service
Mode
Select the mode for supplementary phone services (call hold, call waiting, call
transfer and three-way conference calls) that your VoIP service provider
supports.Europe Type - use supplementary phone services in European
mode USA Type - use supplementary phone services American mode You
might have to subscribe to these services to use them. Contact your VoIP
service provider.
Apply
Click Apply to save your changes back to the ZyXEL Device.
Cancel
Click this to set every field in this screen to its last-saved value.
Call Forwarding
Call forwarding function allows users to determine handling of the incoming calls. For example, a user may
decide that all incoming calls will ring his cell phone as well. The following screenshot shows how users can
use this screen to configure the Prestige to block or redirect calls. You can configure a different call forwarding
table for each SIP account or use the same call forwarding table for both.
All contents Copyright 2007 ZyXEL Communications Corporation.
Page 82

P2302R-P1C Support Notes
82
Unconditional Forward to Number
Enable this feature to have the Prestige forward incoming calls to the number that you configure.
Busy Forward to Number
Enable this feature to have the Prestige forward incoming calls to the number, which you configure when your
SIP account has a call connected.
No Answer Forward to Number
Enable this feature to have the Prestige forward the incoming calls to the number that you configure whenever
you do not answer the call after a specific time period.
All contents Copyright 2007 ZyXEL Communications Corporation.
Page 83

P2302R-P1C Support Notes
83
Label
Description
Table Number
Select the call-forwarding table you want to see in this screen. If you change
this field, the screen automatically refreshes.
Forward to
Number
Setup
The ZyXEL Device checks these rules, in the order in which they appear,
after it checks the rules in the Advanced Setup section.
Unconditional
Forward to
Number
Select this if you want the ZyXEL Device to forward all incoming calls to the
specified phone number, regardless of other rules in the Forward to
Number section. Specify the phone number in the field on the right.
Busy Forward
to Number
Select this if you want the ZyXEL Device to forward incoming calls to the
specified phone number if the phone port is busy. Specify the phone number
in the field on the right. If you have call waiting, the incoming call is
forwarded to the specified phone number if you reject or ignore the second
incoming call.
No Answer
Forward to
Number
Select this if you want the ZyXEL Device to forward incoming calls to the
specified phone number if the call is unanswered. (See No Answer Waiting
Time.) Specify the phone number in the field on the right.
No Answer
Waiting Time
This field is used by the No Answer Forward to Number feature and No
Answer conditions below. Enter the number of seconds the ZyXEL Device
should wait for you to answer an incoming call before it considers the call is
unanswered.
Advanced
Setup
The ZyXEL Device checks these rules before it checks the rules in the
Forward to Number section.
Each field's detail description of the page is listed below.
All contents Copyright 2007 ZyXEL Communications Corporation.
Page 84

P2302R-P1C Support Notes
84
# This field is a sequential value, and it is not associated with a specific rule.
The sequence is important, however. The ZyXEL Device checks each rule in
order, and it only follows the first one that applies.
Activate
Select this to enable this rule. Clear this to disable this rule.
Incoming Call
Number
Enter the phone number to which this rule applies.
Forward to
Number
Enter the phone number to which you want to forward incoming calls from
the Incoming Call Number. You may leave this field blank, depending on
the Condition.
Condition
Select the situations in which you want to forward incoming calls from the
Incoming Call Number, or select an alternative action.
Unconditional - The ZyXEL Device immediately forwards any calls from the
Incoming Call Number to the Forward to Number.
Busy - The ZyXEL Device forwards any calls from the Incoming Call
Number to the Forward to Number when your SIP account already has a
call connected.
No Answer - The ZyXEL Device forwards any calls from the Incoming Call
Number to the Forward to Number when the call is unanswered. (See No
Answer Waiting Time.)
Block - The ZyXEL Device rejects calls from the Incoming Call Number.
Accept - The ZyXEL Device allows calls from the Incoming Call Number.
You might create a rule with this condition if you do not want incoming calls
from someone to be forwarded by rules in the Forward to Number section.
Apply
Click Apply to save your changes back to the ZyXEL Device.
Cancel
Click this to set every field in this screen to its last-saved value.
Call Hold
Prestige allows user agent to interrupt on the flow of an existing call.
Call hold allows you to put a call (A) on hold by pressing the flash key.
If you have another call, press the flash key to switch back and forth between the callers A and B by putting
All contents Copyright 2007 ZyXEL Communications Corporation.
Page 85

P2302R-P1C Support Notes
85
either one on hold.
Call Waiting
This allows you to place a call on hold while you answer another incoming call on the same telephone number.
If there is a second call to your telephone number, you will hear a call waiting tone.
Scenario
A calls B and they start conversation
C calls A
In this scenario, there are 3 kinds of actions available:
Below call flow graphs could help you better understand the call waiting working mechanism.
Scenario 1: If A presses flash key + 0, A will reject C.
Scenario 2: If A presses flash key + 1, A will disconnect B and answer C.
All contents Copyright 2007 ZyXEL Communications Corporation.
Page 86

P2302R-P1C Support Notes
86
Scenario 3: If A presses flash key + 2, A will put B on hold and answer C.
Three Way Conference
Three Way Conference function that makes it possible to set up a conference call with three subscribers being
all able to participate at the same time.
All contents Copyright 2007 ZyXEL Communications Corporation.
Page 87

P2302R-P1C Support Notes
87
To configure Three Way Conference, please follow the below steps:
Step -1. A is on the phone talking with C, A presses the flash key to put the caller on hold and gets a dial
tone.
Step -2. Dial B phone number directly to make another call.
Step -3. When the second call is answered, press the flash key and then press “3" to create a three-way
conversation.
Step -4. Hang up the phone to drop the connection.
Step -5. If you want to separate the activated three-way conference into two individual connections (one is
on-line, the other is on hold), press the flash key and press “2".
All contents Copyright 2007 ZyXEL Communications Corporation.
Page 88

P2302R-P1C Support Notes
88
Call Transfer
This feature allows transferring an incoming call (that you have answered) to another phone.
Note: The primary call between user A and user B must be answered before transfer can be initiated.
Three kinds of call transfer service available:
Blind Transfer
Consult On - Hold Transfer
Attendant Transfer
Application scenario 1: Blind Transfer
A dials to B
B off hooks
A and B start conversation
All contents Copyright 2007 ZyXEL Communications Corporation.
Page 89

P2302R-P1C Support Notes
89
If user A does not want to communicate with user B or user C after call is transferred, user A could choose
Blind Transfer.
To activate Blind Transfer please follow the steps below:
Step 1: A flashes, B MOH (Music On Hold).
Step 2: A dials *98# + C’s number.
Step 3: A hears the ring back tone
Step 4: A on hooks
Step 5: C rings, B hears the ring back tone
Step 6: C off hooks, B and C start conversation
Application scenario 2: Consult On - Hold Transfer
A dials to B
B off hooks
A and B conversation
If user A wants to communicate with user C for a while, then drop the connection to let user B and user C keep
communicating, user A could choose Consult Transfer.
All contents Copyright 2007 ZyXEL Communications Corporation.
Page 90

P2302R-P1C Support Notes
90
To activate Consult On - hold Transfer please follow the steps below:
Step 1: A flashes, B MOH (Music On Hold).
Step 2: A dials *98# + C’s Number.
Step 3: C rings, A hears the ring back tone.
Step 4: C off hooks, A and C start conversation.
Step 5: A on-hooks.
Step 6: B and C start conversation.
Application scenario 3: Attendant Transfer
A dials to B
B off hooks
A and B start Conversation
If user A wants to communicate with user C for a while, then drop the connection to let user B and user C keep
communicating, user A could also choose Attendant Transfer.
All contents Copyright 2007 ZyXEL Communications Corporation.
Page 91

P2302R-P1C Support Notes
91
To activate Attendant Transfer please follow the steps below:
Step 1: A flashes, B MOH (Music On Hold).
Step 2: A dials to C.
Step 3: C rings, A hears the ring back tone.
Step 4: C off hooks, A and C start Conversation.
Step 5: A flashes + *98#.
Step 6: B and C start conversation, A hears the busy tone.
Internal Call
This feature is ZyXEL proprietary implementation.
When you have two phones attached to the P2602HWLx phone ports, you just dial "####" on one of the two
phones, another phone will ring.
MWI
Message Waiting Indication is a common feature of telephone networks. It typically involves an audible or
visible indication that messages are waiting, such as playing a special dial tone (which in telephone networks is
called message-waiting dial tone), lighting a light or indicator on the phone, displaying icons or text, or some
combination.
Enable Message Waiting Indication (MWI) enables your phone to give you a message–waiting (beeping) dial
All contents Copyright 2007 ZyXEL Communications Corporation.
Page 92

P2302R-P1C Support Notes
92
tone when you have a voice message(s). Your VoIP service provider must have a messaging system that sends
message waiting status SIP packets as defined in RFC 3842.
MWI Call flow:
You may configure MWI feature easily on P2302RL-P1 web GUI: VoIP > Advanced Settings
Music on hold
This feature allows you to put a call on hold and have the other person hear a piece of audio (music, speech, etc.)
you previously recorded.
Application Scenarios:
When one side (A) presses flash or reserve key to put a call on hold, the peer side (B) will receive INVITE
packet with zero IP address in SDP to inform there is no need to send RTP out any more (RFC2543) or change
the attribute field in SDP to recvonly (RFC3261). Phone A generates pre-recorded music from IVR to phone B
directly.
All contents Copyright 2007 ZyXEL Communications Corporation.
Page 93

P2302R-P1C Support Notes
93
You may enable Music on Hold feature easily on P2302R-P1C web GUI: VoIP > Advanced Settings
In this graph, Device A has enabled Music on Hold function. Thus when A and B are on a call, and if A holds
the call, B will hear the music tone.
Early Media
Early media allows the Caller to listen to some music being played from the remote side (Can be from the
media server or from the callee) instead of a locally generated ringback tone before the callee answers the
phone.
Early media call flow:
All contents Copyright 2007 ZyXEL Communications Corporation.
Page 94

P2302R-P1C Support Notes
94
Enable early media in web configuration: VOIP>Advanced Settings
Call Park / Call Pickup
Call Park/Pickup function allows you to place a call on hold first, then it can be retrieved from another phone in
the system.
For example, if you are on an active call at your phone, you can park the call by press *97# + park number.
Someone on another phone in the system can then dial the call park number to pick-up the call.
Note: The caller must still pay while the call is parked.
When you park the call, you enter a number of your choice (Up to eight digits), which you must enter again
when you pick up the call. If you do not enter the correct number, you cannot pickup the call. This means that
All contents Copyright 2007 ZyXEL Communications Corporation.
Page 95

P2302R-P1C Support Notes
95
only someone who knows the number you have chosen can pick up the call.
You can have more than one call on hold at the same time, but you must give each call a different number.
This example show you how to configure the Call Park and Call Pickup
Phone Configuration:
Press *97# + park number to park the call
Press #97# + park number to pick-up the call
Call Park Call Flow
When a call has established between A and the caller:
To Call Park the call please follow the below steps:
Step 1: User A Press *97# + park number (5000) to park the call
Step 2: Then A hang up the phone
All contents Copyright 2007 ZyXEL Communications Corporation.
Page 96

P2302R-P1C Support Notes
96
Call Pickup Call Flow
To pick up the call please only need to input #97# and the park number:
In below graph, user B press #97# + park number (5000) to pick up the call.
Phone book Speed dial
The ZyXEL Device allows you to configure up to 10 SIP numbers in the phone book for speed dial.
All contents Copyright 2007 ZyXEL Communications Corporation.
Page 97

P2302R-P1C Support Notes
97
To configure phone book for speed dial, please follow the below steps:
Step 1. Open the web browser from your workstation to connect to the ZyXEL Device by entering the
Management IP address of the ZyXEL Device. The default management IP of the ZyXEL Device is
192.168.1.1.
Step 2. Enter the administrator password appear on the page of login and click on login. The default is '1234'
Step 3. On the left column click on PHONEBOOK to bring you to Speed Dial page to enter phone book
configuration page.
Step 4. Select the entry number you wish to add the to the phone book by the entry selector located under add
new entry category on the speed dial field.
Step 5. Fill in the SIP number of the remote party and a descriptive name and click on the radio button to select
either to use proxy or entering static IP or URL remote peer.
Step 6. Click on Add button when you are finish to add the entry to the phone book.
All contents Copyright 2007 ZyXEL Communications Corporation.
Page 98

P2302R-P1C Support Notes
98
Label
Description
Add New
Entry
Use this section of the screen to edit and save new or existing speed dial
phone book entries.
Speed Dial
Select a speed dial key combination from the drop-down list box.
SIP Number
Enter the SIP number of the party that you will call (use the number or text
that comes before the @ symbol in a full SIP URI). You can use up to 127
ASCII characters.
Name
Enter a descriptive name to identify the party that you will use this entry to
call. You can use up to 127 ASCII characters.
Type
Select Use Proxy if calls to this party use your SIP account configured in the
VoIP screen.
Select Non-Proxy (Use IP or URL) if calls to this party use a different SIP
server or go directly to the callee’s VoIP phone (IP-to-IP). Enter the SIP
server’s or the party’s IP address or domain name (up to 127 ASCII
Extended set characters).
Add
Click this button to save the entry in the speed dial phone book. The speed
dial entry displays in the Speed Dial Phone Book section of the screen.
Speed Dial
Phone Book
This section of the screen displays the currently saved speed dial entries.
You can configure up to 10 entries and use them to make calls.
Speed Dial
This is the entry’s speed dial key combination. Press this key combination on
a telephone attached to the ZyXEL Device in order to call the party named in
this entry.
Name
This is the descriptive name of the party that you will use this speed dial
entry to call.
SIP Number
This is the SIP number of the party that you will call.
Type
This field displays Use Proxy if calls to this party use one of your SIP
accounts. This field displays the SIP server’s or the party’s IP address or
domain name if calls to this party do not use one of your SIP accounts.
Delete
Click this button to remove an entry from the speed dial phonebook.
Each field's detail description of the page is listed below.
All contents Copyright 2007 ZyXEL Communications Corporation.
Page 99

P2302R-P1C Support Notes
99
Edit
Click this button to change the speed dial entry. The speed dial entry
displays in the Add New Entry section of the screen where you can edit it.
Clear
Click this button to remove all of the entries from the speed dial phonebook.
FAQ
ZyNOS FAQ
What is ZyNOS?
ZyNOS is ZyXEL's proprietary Network Operating System. It is the platform on all ZyXEL routers that delivers
network services and applications. It is designed in a modular fashion so it is easy for developers to add new
features. New ZyNOS software upgrades can be easily downloaded from our FTP sites and public Web
download site as they become available.
How do I access the embedded web configurator?
The Web configurator, a user friendly configuration interface via user's web browser, which can be access by
typing in the LAN IP address of the The ZyXEL Device in user’s web browser. To access the ZyXEL
Device's web configurator via web browser, the configuration PC must be in the same IP segment of The
ZyXEL Device and The ZyXEL Device must be reachable to the configuration station. (By default the The
ZyXEL Device LAN IP is 192.168.1.1)
What is the default LAN IP address and Password? Moreover, how do I change it?
The default LAN IP address is "192.168.1.1" and you can change the LAN IP in web configuration menu under
"LAN"->LAN TCP/IP, the default password is 1234. You can change the password once you enter the web
All contents Copyright 2007 ZyXEL Communications Corporation.
Page 100

P2302R-P1C Support Notes
100
configuration menu under "SYSTEM" and press the Password tab. At the password screen type in the old
password and the new password and retype to confirm than press "Apply" button to save the change.
How do I upload the ZyNOS firmware code via embedded web configurator?
The procedure for uploading ZyNOS via embedded web configurator is as follows.
a. Log on into the web configurator.
b. Press "MAINTENANCE" from the left menu.
c. Press "F/W Upload" tab.
d. Press "browse" button and point to the directory where the firmware you want to upload is kept and
press "Upload" button.
e. It will prompt you the firmware is uploading successful and The ZyXEL Device will reboot.
How do I upgrade/backup the ZyNOS firmware by using FTP client program via LAN?
The ZyXEL Device allows you to transfer the firmware from/to The ZyXEL Device by using FTP program via
LAN. The procedure for uploading ZyNOS via FTP is as follows.
a. To upgrade firmware, use FTP client program to put firmware in file 'ras' in the ZyXEL Device. After
data transfer is finished, the ZyXEL Device will program the upgraded firmware into FLASH ROM and
reboot itself. Note: Do not power off the unit after upload the file via ftp until the system LED have
become steady light up. Fail to due so may result in update fail and require RMA.
b. To backup your firmware, use the FTP client program to get file 'ras' from the ZyXEL Device.
How do I upload or backup ROMFILE via web configurator?
In some situations, you may need to upload the ROMFILE, restore to previous saved configuration, or the
need of resetting SMT to factory default.
The procedure for uploading ROMFILE via the web configurator is as follows.
a. Log on into the web configurator.
b. Press "MAINTENANCE" from the left menu.
All contents Copyright 2007 ZyXEL Communications Corporation.
 Loading...