

Page 1

Prestige 661H Series
ADSL 2+ Security Gateway
Prestige 661HW Series
802.11g Wireless ADSL 2+ Gateway
Quick Start Guide
Version 3.40
3/2005
Page 2
Prestige 661H/HW Series Quick Start Guide
Overview
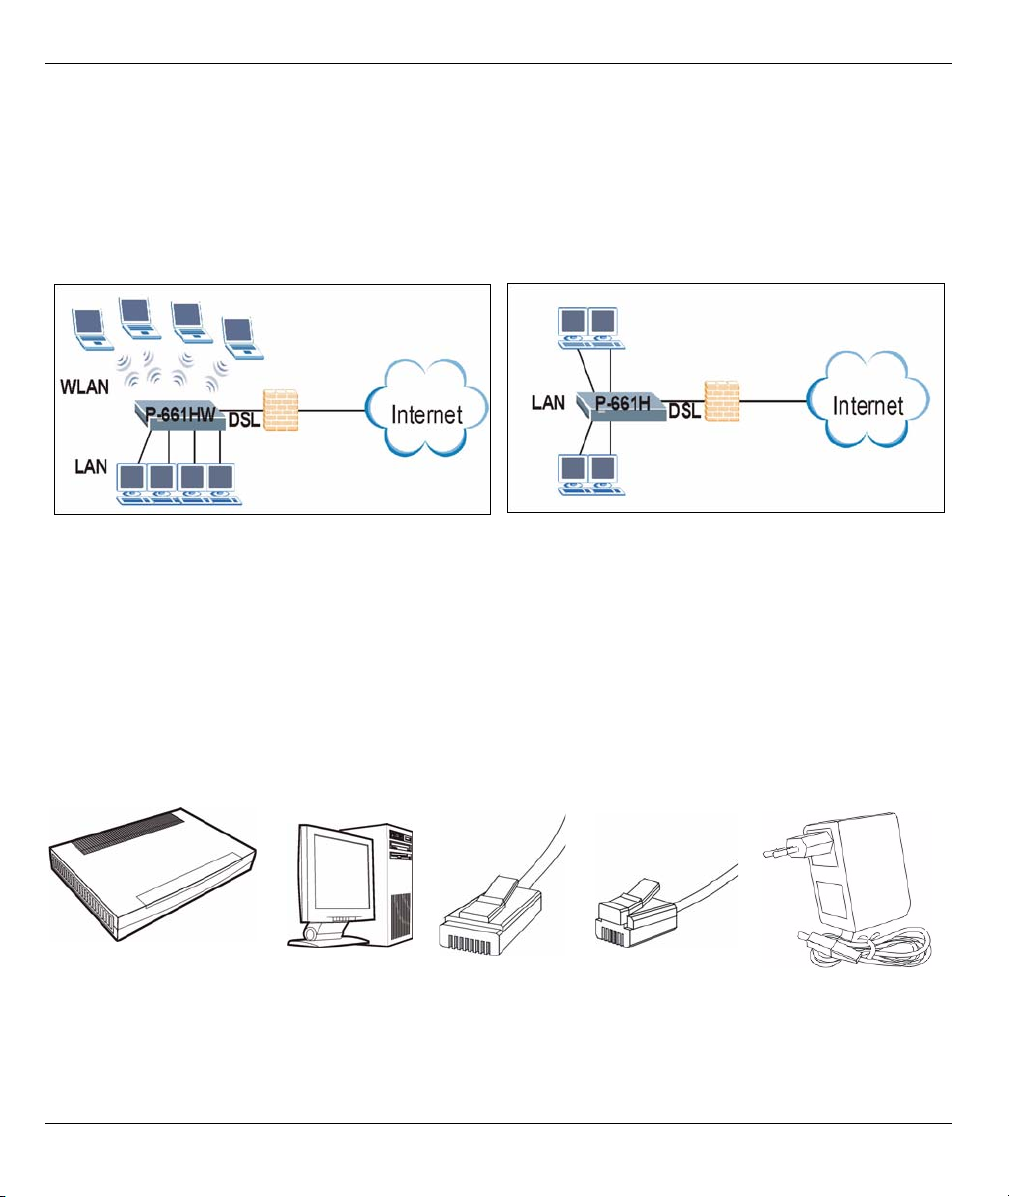
The Prestige 661H (P-661H) and Prestige 661HW (P-661HW) are ADSL routers with a built-in switch. The
Prestige 661HW also has IEEE 802.11g wireless capability. All wireless features pertain to the P-661HW series
only.
You may need your Internet access information.
See your User’s Guide for background information on all features.
This guide is divided into the following sections.
1 Hardware Connections
2 Configuration for Internet Access
3 Wireless Configuration (P-661HW)
4 NAT
5 Firewall
6 TMSS
7 Troubleshooting
1 Hardware Connections
You need the following before you start.
Prestige
If you prefer to see a multi-media animation of how to make hardware connections, see the included CD.
Computer(s) Ethernet Cable Telephone Cable Power Adaptor
2
Page 3
Prestige 661H/HW Series Quick Start Guide
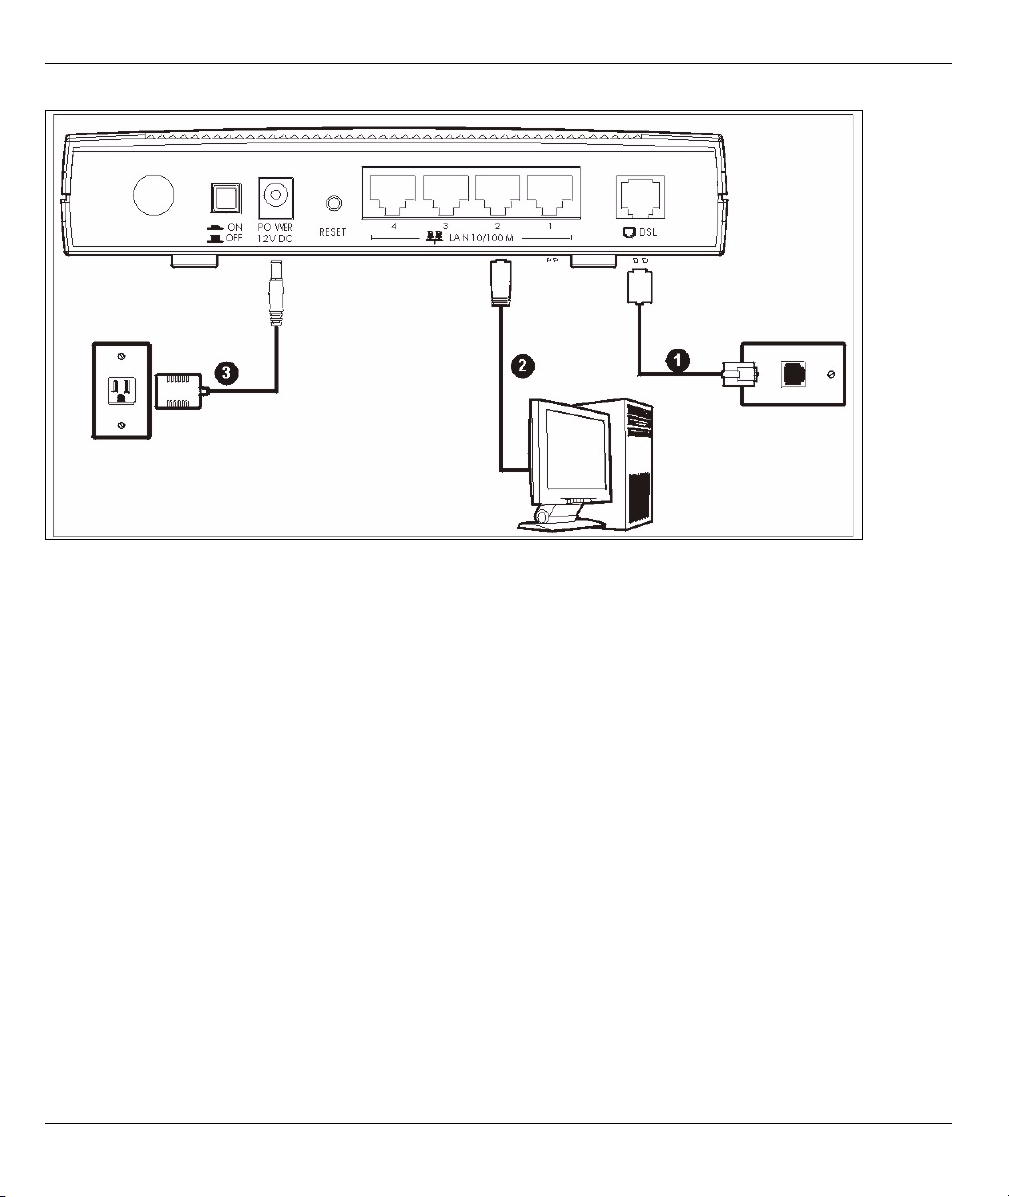
1DSL: Connect the Prestige to a telephone jack using a telephone wire.
2LAN: Use an Ethernet cable to connect a computer to a LAN 10/100M port for initial configuration and/or
Internet access.
3POWER: Use the included power adaptor to connect the POWER socket to an appropriate power source
(see the User’s Guide for power adaptors specifications by region).
After you’ve made the connections, push in the power button to turn on the Prestige. Look at the front panel
LEDs. The PWR/SYS LED blinks while performing system testing. The PWR/SYS and/or WLAN LEDs then
turn steady on if the testing is successful. The LAN LEDs turn on if the (corresponding) LAN ports are properly
connected.
2 Configuration for Internet Access
You may configure the Prestige for Internet access in any one of these ways:
• Configuration Genie
• Zero Configuration
• Web Configurator Internet Access Wizard
3
Page 4
Prestige 661H/HW Series Quick Start Guide
2.1 Configuration Genie
From the included CD, click “Multimedia Auto Provisioner” (the installation and configuration assistant) and
then click “Installation Tutorial”. After you’ve viewed the tutorial, click “Configuration Genie” at the end of the
installation tutorial or from “Multimedia Auto Provisioner” in the CD.
2.2 Zero Configuration
Launch your web browser and
navigate to any web site (for
example, www.zyxel.com). The
Prestige automatically detects
and configures your Internet
connection. This may take about
two minutes.
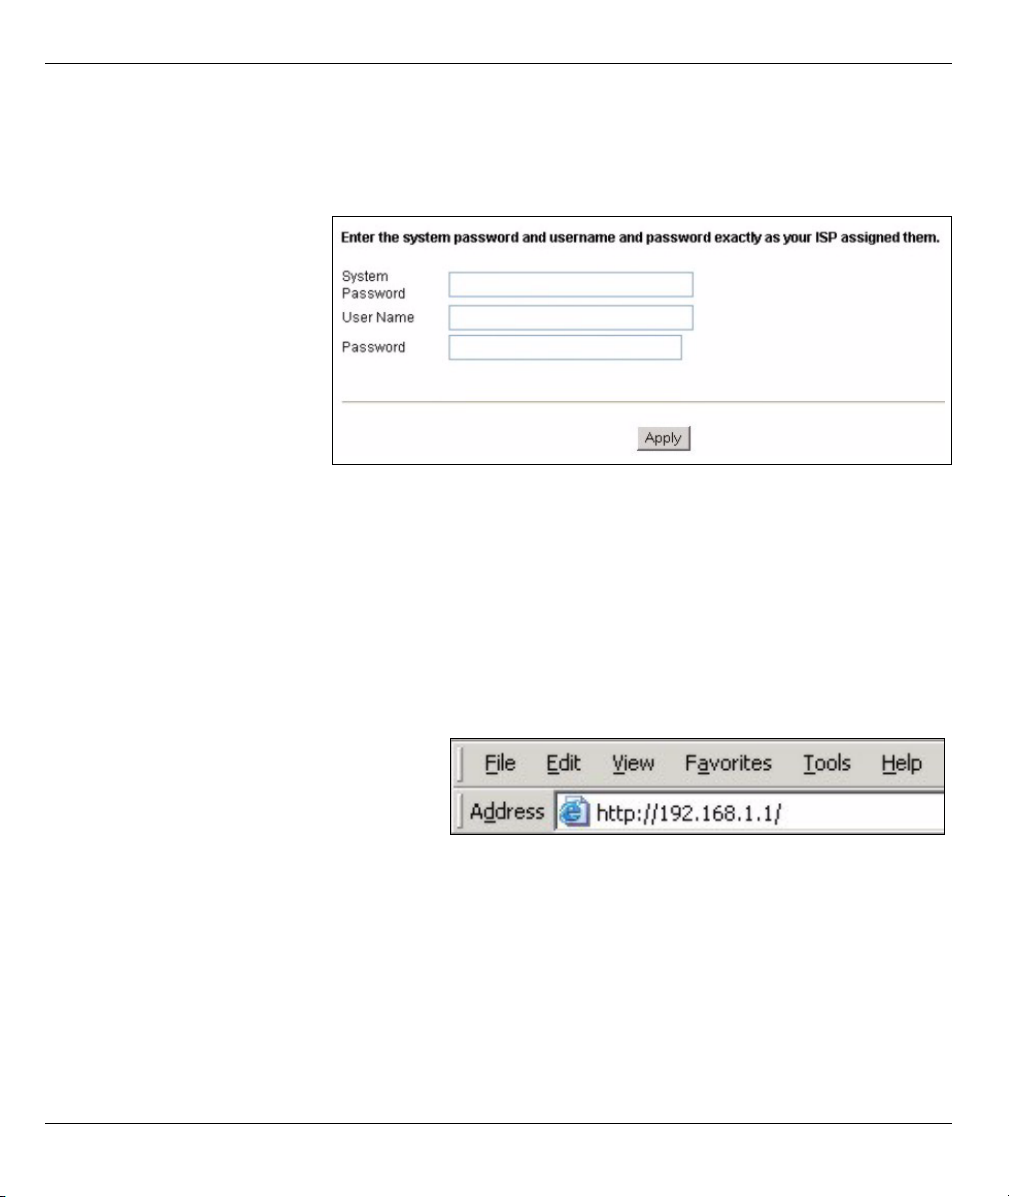
If you have a PPPoE or PPPoA
connection, a screen displays
prompting you to enter your
Internet account information. Enter the username, password and/or service name exactly as provided. Click
Apply.
Note: Configuration Genie or Zero Configuration are only able to configure the device automatically for
Internet access if you are using PPPoE, PPPoA or ENET ENCAP encapsulation with a
dynamically-assigned IP address from your ISP.
If you’re not using these Internet access settings, then use the Web Configurator Internet
Access Wizard to manually configure the device.
2.3 Accessing the Web Configurator
1 Launch your web browser. Enter
“192.168.1.1” as the web site address.
4
Page 5

Prestige 661H/HW Series Quick Start Guide
Note: If you do not see the next screen, then please read Section 7.1 on page 12
2 Click Login. 3 Type a new
password
(retype it to
confirm) and
click Apply.
Otherwise click
Ignore. You
then see the
main web
configurator
screen
4 In the MAIN MENU screen, click WIZARD SETUP.
2.3.1 Internet Access Setup
Note: Enter the Internet access information given to you by your ISP exactly in each wizard screen and
then click Next to continue or click Back to return to the previous screen.
Screen information is not saved when you click Back.
5
Page 6

Prestige 661H/HW Series Quick Start Guide
1 From the Mode drop-down list box, select Routing (default) if you want to use routing features such as
NAT.
2 The next wizard screen varies depending on the Encapsulation you chose in the first wizard screen. From
the Network Address Translation drop-down list box, select SUA Only if you have one public IP address,
Full Feature if you have more than one public IP address (for translation) or None to disable NAT.
• PPPoE.
Select Connect
on Demand
when you don't
want the
connection up
all the time and
specify an idle
time-out period
(in seconds) in
the Max. Idle
Timeout field.
• ENET
ENCAP
Select NailedUp Connection when you want your connection up all
the time. The Prestige will try to bring up the
connection automatically if it is disconnected.
6
Page 7

Prestige 661H/HW Series Quick Start Guide
Note: You will only see the next two screens in Routing mode.
• PPPoA • RFC1483
3 Verify your
LAN and
WAN
settings.
To change the
LAN settings,
click Change
LAN
Configuration;
otherwise click
Save Settings to
save the
configuration
and go to the
final wizard
screen.If you
change the
Prestige’s LAN IP address, you must use the new IP
address if you want to access the web configurator
again.
4 Click Save Settings in the screen shown in step
3 to go to the final wizard screen.The Prestige
automatically tests the connection to the
computer(s) connected to the LAN ports. To test
the connection from the Prestige to the ISP, click
Start Diagnose. Otherwise click Return to Main
Menu to go back to the main screen.
3 Wireless Configuration (P-661HW series only)
WPA-PSK encryption is preferred to WEP because it has user authentication and improved data encryption. If
you don’t have WPA-capable wireless clients, configure WEP encryption.
7
Page 8

Prestige 661H/HW Series Quick Start Guide
Note: Wireless clients and the Prestige must use the same SSID, channel ID, WEP or WPA-PSK key (if
enabled).
1 Click the Wireless LAN link under
Advanced Setup.
3 Click Advanced Setup, Wireless LAN, Wireless. In the ESSID field, enter up to 32 printable characters to
uniquely identify the Prestige. If you didn’t configure WPA-PSK, configure WEP in this screen (not visible
if you’ve configured WPA-PSK).
2 Click 802.1x/WPA.
Select
Authentication
Required, then
select WPAPSK and then
type a Preshared Key.
8
Page 9

Prestige 661H/HW Series Quick Start Guide
3.1 OTIST
Configure this screen only if you have OTIST-aware wireless clients. OTIST (One-Touch Intelligent Security
Technology) allows you to transfer your Prestige’s SSID and WEP or WPA-PSK security settings to wireless
clients that support OTIST and are within transmission range. You can also choose to have OTIST generate
a WPA-PSK key for you if you didn’t configure one manually.
Click Advanced Setup, Wireless LAN and then click OTIST. To change the Setup key enter up to eight
printable characters. To have OTIST automatically generate a WPA-PSK key select the Yes check box. If you
manually configured a WEP key or a WPA-PSK key and you also selected this check box, then the key you
manually configured is used.
Note: The AP and wireless client(s) MUST use
the same Setup key
In each wireless client ZyXEL utility, click the Adapter tab. Select the OTIST check box, enter the same
Setup Key as your Prestige’s and click Save.
Note: You must click Start in the Prestige OTIST web configurator screen and in the wireless client(s)
Adapter screen all within three minutes (at the time or writing). You can start OTIST in the
wireless clients and Prestige in any order but they must all be within range and with OTIST
enabled.
.
9
Page 10

Prestige 661H/HW Series Quick Start Guide
4 NAT
NAT (Network Address Translation - NAT, RFC 1631) means the translation of an IP address in one network to
a different IP address in another. For example, you could translate one public IP address to multiple private IP
addresses on your LAN (SUA Only).
Click
Advanced
Setup and
then NAT to
open the
NAT-Mode
screen.
Select SUA
Only if you
have one public IP address and Full Feature if
you have multiple public IP addresses (for
address translation).
If you have
servers on your
LAN, configure
an SUA server
set to have
them visible to
the outside.
From the NAT -
Mode screen
click Edit
Details and fill
in the fields as
shown.
5 Firewall
The firewall is already enabled by default on the Prestige.
Click Advanced Setup and
then Firewall to open the
firewall screen. The firewall
protects your LAN from
attacks from the Internet. No
traffic can enter your LAN
unless a request was
generated on the LAN first.
Click Default
Policy to see
rule direction
information.
You can also
disable the
firewall here
if you want.
10
Page 11

6 TMSS
Prestige 661H/HW Series Quick Start Guide
TMSS (Trend Micro Security Services) scans
computers behind the Prestige for potential
vulnerabilities such as spyware, missing security
patches, trojans etc. and then tells you how to update
the computer so as to fix the vulnerability.
1TMSS is enabled by default on the Prestige, so
you should see the following screen after you
launch your web browser to connect to the
Internet via the Prestige for the first time. If you
don’t see this screen, then enter http://
tmss.trendmicro.com as the URL. Click Continue
to go to the Active X control installation page.
Click Activate My Services to begin a 3-
3
step process to activate TMSS
2 Download the ActiveX control to view the TMSS
web page. The TMSS web page then appears.
Click Service Summary.
TMSS is now active and can now monitor Prestige
LAN computers with TMSS installed.
Use Parental Control to forbid access to undesirable
web site content based on pre-defined web site
categories. See the TM User’s Guide for details on all
features. You can also configure TMSS using the
Prestige web configurator.
Click TMSS under
Advanced Setup.
4 Fill in the registration form and submit it. After you
submit the registration form, you will receive an email with instructions for validating your e-mail
address. Follow the instructions. Download TMSS
to each computer (behind the Prestige) that you
want TMSS to monitor.
11
Page 12

Prestige 661H/HW Series Quick Start Guide
7 Troubleshooting
PROBLEM CORRECTIVE ACTION
None of the LEDs turn on when
you connect the Prestige’s
power.
Cannot access the Prestige
from my computer.
Cannot access the Internet. Verify the Internet connection settings in the wizard. Make sure you entered the
Make sure that you have the correct power adaptor connected to the Prestige, it
is plugged into an appropriate power source and the Prestige is turned on.
Check all cable connections. If the LEDs still do not turn on, you may have a
hardware problem. In this case, you should contact your local vendor.
Check the cable connection from your computer to the Prestige.
Make sure your computer’s IP address is in the same subnet as the Prestige’s
IP address (see Section 7.1 on page 12).
Ping the Prestige from a computer on the LAN. Make sure your computer’s
Ethernet adapter is installed and functioning properly. In the computer, click
Start, (All) Programs, Accessories and then Command Prompt. In the
Command Prompt window, type "ping" followed by the Prestige’s LAN IP
address (192.168.1.1 is the default) and then press [ENTER]. The Prestige
should reply; otherwise see Section 7.1 on page 12.
If the Prestige’s IP address has changed, then enter the new one as the URL.
Use Internet Explorer 6.0 and later or Netscape Navigator 7.0 and later with
JavaScript enabled.
Make sure you enter the password correctly (the field is case sensitive).
If you’ve forgotten the Prestige’s password, use the RESET button. Press the
button in for about 10 seconds (or until the PWR/SYS LED starts to blink), then
release it. It returns the Prestige to the factory defaults (password is 1234, LAN
IP address 192.168.1.1 etc.; see your User’s Guide for details).
correct user name and password if you are using PPPoE or PPPoA.
For wireless clients, check that both the Prestige 661HW and wireless client(s)
are using the same SSID, channel and WEP or WPA-PSK keys (if configured).
7.1 Set Up Your Computer’s IP Address
This section shows you how to set your Windows NT/2000/XP computer to automatically get an IP address.
This ensures that your computer can connect with your Prestige. Refer to your User’s Guide for detailed IP
address configuration for other Windows and Macintosh computer operating systems.
1 In Windows XP, click start, Control Panel. In Windows 2000/NT, click Start, Settings, Control Panel.
2 In Windows XP, click Network Connections. In Windows 2000/NT, click Network and Dial-up
Connections.
3 Right-click Local Area Connection and then click Properties.
12
Page 13

Prestige 661H/HW Series Quick Start Guide
4 Select Internet Protocol (TCP/IP) (under the General tab in
Windows XP) and click Properties.
5 The Internet Protocol TCP/IP Properties screen opens (the
General tab in Windows XP).
6 Select the Obtain an IP address automatically and Obtain
DNS server address automatically options.
7 Click OK to close the Internet Protocol (TCP/IP) Properties
window.
8 Click Close (OK in Windows 2000/NT) to close the Local Area
Connection Properties window.
9 Close the Network Connections screen.
7.2 Viewing Your Product’s Certifications
1 Go to www.zyxel.com.
2 Select your product from the drop-down list box on the ZyXEL
home page to go to that product's page.
3 Select the certification you wish to view from this page.
13
 Loading...