

Page 1

Prestige 630-C Series
ADSL USB Modem
User’s Guide
Macintosh OS 9 and X
August 2003
Page 2

Prestige 630-C Series ADSL USB Modem
Copyright
Copyright ©2003 by ZyXEL Communications Corporation
The contents of this publication may not be reproduced in any part or as a whole, transcribed, stored in a
retrieval system, translated into any language, or transmitted in any form or by any means, electronic,
mechanical, magnetic, optical, chemical, photocopying, manual, or otherwise, without the prior written
permission of ZyXEL Communications Corporation.
Published by ZyXEL Communications Corporation. All rights reserved.
Disclaimer
ZyXEL does not assume any liability arising out of the application or use of any products, or software
described herein. Neither does it convey any license under its patent rights nor the patents' rights of others.
ZyXEL further reserves the right to make changes in any products described herein without notice. This
publication is subject to change without notice.
Trademarks
Trademarks mentioned in this publication are used for identification purposes only and may be properties of
their respective owners.
ii Copyright
Page 3

Prestige 630-C Series ADSL USB Modem
ZyXEL Limited Warranty
ZyXEL warrants to the original end user (purchaser) that this product is free from any defects in materials
or workmanship for a period of up to two (2) years from the date of purchase. During the warranty period
and upon proof of purchase, should the product have indications of failure due to faulty workmanship
and/or materials, ZyXEL will, at its discretion, repair or replace the defective products or components
without charge for either parts or labor and to whatever extent it shall deem necessary to restore the product
or components to proper operating condition. Any replacement will consist of a new or re-manufactured
functionally equivalent product of equal value, and will be solely at the discretion of ZyXEL. This warranty
shall not apply if the product is modified, misused, tampered with, damaged by an act of God, or subjected
to abnormal working conditions.
NOTE
Repair or replacement, as provided under this warranty, is the exclusive remedy of the purchaser. This
warranty is in lieu of all other warranties, express or implied, including any implied warranty of
merchantability or fitness for a particular use or purpose. ZyXEL shall in no event be held liable for indirect
or consequential damages of any kind of character to the purchaser.
To obtain the services of this warranty, contact ZyXEL's Service Center for your Return Material
Authorization number (RMA). Products must be returned Postage Prepaid. It is recommended that the unit
be insured when shipped. Any returned products without proof of purchase or those with an out-dated
warranty will be repaired or replaced (at the discretion of ZyXEL) and the customer will be billed for parts
and labor. All repaired or replaced products will be shipped by ZyXEL to the corresponding return address,
Postage Paid. This warranty gives you specific legal rights, and you may also have other rights that vary
from country to country.
Online Registration
Register online at www.zyxel.com
Limited Warranty iii
for free future product updates and information.
Page 4

Prestige 630-C Series ADSL USB Modem
Information for Canadian Users
The Industry Canada label identifies certified equipment. This certification means that the equipment meets
certain telecommunications network protective operation and safety requirements. The Industry Canada
does not guarantee that the equipment will operate to a user's satisfaction.
Before installing this equipment, users should ensure that it is permissible to be connected to the facilities of
the local telecommunications company. The equipment must also be installed using an acceptable method
of connection. In some cases, the company's inside wiring associated with a single line individual service
may be extended by means of a certified connector assembly. The customer should be aware that
compliance with the above conditions may not prevent degradation of service in some situations.
Repairs to certified equipment should be made by an authorized Canadian maintenance facility designated
by the supplier. Any repairs or alterations made by the user to this equipment, or equipment malfunctions,
may give the telecommunications company cause to request the user to disconnect the equipment.
For their own protection, users should ensure that the electrical ground connections of the power utility,
telephone lines, and internal metallic water pipe system, if present, are connected together. This precaution
may be particularly important in rural areas.
Caution
Users should not attempt to make such connections themselves, but should contact the appropriate electrical
inspection authority, or electrician, as appropriate.
Note
This digital apparatus does not exceed the Class A limits for radio noise emissions from digital apparatus
set out in the radio interference regulations of Industry.
iv Information for Canadian Users
Page 5

Prestige 630-C Series ADSL USB Modem
Federal Communications Commission
(FCC) Interference Statement
This device complies with Part 15 of FCC rules. Operation is subject to the following two conditions:
This device may not cause harmful interference.
This device must accept any interference received, including interference that may cause undesired
operations.
This equipment has been tested and found to comply with the limits for a CLASS B digital device pursuant
to Part 15 of the FCC Rules. These limits are designed to provide reasonable protection against harmful
interference in a commercial environment. This equipment generates, uses, and can radiate radio frequency
energy, and if not installed and used in accordance with the instructions, may cause harmful interference to
radio communications.
If this equipment does cause harmful interference to radio/television reception, which can be determined by
turning the equipment off and on, the user is encouraged to try to correct the interference by one or more of
the following measures:
Reorient or relocate the receiving antenna.
Increase the separation between the equipment and the receiver.
Connect the equipment into an outlet on a circuit different from that to which the receiver is connected.
Consult the dealer or an experienced radio/TV technician for help.
Notice 1
Changes or modifications not expressly approved by the party responsible for compliance could void the
user's authority to operate the equipment.
Certifications
Refer to the product page at www.zyxel.com.
FCC v
Page 6

Prestige 630-C Series ADSL USB Modem
Customer Support
When contacting your Customer Support Representative, please have the following information ready:
♦ Product model and serial number.
♦ Warranty Information.
♦ Date you received your Product.
♦ Brief description of the problem and the steps you took to solve it.
METHOD
LOCATION
WORLDWIDE
AMERICA
FINLAND
support@zyxel.com.tw
sales@zyxel.com.tw
support@zyxel.com 1-800-255-4101 www.us.zycxel.com NORTH
sales@zyxel.com
support@zyxel.dk +45-3955-0700 www.zyxel.dk SCANDINAVIA
sales@zyxel.dk
sales@zyxel.fi +359-9-4780-8400
+359-9-4780-8448
support@zyxel.de +49-2405-6909-0 www.zyxel.de GERMANY
sales@zyxel.de
E-MAIL
SUPPORT/SALES
+886-3-578-2439 ftp.europe.zyxel.com
ftp.zyxel.com
+45-3955-0707 ftp.zyxel.dk
+49-2405-6909-99
TELEPHONE/FAX WEB SITE/ FTP SITE REGULAR MAIL
+886-3-578-3942 www.zyxel.com
www.europe.zyxel.com
http://www.zyxel.fi/
ZyXEL Communications Corp.,
6 Innovation Road II, ScienceBased Industrial Park, Hsinchu
300, Taiwan
ZyXEL Communications A/S,
Columbusvej 5, 2860 Soeborg,
Denmark
ZyXEL Communications Oy,
Malminkaari 10
00700 Helsinki, Finland
ZyXEL Deutschland GmbH.
Adenauerstr. 20/A2 D-52146
Wuerselen, Germany
vi Customer Support
Page 7

Prestige 630-C Series ADSL USB Modem
Table of Contents
Copyright.....................................................................................................................................................ii
ZyXEL Limited Warranty ...........................................................................................................................iii
Information for Canadian Users ................................................................................................................ iv
Federal Communications Commission (FCC) Interference Statement ....................................................... v
Customer Support....................................................................................................................................... vi
List of Diagrams.......................................................................................................................................... x
List of Tables ............................................................................................................................................... x
Preface ....................................................................................................................................................... xi
About ADSL.............................................................................................................................................. xiii
About USB.................................................................................................................................................xiv
Chapter 1 Getting to Know Your Prestige............................................................................................... 1-1
1.1 Introducing the Prestige 630-C Series ADSL USB Modem..........................................................1-1
1.2 Features........................................................................................................................................1-1
Chapter 2 Hardware Installation..............................................................................................................2-1
2.1 Hardware Overview .....................................................................................................................2-1
Chapter 3 Installing Your Modem............................................................................................................3-1
3.1 Operating Systems........................................................................................................................3-1
3.2 Internet Account Information .......................................................................................................3-1
3.3 Installing the Web Configurator Driver ....................................................................................... 3-2
Chapter 4 Introducing the Web Configurator.........................................................................................4-1
4.1 Making a DSL Connection ...........................................................................................................4-1
Chapter 5 Status Information ...................................................................................................................5-1
5.1 Prestige Status Information Overview.......................................................................................... 5-1
5.2 ADSL Status Information..............................................................................................................5-1
5.3 Viewing LAN Status...................................................................................................................... 5-3
5.4 Viewing PPP Interface Status.......................................................................................................5-4
Chapter 6 Basic Configuration..................................................................................................................6-1
6.1 Configuration Overview ...............................................................................................................6-1
6.2 Configuring WAN......................................................................................................................... 6-1
6.3 Configuring LAN .......................................................................................................................... 6-5
6.4 Configuring DNS..........................................................................................................................6-7
6.5 Saving New Settings .....................................................................................................................6-8
Chapter 7 Administrative Privileges.........................................................................................................7-1
7.1 Administration Privileges Overview............................................................................................. 7-1
7.2 WAN Status................................................................................................................................... 7-1
7.3 ATM Status ...................................................................................................................................7-2
7.4 TCP Status.................................................................................................................................... 7-3
7.5 ADSL Configuration..................................................................................................................... 7-5
7.6 Admin Password Configuration ...................................................................................................7-6
7.7 User Password Configuration......................................................................................................7-7
Table of Contents vii
Page 8

Prestige 630-C Series ADSL USB Modem
7.8 Miscellaneous Configuration ....................................................................................................... 7-8
7.9 Restoring Factory Defaults .......................................................................................................... 7-9
7.10 Performing a Diagnostic Test ....................................................................................................7-10
7.11 System Log ................................................................................................................................. 7-11
7.12 Making a DSL Connection with PPPoE..................................................................................... 7-12
7.13 Uninstalling the Hardware and Driver...................................................................................... 7-14
Chapter 8 Troubleshooting ....................................................................................................................... 8-1
Appendix A Setting up Your Computer’s IP Address...............................................................................C
Appendix B Virtual Circuit Topology........................................................................................................ G
Index............................................................................................................................................................. I
viii Table of Contents
Page 9

Prestige 630-C Series ADSL USB Modem
List of Figures
Figure 2-1 Back Panel Connections ............................................................................................................. 2-1
Figure 2-2 USB Cable Connectors...............................................................................................................2-1
Figure 2-3 Splitter ........................................................................................................................................2-2
Figure 2-4 Microfilter................................................................................................................................... 2-2
Figure 2-5 Front Panel LEDs .......................................................................................................................2-1
Figure 3-1 About This Mac..........................................................................................................................3-1
Figure 3-2 Mac OS 9 Installation File..........................................................................................................3-3
Figure 3-3 Installation Authorization ........................................................................................................... 3-4
Figure 3-4 Select a Destination Drive ..........................................................................................................3-5
Figure 4-1 Open System Preferences ...........................................................................................................4-1
Figure 4-2 System Preferences..................................................................................................................... 4-1
Figure 4-3 New Port Detected...................................................................................................................... 4-2
Figure 4-4 Network: TCP/IP Tab.................................................................................................................4-3
Figure 4-5 Home Page..................................................................................................................................4-4
Figure 5-1 ADSL Status...............................................................................................................................5-2
Figure 5-2 PPP Status...................................................................................................................................5-5
Figure 6-1 WAN Configuration ...................................................................................................................6-2
Figure 6-2 LAN Configuration.....................................................................................................................6-6
Figure 6-3 DNS Configuration.....................................................................................................................6-7
Figure 6-4 Save Settings...............................................................................................................................6-8
Figure 7-1 WAN Status................................................................................................................................ 7-1
Figure 7-2 ATM Status.................................................................................................................................7-3
Figure 7-3 TCP Status .................................................................................................................................. 7-4
Figure 7-4 ADSL Configuration ..................................................................................................................7-6
Figure 7-5 Admin Password Configuration..................................................................................................7-7
Figure 7-6 User Password Configuration.....................................................................................................7-7
Figure 7-7 Miscellaneous Configuration...................................................................................................... 7-8
Figure 7-8 Restore Factory Defaults ............................................................................................................7-9
Figure 7-9 Diagnostic Test......................................................................................................................... 7-10
Figure 7-10 System Log.............................................................................................................................7-12
Figure 7-11 Network: PPPoE Tab.............................................................................................................. 7-13
Figure 7-12 PPPoE Icon Connect............................................................................................................... 7-13
Table of Diagrams and Figures ix
Page 10

Prestige 630-C Series ADSL USB Modem
List of Diagrams
Diagram 1 Virtual Circuit Topology............................................................................................................... E
List of Tables
Table 2-1 LED Descriptions ........................................................................................................................ 2-1
Table 5-1 ADSL Status................................................................................................................................ 5-2
Table 5-2 LAN Status .................................................................................................................................. 5-4
Table 5-3 PPP Status.................................................................................................................................... 5-5
Table 6-1 WAN Configuration ....................................................................................................................6-3
Table 6-2 WAN Configuration Options....................................................................................................... 6-4
Table 6-3 LAN Configuration...................................................................................................................... 6-6
Table 6-4 DNS Configuration...................................................................................................................... 6-8
Table 7-1 WAN Status................................................................................................................................. 7-1
Table 7-2 ATM Status.................................................................................................................................. 7-3
Table 7-3 TCP Status ................................................................................................................................... 7-5
Table 7-4 ADSL Configuration ................................................................................................................... 7-6
Table 7-5 Admin Password Configuration................................................................................................... 7-7
Table 7-6 User Password Configuration ...................................................................................................... 7-8
Table 7-7 Miscellaneous Configuration....................................................................................................... 7-9
Table 7-8 Diagnostic Test.......................................................................................................................... 7-10
Table 7-9 System Log................................................................................................................................ 7-12
Table 8-1 Troubleshooting........................................................................................................................... 8-1
x List of Diagrams and Tables
Page 11

Prestige 630-C Series ADSL USB Modem
Preface
Congratulations on your purchase from the Prestige 630-C ADSL USB Modem Series.
Your USB-powered Prestige supports an upstream data rate of 800 Kbps and is compatible with all G.DMT
compliant Central Office (CO) Digital Subscriber Line Access Multiplexer (DSLAM) equipment.
Your Prestige is easy to install and configure. All functions are configurable via the ZyXEL configuration
wizard and web configurator.
Related Documentation
Support Disk
Refer to the included CD for support documents.
Quick Start Guide
The Quick Start Guide is designed to help you get up and running right away. It contains general
connection and initial configuration instructions.
Certifications
Refer to the product page at www.zyxel.com
ZyXEL Web Site
for information on product certifications.
The ZyXEL download library at www.zyxel.com
well as an online glossary of networking terms.
Help us help you. E-mail all User Guide-related comments, questions or suggestions for improvement to
techwriters@zyxel.com.tw or send regular mail to The Technical Writing Team, ZyXEL Communications
Corp., 6 Innovation Road II, Science-Based Industrial Park, Hsinchu, 300, Taiwan. Thank you.
About This User’s Guide
This User’s Guide provides instructions for using the Prestige 630-C1 ADSL USB modem with Macintosh
computers using Mac OS versions 9.1, 9.2.1, 9.2.2, 10.1.5, 10.2, 10.2.1. All figures shown are in Mac OS
X format.
All graphics in this User’s Guide show the Mac OS X interface. Familiarize
yourself with the Syntax Conventions listed next for better and faster
understanding.
Syntax Conventions
Preface xi
contains additional support documentation as
Page 12

Prestige 630-C Series ADSL USB Modem
• Mouse action sequences are denoted using a comma. For example, “click the Apple icon, Control
Panels and then Modem” means first click the Apple icon, then click or move your mouse pointer over
Control Panels and then click or (double-click) Modem.
• "Select" or "Choose" means for you to use one of the predefined choices.
• Button and field labels, links and screen names are in Bold Times New Roman font.
• Predefined choices are in Bold Arial font.
• The “ZyXEL Prestige 630-C Series ADSL USB Modem” is also referred to as the “modem” the
“Prestige” in this manual.
xii Preface
Page 13

Prestige 630-C Series ADSL USB Modem
About ADSL
ADSL Overview
Asynchronous Digital Subscriber Line (ADSL) technology provides high-speed data access across regular
telephone or ISDN lines by making use of previously unused high-frequency bandwidth. ADSL is
asymmetric in the sense that it provides a higher downstream data rate transfer (up to 8Mbps), than in the
upstream transfer (up to 832 Kbps). Asymmetric operation is ideal for typical home and small office use
where files and information are downloaded more frequently than uploaded.
Advantages of ADSL
1. ADSL provides a private (unlike cable telephone and modem services where the line is shared),
dedicated and secure channel of communications between you and your service provider.
2. Because your line is dedicated (not shared), transmission speeds are not affected by other users. With
cable modems, transmission speeds drop significantly as more users go on-line because the line is
shared.
3. ADSL is "always on" (connected). This means that there is no time wasted dialing up the service several
times a day and waiting to be connected; ADSL is on standby, ready for use whenever you need it.
About ADSL xiii
Page 14

Prestige 630-C Series ADSL USB Modem
About USB
USB
USB (Universal Serial Bus) is a data communications standard that allows your computer to recognize
(auto-detect) new devices. No technical expertise is required to install your device. You simply plug your
USB cable in and follow a limited set of easy-to-understand, automatically generated instructions. Set-up
and operation has never been easier.
Advantages of USB
1. There is no need for numerous different types of ports and connectors on your computer. Modems,
printers, joysticks, keyboards, mice, audio devices, CD-ROMs, digital cameras and other devices can
all be connected through USB.
2. With USB, installing adapter cards, changing dip switches and configuring IRQs (Interrupt Requests)
does not require opening your computer.
3. USB has data transfer rates of up to 12 Mbps.
4. Multiple devices can be daisy-chained to a single port without restarting your computer.
5. USB can power some devices - eliminating the need for batteries or power adapters.
xiv About ADSL
Page 15

The Web Configurator
PPaarrtt II
The Web Configurator
This part covers configuring your Prestige using the Web Configurator.
I
Page 16

Page 17

Prestige 630-C Series ADSL USB Modem
Chapter 1
Getting to Know Your Prestige
This chapter covers the key features and main applications of your modem.
1.1 Introducing the Prestige 630-C Series ADSL USB Modem
The Prestige 630-C Series combines the super-fast speed of state-of-the-art ADSL (Asynchronous Digital
Subscriber Line) technology with the ease of setup and operation facilitated by a USB (Universal Serial
Bus) interface.
The ZyXEL configuration wizard provides an easy-to-use interface to configure your Prestige. You can also
configure the modem through the embedded web configurator, which is totally independent of your
operating system platform.
1.2 Features
This section describes the router’s key features.
• Compliant with Universal Serial Bus Specification Revision 1.1
• USB bus-powered; an external power supply is not required
• Compatible with all G.DMT compliant Central Office (CO) Digital Subscriber Line Access
Multiplexer (DSLAM) equipment
• Software upgradeable
• Includes a user interface screen for checking the status of the connection
• An RJ-11/RJ-45 port for ADSL connection
• Support for DSL downstream data rates of up to 8 Mbps.
• Support for DSL upstream data rates of up to 1 Mbps.
Getting to Know Your Prestige 1-1
Page 18

Page 19
Prestige 630-C Series ADSL USB Modem
Chapter 2
Hardware Installation
This chapter introduces the ports and LED indicators.
2.1 Hardware Overview
Have your system operating disk handy during the installation, in case a specific file can not be found on
your computer.
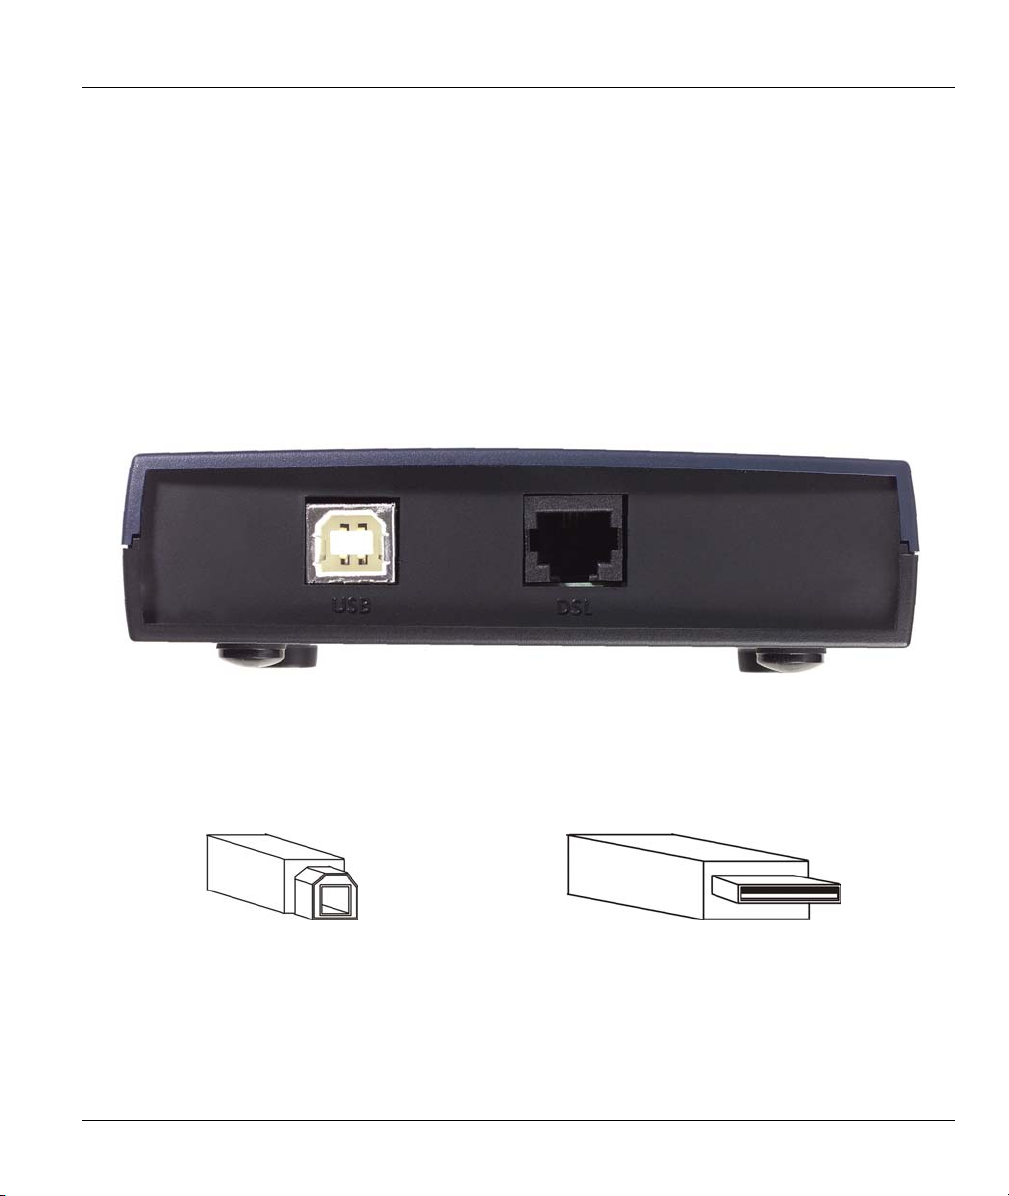
The back panel has two interfaces: a USB and an ADSL port as shown in the following figure.
Figure 2-1 Back Panel Connections
2.1.1 USB Connectors
See the following figure for an explanation of USB connectors.
This cable end will plug into your
modem’s USB port.
Figure 2-2 USB Cable Connectors
Hardware Installation 2-1
This cable end will plug into your
computer’s USB port.
Page 20
Prestige 630-C Series ADSL USB Modem
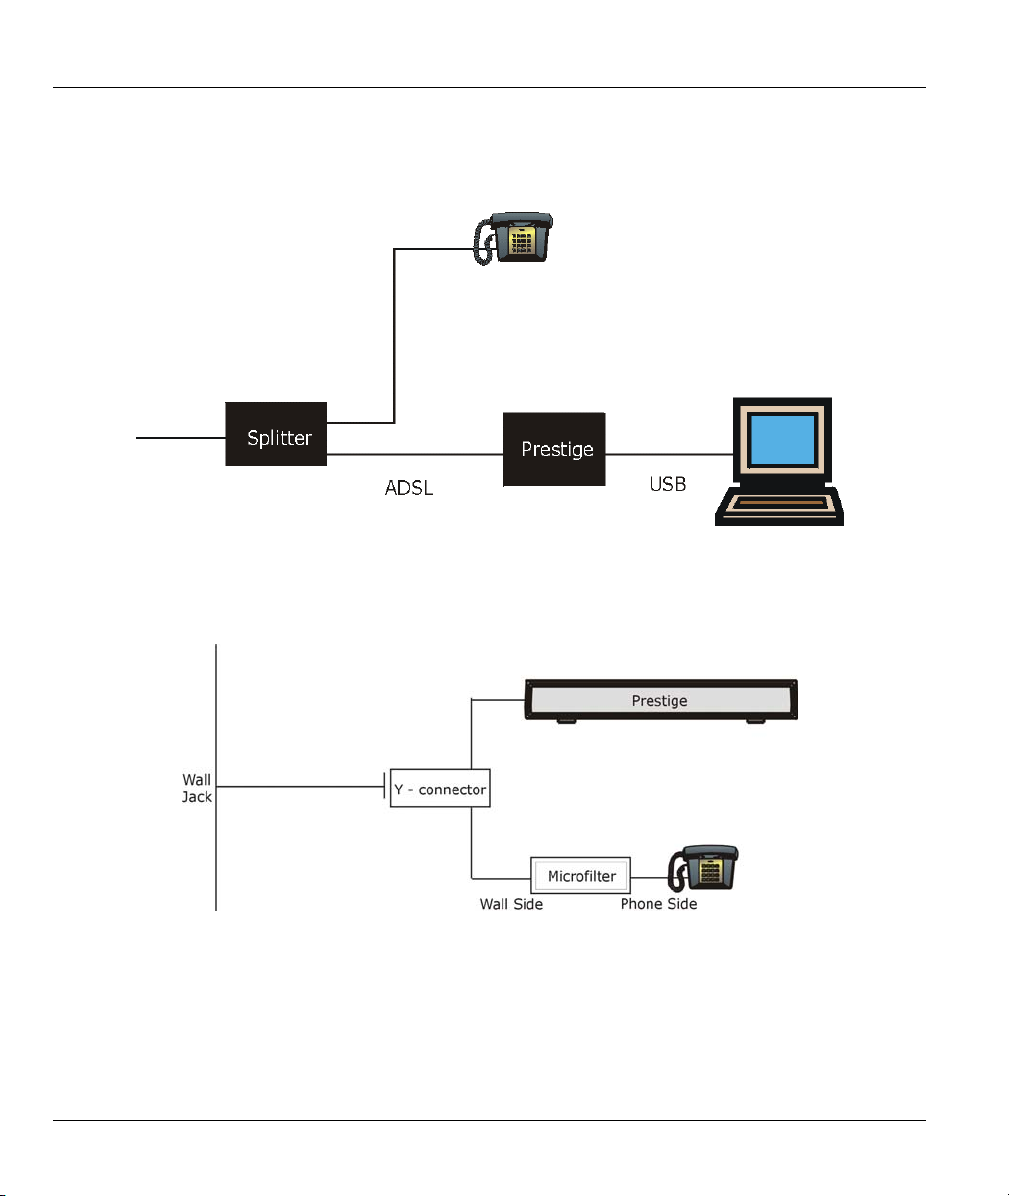
2.1.2 Splitter and Microfilter
Use a splitter (optional) in order to plug a phone into the same ISDN or telephone line. See the following
figure.
Figure 2-3 Splitter
You may opt to buy a telephone microfilter to install between the wall jack and your telephone(s). A
microfilter acts as a low pass filter that screens out possible interference. See the following figure.
Figure 2-4 Microfilter
2-2 Hardware Installation
Page 21
Prestige 630-C Series ADSL USB Modem
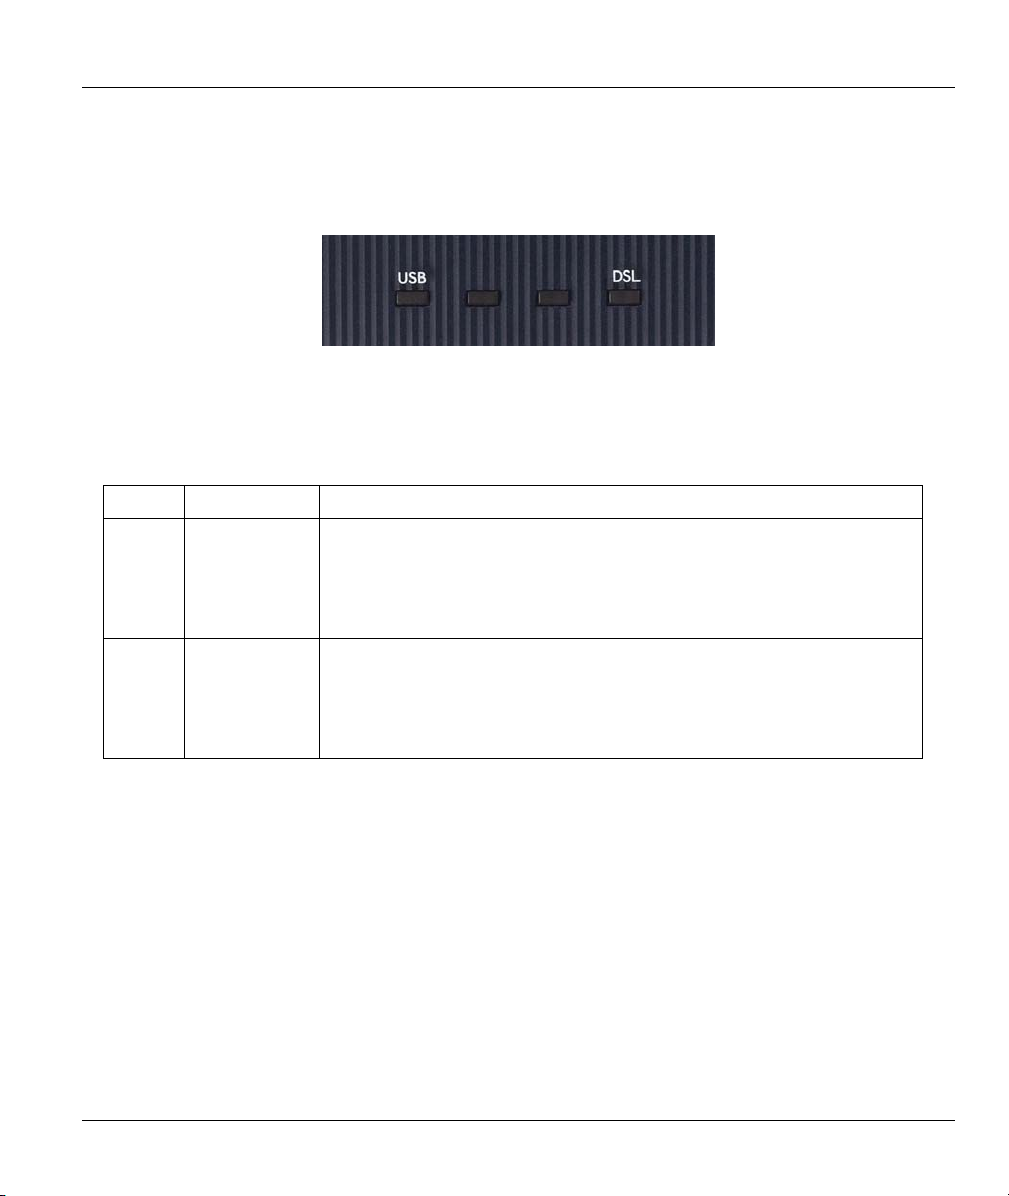
2.1.3 Front Panel LEDs
The LEDs on the front panel of your modem indicate operational status. The table under the following
figure describes the LED functions.
Figure 2-5 Front Panel LEDs
The following table describes the functions of the LEDs.
Table 2-1 LED Descriptions
LED FUNCTION DESCRIPTION
USB
DSL
USB
Interface and
Modem
Power
Connection
DSL Interface This LED is off when there is no DSL connection.
This LED is off when the modem’s USB port is not connected or not
receiving power.
The LED is on when the USB is connected and receiving power.
This LED blinks during data transfer or whenever the DSL link is up.
This LED is on when the ADSL link is up.
This LED blinks when the ADSL link is connecting and the driver
software is installed.
Hardware Installation 2-1
Page 22

Page 23

Prestige 630-C Series ADSL USB Modem
Chapter 3
Installing Your Modem
This chapter shows you how to install your modem and USB driver and introduces the ports and
LED indicators.
3.1 Operating Systems
The modem drivers are compatible with the Macintosh operating system versions 9 and X.
Click the Apple icon and then About This Mac in order to see which OS version is on your Macintosh.
Figure 3-1 About This Mac
The screens on your computer may differ slightly from the screens shown here
depending on the version of your operating system.
3.2 Internet Account Information
You should have an Internet account already set up and been given most of the following information.
REQUIRED INFORMATION: FILL IN THE BLANKS
RFC CLIP, Bridged IP over ATM (RFC1483), PPPoA or PPPoE.
RFC Mode (with Classical and Bridged IP over ATM only)
Bridged or Routed.
VPI:
The Virtual Path Identifier number identifies a bundle of virtual
channels.
VCI:
The Virtual Channel Identifier number identifies a logical connection
between end stations.
Installing Your Modem 3-1
Page 24

Prestige 630-C Series ADSL USB Modem
REQUIRED INFORMATION: FILL IN THE BLANKS
Framing Type:
LLC or VCMUX.
Modulation: Your ISP will tell you which type of ADSL modulation it
uses. The default is Automatic.
Wiring Selection: This is the type of wire being used for the
connection: Line Tip/Ring (default), Line A/A1, or Automatic.
User Name / Password:
Lets your ISP know which account you are logging into and protects
your account from unauthorized users.
Vendor Name:
The name of your vendor is also knows as the ADSL Head End.
ADSL Head End Env:
Your ISP will provide you with this information: Non-Specific or No
Line Driver (BNA)
Your modem supports RFC 1483, PPPoA (Point to Point Protocol over ATM) and PPPoE (Point to Point
Protocol over Ethernet) drivers. These refer to the underlying data transport protocols. The RFC 1483 driver
works as an always-on account. The PPPoA and PPPoE drivers function as dial-up accounts.
When using the RFC 1483 driver, select the mode that your ISP uses, either Bridged IP or Routed IP.
The encapsulation type is also called multiplexing. Your modem supports both LLC and VC/MUX.
See the appendix for more information about VPI and VCI.
3.3 Installing the Web Configurator Driver
The following two sections describe how to install your and modem for both Mac OS 9 and X.
3.3.1 Mac OS 9 Installation
Step 1. Close all Windows programs and applications.
Step 2. Insert the included CD into the CD-ROM drive. An icon for the CD appears.
Step 3. Double-click the CD’s icon.
Step 4. Copy the driver OS9 Package.sit to a directory on your Mac and double-click it.
Step 5. A folder named “install USB ADSL” will be created. Open this folder and double-click the
install icon as shown next.
3-2 Installing Your Modem
Page 25

Prestige 630-C Series ADSL USB Modem
Installation
File
Figure 3-2 Mac OS 9 Installation File
Step 6. After installation is complete, restart your computer when prompted to do so.
3.3.2 Mac OS X Installation
Step 1. Close all Windows programs and applications.
Step 2. Insert the included CD into the CD-ROM drive. An icon for the CD appears.
Step 3. Double-click the CD’s icon.
Step 4. Copy the driver CMX.1.O.X.sit to the desktop and extract this .sit file.
Step 5. The file install USB ADSL.pkg and uninstall script will be created.
Step 6. Double-click install USB ADSL.pkg to install the driver.
Installing Your Modem 3-3
Page 26

Prestige 630-C Series ADSL USB Modem
Step 7. An installation window will appear and prompt you for authorization. It is highly recommended
that you click the Click the lock to make changes button to input an administrator password.
This password will be required every time changes need to be made to the Prestige. Click OK.
Figure 3-3 Installation Authorization
Step 8. After you log in, you will see an Introduction screen. Click Continue. You will then see the
Select a Destination window, select a destination (this must be on an actual physical hard drive
on the Macintosh, not a virtual drive) and click Continue.
3-4 Installing Your Modem
Page 27

Prestige 630-C Series ADSL USB Modem
Figure 3-4 Select a Destination Drive
Step 9. Click Install and then Continue Installation in the Installation Type window. The driver will
automatically install and your MAC will restart.
Installing Your Modem 3-5
Page 28

Page 29

Prestige 630-C Series ADSL USB Modem
Introducing the Web Configurator
This chapter describes how to configure your Prestige with the embedded web configurator.
4.1 Making a DSL Connection
Use the following steps to configure your Macintosh when using the installed driver.
Step 1. Click the Apple icon and System Preferences.
Chapter 4
Figure 4-1 Open System Preferences
Step 2. Click Network.
Figure 4-2 System Preferences
Step 3. A New Port Detected screen opens when the computer detects that the ADSL link is up. Click
OK.
Introducing the Web Configurator 4-1
Page 30

Prestige 630-C Series ADSL USB Modem
Figure 4-3 New Port Detected
Step 4. In the Network screen, select Ethernet Adaptor (en x) in the Show field. In the TCP/IP tab,
select Using DHCP in the Configure field if you are using the bridged IP mode or Manually if
you are using the routed IP mode. Click Apply Now.
4-2 Introducing the Web Configurator
Page 31

Prestige 630-C Series ADSL USB Modem
Figure 4-4 Network: TCP/IP Tab
Step 5. Open your web browser and enter “10.0.0.2” as the address. The following login prompt will
appear.
Step 6. For administrative access, type "admin" as the User ID and “epicrouter” as the Password. For
user access, type “user” as the User ID and “password” as the Password. You may change these
at a later time. Click OK.
Introducing the Web Configurator 4-3
Page 32

Prestige 630-C Series ADSL USB Modem
You should now see the Home Page screen. From this screen, you can also view current WAN
and LAN settings, as well as firmware and software versions.
To view information about your
Prestige, click the links under Status.
Click Home to return to the Home
Page at any time.
To configure the Prestige, click the links under
If you logged in as an administrator, you will have access to the links under
Admin Privilege, where you can do tasks such as modifying the ADSL
configuration, performing system tests, and resetting modem defaults.
Figure 4-5 Home Page
4-4 Introducing the Web Configurator
Page 33

Prestige 630-C Series ADSL USB Modem
Chapter 5
Status Information
This chapter describes how to view the Prestige’s status information.
5.1 Prestige Status Information Overview
The web configurator allows you to view important status information about your Prestige by clicking the
links under Status in the navigation panel.
5.2 ADSL Status Information
Click ADSL to view the ADSL STATUS screen as shown next.
Introducing the Web Configurator 5-1
Page 34

Prestige 630-C Series ADSL USB Modem
Figure 5-1 ADSL Status
The following table describes the fields in this screen.
Table 5-1 ADSL Status
LABEL DESCRIPTION
ADSL Line State This is the current state of the ADSL line.
ADSL Modulation This field displays the ADSL modulation status for G.dmt or T1.413.
ADSL Annex Mode
ADSL Startup
Attempts
Elapsed Time This is the time the modem has been in operation.
5-2 Introducing the Web Configurator
This displays the annex mode (Annex A or Annex B).
This displays the number of ADSL connection attempts.
Page 35

Prestige 630-C Series ADSL USB Modem
Table 5-1 ADSL Status
LABEL DESCRIPTION
The following fields display upstream and downstream statistics for the ADSL connection.
SNR Margin This is the amount of increased noise that can be tolerated while maintaining the
designed BER (bit error rate). The SNR Margin is set by the Central Office
DSLAM. If the SNR Margin is increased, bit error rate performance will improve,
but the data rate will decrease. Conversely, if the SNR Margin is decreased, bit
error rate performance will decrease, but the data rate will increase.
Line Attenuation Attenuation is the decrease in magnitude of the ADSL line signal between the
transmitter (Central Office DSLAM) and the receiver (the Prestige), measured in
dB. It is measured by calculating the difference in dB between the signal power
level received at the Prestige and the reference signal power level transmitted
from the Central Office DSLAM.
Errored Seconds This is the number of errors. Whenever a given second contains a CRC error,
that second will be declared an error second.
Loss of Signal This field displays the number of times the ADSL signal has been lost.
Loss of Frame This field displays the number of times an ADSL frame has been lost.
CRC Errors This is the total number of frames that have CRC errors.
Data Rate This is the ADSL data rate.
Latency
This field displays the latency modes (fast or interleave).
5.3 Viewing LAN Status
Click LAN to view the LAN screen as shown next.
Introducing the Web Configurator 5-3
Page 36

Prestige 630-C Series ADSL USB Modem
The following table describes the fields in this screen.
Table 5-2 LAN Status
LABEL DESCRIPTION
IP Address This is the IP address of your Prestige in dotted decimal notation.
Subnet Mask This is corresponding subnet mask for the above IP Address.
MAC Address This is the MAC address of your Prestige.
Number of Ethernet
devices connected to
the DHCP server:
IP Address This is the IP address of your computer in dotted decimal notation.
MAC Address This is corresponding subnet mask for the above IP Address.
USB Link Status
This shows the number of devices that the Prestige’s DHCP server can
recognize.
This shows the status of the USB link (UP or DOWN).
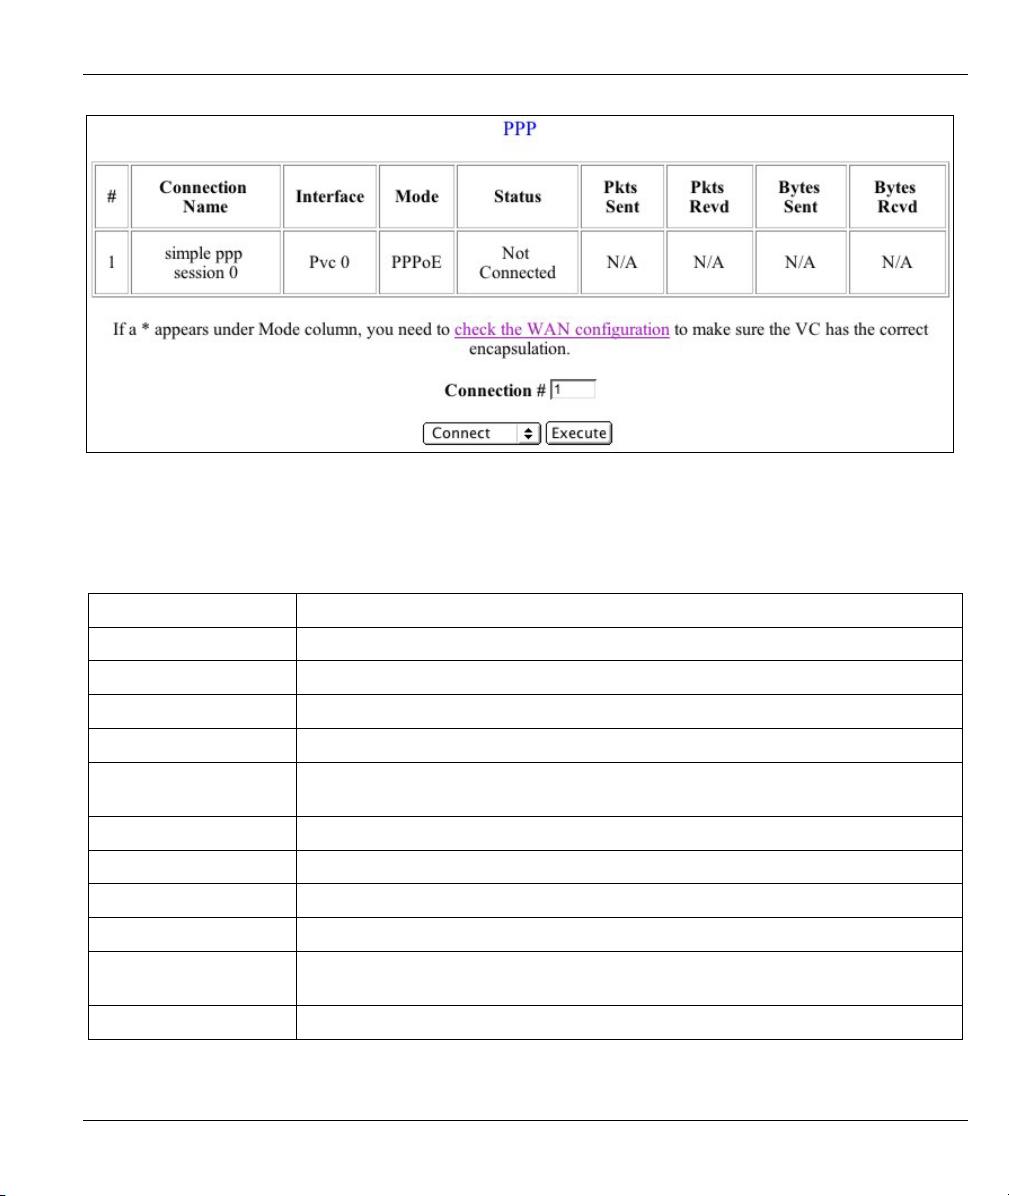
5.4 Viewing PPP Interface Status
Click PPP to view the PPP screen as shown next.
5-4 Introducing the Web Configurator
Page 37
Prestige 630-C Series ADSL USB Modem
Figure 5-2 PPP Status
The following table describes the fields in this screen.
Table 5-3 PPP Status
LABEL DESCRIPTION
# This is the identification number of the PPP connection.
Connection Name This is an identifier given to the connection.
Interface This is type of PPP interface.
Mode
Status
Pkts Sent This is the total number of packets sent.
Pkts Rcvd This is the total number of packets received.
Bytes Sent This is the total number of bytes sent.
Bytes Rcvd This is the total number of bytes received.
check the WAN
configuration
Connection # Select a connection number to view its connection status.
This is the PPP mode (PPPoE or PPPoA).
This is the current status of the PPP connection (Connected or Not
Connected).
Click this link to go to the WAN screen (see Figure 6-1 WAN Configuration) to
edit the encapsulation.
Introducing the Web Configurator 5-5
Page 38

Prestige 630-C Series ADSL USB Modem
Table 5-3 PPP Status
LABEL DESCRIPTION
Connect/Disconnect
Execute
Choose Connect or Disconnect from the drop-down list box to change the
change the status of the PPP connection.
Click the Execute button to connect or disconnect the PPP connection.
5-6 Introducing the Web Configurator
Page 39

Prestige 630-C Series ADSL USB Modem
Chapter 6
Basic Configuration
This chapter describes how to configure your Prestige’s basic settings.
6.1 Configuration Overview
You can configure your Prestige for Internet access through the links under Configuration in the navigation
panel.
6.2 Configuring WAN
Click WAN to configure your Prestige’s WAN settings. See Table 6-2 WAN Configuration Options for a list
of options available.
Basic Configuration 6-1
Page 40

Prestige 630-C Series ADSL USB Modem
Figure 6-1 WAN Configuration
The following table describes the fields in this screen.
6-2 Basic Configuration
Page 41

Prestige 630-C Series ADSL USB Modem
Table 6-1 WAN Configuration
LABEL DESCRIPTION
VPI Enter the Virtual Path Identifier(s) (VPI) given.
VCI Enter the Virtual Channel Identifier(s) (VCI) given.
Static IP Address This is the static IP provided by your ISP.
Subnet Mask This is the corresponding subnet mask for the above IP address.
Gateway This is the gateway IP address.
ATM
Service Category
Bandwidth Bandwidth setting takes effect only when the CBR is selected. Enter a bandwidth
Encapsulation
PPP
Service Name If your ISP provided you a service name, enter it here.
User Name Enter your ISP-assigned user name.
Password Enter your ISP-assigned password.
MRU
MTU If the network stack of any packet is larger than the Maximum Transmission Unit
MSS
Select the service category (UBR or CBR).
in kbps.
Choose an encapsulation type. The choices are as follows: PPPoA VC-MUX,
PPPoA LLC, 1483 Bridged IP LLC, 1483 Routed IP LLC, 1483 Bridged IP
VC-Mux, 1483 Routed IP VC-Mux, Classical IP over ATM, PPPoE VC-Mux,
PPPoE LLC, and PPPoE None.
The Maximum Receive Unit (MRU) indicates the maximum size of the PPP
information field that this device can receive. The default value is 1492 and is
used in the beginning of the PPP negotiation. During negotiation, the peer will
accept this MRU and will not send packets with information fields larger than this
value.
(MTU), it will be fragmented before transmission. During PPP negotiation, the
peer of the PPP connection will indicate its MRU. The actual MTU of the PPP
connection will be set to either the MTU or the peer’s MRU (whichever is
smaller). The default is value 1492.
The Maximum Segment Size (MSS) is the largest size of data that TCP will send
in a single IP packet. When a connection is established between a LAN client
and a host on the WAN side, the LAN client and the WAN host will indicate their
MSS during the TCP connection handshake. The default value is 1432.
Basic Configuration 6-3
Page 42

Prestige 630-C Series ADSL USB Modem
Table 6-1 WAN Configuration
LABEL DESCRIPTION
Disconnect Timeout Enter a time in seconds after which the PPP connection will disconnect if the line
is idle (max: 32767 seconds).
Authentication This field sets the authentication protocol used for outgoing calls. Options for this
field are:
Auto – Your Prestige will accept either CHAP or PAP when requested by this
remote node. PAP mode will run first, and then CHAP.
CHAP – accept CHAP only.
PAP – accept PAP only.
Automatic Reconnect Select this check box to maintain PPP connection. If the ISP shuts down the
PPP connection, it will automatically reconnect PPP session.
DHCP
DHCP Client Enable
Host Name If your ISP provided a host name, enter it here.
Submit Click this button to submit the changes.
Reset Click this button to reset all values to their defaults.
Select Enabled or Disabled to change the status of the DHCP client.
Table 6-2 WAN Configuration Options
LABEL
IP address
Subnet Mask
Bridge Mode Router Mode
(PPPoA/PPPoE)
N/A Automatically
assigned by ISP
N/A Automatically
assigned by ISP
6-4 Basic Configuration
Router Mode
(Dynamic IP)
Automatically
assigned by ISP
Automatically
assigned by ISP
Router Mode
(Static IP)
Provided by ISP
Provided by ISP
Page 43

Prestige 630-C Series ADSL USB Modem
Table 6-2 WAN Configuration Options
LABEL
Encapsulation
Bridge
PPP Service
PPP User Name
PPP Password
DHCP Client
Enable
Bridge Mode Router Mode
(PPPoA/PPPoE)
1483 Bridged IP
LLC
1483 Bridged IP
VC-Mux
Enabled Disabled Disabled Disabled
N/A Provided by ISP N/A N/A
N/A Provided by ISP N/A N/A
N/A Provided by ISP N/A N/A
Unchecked Unchecked Checked Unchecked
PPPoA, LLC/VCMux
PPPoE, LLC/VCMux
6.3 Configuring LAN
Click LAN to configure your Prestige’s LAN settings.
Router Mode
(Dynamic IP)
1483
Bridged/Routed IP
LLC
1483
Bridged/Routed IP
VC-Mux
Classical IP over
ATM
Router Mode
(Static IP)
1483
Bridged/Routed IP
LLC
1483
Bridged/Routed IP
VC-Mux
Classical IP over
ATM
Basic Configuration 6-5
Page 44

Prestige 630-C Series ADSL USB Modem
Figure 6-2 LAN Configuration
The following table describes the fields in this screen.
Table 6-3 LAN Configuration
LABEL DESCRIPTION
IP Address Enter the LAN IP address of the modem in dotted decimal notation.
The default IP address is 10.0.0.2. If you change the LAN
IP address, you must to use the new IP address to access
the web configurator.
Subnet Mask This is the subnet mask corresponding to the IP address above. The default
subnet mask is 2555.0.0.0.
DHCP Server Select this checkbox to enable the DHCP server.
6-6 Basic Configuration
Page 45

Prestige 630-C Series ADSL USB Modem
Table 6-3 LAN Configuration
LABEL DESCRIPTION
DHCP address pool
selection
User Defined Start
Address/User Defined
End Address
Lease Time The lease time is the amount of time a network user will be allowed to connect
Submit Click this button to apply the changes.
Reset Click this button to reset all values to their defaults.
This sets the DHCP address pool.
If System Allocated is selected, the DHCP address pool range starts at the
LAN port IP address and includes the next 12 IP addresses. For example, if the
LAN IP address is 10.0.0.2; the DHCP address pool range is 10.0.0.3 to
10.0.0.14.
If User Defined is selected, the DHCP address pool range includes all IP
addresses from the User Defined Start Address to the User Defined End
Address. The maximum pool size can be 253 IP addresses: 255 total IP
addresses in total, including 1 broadcast address and 1 LAN port IP address.
If you selected User Defined in the DHCP address pool selection field above,
you must enter a start and end IP address. The IP addresses in this range will
be available to be assigned to hosts connected to your Prestige.
with the DHCP server. Enter the number of days, hours, minutes and/or
seconds. If all fields are 0, the allocated IP addresses will be effective
indefinitely.
6.4 Configuring DNS
Click DNS to configure your Prestige’s DNS settings.
Figure 6-3 DNS Configuration
Basic Configuration 6-7
Page 46

Prestige 630-C Series ADSL USB Modem
The following table describes the fields in this screen.
Table 6-4 DNS Configuration
LABEL DESCRIPTION
DNS Proxy Selection Select a DNS proxy selection from the options below:
Disable DNS Proxy: If the DNS proxy is disabled, the LAN port does not
process DNS query messages. For the DHCP requests from local machines, the
DHCP server will select either the server configured in the Preferred DNS
Server field or the server configured in the Alternate DNS Server field (see
below).
Use Auto Discovered DNS Servers Only: If this selection is made, the DNS
proxy will store the DNS server IP addresses obtained from PPP and all DNS
query messages will be sent to one of these dynamically obtained DNS server
information.
Use User Configured DNS Servers Only: The DHCP server will select either
the server configured in the Preferred DNS Server field or the server configured
in the Alternate DNS Server field (see below).
Auto Discovery + User Configured: The DNS proxy’s table will store all the IP
addresses of dynamically obtained and user configured DNS servers.
User Configuration
Preferred DNS Server Enter the IP address in dotted decimal notation of a preferred DNS server.
Alternate DNS Server Inter the IP address in dotted decimal notation of a backup or alternate DNS
server.
Submit Click this button to apply the changes.
Reset Click this button to reset all values to their defaults.
6.5 Saving New Settings
You may click the Save Settings link in the navigation panel at any time to save you settings and allow your
Prestige to reboot. Click the Submit button as shown.
Figure 6-4 Save Settings
6-8 Basic Configuration
Page 47

Prestige 630-C Series ADSL USB Modem
Chapter 7
Administrative Privileges
This chapter describes how to configure your Prestige with the administrator-level access.
7.1 Administration Privileges Overview
If you logged in as an administrator, perform advanced configuration through the links under Admin
Privilege in the navigation panel.
7.2 WAN Status
Click WAN Status to view WAN-related information and status of the WAN connection. This is the same information that appears on the Home Page.
Figure 7-1 WAN Status
The following table describes the fields in this screen.
Table 7-1 WAN Status
LABEL DESCRIPTION
IP Address This is the IP Address for the WAN interface.
Subnet Mask This is the subnet mask for the above IP address.
MAC Address This is the MAC Address for the WAN interface.
Release/Renew
Administrative Privileges 7-1
Select Release or Renew to change the status of the WAN IP address when
the WAN DHCP Client is enabled (dynamic mode).
Page 48

Prestige 630-C Series ADSL USB Modem
Table 7-1 WAN Status
LABEL DESCRIPTION
Execute Click this button to release or renew the WAN IP address.
7.3 ATM Status
Click ATM Status to view ATM cell statistics.
7-2 Administrative Privileges
Page 49

Prestige 630-C Series ADSL USB Modem
The following table describes the fields in this screen.
Table 7-2 ATM Status
LABEL DESCRIPTION
Tx Bytes This is the total number of bytes transmitted.
Rx Bytes This is the total number of bytes received.
Tx Cells This is the total number of cells transmitted.
Rx Cells This is the total number of cells received.
Rx HEC Errors This is the total number of Header Error Control
(HEC) errors received.
Tx Mgmt Cells This is the total number of management cells
transmitted.
Rx Mgmt Cells This is the total number of management cells
received.
Tx CLP0 Cells This refers to the number of cells transmitted with
the CLP bit in the header set to zero.
Rx CLP0 Cells This refers to the number of cells received with the
CLP bit in the header set to zero.
Tx CLP1 Cells This refers to the number of cells transmitted with
the CLP bit in the header set to one.
Rx CLP1 Cells This refers to the number of cells received with the
CLP bit in the header set to one.
Rx Errors This is the total number of cells received containing
errors.
Tx Errors This is the total number of cells transmitted
containing errors.
Rx Misrouted
Cells
This is the number of misrouted cells received.
Figure 7-2 ATM Status
7.4 TCP Status
Click TCP Status to view TCP connection-related information.
Administrative Privileges 7-3
Page 50

Prestige 630-C Series ADSL USB Modem
Figure 7-3 TCP Status
The following table describes the fields in this screen.
7-4 Administrative Privileges
Page 51

Prestige 630-C Series ADSL USB Modem
Table 7-3 TCP Status
LABEL DESCRIPTION
Total Packets Sent This is the total number of packets sent.
Data Packets Sent This is the total number of data packets sent.
Data Bytes Sent This is the total number of data bytes of data sent.
Total Packets
Received
Packets Received in
Sequence
Bytes Received in
Sequence
Out of Order Packets This is the total number of packets that were sent and received out of order.
Out of Order Bytes This is the total number of bytes that were sent and received out of order.
Packets discarded for
bad checksum
Packets discarded for
bad header offset
Packets discarded
because too short
Connections Initiated This is the number of TCP connections initiated.
Connections Accepted This is the number of TCP connections accepted.
Connections
Established
Connections Closed This is the number of TCP connections closed.
This is the total number of packets received.
This is the total number of packets that were received in sequence.
This is the total number of bytes that were received in sequence.
This is the total number of packets discarded because of having a bad
checksum.
This is the total number of packets discarded because of having a bad header
offset.
This is the total number of packets discarded because they were too short.
This is the number of TCP connections established.
7.5 ADSL Configuration
Click ADSL Configuration to configure advanced ADSL settings.
Administrative Privileges 7-5
Page 52

Prestige 630-C Series ADSL USB Modem
Figure 7-4 ADSL Configuration
The following table describes the fields in this screen.
Table 7-4 ADSL Configuration
LABEL DESCRIPTION
Trellis
Handshake Protocol
Wiring Selection
Bit Swapping (No system
reboot needed)
Submit Click this button to submit the changes.
Reset Click this button to reset all values to their defaults.
Select Enabled or Disabled to activate or deactivate the Trellis code. It is
enabled by default.
Select an ADSL handshake protocol. The choices are as follows: Autosense-
G.dmt first, Autosense-T1.413 first, G.dmt/G.lite, T1.413, G.dmt, G.lite.
Make a wiring selection for the RJ-11 port. Tip/Ring is the default for the
board without the inner/outer pair relay. The other choices are A/A1 and Auto.
Select Enabled or Disabled to activate or deactivate upstream bit swapping.
7.6 Admin Password Configuration
Click Admin under Password Configuration to change your Prestige’s web configurator administrator
password.
7-6 Administrative Privileges
Page 53

Prestige 630-C Series ADSL USB Modem
Figure 7-5 Admin Password Configuration
The following table describes the fields in this screen.
Table 7-5 Admin Password Configuration
LABEL DESCRIPTION
Admin Password Enter a new password for administrator login. The password may be up to 65
characters long and may not include an ampersand “&”. For FTP to work, the
password needs to be at least 8 characters.
Retype Password Retype the password to confirm.
Submit Click this button to submit the changes.
Reset Click this button to reset all values to their defaults.
7.7 User Password Configuration
Click User under Password Configuration to change your Prestige’s web configurator user password.
Figure 7-6 User Password Configuration
Administrative Privileges 7-7
Page 54

Prestige 630-C Series ADSL USB Modem
The following table describes the fields in this screen.
Table 7-6 User Password Configuration
LABEL DESCRIPTION
User Password Enter a new password for user login. The password may be up to 65 characters
long and may not include an ampersand “&”.
Retype Password Retype the password.
Submit Click this button to submit the changes.
Reset Click this button to reset all values to their defaults.
7.8 Miscellaneous Configuration
Click Misc Configuration to configure additional HTTP and PPP settings.
Figure 7-7 Miscellaneous Configuration
The following table describes the fields in this screen.
7-8 Administrative Privileges
Page 55

Prestige 630-C Series ADSL USB Modem
Table 7-7 Miscellaneous Configuration
LABEL DESCRIPTION
HTTP server access In this section, you can configure how from where the web configurator can be
accessed.
Select All to allow access from both the LAN and WAN.
All
Restricted LAN
Restricted WAN
Specify IP Enter the IP address of the computer on the WAN that is allowed to access the
Subnet Mask Enter the corresponding subnet mask for the above IP address.
HTTP server port This field allows you to specify a port for the Web server. For example, when
PPP disconnect on LAN
probe timeout
PPP reconnect on WAN
access
Submit Click this button to apply the changes.
Reset Click this button to reset all values to their defaults.
Select the Restricted radio button and the LAN check box to restrict access to
the Prestige from a computer on the LAN.
Select the Restricted radio button and the WAN check box to restrict access
to the Prestige from a computer on the WAN with a specific IP address.
Web Configurator.
set to 1001, the HTTP server address for the LAN side is http://10.0.0.2:1001,
where 10.0.0.2 is the default IP Address).
Select Enabled to allow the PPP session to timeout (see section 6-1). Select
Disabled to prevent disconnection due to timeout.
Select Enabled to have a PPP session automatically reconnect when a packet
is sent to the WAN. Select Disabled to prevent reconnection.
7.9 Restoring Factory Defaults
To restore the factory defaults on your Prestige, click Reset to Factory Defaults; the following screen will
appear. Click Submit to confirm.
Figure 7-8 Restore Factory Defaults
Administrative Privileges 7-9
Page 56

Prestige 630-C Series ADSL USB Modem
7.10 Performing a Diagnostic Test
Your Prestige can perform a diagnostic test on the physical and protocol layers for both the LAN and WAN
sides. Click Diagnostic Test to perform the test and view the results. Click a Help link to view a
description of each test.
Figure 7-9 Diagnostic Test
The following table describes the fields in this screen.
Table 7-8 Diagnostic Test
LABEL DESCRIPTION
Checking USB Connection
Testing USB
Connection
Checking ADSL Connection
Testing ADSL
Synchronization
Checking Circuit x for Network Connection
7-10 Administrative Privileges
This test checks if the USB connection or port is working properly.
This test checks your Prestige to see if it can successfully negotiate and
establish an ADSL connection with your ISP.
Page 57

Table 7-8 Diagnostic Test
LABEL DESCRIPTION
Test ATM OAM
Segment Loop Back
Test ATM OAM End-
to-End Loop Back
Test Ethernet connect
to ATM
Test PPPoPvc 0
PPPOE connection
Test PPPoPvc 0 PPP
layer connection
Test PPPoPvc 0 IP
connect to PPP
Testing Internet Connection
Ping Primary DNS
Query DNS for
This test sends ATM OAM F5 Segment loop back request cells to the central
office equipments through your DSL connection. This test returns PASS if
response cell is received. Since your service provider might not support this
test, your Prestige can still work even if this test fails.
This test sends ATM OAM End-to-End loop back request cells to the central
office equipments through your DSL connection. This test returns PASS if
response cell is received. Since your service provider might not support this
test, your Prestige can still work even if this test fails.
This test checks the Ethernet/ATM connection.
This test returns PASS if your Prestige can connect to a PPPoE server.
This test returns PASS if your login name and password have passed
authentication with your service provider. This test returns SKIPPED if the
PPPoE connection test does not return PASS and your Prestige is configured
with PPPoE encapsulation.
This test returns PASS if your Prestige has been assigned a valid IP address
by your service provider through DHCP or your DSL modem is assigned a valid
IP address statically.
This test returns PASS if the primary DNS can be reached through a ping
request. The primary DNS is assigned by your service provider or obtained
from your service provider by PPP or DHCP negotiation.
This test returns PASS if the host name can be resolved to an IP address
though the domain name servers.
This test returns PASS if the host specified by your ISP can be reached
Ping
through a ping request.
Prestige 630-C Series ADSL USB Modem
7.11 System Log
Click System Log to view the Prestige’s log file. Entries are added to the log file when events are triggered by the system.
Administrative Privileges 7-11
Page 58

Prestige 630-C Series ADSL USB Modem
Figure 7-10 System Log
The following table describes the information in this screen.
Table 7-9 System Log
LABEL DESCRIPTION
Date and Time The log records the date and time of an event.
Clear Log Click this button to clear the log.
here (save log link) Left click this link to view the log in html form. Right click this link and select
“Save Target As…” to save the log as a text file.
7.12 Making a DSL Connection with PPPoE
Use the following steps to configure your Macintosh when using PPPoE. PPPoE is a dial-up connection, so
you configure the driver and create a dial-up connection to use.
Step 1. Click the Apple icon and System Preferences and then Networking (see Figure 4-1 and Figure
4-2).
Step 2. A New Port Detected screen opens when the computer detects that the ADSL link is up. Click
OK (see Figure 4-3).
Step 3. In the Network screen, select Ethernet Adaptor (en x) in the Show field. Click the PPPoE
tab and select the Connect using PPPoE check box. Type the information from your ISP in the
PPPoE Service Name, Account Name and Password fields. Select the Show PPPoE status in
menu bar check box. Click Apply Now.
7-12 Administrative Privileges
Page 59

Prestige 630-C Series ADSL USB Modem
Figure 7-11 Network: PPPoE Tab
Step 4. Click the menu bar icon and select Connect.
Figure 7-12 PPPoE Icon Connect
Administrative Privileges 7-13
Page 60

Prestige 630-C Series ADSL USB Modem
7.13 Uninstalling the Hardware and Driver
Disconnect the USB cable from your Macintosh’s USB port.
Use the following steps to remove your modem’s software driver.
It is recommended that you save and close all other running programs before
uninstalling the modem driver.
Step 1. Open the drive you selected during installation (see section 3.3).
Step 2. Double-click the Uninstall icon.
Step 3. If your computer prompts you to confirm the selection, click Yes. You may need to enter a
password if the administrator who installed the Prestige requires one.
Step 4. Restart your computer when prompted to do so.
7-14 Administrative Privileges
Page 61

Prestige 630-C Series ADSL USB Modem
Chapter 8
Troubleshooting
This chapter covers potential problems and the possible solutions.
Table 8-1 Troubleshooting
PROBLEM CORRECTIVE ACTION
None of the LEDs turn on when
I start the modem.
I cannot access the Prestige on
my computer.
I cannot connect to the Internet. Make sure the ADSL port is properly connected to the telephone wall
Make sure your computer is turned on.
Check the USB cable connections between the modem and your
computer.
Carefully follow the instructions in this User’s Guide to uninstall and
reinstall the software driver.
Make sure the modem’s USB port is connected to your computer’s
USB port.
Restart your computer.
jack.
Select Connect/Disconnect from the menu at the top of your
computer screen.
Make sure that you have configured the correct user name and
password on the WAN settings (see section 6-1 WAN Settings).
Restart your computer.
Troubleshooting 8-1
Page 62

Page 63

Prestige 630-C Series ADSL USB Modem
Appendix A
Setting up Your Computer’s IP Address
Follow the steps to set up your USB computer to use a static IP address given by your ISP. Steps and screen
shots may vary depending on the version of Macintosh.
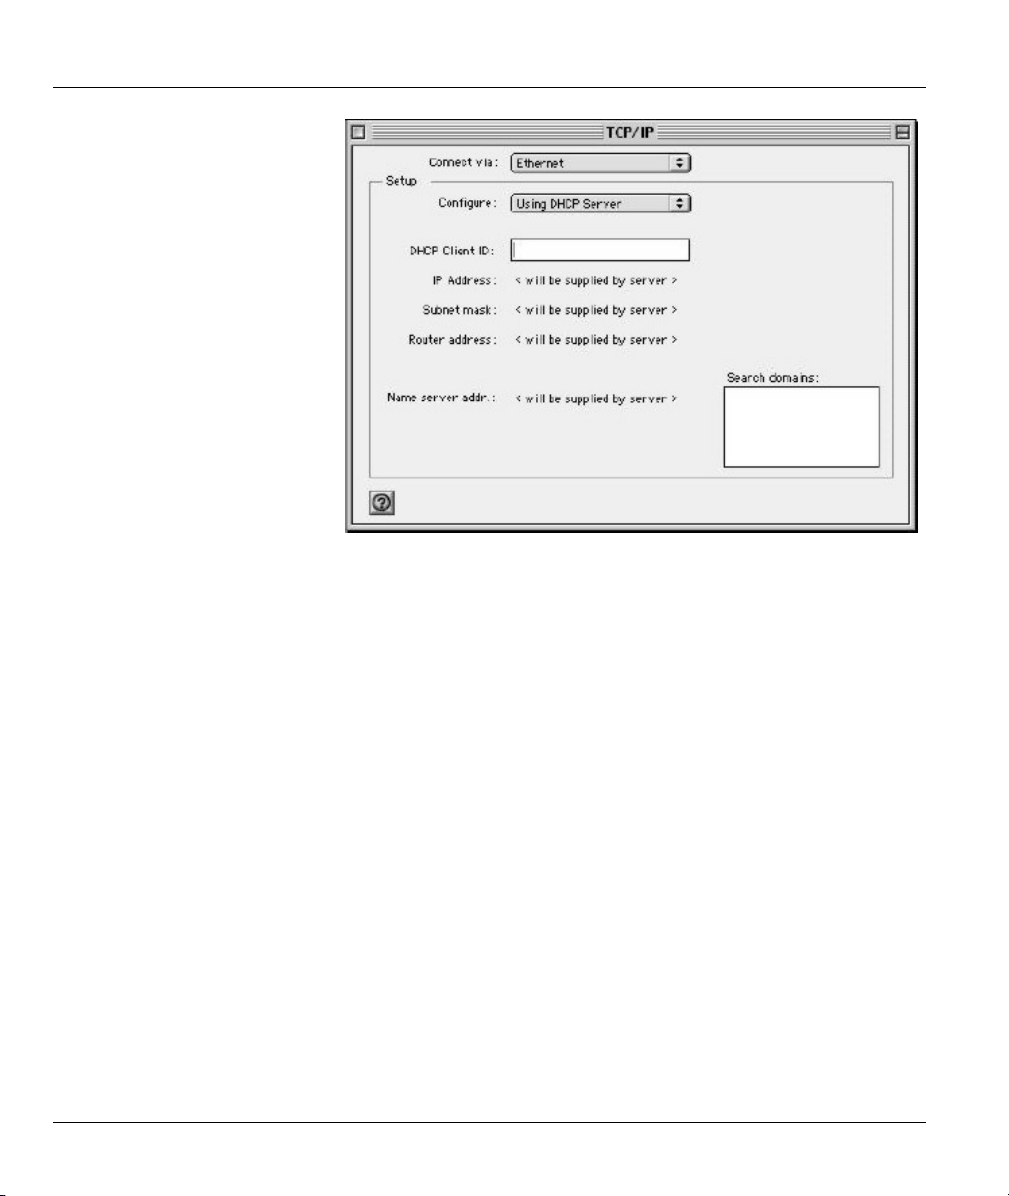
Macintosh OS 9
Click the Apple menu, Control Panel and double-click
1.
TCP/IP to open the TCP/IP Control Panel.
Setting Up Your Computer’s IP Address C
Page 64
Prestige 630-C Series ADSL USB Modem
Select Ethernet built-in
2.
from the Connect via list.
For dynamically assigned settings, select Using DHCP Server from the Configure: list.
3.
4. For statically assigned settings, do the following:
-From the Configure box, select Manually.
-Type your IP address in the IP Address box.
-Type your subnet mask in the Subnet mask box.
-Type the IP address of your Prestige in the Router address box.
Close the TCP/IP Control Panel.
5.
Click Save if prompted, to save changes to your configuration.
6.
7. Turn on your Prestige and restart your computer (if prompted).
Check your TCP/IP properties in the TCP/IP Control Panel window.
D Setting Up Your Computer’s IP Address
Page 65

Macintosh OS X
Click the Apple menu, and click System Preferences
1.
to open the System Preferences window.
Click Network in the icon bar.
2.
- Select Automatic from the Location list.
- Select Built-in Ethernet from the Show list.
- Click the TCP/IP tab.
Prestige 630-C Series ADSL USB Modem
For dynamically assigned settings, select Using DHCP from the Configure list.
3.
4. For statically assigned settings, do the following:
-From the Configure box, select Manually.
-Type your IP address in the IP Address box.
-Type your subnet mask in the Subnet mask box.
-Type the IP address of your Prestige in the Router address box.
Click Apply Now and close the window.
5.
6. Turn on your Prestige and restart your computer (if prompted).
Check your TCP/IP properties in the Network window.
Setting Up Your Computer’s IP Address E
Page 66

Page 67

Prestige 630-C Series ADSL USB Modem
Appendix B
Virtual Circuit Topology
ATM is a connection-oriented technology, meaning that it sets up virtual circuits over which end systems
communicate. The terminology for virtual circuits is as follows:
• Virtual Channel Logical connections between ATM switches
• Virtual Path A bundle of virtual channels
• Virtual Circuit A series of virtual paths between circuit end points
Diagram 1 Virtual Circuit Topology
Think of a virtual path as a cable that contains a bundle of wires. The cable connects two points and wires
within the cable provide individual circuits between the two points. In an ATM cell header, a VPI (Virtual
Path Identifier) identifies a link formed by a virtual path; a VCI (Virtual Channel Identifier) identifies a
channel within a virtual path.
The VPI and VCI identify a virtual path, that is, termination points between ATM switches. A series of
virtual paths make up a virtual circuit.
Your service provider should supply you with VPI/VCI numbers.
Virtual Circuit Topology G
Page 68

Page 69

A
About ADSL .................................................... xiii
ADSL ............................................................... xiii
Advantages of ADSL....................................... xiii
Advantages of USB........................................... xv
Always on ........................................................xiii
Asymmetric Operation..................................... xiii
Authentication.................................................. 6-4
C
CHAP............................................................... 6-4
Compatibility and Compliance ............1-1, xi, 1-1
Computer’s IP Address .......................................A
Configuration ................................................... 4-1
Connections...................................................... 2-2
Contacting Customer Support............................ vi
Copyright ............................................................ ii
Disclaimer....................................................... ii
Trademarks ..................................................... ii
Customer Support .............................................. vi
D
Downstream Data Rates................................... 1-1
F
FCC..................................................................... v
FCC Rules........................................................... v
Features............................................................ 1-1
Federal Communications Commission (FCC)
Interference Statement .................................... v
I
Information for Canadian Users......................... iv
Caution........................................................... iv
Note................................................................ iv
L
LEDs ................................................................ 2-1
Limited Warranty............................................... iii
M
Macintosh Configuration ................................. 4-1
Microfilter........................................................ 2-2
N
Needed Information ......................................... 3-1
Prestige 630-C Series ADSL USB Modem
Index
O
Online Registration............................................ iii
Operating Systems........................................... 3-1
P
Packing List Card ...............................................xi
PAP.................................................................. 6-4
Power Supply................................................... 1-1
Private.............................................................. xiii
R
Read Me First .....................................................xi
Related Documentation.......................................xi
Repair................................................................. iii
RFC 1483......................................................... 3-2
RFC1483.......................................................... 4-1
RJ-11................................................................ 1-1
S
Secure Channel ................................................ xiii
Service ............................................................... iii
Support Disk.......................................................xi
Syntax Conventions...........................................xii
T
Telephone Service, Coexistance with DSL...... xiii
Troubleshooting............................................... 8-1
U
Upstream Data Rates ....................................... 1-1
USB ...................................................................xv
USB as Power Source...................................... 1-1
USB Compliance ............................................. 1-1
USB, advantages................................................xv
USB, What is it? ................................................xv
W
Warranty ............................................................ iii
Z
ZyXEL Contact Information...............................vi
ZyXEL Limited Warranty
Note ............................................................... iii
ZyXEL Web Site ................................................xi
Virtual Circuit Topology I
 Loading...