

Page 1

Prestige 2000W
VoIPon Solutions www.voipon.co.uk sales@voipon.co.uk Tel: +44 (0) 1245 600560
VoIP Wi-Fi Phone
Quick Start Guide
Version WJ.00.10
3/2005
Page 2
Prestige 2000W Quick Start Guide
VoIPon Solutions www.voipon.co.uk sales@voipon.co.uk Tel: +44 (0) 1245 600560
Overview
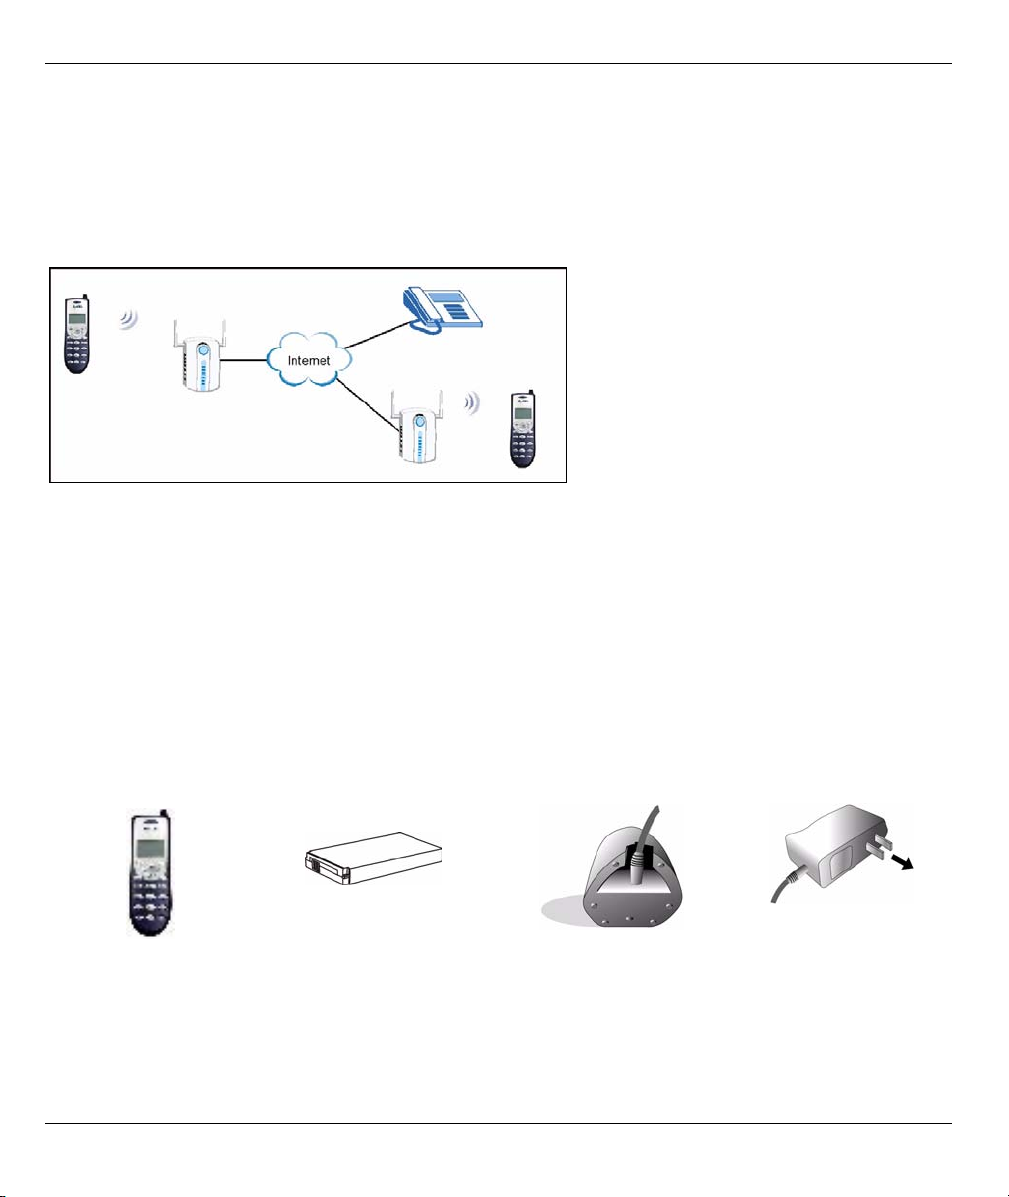
The Prestige 2000W is a wireless Voice over IP (VoIP) telephone. It combines the benefits of Internet
telephony, like cheaper calls, with mobility. This guide covers how to configure and use your Prestige to make
phone calls through the Internet. You can make and receive calls as long you are within range of an
IEEE802.11b enabled wireless network. See the User’s Guide for more information on all features.
Note: You should have Internet access and a voice account already set up.
This guide is divided into the following sections.
1 Hardware
2 The LCD Screen Menus
3 Initial Configuration
4 Phonebook
5 Using the Prestige
6 Accessing the Web Configurator
7 Troubleshooting
1 Hardware
You need the following.
Prestige Battery Charger Power Adaptor
Do the following to prepare the Prestige for use.
2
Page 3

Prestige 2000W Quick Start Guide
VoIPon Solutions www.voipon.co.uk sales@voipon.co.uk Tel: +44 (0) 1245 600560
1 Place the Prestige face down, push down on the
grooves and slide the battery cover off.
3 Connect the included power adaptor (use only
this adaptor) to the charger.
2 With the side of the battery with the CE label
facing up; align the three metal contacts on the
battery to the three corresponding contacts on the
telephone and press the battery down into place.
Note: DO NOT remove the battery’s plastic tab
4 Plug the power adaptor into an appropriate power
outlet.
5 Set the Prestige on the charger. The Prestige automatically turns on.
Note: Charge the battery for five hours before using your Prestige.
3
Page 4
Prestige 2000W Quick Start Guide
VoIPon Solutions www.voipon.co.uk sales@voipon.co.uk Tel: +44 (0) 1245 600560
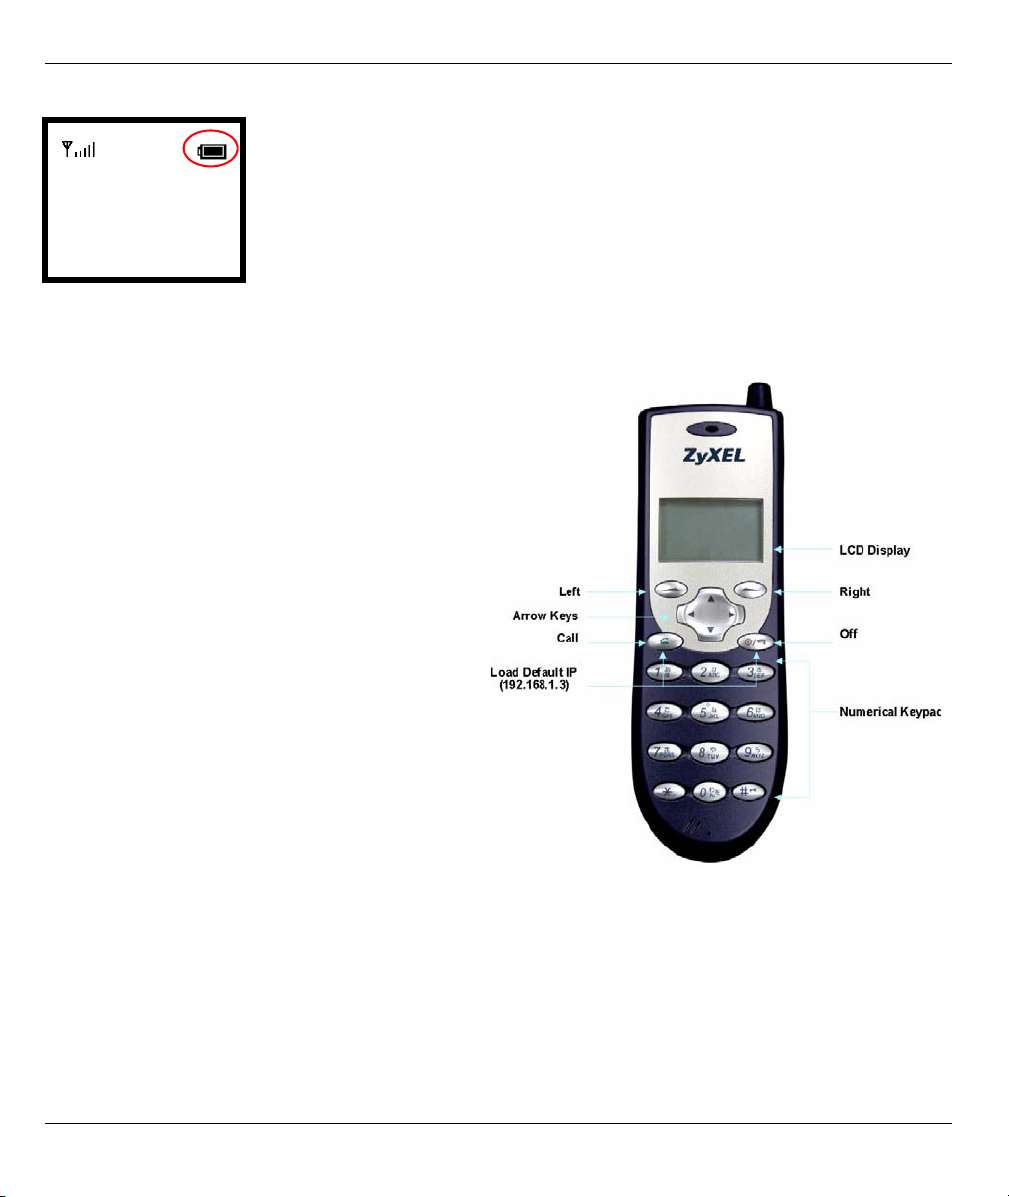
6 The battery indicator bar on the LCD display blinks. It stops blinking when the battery is fully charged.
12:00
ZyXEL
Not registered
Menu Names
7 Remove the Prestige from the charger.
1.1 Keypad and Front Panel
Use the Left key to select on-screen menu options.
Use the Right key to return to the previous menu.
You can also use this key as a shortcut to the
Prestige’s built-in phone book.
Use the arrow keys to navigate between menus and
move the cursor.
Use the Off/On key to reject or cancel calls. Press
and hold it for approximately 2 seconds to turn the
Prestige on or off.
Use the Call key to make and receive calls.
Use the numerical keypad to enter numbers and
characters.
1.2 Switching the Key-lock On and Off
The keys lock automatically if the Prestige is in standby mode for more than one minute.
Press and hold the # key for approximately 2 seconds to lock or unlock the keypad.
4
Page 5

Prestige 2000W Quick Start Guide
VoIPon Solutions www.voipon.co.uk sales@voipon.co.uk Tel: +44 (0) 1245 600560
2 The LCD Screen Menus
This section introduces the Prestige’s LCD screen menu system.
The Prestige initializes after you turn it on.
Initializing….
>>Please Wait!<<
2.1 The Main Screen
The main screen displays after initialization. Hold down the # key for two seconds if the keypad is locked.
shows the strength of the
wireless LAN signal.
Menu The bottom left displays the
function of the Left key. Press the Left
key from the main screen to open the
menus.
Menu Names
Names The bottom right displays the function of the Right key. Press the Right key from the main screen to
open the phonebook.
12:00
ZyXEL
Not registered
shows the battery’s current
charge.
Not registered is the Prestige’s current
connection status. Registered displays
after you properly configure the menu
settings and the Prestige connects to the
SIP proxy server.
2.2 Navigating the Menus
Press the Left button to enter the menus.
After you enter the menus, use the Up or Down arrow keys to scroll through the menu items.
• Press the Left key to access the selected menu item.
• Press the Right key to return to the previous screen.
Note: The Prestige restarts when you return to the main screen after
configuring the wireless LAN, network or SIP settings.
1. Information
2. Call History
3. Phonebook
Select Back
5
Page 6

2.3 Text Input
VoIPon Solutions www.voipon.co.uk sales@voipon.co.uk Tel: +44 (0) 1245 600560
Prestige 2000W Quick Start Guide
• When you need to enter text or numbers in a screen, use the Off key to clear the
default text or backspace.
• Use the up and down arrows to select the type of characters (capital letters, lowercase letters, numbers or symbols).
WEP key 1
**********
Ok Aa1@ Clear
3 Initial Configuration
Use the LCD screen menu system for initial configuration to make calls. Your service provider may have
already configured the settings for you.
Note: If your main screen already displays Registered, skip to Section 4 on page 17.
3.1 Wireless LAN Setup
When you turn the Prestige on, it searches for available wireless LAN Access Points (APs). It selects the AP
with the best signal and restarts and attempts to connect to it.
Use the following if you want to select a specific AP or enter a WEP key.
3.1.1 Site Survey
Do the following to browse the networks available in your area and select one.
1 Select Wireless in the first menu screen (use the up or down arrow to highlight
it and then press the Left key).
2 Select Site Survey.
3 The Prestige checks for and displays a list of available APs.
4 The AP’s SSID is followed by a number describing its relative signal strength.
The higher the number, the better the signal. Select an AP to use.
5 Stay in the Wireless menu and continue with the next section.
7. Wireless
8. Restart
1. Information
Select Back
1. Site Survey
2. SSID
3. Network Mode
Select Back
AP1 99
AP2 90
AP3 85
Select Back
6
Page 7

Prestige 2000W Quick Start Guide
VoIPon Solutions www.voipon.co.uk sales@voipon.co.uk Tel: +44 (0) 1245 600560
3.1.2 WEP Encryption
WEP (Wired Equivalent Privacy) encryption scrambles all communication transmitted between the Prestige
and the AP to keep network communications private. Do the following if you were given a WEP key to use,
otherwise skip to Section 3.1.3 on page 8.
1 Use the up or down arrow and the Left key to select WEP Select.
2 Select the same length of WEP keys as the AP (64-bit or 128-bit).
3 Select a WEP key to configure.
4 The WEP key must be the same as on the AP. Use the left arrow button to clear
the default text. Use the up and down arrows to select the type of characters.
Enter the WEP key. Use the Left key to select Ok when you are done.
If you chose 64-bit WEP, then enter 5 ASCII characters or 10 hexadecimal
characters ("0-9", "A-F").
If you chose 128-bit WEP, then enter 13 ASCII characters or 26 hexadecimal
characters ("0-9", "A-F").
5 You can configure up to four WEP keys (in the same manner as the first) but
only one key can be selected (enabled) at any one time.
6. WEP Select
7. Profiles
8. Auth Type
Select Back
[1] None
[2] 64bit
[3] 128bit
Select Back
7. WEP key 1
8. WEP key 2
9. WEP key 3
Select Back
WEP key 1
**********
Ok Aa1@ Clear
8. WEP key 2
9. WEP key 3
10. WEP key 4
Select Back
7
Page 8

Prestige 2000W Quick Start Guide
VoIPon Solutions www.voipon.co.uk sales@voipon.co.uk Tel: +44 (0) 1245 600560
6 Select Key Select.
7 Select the key that the AP is using.
8 Stay in the Wireless menu and continue with the next section.
3.1.3 Profiles
Use a profile to save your wireless settings for future use.
1 Use the up or down arrow and the Left key to select Profiles.
2 Select Create to make a new profile.
11. Key Select
12. Profiles
13. Auth Type
Select Back
Key 1
Key 2
Key 3
Select Back
7. Profiles
8. Auth Type
1. Site Survey
Select Back
1. Create
2. Activate
3. Remove
Select Back
3 Select a number for the profile and press the Left key. The profile uses the
name of the AP that you are using.
4 Return to the main screen. The Prestige restarts.
1:
2:
3:
Select Back
3.2 Network Settings
Use this section to configure your Prestige to access the Internet.
If you were given a user name and password for Internet access, go to Section 3.2.3 on page 10.
8
Page 9

Prestige 2000W Quick Start Guide
VoIPon Solutions www.voipon.co.uk sales@voipon.co.uk Tel: +44 (0) 1245 600560
If you were given an IP address and subnet mask, go to Section 3.2.1 on page 9.
If you were not given an IP address and subnet mask, go to Section 3.2.2 on page 10.
3.2.1 Fixed IP
With this option you have to manually enter an IP address, subnet mask and gateway IP address. These are
given to you by the network administrator.
1 Select Net Settings in the first menu screen (use the up or down arrow to
highlight it and then press the Left key).
2 Select Network Mode.
3 Select Fixed IP.
4 Select IP Address.
5 Use the left arrow button to clear the default text. Use the up and down arrows
to select the type of characters. Enter your IP address. Use the Left key to
select Ok when you are done.
4. Net Settings
5. SIP Settings
6. Settings
Select Back
1. Network Mode
2. IP Address
3. Subnet Mask
Select Back
[1] Fixed IP
[2] DHCP
[3] PPPoE
Select Back
2. IP Address
3. Subnet Mask
4. Gateway
Select Back
IP Address
192.168.1.3
Ok Aa1@ Clear
6 Select Subnet Mask.
9
3. Subnet Mask
4. Gateway
1. Network Mode
Select Back
Page 10

Prestige 2000W Quick Start Guide
VoIPon Solutions www.voipon.co.uk sales@voipon.co.uk Tel: +44 (0) 1245 600560
7 Clear the subnet mask and enter your’s. Subnet Mask
255.255.255.0
Ok Aa1@ Clear
8 Select Gateway.
9 Clear the gateway IP address and enter your’s.
10The Prestige restarts when you return to the main screen.
4. Gateway
1. Network Mode
2. IP Address
Select Back
Gateway
192.168.1.1
Ok Aa1@ Clear
3.2.2 DHCP
If you do not have a specific IP address for your Prestige, use the following directions to set your Prestige to
get it automatically via DHCP (Dynamic Host Control Protocol).
1 Select Net Settings in the first menu screen (use the up or down arrow to
highlight it and then press the Left key).
2 Select Network Mode.
3 Select DHCP.
4 The Prestige restarts when you return to the main screen.
4. Net Settings
5. SIP Settings
6. Settings
Select Back
1. Network Mode
2. IP Address
3. Subnet Mask
Select Back
[2] DHCP
[3] PPPoE
[1] Fixed IP
Select Back
3.2.3 PPPoE
10
Page 11

Prestige 2000W Quick Start Guide
VoIPon Solutions www.voipon.co.uk sales@voipon.co.uk Tel: +44 (0) 1245 600560
Point-to-Point Protocol over Ethernet (PPPoE) functions as a dial-up connection. You need a user name
(PPPoE name) and password from you ISP.
1 Select Net Settings in the first menu screen (use the up or down arrow to
highlight it and then press the Left key).
2 Select Network Mode.
3 Select PPPoE.
4 Select PPPoE Name.
5 Use the left arrow button to clear the default text. Use the up and down arrows
to select the type of characters. Enter your PPPoE name. Use the Left key to
select Ok when you are done.
4. Net Settings
5. SIP Settings
6. Settings
Select Back
1. Network Mode
2. IP Address
3. Subnet Mask
Select Back
[3] PPPoE
[1] Fixed IP
[2] DHCP
Select Back
2. PPPoE Name
3. PPPoE Pwd
1. Network Mode
Select Back
PPPoE Name
pppoe_username
Ok Aa1@ Clear
11
Page 12

Prestige 2000W Quick Start Guide
VoIPon Solutions www.voipon.co.uk sales@voipon.co.uk Tel: +44 (0) 1245 600560
6 Select PPPoE Pwd.
7 Clear the PPPoE password and enter your’s.
8 The Prestige restarts when you return to the main screen.
3. PPPoE Pwd
1. Network Mode
2. PPPoE Name
Select Back
PPPoE Pwd
*************************
Ok Aa1@ Clear
3.3 SIP Settings
The Prestige uses Session Initiated Protocol (SIP), an internationally recognized standard for implementing
VoIP. The last step in initial configuration is to register your Prestige with your voice service provider’s SIP
server.
3.3.1 Registrar Server
Configure the Registrar settings to have the Prestige register with your provider’s SIP registrar server.
Note: If you have no registrar server information, use the SIP server IP address and port number.
1 Select SIP Settings in the first menu screen.
2 Select Registrar.
5. SIP Settings
6. Settings
7. Wireless
Select Back
1. Registrar
2. OutboundProxy
3. Proxy Server
Select Back
3 Select Registrar IP.
12
1. Registrar IP
2. Port
3. Expiry Time
Select Back
Page 13

Prestige 2000W Quick Start Guide
VoIPon Solutions www.voipon.co.uk sales@voipon.co.uk Tel: +44 (0) 1245 600560
4 Use the left arrow button to clear the default text. Use the up and down arrows
to select the type of characters. Enter the registrar server’s IP address or
domain name. Use the Left key to select Ok when you are done.
5 Select Port.
6 Clear the default port number and enter the registrar server’s listening port
number. Leave the default port number if you were not given one to use.
7 Select Expiry Time if you were given a specific expiration time period to use.
Otherwise leave it set to the default.
8 Clear the expiration time and enter the expiration time you were given.
9 Stay in the SIP Settings menu and continue with the next section.
Registrar IP
sip.proxy.net
Ok Aa1@ Clear
2. Port
3. Expiry Time
1. Registrar IP
Select Back
Port
5061
Ok Aa1@ Clear
3. Expiry Time
1. Registrar IP
2. Port
Select
Back
Expiry Time
300
Ok Aa1@ Clear
3.3.2 Outbound Proxy Server
13
Page 14

Prestige 2000W Quick Start Guide
VoIPon Solutions www.voipon.co.uk sales@voipon.co.uk Tel: +44 (0) 1245 600560
Configure the Prestige to use an outbound proxy server if your LAN is behind a NAT router that does not
support SIP. If your voice service provider gave you an outbound proxy server address and port, then enter
them here.
1 Select Outbound Proxy.
2 Select Proxy IP.
3 Use the left arrow button to clear the default text. Use the up and down arrows
to select the type of characters. Enter the outbound proxy server’s IP address
or domain name. Use the Left key to select Ok when you are done.
4 Select Port.
5 Clear the port and enter the SIP outbound proxy server’s listening port number.
Leave the default port number if you were not given one to use.
2. OutboundProxy
3. Proxy Server
4. User Account
Select Back
1. Proxy IP
2. Port
Select Back
Proxy IP
sip.proxy.net
Ok Aa1@ Clear
2. Port
1. Proxy IP
Select Back
Port
5061
Ok Aa1@ Clear
3.3.3 Proxy Server
14
Page 15

Prestige 2000W Quick Start Guide
VoIPon Solutions www.voipon.co.uk sales@voipon.co.uk Tel: +44 (0) 1245 600560
Configure Proxy Server settings to have the Prestige use your provider’s SIP server.
1 Select Proxy Server.
2 Select Proxy IP.
3 Use the left arrow button to clear the default text. Use the up and down arrows
to select the type of characters. Enter the SIP server’s IP address or domain
name. Use the Left key to select Ok when you are done.
4 Select Port.
5 Clear the port and enter the SIP server’s listening port number. Leave the
default port number if you were not given one to use.
3. Proxy Server
4. User Account
1. Registrar
Select Back
1. Proxy IP
2. Port
Select Back
Proxy IP
sip.proxy.net
Ok Aa1@ Clear
2. Port
1. Proxy IP
Select Back
Port
5061
Ok Aa1@ Clear
3.3.4 User Account
15
Page 16

Prestige 2000W Quick Start Guide
VoIPon Solutions www.voipon.co.uk sales@voipon.co.uk Tel: +44 (0) 1245 600560
When you registered for your voice account, you should have been given a telephone number, user name and
password. Do the following to have Prestige use them when connecting to the SIP server.
1 Select User Account.
2 Select Phone Number.
3 Use the left arrow button to clear the default text. Use the up and down arrows
to select the type of characters. Enter your SIP number. For a SIP account like
1234@VoIP-provider.com
to select Ok when you are done.
4 Select Username.
5 Clear the user name and enter yours exactly as it was given to you. Username
, “1234” would be the SIP number. Use the Left key
4. User Account
1. Registrar
2. OutboundProxy
Select Back
1. Phone Number
2. Username
3. User Pwd
Select Back
Phone Number
100
Ok Aa1@ Clear
2. Username
3. User Pwd
1. Phone Number
Select Back
username
Ok Aa1@ Clear
16
Page 17

Prestige 2000W Quick Start Guide
VoIPon Solutions www.voipon.co.uk sales@voipon.co.uk Tel: +44 (0) 1245 600560
6 Select User Pwd.
7 Clear the password and enter yours.
8 Return to the main screen. The Prestige restarts.
3. User Pwd
1. Phone Number
2. Username
Select Back
User Pwd
*************
Ok Aa1@ Clear
4 Phonebook
Use the phonebook feature to store telephone numbers.
4.1 Calling Methods
There are two ways the Prestige can dial a telephone number; either by using the SIP proxy server or an IP
address.
Select Proxy to have the SIP server make the connection. The SIP proxy server assigns the telephone
number or ITSP and therefore you can leave this field blank.
Select P2P to an IP address to place a call without first going through the SIP proxy server. This is called an
IP to IP (or peer to peer) call. You need to enter the IP address of the callee or another SIP proxy server and
the callee’s telephone number in the Prestige’s phonebook.
4.2 Adding a Phonebook Entry
Use the following instructions to add an entry to your phonebook.
Note: Only enter the IP address when there is no SIP proxy server and/or you want to place a
direct IP to IP call. Otherwise the telephone number is sufficient to make your call
17
.
Page 18

Prestige 2000W Quick Start Guide
VoIPon Solutions www.voipon.co.uk sales@voipon.co.uk Tel: +44 (0) 1245 600560
You must use a phonebook entry to make an IP to IP call.
1 Select Phonebook In the first menu.
2 Select Add Entry.
3 Enter the callee’s name. Use the up and down arrows to select the type of
characters. Use the Left key to select Ok when you are done.
4 Enter the telephone number. User Info:
5 Enter the SIP server’s or the callee’s IP address or domain name. Leave this
blank if you will use the SIP proxy server to call this number.
6 Enter the callee’s listening port number. Leave this blank if you were not given
one.
3. Phonebook
4. Net Settings
5. SIP Settings
Select Back
2. Add Entry
3. Erase
1. Search
Select Back
Display Name:
Ok Aa1@ Clear
Ok Aa1@ Clear
Host IP:
Ok Aa1@ Clear
Port:
Ok Aa1@ Clear
7 Select P2P if calls to this party use a different SIP server or go directly to the
callee’s VoIP phone (peer-to-peer).
Select Proxy if calls to this party use your SIP account.
18
P2P
Proxy
Select Back
Page 19

Prestige 2000W Quick Start Guide
VoIPon Solutions www.voipon.co.uk sales@voipon.co.uk Tel: +44 (0) 1245 600560
5 Using the Prestige
The following sections describe how to use your Prestige for basic tasks.
5.1 Dialing a Telephone Number
Do the following to call a phone number that is not already in your Prestige’s phonebook.
1 When the Prestige is in standby mode, use the numerical keys to enter the phone number.
2 If you enter an incorrect number, press the Right key to backspace.
3 Press the Call key to make your call.
5.2 Using the Phonebook to Dial a Telephone Number
Use the following instructions to call one of existing entries in your Prestige’s phonebook.
1 Press the Right key to enter the phonebook.
2 Use the up or down arrow button to choose the name.
3 Press the Call key to dial the number.
5.3 Re-dialing a Telephone Number
1 In the standby mode, press the Call key.
2 A list of recently called numbers displays.
3 Use the up or down arrow button to scroll through the list and highlight a number.
4 Press the Call key to make the call.
5.4 Answering a Call
Press the Call key to answer a call.
5.5 Rejecting a Call
Press the Off key to reject a call.
5.6 Changing the Volume
Press the left or right arrow button to decrease or increase the volume during a call.
Use the web configurator’s administrator account if you want to change the Prestige’s default volume. See
Section 6 on page 19 for how to access the web configurator.
6 Accessing the Web Configurator
This section describes how to log into the Prestige’s web configurator.
19
Page 20

Prestige 2000W Quick Start Guide
VoIPon Solutions www.voipon.co.uk sales@voipon.co.uk Tel: +44 (0) 1245 600560
6.1 Accounts
The web configurator has two accounts. The user account provides normal functionality of the Prestige and
configurable settings. The administrator’s account allows you to alter the way the Prestige makes and
receives calls, for example selecting a voice codec.
Note: Do not change the administrator settings unless you know what you are doing. These settings
affect the way your Prestige makes and receives calls and are already configured for best
performance.
1 Make sure your Prestige is connected to the wireless LAN and record its IP address (you can use the
Information menu to check your phone’s IP address).
2 Launch your web browser.
3 Type "http://<IP address>" as the URL. Where “IP
address” is the Prestige’s IP address (default
192.168.1.3).
4 Enter your username and password and
click OK to login.
• For user access: Type the default username:
admin and password: 1234 for user-level
access, the first time you login.
• For administrator access: Type the default
username: zyxeladmin and password: 1234
for administrator access, the first time you
login.
7 Troubleshooting
PROBLEM CORRECTIVE ACTION
The Prestige does
not turn on.
The battery icon
( ) is blinking.
Make sure you have the battery installed and charged.
The battery’s power is low. Recharge the battery.
20
Page 21

Prestige 2000W Quick Start Guide
VoIPon Solutions www.voipon.co.uk sales@voipon.co.uk Tel: +44 (0) 1245 600560
PROBLEM CORRECTIVE ACTION
The signal icon
() is blinking
“Net Fail!
(DHCP)”
displays.
“Net Fail!
(PPPoE)”
displays.
“Not Registered”
displays
The signal quality is low or the Prestige cannot find the AP.
Connect to another AP.
Move your Prestige closer to the AP.
There may be too much radio interference (for example a microwave or another AP using the
same channel) around your wireless network. Relocate or reduce the radio interference.
The Prestige failed to obtain an IP address from a DHCP server.
Make sure your wireless LAN settings are correct.
Make sure the DHCP server is operating properly.
Restart the Prestige.
The Prestige failed to obtain an IP address from the ISP.
Make sure your PPPoE settings are correct.
Restart the Prestige.
The Prestige failed to register with the SIP proxy server.
It is still possible to place a direct IP to IP call without the SIP proxy server. You must create
and use a phonebook entry (see Section 4 on page 17).
Check your SIP settings.
Contact your voice service provider.
Procedure to View a Product’s Certification(s)
1 Go to www.zyxel.com.
2 Select your product from the drop-down list box on the ZyXEL home page to go to that product's page.
3 Select the certification you wish to view from this page.
21
 Loading...