

Page 1

ZyXEL
TOTAL INTERNET A CCESS SOLUTION
Prestige 100MH
PSTN Router/Hub
Quick Start Guide
Page 2

Prestige 100MH Quick Start Guide
Prestige 100MH
PSTN Router/Hub
Copyright
Copyright © 1998 by ZyXEL Communications Corporation.
The contents of this publication may not be reproduced in any pa rt or as a whole, transcribed, stored in a retrieval
system, translated into any language, or transmitted in any form or by any means, electronic, mechanical, magnetic,
optical, chemical, photocopying, manual, or otherwise, without the prior written permission of ZyXEL
Communications Corporation.
Published by ZyXEL Communications Corporation. All rights reserved.
Disclaimer
ZyXEL does not assume any liability arising out of the application or use of any products, or software described
herein. Neither does it convey any license under its patent rights nor the patents rights of others. ZyXEL further
reserves the right to make changes in any products described herein without notice. This publication is subject to
change without notice.
Trademarks
Trademarks mentioned in this publication are used for identification purposes only and may be properties of their
respective owners.
ii
Page 3

Prestige 100MH Quick Start Guide
Table of Contents
Chapter 1
Before You Begin
1.1 Purpose Of This Guide .................................................................................... 1
1.2 Who Should Not Use This Guide: .................................................................... 1
1.3 Package Contents.......................................................................................... 1
1.4 Information From Your ISP ..............................................................................2
1.5 Prestige’s Default TCP/IP Settings................................................................... 3
1.5.1 IP Address and Subnet Mask ............................................................... 3
1.5.2 DHCP Setting ...................................................................................... 3
Chapter 2
Cabling & Installation
2.1 Prestige 100MH............................................................................................. 5
Chapter 3
Windows 95 Quick Start
3.1 TCP/IP Installation.......................................................................................... 7
3.2 TCP/IP Configuration ...................................................................................... 9
Chapter 4
Windows NT Quick Start
4.1 TCP/IP Installation.........................................................................................15
4.2 TCP/IP Configuration .....................................................................................16
Chapter 5
Prestige Web Configurator Setup
5.1 Installing PWC Components ...........................................................................21
5.2 Starting the Prestige Web Configurator ...........................................................23
Customer Support .........................................................................................................25
iii
Page 4

Page 5

Prestige 100MH Quick Start Guide
Chapter 1
Before You Begin
1.1 Purpose Of This Guide
This guide provides instructions on how to setup your new Prestige and Windows 95/NT
workstations for Internet access using the Prestige Web Configurator (PWC).
The Prestige Web Configurator provides a quick, simple, and intuitive way to configure your
Prestige. Using a “point-and-click” Web-based Graphical User Interface (GUI), you can
configure, save, monitor, and diagnose your Prestige from any workstation on your LAN.
1.2 Who Should Not Use This Guide:
If the intended application for your Prestige is other than Internet access for Window 95 or NT
workstations, then this guide is not for you. Please refer to the Prestige User’s Guide for details
on other applications.
1.3 Package Contents
This first thing you should do is check all items you received with your Prestige against this list
to make sure nothing is missing. The complete package should include:
θ One Prestige 100MH Router/Hub
θ One Power Adapter: 16V AC Output
1
Page 6

Prestige 100MH Quick Start Guide
θ One Telephone Cable with RJ-11 Connectors
θ One DB -25(male)/DB-9(female) Converter
θ One Console RJ-45/DB-25(female) Cable
θ One Ethernet 10Base-T cable
θ One Prestige Web Configurator CD ROM
θ One Prestige Series User's Manual
θ One Warranty Registration Card
θ One Prestige Web Configurator User’s Guide
θ This Prestige Quick Start Guide
1.4 Information From Your I SP
Your Internet Service Provider (ISP) should provide information needed to setup your Prestige,
usually in the form of an account configuration sheet. The information includes:
l User name and password
l ISP’s access phone number.
l IP address of ISP’s DNS (Domain Name System) server(s).
l Will the ISP be providing you with a static IP address?
Ø If yes, what is the range of IP address and subnet mask dedicated to your account?
l Does the ISP support Multi-Link PPP (MP)?
If your Internet access is not through a commercial ISP, e.g., your corporate dial-in server,
please consult with your network administrator for the above information.
2
Page 7

Prestige 100MH Quick Start Guide
1.5 Prestige’s Default TCP/IP Settings
1.5.1 IP Address and Subnet Mask
Your Prestige is pre-configured in the factory with IP Address of 192.168.1.1 and subnet mask
of 255.255.255.0 (Class C).
1.5.2 DHCP Setting
Your Prestige has a built-in DHCP (Dynamic Host Configuration Protocol) server. DHCP
allows the individual wor kstations on a network to obtain their TCP/IP configuration at start-up
from a centralized DHCP server (in this case, the Prestige ).
The Prestige’s DHCP server is enabled by default. The server has a pool of 32 IP addresses
ranging from 192.168.1.33 to 192.168.1.64. To minimize your workload, we recommend that
you leave the DHCP server enabled, unless you already have another DHCP server running or
other specific reasons.
3
Page 8

Page 9
Prestige 100MH Quick Start Guide
Power
Power
Abcdefg
ghijkl
mmn
opqr
jjjjjjjj.jjjjjjjjj
dsasad
eqr q r
fgh
Abcdefg
ghijkl
mmn
opqr
jjjjjjjj.jjjjjjjjj
dsasad
eqr q r
fgh
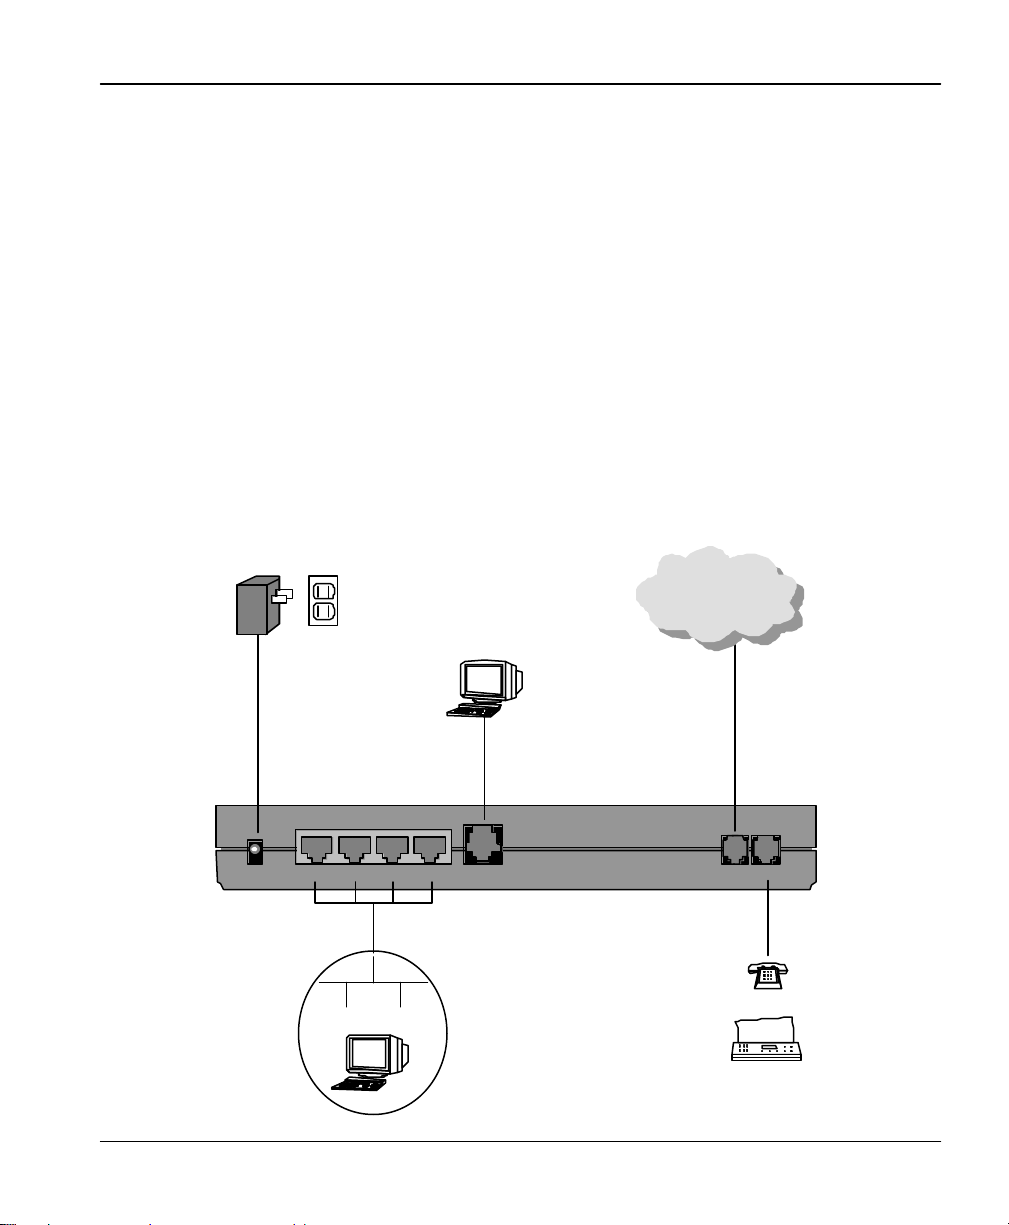
Chapter 2
Cabling & Installation
The following diagrams depict the cabling for the Prestige. After you have completed the
cabling, proceed to Chapter 3: Windows 95 Quick Start or Chapter 4: Windows NT Quick Start.
2.1 Prestige 100MH
Adapter
POWER
Outlet
ETHERNET
4 3 2 1
Ethernet LAN
Computer
CONSOLE
PSTN Network
(Telephone Line)
PHONELINE
Telephone
stuvw xyzasdsad aa s
stuvw xyzasdsad aa s
dddd . rrrr tttttt bbb
dddd . rrrr tttttt bbb
hhhhhh ffff bbbbb
hhhhhh ffff bbbbb
bbbbbbbb
bbbbbbbb
jjjjjjjj. Ee sdasd
jjjjjjjj. Ee sdasd
dsad sasad asdas er
dsad sasad asdas er
fg h fghfg hf ghf ghf h
fg h fghfg hf ghf ghf h
fgh fgh fh ffffgh ffffafd
fgh fgh fh ffffgh ffffafd
Fax
5
Page 10

Page 11

Prestige 100MH Quick Start Guide
Chapter 3
Windows 95 Quick Start
This chapter shows you the step-by-step instructions to configure your Windows 95
workstations for Internet access.
3.1 TCP/IP Installation
You must first install TCP/IP protocol on each Windows 95 workstation before you can use it to
access the Internet. If you have already installed TCP/IP, skip to the TCP/IP Configuration
section on page 9; otherwise, follow these steps:
Step 1. From the Start Menu, select Settings then open Control Panel.
Step 2. Double-click the Network icon to open the Network control panel.
Step 3. Click the Add button in the Network control panel to add a new protocol.
7
Page 12

Prestige 100MH Quick Start Guide
Step 4. Select the Protocol item and click Add.
Step 5. Choose Microsoft from the Manufacturers, and TCP/IP from the Network
Protocols. Then click OK.
This will install the TCP/IP protocol on your workstation.
8
Page 13

Prestige 100MH Quick Start Guide
3.2 TCP/IP Configuration
Follow these steps to setup your TCP/IP configuration for Windows 95.
Step 1. From the Start Menu, select Settings then open Control Panel .
Step 2. Double-click the Network icon to open the Network control panel. A list of installed
components is displayed. Click on TCP/IP selection for the installed network card to
highlight as shown below, then click the Properties button.
9
Page 14

Prestige 100MH Quick Start Guide
Step 3. The TCP/IP Properties dialog with IP Address tab will appear as shown below.
Step 4. Select Obtain an IP address automatically if your ISP did not assign you a block of
registered IP addresses (most cases); otherwise, select Specify an IP address and
enter the IP address and subnet mask for this workstation from the block provided by
your ISP.
Note: Do not assign arbitrary IP address and subnet mask to your workstations.
Otherwise, you will not be able to access the Internet.
10
Page 15

Prestige 100MH Quick Start Guide
Step 5. Select the WINS Configuration tab, and click Disable WINS Resolution.
Step 6. On the Gateway tab, highlight any installed gateways and click the Remove button
until there are none listed.
11
Page 16

Prestige 100MH Quick Start Guide
12
Page 17

Prestige 100MH Quick Start Guide
Step 7. On the DNS Configuration tab, select Enable DNS . Enter a unique name for the
workstation in the Host box. Enter your domain name in the Domain box if you have
one. This field is optional and can be left blank. Leave the DNS Server Search Order
box blank if you plan to get the DNS server address(es) from a DHCP server.
Otherwise enter the DNS server address of your ISP in the third box and click Add.
Click OK to save and close TCP/IP dialog.
Step 8. Now Click OK to close the Network control panel. You may be prompted to insert
your Windows 95 CD or disks. When the drivers are updated, you may be prompted to
restart the system. Make sure the Prestige is powered on before clicking yes and
allow the workstation to restart.
Step 9. From the Windows 95 Start Menu, choose RUN. Then type “winipcfg” and click OK.
This will show the IP address of your workstation. If no address is shown, verify your
cabling.
Repeat the above steps for each Windows 95 workstation on your LAN.
13
Page 18

Page 19

Prestige 100MH Quick Start Guide
Chapter 4
Windows NT Quick Start
This chapter shows you the step-by-step instructions to configure your Windows NT
workstations for Internet access.
4.1 TCP/IP Installation
You must first install TCP/IP protocol on each Windows NT workstation before you can use it
to access the Internet. If you have already installed TCP/IP, skip to the TCP/IP Configuration
section on page 15; otherwise, follow these steps:
Step 1. From the Start Menu, select Settings then open Control Panel .
Step 2. Double-click the Network icon to open the Network control panel.
Step 3. Select the Protocols tab, then click the Add… button.
15
Page 20

Prestige 100MH Quick Start Guide
Step 4. Choose TCP/IP Protocol from the Network Protocol list. Then click OK.
This will install the TCP/IP protocol on you workstation.
4.2 TCP/IP Configuration
Follow these steps to setup your TCP/IP configuration for Windows NT.
Step 1. From the Start Menu, select Settings then open Control Panel .
Step 2. Double-click the Network icon to open the Network control panel.
16
Page 21

Prestige 100MH Quick Start Guide
Step 3. Click the Protocols tab, select the TCP/IP protocol, and click the Properties…
button to open the Microsoft TCP/IP Properties dialog.
Step 4. Select Obtain an IP address automatically if your ISP did not assign you a block of
registered IP addresses (most cases). Otherwise, select Specify an IP address and
enter the IP address and subnet mask for this workstation from the block provided by
your ISP, and enter your Prestige’s IP address in Default Gateway.
17
Page 22

Prestige 100MH Quick Start Guide
Note: Do not assign arbitrary IP address and subnet mask to your workstations. Otherwise,
you will not be able to access the Internet.
Step 5. On the DNS tab, Enter a unique name for the workstation in the Host Name box.
Enter your domain name in the Domain box if you have one. This field is optional and
can be left blank. Make sure the DNS Service Search Order box is blank if you plan
to get the DNS server address(es) from a DHCP server. Otherwise click “Add…” to
enter the DNS server address(es) of your ISP.
18
Page 23

Prestige 100MH Quick Start Guide
Step 6. On the WINS Address tab, make sure the toggle button of Enable DNS for Windows
resolution is not checked.
19
Page 24

Prestige 100MH Quick Start Guide
Step 7. Cli ck on the OK button at the bottom to save and close the TCP/IP Properties dialog.
Step 8. Click on the OK button to save and close the Network control panel.
Repeat the above steps for each Windows NT workstation on your LAN.
20
Page 25

Prestige 100MH Quick Start Guide
Chapter 5
Prestige Web Configurator Setup
The Prestige Web Configurator (PWC) is a JAVA based system that provides you a quick,
simple, and intuitive way to configure your Prestige. Using a “point-and-click” Web-based
Graphical User Interface (GUI), you can configure, save, monitor, and diagnose your Prestige
from any workstation on your LAN.
The PWC system consists of three components:
1. A browser, either Microsoft’s Internet Explorer 3.02 and above, or Netscape Navigator 3.0
and above.
2. Sum Microsystems’s JAVA Activator EA2 release or later.
3. The Presti ge Web Configurator software.
All three components must be installed on the workstation to run PWC.
5.1 Installing PWC Components
To install the Prestige Web Configurator components:
Step 1. Insert the Prestige Web Configurator installation CD into your CD-ROM drive.
The ZyXEL CD Installer Program should start automatically after you insert the CD. If it does
not, run Startup.exe located in the CD’s root directory.
21
Page 26

Prestige 100MH Quick Start Guide
Note: The ZyXEL CD Installer Program (Startup.exe) requires the Microsoft® Visual
Basic 5 Runtime libra ries.
On some systems you may get the message "Error Starting Program" when trying to
start the CD-ROM Installer. If this should occur, use the Windows Explorer to open
the "VB5Run" folder on the CD, then double-click the "Setup" Icon to run Setup.exe.
This program will update your system files, install the VB5 runtime DLLs, and create
a "VB5About" shortcut in the Programs folder in the Start menu. This program gives
you the information about the system files that setup.exe has installed. You may safely
uninstall VB5About with the "Add/Remove Programs" Control Panel after you have
completed PWC installation.
Step 2. Use the Skip and Back buttons to select the PWC components that have not been
installed. Click the Install button to install the selected component.
Follow the on-screen instructions for each package.
22
Page 27

Prestige 100MH Quick Start Guide
Step 3. After you have completed installing all the required components, click the Exit
button.
Step 4. Run the JAVA Activator Control Panel, which in located in the JAVA Activator 1.1
EA2 folder of your Start/Programs gr oup.
Step 5. Make sure the settings match those in the following figure and click OK.
5.2 Starting the Prestige Web Configurator
Step 1. To start PWC, select Startà Programsà ZyXELà Prestige Web Configurator.
Your web browser will start and show PWC’s welcome page.
23
Page 28

Prestige 100MH Quick Start Guide
Step 2. Click the Wizard Setup button at the bottom of the welcome screen to start down the
Wizard Setup path.
The Wizard Setup will guide you through the steps necessary to configure your Prestige for
Internet access. If this is your first experience with a Prestige, you should begin with the Wizard
Setup.
The Wizard Setup is designed to be straight-forward and incorporates detailed on-screen
information every step of the way. You should have no problems completing your Prestige
setup by following the on-screen directions. Should you have any difficulties, detailed
information on the Wizard Setup is available in “Prestige Web Configurator User’s Guide”.
24
Page 29

Prestige 100MH Quick Start Guide
Customer Support
ZyXEL Prestige 100MH
If you have questions about your ZyXEL products or desire assistance, contact ZyXEL
Communications Corporation in one of the following ways.
Contacting ZyXEL
E-mail Technical Support Support@zyxel.com in North America
Support@zyxel.com.tw outside of the US.
E-mail Sales Sales@zyxel.com in North america
Sales@zyxel.com.tw outside of the US.
Web Site Product Information www.zyxel.com ZyXEL’s Internet Site.
Phone North America
Outside North America
Fax North America
Outside North America
FTP File
Downloads
North America
Europe
Mailing Address
ZyXEL Communications Corporation
6, Innovation Road II
Science-Based Industrial Park
Hsinchu, Taiwan 300, R.O.C.
ZyXEL
TOTAL INTERNET A CCESS SOLUTION
(714) 693 -0808 (8:00 to 5:00 PM PST)
+886-3-5782439 Ext.:266 (8:00 to 5:00 PM local)
(714) 693 -8811
+886-3-5782439
ftp.zyxel.com (Software and ROM upgrades)
ftp.zyxel.co.at (Software and ROM upgrades)
ZyXEL Communications, Inc.
4920 E. La Palma Avenue
Anaheim,. CA 92807, U.S.A.
25
 Loading...