

Page 1
Epson Stylus®Photo 1280
Start
Start
Here
Here
Epson Stylus Photo 1280
1
1
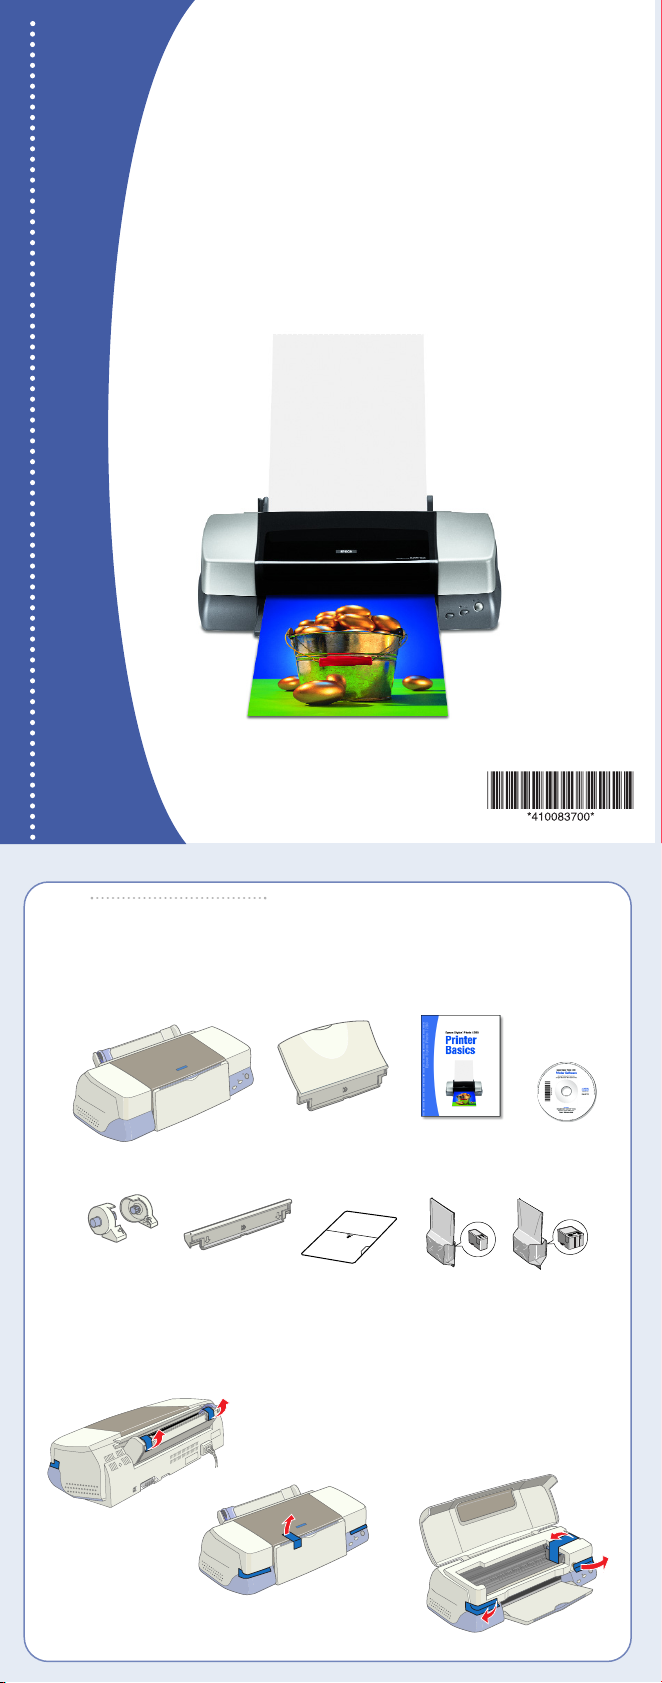
1 Remove everything from the box.
2 Remove all the tape and packing material. Be sure to check inside and all around the printer.
Unpack
Unpack
Roll paper
holders
Printer
Paper support
adapter
Paper support
Uncurling sheet
Printer Basics
book
Ink cartridges
Printer
Software
CD-ROM
Page 2
2
2
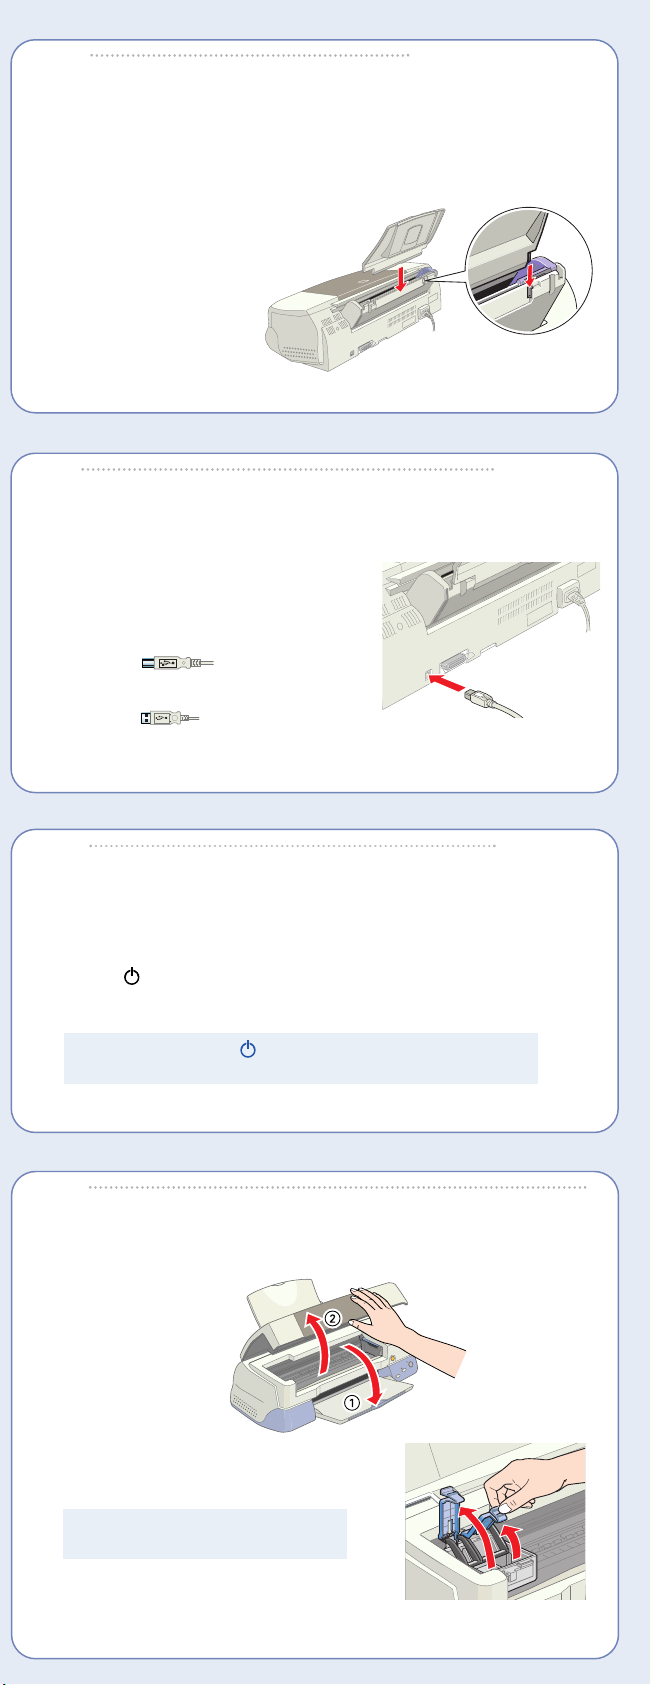
Insert the paper support into the slots on
the back of the printer. (Don’t place it
in the paper feeder.)
Put On the
Put On the
Paper Support
Paper Support
3
3
1 Shut down your computer before attaching
2 Connect the square end of the
3 Connect the flat end of the cable to
4
4
1 Plug the printer into a grounded electrical outlet.
2 Press the power button to turn on the printer.
Connect the Printer
Connect the Printer
the cable.
Leave the computer turned off until instructed
to turn it on in section 7.
USB cable to your printer’s USB port.
any open USB port on your computer.
Turn On the Printer
Turn On the Printer
Don’t turn on your computer yet.
CAUTION: Always use the power button to turn the printer on or off.
Never use an external switch, such as a power strip switch or wall switch.
5
5
1 Lower the output tray
2 Lift up the two ink cartridge clamps.
Install the Ink Cartridges
Install the Ink Cartridges
and open the cover.
NOTE: You must install both ink cartridges,
or the printer won’t work.
Page 3

3 Unwrap the ink cartridges that came with your printer and remove the yellow tape.
WARNING: Keep cartridges out of the reach of children.
Black ink cartridge Color ink cartridge
4 Tilt each cartridge toward you as you lower it. Make sure the tabs rest on the hooks.
Don’t place the cartridge tabs
Hooks
5 Lower the clamps so they snap shut.
Tabs
Make sure the tabs are
positioned above the hooks
under the hooks; you may damage
the clamp when you close it
6 Press the yellow ink replacement button and close the printer cover.
Ink replacement
button
Ink charging takes about two minutes. You will see the power light flash and hear the
printer make noise. Don’t turn off the printer during this process or you’ll waste ink.
CAUTION: Never turn off the printer when the power light is flashing,
unless the printer hasn’t moved or made any noise for more than 5 minutes.
6
6
1 Load paper against the right side of the feeder, then slide the left edge guide up against it.
Put in Paper
Put in Paper
4 x 6 inch paper
2 Pull out the output tray extensions.
Don’t load
paper above
this arrow
letter size paper
Output tray
extensions
Page 4

7
7
Install the Printer
Install the Printer
Software
Software
Windows
1 Make sure your printer is connected and turned off. Then turn on your computer and wait
2 Press the power button to turn on your printer.
3 Insert the printer software CD-ROM in your CD-ROM
4 When you see the Software License Agreement,
5 Click Install Printer Driver and wait while the printer
6 At the end of the driver installation, click OK.
7 Follow the on-screen instructions to install the
8 Click Install GretagMacbeth Software to try the
9 Select Install Reference Guide to install the
®
for Windows to start up.
If you see a New Hardware screen, click Cancel.
or DVD drive.
read it and click Agree.
software is installed.
NOTE: If you see a screen about turning on the
printer, make sure the printer is connected and
turned on and wait for the computer to detect
the printer port.
ICC Color Profiles. Click Finish when done.
program and install it if desired. When you finish,
click Back.
printer manual on your desktop.
10 Select Share Photos Online at Epson PhotoCenter, then click Add Icon to place a link to
the web site on your desktop.
11 Click Exit. Register your printer with Epson
keep it in case you need to reinstall any software later.
Macintosh
1 Make sure your printer is connected and turned on. Then turn on your Macintosh.
2 Insert your printer software CD-ROM in your CD-ROM or DVD drive.
3 Double-click the Epson icon in the window that opens.
4 Read the License Agreement and click Agree.
5 Click Install Printer Driver and follow the
on-screen instructions. (You may need
to enter your administrator password.)
6 Click Install GretagMacbeth Software to try the
program and install it if desired. When you finish,
click Back.
7 Select Install Reference Guide to install the
printer manual on your desktop.
®
®
as instructed. Remove the CD-ROM and
8 Select Share Photos Online at Epson PhotoCenter,
then click Add Icon to place a link to the web site on
your desktop.
9 Click Exit. Register your printer with Epson as instructed. Remove the CD-ROM and keep it
in case you need to reinstall any software later.
10 Now add the printer to the Printer Setup Utility or Print Center as described in the
next section.
Page 5

Add the Printer to the Printer Setup Utility or Print Center
1 Open the Applications folder, then open the Utilities folder and select Printer Setup
Utility or Print Center.
2 Click Add.
3 In OS X 10.4, select Stylus Photo 1280 and
click More Printers.
4 Select EPSON USB at the top of the screen and
Stylus Photo 1280 in the Product list.
5 Select All in the Page Seutp menu.
6 Click Add.
7 Close Printer Setup Utility or Print Center and the
Utilites folder.
8
8
Now you’re ready to print. For instructions, see:
• Your Printer Basics book
Learn about loading paper, printing, maintaining your printer,
solving problems, and contacting Epson.
• Your on-screen Reference Guide
Click the Reference Guide icon on your desktop
to view additional information about your printer.
Print a Photo
Print a Photo
Page 6

Buying Ink and Paper
Buying Ink and Paper
You can purchase geniune Epson ink and paper from an authorized Epson reseller. To
find the nearest reseller, please call 800-GO-EPSON (800-463-7766). To purchase online,
visit www.epsonstore.com (U.S. sales only). In Canada, please call (800) 463-7766 for
reseller referral.
Here are the ink cartridges for your printer:
T007201
Black ink cartridge
Here are three of many Epson papers designed to work with your printer:
Borderless Premium Glossy Photo Paper
Water-resistant, photographic-weight paper featuring Epson’s
BorderFree
photos in a matter of minutes.
Semigloss Scrapbook Photo Paper
Ideal for printing photos with a satin finish. Acid free and
buffered, these pages will last up to 60 years when stored
in an album.
Matte Paper Heavyweight
Professional-looking, flat matte finish for printing photos and
graphics on a non-glossy surface. Perfect for digital fine art work.
®
technology. This paper lets you print frame-ready
T009201
Color ink cartridge
Getting Help
Getting Help
Epson provides technical assistance 24 hours a day through the electronic support services
and automated telephone services listed below.
World Wide Web
From the Internet, you can reach Epson support at http://support.epson.com.
At this site, you can download drivers and other files, look at product documentation,
access troubleshooting information, and receive technical advice through e-mail.
Automated Telephone Services
A variety of automated help services are available 24 hours a day, seven days a week.
To use these services, you must have a touch tone telephone and call (800) 922-8911.
Use the Epson SoundAdviceSMExpress Code 68000 to quickly select your printer
in SoundAdvice.
To speak to a technical support representative, dial:
• U.S.: (562) 276-7296, 6 AM to 8 PM, Pacific Time, Monday through Friday
and 7 AM to 4 PM, Saturday.
• Canada: (905) 709-2567, 6 AM to 6 PM, Pacific Time, Monday through Friday.
Toll or long distance charges may apply. Before you call, please have the following
information ready:
• Product name (Epson Stylus Photo 1280)
• Product serial number (located on the back of the printer)
• Proof of purchase (such as a store receipt) and date of purchase
• Computer configuration and operating system version
• Description of the problem
Epson and Epson Stylus are registered trademarks of Seiko Epson Corporation. BorderFree is a registered trademark, and
Epson PhotoCenter, Epson Store, and SoundAdvice are service marks of Epson America, Inc.
General Notice: Other product names are for identification purposes only and may be trademarks of their respective owners.
Epson disclaims any and all rights in those marks.
© 2005 Epson America, Inc. 7/05
Printed in XXX XX.XX-XX XXX
CPD-15632R1
 Loading...