

Page 1

Table of Contents
Introduction .................................................... 1
Glossary .......................................................... 3
Configurations ................................................. 4
Description of Setup Keys ................................. 5
Zone Control .................................................... 6
Zone Setup ..................................................... 6
Zone Operation ................................................ 7
Scene Control .................................................. 8
Scene Setup .................................................... 9
Scene Operation .............................................. 11
Scene Controller Conf command ........................ 11
Additional Device Setup .................................. 12
Add/Delete Devices .......................................... 12
Assign Association for Two Devices ..................... 13
Definition of Association groups ......................... 15
Change Device Configuration ................................ 15
Add A Simple AV Device .................................... 16
Advanced Z-Wave Network Setups .................. 17
Copying All Network and Device Information to A
Secondary Controller ........................................ 17
Copying Network Information to A Secondary
Controller ........................................................ 18
Transferring All Network and Device Information
to A New Primary Controller (Primary shift) ......... 19
Transferring Only Network Information to A New
Primary Controller (Primary shift) ....................... 20
Replicating All Network and Device Information
from A Primary Controller to your HSK-100Z
(aka “Learning Mode”) ...................................... 21
Listening Mode ................................................. 22
Resetting Your Network..................................... 23
AUDIO/VIDEO SETUP AND OPERATION .......... 24
Description of Audio/Video Control Keys .............. 25
AV Equipment Selection by Entering Device Code . 27
AV Equipment Selection by Searching through
the Library ...................................................... 28
Page 2

Learning IR Commands ..................................... 30
Operating the HSK-100Z for AV Equipment ......... 31
ADVANCED OPERATION FOR AV EQUIPMENT .. 33
Secondary Function .......................................... 33
IR Boost Mode ................................................. 33
Restore Factory Settings ................................... 33
MAINTENANCE ................................................ 34
FREQUENTLY ASKED QUESTIONS .................... 34
Z-Wave Frequently Asked Questions ................... 34
AV Control Frequently Asked Questions ............... 35
TECHNICAL SPECIFICATIONS .......................... 36
WARRANTY...................................................... 37
FEDERAL COMMUNICATION COMMISSION
INTERFERENCE STATEMENT ............................ 37
WARNINGS ...................................................... 39
Page 3
1
HSK-100Z
Z-Wave AV Scenario Controller
Introduction
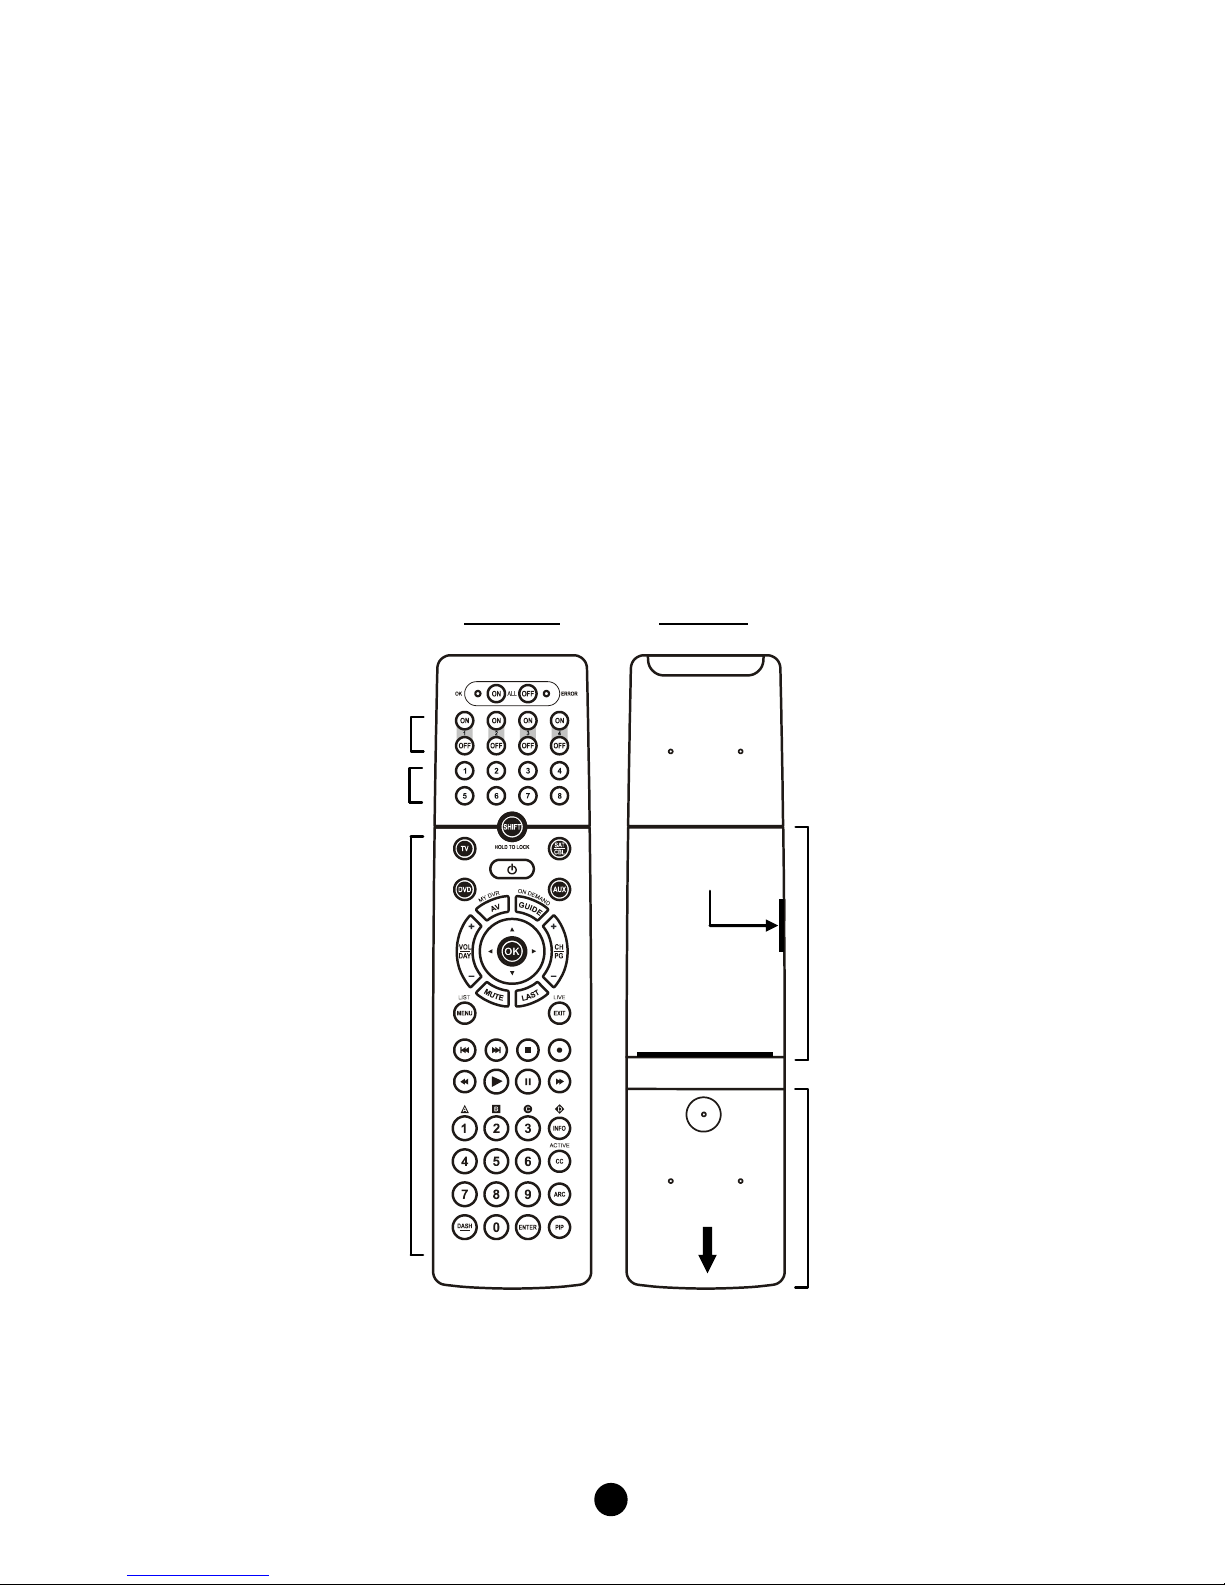
The HSK-100Z Z-Wave AV Scenario Controller is a universal AV remote
and also a Z-Wave controller (Figure 1). As a universal remote, the
HSK-100Z replaces all your AV remotes through its built-in IR code
database or IR code learning. As a Z-Wave controller, the HSK-100Z
works with Z-Wave enabled devices and controls their on/off or
up/down individually, as a Group, or via a pre-configured Scene.
Figure 1 Outlook of the HSK-100Z
Front View
Rear View
( open here )
( slide to open )
Configuration
compartment
Battery
compartment
Audio / video
Control keys
Z-Wave Scene
Control keys
Z-Wave Zone
Control keys
Page 4
2
Please note that all Z-Wave devices, light switches, dimmers, and
shutter switches made from various vendors are compatible with your
HSK-100Z as long as they carry the Z-Wave logo:
Before using the HSK-100Z, please install the batteries:
3xAAA batteries are required for operation.
Remove the battery cover on the back of your HSK-100Z.
Check the polarity of the batteries and the "+/-" marks inside the
battery compartment.
Insert the batteries.
Push the battery cover back in place.
CAUTION (battery safety)
Use new batteries of the recommended type and size only.
Never mix used and new batteries together.
To avoid chemical leaks, remove batteries from the HSK-100Z
if you do not intend to use the remote for an extended period
of time.
Dispose of used batteries properly; do not burn or bury them.
Page 5
3
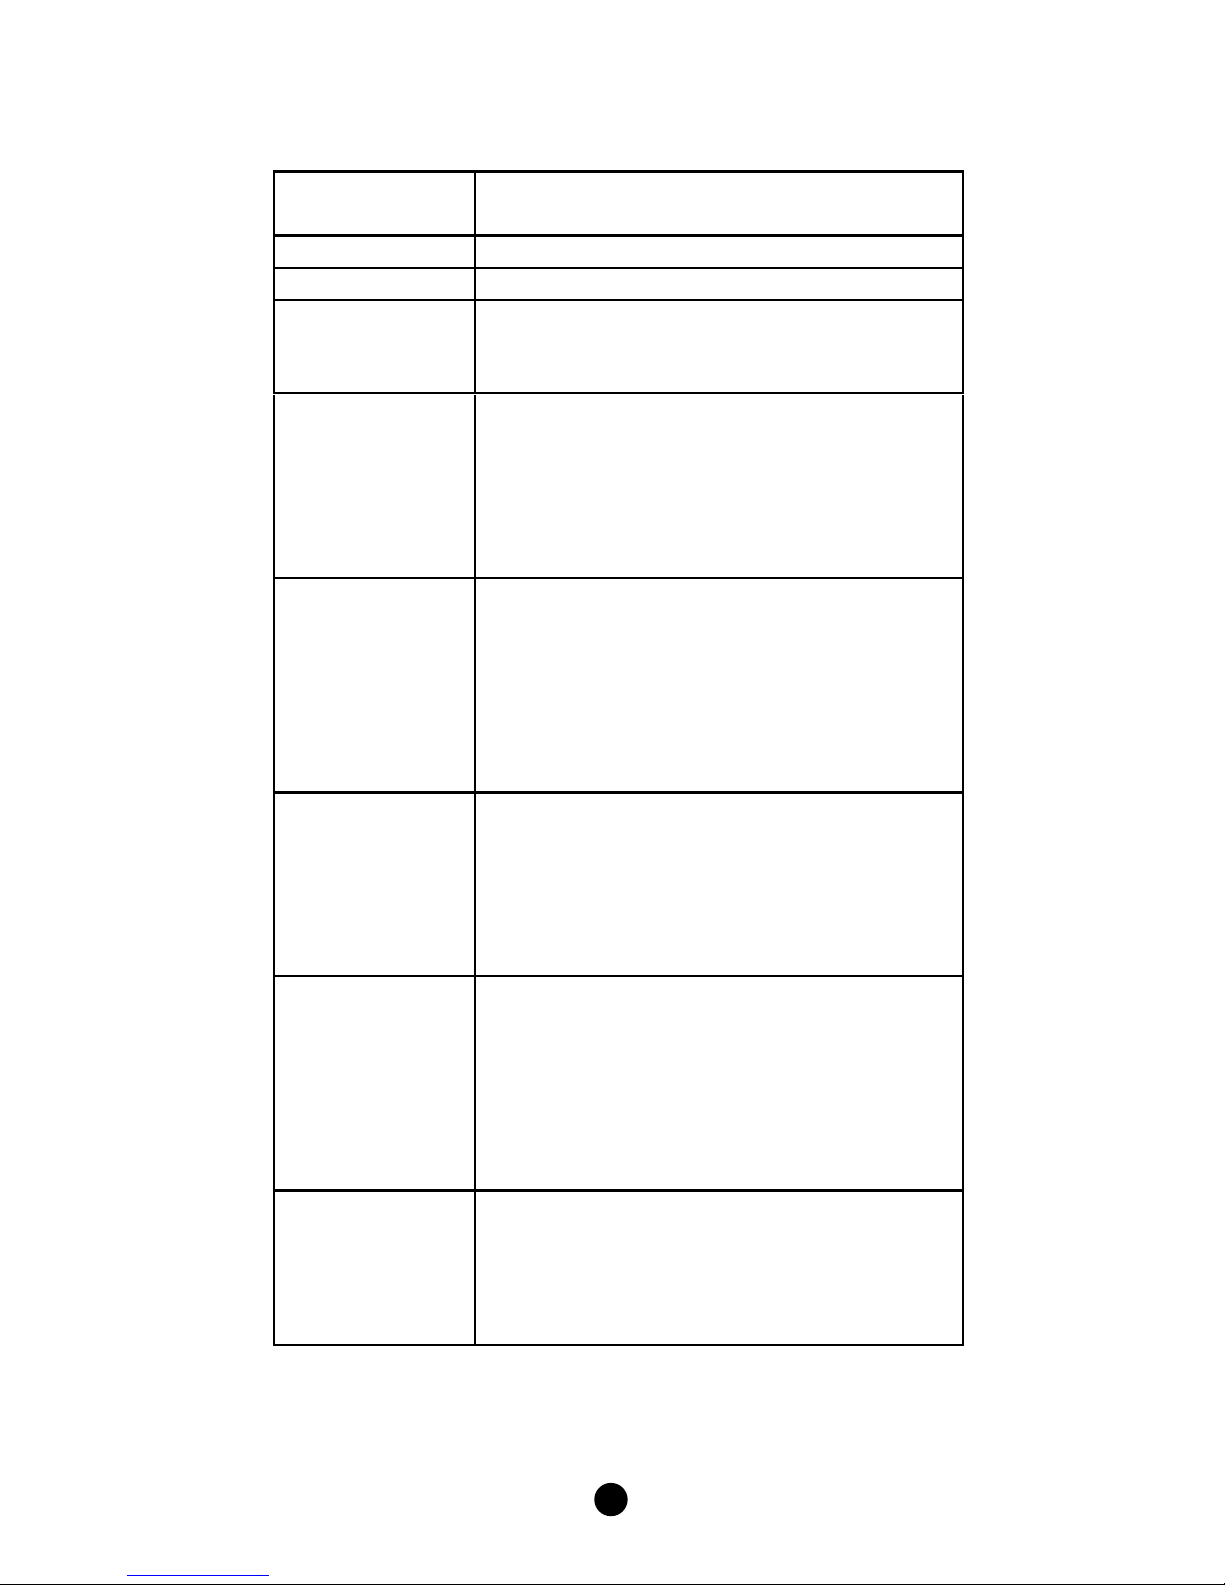
Glossary
Device or Node
Z-Wave enabled device that can be
controlled by the HSK-100Z.
Inclusion
Add a Z-Wave device to the network.
Exclusion
Delete a Z-Wave device from the network.
Remove
To take a device out of a group, scene or
association group while that device still
exists in the same Z-Wave network.
Z-Wave
Network
A collection of Z-Wave devices controlled by
primary and secondary controllers operating
on the same system. A Z-Wave network has
its own unique ID code so that controllers
not in the network cannot control the
system.
Primary
Controller
The first controller used to set up your
devices and network. Only the Primary
Controller can be used to include or delete
modules from a network. It is recommended
that you mark the primary controller for
each network for ease in modifying your
network.
Secondary
Controller
A controller containing network information
about other modules within the network
and is used for controlling devices.
Secondary controllers are created from the
Primary Controller and cannot include or
delete modules to the network.
Inclusion
Controller
A controller containing network information
about other modules within the network
and is used for controlling devices. Inclusion
controllers are created from the Primary
Controller in a SIS enabled Z-Wave network.
Inclusion Controller has the ability to add
and remove devices from the network.
Scene
A collection of Z-Wave devices configured to
turn to a specific level, setting, mode, or
perform an operation. Scenes are usually
activated by a controller, timed event, or
specific conditions.
Page 6

4
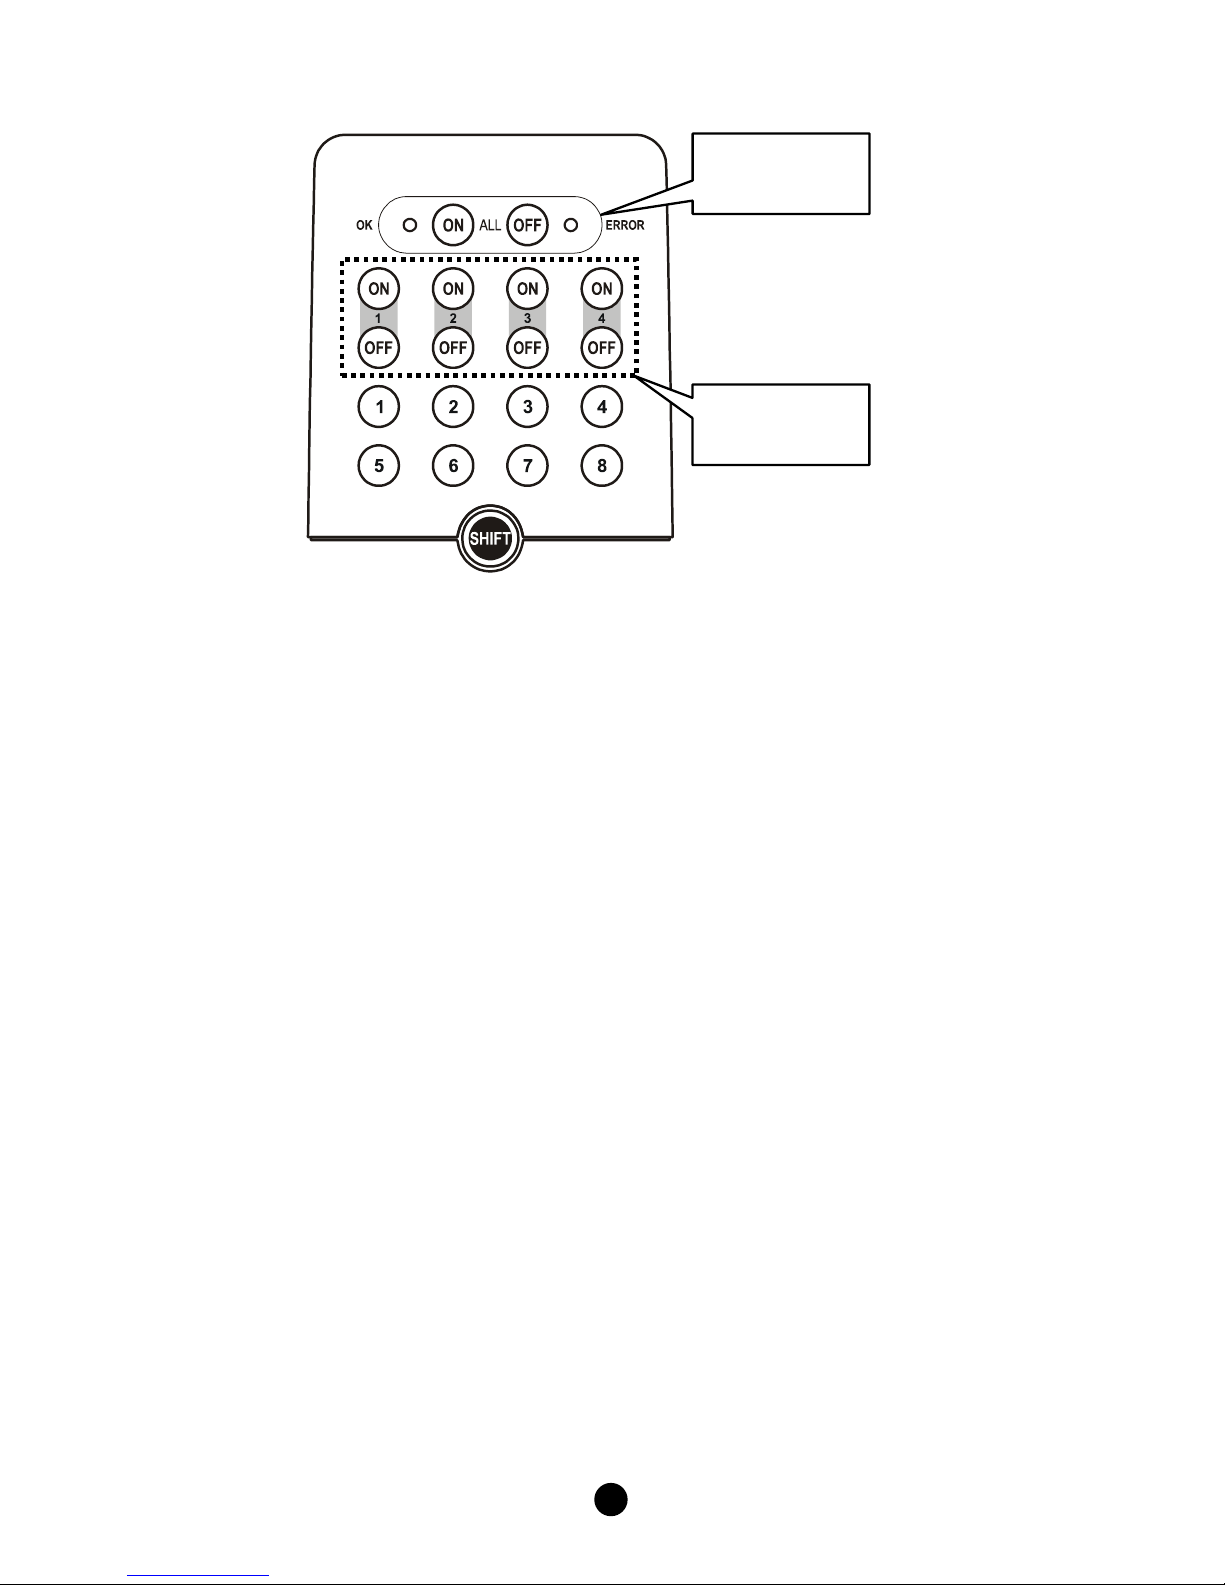
Configurations
Please open the configuration compartment then you can see the
HSK-100Z setup keys (Figure 2).
Figure 2 Setup Keys of the HSK-100Z
Status
LED A
Status
LED B
Page 7

5
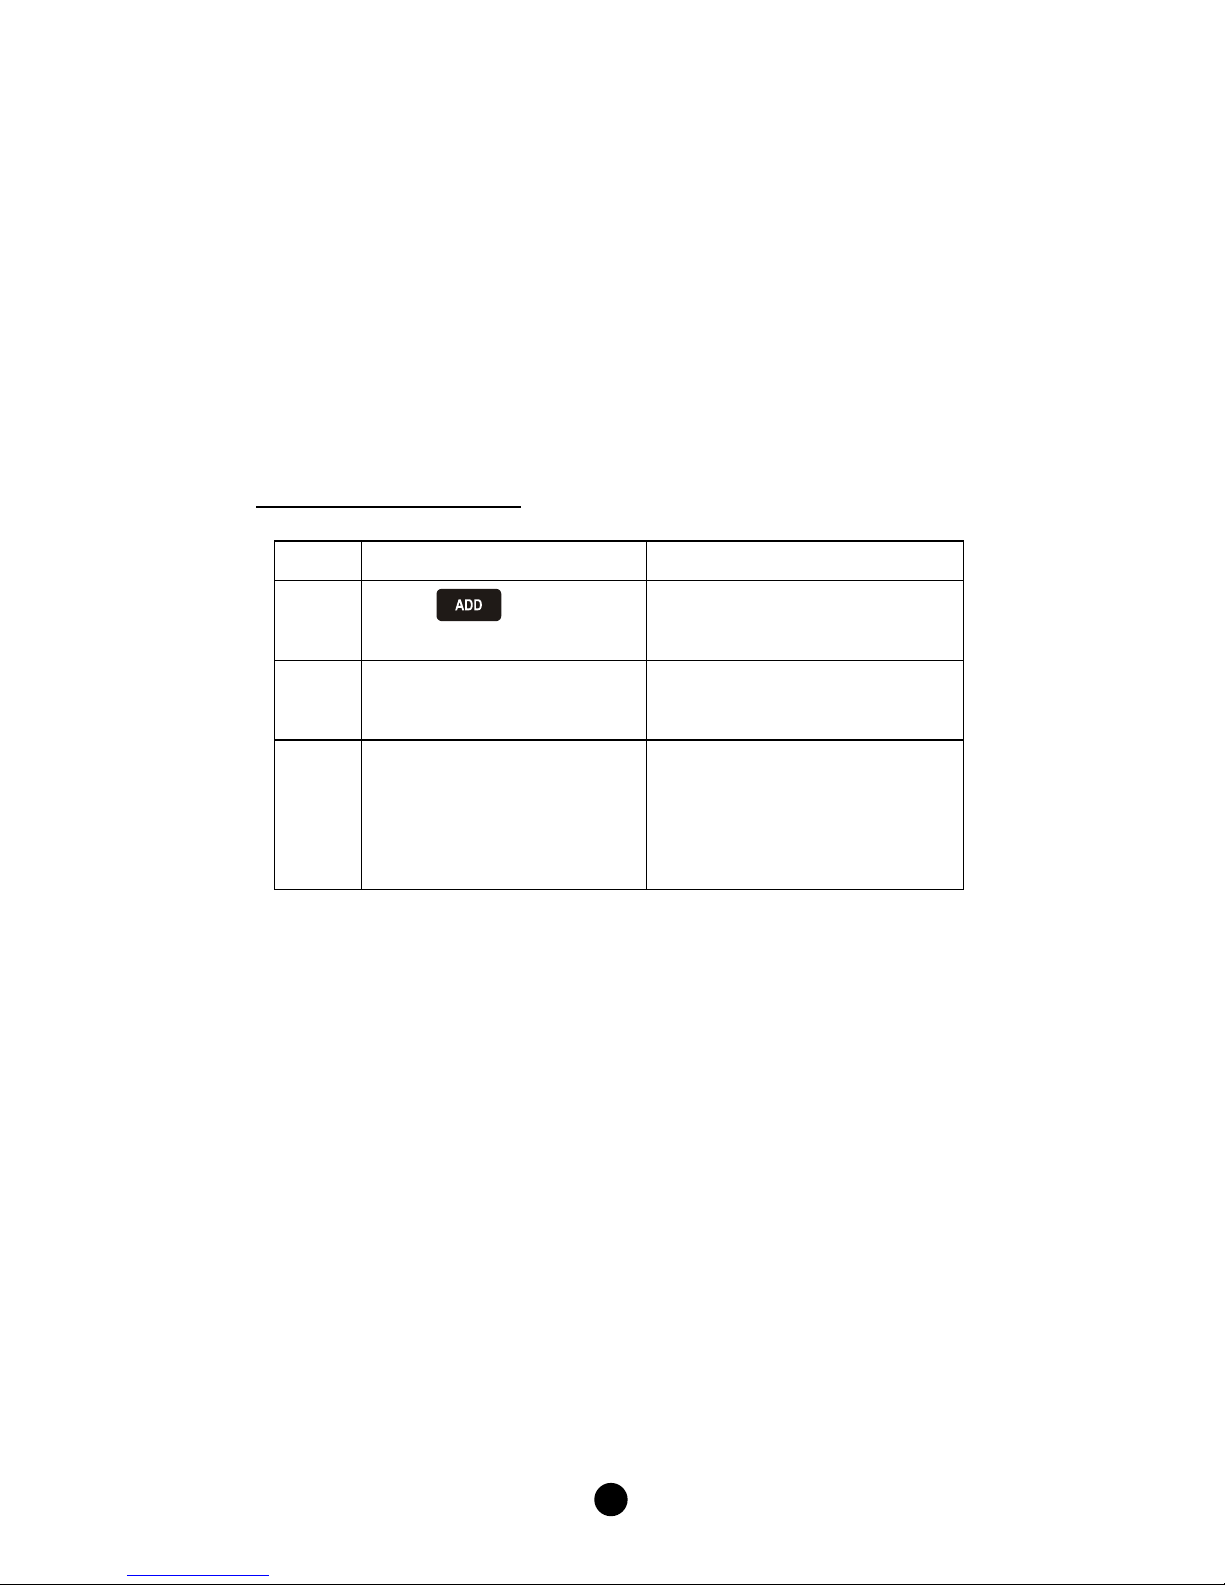
Description of Setup Keys
The ADD and REMOVE keys are used during basic
Zone Setup process. ADD key will perform two
functions:
Add a target device to Z-Wave network, also
known as INCLUSION;
Add the device to the assigned GROUP.
REMOVE key will only remove the target device
from its assigned group but will not exclude it from
the network.
This SHIFT key is used for accessing group numbers
9 to 16 while programming your devices.
These are your group numbers 1 through 8 and also
become group numbers 9 through 16 when
combined with the SHIFT key.
This CONFIGURATION key is used during the
ADVANCED SETUP process.
This ASSOCIATION key is used in conjunction with
ADD, CLEAR or REMOVE keys in order to assign
association groups.
This SCENE key is used in conjunction with ADD,
CLEAR or REMOVE keys in order to program scenes.
This DEVICE key is used in conjunction with ADD,
CLEAR or REMOVE keys in order to include or
exclude devices to the network.
This ADD key is used in the ADVANCED SETUP to:
Add a target device to the network (inclusion);
Add a target device to an association group;
Add a target device to a scene.
This CLEAR key is used in the ADVANCED SETUP to:
Delete a device from the network (exclusion);
Delete an association group;
Delete a scene.
This REMOVE key is used in the ADVANCED SETUP
to:
Remove a device from an association group;
Remove a device from a scene.
For basic on/off or dim up/down control, please refer to Zone Control
section. For more advanced setups including scene control, please
refer to Advanced Setup section.
Page 8
6
Zone Control
The HSK-100Z enables you to control single or multiple Z-Wave
devices with the press of a button. For example, you can group all
your bedroom lights together so that all of them will turn on with the
press of a button.
You can control up to 8 zones with your HSK-100Z. Each zone
supports up to 232 Z-Wave devices.
Zone Setup
Including Device to a Zone
Step
Setup Key
Setup LED Behavior
1
Press in Zone
Setup area
OK LED on
LED A blinks slowly
2
Select a zone group
number from 1 to 8
LED A off
LED B blinks slowly
3
Press the program
button on the target
device
OK LED blinks once then
turns off
LED B off
Zone setup completed
Note: If you cannot add your Z-Wave device, this device might have
been included in another Z-Wave network. In this case, please delete
this device following the steps in the [Deleting a Device from the
Network] section then add this device again.
Page 9

7
Removing Device from a Zone
Step
Setup Key
Setup LED Behavior
1
Press in Zone
Setup area
OK LED on
LED A blinks slowly
2
Select a zone group
number from 1 to 8
LED A off
LED B blinks slowly
3
Press the program
button on the target
device
OK LED blinks once then
turns off
Device been removed
from the zone
successfully
Note: If the ERROR LED turns on or blinks, meaning the setup process
is failed. Please redo the process.
Zone Operation
After adding devices to your HSK-100Z using Zone Setup, you can turn
the device on/off or up/down via the corresponding zone control keys
in front (Figure3).
For on/off switches, press key to turn on the devices and
key to turn them off.
To operate dimmer switches and curtain motors, hold the key
to open the curtain or dim up the light. By holding the key
you can retract the curtain or dim down the light.
You can turn on all the devices in the network by pressing All On
key and turn them off via All Off key.
The green OK LED blinks when the operation is successful, and the
red ERROR LED blinks when it’s failed.
Page 10
8
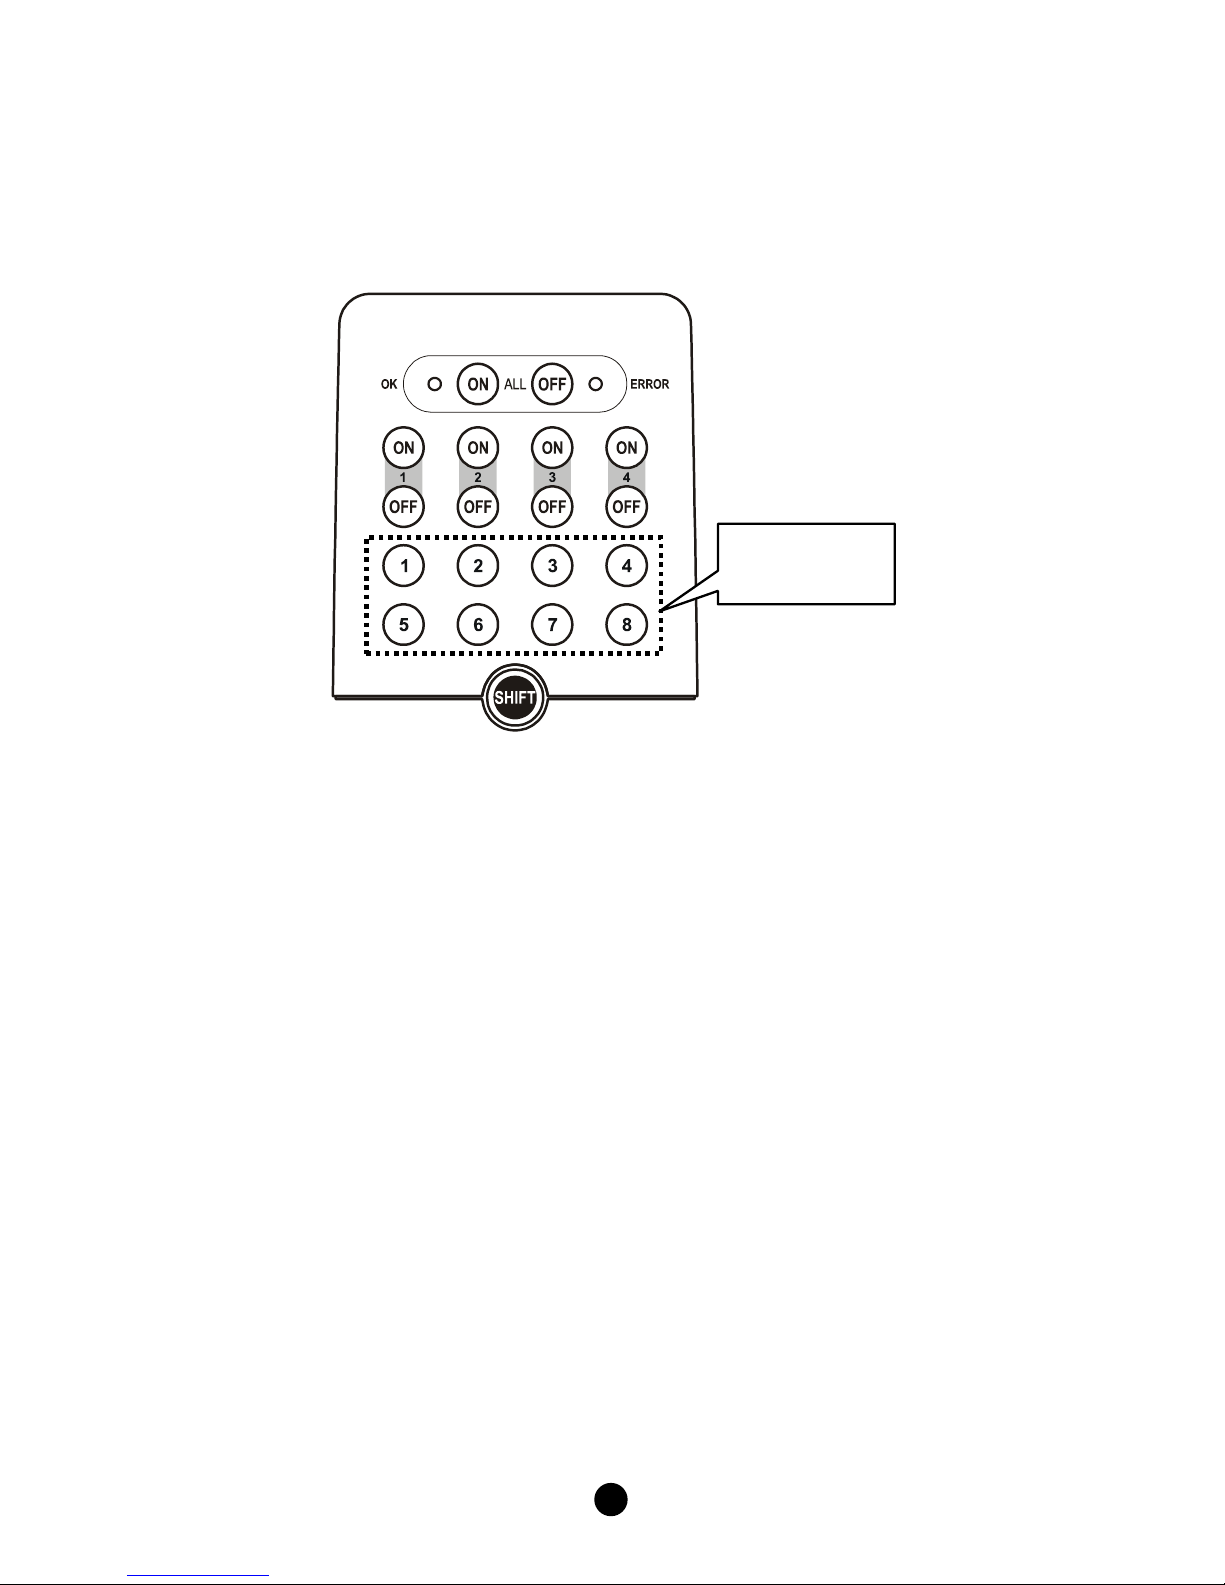
Figure 3 Zone Control Keys of the HSK-100Z
Scene Control
A Z-Wave Scene is a series of controlled events that work in unison for
a planned task or home ambience. For example, you can setup a scene
for “Watch DVD” where the scene button on the HSK-100Z could dim
the lights and turn on your TV, DVD Player, and AV Receiver. A scene
for “Arriving Home” could open the garage door, turn on the hall
lights and disarm the security system. Z-Wave scenes are powerful
tools for home control because they let simple user actions control
multiple events.
The HSK-100Z allows you to setup 16 scenes. Each scene can involve
up to 232 Z-Wave devices.
Zone
Control Keys
All On/Off
Keys
Page 11
9
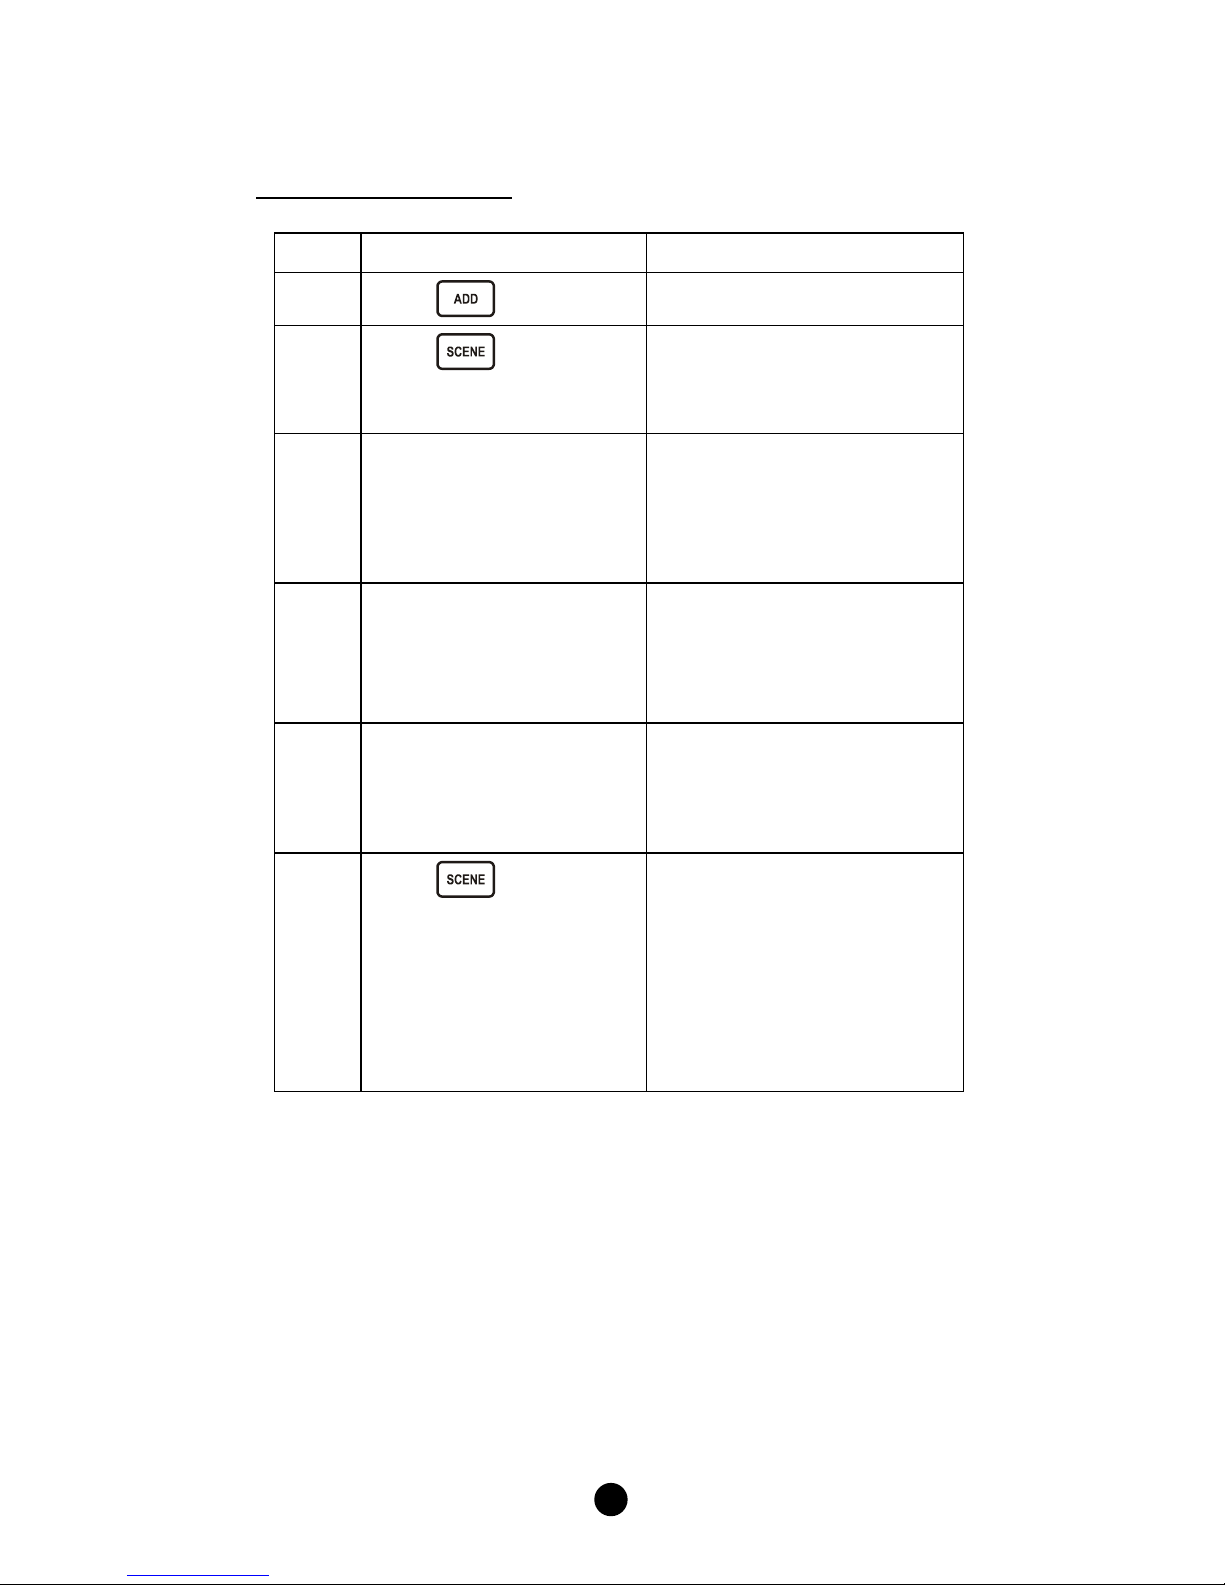
Scene Setup
Adding Device to A Scene
Step
Setup Key
Setup LED Behavior
1
Press
The OK light turns on
2
Press
OK LED blinks once and
stays on
LED A blinks slowly
3
Select a scene number
from 1 to 16 (1-8 or
SHIFT 1-8)
OK LED blinks once and
stays on
LED A off
LED B blinks slowly
4
Press the program
button on the target
device
OK LED blinks once and
stays on
LED B keep blinking
slowly
5
Adjust the target device
on/off or dim level with
its program button, to
the desired status
6
Press
OK LED blinks once then
turns off
LED B off
The current status of the
device will be learned and
saved to a scene
successfully.
Page 12
10
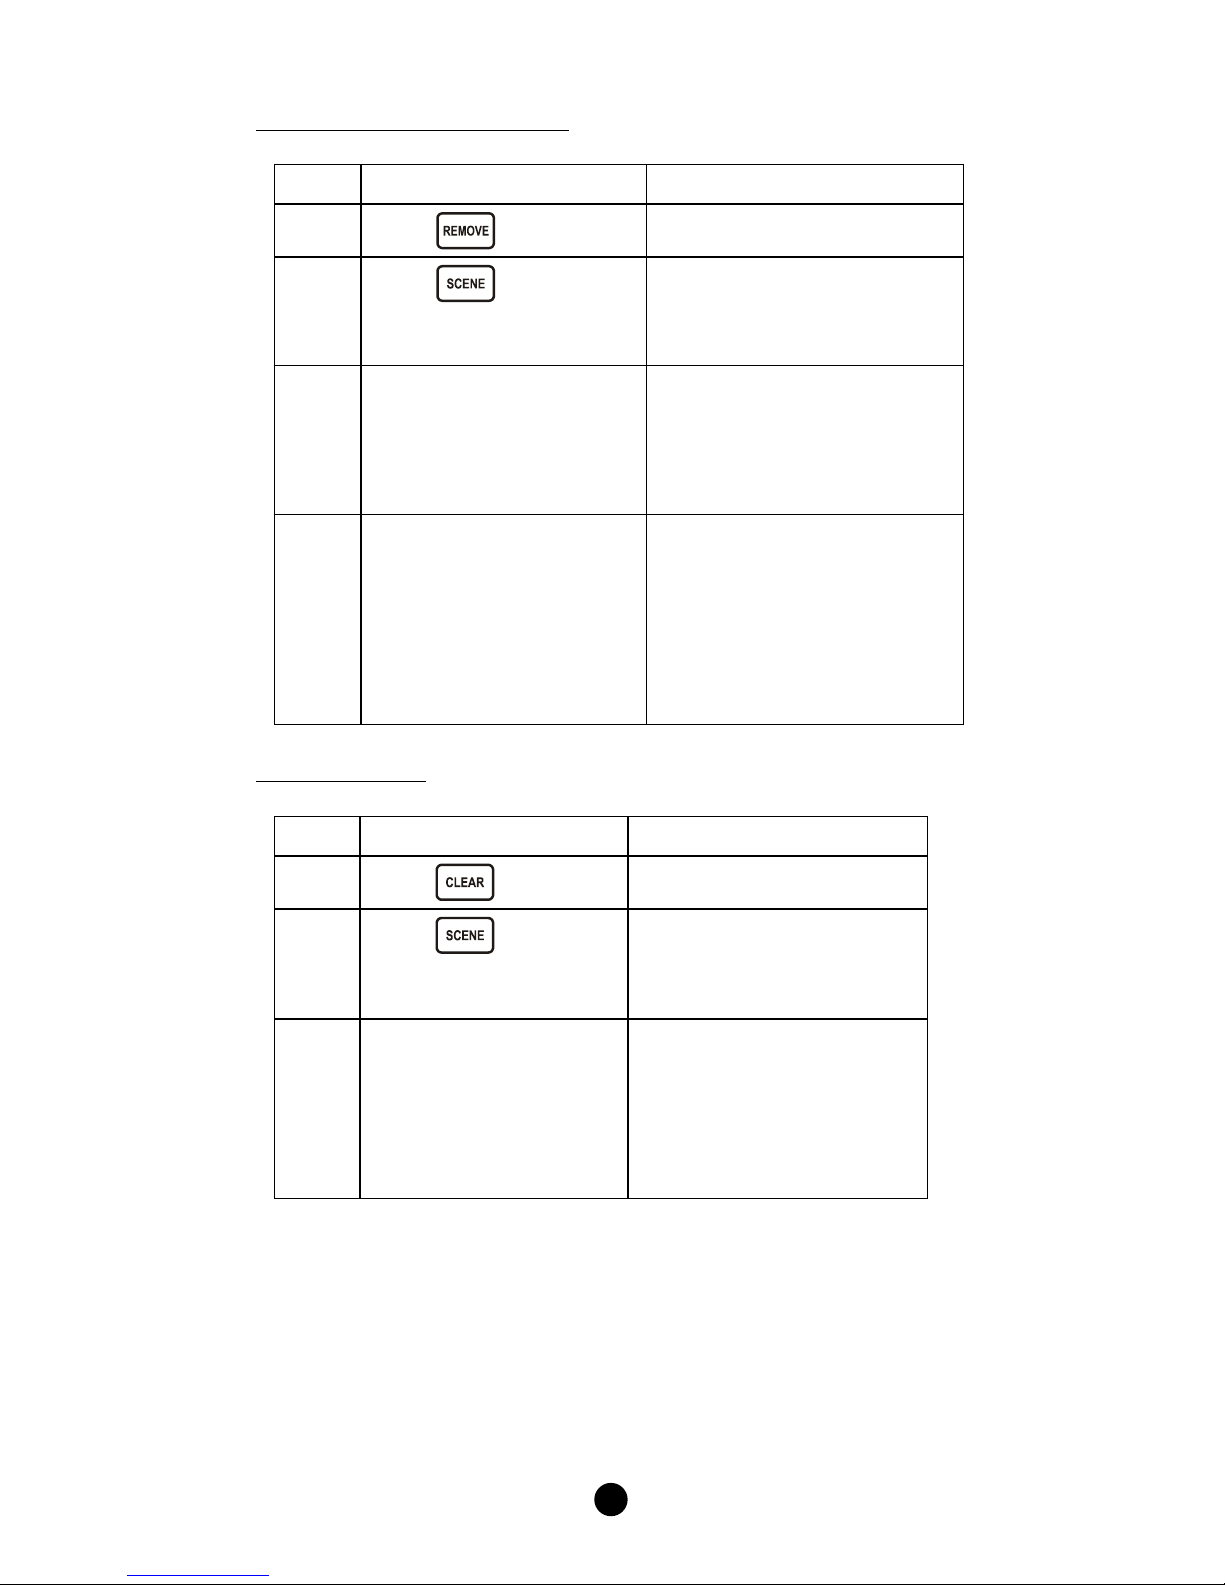
Removing Device from A Scene
Step
Setup Key
Setup LED Behavior
1
Press
The OK light turns on
2
Press
OK LED blinks once and
stays on
LED A blinks slowly
3
Select a scene number
from 1 to 16 (1-8 or
SHIFT 1-8)
OK LED blinks once and
stays on
LED A off
LED B blinks slowly
4
Press the program
button on the target
device
the OK light stays on
then flashes once and
turns off
LED B off
Device removed from
the scene successfully
Deleting A Scene
Step
Setup Key
Setup LED Behavior
1
Press
The OK light turns on
2
Press
OK LED blinks once and
stays on
LED A blinks slowly
3
Select a scene number
from 1 to 16 (1-8 or
SHIFT 1-8)
OK LED blinks once
then turns off
LED A off
Scene deleted from the
scene successfully
Note: If the ERROR LED turns on or blinks, meaning the setup process
is failed. Please redo the process.
Page 13
11
Scene Operation
After the scene setup is done, you can trigger the desired scene via
scene control keys in front panel of the HSK-100Z.
Figure 4 Scene Control Keys of the HSK-100Z
The green OK LED blinks when the operation is successful, and the red
ERROR LED blinks when it’s failed.
Scene Controller Conf command
This section is for advanced user. Please ignore it if you don’t
understand. It won’t affect any normal usage before you send
commands described in this section.
The command class COMMAND_CLASS_ASSOCIATION can be used to
add a node to the scene button. The scene button 1 will send to
devices in the group #9, the scene button 2 will send to group #10 and
so on. The “ON” buttons 1-4 send SCENE_ACTIVATION_SET to devices
in the group #1-4. “SHIFT + ON 1-4” send to devices in the group #5-8.
However, please notice that the scene created by this command is
different from that created by the HSK-100 keypad. If we use this
command to create a scene, the existing scenes created by the HSK100Z will be deleted automatically. In addition, if we use HSK-100Z to
assign a device to a scene button, the setting created by the
ASSOCIATION_SET will be dropped as well.
Scene
Control Keys
Page 14

12
In addition, we can use the
COMMAND_CLASS_SCENE_CONTROLLER_CONF to change the scene
ID for each button. However, if you have added a device to a scene
button before, this command will not take effect.
Please remove the scene setting by using one of
Clear scene in the HSK-100Z.
Use ASSOCIATION_SET to add a device. In this case, all scenes
created by the HSK-100Z will be cleared automatically.
Additional Device Setups
Add/Delete Devices
Adding Device to the Network
Step
Setup Key
Setup LED Behavior
1
Press
( in Advanced Setup)
The OK light turns on
2
Press
OK LED blinks once and
stays on
LED B blinks slowly
3
Press the program
button on the target
device
OK LED blinks once then
turns off
LED B off
Device inclusion
completed
Deleting Device from the Network
Step
Setup Key
Setup LED Behavior
1
Press
The OK light turns on
2
Press
OK LED blinks once and
stays on
LED B blinks slowly
3
Press the program
button on the target
device
OK LED blinks once then
turns off
LED B off
Device exclusion
completed
Page 15

13
Assign Association for Two Devices
The HSK-100Z can be used to assign one device to automatically
interact directly with another device. For example you can assign a
door sensor (primary node) to turn on the light switch (secondary
node) when the door is opened.
Assigning Association
Step
Setup Key
Setup LED Behavior
1
Press
( in Advanced Setup)
The OK light turns on
2
Press
OK LED blinks once and
stays on
LED A blinks slowly
3
Select a group number
from 1 to 16 (1-8 or
SHIFT 1-8)
OK LED blinks once and
stays on
LED A off
LED B blinks slowly
4
Press the program
button on the secondary
node
OK LED blinks once and
stays on
LED B blinks once and
keep blinking slowly
5
Press the program
button on the primary
device
LED B turns off
OK LED blinks once then
turns off
Assigning association
completed
Page 16

14
Removing Device from Association
Step
Setup Key
Setup LED Behavior
1
Press
The OK light turns on
2
Press
OK LED blinks once and
stays on
LED A blinks slowly
3
Select a group number
from 1 to 16 (1-8 or
SHIFT 1-8)
OK LED blinks once and
stays on
LED A off
LED B blinks slowly
4
Press the program
button on the secondary
node
OK LED blinks once and
stays on
LED B blinks once and
keep blinking slowly
5
Press the program
button on the primary
device
LED B turns off
OK LED blinks once then
turns off
Device removed from
the association group
successfully
Deleting an Association Group
Step
Setup Key
Setup LED Behavior
1
Press
The OK light turns on
2
Press
OK LED blinks once and
stays on
LED A blinks slowly
3
Select a group number
from 1 to 16 (1-8 or
SHIFT 1-8)
OK LED blinks once and
stays on
LED A off
LED B blinks slowly
4
Press the program
button on the primary
device
LED B turns off
OK LED blinks once then
turns off
Deleting the association
group successfully
Page 17

15
Definition of Association groups
The HSK-100Z supports 24 association groups. Each group can support
up to 232 devices.
Group
Function
1-8
Zone Control #1-#8
9-24
Scene Control #1-#16
Change Device Configuration
This function is used to modify the parameter of the Z-Wave device
via the configuration command class. This is possible only when the
HSK-100Z is primary controller or inclusion controller.
Step
Setup Key
Setup LED Behavior
1
Press
OK LED stays on
2
Press 0-9 key in the front
OK LED blinks once and
stays on for each key
press
3
Press enter
OK LED stays on then
flashes once and turns
off
LED B off
The input number is the
parameter number.
4
Press 0-9 key
OK LED blinks once and
stays on for each key
press
5
Press enter
OK LED blinks once and
then keeps blinking.
The input number is the
configuration value.
6
Press the program
button in the device.
OK LED blinks and turns
off.
The configuration value
is saved to the device.
Page 18

16
Add A Simple AV Device
The HSK-100Z supports the Simple AV Control command class to
control Z-Wave Simple AV devices. It can support up to 8 channels
with different Z-Wave AV devices. To change to different AV channels,
press each corresponding AV device mode key.
Channel
Mode Key
1
TV 2 DVD
3
SAT/CBL
4
AUX
5
Shift+TV
6
Shift+DVD
7
Shift+SAT/CBL
8
Shift+AUX
To add a Z-Wave Simple AV device to HSK-100Z, please follow these
steps:
Step
Setup Key
Setup LED Behavior
1
Press in Zone
Setup area
OK LED on
LED A blinks slowly
2
Press Shift
OK LED blink
3
Select a zone group
number from 1 to 8
LED A off
LED B blinks slowly
This will select device AV
channel 1-8.
4
Press the program button
on the target device
OK LED blinks for a while and
then turns off.
If a channel is associated with Z-wave Simple AV devices, the local IR
transmission of that channel will be disabled. Instead, the Simple AV
commands will be sent to the associated Z-wave devices.
To recover to local IR emitter, please remove the Z-Wave AV device
using the following steps:
Step
Setup Key
Setup LED Behavior
1
Press
in Zone Setup area
OK LED on
LED A blinks slowly
2
Press Shift
OK LED blink
3
Select a zone group
number from 1 to 8. Press
1 here.
LED A off
LED B blinks slowly
This will select device AV
channel 1-8.
4
Press the program button
on the target device
OK LED blinks for a while and
then turns off.
Page 19

17
Advanced Z-Wave Network Setups
Copying All Network and Device Information to A
Secondary Controller
You can add a secondary controller to your network and copy all of
your HSK-100’s network and device information to the secondary
controller by following the steps below.
Step
Setup Key
Setup LED Behavior
1
Press & hold
for 3 seconds
OK LED on
2
Place the two controller
close to each other
3
Type “8541” on the
setup number keypad
OK LED blinks once for
each number input
OK LED keeps blinking
after entering the 4-digit
4
Please make sure the
target controller is setup
to receive information.
(Refer to the target
controller user manual
for more information)
OK LED blinks once then
turns off
Replication completed
Note: If the replication is unsuccessful, the OK light turns off and the
error light will flash 6 times then turn off.
Page 20

18
Copying Network Information to A Secondary Controller
You can add a secondary controller to your network and copy all of
your primary controller’s network information to the secondary
controller by following the steps below.
Step
Setup Key
Setup LED Behavior
1
Press & hold
for 3 seconds
OK LED on
2
Place the two controller
close to each other
3
Type “8542” on the
setup number keypad
OK LED blinks once for
each number input
OK LED keeps blinking
after entering the 4-digit
4
Please make sure the
target controller is setup
to receive information.
(Refer to the target
controller user manual
for more information)
OK LED blinks once then
turns off
Replication completed
Page 21

19
Transferring All Network and Device Information to A
New Primary Controller (Primary Shift)
You can transfer all of your controller information to another remote
so that it will become the new primary remote. This is done by
following the steps below.
Step
Setup Key
Setup LED Behavior
1
Press & hold
for 3 seconds
OK LED on
2
Place the two controller
close to each other
3
Type “8361” on the
setup number keypad
OK LED blinks once for
each number input
OK LED keeps blinking
after entering the 4-digit
4
Please make sure the
target controller is setup
to receive information.
(Refer to the target
controller user manual
for more information)
OK LED blinks once then
turns off
Replication completed
Page 22

20
Transferring Only Network Information to A New
Primary Controller (Primary Shift)
You can just transfer network information to another remote so that it
will become the new primary remote. This is done by following the
steps below.
Step
Setup Key
Setup LED Behavior
1
Press & hold
for 3 seconds
OK LED on
2
Place the two controller
close to each other
3
Type “8362” on the
setup number keypad
OK LED blinks once for
each number input
OK LED keeps blinking
after entering the 4-digit
4
Please make sure the
target controller is setup
to receive information.
(Refer to the target
controller user manual
for more information)
OK LED blinks once then
turns off
Replication completed
Page 23

21
Replicating All Network and Device Information from A
Primary Controller to Your HSK-100Z (aka “Learning
Mode”)
Your HSK-100Z can:
Copy the settings from another Z-Wave controller
Be included into existing Z-Wave network and become a new
primary or secondary remote
Be excluded from the Z-Wave network
by following the steps below.
Step
Setup Key
Setup LED Behavior
1
Press & hold
for 3 seconds
OK LED on
2
Place the two controller
close to each other
3
Type “8363” on the
setup number keypad
OK LED blinks once for
each number input
4
Please make sure the
primary controller is
setup to send
information. (Refer to
the primary controller
user manual for more
information)
OK LED blinking then
turns off
Replication completed
Note: If the replication is unsuccessful, the OK light turns off and the
error light will flash 6 times then turn off.
Page 24

22
Listening Mode
There are multiple usages by entering this mode:
Version command class: To get application software version, the
Z-Wave protocol version and the supported Z-Wave command
version of this controller.
Manufacturer command class: To get the manufacture ID,
product type ID and the product ID of this controller.
Scene configuration command class: Home gateway can bundle a
scene ID to a group ID using this command.
Association command class: To create and maintain associations
in this remote.
Step
Setup Key
Setup LED Behavior
1
Press & hold
for 3 seconds
OK LED on
2
Place the two controller
close to each other
3
Type “8364” on the
setup number keypad
OK LED blinks once for
each number input
OK LED keeps blinking
after entering the 4-digit
4
Listening mode will
automatically exit after 1
minute of inactivity
OK LED blinks once then
turns off when exiting
listening mode
Replication completed
Note: The mode must not be exited during communication process with
another controller. Please wait for entire communication process to be
completed.
Page 25

23
Resetting Your Network
You can reset your HSK-100Z to clear all Z-Wave network and device
information by the following steps:
Step
Setup Key
Setup LED Behavior
1
Press & hold
for 3 seconds
OK LED on
2
Place the two controller
close to each other
3
Type “8761” on the
setup number keypad
OK LED blinks once for
each number input
OK LED on after entering
the 4-digit
4
OK LED blinking then
turns off
Reset completed
Note 1: If the reset is unsuccessful, the OK light turns off and the error
light will flash 6 times then turn off.
Note 2: After reset the remote, each device should individually perform
in the section on “Delete device from the network” and “Add device to
the network”
Page 26

24
AUDIO/VIDEO SETUP AND OPERATION
In addition to Z-Wave device and scene control, your HSK-100Z is also
a universal remote which enables you to control all your audio/video
systems around your house.
Figure 5 Audio/Video Control Keys of the HSK-100Z
Note: The audio/video control of the HSK-100Z can be done via
infrared or Z-Wave. HSK-200Z Z-Wave IR Control Station is needed
for Z-Wave based AV control. Please refer to the user manual of the
HSK-200Z for details. Other AV equipments that support the Z-Wave
Simple AV Control Command Class can be used as the IR extender as
well.
Audio/Video
Control Keys
Page 27

25
Description of Audio/Video Control Keys
The HSK-100Z operates up to 8 AV equipments which are accessed by
using the SHIFT key and TV or DVD and so on.
Note: The SHIFT key is used when operating both the AV and Z-Wave
equipments
Press once to access secondary function
for the next button. Press and hold to
activate shift lock for permanent use of
secondary functions. Press shift again to
release shift lock
Selects TV mode
Selects satellite, cable receiver or similar
devices such as DVB-T, IPTV, etc.
On/off key for selected AV equipment
Selects DVD player or other optical disc
players such as Blue Ray, PVR, or CD
player
Selects Auxiliary mode normally assigned
to audio equipment
Scrolls through AV modes while in TV
mode; also my DVR when in shift mode
Selects guide while in SAT/CBL mode; also
on demand when in shift mode
Changes volume level of the device; also
in shift mode changes the day when
operating your SAT/CBL device
Changes the channels when in TV, DVR, or
SAT/CBL mode; also in shift mode changes
the page number while operating your
SAT/CBL device
Mute the audio
Return to the previous channel
Page 28

26
4-way directional pad for navigating onscreen menu and OK button for selecting
menu options
Menu, also list when in shift mode
Exit, also Live for SAT/CBL mode when in
shift mode
Previous track
Next track
Stop
Record
Rewind
Play
Pause
Fast forward
Numeric number 1; also in shift mode can
be either triangle/A or yellow button for
TV or SAT/CBL menus
Numeric number 2; also in shift mode can
be either square/B or blue button for TV
or SAT/CBL menus
Numeric number 3; also in shift mode can
be either circle/C or red button for TV or
SAT/CBL menus
Numeric numbers 4,5,6,7,8,9,0
Page 29

27
Info while in SAT/CBL or TV mode; also in
shift mode will be diamond/D or green
button for TV or SAT/CBL menus
Closed caption for teletext; also Active
when in shift mode
Aspect ratio control
Activates picture in picture mode
Dash for HDTV
AV Equipment Selection by Entering Device Code
You may setup the HSK-100Z by following the code entering
instructions:
1. Referring to the DEVICE CODE LIST, look up the 4-digit Device
Code which corresponds to the brand of your A/V equipment. If
there is more than one Device Code listed under your brand, start
from the first code.
2. Press the desired Device Mode Key (e.g. TV).
3. Hold down "CH +" and "VOL -" on the HSK-100Z simultaneously
for 3 seconds until the green indicator lights up.
4. Use the number keys "0" - "9" to enter your 4-digit Device Code.
The indicator flashes twice then goes out.
Turn on your device (e.g. TV), then try the function keys on the HSK100Z. If your device (e.g. TV) responds to your activated function
correctly, you have entered the right Device Code. Otherwise, repeat
the above steps with the next available Device Codes until your device
(e.g. TV) responds to your activated function, and most keys work
correctly.
Simply repeat the above procedures to enter the Device Codes for
your SAT/CBL, DVD or AUX. (Remember to press the correct
Device Mode Key in step 2 above)
Note: If the red indicator flashes 6 times in step 4, a wrong Device
Code has been entered. You are required to repeat step 2 to 4 again.
Page 30

28
Suggestions:
If you cannot find a correct Device Code for your equipment, refer
to AV Equipment Selection by Searching through the Library.
For future reference you are recommended to take note of your
Devices codes in the space provided in the manual after setting
up the HSK-100Z correctly.
AV Equipment Selection by Searching through the
Library
If you cannot identify a correct Device Code for your equipment from
the Device Code list, you may search for the code in the library:-
1. Turn on your device manually (e.g. TV).
2. Press a desired Device Mode Key (e.g. TV).
3. Hold down "CH +" and "VOL -" on the HSK-100Z simultaneously
for 3 seconds until the indicator lights up.
4. Enter a corresponding Magic Search Code from the following
table. The green indicator flashes twice then goes out.
Device to be searched from
code library
Magic Search
Code
TV
0001
VCR/DVR/LASER DISC
0002
SAT
0003
CABLE / DVR+CABLE COMBOS
0004
DVD/DVD-R/RW/DVR+DVD
COMBOS
0005
AUDIO
0006
CD
0007
HOME AUTOMATION
0008
(e.g. press "TV" device mode key, then press "CH +" and "VOL -", and
enter TV Magic Search Code 0001.)
5. Press the same desired device mode key again as in step 2 above.
(e.g. TV)
6. Hold down "CH +" & "VOL -" simultaneously for 3 seconds until
the green indicator lights up, and your HSK-100Z is ready to start
searching.
7. Aim the HSK-100Z at your device (e.g. TV), press the key
slowly and repeatedly until the device has been turned off. Once
your device has been turned off, immediately press Device Mode
Key (e.g. TV) to lock in code and the indicator should go out.
Page 31

29
* Simply repeat the above setup procedures to search for the
Device Code for SAT/CBL, DVD or AUX. (Remember to press the
correct Device Mode Key and correct Magic Search Code in step
2-5 above)
IMPORTANT
If the power on/off function of your device is not infra-red
controlled, you need to follow steps 2 to 6 above and start
searching.
Press and another function key alternately until your
device responds to the expected function, then press the
same Device Mode Key (e.g. TV) to lock in the code.
e.g. Press & alternately, or ;
Press & alternately.
Notes:
TV, VCR, DVD, CTV and other device codes can be searched
for and locked into any device modes. Simply press the
corresponding device mode key in step 2 & 5 and enter an
appropriate Magic Search Code for your DVD, CTV and other
devices.
Each time you press the , the HSK-100Z will skip to the
next code and send out a POWER signal trying to turn off your
device.
If you fail to stop pressing when your device has been
turned off, turn your device on again immediately. Before the
green indicator goes out, press "Mute” on the HSK-100Z to
skip backward. Repeat step 7 above and lock in the code.
If the red indicator flashes six times after your pressing of
key, you are already at the last code of the library.
Press "CH +" and "VOL -" to resume the HSK-100Z and repeat
the above procedures carefully to search again.
Page 32

30
Learning IR Commands
Your HSK-100Z is equipped with learning capability. This allows you to
"teach" your HSK-100Z certain functions from your original equipment
remote. Please follow the steps below.
1 Press the desired device mode key (e.g. TV).
2 Hold down "CH+" and "VOL-" on the HSK-100Z simultaneously for
3 seconds until the green indicator lights up.
3 Enter the learning code "0", "0", "0", "0". The green indicator light
will flash once then stay lit. The HSK-100Z is now ready to learn.
4 Place the HSK-100Z and your device remote on a flat surface,
aimed at each other 1-3 inches apart.
5 Press a desired key once and release on the HSK-100Z which you
want to learn the command. The green indicator will flash once
then stay lit.
6 Press and keep holding the key on your original equipment
remote which you want to learn for a few seconds.
7 When the green indicator light flashes twice and stays lit
continuously, the command has been learned successfully and
you can release the key on your original equipment remote. If the
red indicator light flashes six times, it shows an error in the
learning process. Adjust the position of both remotes and repeat
from step 5 again.
8 Repeat from step 5 to learn other key functions, or press the
same device mode key on step 1 (e.g.TV) to terminate the
learning mode, the green indicator light will flash twice and then
go out immediately.
Page 33

31
Notes:
On step 5 if no key is selected for more that 8 seconds, the red
indicator light will flash six times and the learning mode will exit
automatically.
On step 6, if no other remote signal is received for more than 8
seconds, the red indicator light flashes six times and stays lit
continuously, you need to select a desired key again for learning
as in step 5 on your HSK-100Z.
Each function key will hold one command only, a new command to
be learned will automatically erase and replace the previous one.
If the green indicator light flashes six times during the
transference of signals, the maximum of 100 commands memory
bank is full, press the same device key again to resume normal
operation.
All device mode keys, as well as the SHIFT keys cannot be used for
learning functions.
Operating the HSK-100Z for AV Equipment
Normal Operation
Once you have setup the HSK-100Z for your AV equipment, it works
like your original remote control. To operate, just aim it at your
equipment, press an appropriate device mode key and invoke the
desired function by pressing a corresponding key on the HSK-100Z.
The green indicator turns on during signal transmission and as
Confirmation of key touch.
Punch Through
Punch Through Channel
Punch through channel allows you to operate channel up and down
without having to switch the device modes repeatedly even when
your HSK-100Z is in other operating modes.
To activate the punch through channel setting:
1. Press desired Device Mode Key (e.g. TV).
2. Press and Hold "CH+" key.
3. While still holding the “CH+” key press desired Device Mode Key
(e.g. SAT).
4. Release "CH+” and the green indicator flashes once, now by
pressing the “CH+” key while in TV mode the remote will act as if
pressing the “CH+” key in SAT mode
To deactivate the punch through channel setting:
1. Press desired Device Mode Key (e.g. TV).
2. Press and Hold "CH -" key.
Page 34

32
3. While still holding the “CH-” key press desired Device Mode Key
(e.g. SAT).
4. Release "CH -" (the green indicator flashes twice if the setting is
deactivated).
Punch Through Volume
Punch through volume allows you to operate volume up and down
without having to switch the device modes repeatedly even when
your HSK-100Z is in other operating modes.
To activate the punch through volume setting:
1. Press desired Device Mode Key (e.g. TV).
2. Press and Hold "VOL+" key.
3. While still holding the “VOL+” key press desired Device Mode Key
(e.g. SAT).
4. Release "VOL+” and the green indicator flashes once, now by
pressing the “VOL+” key while in TV mode the remote will act as if
pressing the “VOL+” key in SAT mode
To deactivate the punch through volume setting:
1. Press desired Device Mode Key (e.g. TV).
2. Press and Hold "VOL -" key.
3. While still holding the “VOL-” key press desired Device Mode Key
(e.g. SAT).
4. Release "VOL -" (the green indicator flashes twice if the setting is
deactivated).
Macro Power
Macro Power allows you to turn two of your A/V equipment on/off
simultaneously.
To activate the macro power setting:
1. Press desired Device Mode Key (e.g. TV).
2. Press and Hold key.
3. Press desired Device Mode Key (e.g. SAT).
4. Release (the green indicator flashes once if the setting is
activated).
To deactivate the macro power setting:
1. Press desired Device Mode Key (e.g. TV).
2. Press and Hold key.
3. Press desired Device Mode Key (e.g. SAT).
Page 35

33
4. Release (the green indicator flashes twice if the setting is
deactivated).
ADVANCED OPERATION FOR AV EQUIPMENT
Secondary Function
1 Some keys are able to access 2 functions through the use of the
shift key.
2 To use a buttons secondary function, press the shift key then the
next button pressed will perform its secondary function after
which the buttons will return to their primary functions.
3 You can access the shift lock mode by pressing and holding the
shift key for 3 seconds after which all buttons pressed will use
their secondary function. Pressing the shift key again will end the
shift lock mode.
IR Boost Mode
By activating the boost switch in the battery compartment your HSK100Z will send out 3 IR beams instead of 1 IR beam. Effectively tripling
the power of your IR signal
Note: The range of your IR beam along with the angles will be
increased but will also consume more power from the batteries.
Restore Factory Settings
1 Hold down "CH+" and "VOL-" keys on the remote simultaneously
for 3 seconds until you the indicator lights up and stays lit.
2 Enter the reset code "9", "9", "9", "9". The indicator light goes out
immediately. All settings are now restored to the factory default
setting.
Page 36

34
MAINTENANCE
1 Do not expose your HSK-100Z to dust, strong sunlight, humidity,
high temperatures or mechanical shocks.
2 Do not use old and new batteries together as old batteries tend to
leak.
3 Do not use corrosive or abrasive cleansers on your HSK-100Z.
4 Keep the unit dust free by wiping it with a soft, dry cloth.
5 Do not disassemble your HSK-100Z, it contains no user-
serviceable parts.
FREQUENTLY ASKED QUESTIONS
Z-Wave Frequently Asked Questions
Q Why won’t my HSK-100Z work with the Z-Wave devices I
purchased from another country?
A Due to different countries regulations Z-Wave products from
different regions are set to different frequencies. Before
purchasing new devices make sure you have checked to see that
the device is compatible in your region.
Q Do I need an electrician to install Z-Wave products in my house?
A Installation can be simple. In some cases all you need to do is
attach the Z-Wave plug in module into the wall socket. For more
advanced in-wall modules you may need this done by a qualified
technician.
Q What kinds of devices can I control with Z-Wave technology?
A While the Z-Wave device range is ever growing you can currently
control your lighting, window shades and electric appliance which
requires on/off switch with the HSK-100Z. In addition advanced
models will be able to control additional devices such as
thermostats.
Q What can the HSK-100Z do for me?
A The HSK-100Z can control a combination of up to 232 different Z-
Wave devices in 8 zones or 16 scenes around your house while
also being a standard universal remote that can control up to 8
AV equipments. Your HSK-100Z truly turns your living room into
your whole houses control station.
Page 37

35
Q Why do I need a different module for outdoor lighting?
A The outdoor module is designed to withstand various weather
conditions including heat, rain and snow.
Q Can I use 2 or more HSK-100Z controllers in my house at one
time?
A You can use multiple HSK-100Z around your house by assigning
one remote to be the primary remote and have an additional
secondary controller.
Q If I lost my HSK-100Z will I also lose my settings?
A Yes and no, if you lose your primary HSK-100Z you will need to
add all the Z-Wave devices to your new primary remote again. If
you lose the secondary one you can replicate all the Z-Wave setup
information from your primary remote onto a new secondary
remote. However, audio visual settings will be lost and can not be
replicated such as TV and DVD settings.
Q Where can I keep up to date with the latest Z-Wave products?
A You can get the latest information about Z-Wave by visiting the
www.z-wave.com.
Q How do I know which product is compatible to my HSK-100Z
remote?
A You can check either the specifications in the manual of your
target device. All Z-Wave products also come with the Z-Wave
logo
Q Can the HSK-100Z also operate Zigbee products?
A The HSK-100Z is currently not compatible with any Zigbee product.
AV Control Frequently Asked Questions
Q. My HSK-100Z does not work at all!
A. Check your A/V device, if the device's main switch is turned off,
your HSK-100Z cannot operate your device.
A. Check whether your batteries are inserted properly and are in the
correct +/- position.
A. Check whether you have pressed the corresponding device mode
key for your device.
A. If the batteries are low, replace the batteries.
Page 38

36
Q. If several Device Codes are listed under the brand of my A/V
device, how can I select the correct Device Code?
A. To seek the correct Device Code for your A/V device, test the
codes one by one until most keys work properly.
Q. My A/V equipment responds only to some of the commands.
A. You have set a code for which only some commands work
properly but some do not. Try other codes until most keys work
properly. You can also use the learning function to learn
additional keys.
TECHNICAL SPECIFICATIONS
RF Frequency
908.42MHz (US)
IR Frequency
Up to 455KHz
IR Learning
Max 100 commands
Max. Range
up to 100ft indoor line of sight, in
unobstructed environment
Power
AAA x 3pcs
Temperature
operation: 0~40℃
storage: -20~60℃
Humidity
10~85%, non-condensing
Dimension (LxWxH)
240mm x 60mm x 29mm
Weight (ex. Batteries)
150g
Certifications
CE, FCC, RoHS, Z-Wave
Page 39

37
WARRANTY
Limited One (1) Year Warranty
This warranty does not cover or apply to:
(a) damage to the product due to misuse, mishandling, and abuse, (b)
products not used in accordance with manufacturer's instructions or
recommendations, (c) product not assembled or installed according to
manufacturer's instructions, (d) normal wear and tear, (e) wearing of
the cover do to improper installation of cover and goods (f) damage to
the contents of the shelter, (g) permits required due to zoning issues,
(h) damage that has occurred during shipping, (i) acts of God. In
addition consequential damage and incidental damages, such as
damage to persons or property are not coverable under this warranty,
and you should refer to your homeowner's insurance policy as with
any other outside structure. Note: Some states do not allow the
exclusion or limitation of certain damages, and in those cases these
limitations do not apply.
FEDERAL COMMUNICATION COMMISSION
INTERFERENCE STATEMENT
This equipment has been tested and found to comply with the limits
for a Class B digital device, pursuant to Part 15 of the FCC Rules.
These limits are designed to provide reasonable protection against
harmful interference in a residential installation. This equipment
generates, uses and can radiate radio frequency energy and, if not
installed and used in accordance with the instructions, may cause
harmful interference to radio communications. However, there is no
guarantee that interference will not occur in a particular installation. If
this equipment does cause harmful interference to radio or television
reception, which can be determined by turning the equipment off and
on, the user is encouraged to try to correct the interference by one of
the following measures:
Reorient or relocate the receiving antenna.
Increase the separation between the equipment and receiver.
Page 40

38
Connect the equipment into an outlet on a circuit different from
that to which the receiver is connected.
Consult the dealer or an experienced radio/TV technician for help.
FCC Conditions
This device complies with Part 15 of the FCC Rules. Operation is
subject to the following two conditions:
(1) This device may not cause harmful interference.
(2) This device must accept any interference received, including
interference that may cause undesired operation.
FCC Caution: Any changes or modifications not expressly approved by
the party responsible for compliance could void the user's authority to
operate this equipment.
This transmitter must not be co-located or operating in conjunction
with any other antenna or transmitter.
Page 41

39
WARNINGS
Do not dispose of electrical appliances as unsorted municipal
waste, use separate collection facilities.
Contact your local government for information regarding the
collection systems available.
If electrical appliances are disposed of in landfills or dumps,
hazardous substances can leak into the groundwater and get
into the food chain, damaging your health and well-being.
When replacing old appliances with new once, the retailer is legally
obligated to take back your old appliance for disposal at least for free
of charge.
Changes or modifications not expressly approved by the party
responsible for compliance could void the user's authority to operate
the equipment.
RISK OF FIRE
RISK OF ELECTRICAL SHOCK
RISK OF BURNS
Exercise extreme caution when using Z-Wave devices to control
appliances. Operation of the Z-Wave device may be in a different
room then the controlled appliances, also an unintentional activation
may occur if the wrong button on the remote is pressed. Z-Wave
devices may automatically be powered on due to timed event
programming. Depending upon the appliance, these unattended or
unintentional operations could possible result in a hazardous
condition. For these reasons we recommend the following:
1. Assign Z-Wave controlled appliances to group number 5 to
8 on the HSK-100Z as the likelihood of unintentionally
turning on of the appliance will be reduced significantly
because the “SHIFT” button is also needed to activate
groups 5 through 8.
2. Do not include Z-Wave devices controlling appliances in
your group and scene settings.
3. Do not include Z-Wave devices to control electric heaters
or other appliances which may present a hazardous
condition due to an unattended or unintentional or
automatic power on control.
 Loading...