

Page 1

Page.1 of 17 7/24/2014
2014-07-24
Thank you for purchasing
AvaControl-100
Model: AvaControl-100
Please read this manual carefully
before installing.
AvaControl-100 User Manual
Page 2

Page.2 of 17 7/24/2014
Content
AvaControl-100 User Manual ................................................................................................... 1
A. AvaControl-100 Z-Wave Controller Gateway ............................................................. 3
I. Product specifications ................................................................................................... 3
II. Items list ....................................................................................................................... 4
III. AvaContorl-100 Initial Setup ................................................................................... 4
1. AvaContorl-100 Hardware Installation .................................................................... 4
2. Webpage sections - to establish a connection .......................................................... 6
B. Z-Wave device network settings .................................................................................. 7
I. Add the Z-Wave device ................................................................................................ 7
II. Remove the Z-Wave device ......................................................................................... 8
C. AvaContorl-100 Explain the functionality ................................................................... 9
1. Create room - To distinguish Z-Wave devices ............................................................. 9
I. Scene Setting - Control Z-Wave devices .................................................................... 10
II. Set schedule - timed Z-Wave devices work arrangements ......................................... 12
III. Use the report-Z-Wave devices use electricity ...................................................... 12
D. Appendix - mobile & tablet sections .......................................................................... 13
I. Establish a connection - Mobile Register ................................................................... 13
II. Add / Remove The Device ......................................................................................... 14
III. Room ...................................................................................................................... 16
IV. Scene ...................................................................................................................... 16
V. Trigger Set .................................................................................................................. 17
VI. Schedule settings, generate reports and alarm history ........................................... 17
Page 3

Page.3 of 17 7/24/2014
A. AvaControl-100 Z-Wave Controller Gateway
Congratulations on your purchase! Your
AvaControl-100 is ready to put you in
control of your home. Please take a few
minutes to read through this guide to
familiarize yourself with the steps
required to set up your Z-Wave network
and your AvaControl-100.
I. Product specifications
AvaControl–100 Home Automation Control Server Specification table
Module Name:
AvaControl-100
Hardware
CPU:
CKVIUM ECONA CNS3410, 600MHZ
RAM:
128MB
Flash ROM:
32MB
OS:
Linux 2.6.31
Power:
12 Vdc Adapter, 2A
USB Port:
USB Host 2.0 x2
Ethernet port:
RJ-45 10/100Mb , support 1 WAN + 4 LAN
outer casing:
Plastic
Soft-Wave
Protocol
Z-Wave
HA Functions:
Senses Control
Lighting Control
Door Lock Control
Sensor Trigger Even
Schedule setting
Support mobile phone Push Notification
Support Devices Place Location
User account Management (admin and normal User)
Support Remote update software
Z-Wave Capacity
Support 100 Z-Wave notes
Z-Wave Control
Hardware
Z-Wave Control
Z-WAVE USB DONGLE(ZU1401US)
Page 4

Page.4 of 17 7/24/2014
II. Items list
Z-Wave Control
Z-WAVE USB DONGLE(ZU1401US)
USB adaptor
AC/DC adaptor
Product Image
III. AvaContorl-100 Initial Setup
After you’ve created your Z-Wave network, you’ll need to install your AvaContorl-100.
Follow these steps:
1. AvaContorl-100 Hardware Installation
step 1. Connect the Ethernet cable to your AvaContorl-100 and to a network port on
your internet router.
step 2. Connect the Z-Wave Dongle to USB adapter for the USB ports on your
AvaContorl-100.
step 3. Connect the AC power adapter to your AvaContorl-100 to begin the boot
process.
step 4. Check the panel earth icon will flash, and can be set.
Page 5

Page.5 of 17 7/24/2014
Step 1 Connect the Ethernet cable to WAN port
AvaContorl-100 had three platforms are available, including Web platform, Android
platform and iOS platform, and the specification by the Webpage sections shows, and
other mobile phone sections can also be turned to the appendix - mobile & tablet
sections reading operation.
Step 1 & 2 finish plan
Step 4 Flash can be used
Page 6

Page.6 of 17 7/24/2014
2. Webpage sections - to establish a connection
step 1. Enter the setup.myehome.my in the browser
step 2. To apply for a new account password
step 3. Enter the account number and password,
to access interface.
step 4. Since then logged into this account and password
Note: You can select Gateway to enter. You can set up a multi-up desk Gateway.
step 2. To apply
step 3. Login
step 4. Select Gateway into
Login User Interface
step 1. browser input
Page 7

Page.7 of 17 7/24/2014
B. Z-Wave device network settings
AvaContorl-100 mainly in the control and monitoring of the room, that requires
Z-Wave device to complete the task.
You need to add the Z-Wave devices to AvaContorl-100, that can be used to monitor
and control the functions of the device. Or has not used the device can be removed.
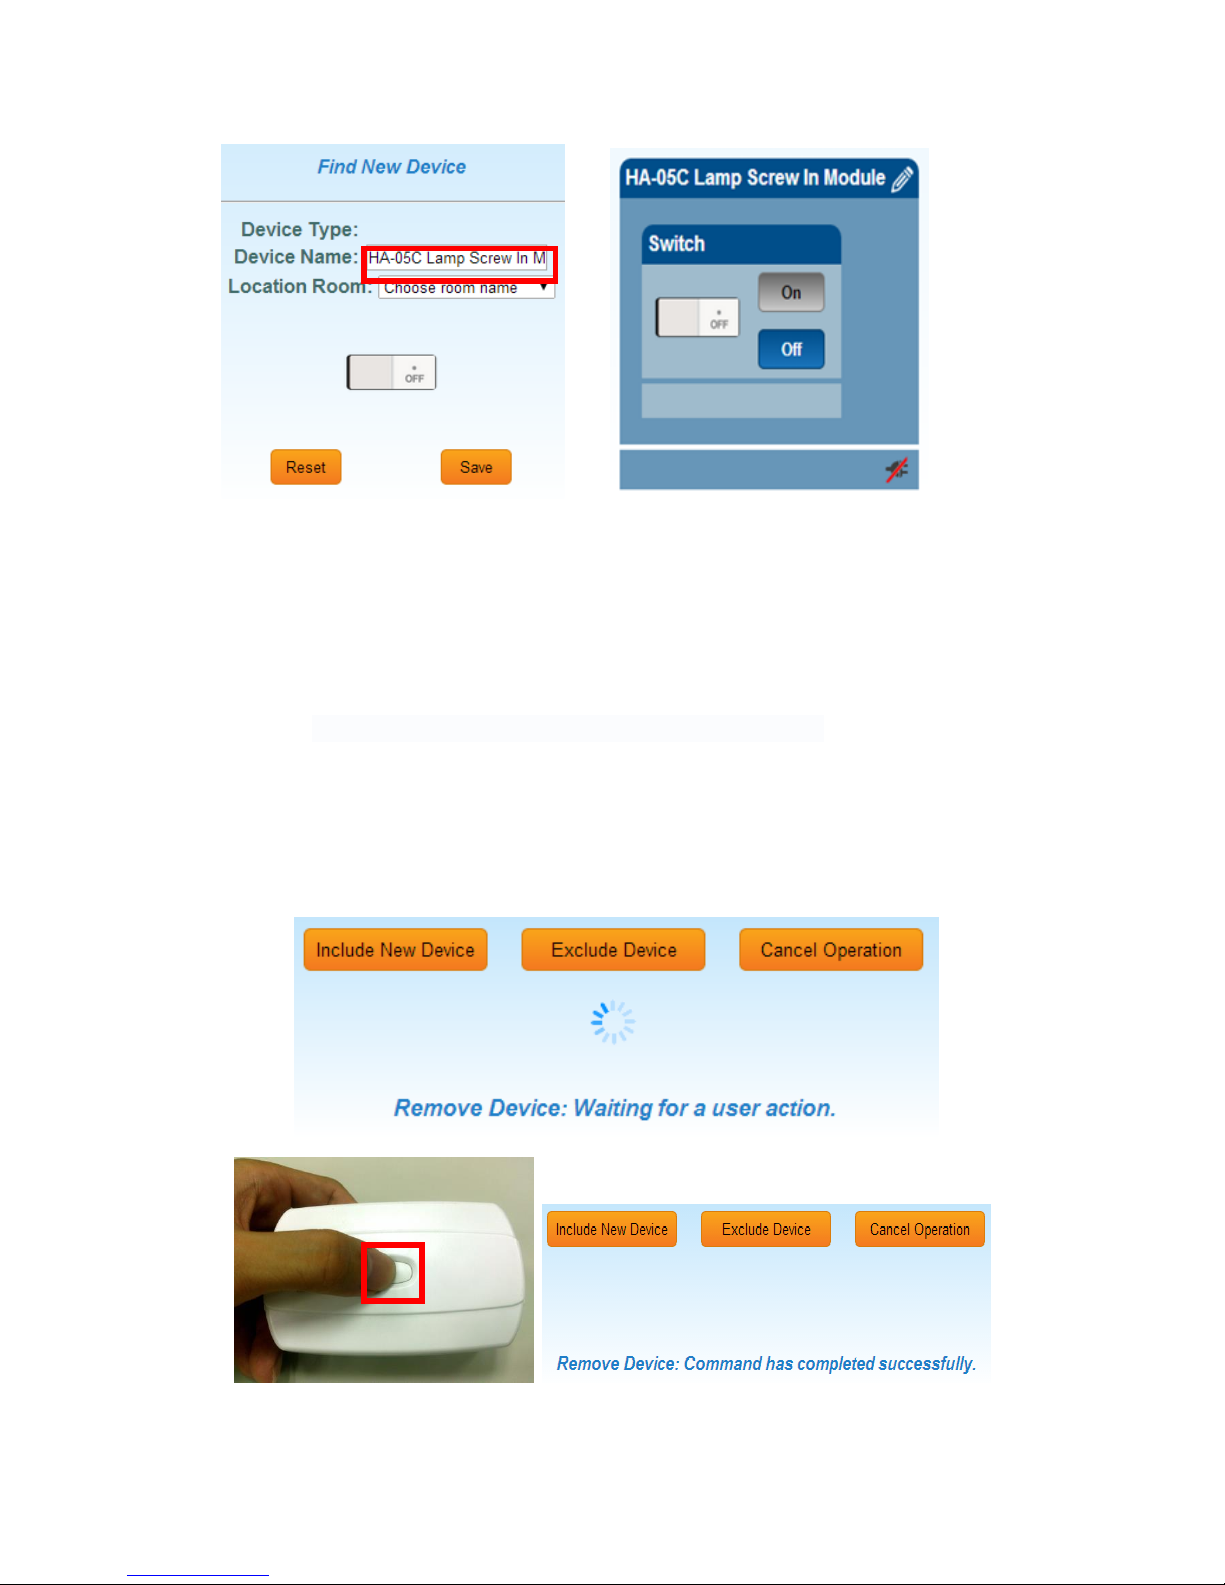
I. Add the Z-Wave device
step 1. Enter the "SetZwave" and select "Device Configuration"
step 2. Click on the "Include New Device", the screen will appear "Add Device:
Waiting for a user action."
step 3. Press the program switch button on the Z-Wave devices to connect
step 4. Success will be " Add Device: Command has completed successfully. " your
device will add complete.
step 5. Find a new device, you can change the name and room settings.
step 6. Then click "device", can be used.
step 1 & step 2
Step 3 Wait devices connected
Step 4 Press the program switch
Successfully added
Page 8
Page.8 of 17 7/24/2014
Note: Z-Wave devices from different manufacturers can add all use, and
connection settings, please refer to the manual for this Z-Wave devices.
II. Remove the Z-Wave device
step 1. Enter the "SetZwave" and select "Device Configuration"
step 2. Click on the "Exclude Device", the screen will appear "Remove Device:
Waiting for a user action."
step 3. Press the program switch button on the Z-Wave devices to connect
step 4. Success will be "Remove Device: Command has completed successfully." ,
your device will be removed as well.
Step5 You can modify the name and room
Step 2Waiting for a user action
Step 3 Press the program switch
Successfully removed
Step6 You can use the new Z-Wave
Page 9

Page.9 of 17 7/24/2014
C. AvaContorl-100 Explain the functionality
This part of illustrates how to use the function AvaContorl-100's because of the new
Z-Wave device can only operate a single object, and the function AvaContorl-100
Z-Wave devices can be classified and integrated use of its features include room,
situational triggers, scheduling and reporting, the following will be introduced one by
one.
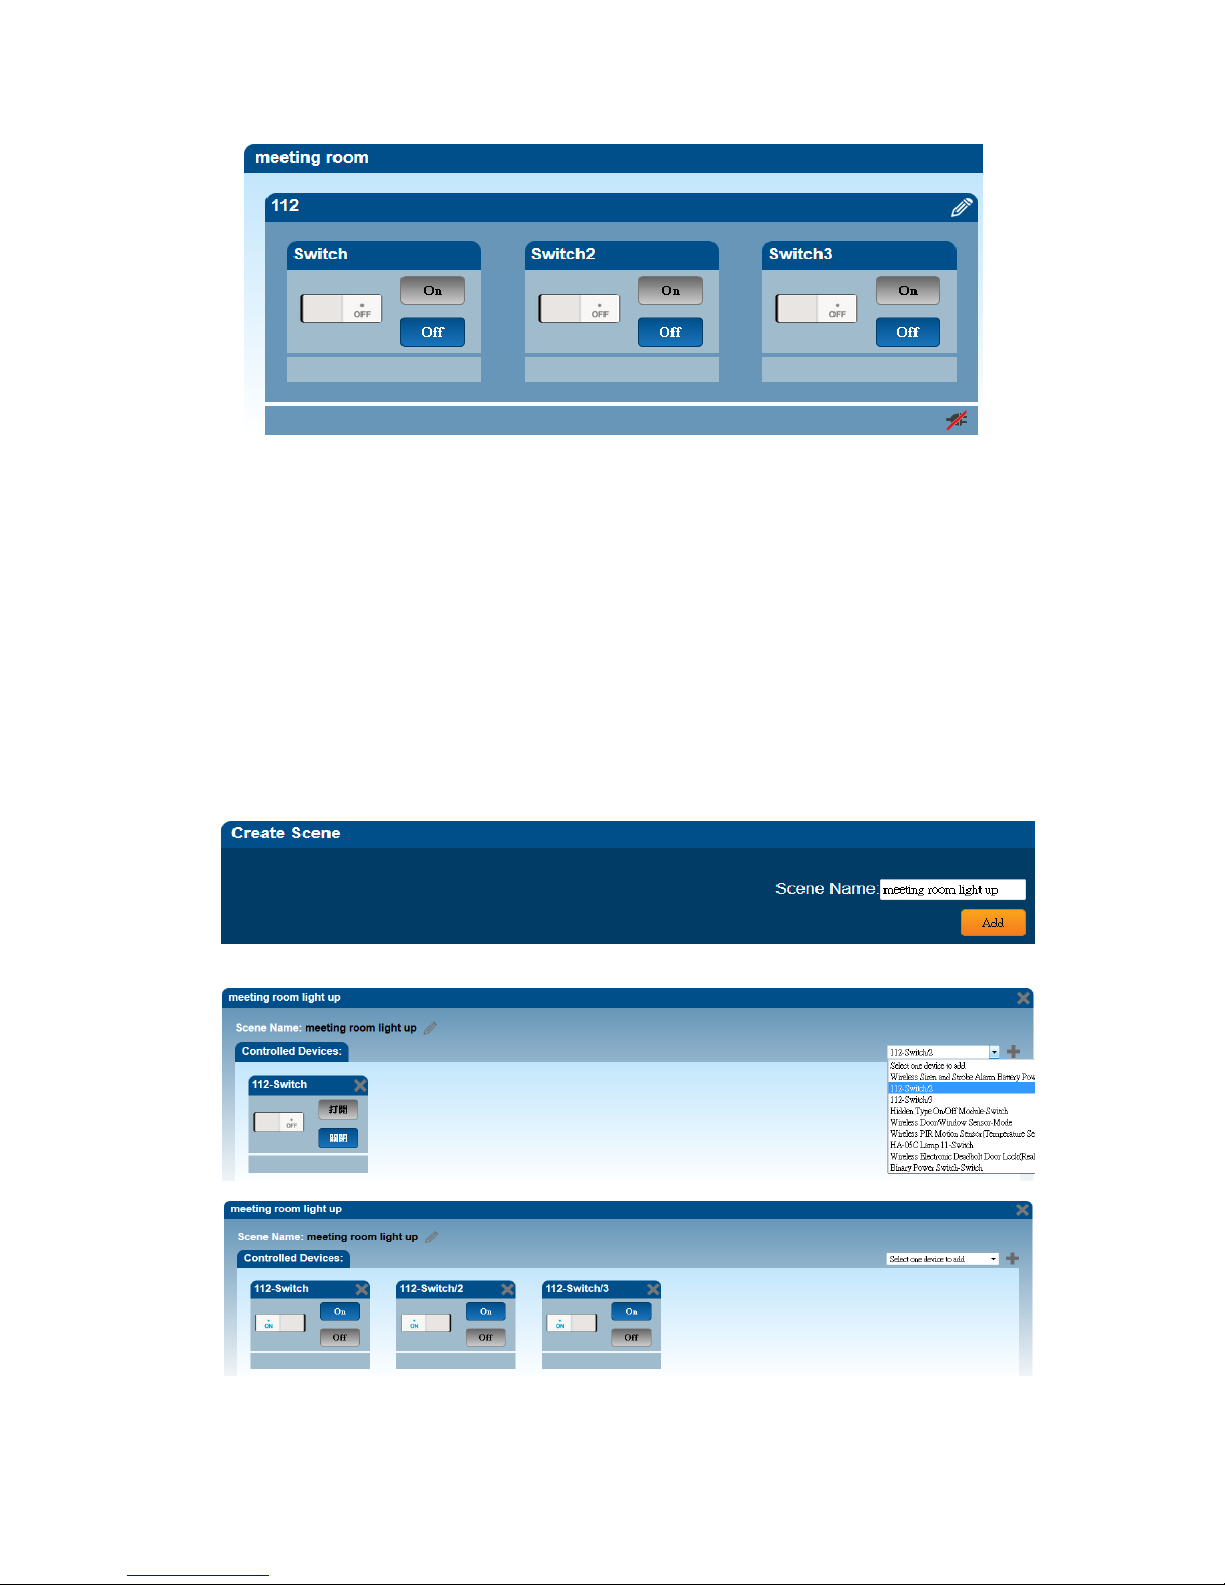
1. Create room - To distinguish Z-Wave devices
Distinguishable position where the Z-Wave device according to the family room, and
quickly know which room is invaded or control appliances.
step 1. Create a new room
step 2. related to the Z-Wave devices into the relative position of the room
Step 1 Create
Step 2 Device settings to the corresponding roomv
Page 10
Page.10 of 17 7/24/2014
Meeting room configuration device
I. Scene Setting - Control Z-Wave devices
You can control a number of Z-Wave devices combine together again, and performed
together after the completion of the operation set by a key operation is complete.
step 1. Enter the "Scene" and then click on the form "Create Scene"
step 2. Increase control this scenario Z-Wave devices
step 3. Setting the device to perform each action
step 4. You can click on to set a good situation, the corresponding Z-Wave devices
can be used
Step 1 Create Scene
Step 3 Setting device action
Step 2Add devices to the scene
Page 11

Page.11 of 17 7/24/2014
To set the monitor entry based Z-Wave devices function when the device is triggered,
the alarm can be launched. Figure 1 alarm settings. Z-Wave control connection
monitoring situations, a combination of two functions set. Figure 2 people into the
lights up.
Figure 1: Set the alarm
Figure 2: Turn the lights up when entering
Step 4 Click on usage scenarios
Page 12
Page.12 of 17 7/24/2014
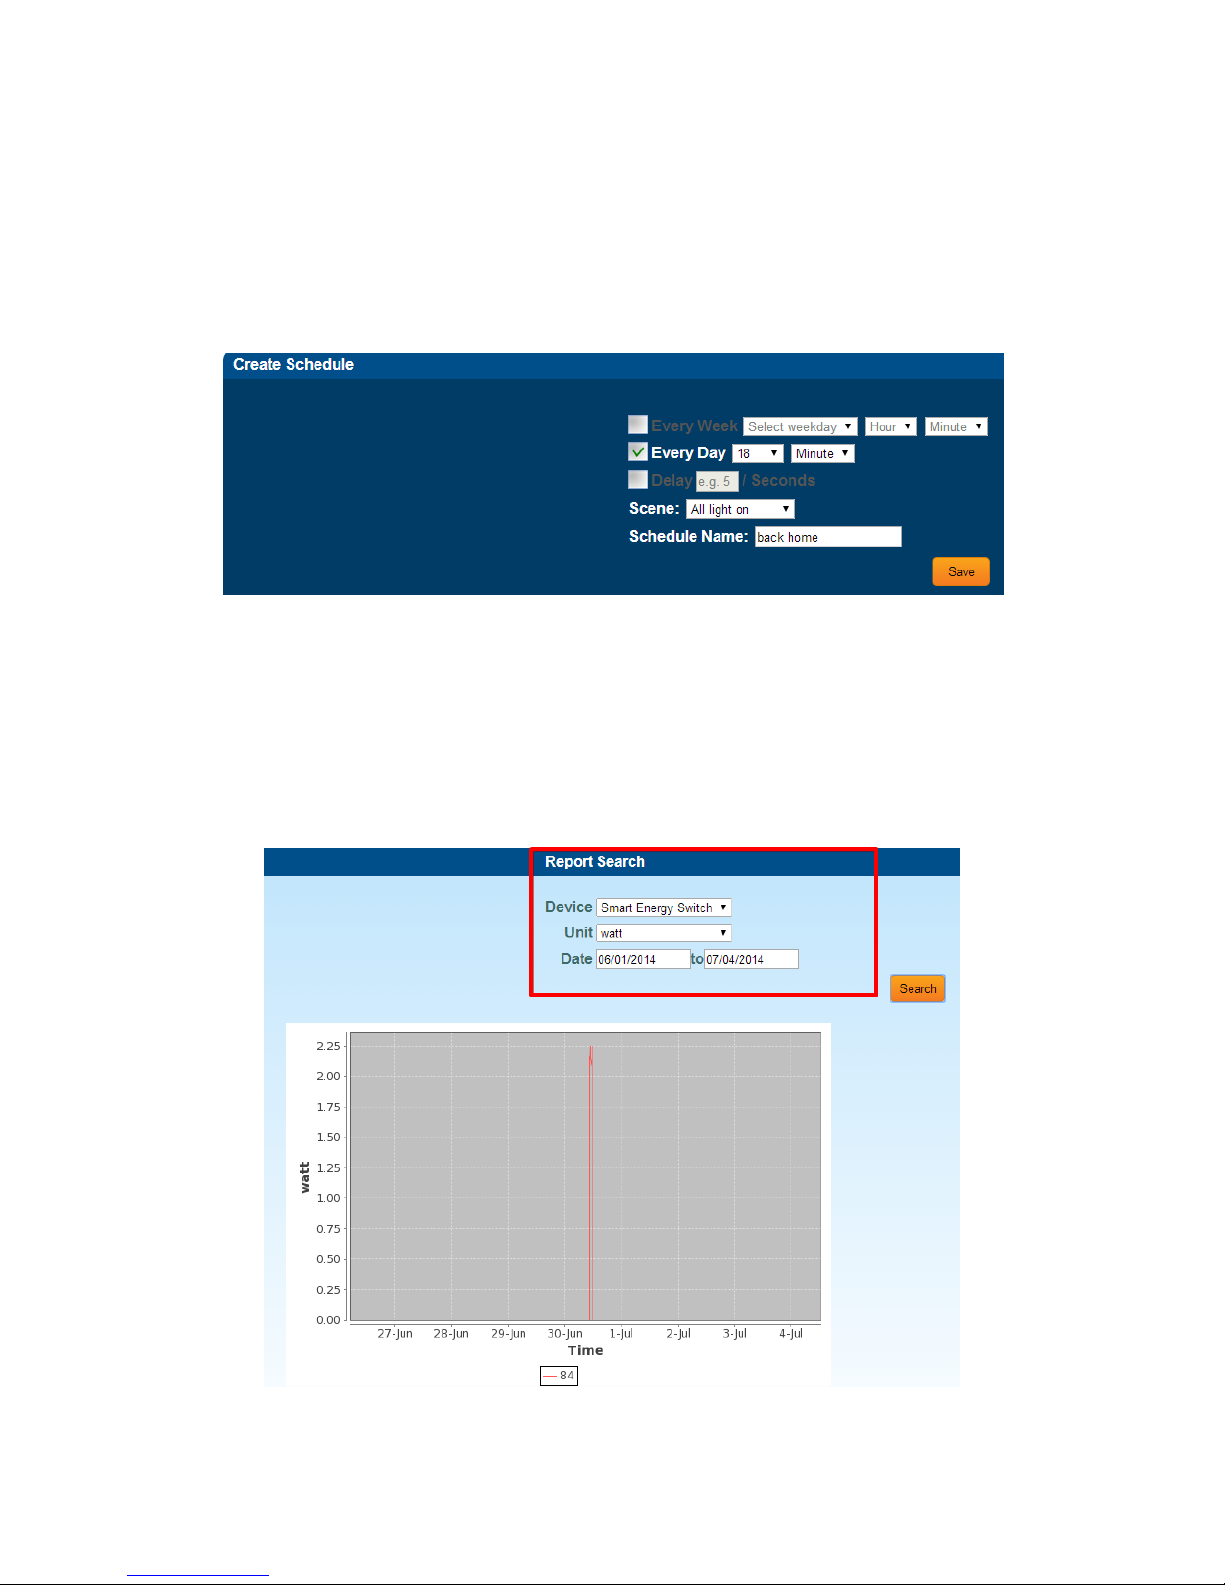
II. Set schedule - timed Z-Wave devices work arrangements
You can set up a schedule for regular monitoring of home security. When setting
the home nobody, automatically turn on monitoring items Z-Wave devices.
Set schedule
III. Use the report-Z-Wave devices use electricity
This feature requires multi Smart Energy Switch device can monitor the amount of
current. You can see how much electricity use.
Amount of electric current
Page 13
Page.13 of 17 7/24/2014
D. Appendix - mobile & tablet sections
AvaControl-100 can be used on iOS and android operating system, can be online at
Play Store & apple store search AvaControl download.
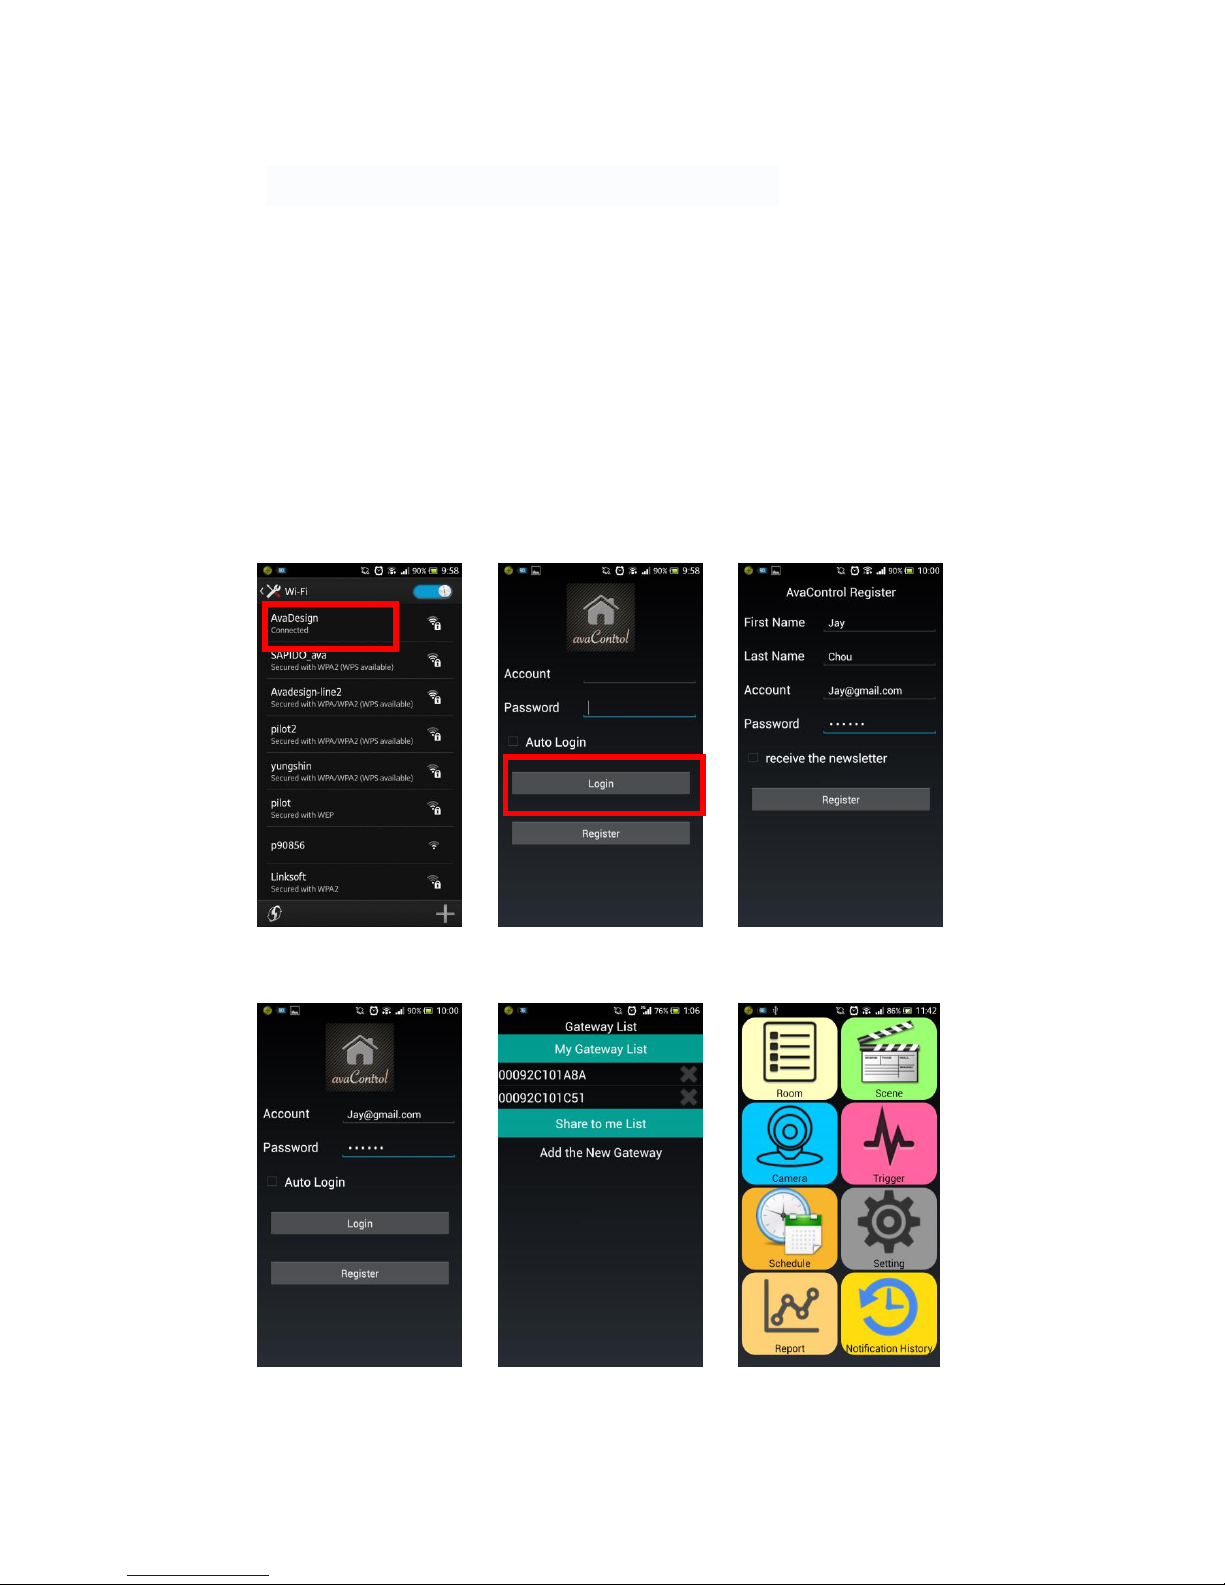
I. Establish a connection - Mobile Register
step 1. With WIFI connection
step 2. enter the registration screen to fill their own account password
step 3. login, enter your username and password
step 4. Choose gateway logged mobile operating
Step 1Gateway WIFI connection
Step 2 Registration
Step 3 Login
Step 4 Select the Gateway to enter the system
Page 14

Page.14 of 17 7/24/2014
II. Add / Remove The Device
1. Add The Device
step 1. Click "Settings" and then click "Add / Remove Device", "add device" or
"Remove Device"
step 2. In this case, manual operation of the Z-Wave device linkages
step 3. Successful there will be "new device, the operation was successful", your
device will add better.
step 4. Then click "device", can be used.
Step 1 Click on Settings, Add / Remove devices and add settings
Step 2 Press the
connection button
Step 3 To add a device
successfully
Step 4 Operable device
Page 15

Page.15 of 17 7/24/2014
2. Remove the device
step 1. Enter the "Settings" and select "Add / Remove Device"
step 2. Click on "Remove Device" screen will appear "Add device: user operations
sent, please wait. "
step 3. At this point, the connection key manual Z-Wave devices
step 4. Success will be "to remove the device, the operation was successful", your
device will be removed as well.
Step 1 Tap Remove device
Step 2
Step 3 Operable device
Step 4 Successfully removed
Page 16

Page.16 of 17 7/24/2014
III. Room
step 1. Add the room
step 2. related to the Z-Wave devices into the relative position of the room
Step 1 Add the room
Step 2 Into the relative room
IV. Scene
step 1. Click the "scene" and then click on the form "Add"
step 2. Increase control this scenario Z-Wave devices
step 3. Setting the action performed by each device
step 4. You can click on to set a good situation, the corresponding Z-Wave devices
can be used
Step 1 Add Scene
Step 2 Add Z-Wave devices and settings
Step 3 can use
Page 17

Page.17 of 17 7/24/2014
V. Trigger Set
step 1. Click the "trigger" and then click Add
step 2. Set the trigger name and trigger sources (that is Z-Wave devices)
step 3. Connected together to set the context
Step 1 Add
Step 2 Set the trigger
source
Step 3 Setting the Scene
VI. Schedule settings, generate reports and alarm history
Open daily alarm time
With Smart Energy Switch
Observe the amount of
current record
Notification History
 Loading...