

Page 1

ZVOX VoiceBud
Hearing Amplier Model VB20
™
Great Sound. Made Simple.
zvox.com
Page 2

Introduction
A smart device app is available for online download.
Search for:
VOICEBUD
Download and then open VoiceBud App. Ensure your VoiceBud has a fresh battery before
using the VoiceBud App. Follow the instructions in the HELP section of the App.
Why You Shouldn’t Throw
Zinc-Air Batteries Away
The zinc-air batteries found in most
hearing aids use air as an energy source
and come in a variety of different sizes.
Be mindful when disposing of these, as
well as other hearing aid batteries, as
zinc-air batteries contain zinc, which should
never be tossed in with household waste.
II VoiceBud | Introduction
For iOS devices, search for
“Voicebud” in the App Store
on your phone or tablet.
For Android devices, search for
“VoiceBud” in the Play Store on
your phone or tablet.
Why You Should Recycle Instead
A far better option is to recycle your
batteries. Most municipalities have drop-off
centers with recycling drop-off boxes for
used batteries. Most electronics stores offer
battery recycling. The batteries will then be
processed and the toxic metals removed
and sold for re-use in various industries.
Page 3

Table Of Contents
Smart Device App Available ...................................................................................................ii
Table of Contents ................................................................................................................. 1
Parts and Features ............................................................................................................ 2-3
Turning the VoiceBud On and Off .......................................................................................... 3
Inserting/Replacing the Battery .......................................................................................... 4-5
The Ear Dome and the Sound Tube ................................................................................... 6-7
Wearing a VoiceBud .......................................................................................................... 8-9
VoiceBud Operation and Use ......................................................................................... 10-11
VoiceBud Modes ........................................................................................................... 12-13
Care of Your VoiceBud ................................................................................................... 14-15
Sound Tube Removal .................................................................................................... 16-18
Sound Tube Installation .................................................................................................. 19-21
VoiceBud | Table of Contents 1
Page 4
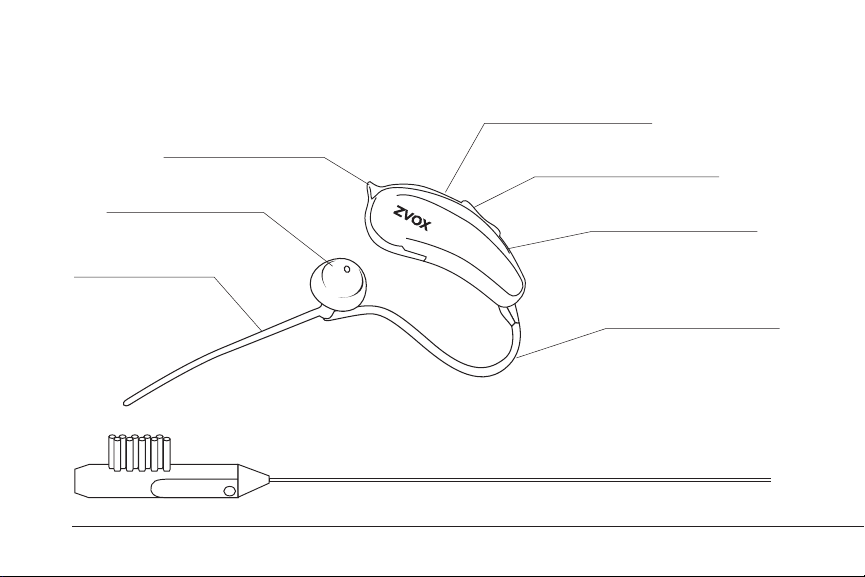
Parts And Features
Rear microphone
Battery door
Ear dome
Stabilizer arm
2 VoiceBud | Parts & Features
Toggle switch
Front microphone
Sound tube
Install and cleaning tool with battery magnet.
Page 5
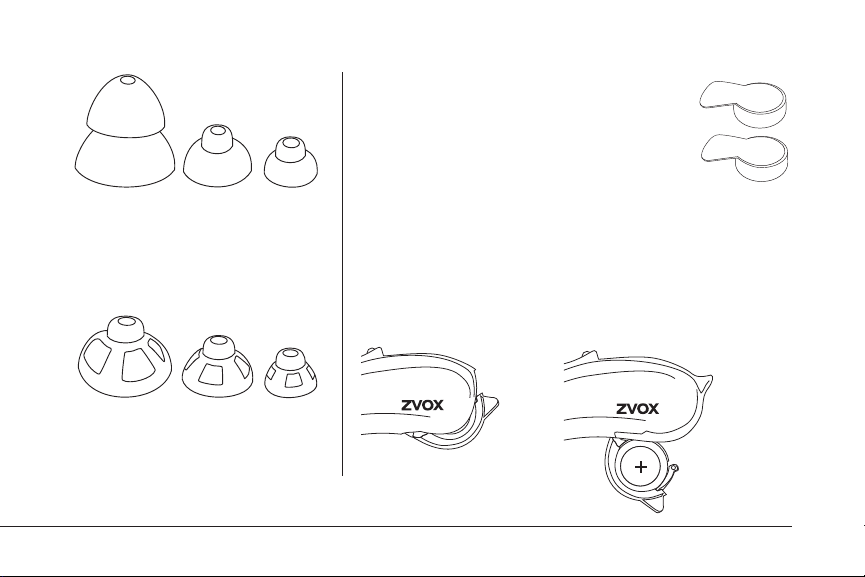
Replacement batteries
Remove tab and wait at least one minute
before use. ZVOX strongly recommends
using size 312 Rayovac or PowerOne
brand batteries in your VoiceBud.
Large
Closed
Dome
Large
Open
Dome
Medium
Closed
Dome
Medium
Open
Dome
Small
Closed
Dome
Small
Open
Dome
Turning the VoiceBud ON and OFF
To avoid unnecessary power consumption, fully open
the battery door whenever the VoiceBud is not in use.
ON-Batte ry
door is closed.
OFF-Batt ery door
is open.
VoiceBud | Parts & Features 3
Page 6

Inserting/Replacing the Battery
1. Hold the VoiceBud in your left hand.
Use your right hand to push down on the
battery door tab, exposing the battery.
2. Remove the used battery, if present.
3. Remove the seal from a fresh battery.
Wait o ne minut e for th e zinc-a ir batte ry
to r each ful l power. Insert the new battery
with the positive (wider) side facing up.
NOTE: The cleaning tool has a magnet
in its handle. It can be used to pick up
the small battery.
Zinc-air battery information:
Once air enters the zinc-air battery, its useful
shelf life is less than 3 weeks. A sealed zinc-air
battery keeps for about 3 years. It takes about
60 to 90 seconds for air to enter the battery.
4 VoiceBud | Inserting/Replacing the Battery
Recyle
exhauste d battery
Page 7
4. Firmly close the battery door. If the battery
door does not close, the battery is installed
incorrectly. Invert and reinstall the battery.
NOTE: Anytime the VoiceBud will not
be used for more than a few hours,
fully open the battery door to extend
the life of the battery. If the VoiceBud
will not be used for more than a few
days, remove the battery.
Please read and follow the instructions on
the battery package regarding safe use and
storage of zinc air batteries. Always recycle
zinc-air batteries
Install new battery
Close battery door
VoiceBud | Inserting/Replacing the Battery 5
Page 8

Choosing the Correct Ear Dome
The VoiceBud has the medium-size ear
dome installed. If this ear dome feels
loose or tight in your ear, use a larger or
smaller ear dome.
To detach an ear dome
Detach an ear dome by pulling it straight
off the sound tube.
Large
Closed Dome
Medium
Closed Dome
Small
Closed Dome
To install an ear dome
Note the orientation of the ear dome in
the diagram. Push the opening in the
back of the ear dome over the ribs at
the end of the sound tube, as shown.
The end of the sound tube should be
ush with the front of the ear dome.
6 VoiceBud | Choosing the Correct Ear Dome
Large
Open Dome
A left sound tube shown,
a right sound tube is similar.
Medium
Open Dome
Small
Open Dome
Page 9

Closed versus Open Ear Domes
An open ear dome allows more outside
sounds to reach your ears, combining with
the sound from the VoiceBud. This sounds
more natural to many VoiceBud users.
However, an open ear dome choice may
limit the amount of amplication you can
use. The increased sound level from the
VoiceBud may generate “feedback”
(see page 11) because the output of the
VoiceBud’s speaker is picked up by the
VoiceBud’s microphones.
A closed ear dome allows a VoiceBud
user to use more sound amplication
because it isolates the VoiceBud’s
speaker from its microphones.
Detaching and Installing
a VoiceBud’s Sound Tube
Instructions starting on
page 16 describe how to use
the supplied tool to remove
and attach the sound tube.
VoiceBud | Closed versus Open Ear Domes 7
Page 10

Wearing a VoiceBud
There are Left Ear and Right Ear sound tubes.
Hold the VoiceBud as shown in the diagram to
identify the correct sound tube.
1. Position the VoiceBud so that the sound
tube drapes over the front of your ear.
Hold the sound tube with one hand and
then use your other hand to gently push
the eardome into the ear canal. Do not
use strong force to insert the eardome.
2. If the ear dome feels loose, replace the ear
dome with the larger ear dome. If the ear
dome feels too tight, use a smaller dome.
3. Position the Stabilizer Arm inside the
earlobe as shown.
4. When the dome is placed correctly, you
should not be able to see the sound tube
sticking out from your ear when facing
a mirror.
8 VoiceBud | Wearing a VoiceBud
left ear
Blue “2B”
right ear
Red “2B”
Page 11

Wearing a VoiceBud (continued)
Position
VoiceBud over
ear as shown
ear dome
VoiceBud
ear dome in
ear canal
stabilizer arm
stabilizer arm
Removing the ear dome from your ear
Hold the sound tube with your thumb and forenger and pull out on the sound tube.
Don’t hesitate to contact the ZVOX Call Center if you have questions about the t of
your VoiceBud.
VoiceBud | Wearing a VoiceBud 9
VoiceBud
Page 12

Operation of Your VoiceBud
There is a multi-function rocker switch
located on the top of your VoiceBud.
Volume Control:
To increase volume, press and release
the top of the switch.
To decrease the volume, press and
release the bottom of the switch.
You should hear a brief “beep” with
each press of the switch.
When you reach the maximum volume,
you will hear two rapid beeps.
You will also hear two rapid beeps
when you reach the minimum volume.
10 VoiceBud | Operation of Your VoiceBud
Volume
Up
Volume
Down
Page 13

Using Your VoiceBud
We nd many people use Mode 2 (noisy
room) most of the time. We suggest
you wear the VoiceBuds for sessions of
at least two hours at a time. This gives
you ample chance to notice the clarity
improvement in everyday sounds.
The VoiceBud may sound unnatural at
rst. But you should quickly notice the
improvement in your ability to engage in
a conversation.
Feedback (Squealing)
Each VoiceBud includes two sensitive
microphones and a speaker. The VoiceBud
picks up quiet or distant sounds and amplies
these sounds so you can hear them better.
As you increase the volume setting of
the VoiceBud, the chance increases the
microphones will pick up the sound from
its own speaker. This “feedback” is heard
as a squealing note. Decreasing the volume
setting eliminates feedback.
A closed ear dome provides more feedback
resistance than an open ear dome,
allowing a VoiceBud user to benet
from more amplication.
VoiceBud | Operation of Your VoiceBud 11
Page 14

Mode Switch Function
A VoiceBud has four Sound Modes. Press and hold down the top button
for 3 seconds to select a mode. Listen for the number of beeps.
Mode 1: Speech (one beep is heard) The
default mode. Use it for conversation, in any
place without much distracting sound.
12 VoiceBud | Mode Switch Function
Mode 2: Noisy Room (two beeps) Use
when inside a space with distracting
noises and other people talking.
Page 15

Mode 3: Automobile/Road Noise (three
beeps) Use when inside moving vehicles.
Mode 4: Outdoors (four beeps) Use when you
are outdoors or inside very large, empty spaces.
The VoiceBud will advance to Mode 1 after Mode 4. When the VoiceBud is turned on,
the VoiceBud will select the mode in use when it was turned off.
VoiceBud | Mode Switch Function 13
Page 16

Care of Your VoiceBud
Foreign matter and condensation can
eventually collect in the sound tube. If
this happens, the VoiceBud’s sound
level will drop. If you notice a drop in
sound level, use the cleaning tool to
clear the sound tube.
ZVOX Audio also recommends using
the cleaning tool at six week intervals to
ensure the sound tube is clear.
14 VoiceBud | Care of Your VoiceBud
1.
2.
3.
cleaning tool extension
ear dome
sound tube
Page 17

4. After using the cleaning tool,
use your mouth to gently blow a
stream of air through the sound
tube. This will help remove any
remaining condensation.
5. Use the cleaning tool’s brush to
clear any foreign matter around the
VoiceBud’s sound tube socket.
Note: Store all unused parts of
the VoiceBud in its zippered case.
5.
sound tube
socket on voicebud
cleaning tool brush
VoiceBud | Care of Your VoiceBud 15
Page 18

Sound Tube Removal
1. Position the end of the tool
as shown. Slide the tool
onto the sound tube.
NOTE: The brush on the tool is in-line
with the red dot on the VoiceBud and
the red arrow on the sound tube.
16 VoiceBud | Sound Tube Removal
Page 19

2. Here is the tool capturing
the sound tube.
3. Twist the tool counter-clockwise
about one-eighth turn.
Now the brush on the tool
is in-line with the green
dot on the VoiceBud.
VoiceBud | Sound Tube Removal 17
Page 20

4. Pull the tool
straight
off of the
sound tube.
18 VoiceBud | Sound Tube Removal
5 Pull the sound tube
out of the VoiceBud.
Page 21

SOUND TUBE INSTALLATION
1a. Position the end of the sound tube
as shown. Align the red arrow on
the sound tube with the green dot
on the VoiceBud Insert the sound
tube into the VoiceBud socket.
1b. Press firmly on the sound tube
to ensure it is fully seated in the
VoiceBud socket.
VoiceBud | Sound Tube Installation 19
Page 22

2. Position the
tool as shown,
with the brush
in-line with the
green dot on the
VoiceBud.
Slide the tool
onto the
sound tube
where it enters
the VoiceBud.
20 VoiceBud | Sound Tube Installation
3. Here is the tool capturing the
sound tube.
Page 23

4. Twist the tool clockwise
about one-eighth turn.
Now the brush on the tool
is in-line with the red dot
on the VoiceBud.
5. Slide the tool off
the sound tube.
The sound tube
is now installed.
VoiceBud | Sound Tube Installation 21
Page 24

Warranty
The ZVOX Audio product warranty information and service agent
for each international region is available here:
https://zvox.com/pages/warranty-repair
© 2018 ZVOX Audio LLC.
www.zvox.com
VB20MAN 09/18
 Loading...