

Page 1
ZVOX AccuVoice TV Speaker
MODEL AV155 | SETUP & OPERATION
www.zvoxaudio.com
Page 2
Important Safety Instructions
READ THIS FIRST
Important Safety Instructions
For ZVOX Audio System
WARNING
TO PREVENT FIRE OR SHOCK HAZARD, DO NOT
EXPOSE THIS APPLIANCE TO RAIN OR MOISTURE.
THIS APPLIANCE SHALL NOT BE EXPOSED TO
DRIPPING OR SPLASHING WATER AND NO OBJECT
FILLED WITH LIQUIDS SUCH AS VASES SHALL BE
PLACED ON APPARATUS.
CAUTION
RISK OF ELECTRICAL SHOCK, DO NOT OPEN
Warning: To reduce the risk of electrical shock, do not
remove cover (or back) – no serviceable parts inside.
Refer servicing to qualied service personnel.
The exclamation point within an
equilateral triangle is intended to alert
the user to the presence of important
operating and maintenance (servicing)
instructions in the literature
accompanying the appliance.
This lightning ash with arrowhead
symbol, within an equilateral triangle, is
intended to alert the user to the presence
of uninsulated “dangerous voltage”
within the product’s enclosure that may
be of sufcient magnitude to constitute a
risk of electrical shock to persons.
1. Read these instructions.
2. Keep these instructions.
3. Heed all warnings.
4. Follow all instructions.
5. Do not use this apparatus near water.
6. Clean only with dry cloth.
7. Do not block any ventilation openings. Install in accordance with the
manufacturer’s instructions.
8. Do not install near any heat sources such as radiators, heat registers, stoves,
or other apparatus (including ampliers) that produce heat.
9. Do not defeat the safety purpose of the polarized or grounding-type plug. A
polarized plug has two blades with one wider than the other. A grounding type
plug has two blades and a third grounding prong. The wide blade or the third
prong are provided for your safety. If the provided plug does not t into your
outlet, consult an electrician for replacement of the obsolete outlet.
10. Protect the power cord from being walked on or pinched particularly at plugs,
convenience receptacles, and the point where they exit from
the apparatus.
11. Only use attachments/accessories specied by the manufacturer.
13. Unplug this apparatus during lightning storms or when unused for long
periods of time.
14. Refer all servicing to qualied service personnel. Servicing is required when
Disposing of this appliance
Electric and electronic appliances often contain valuable materials.
These appliances may also contain materials essential for the
correct functioning of your appliance which, if handled or disposed
of incorrectly, could be hazardous to human health and to the
environment. Therefore, please do not dispose of this appliance
with your household waste. Dispose of it at your local community
waste or recycling center, or contact your retailer for advice.
the apparatus has been damaged in any way, such as power-supply cord or plug
is damaged, liquid has been spilled or objects have fallen into the apparatus, the
apparatus has been exposed to rain or moisture, does not operate normally, or has
been dropped.
15. Grounding or Polarization–This product may be equipped with a polarized
alternating-current line plug (a plug having one blade wider than the other). This plug
will t into the power outlet only one way. This is a safety feature. If you are unable to
insert the plug fully into the outlet, try reversing the plug. If the plug should still fail to
t, contact your electrician to replace your obsolete outlet. Do not defeat the safety
purpose of the polarized plug.
16. Ventilation–Slots and openings in the cabinet are provided for ventilation and to
ensure reliable operation of the product and to protect it from overheating, and these
openings must not be blocked or covered. The openings should never be blocked by
placing the product on a bed, sofa, rug, or other similar surface. This product should
not be placed in a built-in installation such as a bookcase or rack unless proper
ventilation is provided or the manufacturer’s instructions have been adhered to.
17. The MAINS plug or an appliance coupler is used as the disconnect device, the
disconnect device shall remain readily operable.
18. CLASS II apparatus with double insulation, and no protective earth provided.
19. CAUTION: Danger of explosion if the remote control battery is incorrectly replaced.
Replace only with the same or equivalent type.
20. WARNING: The remote control battery (battery or batteries or battery pack) shall not
be exposed to excessive heat such as sunshine, re or the like.
21. No naked ame sources, such as lighted candles, should be placed on the apparatus.
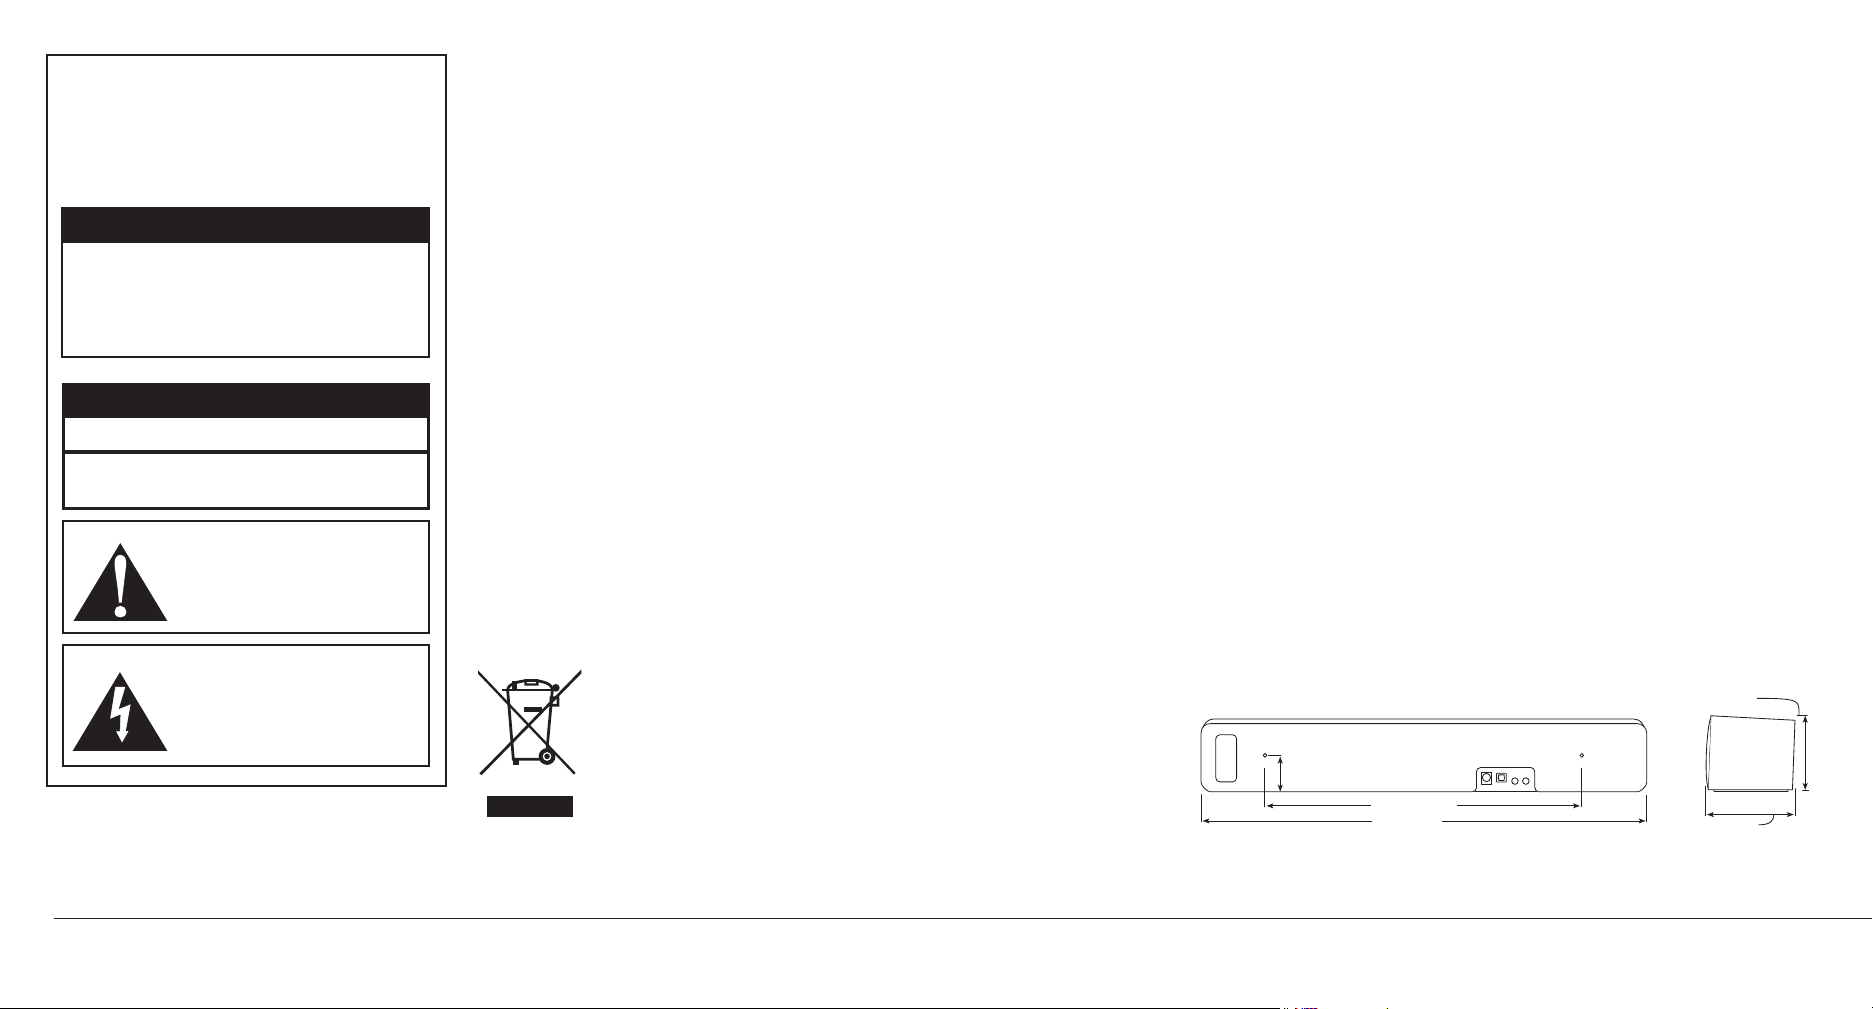
AccuVoice TV Speaker Model AV155 Dimensions
74 mm
(2-15/16")
47 mm
(1-27/32")
300 mm (11-13/16")
432 mm (17")
85 mm
(3-11/32")
2 Quick Setup Guide
Page 3
Quick Setup Guide
(This quick guide is valid for an optical digital audio connection from your TV to the AccuVoice TV Speaker. This is the most common audio output on TVs)
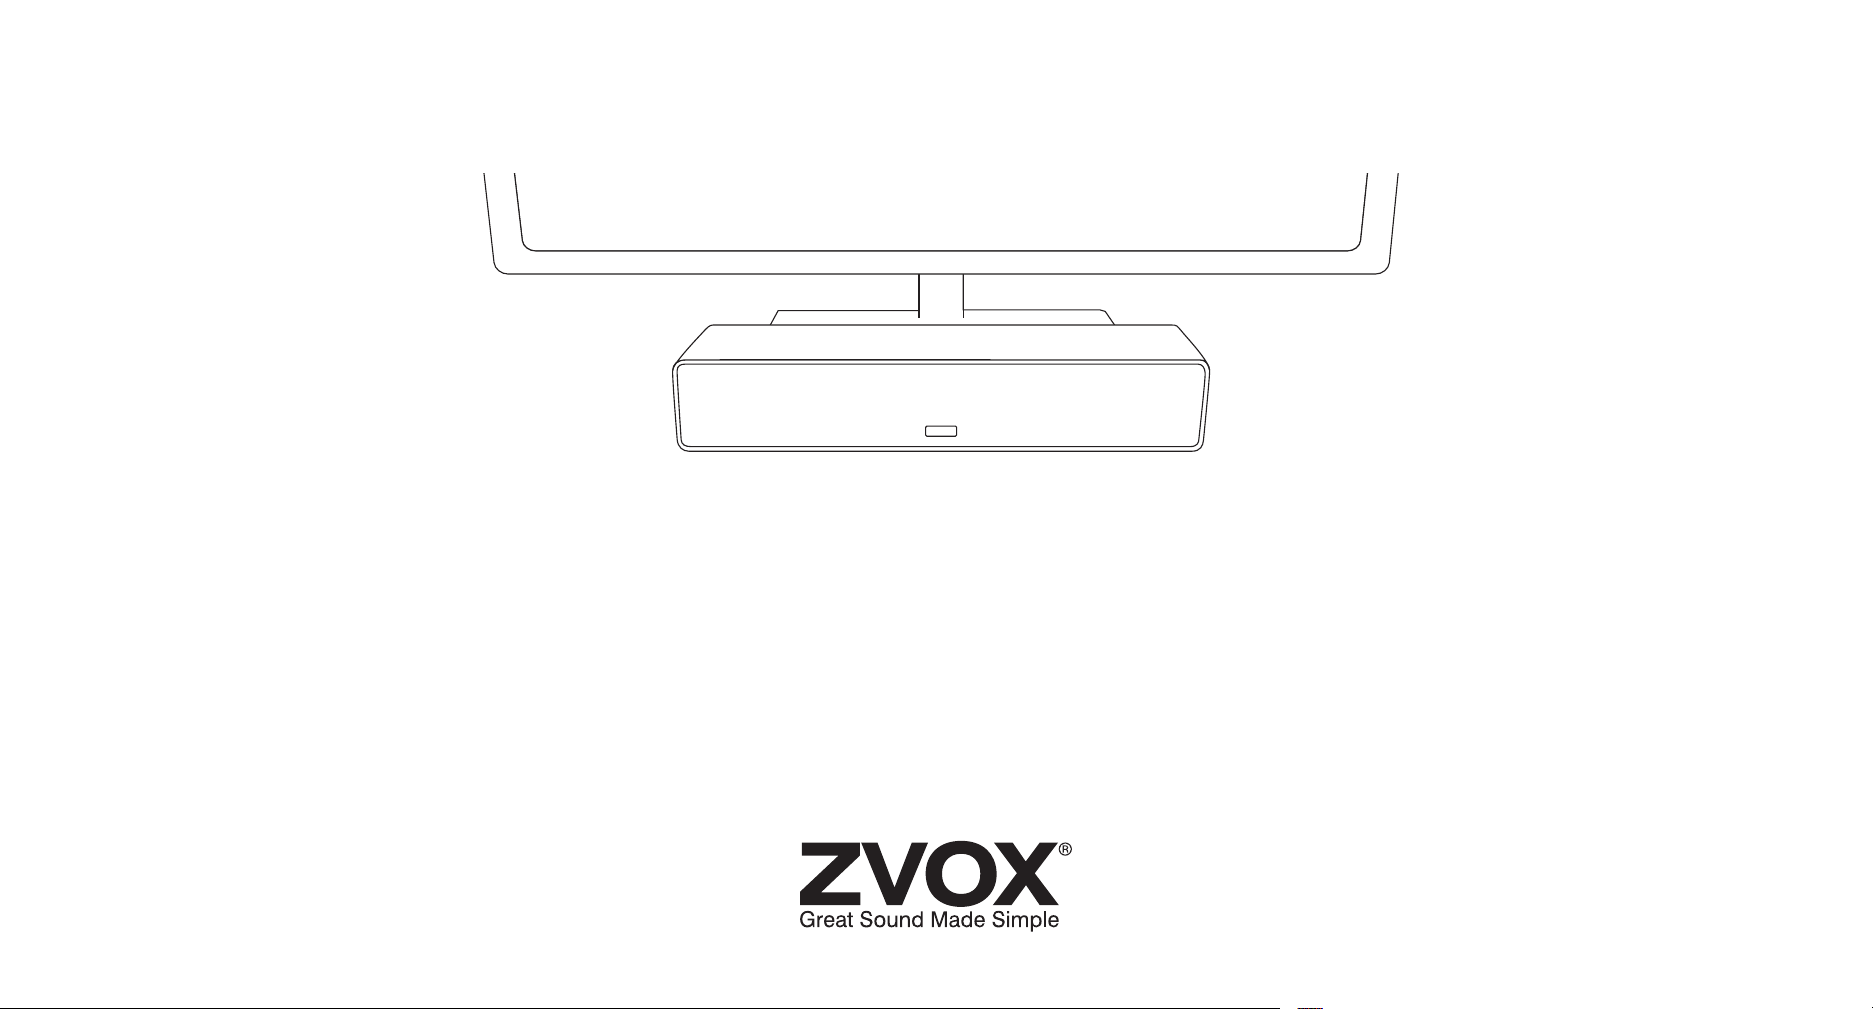
1 Place The ZVOX Speaker
NOTE: For brevity, the ZVOX AccuVoice TV
Speaker Model AV155 is often referred to as
the “ZVOX speaker” or “AV155” in this User
Manual.
You can place the ZVOX speaker anywhere in
front of your TV. It can also be placed on any
level surface near the TV – above, below or to
the left or right. It doesn’t have to be centered
in front of the TV. The ZVOX speaker performs
best if it faces the people watching the TV.
NOTE: The AV155 also has two threaded
sockets on the back panel. With the
additional owner-supplied hardware, these
attachment points alllow “on wall” placement
or secure attachment to a at surface.
15 VDC 2A
POWER
OPTICAL
DIGITAL
INPUT [1]
MINIJACK
ANALOG
INPUT [2]
MINIJACK
HEADPHONE /
SUBW OUTP UT
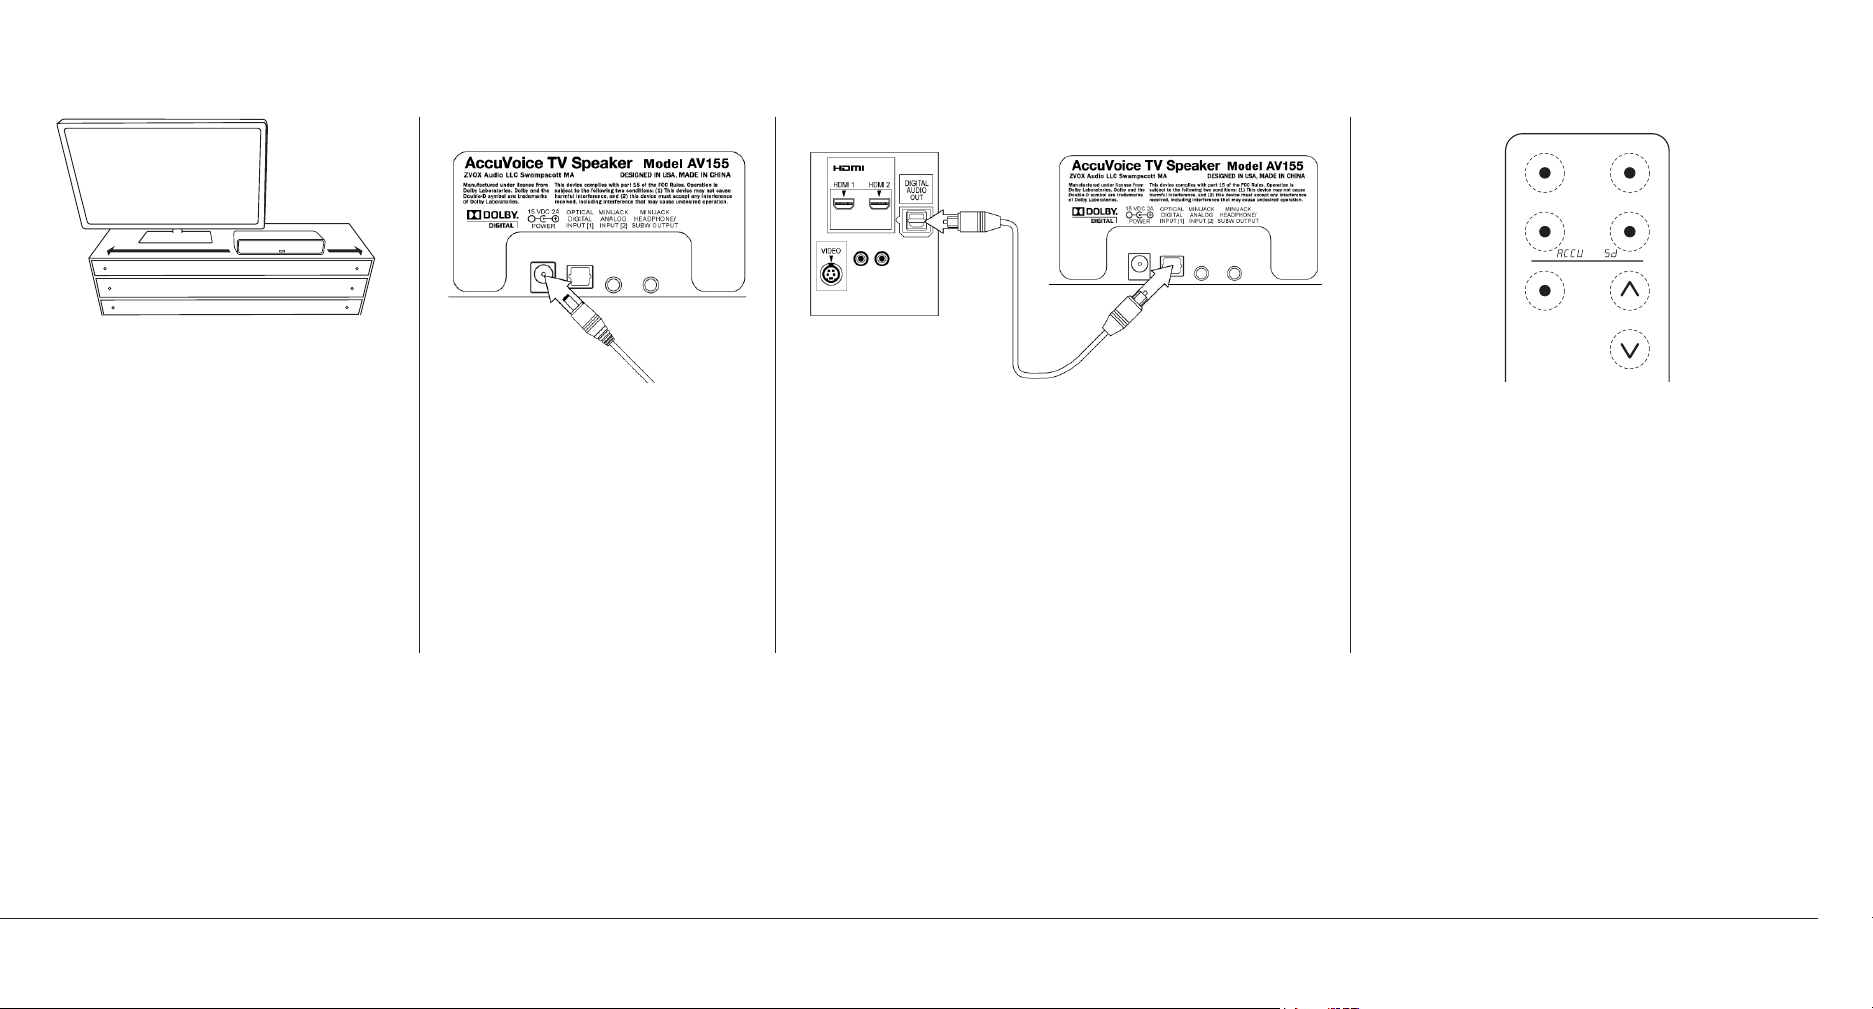
2 Connect Power Cord
to the ZVOX Speaker
Connect the power cord to the power
jack on the back.
Then connect the AC plug into an
AC power receptacle. Don't turn the
ZVOX speaker on just yet.
HDMI 1 HDMI 2
VIDEO
DIGITAL
AUDIO
OUT
15 VDC 2A
POWER
OPTICAL
DIGITAL
INPUT [1]
MINIJACK
ANALOG
INPUT [2]
MINIJACK
HEADPHONE/
SUBW OUTPU T
Back of TV
3 Connect the Optical Signal Cable
Most TVs have an optical digital output jack (sometimes called
“TOSLINK”) on the back. Connect one end of the supplied optical cable
to this optical jack. Connect the other end of the optical cable to the
optical jack on the ZVOX AccuVoice TV speaker.
NOTE 1: The optical plug and jack are not square. Position the optical
plug so it matches the orientation of the optical jack, then push the plug
into the jack. You should hear and feel a "click" when the plug is
correctly inserted into the optical jack.
NOTE 2: If your TV does not have an optical connector, you can also
connect the ZVOX speaker using an analog signal cable (also supplied).
See instructions later in this manual.
INPUT
ACCUVOICE
MUT E
POWER
SURROUND
VOLU ME
4 Turn down your TV’s sound and
turn on the AccuVoice TV Speaker
Tune your TV to a program. Then use the TV remote to lower
the sound coming from your TV until it is inaudible.
Using the ZVOX speaker remote control, press the POWER
button to turn on the ZVOX speaker. You should be able to
hear the TV sound from the ZVOX speaker. Use the volume
buttons on the ZVOX speaker’s remote control to set the
volume to your preferred level. You are done!
If you don’t hear sound, press the INPUT button on the
AV155 until you see “InId” appear on the face of the AV150.
This indicates the optical digital input has been selected.
AV155 North American edition 3
Page 4

Alternative Ways To Connect The AccuVoice TV Speaker Model AV155
If your TV doesn’t have an optical audio output, here are some other options:
a
15 VDC 2A
OPTICAL
DIGITAL
INPUT [1]
POWER
Minijack Analog Audio Out
Many TVs have an audio output minijack (sometimes labeled “3.5mm”) or
headphone jack. Insert one end of the supplied analog "miniplug to miniplug"
cable into the TV's audio out minijack. Insert the miniplug at the other end of the
cable into the ZVOX speaker input jack labeled MINIJACK ANALOG INPUT.
Once you have connected the cable to the ZVOX speaker, follow step 4 from
the front page of this manual. After you have turned on the ZVOX speaker, press
the INPUT button on the ZVOX speaker remote control until you see “In2A”
appear. This selects the analog minijack input.
MINIJACK
ANALOG
INPUT [2]
MINIJACK
HEADPHONE/
SUBW OUTPUT
b
15 VDC 2A
OPTICAL
DIGITAL
INPUT [1]
POWER
Back of TV
Back of TV
Red and White RCA Jack Analog Audio Out
Some TVs use red/white RCA jacks for the analog audio output. Be sure you
have located red and white jacks on the TV that are marked as an “OUTPUT”
(not “INPUT”). Next, identify the cable supplied with the ZVOX speaker that has
a stereo miniplug at one end and red and white RCA plugs at the other end.
Make The Connection
Insert the end of the cable with red and white plugs into the red and white jacks
on the TV labeled “OUT”. Insert the miniplug at the other end of the cable into
the ZVOX speaker input jack labeled MINIJACK ANALOG INPUT.
Once you have connected the Analog Audio signal cable to the ZVOX speaker,
follow step 4 from the front page of this manual. If you don’t hear sound, press
the input button on the ZVOX remote control until you see In2A. This indicates
the analog audio input has been selected.
MINIJACK
ANALOG
INPUT [2]
MINIJACK
HEADPHONE/
SUBW OUTPU T
c
15 VDC 2A
OPTICAL
DIGITAL
INPUT [1]
POWER
Back of
Back of
Cable/Sat Set Top Box
Cable/Sat Set Top Box
Connect To Your Cable Or Satellite TV Set Top Box
If your TV’s audio output is inaccessible (on a wall-mounted TV, for instance)
or unavailable, you can connect the audio output of your cable or satellite set
top box to the ZVOX speaker. Most set top boxes have an “audio output” in
addition to the HDMI output intended for use with the TV.
To connect between the cable box red and white jacks and the ZVOX speaker,
identify the cable supplied with the ZVOX speaker that has a stereo miniplug at
one end and red and white RCA plugs at the other end.
Follow the “Make The Connection” instructions in the previous column.
MINIJACK
ANALOG
INPUT [2]
MINIJACK
HEADPHONE/
SUBW OUTPU T
4 Quick Setup Guide
Page 5

Connection Options
15 VDC 2A
POWER
OPTICA L
DIGITAL
INPUT [1]
MINIJA CK
INPUT [2]
Headphone or Subwoofer Output Minijack
This minijack provides a signal for use with headphones or an amplied
subwoofer. The signal level from this output varies with the volume setting of
the ZVOX speaker. If you wish to mute the output of the ZVOX speaker while
listening to headphones, press and hold the MUTE button ont he ZVOX speaker
remote control for about ve seconds (a “long press”). “HP” will appear on the
ZVOX speaker display screen, indicating headphone-only operation. A second
long press of the same MUTE button cancels headphone-only operation.
Pressing the POWER button on the ZVOX speaker remote control also cancels
headphone-only operation.
ANALOG
MINIJAC K
HEADPH ONE/
SUBW O UTPUT
TV to AV155 Audio Signal Cable Guide
The AV155 includes two analog signal cables and one optical digital signal
cable. One of these three cables will connect from most TVs or cable/
satellite set top boxes to the digital or analog input on the AV155. In the rare
instance your TV or cable/sat set top box has only an optical minijack audio
output, an optical miniplug to standard optical plug cable is needed (not
supplied with the AV155).
Audio cables supplied with the AccuVoice TV Speaker AV155
standard optical plug
to
standard optical plug
analog miniplug
to
analog miniplug
from TV or set top box
left and right
RCA plugs
to analog miniplug
to AV155
Using Both Audio Inputs on the AccuVoice TV Speaker AV155
If you have your TV's optical digital output connected to the AV155’s optical
digital input, you could also use the AV155’s analog minijack input for a second
audio source. You can also connect an analog audio source to the AV155’s
MINJACK ANALOG INPUT. This second source could be music from a portable
audio device, an audio disc in a player or connect an analog audio source to the
AV155’s MINJACK ANALOG INPUT.
To hear an audio source connected to the analog audio input on the ZVOX
AV155 TV Speaker, press the INPUT button on the ZVOX remote control until
you see IN2A appear ont the front of the ZVOX speaker.
Placement Options
Placing The AccuVoice TV Speaker in Front of the TV.
Most people choose to place the ZVOX speaker in front of the TV. But it can also
be placed on any level surface near the TV – above, below or to the left or right.
Choose a place that lets you direct the ZVOX Speaker towards the TV viewers.
• A safe, secure installation of the AccuVoice TV Speaker is the
owner’s responsibility.
• Do not place any objects on top of the AccuVoice TV Speaker.
ZVOX Speaker Wall Mounting Information
The AV155 speaker has two M3 threaded sockets in the enclosure back.
Two 10mm length screws are provided for these sockets. With the correct
additional hardware, you can use these sockets to secure the ZVOX AV155
speaker to most at surfaces, like a wall or shelf. Longer screws may be
necessary NOTE: It is the ZVOX AV155 owner’s responsibility to ensure the
any such mounting is safe and secure. Each of the two mounting sites should
be able to secure a ve pound (3 KG) object.
AV155 North American edition 5
Page 6

Button Functions on the
UP TO
ZVOX Remote Control
Volume
These appropriately named buttons
control the volume.
Power
The Power button switches the ZVOX
speaker between STANDBY and On.
Note: The ZVOX AV155 will also enter
STANDBY if it receives no audio signal for
approximately 30 minutes. A command
from a remote control or a restored audio
signal will turn it back on.
Input Selection
Press the INPUT button on the ZVOX
remote to select between the speaker’s
two inputs.
The choices are:
Optical digital — IN1d
Analog minjack — In2A
Remote Control Button Layout.
INPUT
ACCUVOICE
MUT E
POWER
SURROUND
VOLUME
Mute
Press this button to mute the ZVOX speaker.
When MUTE function is active, the display
blinks “-00-”. The AV155 will enter Standby
if it is left in MUTE for longer than ve
minutes.
Surround Settings
There are three SURROUND levels:
• Surround One (“Sd 1”) has low virtual surround
effect and strong vocals. Use this setting if vocal
clarity is important to you.
• Surround Two (“Sd 2”) has moderate virtual
surround effect and moderate vocals. This is the
recommended setting for general TV programs.
• Surround Three (“Sd 3”) has strong virtual
surround effect and moderate vocals. Many
people prefer this setting when watching movies.
AccuVoice
Press the AccuVoice button to select the AccuVoice function. Additional
presses of the AccuVoice button allow you to select increasing levels of
voice enhancement. There are six levels of increasing voice enhancement,
starting with AC 1 going up to AC 6. The setting you select remains the default
AccuVoice setting until you decide to change it.
Manual On/Off Operation
As delivered, the AV155 turns ON and OFF automatically in response to the
audio signals from the TV and the POWER button on the remote control. If
you do not want the AV155 to automatically turn on and off in response to the
TV’s audio signal, the AV155 can also be congured so it only responds to
the remote control POWER button.
The POWER button on the ZVOX remote control allows you to switch
between Auto On/Off and Manual On/Off modes. To switch modes, rst
make sure the AV155 is “ON”. Then press and hold down the POWER
button for ve seconds. When you see noAS appear on the display, release
the POWER button. noAS indicates that Manual On/Off mode has been
selected. To switch back to Auto On/off mode, press and hold down the
POWER button for ve seconds again. Release the POWER button when you
see AS appear on the display. AS indicates that the Auto
On/Off mode has been selected.
6 Quick Setup Guide
Page 7

INPUT
SURROUND
POWER
MUTE
ACCUVOICE
VOLUME
Other Settings Button
The Other Settings button allows Bass and Treble adjustment and turns Output
Leveling On and Off.
1) Bass Adjustment: The rst press of the Other Settings button displays
the current Bass setting. The range of bass adjustment goes from LO 4 to
LO-6 (This display is shorthand for Lows plus 4 and Lows minus 6). Use the
volume buttons to adjust the bass output across this range. Then wait for the
adjustment display to turn off.
2) Treble Adjustment: A second press of the Other Settings button displays
the current Treble setting. (The range of treble adjustment is HI 4 to HI-4. That
is shorthand for Highs plus 4 and Highs minus 4). Use the volume buttons to
adjust the bass output across this range. Then wait for the adjustment display to
turn off.
3) Output Leveling: A third press of the Other Settings button displays the
Output Leveling feature. The display will be either OL (Output Leveling engaged)
or noOL (Output Leveling off). Use the volume buttons to turn Output Leveling
on or off. Then wait for the adjustment display to turn off.
When engaged, Output Leveling prevents large swings in volume. It also reduces
volume differences between TV channels on cable or satellite systems.
A fourth press of the Other Settings button returns you to the current volume
setting and exits Other Settings adjustment.
Controlling the
AccuVoice TV Speaker
With Another Remote
The OTHER SETTINGS button can
be used to adjust the AV155 so it
responds to one of many cable,
satellite or TV remote controls. Visit
www.zvoxaudio.com for guidance
regarding this “works with your
preferred remote” feature.
The supplied ZVOX remote control
will always adjust the AV155, even if
one also uses his or her preferred TV remote to control VOLUME, MUTE and
POWER on the AccuVoice TV Speaker Model AV155.
STILL NEED ASSISTANCE? If your TV is not the same as the
descriptions in this guide, don’t hesitate to send an inquiry to info@
zvoxaudio.com or call ZVOX Audio at (866) 367-9869. Please provide
your TV brand and model number. A ZVOX Audio representative
should be available (Eastern Time Zone) 9:30 AM to 7:30 PM Monday
through Friday and 10:30 AM to 5:30 PM on Saturday. For further
information about additional options, please refer to the ZVOX Audio
website, www.zvoxaudio.com.
OTHER
SET TINGS (PS)
USA Warranty
For warranty information applicable to an AV155, please visit this webpage:
https://zvox.com/pages/warranty-returns
AV155 North American edition 7
Page 8

© 2018 ZVOX Audio LLC.
www.zvox.com
100155US 8/18
 Loading...