

Page 1

READ AND HEED
READ THIS FIRST – IMPORTANT SAFETY INSTRUCTIONS FOR ZVOX 415 SYSTEM
IMPORTANT SAFETY
WARNING ON POWER
SUPPLY.
The exclamation point within an equilateral triangle is
intended to alert the user of the presence of important
operating and maintenance (servicing) instructions in
the literature accompanying this product.
All safety and operating instructions should be read before your ZVOX
415 is operated.
Safety instructions and operating instructions should be kept for future
reference.
All warnings on the product or in the operating instructions should be
followed.
Operate your ZVOX 415 in accordance with the instructions.
Do Not Use Near Water.
water, such as a bathtub, sink, swimming pool or wet basement. To reduce the risk of fire or electric shock, do not
expose this apparatus to rain or moisture, To avoid dripping
and splashing, no objects filled with liquids, such as vases,
should be placed on your ZVOX 415.
Object Entry.
415 as they may touch voltage points or short out parts that
could result in a fire or electric shock.
Stable Placement.
stand, bracket or table. The 415 may fall, causing serious
injury to a child or adult and serious damage to the product.
Ventilation.
back of the ZVOX 415) REQUIRES ventilation to ensure
reliable operation of the system and to prevent it from
overheating. This area must not be blocked or covered. Do not
allow a soft surface such as carpet or bedding to cover the
heat sink. The system should not be placed in a built-in
installation such as a bookcase without proper ventilation.
Heat.
Place system away from radiators, stoves, heat vents or other heat
sources.
Do Not Abuse The Power Cord.
or trip on the power cord. Never yank to disconnect the cord from an
outlet. Keep the cord away from heated surfaces. Do not pull the cord
around sharp edges or corners. Do not allow cord to hang over the edge
of table or counter.
Do Not Defeat The Safety Purpose Of The Polarized Or Grounding Plug.
polarized plug has two blades with one wider than the other. The wide
blade is provided for your safety. If the provided plug does not fit into
your outlet, consult an electrician for replacement of the obsolete outlet.
Power Supply.
than the unit supplied.
Power Sources.
120-240VAC power source.
Do Not Overload Outlets.
This can result in the risk of fire or electric shock.
Damage Requiring Service.
to an authorized service center when the following conditions occur:
• When the power supply cord or plug is damaged or frayed.
• If liquid is spilled into the unit.
• If the unit has been exposed to rain or water.
• If the unit does not work normally by following the operating
instructions.
• If the unit has been dropped or physically damaged.
• If the unit exhibits a distinct change in performance.
Do not use a power supply with a higher voltage rating
The ZVOX 415 can be operated only with a 50/60HZ
CAUTION:
RISK OF
ELECTRIC
SHOCK DRY
LOCATION USE
ONLY
Do not use your ZVOX 415 near
Never use probes of any kind to reach into the
Do not place the 415 on an unstable cart,
The heat sink (a large black metal panel on the
Install the 415 where no one can step on
Don’t overload your wall outlets or power strip.
Unplug your ZVOX 415 and refer servicing
ATTENTION:
POUR UTILISATION
A L’INTERIEUR
Attachments.
by ZVOX Audio, as they may cause hazards.
Servicing.
®
remove the cover. Refer all servicing to qualified service personnel.
Replacement Parts.
than those recommended by the manufacturer. Unauthorized substitutions may result in fire, electric shock or other hazards.
Safety Check.
ask the service technician to perform safety checks to determine whether
the product is in proper operating condition.
ZVOX Audio, LLC
59 Thomas Road
Swampscott, MA 01907 USA
info@zvoxaudio.com
www.zvoxaudio.com
2 Year Limited Warranty.
To the original purchaser, ZVOX Audio LLC will warrant the
ZVOX 415 system to be free of defects in material and
workmanship for a period of two (2) years from date of pur-
A
chase. With respect to defects, ZVOX will, at its option,
replace the product or repair the defect in the product with no
charge to the original purchaser for parts or labor. Customer is
responsible for shipping charges where required.
This warranty does not extend to any defect, malfunction or
failure caused by misuses, abuse, accident, faulty hookup,
defective associated equipment or use of the system with
equipment for which it is not intended.
This warranty is only valid when the system is returned to the
retailer that sold the ZVOX 415 system to the original purchaser.
This is the sole and express warranty. This warranty is in lieu
of all other warranties, expressed or implied, of merchantability, fitness for purpose or otherwise. In no event shall ZVOX
Audio LLC be liable for incidental or consequential damages
or have any liability with respect to defects other than the
obligations set forth as stated.
To ensure warranty coverage, it is incumbent upon the original
purchaser of the ZVOX 415 system to inform the retailer of the
defect within the warranty period. The only acceptable method
of establishing warranty status is a copy of the original proof
of purchase indicating customer’s name and purchase date.
Lightning.
it is left unattended and unused for long periods of time. This
will prevent damage due to lightning and power line surges.
Unplug Before Cleaning.
wall outlet or other power source before cleaning. Use a
damp cloth for cleaning. Do not use solvents or chemical
cleaning agents.
Do not use any adapters or attachments not recommended
Do not attempt to service this product yourself. Do not
Upon completion of any service or repair to this product,
Unplug your unit during a lightning storm, or when
Unplug your ZVOX system from
Do not allow anyone to use replacement parts other
ZVOX
Great Sound Made Simple
Page 2
1. Unpack 415 cabinet, external power supply and AC cord,
Installation and Operating Instructions: ZVOX 415 Single-Cabinet Surround Sound System
remote control and audio connecting cord.
2. Place cabinet on sturdy surface, or mount to wall or desktop
mount using optional wall-mount-bracket hardware (see separate wall-mount instruction sheet supplied with bracket).
Warning: Threaded inserts on back of 415 are 6mm
metric threads. Note: When wall-mounting the 415, the plastic
feet on the bottom can be removed by carefully prying them off
with a butter knife. Unit should face listening area. Try to align
the cabinet with the center of TV screen.
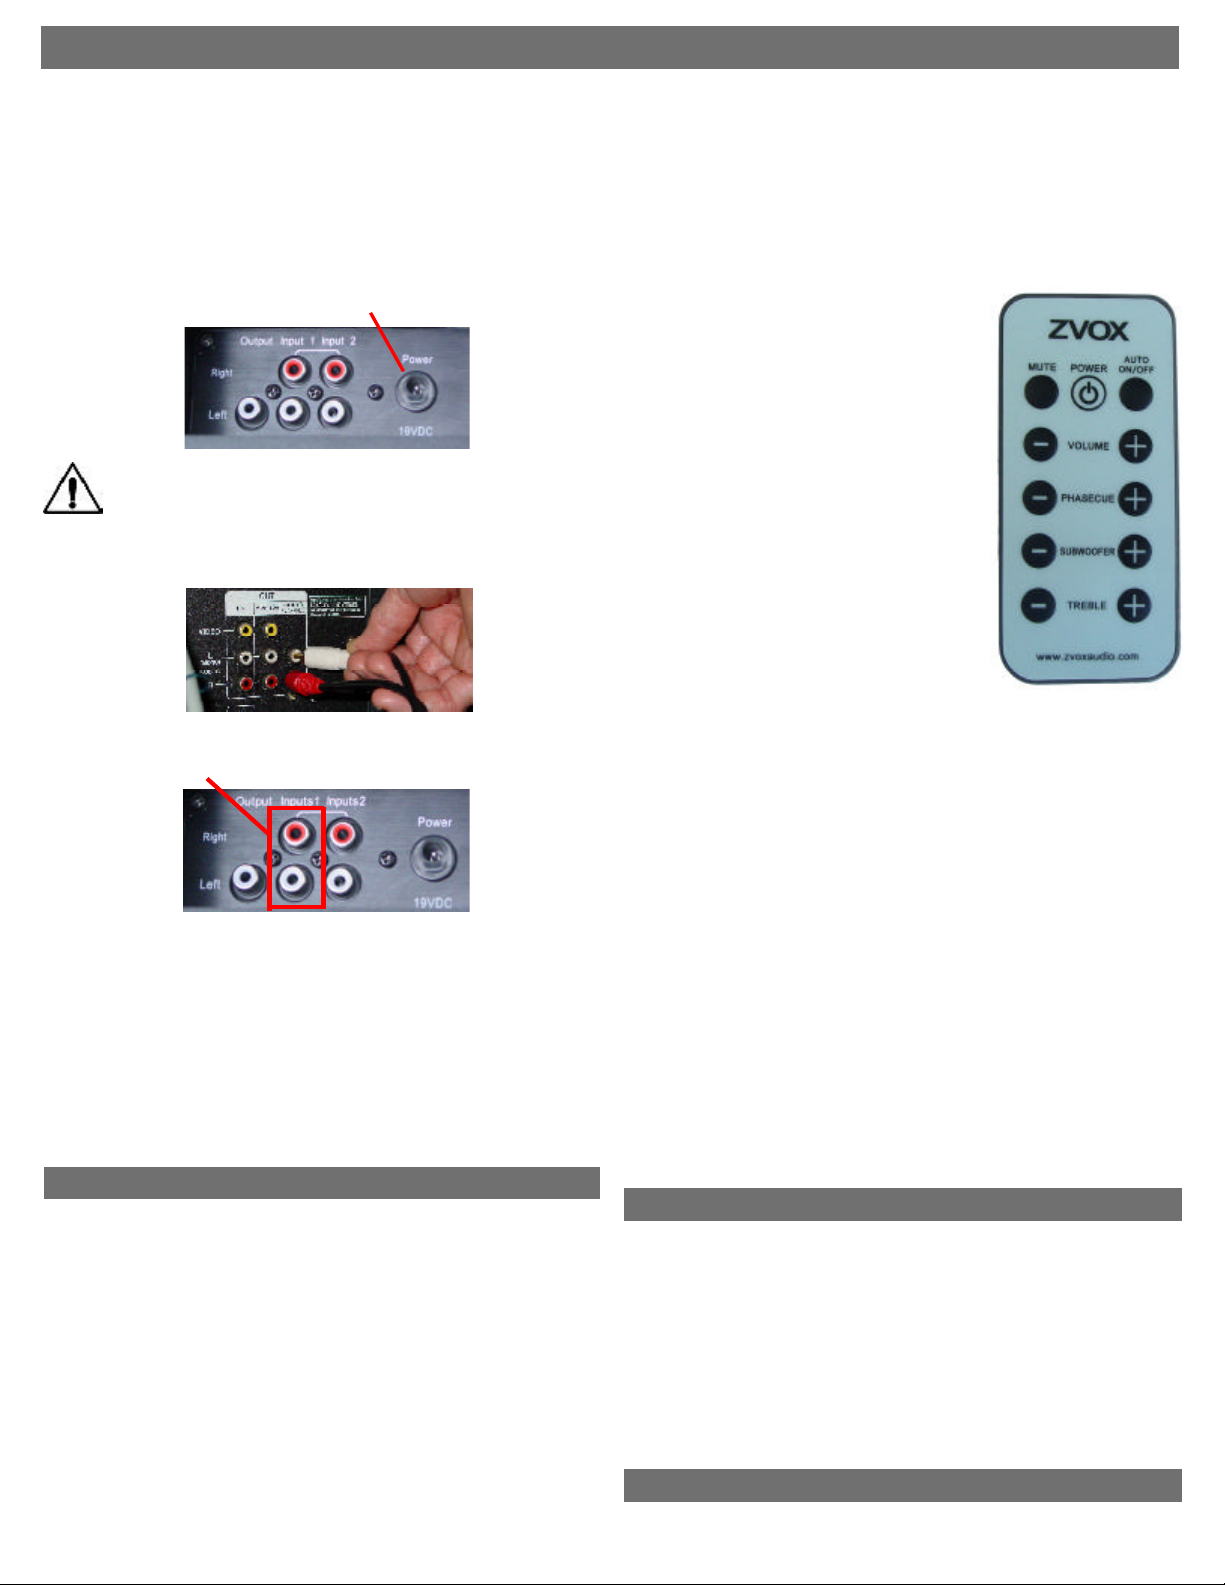
3. Connect AC power supply cord to 19V outlet on back panel.
Rear input
panel of 415
Warning: Don’t plug AC cord into outlet before it is
connected to the power connector on the rear of the unit.
4. Plug the supplied audio connecting cord into the “Audio Out”
jacks of your TV, DVD player, cable box or satellite receiver.
Rear jack
panel of TV
5. Plug other end of audio connecting cable into the red and
white RCA jacks labeled “Input 1” on the back of the ZVOX 415.
Rear input
panel of 415
6. Push the “MENU” button on your TV remote control, then
choose “AUDIO” -- and navigate through the menu options to
choose “SPEAKER: OFF” and “AUDIO OUT: VARIABLE”
(sometimes called “AOV” on a TV’s menu). This allows you to
control the volume of the ZVOX system using your TV’s remote
control. If your TV’s audio output can’t be switched to “VARIABLE,” simply control the volume of the ZVOX 415 by using
the supplied remote control. Alternatively, you may be able to
program your TV remote, or a programmable/learning remote to
control audio levels with any of the following codes: Candle
1004, Hisense 1237 or Aiwa 1036.
Inputs & Controls
• “Input 1” jacks are for audio connecting cable from TV, PC or
other audio source.
• “Input 2” jacks are for a second, mixing input. They will work
correctly only if another device is already connected to the “Input
1” jacks. Note: If you have two devices connected and playing at
the same time (e.g. TV and MP3 player), you will hear both
devices. If you want to connect 3 or more devices – we suggest
you use an input switching device (available at Radio Shack).
• “Output” jack is for use with an optional external powered
subwoofer. This is a “full range” (all frequencies, not just bass)
monaural connection, and should only be used with a subwoofer
that has a variable crossover. We suggest you set the subwoofer’s
crossover at approximately 90 Hz – but you should experiment
with different settings near there.
7. Insert the battery in the ZVOX 415 remote control. To do so,
use a thumbnail to gently pinch in the two small vertical ribs on
the bottom of the back of the remote -- while at the same time
pulling out the battery tray, using the horizontal slot. Place the
battery in the battery tray (with the printed side facing up), and
gently push the tray back into the remote.
8. Turn on the ZVOX 415 by pushing the power button on the
remote control. A blue LED light should come on.
NOTE: In normal operation the unit will go into standby mode 58 minutes after it stops receiving an
audio signal (for example, when you turn
off your TV). The front panel light will turn
from blue to green in standby mode.
When the signal returns (after you turn
your TV on), the light will turn blue
again. To defeat this “automatic standby”
mode, press the “AUTO ON/OFF” button
once (the light will blink). To restore the
setting, press the button again.
9. Adjust volume with the Volume “+”
and “–” buttons. Note that the blue LED
light under the grille will flash with every
push of a button. When you have
reached maximum (or minimum) volume,
the blue LED will stop blinking. The LED
reacts this way for all settings – VOLUME, PHASECUE, SUBWOOFER and
TREBLE.
10. When “MUTE” button is pushed, and
volume is muted, the blue LED will flash
until volume is un-muted with a second push of the button.
11. PHASECUE buttons control the ZVOX virtual surround
sound system. There are nine levels of PHASECUE adjustment. When you turn up the PHASECUE control, the audio
should sound wider or “bigger.” In many cases you will hear
sounds from places where there are no speakers. This effect is
stronger with live music, live sporting events and well-recorded
movies and TV programs. With many programs -- especially
news shows and sitcoms -- PHASECUE will have little effect.
NOTE: If you find that crowd noises or movie special effects
are “drowning out” the dialog, try turning down the PHASECUE
control. This will put more focus on dialog clarity.
12. There are nine levels of SUBWOOFER control. You may
need to experiment with SUBWOOFER levels because speaker
position and program material have a big effect on bass. If the
audio sounds thin, try turning up the SUBWOOFER control. If
the bass sounds overly loud, “boomy” or distorted, turn down
the SUBWOOFER control.
13. There are nine levels of TREBLE control. The adjustment
this control makes is very subtle. Experiment until you think
the sound is not too “bright” and not too “dull.” Most people set
the treble control once and leave the setting in that position.
A few opportunities for fine-tuning.
• If you hear a consistent “hiss” or hum, try turning UP the volume
of your TV or other audio source, and then set the ZVOX volume
level LOWER.
• Please keep in mind that your ZVOX 415 is a highly accurate
audio system that may reveal noise or distortion that other
speakers did not reproduce.
• The PhaseCue control adjusts the size of the perceived “sound
stage.” Feel free to adjust it when playing different kinds of audio.
Some people prefer slightly more, or less PhaseCue effect. Some
people prefer higher settings for movies, and slightly lower settings for music. The “five” setting (of nine) is the default setting.
Questions? Email us at info@zvoxaudio.com
 Loading...