


2
INDEX
General information
.............................................................................................................................
3
Technical characteristics
..............................................................................................................................
4
Warnings
..............................................................................................................................
5
Set up of the machine
..............................................................................................................................
6
Set up of the stand
..............................................................................................................................
7
Proceedings
..............................................................................................................................
8
Cleaning and maintenance
..............................................................................................................................
9
Problem solving
..............................................................................................................................
11
Guarantee
..............................................................................................................................
12
Certificates
..............................................................................................................................
13
Zumoval, S.L. has the right to modificate the content in this manual, without prior notification.

3
GENERAL INFORMATION
First off all, we would like to thank you for choosing a new ZUMOVAL orange juice machine and for the trust
you have shown in our products.
For any questions concerning the machine’s usage, please do not hesitate to contact our distributor or
ZUMOVAL directly. We would be more than pleased to answer any questions you may have. Please closely
follow the instructions indicated in this manual, to achieve the maximum performance from your machine.
Before setting up the machine, please make sure all people authorized to use the machine are familiar
with the present manual and its content.
Please keep this manual in a dry place, near the machine, so it is accessible for any consultation.
Each and every component of the machine, that are in continuous contact with the juice, fulfil strictly the
sanitary normative, in accordance with the manufacturing country’s legislation.

Technical characteristics
MMiinniimmaaxx
MMiinniimmaattiicc
BBaassiicc
TToopp
BBiiggBBaassiicc
FFaassttTToopp
MMOOTTOORR
230V - 50/60Hz
100/115V - 60Hz
0.55 kw 0.55 kw 0.55 kw
MMAAXX CCOONNSSUUMMEE
230V - 50/60Hz
115V - 60Hz
4,1 / 3,7 A
9 / 8,6 A
4,1 / 3,7 A
9 / 8,6 A
4,1 / 3,7 A
9 / 8,6 A
PPRROODDUUCCTTIIOONN
15 units. 28 units. 45 units.
OORRAANNGGEE SSIIZZEE
60-80 mm 2.36”-3.15” 60-80 mm 2.36”-3.15” 75-95 mm 3”-3.8” 60-80 mm 2.36”-3.15”
FFEEEEDDEERR CCAAPPAACCIITTYY
6 units. MAX. 6 kg. MAX. 6 units. MAX. 18 kg. MAX. 5 units. MAX. 18 kg. MAX.
WWIIDDTTHH
33 cm - 13” 33 cm - 13” 62 cm - 24.4” 62 cm - 24.4” 62 cm - 24.4” 62 cm - 24.4”
DDEEPPTTHH
45 cm - 17,7” 45 cm - 17,7” 43 cm - 17” 50 cm - 19.7” 43 cm - 17” 50 cm - 19.7”
HHIIGGHHTT
74 cm - 29.1” 93 cm - 36.6” 70 cm - 27.6” 99 cm - 39” 70 cm - 27.6” 99 cm - 39”
WWEEIIGGHHTT
51.3 kg -113,1 lbs 54.4 kg - 119,93 lbs 42.6 kg - 93,92 lbs 47.5 kg - 104,72 lbs 42.6 kg - 93,9 lbs 47.5kg - 104,7 lbs
ELECTRICAL
PROTECTION
Overcharge and temperature
SECURITY
Inductive detectors of proximity
DDEEGGRREEEE OOFF
PPRROOTTEECCTTIIOONN
IPx4
OOPPCCIIOONNEES
S
••••
AVAILABLE
−
NOT AVAILABLE
X INCLUDED
MMiinniimmaaxx
MMiinniimmaattiicc
BBaassiicc
TToopp
BBiiggBBaassiicc
FFaassttTToopp
MINI STAND
•••• ••••
− − − −
SELF SERVICE STAND
− −
•••• •
•
•
• •••• ••••
DISPENSER STAND
− −
•••• •••• •••• ••••
COOLED DISP. STAND
− −
•••• •••• •••• ••••
ORANGE / SILVER COLOUR
•••• •••• •••• •••• •••• ••••
PERSONALIZED COLOUR
•••• ••••
− − − −
ORANGE COUNTER
•••• •••• •••• •••• •••• ••••
SELF SERVICE TAP
•••• •••• •••• •••• •••• ••••
AUT. SHOWER
•••• •••• •••• ••••
−
••••
BIG CAPACITY JUICE TRAY
− −
•••• •••• •••• ••••
JUICE LEVEL DETECTOR
− − −
••••
−
••••

5
WWAARRNNIINNGG
• It is the responsibility of the user to read the enclosed warnings prior to using this machine.
• After removing the packaging, check that equipment is not damaged. If in doubt, do not use it and
contact the company.
• The packaging materials (plastic bags, foam, cork, etc.) should not be left within reach of children,
as they are a potential danger.
• Before assembling the machine, please, make sure there are no pieces left in the packaging.
• The machine needs to have some ventilation around it in order to perform properly.
• Concerning models on a stand, remember to set the brakes on the front wheels in order to prevent
unwanted moving.
• Before use, clean all the juicing area, SEE CLEANING INSTRUCTIONS.
• Never start the machine running, without making sure that all components are in their correct place
of work, especially the front cover, otherwise the security detector will not allow the machine to run.
• When using the machine, do not touch or access to the moving parts neither by hands nor with any
utensils.
• Machine should never be operated by minor or inexperienced staff without supervision.
• Check that the voltage of your outlet is according to voltage stated in technical label on the side of
your machine.
• Do not use an extension cord. If you decide to do it, it is on your own responsibility, use only
extension that is in good condition and suitable for the power of the machine. The extension cord
should be placed so that no one can pull it or stumble.
• Do not allow the cord to come into contact with hot surfaces.
• To protect against risk of electrical shock and personal injury, do not immerse cord, plug or
appliance in water or any other liquid.
• This product is designed for indoor use, do not expose this appliance to rain or moisture and do not
use it outdoors or with wet hands.
• Always place the machine on a dry, stable and leveled surface.
• To disconnect from the electrical outlet pull the plug gently. Never pull from the cord.
• The use of accessories not recommended by the manufacturer may cause fire, electric shock or
injury, always use original spare parts
THE PROPER SIZE OF ORANGE IN ORDER TO OBTAIN BEST RESULTS
IS 60-80MM DIAMETER.
• It is recommended to wash fruit before juice extraction.
• Do not use the machine out of the temperature range: (from -20º to 40ºC).
• The manufacturer declines any responsibility for damages resulting from improper, careless
or negligent use of equipment, as well as from use by unauthorized persons
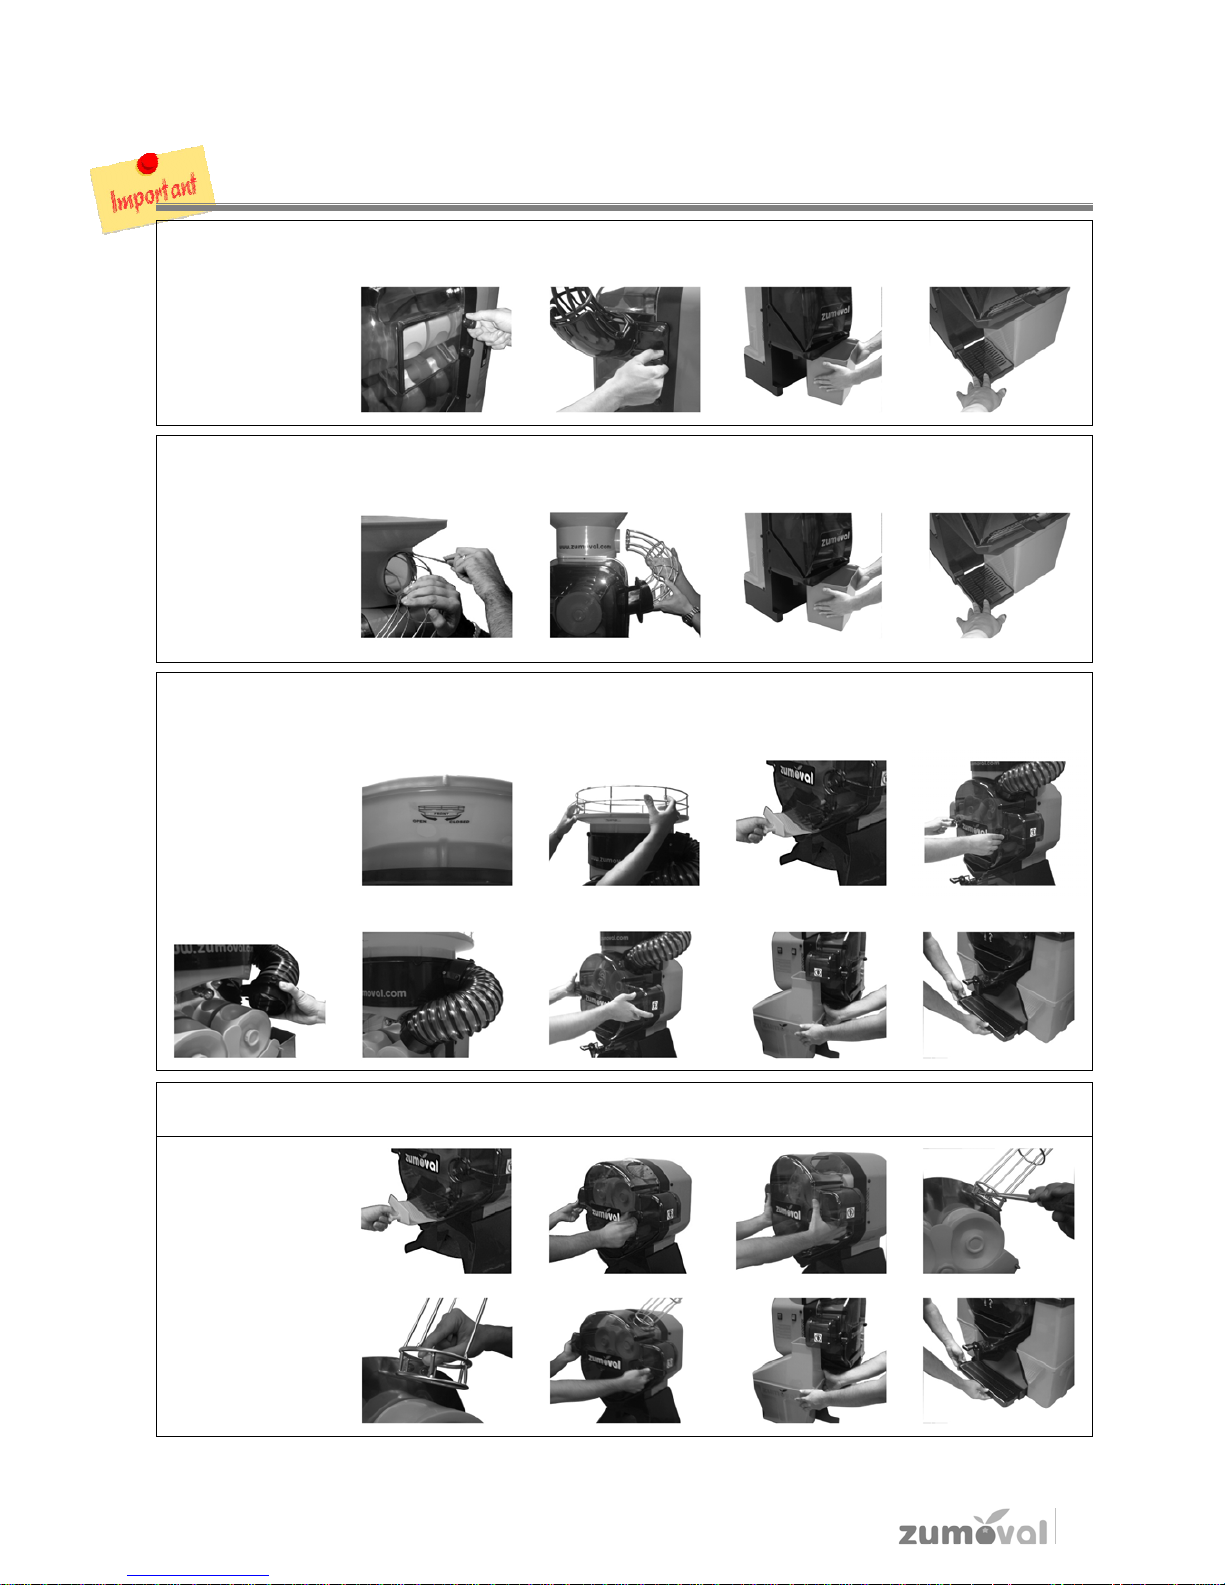
6
Proceed to assemble all the pieces that for transportation reasons come unassembled in their proper location.
SET UP OF THE MACHINE
Minimax
Unscrew the
thumbscrew and
place the feeder
tube.
Place the peel
bucket and the juice
tray.
Minimatic / MiniMaster
Unscrew the
thumbscrew and the
screw of the head
feeder, place the
feeder tube.
Place the peel
bucket and the juice
tray.
Top / FastTop / Master / TopMaster / FrigoMaster
Place the basket,
remove the filter and
the coverscreen. Fit
the feeding tube.
Replace the
coverscreen and the
filter. Finally place
the peel buckets and
the juice tray.
Basic / Big Basic
Remove the filter
and the cover
screen, Place feeder
tube, return the
coverscreen and the
filter and place the
peel buckets.
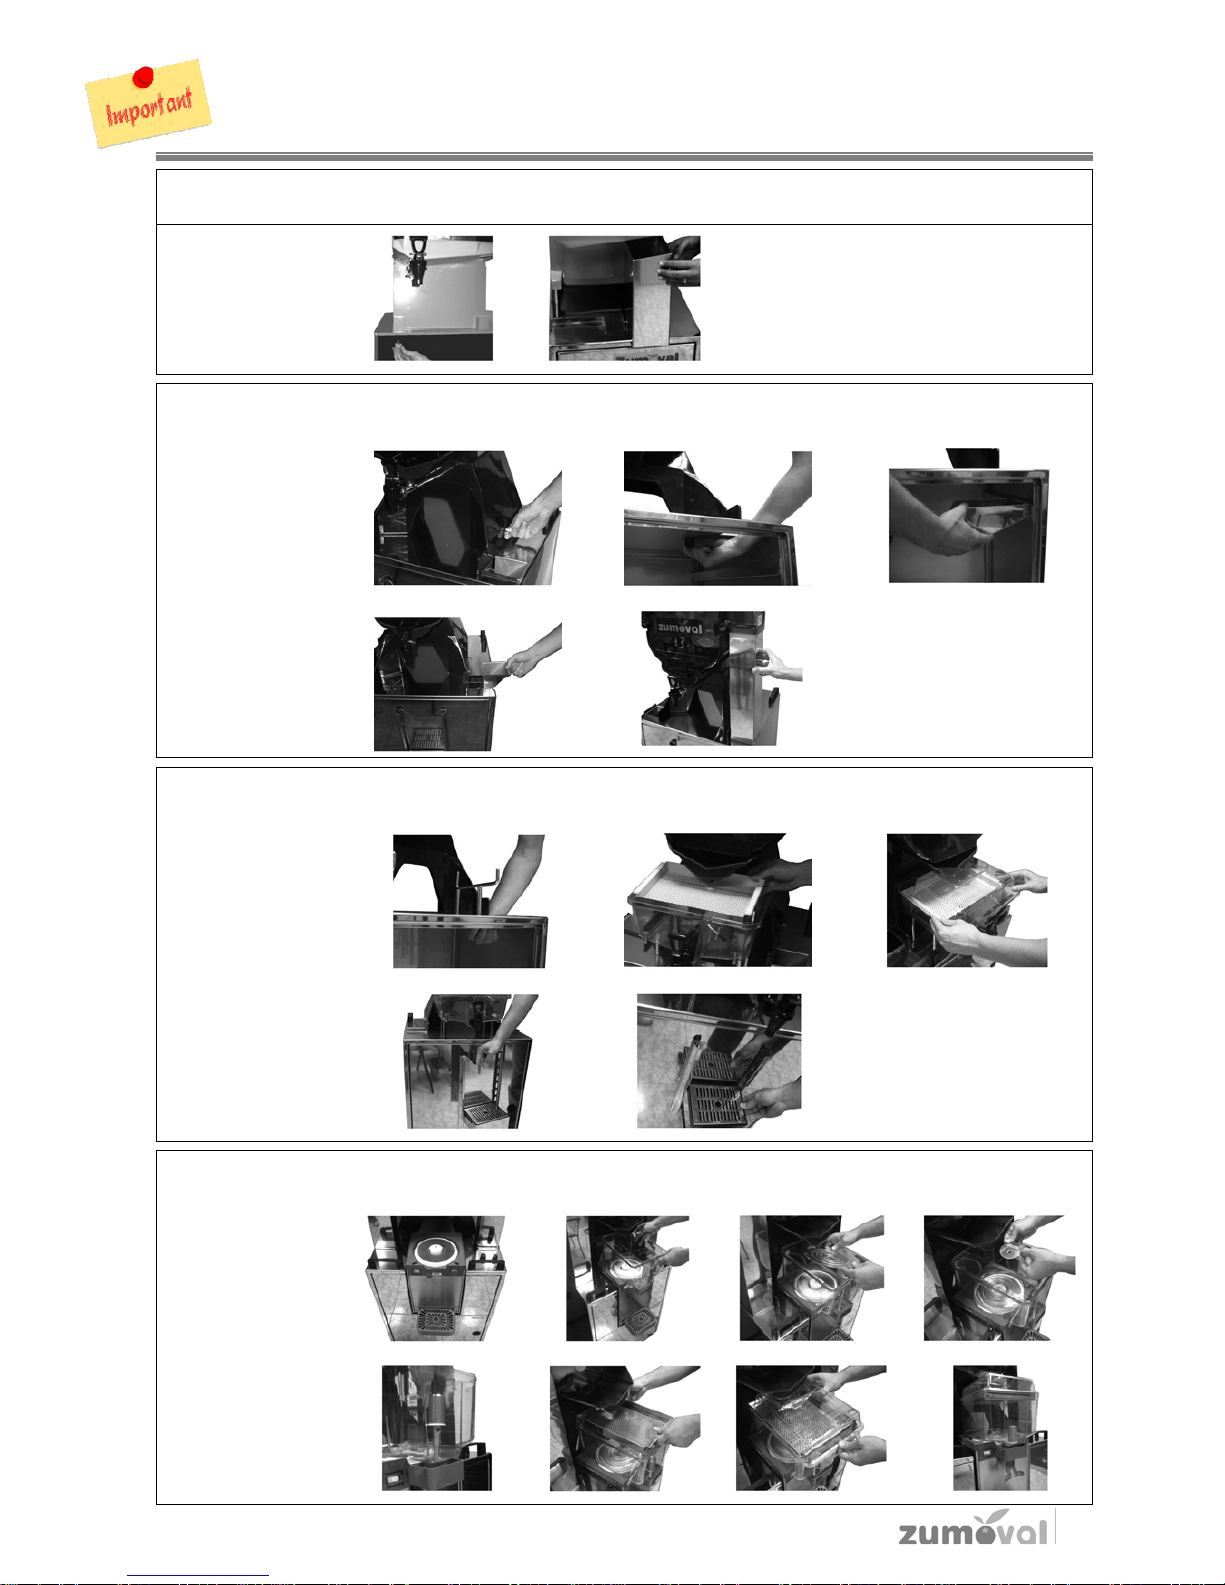
7
SET UP OF
THE
STAND
Mini stand / MiniMaster
Place the machine
on the stand and
place the down
tubes.
Self service stand / TopMaster
Put the machine on
the stand, place the
ramps and the down
tubes and the juice
tray.
Dispenser stand / Master
Realize the same
steps as for the self
service stand.
Place the dispenser
support, place the
dispenser and place
the filter. Place the
juice tray.
Frigo stand / FrigoMaster
Realize the same
steps of the self
service stand.
Place the Caddy as
the images show.
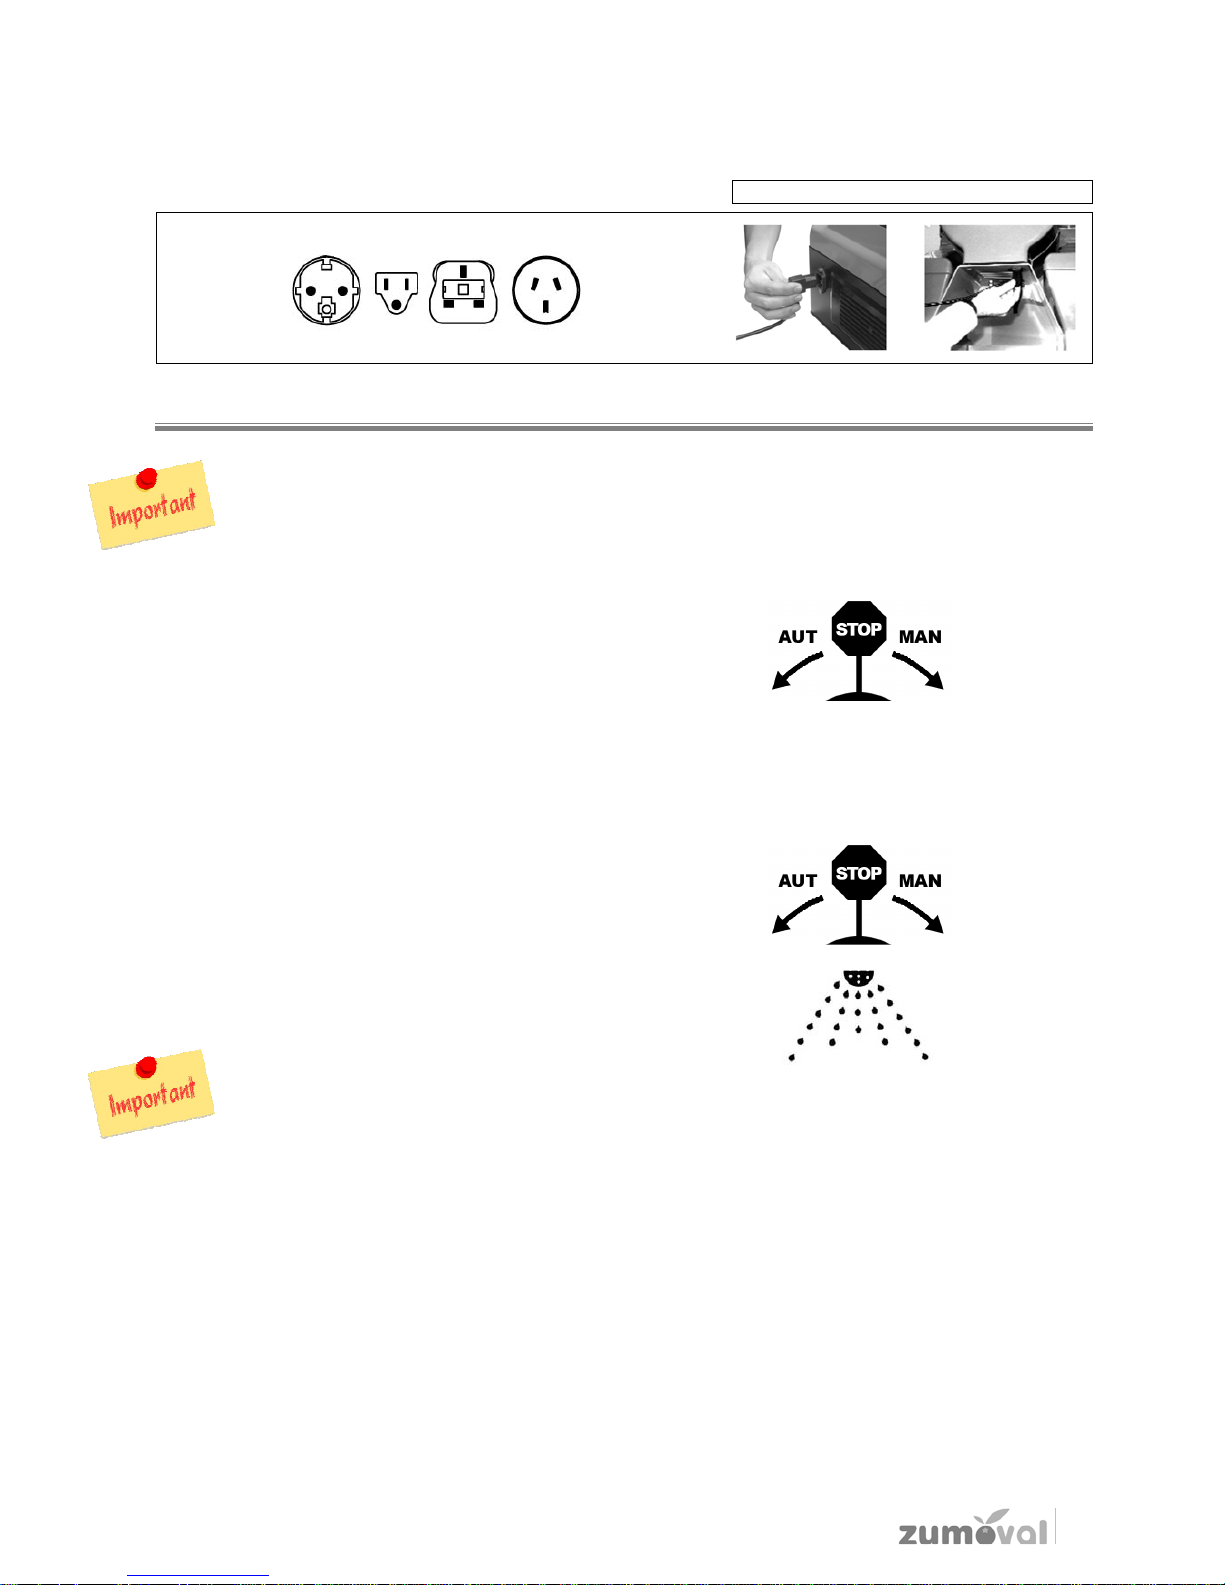
8
Plug the machine into a normal main socket with earth protection.
Plug-in point according to model
PROCEEDINGS
Proceed to introduce oranges through the feeding tube, or the feeding basket (depending on the
model).
To begin with the squeezing process:
Turn on the switching, which is situated at the upper right side of the machine (position I).
- Machines with SELF SERVICE TAP: Turn the self
switch to the position AUT, press the tap
(As indicated on the sticker on the cover screen)
- Machines with
PROGRAMMER
:
Once the switch has been switched on, push one of the red
buttons situated on the front of the machines. The buttons refer to 1, 2, or 3 oranges, while the
button on the right refers to continuing squeezing.
- Machines with JUICE LEVEL DETECTOR: Once the
switch of the machine is turned on, turn the
detector switch to the position AUT
In manual mode the switch can be used.
- Machines with
AUTOMATIC SHOWER
:
Once the water
tube has been connected to the connection at the back of the
machine, push the green button.
The machine has to work in able to connect the shower
To stop the squeezing process:
Stop the machine by pressing the 0 red button at the on/off switch.
- Machines with SELF SERVICE TAP: Close the tap and turn the red light switch off (STOP)
as indicated on the sticker on the coverscreen
- Machines with PROGRAMMER: The first 3 options stop automatically. To stop the continuing
mode, push again this button and put the switch (Pos.0)
- Machines with JUICE LEVEL DETECTOR: In “AUT”, the machine stops automatically, once
the dispenser is full.
If the machine operates in “MAN”, disconnect the on switch.
- Machines with AUTOMATIC SHOWER: Push the SHOWER button and close the water
connection
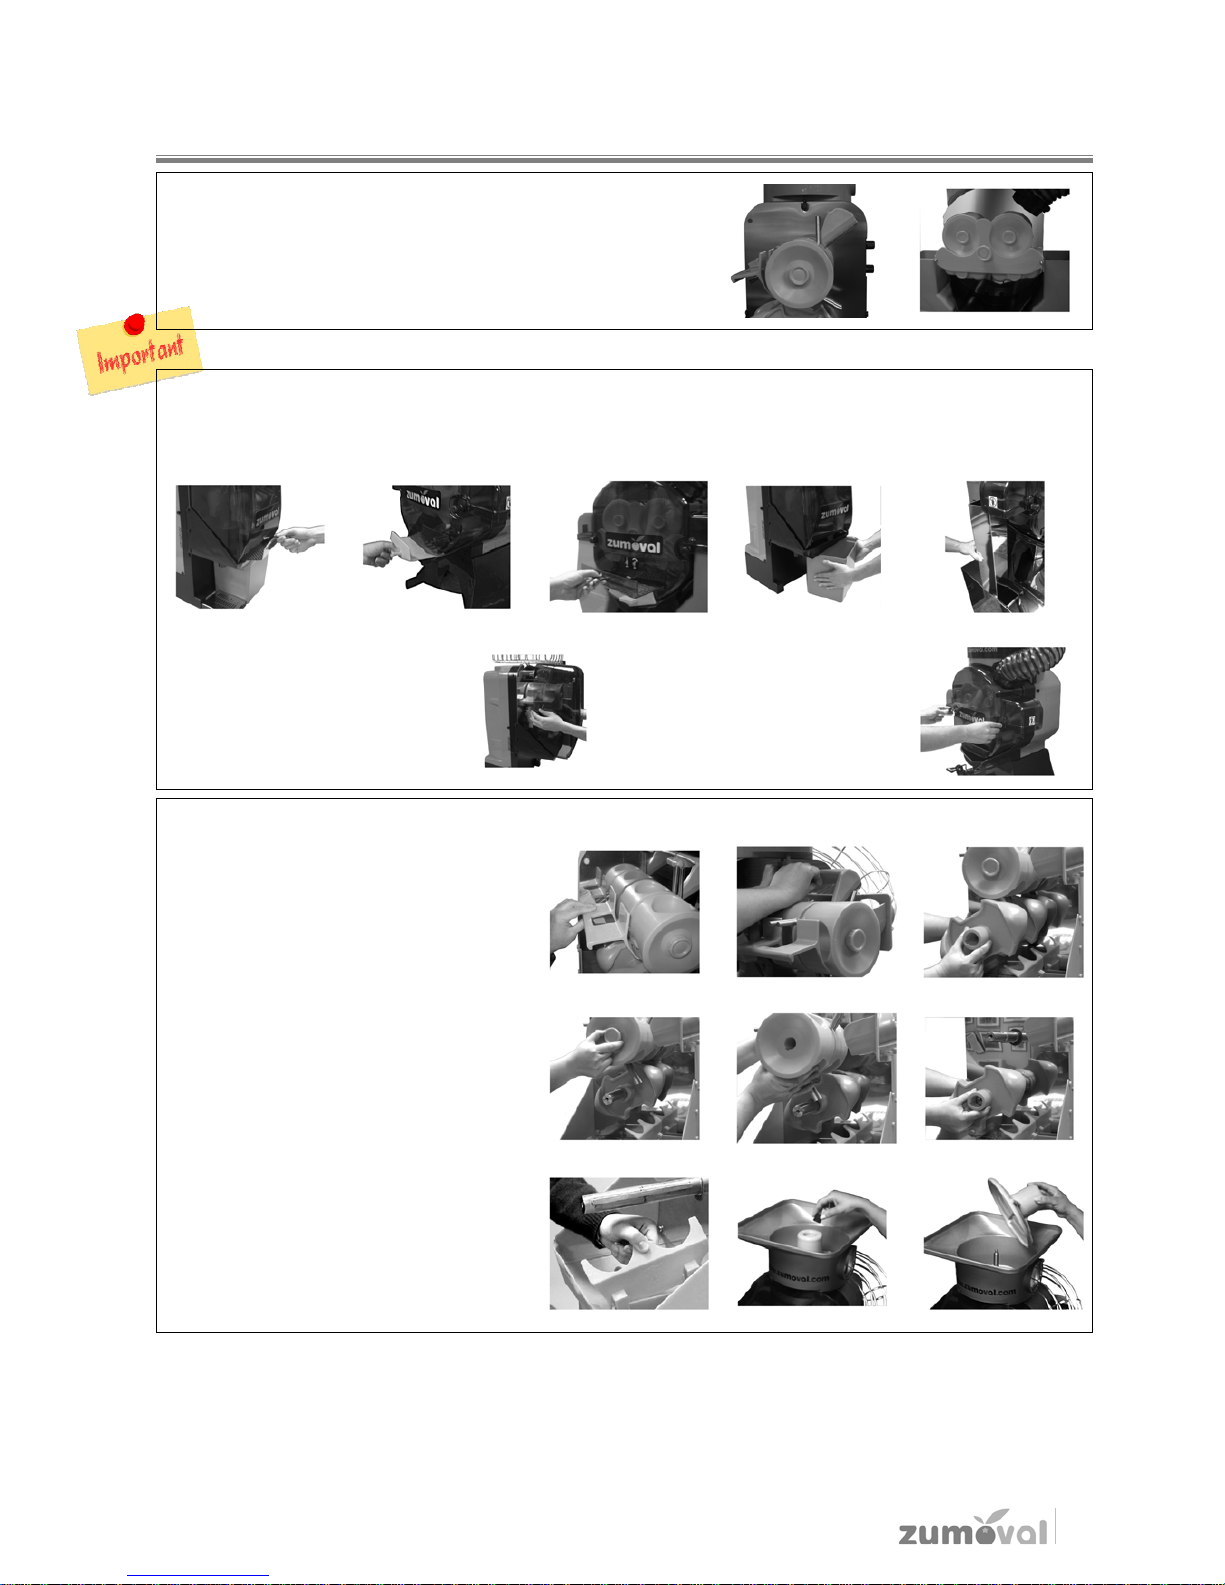
9
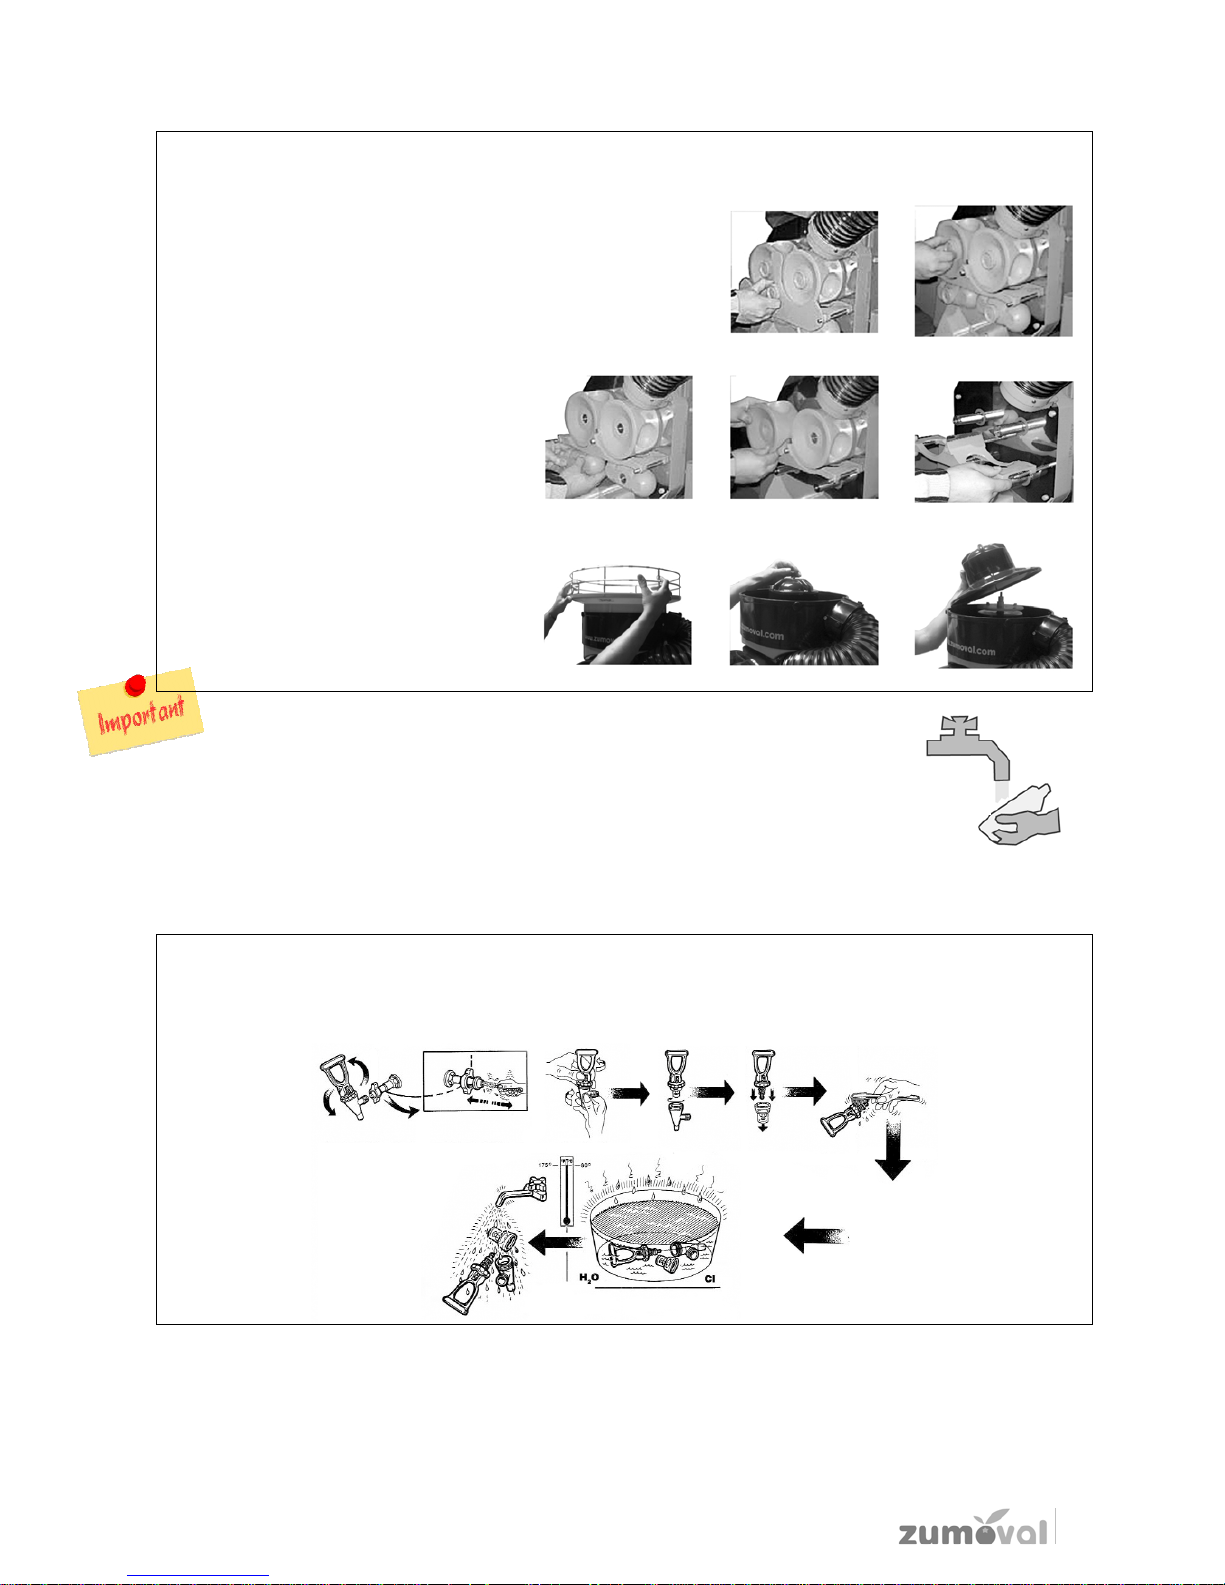
CLEANING AND MAINTENANCE
Once the juice extraction has been finished, stop the machine
according to the model
Leave the rods of the squeezer double drum in a vertical
position
Make sure that the squeezer male parts are horizontal
Unplug the machine from the mains socket.
Remove the juice filter.
Model Minimax, Minimatic, Basic, BigBasic, and Top: Empty the peel bucket.
Model with metal stand: Remove the lateral tubes.
Remove the front cover, moving
it slowly upwards and towards.
Remove the front cover, by
unscrewing the two lateral
screws.
MINIMAX – MINIMATIC- MINIMASTER
Remove the positioner, pushing it upwards.
Remove the knife, by unscrewing the knife
screw (Be careful. The knife is sharp).
Remove the squeezer male part, by
unscrewing the screw.
Remove the squeezer drum by unscrewing
the screw. Remove the second squeezer
male part.
Remove the ejector.
For the models with head feeder:
Take of the turning feeder plate, by
unscrewing the screw
10
BASIC – BIG BASIC – TOP – FASTTOP – TOPMASTER – MASTER - FRIGOMASTER
Unscrew the five principal screws of the squeezing system parts.
Remove the two squeezing drums, the
two male parts and knifepiece pulling it
outwards. Be careful with this part,
because of its cutting edge.
For the models with the upper feeder
component, twist softly the upper metal
basket all the way towards the left and
then gently pull up. Remove the turning
dish by unscrewing the screw towards the
right.
Thoroughly clean all parts, and block of the machine with cold water and
detergent.
Do not use abrasive nor dissolvent products, since they could harm the
compound of the elements of the machine. Do not clean the machine with water
under pressure.
Dry the components of the system and the block of the machine.
Assemble all the parts in reverse order. No tools are required to assemble or disassemble the machine. All
parts should fit with ease and without undue force.
For machines with self service tap, IMPORTANT: In order to ensure the perfect hygiene of your orange
squeezer, it is necessary to clean the tap periodically. Follow the instructions according to the diagram.
Follow the depicted instructions.
For machines with AUTOMATIC SHOWER:
This system does not replace the daily cleaning of the machine.
It permits a quick cleaning during the day, of the area the oranges are squeezed.
Other than daily cleaning, Zumoval machines require no other routine maintenance.
Máx. 25ºC
11
PPRROOBBLLEEMM SSOOLLVVIINNGG
FAILURE
POSSIBLE CAUSE
SOLU
T
ION
The machine does not operate
Machine unplugged Plug it to socket
No power Check the plug and socket
Transparent cover misplaced Make sure it is well placed
Defective safe detectors Call Customer service
Defective ON / OFF button Call Customer service
Defective electric circuit Call Customer service
The machine is blocked while
squeezing is in progress
Insufficient voltage
Check that the voltage is according
to indicated on the identification
label
Wrong fruit size
Check the size of the fruit is as
shown in this manual
The Positioner is broken or bent Misplaced drum or positioned
Make sure the pieces are well
placed
The tap is blocked juice has seeds or excessive pulp
Dissemble and clean the tap as
described in the manual
The machine stops every few
minutes
Insufficient ventilation
Check that ventilation gratings are
not covered
Electrical overload Call Customer service

12
GUARANTEE
Due to high manufacturing standards and strict quality controls, we guarantee the perfect performance of our
machines.
This warranty is valid for two years from the date of purchase in the country of manufacture. In all other
countries the warranty is set by the official distributor but shall not, in any case, be less than 1 year from the
date of purchase.
For a valid claim it is necessary to provide this warranty together with proof of purchase.
We guarantee the repair or replacement of any defective part, component or accessory due to manufacturing
fault. This replacement or repair shall take place at one of our authorized workshops.
The transport cost, hand power and other costs arising from repair or replacement will be charged to the
customer.
THIS WARRANTY DOES NOT COVER: The breakage or weakness of any part or component as a
consequence of improper or inadequate installation, misuse or neglect. Furthermore, we will not be held
responsible for damage caused by normal wear and tear, repair or modification to any part of the machine
undertaken by any unauthorised person. To fulfil the terms of the warranty, all repairs must be performed by
our technical department or the official Zumoval distributor.
Any falsification of warranty documentation, or the loss or damage to the machine’s identification plate, will
lead to the present warranty becoming invalid.
In order to go to our Technical Service, it is be indispensable to mention the serial Nº SERIES of the
identification sticker

Pol. Ind. Fuente del Jarro ⋅
C/ Islas Canarias, 59
46988 PATERNA (VALENCIA – SPAIN)
e-mail: info@zumoval.com ⋅ http://www.zumoval.com
Tel. +34 961 344 141 ⋅ Fax +34 961 343 955
DECLARATION
OF CONFIRMITY
ZUMOVAL, S.L., Based in, Pol. Ind. Fuente del Jarro, C/ Islas Canarias 59, 46988 – Paterna (Valencia Spain), declares, under our exclusive responsibility that following Orange Juicer Machines of the brand
Zumoval, and models:
MINIMAX
BASIC TOP
MINIMATIC
BIG BASIC FASTTOP
Are in compliance with the provisions of the following European directives:
2006 / 42 / CE
Directive on machinery, and amending Directive 95/16/EC
2006 / 95 /
CE
Directive on the harmonisation of the laws of Member States relating
to electrical equipment designed for use within certain voltage limits
2004 / 108 / CE
Directive on the approximation of the laws of the Member States
relating to electromagnetic compatibility
93 / 43 / CE
Directive on the hygiene of foodstuffs
2002 / 72 / CE
Directive relating to plastic materials and articles intended to come
into contact with foodstuffs.
Being applied the following harmonized norms, national norms, international technical specifications:
UNE EN ISO 12100
-
1:2004
Safety of machinery - Basic concepts, general principles for design Part 1: Basic terminology, methodology
UNE EN ISO 12100
-
2:2004
Safety of machinery - Basic concepts, general principles for design Part 2: Technical principles
EN 61000
-3-2
Electromagnetic compatibility
Part 3-2: Limits - Limits for harmonic current emmissions (equipment
with input current 16A per phase).
EN 61000
-3-3
Electromagnetic compatibility
Part 3-3: Limits - Limitation of voltage fluctuations and flicker in
public low-voltage supply systems, for equipment with rated current
≤ 16 A per phase
EN 1672
-2
Food processing machinery - Basic concepts –
Part 2: Hygiene requirements
Paterna, the 03th of January 2013 Firmature: N. Alcañiz
Technical department


SPARE PART LIST (2013-V0)
Basic / BigBasic
Master / FrigoMaster
Top / FastTop / TopMaster
MiniMaster
Minimax / Minimatic
(*) Indicate model and option.
SPARE PART LIST (2013-V0)
DESCRIPTION MODEL COD (*)
BTM
00018
TOR DIN-912 M-5X18 INOX R8MM
RUSTLESS SCREW
MXM
00020
CESTA INOX MINIMAX
STAINLESS STEEL BASKET
MXM
00035
TOR DIN-85 M-4X10 H ZINC
SCREW H ZINC
MXM
00040
ARANDELA DIN-9021 D-6 INOX
RUSTLESS WASHER
BTM-MXM
00042
ELFIN PULSADOR 2 ON-OFF
SWITCH PUSH
BTM-MXM
00045
BORNE 2.5 WDU-N FASE
PE-TERMINAL
BTM-MXM
00046
BORNE 2.5 WPE-N TIERRA
PE-GROUND TERMINAL
BTM-MXM
00048
TOR DIN-933 M-8X30 H ZINC
SCREW H ZINC
BTM-MXM
00049
TERM AISLAD PUNTERA NEGRO
SOLDERLESS TERM INSULATED
BTM-MXM
00052
CONTAC GE MC1 220/240V-50HZ
150
CONTACTOR
MXM
00055
ALIM PLATO GIRATORIO MM BK
TURNING FEEDER PLATE
BTM-MXM
00058
TERM AISLAD FASTON HEMBRA 6.35
SOLDERLESS TERM INSULATED
BTM-MXM
00059
TERM PRE-AISLAD HORQUILLA M4 ROJO
SOLDERLESS TERM INSULATED
BTM-MXM
00061
MICRORRUPTOR
MICROSWITCH
BTM-MXM
00062
ELFIN PULSADOR 1 ROJO
SWITCH PUSH
BTM
00063
ALIM PLATO GIRATORIO TOP BK
TURNING FEEDER PLATE
BTM-MXM
00065
CHAVETA H 8X7X15
COTTER H
MXM
00066
CHAVETA H 8X7X50
COTTER H
BTM-MXM
00067
CHAVETA INOX 8X7X70
STAINLESS COTTER
BTM
00068
TOR DIN-913 M-6X55 H
SCREW H
BTM-MXM
00072
TOR DIN-933 M-8X25 H ZINC
SCREW H ZINC
BTM
00073
TOR DIN-85 M-4X20 INOX
RUSTLESS SCREW
BTM
00077
TOR DIN-913 M-6X10 H
SCREW H
BTM
00081
RODAMIENTO 6004 LLU
BEARING
BTM
00082
RODAMIENTO 6006 LLU
BEARING
MXM
00083
RODAMIENTO 6007 LLU
BEARING
BTM-MXM
00086
TOR DIN-85 M-4X10 INOX
46
RUSTLESS SCREW
BTM
00088
VARILLA CARATULA M-8 BTM
SCREEN ROD
MXM
00089
VARILLA CUCHILLA-POS M-10 MXM
BLADE ROD-POSITIONER
BTM-MXM
00090
CABLE BTM-MXM UL 2/C 18AWG X450 T/O
INTERNAL WIRING
MXM
00093
CUCHILLA MXM NA
KNIFEPIECE
BTM
00094
MACHO EXPRIMIDOR BTM
SQUEEZER MALE
MXM
00095
MACHO EXPRIMIDOR MXM
SQUEEZER MALE
BTM
00096
TAMBOR EXPRIMIDOR BTM
SQUEEZER DRUM
BTM
00097
SOPORTE ALIM CABEZAL TOP
FEDEER SUPPORT
MXM
00098
EXTRACTOR MXM NA
EJECTOR
BTM-MXM
00107
MOTOR CONDENSADOR 20MF
130
MOTOR CAPACITOR
BTM-MXM
00108
REJILLA VENTILACION BK
VENTILATION GRID
BTM
00110
EJE INOX BTM INF
28
LOWER RUSTLESS SHAFT
MXM
00111
EJE INOX MXM INF
LOWER RUSTLESS SHAFT
BTM
00112
EJE INOX BTM SUP
UPPER RUSTLESS SHAFT
MXM
00113
EJE INOX MXM SUP
UPPER RUSTLESS SHAFT
BTM-MXM
00114
TOR DIN-912 M-6X16 H ZINC
SCREW H ZINC
MXM
00115
PIÑON MXM SUPERIOR
UPPER GEAR
MXM
00117
PIÑON MXM INFERIOR
36
LOWER GEAR
BTM-MXM
00120
ELFIN KIT BLOQUES P/L (2NA)
SWITCH BLOCK
BTM
00126
CARATULA TAPA DER BTM
COVER SCREEN RIGHT LID
PAG: 1 / 6The data reflected here may change without prior notice.

(*) Indicate model and option.
SPARE PART LIST (2013-V0)
DESCRIPTION MODEL COD (*)
BTM-MXM
00127
CABLE BTM-MXM UL 2/C 18AWG X350 T/T
INTERNAL WIRING
BTM
00129
CARTER BTM TAPA
14
SUMP COVER
BTM
00131
PANTALLA ZUMO BTM NA
PROTECT JUICE SCREEN
BTM
00136
BANDEJA GT BTM BK
TRAY
BTM
00144
ELFIN KIT BLOQUES P/L (4NA)
SWITCH BLOCK
BTM-MXM
00150
TERM AISLAD PUNTERA ROJO
SOLDERLESS TERM INSULATED
BTM
00152
POMO D45 HEMBRA M-12 NA
FEMALE THUMSCREW
BTM
00153
SELEC ELECTRONIC 1-2-3
ELECTRONIC 1-2-3 SELECTOR
BTM
00167
DEPOSITO CORTEZAS MUEB S/S-DISP
PEEL BUCKET STAND
BTM-MXM
00168
ANILLO SEEGER DIN 471 E-34
C CLIP
BTM-MXM
00171
ARANDELA D-35X9X3 H
WASHER H
BTM
00173
ARANDELA DIN-125 D-10 H ZINC
WASHER H ZINC
BTM-MXM
00174
ARANDELA DIN-125 D-8 INOX
RUSTLESS WASHER
BTM
00175
CHAVETA H 8X7X70
COTTER H
MXM
00176
CHAVETA INOX 8X7X170
STAINLESS COTTER
BTM
00177
CHAVETA INOX 8X7X50
STAINLESS COTTER
BTM-MXM
00178
POMO D45 MACHO M-8 NA
MALE THUMSCREW
BTM
00180
TOR DIN-933 M-8X50 H
SCREW H
BTM
00183
TOR DIN-933 M-8X16 INOX
RUSTLESS SCREW
BTM
00187
TUERCA DIN-934 M-6 H ZINC
WINGNUT H ZINC
BTM
00188
TUERCA DIN-934 M-8 H ZINC
WINGNUT H ZINC
BTM-MXM
00189
TUERCA DIN-985 M-4 INOX AUTOSE
RUSTLESS WINGNUT
BTM
00190
TUERCA DIN-934 M-10 H ZINC
WINGNUT H ZINC
BTM-MXM
00192
TUERCA DIN-934 M-8 INOX
RUSTLESS WINGNUT
MXM
00194
POSICIONADOR 06 MXM
38
POSITIONER
MXM
00195
POSICIONADOR 06 GUIA MXM
POSITIONER GUIDE
BTM
00196
RETEN 30X40X6 DL INOX
RUBBER SEAL
MXM
00198
RETEN 35X50X7 DL INOX SIL-FDA
RUBBER SEAL
BTM
00199
VARILLA EXTRACTOR M-12 BTM
EJECTOR ROD
MXM
00200
POSICIONADOR 06 TAPA MXM
POSITIONER LID
BTM
00201
EXTRACTOR CUCHILLA BTM
BLADE EJECTOR
BTM
00203
AGITADOR DISPENSADOR MASTER
SHAKER DISPENSER
BTM-MXM
00211
DC PRENSA V-TEC 9GR PG9
DC HOSE FIXING
MXM
00217
FILTRO ZUMO MXM INOX
RUSTLESS JUICE FILTER
BTM-MXM
00219
REJILLA GT INOX MXM-MUEB S/S-DISP
LUGGAGE-RACK
BTM
00220
REJILLA GT INOX BT
LUGGAGE-RACK
BTM
00222
EJE ALIM VERTICAL INOX TOP
RUSTLESS FEEDER SHAFT
BTM
00224
PIÑON ALIM 1 REDUCT TOP
GEAR FEEDER
BTM
00225
PIÑON ALIM 2 CABEZ TOP
GEAR FEEDER
BTM-MXM
00226
PIÑON ALIM 3 HORIZ TOP-MM
GEAR FEEDER
BTM
00227
PIÑON ALIM 4 EJE TOP
GEAR FEEDER
BTM
00237
CARATULA TAPA BALANC BTM
COVER SCREEN BAL
BTM-MXM
00244
ELFIN PULSADOR 1 AZUL
SWITCH PUSH
BTM
00247
TOR GUIA M-4X12 INOX MUEBLE
STAND TRAY RUSTLESS SCREW
BTM
00251
GRIFO
TAP
BTM
00256
TUBO CAIDA MUEB S/S-DISP-FRIGO
DOWN TUBE STAND
BTM
00263
SELEC PULSADOR ROJO
RED PUSH-BUTTON
BTM
00265
CARATULA BTM
11
COVER SCREEN
BTM
00276
FILTRO ZUMO BTM
32
JUICE FILTER
BTM
00277
FILTRO ZUMO BTM-BIG
32
JUICE FILTER
BTM-MXM
00285
EMBELLECEDOR DIN-85 M4 BK
30
PLASTIC LID
BTM-MXM
00286
EMBELLECEDOR DIN-85 M6 BK
31
PLASTIC LID
BTM-MXM
00287
POMO D25 HEMBRA M-8 BK
FEMALE THUMSCREW
PAG: 2 / 6The data reflected here may change without prior notice.

(*) Indicate model and option.
SPARE PART LIST (2013-V0)
DESCRIPTION MODEL COD (*)
BTM-MXM
00289
POMO D25 MACHO M-6 BK
MALE THUMSCREW
BTM
00291
CUBRE JUNTA LATERAL TOP BK
20
BACK COVER JOINT
BTM
00294
REDUC BTM VARVEL 14-160 R:1/28
39
REDUCER
BTM
00298
ESCUADRA SOPORTE MUEB BTM BK
SUPPORT BRACKET STAND
BTM
00300
BANCADA BTM BK
3
BASEPLATE
BTM
00302
ELFIN SELECTOR 1-0-2 NARAN
SELECTOR SWITCH
BTM
00310
FINDER RELE 1C 16A 230VAC
145
RELAY
MXM
00311
TUBO ALIM MX GRAPA BK
FEEDER TUBE SUPPORT CLAMP
MXM
00313
SOPORTE TUBO ALIM MM BK
FEEDER TUBE SUPPORT
MXM
00314
SOPORTE TUBO ALIM MX BK
FEEDER TUBE SUPPORT
BTM
00315
TUBO ALIM BASIC D80
FEEDER TUBE
BTM-MXM
00322
BANDEJA GT MXM-MUEB BK
5
TRAY
MXM
00325
BASE CARTER MXM BK
SUMP BASE
MXM
00333
TAMBOR EXPRIMIDOR MXM DOBLE
SQUEEZER DOUBLE DRUM
BTM-MXM
00334
TERM AISLAD PUNTERA DOBLE NEGRO
SOLDERLESS TERM INSULATED
MXM
00335
TOR DIN-85 M-4X8 H ZINC
SCREW H ZINC
MXM
00336
REJILLA CARTER MXM BK
SUMP GRID
BTM
00343
DEPOSITO CORTEZAS MUEB FRIGO
PEEL BUCKET STAND
BTM
00345
RETEN PROTECCION SUP BTM
UPPER SEAL PROTECTION
BTM
00346
RETEN PROTECCION INF BTM
LOWER SEAL PROTECTION
MXM
00348
SOPORTE CARAT TAPA MXM BK
45
COVER SCREEN SUPPORT CAP
BTM-MXM
00350
CABLE BTM-MXM UL 8/C 22AWG X800 T/F
INTERNAL WIRING
BTM
00358
MUEBLE INOX FRIGO S/M
COOLED DISPENSER STAND
MXM
00361
SOPORTE CARATULA 09 MXM BK
44
COVER SCREEN SUPPORT
MXM
00363
SOPORTE ALIM CABEZAL MM
FEEDER SUPPORT
BTM
00370
BANDEJA ZUMO BTM BK
6
JUICE TRAY
BTM
00371
BANDEJA ZUMO BTM BK SELF
6
JUICE TRAY
MXM
00372
BANDEJA ZUMO MXM BK
7
JUICE TRAY
MXM
00373
BANDEJA ZUMO MXM BK SELF
7
JUICE TRAY
BTM
00376
CABEZAL ALIM TOP BK-TP
10
HEAD FEDEER
BTM
00386
MUEBLE INOX SELF SERVICE S/M
SELF SERVICE STAND
BTM
00387
MUEBLE INOX DISPENSER S/M
DISPENSER STAND
BTM
00391
CUBRE DELANTERO TOP NA
18
COVER TOP
MXM
00395
TUBO ALIM MX PROTEC BK
FEEDER TUBE PROTECTION
MXM
00396
TUBO ALIM MX BK
FEEDER TUBE
MXM
00397
CUBRE TRAS MM NA
21
BACK COVER
MXM
00400
CARATULA MXM
12
COVER SCREEN
BTM
00401
TUBO ALIM BIGBASIC D100
FEEDER TUBE
BTM
00402
CARATULA TAPA IZQ BTM
COVER SCREEN LEFT LID
MXM
00404
CUBRE TRAS MX NA
22
BACK COVER
BTM
00405
CUBRE TRAS BASIC NA
19
BACK COVER
BTM
00406
CUBRE TRAS TOP NA
23
BACK COVER
MXM
00408
TAPON GRAPA ESTRIADA D5X12 MM
PLUGGING CAP
BTM
00409
SOPORTE BANDEJA GT MUEB S/S-DISP
STAND SUPPORT TRAY
MXM
00411
TAPON GRAPA ESTRIADA D7X19 MM
PLUGGING CAP
BTM-MXM
00414
DETECT INDUCTIVO M12 024/240VAC
INDUCTIVE PROXIMITY SWITCH
BTM-MXM
00418
CABLE BTM-MXM UL 2/C 18AWG X500 T/F/E
INTERNAL WIRING
MXM
00419
MARCO BANDEJA GT MUEB MINI
TRAY HOLDER
BTM
00420
RAMPA INFERIOR MUEB S/SERV
STAND LOWER RAMP
BTM-MXM
00423
TERM PRE-AISLAD EMPALME ROJO
SOLDERLESS TERM INSULATED
MXM
00426
RETEN PROTECCION INF MXM
LOWER SEAL PROTECTION
MXM
00427
RETEN PROTECCION SUP MXM
UPPER SEAL PROTECTION
MXM
00428
TOR DIN-912 M-3X20 H
SCREW H
PAG: 3 / 6The data reflected here may change without prior notice.

(*) Indicate model and option.
SPARE PART LIST (2013-V0)
DESCRIPTION MODEL COD (*)
MXM
00431
TOR DIN-85 M-6X20 INOX
RUSTLESS SCREW
BTM-MXM
00432
TOR DIN-85 M-6X12 INOX
RUSTLESS SCREW
BTM-MXM
00436
ARANDELA DIN-6798 D-6 INOX
RUSTLESS WASHER
BTM
00443
ELFIN KIT BLOQUES P/L (2NA+2NC)
SWITCH BLOCK
BTM-MXM
00447
ELFIN KIT BLOQUES P/L (1NA)
SWITCH BLOCK
MXM
00452
DEPOSITO CORTEZAS MUEB MINI XL
PEEL BUCKET STAND
BTM-MXM
00460
TOR DIN-933 M-10X45 H ZINC
SCREW H ZINC
BTM-MXM
00469
CONTADOR KU 230VAC
135
COUNTER
BTM-MXM
00475
CARRIL SIMETRICO DIN TS35 L-125-MM
DIN RAIL TS35
BTM-MXM
00480
DISCO TRACCION ALIM BK
TRACTION DISK FEEDER
MXM
00485
CABEZAL ALIM MM NA
9
HEAD FEDEER
MXM
00487
EJE ALIM VERTICAL INOX MM
RUSTLESS FEEDER SHAFT
MXM
00488
SUPLEM DISCO TRAC ALIM MM
FEEDER TRACTION DISC SUPPL
BTM-MXM
00489
ANILLO SEEGER DIN-471 E-16
C CLIP
BTM-MXM
00497
CABLE BTM-MXM UL 2/C 18AWG X450 T/T
INTERNAL WIRING
MXM
00502
ARANDELA D-28X6,5X2 H
WASHER H
BTM-MXM
00503
TOR DIN-933 M-6X10 INOX
RUSTLESS SCREW
BTM-MXM
00508
MOT 0,55KW 71/90 230V-50/60HZ MA
160
MOTOR
BTM-MXM
00510
ELFIN SELECTOR 1-0-2R ROJO
SELECTOR SWITCH
MXM
00516
PIÑON ALIM 4 EJE MM
GEAR FEEDER
BTM-MXM
00519
TOPE DISPARO MICRO SELF
MICRO STOP
BTM
00520
GUIA VARILLA SELF BTM
ROD GUIDE STOP
BTM-MXM
00526
TUERCA DIN-985 M-5 INOX AUTOSE
RUSTLESS WINGNUT
BTM
00528
SOPORTE G-INOX SELF BTM
SELF TAP SUPPORT
MXM
00529
SOPORTE G-INOX SELF MXM
SELF TAP SUPPORT
MXM
00533
VARILLA GRIFO SELF MXM
SELF TAP ROD
BTM
00534
VARILLA GRIFO SELF BTM
SELF TAP ROD
MXM
00535
MUEBLE INOX MINI S/M
MINI STAND
BTM-MXM
00538
TOR DIN-913 M-6X6 H
SCREW H
MXM
00541
TOR DIN-7971 M-2,9X10 INOX
RUSTLESS SCREW
BTM
00544
DEPOSITO DISPENSER TAPA
JUICE DISPENSER COVER
BTM
00545
FILTRO DEPOSITO DISPENSER INOX
RUSTLESS FILTER
BTM
00549
SOPORTE DISPENSADOR MASTER
DISPENSER SUPPORT
BTM
00550
DEPOSITO FRIGO TAPA
JUICE DISPENSER COVER
BTM
00551
FILTRO DEPOSITO FRIGO INOX
RUSTLESS FILTER
BTM-MXM
00554
ELECTROV PK G1/4 230VAC-50/60H
140
SOLENOID VALVE
BTM-MXM
00555
TOR DIN-85 M-5X10 INOX
46
RUSTLESS SCREW
MXM
00556
TUBO CAIDA MUEB MINI
DOWN TUBE STAND
MXM
00562
EJE REDUC MXM F-125 RS
REDUCER SHAFT
BTM-MXM
00565
ELECTROV CONECTOR BOBINA
COIL CONNECTOR
BTM
00566
FINDER BASE RELE SERIE 95.05
RELAY BASE
BTM-MXM
00570
CABLE BTM-MXM UL 5/C 18AWG X650 T/F/O
125
INTERNAL WIRING
BTM-MXM
00576
ELFIN BOMBILLA 230V-2W
110
LAMP
BTM-MXM
00583
BASE CONECTOR IEC320-C14
POWER INLET CONNECTOR
MXM
00590
POMO D25 MACHO M-8 NA
MALE THUMSCREW
MXM
00594
DEPOSITO CORTEZAS MXM NA
25
PEEL BUCKET
BTM
00648
FILTRO SELF BTM
SELF FILTER
BTM
00650
CARATULA BTM SELF
11
COVER SCREEN
MXM
00675
FILTRO SELF MXM INOX
RUSTLESS JUICE FILTER
BTM-MXM
00676
GRIFO SELF
SELF TAP
BTM
00679
CESTA ALIMENT BASE TOP NA
17
FEEDER BASE BASKET
BTM-MXM
00695
CABLE BTM-MXM UL 2/C 18AWG X250 T/T
INTERNAL WIRING
BTM
00700
NIV SENSOR CAPACITIVO RECHNER
CAPACITIVE SWITCH
PAG: 4 / 6The data reflected here may change without prior notice.

(*) Indicate model and option.
SPARE PART LIST (2013-V0)
DESCRIPTION MODEL COD (*)
BTM-MXM
00705
CABLE CONEX IEC320-C13+SCHUKO
POWER CORD
BTM-MXM
00713
CABLE RIGIDO UL 1/C 18AWG ROJO
CABLE RIGID SINGLE CORE
BTM
00714
VENTILADOR SU 220/240V-50/60HZ
FAN
BTM
00715
VENTILADOR SU 115V-50/60HZ
FAN
BTM
00716
VENTILADOR SU REJILLA 92X92 PL
FAN GRID
BTM-MXM
00721
CABLE BTM-MXM UL 5/C 18AWG X250 T/T
INTERNAL WIRING
BTM-MXM
00722
ELFIN KIT BLOQUES P/L (1NA+1NC)
SWITCH BLOCK
BTM-MXM
00725
CABLE BTM-MXM UL 2/C 18AWG X550 T/T
INTERNAL WIRING
BTM
00766
DEPOSITO DISPENSER BASE
JUICE DISPENSER BASE
BTM-MXM
00768
TOR DIN-913 M-6X16 H
SCREW H
BTM-MXM
00818
CABLE BTM-MXM UL 3/C 18AWG X650 T/F
115
INTERNAL WIRING
BTM
00877
RAMPA CAIDA IZQ MUEB S/S-DISP
STAND LEFT RAMP
BTM
00878
RAMPA CAIDA DER MUEB S/S-DISP
STAND RIGHT RAMP
BTM
00879
RAMPA CAIDA IZQ MUEB FRIGO
STAND LEFT RAMP
BTM
00880
RAMPA CAIDA DER MUEB FRIGO
STAND RIGHT RAMP
BTM
00883
DEPOSITO CORTEZAS BT TAPA DER NA
26
RIGHT PEEL BUCKET LID
BTM
00884
DEPOSITO CORTEZAS BT BASE NA
24
PEEL BUCKET BASE
BTM
00885
DEPOSITO CORTEZAS BT TAPA IZQ NA
27
LEFT PEEL BUCKET LID
BTM
00902
GRIFO ACOPLAMIENTO CORTO 47 MM
COUPLING TAP
BTM
00903
GRIFO JUNTA
TAP'S WASHER
BTM
00904
GRIFO TUERCA
TAP'S NUT
BTM
00905
GRIFO TUERCA VALONA
TAP'S NUT VALON
BTM-MXM
00914
CIERRE SOUTHCO
CLOSING DEVICE
BTM-MXM
00915
TUERCA DIN-934 M-3 H ZINC
WINGNUT H ZINC
BTM-MXM
00916
ARANDELA DIN-6798 D-3 H ZINC
WASHER H ZINC
BTM
00919
EXTRACTOR CUCHILLA BIGBASIC
BLADE EJECTOR
BTM
00921
POMO D45 HEMBRA M-12 NA BIG
FEMALE THUMSCREW
BTM
00923
POMO D45 MACHO M-8 NA BIG
MALE THUMSCREW
BTM
00925
TAMBOR EXPRIMIDOR BIG D80-D100
SQUEEZER DRUM
BTM
00926
MACHO EXPRIMIDOR BIG D80-D100
SQUEEZER MALE
BTM
00929
SEPARADOR VARILLA D8 BIGBASIC
SEPARATING ROD
BTM
00930
SEPARADOR VARILLA D12 BIGBASIC
SEPARATING ROD
BTM-MXM
00961
DC DIFUSOR BOLA
DC SHOWER DIFFUSER
BTM-MXM
00962
DC TUERCA H DIN-936.5 M-18X1.5
DC WINGNUT H
BTM
00965
CARATULA BTM BIG
11
COVER SCREEN
BTM-MXM
00976
CABLE BTM-MXM UL 2/C 18AWG X450 T/F
120
INTERNAL WIRING
BTM-MXM
01000
DC VALVULA BOLA 1/4" H-H AIGNE
DC VALVE
BTM-MXM
01003
DC CODO 1/4" M-H
DC ELBOW
BTM-MXM
01004
DC REDUCCION 1/4"-3/8" M-M
DC REDUCTION
BTM-MXM
01007
RETEN PROTECCION TAPA BTM-MXM
LOWER SEAL PROTECTION
BTM
01014
DC SOPORTE ELECTROVALVULA BTM
DC EVALVE SHOWER SUPPORT
MXM
01015
DC SOPORTE ELECTROVALVULA MXM
DC EVALVE SHOWER SUPPORT
BTM-MXM
01043
RUEDA RHOMB FRENO
43
ROTATORY BRAKE WHEEL
BTM-MXM
01046
RUEDA RHOMB CENTRAL FIJA
42
FIXED WHEEL
BTM
01065
PIÑON BTM SUPERIOR 0
UPPER GEAR
BTM
01066
PIÑON BTM SUPERIOR 1
UPPER GEAR
BTM
01067
PIÑON BTM INFERIOR 0
LOWER GEAR
BTM
01068
PIÑON BTM INFERIOR 1
LOWER GEAR
BTM
01070
EJE REDUC BTM F-125 VAR
29
REDUCER SHAFT
BTM-MXM
01078
CABLE CONEX IEC320-C13+USA
POWER CORD
BTM-MXM
01079
CABLE CONEX IEC320-C13+UK
POWER CORD
MXM
01107
REDUC MXM MRIV40 B7 R127 14-160
REDUCER
BTM-MXM
01144
CABLE CONEX IEC320-C13+AUS
POWER CORD
PAG: 5 / 6The data reflected here may change without prior notice.

(*) Indicate model and option.
SPARE PART LIST (2013-V0)
DESCRIPTION MODEL COD (*)
BTM-MXM
01181
DC ADAP MACHO 6-1/4" BSP
DC ADAPTER MALE
BTM-MXM
01182
DC CODO IGUAL 6MM
DC ELBOW
BTM-MXM
01183
DC ADAP M ESP LISA 6-1/4" BSP
DC ADAPTER MALE
BTM-MXM
01184
DC ADAP HEMBRA 6-1/4" BSP
DC ADAPTER FEMALE
BTM-MXM
01185
DC MANGUERA LLDPE 6MM
DC HOSE
BTM-MXM
01190
DC TUERCA INOX R-1/4"
DC RUSTLESS WINGNUT
BTM-MXM
01191
DC MACHON ROSCA MACHO 1/4"
DC MALE CONNECTOR
BTM
01195
CESTA ALIMENT PROTEC INOX TOP
PROTEC BASKET
BTM
01196
CESTA INOX BASIC-BIG
STAINLESS STEEL BASKET
BTM-MXM
01201
CAPUCHON PVC M-6 NEGRO
CAP
BTM
01204
TUERCA DIN-1587 M-8 INOX CIEGA
RUSTLESS WINGNUT
MXM
01208
TOR DIN-963 M-4X16 INOX
RUSTLESS SCREW
BTM-MXM
01209
TOR DIN-7971 M-2,9X16 INOX
RUSTLESS SCREW
BTM-MXM
01224
ASA MUEBLE
HANDLE STAND
BTM-MXM
01226
ASA MUEBLE TAPA
LID HANDLE STAND
BTM
01232
INV CONTACT AUXILIAR GE MARN422AT
AUXILIARY CONTACT BLOCK
BTM-MXM
01248
TOR DIN-912 M-8X25 INOX
RUSTLESS SCREW
BTM
01264
CAPUCHON PVC M-4 NEGRO
CAP
MXM
01276
TAPON OBTURACIÓN DIA.AG.19MM
PLUGGING CAP
MXM
01304
CARTER MXM TAPA RODAMIENTOS
SUMP BEARING-LID
MXM
01307
TUBO ALIM MM INOX D80
FEEDER TUBE PROTECTION
BTM
01318
TOR GUIA M-6X25 INOX E-TUB TOP
STANL-STEEL TUBE GUIDE
BTM-MXM
01344
TOR DIN-85 M-4X14 INOX
RUSTLESS SCREW
CADDY
51018
CD REJILLA CAJON
CADDY PARTS
CADDY
51019
CD CAJON RECOGEGOTAS
CADDY PARTS
CADDY
51038
CD PALANCA MANDO GRIFO INOX
CADDY PARTS
CADDY
51061
CD DEPOSITO 7L GRIFO INOX
CADDY PARTS
CADDY
51100
MAQ FRIO CADDY 7/1 G 230V/50HZ
50
COOLER CADDY
BTM
70006
KIT TUBO ALIM TOP PLAST BK
FEEDER TUBE KIT
BTM
70023
KIT CARTER BIGBASIC BK
SUMP KIT
BTM
70024
KIT CARTER BTM TI-TP BK
15
SUMP KIT
MXM
70026
KIT CARTER MXM BK
16
SUMP KIT
PAG: 6 / 6The data reflected here may change without prior notice.
 Loading...