

Page 1
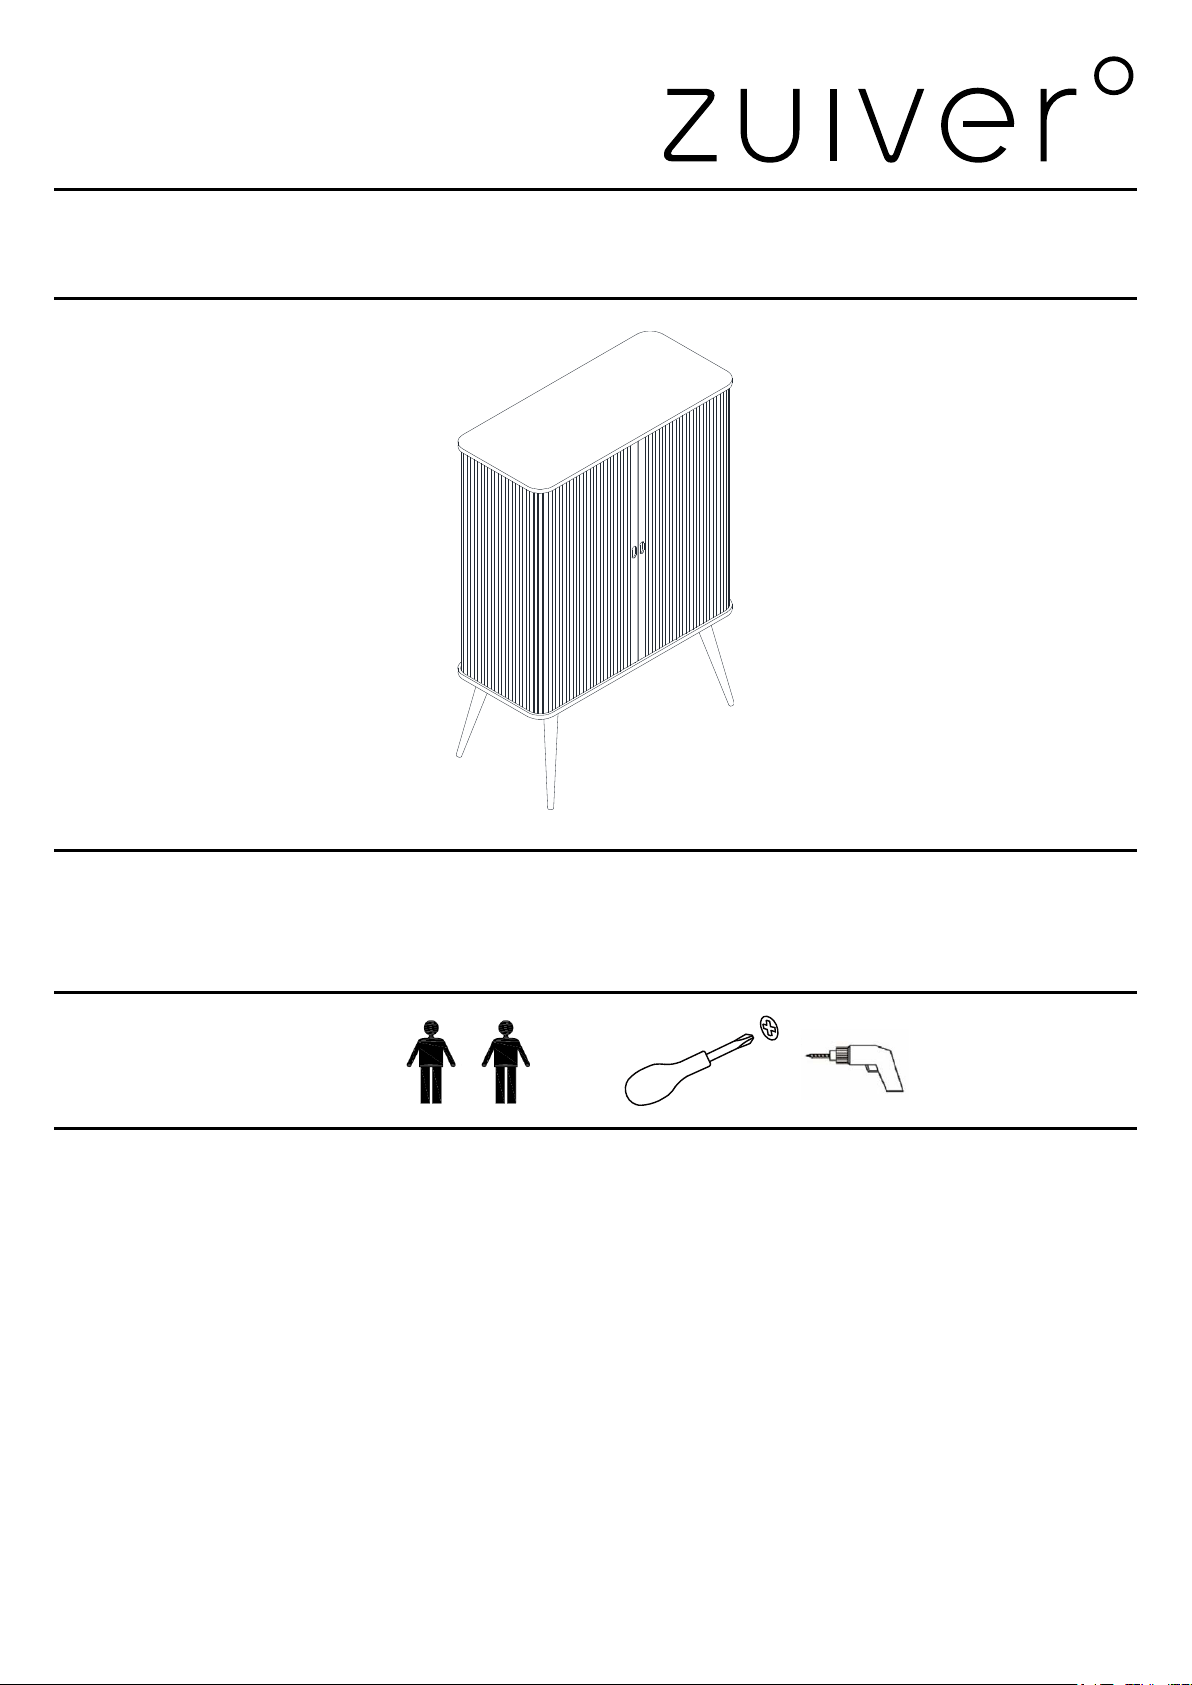
Thank you for purchasing this cabinet barbier. Please read the instructions carefully before use to
ensure safe and satisfactory operation of this product.
Pre-assembly preparation
Please ensure instructions are read in full before attempting to assemble this product
Necessary tools
Please check the pack contents before attempting to assemble this product. A full checklist of
components is given in this leaflet. If any components are missing, please contact the retailer from
whom you bought this product.
This product is HEAVY, it should be assembled as near as possible to the point of use. TAKE CARE
WHEN LIFTING to avoid personal injury and (or) damage to the product.
This product takes approximately 30 MINUTES to assemble with 2 PEOPLE.
The fittings pack contains SMALL ITEMS which should be KEPT AWAY FROM YOUNG CHILDREN.
Read this leaflet in full before commencing assembly.
PLEASE KEEP THESE INSTRUCTIONS FOR FUTURE REFERENCE
03/16 1
Page 2
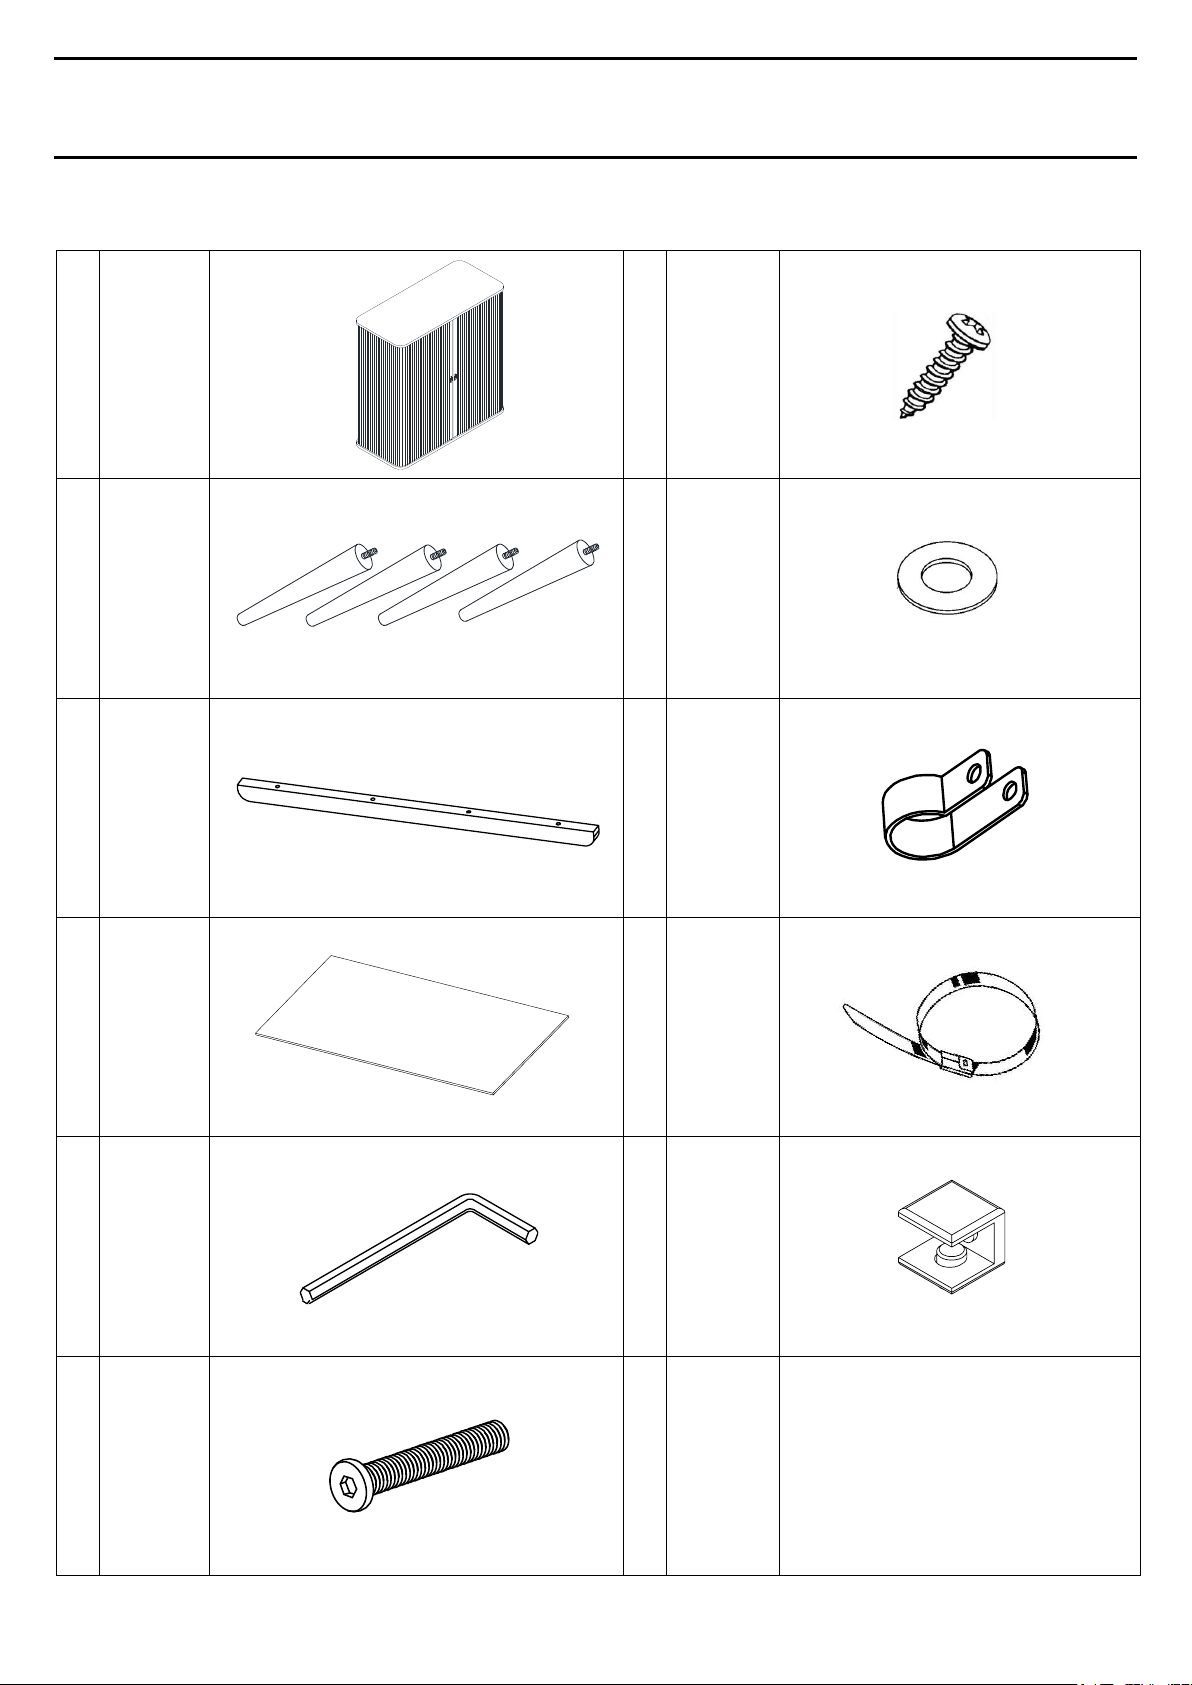
A
Cabinet
x 1
G
Screw
x 2
B
Legs x
4
H
Washer
x 4
C
Support
bar x 1
I
Plastic
loop
bracket
x 4
D
Glass
shelves
X 3
J
Cable
tie x 2
E
Allen
key x 1
K
Shelf
clip
X 18
F
Allen
bolts x
4
Fittings and parts checklist
03/16 2
Page 3
F C E
A
CAUTION!
Please take care when lifting,
this unit is very heavy! Do
not drag the unit or put
pressure / force on the
tambour curtain when
moving. Please lift by holding
the top and bottom panels to
prevent damaging the legs
and curtain!
B
Step by step assembly instructions
Step One
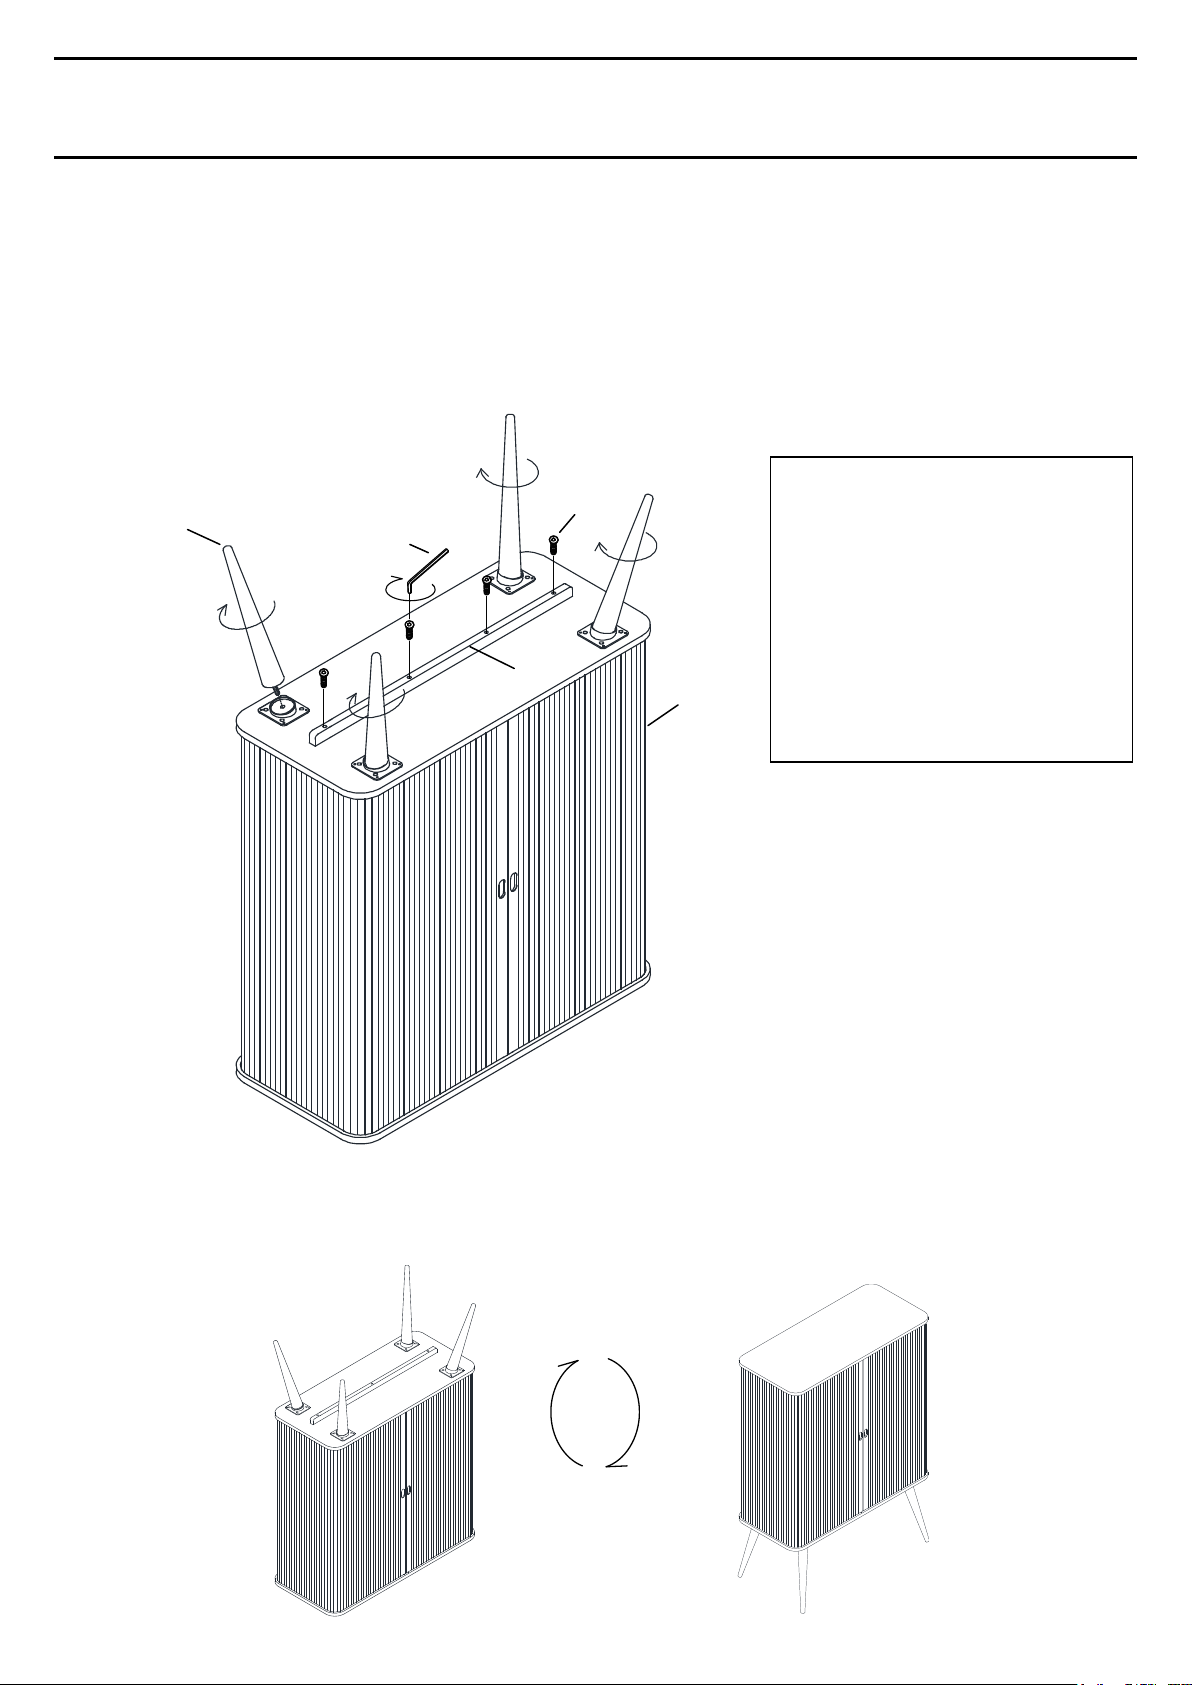
With minimum 2 people, carefully place the cabinet (part A) upside down on a soft, flat surface near
where the unit will be used. Locate the support rail (part C) and secure using the allen bolts (part F)
and allen key (part E).
Locate the legs (part B) and tighten by hand as shown below. Ensure all legs and bolts are fully
tightened before use.
Step Two
With 2 people, carefully turn the cabinet over and place in position.
03/16 3
Page 4
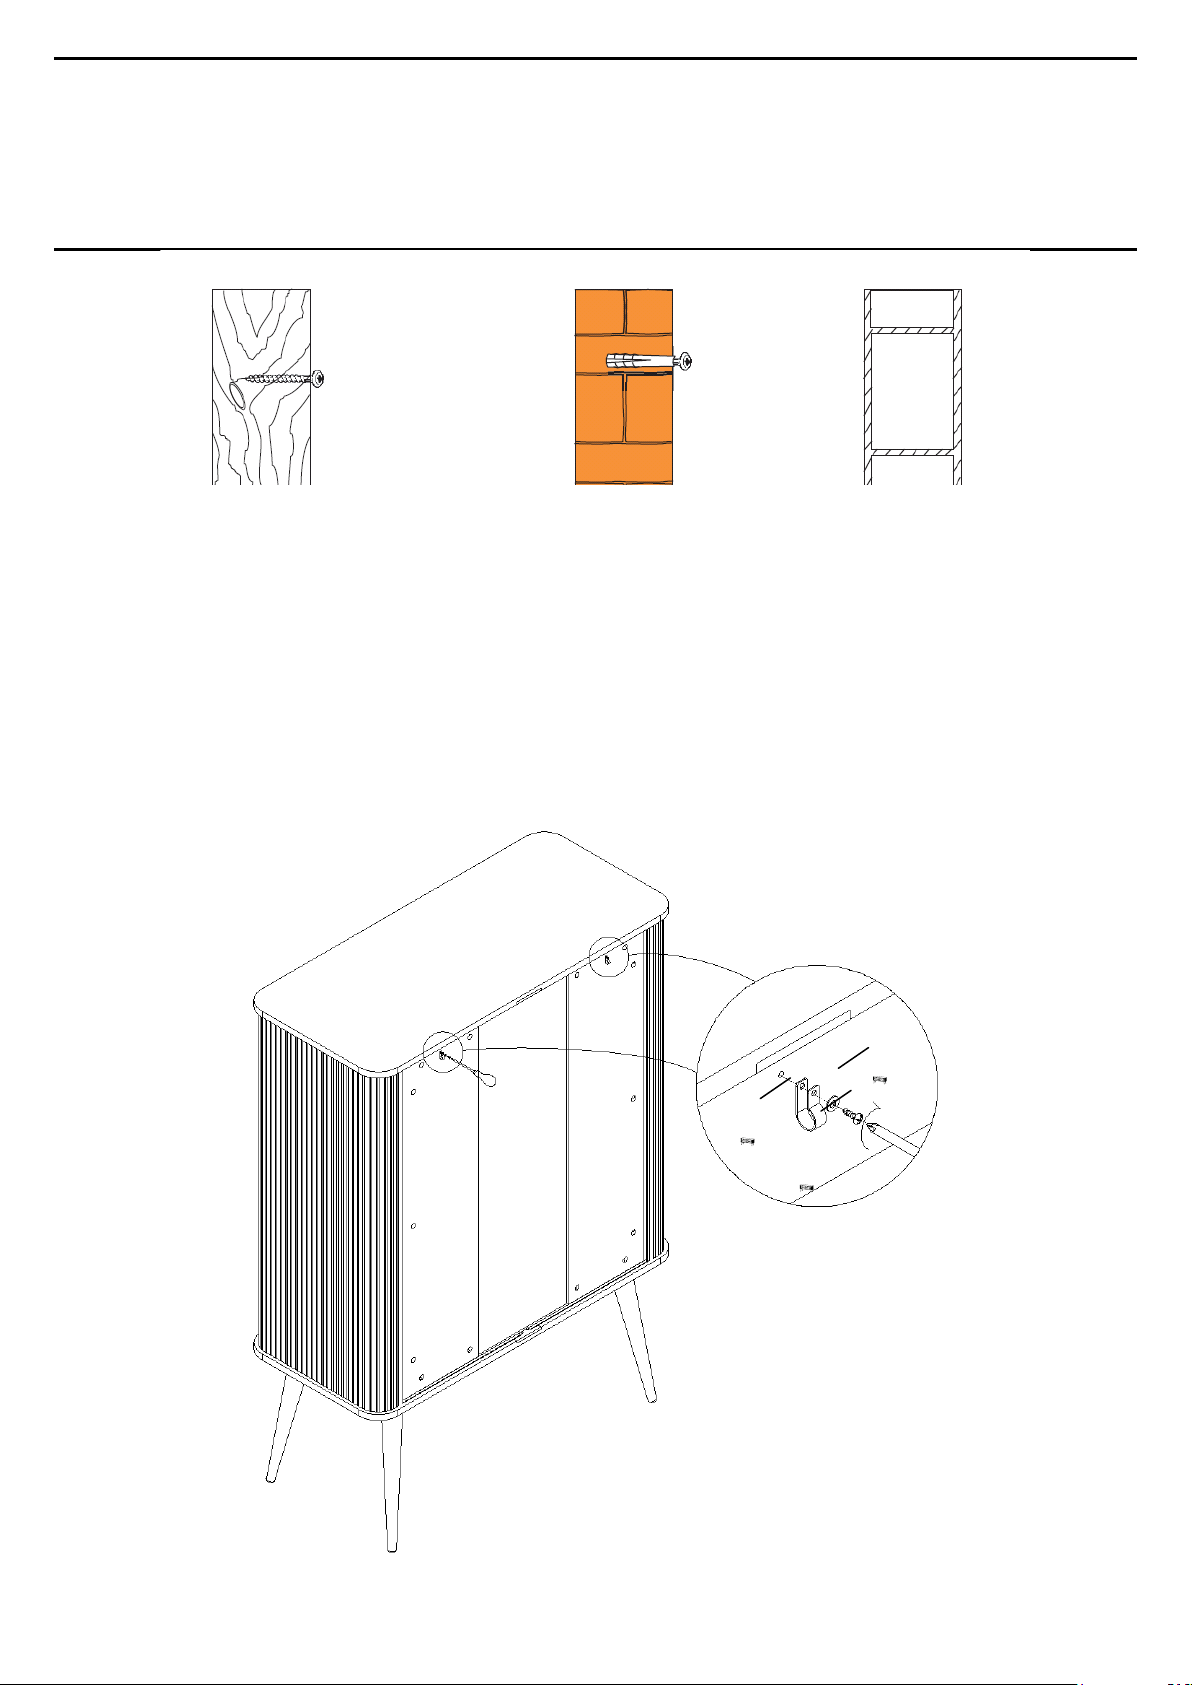
Wood
If fixing to wood make sure
that it isn’t chipboard as
screws can easily pull away
from the core structure
Brick or Masonry
Use an appropriate
wall plug provided
you are sure your
wall is sound
Cavity wall
Special toggle wall
plugs are needed.
Seek expert advice
H
G
I
Wall fixing - if in doubt seek professional advice
Please ensure to use the correct size rawl plug when installing the plastic loop bracket to a wall. If
your wall is cavity construction or wood you may need to seek appropriate wall fixings.
Step Three
With a screwdriver (not included) secure the plastic loop bracket (2 x part I) to the back of the cabinet
using the washer (2 x part H) and screw (2 x part G).
03/16 4
Page 5
I
H
!!
J
J
!!*
!!*
!!*
Fittings not included
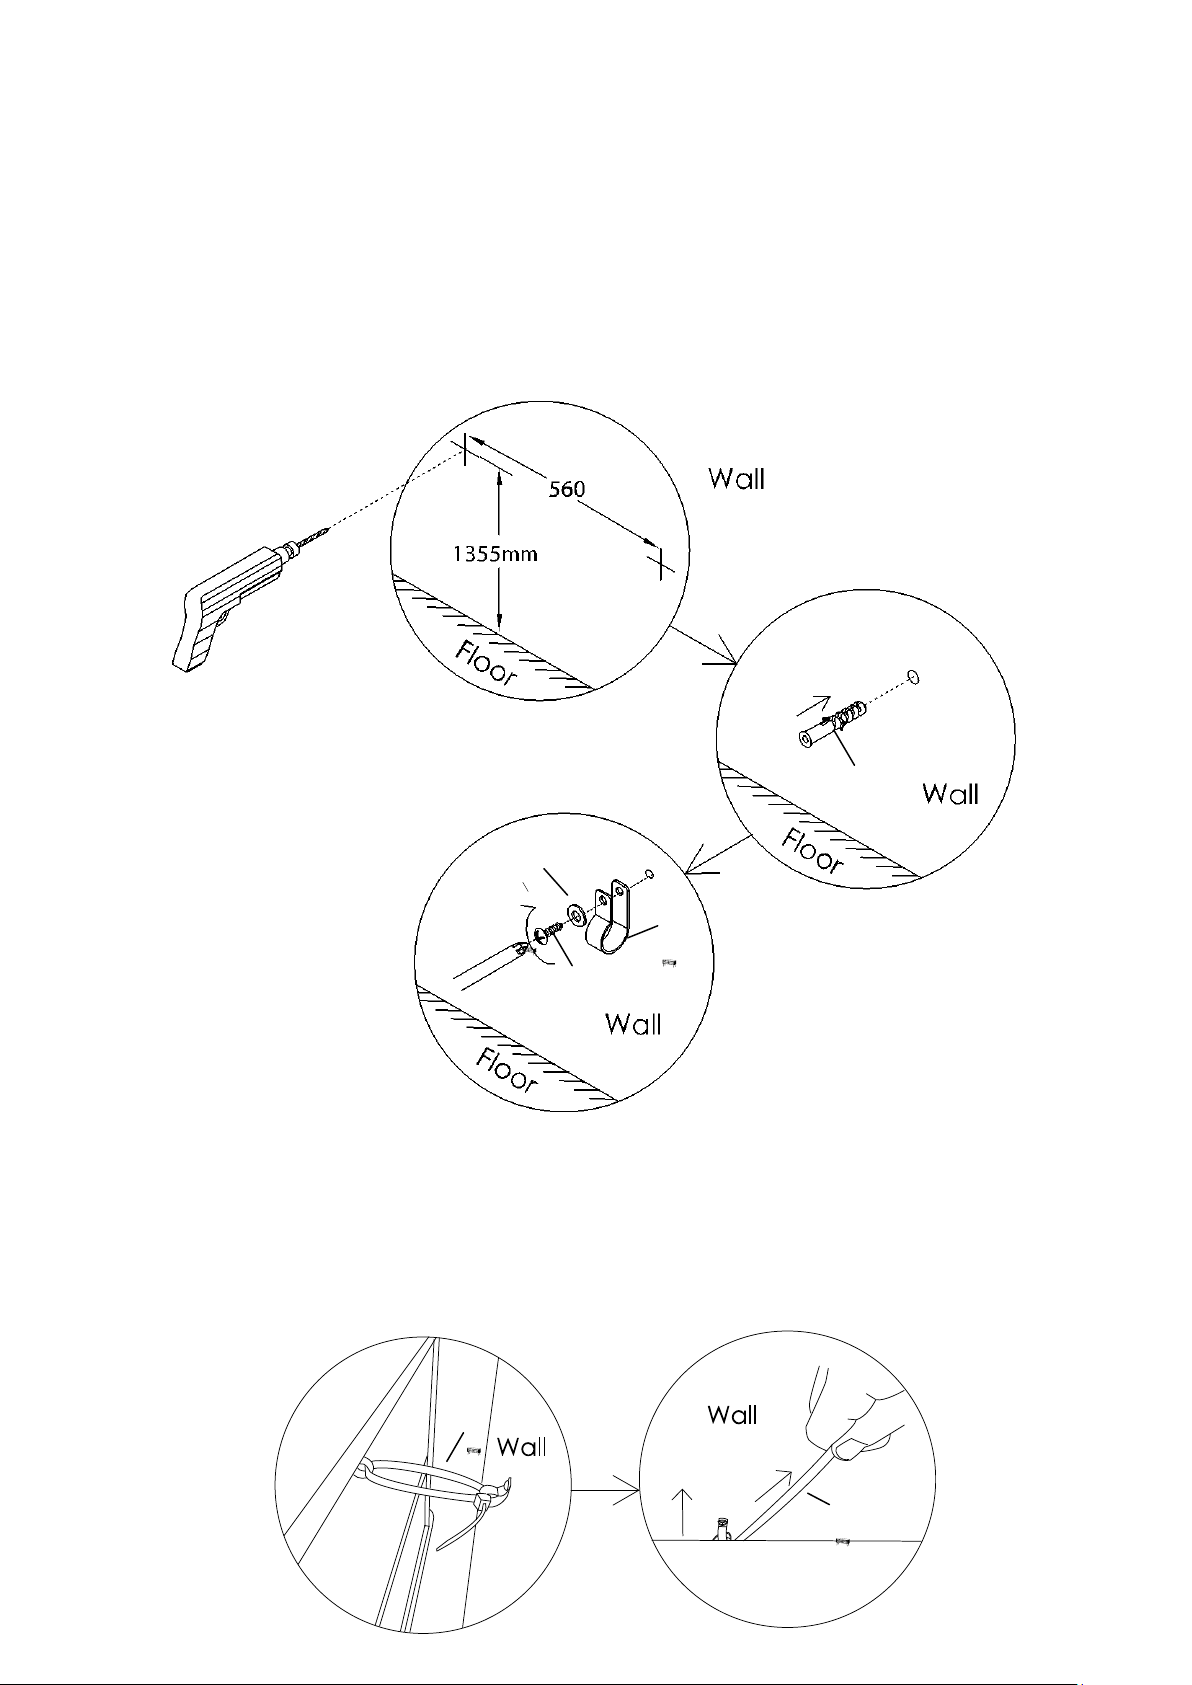
Step Four
Before drilling, ensure the size of hole will be correct to fit your wall fixing (not included).
Warning: Ensure the area to be drilled is free from hidden electrical wires, water and gas
pipes.
Mark the hole positions shown below and drill using a masonry bit. Push the wall fixings into position.
With a screwdriver secure the plastic loop brackets (2 x part I) to the wall using the washers (2 x part
H) and screws (not included).
Step Five
Locate the cable ties (part J) as shown below. Push the cabinet back towards the wall and into
position. Pull the cable tie (part J) tight.
03/16 5
Page 6
Shelf support
PLEASE READ!
This veneered cabinet top has a natural open grain finish. Please read the care guide
thoroughly. We recommend using mats and wiping up spilled liquids. Avoid placing plant
pots or vases without waterproof mats to prolong the life of this product.
Maximum weight 10kgs!
K
D
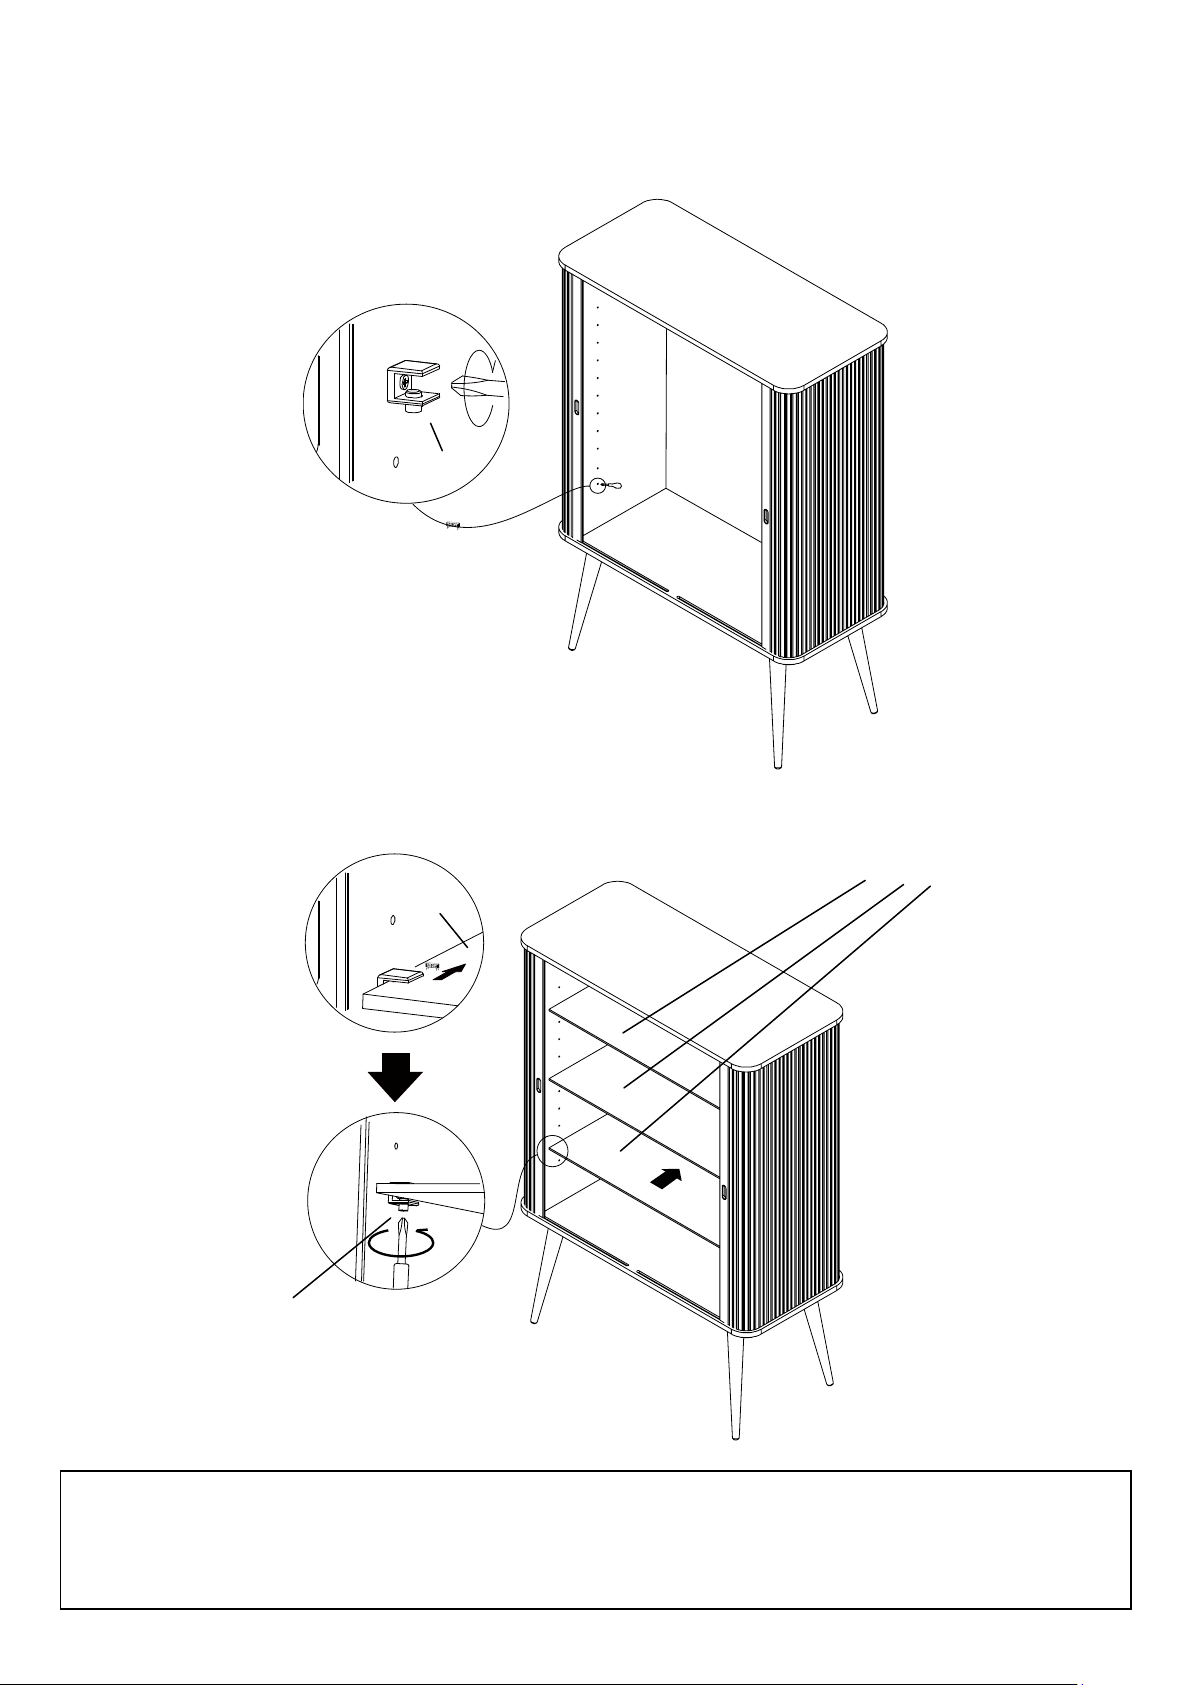
Step Six
Position the shelf clips (part K) in required locations as shown below and secure using a crosshead
screwdriver (not included).
Step Seven
Slide the glass shelves (part D) into position and secure with screwdriver.
03/16 6
Page 7

Care and Maintenance
Wood furniture
Wood displays different grain patterns depending on which way they cut - for example, the
‘medullary ray’ which can appear is a mark of good quality timber - these are just
characteristics of the natural beauty of the wood. Some furniture is also deliberately aged and
rustic.
Wood veneers also allow distinctive patterns to be created on flat surfaces, such as table tops
and drawer fronts by the way the slivers are arranged.
All timber surfaces will change colour and mellow over time. New furniture will initially vary in
shade from items that have been previously purchased.
How to care for your wood furniture
Furniture with a hard lacquer, wax polish or painted surface should be dusted with a dry cloth.
Spray polishes are best avoided as they contain silicones which may spoil the furniture’s
surface by building up over time.
Make sure all surfaces are protected from heat and liquids by mats and coasters. Wipe up
spills immediately and ensure that a mat or pad is placed under paper if you are writing.
Our furniture will endure most temperatures in the home but it is best to avoid placing furniture
next to heat sources such as radiators or fires. Be particularly careful with solid wood as the
lack of humidity caused by central heating can cause damage such as warping.
Safety instructions
Never drag furniture when moving it, always lift it.
Periodically check all fixings to ensure none have come loose and re-tighten where necessary.
Please take care when handling or moving the furniture, careless handling may cause damage
or injury.
Furniture can be dangerous if incorrectly installed. Assembly should be carried out by a
competent person. No liability will be accepted for damage or injury caused by incorrectly
installed or assembled furniture.
It is recommended that before moving heavy objects to a new location they are completely dis-
assembled to avoid personal injury or damage to the furniture. Please be careful to retain all
fittings when doing this.
If any glass is chipped or broken stop using the product and consult the manufacturer or
supplier.
WARNING:
Do not place very hot or very cold items on the glass surface(s) unless adequately thick table
mats are used to prevent such items from coming into contact with the glass.
Do not sit or stand upon the glass surface(s)
Do not use the glass as a chopping surface. Do not strike the glass with hard or pointed items.
When cleaning glass panels use a damp cloth or leather with washing up liquid or soft soap if
necessary; do not use washing powders or any other substances containing abrasives since
these substances scratch glass.
03/16 7
 Loading...