

Page 1
Operating instructions
Combair SE | SEP
Oven
Page 2

Thank you for choosing to buy one of our products. Your appliance is made to
high standards and is easy to use. Nevertheless, please take the time to read
these operating instructions in order to familiarise yourself with the appliance
and get the best use out of it.
Please follow the safety precautions.
Modifications
Text, diagrams and data correspond to the technical standard of the appliance
at the time these operating instructions went to press. The right to make technical modifications for the purpose of the further development of the appliance
is reserved.
Validity
The product family (model number) corresponds to the first alphanumerics on
the identification plate. These operating instructions apply to:
Type Product family Size system
BCSEZ60 21016 60-600
BCSEZ60c 21016 60-600
BCSEPZ60 21019 60-600
BCSEPZ60c 21019 60-600
Variations depending on the model are noted in the text.
Colour operating instructions can be downloaded from the internet from
www.vzug.com.
© V-ZUG Ltd, CH-6301 Zug, 2016
2
Page 3

Table of contents
1 Safety precautions 6
1.1
Symbols used .............................................................................................6
1.2
General safety precautions ...................................................................... 7
1.3
Appliance-specific safety precautions ...................................................8
1.4
Instructions for use .................................................................................... 9
2 Disposal 12
3 Using for the first time 13
4 Appliance description 14
4.1
Construction ............................................................................................. 14
4.2
Operating and display elements .......................................................... 15
4.3
Cooking space......................................................................................... 16
4.4
Accessories.............................................................................................. 17
4.5
Plate warmer ............................................................................................ 18
5 Operating modes 19
5.1
Overview of operating modes............................................................... 19
5.2
Top/Bottom heat ..................................................................................... 19
5.3
Hot air........................................................................................................ 20
5.4
PizzaPlus................................................................................................... 20
5.5
Grill............................................................................................................. 21
5.6
Grill-forced convection ........................................................................... 21
5.7
Top/Bottom heat humid......................................................................... 22
5.8
Hot air humid ........................................................................................... 22
5.9
Bottom heat.............................................................................................. 23
5.10
Fast heating.............................................................................................. 23
6 Using the appliance 24
6.1
Selecting and starting the operating mode........................................ 25
6.2
Checking and changing the settings................................................... 26
6.3
Setting a duration .................................................................................... 26
6.4
Setting a delayed start / end time ....................................................... 27
6.5
Food probe temperature........................................................................ 28
6.6
Cancelling / ending the operating mode before time...................... 29
6.7
Changing the operating mode.............................................................. 30
6.8
Timer.......................................................................................................... 30
6.9
End of operation...................................................................................... 32
3
Page 4

6.10
Switching the appliance off ................................................................... 33
7 GourmetGuide 35
7.1
Recipe book............................................................................................. 35
7.2
Own recipes ............................................................................................. 37
7.3
Soft roasting ............................................................................................. 41
7.4
Keep warm * ............................................................................................ 44
8 EasyCook 45
8.1
Overview of food groups ....................................................................... 45
8.2
Selecting foods and starting ................................................................. 46
9 Favourites 47
9.1
Creating favourites .................................................................................. 47
9.2
Selecting and starting favourites.......................................................... 47
9.3
Changing favourites................................................................................ 48
9.4
Deleting favourites .................................................................................. 48
10 Tips and tricks 49
10.1
Unsatisfactory cooking result................................................................ 49
10.2
Saving energy .......................................................................................... 50
11 User settings 51
11.1
Overview of user settings ...................................................................... 51
11.2
Adjusting user settings........................................................................... 51
11.3
Language .................................................................................................. 52
11.4
Display....................................................................................................... 52
11.5
Date............................................................................................................ 52
11.6
Clock.......................................................................................................... 53
11.7
Notifications.............................................................................................. 53
11.8
Pyrolytic cleaning of appliance............................................................. 53
11.9
Volume ...................................................................................................... 54
11.10
Assistance functions............................................................................... 54
11.11
Temperature ............................................................................................. 55
11.12
Childproof lock ........................................................................................ 55
11.13
Appliance information............................................................................. 55
11.14
Demo mode ............................................................................................. 55
11.15
Factory settings ....................................................................................... 56
12 Care and maintenance 57
12.1
Cleaning the exterior .............................................................................. 57
12.2
Cleaning the cooking space ................................................................. 57
4
Page 5

12.3
Cleaning the appliance door................................................................. 58
12.4
Cleaning the door seal........................................................................... 59
12.5
Replacing the door seal......................................................................... 59
12.6
Replacing the door seal on pyrolysis appliances............................. 60
12.7
Replacing the halogen light bulb ......................................................... 61
12.8
Cleaning the accessories and shelf guides....................................... 62
12.9
Pyrolytic self-cleaning ............................................................................. 63
13 Trouble-shooting 66
13.1
What to do if … ........................................................................................ 66
13.2
After a power failure ............................................................................... 69
14 Accessories and spare parts 71
14.1
Accessories.............................................................................................. 71
14.2
Special accessories................................................................................ 71
14.3
Spare parts............................................................................................... 72
15 Technical data 73
15.1
Note for testing institutes ....................................................................... 73
15.2
Temperature measurement ................................................................... 73
15.3
Product data sheet.................................................................................. 74
15.4
Automatic energy-saving stand-by....................................................... 75
15.5
Reference to «Open Source» licence.................................................. 75
16 Index 76
17 Service & Support 79
5
Page 6

1 Safety precautions
1.1 Symbols used
Denotes important safety precautions.
Failure to observe said precautions can result in injury or in damage to the appliance or fittings!
Information and precautions that should be observed.
Information on disposal
Information about the operating instructions
▸ Indicates step-by-step instructions.
– Describes how the appliance reacts to the steps taken.
▪ Indicates a list.
6
Page 7

1 Safety precautions
1.2 General safety precautions
▪ Read the operating instructions before using the appliance for
the first time!
▪ This appliance can be used by children aged 8 and above
and by persons with reduced physical, sensory or mental capabilities, or lack of experience and/or knowledge, provided
they are supervised or have been instructed on the safe use
of the appliance and have understood the hazards involved.
Children shall not play with the appliance. Cleaning and user
maintenance shall not be undertaken by children without supervision.
▪ If an appliance is not equipped with a mains cable and a plug
or other means for disconnecting from the mains with a contact opening on each pole complying with the conditions of
overvoltage category III for full isolation, an isolating device
must be incorporated into the permanently installed electrical
installation in accordance with the installation regulations.
▪ If the mains cable of this appliance is damaged, it must be re-
placed by the manufacturer or its Customer Services or a similarly qualified person in order to avoid hazard.
7
Page 8

1 Safety precautions
1.3 Appliance-specific safety precautions
▪ READ THE IMPORTANT SAFETY PRECAUTIONS CAREFULLY
AND RETAIN FOR FUTURE USE.
▪ WARNING: The appliance and its accessible parts get hot
during use. Be careful not to touch the heating elements. Children under 8 years of age must be kept away from the appliance unless they are constantly supervised.
▪ WARNING: Accessible parts can get hot during use. Keep
young children away from the appliance.
▪ This appliance is intended for use in the home and similar set-
tings such as: in staff kitchens in shops, offices and other
commercial establishments; in agricultural establishments; by
guests in hotels, motels and other accommodation establishments; in bed and breakfast establishments.
▪ A heatable appliance drawer and its contents get hot.
▪ Do not use aggressive or abrasive cleaning agents or sharp
metal scrapers for cleaning the glass in the oven door as they
could scratch the surface. This can destroy the glass.
▪ For appliances with pyrolytic self-cleaning: Excessive soiling
and any and all accessories (tableware, baking trays, runners,
shelf guides) must be removed before carrying out pyrolytic
self-cleaning.
▪ Only use the food probe recommended for this oven.
▪ Under no circumstances use a steam cleaner to clean this ap-
pliance.
▪ WARNING: Before replacing the light bulb, ensure the appli-
ance is switched off and disconnected from the mains power
supply to avoid possible electric shock.
8
Page 9

1 Safety precautions
▪ See the 'Accessories' section for the proper use of insertable
parts.
1.4 Instructions for use
Before using for the first time
▪ The appliance must be installed and connected to the electricity supply in
accordance with the separate installation instructions. Have a qualified fitter/
electrician carry out the necessary work.
Correct use
▪ The appliance is designed for use in the home for preparing food. Under no
circumstances flambé or cook food using a lot of fat in the cooking space!
No liability is assumed for any damage caused by improper use or incorrect
handling.
▪ Never use the appliance to dry animals, textiles or paper, etc.
▪ Do not use the appliance as a room heater.
▪ The appliance should only be installed and operated at an ambient temper-
ature of 5 °C to 35 °C.
▪ Any repairs, modifications or manipulations to the appliance, especially any
electrically live parts, may only be carried out by the manufacturer, its Customer Services or a similarly qualified person. Repairs if carried out incorrectly may cause serious injury, damage to the appliance and fittings, as
well as affect the functioning of the appliance. If the appliance is not working properly or in case of a repair order, follow the instructions given in the
«Service & Support» section. Please contact our Customer Services if necessary.
▪ Use original spare parts only.
▪ Retain these operating instructions for future reference.
▪ The appliance corresponds to recognised technology standards and the rel-
evant safety regulations. Proper use of the appliance is essential to avoid
damage and accidents. Please therefore follow the precautions given in
these operating instructions.
Note on use
▪ Use the childproof locking facility.
▪ If the appliance is visibly damaged, do not use it. Contact our Customer
Services.
9
Page 10

1 Safety precautions
▪ If the appliance is not operating properly, disconnect it from the power sup-
ply immediately.
▪ Ensure there are no foreign bodies or pets in the cooking space before
closing the appliance door.
▪ Objects that could pose a danger if the appliance were accidentally
switched on should not be stored in the cooking space or the heatable appliance drawer. Do not store food or any temperature-sensitive or inflammable materials, e.g. cleaning agents, oven sprays, etc., in the cooking
space or the heatable appliance drawer.
▪ For appliances with grill: Leave the appliance door closed when grilling. The
heat could otherwise damage the operating and display elements or the fitted units above.
Caution: Risk of burns!
▪ The appliance gets very hot when in use. The appliance door also gets hot.
▪ Steam and/or hot air may escape from the cooking space when the appli-
ance door is opened.
▪ The appliance will remain hot for some time after it is switched off and will
only cool down slowly to room temperature. Allow sufficient time for the appliance to cool down before, for instance, cleaning it.
▪ Overheated fat and oil can easily catch fire. Heating oil in the cooking
space to sear meat is dangerous and should not be done. Never attempt to
extinguish burning oil or fat with water. Danger of explosion! Smother the
flames with a fire blanket. Keep doors and windows closed.
▪ Do not pour spirits (brandy, whisky, schnapps, etc.) over hot food. Danger
of explosion!
▪ Do not leave the appliance unattended when drying herbs, bread, mush-
rooms, etc. If the foodstuff dries out too much, it can pose a fire hazard.
▪ If you notice smoke possibly coming from the appliance itself or from inside
the cooking space, keep the appliance door closed. Disconnect the appliance from the power supply.
▪ Accessories get hot in the cooking space. Use protective gloves or oven
cloths.
Caution: Risk of injury!
▪ Be careful not to put fingers in the door hinges, there is otherwise a risk of
injury if the appliance door is moved. Particular care should be taken when
children are around.
10
Page 11

1 Safety precautions
▪ Only leave the appliance door open in the at-rest position. An open appli-
ance door poses a danger of tripping or injury! Do not sit or rest on the appliance door or use it as a storage surface.
▪ For hobs: A hob guard can be fitted to protect small children. Hob guards
are available from specialist retailers.
Caution: Risk to life!
▪ Danger of suffocation! Keep packaging material, e.g. plastic film and poly-
styrene, away from children. Packaging material can be dangerous for children.
How to avoid damaging the appliance
▪ Close the appliance door carefully.
▪ For appliances with visible bottom heating element: Do not place any ob-
jects directly on the bottom heating element.
▪ Do not use protective aluminium inserts with appliances with no visible bot-
tom heating element.
▪ Do not use objects that can rust in the cooking space.
▪ Using knives or cutting wheels on the baking tray will visibly damage the
surface.
▪ To prevent corrosion, leave the appliance door open in the at-rest position
until the cooking space has cooled down.
▪ When cleaning the appliance, make sure no water gets inside it. Use a
moderately damp cloth. Do not spray the outside or the inside of the appliance with water. If water gets inside the appliance, it will cause damage.
11
Page 12

2 Disposal
Packaging
▪ All packaging materials (cardboard, plastic film (PE) and polystyrene (EPS))
are marked and should, if possible, be collected for recycling and disposed
of in an environmentally friendly way.
Disconnection
▪ Disconnect the appliance from the mains. With a fixed appliance, this is to
be carried out by a qualified electrician!
Safety
▪ Disable the appliance to prevent accidents caused by improper use, espe-
cially through children playing.
▪ Pull the plug out of the mains socket or have the appliance disconnected
from the mains by an electrician. Then cut the mains cable off flush with the
appliance.
Disposal
▪ The old appliance should not be discarded as worthless rubbish. If dis-
posed of correctly, the raw materials can be recovered for recycling.
▪ The symbol on the identification plate warns that the appliance may not
be disposed of in normal household waste.
▪ The appliance must be disposed of in accordance with local regulations on
waste disposal. For more information on the handling, disposal and recycling of the product, please contact the local authorities, the local recycling
facilities for household waste or the retailer from whom you purchased the
appliance.
12
Page 13

3 Using for the first time
Before operating the newly installed appliance for the first time, the following
steps should be taken:
▸ Remove the packaging and transportation material as well as any blue pro-
tective film from the cooking space.
▸ Clean the cooking space and the accessories.
▸ Press the power button.
– The appliance switches on.
Scenario 1 *
* applies only to appliances which were produced after March 2016 or have
received a software update.
– Various user settings necessary for operation, such as language, time
and temperature unit, are shown on the display one after the other.
▸ Make the settings and confirm.
Language and time must be set so that the appliance can be operated.
Scenario 2 **
** applies only to appliances produced before or during February 2016.
▸ Set the time (see page 53).
Finishing the first-time use process
▸ Heat the empty cooking space (without wire shelves, baking trays, etc.) us-
ing the operating mode at 230°C for about 30minutes.
As there is likely to be some smoke and odour given off, we recommend ventilating the room well during this phase.
All temperatures in these operating instructions are in degrees
Celsius. Apply the corresponding conversions via the user setting «Degrees Fahrenheit» (see page 55).
13
Page 14
4 Appliance description
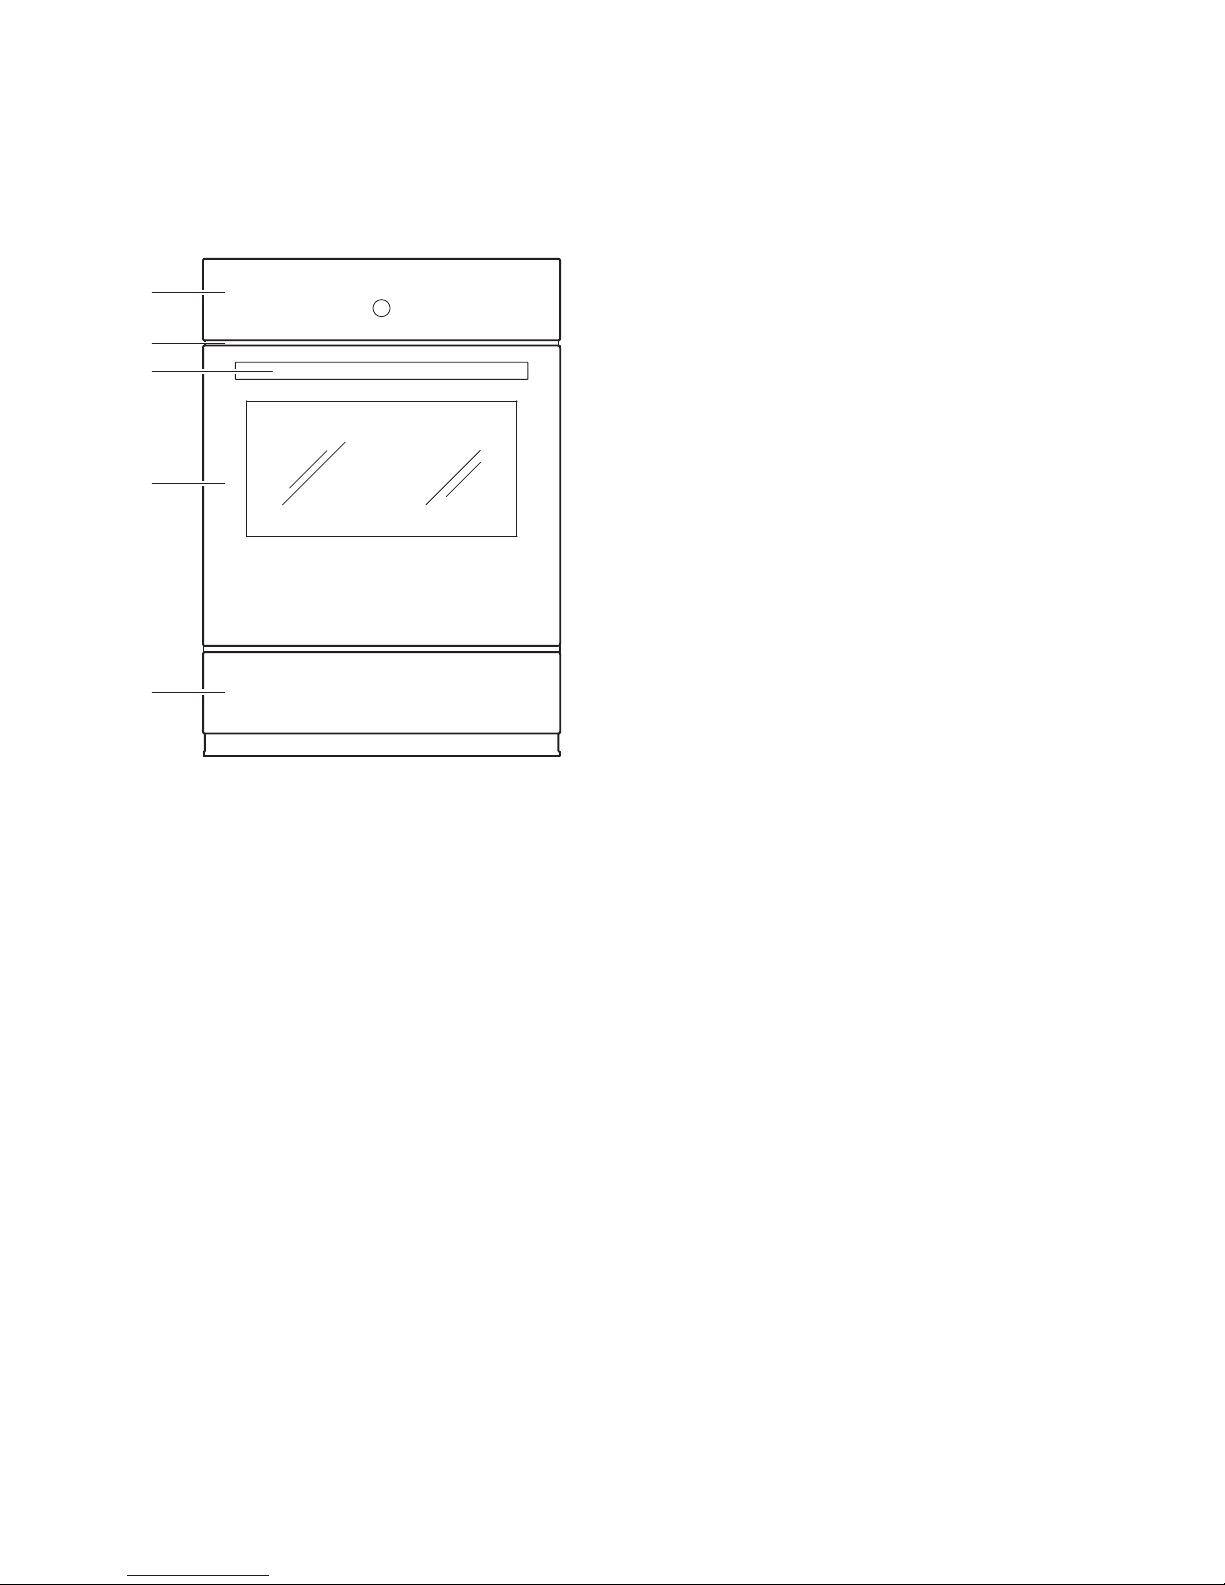
4.1 Construction
1
2
3
4
5
1
Operating and display elements
2
Ventilation opening
3
Door handle
4
Appliance door
5
Heatable appliance drawer *
* Depending on model
14
Page 15
4 Appliance description
4.2 Operating and display elements
12:00
7RSERWWRPKHDW
곋2SHUDWLQJPRGHV
2 3
4
1
5
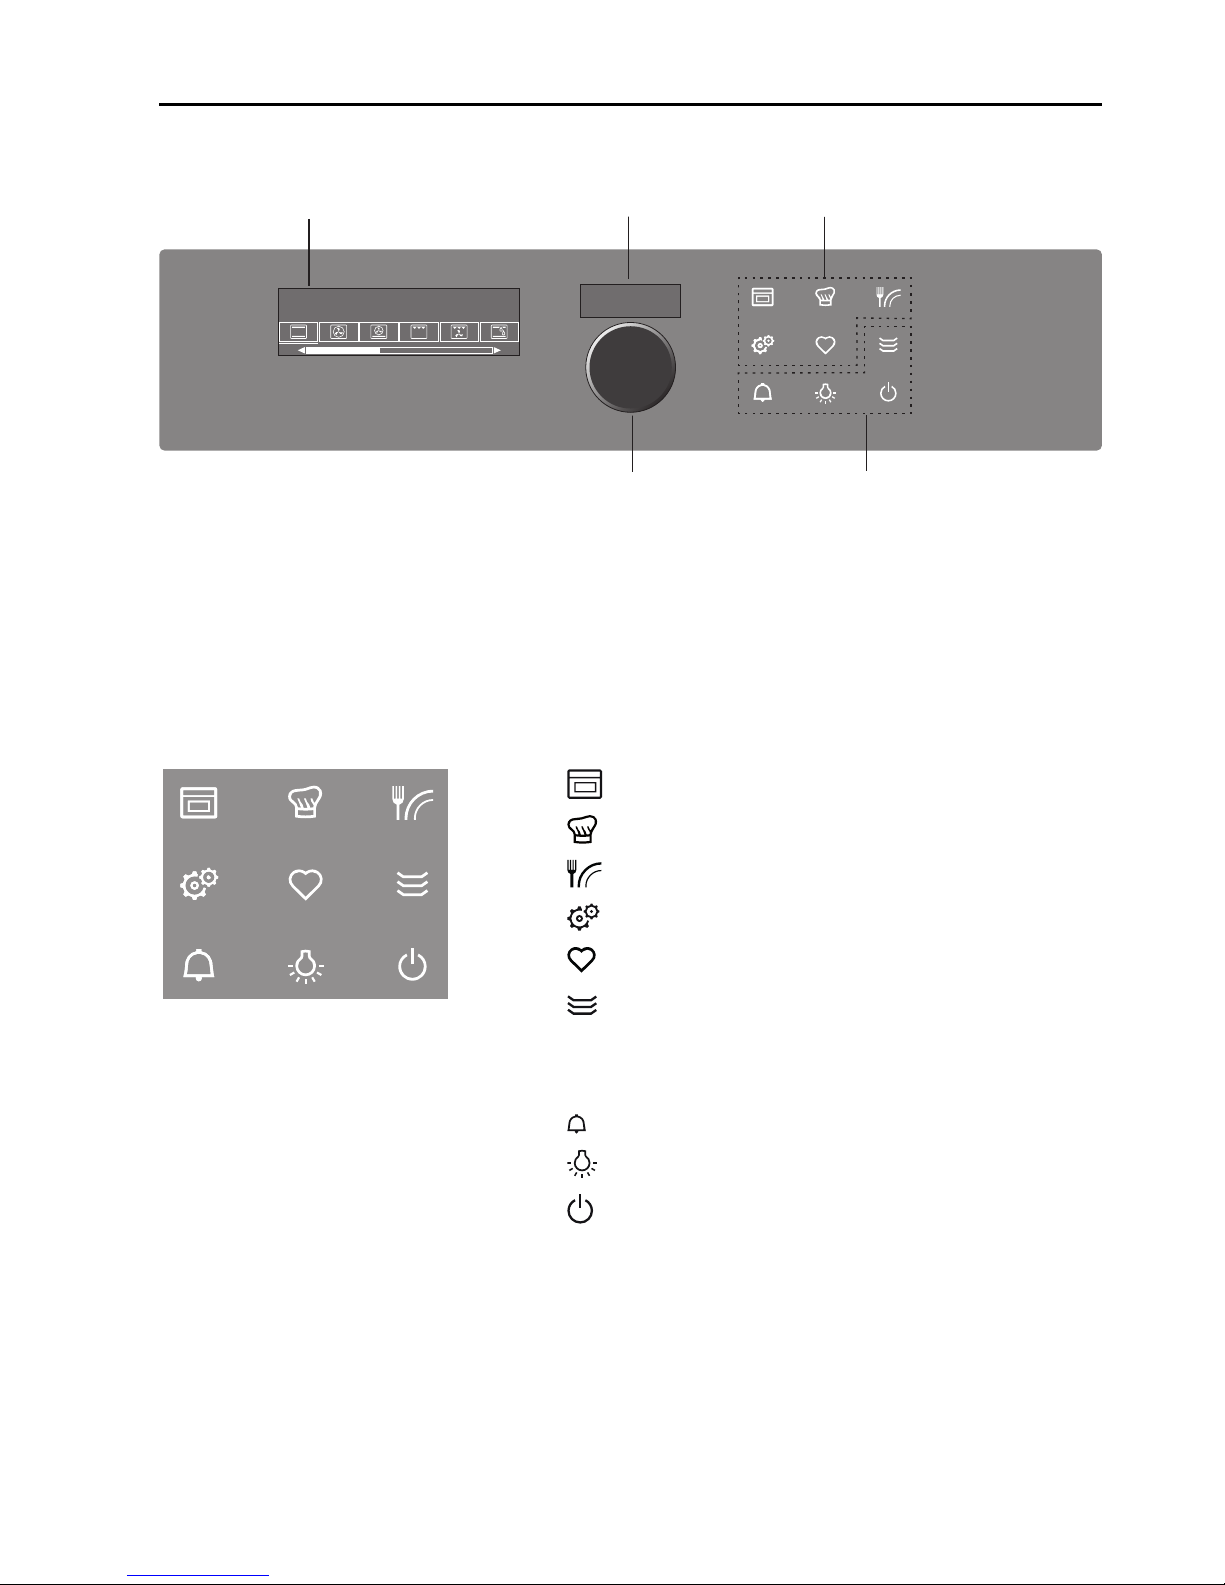
1
Display
4
Action buttons
2
Digital display
(duration/timer/time)
5
Switch on the adjusting knob/appliance
3
Menu buttons
Overview of touch buttons
Operating modes
GourmetGuide
EasyCook
User settings
Favourites
Heatable appliance drawer/plate
warmer *
* Depending on model
Timer
Cooking space illumination
Switch off
15
Page 16
4 Appliance description
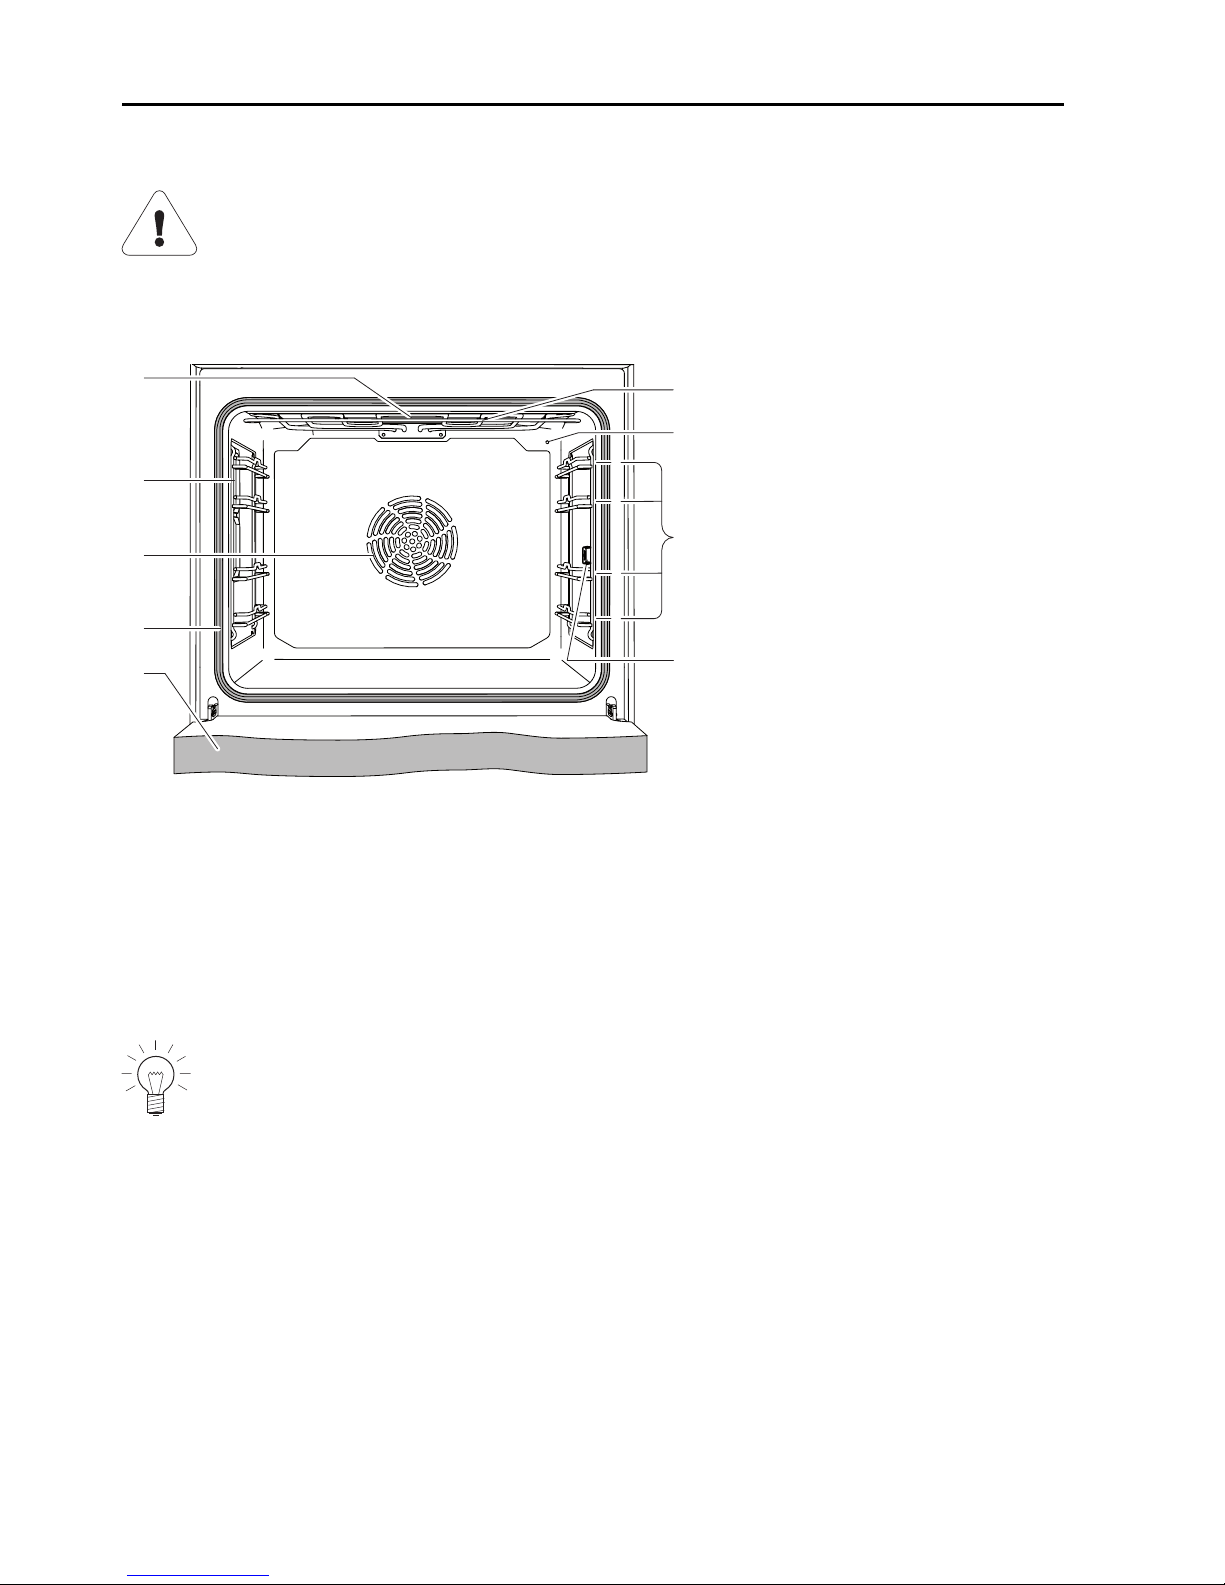
4.3 Cooking space
Using protective inserts or aluminium foil can damage the appliance.
Do not place any protective insert or aluminium foil on the floor of
the cooking space.
6
7
8
1
4
1
2
3
4
5
3
2
9
1
Appliance door
6
Temperature sensor
2
Door seal
7
Grill/top heat
3
Hot air blower
8
Levels (labelled)
4
Cooking space illumination
9
Socket for food probe
5
Cooking space ventilation
The bottom heating element is beneath the cooking space floor.
16
Page 17
4 Appliance description
4.4 Accessories
Incorrect handling can cause damage!
Do not use knives or cutting wheels on the accessories.
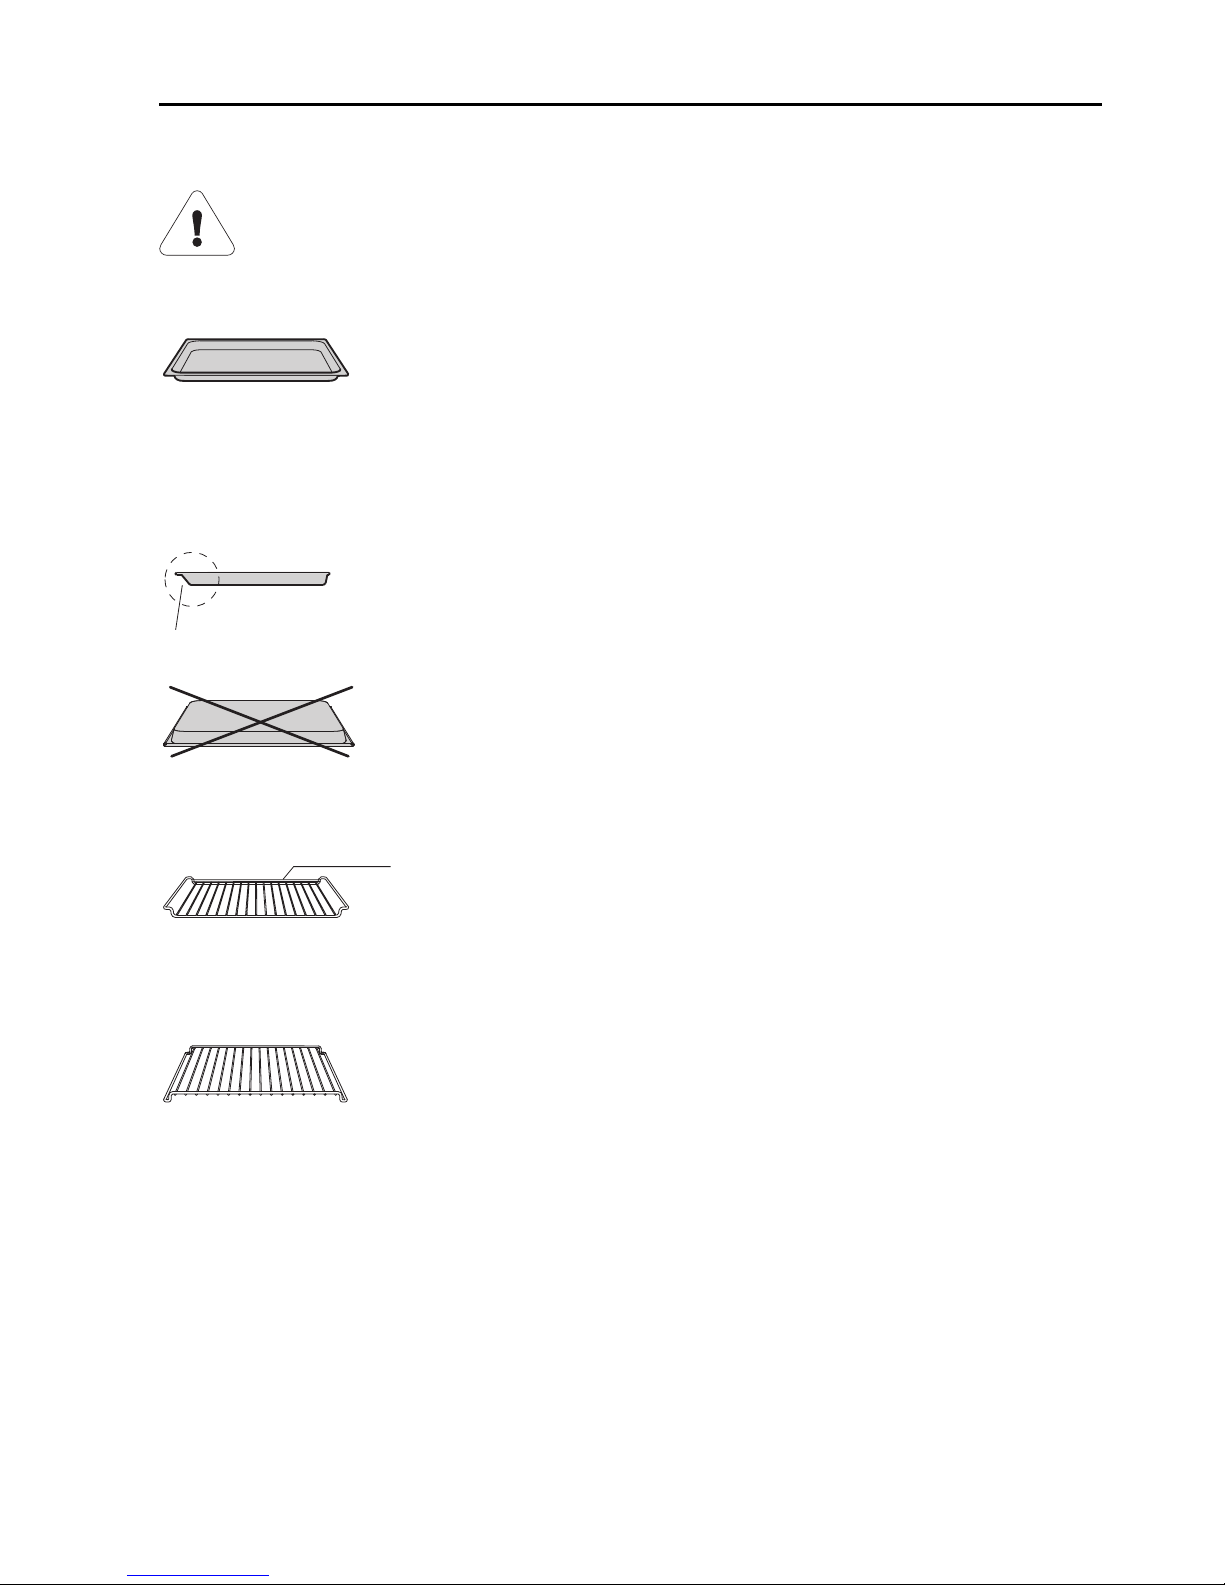
TopClean baking tray
▪ Baking tin for flans and biscuits
▪ Use together with the wire shelf as a drip tray
▪ If not fully covered, its shape can become distorted
during baking. This is normal. It will go back to its
original form as it cools down.
1
▸ Ensure that the «sloped» side 1 of the baking tray
is to the back of the cooking space.
▸ Only use the normal way round – not upside down.
Wire shelf
1
▪ For standing roasting and baking tins on
▪ For standing meat, frozen pizza, etc. on
▸ Ensure that the cross strut 1 is to the back of the
cooking space. It enables the food to be removed
safely from the cooking space.
▪ Serves as a cooling rack
17
Page 18

4 Appliance description
Food probe
▪ For measuring the core temperature of food
For recommended food probe temperatures, see «EasyCook».
Not suitable for temperatures of over 230°C. There must be a distance between the food probe and the roof of the cooking space of at
least 5cm.
Special accessories
Place any accessories not included in the scope of delivery on the
wire shelf.
▸ Special accessories can be found at: www.vzug.com
4.5 Plate warmer
▸ If the appliance is switched off, first press the adjusting knob.
▸ Put the wire shelf at level 1 and place the tableware on it.
▸ Press the touch button.
▸ Set the required duration.
Select a duration of at least 1 hour.
▸ Set the end time if necessary.
▸ Switch on the «Plate warmer» by selecting .
– The «Plate warmer» switches off automatically when the set duration is
over.
18
Page 19
5 Operating modes
5.1 Overview of operating modes
All the operating modes and fast heating are described below.
Follow the advice given in «Tips and tricks» (see page 49) and in
«EasyCook».
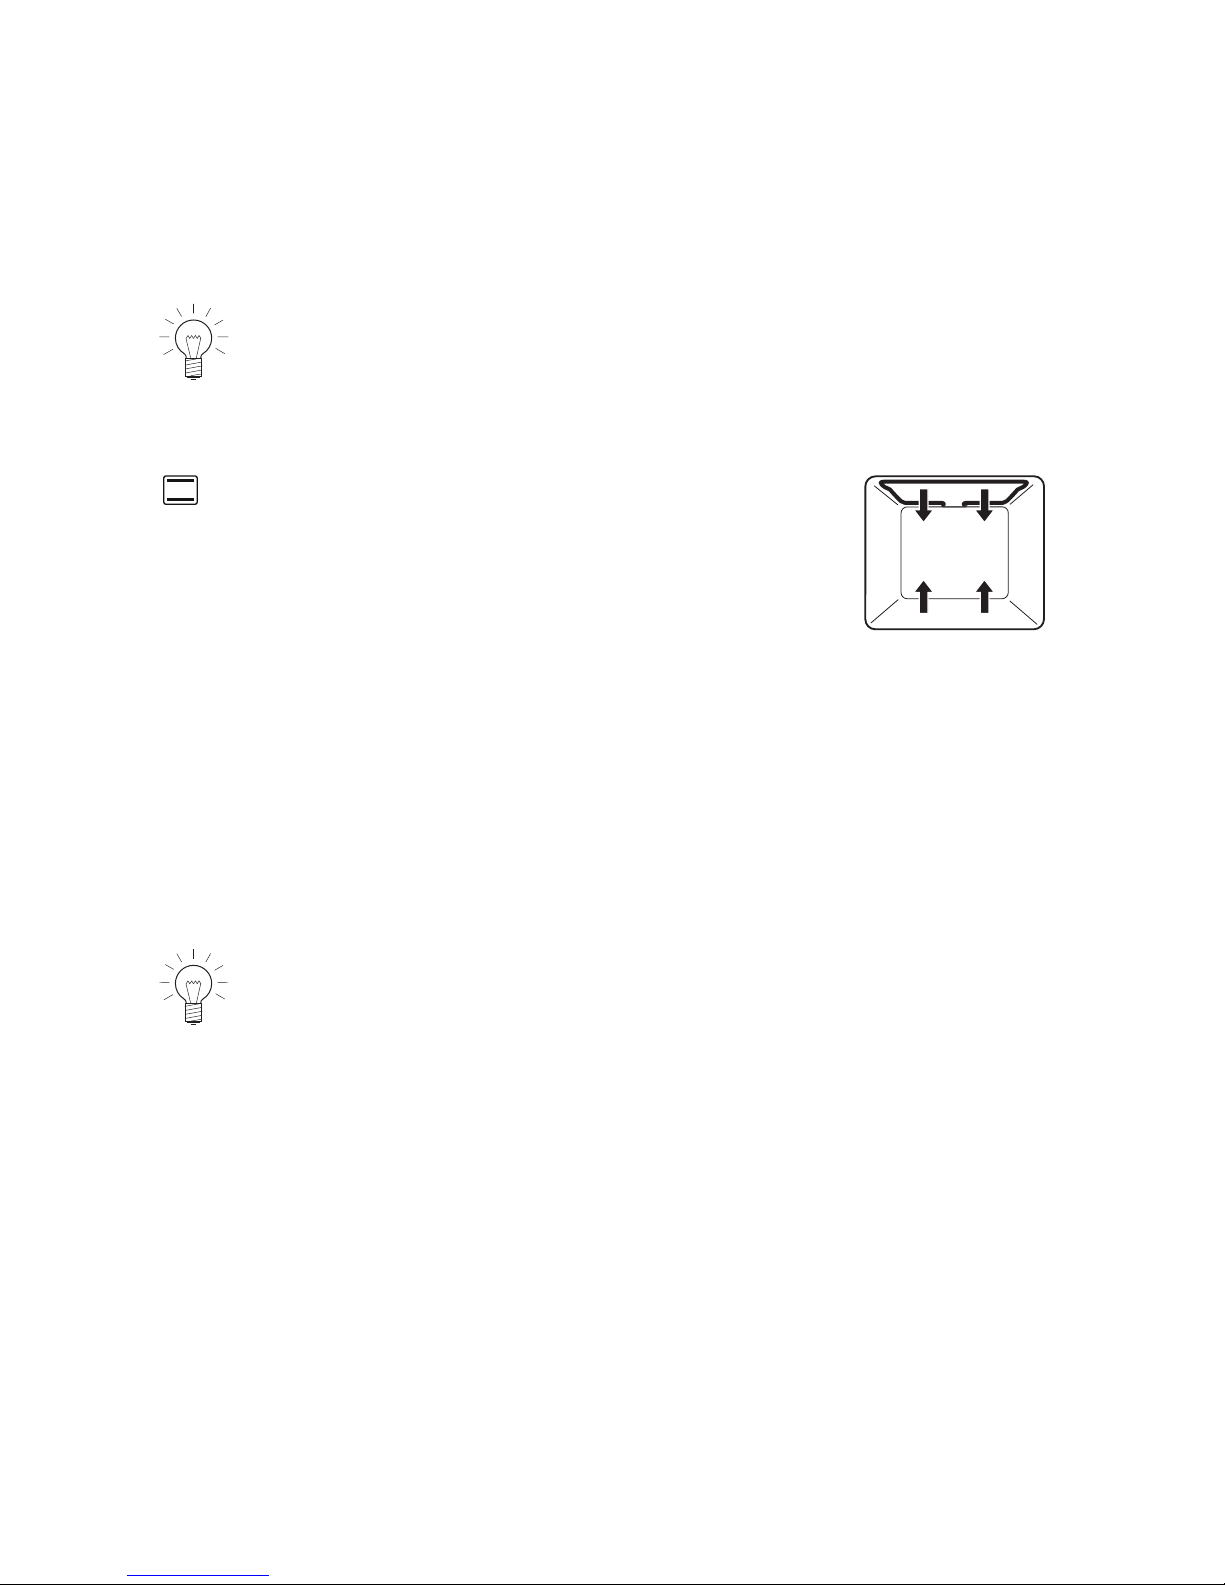
5.2 Top/Bottom heat
Temperature range 30–280 °C
Temperature range for pyrolysis appliance
30–300 °C
Recommended value 200 °C
Level 2 (or 1)
The cooking space is heated by the top and bottom heating elements.
Uses
▪ Classic operating mode for cooking and baking on onelevel
▪ Cakes, biscuits, bread and roasts
Use a dark enamelled tray or a black tray or tin for crispy results.
19
Page 20

5 Operating modes
5.3 Hot air
Temperature range 30–250 °C
Temperature range for pyrolysis appliance
30–280 °C
Recommended value 180 °C
Level 1 + 3 or 2
(or 1 + 3 + 2)
A heating element behind the back wall of the cooking space heats up the air
inside the cooking space, which is circulated evenly.
Uses
▪ Particularly suitable for baking savouries and biscuits on several levels at
the same time
▪ Cakes, bread and roasts
Select a lower temperature (reduce by approximately 20°C) than for
as the heat transfer is more efficient.
5.4 PizzaPlus
Temperature range 30–250 °C
Recommended value 200 °C
Level 2 (or 1)
The cooking space is heated by hot air and bottom heat. The base of the food
is baked particularly intensively.
Uses
▪ Pizza
▪ Flans and quiches
Use a dark enamelled tray or a black tray or tin without baking paper
for very crispy results.
20
Page 21
5 Operating modes
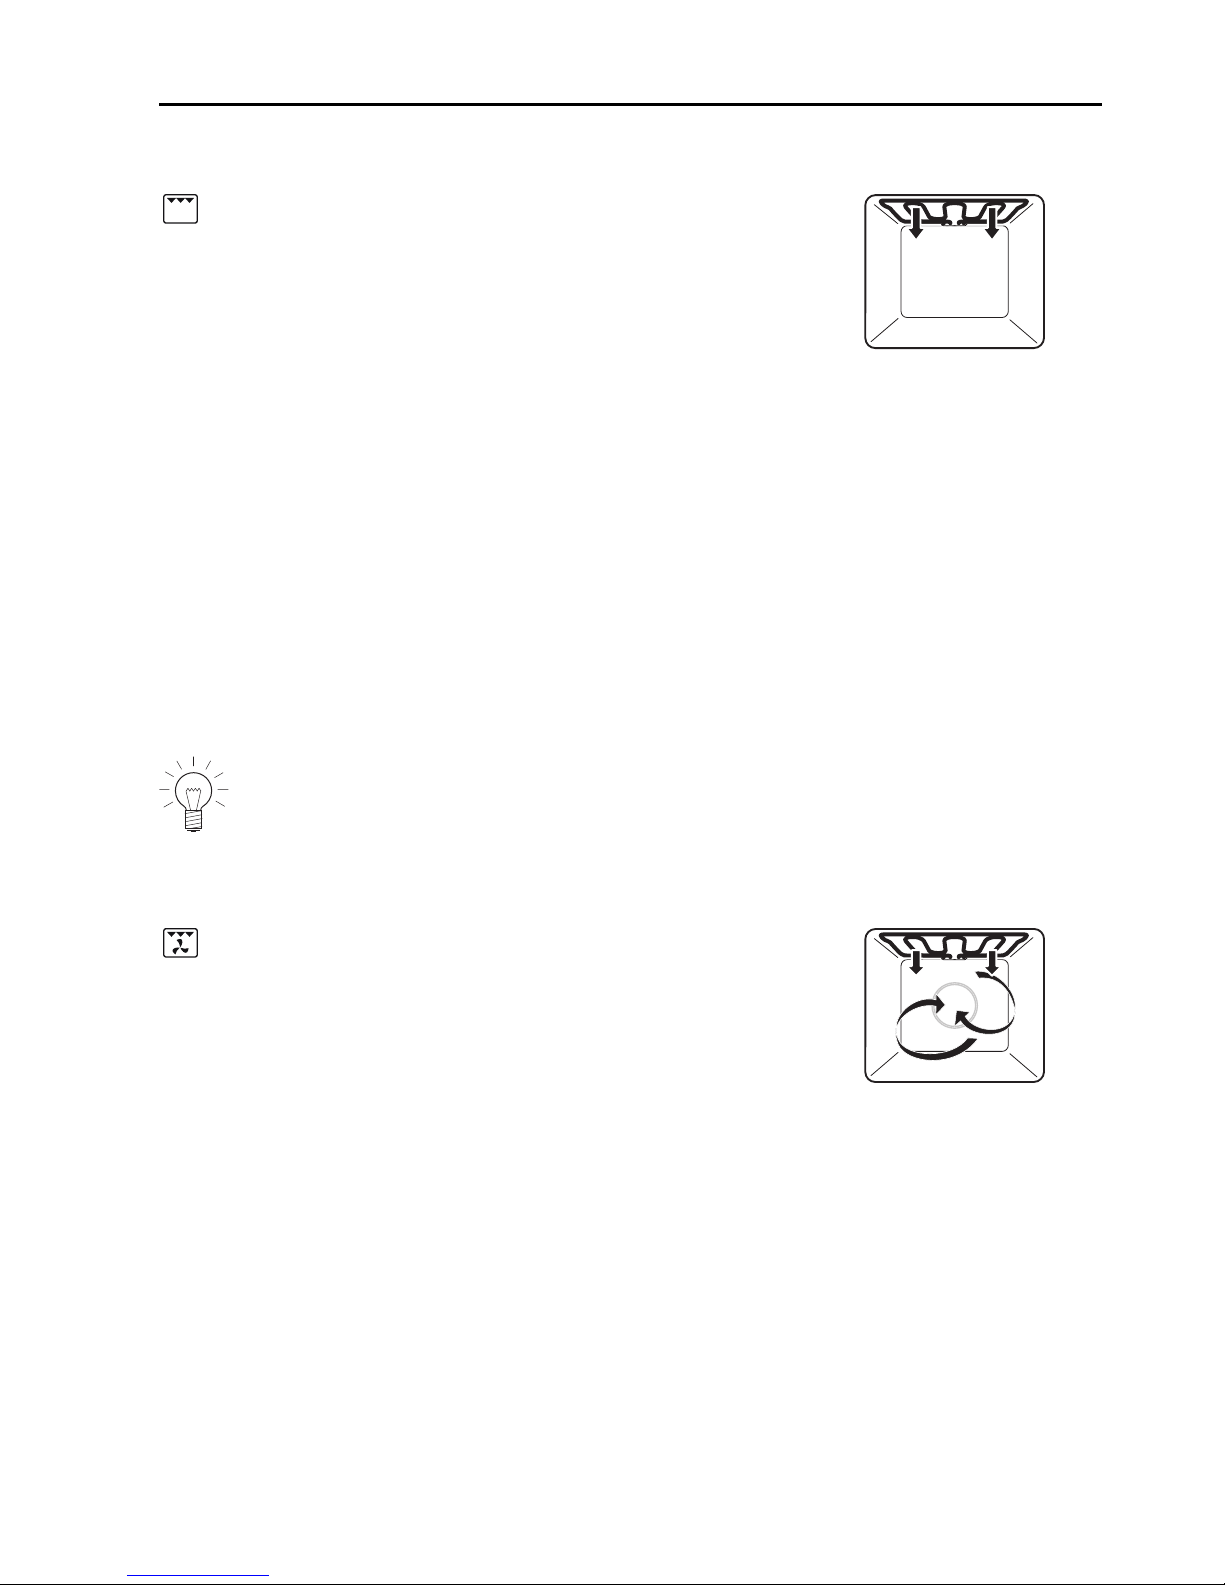
5.5 Grill
Temperature range 5 levels
Recommended value Level 3
Level 3 or 4
The cooking space is heated by the grill element.
Uses
▪ Flat food for grilling, e.g. steaks, chops, chicken parts, fish and sausages
▪ Gratinating
▪ Toast
▸ Place the food to be grilled directly on the wire shelf.
▸ Line the baking tray with aluminium foil and then place it underneath the
wire shelf.
For optimal results, preheat the cooking space for 3 minutes before
placing the food in.
5.6 Grill-forced convection
Temperature range 30–250 °C
Recommended value 200 °C
Level 2 or 3
The cooking space is heated by the grill element. The hot air fan distributes
the air evenly in the cooking space.
Uses
▪ Suitable for a whole chicken
▪ Large, bulky food for grilling
▸ Put food for grilling in a porcelain or glass dish or directly on the wire shelf.
▸ Line the baking tray with aluminium foil and then place it underneath the
wire shelf.
21
Page 22
5 Operating modes
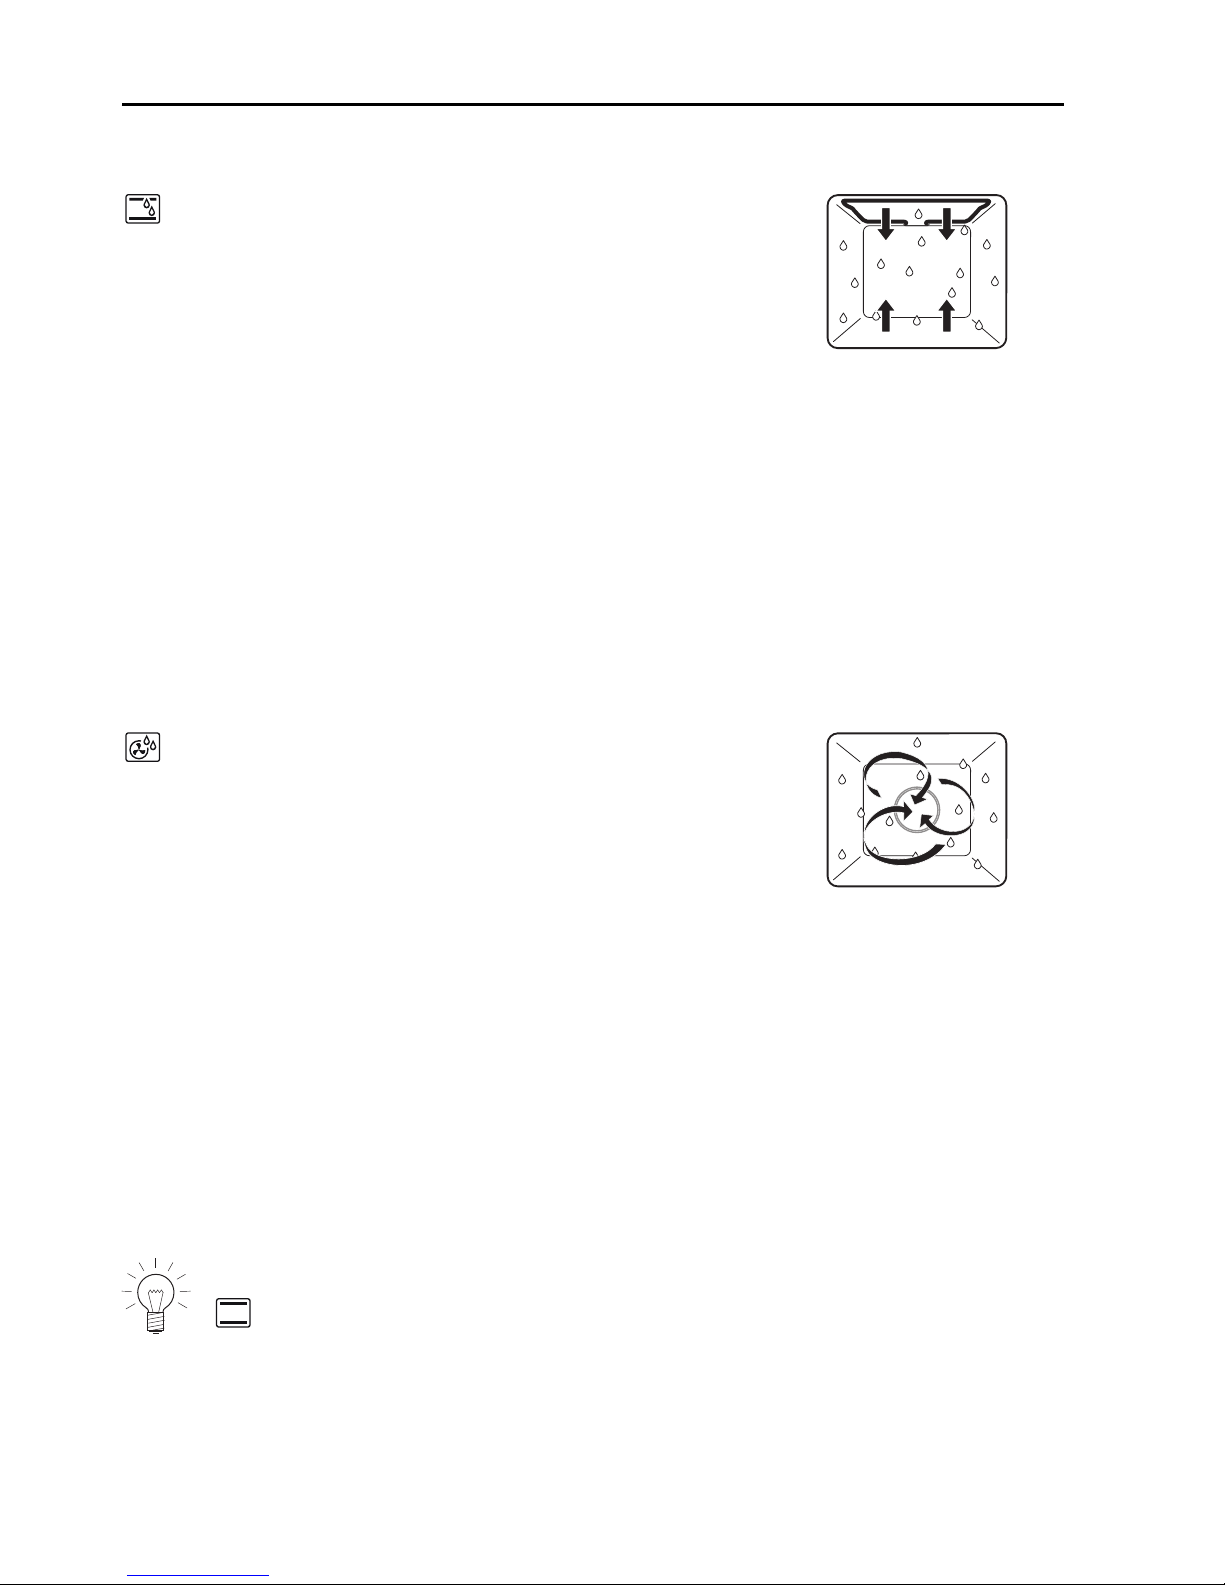
5.7 Top/Bottom heat humid
Temperature range 30–250 °C
Recommended value 200 °C
Level 2 (or 1)
The cooking space is heated by the top and bottom heating elements. The
steam produced is largely retained in the cooking space. The food retains its
moisture.
Uses
▪ Bread, plaited bread, roasts and gratins on one level
▪ Low-temperature cooking
5.8 Hot air humid
Temperature range 30–250 °C
Recommended value 180 °C
Level 1 + 3 or 2
(or 1 + 3 + 2)
A heating element behind the back wall of the cooking space heats up the air
inside the cooking space, which is circulated evenly. The steam produced is
largely retained in the cooking space. The food retains its moisture.
Uses
▪ For savouries and biscuits on two levels at the same time
▪ For yeast pastries and bread on two levels at the same time
▪ Gratins and baked dishes
Select a lower temperature (reduce by approximately 20°C) than for
as the heat transfer is more efficient.
22
Page 23

5 Operating modes
5.9 Bottom heat
Temperature range 6 levels
Recommended value Level 3
Level 2 (or 1)
The cooking space is heated by the bottom heating element.
Uses
▪ Baking flan bases
▪ Preserving
Use a dark enamelled tray or a black tray or tin for crispy results.
5.10 Fast heating
For fast heating , the cooking space is heated with hot air and bottom heat,
which shortens the preheating process. Fast heating can be used with the fol-
lowing operating modes: and .
▸ Select the desired operating mode and adjust the settings.
▸ To start the operating mode, select .
▸ Select «Switch fast heating on» in the settings for the operating mode.
– Above , the symbol illuminates.
As soon as the set temperature has been reached,
– an acoustic signal is emitted.
23
Page 24

6 Using the appliance
The different main menus and functions are selected by pressing the corresponding touch button. Selected touch buttons and functions are illuminated in
white; other selectable functions are illuminated in orange.
Settings and functions that cannot be selected or changed are greyed out in
the various menus.
The appliance offers the following touch buttons with the following main
menus and functions:
Operating modes
GourmetGuide
EasyCook
User settings
Favourites
Heatable appliance drawer/plate
warmer *
* Depending on model
Timer
Cooking space illumination
Switch off
Adjusting knob functions
Press
▪ Switching on the appliance
▪ Selecting/opening a submenu, setting, etc.
▪ Confirming/closing a message
▪ Activating/deactivating a user setting
Turn
▪ Navigating within the submenus
▪ Changing/setting a value or user setting
24
Page 25

6 Using the appliance
6.1 Selecting and starting the operating mode
▸ If the appliance is switched off: first press the adjusting knob.
▸ If the appliance has another menu open: press the touch button.
– The selection of operating modes appears in the display.
▸ Select the operating mode.
– The operating mode settings appear in the display; a recommended
value appears above the temperature.
▸ Set the values for duration, end time, temperature or temperature level and
target temperature as required and confirm.
Press and go
Once all the necessary settings for the operating mode have been made, a
bar appears in the display and counts down 20seconds. If no further settings
are made during this time, operation starts automatically. If a setting is
changed, Press and go starts again.
The duration of Press and go can be adjusted (see page 54) or it
can be deactivated altogether in the user settings.
▸ To start operation immediately, i.e. without Press and go, select .
– If it is set, the remaining time appears on the display and in the digital
display.
The operating mode selected cannot be changed after operation has
started.
25
Page 26
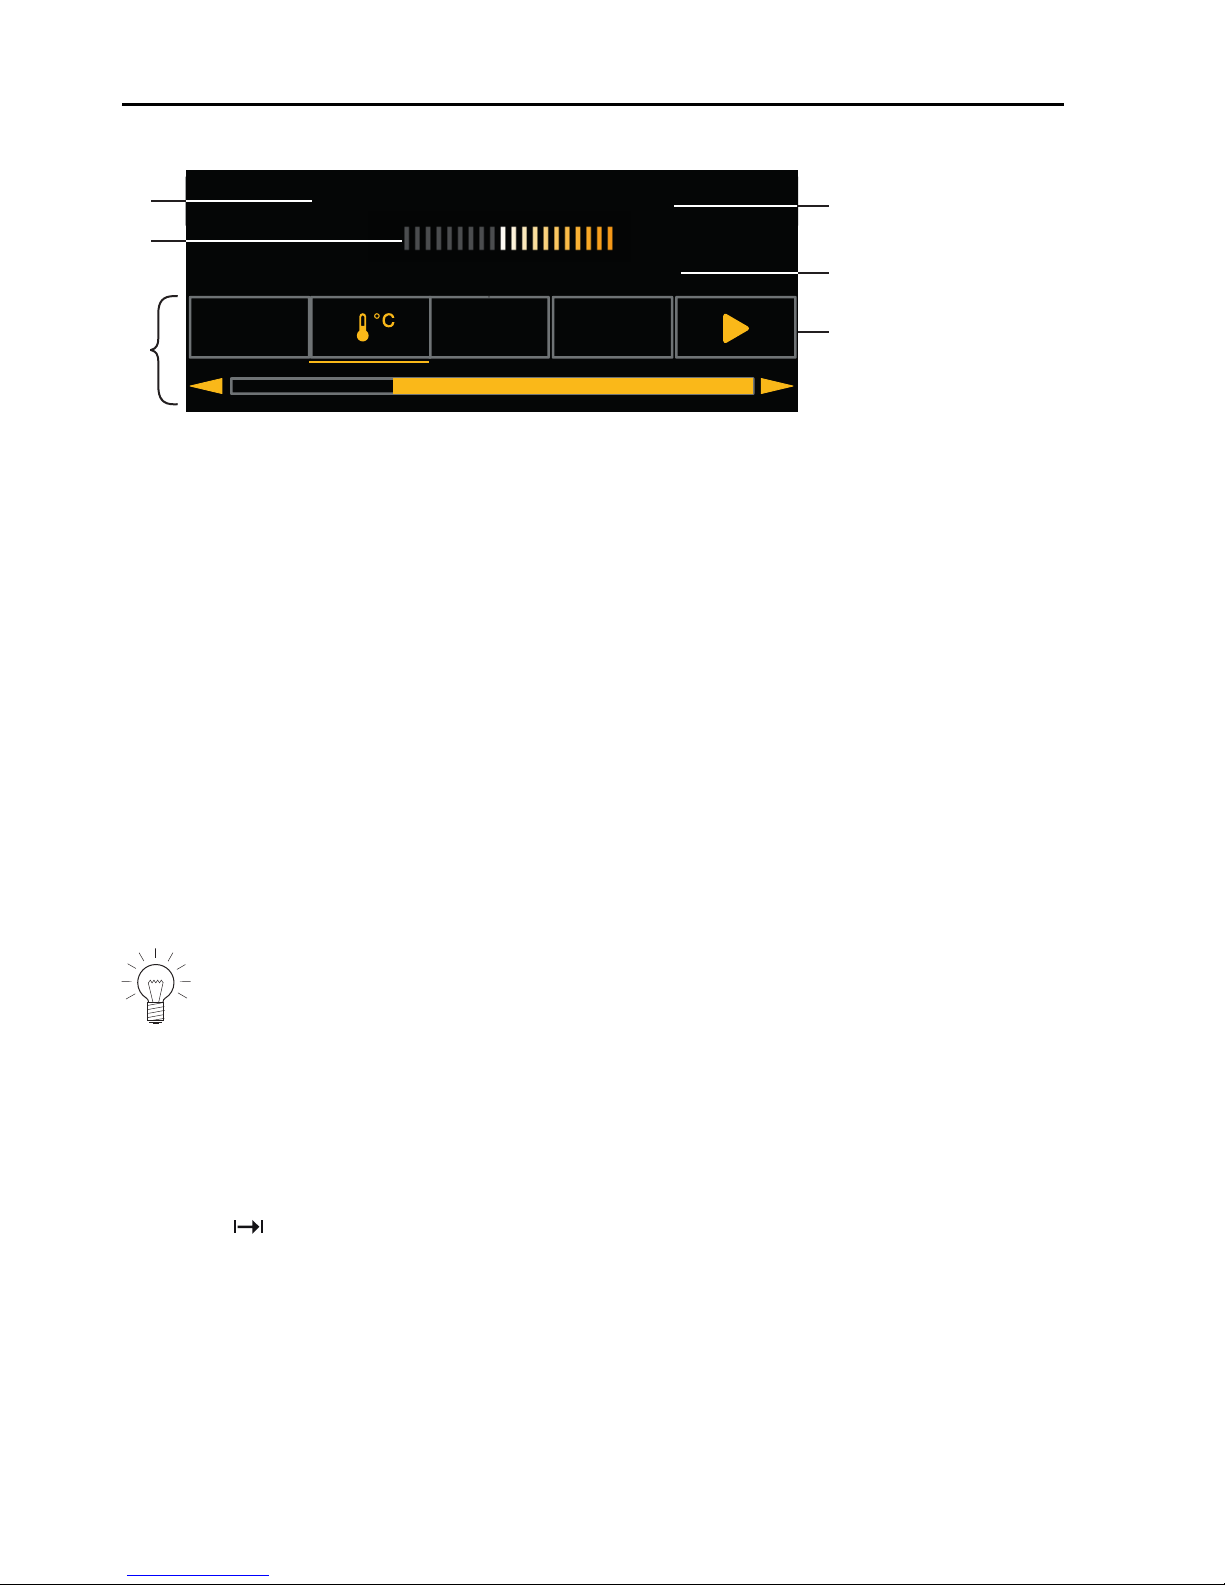
6 Using the appliance
Display overview
곌6HWWHPSHUDWXUH
굙굚굛
K
5
6
1
3
2
4
1
Operating mode settings
4
Current position of the adjusting
knob / selected setting
2
Press and go
5
Set values / recommended values
3
Operating mode with symbol
6
Symbols for settings
6.2 Checking and changing the settings
▸ Select the symbol for the desired setting.
▸ To change the value, turn the adjusting knob to the right or left.
▸ Press the adjusting knob to confirm the setting.
– The operating mode settings are displayed.
– The changed value can be seen above the corresponding symbol.
The end time can only be changed during the first 60seconds of
operation.
6.3 Setting a duration
The selected operating mode ends automatically when the set duration is up.
▸ Select the desired operating mode.
▸ Select in the operating mode settings.
▸ Set the desired duration – max. 9hrs 59mins – and confirm.
– The duration is displayed in the operating mode settings as well as the
end time which is calculated based on this value.
– End of operation / Duration finished (see page 32)
26
Page 27

6 Using the appliance
6.4 Setting a delayed start / end time
The delayed start is activated when both the duration and the end time are set
for the selected operating mode.
The appliance switches automatically on and off again at the desired times.
If you use the food probe, you will need to estimate and set the duration. You
will find a guide on times in «EasyCook». The appliance switches on with a
delay and switches off again when the set target temperature is reached. Depending on the estimated duration, this can occur earlier or later than the end
time.
Perishables should not be kept unrefrigerated.
Before setting the delayed start
▸ Place the food in the cooking space.
▸ Select the desired operating mode.
▸ Set the temperature.
▸ Set the duration.
Setting a delayed start
▸ Select in the operating mode settings.
– The current end time calculated using the duration is displayed.
▸ Set the desired end time and confirm.
– The remaining time until the start of the operation is displayed.
– After 3 minutes, the display goes out and the touch button is illu-
minated in white. The display can be called up again at any time by
pressing the adjusting knob.
– The appliance remains switched off until 3 minutes before the auto-
matic start of operation.
▸ Checking and changing the settings (see page 26)
27
Page 28

6 Using the appliance
Example
▸ Select the operating mode and 180°C.
▸ At 8:00, set a duration of 1hour and 15minutes.
▸ Set the end time to 11:30.
– The appliance will automatically switch on at 10:15 and off again at
11:30.
6.5 Food probe temperature
Only use the supplied food probe.
Do not clean the food probe in the dishwasher. Always keep the
plug clean.
The food probe is used to measure the temperature inside the food (referred
to as the food probe temperature). As soon as the food reaches the target
temperature (the food probe temperature that should be attained at the end of
the cooking process), operation stops automatically. It is also possible to
simply measure the food probe temperature without stopping operation.
The food probe must be inserted as far into the middle of the meat as
possible to get a correct reading of the food probe temperature.
The optimal target temperature is dependent on the cut of meat and
on the degree of doneness.
Refer to the information on target temperatures in «EasyCook».
Setting
▸ Select the desired operating mode and set the temperature.
▸ Select in the operating mode settings.
▸ Set the desired target temperature and confirm.
▸ To start operation, select .
Operation can only be started when the food probe is plugged in.
▸ Checking and changing the settings (see page 26)
– The current food probe temperature is shown in the top part of the dis-
play when cooking.
– The set target temperature is displayed above .
28
Page 29

6 Using the appliance
– Operation ends automatically once the target temperature has been
reached – see also End of (see page 32)operation.
If the meat is left in the cooking space after having switched off the
appliance, the food probe temperature will continue to rise due to the
residual heat.
Measuring the food probe temperature
If you only wish to measure the food probe temperature without operation
stopping automatically when the target temperature is reached, proceed as follows:
▸ Select the desired operating mode and set the temperature and, if you wish,
the duration.
▸ Plug in the food probe.
▸ Start the operating mode.
– The current food probe temperature is shown in the top part of the dis-
play when cooking.
6.6 Cancelling / ending the operating mode before time
▸ In the operating mode settings, select or press the touch button.
– An acoustic signal is emitted.
– The selected operating mode is aborted.
– The following appears in the display: « Residual heat» and, for ex-
ample: « Hot air
aborted».
– If the food probe is inserted, the food probe temperature
is displayed. *
* applies only to appliances which were produced after March 2016 or have
received a software update.
▸ If you wish to start a new operating mode, press the touch button.
▸ If you wish to switch off the appliance, press the touch button.
29
Page 30

6 Using the appliance
6.7 Changing the operating mode
If no operating mode is running:
▸ Select in the settings of the current operating mode.
– The operating modes menu is displayed.
If an operating mode is already running:
▸ Select or press the touch button.
– The selected operating mode is cancelled.
▸ Press the touch button and choose a new operating mode.
6.8 Timer
The timer functions like an egg timer. It can be used at any time and independently of all other functions.
Setting and starting the timer
▸ Press the touch button.
– A suggested value of «10mins» appears in the display.
▸ Turn the adjusting knob and set the desired duration.
– The duration and the end time for the timer appear on the display.
The timer can be set for:
▪ up to 10 minutes in 10-second intervals, e.g. 9 minutes and 50 seconds.
▪ over 10 minutes in 1-minute intervals, e.g. 1hour and 12minutes.
The maximum timer duration is 9 hours and 59 minutes.
▸ Press the adjusting knob to confirm.
– The timer starts.
– If there is no operating mode running with a set duration, the remaining
time on the timer will be displayed in the digital display.
– The touch button is illuminated in white.
– If the appliance was in another menu before the timer was set, e.g. op-
erating modes, the menu or the submenu selected within it, e.g. a running operating mode, appears.
– If the appliance was not in another menu, the display goes black.
30
Page 31

6 Using the appliance
Checking and changing
▸ Press the touch button.
– The countdown to the remaining time appears in the display.
▸ Shorten or extend the time by turning the adjusting knob.
▸ Confirm this shortening or extending of the time.
When the timer finishes
When the set duration is up:
– An acoustic signal is emitted.
– «Timer finished» appears in the display.
▸ To close the message, select .
Switching the timer off before time
▸ Press the touch button.
– The countdown to the remaining time appears in the display.
▸ Set the timer to 0 by turning the adjusting knob and confirm.
Or, if the timer is the only active function:
▸ Press the touch button.
Or, if you wish to switch off the appliance:
▸ Press the touch button 2×.
31
Page 32

6 Using the appliance
6.9 End of operation
When the set duration is up or, if the food probe is being used, when the set
target temperature is reached:
– The selected operating mode ends automatically.
– An acoustic signal is emitted.
– Three options are displayed:
▪ Select to choose a new operating mode
▪ Select to extend the operation
▪ Select to switch the appliance off.
– The appliance switches off automatically after 3 minutes without inter-
action.
You can adjust (see page 52) the appliance end time individually.
– As long as the temperature is above 80°C, « Residual heat» ap-
pears in the display.
– If the food probe is inserted, the food probe temperature is displayed. *
The food can be kept warm with residual heat for some time. As soon
as the temperature falls below 80°C, all the displays go out. If at this
point the food probe is still inserted, the displays only go out when the
food probe is removed. *
The cooling fan can continue to run.
* applies only to appliances which were produced after March 2016 or have
received a software update.
32
Page 33

6 Using the appliance
Removing food from cooking space
Risk of burns!
Hot air may escape from the cooking space when the appliance
door is opened.
The accessories get hot. Use protective gloves or oven cloths.
▸ Take the food out of the cooking space when done.
▸ Wipe away traces of water or soiling with a soft cloth to prevent corrosion
and unpleasant odours.
▸ Leave the appliance door open in the at-rest position until the cooking
space has cooled down and dried out.
6.10 Switching the appliance off
▸ Press the touch button.
– An acoustic signal is emitted.
– Any running operating mode or application is ended; if switched on,
the timer, cooking space illumination or plate warmer will remain act-
ive.
– « Residual heat» appears in the display.
– If the food probe is inserted, the food probe temperature
is displayed. *
* applies only to appliances which were produced after March 2016 or have
received a software update.
▸ Press the touch button again.
– All touch buttons go out.
– All functions are ended and switched off.
Or, at the end of operation:
▸ Choose the option in the display.
– An acoustic signal is emitted.
– Any running operating mode or application is ended; if switched on,
the timer, cooking space illumination or plate warmer will remain act-
ive.
– The following appears in the display: « Residual heat».
33
Page 34

6 Using the appliance
– If the food probe is inserted, the food probe temperature
is displayed. *
* applies only to appliances which were produced after March 2016 or have
received a software update.
▸ Press the touch button.
– All touch buttons go out.
– All functions are ended and switched off.
The appliance is switched off if none of the touch buttons are illuminated any more and the display is dark.
The cooling fan can continue to run.
34
Page 35

7 GourmetGuide
The GourmetGuide encompasses several programmes which make preparing meals as easy as possible for you. The following programmes can be
called up:
Recipes Keep warm *
Soft roasting
* applies only to appliances which were produced after March 2016 or have
received a software update.
7.1 Recipe book
A recipe book contains recipes which are tailored to suit the particular appliance. These are already programmed into the appliance and run automatically
once started.
The «Recipe book» function allows you to cook by following a recipe. To use
this function, you must first order the recipe book (subject to charge) before
you are able to activate it in the appliance.
The following recipe books are available for your appliance:
▪ Baking treats
Unlocking a recipe book
When you buy a recipe book, you receive a password which is used to unlock
the recipe book in the appliance. After it has been unlocked, the recipes are
displayed in the appliance.
▸ If the appliance is switched off, first press the adjusting knob.
▸ Press the touch button.
▸ Select .
▸ Select the recipe book that you wish to unlock.
– The following appears in the display: «Do you want to unlock the re-
cipe book?».
▸ Select «Yes».
▸ Enter the password using the on-screen keypad and confirm by selecting .
– The recipe book is now unlocked.
35
Page 36

7 GourmetGuide
Starting a recipe
For recipes that do not require preheating, place the food in the cold
cooking space.
▸ If the appliance is switched off, first press the adjusting knob.
▸ Press the touch button.
▸ Select .
▸ Select the desired recipe book or «Own recipes».
▸ To select a recipe, choose .
▸ Select a recipe.
– The recipe settings are displayed.
▸ If you wish, set the end time or delayed start.
When cooking recipes from recipe books, a delayed start is only possible if the cooking space does not need to be preheated and the
food does not need to be stirred or turned partway through, for example.
▸ To start the recipe, select .
– The recipe starts.
– The display shows the current recipe step, the time remaining in this
step and the entire duration of the recipe.
– The digital display shows the remaining time for the current recipe
step.
In the course of the recipe
In the course of the recipe, it may be necessary to open the appliance door,
e.g. to turn over the food or to spread a topping over it. In such an instance,
operation is paused and the display shows instructions on what to do next.
To continue the recipe, proceed as follows:
▸ Open the appliance door.
▸ Carry out the action, e.g. turn over food.
▸ Close appliance door and select in the display.
– The recipe will continue to run.
36
Page 37

7 GourmetGuide
Aborting the recipe
▸ In the recipe settings, select .
– The following appears in the display: «Should the current recipe be
aborted?»
▸ To abort the recipe, select «Yes».
– The recipe is aborted.
7.2 Own recipes
Up to 24 of your own favourite recipes can be created and saved. A recipe
can consist of several steps with any operating modes, pauses and hold
times, which run automatically once started. You can also change and save
existing recipes.
Creating your own recipe
▸ If the appliance is switched off, first press the adjusting knob.
▸ Press the touch button.
▸ Select .
▸ Select .
▸ To create a new recipe, select .
– The selection of operating modes appears in the display.
▸ Select the desired operating mode.
▸ Set the target temperature, duration, temperature or temperature level for
step1.
If you are only making temperature settings, this step takes as long as
is necessary for the cooking space to reach the required temperature.
This represents the preheating process.
▸ To confirm the settings, select .
▸ To add a new step, select .
▸ Set an operating mode, pause or hold time to step 2.
37
Page 38
7 GourmetGuide
For the intermediate step «Hold», the heating continues to run and
the cooking space temperature remains constant. For the intermediate
step «Pause», the cooking space is not heated any more and the
temperature drops.
After a hold or pause step, a preheating stage can be set.
▸ To save the settings, select .
– The overview of the set steps is displayed.
▸ Set additional steps in the same way. A recipe can consist of up to 9 steps.
▸ To save the recipe, select .
– The overview of the available storage spaces is displayed.
▸ Select the desired (empty) storage space and confirm.
▸ Enter the recipe name using the on-screen keypad and confirm by pressing
.
– The recipe is now saved.
– The following appears in the display: «Do you want to run the recipe?».
If you do not wish to run the recipe, you will return to the recipes main
menu.
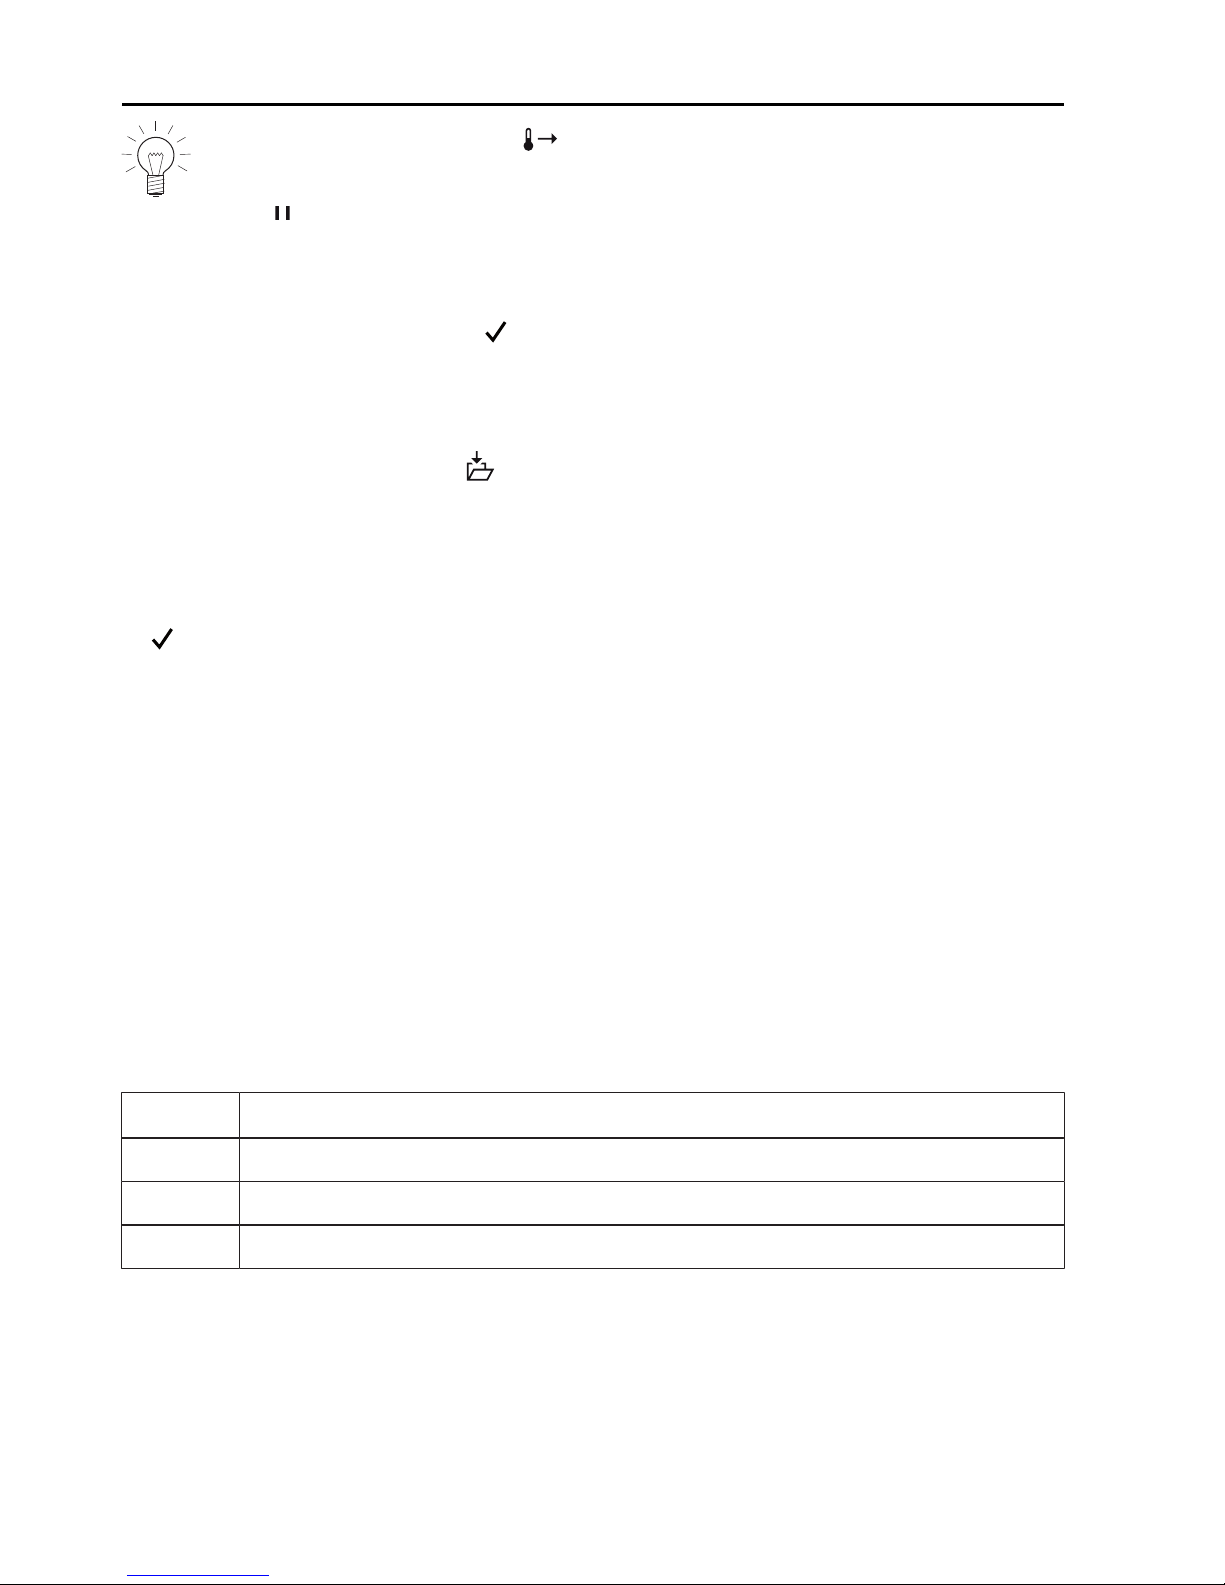
Step duration
The duration of a step depends on whether values have been set for the target
temperature, duration, temperature or temperature level. If multiple values
have been set, e.g. the duration and the temperature, only one of these takes
priority for the step duration.
The table below shows the priorities in descending order:
Setting
1 Target temperature
2 Duration
3 Temperature / temperature level
38
Page 39

7 GourmetGuide
Aborting recipe entry/change
▸ Select in the overview of the set steps.
– The following appears in the display: «Do you really want to cancel the
entering of the recipe?»
▸ To abort the recipe entry, select «Yes».
– The menu for your own recipes or, if a recipe from a recipe book was
changed, the menu for the recipe book appears in the display.
Ending a step before time
This is only possible for «Own recipes». If, for example when a recipe is
running, you realise that the food or the cooking space is ready for the next
step in the recipe even though the current step is still in progress, you can end
the step before time.
▸ Select the symbol for target temperature, duration, temperature or temperat-
ure level in the operating mode settings. Pay attention to the priorities for
the step duration as described under «Step duration».
▸ Set the displayed value to 0 or reduce it until it is less than the currently
measured value.
▸ Press the adjusting knob to confirm.
– The step is ended.
– If it was the final step, the recipe ends too.
– If it was not the final step, the next step starts.
Changing recipes
Any recipe – from a recipe book as well as your own recipes – can be copied
and changed.
▸ Select the desired recipe book or .
▸ Select .
▸ Choose a recipe.
– An overview of the steps in the recipe is displayed.
Changing a step
▸ Select the step you want to change.
▸ Make the settings and confirm with .
39
Page 40

7 GourmetGuide
Adding a step
▸ Select .
▸ Make the settings and confirm with .
Deleting a step
▸ Select .
– The overview of the steps in the recipe is displayed.
▸ Select the step.
– The following appears in the display: «Do you want to delete this
step?».
▸ To deleted the step, select «Yes».
– The step is deleted.
Saving an amended recipe
▸ Select .
▸ Select storage space, enter the recipe name and confirm by pressing .
– The amended recipe is now saved.
A storage space that is already being used can be overwritten.
Recipes that have been amended from recipe books are not saved in
the recipe book, but under «Own recipes». The original recipe remains in the corresponding recipe book.
Deleting your own recipe
Any recipe in «Own recipes» can be deleted.
▸ Select «Own recipes».
▸ Select .
▸ Select the recipe to be deleted.
– The following appears in the display: «Do you want to delete this re-
cipe?»
▸ To delete the recipe, select «Yes».
– The recipe is deleted.
40
Page 41

7 GourmetGuide
7.3 Soft roasting
How it functions
The soft roasting function allows high-quality cuts of meat to be prepared
gently. You can select exactly when the cooking process is complete, irrespective of the weight and thickness of the meat. The temperature is automatically regulated.
Tips for an optimal result
▪ Take the meat out of the refrigerator ½ to 1 hour before soft roasting.
▪ Weight of meat: 500–2000g
▪ Meat thickness: at least 4cm
▪ Quality: lean, high-quality meat
Soft roasting table for «Soft roasting seared»
Cut of meat Degree of doneness Recommended target
temperature°C
Fillet of veal rare
medium
58
62
Rump or loin of veal medium 63
Shoulder of veal medium 72
Neck of veal medium 78
Fillet of beef rare
medium
53
57
Rib-eye or sirloin rare
medium
53
57
Rump of beef medium 63
Chuck of beef medium 68
Shoulder of beef medium 72
Rump or loin of pork medium 65
Neck of pork medium 80
41
Page 42

7 GourmetGuide
Leg of lamb rare
medium
63
67
Freely select meat type – 70
«Soft roasting seared»
▸ Season or marinate the meat.
Remove any marinade made with herbs, mustard, etc. from the meat
before searing. These ingredients burn easily.
▸ Salt the meat immediately before searing.
▸ Briefly sear the meat all over for no longer than 5minutes.
▸ Then place the meat in a glass or porcelain roasting dish.
If you do not intend to sear the meat until after the soft roasting, lower
the recommended target temperature by around 3–4°C.
▸ Insert the food probe into the meat so that the tip is in the centre of the
thickest part.
The food probe must be inserted as far into the middle of the meat as
possible to get a correct reading of the food probe temperature. The
temperature inside the meat is crucial for optimal results at the end of
cooking.
▸ Put the wire shelf at level 2 and place the dish on it.
▸ Insert the food probe plug into the socket.
▸ Start «Soft roasting seared» (see page 43).
42
Page 43

7 GourmetGuide
Selecting and starting soft roasting
The longer the meat is cooked, the more tender and succulent it becomes. This applies particularly for thicker pieces of meat.
The target temperature cannot be changed once soft roasting has
started.
▸ If the appliance is switched off, first press the adjusting knob.
▸ Press the touch button.
▸ Select .
▸ Select the desired soft roasting method.
▸ Select the desired type of meat.
▸ Select the desired cut.
▸ If the desired type of meat or cut cannot be selected, select the
«Freely select meat type» option.
▸ Select the degree of doneness (not possible for «Freely select meat
type»).
– The operating mode settings are displayed.
– A recommended value appears above the target temperature.
▸ Adjust the recommended value if necessary and set a delayed start if you
wish.
▸ To start soft roasting, select .
The food probe must be plugged in.
– Soft roasting starts.
– The set target temperature, the current food probe temperature and
the remaining time are displayed.
– The remaining time appears in the digital display.
The appliance door must be closed during operation. If the appliance
door is opened while soft roasting is running, the operation is interrupted and then, after a short time, cancelled.
43
Page 44

7 GourmetGuide
Inadvertently interrupting the programme
▸ If the touch button is pressed, the soft roasting programme is interrupted.
– The following appears in the display: «Should be cancelled?»
▸ To continue soft roasting, select «No».
– Operation is continued.
Cancelling / ending soft roasting before time
▸ Select in the soft roasting settings or press the touch button.
– The following appears in the display: «Should be cancelled?».
▸ Select «Yes».
– Operation is cancelled.
▸ To switch off the appliance, press the touch button.
If you accidentally pressed «Yes» or you wish to finish cooking the
meat, you must press the touch button and select an operating
mode. «Soft roasting» is not suitable for partially meat.
7.4 Keep warm *
* applies only to appliances which were produced after March 2016 or have
received a software update.
Cooked foods can be kept warm using the «Keep warm» setting.
If the cooking space is already hot, open the appliance door and allow
the cooking space to cool down for 3 to 4 minutes before starting the
«Keep warm» function. This ensures that the food does not overcook.
The longer the food is kept warm, the greater the changes may be to
the consistency of the food.
44
Page 45

8 EasyCook
EasyCook helps you to prepare any food simply and conveniently. After
choosing the food group and food, the appliance suggests the suitable operating modes or GourmetGuide applications, including the settings and accessories.
The brochure of the same name, which you received with the operating instructions, contains the same settings information in paper form.
The values given for temperature or temperature levels and duration
serve only as guide. They may vary depending on the type and size of
the food as well as on individual preference.
8.1 Overview of food groups
Foods are categorised into different groups; an item of food can appear in
more than one group.
The following food groups can be selected:
Fruit Fish and seafood
Mushrooms Flans and pizza
Potatoes Bakery products
Meat Baked dishes and gratins
Poultry
45
Page 46

8 EasyCook
8.2 Selecting foods and starting
▸ If the appliance is switched off, first press the adjusting knob.
▸ Press the touch button.
– The overview of food groups is displayed.
▸ Select the food group.
▸ Select the desired type of food.
▸ If necessary, select the shape (whole, in pieces, etc.) of the food.
▸ If necessary, select the preparation method (cooking, baking, etc.).
▪ The display contains information about:
– Temperature
– Duration
– Preheating necessary/not necessary
– Accessories required
– Level
– Possible tips
▸ Select .
▸ The operating mode summary is displayed.
▸ To start operation, select .
You can change the set values to a limited extend frame.
46
Page 47

9 Favourites
Up to 24 operating modes, GourmetGuide and EasyCook applications together with the settings made can be saved as favourites.
9.1 Creating favourites
▸ Select an operating mode, GourmetGuide or EasyCook application.
▸ Make the settings.
▸ Press the touch button.
– The favourites menu opens.
▸ Select a storage space and confirm.
▸ Enter the name of the favourite using the on-screen keypad and confirm.
– The favourite is saved.
9.2 Selecting and starting favourites
▸ Press the touch button.
▸ Choose the desired favourite and select «Yes».
▸ To start the favourite, select .
– The favourite starts.
47
Page 48

9 Favourites
9.3 Changing favourites
▸ Select the desired favourite.
▸ Adjust the settings as you wish.
▸ Press the touch button.
▸ Select the storage place or favourite that is to be overwritten.
▸ Enter the favourite name or overwrite as appropriate.
– The modified favourite is saved.
9.4 Deleting favourites
▸ If the appliance has another menu open, press the touch button.
▸ Select .
▸ Select the favourite to be deleted.
– The following appears in the display: «Do you want to delete this fa-
vourite?».
▸ To delete the favourite, select «Yes».
– The favourite is deleted.
48
Page 49

10 Tips and tricks
10.1 Unsatisfactory cooking result...
...when baking and roasting
Result Solution
▪ The baking or roast looks
good on the outside but is
still doughy or raw on the
inside.
▸ Next time, set a lower temperature and
lengthen the operating time.
▪ The cake collapses.
▸ Check that the settings used correspond to
those recommended in «EasyCook».
▸ Next time, set a lower temperature and
lengthen the operating time.
▸ Stir the cake mixture well. When finished,
bake immediately.
▸ For whisked sponges, beat the egg yolks /
egg whites to a foam a little longer and then
carefully fold into the mixture. When finished,
bake immediately.
▸ Follow the instructions on how much baking
powder to add.
49
Page 50
10 Tips and tricks
Result Solution
▪ The baking has browned
unevenly.
▸ Next time, set a lower temperature and ad-
just the operating time.
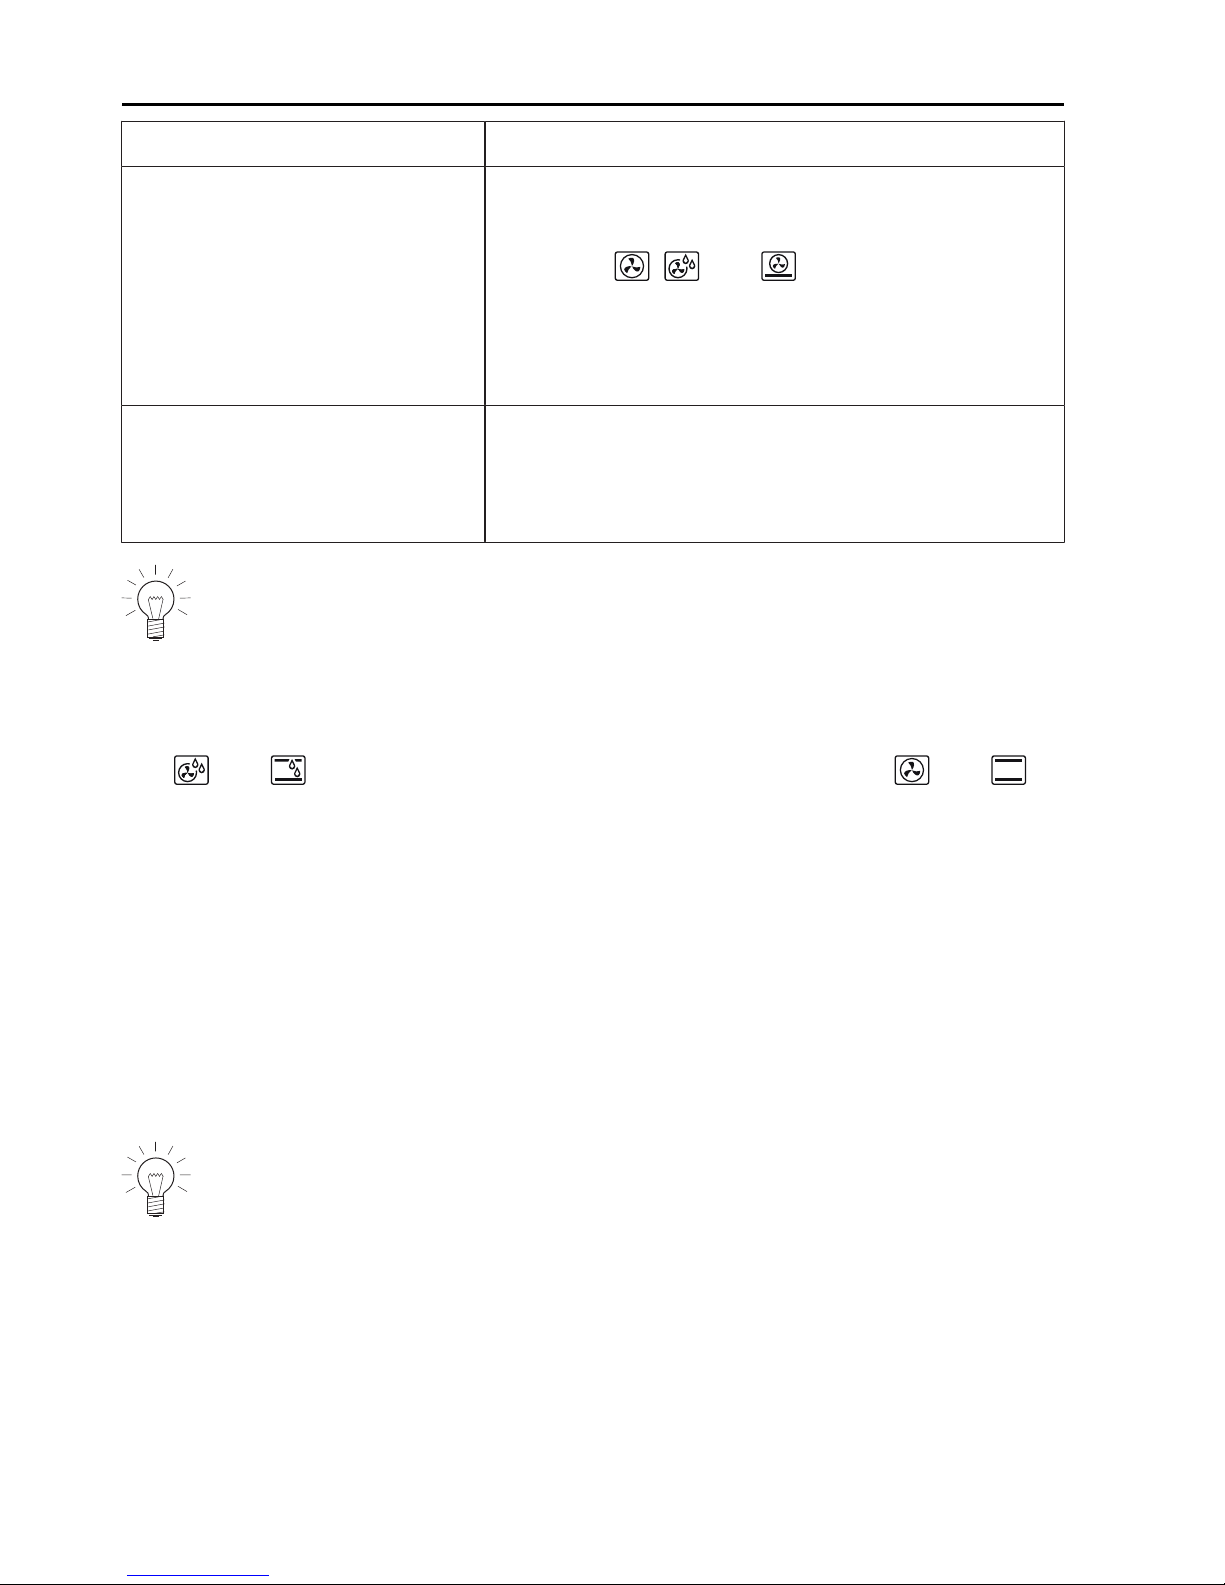
▸ If using , and , check that the levels
used correspond to «EasyCook».
▸ Do not push baking tins or bulky foodstuffs
right to the back of the cooking space.
▪ The baked goods have
come out lighter on one
baking tray than on the
other.
▸ Check that the settings used correspond to
those recommended in «EasyCook».
Some uneven browning is normal. More even browning is generally
achieved at lower temperatures.
10.2 Saving energy
The and operating modes consume less energy than the and
operating modes.
▸ Avoid opening the appliance door frequently.
▸ Only switch the illumination on when needed.
▸ For gratins, use the residual heat: for cooking times over 30 minutes, switch
the appliance off 5–10 minutes before the end of the operating time.
▸ Minimize preheating.
▸ Only preheat the cooking space if the cooking or baking results depend on
it.
Power consumption can be reduced to a minimum by selecting «Hide
time» in the user settings. Despite automatic energy-saving stand-by,
all safety functions remain active.
50
Page 51
11 User settings
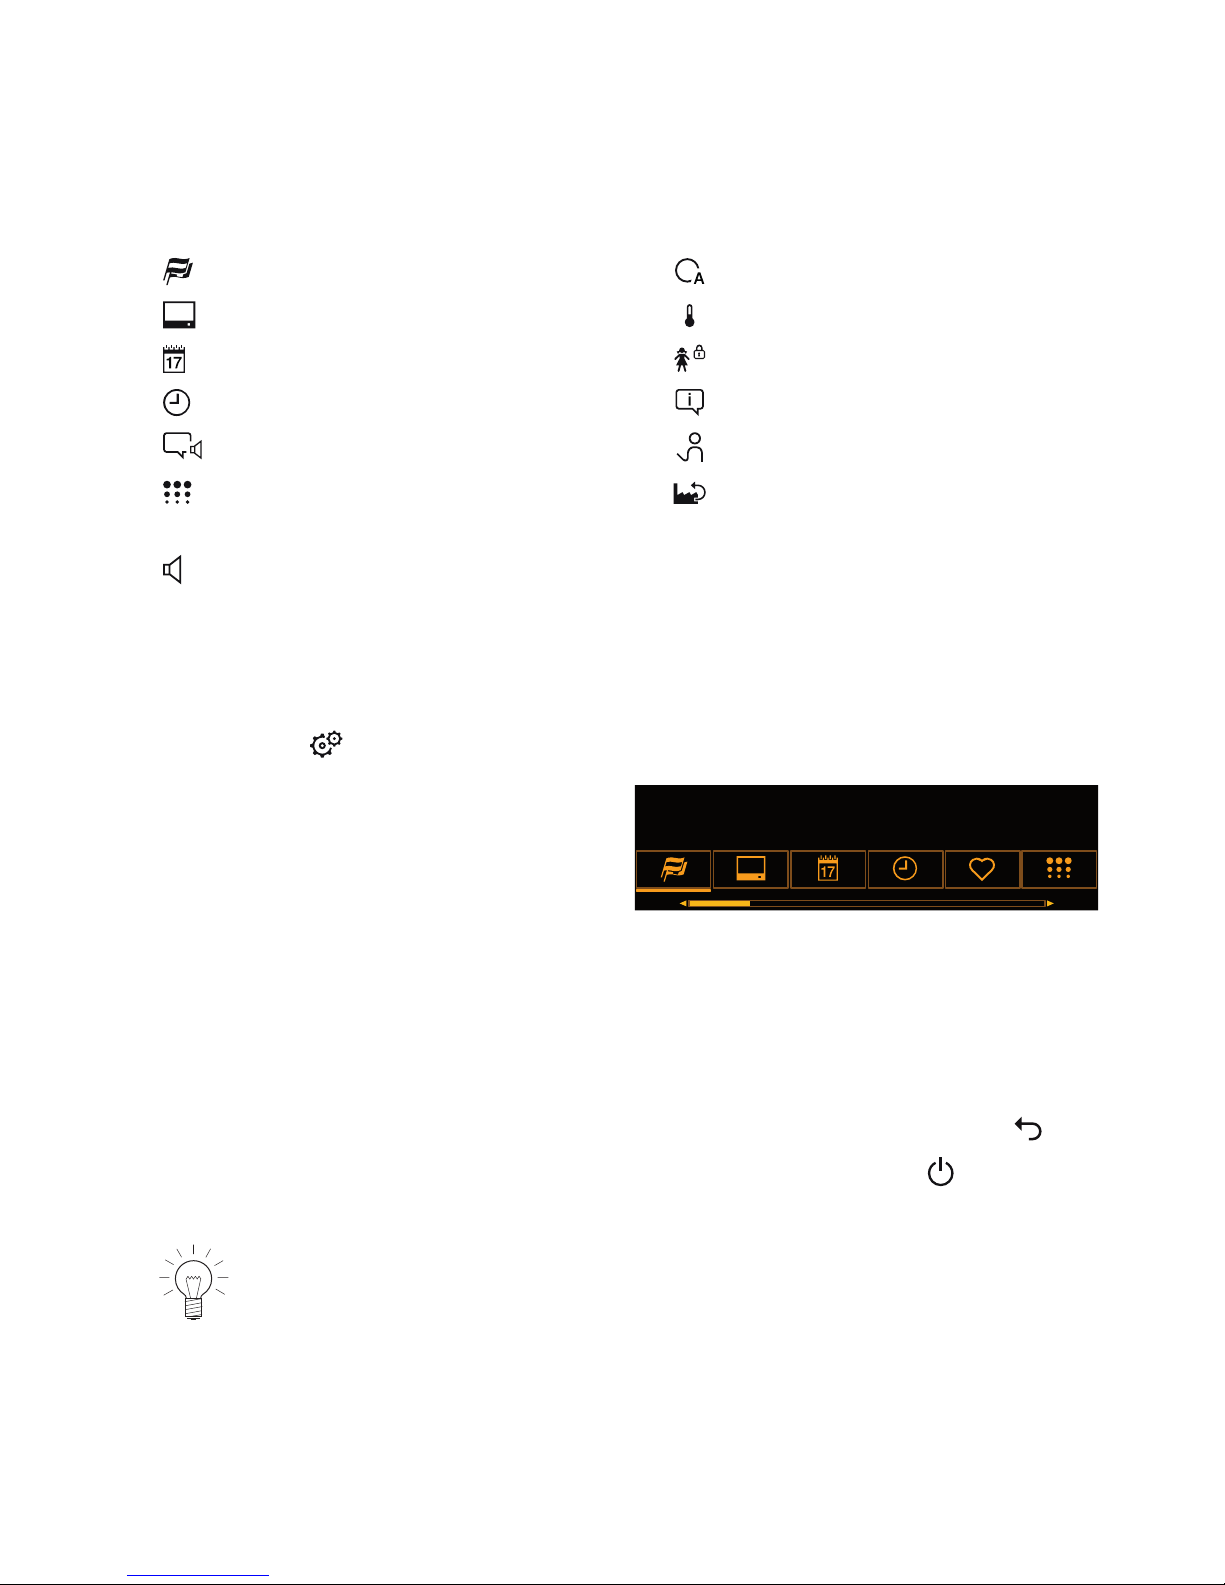
11.1 Overview of user settings
Language Assistance functions
Display Temperature
Date Childproof lock
Clock Appliance information
Notifications Demo mode
Pyrolytic self-cleaning (depending on model)
Factory settings
Volume
11.2 Adjusting user settings
▸ If the appliance is switched off, first press the adjusting knob.
▸ Press the touch button.
▪ The user settings main menu ap-
pears in the display:
괫8VHUVHWWLQJV
6HWODQJXDJH
▸ Select the desired user setting or submenu.
▸ Adjust the desired user setting and press the adjusting knob to confirm.
– Either the user settings main menu or the relevant submenu appears in
the display.
▸ To exit a submenu and return to the user settings main menu, select .
▸ To exit the user settings, press a different touch button or the touch but-
ton.
All user settings are retained in the event of a power failure.
51
Page 52

11 User settings
11.3 Language
The language in the display can be changed. Different languages are available
for selection.
11.4 Display
Contrast
With this function, the readability of the display can be adjusted based on how
the appliance is installed.
Brightness
The brightness of the display can be changed.
Start screen *
* applies only to appliances which were produced after March 2016 or have
received a software update.
With this user setting, you can determine the menu that is displayed when you
start the appliance. The following menus can be selected:
▪ Operating modes (factory set)
▪ GourmetGuide
▪ EasyCook
▪ Favourites
Appliance switch-off time
If no operating mode is running but the appliance is switched on, it is automatically switched off after a certain period of time without any user interaction.
Example: After the end of an operating mode.
The appliance switch-off time can be set between 3 and 30 minutes; the factory setting is 15minutes.
11.5 Date
The date can be retrieved and changed.
52
Page 53

11 User settings
11.6 Clock
The following time functions are available:
▪ Time
▪ Time format
▪ Time display
▪ Mains synchronization
Time format
The time can be displayed in the European 24-hour time format or the US
12‑hour format (a.m./p.m.).
Time display
With the «Show time» setting (factory setting), the time is dimmed between
00:00 and 06:00 (24-hour format) or 12:00 a.m. and 06:00 a.m. (12-hour
format).
If «Hide time» is selected, the displays are not illuminated when the appliance
is off.
To reduce power consumption to a minimum, select «Hide time» in
the user settings. Despite automatic energy-saving stand-by, all safety
functions are active.
Mains synchronisation
Mains synchronisation synchronises the appliance clock with the mains frequency. Irregular mains frequency can cause the clock to not run correctly. A
pulse generator inside the appliance is used when mains synchronisation is
switched off.
11.7 Notifications
Acoustic signals and instruction messages can be switched off or disabled.
11.8 Pyrolytic cleaning of appliance
This function enables pyrolytic cleaning of the cooking space.
See Pyrolytic self-cleaning (see page 63).
53
Page 54

11 User settings
11.9 Volume
The acoustic signal can be set at one of two levels of loudness or can be
completely switched off.
An acoustic signal is emitted in the event of a malfunction even if the
setting is set to «off».
A short acoustic signal is emitted when the appliance is switched off
even if the setting is set to «off» (safety function).
11.10 Assistance functions
Illumination
The «Automatic» setting switches on the cooking space illumination:
▪ 3 minutes before a cooking process ends, e.g. in the case of an automatic
programme or an operating mode with a set duration, or
▪ if the operation is ended before time, i.e. cancelled (using or the touch
button).
Depending on the model, the illumination also switches on when the appliance
door is opened.
Press the sensor button to switch the illumination on or off at any
time.
If the illumination is not switched off, it will go out after a maximum of
5 minutes to save electricity.
Fast heating
With the «Automatic» setting, fast heating is switched on automatically
wherever possible.
Press and go
«Press and go» refers to the period of time after which an operating mode/
programme starts automatically as long as all necessary settings are available
or have been made. Adjusting the settings restarts the countdown.
«Press and go» can be switched on or off.
When «Press and go» is activated, values between 10 seconds and
1 minute are possible; the factory setting is 20 seconds.
54
Page 55

11 User settings
11.11 Temperature
Temperature unit
The temperature can be displayed in «°C» or «°F».
▪ °C:
Degrees Celsius
▪ °F:
Degrees Fahrenheit
Default value for soft roasting
The default value is the target temperature that is automatically set when soft
roasting. With this user setting, it can be increased or decreased by up to
4°C; the setting then applies for all cuts of meat.
Example: When using «Soft roasting seared» with a 2°C increase in the default value, a «medium» fillet of beef is cooked to a target temperature of
59°C instead of 57°C.
11.12 Childproof lock
The childproof lock is to prevent children accidentally switching on the appliance.
When the childproof lock is activated, the appliance can only be operated after
first entering a code. The code is displayed in reverse order when unlocking.
The childproof lock activates 3 minutes after the appliance is switched
off.
11.13 Appliance information
Under «Appliance information», you will find:
▪ A link to the Service Desk
▪ The article and serial number (FN) of your appliance
▪ The software versions of your appliance as well as the acoustic signals and
background images currently being used (depending on model)
11.14 Demo mode
In demo mode, almost all the appliance functions are available but it is not
possible to cook with the appliance. This ensures operating safety during
product demonstrations and consultations.
It is only possible to switch demo mode on and off with a safety code.
55
Page 56

11 User settings
11.15 Factory settings
If one or more user settings have been changed, these can be reset to the
factory settings.
56
Page 57

12 Care and maintenance
Risk of burns from hot surfaces!
Allow the appliance and the accessories to cool down before cleaning them.
Damage to the appliance from incorrect treatment!
Do not use any abrasive or caustic cleaning agents, metal scrapers
that are sharp or scratch, steel wool, abrasive scouring pads, etc.
These products will damage the surfaces. Glass surfaces that are
scratched can crack.
Never use a steam cleaner to clean the appliance.
12.1 Cleaning the exterior
▸ Remove any soiling or excess cleaning solution immediately.
▸ Clean the surfaces with a soft cloth dampened with water and a little wash-
ing-up liquid – for metallic surfaces rub in the direction of the original polish
lines.
▸ Wipe dry with a soft cloth.
12.2 Cleaning the cooking space
Damage to the appliance from incorrect treatment!
Do not bend the temperature sensor or heating elements.
Do not scour the surface. Scouring will damage the surface.
▸ Remove any soiling from the cooking space while still hand warm using a
soft cloth dampened with water and a little washing-up liquid. Wipe dry with
a soft cloth.
In the case of appliances without pyrolysis:
▸ Use a commercially available oven cleaner and follow the manufacturer’s in-
structions.
57
Page 58
12 Care and maintenance
Never clean appliances with pyrolysis using oven cleaner
as the surface could otherwise be damaged.
► Carry out pyrolysis in the case of stubborn dirt
deposits (see page 63).
12.3 Cleaning the appliance door
▸ Clean the appliance door with a soft cloth dampened with water and a little
washing-up liquid.
▸ Wipe dry with a soft cloth.
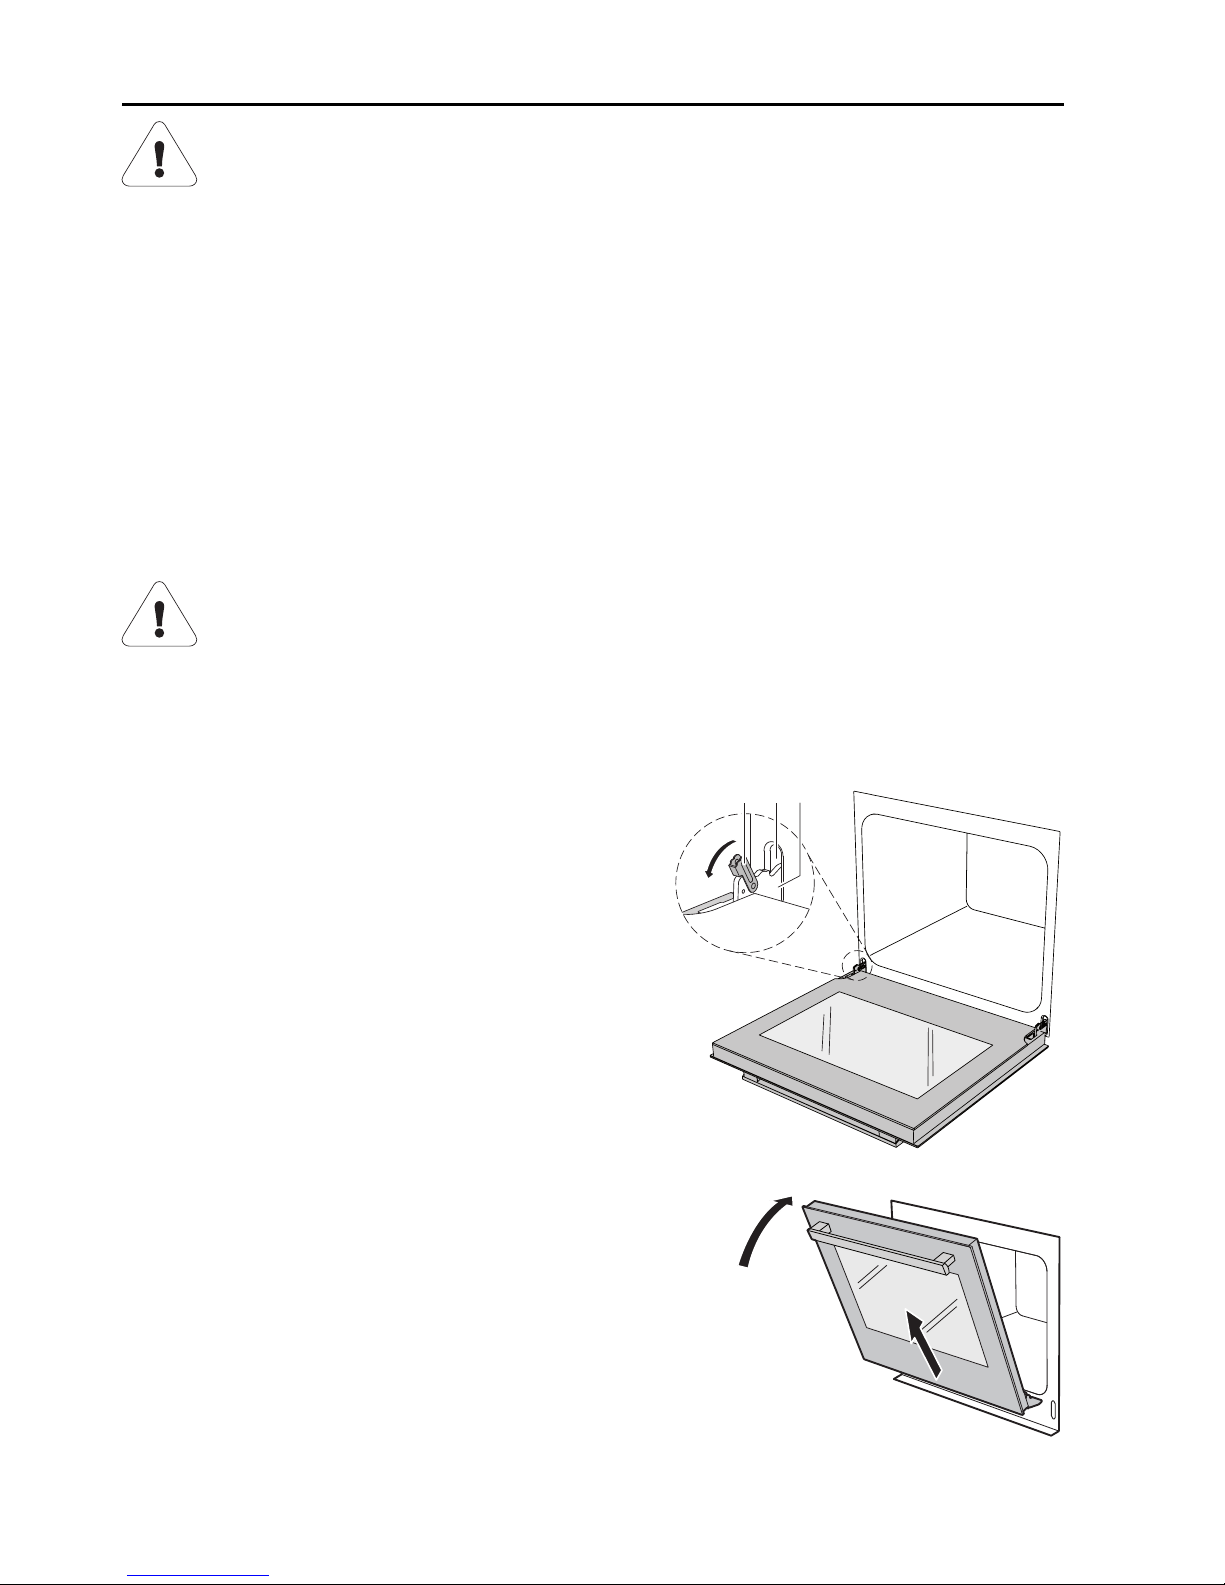
Removing the appliance door
Risk of injury from moving parts!
Be careful not to put fingers in the door hinges.
The appliance door is heavy. When removing and reassembling the
appliance door, hold it firmly at the sides with both hands.
▸ Open the appliance door as far as it will
go.
▸ Fold the clips2 on both door hinges1 for-
ward.
231
▸ Close the appliance door as far as its at-
rest position (about 30°).
▸ Lift the appliance door out at an angle.
30°
58
Page 59
12 Care and maintenance
Reassembling the appliance door
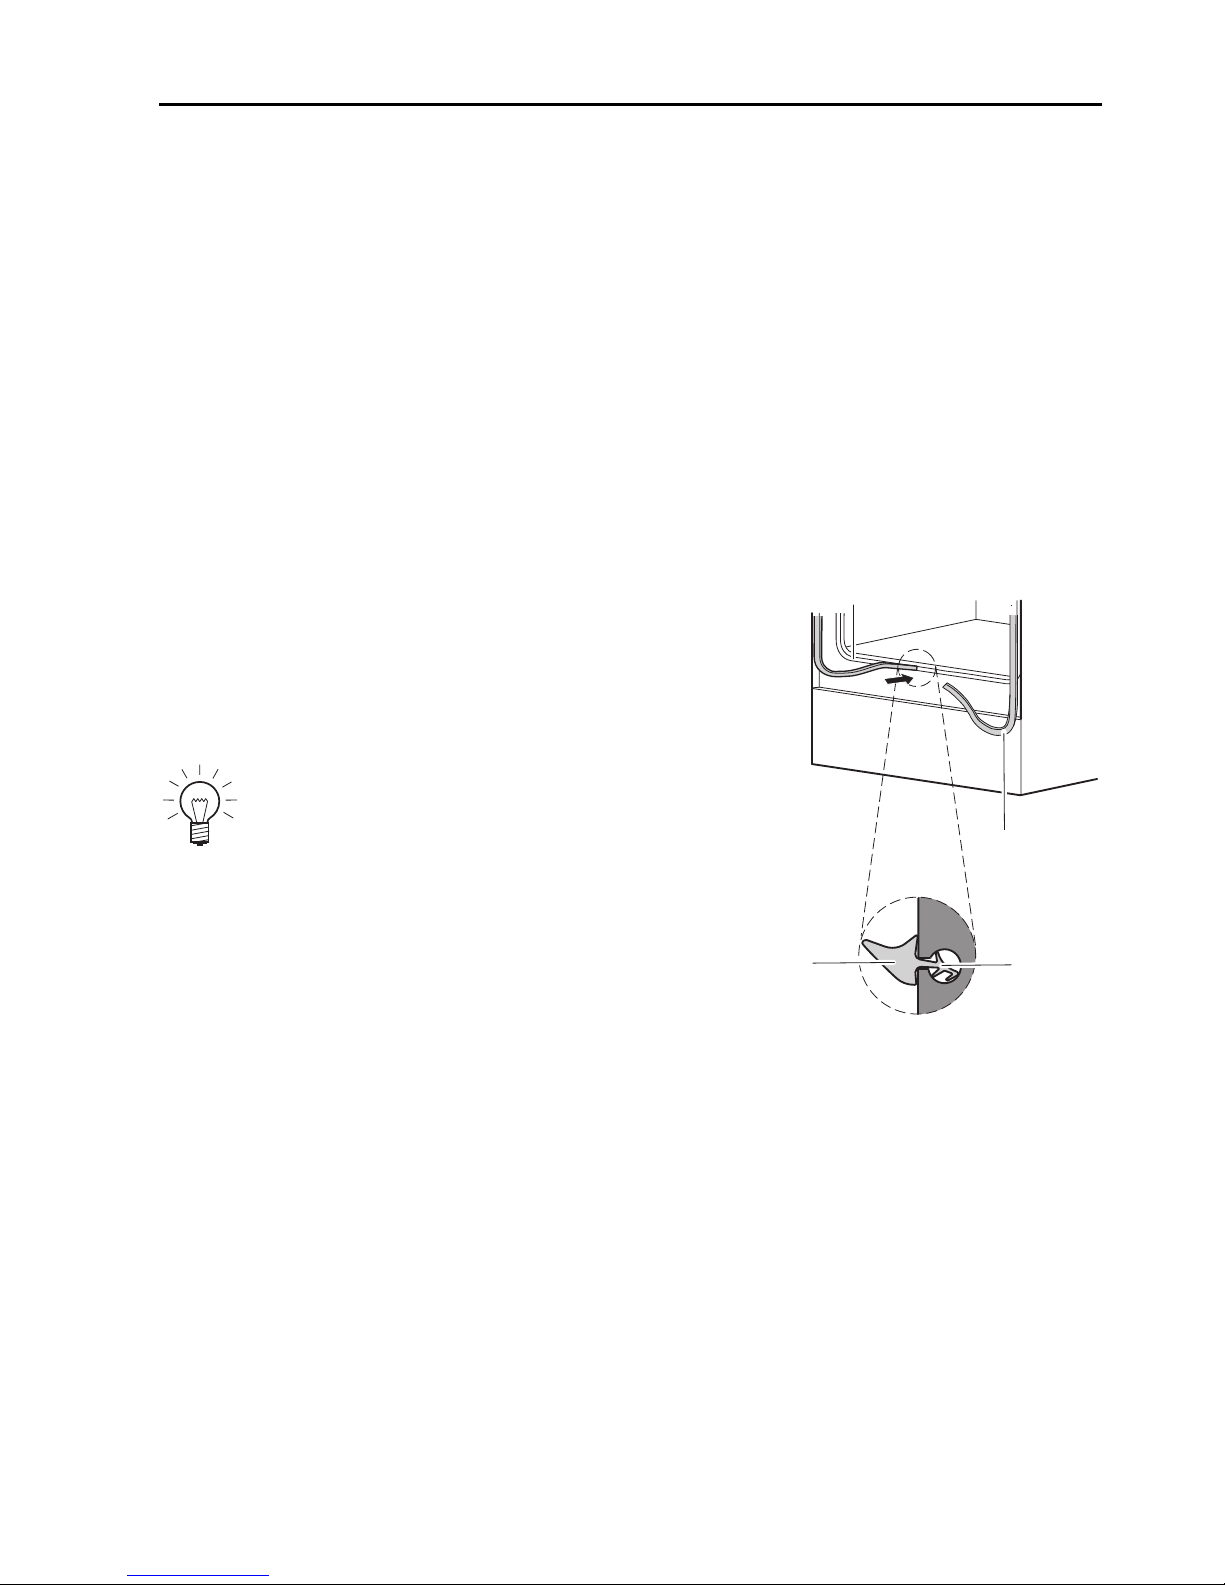
▸ From the front, push both hinges 1 into the opening 3.
▸ Open the appliance door as far as it will go and close back the clips 2.
12.4 Cleaning the door seal
▸ Clean the door seal with a soft cloth dampened with water, but do not use
any cleaning agent.
▸ Wipe dry with a soft cloth.
12.5 Replacing the door seal
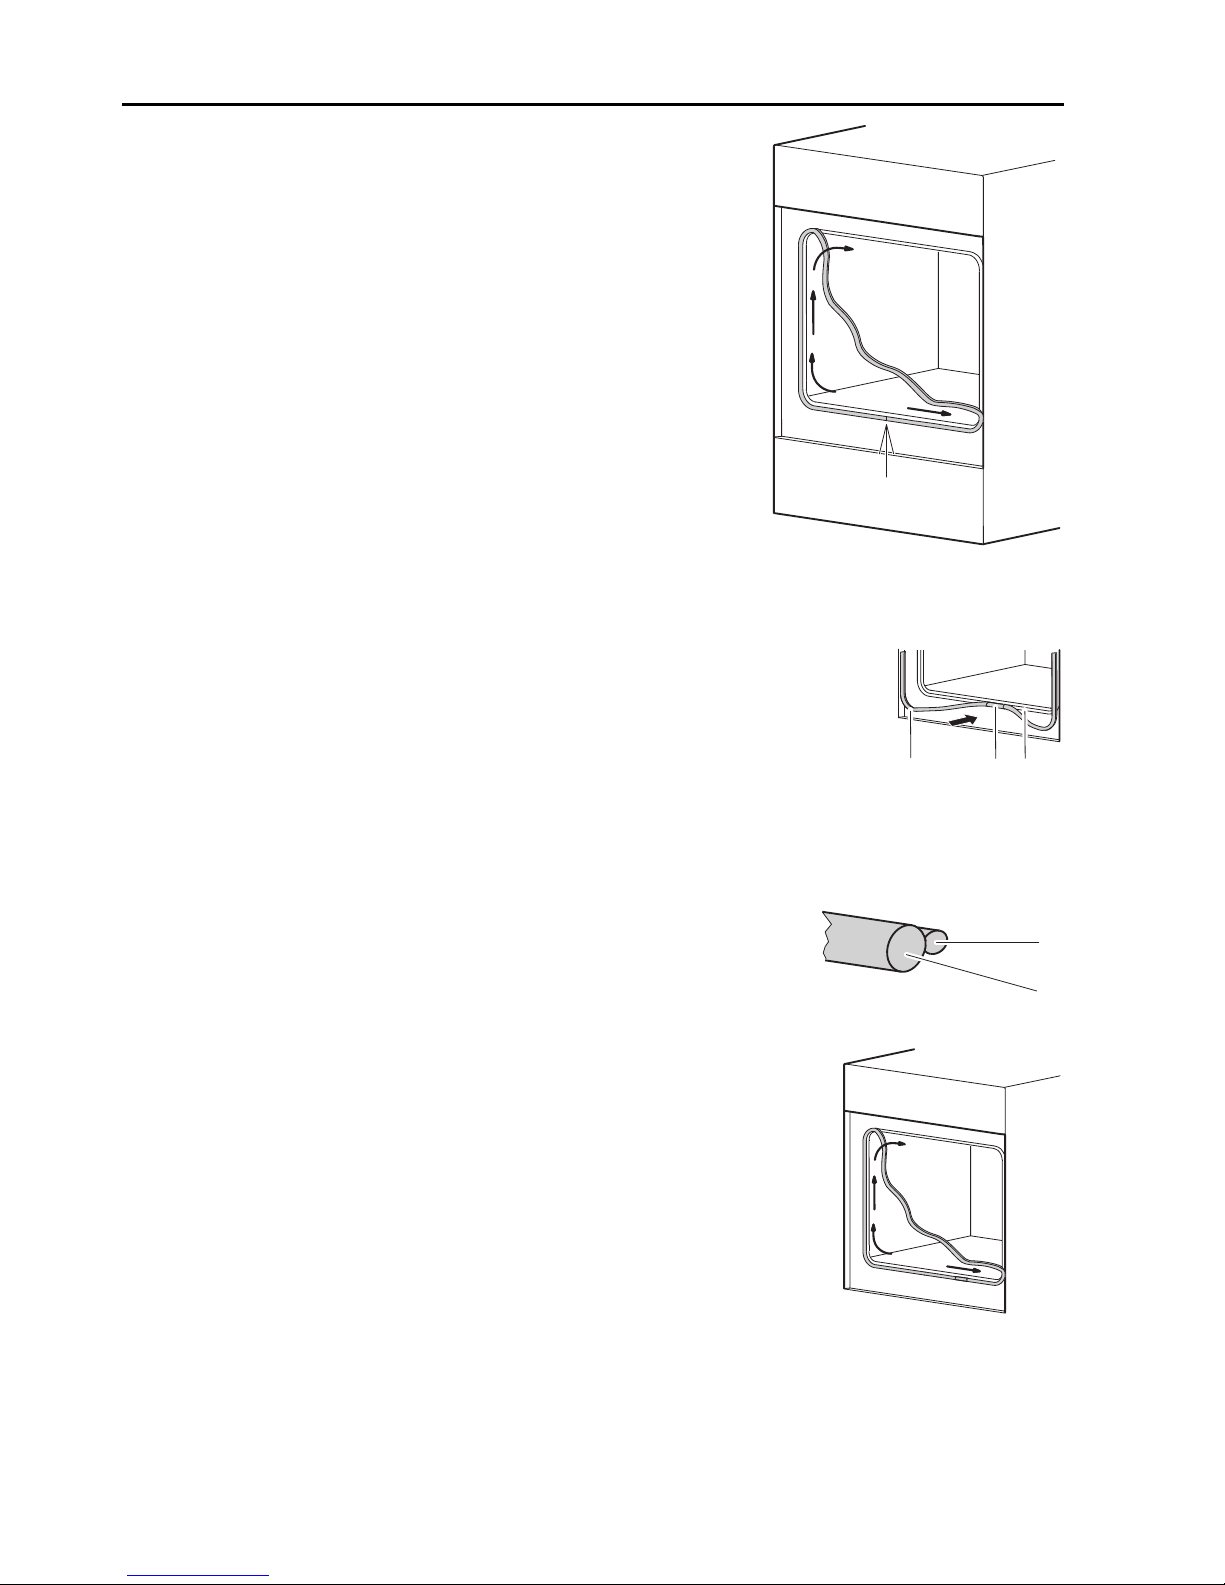
▸ Remove the damaged door seal.
▸ Clean the groove 1 with a slightly
damp cloth.
▸ Press the ends of the new door seal
2 into the groove in the centre of
the frame at the bottom.
3
4
2
1
The ends must touch each
other but not overlap.
▸ Ensure that only the thinner part 3
of the seal is pressed into the
groove; the thicker part 4 must not
be in the groove.
59
Page 60
12 Care and maintenance
▸ Starting from the bottom, press the
seal evenly into the groove.
12.6 Replacing the door seal on pyrolysis appliances
▸ Remove the damaged door seal.
▸ Clean the groove 3 with a slightly damp
cloth.
▸ Press the new door seal 1 into the groove,
with the seam joint 2 off-centre in the frame
at the bottom.
2
31
▸ Ensure that only the thinner part 4 of the seal
is pressed into the groove; the thicker part 5
must not be in the groove.
4
5
▸ Starting from the bottom, press the seal
evenly into the groove.
60
Page 61
12 Care and maintenance
12.7 Replacing the halogen light bulb
WARNING: Risk of electric shock!
Disconnect the appliance from the mains power supply before replacing the halogen light bulb.
Risk of burns from hot surfaces!
Allow the halogen light bulb and the appliance to cool down before
replacing the halogen light bulb.
It is recommended to replace both halogen lights at the same time, even
if one is still functioning.
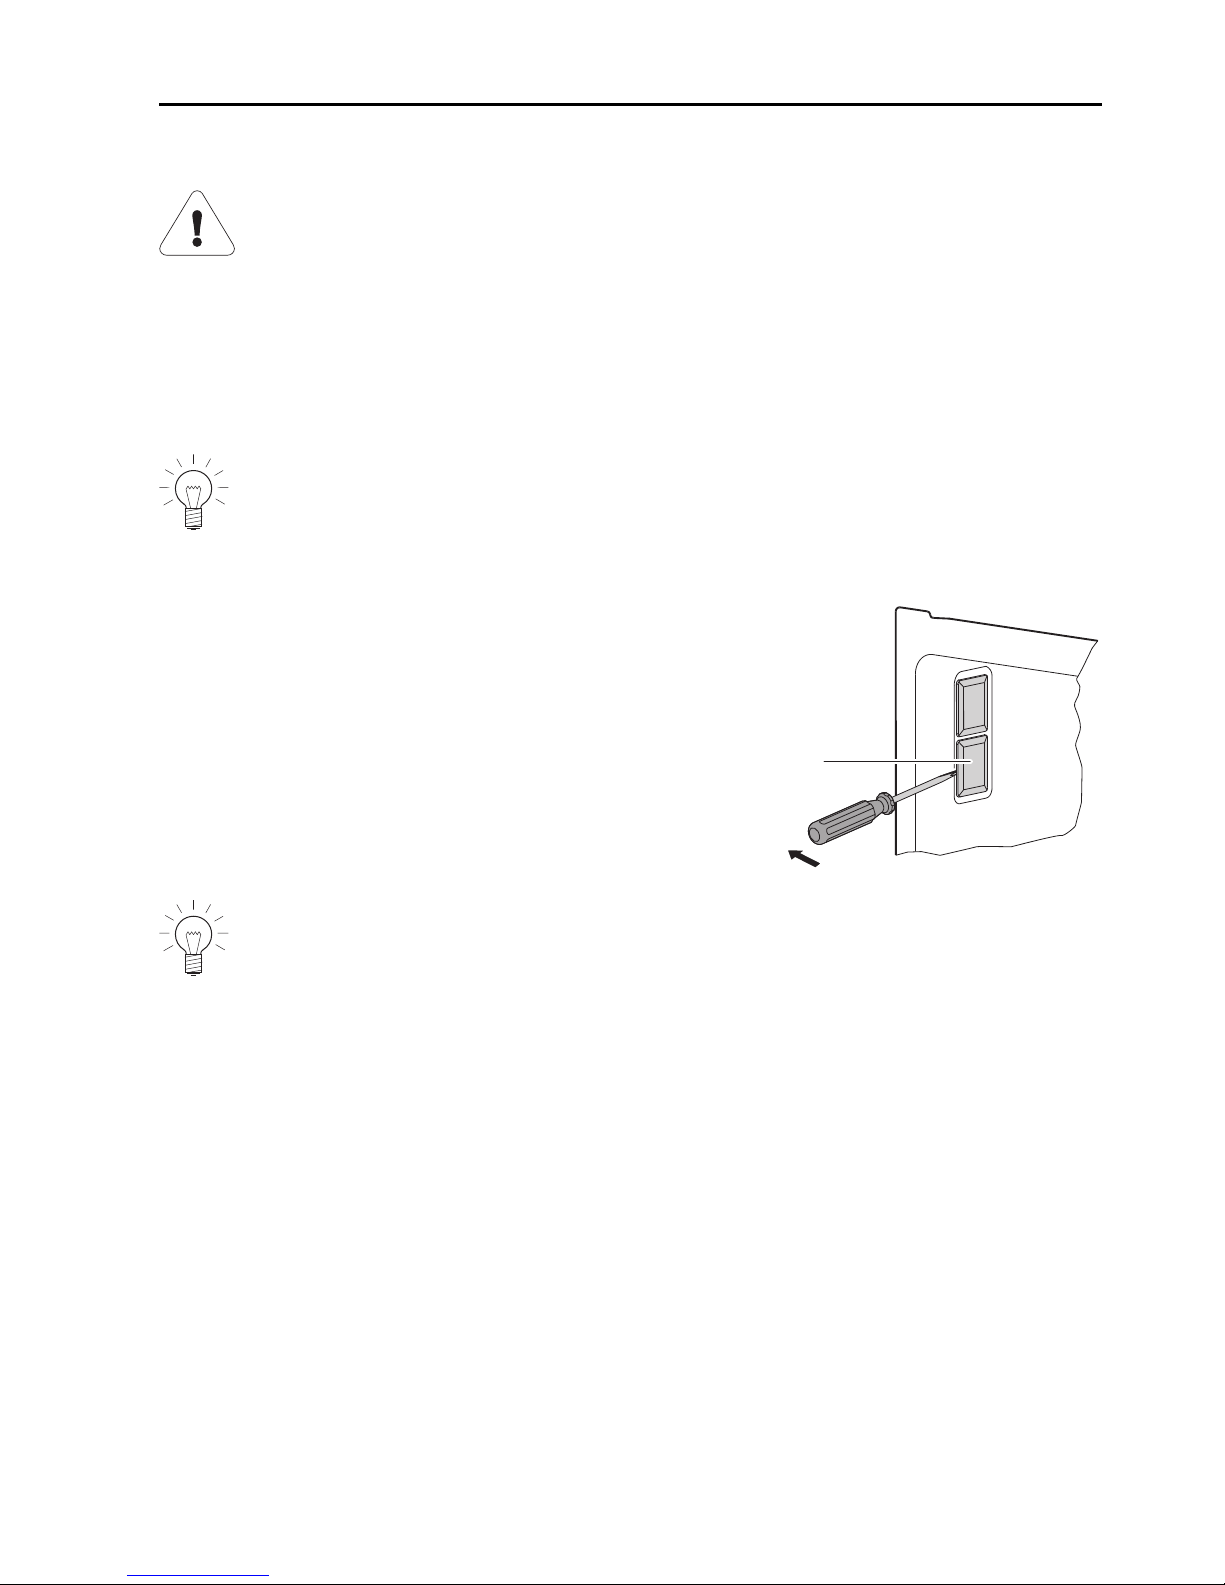
▸ Remove the left shelf guide.
▸ Place the screw driver along the middle of
the edge of the glass and carefully remove
the glass light cover 1 from its fixture.
▸ Take out the defective halogen light bulb.
▸ Carefully fit the new halogen light bulb.
1
Do not touch the halogen light bulb with bare hands. Instead, use a
fine, dry, grease-free cloth.
▸ Press the glass light cover 1 back into its fixture.
▸ Repeat the same process to replace the second halogen light.
▸ Replace the shelf guides.
▸ Switch the power supply back on.
61
Page 62
12 Care and maintenance
12.8 Cleaning the accessories and shelf guides
▪ The wire shelf and shelf guides can be cleaned in the dishwasher.
▪ The baking tray can be cleaned in the dishwasher; however, this will affect
its non-stick properties.
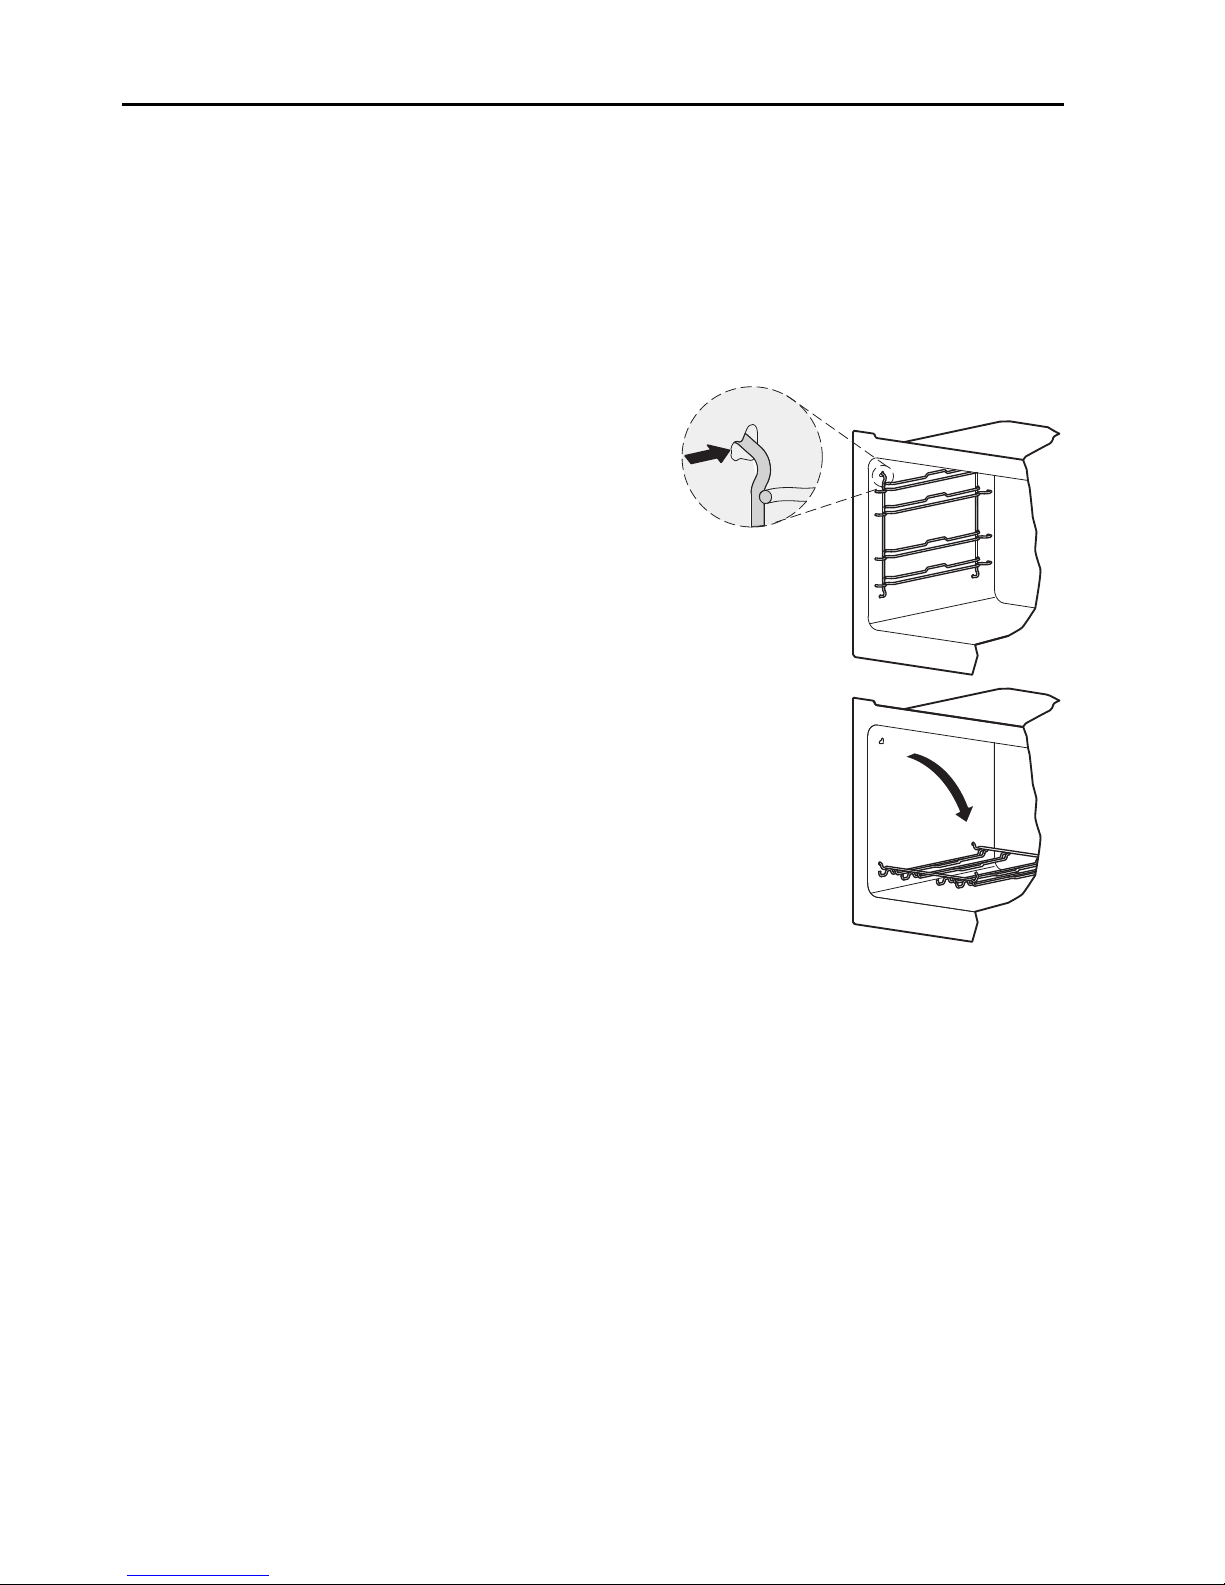
Removing and reassembling the shelf guides
▸ Push the shelf guides at the top
backwards and take out of the
opening.
▸ Swing the shelf guide into the
middle of the cooking space and remove from the opening at the bottom.
▸ Put back in reverse order.
62
Page 63

12 Care and maintenance
12.9 Pyrolytic self-cleaning
Danger of explosion due to deposits and cleaning agents!
Remove grease or oil deposits. Do not use any chemical cleaning
agents. Deposits could give rise to chemical reactions and destroy
the enamel. Poisonous fumes could escape.
Do not leave the appliance unattended.
Risk of burns from hot surfaces! The front of the appliance heats up
more than in normal operation.
There is likely to be some smoke given off for a short period of time
so ventilate the room during the pyrolysis phase.
In pyrolytic self-cleaning, any soiling is burned off at a high temperature.
Possible settings
▪
Lightly soiled Cleaning duration: 1½ hrs.
▪
Medium soiled Cleaning duration: 2 hrs.
▪
Heavily soiled Cleaning duration: 2½ hrs.
The pyrolytic self-cleaning process – including cooling down – takes
about4-5 hours.
As long as the temperature is over 300°C, the illumination switches
off and cannot be switched back on.
Over time with use the cooking space can turn matt. Fruit acid and fatty acid
deposits can leave stains. This will not affect the cooking or baking characteristics of the appliance nor affect its functioning.
63
Page 64

12 Care and maintenance
Selecting and starting pyrolytic self-cleaning
Damage to accessories from self-cleaning!
Remove accessories, shelf guides, full extension roller runners, cookware and any other objects from the cooking space. Otherwise they
can become discoloured and the surfaces may become abraded. The
rolling properties of full extension roller runners deteriorate.
▸ Close the appliance door.
▸ If the appliance is switched off, first press the adjusting knob.
▸ Press the touch button.
▸ Select .
▸ Select the degree of soiling.
– The calculated end time for the pyrolytic self-cleaning process is
shown in the display above .
▸ To start the pyrolytic self-cleaning process, select .
– The appliance door locks.
Delayed start
The start of the pyrolytic self-cleaning process can be delayed, for example, to
take advantage of lower electricity tariffs.
▸ Select before starting.
▸ Set the desired end time.
▸ Select .
– The appliance remains switched off until the calculated automatic start.
64
Page 65

12 Care and maintenance
Aborting
▸ Select in the display.
– The pyrolytic self-cleaning process is aborted.
▸ The residual heat can be found in the display.
▸ The appliance door remains locked until the temperature drops below
300°C.
End
The appliance door can only be opened once the temperature drops below
300°C.
▸ Wait until the appliance has cooled to hand warm to remove any residue left
behind using a soft cloth dampened with water. Do not use cleaning agents.
65
Page 66
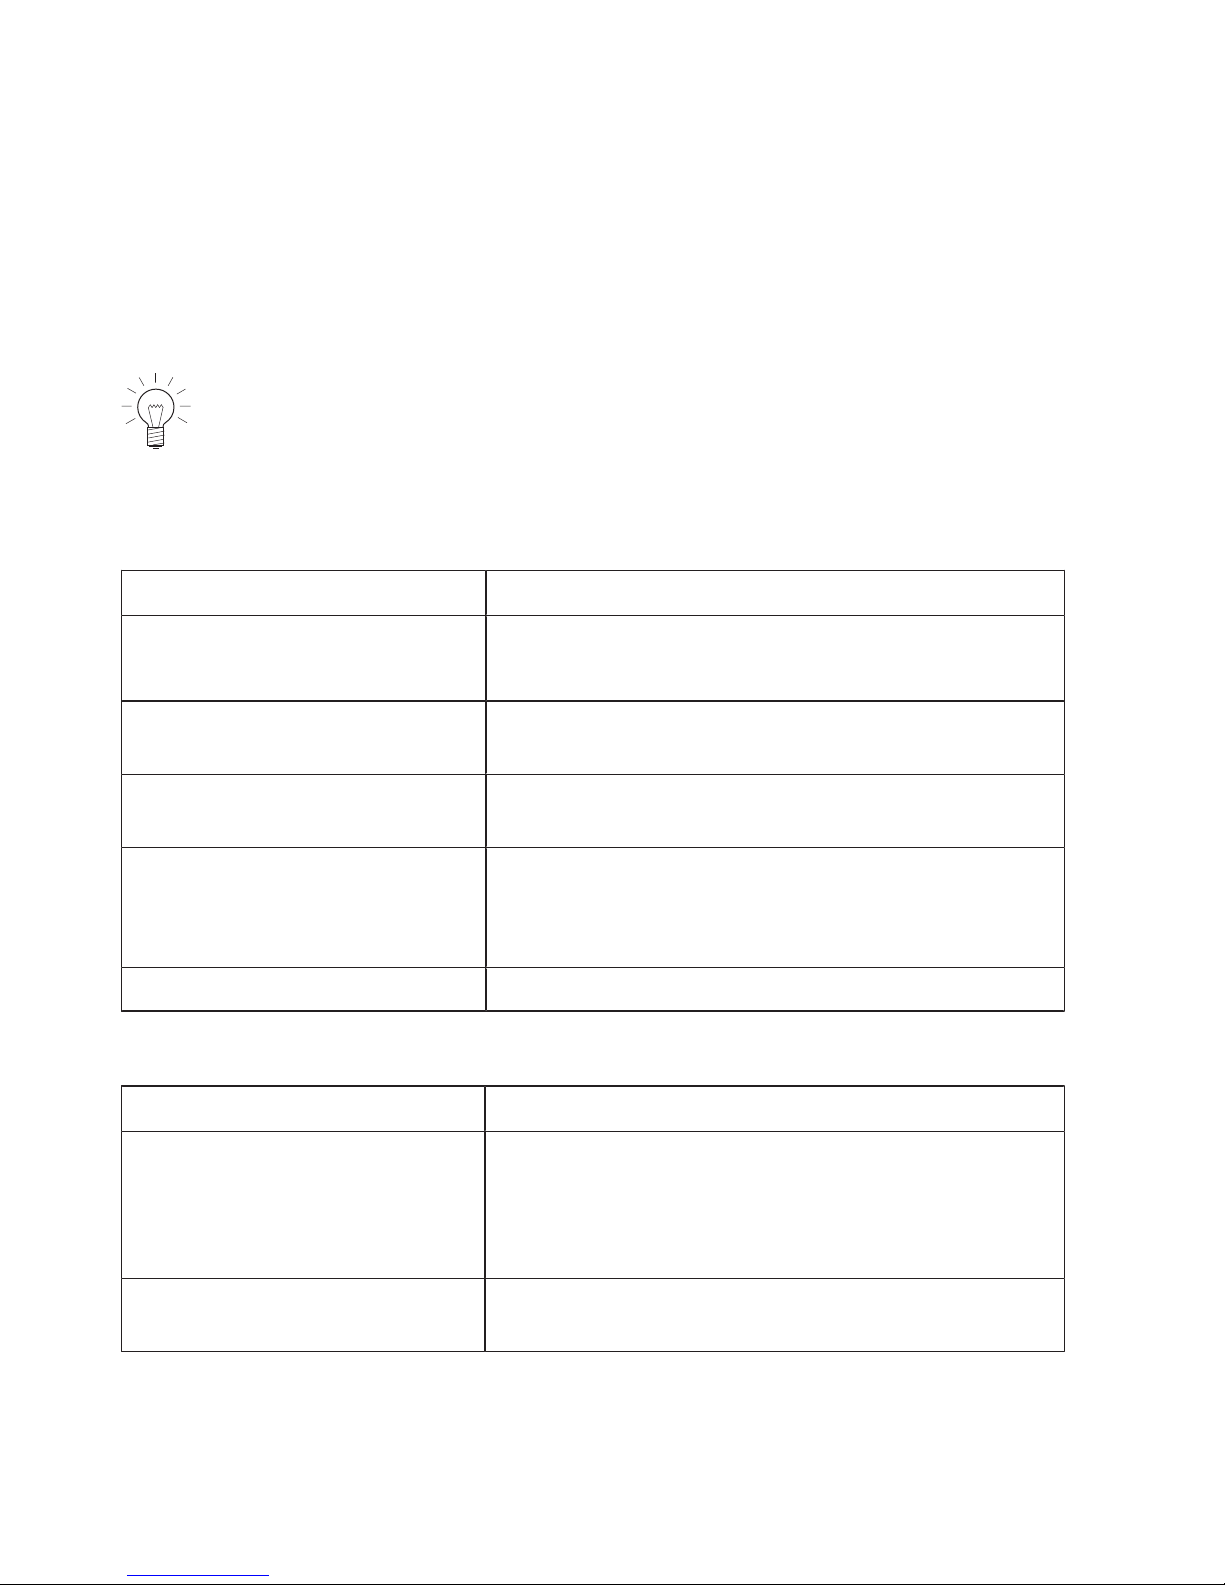
13 Trouble-shooting
13.1 What to do if …
This section lists faults that can be solved simply by following the instructions
given. If another fault is displayed or the fault cannot be remedied, please call
Customer Services.
Before calling Customer Services, please note down the error message
in full.
Fxx/Exxx see operating instructions
FNxxxxx xxxxxx.
… the appliance is not working
Possible cause Solution
▪ A household fuse or circuit
breaker has tripped.
▸ Change the fuse.
▸ Reset the circuit breaker.
▪ The fuse or circuit breaker
keeps blowing.
▸ Call Customer Services.
▪ An interruption in the
mains power supply.
▸ Check the power supply.
▪ Demo mode is switched
on.
It is only possible to switch off demo mode with
a safety code.
▸ Call Customer Services.
▪ The appliance is faulty.
▸ Call Customer Services.
… the appliance door cannot be opened
Possible cause Solution
▪ The temperature of the
cooking space is over
300°C.
▸ Wait for it to cool down.
The appliance door cannot be opened until the
temperature of the cooking space has dropped
below 300°C.
▪ Pyrolytic self-cleaning is
running.
▸ Wait until pyrolytic self-cleaning has finished.
66
Page 67
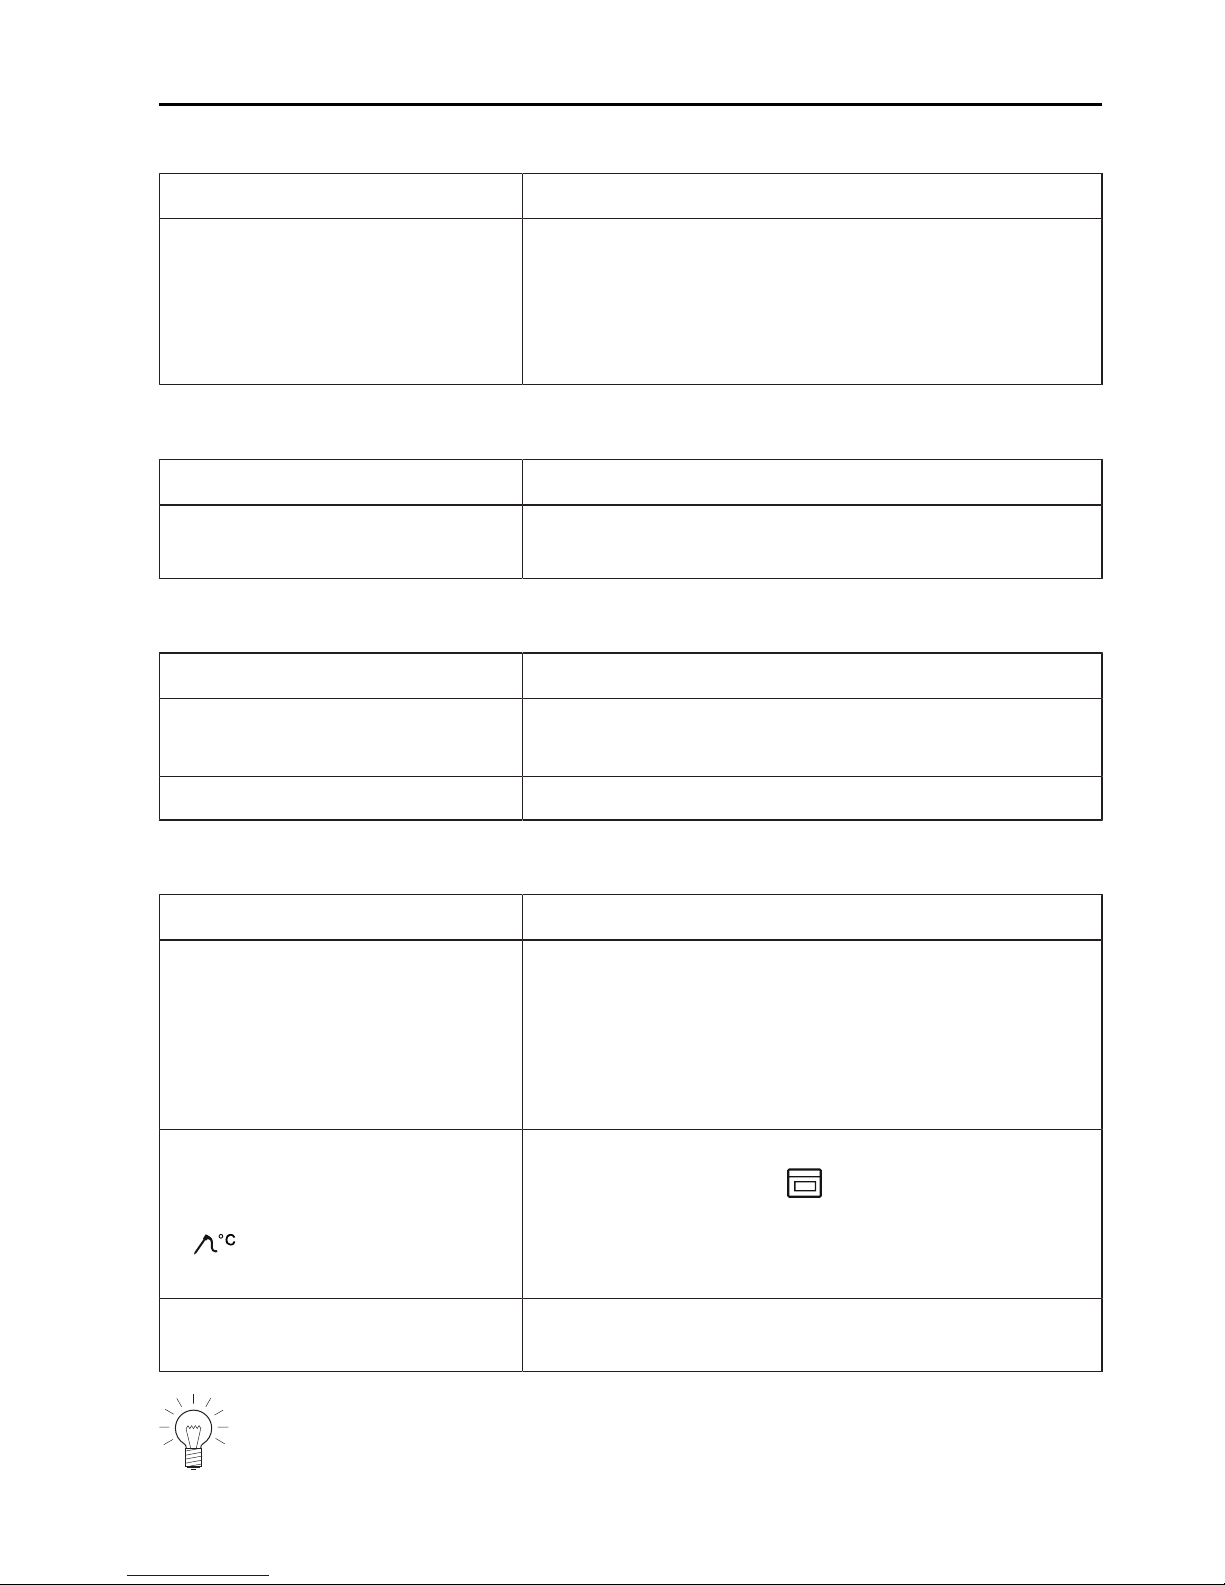
13 Trouble-shooting
… just the illumination is not working
Possible cause Solution
▪ The halogen light is defect-
ive.
▸ Switch off the oven.
▸ Disconnect the appliance from the electricity
supply.
▸ Replace the halogen light bulb.
... the cooking time seems unusually long
Possible cause Solution
▪ The appliance only has a
single-phase connection.
▸ Establish a two-phase connection.
… when grilling, thick smoke is given off
Possible cause Solution
▪ The food is too near to the
heating elements.
▸ Check that the level selected corresponds to
the «EasyCook».
▪ Grill setting is too high.
▸ Reduce the grill setting.
...the food probe temperature is not displayed
Possible cause Solution
▪ The food probe is not
plugged in correctly.
▸ Check whether the food probe is correctly
plugged into the socket.
▸ Check whether the food probe is correctly in-
serted in the food: The tip must be in the
centre of the thickest part.
▪ In the selected automatic
programme, the food
probe cannot be used; the
symbol is illuminated
in grey.
▸ If you wish to use the food probe in spite of
this, change to the operating mode menu
and set a suitable operating mode.
▪ The food probe or the
socket is defective.
▸ Call Customer Services.
The food probe temperature is never displayed during the heating process.
67
Page 68
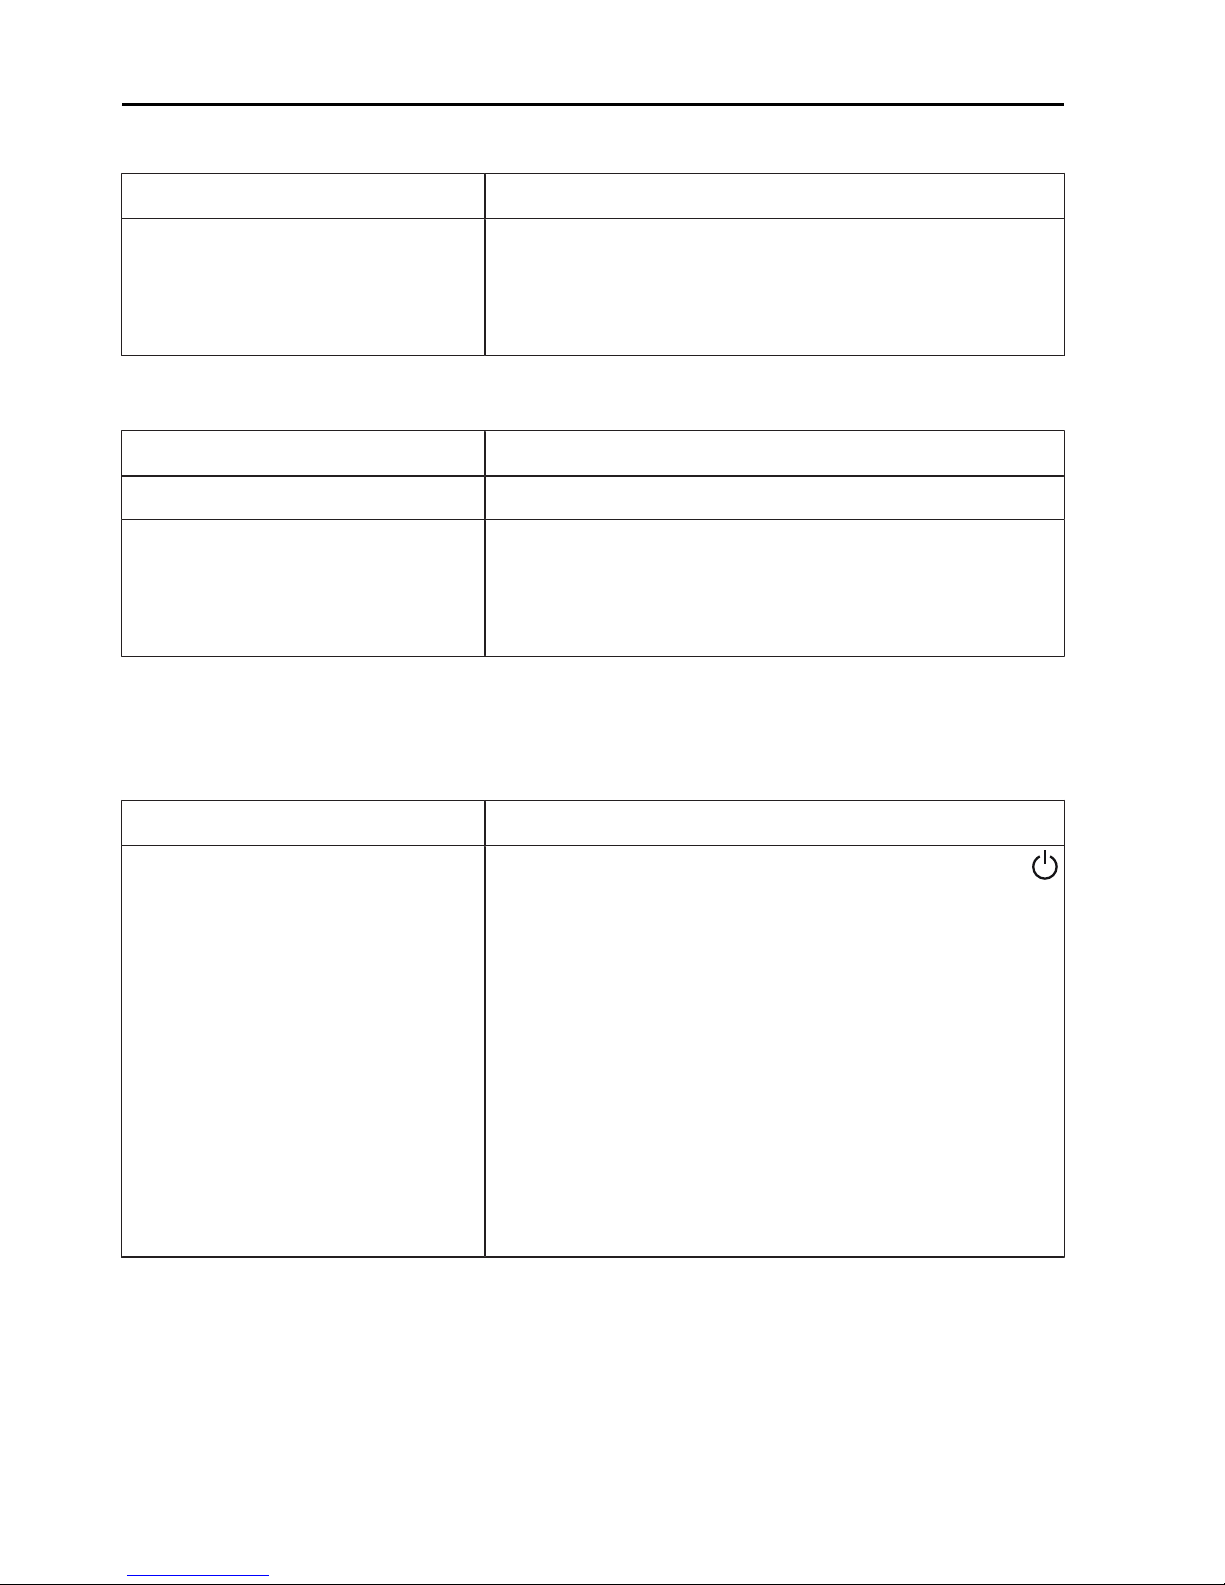
13 Trouble-shooting
…the appliance makes noises during operation
Possible cause Solution
▪ The appliance may emit
noise when operating (e.g.
switching and pumping
noises).
Such noise is normal.
… the clock is not running correctly
Possible cause Solution
▪ Irregular mains frequency
▸ Switch off the mains synchronization.
▪ Internal pulse generator is
imprecise when mains synchronization is switched
off.
▸ Call Customer Services.
...the following appears in the display
FX/EXX see operating instructions
FN XXX XXXXXX
Possible cause Solution
▪ Various situations can lead
to an error message.
▸ Cancel the error message by pressing the
touch button.
▸ Disconnect from the power supply for
about1minute.
▸ Reconnect the power supply.
▸ If the error appears again, note down the er-
ror message in full along with the serial number (FN; see identification plate).
▸ Disconnect from the power supply.
▸ Call Customer Services.
68
Page 69

13 Trouble-shooting
… the following appears in the display
UX/EXX see operating instructions
FN XXX XXXXXX
Possible cause Solution
▪ An interruption in the
power supply.
▸ Cancel the error message by pressing the
button.
▸ Disconnect from the power supply for
about1minute.
▸ Reconnect the power supply.
▸ If the error appears again, note down the er-
ror message in full along with the serial number (FN; see identification plate).
▸ Disconnect from the power supply.
▸ Call Customer Services.
13.2 After a power failure
The user settings remain unchanged.
Brief power failure during operation
– The current operation of the appliance is aborted.
– The following appears in the display when the appliance is switched
on: «Power failure. Operation aborted».
▸ To confirm the message, select .
– The operating modes menu appears in the display.
69
Page 70

13 Trouble-shooting
Prolonged power failure
Scenario 1 *
* applies only to appliances which were produced after March 2016 or have
received a software update.
The process involved in using the appliance for the first time is carried out
after a prolonged power failure. However, only the language and time need to
be reset to enable the appliance to be operated again. It is not necessary to
make any other settings.
Scenario 2 **
** applies only to appliances produced before or during February 2016.
The process involved in using the appliance for the first time is carried out
after a prolonged power failure. However, only the time needs to be reset to
enable the appliance to be operated again. It is not necessary to make any
other settings.
– The following appears in the display when the appliance is switched
on: «Power failure. Set time.»
▸ To confirm the message, select .
– The «Clock» menu in the user settings appears in the display.
▸ Select , set the time and confirm.
– The «Clock» menu appears again in the display.
▸ Select .
– The following appears in the display: «Do you want to continue using
for the first time?»
▸ If you wish to make additional user settings, select «Yes».
– The relevant user settings menu appears in the display.
▸ If you do not wish to make any additional user settings, select «No».
– The appliance is ready for operation again.
70
Page 71
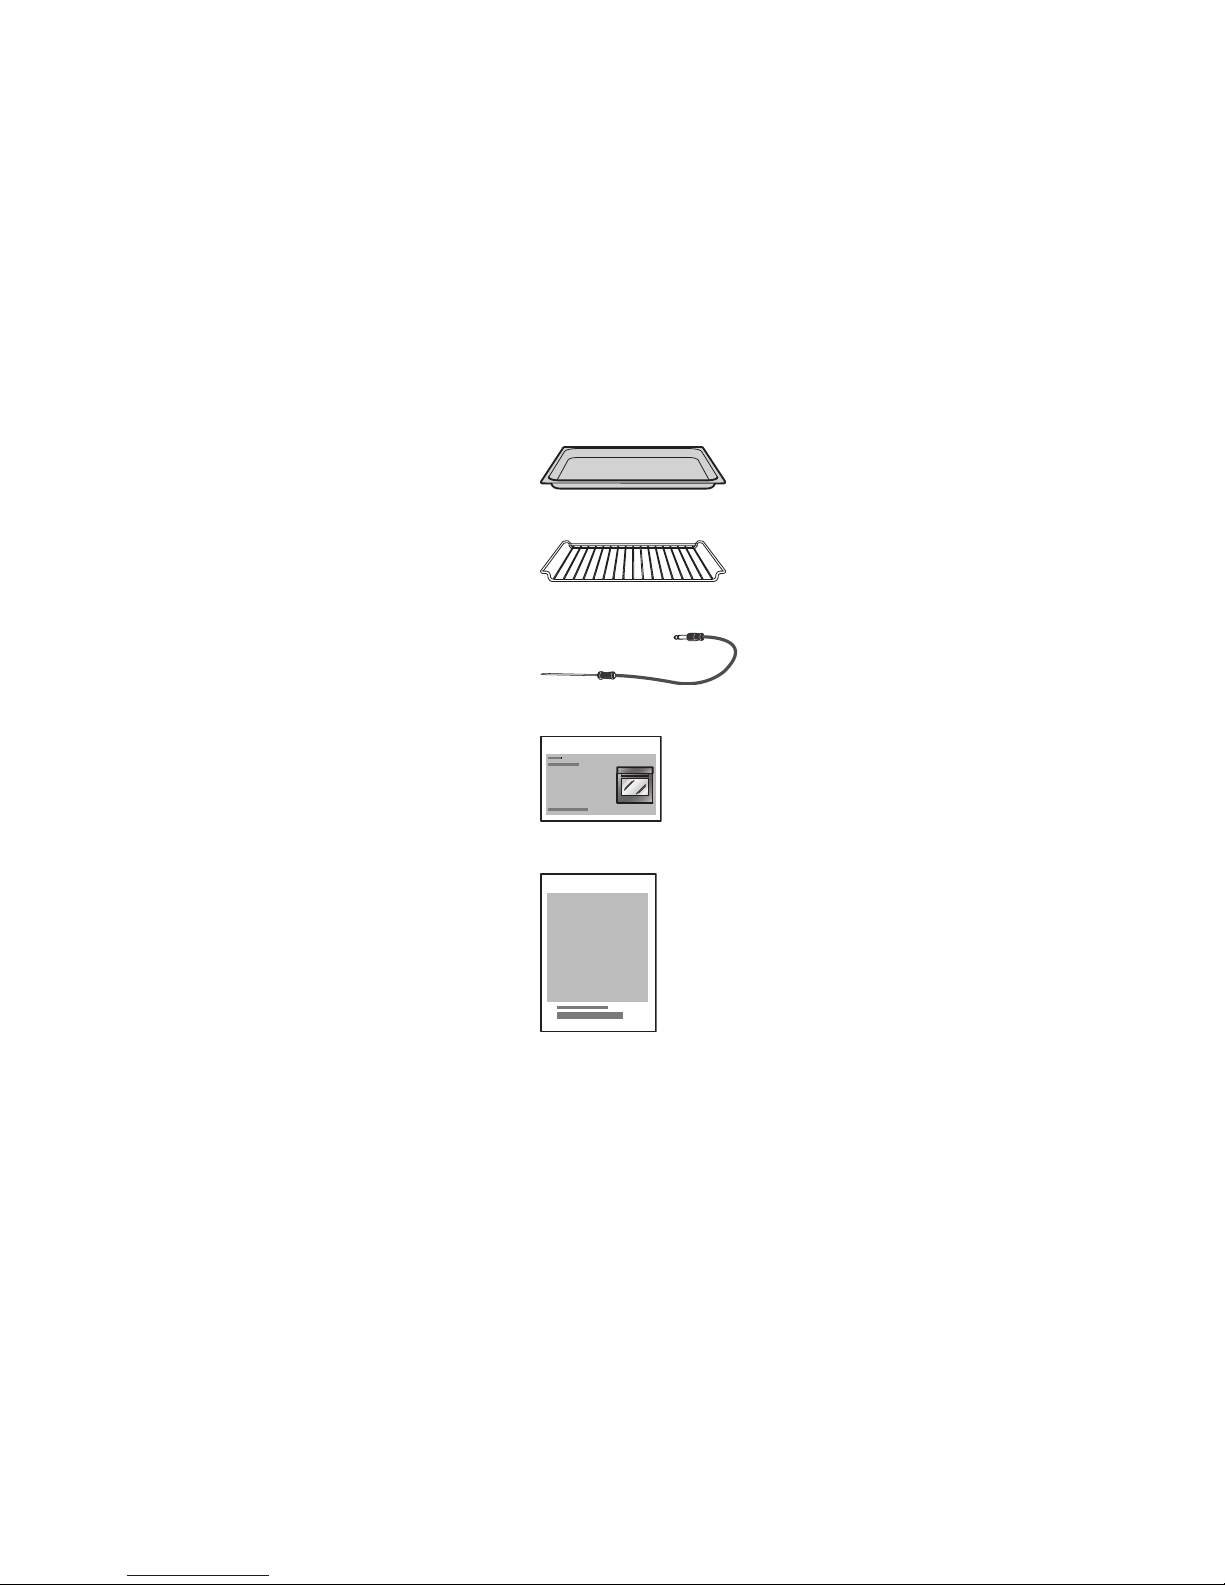
14 Accessories and spare parts
The accessories listed below, as well as spare parts, can also be ordered in
addition to the scope of delivery of the appliance. Ordering is subject to a fee,
except in the event of warranty claims. Please give the product family of the
appliance and exact description of the accessory or spare part when ordering
parts.
14.1 Accessories
TopClean baking tray
Wire shelf
Food probe
with straight handle
EasyCook brochure
Bedienungsanleitung … Einstelltipps
Recipe book
14.2 Special accessories
For information see: www.vzug.com
71
Page 72

14 Accessories and spare parts
14.3 Spare parts
Shelf guides
left/right
Halogen light bulb
Door seal
Door seal for
pyrolytic appliances
The halogen light bulb is also available from specialist retailers.
72
Page 73
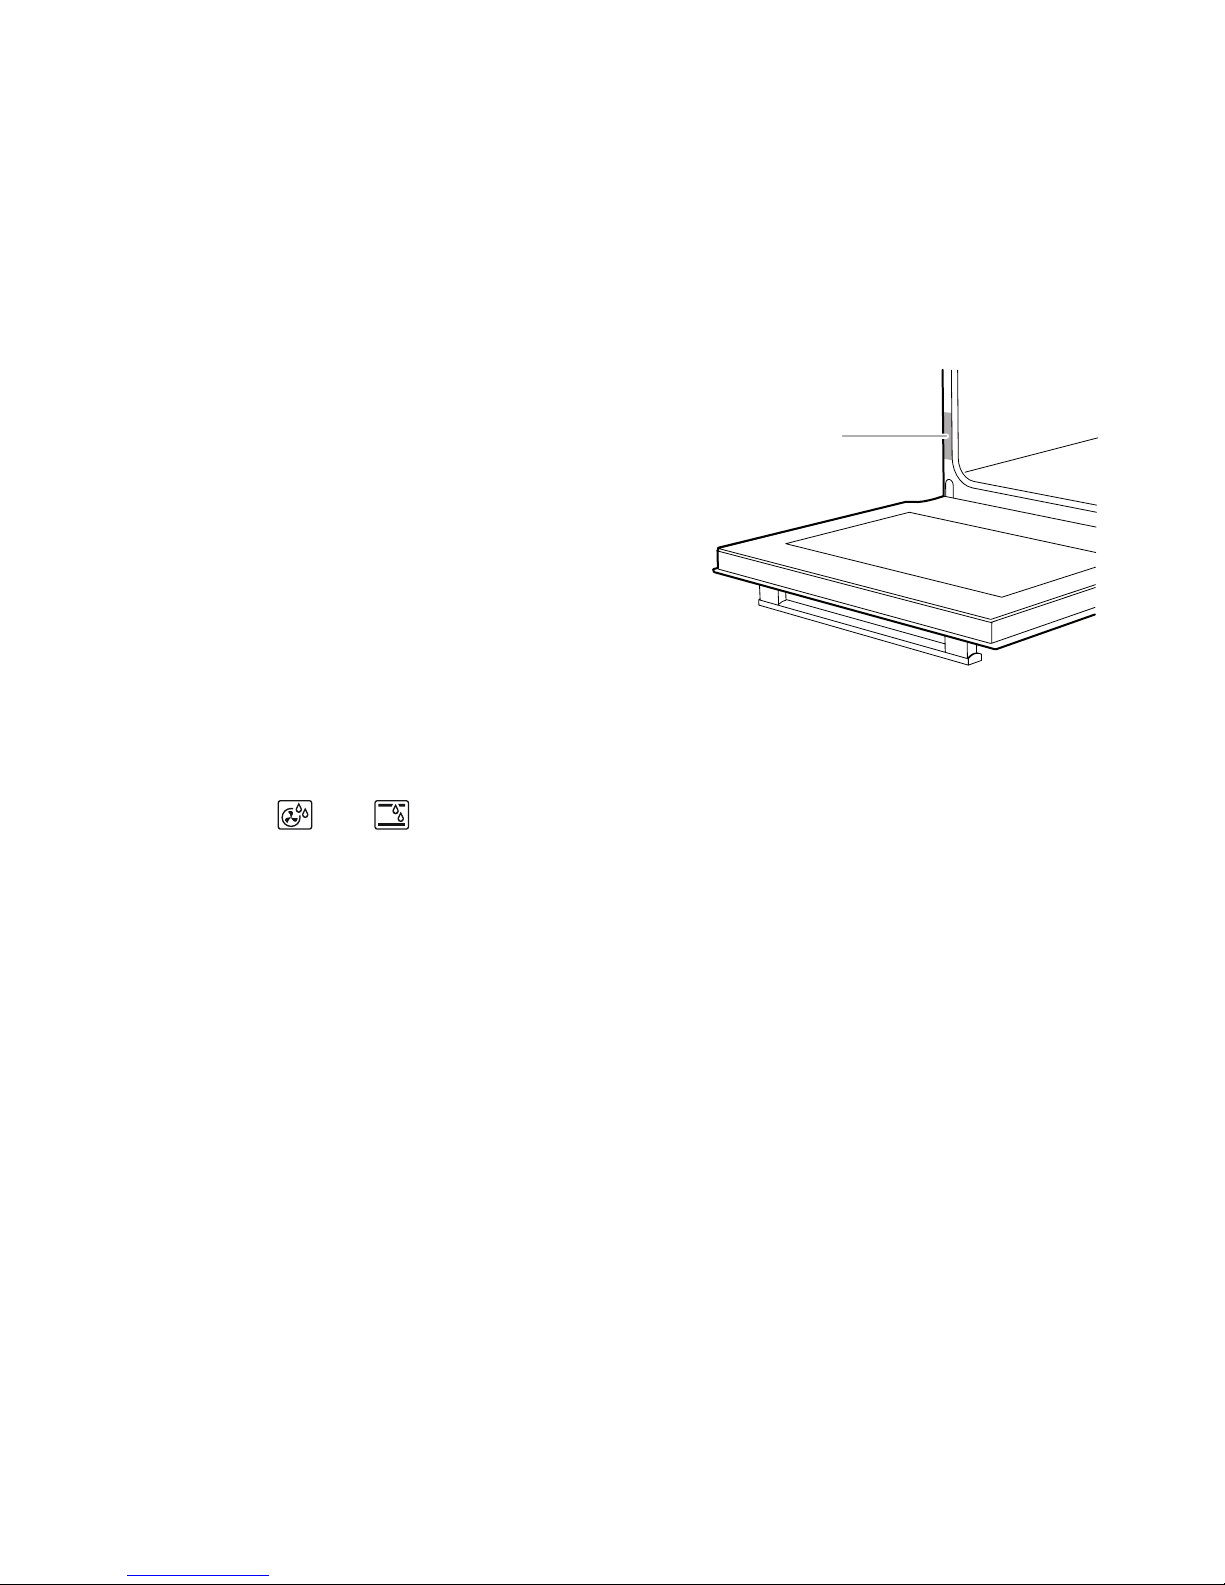
15 Technical data
Dimensions
▸ See installation instructions
Electrical connection
▸ See identification plate 1
1
15.1 Note for testing institutes
The energy efficiency class according to EN 50304/EN 60350 is determined
using the and operating modes.
Placing thermocouples between the appliance door and the seal can cause
lack of leak-tightness and thus measuring errors.
The usable volume as defined by EN 50304/EN 60350 is obtained with the
shelf guides disassembled.
15.2 Temperature measurement
The temperature of the cooking space is measured when the cooking space is
empty according to an internationally accepted standard. Own measurements
can be imprecise and are not suitable for checking the accuracy of the temperature.
73
Page 74

15 Technical data
15.3 Product data sheet
In accordance with EU Regulation No.: 66/2014
Brand – V-ZUG Ltd
Type of appliance – Oven
Model designation – BCSE | BCSE DV |
BCSEP | BCSEP DV
Mass of appliance kg 48 | 48 | 52 | 54
Number of cavities – 1
Heat source per cavity – Electric
Volume per cavity l 68
Energy consumption in conventional mode 1) kWh/
cycle
0.93 | 0.93 | 0.94 |
0.94
Energy consumption in hot air / forced convection mode 2)
kWh/
cycle
0.8 | 0.8 | 0.78 |
0.78
Energy-efficiency index per cavity 3) – 96.4 | 96.4 | 92.8 |
92.8
Measurement and calculation methods used – IEC 60350
1) required to heat a standardised load in cavity
2) required to heat a standardised load in cavity
3) Measurement methods:Ssee EU Regulation No. 66/2014, Annex II, Chapter 1
Saving energy while cooking
The and operating modes consume less energy than the and
operating modes.
▸ Avoid opening the appliance door frequently.
▸ For gratins, use the residual heat: for cooking times over 30 minutes, switch
the appliance off 5–10 minutes before the end of the operating time.
▸ Minimize preheating.
▸ Only preheat the cooking space if the cooking or baking results depend on
it.
74
Page 75

15 Technical data
15.4 Automatic energy-saving stand-by
To prevent unnecessary energy consumption, the appliance is equipped with
an automatic energy-saving stand-by feature.
To reduce power consumption to a minimum, select «Hide time» in
the user settings. Despite automatic energy-saving stand-by, all safety
features are active.
15.5 Reference to «Open Source» licence
Your appliance contains Newlib open-source software. This is subject to the licensing conditions specified in Section 4.1 (4.1.1-4.1.8; 4.1.9; 4.1.10;
4.1.14-4.1.16) of the enclosed open-source software licence text document.
75
Page 76

16 Index
A
Aborting
Changing recipes.............................. 39
Creating your own recipe ................ 39
Operating mode ................................ 29
Recipes ............................................... 37
Accessories ....................................... 17, 71
Cleaning.............................................. 62
Acoustic signals ....................................... 53
Appliance door
Cleaning.............................................. 58
Removing............................................ 58
Appliance information ............................. 55
Appliance switch-off time ....................... 52
B
Baking tray ................................................ 17
Before using for the first time................... 9
Bottom heat ....................................... 16, 23
Brightness ................................................. 52
C
Cleaning..................................................... 57
Accessories........................................ 62
Cooking space .................................. 57
Door seal ............................................ 59
Shelf guides........................................ 62
Cleaning the exterior ............................... 57
Clearing
Favourites ........................................... 48
Clock .......................................................... 53
Construction.............................................. 14
Contrast ..................................................... 52
Cooking space
Cleaning.............................................. 57
Temperature measurement ............. 73
D
Delayed start............................................. 27
Pyrolytic self-cleaning ....................... 64
Deleting
Own recipe ......................................... 40
Demo mode .............................................. 55
Dimensions ............................................... 73
Disconnection........................................... 12
Disposal..................................................... 12
Door seal
Cleaning.............................................. 59
Replacing............................................ 59
Replacing on pyrolysis appliance .. 60
Duration ..................................................... 26
Recipe step ........................................ 38
E
EasyCook ........................................... 45, 71
Food groups....................................... 45
Electrical connection ............................... 73
End ............................................................. 27
Extended warranty ................................... 79
Extending operation ................................ 32
F
F and E messages .................................. 68
Factory settings........................................ 56
Fast heating ....................................... 23, 54
Automatic switch-on.......................... 54
Favourites.................................................. 47
Changing ............................................ 48
Clearing............................................... 48
Creating............................................... 47
Starting ................................................ 47
FN ............................................................... 55
Food probe ........................................ 18, 28
Food probe temperature ........................ 28
Measure only...................................... 29
G
Grill ............................................................. 21
Grill-forced convection ............................ 21
H
Halogen light bulb ................................... 61
Hold ............................................................ 38
Hot air ........................................................ 20
Hot air humid ............................................ 22
Hot air with bottom heat ......................... 20
I
Identification plate.................................... 73
76
Page 77

16 Index
Illumination ......................................... 54, 67
Initial set-up .................................................. 9
Instruction message ................................ 53
Instructions for use ..................................... 9
K
Keep warm................................................ 44
L
Language................................................... 52
Levels ......................................................... 16
Long cooking time................................... 67
M
Mains synchronisation ............................ 53
Maintenance ............................................. 57
Model number ..................................... 2, 55
O
Operating and display elements........... 15
Operating mode
Aborting............................................... 29
Changing ............................................ 30
Selecting ............................................. 25
Operating mode settings........................ 26
Changing ............................................ 26
Checking............................................. 26
Operation................................................... 24
Own recipes.............................................. 37
Creating............................................... 37
Deleting ............................................... 40
P
Packaging ................................................. 12
Pause ......................................................... 38
Power failure ............................................. 69
Preheating .......................................... 50, 74
Press and go ..................................... 26, 54
Product family.............................................. 2
Pyrolytic self-cleaning.............................. 63
Aborting............................................... 65
Starting ................................................ 64
Q
Quick instructions .................................... 80
R
Recipe book ...................................... 35, 71
Unlocking............................................ 35
Recipes...................................................... 35
Aborting............................................... 37
Action required .................................. 36
Changing ............................................ 39
Copying............................................... 39
Creating own...................................... 37
Ending a step before time ............... 39
Step duration...................................... 38
S
Safety ......................................................... 12
Safety precautions
Appliance-specific ................................8
Before using for the first time ............9
Correct use............................................9
General...................................................7
Saving energy.................................... 50, 74
Self-cleaning ............................................. 63
Aborting............................................... 65
Starting ................................................ 64
Service & Support.................................... 79
Service desk ............................................. 55
Setting the time ........................................ 51
Shelf guides
Cleaning.............................................. 62
Removing............................................ 62
Socket ........................................................ 16
Soft roasting.............................................. 41
Default value ...................................... 55
Positioning the food probe.............. 42
Seared ................................................. 42
Starting ................................................ 43
Switching off before time ................. 44
Software versions..................................... 55
Spare parts ............................................... 72
Special accessories ......................... 18, 71
Stand-by..................................................... 75
Start screen............................................... 52
Switching off before time........................ 29
Symbols ........................................................ 6
T
Target temperature .................................. 28
Technical data .......................................... 73
Technical enquiries.................................. 79
77
Page 78

Temperature sensor ................................ 16
Temperature unit...................................... 55
Testing institutes ...................................... 73
Time display.............................................. 53
Time format ............................................... 53
Timer .......................................................... 30
Tips and tricks .......................................... 49
Top/bottom heat ...................................... 19
Top/bottom heat humid.......................... 22
Touch buttons........................................... 15
Type............................................................... 2
U
U and E messages.................................. 69
Uneven browning..................................... 50
User settings............................................. 51
Adjusting ............................................. 51
Overview ............................................. 51
Using for the first time............................. 13
V
Validity........................................................... 2
Volume....................................................... 54
W
Warming plates ........................................ 18
Wire shelf................................................... 17
78
Page 79

17 Service & Support
The «Troubleshooting» chapter provides valuable information for dealing with
minor operating faults. This saves you the time, effort and potential cost of having
to call out a service technician.
Information on the V-ZUG warranty can be found at www.vzug.com →Service →Warranty in-
formation. Please read this information carefully.
Please register your V-ZUG appliance online immediately at www.vzug.com→Service→War-
ranty registration. This will allow you to take advantage of the best possible support in the
event of an fault in the appliance during the warranty period. You will require the serial
number (FN) and appliance designation to complete the registration process. This informa-
tion can be found on the identification plate for your appliance.
My appliance information:
FN: ___________________ Appliance: _____________________
Always have this appliance information to hand when you contact V-ZUG. Thank you.
▸ Open the appliance door.
– The identification plate is located on the left-side panel.
Requesting repairs
You can find the telephone number for your nearest V-ZUG service centre at
www.vzug.com→Service→Service hotline.
Technical enquiries, accessories, extended warranty
V-ZUG is happy to help with your general administrative and technical enquiries, orders for
accessories and spare parts, or information relating to advanced service agreements.
79
Page 80
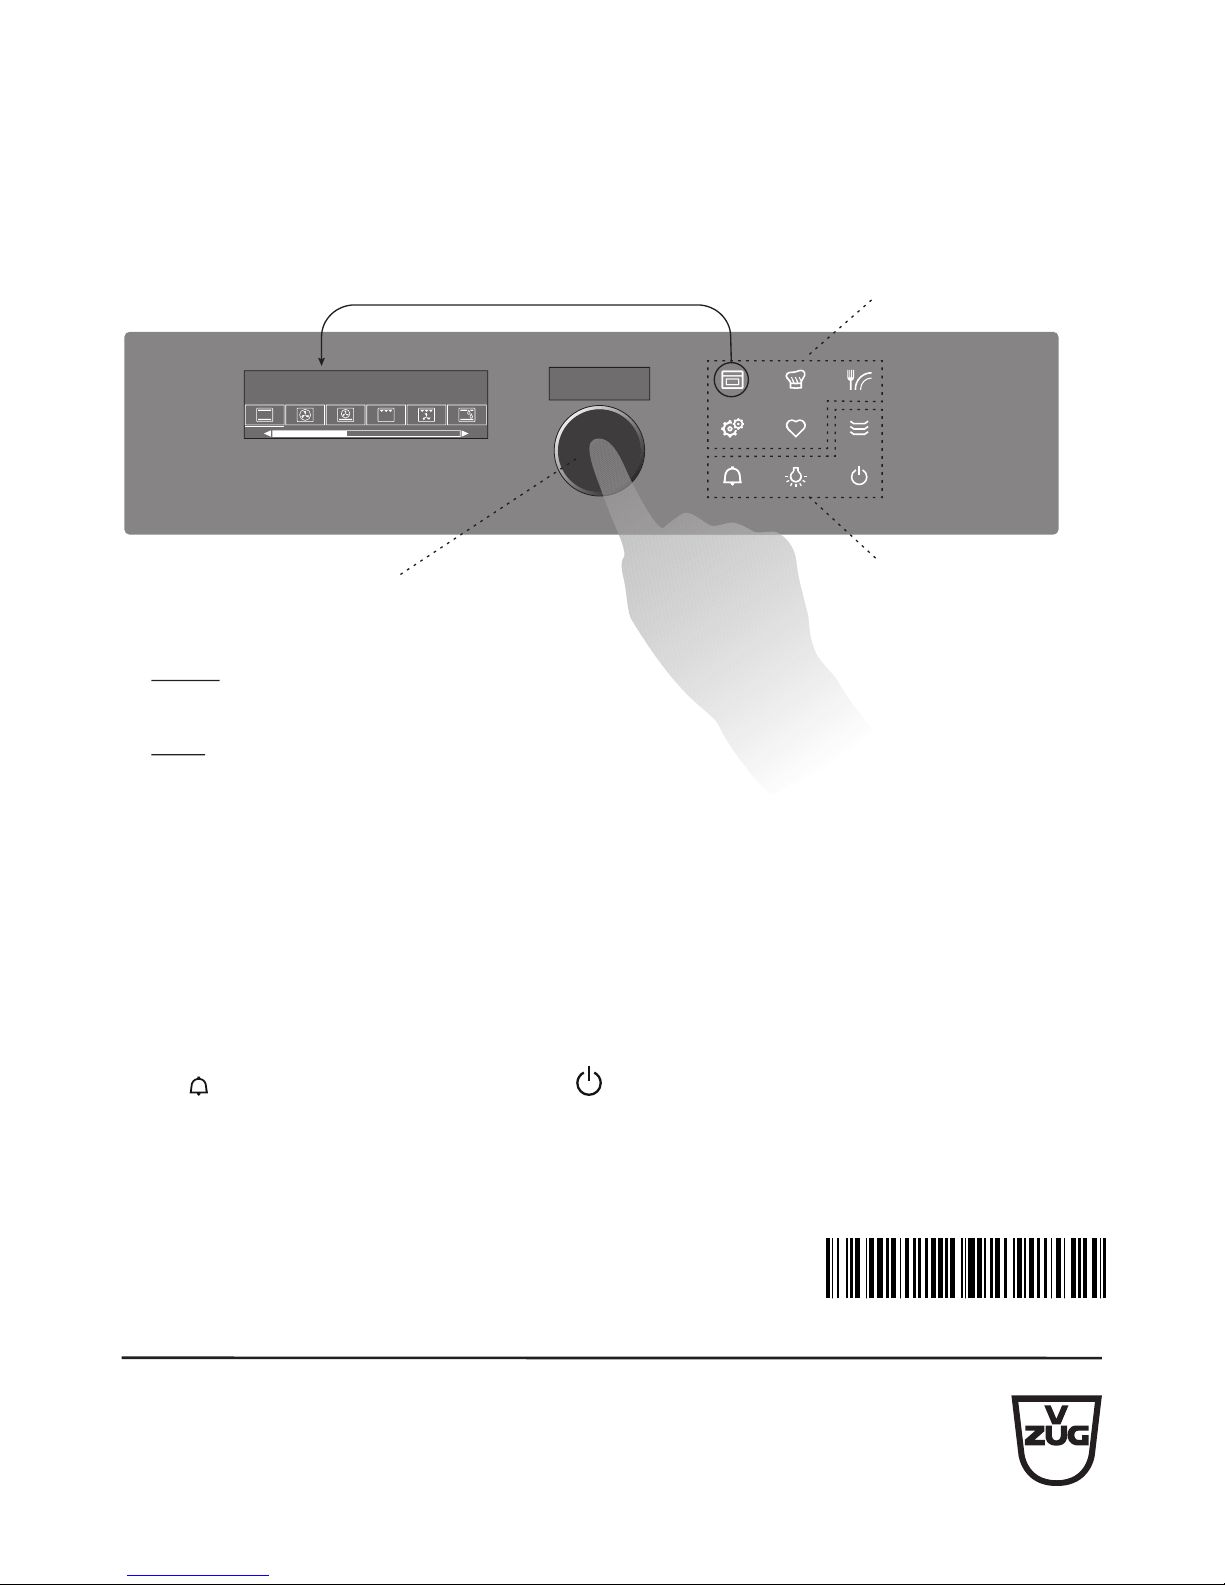
Quick instructions
Here you will find an overview of key operating information.
Active menu
Action buttons
Menu buttons
12:00
7RSERWWRPKHDW
곋2SHUDWLQJPRGHV
Press to switch on the appliance or
to select/confirm
Turn to set the temperature and time
or to navigate within the menu
Adjusting knob as a central
operating element
►
►
Menu and action buttons
The menu buttons contain a selection of preparation options and user settings.
These can be selected by pressing the relevant button. The active menu is shown
in the display. You can use the adjusting knob to operate and navigate within the
menu; additional submenus can also be called up.
The function buttons give you direct access to independent functions such as the
timer or switching off the appliance .
V-ZUG Ltd
Industriestrasse 66, P.O. Box 59, CH-6301 Zug
[email protected], www.vzug.com
J21015352-R04
 Loading...