

Page 1
Operating instructions
Adora TS WP
Tumble dryer
Page 2

2
Safety precautions
Read the operating instructions before using the appliance for the first
time.
General safety precautions
▪ This appliance can be used
by children aged 8 and
above and by persons with
reduced physical, sensory
or mental capabilities, or
lack of experience and/or
knowledge, provided they
are supervised or have
been instructed on the safe
use of the appliance and
have understood the hazards involved. Children shall
not play with the appliance.
Cleaning and user maintenance shall not be undertaken by children without supervision.
▪ If an appliance is not
equipped with a mains
cable and a plug or other
means for disconnecting
from the mains with a contact opening on each pole
complying with the conditions of overvoltage category III for full isolation, an
isolating device must be incorporated into the permanently installed electrical installation in accordance with
the installation regulations.
▪ If the mains cable of this ap-
pliance is damaged, it must
be replaced by the manufacturer or its Customer Services or a similarly qualified
person in order to avoid
hazard.
Appliance-specific safety
precautions
▪ Children under 3 years of
age must be kept away
from the appliance unless
they are constantly supervised.
▪ The appliance has a max-
imum dry load capacity of
7 kg.
▪ This appliance is only suit-
able for drying textiles which
have been washed in water.
▪ The appliance is only to be
used with the recommended
vaporizing medium. The use
of other substances may
give rise to a toxic or fire
risk.
▪ The appliance has hot sur-
faces to evaporate active
components. These surfaces should not be
touched during use.
▪ The tumble dryer may not
be used if industrial chemic-
Page 3

Safety precautions
3
als were used for cleaning.
▪ Clean the fluff filters regu-
larly.
▪ Do not allow fluff to build up
around the tumble dryer.
▪ Do not dry unwashed items
in the tumble dryer.
▪ Textiles that have been
cleaned, treated or soaked
with flammable chemicals,
detergents or solvents (such
as white spirit, alcohol, stain
remover, oil, turpentine,
acetone, paint, wax, etc.)
are a fire and explosion hazard! Wash materials containing such substances first by
hand with water or allow the
solvent to evaporate completely.
▪ Items such as foam rubber
(latex foam), shower caps,
waterproof textiles, rubber
backed articles and clothes
or pillows fitted with foam
rubber pads should not be
dried in the tumble dryer.
▪ Remove objects such as
lighters and matches and
the like.
▪ Never stop a tumble dryer
before the end of the drying
cycle unless all items are
quickly removed and spread
out so that the heat is dis-
sipated.
▪ Exhaust air must not be dis-
charged into a flue which is
used for exhausting fumes
from appliances burning
gas or other fuels.
▪ Do not use a fabric condi-
tioner or other fabric care
solutions in the wash. Otherwise pay attention to the
manufacturer's instructions.
▪ Do not install the appliance
behind a door that locks, a
sliding door or a door with a
hinge that lies opposite the
hinge of the appliance.
To minimize the risk of fire in a
tumble dryer, the following should
be observed:
▪ Oil-affected items can ignite
spontaneously, especially
when exposed to heat
sources such as in a tumble
dryer. The items become
warm, causing an oxidation
reaction in the oil. Oxidation
creates heat. If the heat cannot escape, the items can
become hot enough to
catch fire. Piling, stacking or
storing oil-affected items
can prevent heat from escaping and so create a fire
hazard. If it is unavoidable
that fabrics that contain vegetable or cooking oil or
Page 4
Safety precautions
4
have been contaminated by
hair care products be
placed in a tumble dryer
they should first be washed
in hot water with extra detergent – this will reduce, but
not eliminate, the hazard.
Instructions for use
▪ Ensure access to the place of discon-
nection (e.g. socket outlet, wall switch,
fuse) and the water tap.
▪ Any repairs, modifications or manipula-
tions to the appliance, especially any
electrically live parts, may only be carried out by the manufacturer, its customer service department or similarly
qualified persons. Repairs if carried out
incorrectly may cause serious injury,
damage to the appliance and fittings, as
well as affect the functioning of the appliance. If the appliance is not working
properly or in case a repair is needed,
follow the instructions given in the «Service and repairs» section. Please contact our Customer Services if necessary.
▪ Before closing the appliance door and
starting a programme, ensure that there
are no foreign objects or pets in the
drum.
▪ Strictly use original spare parts only.
▪ If the appliance is not functioning prop-
erly, disconnect it from the power supply immediately.
▪ Do not operate the appliance without a
door filter or with a damaged door filter.
Fluff can destroy the appliance!
▪ To protect your washing, follow the fab-
ric care symbols and the hints and advice in the «Programme overview» section.
▪ Packaging material, e.g. plastic film and
polystyrene, can be dangerous for chil-
dren. Danger of suffocation! Keep packaging material away from children.
Correct use
The appliance is only suitable for drying
home textiles. It is designed for use in the
home and for the above-mentioned purpose only. No liability is assumed for any
damage caused by improper or incorrect
use.
Transport and installation
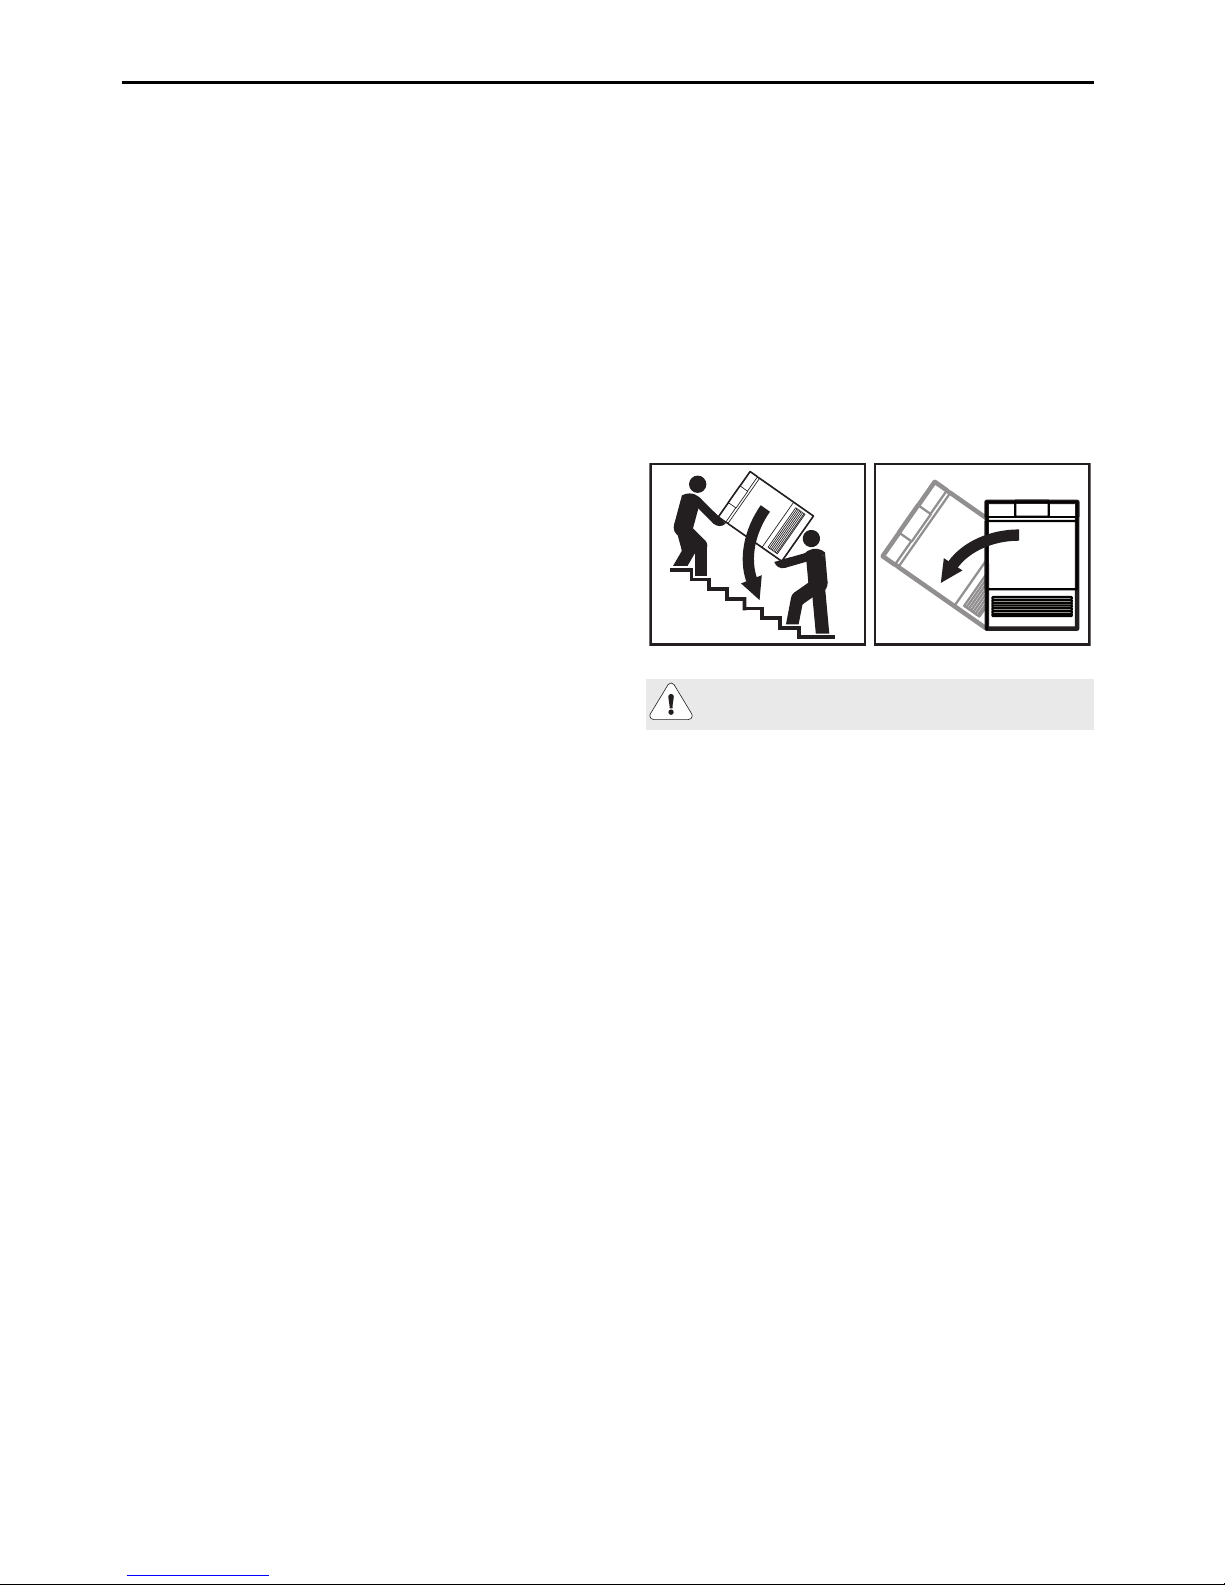
Front
Front
Tilt max. 90° to the left!
Transport the appliance in an upright position only! Transporting it in any other position will result in damage to the appliance!
When carried carefully without being
shaken, the appliance may be tilted a maximum of 90° to the left (viewed from the
front).
As a general rule, rooms containing a heat
pump dryer should be ventilated as these
produce some humidity. If the room is kept
closed, it must be aired occasionally
(either by opening the door to the room or
a window) between several consecutive
drying programmes.
Page 5
Safety precautions
5
Using for the first time
The appliance must be installed and
connected to the electricity supply by
a qualified fitter/electrician in accordance with the separate installation instructions.
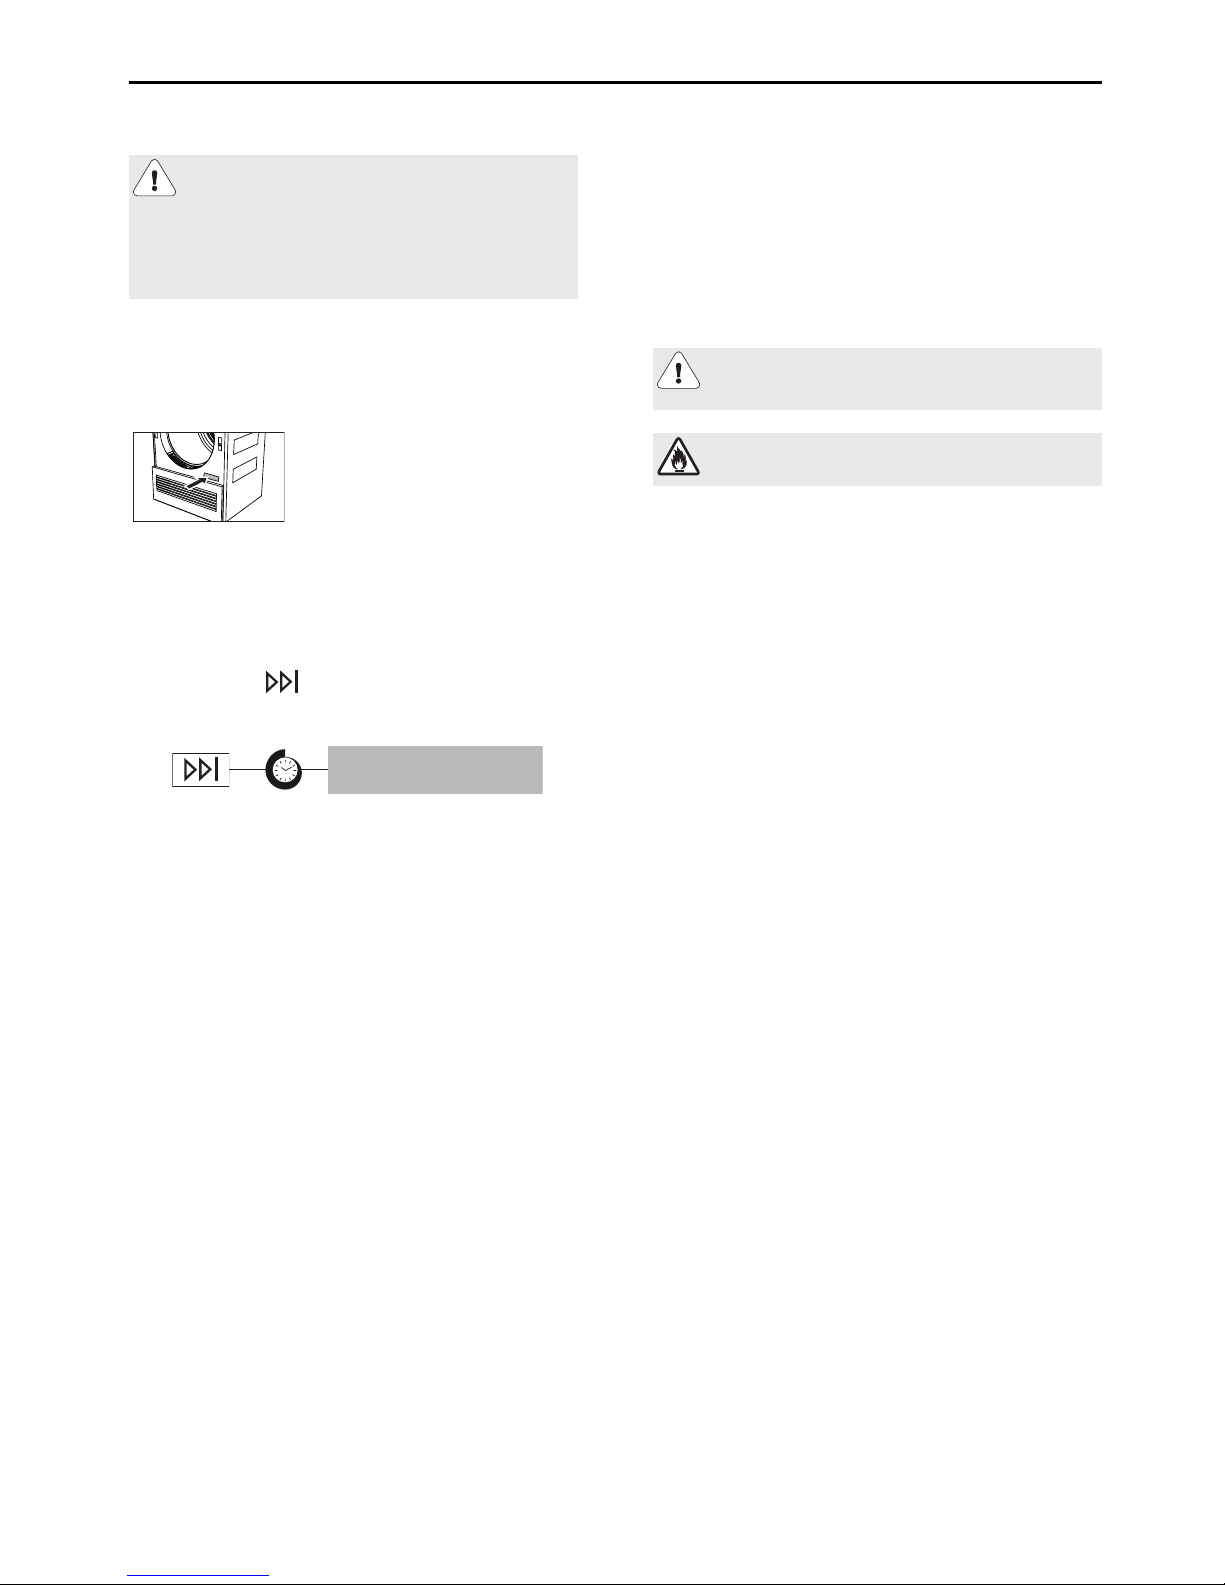
Serial number
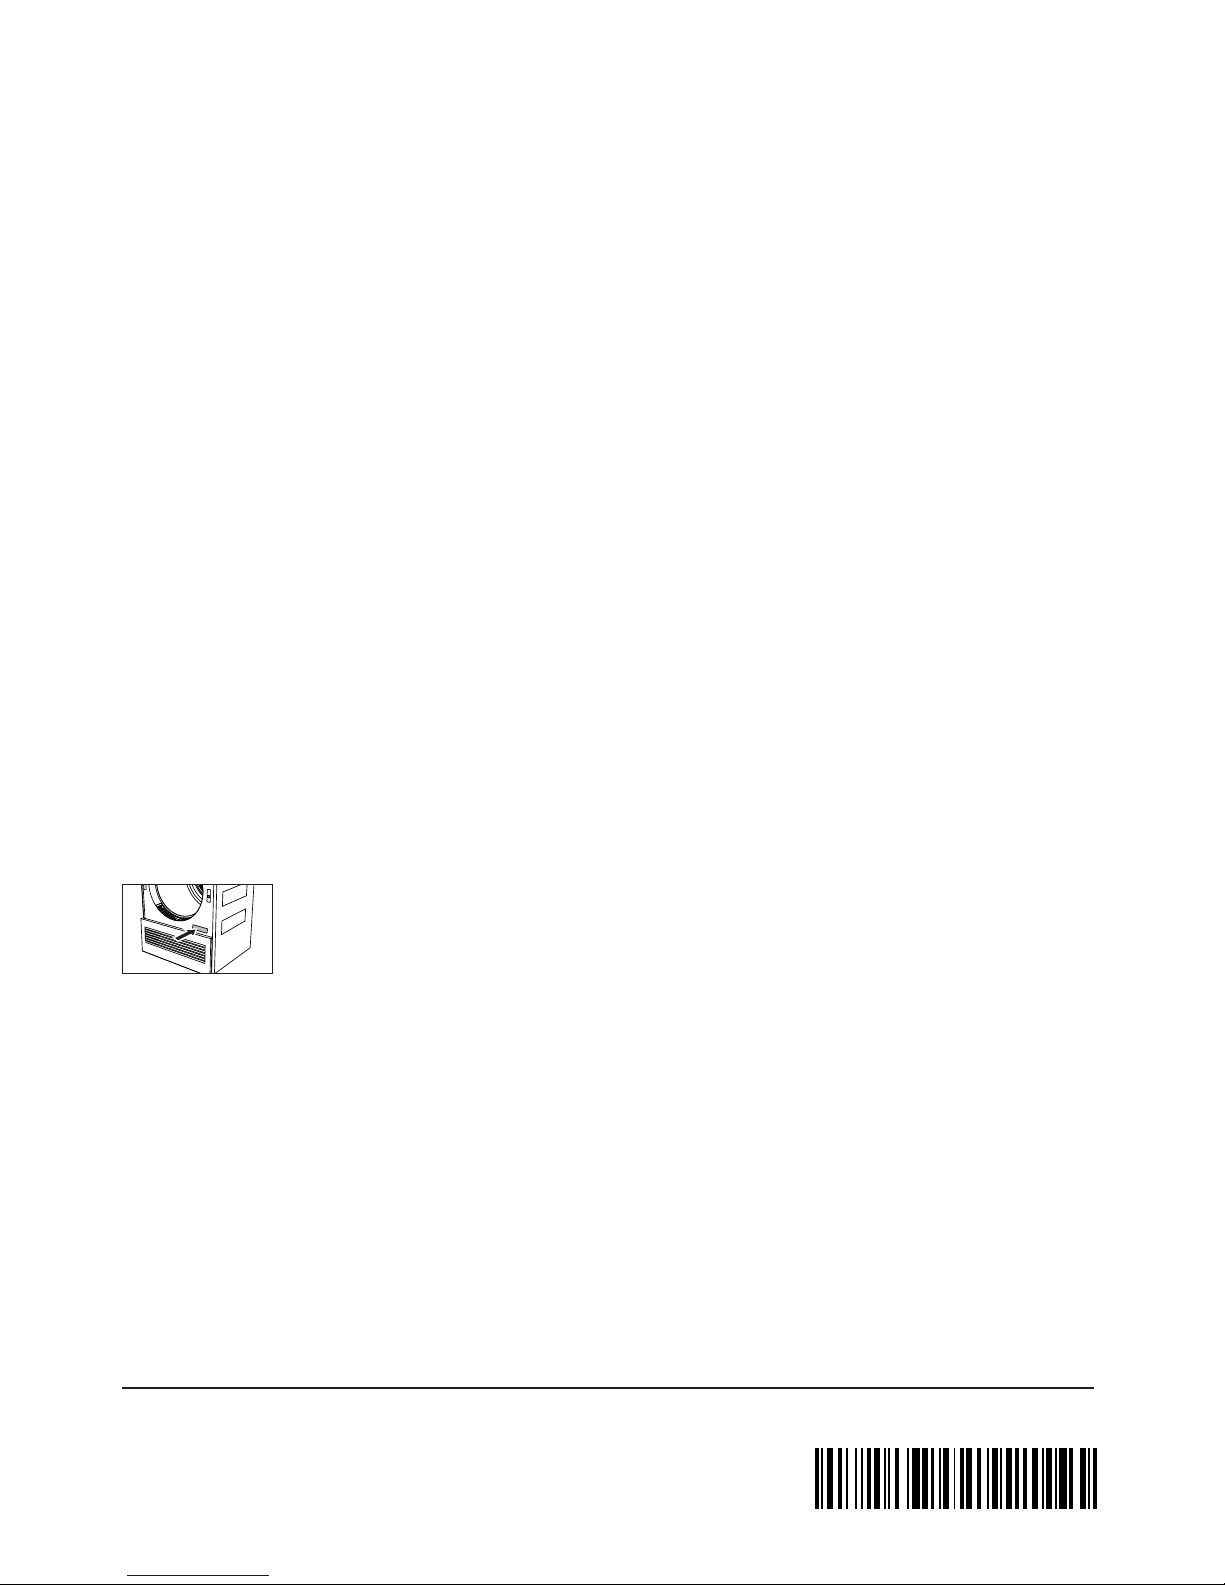
The serial number (FN) is located on the
identification plate:
▸ Note down the FN on the back page of
these operating instructions.
The FN can also be retrieved as follows:
▸ Hold the button depressed until
the following display appears:
User settings
FN XXXXX XXXXXX
Note on the operating
instructions
For more information on your appliance
and for answers to frequently asked ques-
tions, visit http://www.vzug.com.
Symbols used
Denotes important safety precautions.
Caution, risk of fire!
Failure to observe said precautions can
result in injury or in damage to the appliance or fittings!
Validity
The product family (model number) corresponds to the first alphanumerics on the
identification plate. These operating instructions apply to:
Appliance
designation
Adora TS WP
Type
WTATSWPZ
Product family
12005
Variations depending on the model are
noted in the text.
Modifications
Text, diagrams and data correspond to the
technical standard of the appliance at the
time these operating instructions went to
press. The right to make technical modifications for the purpose of the further development of the appliances is reserved.
Page 6

Contents
1 Appliance description 7
1.1 Appliance construction ..................................7
1.2 Indicator lights .................................................7
1.3 Operating and display elements..................8
2 Programme overview 9
2.1 Automatic programmes .................................9
2.2 Standard programme.....................................9
2.3 Additional programme ...................................9
2.4 Fabric types .................................................. 10
2.5 Additional functions ..................................... 11
2.6 EcoManagement .......................................... 11
3 Operating the appliance 12
3.1 Preparations.................................................. 12
3.2 Selecting programme.................................. 12
3.3 Selecting additional functions.................... 13
3.4 Delayed start................................................. 13
3.5 Timed drying ................................................. 14
3.6 Changing selection...................................... 14
3.7 Aborting a programme ............................... 14
3.8 Interrupting a programme .......................... 14
3.9 With childproof lock activated ................... 15
3.10 End of programme ...................................... 16
3.11 EcoManagement statistics ......................... 17
4 User settings 17
5 Care and maintenance 20
5.1 Cleaning the door filter and door filter mat...
20
5.2 Cleaning the front filter mat (annually)..... 21
5.3 Cleaning the moisture sensor ................... 21
5.4 Cleaning the temperature sensor ............. 22
5.5 Cleaning the appliance............................... 22
6 Trouble-shooting 22
6.1 Error messages............................................ 22
6.2 Other possible problems............................ 24
7 Spare parts 25
8 Technical data 26
9 Drying tips 28
9.1 Saving energy................................................28
9.2 Avoiding damage..........................................28
10 Disposal 29
11 Notes 30
12 Quick instructions 32
13 Services & support 32
6
Page 7
1 Appliance description
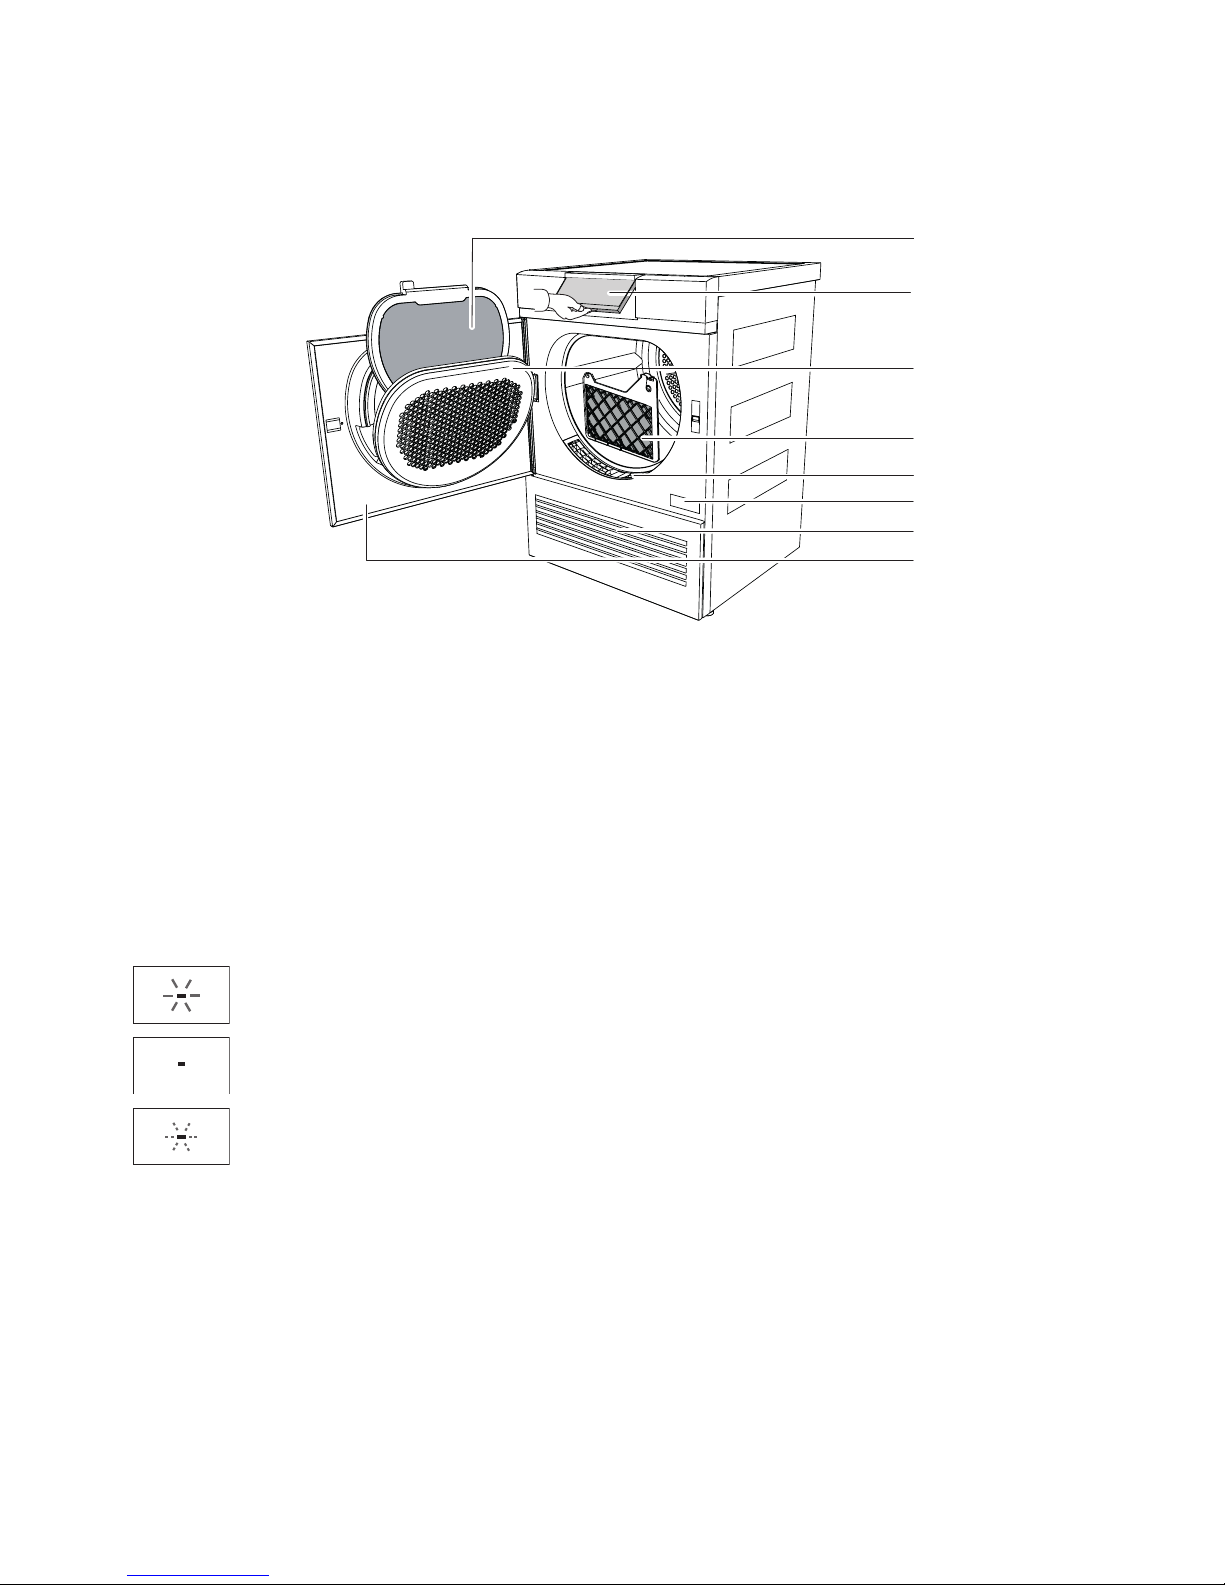
1.1 Appliance construction
1
2
3
4
6
7
8
5
1
Door filter with door filter mat
5
Front grille
2
Pivoting operating panel
6
Identification plate / serial number (FN)
3
Cover for door filter
7
Ventilation grille
4
Front filter mat
8
Appliance door
1.2 Indicator lights
Illuminated: relevant function active
Off: relevant function not selectable
Flashing: relevant function selectable
7
Page 8
1 Appliance description
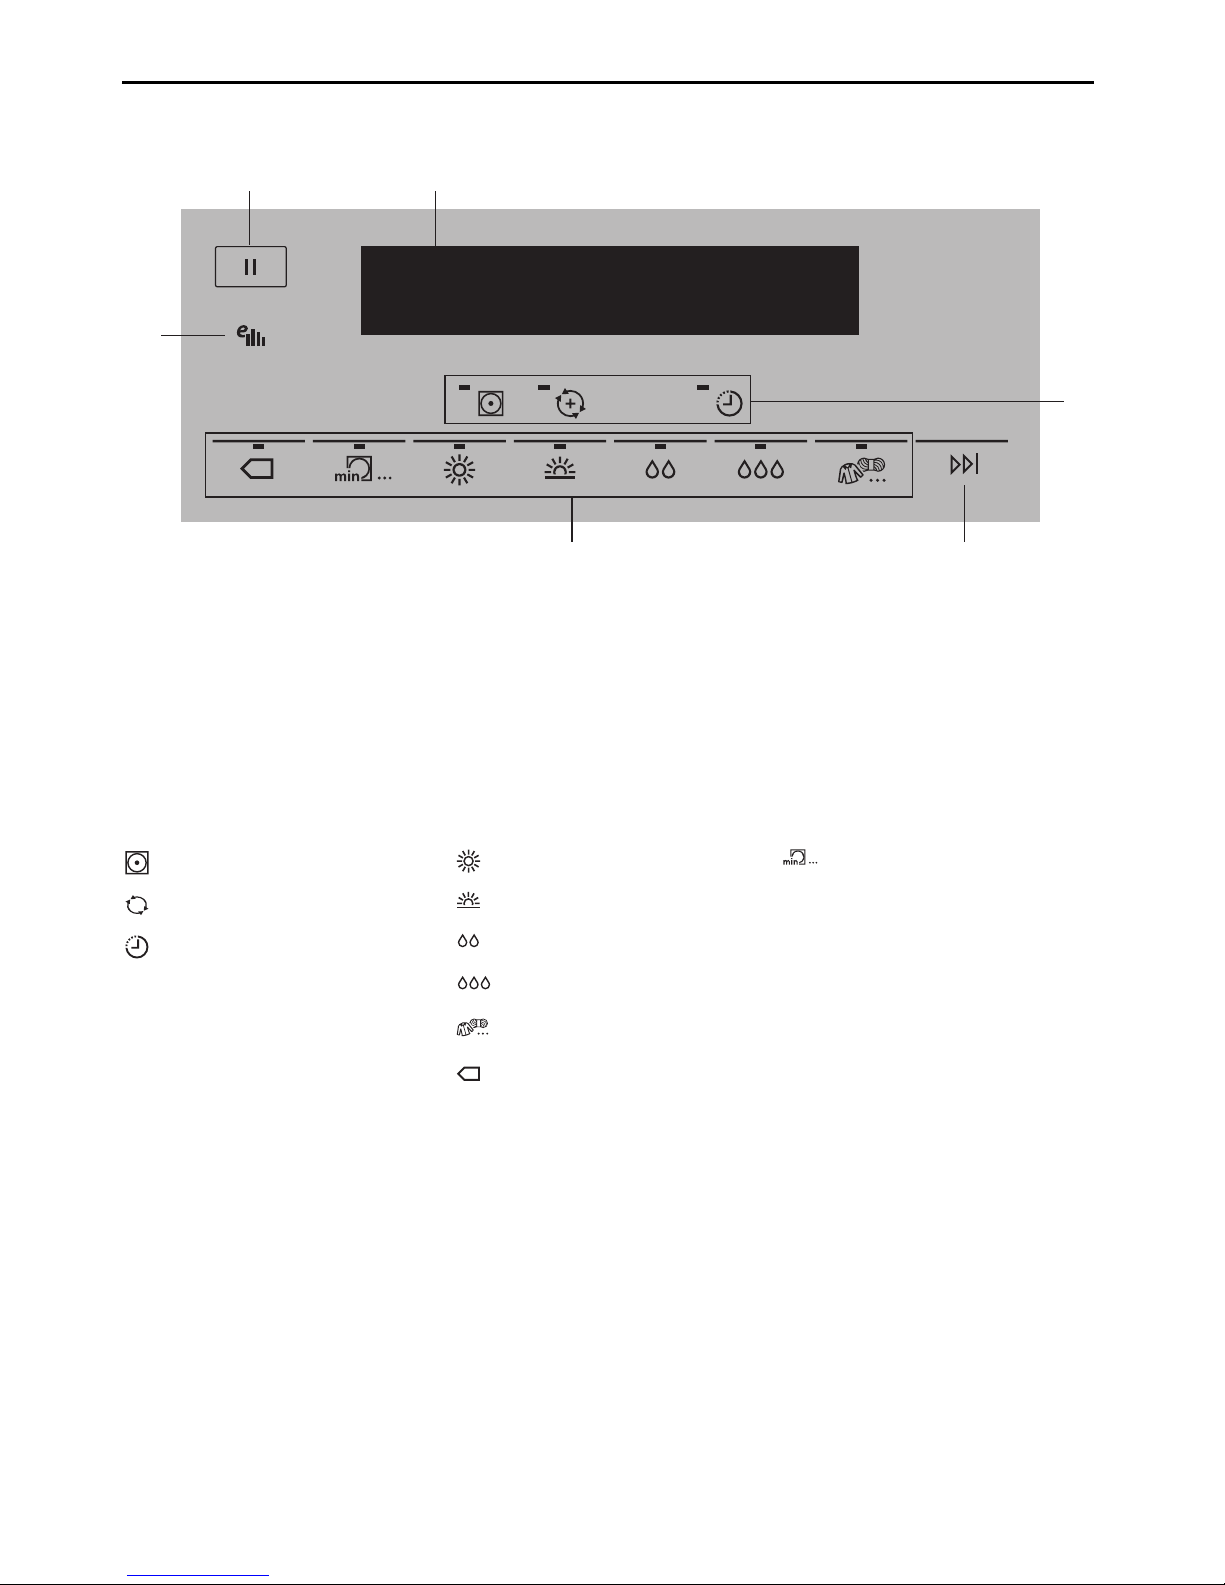
1.3 Operating and display elements
3
4
5
6
1 2
1
Pause
4
End of programme
2
Display
5
Automatic programmes
3
Additional functions
6
EcoManagement
Additional functions Automatic programmes Additional programme
Easy care Extra dry Timed drying
+
ReversePlus Normal dry
Delayed start Iron dry
Damp
Fabric types
Standard programme
8
Page 9
2 Programme overview
2 Programme overview
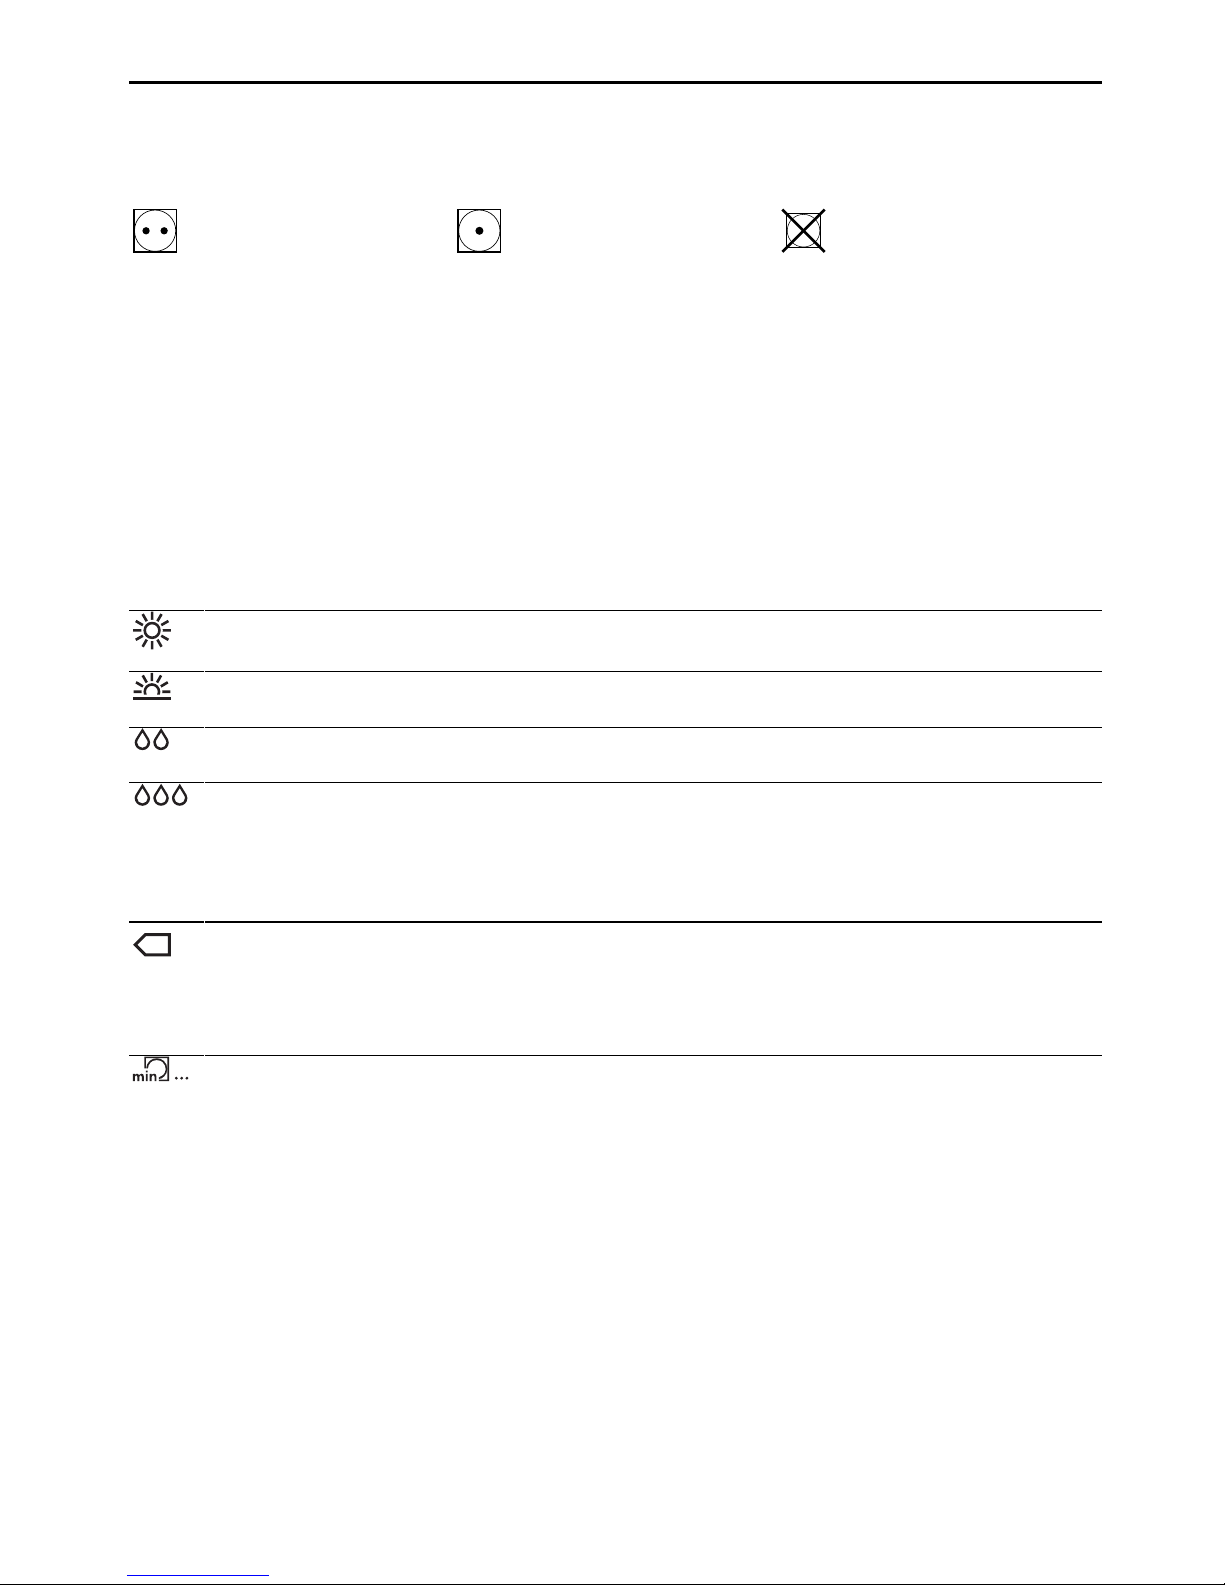
To avoid damaging the laundry, follow the fabric care symbols on garment labels:
Tumble dry, medium heat Tumble dry, low heat Do not tumble dry
2.1 Automatic programmes
Automatic drying programmes have 3 phases:
Drying
The laundry is dried according to the settings.
Cooling down /
Final airing
The laundry is cooled down to a temperature at which creasing is minimized. The duration of this phase depends on the temperature of the
laundry. «Crease guard» starts if the appliance is not unloaded when
this phase ends.
Crease guard
The dried washing is moved at frequent intervals for up to 30 minutes
to prevent creasing. Open the appliance door to end before time.
Extra dry: For thick, multi-layered textiles and mixed loads. Less suitable for knitted or woven articles (e.g. t-shirts or underwear).
1–7 kg
Normal dry: For similar items of washing (e.g. t-shirts or underwear). 1–7 kg
Iron dry: For items that are to be ironed. 1–7 kg
Damp: For items that are to be pressed in a mangle (e.g. table
linen).
1–7 kg
2.2 Standard programme
The most efficient programme for drying normal wet cotton laundry.
1–7kg
2.3 Additional programme
Timed drying: For final drying of textiles. For final drying of sleeping
bags and quilts, provided they have the relevant fabric care symbols.
Load for bulky textiles: 1 item
1–7 kg
9
Page 10
2 Programme overview
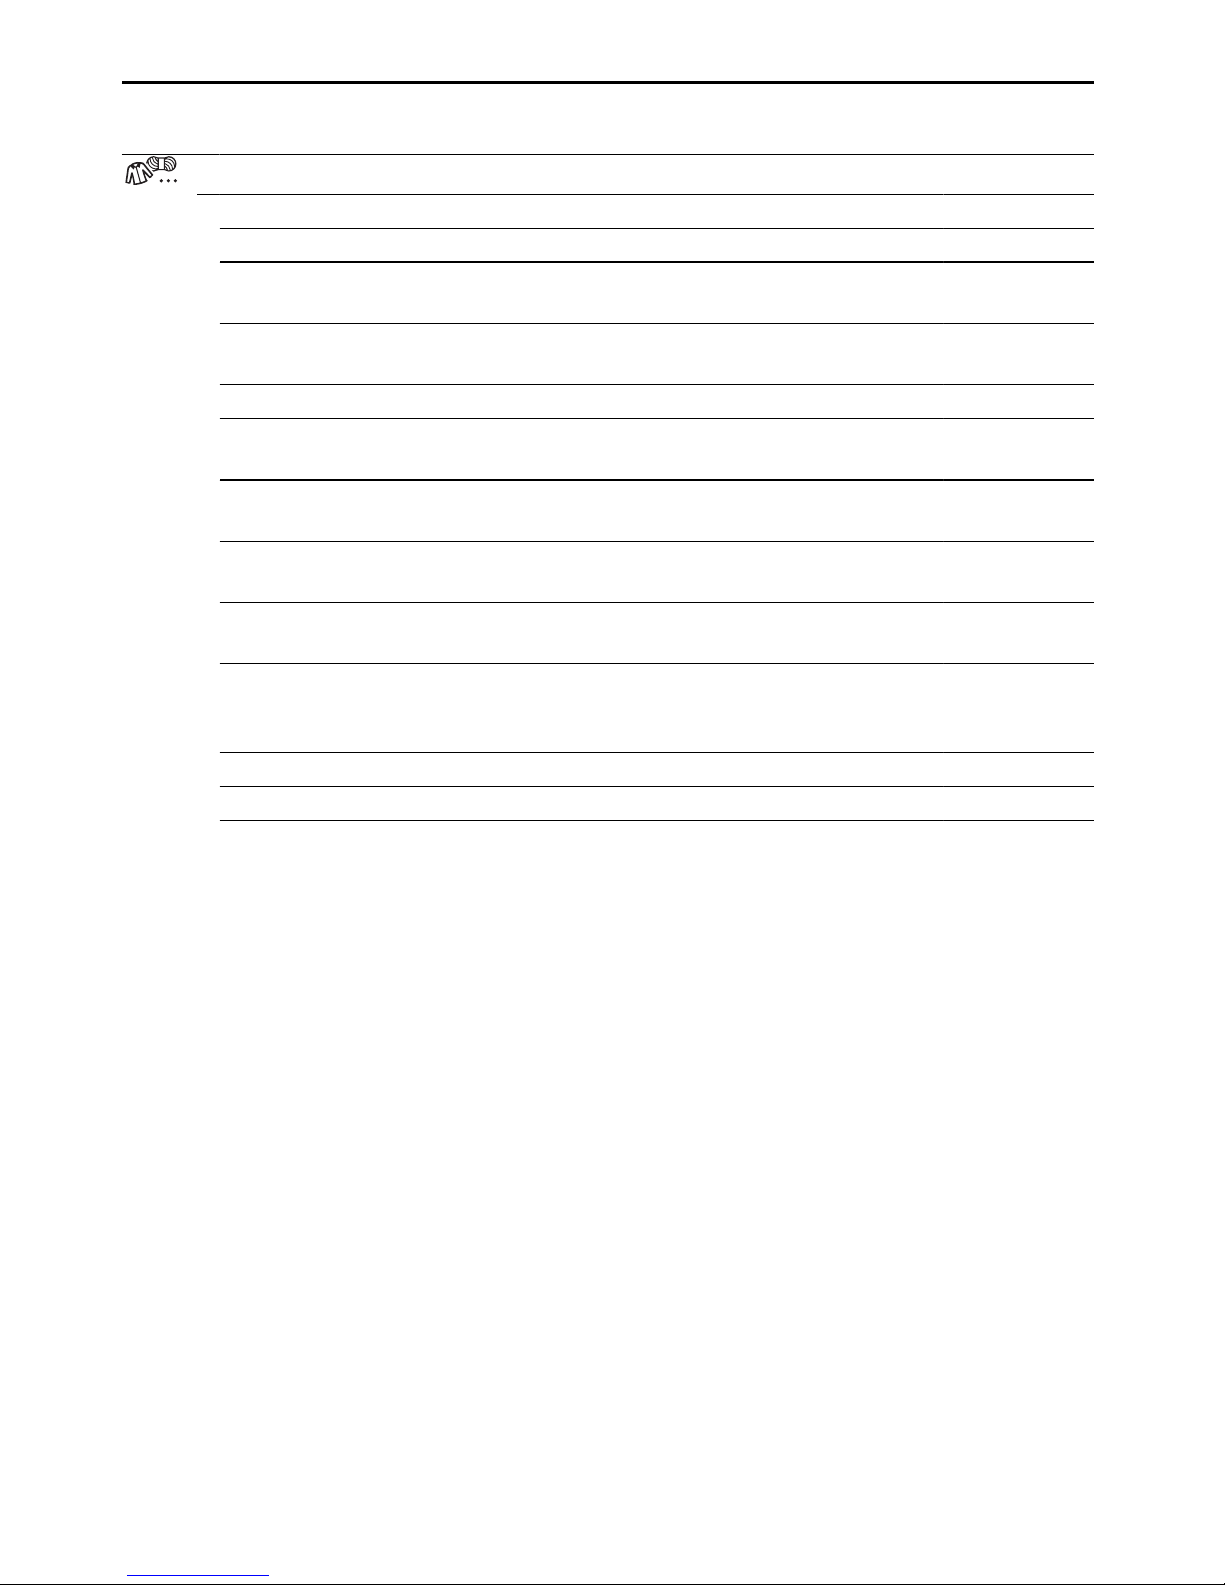
2.4 Fabric types
▸ Press the button repeatedly to select the fabric type.
Airing: For refreshing or airing little-worn garments. 1–1.5 kg
Woollens: Gentle drying for woollen textiles labelled as washable. 1kg
Silks: For drying silk fabrics. Follow the fabric care symbols as silk
tends to crease easily.
1–1.5 kg
Crease guard: For reduced creasing (e.g. shirts and blouses). The
laundry is ready for ironing.
1kg
Shirts: Fabrics are gently dried to «cupboard dry». 1–7items
Outdoor garments: Leisure- and sportswear (Sympatex, Gore-tex, ...)
are dried gently.
1–3kg
Denim: Denim fabrics are dried to «cupboard dry». Follow the fabric
care symbols as denim material can shrink.
1–4kg
Baby garments: Baby garments are gently and hygienically dried to
«cupboard dry».
1–5kg
Thin down filling: For light-weight down textiles (e.g. thin duvets and
jackets). Optimum load: 1 item
1–2kg
Thick down filling: For bulky down textiles (e.g. pillows, jackets and
thick duvets). If recommended, tennis balls can be used for fluffing
up the down during drying. Optimum load: 1 item
1–2kg
Bedding: For similar items of washing. Fasten zips and buttons. 1–3kg
Towelling: For drying thick towels and terry towelling. 1–3kg
Basket programme: For drying clean canvas shoes/trainers and
small items such as gloves, hats and soft toys in the basket (can be
ordered as an accessory). Not suitable for leather or synthetic
leather.
10
Page 11
2 Programme overview
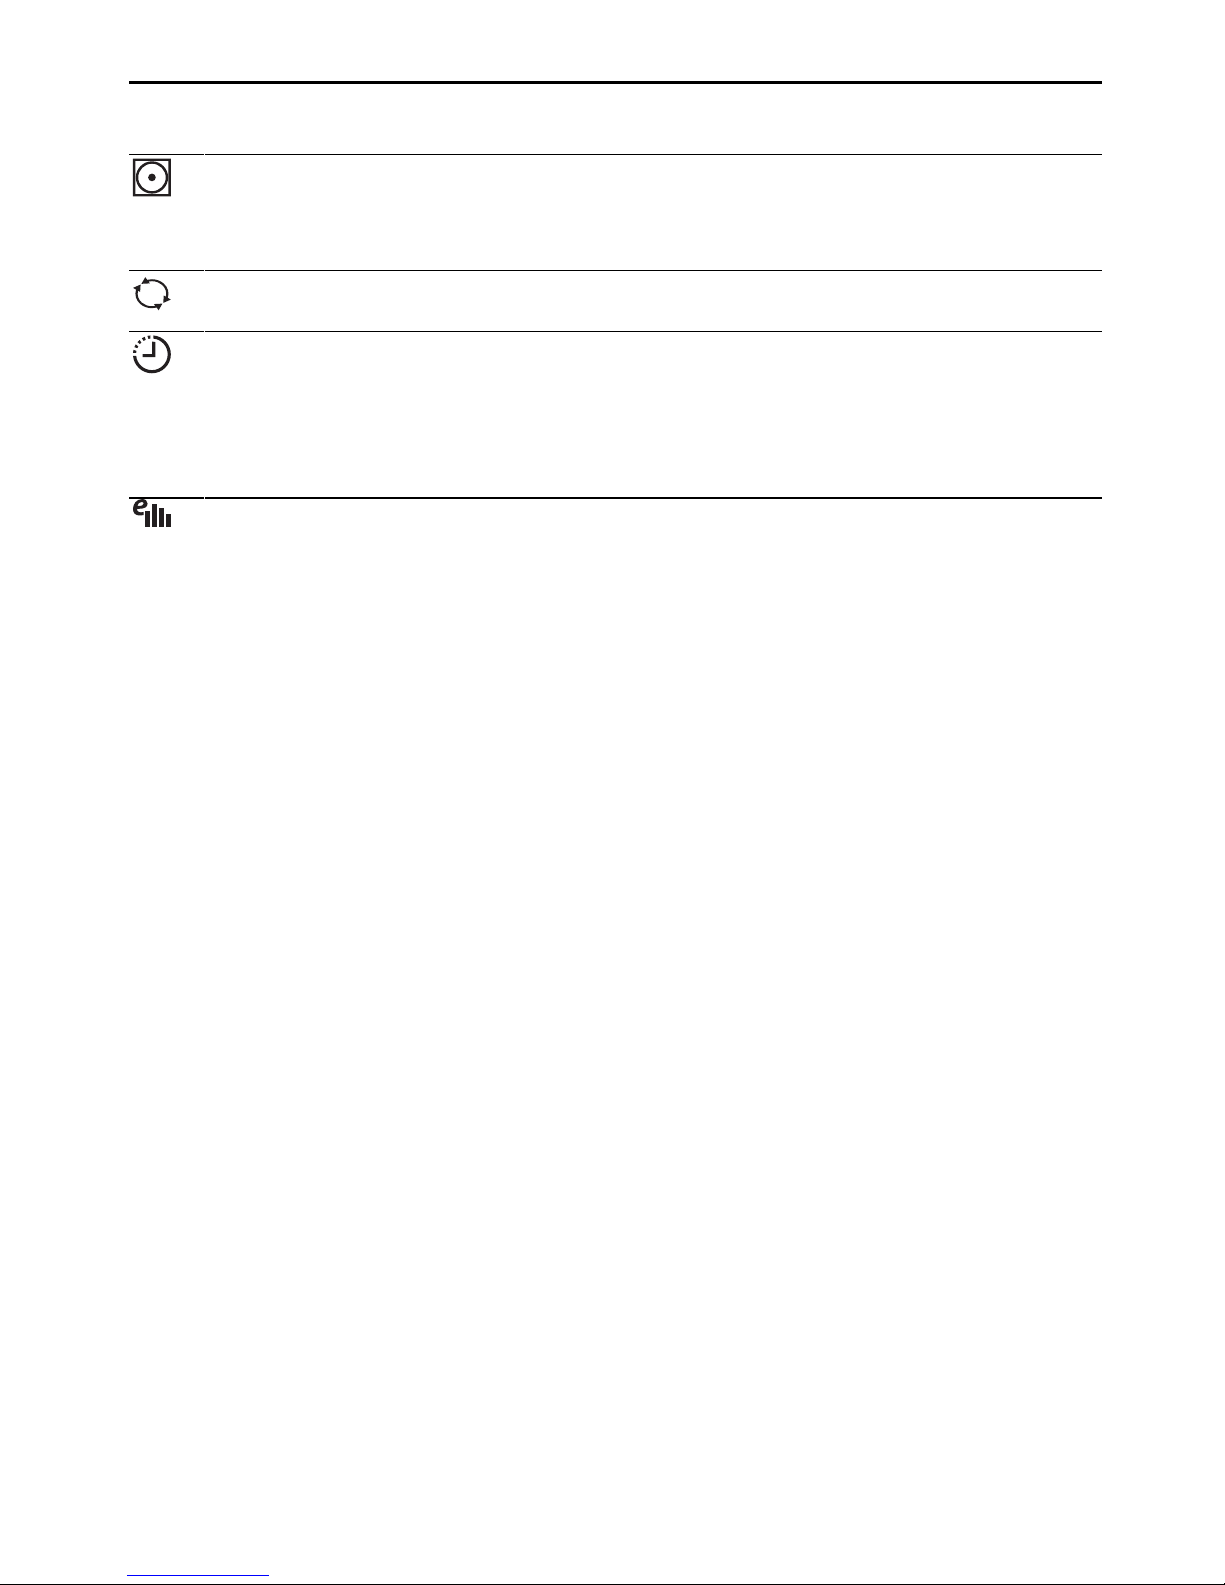
2.5 Additional functions
Easy care: Gentle drying for mixed fabrics (e.g. shirts, pullovers and
T-shirts). The level of dryness is reduced. To prevent creasing, put
only a few items of laundry in the washing drum and unload them as
soon as the programme ends.
1–2.5kg
+
ReversePlus: The laundry is dried evenly and less likely to get
tangled. Particularly suitable for drying larger items, e.g. bedding.
Delayed start: For taking advantage of cheap-rate electricity (setting
range of up to 24hours). The programme starts automatically when
the delayed start set is reached.
2.6 EcoManagement
EcoManagement provides information on the energy consumption of the appliance.
The following statistical data can only be retrieved when no programme is running:
▪ Energy consumption of the last programme
▪ Total energy consumption
▪ Average energy consumption of the last 25 programmes
The energy consumption of a programme is displayed during programme selection. At the end of a programme, the energy consumption of the last programme
run is displayed.
11
Page 12
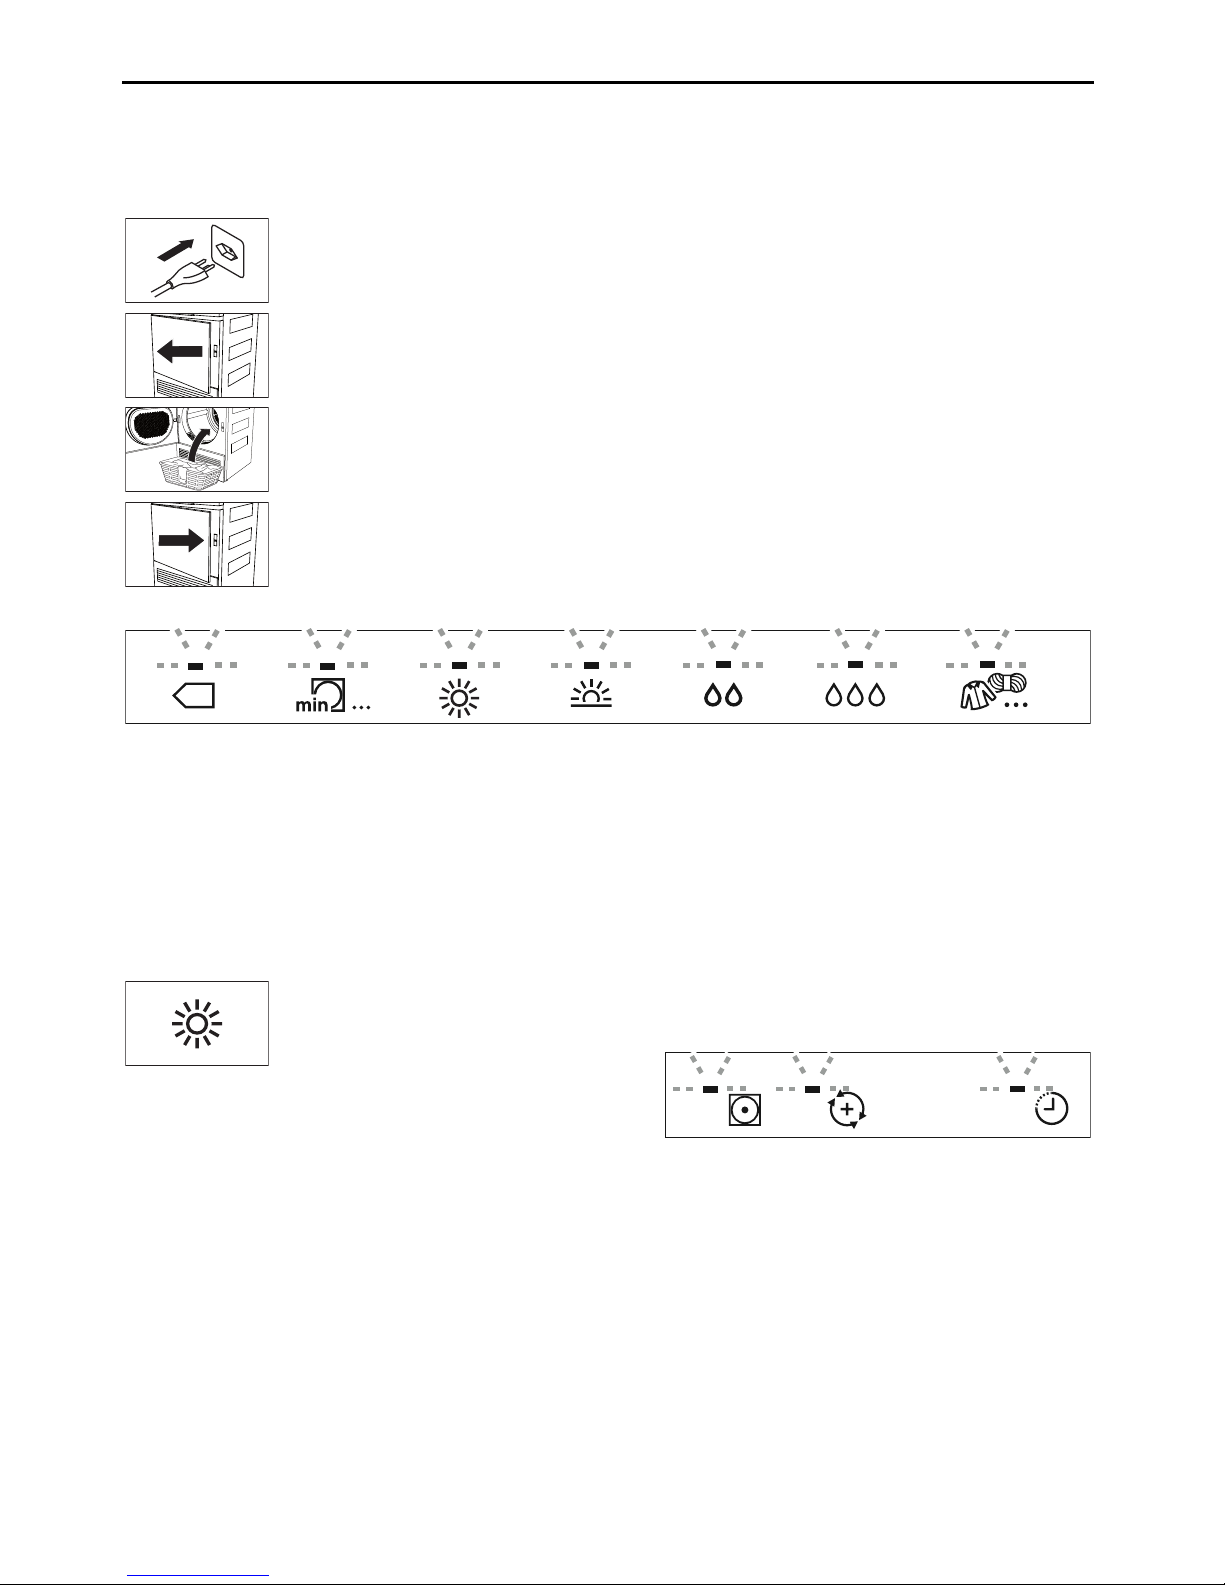
3 Operating the appliance
3 Operating the appliance
3.1 Preparations
▸ Insert the mains plug into a suitable mains socket.
▸ Press the markings at the edge of the door (5 dots) and open the appli-
ance door.
▸ Loosely load wet laundry items one by one into the appliance.
▸ Close the appliance door. Ensure that no items of laundry are trapped in
the door.
The indicator lights for the programme buttons flash. They go out after 20seconds if no programme selection is made. A programme can still be selected afterwards.
3.2 Selecting programme
«Press and go»
When a programme is selected, all the necessary settings for it are assigned automatically.
Additional functions can be selected or deselected by using further buttons in other views.
▸ Press the button for the de-
sired programme.
The indicator lights for selectable additional functions flash.
If no button is pressed within the next 20seconds, the programme selected starts automatically.
12
Page 13
3 Operating the appliance
Duration remaining indicator
When the programme starts, the programme
duration at maximum load is displayed. The letter «h» flashes for about 1 minute. During this
time, the actual load is being determined and
the expected duration remaining is being calculated.
Determining load 1h35
The expected duration remaining is subsequently displayed.
Drying 1h24
The programme may possibly take longer than
initially calculated. In this case, the duration remaining freezes while the programme runs. The
letter «h» flashes again.
Calculating time
remaining
0h15
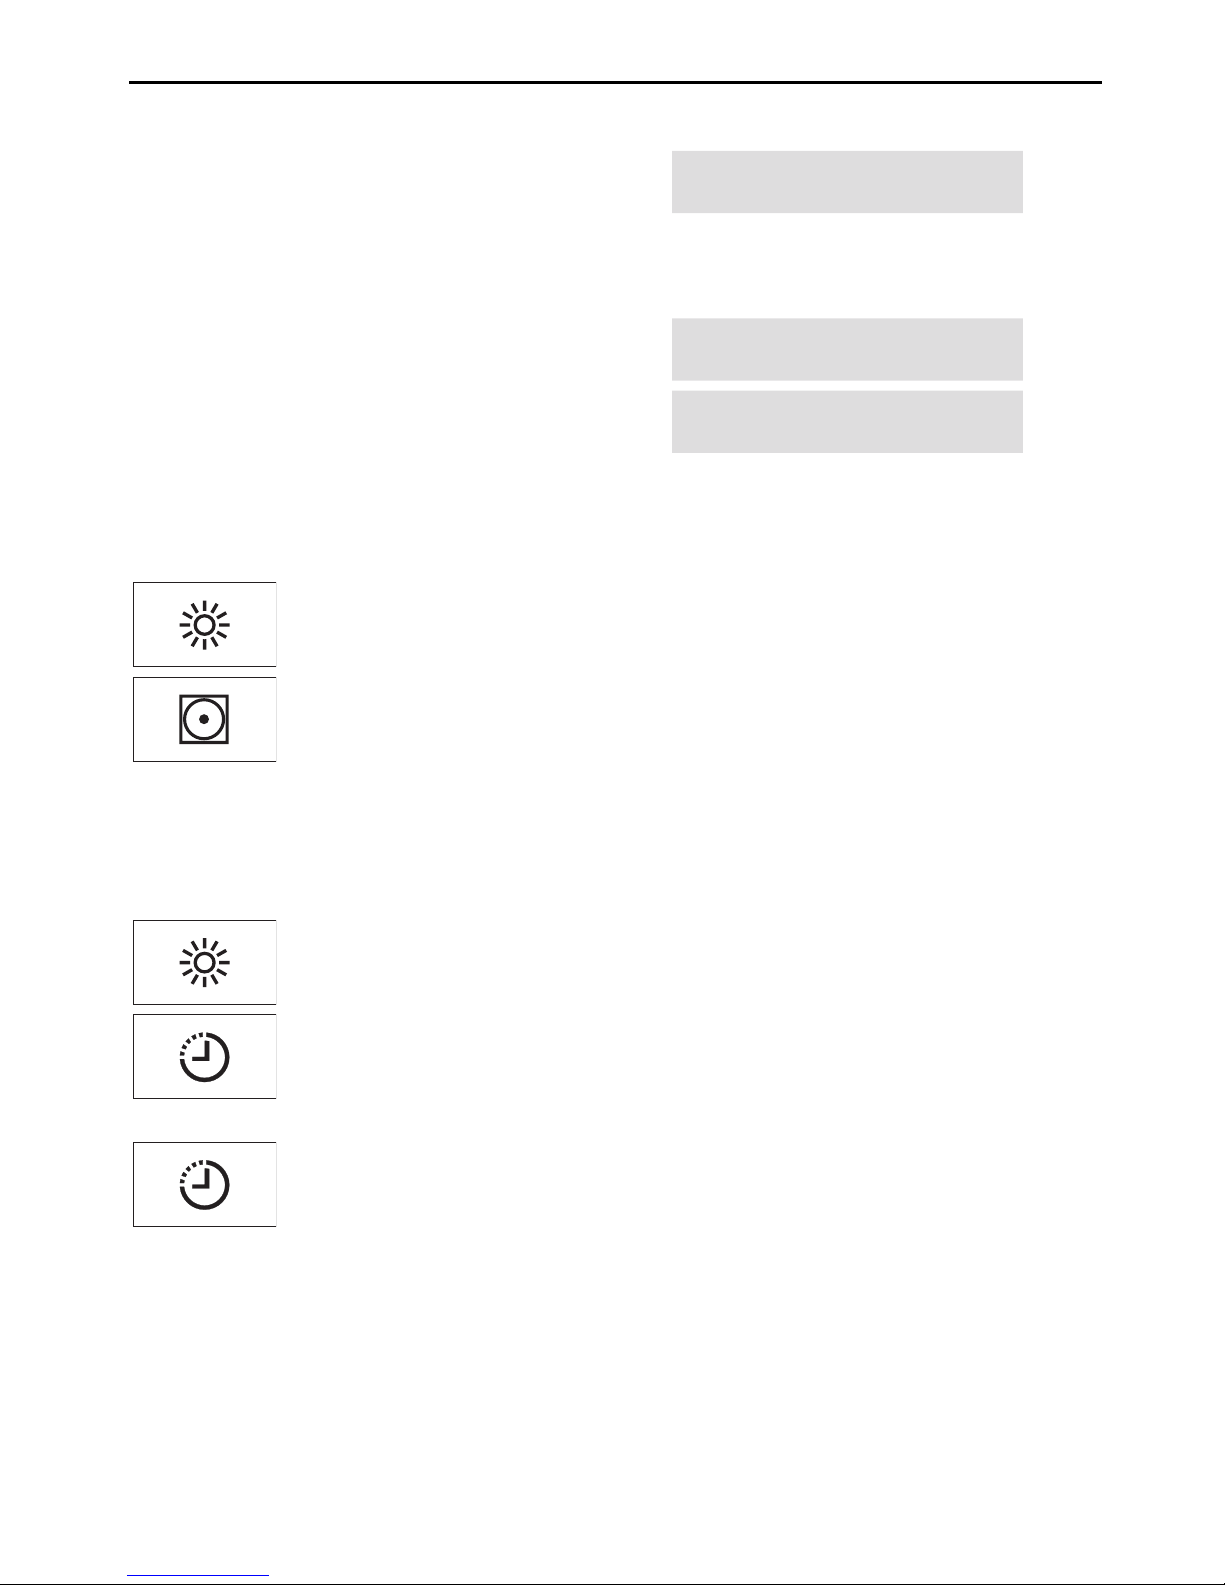
3.3 Selecting additional functions
▸ Press the button for the desired programme.
▸ Press the button for the desired additional function.
If the programme needs to be changed, it is possible to select a new programme within 20 seconds. Additional functions must also be reselected.
If no button is pressed within the next 20seconds, the programme selected starts automatically.
3.4 Delayed start
▸ Press the button for the desired programme.
▸ Press the button repeatedly until the time by which the start should be
delayed (max. 24hours) appears in the display.
The display goes dark. The programme starts when the set start time is
reached.
▸ To reduce the remaining time delay in hourly intervals, press the button re-
peatedly again.
Laundry can be added at any time.
13
Page 14
3 Operating the appliance
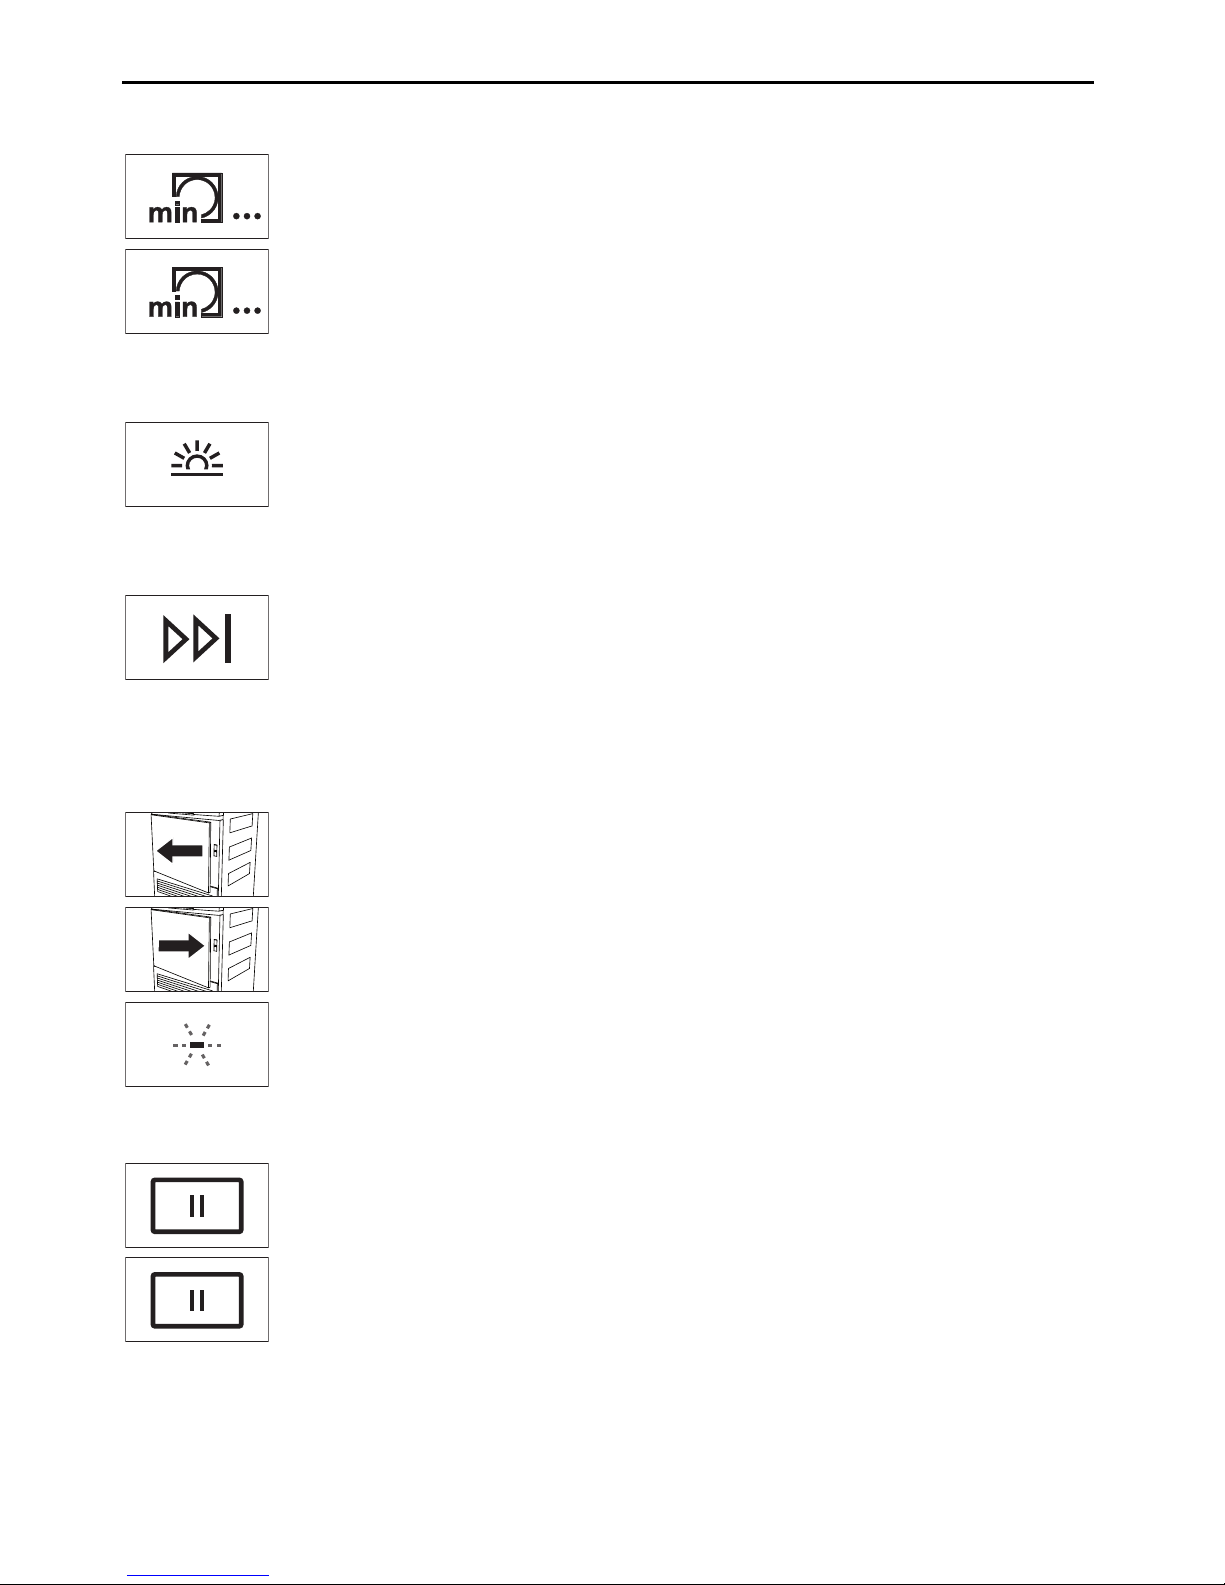
3.5 Timed drying
▸ Press button.
The set duration appears in the display.
▸ Press the button repeatedly until the desired duration is displayed.
3.6 Changing selection
▸ Press another programme button during programme selection.
All selected settings are cleared. No changes can be made once a programme has started. The programme must be aborted.
3.7 Aborting a programme
▸ Press button.
The programme is aborted. All settings are cleared.
3.8 Interrupting a programme
Through opening the appliance door
▸ Open the appliance door.
The indicator light for the programme selected illuminates. The programme
is interrupted. Laundry can be added.
▸ Close the appliance door.
The indicator light for the programme selected flashes.
▸ Press the flashing programme button.
The programme is resumed.
Through pressing the pause button
▸ Press button.
The programme is interrupted.
▸ Press the button again.
The programme is resumed.
Note: Each time a programme is interrupted, the programme sequence is delayed by
5minutes.
14
Page 15
3 Operating the appliance
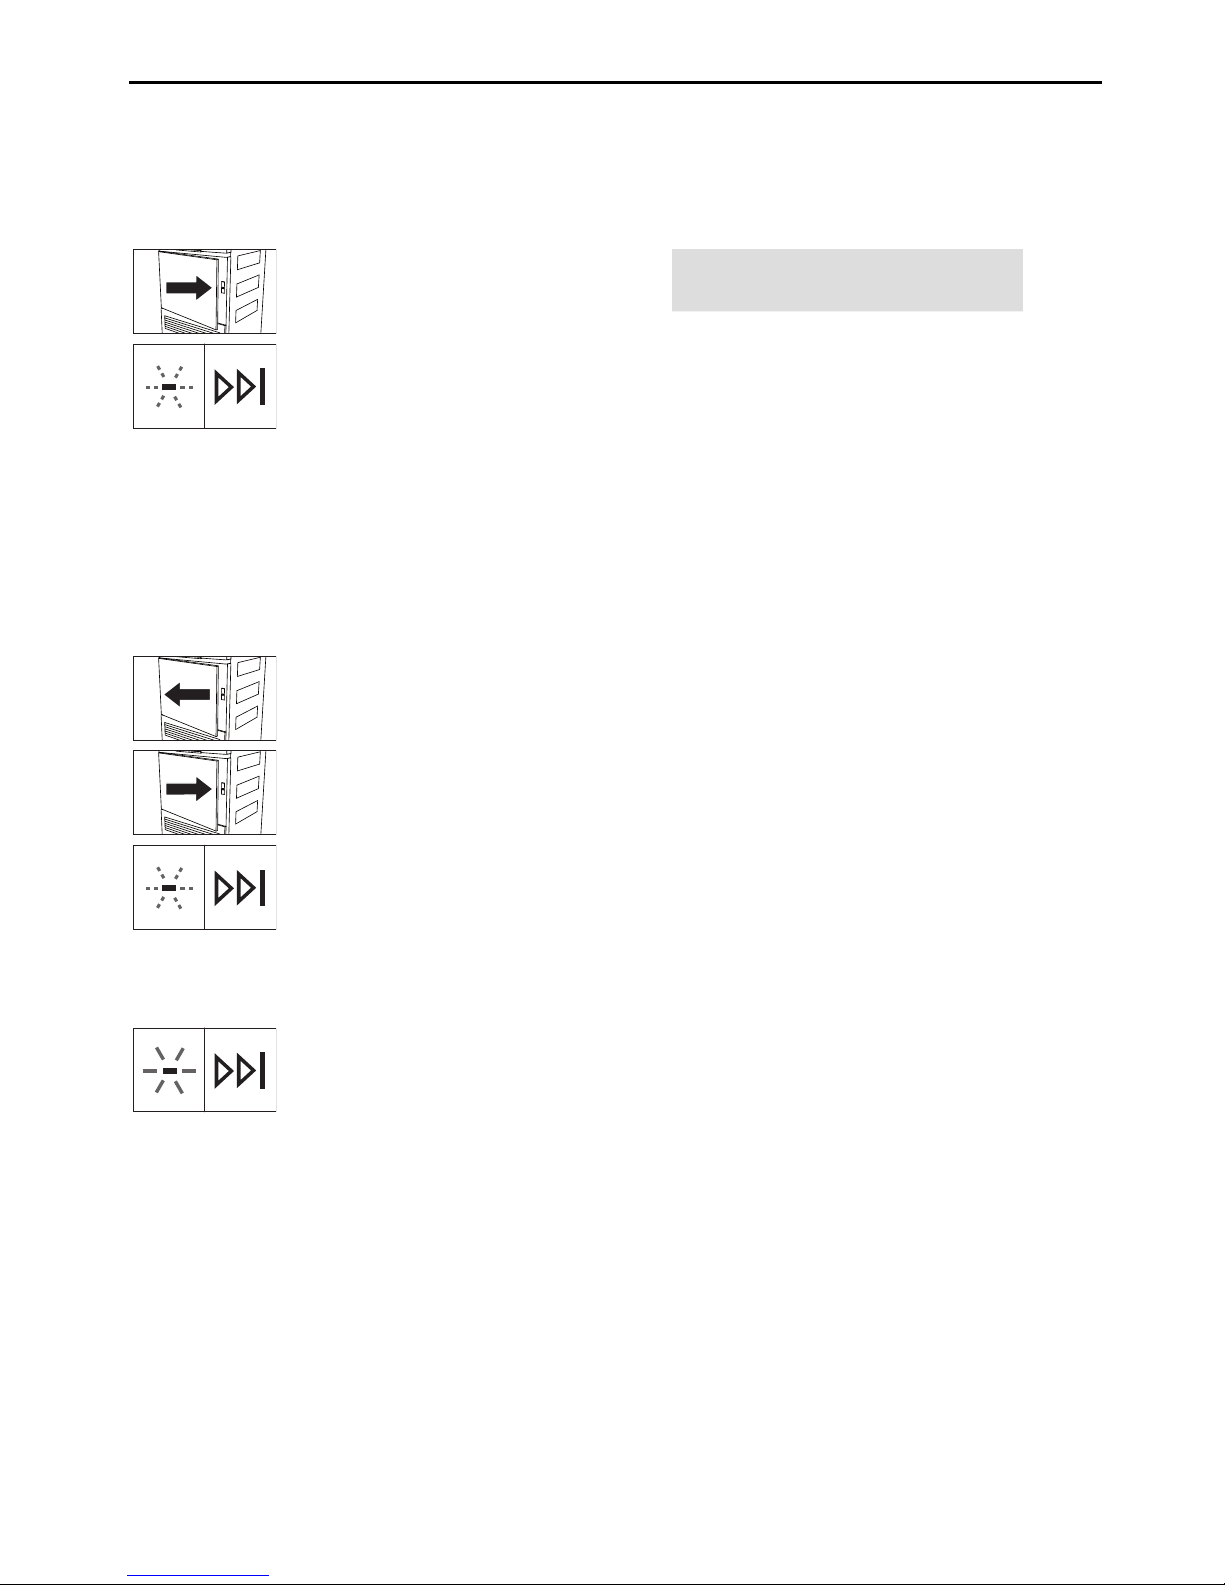
3.9 With childproof lock activated
How to turn the childproof lock on/off is described in «User settings».
Selecting programme
▸ Close the appliance door.
Childproof lock
The following display appears:
▸ Hold the desired, flashing pro-
gramme button depressed
and at the same time press
the «End of programme» button.
After being unlocked, the appliance can be operated normally. The childproof lock is automatically activated as soon as the programme starts.
Interrupting a programme
▸ Open appliance door.
The programme is interrupted. Washing can be added.
▸ Close appliance door.
▸ Hold the flashing programme button depressed and at the same time
press the «End of programme» button.
The programme continues.
Aborting a programme
▸ With the appliance door open or closed, hold the illuminated programme
button depressed and at the same time press the «End of programme»
button.
The programme is aborted.
15
Page 16
3 Operating the appliance
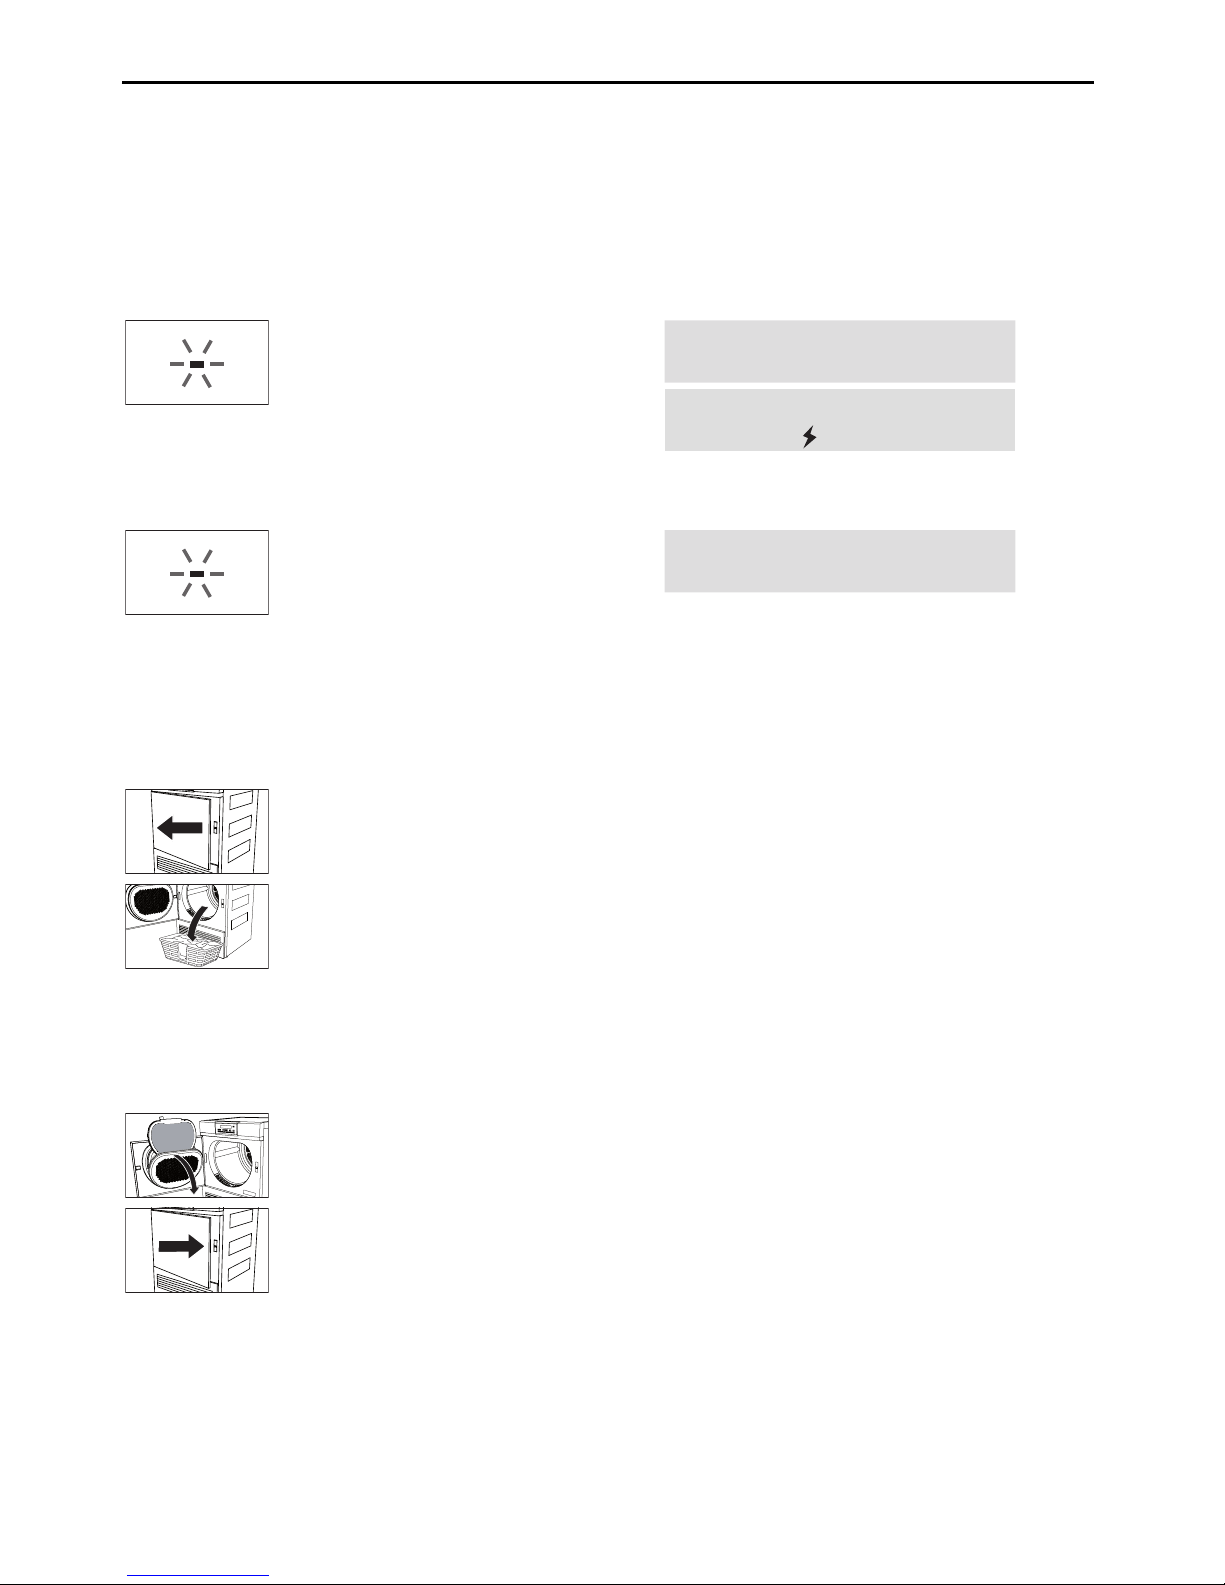
3.10 End of programme
Display
Depending on whether «EcoManagement» has been activated, information on the energy
consumption is displayed when a programme ends.
With «EcoManagement»
The indicator light for the programme that has finished illuminates. The adjacent messages alternate in the display:
End of programme
Clean door filter
1.1kWh
End of programme
Without «EcoManagement»
The indicator light for the programme that has finished illuminates. The adjacent display
appears:
End of programme
Clean door filter
Note: Crease guard starts if the appliance is not unloaded straightaway. When it has finished,
all displays go out.
Unloading the washing
▸ Open the appliance door.
All displays go out.
▸ Unload the laundry.
Note: If the appliance door is opened during the «Final airing» phase, the programme is
aborted. All displays go out.
Each time after use
▸ Clean door filter (see page 20).
▸ Close appliance door.
16
Page 17
4 User settings
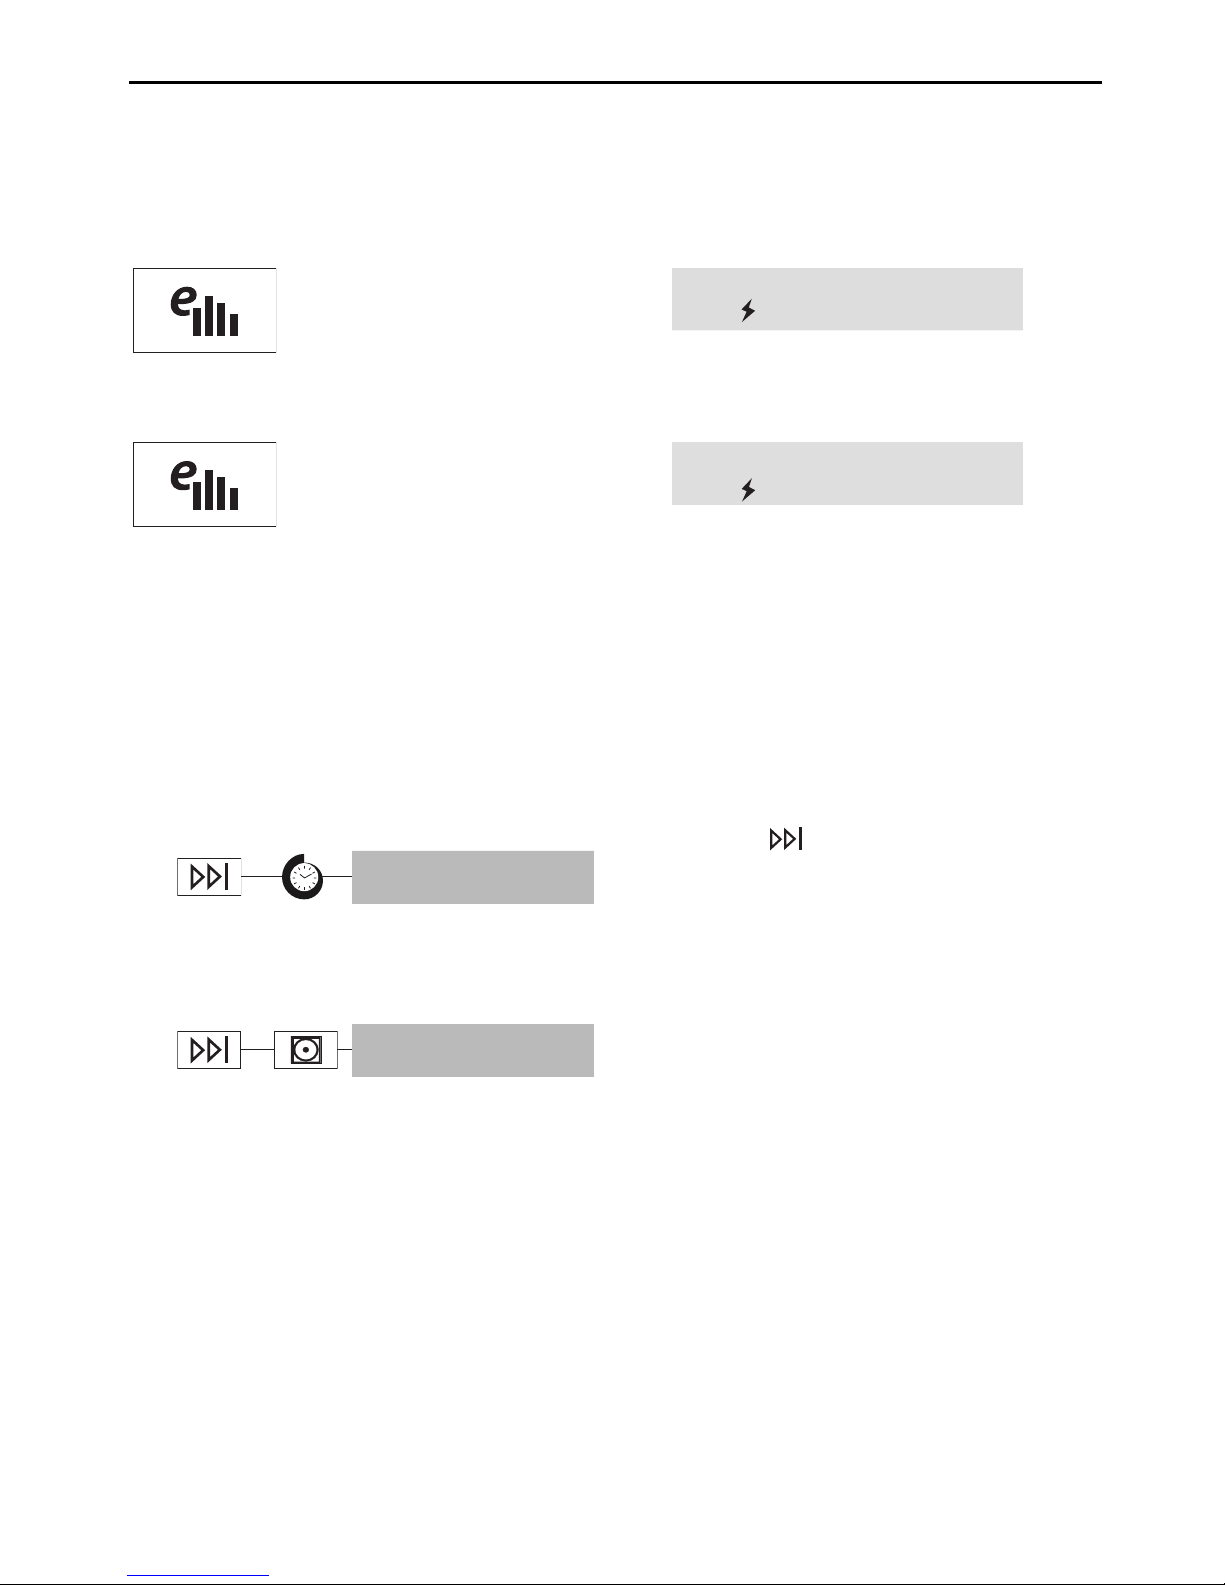
3.11 EcoManagement statistics
Energy consumption can be displayed before a programme starts or after a programme
ends.
Display total consumption
▸ Hold the button depressed for
3seconds.
Total consumption
123 kWh
The adjacent display appears.
Display average consumption
▸ Press the button again.
Average per cycle
0.6kWh
The adjacent display appears.
4 User settings
Providing no programme is running and no error message is displayed, the user settings
can be changed with the appliance door open or closed.
4.1 Preparations
The serial number has to be retrieved before the user settings can be changed.
User settings
FN XXXXX XXXXXX
▸ Hold the button depressed until the
adjacent display appears.
The user settings can be changed.
4.2 Language
1x
Language
D/F/I/R/E
English
The language is set during the initial setup of the appliance. It can be changed.
17
Page 18
4 User settings
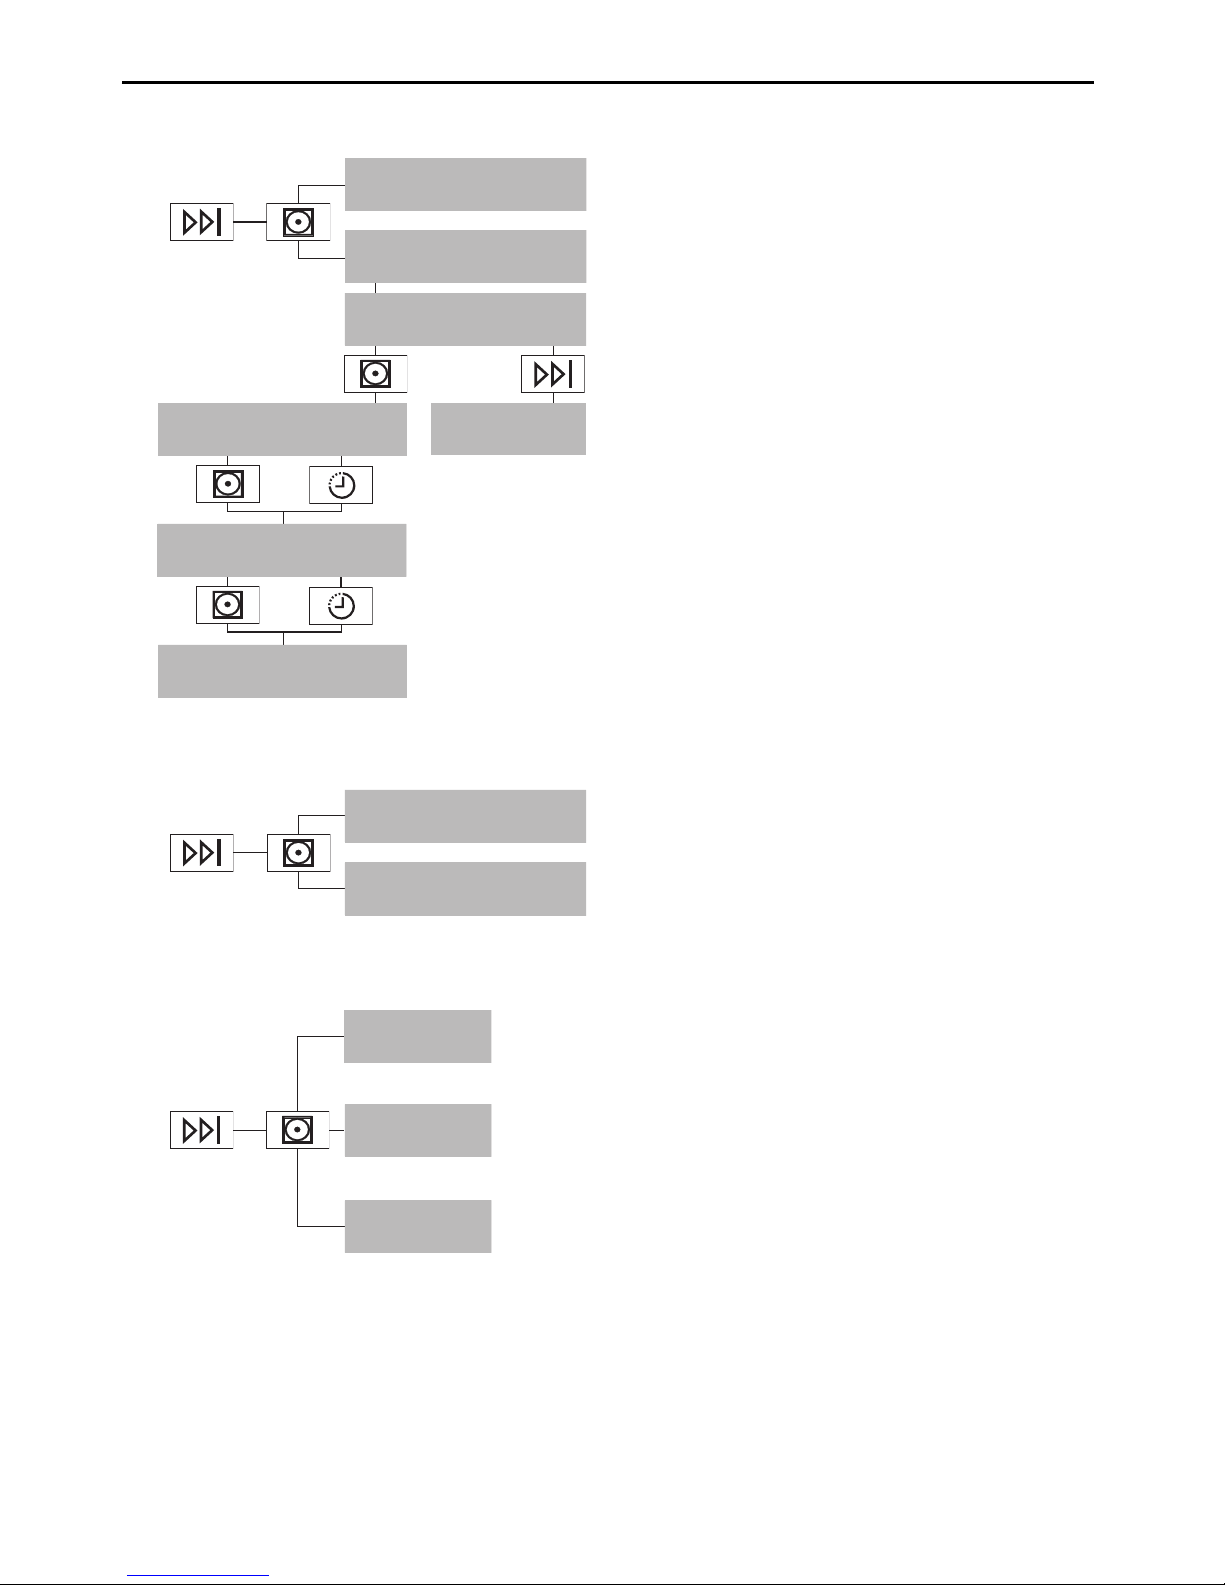
4.3 EcoManagement
Ein
2x
EcoManagement
OFF
EcoManagement
ON
Childproof lock
OFF
EcoManagement
Clear counter?
Clear total consumption?
YES: NO:
Durchschnitt löschen?
JA: NEIN:
Childproof lock
OFF
1
Clear average?
YES: NO:
When this function is activated, expected
consumption values appear at the start
of the programme and actual consumption values appear at the end of the programme. The stored consumption values
can be deleted as well.
4.4 Childproof lock
Ein
3x
Childproof lock
ON
Childproof lock
OFF
1
The childproof lock prevents a programme from being started accidentally.
A programme can only be started by
pressing two buttons at the same time.
4.5 Level of dryness
4x
.....
.....
Level of dryness
1
Very low
final drying
Level of dryness
3
Normal
final drying
1
Level of dryness
5
Very strong
final drying
Change the level of dryness if the washing is not being dried sufficiently or is
being overdried. The new level of dryness applies to all programmes. Very
low final drying is recommended for very
hard water and very strong final drying
for very soft water. Caution! Overdrying
can weaken fabrics!
1
Factory setting
18
Page 19
4 User settings
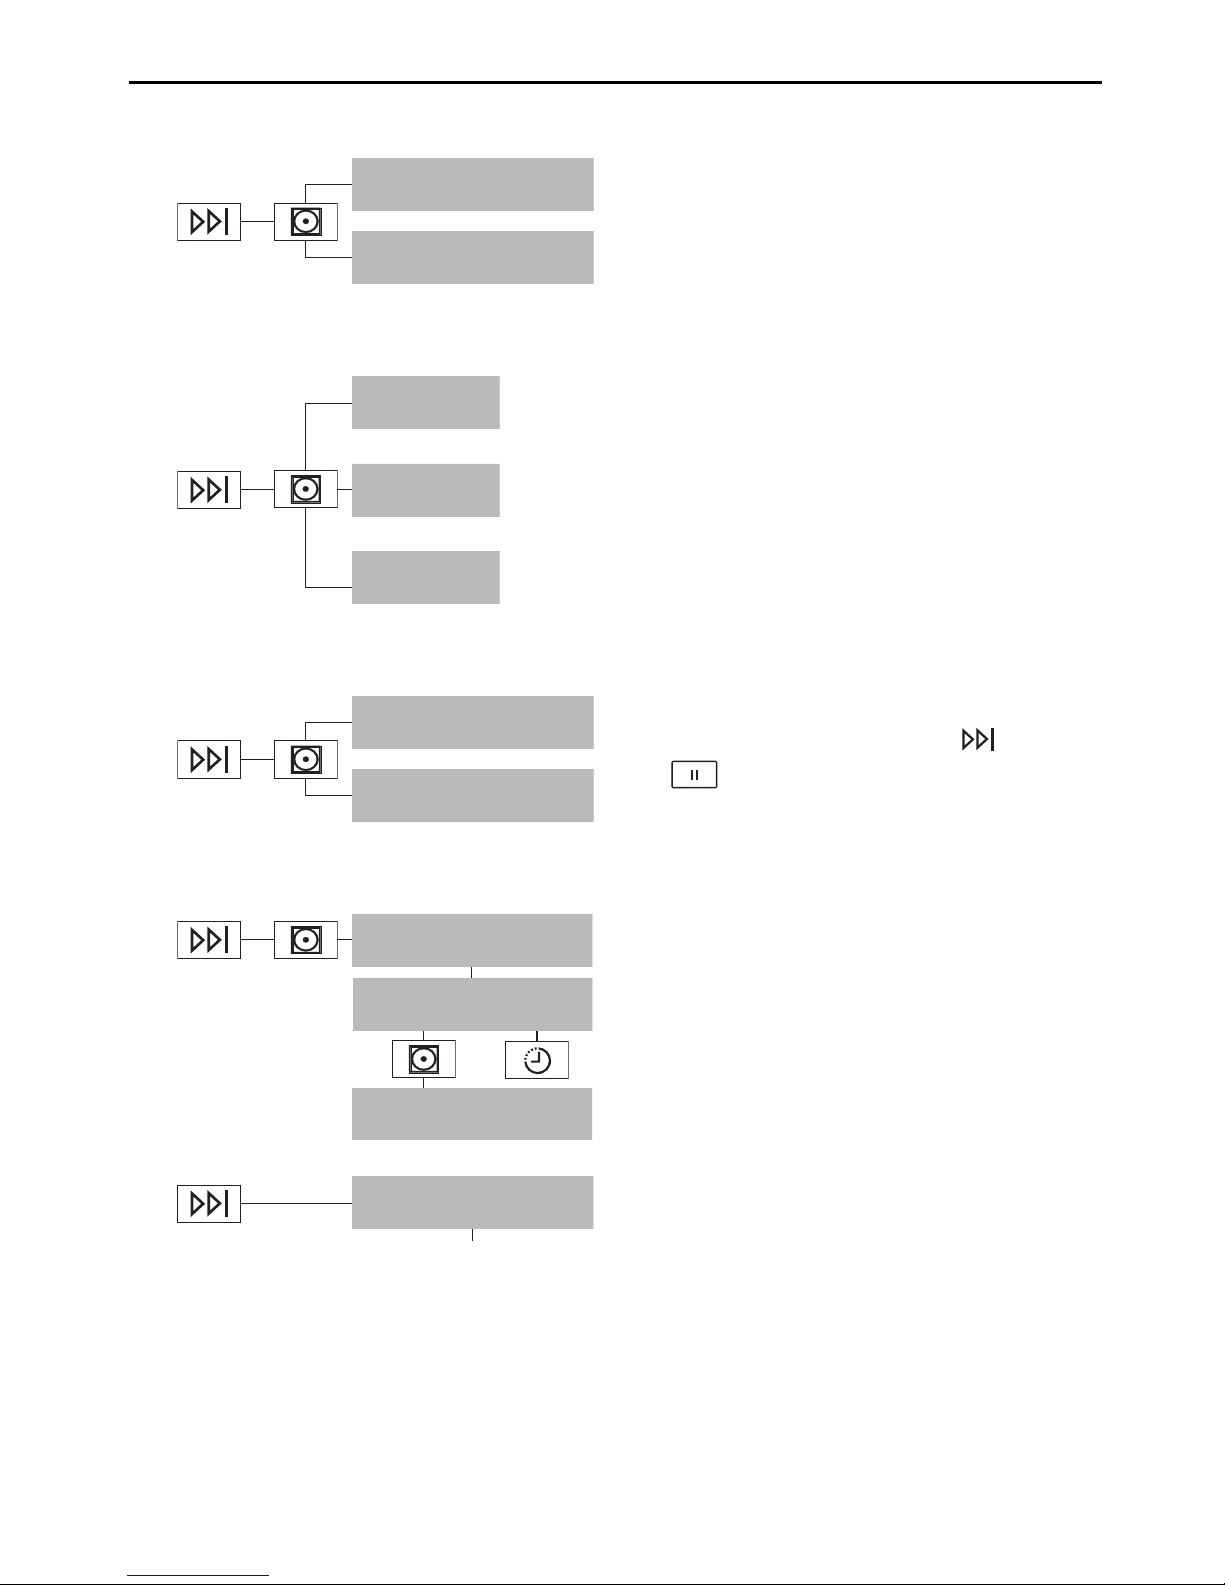
4.6 ReversePlus
Ein
5x
ReversePlus
ON
ReversePlus
OFF
1
When this function is activated, the
washing dries evenly and is less likely to
get tangled.
4.7 Brightness
6x
Very dark
Medium
bright
Very bright
Brightness
1
Brightness
3
Brightness
5
1
...
...
The display can be adjusted to the prevailing lighting conditions.
4.8 Button tone
7x
Button tone
OFF
Button tone
ON
1
The button tone can be turned on and
off. The button tone for the and
buttons cannot be turned off.
4.9 Factory settings
9x
Factory settings
YES: NO:
Factory settings
restore?
Factory settings
restored!
The factory settings can be restored. The
language if changed is not reset to the
factory setting.
10x
Display goes out.
Configuration saved
1
Factory setting
19
Page 20
5 Care and maintenance
5 Care and maintenance
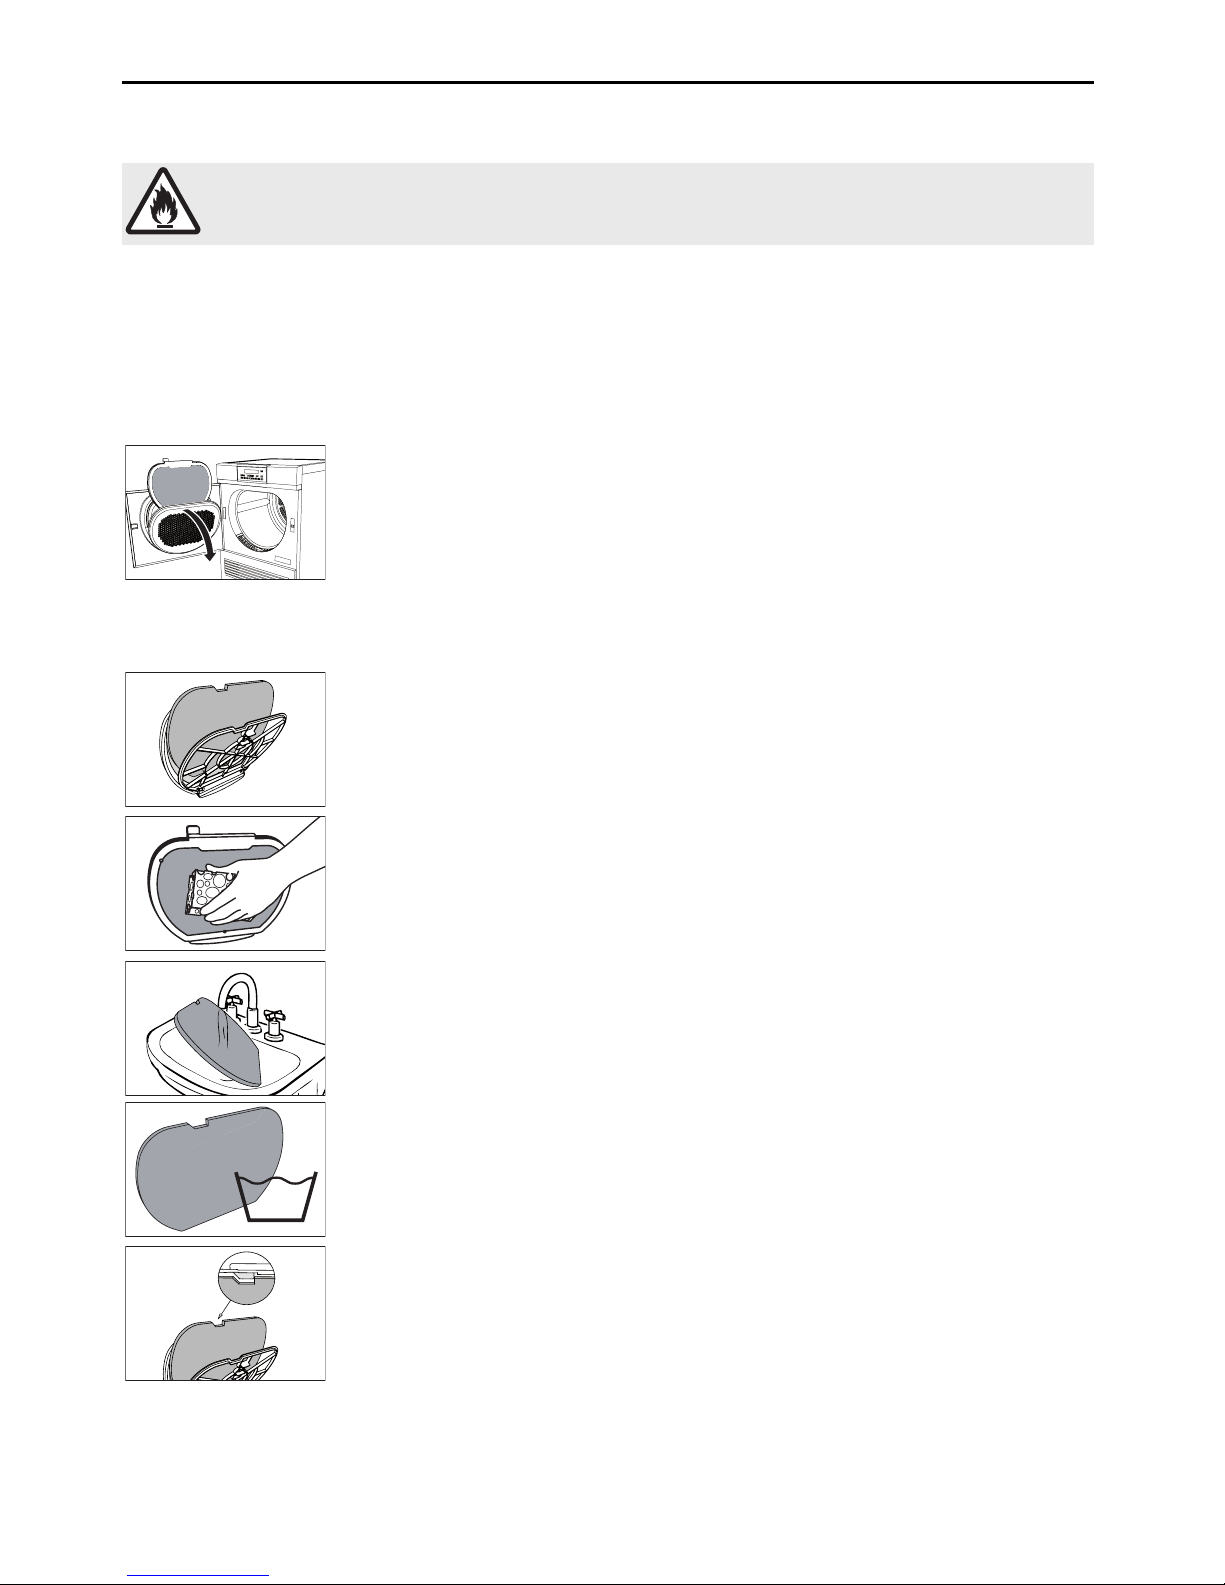
To minimize the risk of fire hazard regularly clean the filters!
A thick coating of fluff can trigger the «A9 Clean filter and mats» (see page 22) error message.
5.1 Cleaning the door filter and door filter mat
Cleaning the door filter (each time after tumble drying)
1
▸ Open appliance door and then open cover for door filter.
▸ Take out the door filter 1 and remove the fluff.
▸ Put back the door filter 1.
▸ Close cover for door filter and close appliance door.
Cleaning the door filter and door filter mat (as required)
2
1
▸ Take out the door filter 1, as described in «Cleaning the door filter».
▸ Open the door filter 1 and take out the door filter mat 2.
1
▸ Hold the door filter 1 up to the light to detect deposits. Clean the door
filter 1 if necessary (with water, a sponge and abrasive liquid cleaning
agent or cleaning vinegar).
2
2
40
▸ Wash the door filter mat 2 under running water or in a washing ma-
chine at 40°C.
Caution! Never clean the door filter mat with a vacuum cleaner!
2
▸ Put the dry door filter mat 2 back into the door filter 1.
▸ Put back the door filter 1.
Note: Ensure the door filter 1 is positioned correctly.
20
Page 21
5 Care and maintenance
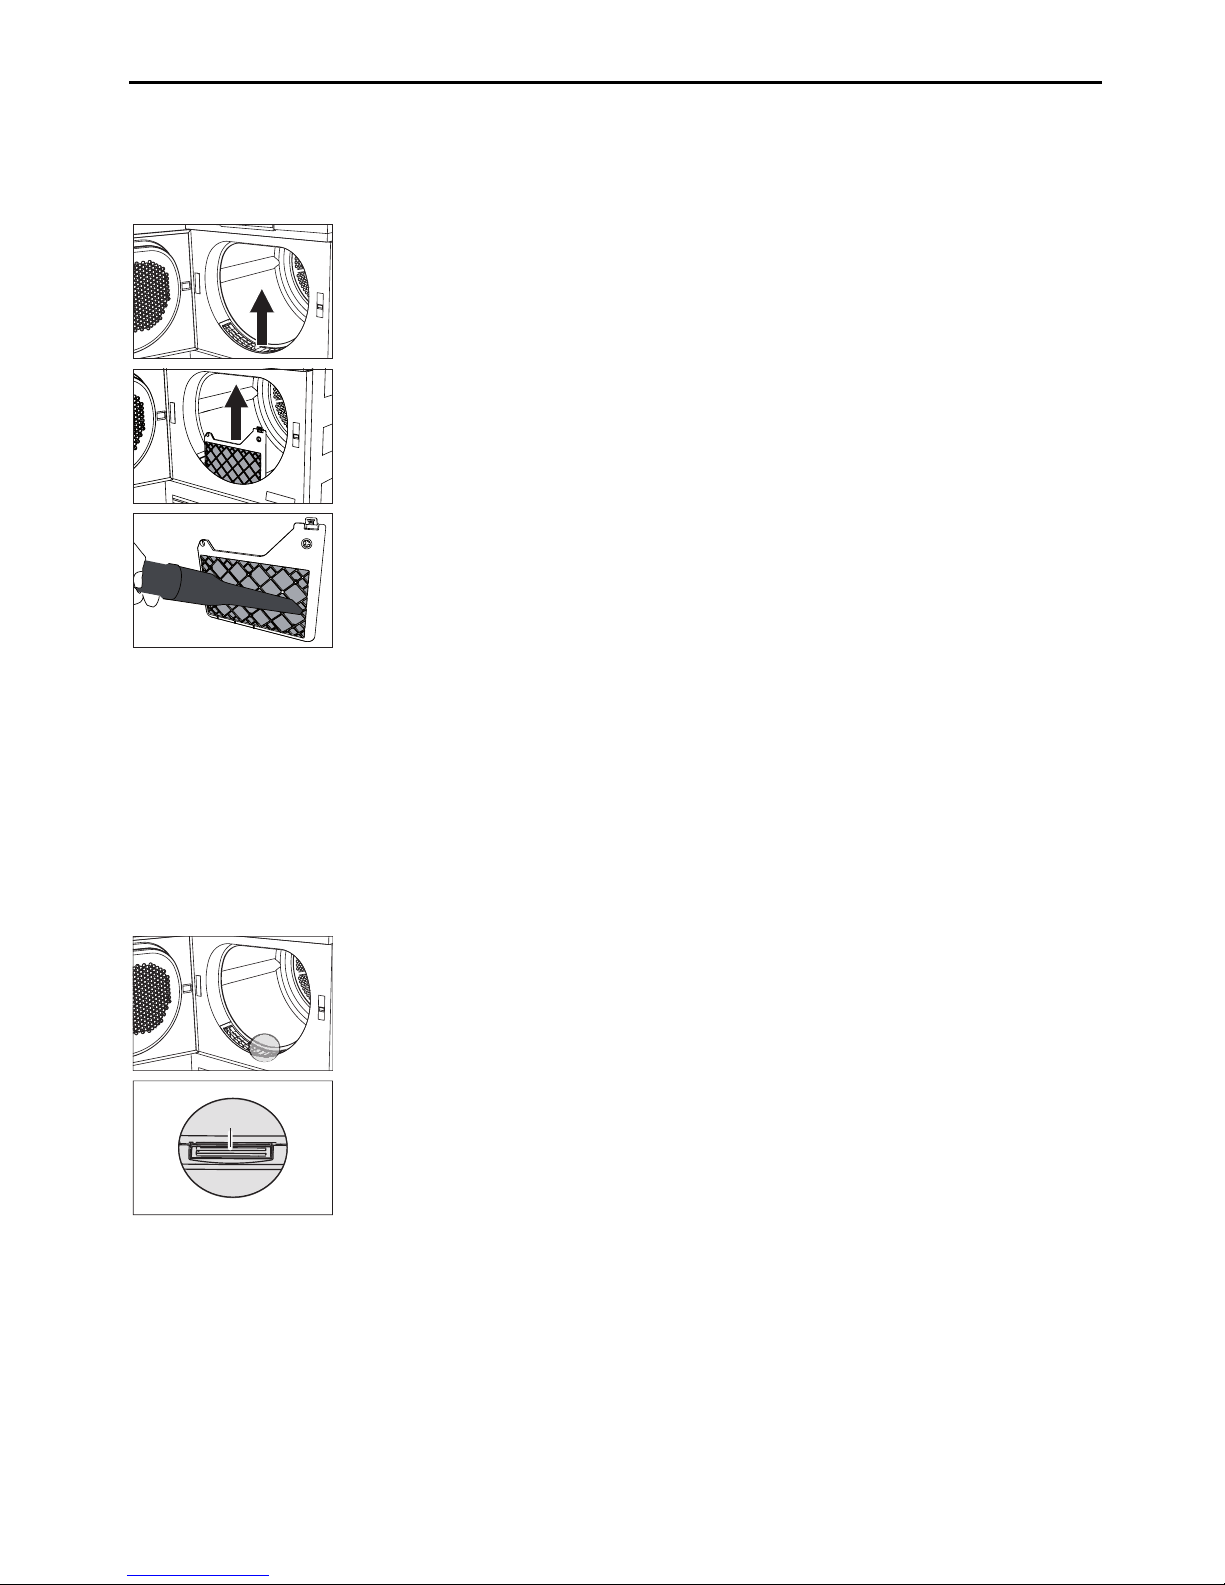
5.2 Cleaning the front filter mat (annually)
If the «A9 Clean filter and mats» error message still appears after the door filter and the door
filter mat have been cleaned, the front filter mat must also be carefully cleaned.
1
▸ Open the appliance door and remove the front grille 1.
2
3
▸ Press the lug 2 down slightly to release and remove the front filter
mat 3.
3
▸ Clean the front filter mat 3 carefully using a vacuum cleaner with the
crevice tool attachment.
▸ Clean the air duct in front of the front filter mat with a vacuum cleaner
or moist cloth if necessary.
▸ Put back the front filter mat 3 and engage. Ensure it is positioned cor-
rectly.
▸ Put back the front grille 1.
Note: The appliance will not start without the front filter mat being cor-
rectly in place.
5.3 Cleaning the moisture sensor
If the «A3» error message appears, the moisture sensor must be cleaned.
1
▸ Open appliance door.
1
▸ Remove any fluff or foreign objects on the moisture sensor 1.
▸ If necessary, clean moisture sensor 1 with a damp cloth and wipe dry.
21
Page 22
6 Trouble-shooting
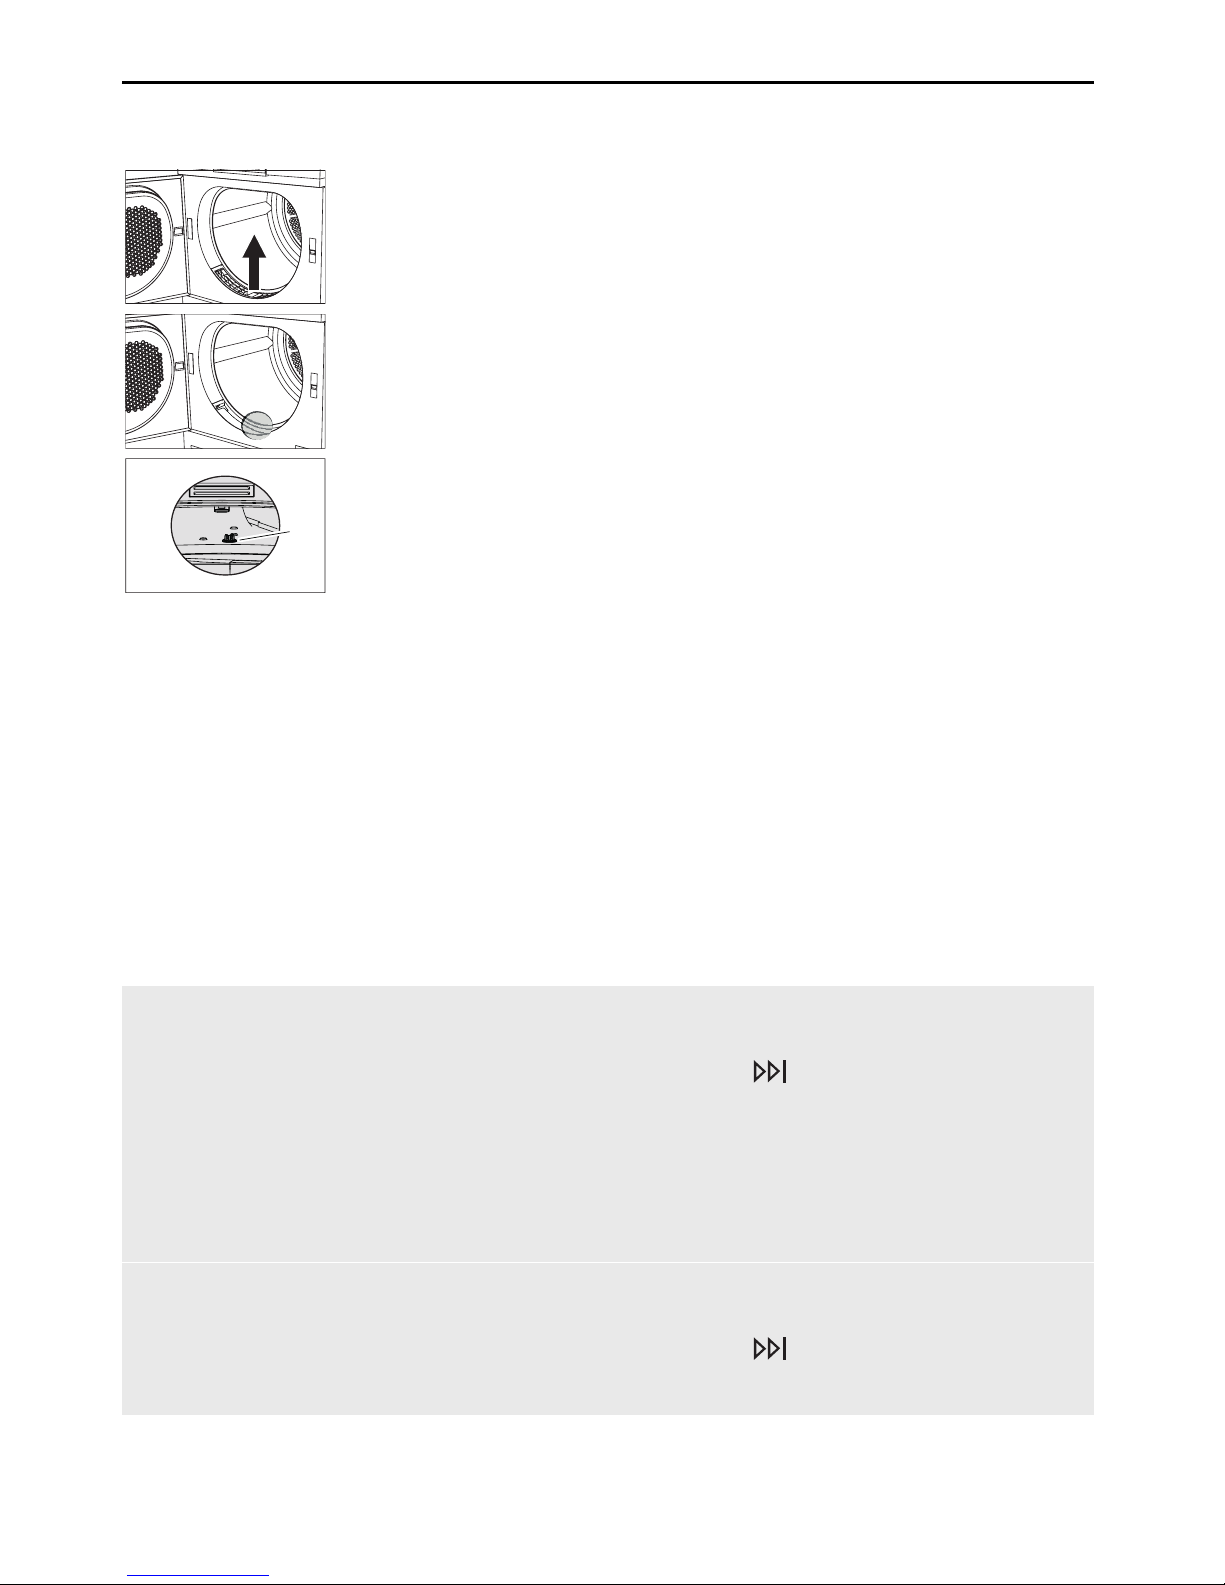
5.4 Cleaning the temperature sensor
1
▸ Open the appliance door and remove the front grille 1.
2
▸ Clean the temperature sensor 2 with a damp cloth.
▸ Put back the front grille 1.
2
5.5 Cleaning the appliance
▸ Wipe the outside of the appliance from time to time with a damp cloth and wipe dry.
6 Trouble-shooting
You may be able to trouble-shoot the following errors yourself. If not, note down the error
message in full (message, F and E numbers) and call Customer Services.
6.1 Error messages
Display Possible cause Solution
A0 Check outlet ▪ The drain hose is
blocked, kinked or defective.
▪ The pumping height of
the drain hose is too
high (>1.2 m).
▪ The appliance is con-
nected to a concealed
double drain trap.
▸ Check part of drain hose that is not
housed in appliance.
▸ Press the button.
▸ Restart the programme.
A3 Clean moisture sensor
▪ Moisture sensor is
dirty or wet.
▸ Clean moisture sensor and then wipe dry
(see page 21).
▸ Press the button.
▸ Restart the programme.
22
Page 23
6 Trouble-shooting
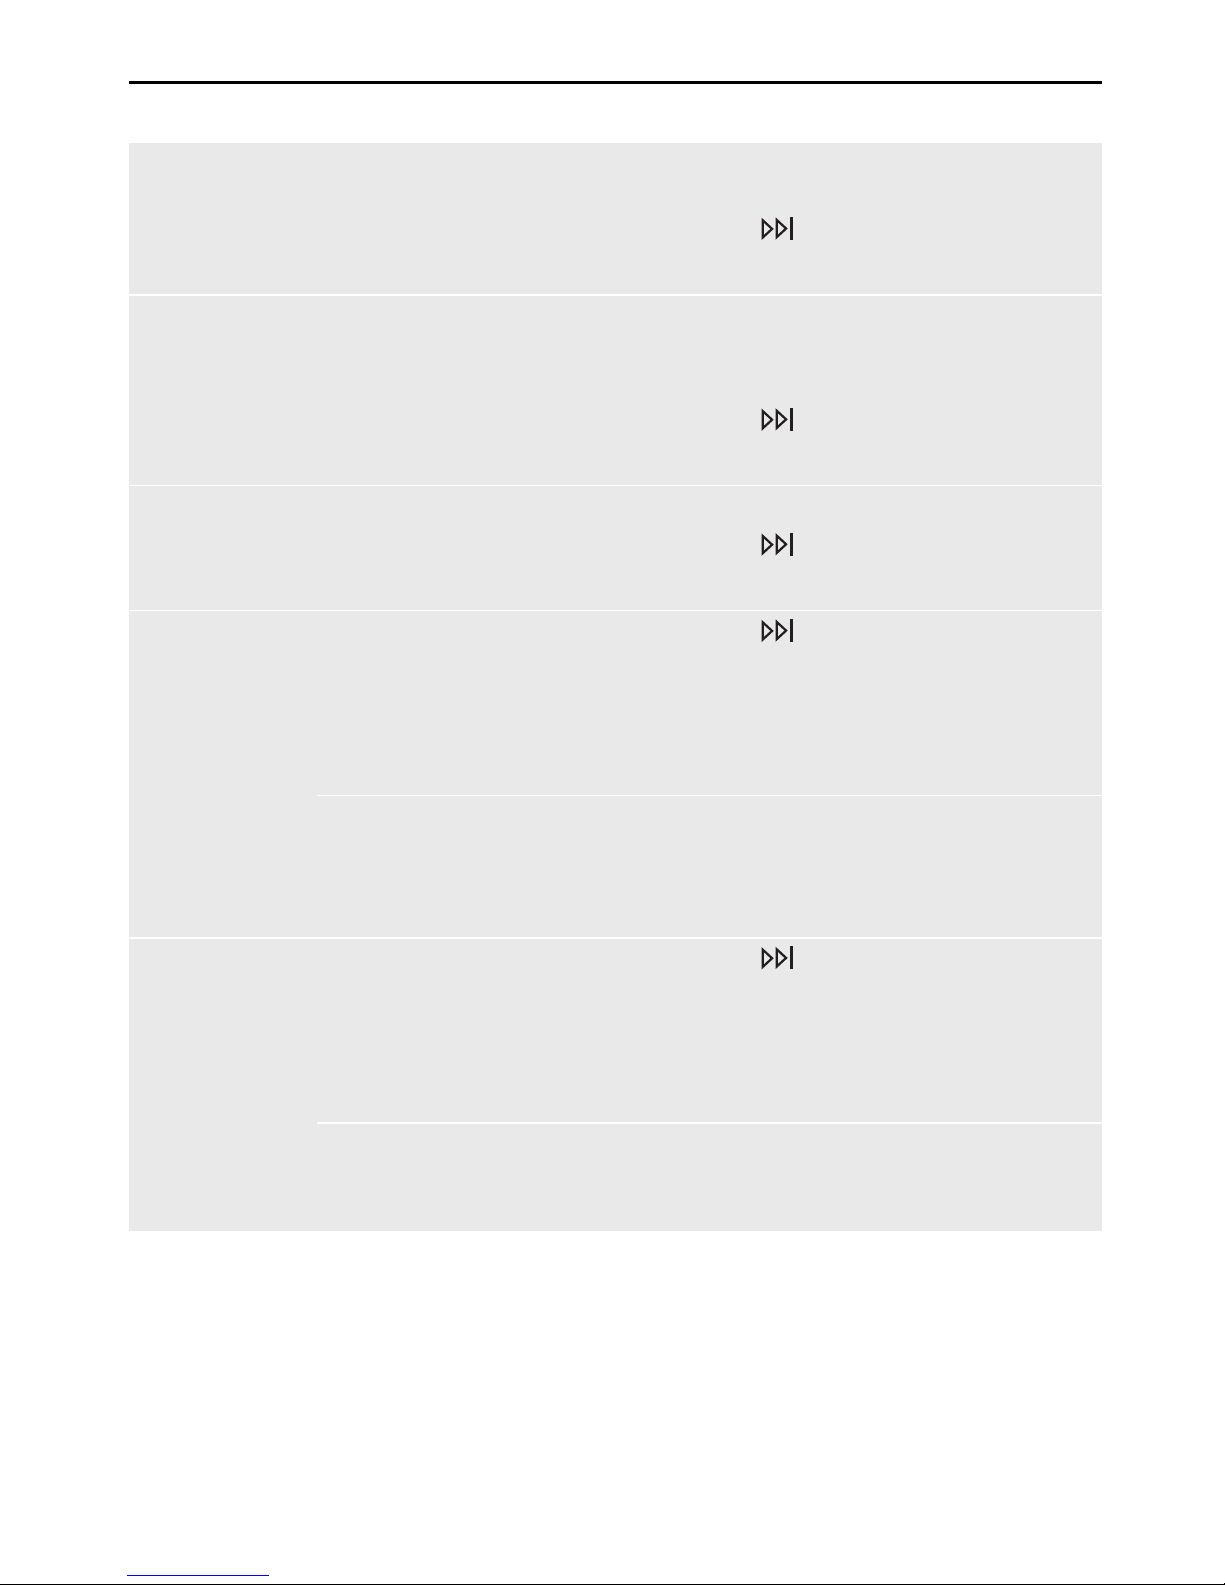
Display Possible cause Solution
A9 Clean filter
and mats
▪ Door filter, door filter
mat or front filter mat
are blocked.
▸ Check and
clean (see page 20) parts.
▸ Press the button.
▸ Restart the programme.
Insert door filter /
close appliance
door
▪ The door filter is miss-
ing.
▪ The appliance door is
open.
▸ Insert door filter (ensure it is positioned
correctly).
▸ Close the appliance door.
▸ Press the button.
▸ Restart the programme.
Insert front mat ▪ The front filter mat is
not inserted correctly.
▸ Insert front filter mat correctly.
▸ Press the button.
▸ Restart the programme.
FXX/EXX see instructions
FN XXXXX
XXXXXX
▪ Various situations can
lead to this error message.
▸ Press the button.
▸ Switch off the power supply for about
1 minute.
▸ Switch the power supply back on again
and select a new programme.
▪ If the error appears
again:
▸ Note down error message in full and appli-
ance's FN.
▸ Switch off the power supply.
▸ Call Customer Services.
UXX/EXX see instructions
FN XXXXX
XXXXXX
▪ Overvoltage (U1)
▪ Undervoltage (U2)
▸ Press the button.
▸ Switch off the power supply for about
1 minute.
▸ Switch the power supply back on again
and select a new programme.
▪ If the error appears
again:
▸ Disconnect from the power supply.
▸ Have an electrician check the house in-
stallation.
23
Page 24
6 Trouble-shooting
6.2 Other possible problems
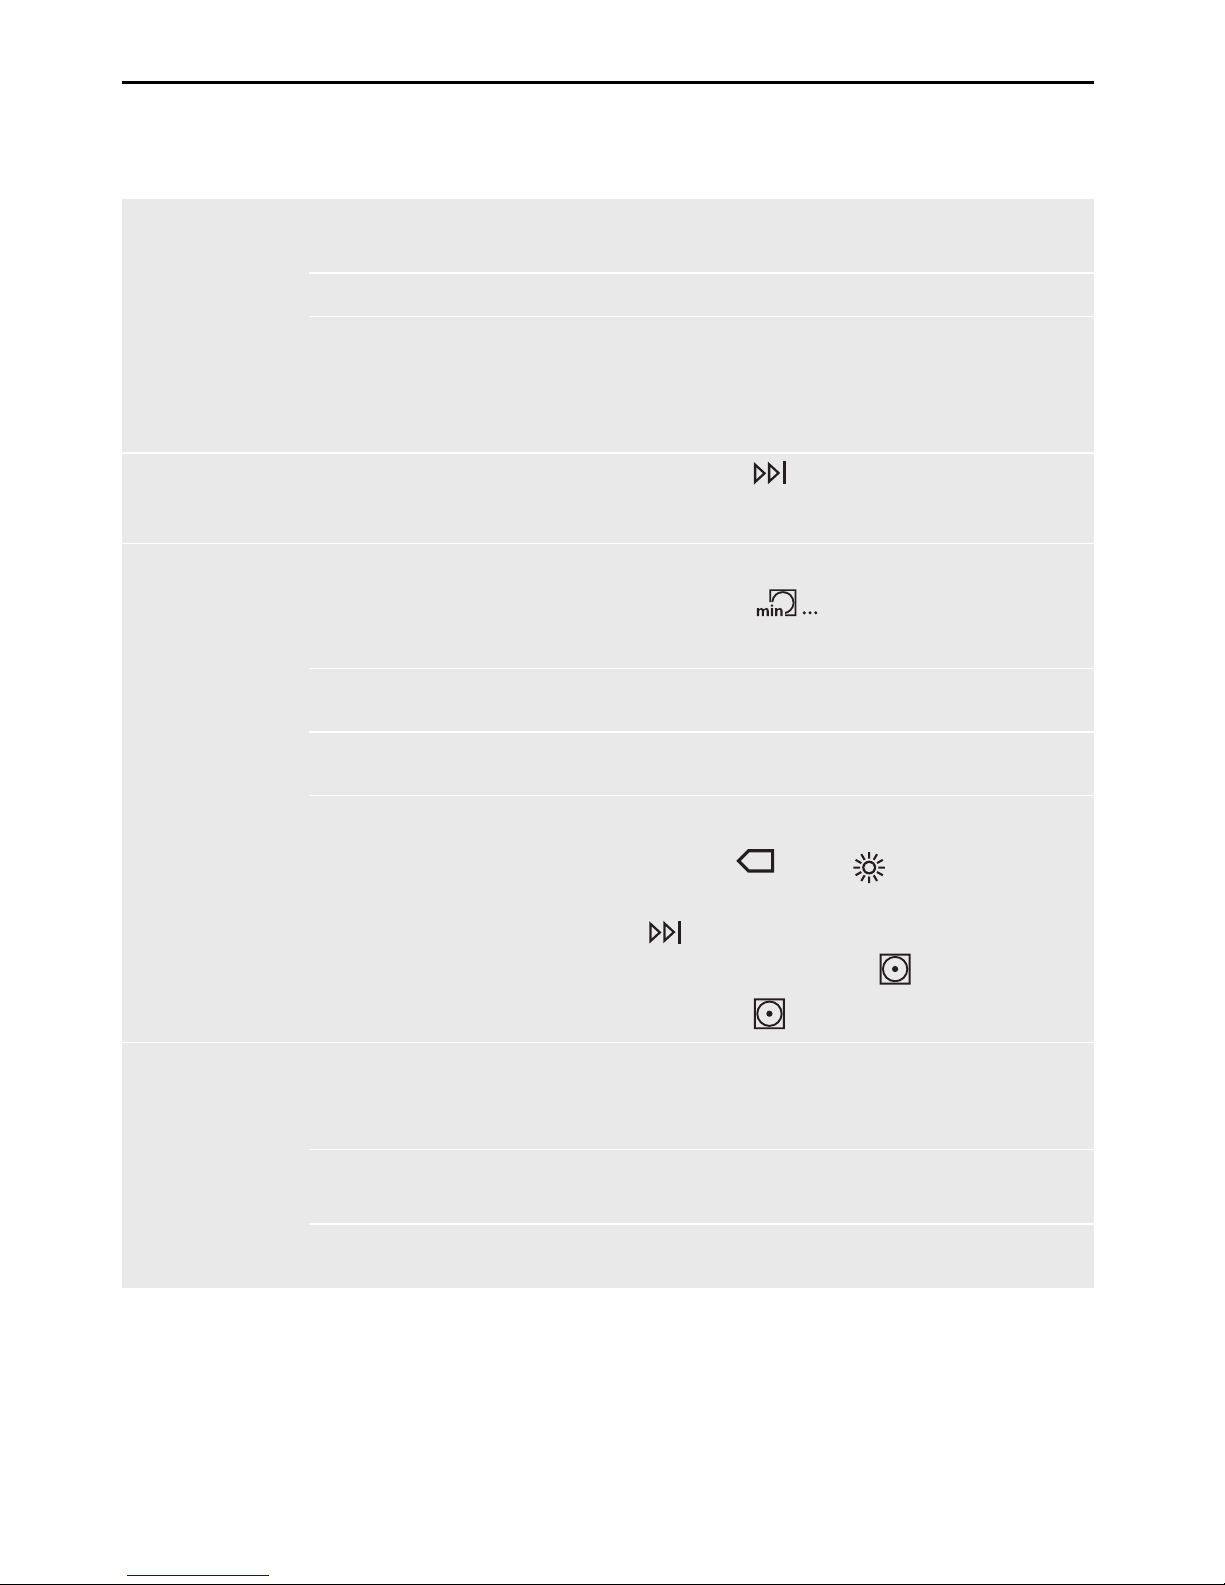
Problem Possible cause Solution
The programme
takes significantly longer than
indicated.
▪ Door filter and/or door
filter mat are blocked.
▸ Clean (see page 20) door filter and/or
door filter mat.
▪ Very wet washing.
▸ Spin washing at higher speed.
▪ The ambient temperat-
ure is too high or too
low.
▸ Improve circulation and ventilation of air in
room.
▸ Ensure that the temperature of the room is
between 5 and 35°C.
No new programme can be
selected.
▪ A programme was in-
terrupted.
▸ Press the button.
▸ Select a new programme.
The washing is
not dry enough.
▪ Mixed laundry load. ▸ Select a longer programme.
▸ Select the programme.
▸ Change the level of dryness.
▪ Interruption in power
supply.
▸ Check the mains plug, lead and fuses.
▪ The moisture sensor is
dirty.
▸ Clean (see page 21) the moisture sensor.
▪ The «demo mode» is
activated.
▸ Open appliance door.
▸ Hold the and buttons de-
pressed and at the same time press the
button. «Demo mode on/off» appears
in the display and the button flashes.
▸ Press the button.
The duration remaining indicator
remains frozen
for a longer
period.
▪ Not yet reached level
of dryness required.
▸ No action is necessary. The indicator will
run automatically once the level of dryness
is reached.
▪ Wash load very mixed.
▸ No action is necessary. The indicator will
run automatically in a while.
▪ Build-up of fluff in door
filter.
▸ Clean (see page 20) the door filter.
24
Page 25
7 Spare parts
Problem Possible cause Solution
The progress of
the programme
remains frozen at
«Final airing» for
a longer period.
▪ The laundry is being
cooled down.
▪ A high ambient tem-
perature extends the
cooling-down phase.
▸ No action is necessary. The laundry can
be unloaded at any time as long as it is
then spread out to cool down.
▪ The temperature
sensor is dirty.
▸ Clean (see page 22) the temperature
sensor.
The appliance
will not start.
▪ The appliance door is
open.
▸ Close the appliance door.
▪ Door filter or front filter
mat are missing.
▸ Insert door filter or front filter mat and en-
sure it is positioned correctly.
▪ Interruption in power
supply.
▸ Insert plug into mains socket.
▸ Turn wall switch on.
▸ Check fuse or circuit breaker.
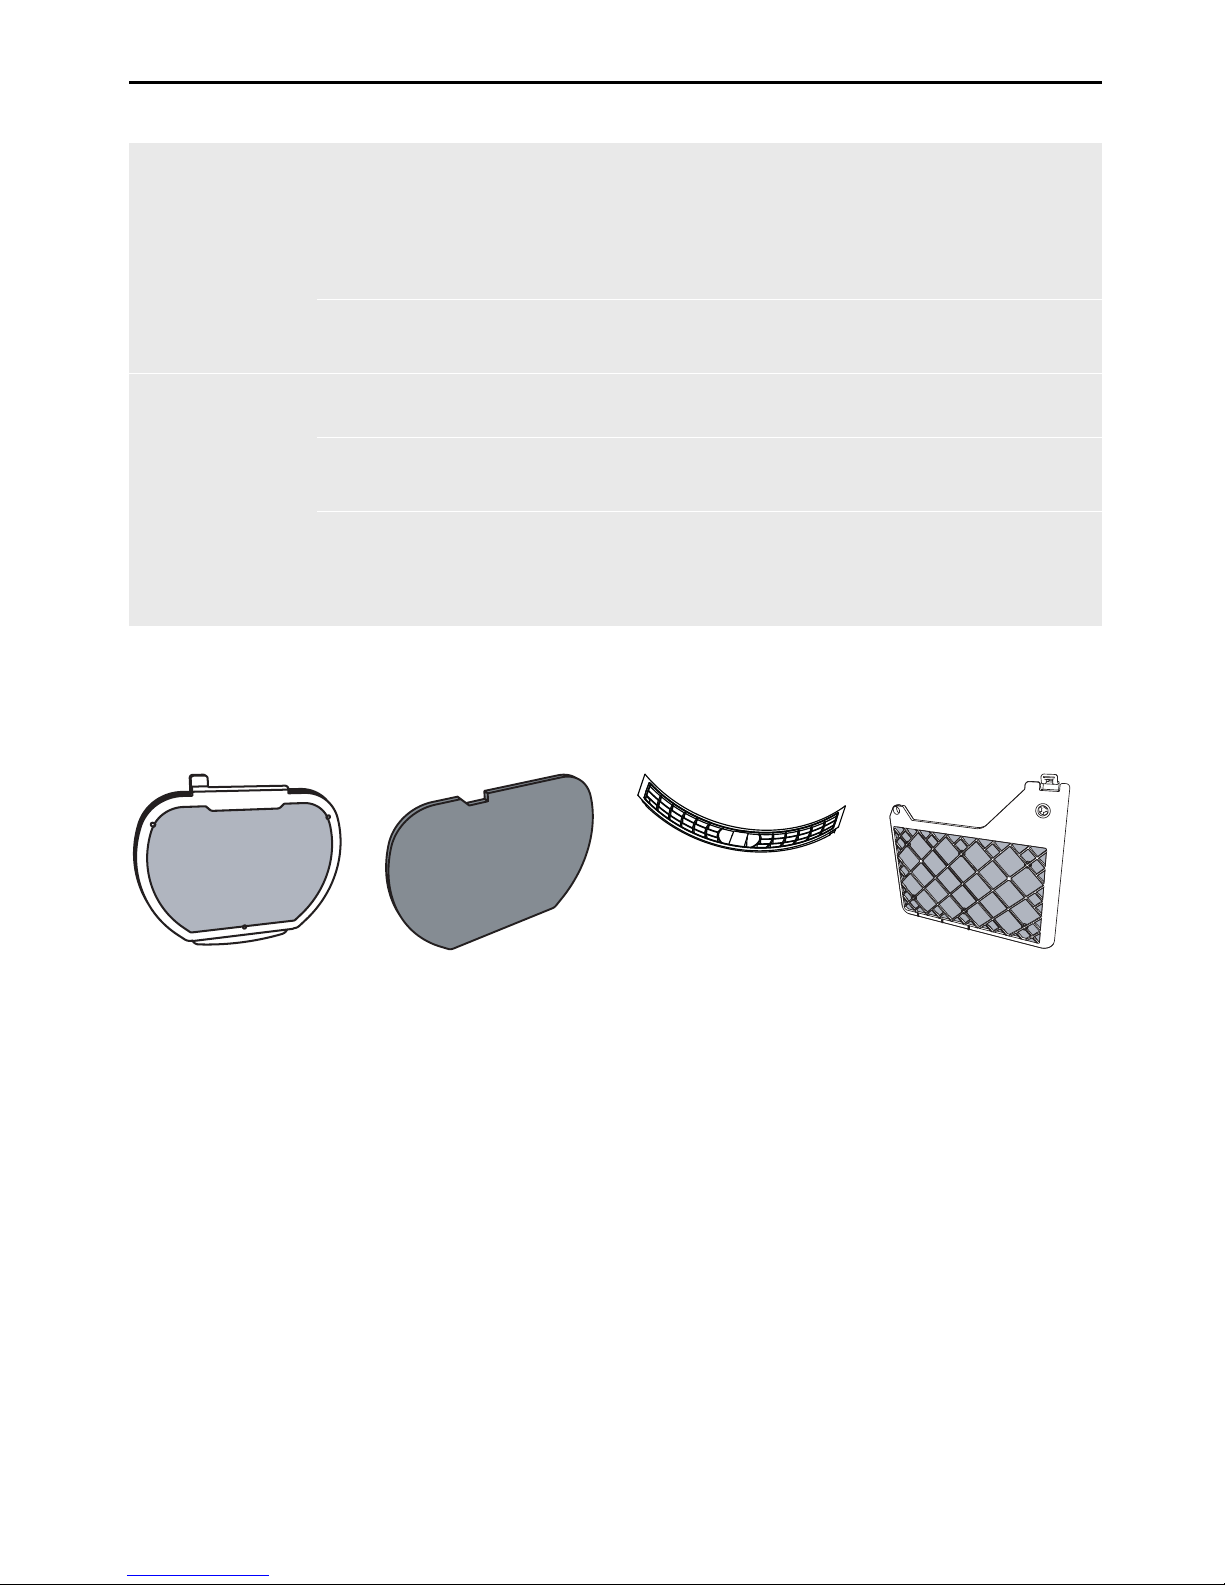
7 Spare parts
Please give model number and exact designation when ordering parts.
Door filter Door filter mat Front grille Front filter mat
25
Page 26
8 Technical data
8 Technical data
Dimensions Ambient conditions
Height 85cm Permissible room temperature
when appliance is in operation: 5°C to 35°C
Width 59.5cm
Depth 61cm
Weight 65kg
Electrical connection
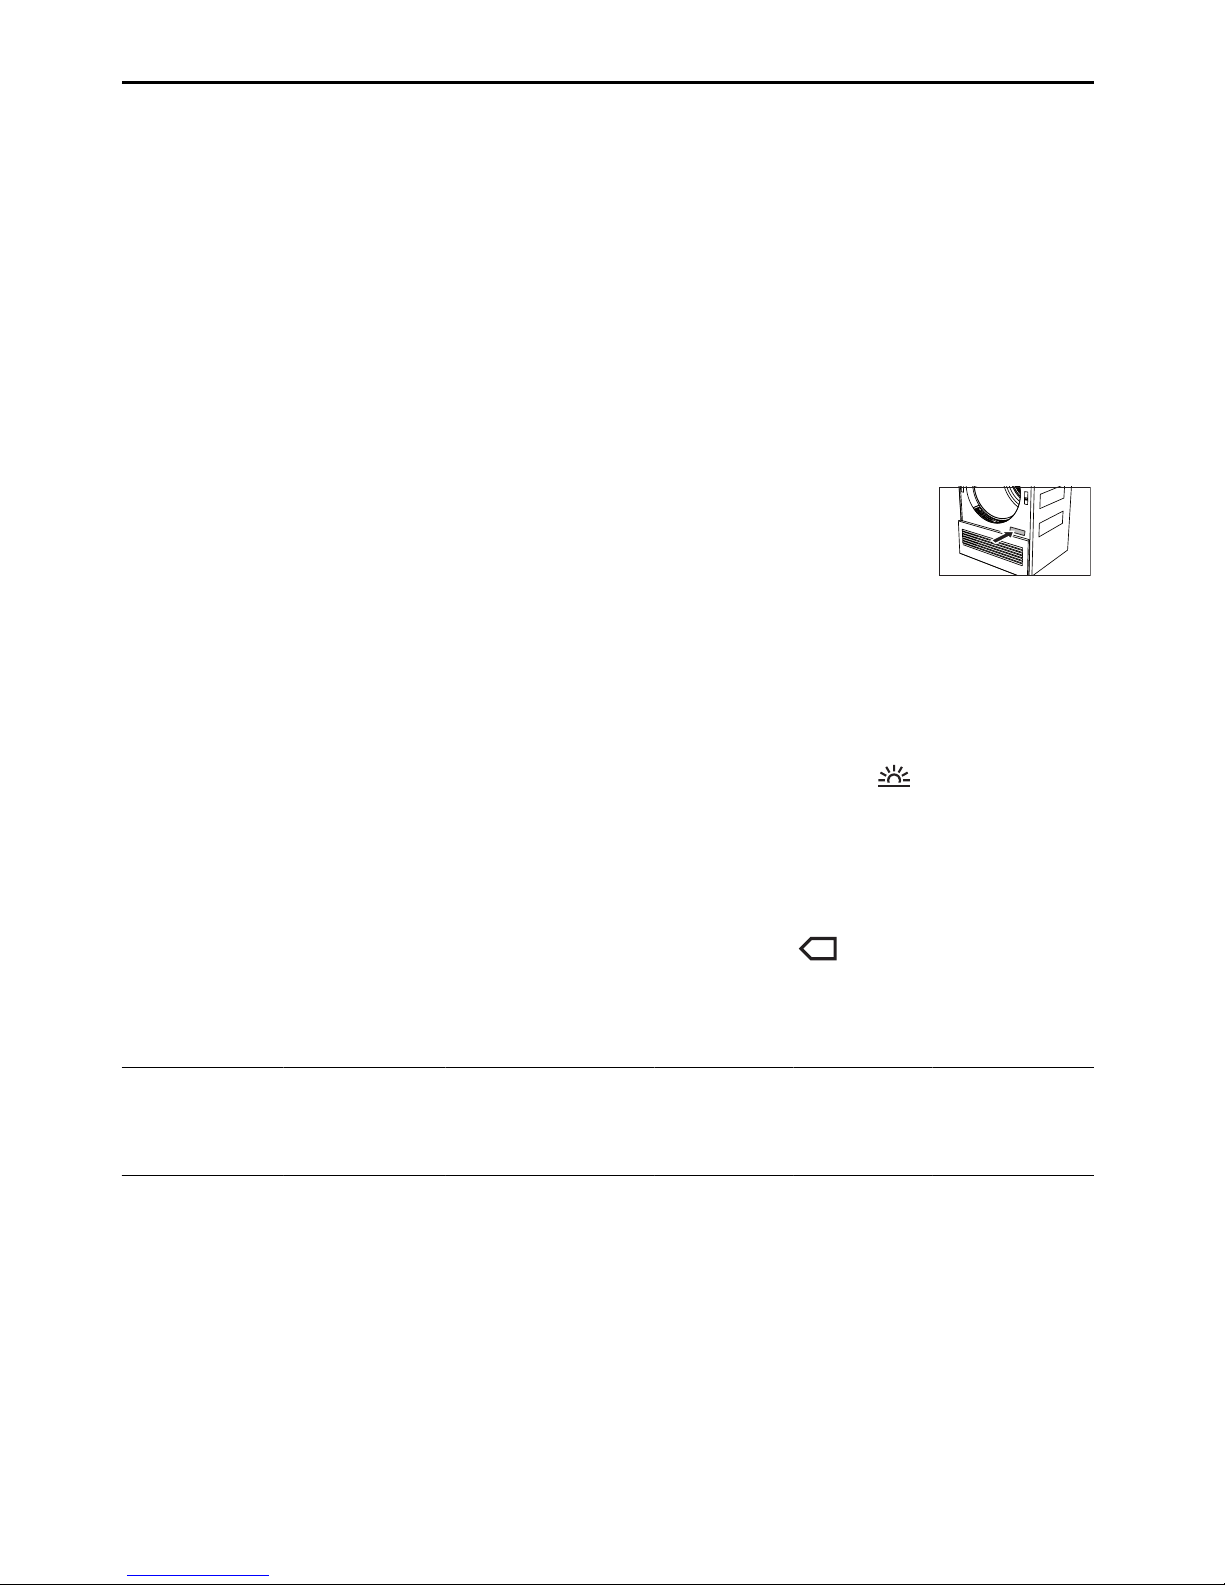
Pumping height of pump 1.2m See identification plate:
▸ Open the appliance door.
Dry load capacity 7kg
The identification plate is
located bottom right.
8.1 Note for testing institutes
▸ The appliance must be connected to the electricity supply for at least 5 minutes before
taking measurements.
▸ The declaration data can be determined correctly only after a run-in phase of 5 complete
drying programmes with washing (automatic programme: normal dry ).
▸ Wash the door filter each time after completing a drying programme.
▸ Set to the standard programme according to AS/NZS 2442.2:2000:
Programme Load capacity
Standard programme 7kg
▸ Press the button.
Data for the standard programme
Load capacitykgProgramme
duration
hrs./mins.
Energy
star rating
Energy con-
sumption
kWh
7 2h42 9 1.66
26
Page 27

8 Technical data
8.2 Consumption values
The stated values for the programme duration and energy apply for the maximum stated capacity with a wash spun at around 1200 rpm (corresponds to a moisture level of around
60%). A higher spin speed or a smaller load reduce them by around 20–30%.
Automatic programmes
Programme Load
capacity
kg
Residual moisture
%
Programme
duration
hrs./mins.
Energy
kWh
Extra dry 1–7 –4 to –1 2h30 1.50
Normal dry 1–7 –1 to 2 2h03 1.23
Iron dry 1–7 8 to 16 1h40 0.98
Damp 1–7 20 to 30 1h20 0.74
Fabric types
Programme Load
capacity
kg
Residual moisture
%
Programme
duration
hrs./mins.
Energy
kWh
Airing 1–1.5 – 0h10 0.03
Silks 1–1.5 0 to 2 0h40 0.31
Crease guard 1 – 0h20 0.10
Shirts 1–7items 0 to 2 0h35 0.27
Outdoor garments 1–3 0 to 2 1h05 0.59
Denim 1–4 –1 to 2 1h45 1.03
Baby garments 1–5 –1 to 1 2h10 1.24
Thin down filling 1–2 –1 to 1 2h00 1.20
Thick down filling 1–2 –1 to 1 2h40 1.50
Towelling 1–3 –1 to 1 1h25 0.82
Bedding 1–3 –1 to 1 1h30 0.81
Woollens 1 0 to 5 1h10 0.56
27
Page 28

9 Drying tips
9 Drying tips
9.1 Saving energy
▪ Spin the washing in the washing machine at a high spin speed before tumble drying.
Mechanical draining in the washing machine is much more efficient than water evaporation
in the tumble dryer.
▪ Clean the door filter and the filter mats regularly. Dirty fluff filters block the air flow and re-
duce the appliance's efficiency.
▪ Where possible fill the drum to the maximum load capacity of the relevant programme.
▪ Select «EcoManagement» to find efficient programmes.
9.2 Avoiding damage
▪ Follow the fabric care symbols on garment labels.
▪ For the wash, it is recommended that fabric conditioners, tumble dryer sheets or other fab-
ric care solutions not be used. These can lead to the formation of a visible film in the
drum.
▪ Remove foreign objects and larger parts made of metal or hard plastic (e.g. buckles,
stones, detergent dosing aids) before tumble drying. These can dent the drum.
▪ Fasten hook and eye fasteners and zips. These can damage the laundry and the drum.
▪ Fasten cloth belts, apron ties and duvet and pillow cases to avoid them getting tangled up.
28
Page 29
10 Disposal
10 Disposal
10.1 Packaging
Never allow children to play with packaging material due to the danger of injury or
suffocation. Store the packaging material in a safe location or dispose of it in an
environmentally-friendly way.
10.2 Safety
Render the appliance unusable to prevent accidents caused by improper use (e.g. through
children playing):
▸ Disconnect the appliance from the mains. With a fixed appliance, this is to be carried out
by a qualified electrician. Then cut the mains cable off flush with the appliance.
▸ Remove or disable the lock on the appliance door.
10.3 Disposal
▪ The «crossed‐out wheeled bin» symbol requires the separate collection of waste
electrical and electronic equipment (WEEE). Such equipment can contain hazardous, environmentally harmful materials.
▪ These appliances are to be handed over to a designated collection point for the recycling
of electrical and electronic equipment and must not be disposed of with unsorted household waste. And in this way, you will be helping to protect resources and the environment.
▪ For more information, please contact the local authorities.
10.4 Note on heat pump
This appliance is CFC-free (the cold circuit contains R134a).
29
Page 30

30
11 Notes
Page 31

31
Page 32
12 Quick instructions
Please first read the safety precautions in the operating instructions!
To start programme:
▸ Open appliance door.
▸ Check door filter.
▸ Load laundry.
▸ Close the appliance door.
▸ Select programme and any additional
functions (if required). Programme
starts automatically after 20seconds.
When programme has finished:
▸ When «Clean door filter» appears in the
display, unload the dry laundry.
▸ Clean door filter.
▸ Close appliance door.
13 Services & support
Register your appliance today online via
our website at www.vzug.com and benefit
from the best possible support in the event
of a malfunction – including during the
manufacturer's 2-year warranty period. You
will require the serial number (FN) and appliance designation to register your appliance. You will them on the identification
plate of your appliance.
Your repair order
You can find the telephone number of the
nearest V-ZUG service centre to you under
www.vzug.com→Service→Service hotline.
General queries, accessories and service
agreement
V-ZUG will be happy to help you with any
general administrative or technical queries,
to accept your orders for accessories and
spare parts and to inform you about our
progressive service agreements.
V-ZUG Ltd
Industriestrasse 66, P.O. Box 59, CH-6301 Zug
[email protected], www.vzug.com
1013633-R02
 Loading...