

Page 1
1
Page 2

2
Page 3

1
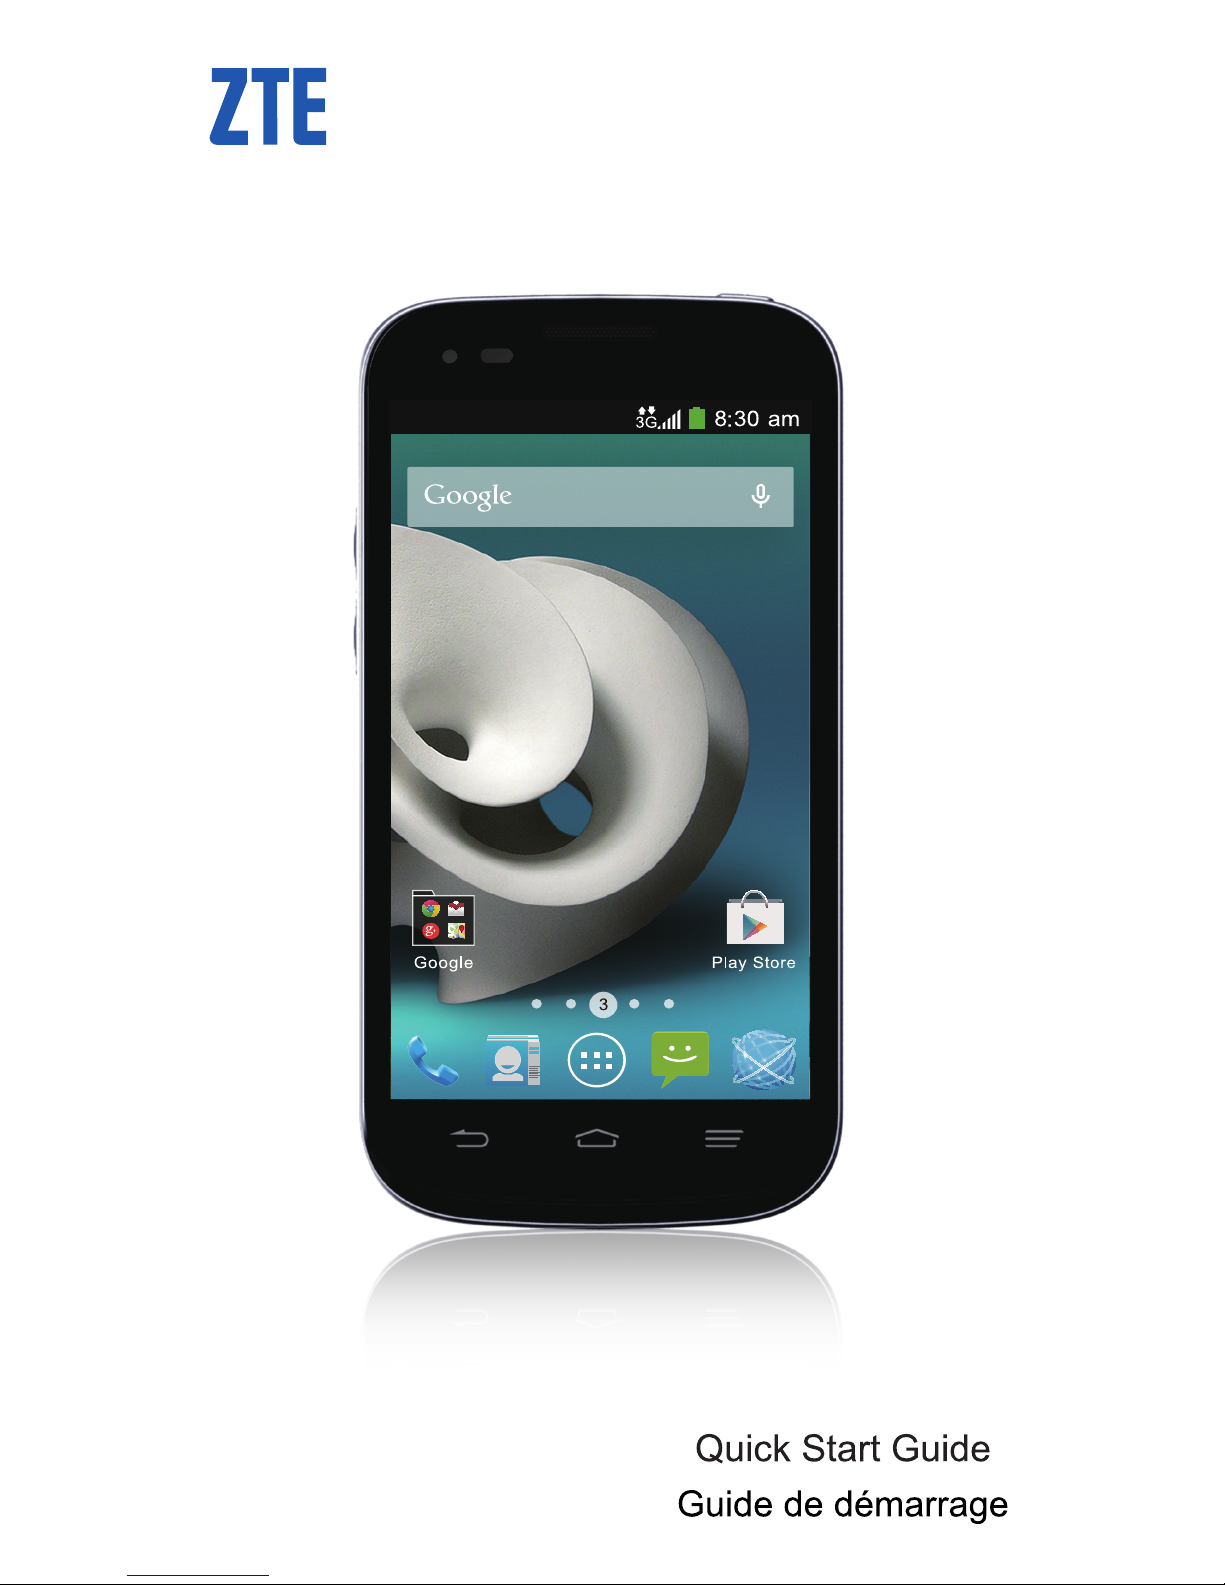
ZTE Z730
WCDMA/GSM Mobile Phone
Quick Start Guide
Page 4

2
Getting to Know Your Phone ............7
Starting Up .........................................9
Charging the Battery ....................... 12
Powering On/Off Your Phone .........14
Getting to Know the Home Screen 14
Opening Applications ..........................15
Adding Shortcuts or Widgets ...............16
Removing Shortcuts or Widgets ..........16
Organizing Shortcuts With Folders .....16
Applying New Wallpapers ...................16
Checking the Phone Status ............ 17
Managing Notications ................... 18
Setting Ringtone and Sound ..........20
Setting Ringtone or Notication Sound 20
Setting System Tones .........................20
Adjusting Volume ............................ 20
Setting a Screen Lock ..................... 21
Checking Voicemail ......................... 22
Making a Call....................................23
Adding Contacts ..............................23
Page 5

3
Creating a New Contact ...................... 23
Importing Contacts in Batches ............24
Sending a Message .........................24
Setting Up Email Accounts .............25
Setting Up Gmail ................................. 25
Setting Up Email .................................25
Setting Up an Exchange ActiveSync®
Account ...............................................26
Connecting With a Bluetooth
Headset.............................................27
Installing Apps From the Google
Play™ Store .....................................28
Taking a Photo ................................. 30
Recording a Video ........................... 31
Playing Music...................................32
Connecting to PC ............................33
Connecting to the Internet ..............34
Connecting via Wi-Fi ........................... 34
Connecting via Mobile Network ...........35
Connecting via USB Tethering ............36
Extending Battery Life ....................37
Page 6

4
Freeing Up Memory Space .............37
Managing the Phone Storage ......... 38
Deleting Old Messages ....................... 38
Clearing Browser’s Local Content .......38
Product Safety Information ............39
For Your Safety ................................ 41
Radio Frequency (RF) Energy ............41
FCC Compliance .................................43
IC Notice .............................................45
Hearing Aid Compatibility (HAC)
regulations for Mobile Phones .............46
CTIA Requirements ............................. 49
Page 7

5
LEGAL INFORMATION
Copyright © 2014 ZTE CORPORATION.
All rights reserved.
No part of this publication may be quoted,
reproduced, translated or used in any form
or by any means, electronic or mechanical, including photocopying and microfilm,
without the prior written permission of ZTE
Corporation.
Notice
ZTE Corporation reserves the right to make
modications on print errors or update specications in this guide without prior notice.
We offer self-service for our smart terminal
device users. Please visit the ZTE official
website (at www.ztedevices.ca) for more
information on self-service and supported
product models. Information on the website
takes precedence.
Disclaimer
ZTE Corporation expressly disclaims any
liability for faults and damages caused by
unauthorized modications of the software.
Page 8

6
Images and screenshots used in this guide
may differ from the actual product. Content
in this guide may differ from the actual product or software.
Trademarks
ZTE and the ZTE logos are trademarks of
the ZTE Corporation.
Google and Android are trademarks of
Google, Inc.
The Bluetooth® trademark and logos are
owned by the Bluetooth SIG, Inc. and any
use of such trademarks by ZTE Corporation
is under license.
microSDHC logo is a trademark of
the SD-3C, LLC.
Other trademarks and trade names are the
property of their respective owners.
Version No. : R1.0
Edition Time : November 6, 2014
Manual No. : 079584506937
Page 9
7
Getting to Know Your
Phone
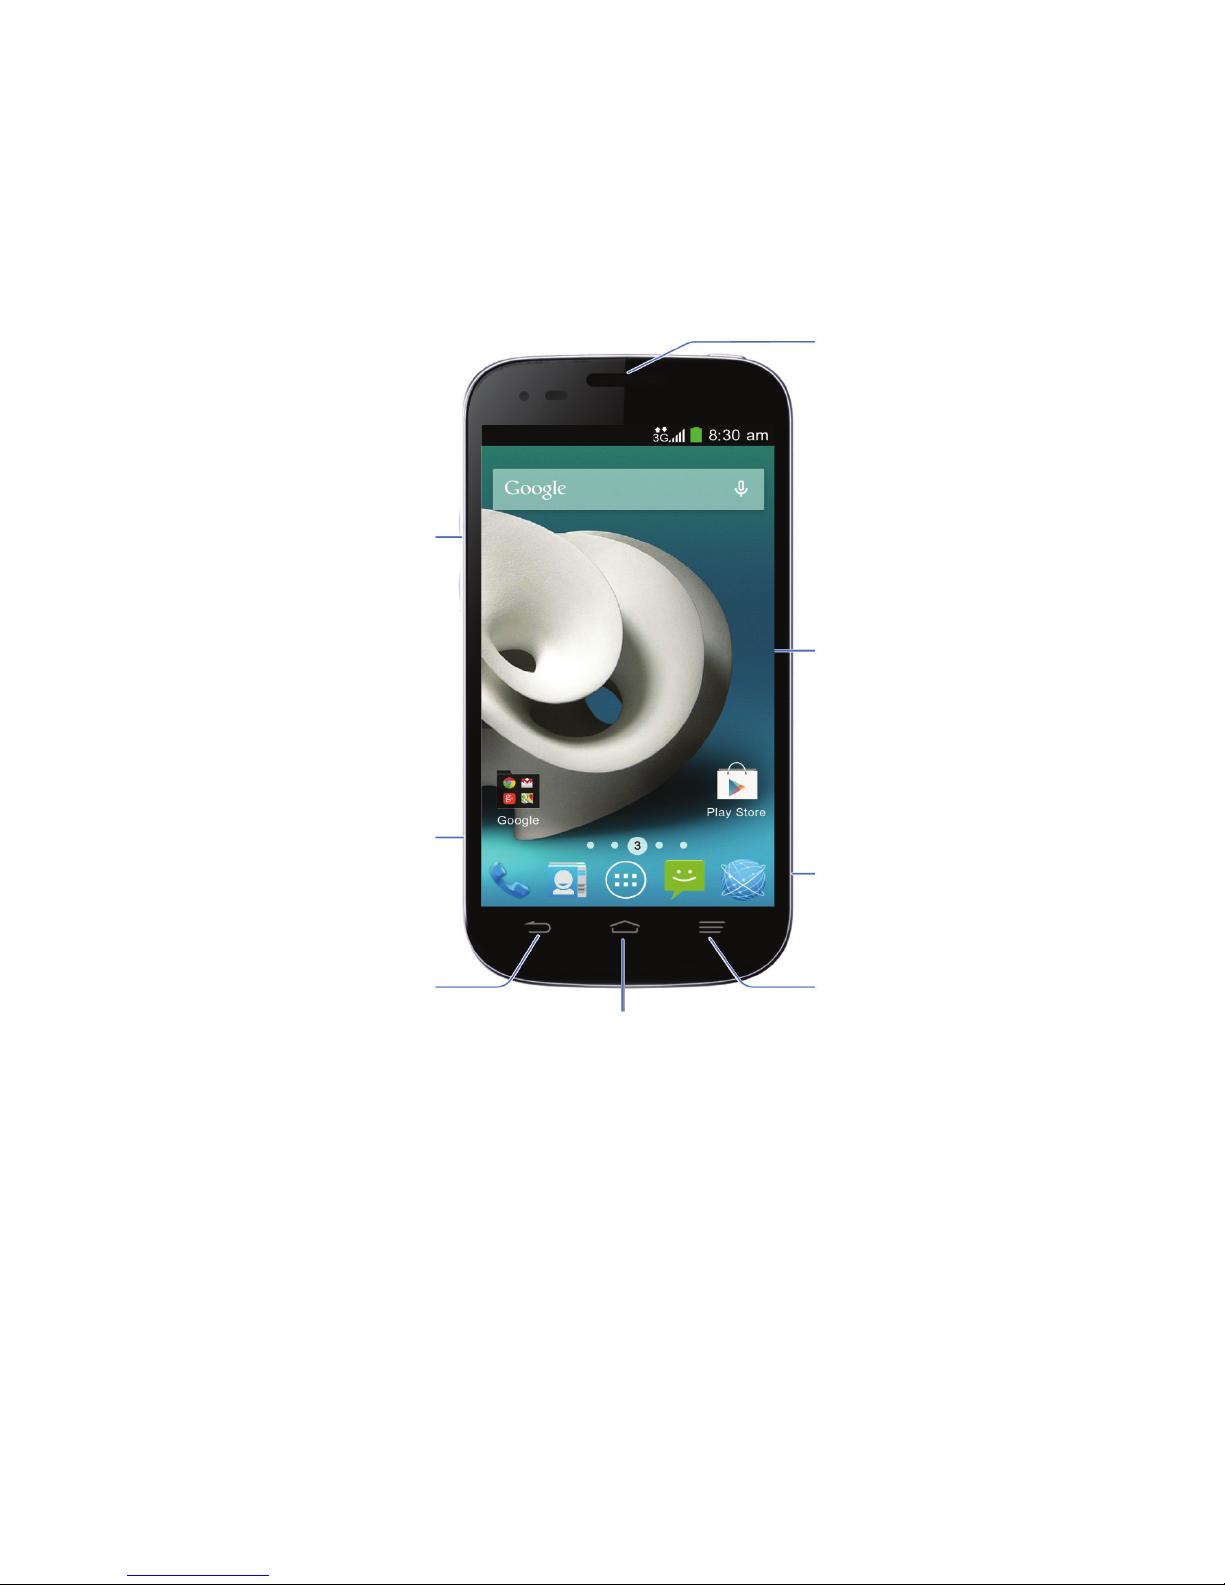
Earpiece
Volume
Key
Charging/
micro-USB
Jack
Back Key
Touch
Screen
microSDHC
Card Slot
Menu Key
Home Key
Page 10
8
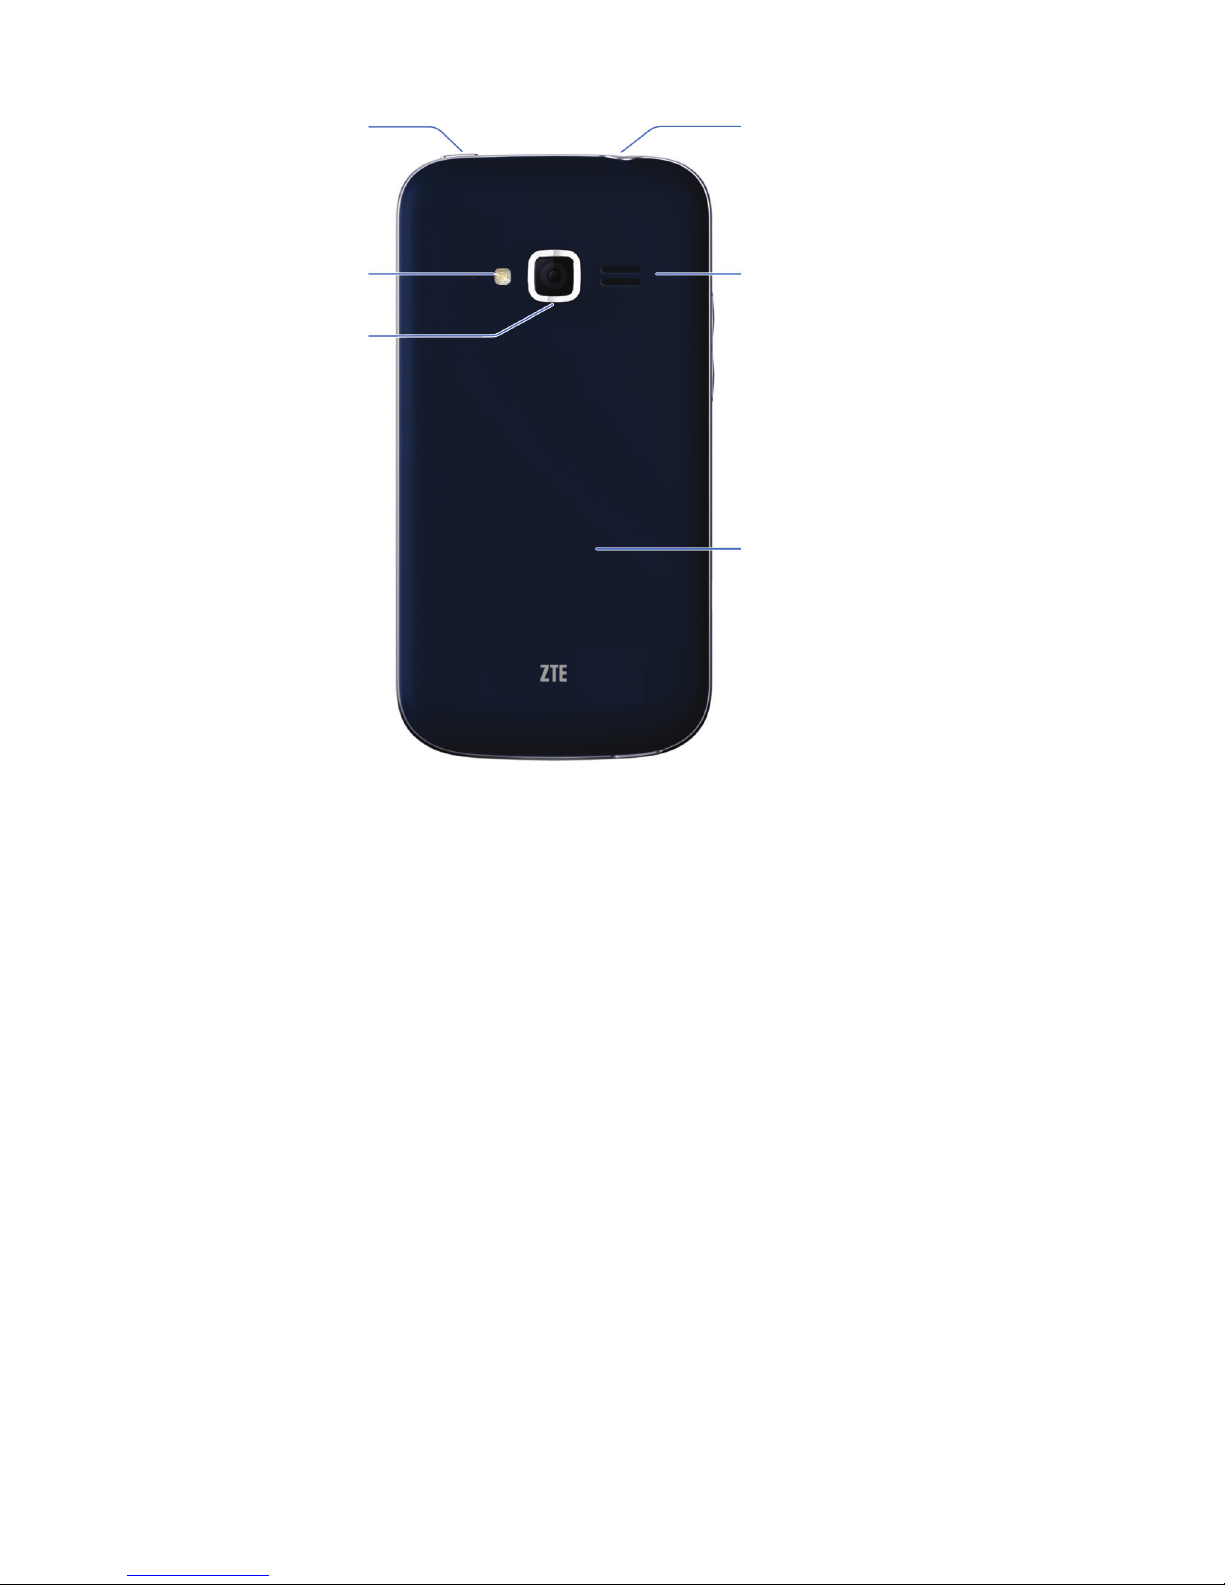
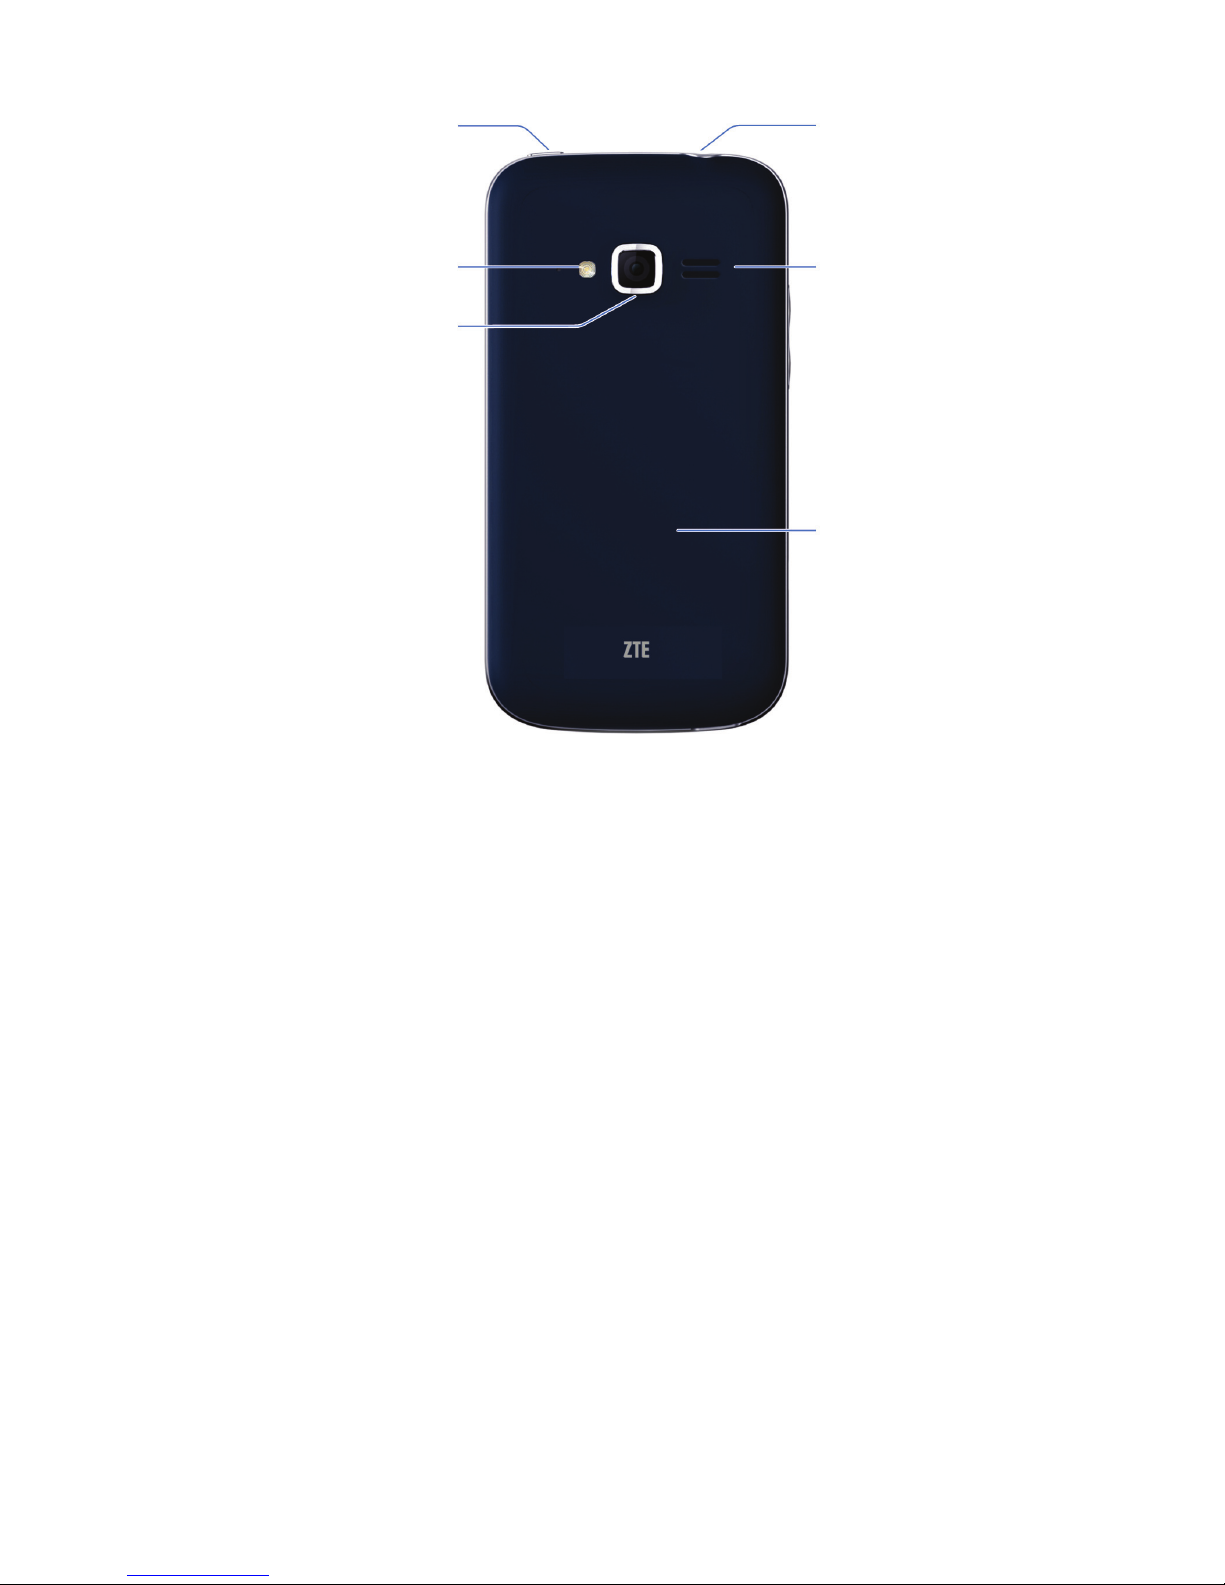
Power
Key
Headset Jack
Flash
Camera
Speaker
Back Cover
Power Key
• Press and hold to power on, restart,
turn on/off airplane mode, select phone
modes, or power off.
• Press to turn off or on the screen display.
Home Key
• Touch to return to the home screen from
any application or screen.
• Touch and hold to use Google Search.
• Double-touch to see recently used ap-
plications.
Page 11

9
Menu Key
Touch to get the options for the current
screen.
Back Key
Touch to go to the previous screen.
Volume Key
Press or hold to turn the volume up or down.
Starting Up
Switch off your phone before installing or
replacing the battery or the micro-SIM card.
The microSDHC™ card is optional and can
be installed and removed while the phone
is turned on. Unmount the microSDHC card
before removing it.
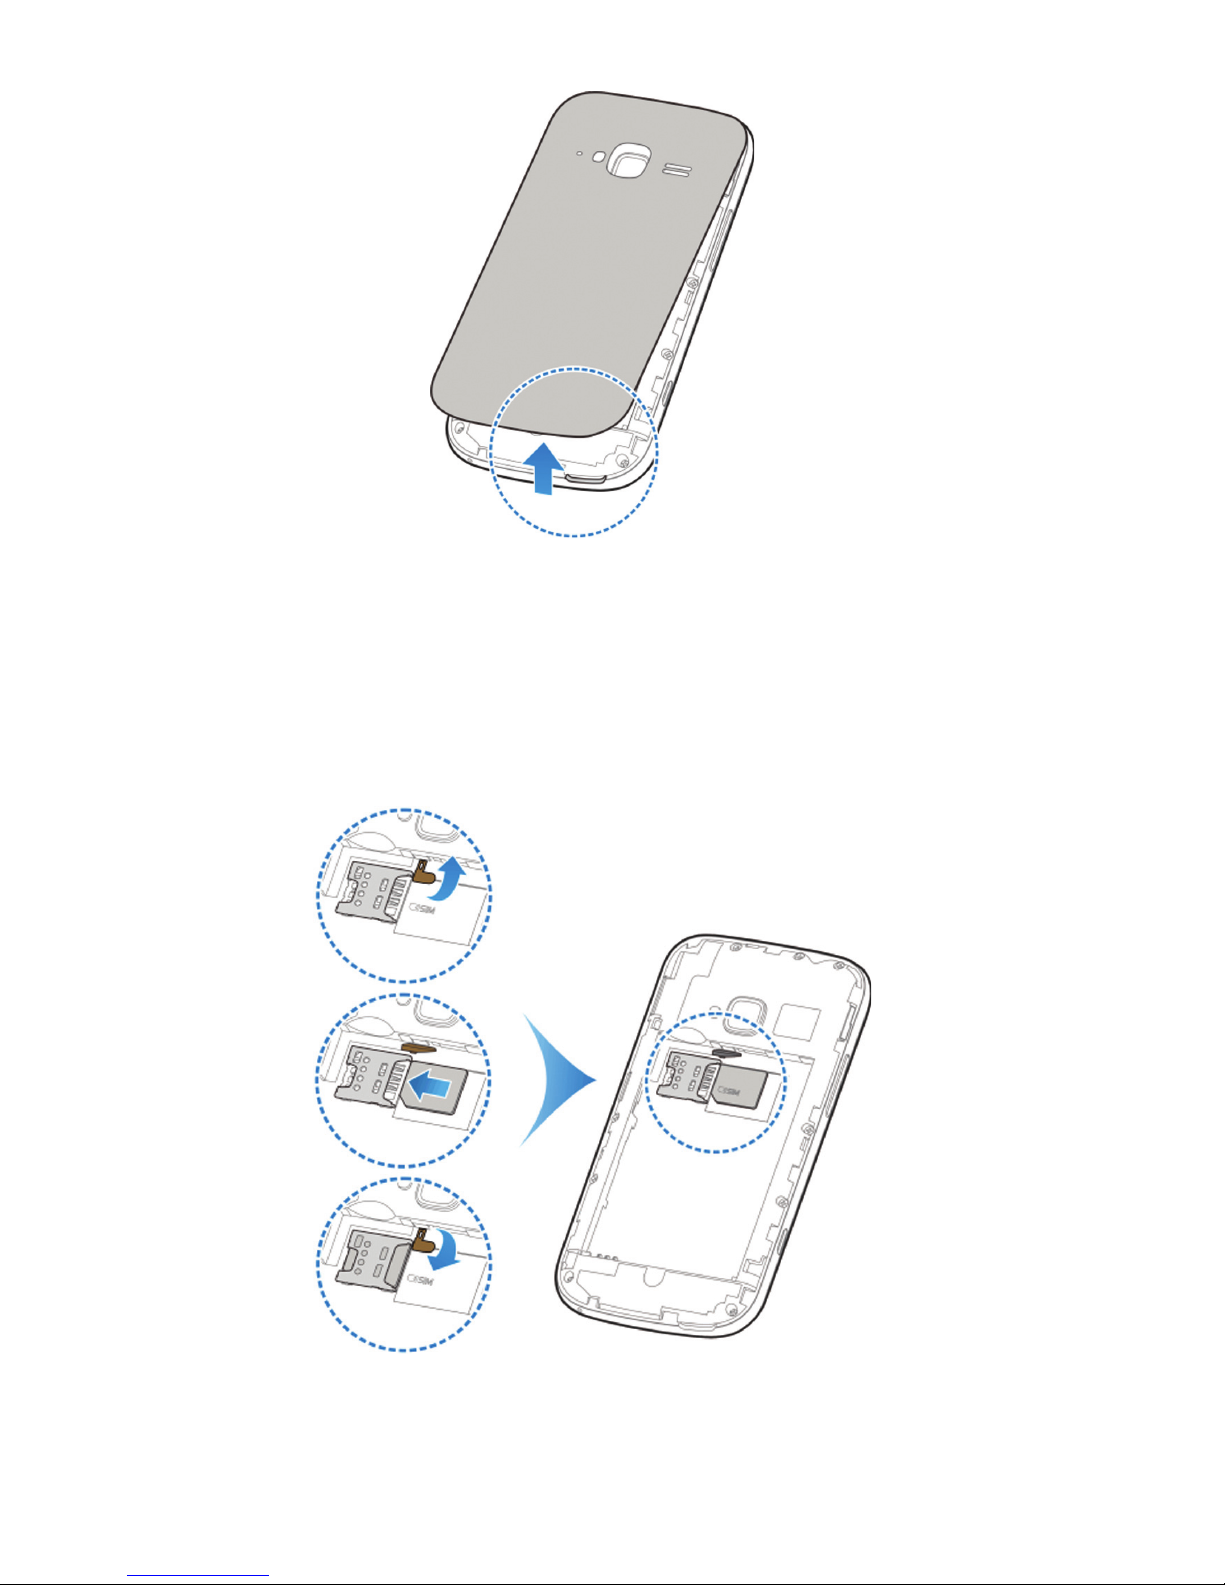
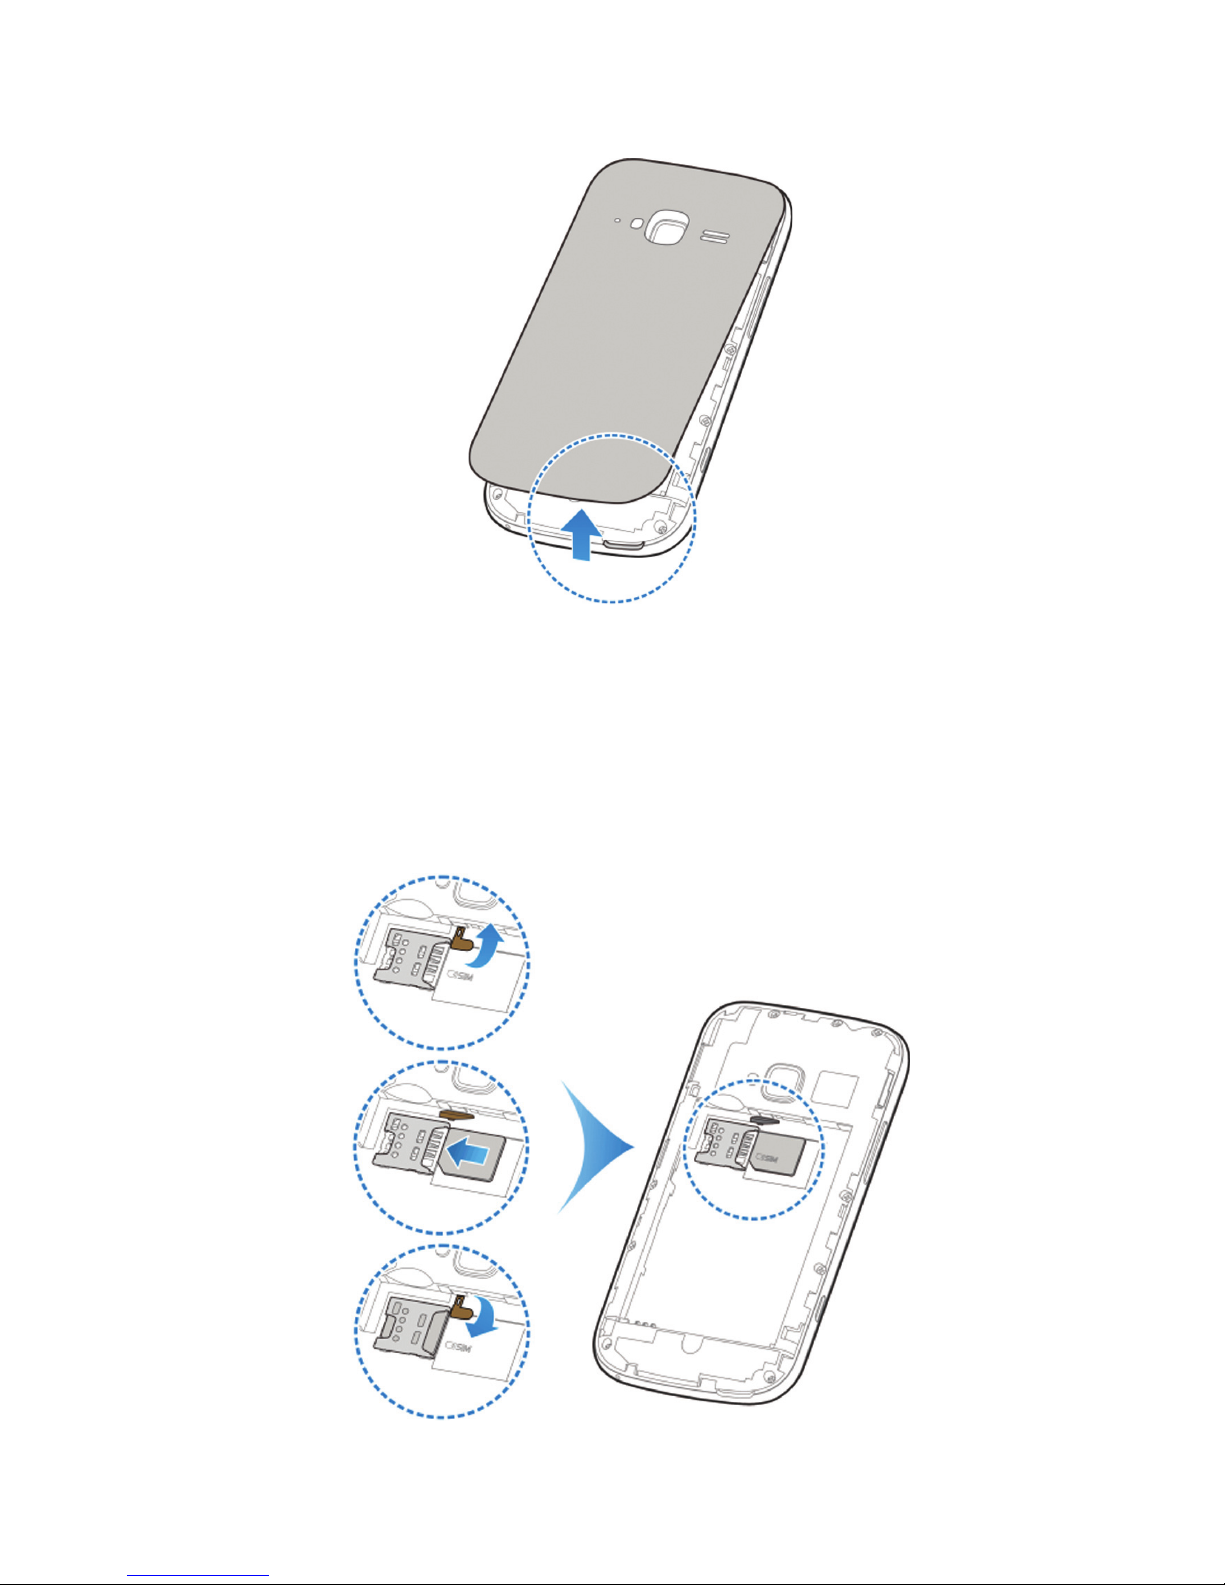
1. Place your nger in the slot at the bottom of the back cover to lift and remove
the cover.
Page 12
10
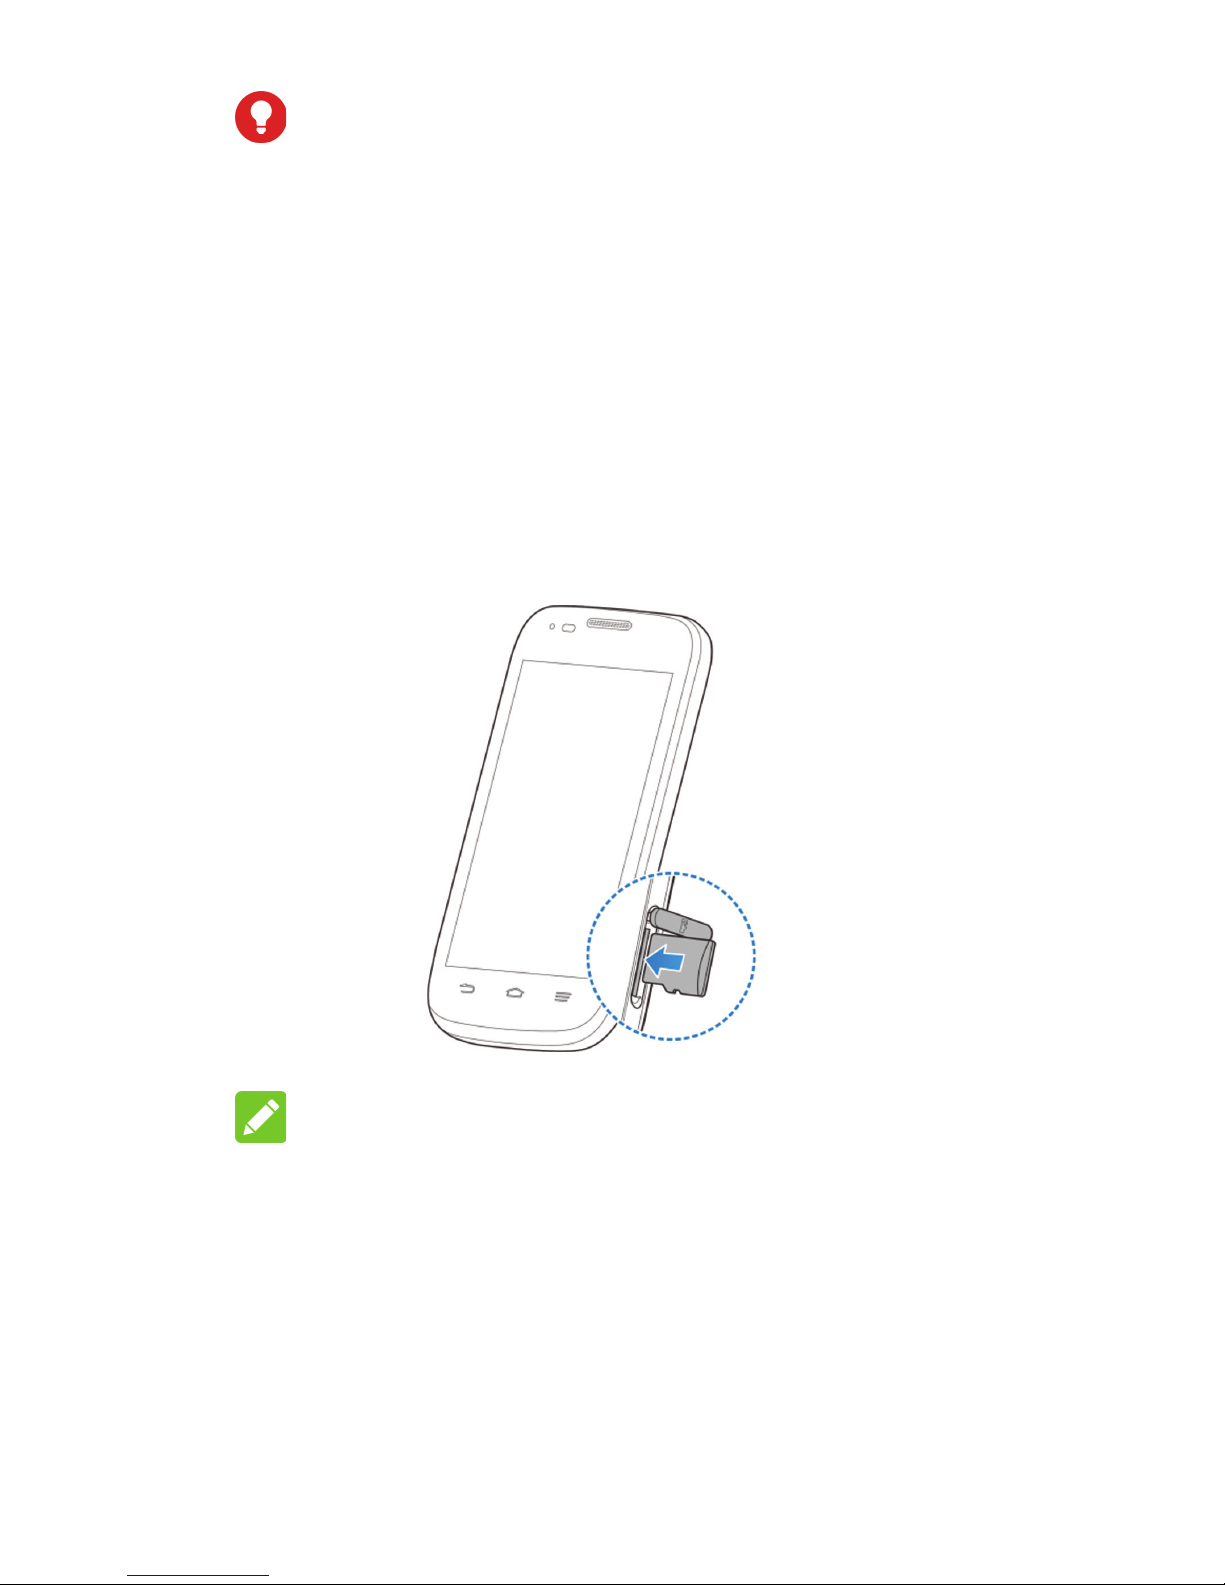
2. Lift the rubber stopper, and then hold the
micro-SIM card with its cut corner oriented as shown and slip it into the card
holder.
Page 13
11
WARNING!
To avoid damage to the phone, do not use
any other kind of SIM card, or any non-standard micro-SIM card cut from a SIM card.
You can get a standard micro-SIM card from
your service provider.
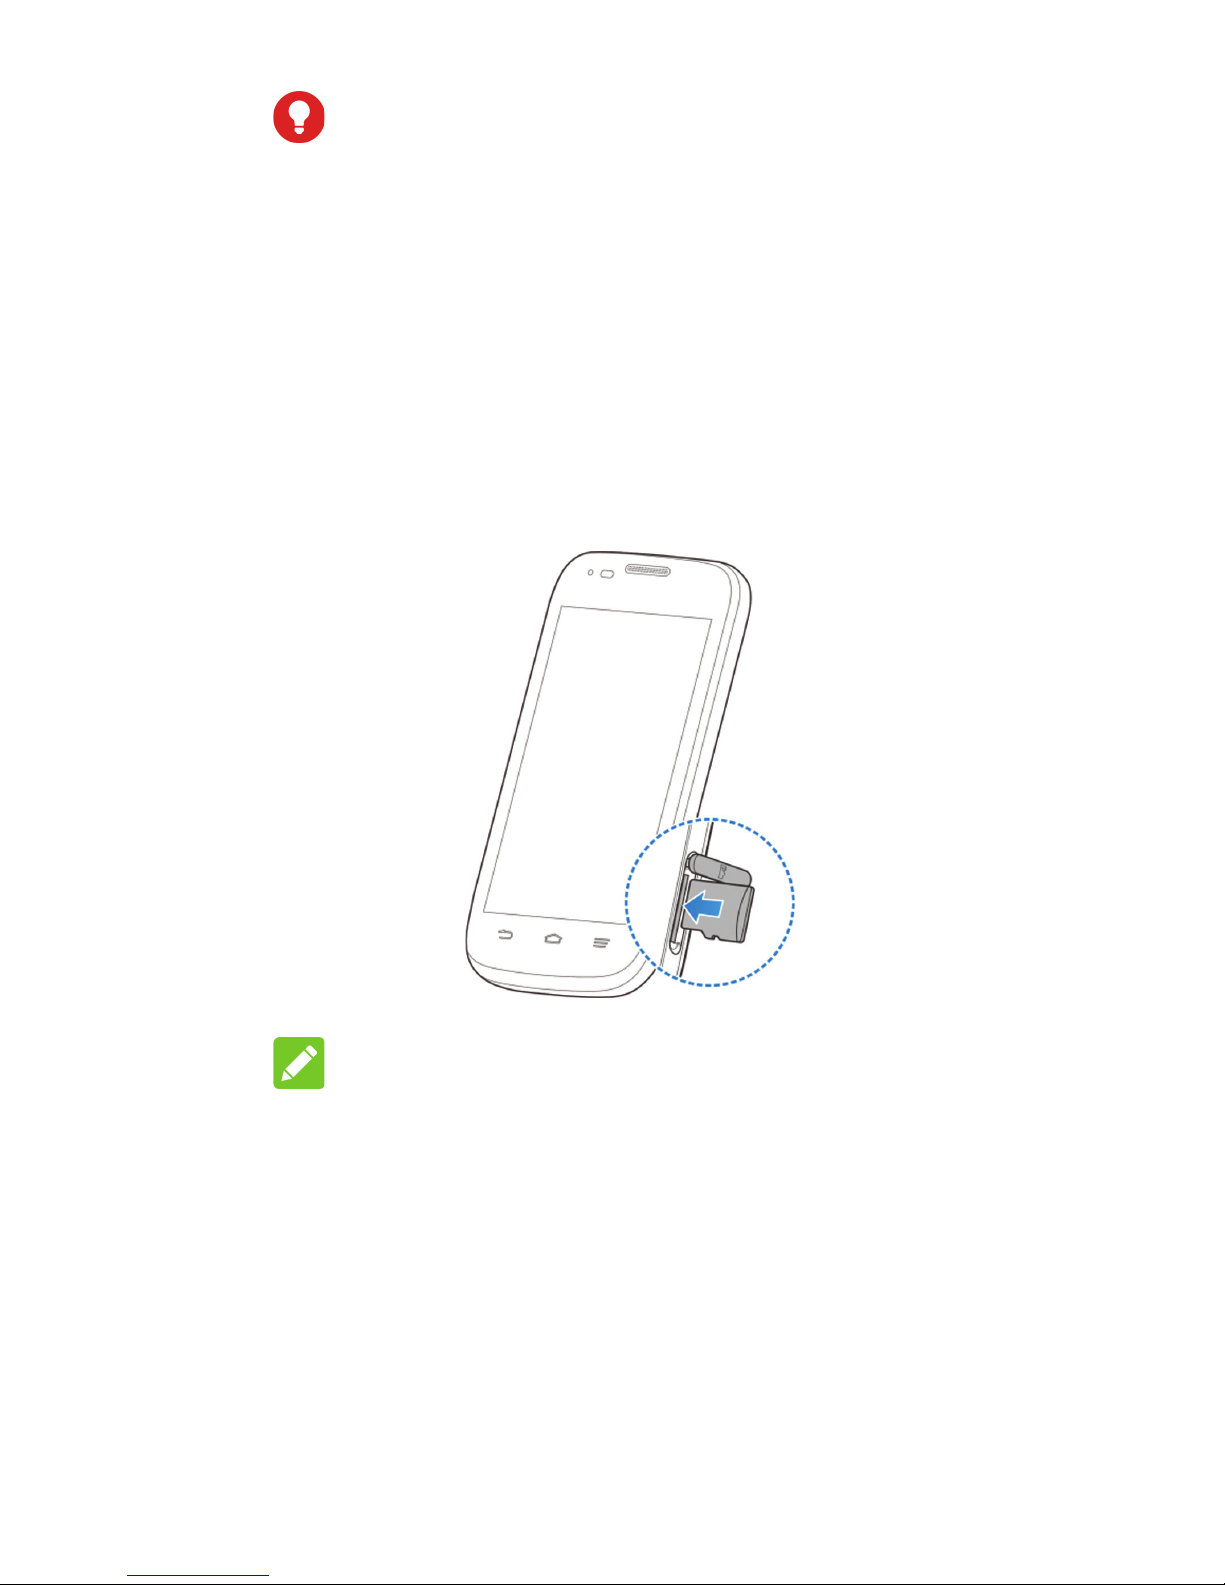
3. Insert your microSDHC card into the microSDHC card slot.
NOTE:
Your phone may come with a pre-installed
microSDHC card. Some applications may
not function normally after you remove the
card, pre-installed or otherwise.
Page 14
12
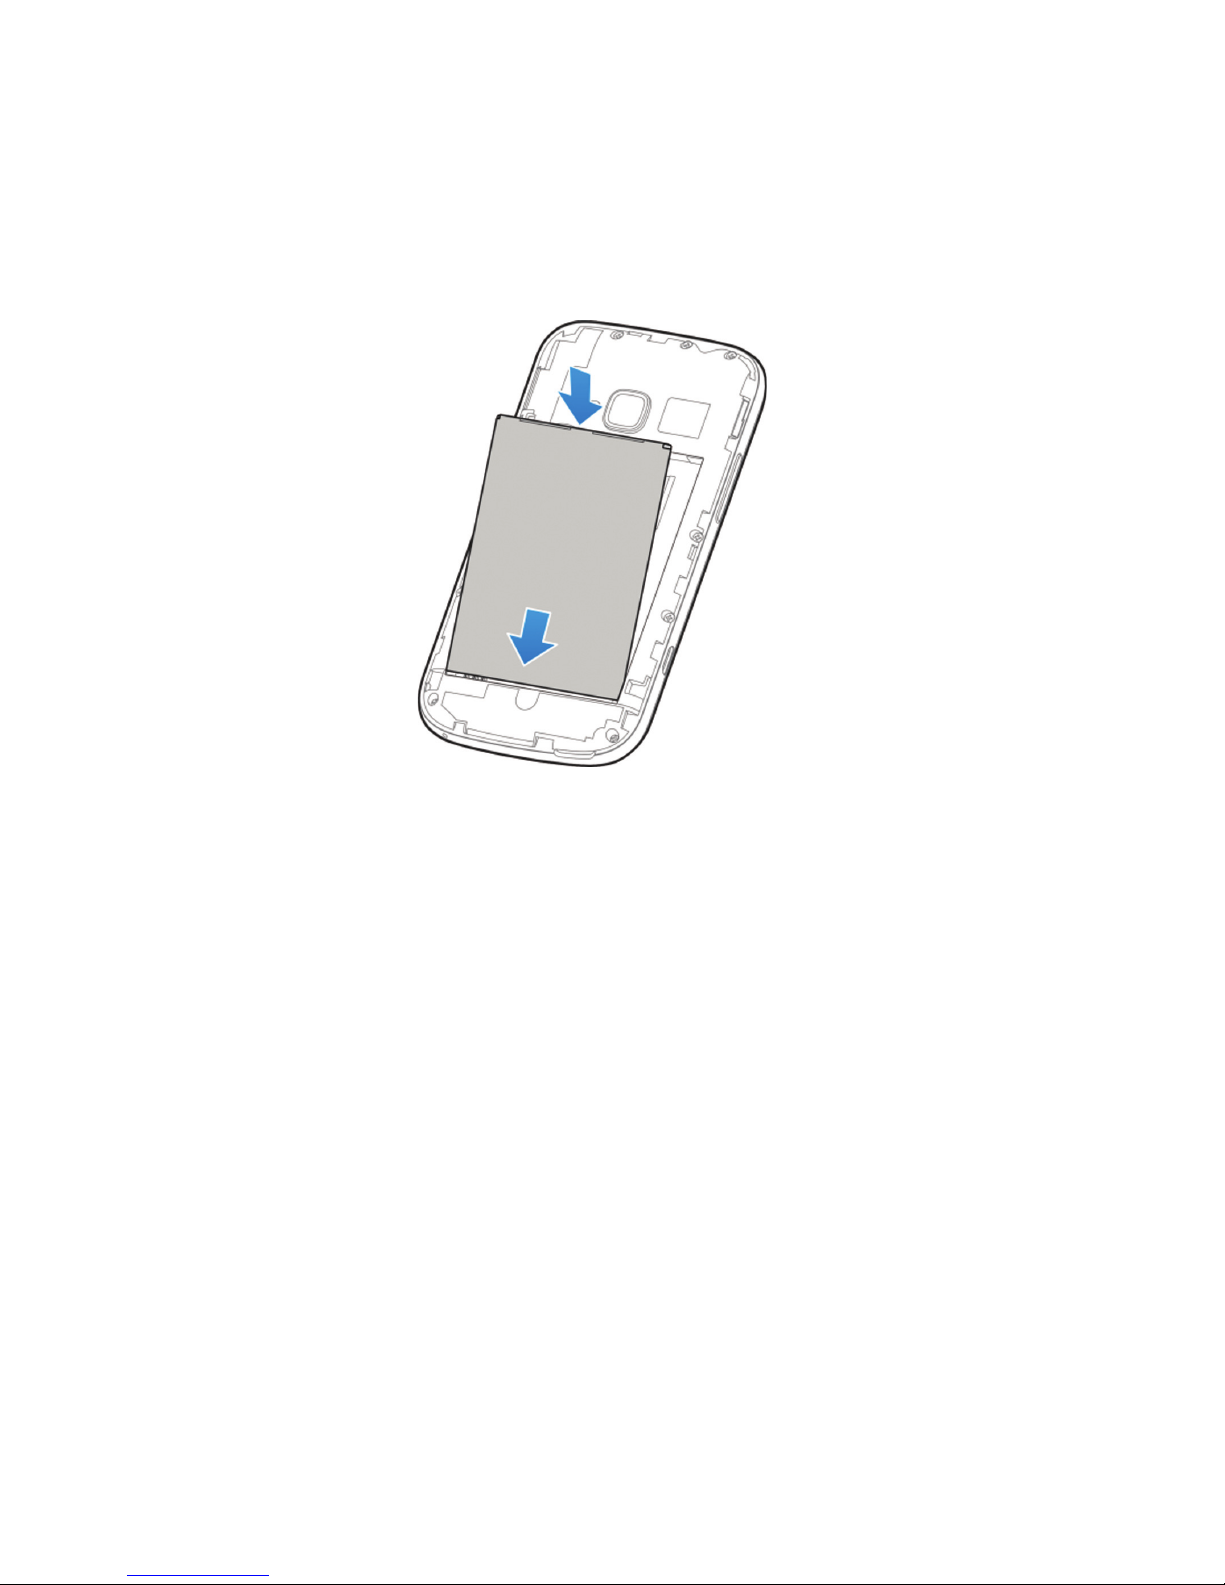
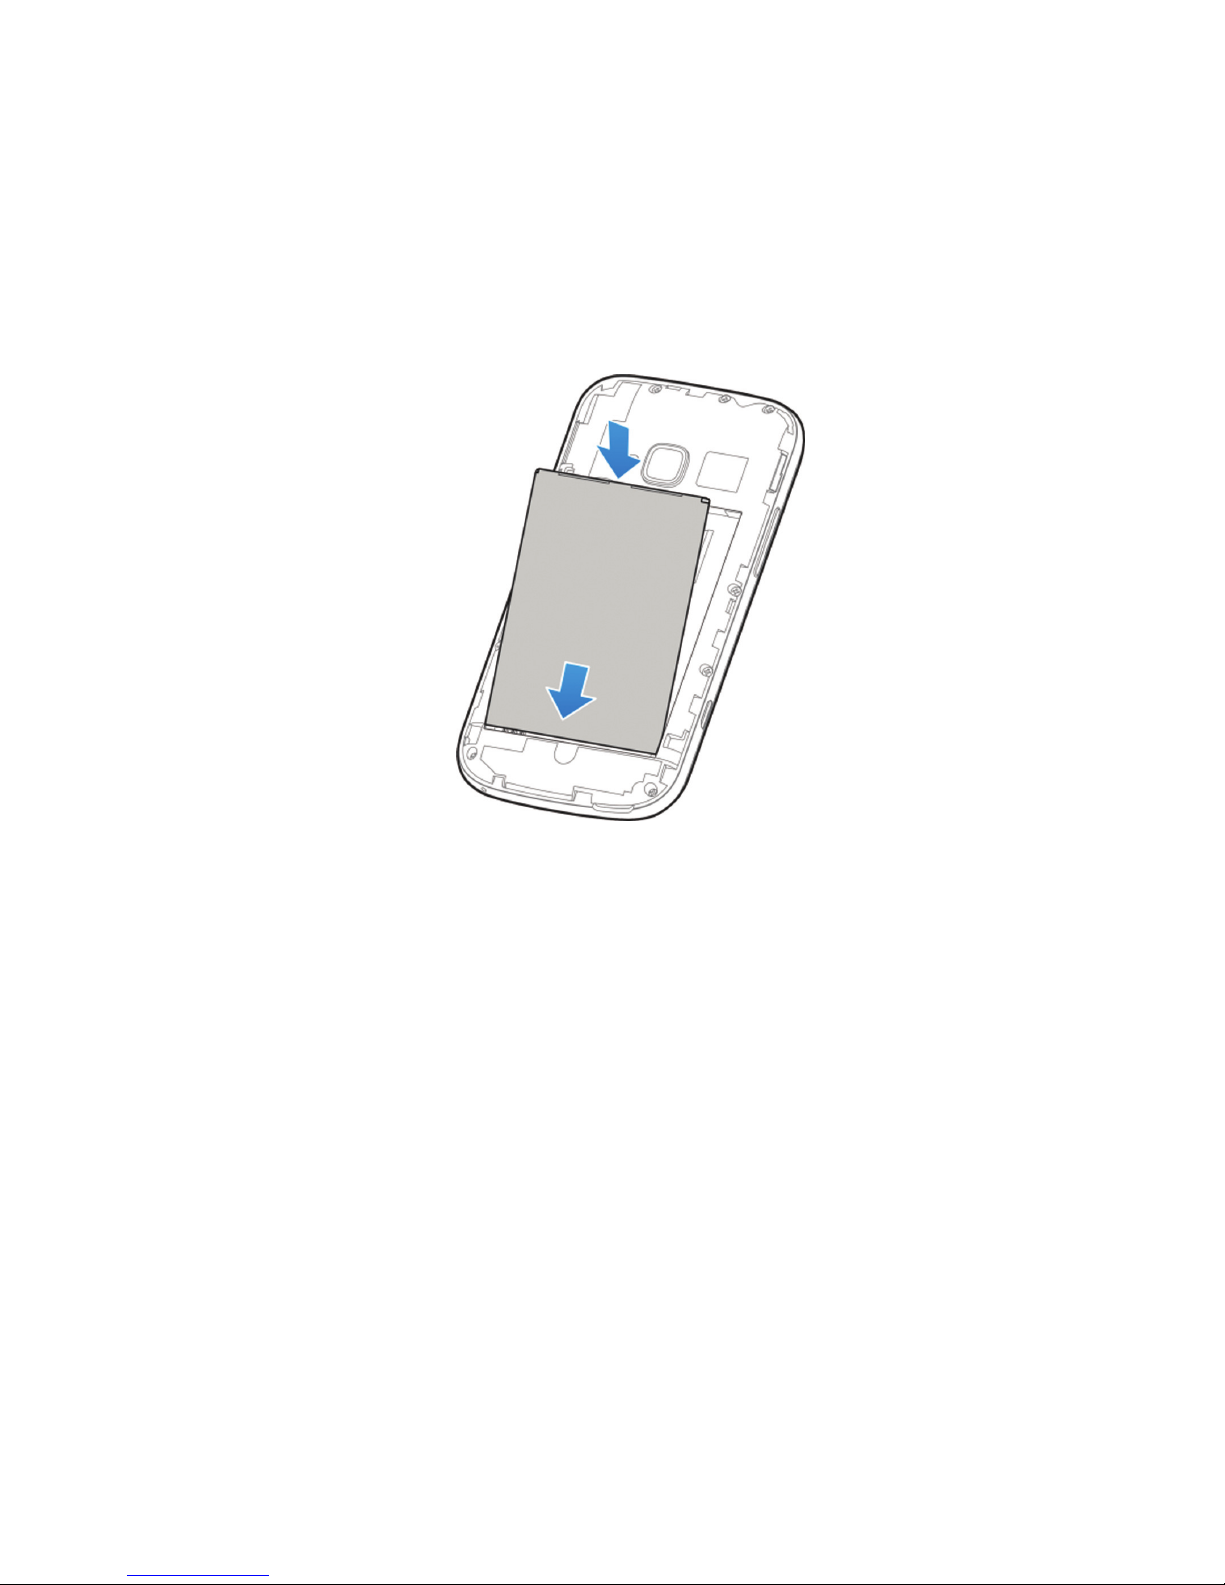
4. Align the connectors on the phone and
the battery and slide the battery into the
compartment. Then gently press the battery down until it is secured.
5. Align the back cover with the back of
the phone and press the cover back into
place. Ensure that all the tabs are secure
and there are no gaps around the cover.
Charging the Battery
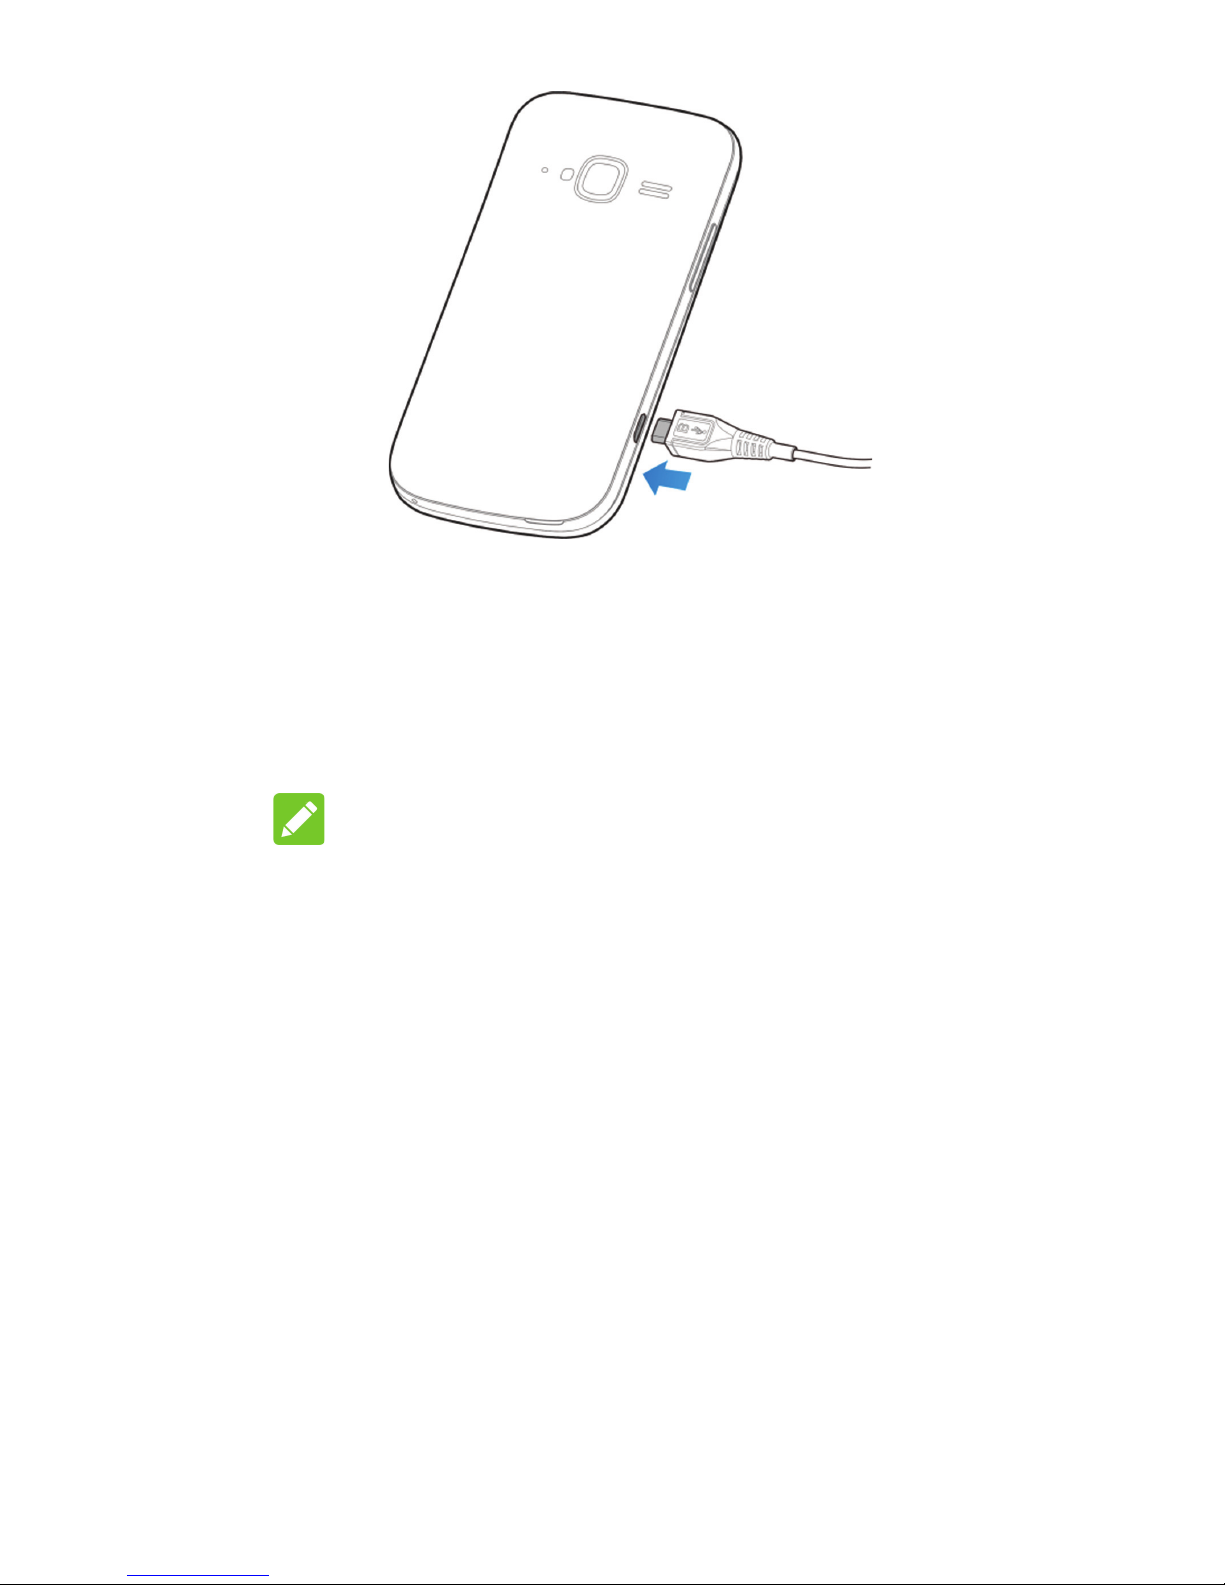
1. Connect the adapter to the charging
jack. Ensure that the adapter is inserted
with the correct orientation. Do not force
the connector into the charging jack.
Page 15
13
2. Connect the charger to a standard AC
power outlet.
3. Disconnect the charger when the battery
is fully charged.
NOTE:
If the battery is extremely low, you may be
unable to power on the phone even when it
is being charged. In this case, try again after
charging the phone for at least 10 minutes.
Contact customer service if you still cannot
power on the phone after prolonged charging.
Page 16

14
Powering On/Off Your
Phone
Ensure that the battery is charged before
powering on.
• Press and hold the Power Key to turn
on your phone.
• To turn it off, press and hold the Power
Key to open the options menu. Touch
Power off > OK.
Getting to Know the Home
Screen
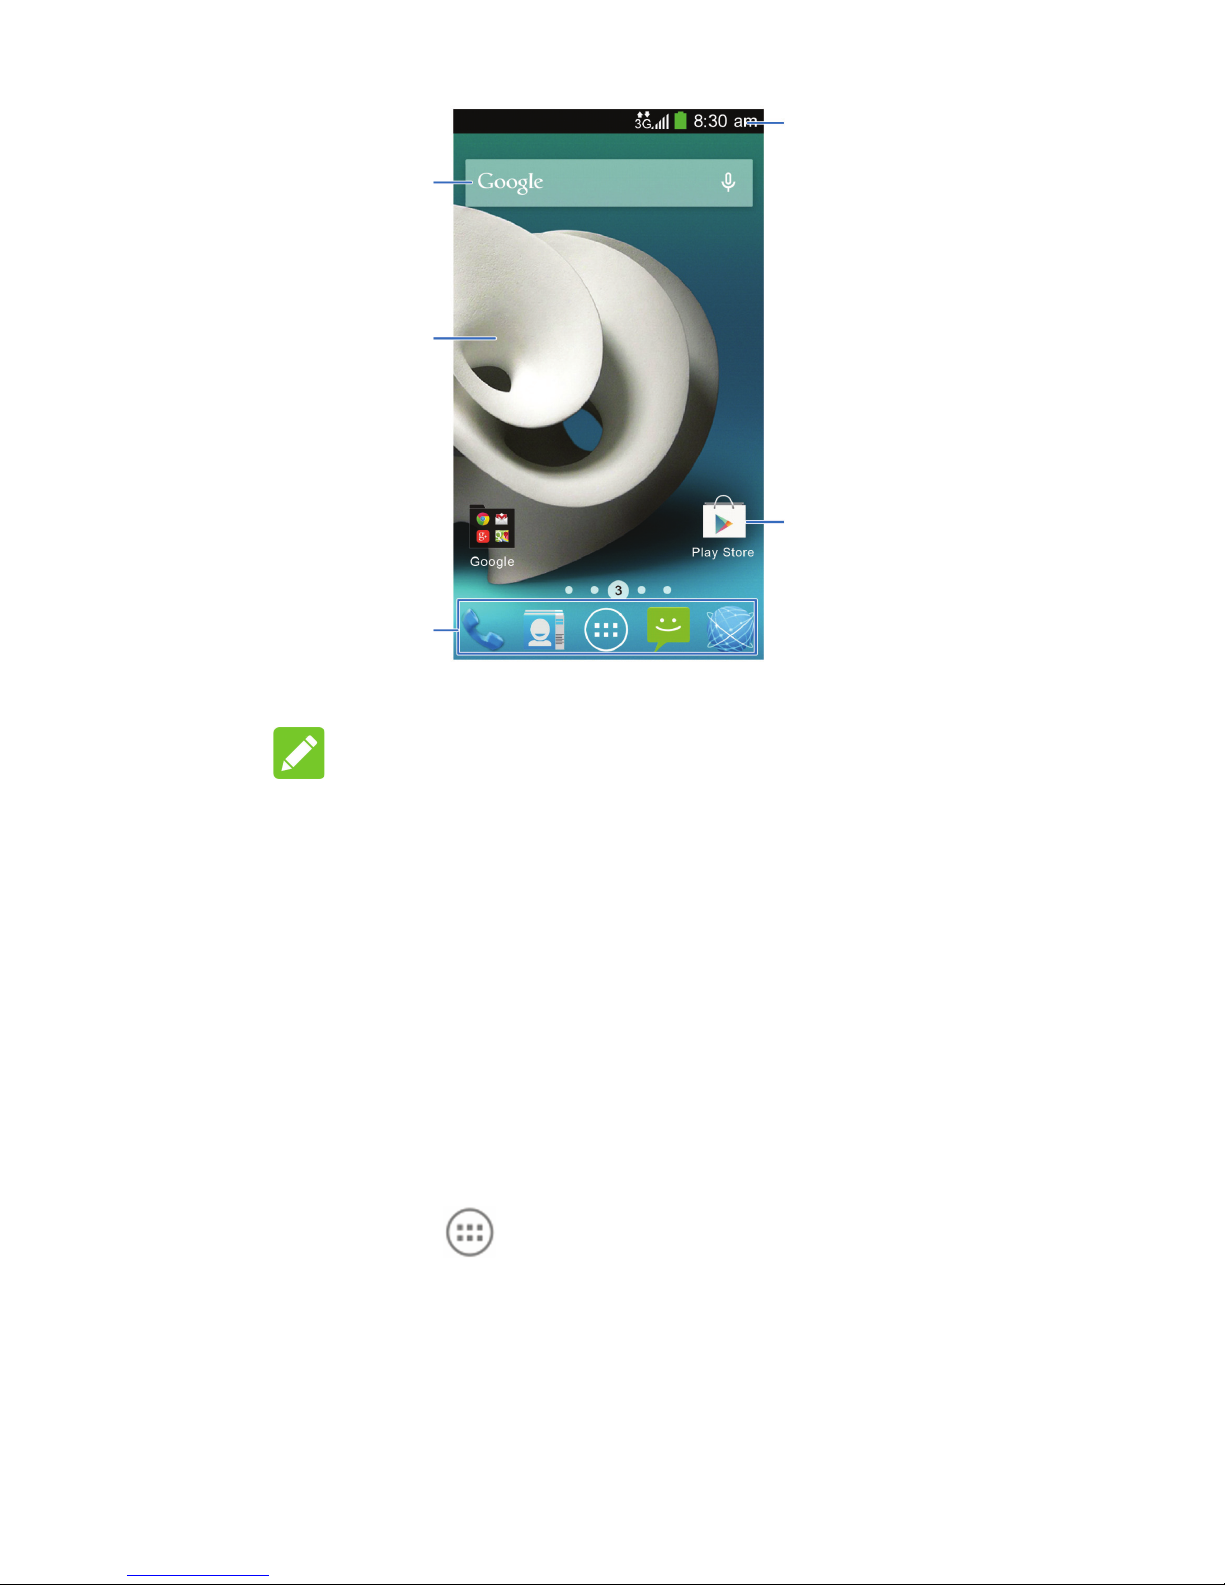
The home screen is the starting point for
your phone’s applications, functions, and
menus. You can customize your home
screen by adding application shortcuts, folders, widgets, and more.
Page 17
15
Google
Search
Wallpaper
Favorite
Tray
Shortcuts
Shortcuts
Status &
Notications
NOTE:
Your home screen extends beyond the initial
screen, providing more space for shortcuts,
widgets, and folders. Simply swipe left or
right to see the extended home screens.
Opening Applications
1. Touch the Home Key if the current
screen is not the home screen.
2. Touch .
3. Slide left or right on the screen and
touch an app to open it.
Page 18
16
Adding Shortcuts or Widgets
1. Touch the Home Key > .
2. If you want to add a widget, touch WID-
GETS.
3. Touch and hold a widget or an app icon
and drag it to the home screen.
Removing Shortcuts or Widgets
1. Touch and hold a widget or shortcut on
the home screen.
2. Drag it to to remove it.
Organizing Shortcuts With
Folders
1. Touch and hold a shortcut on the home
screen you want to add into a folder until
appears.
2. Drag the shortcut to and release it. A new folder will be created and
the shortcut is added into the folder.
Applying New Wallpapers
You can set the wallpaper for the home
screen or lock screen.
Page 19
17
1. Touch the Home Key > Menu Key >
Wallpaper.
2. Touch Home or Lock screen.
3. Select a wallpaper source from Gallery,
Live Wallpapers, Photos, or Wallpapers and touch the image or animation
you want to use as the wallpaper.
4. For Gallery images, touch OK at the top
of the screen. For Live wallpapers or
Wallpapers, touch Set Wallpaper. For
Photos, touch Done.
Checking the Phone Status
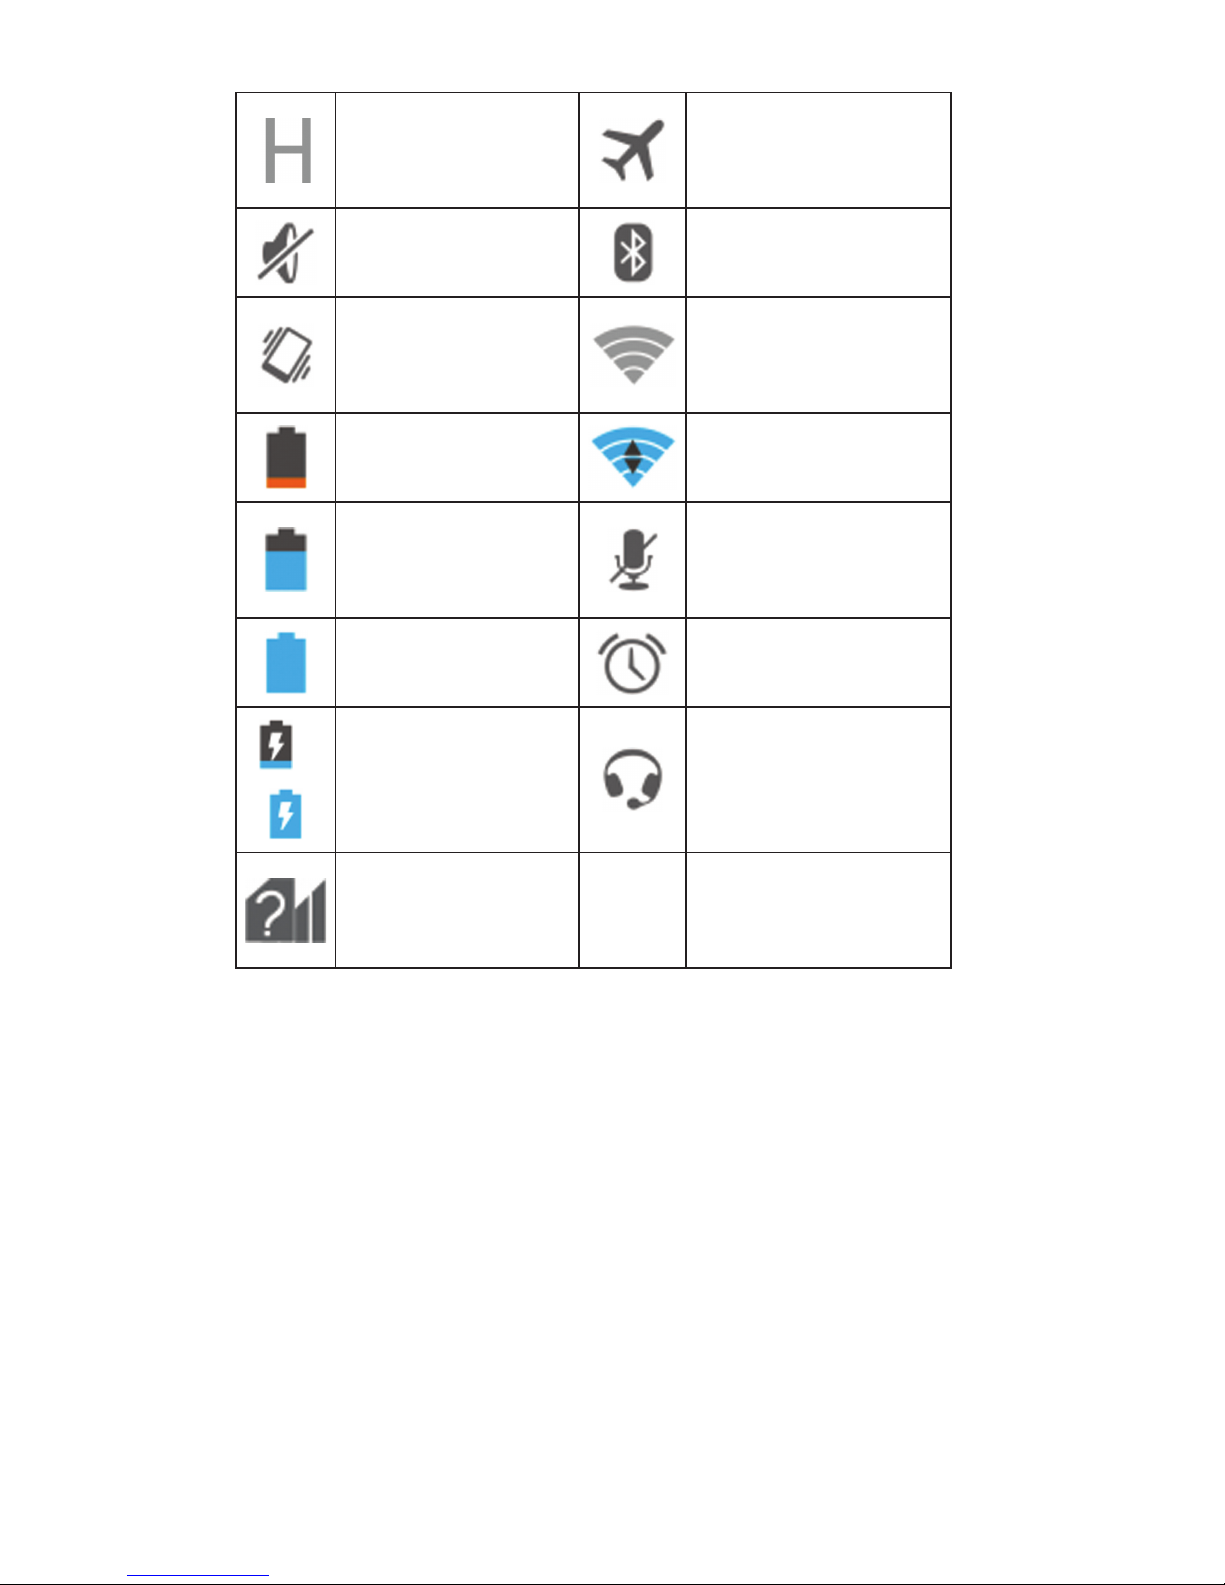
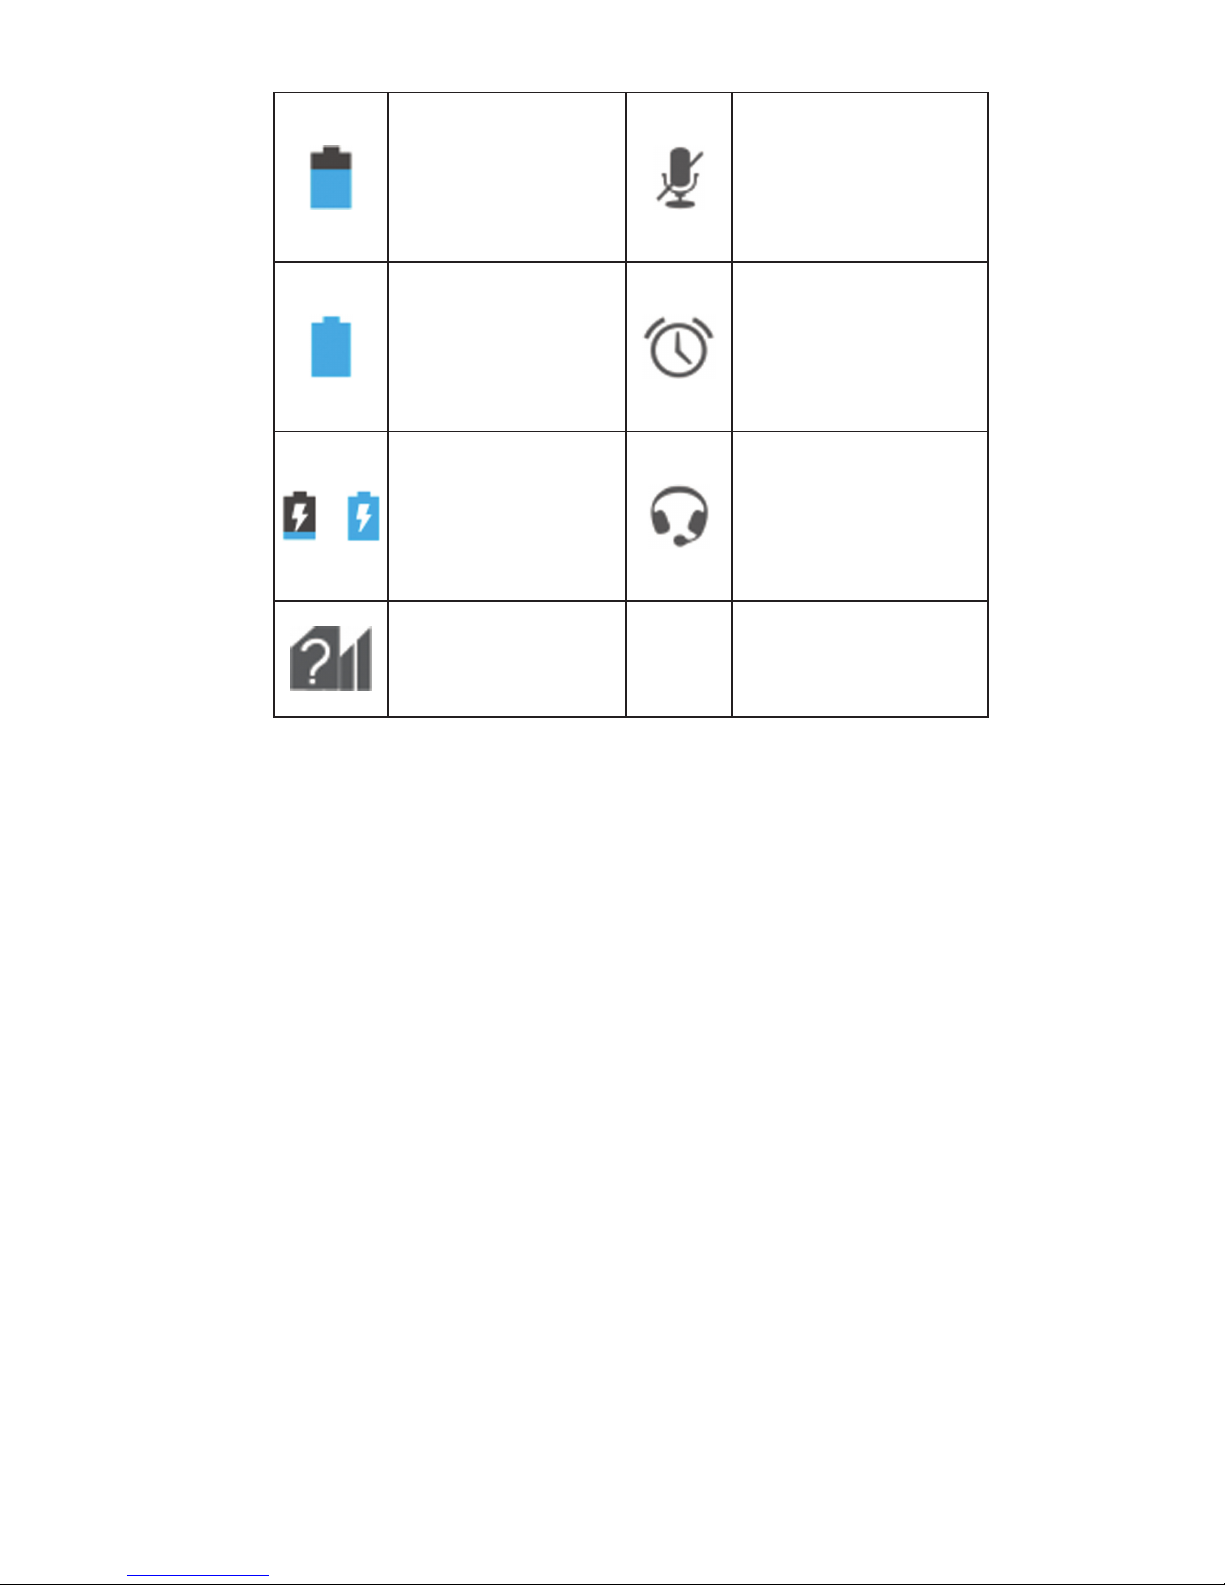
The status bar at the top of the screen displays phone and service status with various
icons on the right side. Below are some of
the icons and their meanings.
GPRS
connected
No signal
EDGE
connected
Signal strength
3G connected
Mobile data in
use
Page 20
18
HSPA
connected
Flight mode
Ringer off Bluetooth on
Vibrate mode
Connected to a
Wi-Fi® network
Battery low Wi-Fi in use
Battery partially drained
Phone microphone off
Battery full Alarm set
/
Battery
charging
Wired headset
connected
No SIM card
installed
Managing Notications
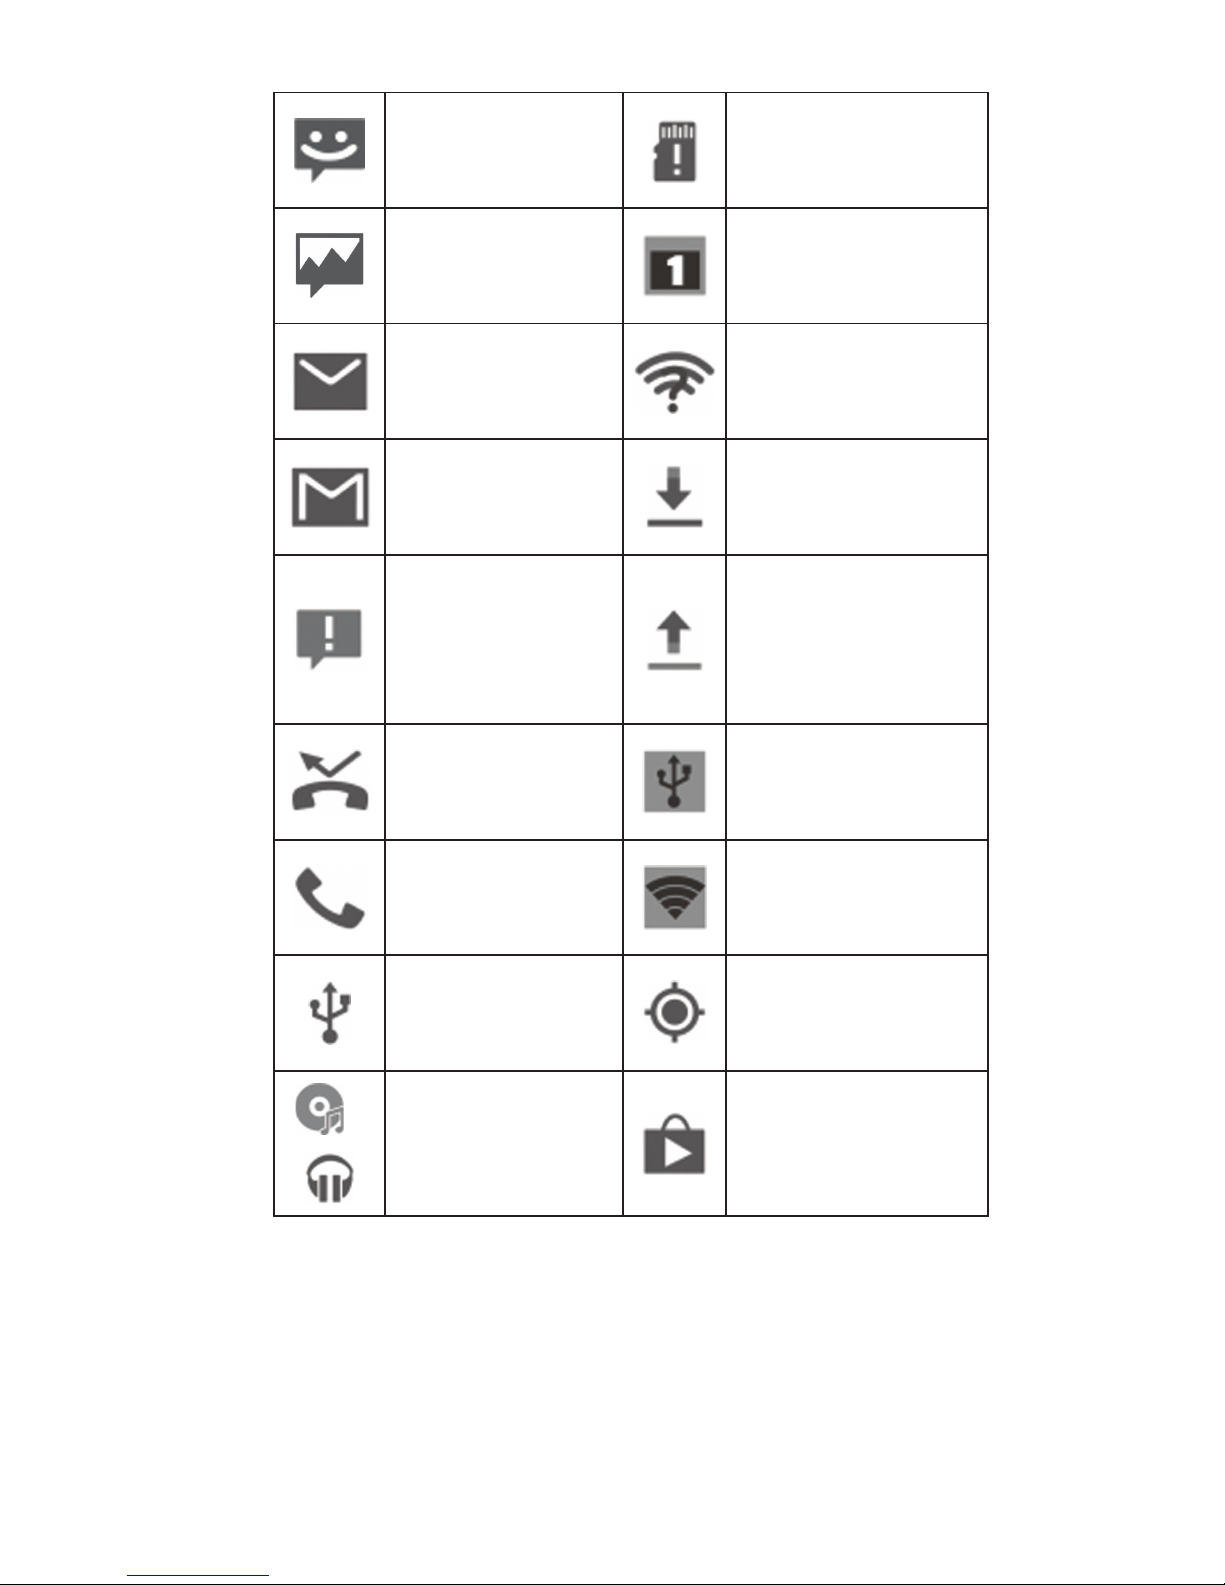
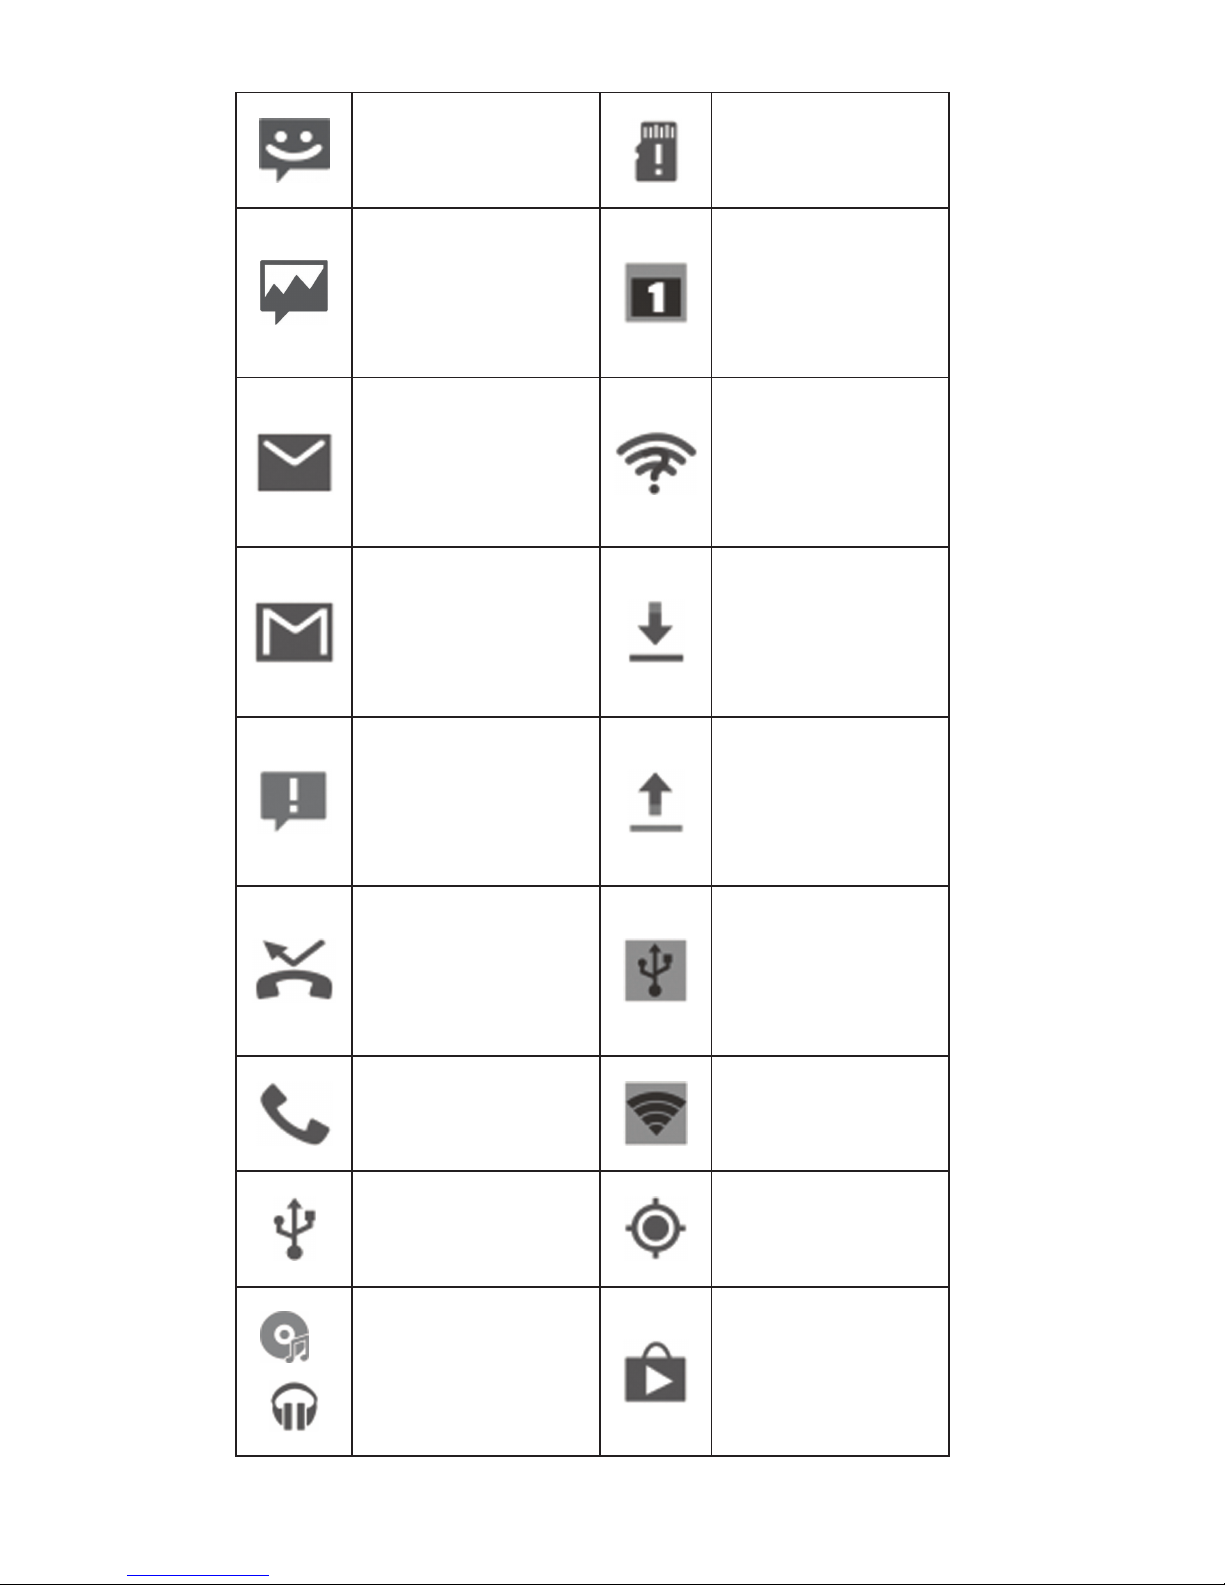
The status bar at the top of the screen provides notification alerts with different icons
on the left side. Below are some of the icons
and their meanings.
The notifications depend on the apps installed and you can touch and drag the status bar down to see more information.
Page 21
19
New SMS
microSDHC
card removed
New MMS
Upcoming
event
New email
New Wi-Fi network detected
New Gmail™
message
Downloading
data
Problem with
SMS/MMS
delivery
Sending data
Missed call
USB tethering
is on
Call in
progress
Portable Wi-Fi
hotspot
USB
connected
GPS on
/
Song is
playing
Updates
available
Page 22

20
Setting Ringtone and
Sound
Setting Ringtone or Notication
Sound
1. Touch the Home Key > > Settings >
Sound.
2. Touch Phone ringtone or Default noti-
cation sound.
3. Select the ringtone you want to use.
4. Touch OK.
Setting System Tones
1. Touch the Home Key > > Settings >
Sound.
2. Scroll to the SYSTEM section and check
the types of sound you want to hear or
uncheck those you do not need.
Adjusting Volume
To adjust call volume, press the Volume Key
while on a call. To adjust other types of volume, follow the steps below.
Page 23
21
1. Touch the Home Key > > Settings >
Sound > Volumes.
2. Drag the sliders to adjust the volume for
music, video, games, and other media,
the ringtone and notication volume, and
the alarm volume.
3. Touch OK to save.
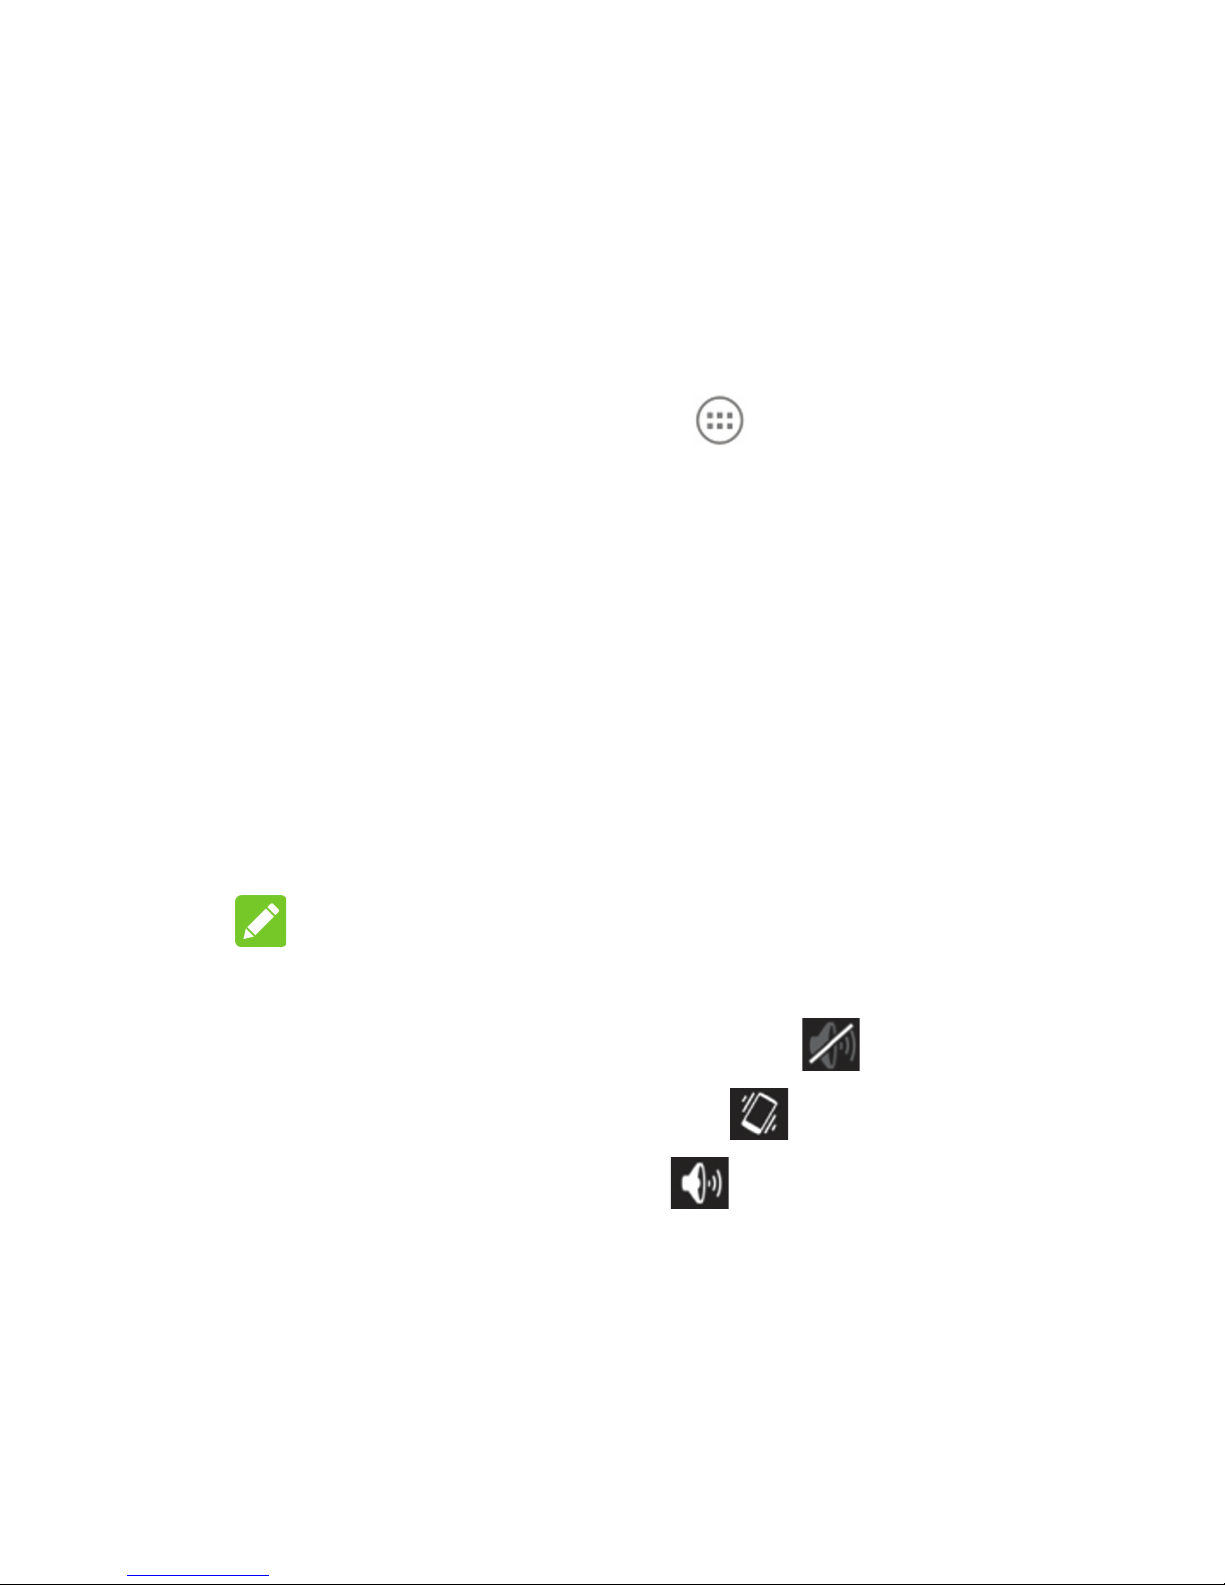
NOTE:
Press and hold the Power Key and then
touch to enable the silent mode, touch
to enable the vibration mode, or touch
to disable the silent mode.
Setting a Screen Lock
You can protect your phone by creating a
screen lock. When it is enabled, you need
to touch and hold an icon, draw a pattern, or
enter a numeric PIN or password to unlock
the phone’s screen and keys.
1. Touch the Home Key > Menu Key >
System settings > Security > Screen
lock.
2. Touch None, Long press, Pattern, PIN
or Password.
Page 24
22
u
Touch None to disable the screen
lock.
u
Touch Long press to enable unlock
with a ‘touch and hold’ gesture. You
can unlock the screen by touching
and holding at the center of the
display.
u
Touch Pattern to create a pattern
that you must draw to unlock the
screen.
u
Touch PIN or Password to set a nu-
meric PIN or a password you must
enter to unlock your screen.
Checking Voicemail
1. Touch the Home Key > .
2. In the dialer tab , touch and hold
. If prompted, enter your voicemail
password.
3. Follow the voice prompts to listen to and
manage your voicemail messages.
Page 25
23
Making a Call
1. Touch the Home Key > .
2. In the dialer tab , enter the phone
number with the on-screen keypad.
Touch to delete incorrect digits.
3. Touch the icon below the keypad to
place the call.
Adding Contacts
Creating a New Contact
1. Touch the Home Key > and touch
the all contacts tab .
2. Touch , or Create a new contact (if
there are no contacts).
3. Enter the contact name, phone numbers,
email addresses, and other information,
as shown. Touch DONE to save the contact.
Page 26

24
Importing Contacts in Batches
1. Touch the Home Key > .
2. Touch the Menu Key > Import/export >
Manager SIM card contacts or Import
from storage.
3. If prompted, select an account in which
to save the contacts.
4. For importing from the micro-SIM card,
touch the Menu Key > Import all.
For importing from the microSDHC card,
select the vCard file(s) on the microSDHC card and touch OK to begin importing.
Sending a Message
1. Touch in the home screen and select
Messaging, then touch .
2. Enter the recipient(s) and message text.
If you want to send an MMS, add subject
and attachments.
3. Touch to send the message.
Page 27

25
Setting Up Email Accounts
Setting Up Gmail
1. Touch in the home screen and select
Gmail.
NOTE:
If another Gmail account is already set
up, tap the Home Key > > Settings
> Add account > Google.
2. Touch Existing to sign in to your existing
Google Account. If you have no Google
Accounts, touch New to create one.
3. Follow the instructions on the screen to
set up the account.
Setting Up Email
1. Touch in the home screen and select
Email.
NOTE:
If another email account is already set
up, touch the Menu Key > Settings >
ADD ACCOUNT.
2. Enter the email address and password.
Page 28

26
3. Touch Next and follow the onscreen in-
structions.
Setting Up an Exchange
ActiveSync® Account
1. Touch in the home screen and select
Email.
NOTE:
If another email account is already set
up, touch the Menu Key > Settings >
ADD ACCOUNT.
2. Enter the email address and password.
3. Touch Manual setup > Exchange.
4. If necessary, edit Domain\Username,
Password, and Server information.
5. Read the onscreen activation disclaimer
and, if prompted, touch Next.
6. If prompted, touch OK to allow the
server to remotely control some of your
phone’s security features.
7. Configure the settings on the screen,
such as Days to sync, and then touch
Next.
Page 29
27
8. If prompted, touch Activate to activate
the Email app as a device administrator.
9. Identify your new account with a unique
name and then touch Next.
Contact your server administrator for more
help.
Connecting With a
Bluetooth Headset
1. Turn on the Bluetooth headset and
switch it to pairing mode. Refer to the
headset’s user guide for more information.
2. Touch in the home screen and select
Settings > Bluetooth.
3. Slide the ON/OFF switch if Bluetooth is
off. When Bluetooth is on, the icon
appears in the status bar.
NOTE:
Your phone automatically scans for and
displays the IDs of all available Bluetooth devices in range. You could touch
SEARCH FOR DEVICES if you wanted
to scan again.
Page 30
28
4. Touch the ID of the headset, or any other
device you want to pair with your phone.
Enter a passcode if prompted.
5. If necessary, touch the ID of the paired
headset to connect with it. Once con-
nected, the icon in the status bar
turns light.
NOTE:
Touch the ID again to end the connection.
Installing Apps From the
Google Play™ Store
There are tens of thousands of games and
applications in the Google Play Store for you
to download and install. You can send feedback or comments on an application.
Before you begin, ensure that you have
signed in to your Google account.
NOTE:
The content you can access in the Play
Store depends on your region and your service provider.
1. Touch the Home Key > > Play
Store.
Page 31

29
The rst time you launch Play Store, ac-
cept the Google Play Terms of Service.
2. Find the apps you need either by category or by touching .
3. Touch the app to see detailed description.
4. Touch INSTALL (free apps) or the price
(paid apps). If the app is not free, you
need to sign in to your Google Wallet™
account and select a payment method.
CAUTION:
Once installed, some apps can access many
functions or a significant amount of your
personal data. The Play Store will show you
what the app can access. Touch ACCEPT to
proceed, or touch the Back Key to cancel.
5. Wait for the app to be downloaded and
installed automatically. Payment needs
to be authorized before paid apps start
downloading.
The app is successfully installed when the
icon appears in the status bar. You can
find the new app after touching the Home
Key > .
Page 32
30
Taking a Photo
1. Touch in the home screen and select
Camera.
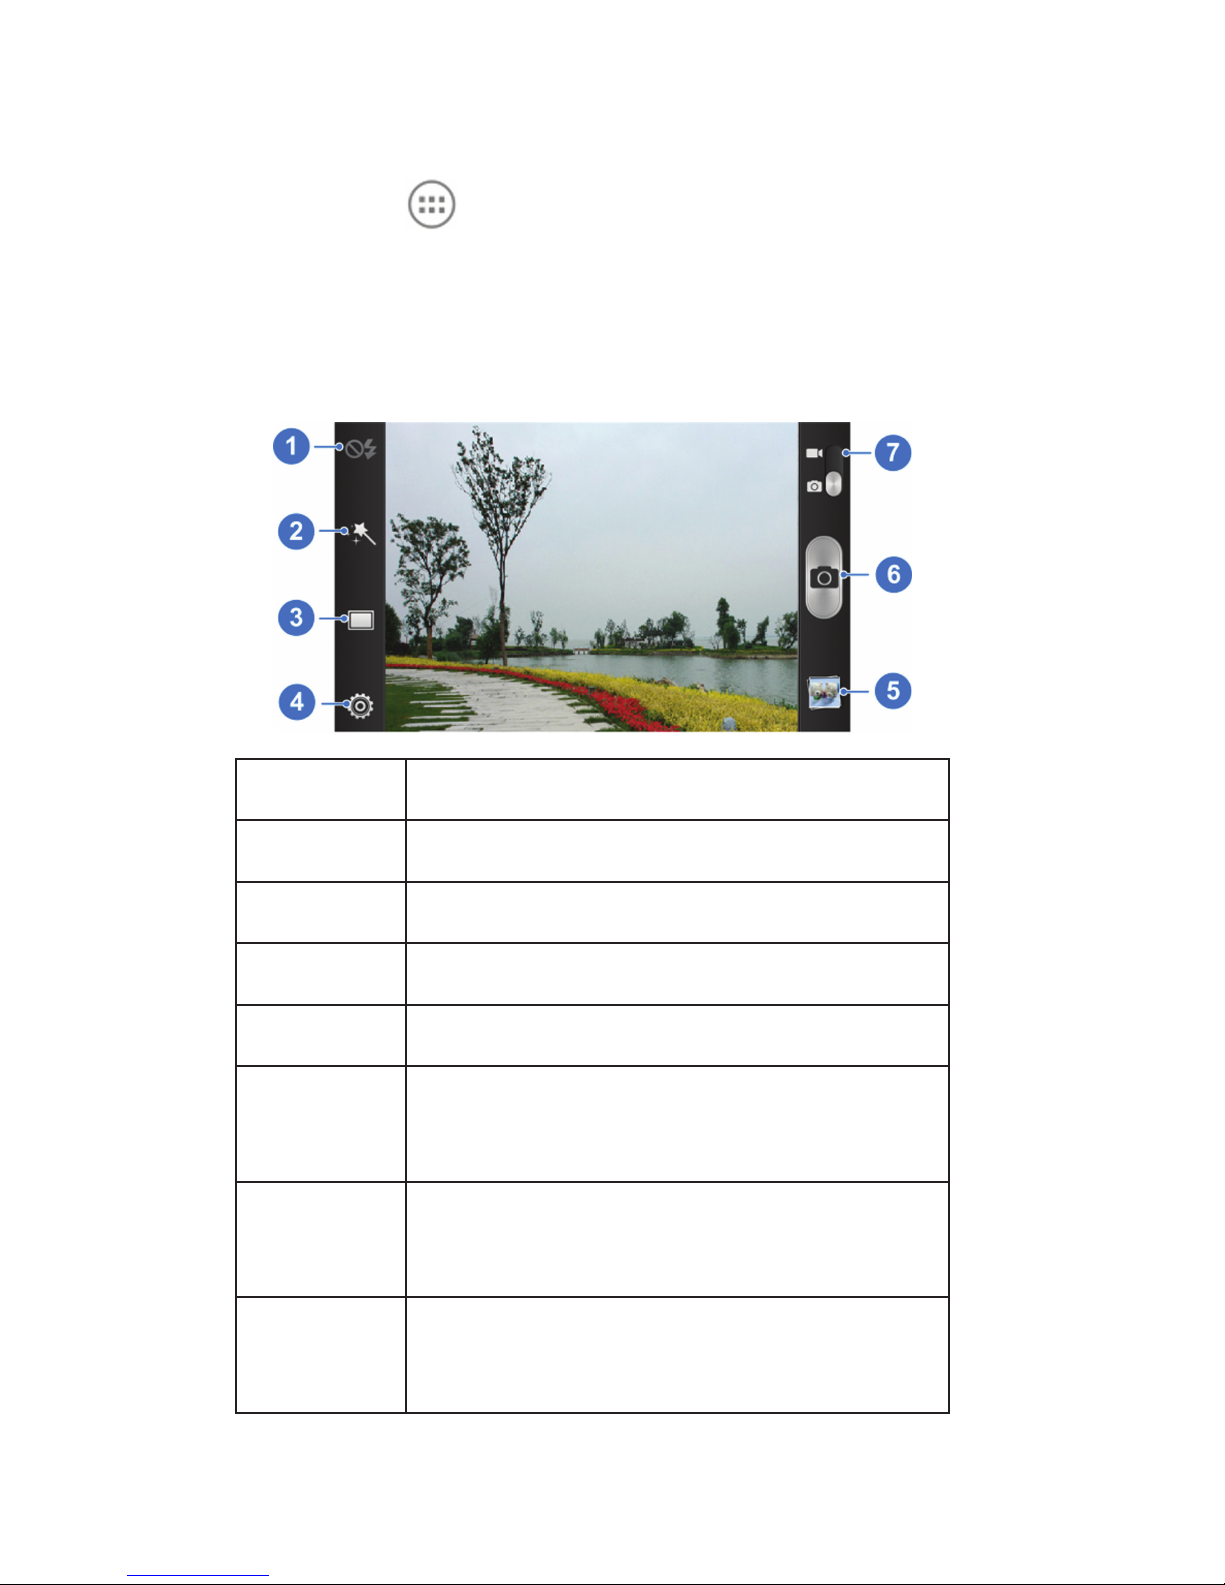
2. Aim the camera at the subject and make
any necessary adjustment.
Number Function
1 Change the ash setting.
2 Select color effect.
3 Select scene mode.
4 Change the camera settings.
5
View pictures and videos you
have taken.
6
Touch the shutter button to take
a picture.
7
Switch between the camera and
camcorder.
Page 33
31
3. Lightly touch .
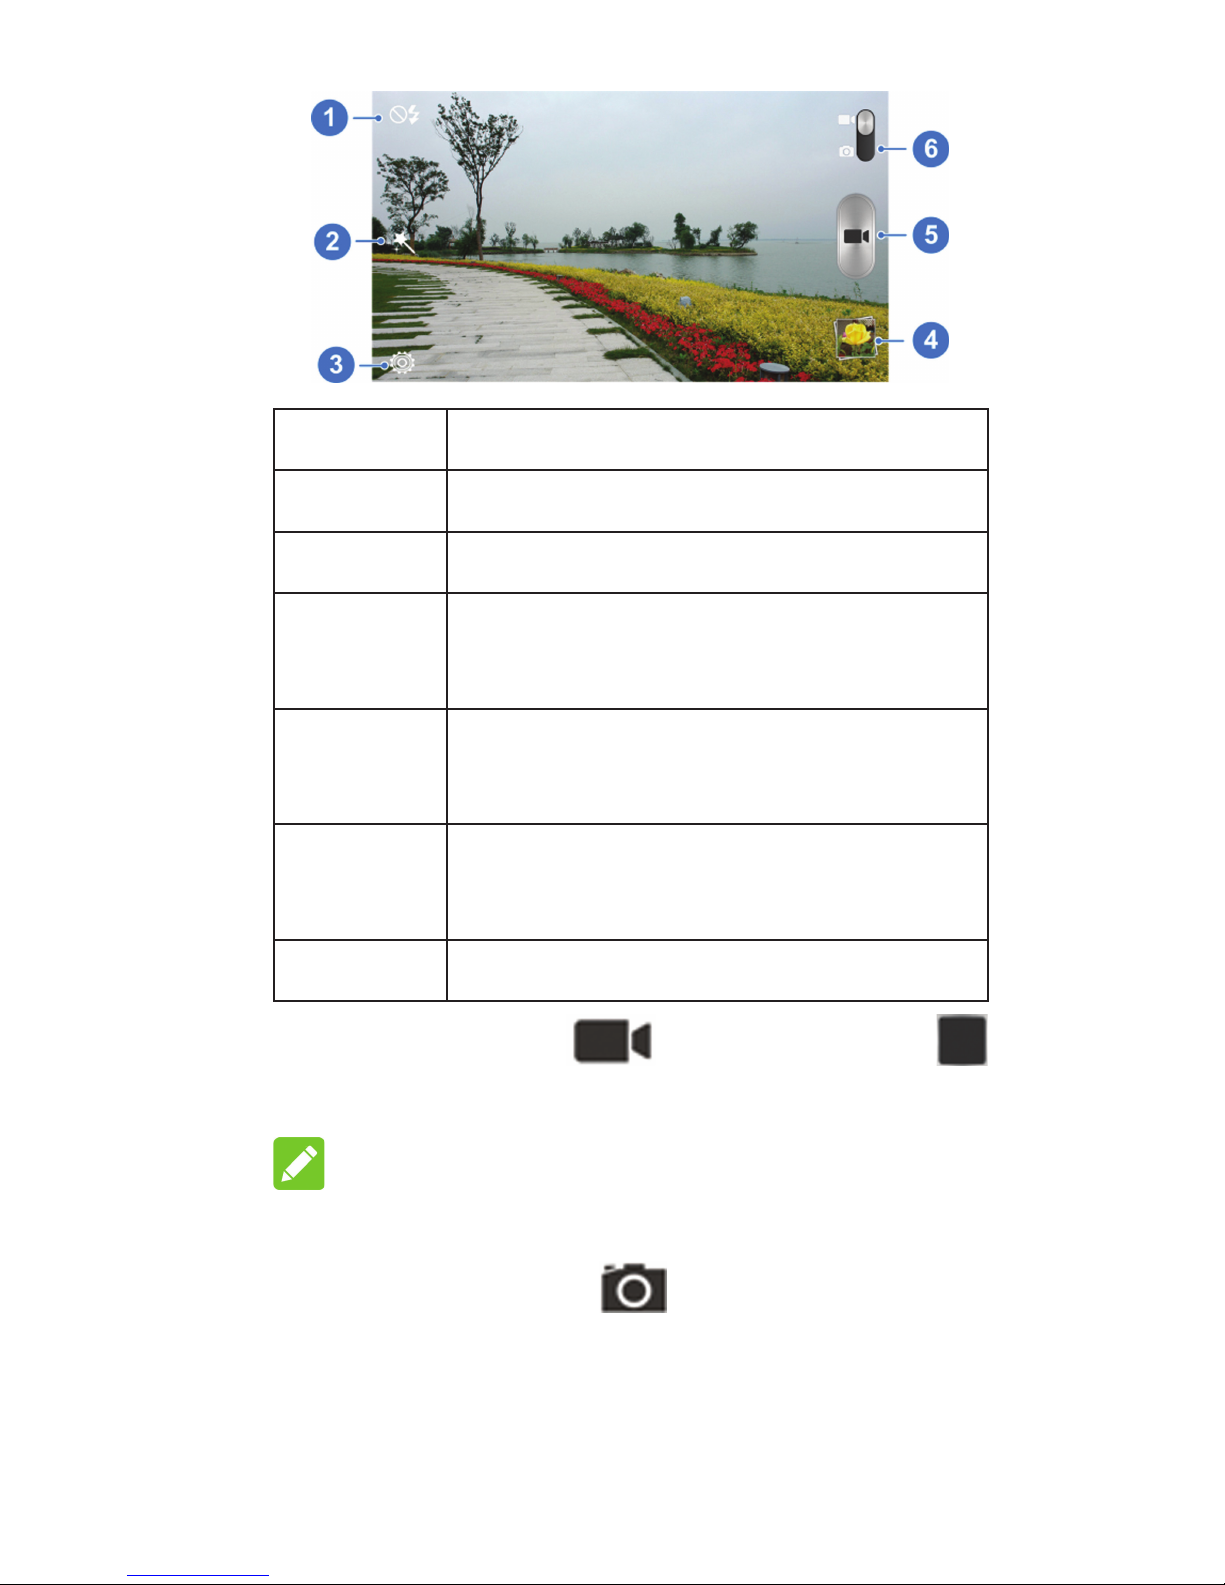
Recording a Video
1. Touch in the home screen and select
Camera.
2. Slide the switch to open the camcorder.
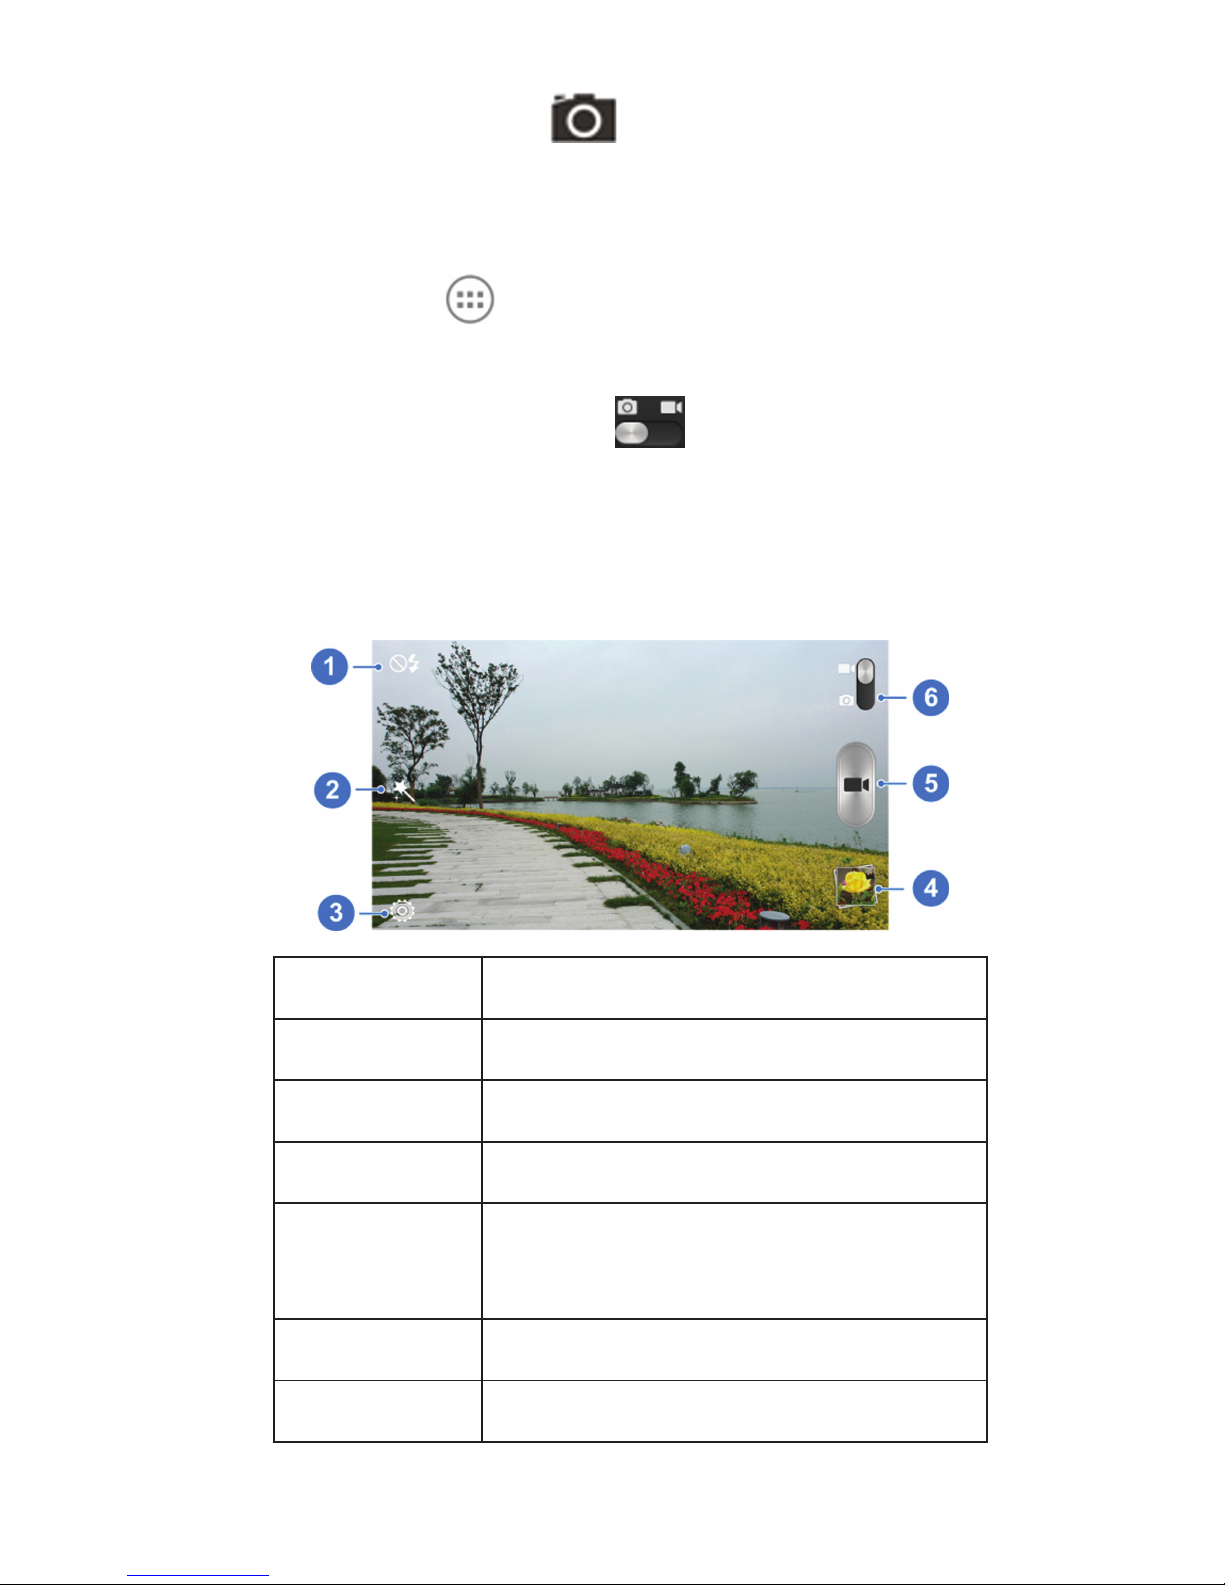
3. Aim the camera at the subject and make
any necessary adjustment.
Number Function
1 Turn on/off ash.
2 Select scene mode.
3 Change camcorder settings.
4
View photos and videos you
have captured.
5 Start/end video recording.
6 Switch to camera mode.
Page 34
32
4. Touch to start and to stop recording.
NOTE:
While the recording is in progress, you can
touch to save the frame as a separate
photo.
Playing Music
1. Touch in the home screen and select
Play Music.
2. Touch > My Library, and select a
category, such as Artists or Albums, to
nd the song you want to play.
3. Touch the song to play it back.
Page 35
33
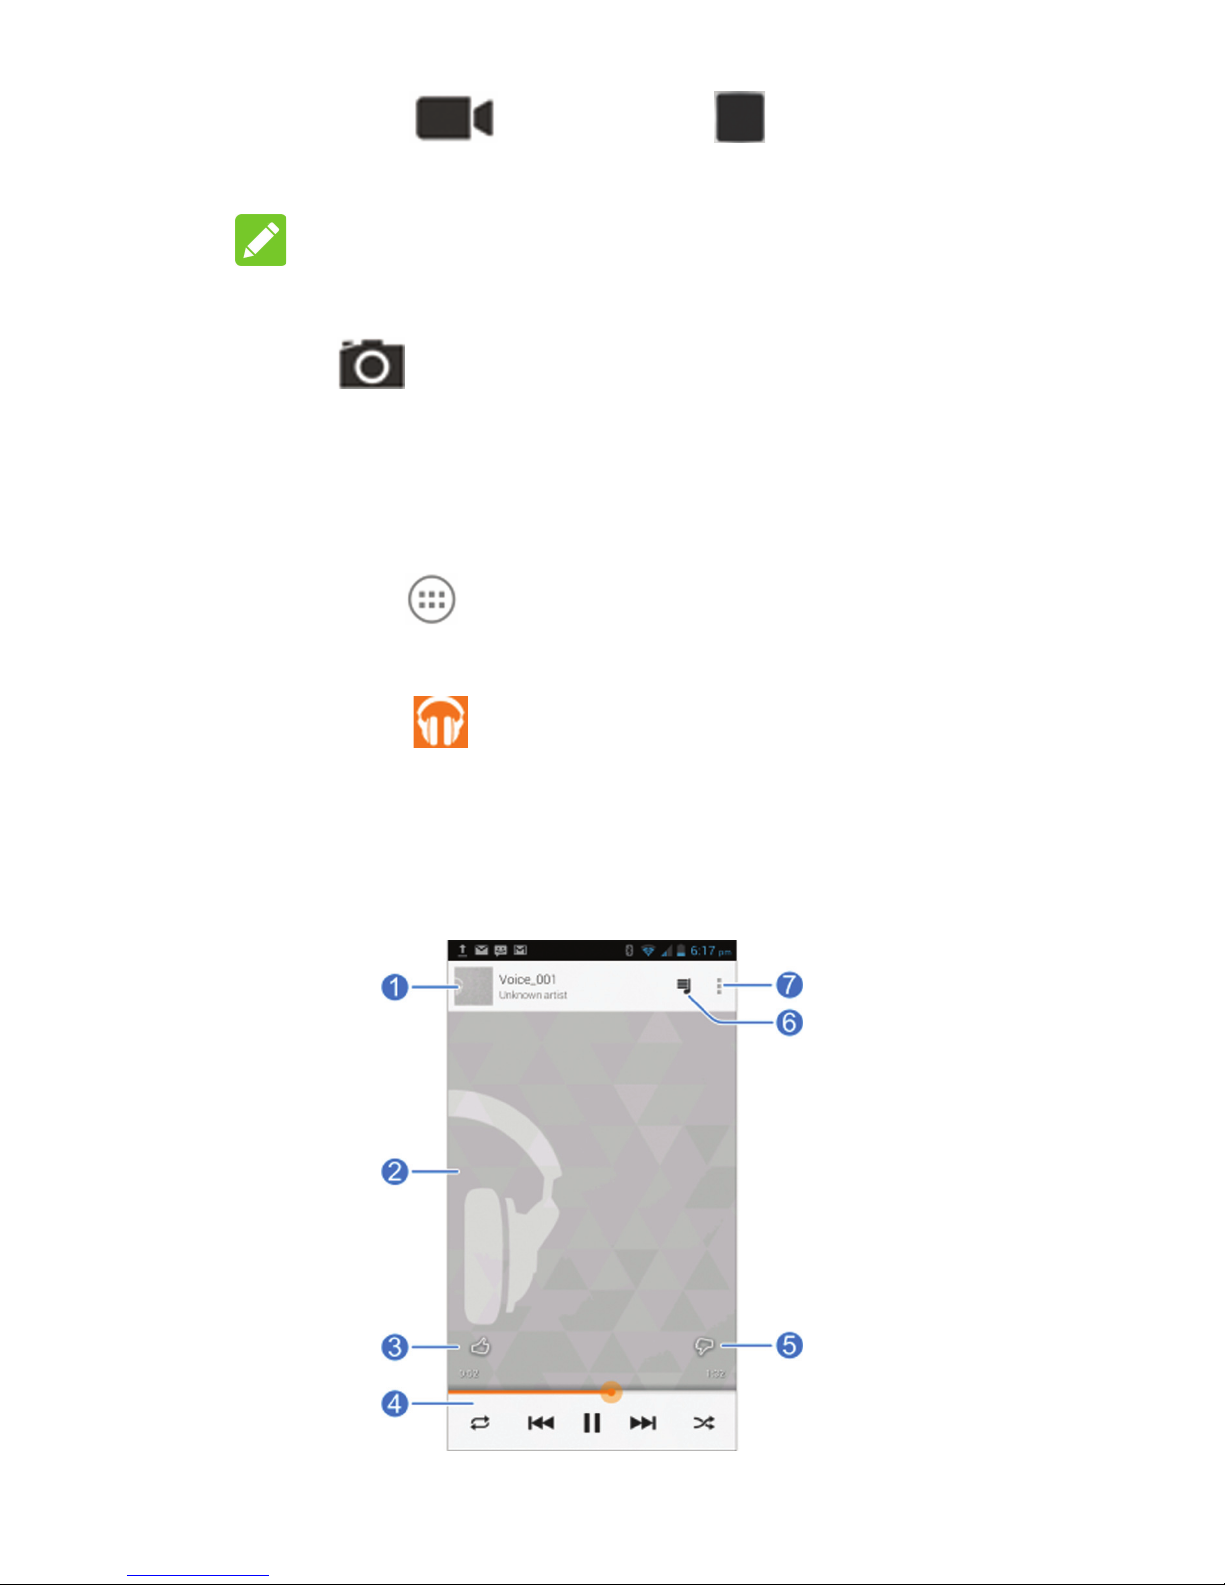
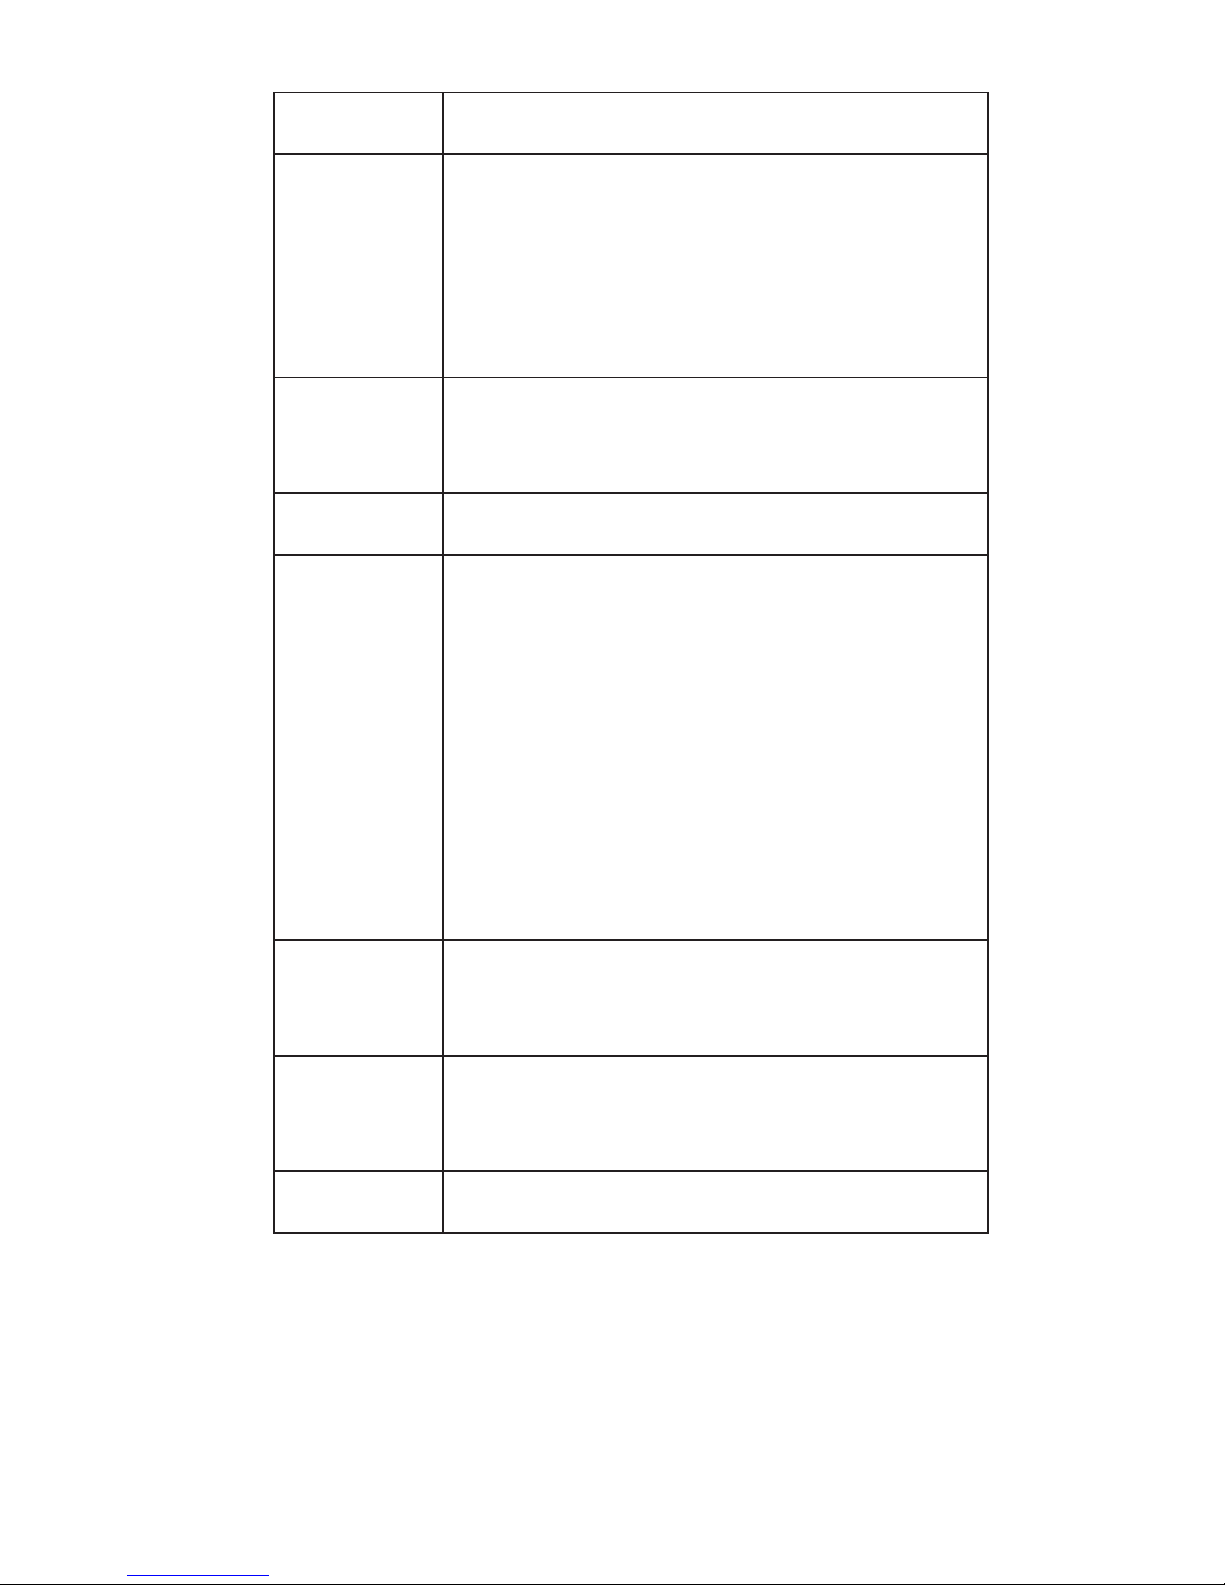
Number Function
1
Song and artist information.
Touch or drag down to return to
the music library.
2 Album artwork.
3 Give the song a thumbs-up.
4
Playback control. Skip songs,
pause and resume playback,
use shufe or repeat. Drag the
progress bar to jump to any part
of the song.
5 Give the song a thumbs-down.
6
Touch to see the current playlist
(queue).
7 Get more options.
Connecting to PC
You can connect your phone to a computer
with a USB cable and transfer music, pic-
tures, and other les in either direction. Your
device stores these les in internal storage
or on a removable microSDHC card.
1. Touch and hold the status bar across the
top of the screen and ick down.
Page 36

34
2. Touch (Connected as [current connection mode]).
3. Choose one of the following options:
u
Charge only: Charge your phone
via USB.
u
USB mass storage: Transfer files
between PC and external SD card
on Android devices.
u
Install driver: Install the driver
needed for connecting your phone to
your PC.
u
Media device (MTP): Transfer me-
dia les on Windows® or Mac®.
u
Camera (PTP): Transfer photos us-
ing camera software.
To disconnect the device from the computer,
simply unplug the USB cable when you’re
nished.
Connecting to the Internet
Connecting via Wi-Fi
1. Touch the Home Key > Menu Key >
System settings > Wi-Fi.
2. Slide the ON/OFF switch if Wi-Fi is off.
Page 37

35
Your phone automatically searches for
Wi-Fi networks in range and displays
their names and security settings. Your
phone also connects to previously linked
networks when they are in range.
3. Touch a network name to connect to it.
If the network is secured, enter a pass-
word or other credentials. (Ask your network administrator for details.)
Connecting via Mobile Network
To connect to the Internet via mobile network
you can use the default Access Point Names
(APN). If you want to add a new APN, please
contact the service provider to get the necessary information. Do not change the default settings unless instructed by the service
provider. Otherwise the service might stop
working.
1. Touch the Home Key > Menu Key >
System settings > Mobile networks >
Access Point Names.
2. Touch .
3. Touch each item to enter the information
you get from your service provider.
Page 38

36
4. Touch the Menu Key > Save to com-
plete.
Connecting via USB Tethering
You can access the Internet on your computer via the USB tethering feature of your
phone. The feature needs data connection
on a mobile network and may result in data
charges.
NOTE:
If your phone has a microSDHC card or USB
storage, you can’t mount it on your computer
while USB tethered.
1. Connect your phone to your computer
with a USB cable.
2. Touch the Home Key > Menu Key >
System settings > More.
3. Check USB tethering. A new network
connection will be created on your computer.
NOTE:
To stop sharing your data connection, uncheck USB tethering or disconnect the USB
cable.
Page 39

37
Extending Battery Life
There are several things you can do to make
your battery last longer.
• Turn on Wi-Fi, Bluetooth, GPS, mobile
data, auto-sync only when you need to.
• Lower the screen brightness.
• Use USB tethering (when you have a
cable) instead of portable Wi-Fi hotspot
to share your phone’s data service.
• From the home screen, touch > Task
Manager and close the apps you do not
need but still run in the background.
• From the home screen, touch > Set-
tings > Sound and uncheck Vibrate on
touch.
Freeing Up Memory Space
Use Task Manager to free up memory
space and optimize system speed.
1. From the home screen, touch > Task
Manager.
2. Touch the Tasks tab and touch next
to the application you do not need.
Page 40

38
You can also touch Close All to stop all running applications.
Managing the Phone Storage
Deleting Old Messages
You can manually delete old messages to
free up some storage space. You may also
set up auto deletion of the oldest messages
when the limits are reached.
1. From the home screen, touch >
Messaging.
2. Touch the Menu Key > Settings.
3. Check Delete old messages to enable
auto deletion.
4. Touch Text message limit or Multime-
dia message limit to set the maximum
limit.
5. Touch Set.
Clearing Browser’s Local Content
1. From the home screen, touch >
Browser.
2. Touch the Menu Key > Settings > Privacy & security.
Page 41
39
3. Touch Clear cache, Clear history, and
Clear all cookie data.
Product Safety Information
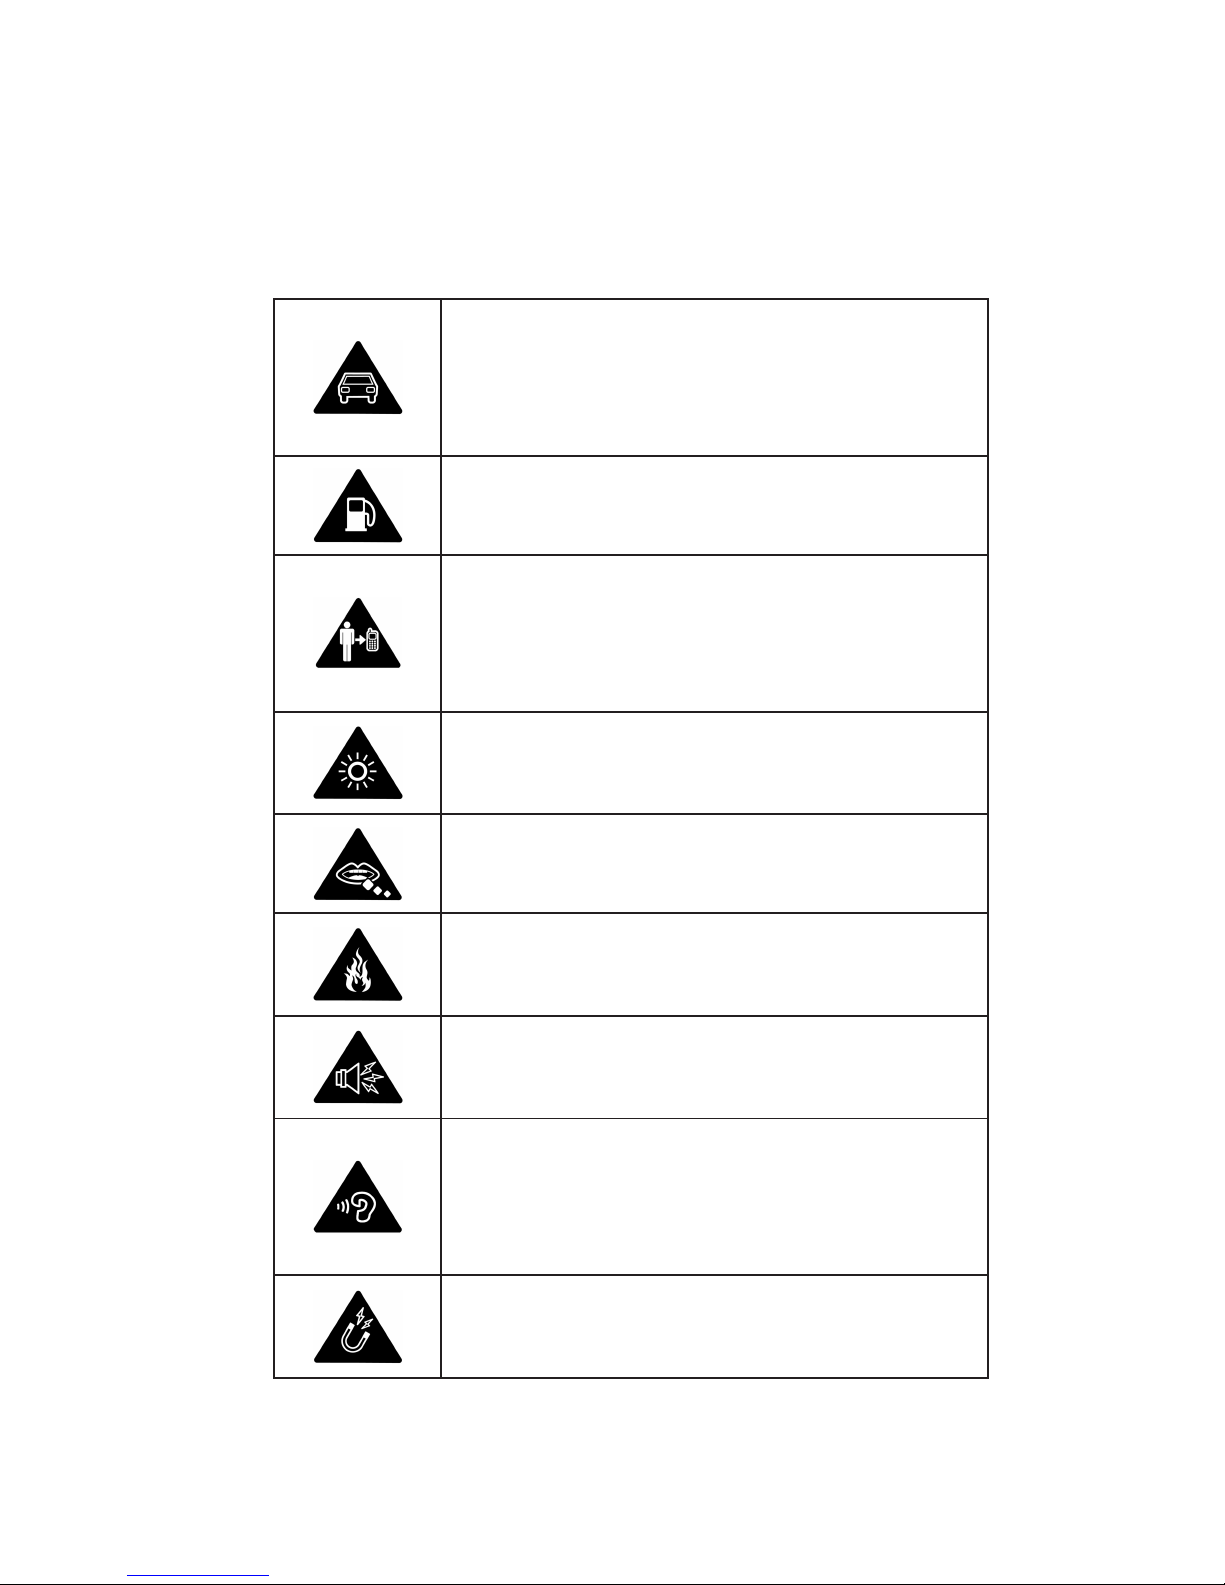
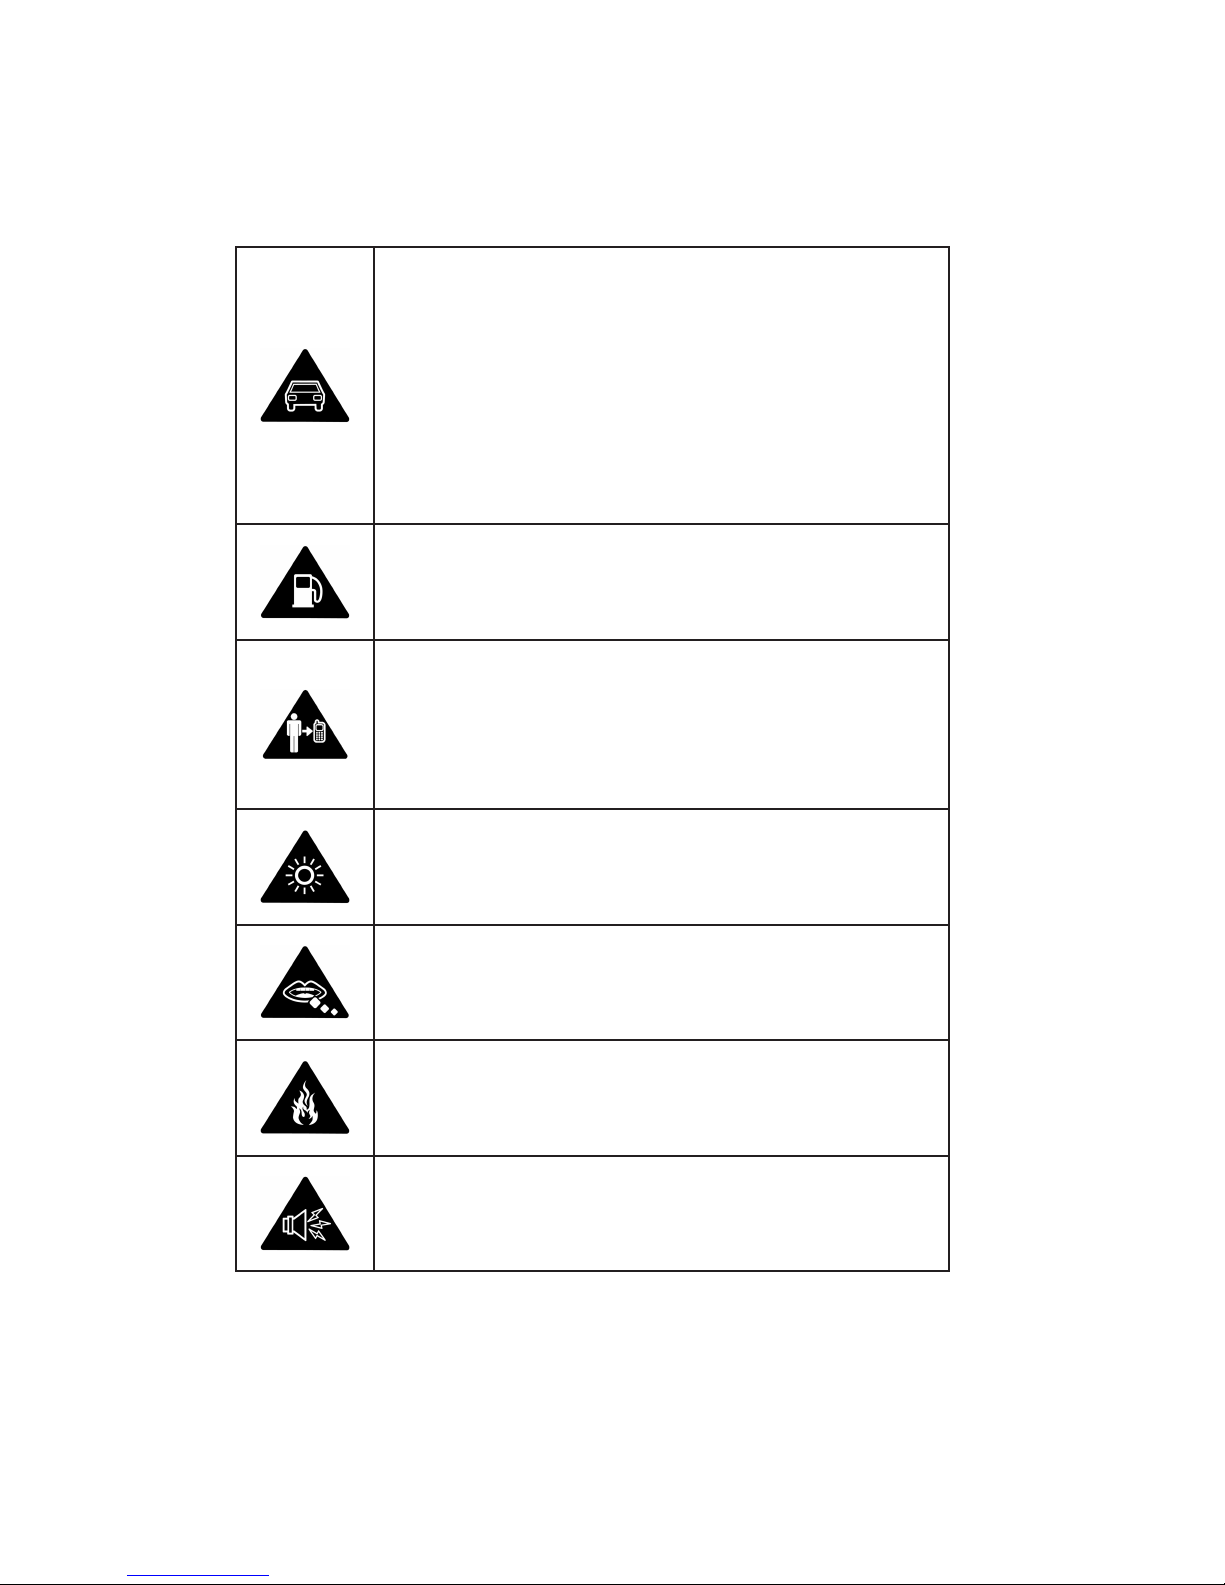
Don’t make or receive handheld
calls while driving. Never text
while driving.
Don’t use at gas stations.
Keep your phone at least 15 mm
away from your ear or body while
making calls.
Your phone may produce a bright
or ashing light.
Small parts may cause choking.
Do not dispose of your phone in
re.
Your phone can produce a loud
sound.
To prevent possible hearing damage, do not listen at high volume
levels for long periods.
Avoid contact with anything magnetic.
Page 42
40
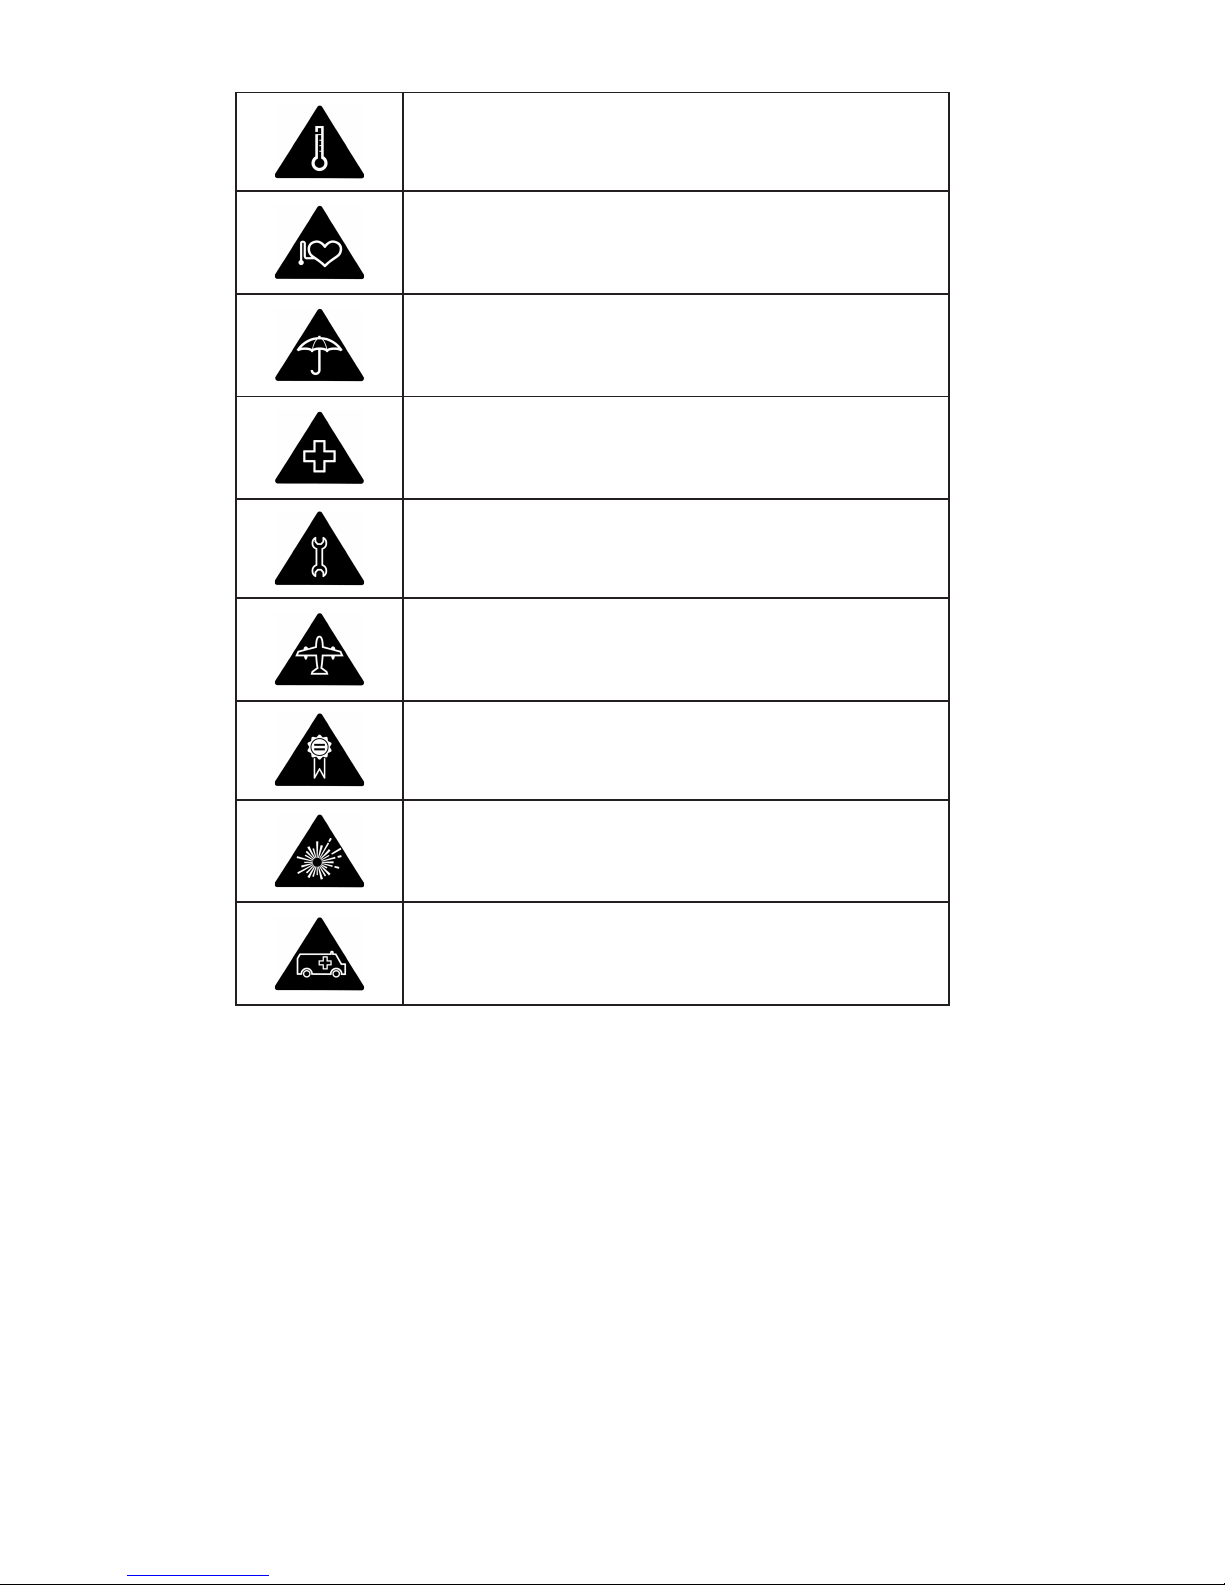
Avoid extreme temperatures.
Keep away from pacemakers and
other electronic medical devices.
Avoid contact with liquid. Keep
your phone dry.
Turn off when asked to in hospitals and medical facilities.
Don’t take your phone apart.
Turn off when told to in aircrafts
and airports.
Only use approved accessories.
Turn off when near explosive materials or liquids.
Don’t rely on your phone for
emergency communications.
Page 43

41
For Your Safety
Radio Frequency (RF) Energy
This device meets the government’s
requirements for exposure to radio waves.
This device is designed and manufactured
not to exceed the emission limits for
exposure to radio frequency (RF) energy set
by the Federal Communications Commission
of the U.S. Government:
The exposure standard for wireless mobile
devices employs a unit of measurement
known as the Specific Absorption Rate, or
SAR. The SAR limit set by the FCC is 1.6W/
kg. *Tests for SAR are conducted using
standard operating positions accepted by
the FCC with the device transmitting at its
highest certified power level in all tested
frequency bands. Although the SAR is
determined at the highest certified power
level, the actual SAR level of the device
while operating can be well below the
maximum value. This is because the device
is designed to operate at multiple power
levels so as to use only the poser required to
Page 44

42
reach the network. In general, the closer you
are to a wireless base station antenna, the
lower the power output.
The highest SAR value for the device as
reported to the FCC when tested for use
at the ear is 1.14 W/kg and when worn on
the body, as described in this user guide,
is 1.32 W/kg (Body-worn measurements
differ among device models, depending
upon available enhancements and FCC
requirements.)
While there may be differences between the
SAR levels of various devices and at various
positions, they all meet the government
requirement.
The FCC has granted an Equipment
Authorization for this device with all reported
SAR levels evaluated as in compliance
with the FCC RF exposure guidelines. SAR
information on this device is on le with the
FCC and can be found under the Display
Grant section of http://www.fcc.gov/oet/ea/
fccid/ after searching on:
FCC ID: SRQ-ZTEZ730
Page 45

43
For body worn operation, this device
has been tested and meets the FCC
RF exposure guidelines for use with an
accessory that contains no metal and the
positions the handset a minimum of 1.0 cm
from the body. Use of other enhancements
may not ensure compliance with FCC RF
exposure guidelines. If you do no t use a
body-worn accessory and are not holding
the device at the ear, position the handset a
minimum of 1.0 cm from your body when the
device is switched on.
FCC Compliance
This mobile phone complies with part 15 of
the FCC Rules. Operation is subject to the
following two conditions: (1) This device
may not cause harmful interference, and
(2) this device must accept any interference
received, including interference that may
cause undesired operation.
CAUTION: Changes or modifications
not expressly approved by the party
responsible for compliance could void the
user’s authority to operate the equipment.
Page 46

44
This mobile phone has been tested and
found to comply with the limits for a Class
B digital device, pursuant to Part 15 of the
FCC Rules. These limits are designed to
provide reasonable protection against harmful interference in a residential installation.
This equipment generates, uses and can
radiated radio frequency energy and, if not
installed and used in accordance with the
instructions, may cause harmful interference
to radio communications. However, there is
no guarantee that interference will not occur
in a particular installation. If this equipment
does cause harmful interference to radio
or television reception, which can be determined by turning the equipment off and on,
the user is encouraged to try to correct the
interference by one or more of the following
measures:
• Reorient or relocate the receiving
antenna.
• Increase the separation between the
equipment and receiver.
• Connect the equipment into an outlet on
a circuit different from that to which the
Page 47

45
receiver is connected.
• Consult the dealer or an experienced
radio/TV technician for help.
IC Notice
This device complies with Industry Canada
license-exempt RSS standard(s). Operation
is subject to the following two conditions: (1)
this device may not cause interference, and
(2) this device must accept any interference,
including interference that may cause undesired operation of the device.
This Class B digital apparatus complies with
Canadian ICES-003.
IC: 5200E-Z730
IC Radiation Exposure Statement
This EUT is compliance with SAR for general
population/uncontrolled exposure limits in IC
RSS-102 and had been tested in accordance
with the measurement methods and
procedures specied in IEEE 1528 and IEC
62209. This equipment should be installed
and operated with minimum distance 1.0 cm
between the radiator and your body. This
device and its antenna(s) must not be co-
Page 48

46
located or operating in conjunction with any
other antenna or transmitter.
Hearing Aid Compatibility (HAC)
regulations for Mobile Phones
In 2003, the FCC adopted rules to make
digital wireless telephones compatible with
hearing aids and cochlear implants. Although
analog wireless phones do not usually cause
interference with hearing aids or cochlear
implants, digital wireless phones sometimes
do because of electromagnetic energy emitted by the phone's antenna, backlight, or
other components. Your phone is compliant
with FCC HAC regulations (ANSI C63.19-
2011). While some wireless phones are used
near some hearing devices (hearing aids
and cochlear implants), users may detect a
buzzing, humming, or whining noise. Some
hearing devices are more immune than others to this interference noise and phones
also vary in the amount of interference they
generate. The wireless telephone industry
has developed a rating system for wireless
phones to assist hearing device users in
Page 49

47
nding phones that may be compatible with
their hearing devices. Not all phones have
been rated. Phones that are rated have the
rating on their box or a label located on the
box. The ratings are not guarantees. Results
will vary depending on the user's hearing device and hearing loss. If your hearing device
happens to be vulnerable to interference,
you may not be able to use a rated phone
successfully. Trying out the phone with your
hearing device is the best way to evaluate it
for your personal needs.
This phone has been tested and rated for
use with hearing aids for some of the wireless technologies that it uses. However,
there may be some newer wireless technologies used in this phone that have not been
tested yet for use with hearing aids. It is
important to try the different features of this
phone thoroughly and in different locations,
using your hearing aid or cochlear implant,
to determine if you hear any interfering
noise. Consult your service provider or the
manufacturer of this phone for information
Page 50

48
on hearing aid compatibility. If you have
questions about return or exchange policies,
consult your service provider or phone retailer.
M-Ratings: Phones rated M3 or M4 meet
FCC requirements and are likely to generate less interference to hearing devices than
phones that are not labeled. M4 is the better/higher of the two ratings.
T-Ratings: Phones rated T3 or T4 meet
FCC requirements and are likely to be more
usable with a hearing device’s telecoil (“T
Switch” or “Telephone Switch”) than unrated
phones. T4 is the better/ higher of the two
ratings. (Note that not all hearing devices
have telecoils in them.)
Your phone meets the M3/T4 level rating.
Hearing devices may also be rated. Your
hearing device manufacturer or hearing
health professional may help you find this
rating. For more information about FCC
Hearing Aid Compatibility, please go to http://
www.fcc.gov/cgb/dro.
Page 51

49
CTIA Requirements
a) Do not disassemble or open crush, bend
or deform, puncture or shred.
b) Do not modify or remanufacture, attempt
to insert foreign objects into the battery,
immerse or expose to water or other liquids,
expose to re, explosion or other hazard.
c) Only use the battery for the system for
which it is specied
d) Only use the battery with a charging
system that has been qualified with the
system per CTIA Certication Requirements
for Battery System Compliance to IEEE
1725. Use of an unqualified battery or
charger may present a risk of re, explosion,
leakage, or other hazard.
e) Do not short circuit a battery or allow
metallic conductive objects to contact battery
terminals.
f) Replace the battery only with another
battery that has been qualified with the
system per this standard, IEEE-Std-1725.
Use of an unqualified battery may present
a risk of fire, explosion, leakage or other
hazard.
Page 52

50
g) Promptly dispose of used batteries in
accordance with local regulations
h) Battery usage by children should be
supervised.
j) Avoid dropping the phone or battery. If
the phone or battery is dropped, especially
on a hard surface, and the user suspects
damage, take it to a service center for
inspection.
k) Improper battery use may result in a re,
explosion or other hazard.
For those host devices that utilize a USB
port as a charging source, the host device’s
user manual shall include a statement that
the phone shall only be connected to CTIA
certified adapters, products that bear the
USB-IF logo or products that have completed
the USB-IF compliance program.
Page 53

51
ZTE Z730
Téléphone mobile WCDMA/
GSM
Guide de démarrage rapide
Page 54

52
Connaître votre téléphone .............. 58
Préparation.......................................60
Chargement de la batterie ..............64
Mise sous tension et hors tension du
téléphone ..........................................65
Écran d’accueil ................................66
Ouverture d’application .......................67
Ajout de raccourcis ou de gadgets
logiciels ...............................................67
Suppression d’un raccourci ou ...........68
d’un gadget logiciel .............................68
Organisation au moyen des dossiers ..68
Application d’un nouveau fond d’écran 69
Vérication de l’état du téléphone . 70
Gestion des notications ................71
Réglage de la sonnerie et du son ..73
Réglage de la sonnerie et du son
associé aux notications .....................73
Réglages des tonalités du système ....73
Réglage du volume..........................74
Réglage du verrouillage d’écran .... 75
Page 55

53
Vérication de la messagerie vocale .
76
Appels...............................................77
Ajout d’un contact ........................... 77
Création d’un contact ..........................77
Importation de contacts .......................78
Envoi d’un message ........................78
Conguration du compte de courriel
79
Conguration du compte Gmail ...........79
Conguration du courriel ..................... 80
Configuration d’un compte Exchange
ActiveSync® ....................................... 80
Connexion d’un casque-micro
Bluetooth ..........................................82
Installation d’une application de la
boutique Google Play™ .................. 83
Prise d’une photo ............................85
Enregistrement d’une vidéo ...........86
Écouter de la musique ....................88
Connexion au PC .............................90
Page 56

54
Connexion à Internet .......................91
Connexion à un réseau Wi-Fi ..............91
Connexion à un réseau mobile ...........92
Connexion au moyen d’un partage de
connexion USB ...................................93
Prolongement de l’autonomie de la
batterie..............................................94
Libération d’espace mémoire .........95
Gestion du stockage de votre
téléphone ..........................................96
Suppression des anciens messages ...96
Nettoyage du contenu local du
navigateur ...........................................97
Données de sécurité de l’appareil .98
Pour votre sécurité ........................100
Énergie des fréquences radio (FR) ... 100
Conformité à la FCC .........................103
Avis d’Industrie Canada ....................105
Prise en charge des prothèses auditives
106
Exigences de la CTIA ........................ 110
Page 57

55
MENTIONS LÉGALES
© ZTE CORPORATION, 2014.
Tous droits réservés.
Aucune partie de cette publication ne peut
être citée, reproduite, traduite ou utilisée
sous quelque forme ou par quelque moyen
que ce soit, électronique ou mécanique, y
compris la photocopie et le microlm, sans l’
autorisation écrite préalable de ZTE Corporation.
Avis
ZTE Corporation se réserve le droit d’apporter des modifications aux erreurs d’impression ou de mettre à jour les caractéristiques
techniques figurant dans le présent guide
sans préavis.
Nous offrons une solution libre-service
aux utilisateurs de téléphones intelligents.
Visitez le site Web ofciel de ZTE (à www.
ztedevices.ca) pour obtenir de plus amples
renseignements sur cette solution libreservice et connaître les modèles pris en
charge. Toute information disponible sur le
site Web a préséance.
Page 58

56
Avis de non-responsabilité
ZTE Corporation décline expressément toute
responsabilité relative aux défauts et dommages causés par toute modification non
autorisée du logiciel.
Les images et captures d’écran présentes
dans le présent manuel peuvent différer du
produit réel et son contenu peut différer du
produit ou du logiciel réel.
Marques de commerce
ZTE et les logos ZTE sont des marques ce
commerce de ZTE Corporation.
Google et Android sont des marques de
commerce de Google Inc.
La marque de commerce et les logos Blue-
tooth
®
sont la propriété de Bluetooth SIG,
Inc. et toute utilisation de ces marques par
ZTE Corporation est accordée sous licence.
Le logo microSDHC est une marque
de commerce de SD-3C, LLC.
Page 59

57
Les autres marques et appellations commerciales appartiennent à leurs propriétaires
respectifs.
Version nº R1.0
Date de modication : 6 novembre 2014
Numéro de manuel : 079584506937
Page 60
58
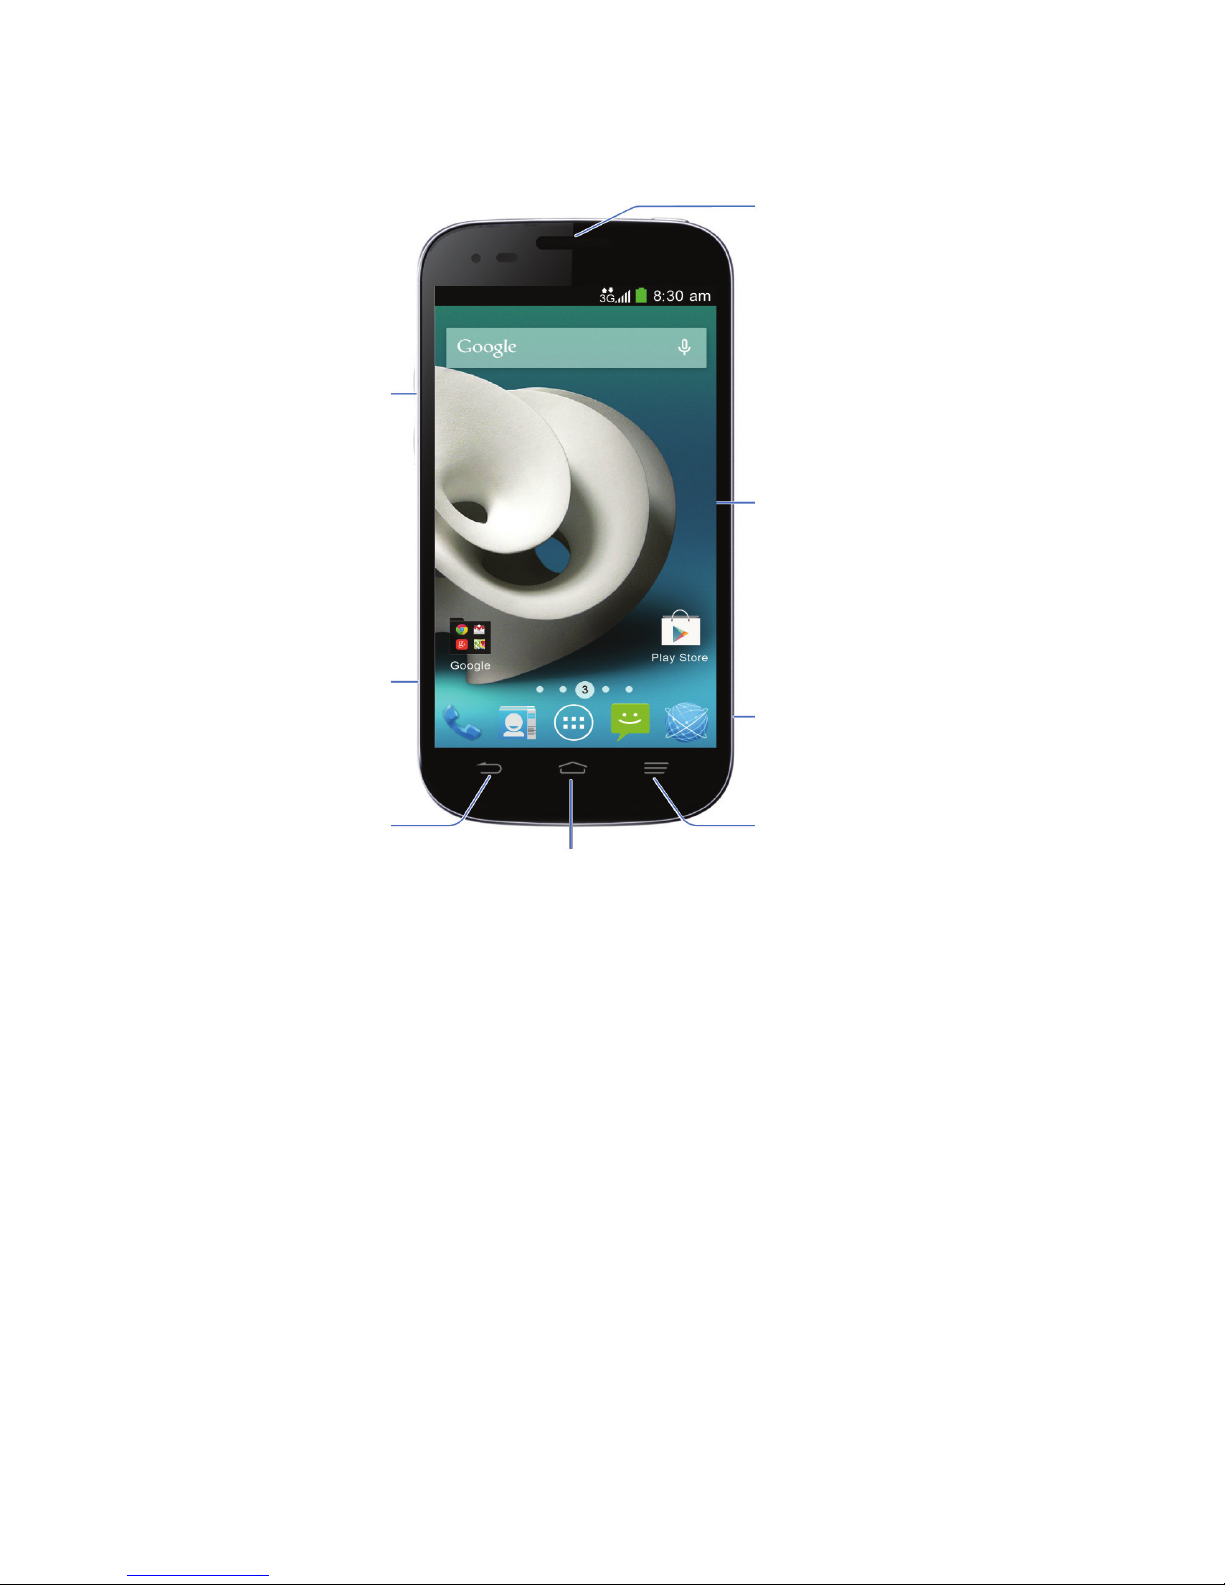
Connaître votre téléphone
Écouteur
Touches
Volume
Prise
chargeur/
micro-USB
Touche
Retour
en arrière
Écran
tactile
Emplacement
pour carte
microSDHC
Touche Menu
Touche
Accueil
Page 61
59
Touche
Marche-arrêt
Prise d’
écouteurs
Flash
Appareil
photo
Haut-parleur
Couvercle
arrière
Touche Marche-arrêt
• Appuyez et maintenez votre doigt sur
la touche pour allumer, redémarrer, ou
éteindre votre appareil ou encore pour
activer ou désactiver le mode avion et
sélectionner les modes du téléphone.
• Appuyez sur la touche pour allumer ou
éteindre l’afchage.
Touche Accueil
• Appuyez sur cette touche pour revenir à
l’écran d’accueil à partir de tout écran ou
de toute application.
Page 62

60
• Appuyez et maintenez votre doigt sur la
touche pour utiliser la recherche Google.
• Appuyez deux fois pour voir les applications utilisées récemment.
Touche Menu
Appuyez sur cette touche pour accéder aux
options de l’écran.
Touche Retour en arrière
Appuyez sur cette touche pour revenir
à l’écran précédent.
Touches Volume
Appuyez ou maintenez votre doigt sur ces
touches pour augmenter ou diminuer le volume.
Préparation
Éteignez votre téléphone avant d’installer ou
de remplacer la batterie ou la carte microSIM. La carte microSDHC™ est en option
et peut être installée ou retirée pendant que
votre téléphone est allumé. Désinstallez la
carte microSDHC avant de la retirer.
1. Placez votre doigt vis-à-vis de la fente
au bas du couvercle arrière an de sou-
Page 63
61
lever et de retirer le couvercle.
2. Levez le butoir en caoutchouc, tenez la
carte micro-SIM avec le coin coupé orienté comme illustré et glissez la carte en
place.
Page 64
62
AVERTISSEMENT!
Pour éviter d’endommager le téléphone,
n’utilisez pas d’autres types de carte SIM ni
une carte micro-SIM fabriquée à partir d’une
carte SIM. Vous pouvez obtenir une carte
micro-SIM standard auprès de votre fournisseur de services.
3. Insérez la carte microSDHC dans son
emplacement.
REMARQUE :
Il se peut que votre téléphone ait déjà une
carte microSDHC préinstallée. Certaines
applications peuvent ne pas fonctionner normalement après avoir retiré la carte, qu’elle
soit préinstallée ou non.
Page 65
63
4. Alignez les connecteurs du téléphone et
la batterie et glissez cette dernière dans
son compartiment. Ensuite, poussez
doucement sur la batterie afin qu’elle
soit bien sécurisée.
5. Alignez le couvercle avec l’arrière du
téléphone et poussez-le en place.
Assurez-vous que les languettes sont
sécurisées et qu’il n’y a pas d’espace
sur le pourtour.
Page 66
64
Chargement de la batterie
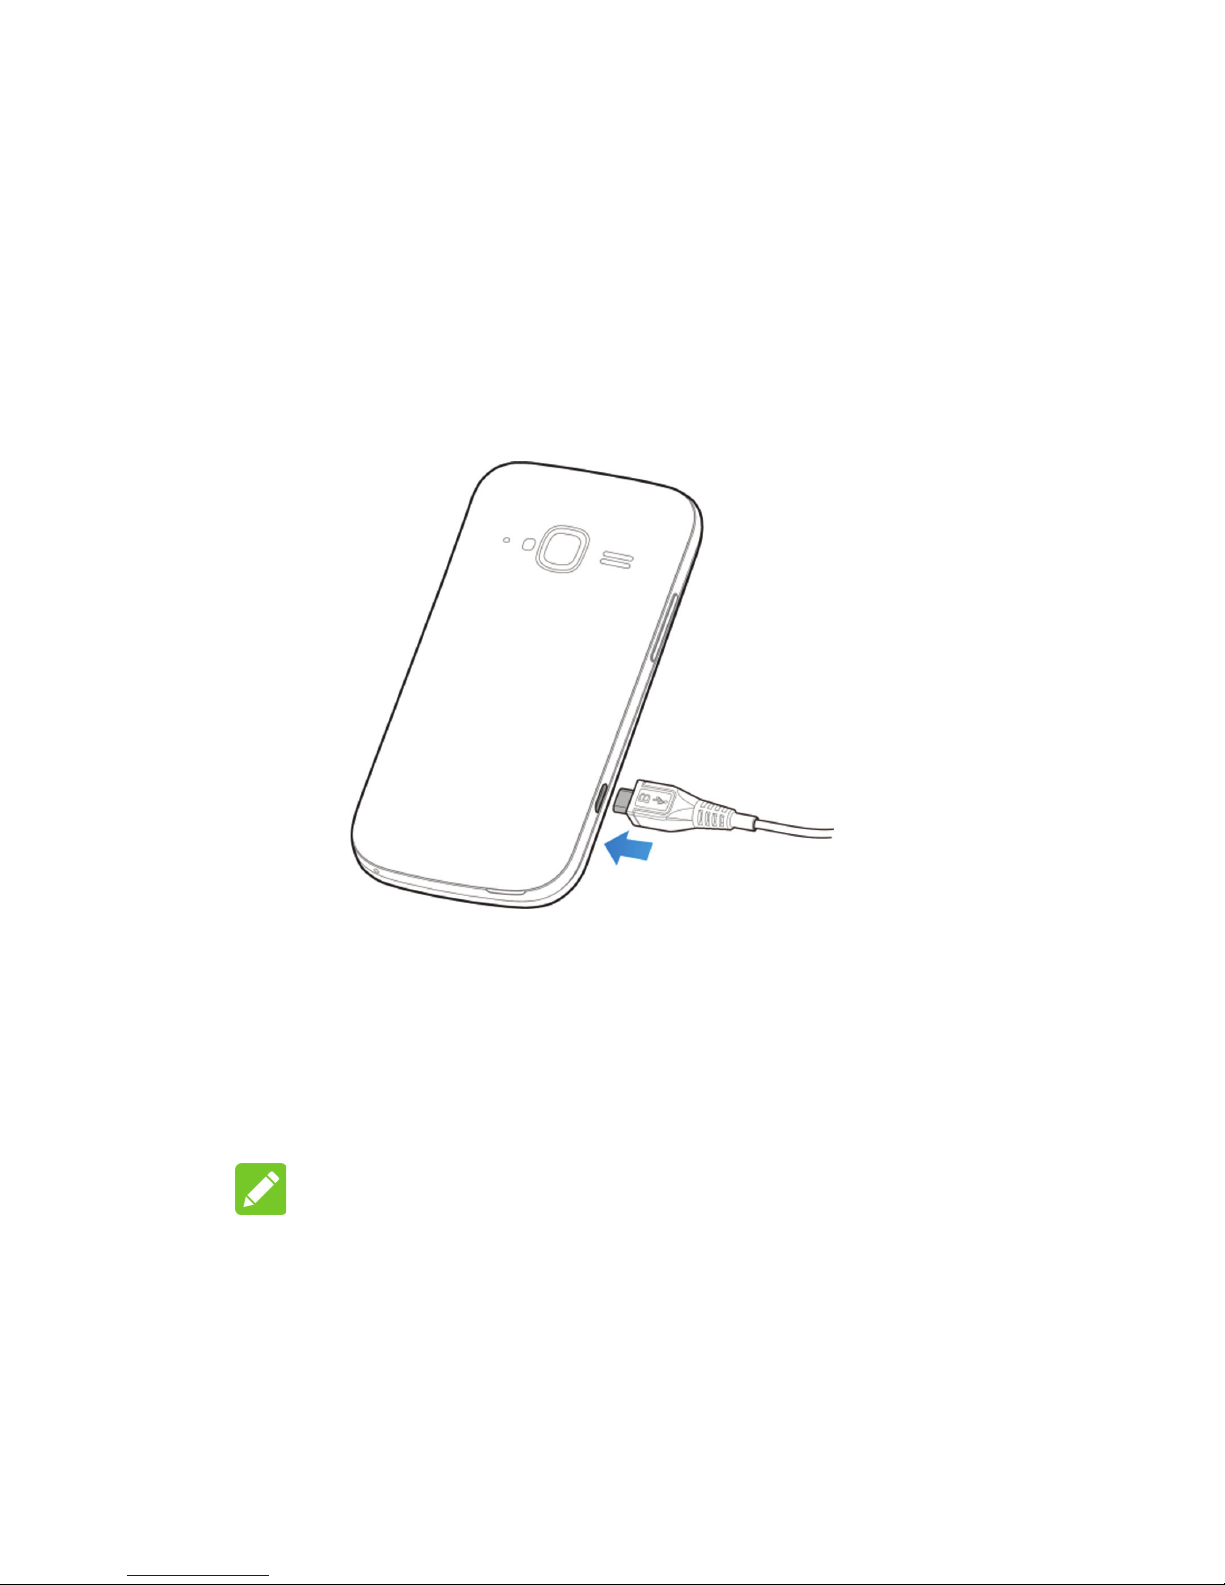
1. Reliez l’adaptateur à la prise du
chargeur. Assurez-vous que le connecteur de l’adaptateur est inséré du
bon côté. Ne forcez pas le connecteur
dans la prise du chargeur.
2. Branchez le chargeur sur une prise de
courant murale c.a. standard.
3. Débranchez le chargeur lorsque la batterie est complètement chargée.
REMARQUE :
Si le niveau de chargement de la batterie est
très faible, il se peut que vous ne soyez pas
en mesure d’allumer le téléphone, même si
Page 67

65
celui-ci est en chargement. Dans un tel cas,
réessayez après au moins 10 minutes de
chargement. Communiquez avec le service
à la clientèle si vous n’êtes toujours pas en
mesure d’allumer le téléphone après une
période de chargement prolongée.
Mise sous tension et hors
tension du téléphone
Assurez-vous que la batterie est chargée
avant la mise sous tension.
• Appuyez et maintenez votre doigt sur
Marche-Arrêt pour allumer votre téléphone.
• Pour éteindre votre téléphone, appuyez
et maintenez votre doigt sur MarcheArrêt pour accéder au menu d’options.
Appuyez sur Éteindre > OK.
Page 68
66
Écran d’accueil
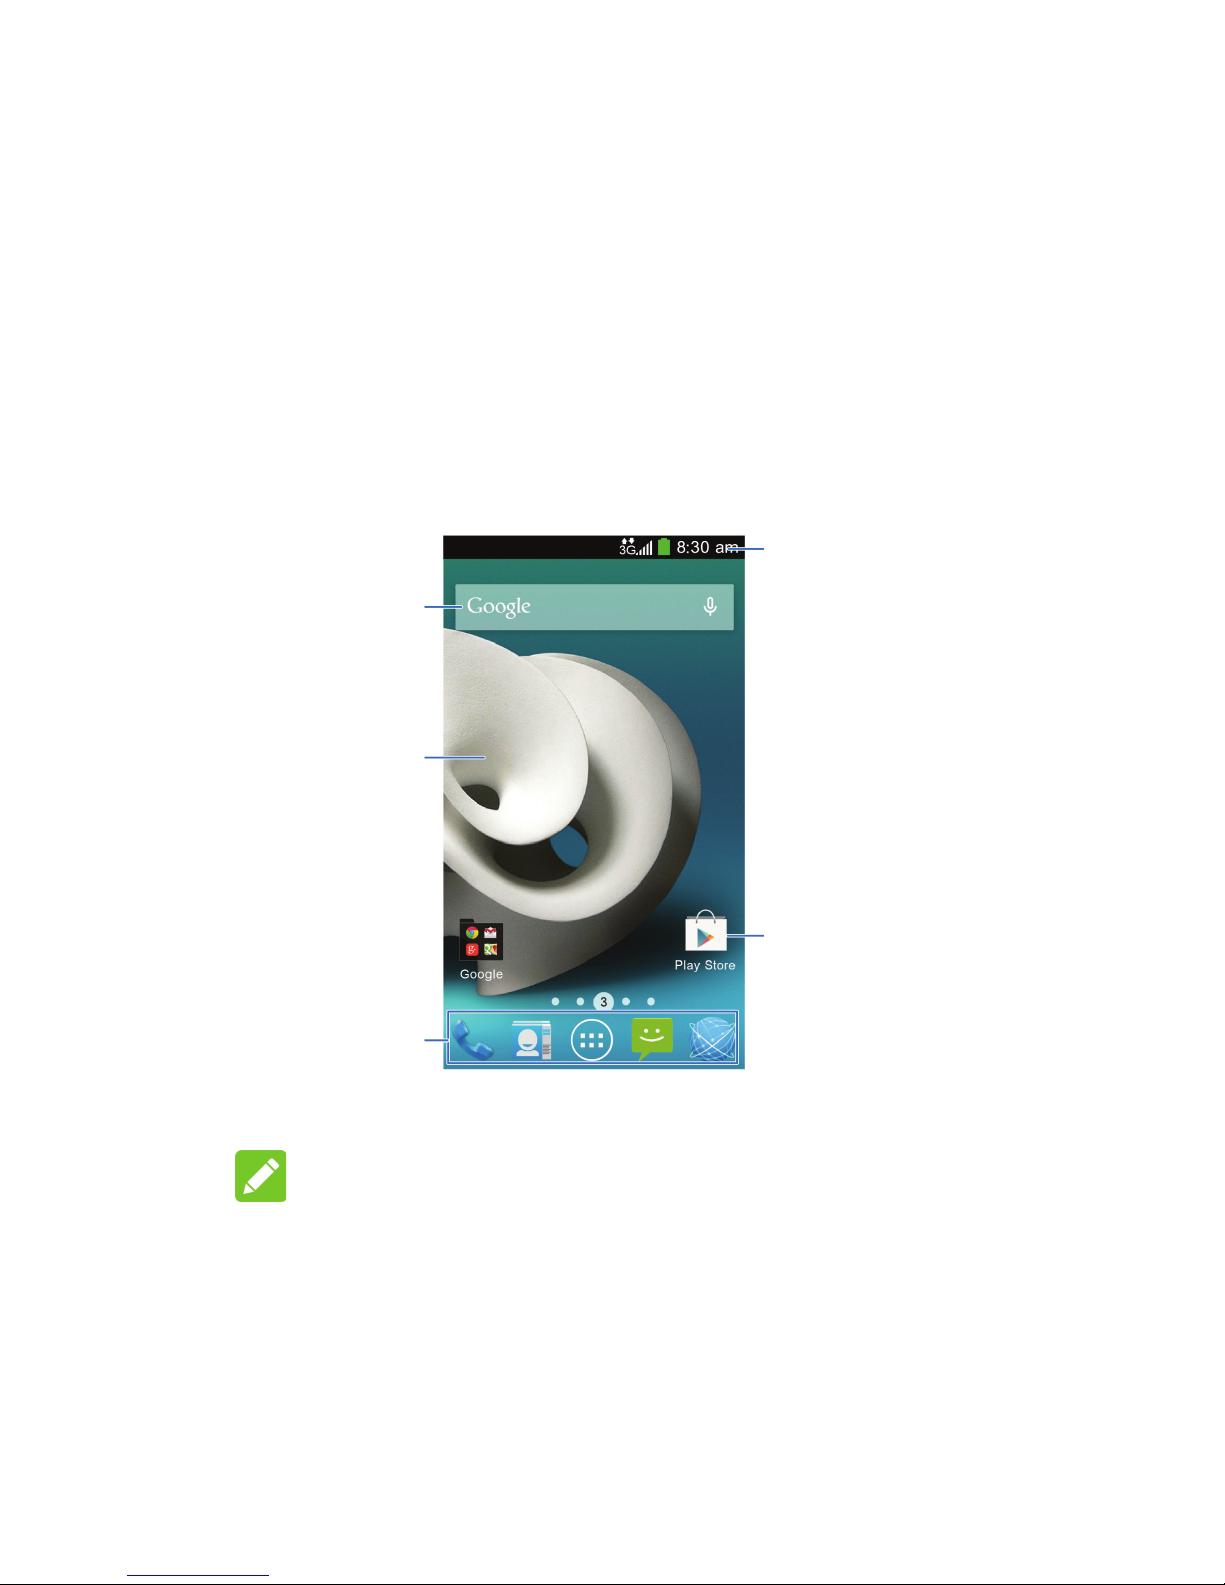
L’écran d’accueil est le point de départ pour
accéder aux applications, fonctions et menus
de votre téléphone. Vous pouvez personnaliser votre écran d’accueil en ajoutant des
applications, des raccourcis, des dossiers,
des gadgets logiciels et plus encore.
Recherche
dans
Google
Fond d’
écran
Raccourcis
de la barre
des éléments
favoris
Raccourcis
États et
notications
REMARQUE :
L’écran d’accueil de votre téléphone peut
être étendu au-delà de l’écran initial, fournissant ainsi davantage de place pour ajouter
Page 69

67
des raccourcis, des gadgets logiciels et des
dossiers. Glissez simplement votre doigt
vers la droite ou la gauche pour afcher les
autres écrans d’accueil.
Ouverture d’application
1. Appuyez sur Accueil si l’écran courant
n’est pas l’écran d’accueil.
2. Appuyez sur .
3. Glissez votre doigt vers la gauche ou
vers la droite de l’écran, puis appuyez
sur une application pour l’ouvrir.
Ajout de raccourcis ou de
gadgets logiciels
1. Appuyez sur Accueil > .
2. Pour ajouter un gadget logiciel, appuyez
sur WIDGETS.
3. Appuyez et maintenez votre doigt sur
une icône, puis faites-la glisser dans
l’écran d’accueil.
Page 70
68
Suppression d’un raccourci ou
d’un gadget logiciel
1. Appuyez et maintenez votre doigt sur un
raccourci ou un gadget logiciel de l’écran
d’accueil.
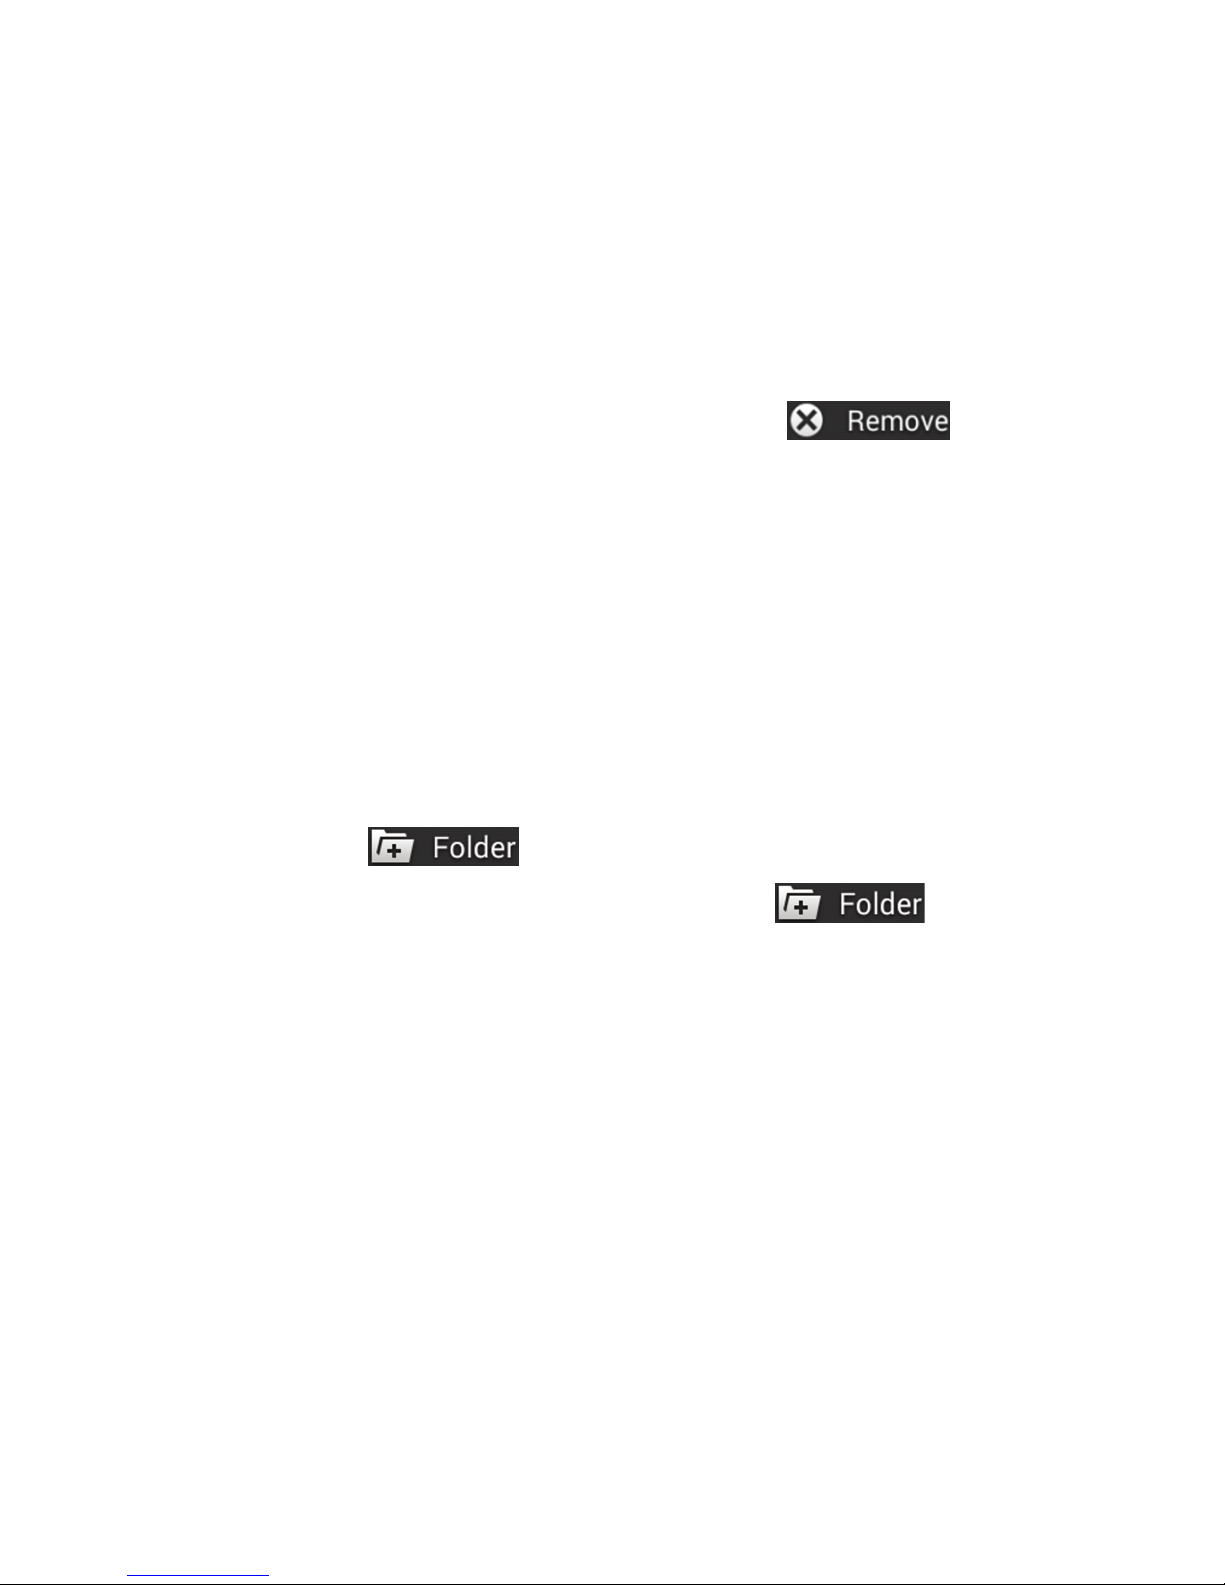
2. Faites glisser celui-ci vers
pour le supprimer.
Organisation au moyen des
dossiers
1. Appuyez et maintenez votre doigt sur le
raccourci de l’écran d’accueil que vous
voulez ajouter à un dossier jusqu’à ce
que s’afche.
2. Faites glisser le raccourci vers ,
puis déposez-le. Un nouveau dossier est
créé, et les raccourcis sont ajoutés au
dossier.
Page 71

69
Application d’un nouveau fond d’
écran
Vous pouvez dénir le fond de l’écran
d’accueil ou de l’écran de verrouillage
1. Appuyez sur Accueil > Menu > Fond
d’écran.
2. Appuyez sur Accueil ou sur Verrouiller
écran.
3. Sélectionnez une source de fond d’écran
à partir de Galerie, Fonds d’écran ani-
més, Photos ou Fonds d’écran, puis
sélectionnez l’image ou l’animation à
utiliser pour le fond d’écran.
4. Pour les images de la galerie, appuyez
sur OK au haut de l’écran. Pour les
fonds d’écran et les fonds d’écran animés, appuyez sur Établir comme fond
d’écran. Pour les photos, appuyez sur
Terminé.
Page 72
70
Vérication de l’état du
téléphone
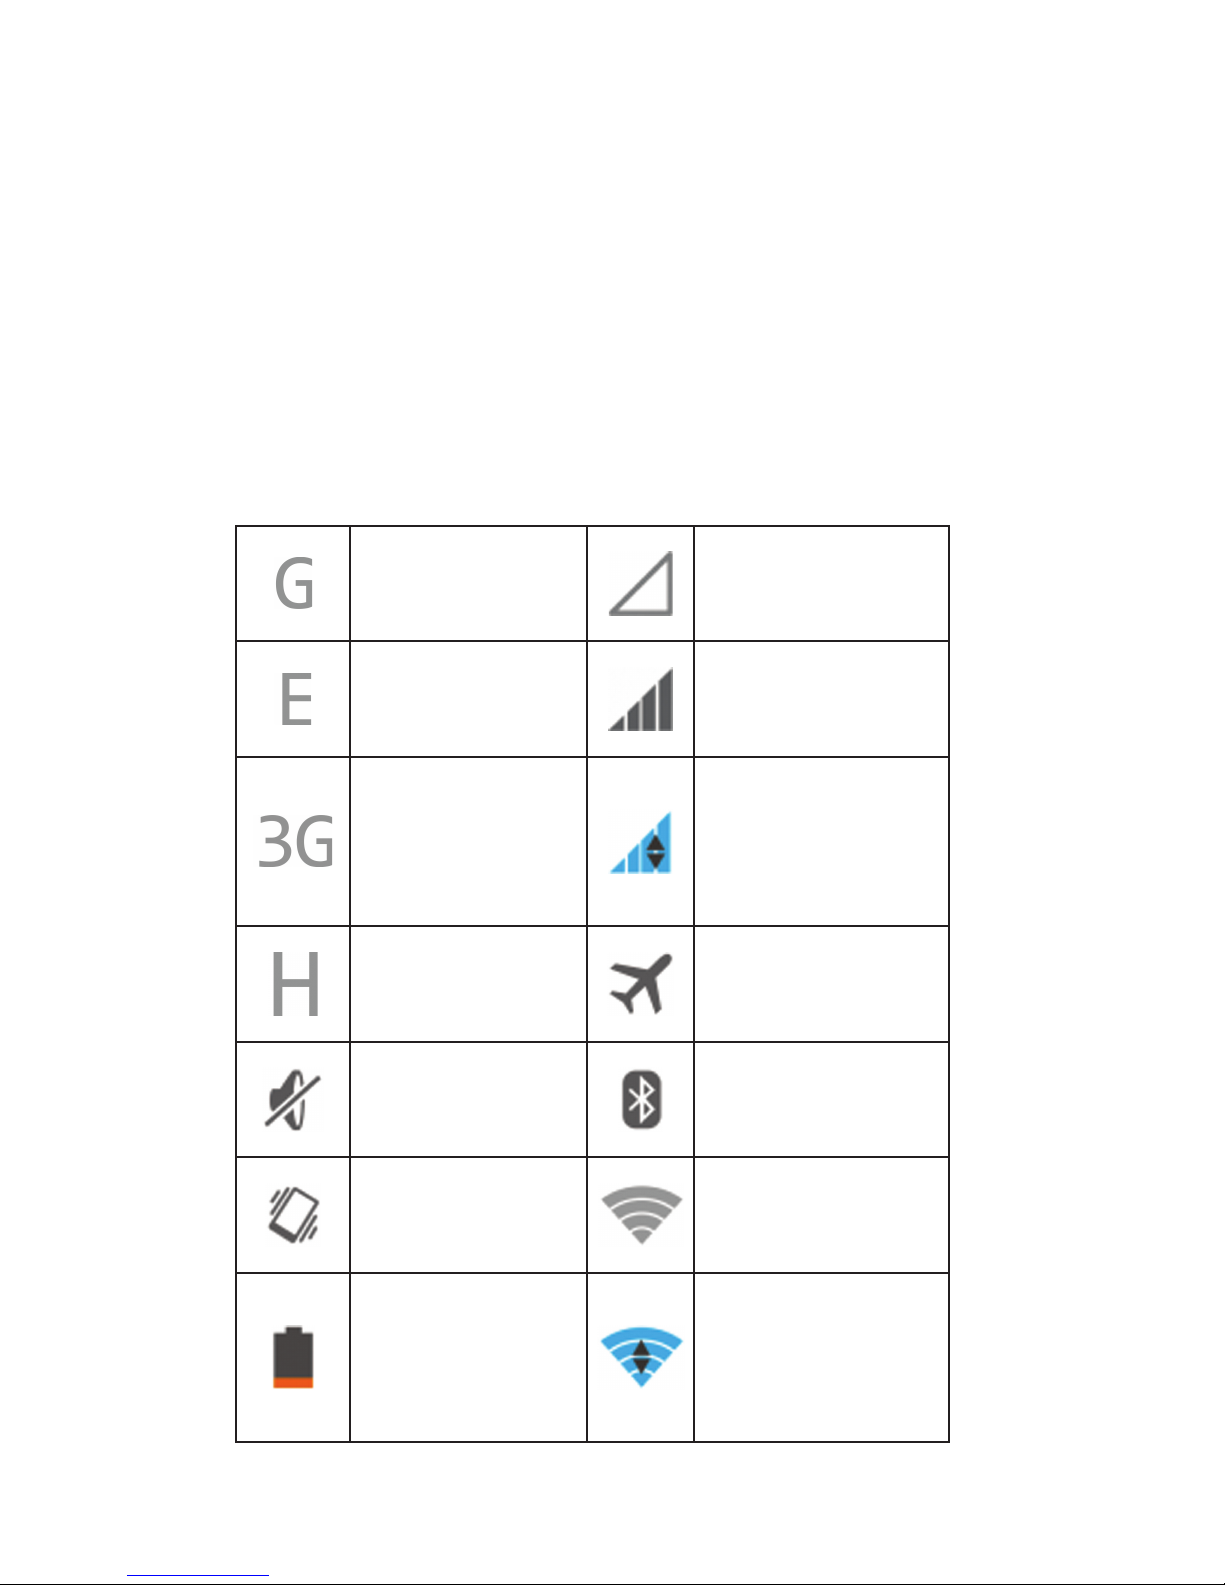
La barre d’état au haut de l’écran regroupe,
à droite, les icônes d’état de service et du
téléphone. Le tableau ci-dessous présente
quelques icônes ainsi que ce à quoi elles
servent.
Connecté par
GPRS
Aucun signal
Connecté par
EDGE
Intensité du
signal
Connexion
3G
Utilisation des
données mobiles
Connecté par
HSPA
Mode avion
Sonnerie
désactivée
Bluetooth
activé
Mode
Vibration
Connecté à un
réseau Wi-Fi®
Batterie faible
Utilisation de
la technologie
Wi-Fi
Page 73
71
Batterie partiellement
déchargée
Microphone
fermé
Batterie
complètement
chargée
Alarme réglée
/
Batterie en
cours de
charge
Casque-micro
connecté
Aucune carte
SIM installée
Gestion des notications
La barre d’état au haut de l’écran présente
des alertes de notication ainsi que différentes icônes à gauche. Le tableau ci-dessous
présente quelques icônes ainsi que ce à
quoi elles servent.
Les notications dépendent des applications
installées. Vous pouvez faire glisser la barre
d’état vers le bas pour afcher plus de renseignements.
Page 74
72
Nouveau texto
Carte microSDHC retirée
Nouveau message multimédia
Événement à
venir
Nouveau
courriel
Nouveau
réseau Wi-Fi
détecté
Nouveau message Gmail™
Données en
cours de téléchargement
Problème de
livraison de
SMS/MMS
Envoi de données
Appel manqué
Partage de
connexion
USB activé
Appel en
cours
Point d’accès
Wi-Fi portable
Connexion
USB
GPS activé
/
Lecture de
musique en
cours
Mises à jour
disponibles
Page 75

73
Réglage de la sonnerie et
du son
Réglage de la sonnerie et du son
associé aux notications
1. Appuyez sur Accueil > > Réglages
> Son.
2. Appuyez sur Sonnerie du téléphone ou
sur Notication par défaut.
3. Sélectionnez la sonnerie souhaitée.
4. Appuyez sur OK.
Réglages des tonalités du
système
1. Appuyez sur Accueil > > Réglages
> Son.
2. Faites déler d’écran jusqu’à la section
SYSTÈME, puis sélectionnez les types
de son que vous souhaitez entendre et
désélectionnez ceux qui ne vous intéressent pas.
Page 76
74
Réglage du volume
Pour régler le volume, appuyez sur les
touches du Volume au cours d’un appel.
Pour régler les autres types de volumes,
suivez les étapes suivantes.
1. Appuyez sur Accueil > > Réglages
> Son > Volumes.
2. Réglez le curseur d’ajustement du volume du son pour la musique, les vidéos,
les jeux ou d’autres multimédias ainsi
que pour le volume de la sonnerie ou du
son d’une notication ou de l’alarme.
3. Appuyez sur OK pour enregistrer votre
choix.
REMARQUE :
Appuyez et maintenez votre doigt sur
Marche-Arrêt, puis appuyez sur pour
activer le mode silencieux, sur pour acti-
ver le mode vibreur ou sur pour désactiver le mode silencieux.
Page 77

75
Réglage du verrouillage d’
écran
Vous pouvez protéger l’accès de votre téléphone en créant un verrouillage d’écran.
Lorsque la fonctionnalité est activée, appuyez et maintenez votre doigt sur une
icône, dessinez un schéma ou entrez un
code PIN numérique, voire un mot de passe,
pour déverrouiller l’écran et les touches de
votre téléphone.
1. Appuyez sur Accueil > Menu >
Paramètres système > Sécurité > Verrouillage de l’écran.
2. Sélectionnez Aucun, Appuyer longuement, Schéma, PIN ou Mot de passe.
u
Sélectionnez Aucunpour désactiver
le verrouillage d’écran.
u
Sélectionnez Appuyez longuement
pour déverrouiller l’écran au moyen
du geste concerné. Ainsi, vous pourrez déverrouiller l’écran en appuyant
longuement sur au centre de
l’écran.
Page 78
76
u
Sélectionnez Schéma pour créer un
dessin permettant de déverrouiller
l’écran.
u
Sélectionnez PIN ou Mot de passe
pour dénir un PIN numérique ou un
mot de passe que vous devrez entrer pour déverrouiller l’écran.
Vérication de la
messagerie vocale
1. Appuyez sur Accueil > .
2. À partir de l’onglet de composition de
numéro , appuyez et maintenez
votre doigt sur . Si demandé, entrez votre mot de passe pour accéder à
la messagerie vocale.
3. Suivez les instructions vocales pour
écouter et gérer vos messages vocaux.
Page 79
77
Appels
1. Appuyez sur Accueil > .
2. À partir de l’onglet de composition du numéro , entrez le numéro en utilisant
le clavier à l’écran. Appuyez sur
pour supprimer les chiffres incorrects.
3. Appuyez sur l’icône , sous le clavier
de composition, pour appeler.
Ajout d’un contact
Création d’un contact
1. Appuyez sur Accueil > puis sur
l’onglet de tous les contacts .
2. Appuyez sur ou encore sur Créer
un nouveau contact (s’il n’y a aucun
contact).
3. Entrez le nom du contact, les numéros
de téléphone, adresses de courriel et
autres données pertinentes, comme
présenté. Appuyez sur OK pour enregistrer le contact.
Page 80

78
Importation de contacts
1. Appuyez sur Accueil > .
2. Appuyez sur Menu > Importer/Exporter
> Contacts de la carte SIM du gestionnaire ou Importer du stockage.
3. Si demandé, sélectionnez un compte
dans lequel enregistrer les contacts.
4. Pour l’importation à partir d’une carte
micro-SIM, appuyez sur Menu > Tout
importer.
Pour l’importation à partir d’une carte microSDHC, sélectionnez les fichiers vCard
voulus de la carte microSDHC, puis appuyez
sur OK pour lancer l’importation.
Envoi d’un message
1. Appuyez sur de l’écran d’accueil et
sélectionnez Messages, puis appuyez
sur .
2. Entrez le ou les destinataires ainsi que
le message texte. Si vous souhaitez envoyer un message multimédia, ajouter le
sujet et les pièces jointes.
Page 81
79
3. Appuyez sur pour envoyer le message.
Conguration du compte
de courriel
Conguration du compte Gmail
1. Appuyez sur de l’écran d’accueil et
sélectionnez Gmail.
REMARQUE :
Si un autre compte Gmail est déjà con-
guré, appuyez sur Accueil > > Ré-
glages > Ajouter un compte > Google.
2. Appuyez sur Existant pour vous con-
necter en utilisant votre compte Google
existant. Si vous n’avez pas de compte
Google, appuyez sur Nouveau an d’en
créer un.
3. Suivez les instructions à l’écran pour la
conguration du compte.
Page 82

80
Conguration du courriel
1. Appuyez sur de l’écran d’accueil et
sélectionnez Courriel.
REMARQUE :
Si un autre compte de courriel est déjà
activé, appuyez sur Menu > Réglages >
Ajouter un compte.
2. Entrez votre adresse de courriel et votre
mot de passe.
3. Appuyez sur Suivant, puis suivez les
indications à l’écran.
Conguration d’un compte
Exchange ActiveSync®
1. Appuyez sur de l’écran d’accueil et
sélectionnez Courriel.
REMARQUE :
Si un autre compte de courriel est déjà
activé, appuyez sur Menu > Réglages >
Ajouter un compte.
2. Entrez votre adresse de courriel et votre
mot de passe.
3. Appuyez sur Configuration > Ex-
change.
Page 83

81
4. Au besoin, modifiez les données des
champs Domaine\Nom d’utilisateur,
Mot de passe et Serveur.
5. Lisez l’avis de non-responsabilité de l’
activation à l’écran, puis appuyez sur
Suivant.
6. Si demandé, appuyez sur OK pour
permettre au serveur de commander à
distance quelques fonctionnalités de sécurité de votre téléphone.
7. Congurez les réglages à l’écran, comme Jours pour la synchronisation,
puis appuyez sur Suivant.
8. Si demandé, appuyez sur Activer pour
activer l’application de courriel à titre
d’administrateur de l’appareil.
9. Entrez les données d’identification de
votre nouveau compte et un nom unique,
puis appuyez sur Suivant.
Communiquez avec votre administrateur de
serveur pour de l’aide supplémentaire.
Page 84
82
Connexion d’un casquemicro Bluetooth
1. Activez le casque-micro Bluethoot
et mettez-le en mode de jumelage.
Consultez le manuel de l’utilisateur du
casque pour plus de détails.
2. Appuyez sur dans l’écran d’accueil et
sélectionnez Paramètres > Bluetooth.
3. Activez l’interrupteur Bluetooth si
celui-ci est désactivé. Lorsque Bluetooth
est activé, l’icône s’affiche dans la
barre d’état.
REMARQUE :
Votre téléphone recherche automatiquement tous les appareils Bluetooth
disponibles à sa portée et affiche leur
ID. Vous pouvez également appuyer sur
RECHERCHER APPAREILS si vous
voulez effectuer une nouvelle recherche.
4. Sélectionnez l’ID du casque-micro ou
de tout autre appareil à jumeler au téléphone. Entrez le code d’accès si demandé.
Page 85

83
5. Au besoin, sélectionnez l’ID du casque
jumelé afin d’établir une connexion.
Lorsque la connexion est établie, l’icône
de la barre d’état s’allume
REMARQUE :
Sélectionnez à nouveau l’ID du casquemicro pour rompre la connexion.
Installation d’une
application de la boutique
Google Play™
Des milliers de jeux et d’application vous
sont offerts à partir de la boutique Google
Play. Vous avez également la possibilité d’
y publier vos commentaires concernant une
application.
Avant de commencer, assurez-vous que
vous êtes connecté à votre compte Google.
REMARQUE :
Le contenu accessible de la boutique Google
Play dépend de votre région et de votre
fournisseur de services.
Page 86

84
1. Appuyez sur Accueil > > Play
Store.
Au premier lancement de Play Store,
vous devez accepter les conditions de
Google Play.
2. Repérez les applications convoitées en
utilisant les catégories ou en appuyant
sur .
3. Sélectionnez l’application afin de voir
une description détaillée.
4. Appuyez sur INSTALLER (pour les ap-
plications gratuites) ou sur le prix (pour
les applications payantes) dans l’écran
des données de l’application. Si l’application n’est pas gratuite, vous devez ouvrir un compte Google™ et sélectionner
un mode de paiement.
ATTENTION :
Une fois installées, certaines applications peuvent accéder à d’autres fonctionnalités de l’appareil ou à des données personnelles. Les messages de la
boutique Google Play vous afficheront
ce à quoi les applications peuvent ac-
Page 87
85
céder. Appuyez sur ACCEPTER pour
continuer ou appuyez sur Retour en ar-
rière pour annuler.
5. Attendez la n du téléchargement et de l’
installation automatique de l’application.
Le paiement doit être autorisé avant le
lancement du téléchargement de l’application.
Lorsque l’application est installée, l’icône
s’afche dans la barre d’état. Vous pouvez
vous rendre à la nouvelle application en
appuyant sur Accueil > .
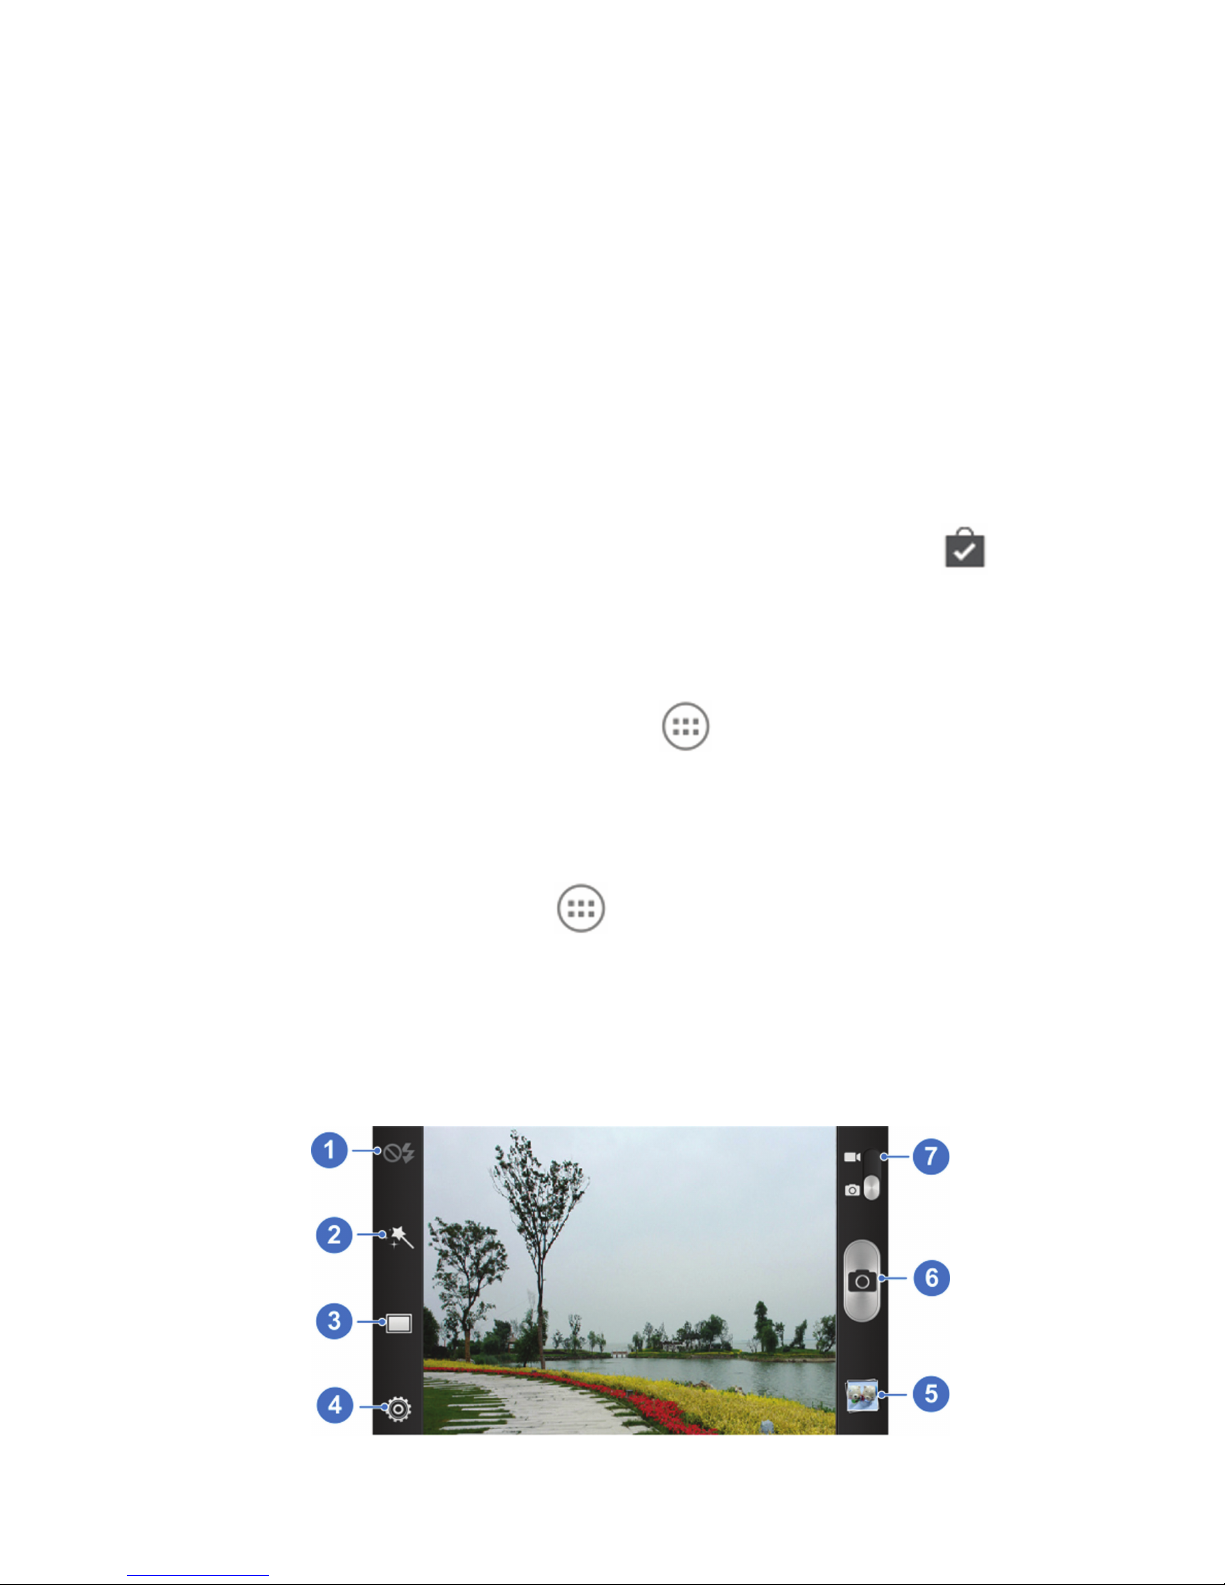
Prise d’une photo
1. Appuyez sur de l’écran d’accueil, et
sélectionnez Appareil photo.
2. Orientez l’appareil photo vers le sujet,
puis effectuez les réglages requis.
Page 88
86
Numéro Fonction
1
Modier le paramétrage du
ash.
2 Sélectionner l’effet de couleur
3 Sélectionner le mode de scène
4
Modier les paramètres de
l’appareil photo.
5
Afcher les photos prises et les
vidéos lmées.
6
Appuyer doucement sur le
déclencheur pour prendre une
photo.
7
Basculer entre l’appareil photo
et la caméra.
3. Appuyez doucement sur .
Enregistrement d’une vidéo
1. Appuyez sur de l’écran d’accueil, et
sélectionnez Appareil photo.
2. Basculez le commutateur an d’ac-
céder à la caméra.
3. Orientez l’appareil vers le sujet, puis effectuez les réglages requis.
Page 89
87
Numéro Fonction
1 Activer ou désactiver le ash.
2 Sélectionner le mode de scène
3
Modier les paramètres de la
caméra.
4
Afcher les photos prises et les
vidéos lmées.
5
Lancer ou arrêter l’enregistrement vidéo.
6 Passer au mode Appareil photo.
4. Appuyez sur pour lancer ou
arrêter l’enregistrement.
REMARQUE :
Lorsque l’enregistrement est en cours, vous
pouvez appuyer sur pour enregistrer
l’image comme photo distincte.
Page 90
88
Écouter de la musique
1. Appuyez sur dans l’écran d’accueil,
puis sur Play Music.
2. Appuyez sur > Ma bibliothèque,
puis sélectionnez une catégorie (par
exemple, artiste ou album) afin de
repérer la pièce que vous souhaitez
entendre.
3. Appuyez sur la chanson à écouter.
Page 91
89
Numéro Fonction
1
Afcher l’information sur l’artiste
et la chanson. Faire glisser
l’écran vers le bas pour retourner à la bibliothèque de musique
2
Conception graphique de
l’album.
3 Noter favorablement la chanson.
4
Commandes de lecture : Ignorer
des chansons, mettre en pause
et reprendre la lecture, activer la
lecture aléatoire ou le mode répétition. Faire glisser la barre de
progression pour passer à une
autre partie de la musique.
5
Noter défavorablement la
chanson.
6
Appuyer pour afcher la liste de
lecture en cours (liste d’attente).
7 Obtenir d’autres options.
Page 92

90
Connexion au PC
Vous pouvez connecter votre téléphone à
un ordinateur en utilisant un câble USB et
transférer de la musique, des photos ou d’
autres fichiers, et ce, dans les deux direc-
tions. Votre appareil stocke ces chiers sur
une unité de stockage interne ou une carte
microSDHC amovible.
1. Appuyez et maintenez votre doigt sur la
barre d’état au haut de l’écran et glissezle vers le bas.
2. Appuyez sur (Connecté en tant que
[mode de connexion actuel]).
3. Choisissez l’une des options suivantes :
u
Alimentation uniquement : Re-
chargement de votre téléphone au
moyen d’une connexion USB.
u
Stockage de masse USB : Trans-
fert de fichiers entre un ordinateur
personnel et une carte SD externe
des appareils Android.
Page 93

91
u
Installation de pilotes : Installation
des pilotes nécessaires pour relier
votre téléphone à votre ordinateur.
u
Fichiers médias (MTP) : Transfert
de chiers multimédias sur
Windows® ou sur Mac®.
u
Fichiers photo (PTP) : Transfert de
photos en utilisant un logiciel d’ap-
pareil photo.
Pour déconnecter votre appareil de l’ordinateur, débranchez simplement le câble USB
lorsque vous avez terminé.
Connexion à Internet
Connexion à un réseau Wi-Fi
1. Appuyez sur Accueil > Menu >
Paramètres système > Wi-Fi.
2. Activez l’interrupteur Wi-Fi si celui-ci
est désactivé.
Votre téléphone recherchera automa-
tiquement les réseaux Wi-Fi à proximité
et afchera leur nom et les paramètres
Page 94

92
de sécurités. Votre téléphone se connecte automatiquement aux réseaux WiFi précédemment utilisés lorsqu’ils sont
à sa portée.
3. Appuyez sur un nom de réseau pour
vous y connecter.
Si le réseau est sécurisé, entrez un mot de
passe ou d’autres renseignements d’authentication. (Communiquez avec votre administrateur de réseau pour plus de détails.)
Connexion à un réseau mobile
Pour vous connecter à Internet en utilisant
un réseau mobile, vous pouvez utiliser
le nom du point d’accès par défaut. Pour
ajouter un nouveau nom de point d’accès,
communiquez avec votre fournisseur de
service afin d’obtenir les renseignements
nécessaires. Ne modifiez pas les réglages
par défaut à moins d’indication contraire de
votre fournisseur de services, car sinon, le
service pourrait ne pas fonctionner.
Page 95

93
1. Appuyez sur Accueil > Menu >
Paramètres système > Réseaux mobiles > Nom de point d’accès.
2. Appuyez sur .
3. Entrez les renseignements pertinents de
votre fournisseur de services.
4. Appuyez sur Menu > Enregistrer pour
terminer.
Connexion au moyen d’un
partage de connexion USB
Vous pouvez accéder à Internet à partir de
votre ordinateur grâce à la fonctionnalité de
partage de connexion USB de votre téléphone. La fonctionnalité a recours à la connexion de données du réseau mobile et peut
mener à des frais de données.
REMARQUE :
Si votre téléphone dispose d’une carte microSDHC ou d’un dispositif USB de stockage, vous n’aurez pas accès au contenu
stocké lors du partage de connexion USB.
1. Reliez votre téléphone à l’ordinateur à
l’aide d’un câble USB.
Page 96

94
2. Appuyez sur Accueil > Menu >
Paramètres > Applications.
3. Sélectionnez Partage de connexion
USB. Une nouvelle connexion sera disponible à partir de votre ordinateur.
REMARQUE :
Pour arrêter le partage de connexion, désélectionnez Partage de connexion ou décon-
nectez le câble USB.
Prolongement de l’
autonomie de la batterie
Il y a certaines choses que vous pouvez faire
pour prolonger l’autonomie de votre batterie:
• Activer les fonctionnalités les plus exigeantes (Wi-Fi, Bluetooth, GPS, données mobiles et synchronisation) seulement lorsque vous les utilisez.
• Réduire la luminosité de l’écran.
• Utiliser le partage de connexion USB (si
vous disposez d’un câble USB), plutôt
qu’un point d’accès Wi-Fi, pour partager
le service de données de votre téléphone.
Page 97

95
• À partir de l’écran d’accueil, appuyer sur
> Gest. des tâches et sélectionner
les applications dont vous n’avez plus
besoin, mais qui fonctionnent en arrièreplan.
• À partir de l’écran d’accueil, appuyer sur
> Réglages > Son et désélectionner
Vibrer au toucher.
Libération d’espace
mémoire
Utilisez le Gestionnaire des tâches pour
libérer de l’espace mémoire et optimiser la
vitesse de votre système.
1. À partir de l’écran d’accueil, appuyez sur
> Gest. des tâches.
2. Appuyez sur l’onglet Tâches e t
appuyez sur l’icône située à côté
de l’application dont vous n’avez plus
besoin.
Vous pouvez également appuyer sur Tout
fermer pour arrêter toutes les applications.
Page 98

96
Gestion du stockage de
votre téléphone
Suppression des anciens
messages
Vous pouvez effacer manuellement les an-
ciens messages an de libérer de l’espace.
Vous pouvez également choisir la suppression automatique des anciens messages
lorsqu’une certaine limite est atteinte.
1. À partir de l’écran d’accueil, appuyez sur
> Messages.
2. Appuyez sur Menu > Réglages.
3. Sélectionnez Supprimer les anciens
messages pour activer la suppression
automatique.
4. Appuyez sur Limite de messages
textes ou Limite de messages mul-
timédias afin d’établir une limite maxi-
male.
5. Appuyez sur Établir.
Page 99

97
Nettoyage du contenu local du
navigateur
1. À partir de l’écran d’accueil, appuyez sur
> Navigateur.
2. Appuyez sur Menu > Réglages > Con-
dentialité et sécurité.
3. Appuyez sur Effacer l'antémémoire,
Nettoyer l’historique et Supprimer les
donnés de témoins.
Page 100
98
Données de sécurité de l’
appareil
Ne Ne pas utiliser l’appareil pour
faire ou recevoir des appels en
conduisant. Ne jamais composer
ou lire de messages textes en
conduisant.
Ne pas utiliser dans les stationsservice.
Placer le téléphone à au moins 15
mm de l’oreille ou du corps pour
passer des appels.
Ce téléphone peut émettre une
lumière vive ou clignotante.
Des petites pièces peuvent causer
la suffocation.
Ne pas jeter le téléphone dans le
feu.
Le téléphone peut émettre des
sons forts.
 Loading...