

Page 1

GSM Dual-Band GPRS Digital
Mobile Phone
User Manual
Page 2
文档信息
版本 修订日期 修订人 软件版本 备注
V1.0
09
09.05
年 0
月 张金娥
1
赵琼
2
Page 3

GSM Dual-Band GPRS
Digital Mobile Phone
The manual is applicable for
ZTE-G X760 mobile phone
.
Page 4

Copyright © 2008 by ZTE Corporation
All rights reserved.
No part of this publication may be excerpted, reproduced,
translated or utilized in any form or by any means, electronic or
mechanical, including photocopying and microfilm, without the
prior written permission of ZTE Corporation.
ZTE Corporation reserves the right to make modifications on print
errors or update specifications in this manual without prior notice.
Version 1.0, May. 2008
4
Page 5

Contents
Before Use ................................................................................ 1
Introduction ............................................................................ 1
Safety Instructions .................................................................. 1
Safety Warnings and Precautions .......................................... 2
Parts Definition ....................................................................... 8
Appearance ..................................................................... 8
Key Definitions ................................................................ 8
Descriptions of Touch-screen Shortcuts ........................ 10
Descriptions of icons on status bar ............................... 10
Insert and Remove SIM Card ............................................... 11
Insert and Remove Memory Card ........................................ 11
Battery .................................................................................. 12
Install the battery ........................................................... 12
Remove the battery ....................................................... 12
Charge the battery ........................................................ 13
Power ON/OFF .................................................................... 14
Enter 3D Interface................................................................... 16
Communication ...................................................................... 17
Call ....................................................................................... 17
Make a Call ................................................................... 17
Emergency Calls ........................................................... 18
Answer Calls ................................................................. 18
Hands-free .................................................................... 18
Call Options ................................................................... 19
Messages ............................................................................. 20
Page 6

SMS .............................................................................. 20
MMS ............................................................................. 22
Voice Mail Server .......................................................... 24
Broadcast Message ...................................................... 24
Contacts ............................................................................... 25
Quick Search ................................................................ 25
Search by Name ........................................................... 25
Add New Entry .............................................................. 25
Caller Group ................................................................. 26
Copy All ........................................................................ 26
Delete All ...................................................................... 26
Preferred Storage ......................................................... 26
Memory Status .............................................................. 27
Call History .......................................................................... 28
Entertainment ......................................................................... 29
Music ................................................................................... 29
Audio Player ................................................................. 29
FM Radio ...................................................................... 30
Sound Recorder ........................................................... 31
Games ................................................................................. 31
Video ................................................................................... 32
Camera ......................................................................... 32
Video Player ................................................................. 33
Album ........................................................................... 34
Video Recorder ............................................................. 35
Connect ............................................................................... 36
STK Service .................................................................. 36
WAP .............................................................................. 36
Bluetooth ...................................................................... 38
6
Page 7

Data Account ................................................................. 41
GPRS Counter .............................................................. 41
Applications ............................................................................ 42
Alarm .................................................................................... 42
File Manager ........................................................................ 42
Settings ................................................................................ 42
User Profiles .................................................................. 42
Phone Setup ................................................................. 43
Call Setup ...................................................................... 44
Network Setup ............................................................... 45
Security Setup ............................................................... 46
Pen Calibration .............................................................. 49
Restore Factory Settings ............................................... 49
Calendar ............................................................................... 50
Organizer ............................................................................. 50
Calculator ...................................................................... 50
Stopwatch ...................................................................... 50
nWay Stopwatch ............................................................ 51
Unit Converter ............................................................... 51
Currency Converter ....................................................... 51
World Clock ................................................................... 51
Bookshelf ...................................................................... 51
PC Connection ........................................................................ 53
Mass Storage
Webcam
............................................................................... 53
....................................................................... 53
Input Methods ......................................................................... 54
Page 8

Appendix ................................................................................ 55
Shortcuts ............................................................................. 55
Clearance and Maintenance ................................................ 56
Failure Analysis ..................................................................... 58
8
Page 9

錯誤! 使用 [常用] 索引標籤將 标题 1 套用到您想要在此處顯示的文字。
Before Use
Introduction
Thank you for choosing ZTE Corporation’s
Dual-Band GPRS Digital Mobile Phone.
To guarantee your mobile phone always in its best condition,
please read this manual carefully and keep it for future use.
The pictures in this user manual are only used to demonstrate the
mobile phone’s functions, so they are maybe different from what
you see on your mobile phone. Please refer to your mobile phone if
there are any differ ences.
ZTE-G X790
GSM
Safety Instructions
If your mobile phone is lost or stolen, notify your service provider
immediately to prevent others from abusing it. Meanwhile you
need provide your service provider with your mobile phone’s
ESN, which is printed on the label on the back of your mobile
phone (appears after the battery is taken out). Keep the ESN
properly for future use.
To protect your mobile phone against abuse, take the following
precautions:
– Set PIN code (as your phone needs SIM card) and modify it
from time to time.
– Take your mobile phone along as much as possible.
1
Page 10
Safety Warnings and Precautions
Precautions for using your mobile phone
Traffic Security
z Pay attention to traffic security and follow all local relevant
laws and regulations while driving.
Interference
z Do not use your mobile phone near weak signal or
high-precision electronic devices. Radio wave interference
may cause failure to an electronic device or other
problems. Pay special attention when you use your mobile
phone near audio phone, pacemaker and/or other medical
electronic devices, fire detector, auto-door and/or other
auto-control equipments. For details on the influence
caused by your mobile phone on pacemaker or other
medical electronic devices, please consult the
manufacturer or your local distributor.
z Do not use your mobile phone near TV set, radio or office
automated equipments to avoid mutual influence.
On Airplane
2
Page 11
錯誤! 使用 [常用] 索引標籤將 标题 1 套用到您想要在此處顯示的文字。
z Turn off your mobile phone on airplane where it’s
forbidden to use it. The mobile phone may affect the
normal operation of electronic devices, therefore please
follow the relevant regulations when using your mobile
phone on airplane.
In Hospital
z Turn off your mobile phone in hospital where it’s forbidden
to use it. The mobile phone may affect the normal
operation of medical apparatus, therefore please follow
the relevant regulations when using your mobile phone in
hospital.
In Gas Station
z Do not use your mobil e phone in gas station. Turn off your
mobile phone near fuels or chemicals.
Waterproof
z Keep your mobile phone away from water . This may cause
overheating, electric leakage or failure if water or any
other kind of liquid enters your mobile phone.
Disassemble
3
Page 12

z Do not disassemble or reassemble your mobile phone
because this might cause damage, electric leakage or
circuit failure.
Antenna
z Do not use your mobile phone if your antenna is damaged
because this may cause body injury.
Away from Children
z Keep your mobile phone from children. It ma y cause bod y
injury when the mobile phone is used as a toy.
Original Accessories
z Use the original accessories or those authenticated by the
manufacturer. Using non-original accessories may affect
the mobile phone’s performance, violate the warranty
provisions or relevant national regulations about telecom
terminals, or even cause body injury.
Explosio n Areas
z Please strictly follow relevant laws and regulations to turn
off your mobile phone in or near the explosion areas.
4
Page 13

錯誤! 使用 [常用] 索引標籤將 标题 1 套用到您想要在此處顯示的文字。
Emergency Calls
z Make sure your mobile phone is turned on and in the service
area. Input the emergency number and press “Sen d” key to dial.
Let others know where you are and do not hang up without
permission.
Precautions for using the battery
z Put the battery in a cool and ven tilated place where there
is no direct sunshine.
z The battery life is usually limited, and it becomes shorter
and shorter after the battery is charged over and over
again. If the charging fails several times, this indicates that
the battery is worn out and the replacement is advised.
z Dispose the worn-out batteries in designated places
according to specified regulations rather than throw them
int o residential ga r b age.
z Do not throw the worn-out batteries into fire because this
might cause fire or explosion.
z Do not press with great force when installing the battery
because this may result in leakage, overheating, explosion
or fire.
z Do not disassemble or reassemble the battery because
this may result in leakage, overheating, explosion or fire.
z If the battery becomes hot, changes in color or gets
deformed during the course of use, charging or storage,
5
Page 14
please immediately stop using and replace it.
z Keep the battery away from dampness to prevent
overheating, smoldering or erosion.
z Do not leave the battery in direct sunshine, around a car or
high-temperature place because this might result in
leakage or overheating. This might affect the battery’s
performance and shorten its life.
z Do not keep charging the battery continuously over 24 hours.
Note:
If the battery is damaged, please avoid contacting the
materials in it. If your skin has contacted those
materials, flush your skin with lots of water and seek
Precautions for using the charger
z Use the power voltage between 110VAC and 220VAC.
Using the voltage beyond the range may cause leakage,
fire or damage to the phone and charger.
z Do not short-circuit the charger because this might cause
electric shock, smoldering or damage.
z Do not charge the battery in direct sunshine, near
for help from doctors if necessary.
dampness, dust, vibration, TV set, or radio (may affect the
image, sound), etc.
z Do not use the charger if the power cable is damaged
because this might cause fire or electric shock.
6
Page 15

錯誤! 使用 [常用] 索引標籤將 标题 1 套用到您想要在此處顯示的文字。
z Do not place water containers near the charger to avoid
water splashing. If water or any other kind of liquid
splashes on the charger, immediately remove the charger
from the power socket to avoid overheating, fire, electric
shock or failure.
z Do not disassemble or reassemble the charger because
this might cause body injury, electric shock, fire or
damage.
z Do not touch any charger, power cable or power socket
with wet hands to avoid electric shock.
z Do not place heavy objects onto power cables or refit
power cable because this might cause electric shock or
fire.
z Remove po wer plug from the socket before cleaning and
maintenance.
z Hold the charger rather than pull the power cable while
removing the plug from the socket because this might
cause damage, electric shock or fire.
7
Page 16
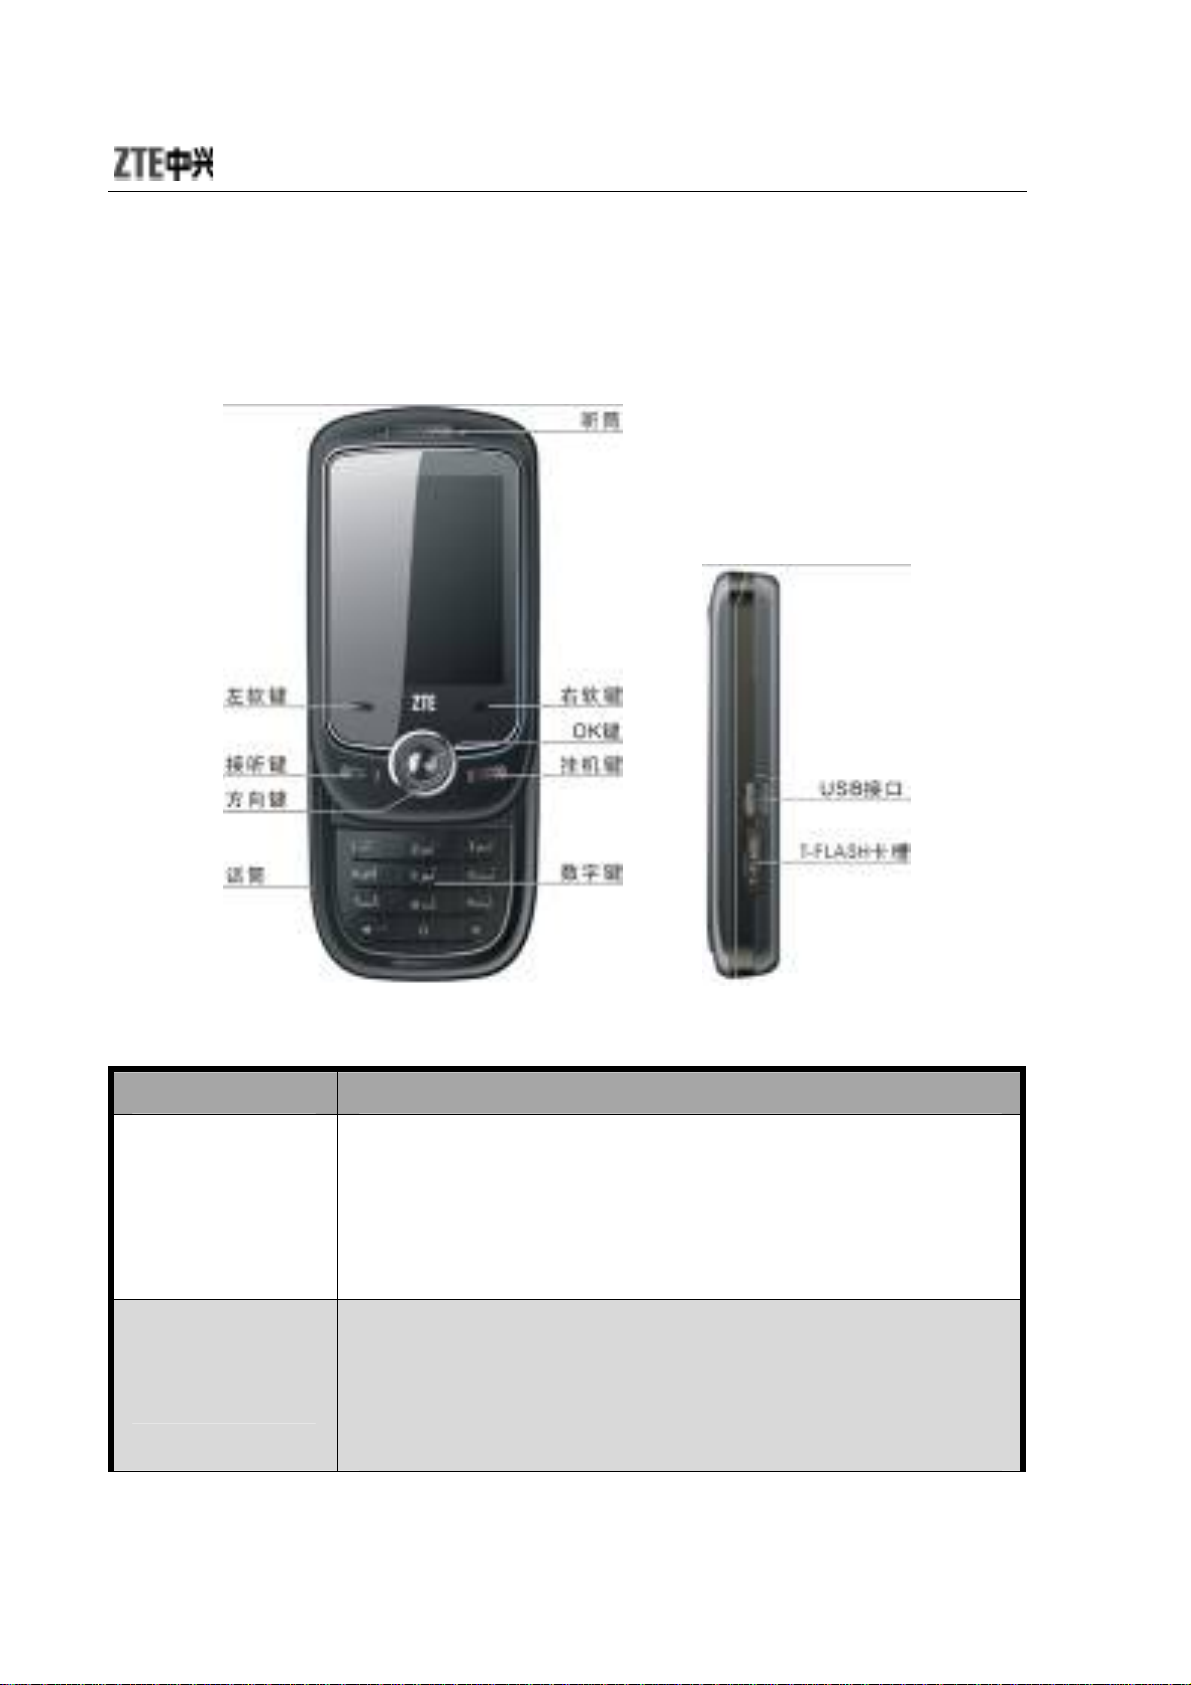
Parts Definition
Appearance
Key Definitions
Keys Descriptions
Move the cursor to the left/right;
Left/right
key
Up/down
key
Press the key to switch among 3D interfaces
In idle mode, press left key to enter “Write
Message”, press right key to enter ““Inbox”. You
could change the default settings;
Move the cursor up/down;
Press the key to move the highlighted bar in
submenu;
In idle mode, press Up key to enter “Audio
Player”, press Down key to enter “User
8
Page 17

錯誤! 使用 [常用] 索引標籤將 标题 1 套用到您想要在此處顯示的文字。
Profiles”. You could change the default
settings;
In idle mode, press this key to view calendar;
and press & hold this key to lock the keypad;
Left soft key
Right soft
key
Send key
End key
Press this key to switch 3D interface;
Execute the operations at the left-down
corner of the screen.
Execute the operations at the right-down
corner of the screen.
In idle mode, press this key to view the list of
contacts.
Dial a number or receive incoming calls;
In idle mode, press this key to view all call
history.
Hang up a call or reject an incoming call;
Hold this key to power on/off;
In idle mode, press this key to turn off
background music.
In other mode, press this key to return to idle
mode.
key
OK
Numeric
keys
# key
In idle mode, press OK key to enter “Audio
Player”;
In most case, OK key functions the same as
left soft key.
Input numbers or symbols.
Quickly select the menu op tion during menu
operation.
Press & hold this key to switch between
Meeting and Silence mode.
9
Page 18
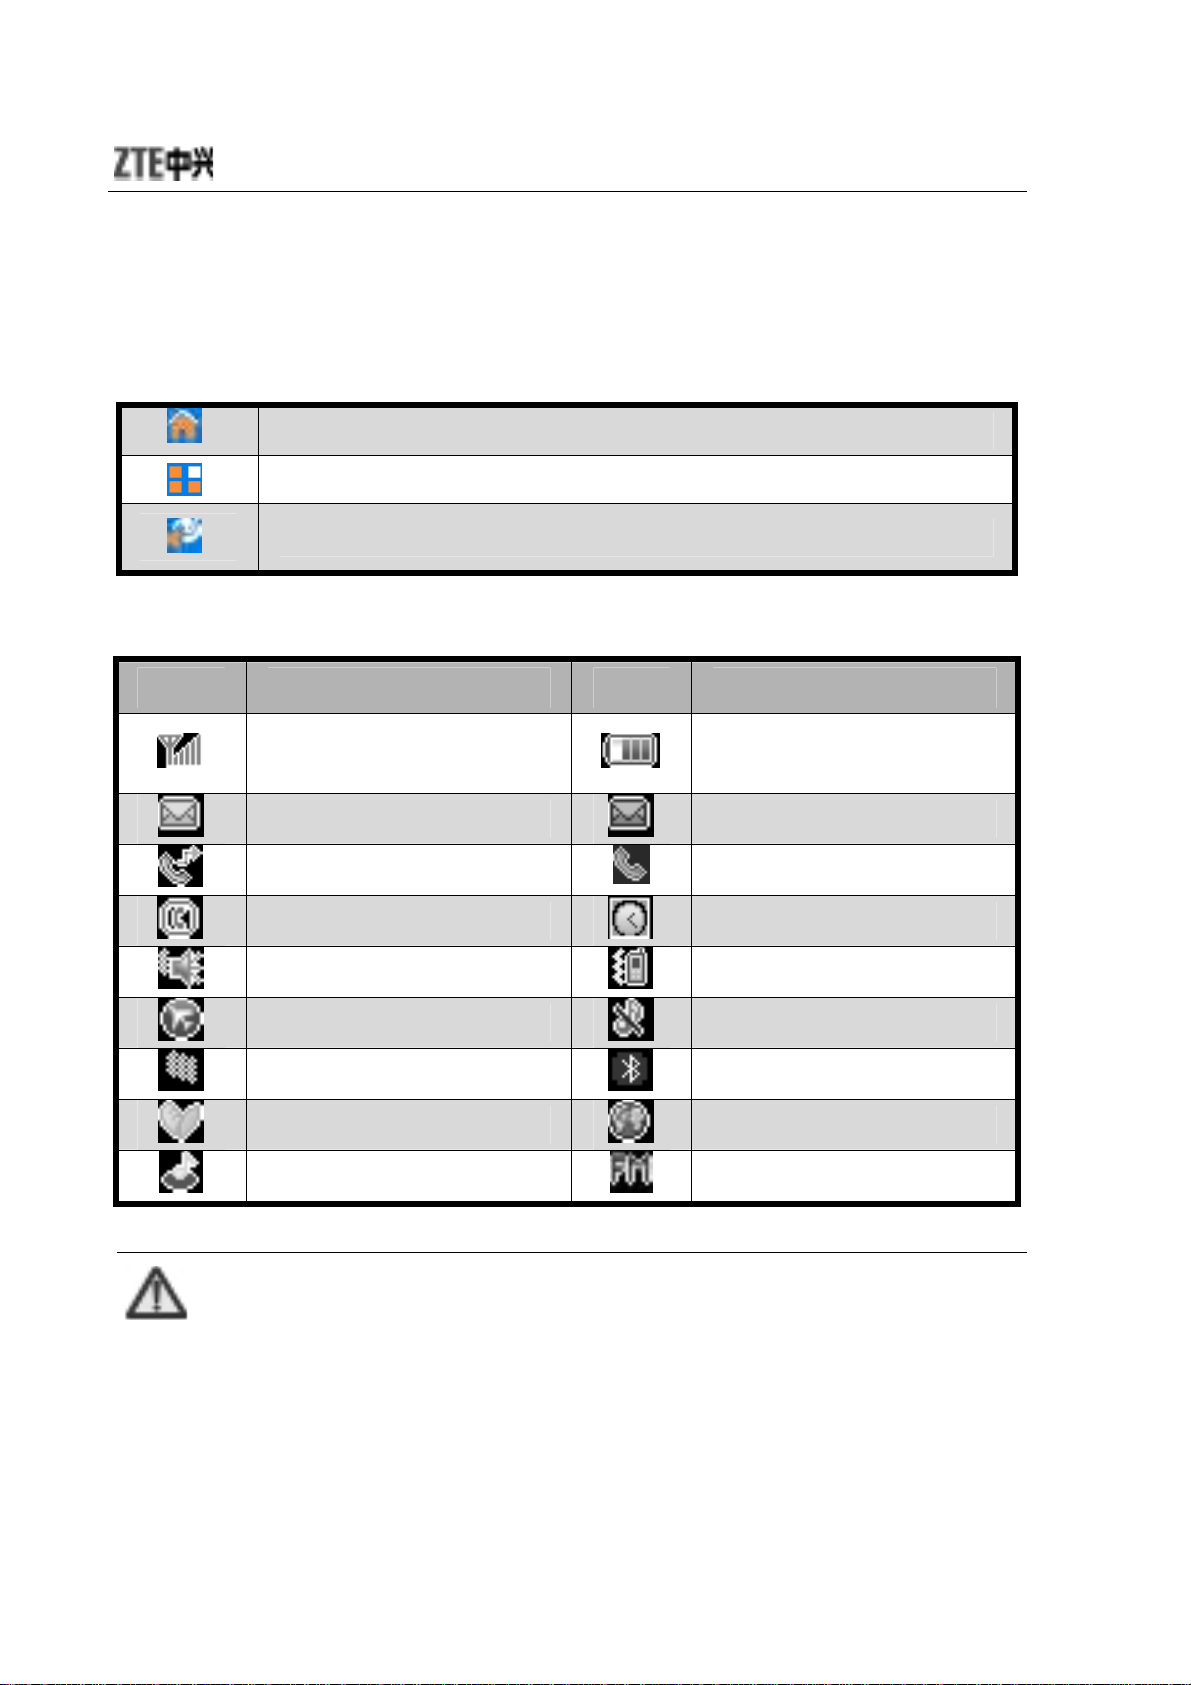
Descriptions of Touch-screen Shortcuts
There are three shortcuts on the standby screen, shown as below:
Click it to return to standby screen.
In idle mode, click it to display the “shortcuts”.
In idle mode, click it to enter “User Profiles”.
Descriptions of icons on status bar
Icons Descriptions Icons Descriptions
Network signal
strength
Unread SMS
Call Forwarding
Hands-free
Outdoor
Battery capacity
indication
Unread MMS
Calling or in a call
Alarm ON
Meeting
Note:
Flight
Self-defined
In Roaming
MP3 ON
In this user manual, “press” means pressing the key
and then releasing; “hold” means pressing and
holding the key for about 2 seconds or more; “click”
means clicking the corresponding icon on the screen
with touch-pen.
Silence
Bluetooth ON
GPRS
FM Radio ON
10
Page 19
錯誤! 使用 [常用] 索引標籤將 标题 1 套用到您想要在此處顯示的文字。
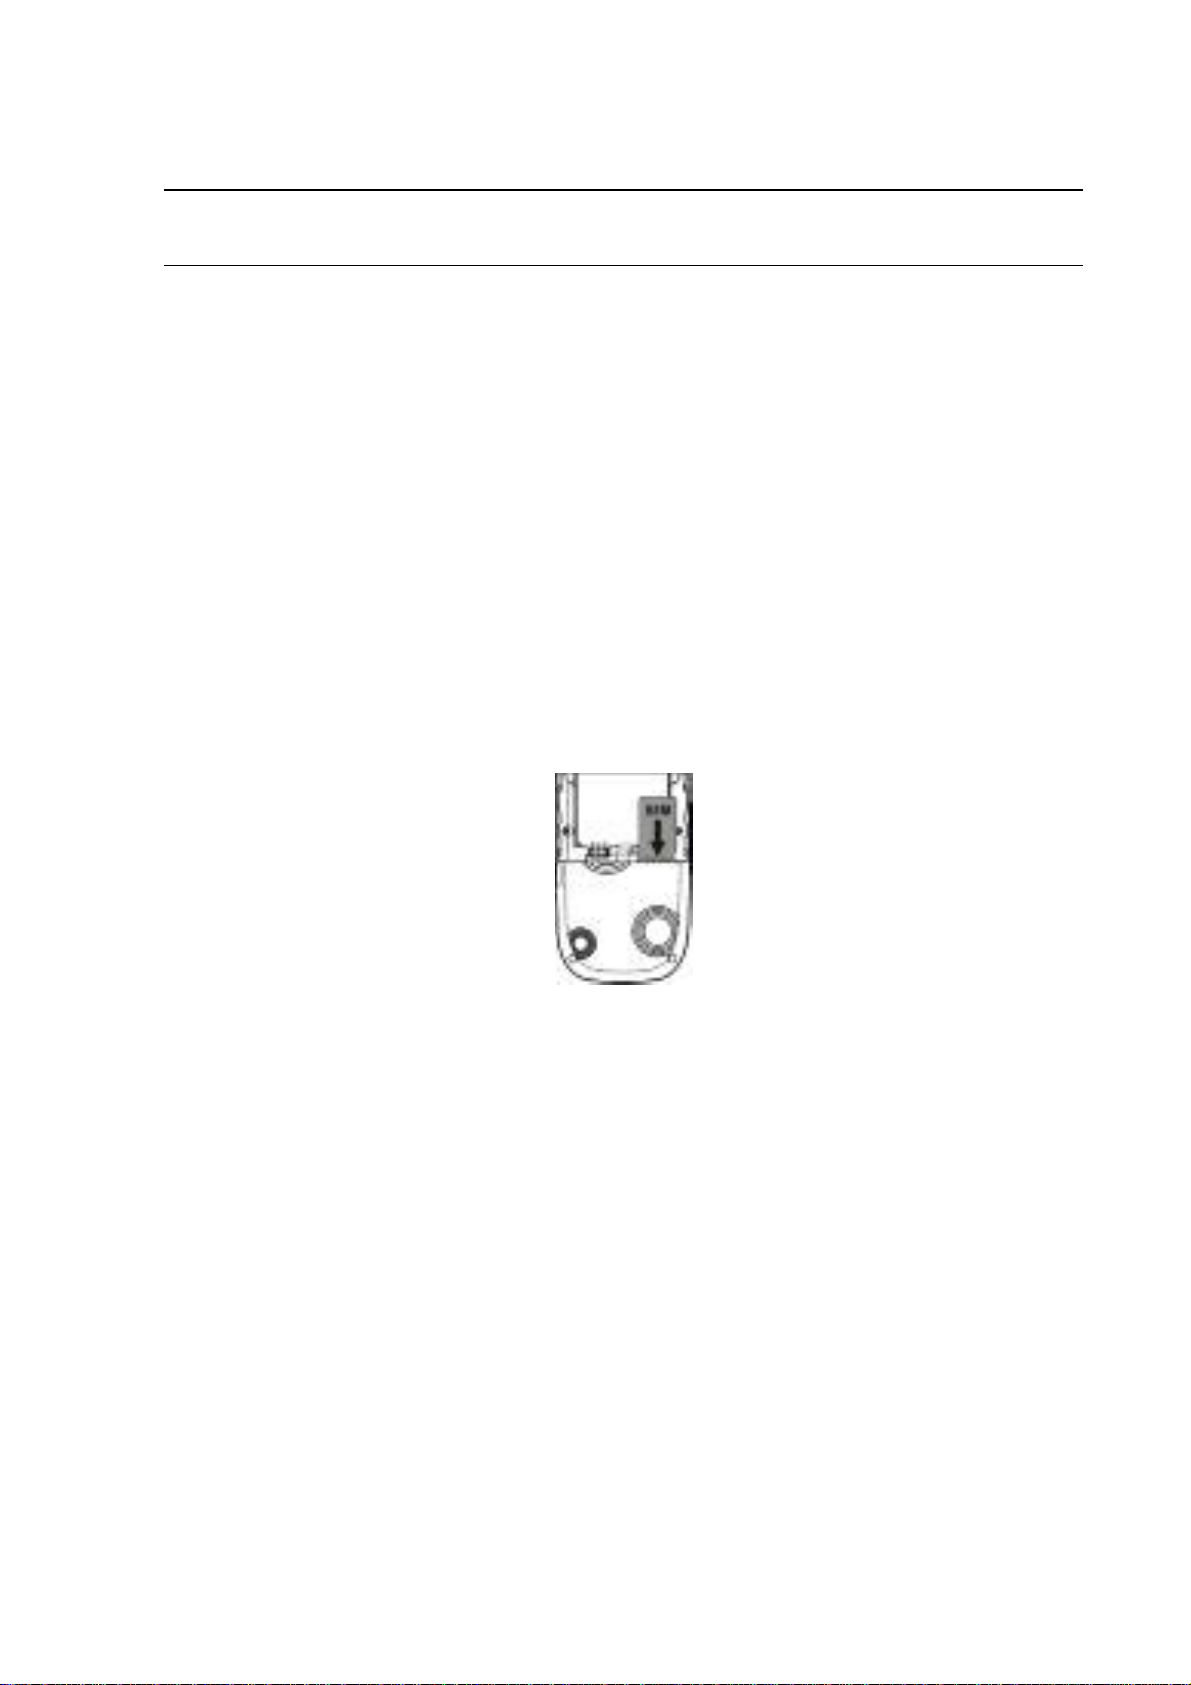
Insert and Remove SIM Card
Insert a valid SIM card into your mobile phone before use. All
information regarding network connection and SIM phone book
is saved in SIM card. In order to avoid the loss and damage of
information saved in SIM card, please don’t touch the metal
surface and put SIM card far away from electricity or magnetism.
1. Turn off your mobile phone, remove the battery and
disconnect the external power.
2. Put SIM card into the socket as shown in the figure.
3. Turn off your mobile phone and remove the battery before
taking out SIM card.
4. Follow the converse steps to remove SIM card.
Insert and Remove Memory Card
1. Turn off your mobile phone, remove the battery and
disconnect the external power.
2. Insert the memo ry card into the slot in the direction of arrow
shown in the figure below:
11
Page 20
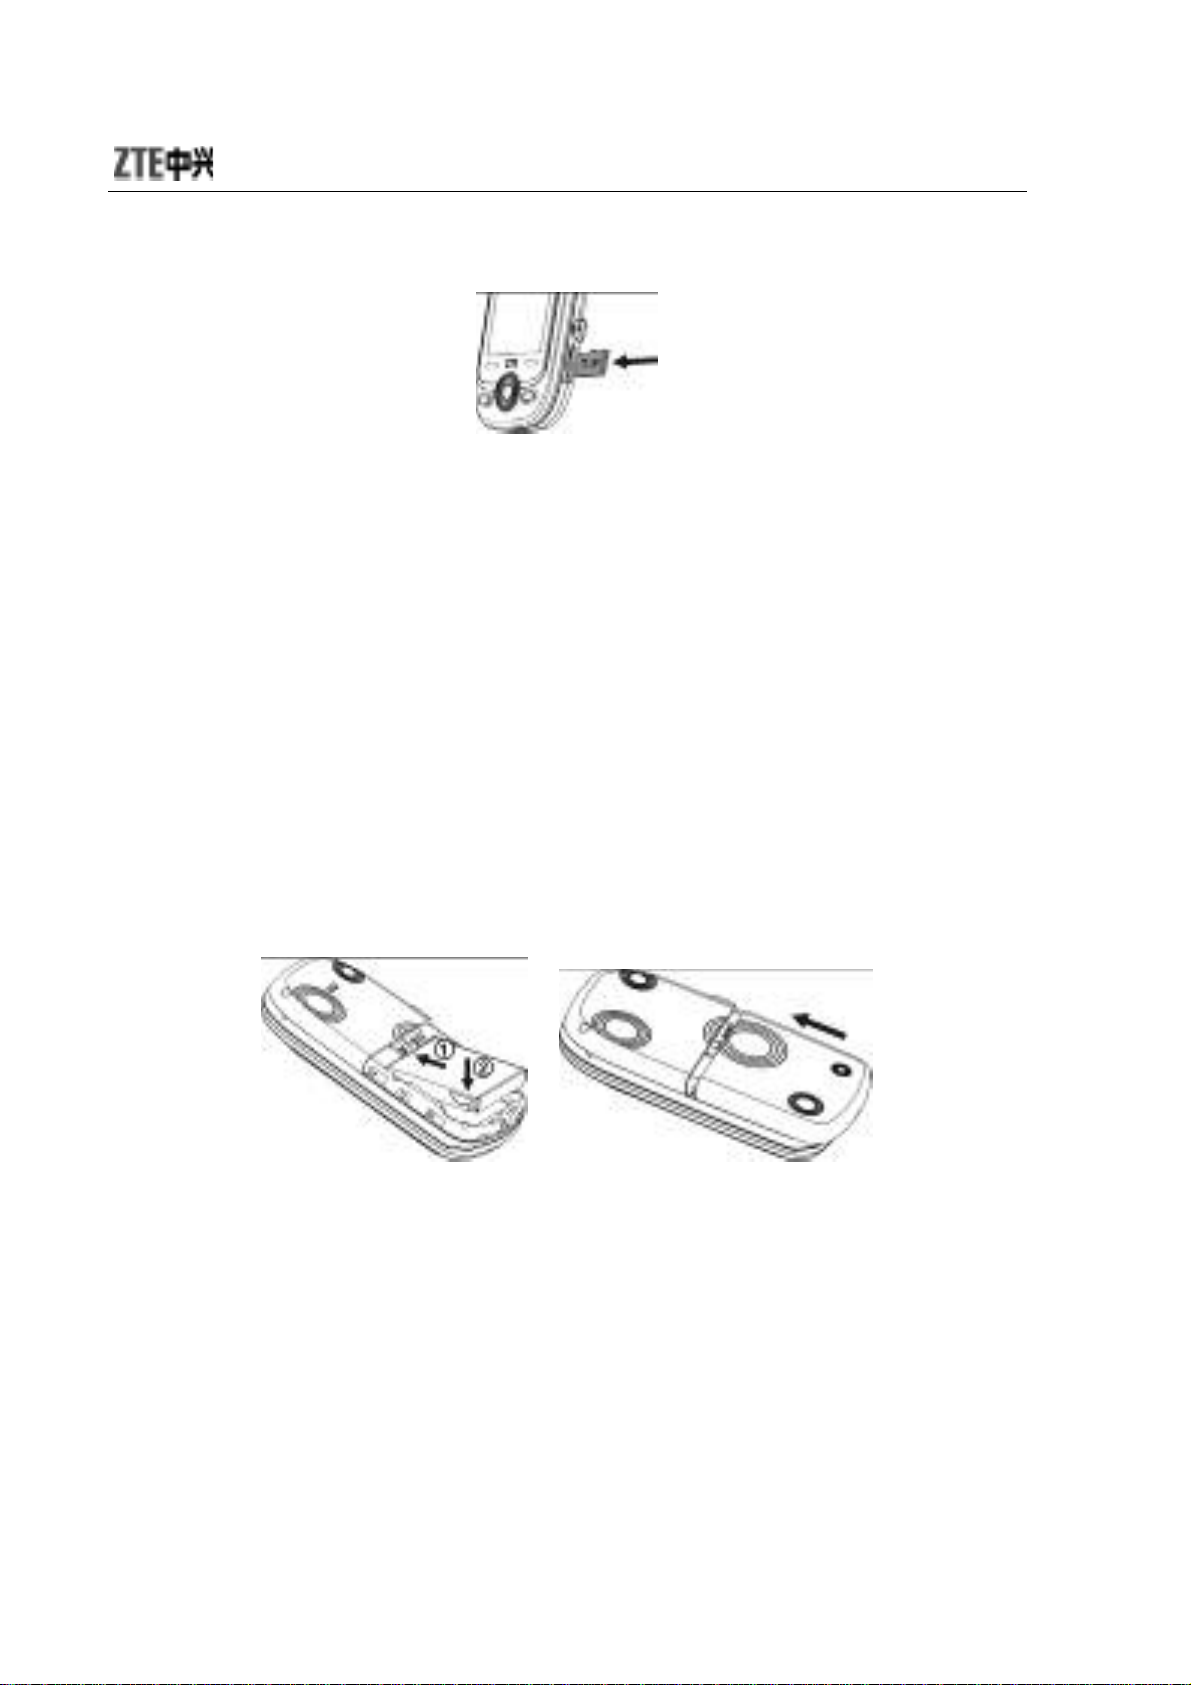
3. Turn off your mobile phone and press the memory card to
remove it.
Battery
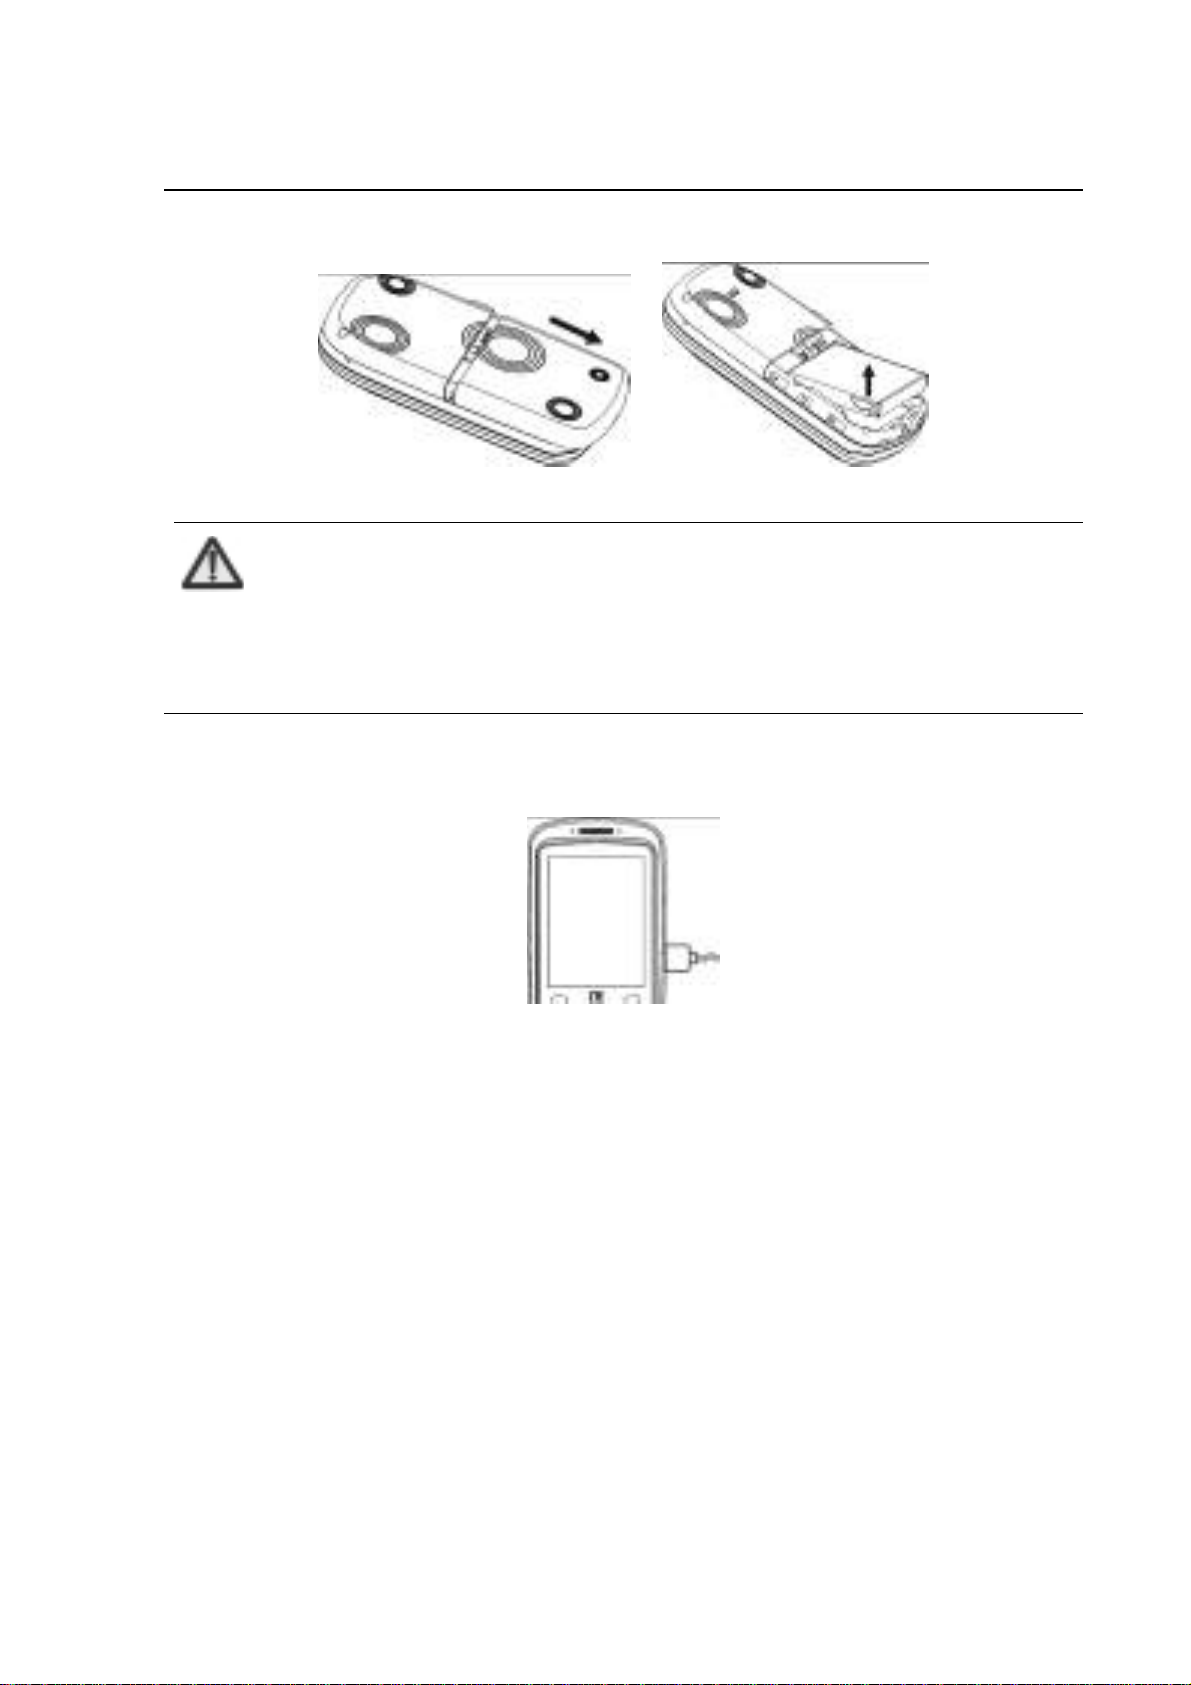
Install the battery
1. Align the battery's contact points in the direction of the arrow
as shown, and Insert the battery into the slot;
2. Put on the battery cover, and push forward in the direction of
the arrow as shown until it’s locked.
Remove the battery
1. Push the battery cover in the direction of the arrow as shown
and open the cover.
2. Pull the battery in the direction of the arrow as shown and
take out the battery.
12
Page 21
錯誤! 使用 [常用] 索引標籤將 标题 1 套用到您想要在此處顯示的文字。
Note:
Please turn off your mobile phone before taking out
the battery, otherwise your mobile phone might be
damaged.
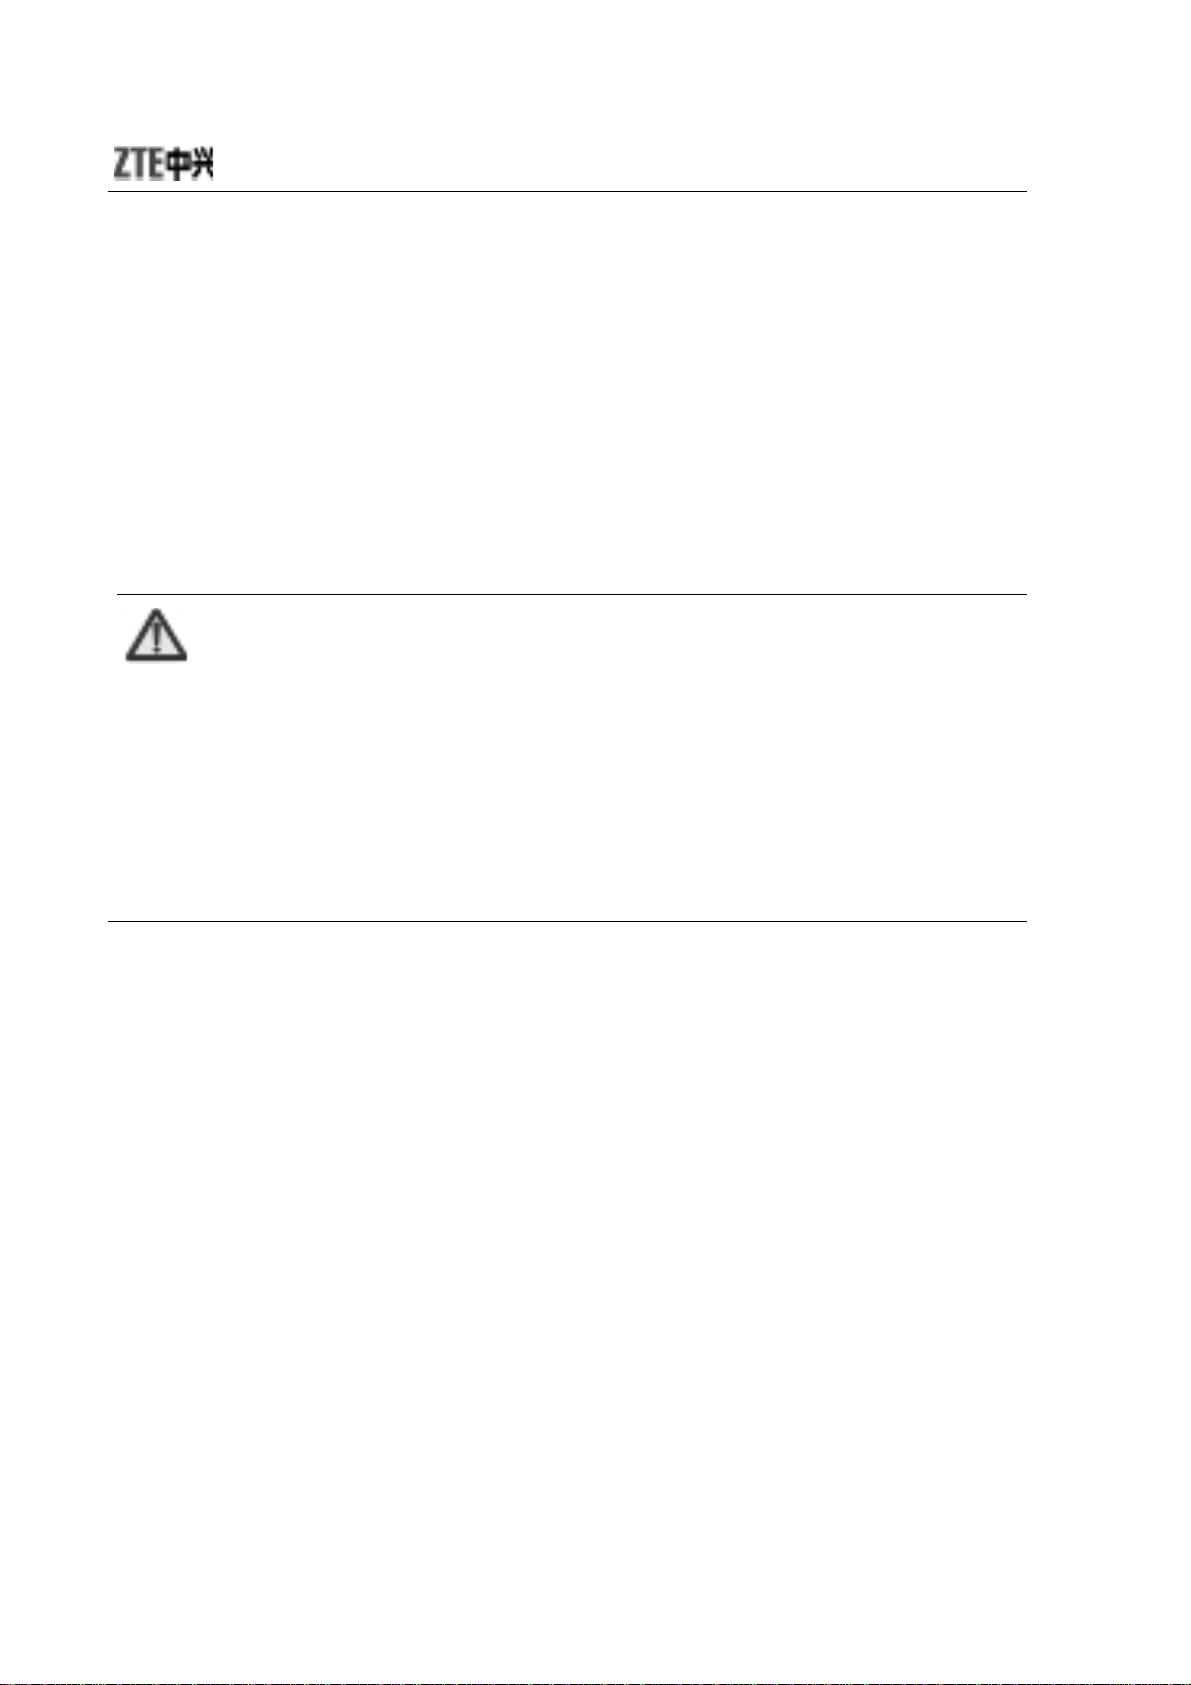
Charge the battery
1. Open USB interface cover at the right side of the phone, and
insert the plug;
2. Connect the charger to AC power socket. When the phone is
powered on, the battery capacity bar on up-right corner of the
screen keeps scrolling during charging; when the phone is
powered off, there will be charging indication on the screen
during charging.
3. If the phone is used excessively without enough capability,
the charging indication will not immediately appear on the
screen of the phone when charging starts,and the phone
might not be powered on within a few minutes after the
13
Page 22
charging starts;
4. It usually takes about two and half hours to complete the
charging. During the charging, the battery, mobile phone and
charger may normally become hot.
5. Please disconnect the charger from your mobile phone and
the socket when the charging is completed.
Note:
Put your phone in ventilated place under normal
temperature during charging. Use the original charger
or those authenticated by the manufacturer. Using
non-original charger may cause danger and violate
the warranty provisions. Ch a r g e y o u r m o b i le p h o n e
in time when it is powered off automatically or
prompts the lack of the power.
Power ON/OFF
Hold End key until the power-on/off animation appears.
After your turn on your mobile phone, it will automatically check
whether or not SIM card is inserted or usable, and shows the
following information on the screen in turn:
Enter Phone Lock Code: if you’ve set lock code.
Enter PIN Code: if you’ve set PIN code for SIM card.
14
Page 23

錯誤! 使用 [常用] 索引標籤將 标题 1 套用到您想要在此處顯示的文字。
Note:
SIM card will be locked if you enter wrong PIN code
three times. Then you need PUK code to unlock SIM
card. The PIN code may be provided to you together
with SIM card. If not, contact your network service
provider. The default PIN code is normally 1234.
Please replace it with your own PIN code as soon as
possible.
Search: The mobile phone will search for the available
network.
15
Page 24

Enter 3D Interface
Your mobile phone provides 3D Interface: “Communication”,
“Entertainment” and “Applications”.
Enter 3D interface in either of the following two methods:
1. Press OK key to enter the interface.
2. Flip your fing er or t ouc h pen on the screen from down to up.
There are four icons on the top of the screen. Click
“Communication”, click
enter “Applications”, and click
Use navigation keys
Press left/right key to switch among “Communication”,
“Entertainment” and “Applications”, press up/down key to select
the submenu, press right soft key to exit the menu, and press
end key to return to idle screen.
Use touch pen
Flip your finger or touch pen on the screen from left to right to
switch the main interface, and flip from up to down to return to the
to enter “Entertainment”, click
to return to idle screen.
to enter
to
previous menu.
In idle mode, pr ess left soft key and # key to u nlock the keypad,
and you can also unlock the keypad by flipping your finger or
touch pen on the screen from left to right.
16
Page 25

錯誤! 使用 [常用] 索引標籤將 标题 1 套用到您想要在此處顯示的文字。
Communication
Call
Make a Call
Direct Dial
Using keyboard
In idle mode, press numeric keys to input the phon e number
and press “Send” key to dial;
Using touch pen
In idle mode, use touch-pen to click any blank space on the
screen to display the dialing keyboard, click the numeric
keys to input the number, and click
Dial from Contacts
Using keyboard
In idle mode, press right soft key to enter “Contacts” to select
the contact you want to dial, and press “Send” key to dial;
Using touch pen
1. In idle mode, use touch-pen to click any blank space on
the screen to display the dialing keyboard;
2. Click to enter the list of “Contacts” to select the
to dial.
contact you want to dial, and click
Add Useful Number
17
Key to dial.
Page 26

Enter the dialing interface, click
number from Contacts. Press
and number, and click
numbers.
Dial International Calls
To dial an international call, press or click
international prefix “+” appears on the screen. Dial the country
code or regional code, city code and then telephone number.
to dial. You could add three useful
and
to displ ay the contact’s name
to select a useful
until the
Emergency Calls
You could make emergency calls without SIM card so long as
you are in the area covered by the network.
Answer Calls
You can press “Send” key to answer the call.
Use headset to answer
If the headset is connected, you can press the key on the
headset to answer the call.
Hands-free
1. During the conversation, press “H-Free” key to enter the
hands-free status;
2. Press “H-Held” to return to normal status.
18
Page 27

錯誤! 使用 [常用] 索引標籤將 标题 1 套用到您想要在此處顯示的文字。
Call Options
During the conversation, press “Option” to enter the menu. You
could perform the following operations:
Hold: hold the current conversation.
End: end the current conversation.
New Call: enter new dialing interface.
Phone Book: enter the contacts.
Messages: enter “Message”. MMS function will be
disabled during the conversation due to the
restriction of network occupancy.
Sound Recorder: record the current conversation.
Mute: as “Mute” is on, the other party can’t hear your
voice.
DTMF: turn on or off.
Conference*:
Swap: keep switching between different parties.
Conference: have a conference phone call.
Transfer: transfer current call to other phone.
End Single: end current call.
End All: end all active calls
Note:
The menu option marked with “*” appears only under
specific conditions. Conference function requires
network support.
19
Page 28

Messages
SMS
Write Message
1. Enter “Write Message” to edit the text;
2. Select “Insert” to insert the phone number, template, etc.
3. after editing the text, press “Opt ion” to select :
Send Only: press “Option” to select “Send Now” after
entering the recipient’s number (select multiple
numbers from “Contacts” or “Call History”)
Send By Group: send the message to all the contacts in
the group.
Save and Send: operate the same as “Send Only”. The
message will be saved in “Outbox” after it
was sent.
Save as Draft: save the message in “Inbox”;
Note:
SMS centers of some cities and regions do not
support a short message containing more than 160
English letters. Only the mobile phone with EMS
function could receive/send static icons, animated
icons and music files.
View Message
20
Page 29

錯誤! 使用 [常用] 索引標籤將 标题 1 套用到您想要在此處顯示的文字。
Select “Inbox” to view the received messages.
Select “Outbox” to view the sent and saved messages.
Select “Drafts” to view the saved but not yet sent messages.
Settings
Before using Messages, y ou need perform re levant settings:
Profile Settings: Please contact your local network
provider to obtain the service center number.
Enter “Profile Settings” and select one profile.
Select “Edit” to set “Profile Name”, “SC Address”,
“Valid P er iod ” and “Message Type”.
Note:
“Valid Period”, “Fax” and “Page” need network
support.
Common Setting: select ON/OFF for “Deliver Report”
and “Reply Path”.
When “Delivery Report” is set on, the SMS
center will return status report to you no matter
whether or not the other party could receive
your message. In this way, you could
conveniently know whether or not the other
party has received your message.
Memory Status: display th e memory space for SMS in SI M
card and Phone;
Preferred Storage: select “SIM” or “Phone” as the
default storage media for SMS.
21
Page 30

SMS Counter
You could view the number of messages “sent” and “received”.
MMS
Note:
MMS requires network support, therefore make sure
your SIM card supports MMS before use, or consult
your network provider. Make sure to complete the
following operations before sending MMS: you’ve set
service center number; you’ve completed WAP
setting.
If the MMS is too large, the mobile phone might not
be able to send or receive it
Your mobile phone supports MMS. After necessary settings, you
could send/receive MMS.
Write Message
1. Enter “Write Message” to edit the recipient’s number and
E-mail;
2. Edit the subject and MMS text, press “Option” to insert the
selected picture, sound file, etc.
3. After editing, you could select “Send Only”, ”Save and Send”,
“Save to Draft”, “Send Options” or “Exit”.
22
Page 31

錯誤! 使用 [常用] 索引標籤將 标题 1 套用到您想要在此處顯示的文字。
View Message
Select “Inbox” to view the received messages.
Select “Outbox” to view the sent and saved messages.
Select “Drafts” to view the saved but not yet sent messages.
Settings
Compose: set “Creation Mode”, “Image Resizing” and
“Auto Signature”.
Send: set “Validity period”, “Delivery report”, “Read report”,
“Priority”, “Slide Timing” and “Delivery time”.
Retrieve: set “Home network”, “Roaming”, “Read Report ”
and “Delivery Report”.
Filter: set “Anonymous” and “Advertisement”.
Server Profile: Generally, the default setting will be
CHINA MOBILE MMS in China.
Memory Status: check the memory status.
Note:
The use of “Delivery Report” and “Anonymous”
depends on your network service provided by your
provider. For more details, please consult your
network provider.
Your mobile phone has reserved some usable space
to save MMS. It may fully occupy the space if you
store a lot of multimedia messages. If your phone
prompts with “storage full”, you must delete some
redundant messages to make sure there is enough
23
Page 32

space to store new multimedia messages.
Voice Mail Server
When you are unable to answer the call, you could let the other
party leave a message for you through voice mail server. You
could visit voice mail server to listen to the message later.
You could set two voice mail numbers.
In idle mode, hold “1” key to dial the first voice mail number
you’ve set.
Note:
Make sure to apply for the service before use
because it requires network support.
Broadcast Message
Broadcast message indicates the public message sent by
network operator. Through broadcast messages, you could
receive the information about weather, taxi, hospital, etc.
Note:
The broadcast message needs the support from
network provider. For usable information, please
consult your local network provider.
24
Page 33

錯誤! 使用 [常用] 索引標籤將 标题 1 套用到您想要在此處顯示的文字。
Contacts
You could save the contact’s name, telephone number, mobile
phone number, etc. The numbers could be saved either in
Phone or SIM card.
Quick Search
Input the first lette r of your desired contact’s name on the scre en to
quickly search for the contact, an d press left/rig ht key to switch
between the groups.
Search by Name
Input the name, and press “Search” to find the matching entries.
Add New Entry
You could add n ew entry “To SIM” or “To Phone”.
If you want to add new entry to SIM, you need input “Name” and
“Number” only.
If you want to add new entry to Phone, besides “Name”,
“Number”, “Home Number”, “Office Number”, “Other Number”,
“Email Address”, “Memo”, and you need edit the following
Caller Group: Add the phone nu mber into different caller
groups.
Associate Picture: Set your personalized caller picture fo r
the current number. Select the proper picture
from “Phone” or “Card”, which could be
previewed.
Associate Sound: Select the proper ring tone from
“Phone” or “Card”.
25
Page 34

Caller Group
Your mobile phone supports caller grouping function, which
allows you to select “View member”, “Group ringer”, “Group pic”,
“Add member”, “Del member”, “Rename”, or “Del All Members”.
Note:
You could add/delete the members only when they
are saved in Phone.
Copy All
Select “From SIM” to copy all entries from SIM card to Phone, or
select “From Phone” to copy all entries from Phone to SIM card.
Note:
When copying all entries from Phone to SIM card,
only the name and number will be copied.
Delete All
Select “From SIM” to delete all entries saved in SIM card, and
select “From Phone” to delete all entries saved in Phone.
Preferred Storage
You could set the preferred storage location for the current
number.
26
Page 35

錯誤! 使用 [常用] 索引標籤將 标题 1 套用到您想要在此處顯示的文字。
Memory Status
Owner Number: set two numbers for Owner Number.
Note:
Any changes arising from the use of this function will
not affect the actual numbers saved in SIM card.
Memory Status: You could check the memory status of
both phone and SIM.
27
Page 36

Call History
“Missed Calls”, “Dialed Calls”, and “Received Calls” are saved in
“Call History”. If the records are full, the earliest saved records
will be deleted.
In idle mode, press OK key to enter the main menu, and then
select “Call History”.
View
1. Select “Call History” in the main menu to select “Missed
Calls”/ “Dialed Calls”/“Received Calls”.
2. Select the record you want to view from the list.
Delete Call Log
1. Select “Call History” in the main menu to select “Delete Call
Log”.
2. Select “Missed Calls”, “Dialed Calls”, “Received Calls” or
“Delete All”.
Call Time
Under “Call Time”, you could select “Last Call Time”, “Total Sent”,
“Total Received” or “Reset All Time”.
28
Page 37

錯誤! 使用 [常用] 索引標籤將 标题 1 套用到您想要在此處顯示的文字。
Entertainment
Music
Audio Player
1. Select “Audio Player” to enter the interface, and press
“Option” and select “Settings” to set “Background Play”,
“Repeat”:
Storage Location: select “Phone” or “Memory Card”.
BT Stereo Headset: if your BT stereo headset has
matched with your mobile phone, and
“BT Stereo Headset” has been set ON,
you could select “BT Stereo Headset”
to listen to music.
2. Press “Option” “Playlist” to check the list of audio files in
phone or memory card.
3. Press “Option” ”Play” to play the audio files in the list.
Note:
The audio files must be saved in “My Music” folder of
the phone or memory ca rd.
Select an audio file, press “Option” “Play”:
Press Up key t o enter “Pla yer Settings ”, and p ress OK key
to pause/resume.
29
Page 38

Press side keys to adjust the volume.
Press Right key to play the next file, and press Left key to
play the previous one.
You could also perform the operations using the touch-pen:
Click
Click
Click
Click to adjust the volume.
Click to play the next file; click to play the
to play.
to pause.
to stop playing.
previous file.
Click to change repeat mode.
Click to change random mode.
Click to enter Setup menu
Note:
Please select medium vo lume whe n listening to music.
FM Radio
Note:
You could listen to the radio only as the headset is
Channel List: edit up to 9 channels.
inserted into the mobile phone.
30
Page 39

錯誤! 使用 [常用] 索引標籤將 标题 1 套用到您想要在此處顯示的文字。
Manual Input: manually input a channel.
Preset Auto Search: automatically search for channels.
Settings: after you turn on “Background Play”, “Loud
Speaker”, “Record Format” and “Record Storage”.
Record: record the current channel.
Append: continue to record amr files on the current file.
File List: display the list of files.
Sound Recorder
The recorded files will be saved in this menu. Press “Option” to
select:
Record: start recording.
Settings: set “Pre. Storage” and “F ile Format”.
List: view all the recorded fi les in the list.
Select a recorded file and press “Options” to select: “Play”,
“Append”, “Rename”, “Delete” and “Delete All”.
Games
Your mobile phone provides 3D Game and Classical Games.
Enter the menu and view the operation descriptions.
31
Page 40

Video
Camera
1. Select ‘’Camera” to enter the preview interface, and press
“Option”:
Album: enter Album to view the photos you’ve just taken;
Camera Settings: set “Shutter Sound”, “EV”, “Banding”,
“Delay Timer”, and “Cont Shot”.
Image Settings: set “Image Size” and “Image Quality”.
White Balance: select “Auto”, “Daylight”, “Tungsten”,
“Fluorescent”, “Cloud”, or “Incandescence”.
Scene Mode: select “Auto” o r “Night”.
Effect Settings: select “Normal”, “Grayscale”, “Sepia”
“Sepia Green”, “Sepia Blue”, “Color Invert”,
“Gray Invert” or “Contrast”.
Wallpaper Frame: select “Off” or 4 different kinds of
frames.
Storage: select “Phone” or “Memory Card”.
Restore Default: restore to factory default settings.
2. Press OK key to take photos after the above settings:
On the preview interface, you could perform the following
operations with the touch-pen:
32
Page 41

錯誤! 使用 [常用] 索引標籤將 标题 1 套用到您想要在此處顯示的文字。
Click to adjust EV parameters;
Click to adjust the camera focus;
Click FX to change effect settings;
Click to delay the time;
Click to set “Cont Shot”;
Click to set “Image Quality”;
Click to set “image size”;
Click to complete “Capturing” and ask “Save Image?”.
Note:
The camera focus can not be adjusted when the
image size is set maximum.
Video Player
The mobile phone provides video playing function.
Select “Video Player” to enter the list of video files. Press
Up/down key to select the file to play, press “Option” or directly
use touch-pen to select the video. You could perform the
following operations:
Play: play the select video.
Forward: select “MMS” or “Bluetooth” to receive your
video.
Rename: change the name of selected video.
33
Page 42

Delete: delete the selected video.
Delete All: delete all videos.
Sort: select “By Name”, “By Type”, “By Time”, “By Size” or
“None”.
Storage: select “Phone” or “Memory Card”.
Select the video and press “Option” to set:
Animation: select “Brightness”, “Contrast” or “Repeat”.
Bluetooth: set “Bluetooth stereo output” or “Bluetooth
stereo headset”.
Select a video and use touch-pen to perform the following
operations:
Click or “Play” to play the video.
Click or “Pause” to pause.
Click “Stop” to stop playing.
Click to switch to full screen, and click any space on
the screen or press RSK to return to normal mode.
Click
Click to control the playing process.
Click “Return” to return to previous interface.
to adjust the volume.
Album
Select “Album” to view the photos taken or other pictures saved
in “Album”.
34
Page 43

錯誤! 使用 [常用] 索引標籤將 标题 1 套用到您想要在此處顯示的文字。
Note:
You could view the photos in “Album” only when they
are saved in “Photos” folder of Phone or Memory
Card.
Video Recorder
1. Select “Video Recorder” to enter the preview interface, and
press “Option” to perform the following operations:
To Player: enter “Video Player” to view the recorded
videos.
Camcorder Setting: set “White Balance”, “EV”, “Night
Mode” and “Banding”.
Video Setting: set “Video Quality”, “File Size Limit”, “Rec
Time Limit”, “Record Audio” and “Encode
Format”.
Effect Setting: select “Normal”, “Grayscale”, “Sepia”,
“Sepia Green”, “Sepia Blue”, “Color Invert”,
“Gray Invert” or “C ontrast”.
Restore Default: restore to factory default settings.
2. After the above settings, press OK key to record videos.
Under the record preview interface, you could use touch-pen to
perform the following operations:
Click
to record a new video.
35
Page 44

Click to pause.
Click “Stop” to stop recording.
Press “Back” to return to previous interface.
The default name of saved video shall be “MOV+ four SN
number + Letter”, and the letter varies from A to Z. The videos
will be saved in “Video Player”.
Note:
You could view the videos from “Video Player” or
“Video” folder under “File Manager” of Memory Card.
Connect
STK Service
STK card services are value-added services provided by your
network provider.
Your mobile phone supports STK service. If SIM card and your
network provider do not support the service, this function can’t
be used.
WAP
Your mobile phone supports Wireless Application Protocol (WAP).
You could get access to the services provided by your network
provider. It allows you to get information about news, weather
forecast, airline flights, etc. These services are especially
36
Page 45

錯誤! 使用 [常用] 索引標籤將 标题 1 套用到您想要在此處顯示的文字。
designed for the mobile phone, and they are main tained by WAP
provider .
Note:
WAP service requires network support. Please
consult your network operator or service provider for
details on usability, quotation, and tax of WAP
service. Your service provider will give you
instructions on how to use this service.
You could use the value-added services provided by network
operator. The menu mainly includes the following options:
“Homepage”, “Bookmarks”, “Recent Pages”, “Enter Address”,
“Service Inbox” or “Settings”.
Homepage: You could visit the homepage. Homepage is
WAP site you set in “Settings”. If you do not set
WAP site, the factory preset site will be used.
Bookmarks: Select a bookmark to display the bookmarks
such as “yahoo”, “sina”, etc, press “Option” to
select “Goto”, “Edit”, “Send”, “Delete”, “Delete All”
or “Add Bookmark”.
Note:
Before use, please make sure your bookmark list is
not empty. In order to avoid this, a few common
websites have been preset to you in your mobile
phone.
Recent Pages: Display the recent pages you’ve visited. If
you have select the history, simply select
37
Page 46

“Goto” to visit this page.
Enter Address: Input URL address, and press “OK” to
complete. You could visit WAP site now.
Service Inbox: Check the service information sent by
your service provider. Press “Option” to
select “Read”, “Delete” or “Delete All”.
Settings: You could select “Edit Profile”, “Browse
Options”, “Service Message Settings”, “Clear
Cache”, “Clear Cookies” or “Trusted Certificates”.
Bluetooth
Bluetooth function enables you to exchange data with your
phone & other Bluetooth devices, and listen to music or talk
hands-free with Bluetooth headset.
You don’t have to put your phone & other Bluetooth devices
together since Bluetooth devices communicate through radio
wave. You need make sure the distance between your phone
and other Bluetooth devices will not exceed 10m. Bluetooth
connection might be interfered by some obstacles or other
electronic devices.
Power
Turn ON/OFF Bluetooth. You could see the Bluetooth icon on
the status bar.
Inquire Audio Device
Search for Bluetooth headsets, etc.
38
Page 47

錯誤! 使用 [常用] 索引標籤將 标题 1 套用到您想要在此處顯示的文字。
My Device
In “My Device”, you cou ld view the Bl uetooth de vices you searched
for last time. If there is no Bluetooth device, then “Empty” will be
displayed.
1. Press “Option”
”Inquiry New Device” to search for new
devices;
2. Select a device after the phone searched for Bluetooth devices,
and press “Connect” to connect the phone with the device.
3. Durin g the course of connecti on, enter the same pass word to
successfully connect between the phone and the device.
4. After successful connection, you could communicate with the
device.
Note:
Some devices such as Bluetooth headsets, might
have fixed password “0000”. You need input this
password if your phone needs to connect some
devices.
Activate Device
Under “Active Device”, you could view the Bluetooth devices
connected successfully.
Setting
Perform the following settings for Bluetooth function:
39
Page 48

Visibility: turn ON/OFF. If you select “OFF”, other
Bluetooth devices can’t search for your
mobile phone.
Change Device Name: when other Bluetooth devices
search for your mobile phone, the name of
your mobile phone will be displayed.
Authentication: turn ON/OFF. When you turn on this
function, other Bluetooth devices will need
authentication before successfully
connecting to your mobile phone. When
you turn off this function, other Bluetooth
devices will freely connect your mobile
phone without authentication.
Audio Path: select “Leave in Phone” or “Forward to BT
Headset”.
FTP Setting: select “Receive Position”, “Shared Folder”
and “Access Right”.
Remote SIM Mode: turn ON or OFF the mode.
About
You could check the relevant information of Bluetooth function.
Note:
If the memory card isn’t inserted, the received files
will be automatically saved in “Received” folder of
your phone.
40
Page 49

錯誤! 使用 [常用] 索引標籤將 标题 1 套用到您想要在此處顯示的文字。
Data Account
GSM Data
Under “GSM Data”, the list of data accounts is displayed. Select
one account, press “Edit” to edit “Account Name”, “Number”,
“User Name”, “Password”, “Line Type”, “Speed”, “DNS”, etc.
GPRS
In “GSM Data”, press “OK” to display the list of data accounts.
Select one account, press “Edit” to edit “Account Name”, “APN”,
“User Name”, “Password”, “Auth. Type”, etc.
GPRS Counter
Check the data flow under GPRS network. You could view “Last
Sent”, “Last Received”, “All Sent”, “All Received” or “Reset
Counter”.
41
Page 50

Applications
Alarm
Your mobile phone could set up to 8 alarms, and it supports turn
off alarm.
File Manager
Enter “File Manager” to display “Phone” and “Memory Card”.
The Total and Free memory space will be displayed on the upper
part of the interface.
Press “Option” to select:
Open: list the directories and files under root directory.
Create Folder: create a new folder.
Format: Format the selected storage. This would delete
all the data saved in the selected storage.
Settings
User Profiles
Your mobile phone provides multiple profiles, which allows you
to perform personalized settings of “Incoming Call”, “Alarm”,
“Message”, “Keypad Tone”, “Extra Tone” and “Power On/Off
Volume” according to different occasions. The optional profiles
42
Page 51

錯誤! 使用 [常用] 索引標籤將 标题 1 套用到您想要在此處顯示的文字。
include “General”, “Silent”, “Meeting”, “Outdoor”, “Flight”, and
you could also customize the profiles.
Phone Setup
Vibrate Feedback
You could turn “On” o r “Off” this function. When it is “ON”, your
mobile phone will slightly vibrate when you press the keys or
click the icons.
Scheduled Power On/Off
You could edit up to 4 groups of power on/off time. Press “Edit”
to set “Status”, “Type” and “Time”.
Note:
Auto Lock Keypad
You could prevent inadvertent operations resulting from
improper key press.
Press left soft key and # key to unlock the keypad, or flip your
finger or touch p en on the screen from left to ri ght to u nloc k the
keypad.
The time should be set different y to avoid conflict.
43
Page 52

Call Setup
Call Waiting
After this function is activated, the system will inform you if there
is another incoming call. Please contact your network provider
for details.
Call Divert
This function allows you to divert incoming call to another
designated number.
Note:
This function requires network support, so please
contact your network provider for details.
You could select “Divert All Voice Calls”, “Divert If Busy”, ”Divert If
No Answer”, “Divert If Unreachable”, or “Divert All Data Calls”.
If you don’t need to divert, you could select “Cancel All Divert”.
Press OK to select:
Activate: set the diverted object number.
Deactivate: cancel call divert.
Query Status: check the status of the function.
Speed Dial
44
Page 53

錯誤! 使用 [常用] 索引標籤將 标题 1 套用到您想要在此處顯示的文字。
Enable Speed Dial: turn on/off speed dial.
Set Number: You could edit 8 phone numbers for
numeric keys 2~9. In idle mode, hold numeric
keys 2~9 to dial th e corresponding n umber.
Answer Key
You could set “Send Key” or “An y Key” to answer the incoming
call.
Black List
You could edit th e Black List. After you select “On” under Mode,
the incoming call from the numbers in the Black List will be
rejected.
Auto Redial
You could turn on/off this function. If the other party doesn’t
answer the call as you select “On”, your mobile phone will
automatically redial after a while. It will auto redial up to 10 times.
Network Setup
Network Selection
There are three modes under Network Selection: “New Search”,
“Select Network” and “Selection Mode”. Under “S election Mode”,
you could select “Automatic” or “Manual”.
GPRS Connection
45
Page 54

Press left soft key “Change” to switch between “When Needed”
and “Always”.
Security Setup
You need to input the password ‘0000’ to enter “Security Setup”.
SIM Lock
If “SIM Lock” is currently set “OFF”, select “ON” to input
PIN code to unlock your SIM card. You need input correct
PIN code to unlock your SIM card as you turn on your
mobile phone next time.
If “SIM Lock” is set “ON”, select “OFF” to cancel the
protection.
Note:
Your SIM card will be locked if you enter wrong PIN
code continuously for three times. In this case you
need PUK code to unlock your SIM card.
The PIN code, PUK code and SIM card may be
provided to you all together. If not, contact your
network provider. The default PIN code is normally
1234. Please change to your own PIN code as soon
Phone Lock
as possible.
46
Page 55

錯誤! 使用 [常用] 索引標籤將 标题 1 套用到您想要在此處顯示的文字。
Phone Lock could prevent your mobile phone against illegal use.
Select “Power On” to input the password. You need input
correct password to unlock your mobile phone as you turn
on your mobile phone next time.
Select “Changing SIM” to input the password. You need
input correct password to unlock your mobile phone as
you change your SIM card next time.
Select “OFF” to cancel the protection.
Note:
Call Barring
Note:
The default password is 0000. Please change to your
own password as soon as possible.
Please contact your network provider for details
since some providers might not provide call barring
service. When applying for this service, you will get a
four-digit password provided by your provider to
activate call barring.
Press “Call Barring” to select:
All Outgoing Calls: select “Activate”, “Deactivate” or
“Query Status”.
47
Page 56

International Calls: the same as above.
International Calls Except To Home PLMN: the same
as above.
All Incoming Calls: the same as above.
When Roaming: the same as above.
Cancel All: input the password to cancel all call barring.
Change Barring PW: Input the old password and set new
one.
Fixed Dial
If your SIM card supports, only the selected numbers could be
dialed. After this function is activated, you are only allowed to
dial the numbers in Fixed Dial List or a few numbers.
Enter “Fixed Dial” to select:
Mode: Input PIN2 code to turn ON/OFF Fixed Dial
function.
Fixed Dial List: Edit a maximum of 10 fixed dial numbers.
Press “Option” to select “Edit” or “Find in
PHB”.
Note:
You need input PIN2 code to turn on/off fixed dial
48
Page 57

錯誤! 使用 [常用] 索引標籤將 标题 1 套用到您想要在此處顯示的文字。
function. Please contact your network provider to get
PIN2 code. After fixed dial is activated, only the
entries you set in Fixed Dial List will be displayed in
phone book.
Change Password
You could change “PIN”, “PIN2” and “Phone Lock Password”.
Note:
The length of password must be more than 4 digits
and less than 8 digits.
Pen Calibration
As you feel your mobile phone doesn’t react properl y after you
use the touch-pen to click relevant option or icon, you need
calibrate the touch screen. Click
calibration is completed. If the calibration is still not accurate as
you make sure to click the center every time, you should refer to
Restore Factory Settings.
with the touch-pen until the
Restore Factory Settings
Enter “Restore Factory Settings”. You need input the correct
phone lock password, and press “OK” to restore factory
settings.
49
Page 58

Calendar
Enter “Calendar”, the calendar in current month will be displayed
on the screen and the current date will be marked by a
background box in special color .
You could press navigation keys or click the direction arrows on
the screen to browse the dates and the information on the screen
will also change consequently.
To Do List for current date will be displayed on the idle screen
after adding a new task and turning on “Alarm”. Click it to view
the details.
Organizer
Calculator
Your mobile phone provides a calculator to perform simple
calculations. You could add, subtract, multiply or divide, and
select M+, M-, MR, and MC to perform relevant operations.
Note:
The calculator is limited to precisions, therefore it
Stopwatch
might generate errors.
You could select “Spit Timing”, “Lap Timing” or “View record”.
50
Page 59

錯誤! 使用 [常用] 索引標籤將 标题 1 套用到您想要在此處顯示的文字。
nWay Stopwatch
Press 4 different navigation keys to record the different timing
respectively.
Note:
Press LSK to stop time measuring, and hold left soft
key to clear up all the records.
Unit Converter
Your mobile phone provides you with unit converter to convert
the weight and length. Input the value to perform the
conversions, such as from Kg to Pound, from Kg to Ounce, from
Km to Mile, and from M to Yard.
Currency Converter
Your mobile phone provides you with basic functions regarding
currency conversion.
World Clock
Press left/right navigation key to view the time of different cities.
Bookshelf
Enter “Bookshelf” and press “Option” to select::
Open E-Book: open E-Book, and press “Option” to select
“Find”, “Jump To”, “Go To Bookmark”, “Add
Bookmark”, “Remove Bookmark”, “Book Info”,
51
Page 60

“Settings”, “Apply Global Settings”, “Help” or
“Close”.
CleanUp Bookshelf: clean the bookshelf.
Global Settings: you could set “Font Style”, “Font Size”,
“Scroll By”, “Auto Scroll”, “Scroll Speed”, “Full
Screen”, “Encoding” or “Select Memory”.
Book Info: display the file title, size and format.
Delete: delete this file.
Delete All Files: delete all files.
Sort: you could sel ect “By Name”, “By Type”, “By Time”,
“By Size” or “None”.
Apply Global Setti ngs: restore factory default settings.
Note:
The list will be automatically updated as you put txt
files into “E-book” directory of the phone or memory
card.
52
Page 61

錯誤! 使用 [常用] 索引標籤將 标题 1 套用到您想要在此處顯示的文字。
PC Connection
Mass Storage
Your mobile phone supports mass storage—U disk function.
As the phone is turned off, connect your mobile phone
with PC through USB data cable. In this case, your mobile
phone can be used as U disk.
As the phone is turned on, connect your mobile phone
with PC through USB data cable. If the memory card is
inserted, you could select Mass Storage.
Webcam
Your mobile phone supports webcam, which can be operated
simply like USB webcams.
As the phone is turned on, connect your mobile phone
with PC through USB data cable. In this case, your mobile
phone will display “USB Config”.
Select “Webcam”, press “OK”, and a full-screen camera
interface will appear. This indicates your mobile phone
could be used as webcam now.
Your computer will detect new video devices. Up to now,
you could use the camera like other USB webcams.
Press End key or directly pull out the data cable to exit
camera mode.
53
Page 62

Input Methods
Your mobile phone supports handwriting input.
Under handwriting input mode, you could either use the touch
pen or click the virtual keypad to enter the inputs. The
handwriting input methods include
ABC& abc input method,
eZiABC& eZiabc input method, 123 input method and
Symbol input method.
Switch the input method: Press
Input the space: Press 0 key under any method except for
key.
#
123 input method.
ABC& abc input method: Each key is used to input
multiple letters. Quickly repeat the key
until your desired letter appears.
eZiABC& eZiabc input method: Press the
corresponding number key to input.
If the word is not what you want,
press up/down key to view other
matches, and press Select to
input.
123 input method: Press the numeric keys to input the
corresponding numbers.
Symbol input met hod: Under text input mode, pres s * key
to display the symbol box, press navigation
key to select the symbol and press OK key to
confirm.
54
Page 63

錯誤! 使用 [常用] 索引標籤將 标题 1 套用到您想要在此處顯示的文字。
Appendix
Shortcuts
Lock the keypad: In idle mode, hold LSK to quickly lock
the keypad.
Unlock the keypad: In idle mode, press LSK and # key, or
flip your finger or touch pen on the screen from
left to right to unlock the keypad.
End key: press it to quickly return to idle screen.
Capture key: press it to quickly enter the camera
interface.
# key: hold it to switch between Meeting and Silence.
Idle Shortcut Idle Setting: You could set 5 icons on the idle
screen such as “Message”, “Calendar”,
“Calculator”, “Bluetooth”, “Audio Player”
etc.
User Profiles: in idle mode, you could set the us er p rofi les
such as “General”, “Silent”, “Meeting”,
“Outdoor” and “Flight”.
Navigation keys: In idle mode, press up key to enter
“Audio Player”, press down key to enter “User
Profiles”, press left key to enter “Write Message”,
and press right key to enter “Inbox”, you could
define as other shortcuts based on your
requirements.
55
Page 64

Clearance and Maintenance
z Please maintain your mobile phone with good care since it is
delicately designed and manufactured. The following advice
might help you extend the life of your mobile phone.
z Clean your mobile phone, battery and charger with a soft dry
cloth.
z Do not clean your mobile phone with the liquor such as
alcohol, dilution agent or benzene.
z Clean the socket from time to time because a dust y socket
might cause disconnection, power failure, or even charging
failure.
z Do not press keys with needles, pen points or other sharp
objects to avoid damage or inadvertent operation.
z Keep tiny metal objects such as thumb pins away from the
phone receiver. The phone speaker is magnetic and thus
magnetizes those metal objects, which may hurt people or
damage the phone.
z Keep your mobile phone dry. Rain, moisture or any kind of
liquid containing minerals might corrupt the circuit.
z Do not touch the mobile phone with wet hands because this
might cause electric shock, which would hurt people or
damage the phone.
z Don’t use and put your mobile phone in a dusty or dirty
environment because this might damage the phone
components.
56
Page 65

錯誤! 使用 [常用] 索引標籤將 标题 1 套用到您想要在此處顯示的文字。
z Don’t keep your mobile phone near high-temperature
because it might shorten the life of electronic devices,
damage the battery, twist or melt some plastic parts.
z Don’t keep your mobile phone in a place where the
temperature is too low , otherwise the water vapor would form
inside the phone when the temperature rises up to normal
degree, which would damage PCB of the phone.
z Don’t put your mobile phone in or on the heating devices
(microwave oven, toaster oven or radiator) because
overheating might result in explosion.
z The color of the waterproof label in the phone will be
changed if the phone or battery gets wet. In this case, the
warranty provisions will become void even if the warranty
period doesn’t expire.
z Please send your mobile phone to the nearest service center
for inspection if there is anything wrong with your mobile
phone, battery, charger or accessories. The service center
staff will provide you help.
57
Page 66

A
Failure Analysis
Symptoms Possible Causes Solutions
Unable to
turn on the
phone
utomatic
power-off
Inadequate
standby
time
Unable to
connect
the
network
Call drop
Inadequate battery
capacity
Poor contact Reinstall the battery
Seriously poor
ba tt er y capacity
Deceasing of
battery
performance
Poor network
signal
Poor network
signal
Out of the service
area
Poor network
signal
Charge the battery
Recharge the battery
Replace the battery
Turn off the phone as
the signal is poor.
Move to other places
Make sure your phone
is in network service
area
Move to other places
Do not ring
upon
incoming
calls
Prompt to
input PUK
Enter “User Profile” to
Set “Silence” or
minimum volume.
SIM card locked
due to the
continuous entering
of wrong PIN code
for three times.
change “Silence” to
other profile or check the
ringing volume.
Contact your network
operator.
58
Page 67

錯誤! 使用 [常用] 索引標籤將 标题 1 套用到您想要在此處顯示的文字。
FCC Regulations:
zThis mobile phone complies with part 15 of the FCC Rules.
Operation is subject to the following two conditions: (1) This
device may not cause harmful interference, and (2) this device
must accept any interference received, including interference
that may cause undesired operation.
zThis mobile phone has been tested and found to compl y with
the limits for a Class B digital device, pursuant to Part 15 of the
FCC Rules. These limits are designed to provide reasonable
protection against harmful interference in a residential
installation. This equipment generates, uses and can radiated
radio frequency energy and, if not installed and used in
accordance with the instructions, may cause harmful
interference to radio communications. However, there is no
guarantee that interference will not occur in a particular
installation If this equipment does cause harmful interference to
radio or television reception, which can be determined by turning
the equipment off and on, the user is encouraged to try to
59
Page 68

correct the interference by one or more of the following
measures:
-Reorient or relocate the receiving antenna.
-Increase the separation between the equipment and receiver.
-Connect the equipment into an outlet on a circuit different from
that to which the receiver is connected.
-Consult the dealer or an experienced radio/TV technician for
help.
Changes or modifications not expressly approved by the party
responsible for compliance could void the user‘s authority to
operate the equipment.
zThe antenna(s) used for this transmitter must not be
co-located or operating in conjunction with any other an tenna o r
transmitter.
60
Page 69

錯誤! 使用 [常用] 索引標籤將 标题 1 套用到您想要在此處顯示的文字。
4RF Exposure Information (SAR)
This mobile phone meets the government’s requirements for
exposure to radio waves.
This phone is designed and manufactured not to exceed the
emission limits for exposure to radio frequency (RF) energy set
by the Federal Communications Commission of the U.S.
Government.
The exposure standard for wireless mobile phones employs a
unit of measurement known as the Specific Absorption Rate, or
SAR. The SAR limit set by the FCC is 1.6W/kg.
SAR are conducted using standard operating positions accepted
by the FCC with the phone transmitting at its highest certified
power level in all tested frequency bands. Although the SAR is
determined at the highest certified power level, the actual SAR
level of the phone while operating can be well below the
maximum value. This is because the phone is designed to
operate at multiple power levels so as to use only the poser
required to reach the network. In general, the closer you are to
a wireless base station antenna, the lower the power output.
*
Tests for
The highest SAR value for the model phone as reported to the
FCC when tested for use at the ear is 0.187 W/kg and when
worn on the body, as described in this user guide, is 1.45 W/kg
61
Page 70

(Body-worn measurements differ among phone models,
depending upon available enhancements and FCC
requirements.)
While there may be differences between the SAR levels of
various phones and at various positions, they all meet the
government requirement.
The FCC has granted an Equipment Authorization for this model
phone with all reported SAR levels evaluated as in compliance
with the FCC RF exposure guidelines. SAR information on this
model phone is on file with the FCC and can be found under the
Display Grant section of http://www.fcc.gov/oet/fccid
searching on FCC ID: Q78-X790.
This device is compliance with SAR for general population
/uncontrolled exposure limits in ANSI/IEEE C95.1-1999 and had
been tested in accordance with the measurement methods a nd
procedures specified in OET Bulletin 65 Supplement C.
For body worn operation, this phone has been tested and meets
after
the FCC RF exposure guidelines for use with an accessory that
contains no metal and the positions the handset a minimum of
1.5 cm from the body. Use of other enhancements may not
62
Page 71

錯誤! 使用 [常用] 索引標籤將 标题 1 套用到您想要在此處顯示的文字。
ensure compliance with FCC RF exposure guidelines. If you
do no t use a body-worn accessory and are not holding the
phone at the ear , position the han dset a minimum of 1.5 cm from
your body when the phone is switched on.
63
 Loading...