

Page 1

User Guide
Vodafone Mobile
Broadband USB Stick
K4201-Z
Designed
by Vodafone
Page 2

Welcome
to the world of mobile communications
1 Welcome
2 Set up your USB Stick
dnanoitallatsni8swodniW3
user experience
4 Connection window
5 QuickStart window layout
6 QuickStart view: Current
network panel
7 SMS view
8 Account view
9 USB Stick LED lights
10 Hints and tips
15 Glossary
16 FCC Compliance
16 Radio Frequency (RF) Energy
Page 3

Welcome
Your new Vodafone Mobile Broadband USB Stick connects your
computer to the internet over the Vodafone mobile phone
network. The Vodafone QuickStart technology built into the
device lets you connect quickly, simply and easily.
Browse the web
You can now access the web and any other internet service
wherever there’s a mobile phone network.
Pick up emails
Keep up to date with your emails, wherever you are.
Send and receive SMS text messages
You can send and receive SMS text messages straight from your
computer. The SMS application provides an easy way to view
messages, write new ones, and manage them.
System Requirements
To use this USB Stick and the Vodafone Mobile Broadband
Note:
Linux users can access
the Vodafone Mobile
Broadband application
by entering either of the
following addresses into
your browser: http://
VodafoneMobile.vmb or
http://192.168.9.1.
application, you need:
A computer running Microsoft–
®
Windows® 8, Windows® 7
(SP1 recommended), Windows Vista™ (SP2 recommended), or
Windows
Mac OS
®
XP (SP3 recommended), or an Apple Mac running
®
X 10.5 (Intel®), 10.6 or 10.7 (all with latest updates),
or a computer running Linux Ubuntu 11.10/10.10/10.04,
openSUSE 11.4/11.3, Fedora 16/14, Debian 6.0/5.0, Mandriva
2010.2, Red Flag 7.0. There may be some limitations in the
Linux implementation.
A USB socket–
Administrator rights on your computer.–
1
Page 4
Set up your
Step 1
USB Stick
Note: Some computers
may be set up to
prevent automatic
installation of the VMB
Lite service from your
USB Stick. In this case,
follow the steps in the
hints and tips section
to manually install the
VMB Lite service on your
computer.
On a Windows 8 PC
the user experience is
slightly different. This is
explained on the next
page.
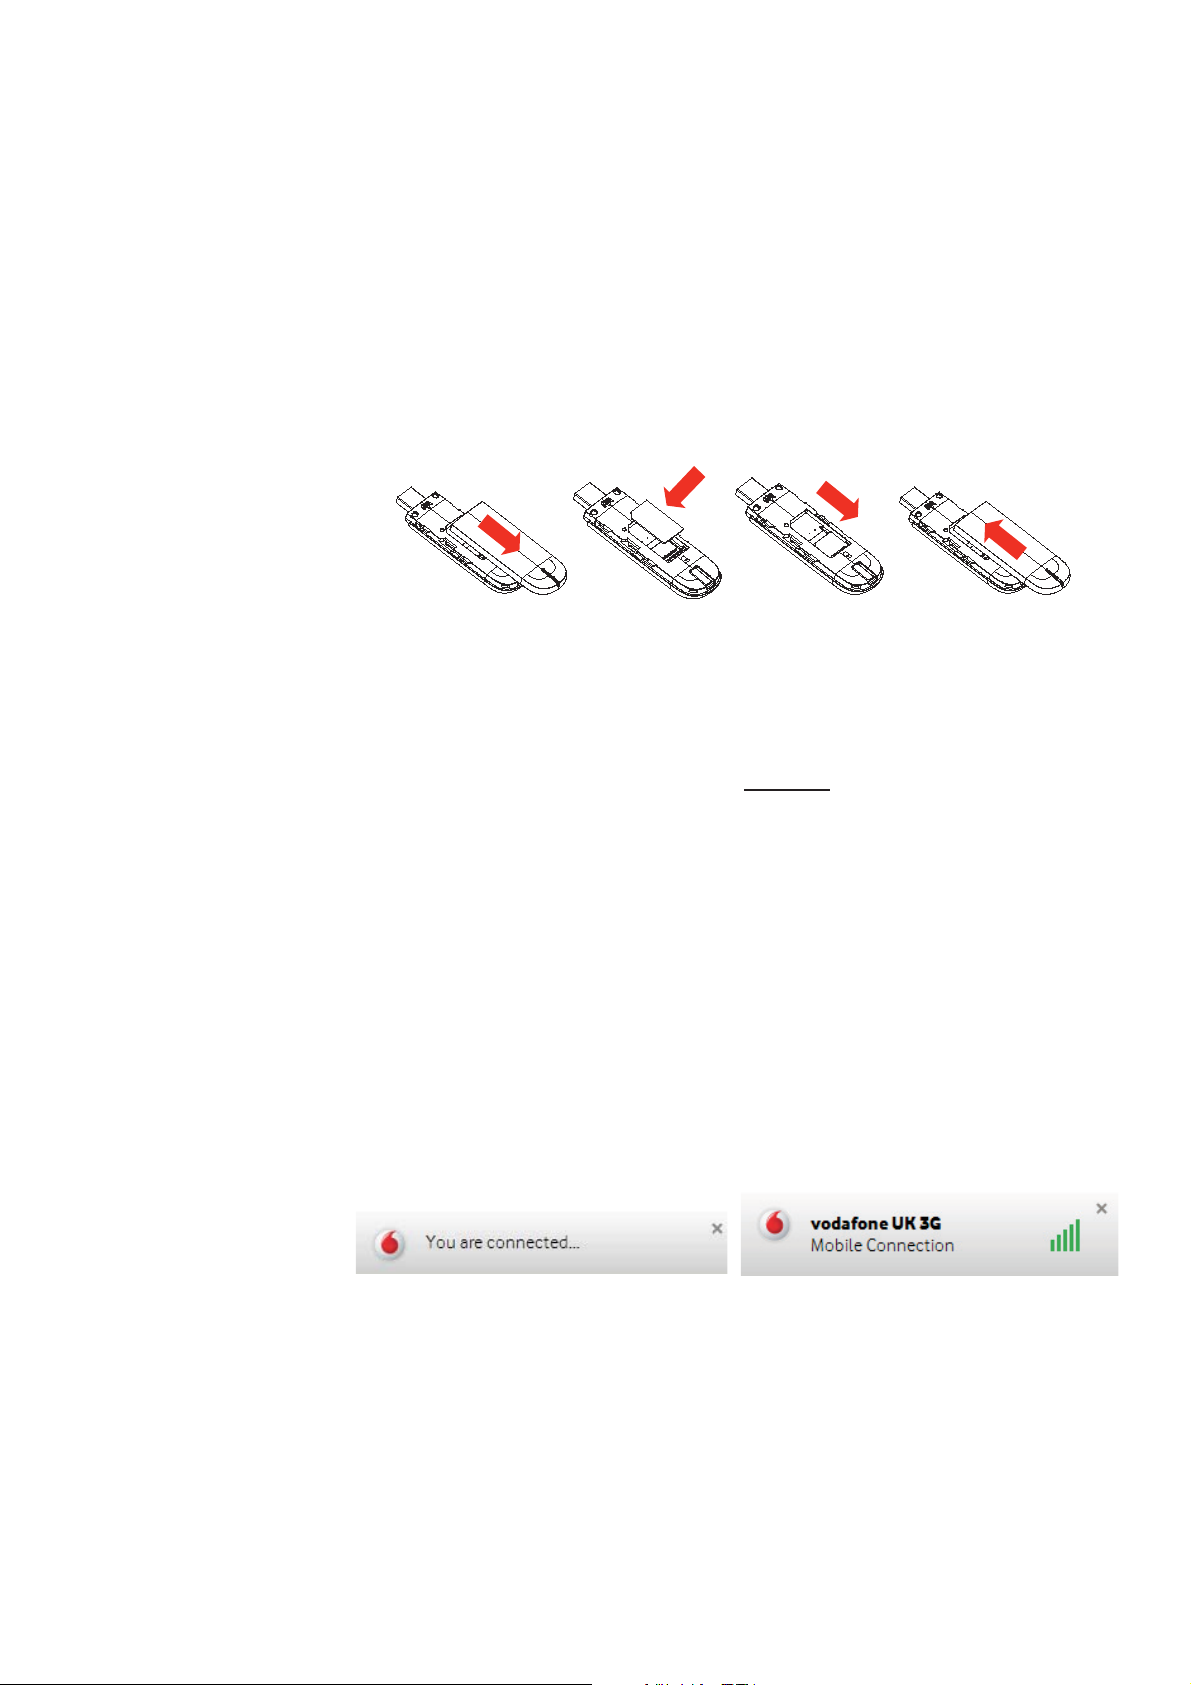
Slide the front cover off the USB Stick, and insert your SIM as
shown.
Step 2
Important. If you have an earlier version of the VMB software
on your computer, you must un-install the VMB software
completely and re-boot your PC before inserting this USB Stick.
Step 3
Plug the USB Stick fi rmly into your computer’s USB port.
You should see a progress bar whilst the Vodafone Mobile
Broadband service is installed on your computer from the
USB Stick. Once setup is complete, the Vodafone Mobile
Broadband application is started automatically, and you are
connected to the Vodafone network (if a PIN is required you
will see a popup screen requesting it before you can connect).
The LED on the USB Stick will change from fl ashing to solid, and
you will see 2 popup screens.
2
Page 5
Windows 8
installation
and user
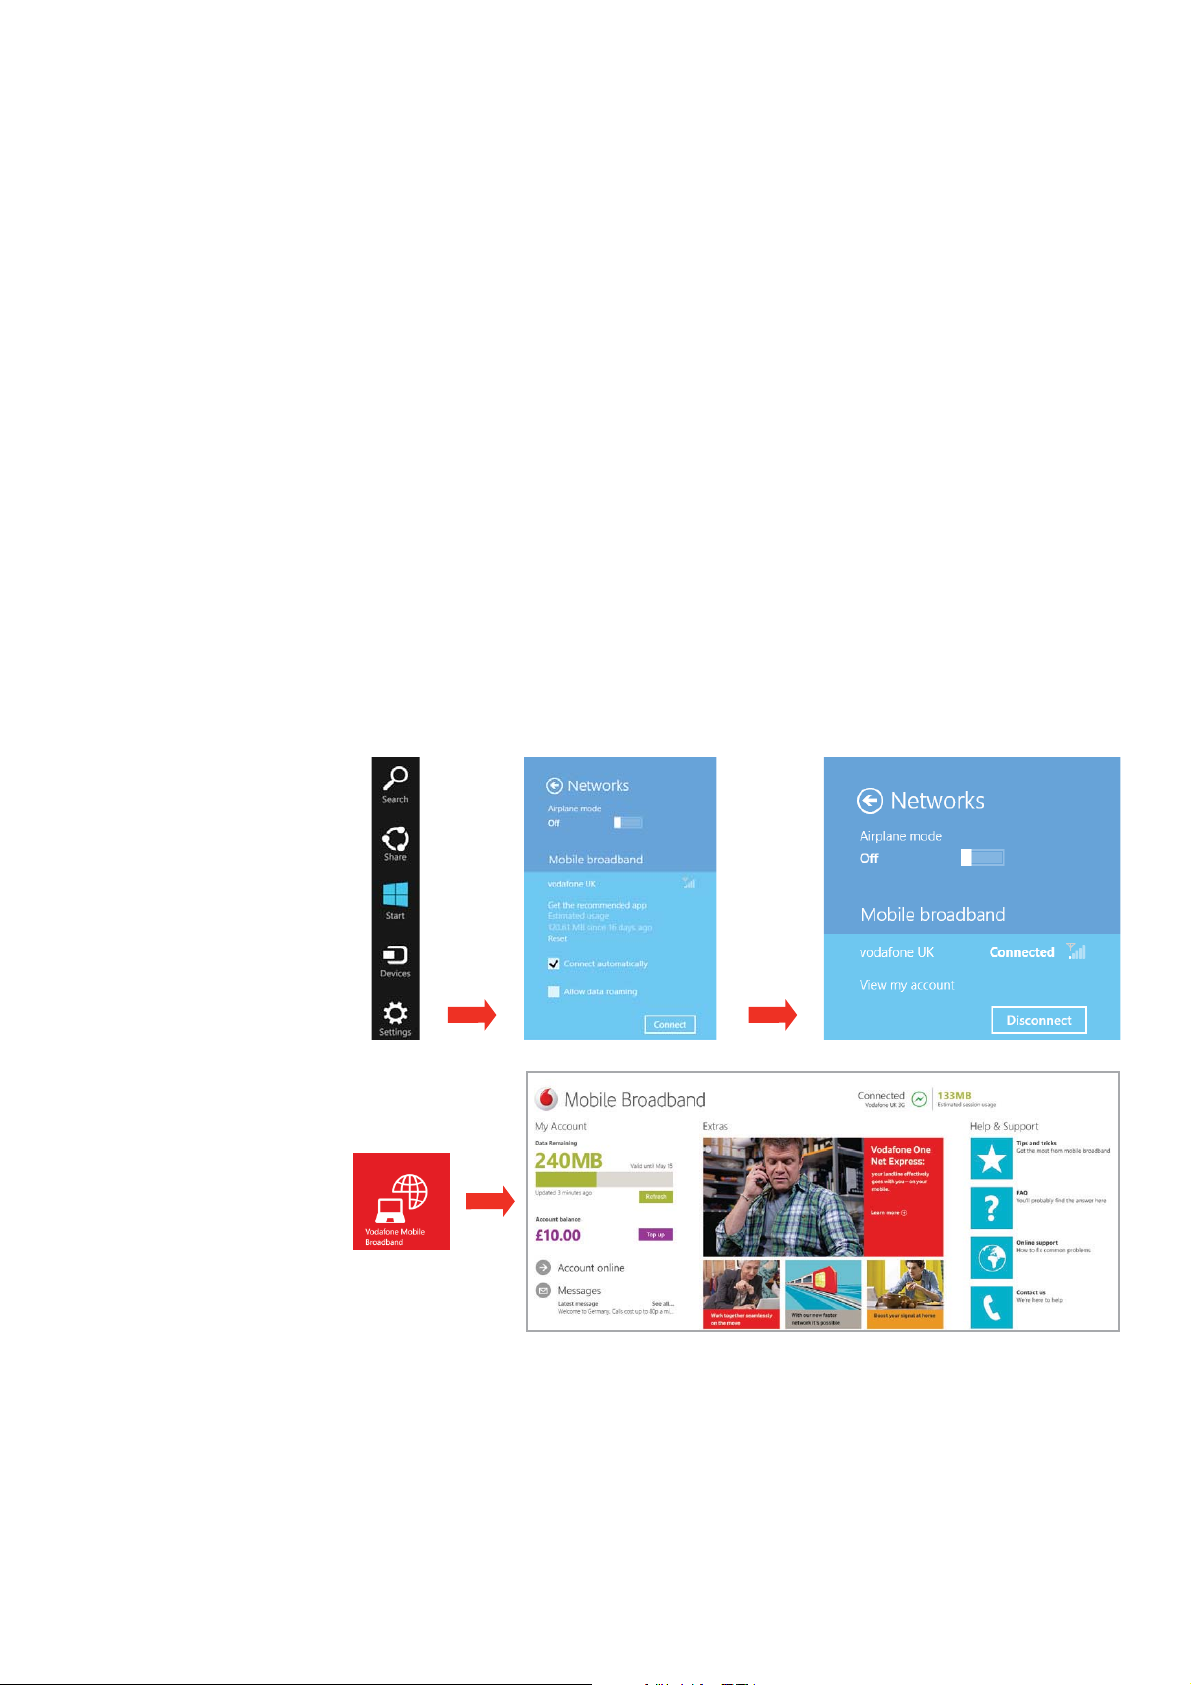
On a Windows 8 PC the Mobile Broadband user experience is
slightly different as the mobile network connectivity is managed
within the Windows 8 operating system. When you plug in the
USB Stick, you need to open the ‘charms’ (Search, Share, Start,
experience
Device and Settings), and select
Wi-Fi Network Name) > Mobile Broadband.
Select
Initially the Connection Manager will show ‘Get recommended
app’ and this will change to ‘View my account’ when the Mobile
Broadband application has been automatically downloaded by
Windows 8.
Connect Automatically if required, then click Connect.
Settings > Networks (or Your
Note:
The Mobile Broadband
application can be
launched by selecting
the application Tile or
View My Account Link in
the Networks area of the
Settings charm
3
Page 6
Connection
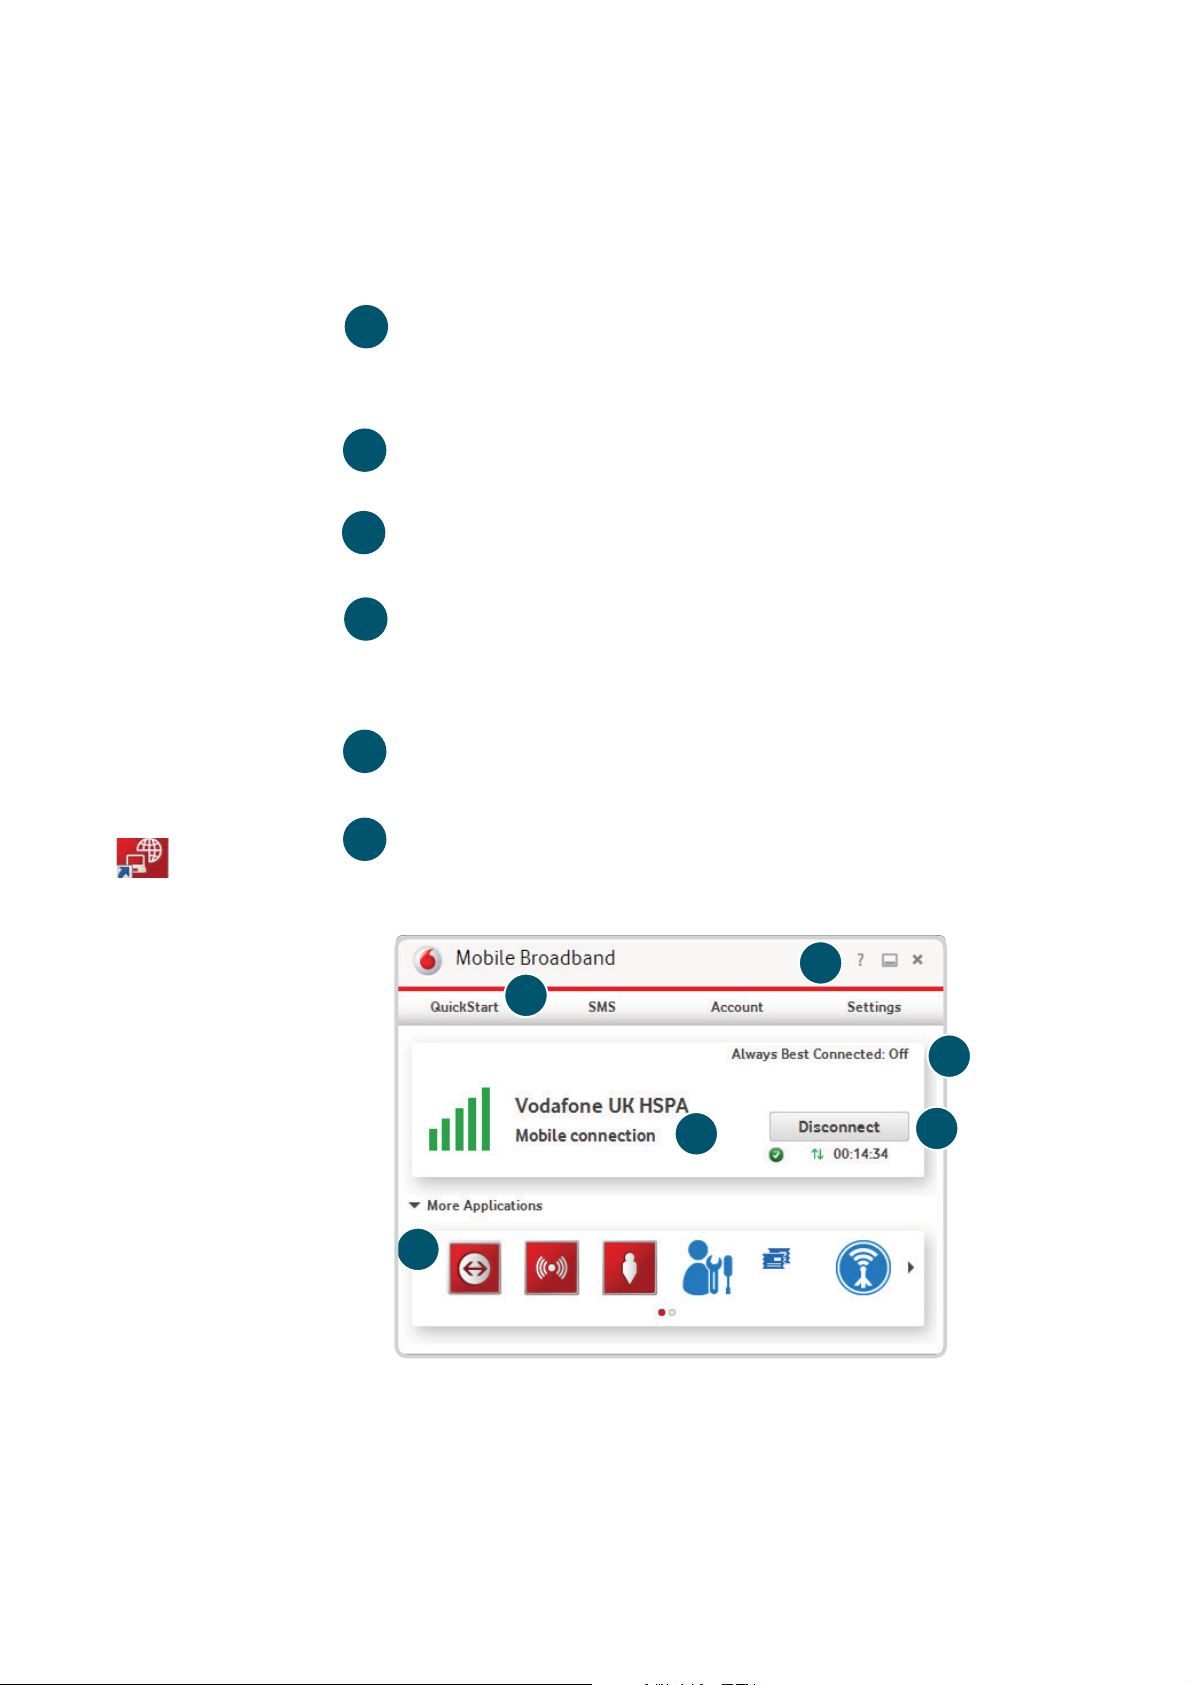
Connect/Disconnect
1
window
Note: Once setup
is complete, you
can always access
the Vodafone
Mobile Broadband
application when
your USB Stick
is inserted into
your computer by
clicking the desktop
icon
Connect to the internet via the mobile phone network or
Wi-Fi, to browse the web or use email
2
Status
Check the status of the current connection
3
Shortcuts
Select services, applications and tools
4
Menu bar
Device and network settings and diagnostics, SMS
functionality, manage your account.
Help
5
View Help topics
Always Best Connected
6
Confi gure connection preferences
5
4
6
2
3
1
4
Page 7

QuickStart
1
Navigation tabs – Select QuickStart, SMS or Account view
window
layout
Note: Every window
in the QuickStart
application has this
same standard layout.
Context-sensitive
help for each window
is always available
at the bottom of the
window.
2
Navigation bar – Select an area within each view
3
Current network panel – Status of mobile broadband
network connection
4
Content area – Content for current area
Context help – Context-sensitive help for current area
5
(scroll down)
6
Language selection – Defaults to browser language
1
2
4
5
6
3
Sometimes an
additional Menu bar
will appear on the left
of the window
In the QuickStart view Settings area you can:
Set options for automatic connection to the mobile network–
Specify the SIM PIN number (if required by your network)–
Set other options via the Menu bar on the left-hand side of the –
window.
5
Page 8

QuickStart
The Current network panel appears on the right-hand side
view: Current
network panel
Note: Whenever you
insert your USB Stick
into your computer
you are connected to
the mobile network.
If you are running
Linux you will need
to open the browser
manually.
Automatic network
connection can be
disabled from the
Settings area in the
QuickStart view.
of every screen within the QuickStart application. ‘Roaming
network’ is displayed when you are roaming on another
operator’s network, or ‘Home network’.
Mobile number – Shown if permitted by your network operator
Signal – More bars indicates better mobile broadband network
signal
Status – Tick when connected to network; Cross when not
connected
Network – Name and type of currently connected network
Time connected – For current connection to network
Total volume – Approximate cumulative data usage
Up / Down – Approximate connection speed: ‘Up’ to the
network from your computer, and ‘Down’ from the network
The QuickStart
application can also
be accessed from
the Vodafone Mobile
Broadband desktop
icon.
6
Page 9

SMS view
Note: When you
select the checkbox
in the title bar of the
Inbox, Sent folder
or Draft folder, all
messages in that
folder are selected.
This is useful if
you want to delete
multiple messages.
It is not possible to
forward multiple
messages.
The SMS view has six options on the Navigation bar covering
all messaging functions: Inbox, Write, Sent, Draft, Settings
and Help.
In the Settings area
you can select or
de-select the SMS
preview in the
QuickStart view.
7
Page 10

Account
The Account view has three options on the Navigation bar:
view
Note: The options
that are displayed on
the Navigation bar
are dependent on the
account type selected.
Account details, Account type and Help. For prepaid account
customers there are two additional options: Balance and
TopUp.
For prepaid accounts, the Balance area shows your current
account balance. Click the Refresh button to update the
balance value. The TopUp area allows you to top up a prepaid
account balance using either a voucher, or a credit or debit card.
8
Page 11

USB Stick LED
The LED light on your USB Stick shows which kind of mobile
lights
network has been found, and whether the USB Stick is
connected to that network.
Green blinking
A GPRS network has been found – you could connect
Green solid
Connected via GPRS
Blue blinking
A 3G network has been found – you could connect
Blue solid
Connected via 3G
Light blue solid
Connected via 3G Broadband.
Signal strength
The strength of the mobile or Wi-Fi network signal is shown
by the symbol to the left of the Connect button, and by the
icon in the Windows Notifi cation area.
The more bars that are fi lled in, the better the signal quality.
At least one bar must be fi lled in order to connect.
9
Page 12

Hints and tips
Install problems on PC with older version of VMB
If you had a problem installing the software (the symptoms
could be any of the following):
– a new desktop icon for VMB was not created on your
desktop, or
– when you run VMB from the desktop shortcut you do not
get a new software splash screen displayed which says
Note: The correct
software has the
“Vodafone Mobile
Broadband with
QuickStart” splashscreen, and you
should be able
to access all the
functions referenced
in this QSG by clicking
on the Vodafone
Mobile Broadband
desktop icon.
“Vodafone Mobile Broadband with QuickStart”, or
– when you insert the device you do not see it appear as a CD
ROM device on your computer, or
– when running VMB you receive a “Device Not Detected”
message.
The cause of the problem could be an issue with an
incomplete un-install of an earlier version of the Vodafone
Mobile Broadband software already installed for an older
device. This problem may appear on all PCs with Windows
operating systems. It should not occur on Apple devices.
Vodafone have developed a clean-up tool to remove the old
version of the software correctly, it is available from
www.support.vodafone.com/vmb_cleanup.
Download the clean-up tool and unzip the fi les. After
removing the current VMB software (remove using Windows),
10
run the clean-up tool (VmbCleanup.exe) and select all
3 options
– Settings, Data and Device Registration. Re-boot
your PC and then insert your new USB Stick, and the correct
VMB software should install automatically.
Page 13

Vodafone Mobile Broadband software manual installation
On Microsoft Windows computers
Plug your USB Stick into your computer
Right-click on the VMB Lite 10.* drive in ‘My Computer’ –
(Start menu>Computer on Vista and Windows 7)
Select ‘Open’ or ‘Explore’–
Double-click the fi le called setup_vmb_lite.exe on your –
USB Stick
You will see a progress bar.–
It may take a few minutes to set up your USB Stick, but
once setup is complete, the Vodafone Mobile Broadband
application will start and automatically connect you to the
mobile network. If for some reason the application does not
start, select Vodafone Mobile Broadband from the Windows
Start menu, or double-click the Vodafone Mobile Broadband
desktop icon.
On Mac OS X computers
When you plug your USB stick in for the fi rst time, a disk
named Vodafone Mobile Broadband will popup on your
desktop. Double click on the Vodafone Mobile Broadband
app to start installation. You will be asked to select your
account type during this process. Vodafone Mobile
Broadband will start automatically after installation.
11
Page 14

The application won’t install on Windows
If the software does not install, or the install progress bar
keeps looping
From the Windows Start menu, select – Settings>
Control Panel>System>Hardware>Device Manager
Expand ‘Universal Serial Bus Controllers’–
Right-click ‘USB Mass Storage Device’ and select ‘Uninstall’–
If your devices are not reloaded, select ‘Scan for Hardware –
changes’ from the ‘Action’ menu.
Cannot open QuickStart application window
The following things may prevent you from opening the
Vodafone QuickStart application window by double-clicking
the desktop shortcut:
Your computer already has a connection via an ethernet –
12
LAN cable
Your computer already has a connection via a Wi-Fi network–
You may be using a VPN (Virtual Private Network).–
Unplugging the LAN cable, switching off Wi-Fi on your
computer, or exiting your VPN , and then re-inserting the
USB Stick, or re-starting the PC may solve the problem.
Page 15

No network can be found
Change your physical location: in a building, move closer to a
window, move higher up, or go outside
Note: If you can
see the application
window in your
browser, you can
find more hints
and tips in the Help
area. Selecting the
Help option on the
Navigation bar in
any view, and then
‘Diagnostics’ in
the Menu bar, may
help you to identify
a problem. This
area also shows
information that
may be required if
you need to contact
Support at your
mobile network
operator. Select
‘Support’ from the
Menu bar for more
information and local
support.
Open the QuickStart application window–
Select the Settings heading on the Navigation bar–
Select the Network entry in the Menu bar on the left–
Click ‘Search’ to search for available networks–
See if you can connect to one of the allowed networks –
listed
Click ‘Save’ to save your change–
If you are abroad, contact Support, and check that data –
services and roaming are enabled on your account.
Re-installing the software
If you want to re-install the software from the USB Stick, you
need to fi rst delete the Vodafone Mobile Broadband Service
software from your computer.
From the Windows Start menu, select Settings> –
Control Panel>Add or Remove Programs (XP) or Programs
and Features (Windows 7)
Run the Vodafone Mobile Broadband Uninstaller–
Re-insert your USB Stick and the software will re-install.–
13
Page 16

No connection can be opened (1)
Check the device status (click on desktop shortcut, select –
the QuickStart tab, Help on Settings bar, and select
Diagnostics from the menu). This may indicate the source
of the problem.
No connection can be opened (2)
Wait a few minutes and try to connect again. This is most
often a temporary problem, especially if an ‘Error 631’ or
‘Error 619’ isreferenced. If the problem persists, please call
Support.
Close the application window and then re-open it–
Re-start your computer–
Open the QuickStart application window–
Select the Settings heading on the Navigation bar–
14
Select the Network entry in the Menu bar on the left–
Check which option is selected. If the option is set to a –
‘Preferred’ option, set it to an ‘Only’ option
Click ‘Save’ to save your change–
If you are using a VPN (Virtual Private Network), contact the –
administrator of your VPN
Select the Account tab–
Select the Account type heading in the Navigation bar–
Check that the type of account you have with your mobile –
network operator is selected in the drop-down menu.
Page 17

Glossary
Bearer Communication method used for data transport over the mobile
network, eg. 3G Broadband, HSPA, 3G, etc.
Built-in data card Mobile data card built into notebook computer. Enables data
connections over the mobile phone network.
USB stick
EDGE An enhancement to the GPRS bearer offering higher speeds,
GPRS The General Packet Radio Service is a bearer offering higher data
GSM Global System for Mobile Communication.
Home network The network of the mobile operator who provided your SIM.
HSPA High-Speed Packet Access bearer, enhancing 3G, including both
HSUPA High-Speed Uplink Packet Access bearer.
3G broadband The latest enhancement to the 3G bearer.
Roaming You can use your mobile device on any other mobile network
A device for your computer that you can use to open a data
connection over the mobile phone network.
although not as fast as 3G Broadband.
speeds than GSM, on which it is based.
HSUPA (Uplink) and HSDPA (Downlink).
3G The third-generation mobile phone service, as UMTS (Universal
Mobile Telecommunications System) is also known, is a bearer
providing higher data speeds.
that has a roaming agreement with your operator, whether in
your country or abroad.
SIM Your Subscriber Identity Module is the postage-stamp-sized chip
that you will have received together with your mobile contract.
Your SIM has gold contacts on one side.
15
Page 18

FCC
This device has been tested and found to comply with the limits for a
Compliance
Note:
This Device can
not be used in
conjunction
with any other
transmitter
device.
Class B digital device, pursuant to Part 15 of the FCC Rules. These limits
are designed to provide reasonable protection against harmful
interference in a residential installation. This equipment generates, uses
and can radiated radio frequency energy and, if not installed and used in
accordance with the instructions, may cause harmful interference to
radio communications. However, there is no guarantee that interference
will not occur in a particular installation If this equipment does cause
harmful interference to radio or television reception, which can be
determined by turning the equipment off and on, the user is
encouraged to try to correct the interference by one or more of the
following measures:
-Reorient or relocate the receiving antenna.
-Increase the separation between the equipment and receiver.
-Connect the equipment into an outlet on a circuit different from that to
which the receiver is connected.
-Consult the dealer or an experienced radio/TV technician for help.
Radio
Frequency
(RF) Energy
16
Changes or modifications not expressly approved by the party
responsible for compliance could void the user‘s authority to operate
the equipment.
This device meets the government’s requirements for exposure to radio
waves. This device is designed and manufactured not to exceed the
emission limits for exposure to radio frequency (RF) energy set by the
Federal Communications Commission of the U.S. Government. The
exposure standard for wireless device employs a unit of measurement
Page 19

known as the Specific Absorption Rate, or SAR. The SAR limit set by the
FCC is 1.6W/kg. *Tests for SAR are conducted using standard operating
positions accepted by the FCC with the device transmitting at its
highest certified power level in all tested frequency bands. Although
the SAR is determined at the highest certified power level, the actual
SAR level of the device while operating can be well below the
maximum value. This is because the device is designed to operate at
multiple power levels so as to use only the poser required to reach the
network. In general, the closer you are to a wireless base station
antenna, the lower the power output. SAR compliance has been
established in the host product(s) (laptop computers), tested at 5mm
separation distance to the human body, and tested with USB slot
configurations including Horizontal-UP, Horizontal-Down,
Vertical-Front, Vertical-Back. This device can be used in host product(s)
with substantially similar physical dimensions, construction, and
electrical and RF characteristics. The highest SAR value, tested per FCC
RF exposure guidelines for USB dongle, as described in this user guide,
is 1.029W/kg. The FCC has granted an Equipment Authorization for this
device with all reported SAR levels evaluated as in compliance with the
FCC RF exposure guidelines. SAR information on this device is on file
with the FCC and can be found under the Display Grant section of
http://www.fcc.gov/oet/ea/fccid/ after searching on FCC ID:
Q78-K4201-Z
17
Page 20

Page 21

Page 22

The term Mobile Broadband together with the
‘birds’ design is a trademark of GSMC Limited.
© Vodafone 2013. Vodafone and the
Vodafone logos are trade marks of
the Vodafone Group. Any product or
company names mentioned herein
may be the trade marks of their
respective owners.
Product Code:
K4201-Z 01/13_en_GB
 Loading...