

Page 1

1
ZTE Blade C2 Plus
Mobile Phone
Quick Start Guide
Page 2
2
LEGAL INFORMATION
Copyright © 2014 ZTE CORPORATION.
All rights reserved.
No part of this publication may be quoted, reproduced, translated or
used in any form or by any means, electronic or mechanical, including
photocopying and microfilm, without the prior written permission of ZTE
Corporation.
ZTE Corporation reserves the right to make modifications on print errors or
update specifications in this guide without prior notice.
Trademarks
ZTE and the ZTE logos are trademarks of the ZTE Corporation. Google
and Android are trademarks of Google, Inc. The Bluetooth® trademark
and logos are owned by the Bluetooth SIG, Inc. and any use of such
trademarks by ZTE Corporation is under license.
microSDHC Logo is a trademark of SD-3C, LLC.
Other trademarks and trade names are the property of their respective
owners.
We offer self-service for our smart terminal device users. Please visit the
ZTE official website (at www.ztedevice.com) for more information on
self-service and supported product models. Information on the website
takes precedence.
Page 3

3
Visit http://www.ztedevice.com to download the user manual. Just click
Support > Manuals from the home page and then select your location,
product type, and name to search for related support information.
Disclaimer
ZTE Corporation expressly disclaims any liability for faults and damages
caused by unauthorized modifications of the software.
Version No. : R1.0
Edition Time : 2014.08
Page 4
4
Product Safety Information
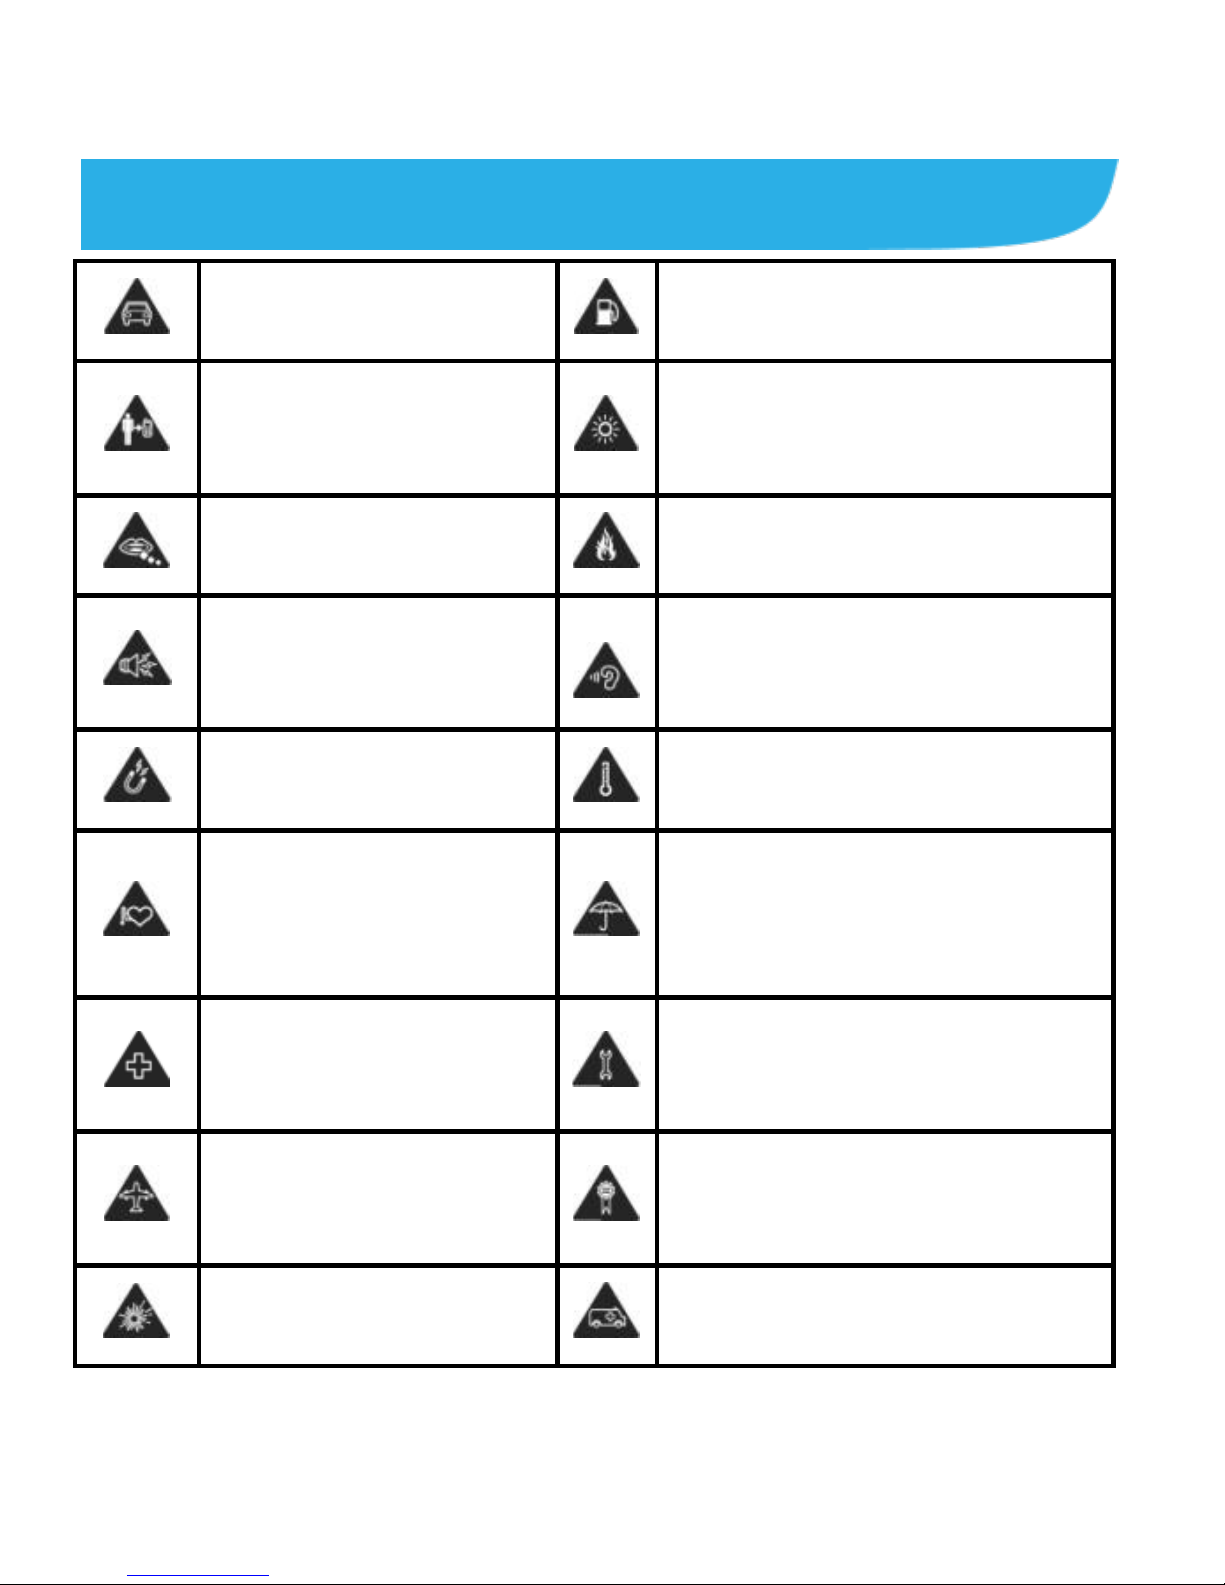
Do not use hand-held
while driving
Do not use while re-fuelling
For body-worn operation
maintain a separation of
15 mm
This device may produce a
bright or flashing light
Small parts may cause a
choking hazard
Do not dispose of it in a fire
This device may produce
a loud sound
To prevent possible hearing
damage, do not listen at high
volume levels for long periods.
Avoid contact with
magnetic media
Avoid Extreme Temperatures
Keep away from
pacemakers and other
personal medical
devices
Avoid any contact with liquid,
keep it dry
Switch off when
instructed in hospitals
and medical facilities
Do not attempt to disassemble
Switch off when
instructed in aircrafts
and airports
Only use approved accessories
Switch off in explosive
environments
Do not rely on this device for
emergency communications
Page 5
5
Getting to Know Your Phone
Overview
Keys Explained
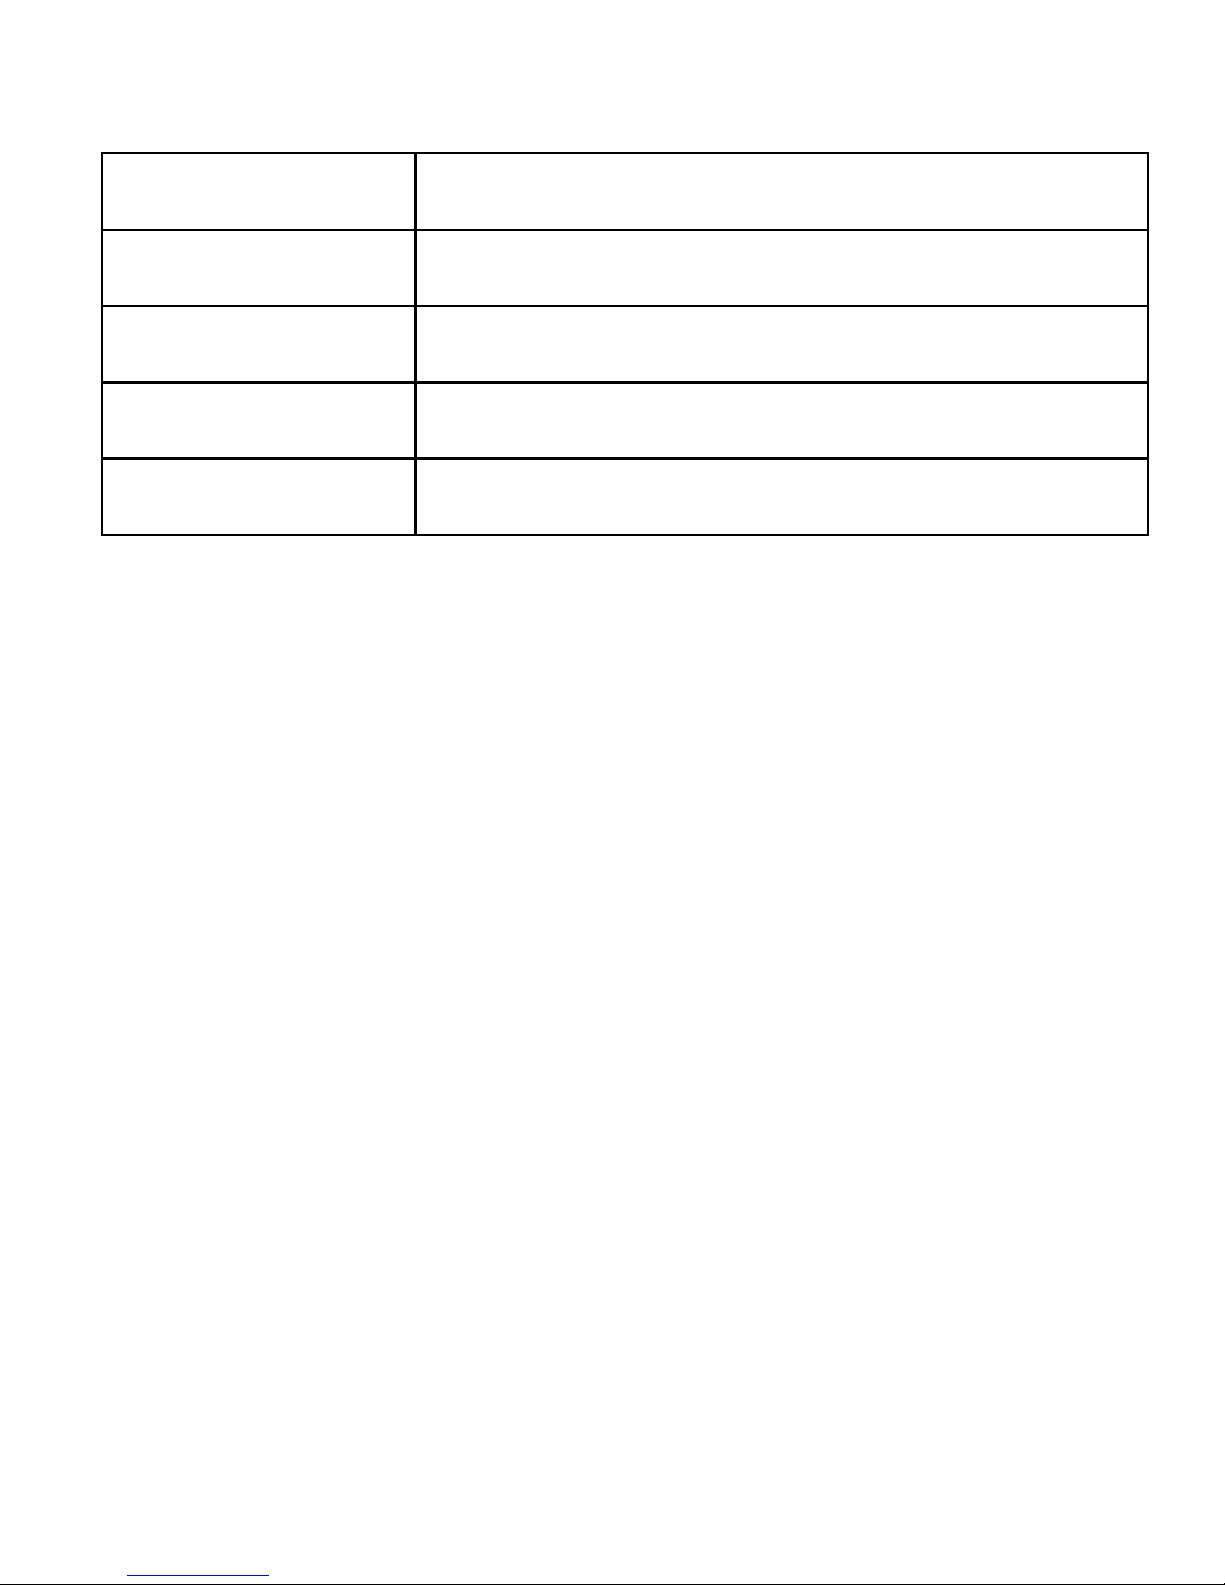
Key
Function
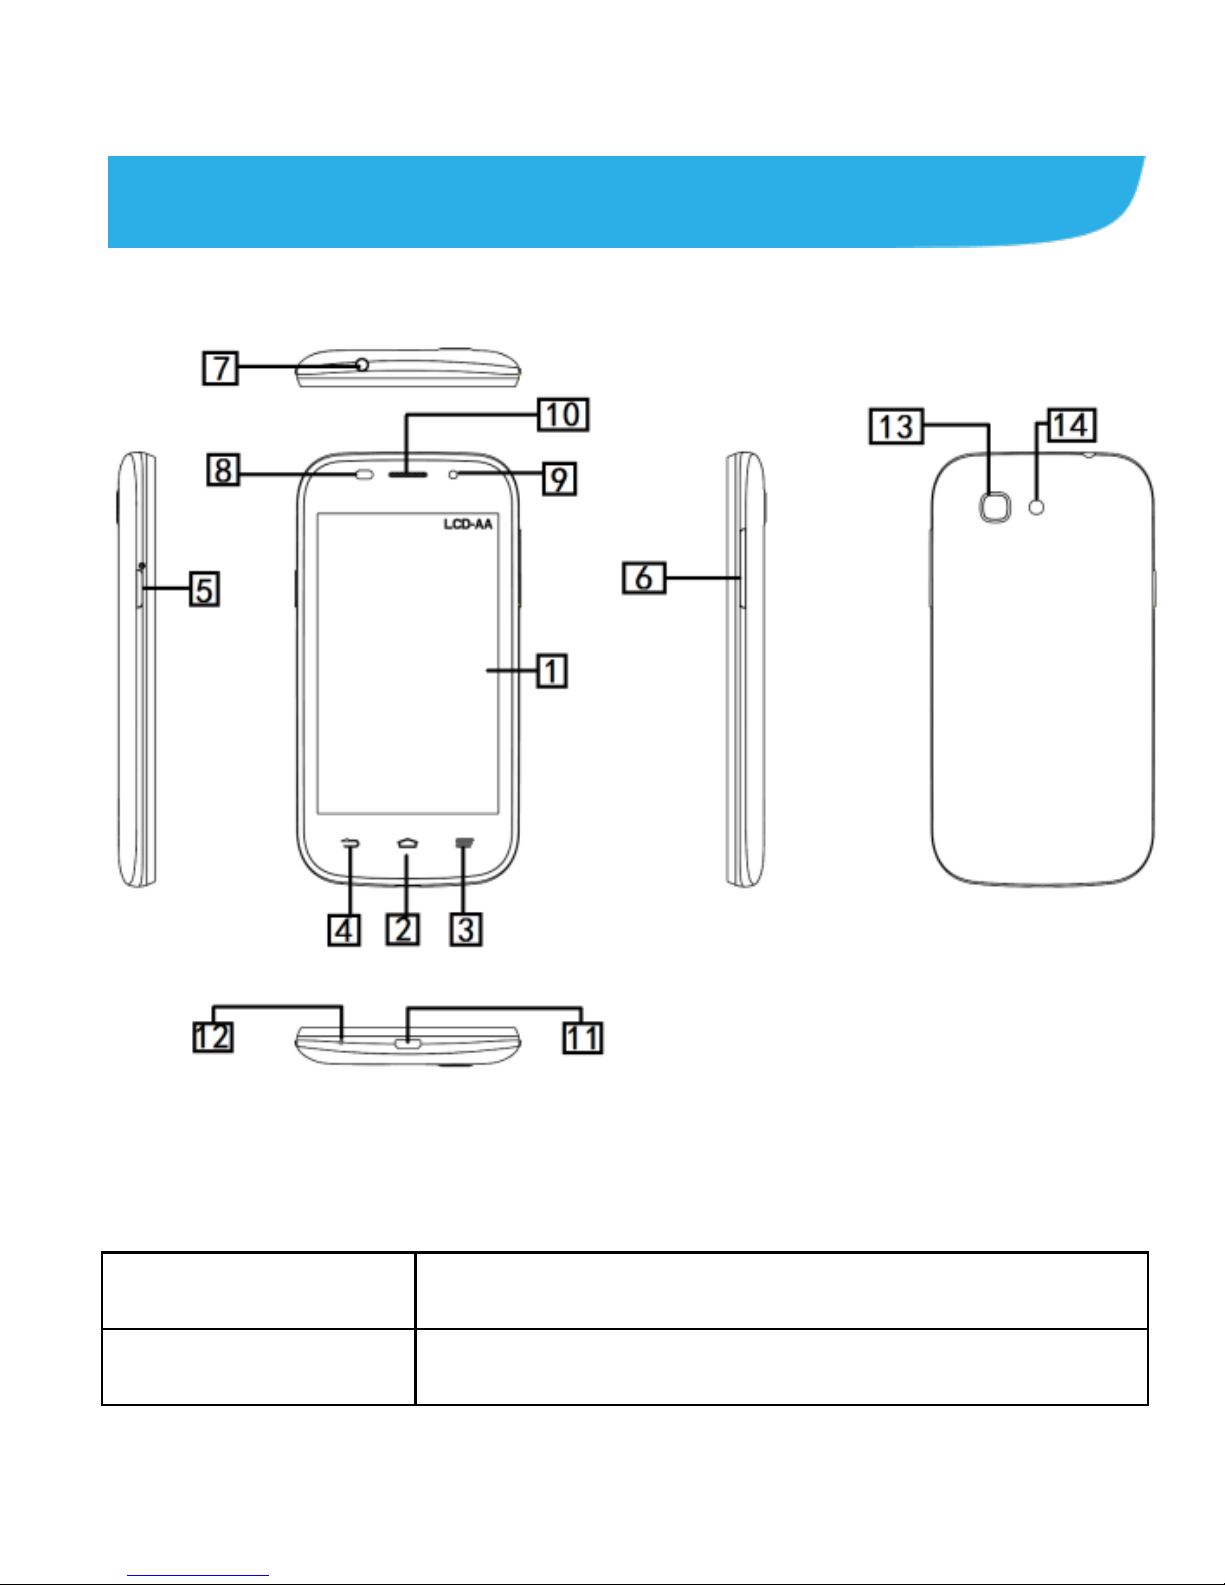
1.Touch Screen
Display user interface.
Page 6
6
Key
Function
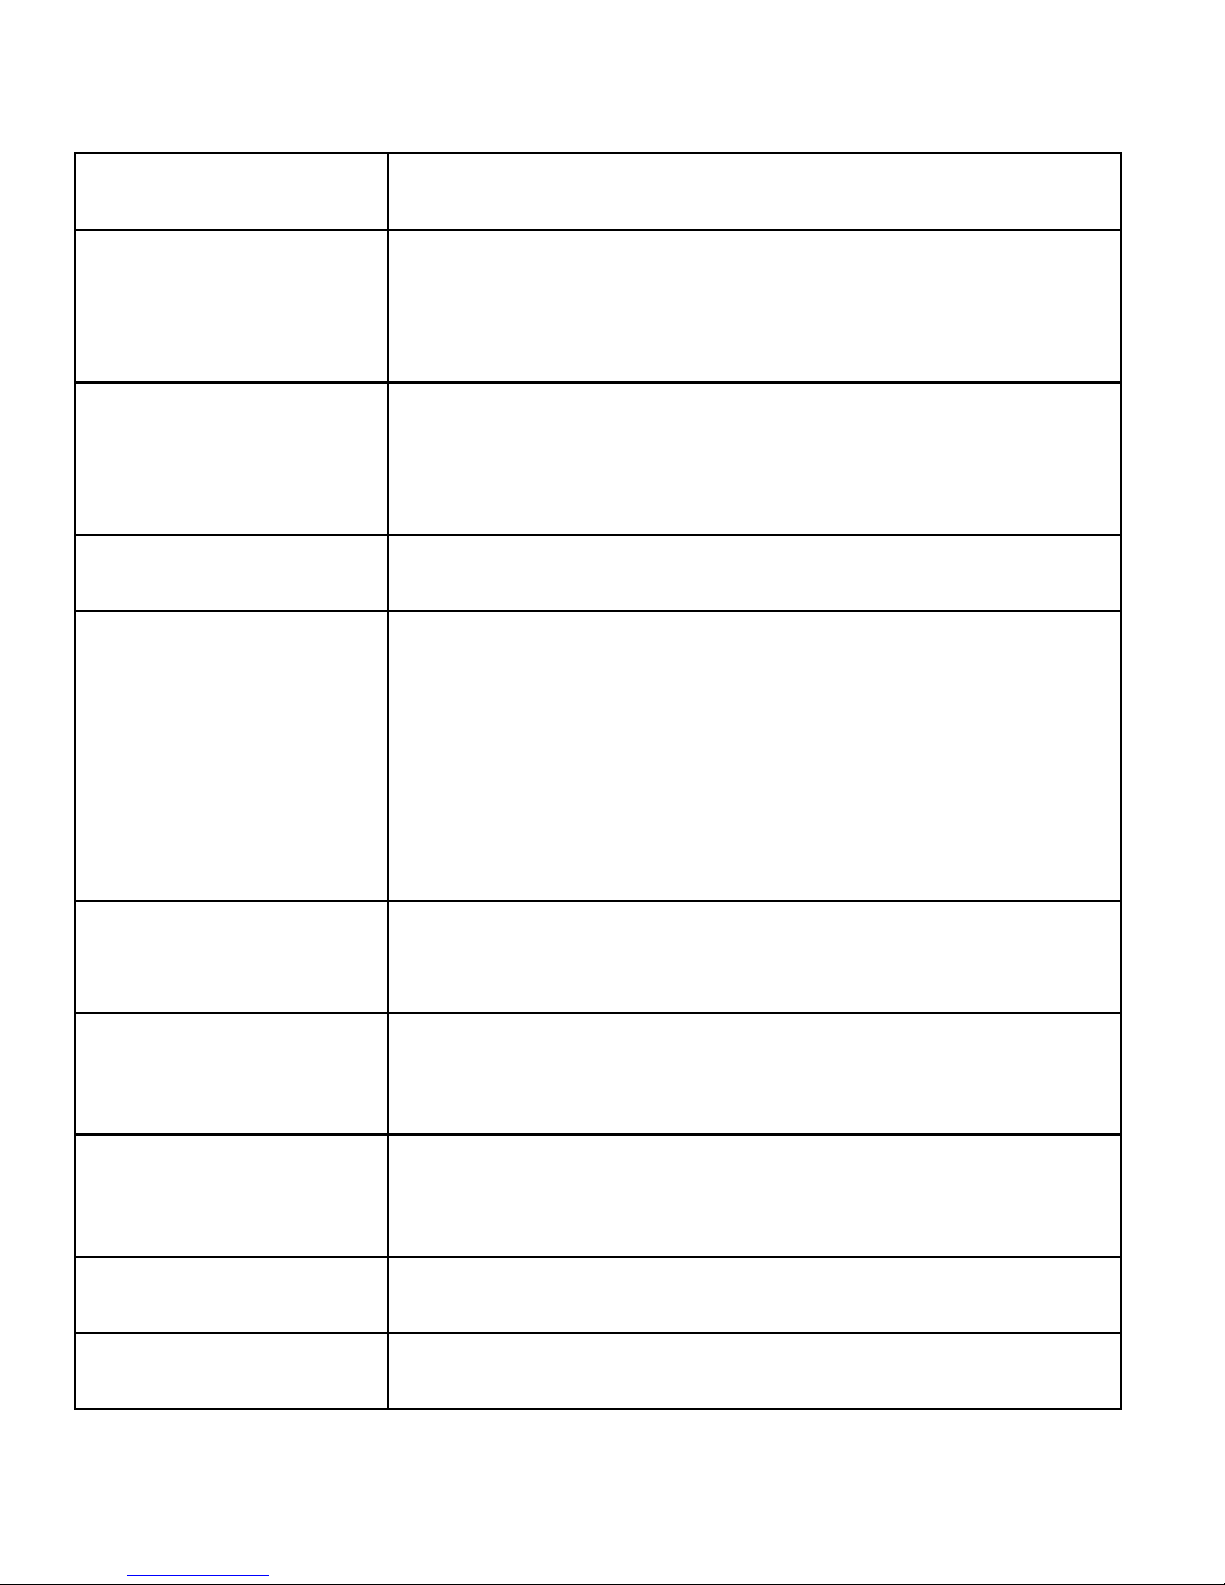
2. Home Key
Touch to return to the Home screen
from any application or screen.
Hold to see Google search.
3.Menu Key
Touch to get the options for the current
screen.
Hold to see recently used applications.
4.Back Key
Touch to go to the previous screen.
5.Power Key
Hold to turn on or off Silent or Vibrate
or Ring or Airplane mode or Reboot
Device, or to power off.
Press to switch your phone to Sleep
mode.
Press to wake up your phone.
6. Volume Keys
Press or hold to turn the volume up or
down.
7.Headphone
Interface
External headphone cable.
8. Proximity
sensor
Support the proximity sensor function.
9. Front camera
Photographed using parts.
10.Earphone
Receiving sound during a call.
Page 7
7
Key
Function
11.USB Interface
External USB data cable.
12.Microphone
Send voice during a call.
13.Rear Camera
Photographed using parts.
14.Flash Light
Instant illumination in low light situations.
Page 8
8
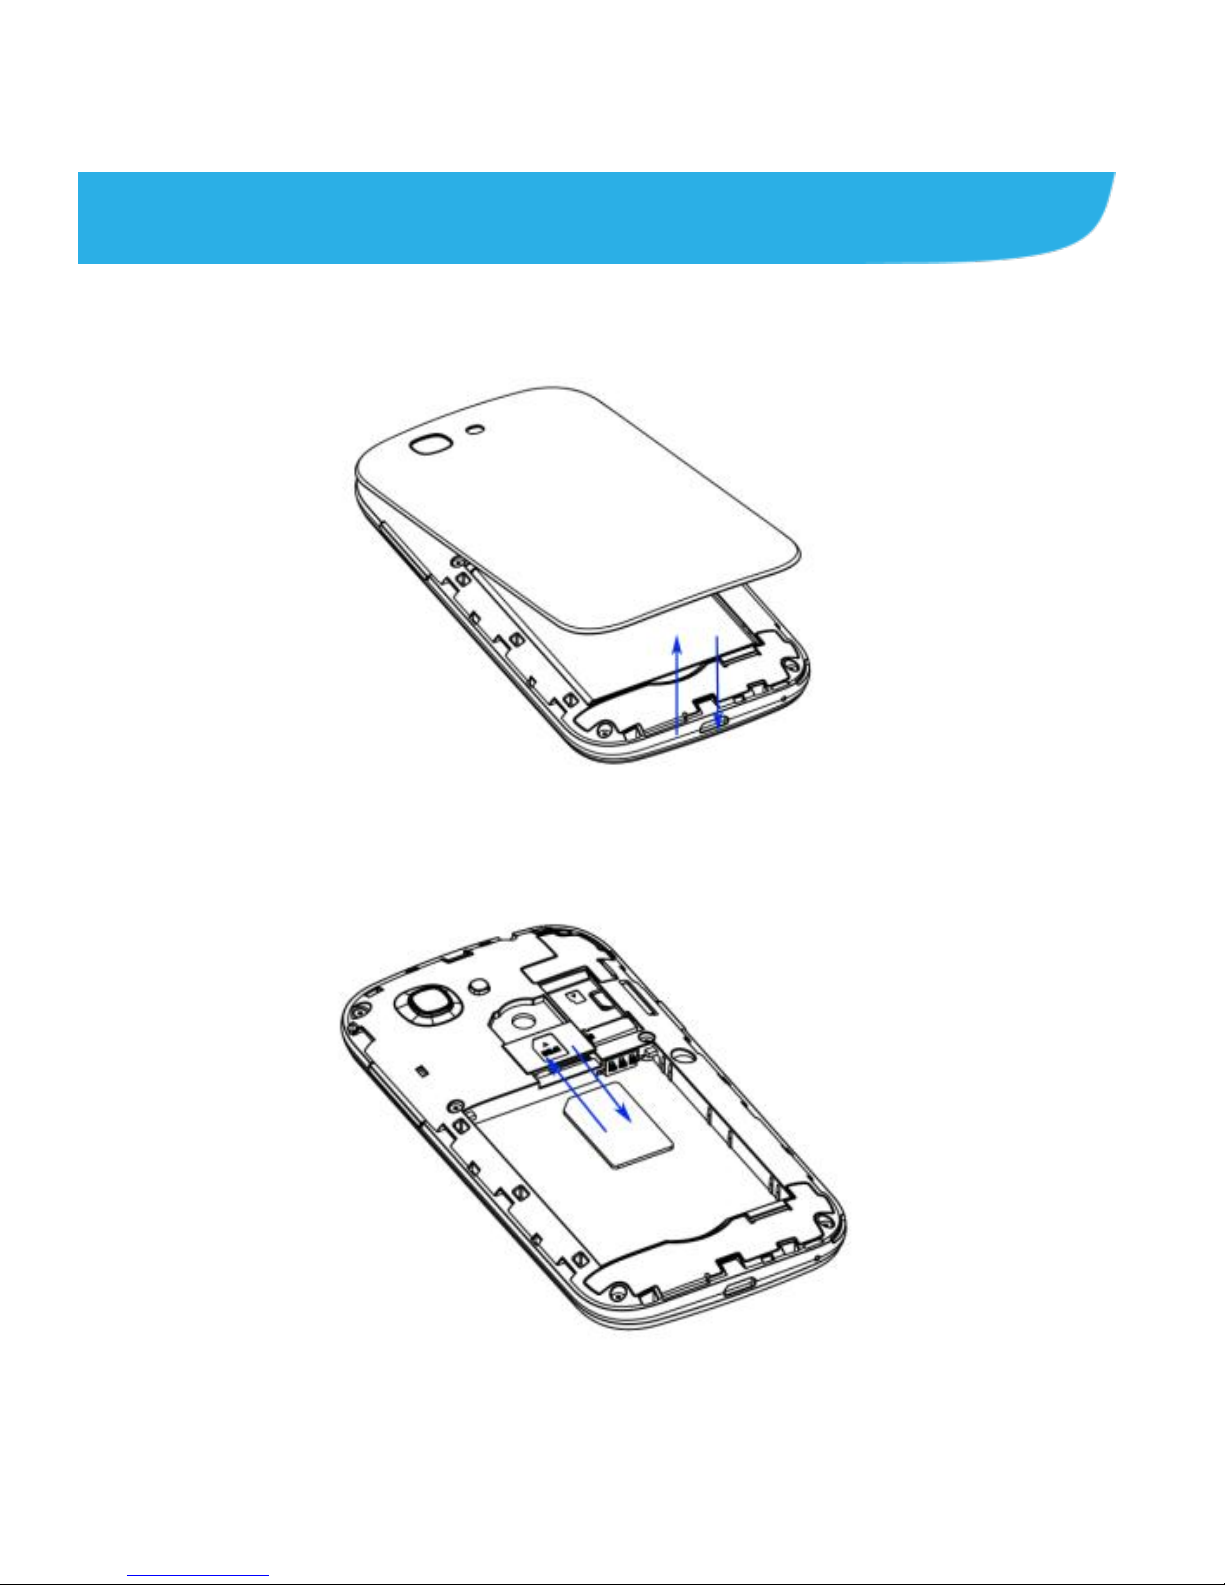
Before Getting Started
Removing the Back Cover
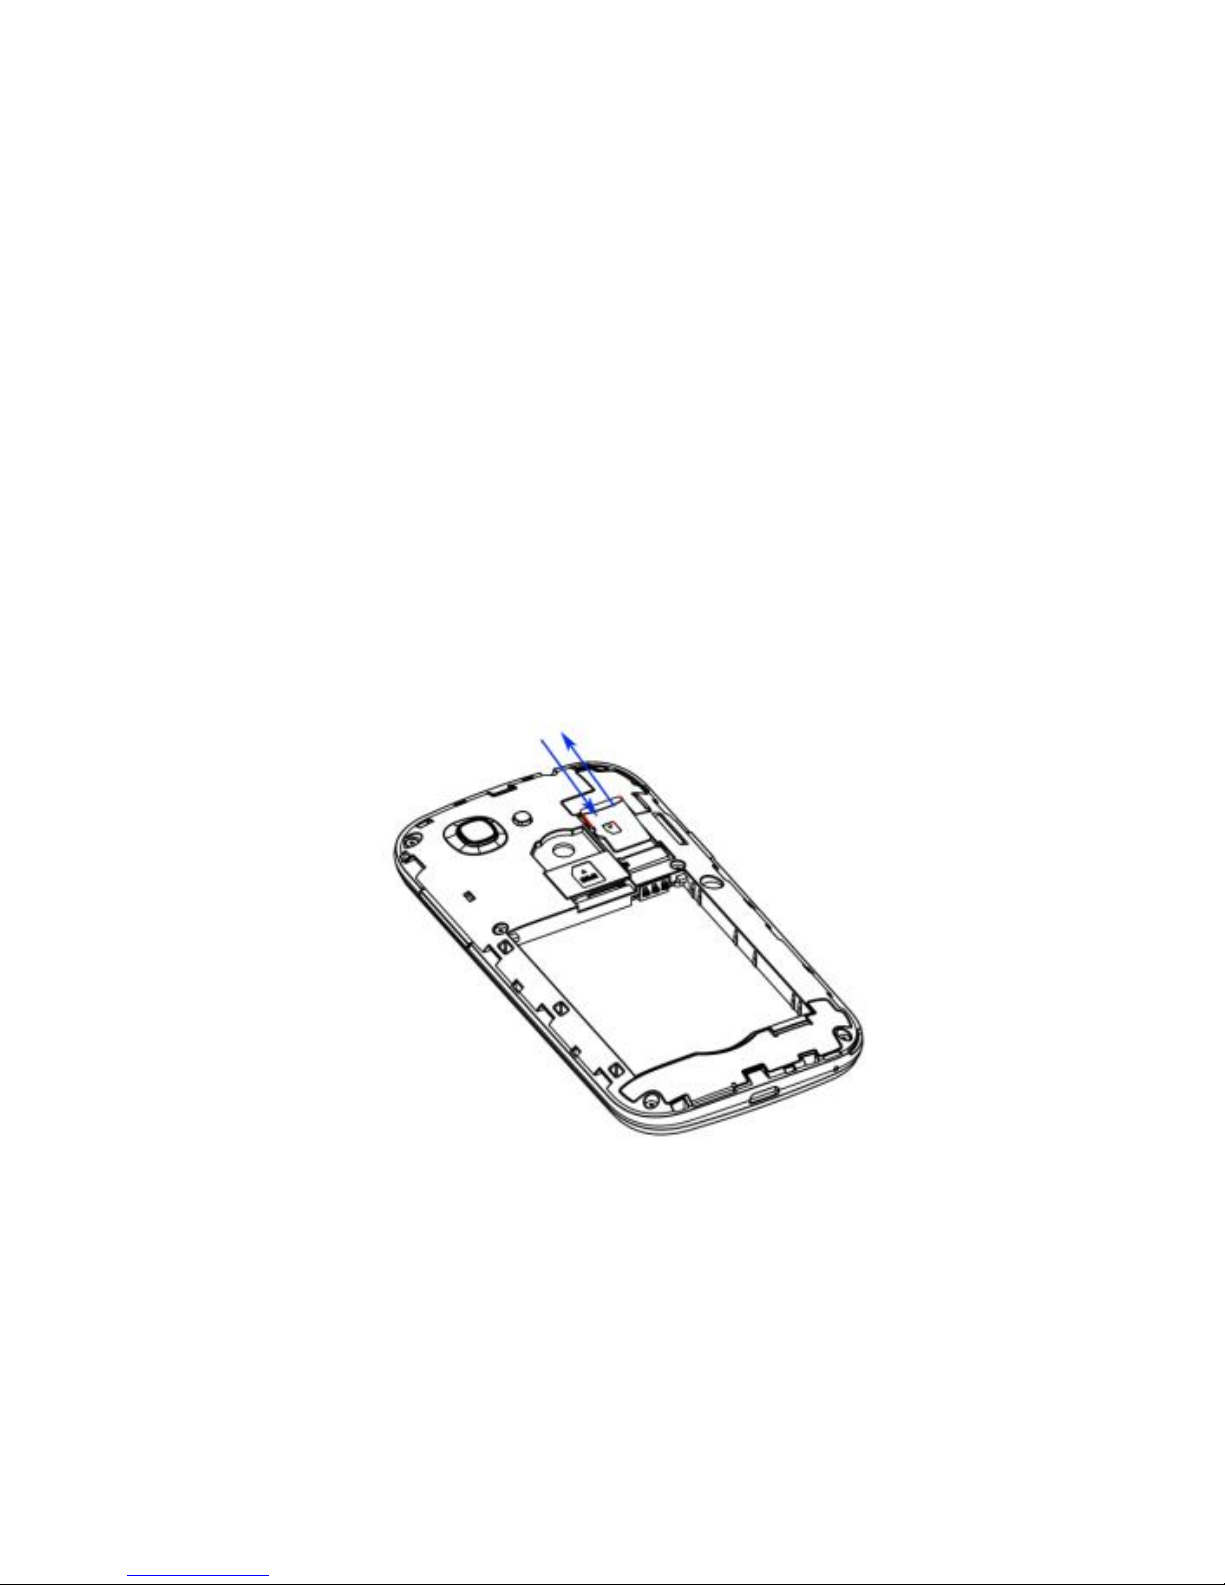
Installing the SIM Card
Page 9
9
NOTES:
● Switch off your phone before installing or replacing the SIM card.
● If you're using a small card, please use the SIM card dedicated card
sets, and then the whole into the slot Normal use.
● Please buy standardization SIM dedicated card sets from the formal
channels,otherwise the slot shrapnel may be pulled off when taking cards.
Installing the microSD Card
NOTE: The phone supports SD card hot-plug function.Some applications
may require a microSD card to work normally or may store certain data on it.
Page 10
10
Therefore, it is recommended that you keep a microSD card installed and
not remove or replace it randomly.
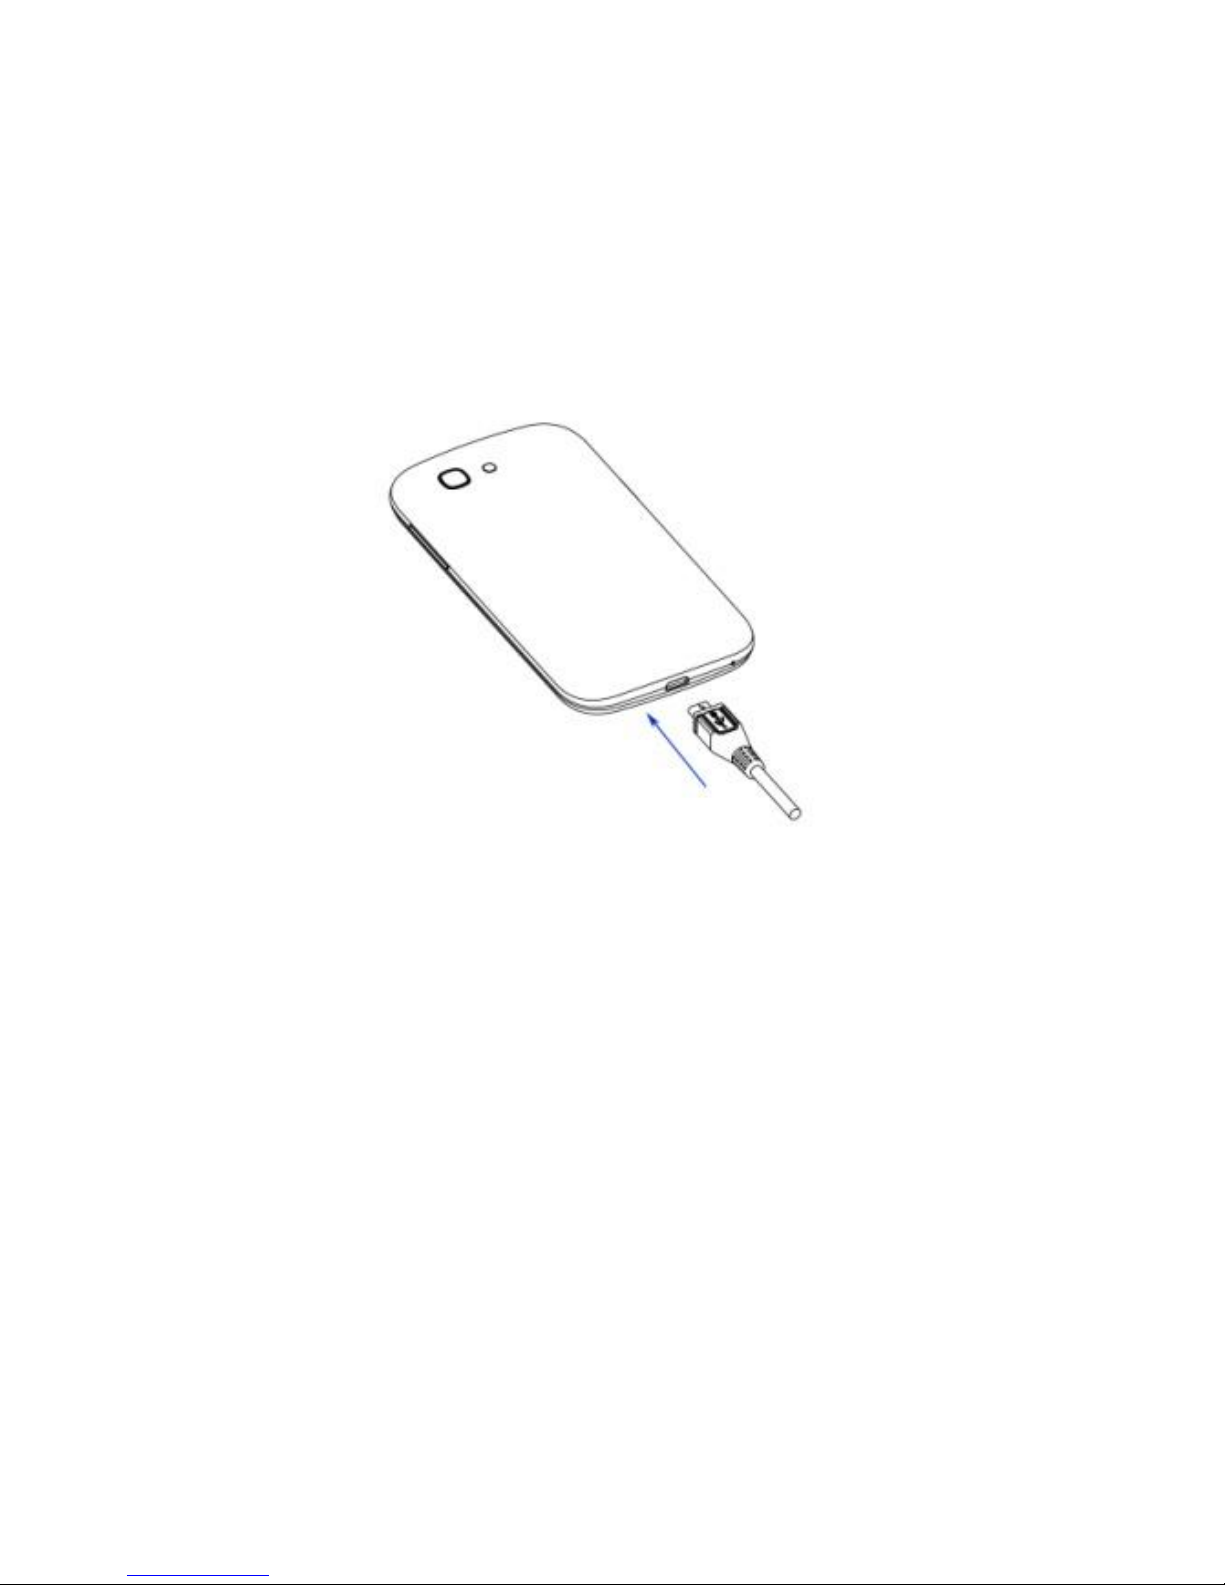
Charging the Battery
When you first get your new phone you’ll need to charge the battery like
this:
1. Connect the adapter to the charging jack.
2. Connect the charger to a standard AC power outlet.
3. Disconnect the charger when the battery is fully charged.
NOTES:
● If excessive discharge of the battery, the charging icon will display
delay.
● If the battery is extremely low, you may be unable to power on the
phone even when it is being charged. In this case, try again after charging
Page 11

11
the phone for at least 10 minutes. Contact customer service if you still
cannot power on the phone after prolonged charging.
CAUTION:Use only ZTE-approved chargers and cables. The use of
unapproved accessories could damage your phone or cause the
battery to explode.
Page 12

12
Powering On/Off Your Phone
Make sure the battery is charged before powering on.
Press and hold the Power Key to turn on your phone.
To turn it off, press and hold the Power Key to open the options
menu. Touch Power off > OK.
Waking Up Your Phone
1. Press the Power Key to activate your screen display.
2. Touch and hold at the center of the screen.
NOTE:
If you have set an ‘unlock pattern’, or a PIN/password for your phone, you’ll
need to draw the pattern or enter the PIN/password to unlock your screen.
Using the Touch Screen
Your phone’s touch screen lets you control actions through a variety of
touch gestures.
Touch
When you want to type using the onscreen keyboard, select items
onscreen such as application and settings icons, or press onscreen
buttons, simply touch them with your finger.
Page 13

13
Touch and Hold
To open the available options for an item (for example, a message or
link in a Web page), touch and hold the item.
Swipe or Slide
To swipe or slide means to quickly drag your finger vertically or
horizontally across the screen.
Drag
To drag, press and hold your finger with some pressure before you
start to move your finger. While dragging, do not release your finger
until you have reached the target position.
Pinch
In some apps (such as Maps, Browser, and Gallery), you can zoom
in and out by placing two fingers on the screen at once and pinching
them together (to zoom out) or spreading them apart (to zoom in).
Rotate the screen
For most screens, you can automatically change the screen
orientation from portrait to landscape by turning the phone sideways.
Page 14

14
FCC Compliance
This device complies with part 15 of the FCC Rules. Operation is subject
to the condition that this device does not cause harmful interference.
Caution: Changes or modifications not expressly approved by the
manufacturer could void the user’s authority to operate the
equipment.
Note: This equipment has been tested and found to comply with
the limits for a Class B digital device, pursuant to part 15 of the FCC
Rules. These limits are designed to provide reasonable protection
against harmful interference in a residential installation. This
equipment generates, uses and can radiate radio frequency energy
and, if not installed and used in accordance with the instructions,
may cause harmful interference to radio communications. However,
there is no guarantee that interference will not occur in a particular
installation. If this equipment does cause harmful interference to
radio or television reception, which can be determined by turning the
equipment off and on, the user is encouraged to try to correct the
interference by one or more of the following measures:
—Reorient or relocate the receiving antenna.
—Increase the separation between the equipment and receiver.
Page 15

15
—Connect the equipment into an outlet on a circuit different from
that to which the receiver is connected.
—Consult the dealer or an experienced radio/ TV technician for help.
Health and safety information
Radio Frequency (RF) Energy
This model phone meets the government’s requirements for exposure to
radio waves.
This phone is designed and manufactured not to exceed the emission
limits for exposure to radio frequency (RF) energy set by the Federal
Communications Commission of the U.S. Government:
The exposure standard for wireless mobile phones employs a unit of
measurement known as the Specific Absorption Rate, or SAR. The
SAR limit set by the FCC is 1.6W/kg. *Tests for SAR are conducted
using standard operating positions accepted by the FCC with the phone
transmitting at its highest certified power level in all tested frequency
bands. Although the SAR is determined at the highest certified power
level, the actual SAR level of the phone while operating can be well
below the maximum value. This is because the phone is designed to
operate at multiple power levels so as to use only the poser required to
reach the network. In general, the closer you are to a wireless base
Page 16

16
station antenna, the lower the power output.
The highest SAR value for the model phone as reported to the FCC
when tested for use at the ear is 0.69 W/kg and when worn on the body,
as described in this user guide, is 1.47 W/kg (Body-worn measurements
differ among phone models, depending upon available enhancements
and FCC requirements.)
While there may be differences between the SAR levels of various
phones and at various positions, they all meet the government
requirement.
The FCC has granted an Equipment Authorization for this model phone
with all reported SAR levels evaluated as in compliance with the FCC RF
exposure guidelines. SAR information on this model phone is on file
with the FCC and can be found under the Display Grant section of
http://www.fcc.gov/oet/fccid after searching on .
FCC ID: SRQ-ZTEV813W
For body worn operation, this phone has been tested and meets the FCC
RF exposure guidelines for use with an accessory that contains no metal
and the positions the handset a minimum of 1.0 cm from the body. Use
of other enhancements may not ensure compliance with FCC RF
exposure guidelines. If you do no t use a body-worn accessory and are
not holding the phone at the ear, position the handset a minimum of 1.0
cm from your body when the phone is switched on.
 Loading...