

Page 1

ZTE Blade A31 Lite
User Manual
1
Page 2

About This Manual
Thank you for choosing this ZTE mobile device. In order to keep
your device in its best condition, please read this manual and
keep it for future reference.
Copyright
Copyright © 2021 ZTE CORPORATION
All rights reserved.
No part of this publication may be quoted, reproduced, translated
or used in any form or by any means, electronic or mechanical,
including photocopying and microfilm, without the prior written
permission of ZTE Corporation.
Notice
ZTE Corporation reserves the right to make modifications on print
errors or update specifications in this guide without prior notice.
This manual has been designed with the utmost care to ensure
the accuracy of its content. However, all statements, information
and recommendations contained therein do not constitute a
warranty of any kind, either expressed or implied. Please refer to
For Your Safety to be sure to use your phone properly and safely.
We offer self-service for our smart terminal device users. Please
visit the ZTE official website (at https://www.ztedevices.com/) for
more information on self-service and supported product models.
Information on the website takes precedence.
2
Page 3

Disclaimer
ZTE Corporation expressly disclaims any liability for faults and
damages caused by unauthorized modifications of the software.
Images and screenshots used in this manual may differ from the
actual product. Content in this manual may differ from the actual
product or software.
Trademarks
ZTE and the ZTE logos are trademarks of ZTE Corporation.
Android™ is a trademark of Google LLC.
The Bluetooth® word mark and logos are registered trademarks
owned by the Bluetooth SIG, Inc. and any use of such marks by
ZTE Corporation is under license.
microSDXC Logo is a trademark of SD-3C, LLC.
Other trademarks and trade names are those of their respective
owners.
3
Page 4
NOTE
Additional information, supplementary
instruction or tips for the operation of the
product.
CAUTION
Safety information that, if ignored, may
cause minor damage to the equipment
or service interruption.
WARNING
Safety information that, if ignored, may
cause serious damage to the equipment
or danger to personal safety.
Instructional Icons
Version No.: R1.0
Edition Time: February 26, 2021
4
Page 5

Contents
Getting Started ......................................................... 9
Getting to Know Your Phone .............................................. 9
Knowing the Keys ............................................................ 11
Setting Up Your Phone ..................................................... 11
Charging the Phone ......................................................... 15
Powering On/Off .............................................................. 16
Setting Up for the First Time ............................................. 17
Locking/Unlocking the Screen and Keys ........................... 17
Getting to Know the Home Screen ................................... 18
Personalizing ......................................................... 20
Setting the Navigation Style .............................................. 20
Changing the System Language ...................................... 21
Switching to Vibration or Silent Mode ............................... 22
Using Do Not Disturb Mode .............................................. 23
Choosing Your Wallpaper ................................................. 24
Using Dark Theme ........................................................... 25
Knowing the Basics ............................................... 26
Phone Status Icons .......................................................... 26
Notification Icons .............................................................. 27
Using Quick Settings ........................................................ 27
Opening and Switching Apps ............................................ 28
Security .................................................................. 30
5
Page 6

Protecting Your Phone With Screen Locks ....................... 30
Protecting Your Phone With App Pinning .......................... 31
Connecting to Networks ........................................ 33
Connecting to Mobile Networks ........................................ 33
Connecting to Wi-Fi ......................................................... 36
Connecting to Devices .......................................... 37
Connecting to Bluetooth Devices ..................................... 37
Connecting to Your Computer via USB ............................. 38
Sharing Files With Nearby Devices .................................. 39
Sharing Your Mobile Data Connection Through
Tethering ................................................................. 42
Phone Calls ............................................................ 43
Placing Calls .................................................................... 43
Answering or Rejecting Calls ........................................... 44
Using Options During a Call ............................................. 45
Managing Multi-party Calls ............................................... 46
Contacts .................................................................. 49
Adding a New Contact ..................................................... 49
Importing and Exporting Contacts .................................... 49
Setting a Ringtone for a Contact ...................................... 50
Setting Call Blocking ........................................................ 51
Messages ................................................................ 52
Sending a Message ......................................................... 52
6
Page 7

Message Options ............................................................. 53
Web Browser .......................................................... 55
Opening the Browser ....................................................... 55
Using Multiple Browser Tabs ............................................ 55
Changing Browser Settings .............................................. 56
Camera ................................................................... 57
Capturing a Photo ............................................................ 57
Recording a Video ............................................................ 59
Using Pro Mode ............................................................... 59
Using Other Camera Modes ............................................. 60
Gallery .................................................................... 62
Opening Gallery ............................................................... 62
Sharing Your Photos or Videos ......................................... 62
Deleting Unwanted Photos or Videos ............................... 62
FM Radio ................................................................ 63
Scanning for Channels ..................................................... 63
Listening to FM Radio ...................................................... 63
Voice Recorder ....................................................... 64
Recording a Voice Memo ................................................. 64
Playing a Voice Memo ...................................................... 64
Trimming a Voice Memo ................................ ................... 65
Settings .................................................................. 66
Network & Internet ........................................................... 66
7
Page 8

Connected Devices .......................................................... 68
Apps & Notifications ......................................................... 69
Battery ............................................................................. 71
Features ................................................................ .......... 71
Display ............................................................................ 71
Sound .............................................................................. 71
Storage ............................................................................ 72
Privacy ............................................................................ 72
Location ........................................................................... 73
Security ........................................................................... 73
Accounts ......................................................................... 75
Accessibility ..................................................................... 75
Digital Wellbeing & Parental Controls ............................... 76
Google ............................................................................ 76
System ............................................................................ 77
About Phone .................................................................... 78
For Your Safety ...................................................... 79
General Safety................................................................. 79
FCC RF Exposure Information (SAR) ............................... 81
FCC Regulations ............................................................. 82
Distractions...................................................................... 84
Product Handling ............................................................. 84
Electrical Safety ............................................................... 90
Radio Frequency Interference .......................................... 90
Explosive Environments ................................................... 92
8
Page 9
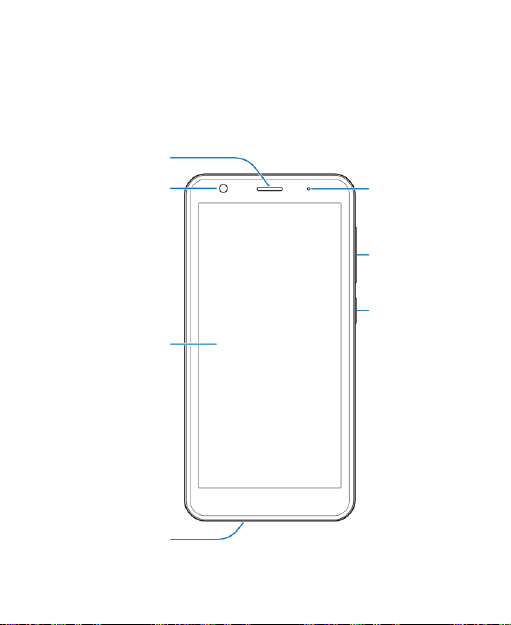
Front camera
Touch screen
Earpiece
Volume key
Power key
Indicator light
Microphone
Getting Started
Getting to Know Your Phone
9
Page 10
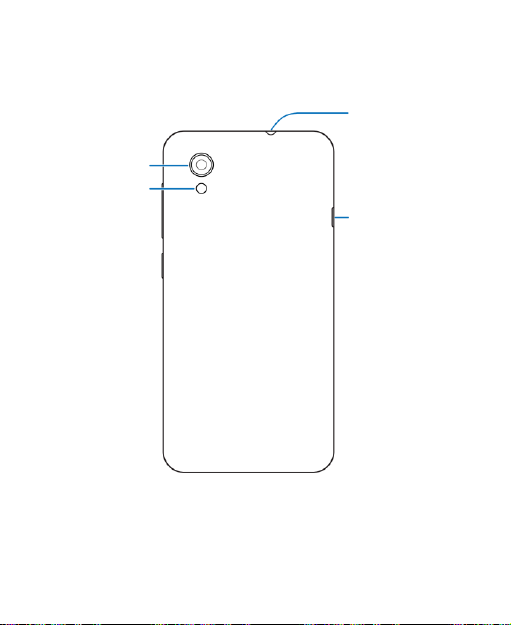
Headset jack*
Back camera
Charging/microUSB jack
Flash
10
Page 11
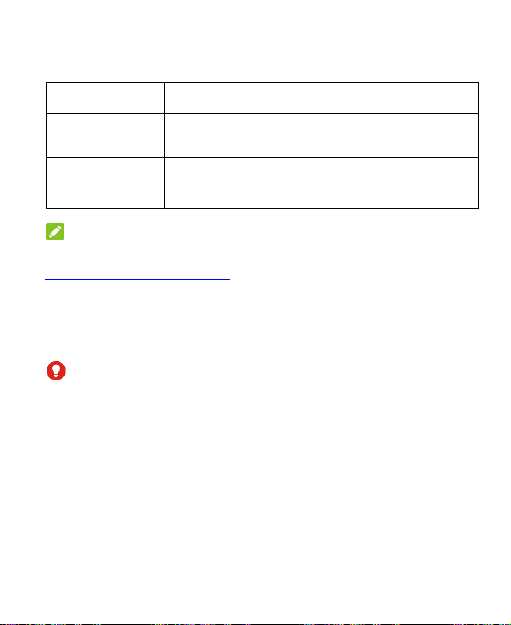
Key
Function
Power key
Press and hold to power off or restart.
Press to turn off or on the screen display.
Volume key
Press or hold either end of the key to turn the
volume up or down.
Knowing the Keys
NOTE:
You can use virtual keys or gestures to navigate your phone. See
Setting the Navigation Style.
Setting Up Your Phone
Power off your phone before removing or replacing the battery.
WARNING!
To avoid damage to the phone, do not use any other kind of SIM
cards, or any non-standard nano-SIM card cut from a SIM card.
You can get a standard nano-SIM card from your service
provider.
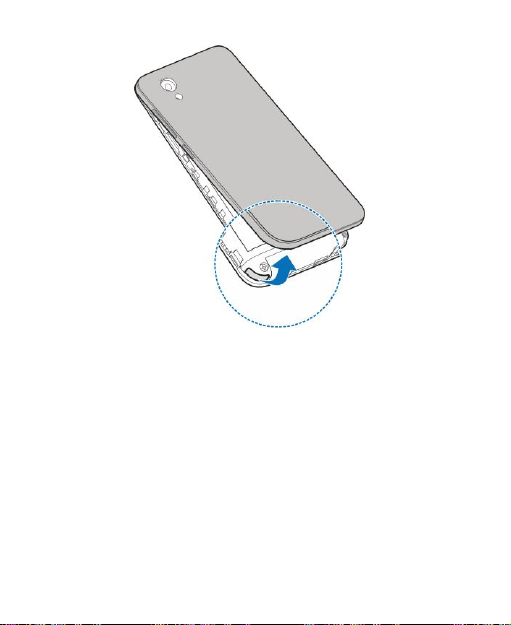
1. Place your finger into the slot at the bottom of the back cover,
and gently lift and remove the cover.
11
Page 12
2. Install the nano-SIM card and the microSDXC card as
shown.
If your phone supports dual SIM cards, you can also install a
second nano-SIM card in slot 2.
12
Page 13
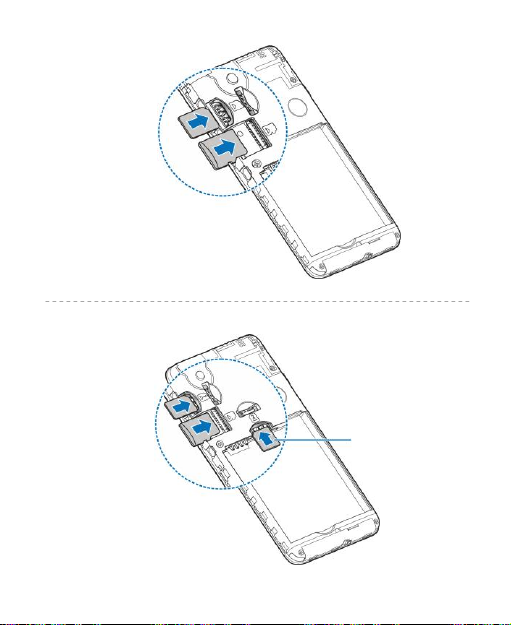
nano-SIM
slot 2
Single-SIM
model
Dual-SIM
model
13
Page 14
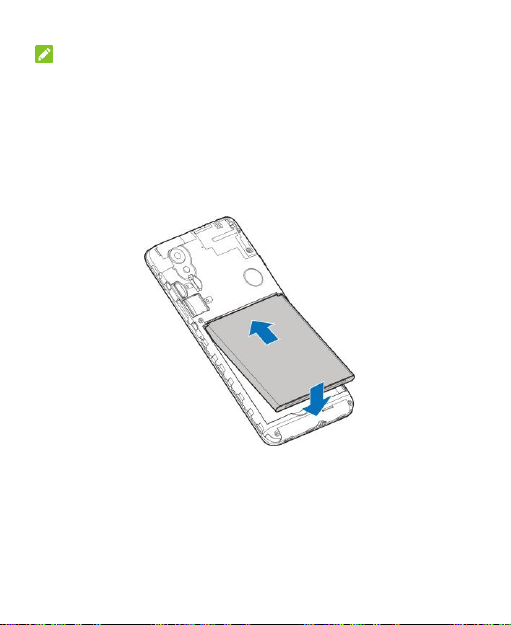
Single-SIM
model
NOTES:
The dual-SIM model is not available in every country. Consult
your supplier for more information.
If two nano-SIM cards are installed on the dual-SIM model,
both cards can connect to the 4G, 3G, or 2G network, and
either card can be used for mobile data.
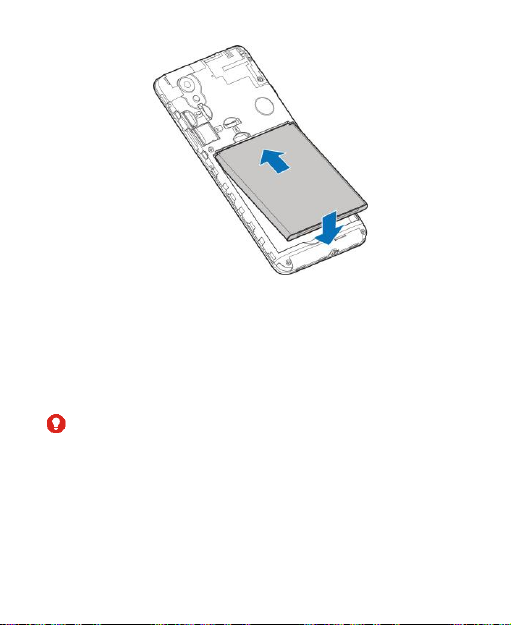
3. Insert the battery, making sure the connectors align. Gently
push down on the battery until it clicks into place.
14
Page 15
Dual-SIM
model
4. Replace the back cover.
Charging the Phone
Your phone’s battery should have enough power for the phone to
turn on, find a signal, and make a few calls. You should fully
charge the battery as soon as possible.
WARNING!
Use only ZTE-approved chargers and USB cables. The use of
unapproved accessories could damage your phone or cause the
battery to explode.
1. Connect the adapter to the charging jack. Ensure that the
adapter is inserted in the correct direction.
15
Page 16
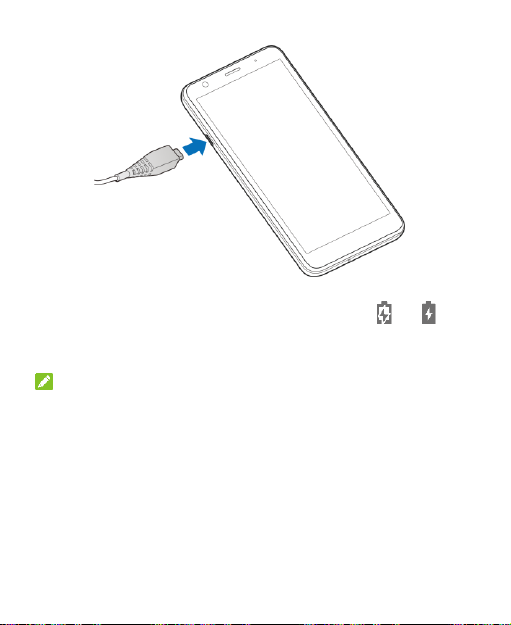
2. Connect the charger to a standard AC power outlet. If the
phone is on, you’ll see a charging icon such as or
appear on the status bar.
3. Disconnect the charger when the battery is fully charged.
NOTE:
If the battery is extremely low, you may be unable to power on
the phone even when it is being charged. In this case, try again
after charging the phone for at least 20 minutes. Contact the
customer service if you still cannot power on the phone after
prolonged charging.
Powering On/Off
Press and hold the Power key to turn on your phone.
16
Page 17

To power off, press and hold the Power key to open the
options menu, and touch > .
NOTE:
If the screen freezes or takes too long to respond, reinstall the
battery and power on again.
Setting Up for the First Time
When you first power on your phone after you purchase it or
reset it to factory settings, you need to do some settings before
using it.
Select the language field and follow the on-screen prompts to set
up your phone.
Locking/Unlocking the Screen and
Keys
Your phone allows you to quickly lock the screen and keys (put
the phone to sleep mode) when not in use and to turn the screen
back on and unlock it when you need it.
To lock the screen and keys:
To quickly turn the screen off and lock the keys, press the Power
key.
NOTE:
To save battery power, the phone automatically turns off the
screen after some time of inactivity. You will still be able to
17
Page 18

receive messages and calls while the phone screen is off.
To unlock the screen and keys:
1. Press the Power key to turn the screen on.
2. Swipe up on the screen.
- or Swipe from to open the camera.
- or Touch a notification twice consecutively to open the related
app.
NOTE:
If you have set an unlock pattern, a PIN or a password for your
phone (see Protecting Your Phone With Screen Locks), you’ll
need to draw the pattern or enter the PIN/password to unlock your
screen.
Getting to Know the Home Screen
The home screen is the starting point for your phone’s
applications, functions, and menus. You can customize your
home screen by adding shortcuts and folders.
Extended Home Screen Panels
Your home screen is extendable, providing more space for
shortcuts and folders. After adding some extended panels, you
can simply swipe left or right on the home screen to see each
panel. You can also remove these panels.
18
Page 19

To add a new home screen panel:
Touch and hold an item such as a shortcut or folder on the home
screen and drag it to the right edge of the screen to create a new
home screen panel and put the item on it.
NOTE:
No empty home screen panel is allowed to exist. If the shortcut or
folder is the only item on the current home screen panel, the
panel will be deleted as you remove the item.
19
Page 20
Personalizing
Setting the Navigation Style
You can set the navigation style as virtual navigation or gesture
navigation.
Use Virtual Navigation
To enable virtual navigation:
1. Open Settings and touch Features > System navigation.
2. Select Virtual navigation.
NOTE:
Touch beside Virtual navigation to change the navigation
key layout, or turn on or off the concealable navigation bar. To
hide the navigation bar, switch off Always show navigation bar
and touch on the navigation bar. To display the navigation
bar again, swipe up from the bottom of the screen.
To use virtual navigation:
Touch (the Home key) to return to the home screen from
any application or screen.
Touch and hold to use the Google Assistant.
Touch (the Back key) to go to the previous screen.
Touch (the Recent apps key) to see recently used apps.
20
Page 21

Touch twice to switch to the most recent application.
Use Gesture Navigation
To enable gesture navigation:
1. Open Settings and touch Features > System navigation.
2. Select Gestures.
NOTE:
Touch beside Gestures to enable or disable visual feedback
and adjust the back sensitivity of edges for gesture navigation.
To use gesture navigation:
Swipe up from the bottom of your screen to return to the
home screen from any application or screen.
Swipe up from the bottom of your screen to the middle and
hold to see recently used apps.
Swipe left or right along the bottom of your screen to switch
among recently used apps.
Swipe inside from the left or right edge of your screen to go to
the previous screen.
Swipe up from the bottom left or bottom right of your screen
to activate the Google Assistant.
Changing the System Language
1. Open Settings and touch System > Languages & input >
Languages. The first language in the list is the default
21
Page 22

system language.
2. Touch Add a language and then the language you need.
Select the regional variant of the language if prompted.
3. Touch and hold a language and move it to the top to switch
to that language.
NOTE:
To remove languages from the list, touch > Remove and select
the languages you want to delete.
Switching to Vibration or Silent Mode
You can set the phone to vibration or silent mode by using one of
the following methods.
Press the Volume key up or down and then touch the icon
above the slider to switch the phone to vibration or silent
mode or turn on the sound.
Press the Volume up key and the Power key at the same
time to switch to silent mode or vibration mode.
NOTE:
You can select to switch to silent or vibration mode by
opening Settings > Sound > Switch to vibrate/silent and
choosing Mute or Vibrate.
Swipe down from the status bar to open the notification panel
and drag the panel downwards. Touch Ring, Vibrate, or
Silent to switch the phone to vibration or silent mode or turn
on the sound.
22
Page 23

Open Settings and touch Sound > Advanced > Notification
mode and select Vibrate or Mute to switch to vibration or
silent mode.
Using Do Not Disturb Mode
You can limit interruptions with Do Not Disturb mode. This mode
can mute sound, stop vibration, and block visual disturbances.
You can pick what you block and what you allow.
Turn On or Off Do Not Disturb Mode
1. Open Settings and touch Sound > Do Not Disturb.
2. Touch TURN ON NOW or TURN OFF NOW.
Set the Exceptions for Do Not Disturb Mode
1. Open Settings and touch Sound > Do Not Disturb.
2. Select the following options and choose what to allow.
People: Allow calls, messages, or conversations.
Apps: Choose which apps can send you notifications.
Alarms & other interruptions: Allow alarms, media
sounds, touch sounds, reminders, or calendar events.
Set an Automatic Schedule
You can set automatic schedules to activate Do Not Disturb
mode for specific times or events.
1. Open Settings and touch Sound > Do Not Disturb >
Schedules.
23
Page 24

2. Touch an existing schedule to turn it on or off, or touch
next to the schedule to customize it.
- or Touch Add more to create your own schedules.
Set How Long Do Not Disturb Mode Lasts
1. Open Settings and touch Sound > Do Not Disturb >
Advanced > Duration for Quick Settings.
2. Set how long Do Not Disturb mode will stay on when you turn
it on.
Choose Settings for Hidden Notifications
1. Open Settings and touch Sound > Do Not Disturb >
Advanced > Display options for hidden notifications.
2. Set notification behavior in Do Not Disturb mode. You can
block sound or visuals from notifications, or customize more
restrictions.
Choosing Your Wallpaper
You can set the wallpaper for the home screen or lock screen.
1. Touch and hold an empty place on the home screen and then
touch Wallpapers.
2. Select a preset wallpaper, or touch GALLERY > Gallery Go
to select a picture and pan and zoom on it to select the area
for the wallpaper.
24
Page 25

3. Touch SET AS and choose where the wallpaper should be
used.
NOTE:
Alternatively, you can open Settings and touch Display >
Wallpaper to set the wallpaper.
Using Dark Theme
When Dark theme is enabled, your phone will turn the screen to
dark with white text on a black background, relieving eye irritation
caused by screen glare at night.
1. Open Settings and touch Display > Dark theme.
2. Touch TURN ON NOW to enable Dark theme.
- or If you want to set a schedule when Dark theme will be turned
on automatically, touch Schedule and set the start and end
time.
NOTE:
Not all apps support Dark theme.
25
Page 26
3G connected
No signal
4G connected
Signal strength
Vibration on
Mobile data in use
Silent mode on
Airplane mode
Do Not Disturb mode
on
Connected to a Wi-Fi®
network
Battery low
Speaker on
Battery full
Phone microphone off
Battery charging
Location service
active
Wired headset
connected
Alarm set
Knowing the Basics
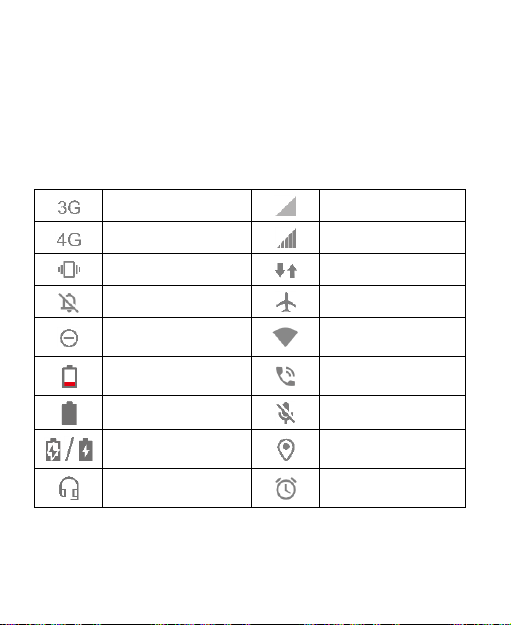
Phone Status Icons
The status bar at the top of the home screen provides phone and
service status icons on the right side. Below are some of the
icons you may see.
26
Page 27
New message(s) from
the Messages app
New Wi-Fi network
detected
Missed call
microSDXC card
mounted
Call in progress
Call on hold
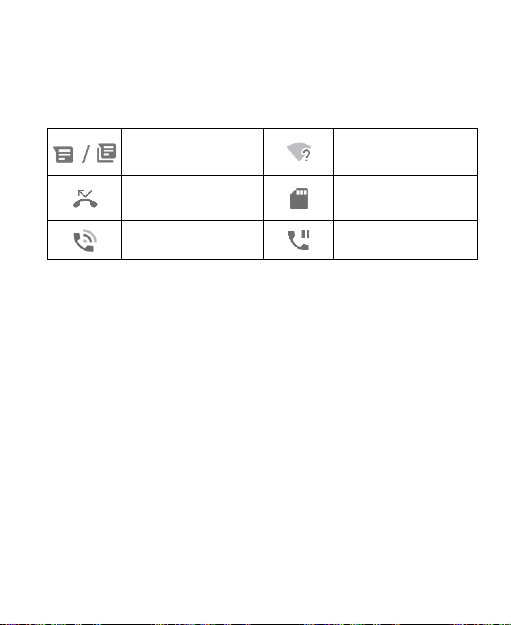
Notification Icons
The status bar at the top of the home screen provides notification
icons on the left. Below are some of the icons you may see.
Using Quick Settings
The Quick Settings make it convenient to view or change the
most common settings for your phone.
Swipe down from the status bar and drag the notification panel
downwards to open the Quick Settings panel.
To turn on or off settings quickly:
1. Open the Quick Settings panel.
2. To turn on or off a setting, touch its tile. Touch and hold
certain tiles to access more setting options. For example,
touch and hold the Wi-Fi tile to open Wi-Fi settings.
To customize the Quick Settings panel:
You can add, remove or rearrange the tiles on the Quick Settings
panel.
27
Page 28

1. Open the Quick Settings panel.
2. Touch at the bottom and do one of the following.
Touch and hold a tile and drag it to the position you want.
Touch and hold a tile and drag it to the section below to
hide it.
In the HOLD AND DRAG TO ADD TILES section, drag a
tile up to show it in the Quick Settings panel.
Opening and Switching Apps
Open an App
1. Swipe up on the home screen to view apps.
2. Slide up or down on the screen and touch an app to open it.
NOTE:
Drag the slider on the right side of the screen to the initial letter of
the app you need, or touch the search box at the top to search for
apps.
Switch Between Recently Opened Apps
1. Open the recent apps list. The apps you’ve used recently are
displayed in a series of cards. Slide left and right to see all the
cards.
NOTE:
To view how to see recently used apps in different navigation
styles, see Setting the Navigation Style.
28
Page 29

2. Touch a card to open that app.
NOTE:
You can swipe a card up to remove it from the screen, which will
free up running memory on the phone.
29
Page 30

Security
Protecting Your Phone With Screen
Locks
You can protect your phone by creating a screen lock. When it is
enabled, you need to swipe up on the screen, draw a pattern or
enter a numeric PIN or password to unlock the phone’s screen
and keys.
1. Open Settings and touch Security > Screen lock.
2. Touch None, Swipe, Pattern, PIN or Password.
Touch None to disable the screen lock.
Touch Swipe to enable screen lock and allow unlocking
with a “swipe” gesture. You can unlock the screen by
touching the display and sliding up.
Touch Pattern to create a pattern that you must draw to
unlock the screen.
Touch PIN or Password to set a numeric PIN or a
password that you must enter to unlock the screen.
3. For Pattern, PIN, or Password lock, select how you want
notifications and their contents to show when the phone is
locked. Then touch Done.
CAUTION:
Remember the pattern, PIN or password you set. Otherwise, you
will have to contact the customer service to reflash the phone
30
Page 31

software to use your phone, and all data in your phone will be
erased.
Protecting Your Phone With App
Pinning
You can pin an app's screen to keep it in view until you unpin it.
This feature can be used, for example, to let a trusted friend play
a specific game.
NOTE:
When an app is pinned, the pinned app may open other apps and
your personal data may be accessible, so use app pinning only
with people you trust.
Turn On App Pinning
1. Open Settings and touch Security > Advanced > App
pinning.
2. Touch the On/Off switch.
3. Read the on-screen prompts and touch OK.
4. To add security for unpinning, switch on Lock device when
unpinning and set up a screen lock as prompted, or switch
on Ask for unlock pattern before unpinning, Ask for PIN
before unpinning, or Ask for password before unpinning
if you’ve set a screen lock already.
31
Page 32

Pin an App
1. Ensure that app pinning is turned on.
2. Open the recent apps list. If the app you want to keep in view
is not in recent apps, open it first.
3. Swipe left and right to find the app card. Then touch at the
top of the card and select Pin.
Unpin the App
1. To unpin the app and return to normal use, touch and hold
both and for virtual navigation; swipe up from the
bottom of the screen and hold for a while for gesture
navigation.
2. If screen lock is enabled for app pinning, swipe up on the lock
screen and draw the pattern or enter the PIN/password.
32
Page 33

Connecting to Networks
Connecting to Mobile Networks
Manage the nano-SIM Cards (Dual-SIM
Model)
When two nano-SIM cards are installed on the dual-SIM model,
you can turn on or off one of the cards or mobile data, or choose
the default card for calls or messages.
To turn on or off a card:
1. Open Settings and touch Network & internet.
2. Touch one of the two card names at the top.
3. Touch the Use SIM / Off switch at the top.
NOTE:
You can touch next to the card name to edit it, change its
color, and view the service provider and number of the card.
To turn on/off mobile data:
1. Open Settings and touch Network & internet.
2. Touch one of the two card names at the top.
3. Touch the switch next to Mobile data.
4. If prompted, touch USE [card name] to confirm.
To set the default card for calls or messages:
33
Page 34

1. Open Settings and touch Network & internet.
2. Touch either one of the two card names at the top.
3. Touch Calls preference / SMS preference to set the
preferred SIM for outgoing calls and messages.
To allow non-data card to use data during calls:
When the non-data nano-SIM card is connected to a call, the
other nano-SIM card cannot use data service. You can set the
non-data card to use data temporarily during the call.
NOTE:
This feature is only useful when VoLTE service is available for
the non-data card.
1. Open Settings and touch Network & internet.
2. Touch the name of the non-data card at the top.
3. Touch Advanced and turn on 4G Calling / VoLTE and Data
during calls.
Control Mobile Data Use
1. Open Settings and touch Network & internet > Mobile
network.
2. If two nano-SIM cards are installed, touch one of the card
names.
3. Touch the Mobile data switch to enable or disable mobile
data for the current card.
4. If prompted, touch USE [card name] to confirm.
NOTE:
34
Page 35

Switch on or off Roaming to control mobile data use on roaming
networks.
Select Preferred Network Type
1. Open Settings and touch Network & internet > Mobile
network.
2. If two nano-SIM cards are installed, touch one of the card
names.
3. Touch Advanced > Preferred network type and select the
type of network you prefer the phone to connect to.
Set Access Point Names
To connect to the Internet, you can use the default Access Point
Names (APN). And if you want to add a new APN, please contact
the service provider to get the necessary information.
1. Open Settings and touch Network & internet > Mobile
network.
2. If two nano-SIM cards are installed, touch one of the card
names.
3. Touch Advanced > Access Point Names > > New APN.
4. Touch each item to enter the information you get from your
service provider.
5. Touch > Save to complete.
NOTE:
To set the APN to default settings, touch > Reset to default.
35
Page 36

Connecting to Wi-Fi
Wi-Fi is a wireless networking technology that can provide
Internet access at distances of up to 100 meters, depending on
the Wi-Fi router and your surroundings.
To turn Wi-Fi on and connect to a Wi-Fi network:
1. Open Settings and touch Network & internet > Wi-Fi.
2. Slide the switch to the on position to turn on Wi-Fi.
3. Touch a Wi-Fi network name to connect to it.
4. If the network is secured, enter the password and touch
CONNECT.
NOTES:
Your phone automatically connects to previously used Wi-Fi
networks when they are in range.
Your phone can automatically use mobile data network
when the Wi-Fi signal is weak. To use this feature, touch
Wi-Fi preferences below the network list in the Wi-Fi
screen and switch on Auto-switch to mobile network.
Additional charges may occur.
36
Page 37

Connecting to Devices
Connecting to Bluetooth Devices
Bluetooth is a short-range wireless communication technology.
Phones or other devices with Bluetooth capabilities can
exchange information wirelessly within a distance of a few meters.
The Bluetooth devices must be paired before the communication
is performed.
1. Open Settings and touch Connected devices.
2. Touch Pair new device. Your phone automatically scans for
and displays the IDs of all available Bluetooth devices in
range.
3. Touch the device you want to pair with.
4. If necessary, confirm that the Bluetooth passkeys are the
same between the two devices and touch PAIR. Alternatively,
enter a Bluetooth passkey and touch PAIR.
Pairing is successfully completed when the other device
accepts the connection or the same passkey is entered.
NOTE:
The Bluetooth passkey may be fixed for certain devices, such as
headsets and hands-free car kits. You can try entering 0000 or
1234 (the most common passkeys), or refer to the documents for
that device.
37
Page 38

Connecting to Your Computer via USB
You can connect your phone to a computer with a USB cable and
transfer music, pictures, and other files in both directions. Your
phone stores these files in the phone storage or on a removable
microSDXC card.
If you are using USB tethering, you must turn that off before you
can use USB to transfer files between your phone and computer.
Connect Your Phone to a Computer via USB
1. Connect your phone to the computer with a USB cable.
2. The Use USB for options menu will automatically open, and
you can choose one of the following options.
File Transfer: Transfer files on Windows
PTP: Transfer photos or files if File Transfer is not
supported by your computer.
Charge this device: Charge your phone via USB.
Install driver: Install the driver needed for some USB
connection modes (such as File Transfer). You only need
to install the driver on the same PC once.
NOTE:
You can also install the driver on PC by running the
executable file in the new CD-ROM drive.
Disconnect Your Phone From the Computer
To disconnect the phone from the computer, simply unplug the
38
®
PC or Mac®.
Page 39

USB cable when you’re finished.
Sharing Files With Nearby Devices
With Nearby Share, you can share photos, videos, and
documents with nearby devices via Bluetooth or Wi-Fi.
Turn Sharing On or Off
1. On your phone, make sure Bluetooth, Wi-Fi, and Location are
turned on. See Connecting to Bluetooth Devices, Connecting
to Wi-Fi and Location.
2. Open Settings and touch Connected devices >
Connection preferences > Nearby Share.
3. Touch the switch at the top to turn Nearby Share on or off.
Share Content With Someone
1. Open the content, like a photo or a message on your phone.
2. Find and touch the Share option and then select Nearby
Share.
3. Touch Turn on if Nearby Share is switched off.
4. Hold your phone and your friend’s device which supports the
Nearby Share feature close to each other.
NOTE:
Make sure both devices are unlocked, and have Nearby
Share, Wi-Fi, Bluetooth and location turned on.
5. If prompted, touch the Nearby Share notification on your
friend’s device to make that device visible to nearby devices.
39
Page 40

6. On your phone, your friend’s device name will appear and
touch the device name to send the content.
7. Accept the sharing on your friend’s device.
Get Content From Someone
1. Ask your friend to follow the “Share Content With Someone”
steps above.
2. You’ll get a notification that someone is sharing content with
you. Touch the notification if you haven’t set your phone
visible to nearby devices.
NOTE:
Make sure both devices are unlocked, and have Nearby
Share, Wi-Fi, Bluetooth and location turned on.
3. Touch Accept to get the content.
Choose Who Can Share Content With You
1. Open Settings and touch Connected devices >
Connection preferences > Nearby Share.
2. Touch Device visibility and choose one of the following
options.
All Contacts: Your phone is visible to your contacts while
your phone screen is on and unlocked. You need to sign
in to your Google account first.
Some Contacts: Your phone is visible to nearby contacts
you choose while your phone screen is on and unlocked.
You need to sign in to your Google account first.
40
Page 41

Hidden: When you get a notification that someone is
sharing content, you can choose to make your phone
visible manually in order for that device to find your
phone.
Set Data Usage for Sharing
1. Open Settings and touch Connected devices >
Connection preferences > Nearby Share.
2. Touch Data and choose one of the following options.
Data: Mobile data may be used for small files. Charges
may apply.
Wi-Fi only: Never use mobile data to share.
Without internet: Files will always be shared offline.
41
Page 42

Sharing Your Mobile Data
Connection Through Tethering
You can use tethering to share your phone’s Internet connection
with a computer that connects to your phone by Bluetooth or via
a USB cable.
NOTE:
You cannot transfer files between your phone and the computer
when the phone is USB tethered.
1. Open Settings and touch Network & internet > Hotspot &
tethering.
2. Switch on USB tethering or Bluetooth tethering.
For USB tethering, connect your phone to the computer
with the supplied USB cable before touching USB
tethering.
For Bluetooth tethering, pair your phone with the
computer via Bluetooth and set the computer to obtain
its network connection via Bluetooth.
NOTE:
To stop sharing your data connection, switch off USB tethering
or Bluetooth tethering.
42
Page 43
Phone Calls
Placing Calls
Place a Call by Dialing
1. From the home screen, touch .
2. Touch to open the dialer and enter the phone number or
the contact name with the dialpad. Touch to delete
incorrect digits.
NOTE:
As you enter the phone number or the contact name, your
phone searches for matching information in your contacts. If
you see the number and contact you want to call, touch it to
get call, messaging, and history options.
3. Touch below the keypad to dial a call.
4. If two nano-SIM cards are installed and there is no preferred
card for phone calls, select the card you want to use for the
call.
NOTE:
To make an international call, touch and hold the 0 key to enter
the plus (+) symbol. Next, enter the country code, followed by the
city/area code and then the phone number.
43
Page 44
Place a Call From the Call History
The call history is a list of all the calls you've placed, received, or
missed. It provides a convenient way to redial a number, return a
call, or add a number to your contacts.
1. From the home screen, touch > (in the top search
field) > Call history.
NOTE:
Touch Missed to find all missed calls.
2. Touch next to a listing to call back.
NOTE:
You can also touch the contact icon in front of the listing to get
more options for calling and texting.
Call Your Contacts
1. From the home screen, touch > the tab to view all
your contacts.
2. Touch a contact and then touch the number to place a voice
call, or touch to start a Google Duo video call.
Answering or Rejecting Calls
Answer a Call
When you receive a phone call, slide up to answer the call.
44
Page 45
- or If the screen is unlocked, touch ANSWER.
NOTE:
To silence the ringer before answering the call, press either end
of the Volume key.
Reject a Call
When you receive a phone call, slide down to reject the call.
You can also touch Reply to reject the call and select a preset
text message or edit one to send to the caller.
- or If the screen is unlocked, touch DECLINE to reject the call. You
can also touch the caller number or name, and then touch Reply
to reject the call and select a preset text message or edit one to
send to the caller.
Using Options During a Call
During a call, you will see a number of on-screen options. Touch
an option to select it.
Touch to turn on or off the speaker.
Touch to mute or unmute your microphone.
Touch to switch to the keypad when you need to enter a
code (for example, the PIN for your voicemail or bank
account) during the call.
45
Page 46
Touch to put the call on hold.
Touch to make another call separately from the first call,
which is put on hold.
Touch to merge the separate calls into a single
conference call.
Touch to put the caller you are speaking to on hold, and
switch to the other call that has been put on hold.
Touch to end the current call.
WARNING!
Because of higher volume levels, do not place the phone near
your ear during speakerphone use.
Managing Multi-party Calls
When the call waiting and conference call features are available,
you can switch between two calls or set up a conference call.
NOTE:
The call waiting and conference call features need network
support and may result in additional charges. Please contact your
service provider for more information.
Switch Between Current Calls
When you’re on a call and another call comes in, your phone
screen informs you and displays the caller ID.
46
Page 47

To respond to an incoming call while you’re on a call:
Slide up to answer the call. This puts the first caller on
hold and answers the second call.
Touch Answer & end ongoing call to answer the call. This
ends the first call and answers the second call.
Slide down to reject the second call.
Touch Reply to reject the second call and select a preset text
message or edit one to send to the caller.
To switch between two calls:
Touch .
Set Up a Conference Call
With this feature, you can talk to multiple people at the same
time.
1. Place the first call.
2. Once you have established the connection, answer an
incoming call or touch and dial the second number. This
puts the first caller on hold.
3. When you’re connected to the second party, touch .
4. If you need to add more parties, have them call you or touch
to dial the number, and touch to merge the calls one
by one.
47
Page 48

NOTE:
The number of calls you can merge depends on your network.
Contact your mobile service provider for more information.
If one of the people you called hangs up during the call, you and
the remaining callers stay connected. If you initiated the call and
are the first to hang up, all callers are disconnected.
To end the conference call, touch .
48
Page 49

Contacts
You can add contacts on your phone and synchronize them with
the contacts in your Google account or other accounts that
support contact syncing.
To see your contacts, touch Google (folder) > Contacts from
the home screen.
Adding a New Contact
1. Open Contacts.
2. Touch to add a new contact.
3. Enter the contact name, phone numbers, email addresses,
and other information. Touch More fields if necessary.
4. Touch Save.
Importing and Exporting Contacts
You can import contacts from your nano-SIM card, the phone
storage or an installed microSDXC card, or export contacts to
the phone storage or microSDXC card. This is especially useful
when you need to transfer contacts between different devices.
Import Contacts From the nano-SIM Card
1. Open Contacts.
2. Touch > Settings > Import > SIM [card name] > OK.
49
Page 50

NOTE:
For the single-SIM model or if only one nano-SIM card is
installed, touch > Settings > Import > SIM card > OK.
3. Check the contacts you need and then touch Import.
Import Contacts From the Phone Storage or
the microSDXC Card
1. Open Contacts.
2. Touch > Settings > Import.
3. Select .vcf file and touch OK.
4. Touch and find the vCard file(s) on the phone storage or
microSDXC card and touch one to import contacts.
Export Contacts to the Phone Storage or the
microSDXC Card
1. Open Contacts.
2. Touch > Settings > Export.
3. Touch and select the directory in which the vCard file will
be saved.
4. Edit the file name if needed and touch SAVE to create the file.
Setting a Ringtone for a Contact
Assign a special ringtone to a contact, so you know who is
calling when you hear the ringtone.
50
Page 51
1. Open Contacts.
2. Touch a contact you want to set a ringtone for and then touch
> Set ringtone.
3. Select a ringtone you like and touch OK or touch Add
ringtone at the bottom to choose an audio file and set it as
the ringtone.
Setting Call Blocking
The call blocking feature allows you to block calls and messages
from certain numbers.
1. Open Contacts.
2. Touch > Settings > Blocked numbers.
3. Touch Add a number.
4. Enter a phone number or touch to select a number from
the contact list.
5. Touch Block.
NOTES:
You can also block calls from unidentified callers by switching
on Unknown in the Blocked numbers screen.
To unblock a number, touch next to the number and
touch Unblock.
51
Page 52
Messages
You can use Messages to exchange text messages (SMS),
multimedia messages (MMS), and chat messages.
Sending a Message
1. From the home screen, touch .
2. Touch Start chat.
3. Add recipients by one of the following ways.
Manually enter the recipient’s number or contact name.
(You can touch to enter numbers with a dialpad.) If
the phone presents a few suggestions, touch the one
you want to add.
Select a recipient from your contact list.
To add more recipients for a group conversation, touch
to choose the recipients and then touch Next. You
can edit the group name if necessary.
4. Touch the text box and enter the message text. You can
touch > to add emoji to your text message.
5. If you want to send a multimedia message, touch to
add pictures, videos or voice recordings to the message.
6. For a multimedia message, touch and hold to mark the
message as urgent or add a message subject.
52
Page 53
7. If two nano-SIM cards are available, you can also touch and
hold to choose the card for sending this message.
8. Touch .
NOTES:
If you add two or more recipients, the message may be sent
as a group MMS where everyone can reply and see each
other’s messages. For group message setting, touch >
Settings > [nano-SIM card name] SIM > Group
messaging (if two nano-SIMs are installed) or >
Settings > Advanced > Group messaging (if only one
nano-SIM card is installed) from the Messages screen.
You can also include email addresses as recipients for a
multimedia message.
Do not add any attachment if you want to send a text
message. Otherwise you may be charged for a multimedia
message.
Message Options
On the Messages screen, touch and hold a thread and the
following options are available.
Touch to archive the thread. You can touch >
Archived from the Messages screen to find all archived
messages.
Touch > Delete to delete the thread.
53
Page 54

Touch to add the new number in the thread to your
contacts.
Touch > OK to block the contact or number in the
thread, and the thread will be moved to “Spam & blocked.”
You can touch > Spam & blocked from the Messages
screen to find all blocked messages.
NOTE:
You can touch and hold a thread and touch more to select them,
and then choose to archive or delete them.
54
Page 55
Web Browser
Opening the Browser
Open the Chrome app to launch the web browser.
To open a web page or search the web:
1. Open Chrome.
2. Touch the address box at the top of the web page.
3. Enter the address (URL) of a web page or enter terms you
want to search for. You can also touch to search by
voice.
4. Touch a URL or search suggestion or touch the enter key on
the keyboard to open the web page or search results.
NOTE:
Touch > if you want to stop opening the page.
Using Multiple Browser Tabs
You can open several web pages at the same time (one page in
each tab) and switch between them freely.
To open a new browser tab:
Touch > New tab. A new browser tab opens.
55
Page 56
To switch between tabs:
1. Touch (the number shows how many tabs you have
opened).
2. Swipe vertically to scroll through the list of opened tabs.
3. Touch the title of the tab you want to open.
NOTE:
Swipe a tab title left or right or touch its to close the tab.
Changing Browser Settings
You can configure a number of settings to customize the way
you browse the web, including options that you can use to
control your privacy. To open the Chrome settings screen, touch
> Settings.
56
Page 57
Camera
Capturing a Photo
1. From the home screen, touch .
2. Aim the camera at the subject and make any necessary
adjustments. Capture (auto camera) mode is used by default.
57
Page 58
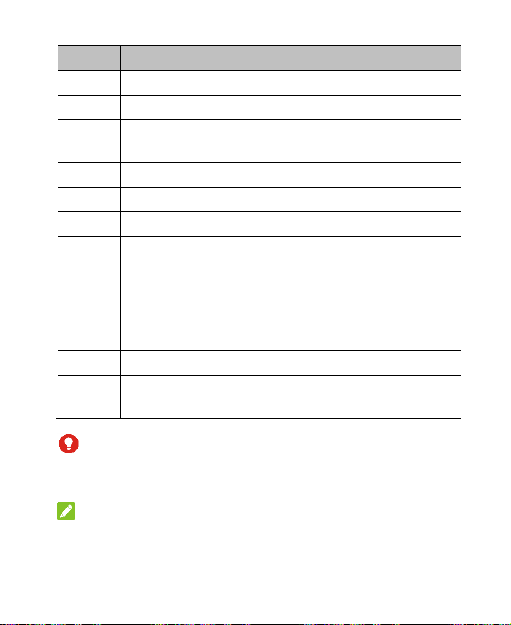
Number
Function
1
Change the HDR setting.
2
Change the flash setting.
3
Swipe left or right on the viewfinder area to change
camera modes.
4
View pictures and videos you have taken.
5
Capture a picture.
6
Switch between the front and back cameras.
7
Swipe left or right to switch among the default
Capture (auto camera) mode, Panorama mode,
Burst mode, Pro mode, Video mode, and Time
lapse mode. Touch More to use other special
camera modes: Interval, Filter, QR code, Night,
and DV Night.
8
Change the camera settings.
9
Enable beauty mode and customize its options to
beautify faces in the picture.
WARNING!
Keep a safe distance when using the flash. Do not point the
flash towards the eyes of people or animals.
NOTE:
You can spread or pinch on the screen to zoom in or out
before taking pictures.
58
Page 59
3. Lightly touch .
Recording a Video
1. From the home screen, touch .
2. Touch Video.
3. Aim the camera at the subject and make any necessary
adjustments.
4. Touch to start recording. You can touch or to
pause or resume recording, or touch to save the frame
as a photo.
5. Touch to stop recording.
NOTES:
You can spread or pinch on the screen to zoom in or out
before and during recording.
You can record a silent video by turning off the microphone.
Just touch at the top and switch off Microphone switch
before recording.
Using Pro Mode
You can use Pro mode to adjust more camera options for your
photo such as ISO, white balance, exposure, etc.
1. Open the Camera app.
59
Page 60

2. Touch Pro.
3. Aim the camera at the subject and you can make the
following adjustments.
Touch the camera options at the bottom to adjust overall
exposure, ISO, white balance, contrast and saturation.
Touch at the top to adjust the metering setting.
4. Touch to take the photo.
Using Other Camera Modes
Your camera app offers other powerful and interesting camera
modes. Swipe left or right on the viewfinder screen to find them
all.
Panorama: Capture panoramic photos either horizontally or
vertically.
Burst: Touch and hold to take a series of photos
quickly.
Time lapse: Record time lapse videos with the back
camera. You can set the time interval between each frame
in the camera settings.
Interval: Take several pictures with the front camera
automatically and save the selfie(s) you like. You can set
the time interval between each picture in the camera
settings.
Filter: Select a color effect for the picture.
60
Page 61

Qr code: Read the QR code in the viewfinder screen. Or
touch at the top to open a picture and scan the QR
code in it.
Night: Capture pictures in low-light environment.
DV Night: Record videos in low-light environment.
NOTE:
Some camera modes are only available for the back camera or
the front camera.
61
Page 62

Gallery
Opening Gallery
From the home screen, touch Gallery (Gallery Go). Gallery Go
is an offline photo gallery, which you can use to edit, find, and
manage photos without Internet. You can touch Photos to view
all your photos and videos, or touch Folders to find photos and
videos organized by folders.
Sharing Your Photos or Videos
1. Open Gallery.
2. Touch and hold a photo or video to select it.
3. Touch more items that you want to share.
4. Touch and select how you want to share the items.
Deleting Unwanted Photos or Videos
1. Open Gallery.
2. Touch and hold a photo or video to select it.
3. Touch more items that you want to delete.
4. Touch > Delete > Delete.
NOTE:
You cannot restore the deleted photos and videos.
62
Page 63
FM Radio
Scanning for Channels
1. Plug in a wired headset and open the FM Radio app.
2. Touch > Scan. Your phone scans for all available
channels and saves them to the channel list.
NOTE:
When you open the FM Radio app for the first time, it will
automatically scan for channels and show the channel list. You
can also touch > All channels to view the list.
Listening to FM Radio
1. Open FM Radio while the headset is connected.
2. Touch > All channels and select a channel.
You can also drag the red line along the frequency panel or
touch or to switch to other channels, or touch or
to adjust the current channel frequency.
NOTES:
Touch to add the channel to favourites.
Touch to listen to the radio through the phone speaker.
63
Page 64
Voice Recorder
Voice Recorder enables you to record and listen to voice
memos.
Recording a Voice Memo
1. Open Voice Recorder.
2. Touch to select the audio format of the recording.
3. Touch to start recording. During recording, you can do
the following:
Touch or to pause or continue the recording.
Touch or to add a time tag or photo tag to the
recording.
Touch an added time tag to attach a picture or add text.
4. Touch DONE to stop recording.
5. Edit the file name and touch SAVE to save the recording.
If you don’t want to save the memo after recording it, touch
DELETE > DELETE to delete it.
Playing a Voice Memo
1. Touch at the top right of the screen to see all
recordings.
64
Page 65

2. Touch the title of a memo to play it. During the playing, you
can touch to change the playback speed, touch View
tag to view all tags, touch or to add a time tag or
photo tag, or touch and hold a tag to delete it.
Trimming a Voice Memo
1. While playing a recording, touch to open the editing
screen.
2. Drag or to trim the recording. You can touch to
preview the trimmed recording.
3. Touch TRIM.
4. Edit the new file name and touch SAVE.
65
Page 66

Settings
The Settings app contains most of the tools for customizing
and configuring your phone.
Network & Internet
Wi-Fi
Open Settings and touch Network & internet > Wi-Fi. You can
turn Wi-Fi on or off and configure your Wi-Fi connections. See
Connecting to Wi-Fi.
Mobile Network
Open Settings and touch Network & internet > Mobile
network to control mobile data, data roaming, check and
manage mobile data use, set network type, VoLTE, and set
access point names and other network options. If you have
installed two nano-SIM cards on the dual-SIM model, you can
also set the assigned name and color for each card, turn on or
off a card, set the default card for calls/messages, and data use
during calls. See Connecting to Mobile Networks.
NOTE:
The data usage is measured by your phone, and your carrier’s
data usage accounting may differ.
66
Page 67

Airplane Mode
Open Settings and touch Network & internet > Airplane
mode to turn airplane mode on or off. All the phone’s radios
that transmit voice or data are turned off when airplane mode is
on.
Hotspot & Tethering
Open Settings and touch Network & internet > Hotspot &
tethering to share your phone’s mobile data connection with
PCs or other devices. See Sharing Your Mobile Data
Connection Through Tethering.
Data Saver
Open Settings and touch Network & internet > Data Saver to
enable or disable Data Saver, which prevents apps from using
data connection in the background. Apps you’re currently using
can access data, but may do so less frequently when Data
Saver is enabled. You can touch Unrestricted data to allow
some apps to always have data connection access, even when
Data Saver is enabled.
VPN
Open Settings and touch Network & internet > Advanced >
VPN to set up and connect to virtual private networks.
Private DNS
To get information from a website, your phone first asks where
67
Page 68

the website is. Private DNS is a way to help secure these
questions and answers.
By default, your phone uses Private DNS with all networks that
can use Private DNS. We recommend keeping Private DNS
turned on.
Open Settings and touch Network & internet > Advanced >
Private DNS to turn Private DNS on or off, or change its
settings.
Connected Devices
Open Settings and touch Connected devices > Connection
preferences to use the following features.
Bluetooth: Turn Bluetooth on or off and configure your
Bluetooth connections. See Connecting to Bluetooth
Devices.
Printing: Use the default printing service or other printer
plug-ins installed from the Google Play Store or your printer
manufacturer for wireless printing.
Files received via Bluetooth: Check records of files
received via Bluetooth.
Nearby Share: Use Bluetooth or Wi-Fi to share contents
with other devices near your phone. See Sharing Files With
Nearby Devices.
68
Page 69

Apps & Notifications
App Info
Open Settings and touch Apps & notifications. View recently
opened apps at the top or touch SEE ALL [number] APPS to
see all apps installed on your phone and manage them. Touch
an app to see its information and configure the available
options.
Conversations
Open Settings and touch Apps & notifications >
Conversations to check your priority and modified
conversations in the Messages app and change conversation
settings. Once you mark a conversation as priority by touching
and holding it on the notification panel, or make any other
changes to a conversation, it will appear in this menu.
Notifications
Open Settings and touch Apps & notifications >
Notifications to manage app notifications.
Screen Time
Open Settings and touch Apps & notifications > Screen time
to find out how much time you spend on apps and set the total
time per day that you can use an app. When you reach your
limit, the app closes and its icon dims.
69
Page 70

Default Apps
Open Settings and touch Apps & notifications > Advanced >
Default apps to select the default app for voice assistant and
input, web browsing, phone calling, messaging, etc. Touch
Opening links to set Instant apps options, or touch an installed
app to check its supported links and set whether to open the
links in the app, and clear the app’s defaults.
Permission Manager
Open Settings and touch Apps & notifications > Advanced >
Permission manager to check what apps have been allowed
to access certain permissions. You can also change the app
permissions.
WARNING!
Changing the app permissions may result in the app not
working correctly or as originally intended.
Wireless Emergency Alerts
Open Settings and touch Apps & notifications > Advanced >
Wireless emergency alerts to enable/disable emergency
alerts such as AMBER alerts and Extreme threats and set alert
preferences.
Special App Access
Open Settings and touch Apps & notifications > Advanced >
Special app access to set special access options of apps.
70
Page 71

Battery
Open Settings and touch Battery to view the battery level,
enable different battery saving modes, check what has been
using the battery, and manage apps intelligently or set more
options to improve battery life.
Features
Open Settings and touch Features. The following features are
available.
System navigation: Set the navigation style as virtual
navigation or gesture navigation. See Setting the Navigation
Style.
Scheduled power On/Off: Set the day and time when the
phone automatically powers on or off.
Display
Open Settings and touch Display to configure the display
options, including brightness level, Dark theme, wallpapers,
screen sleep time, auto-rotate screen, font size, lock screen
options, etc.
Sound
Open Settings and touch Sound. Adjust different types of
71
Page 72

volume, toggle sound mode (see Switching to Vibration or
Silent Mode), set Do Not Disturb options (see Using Do Not
Disturb Mode), set up ringtone, notification and alarm sound,
and set other sounds and vibrations.
Storage
Open Settings and touch Storage to view the memory
information of the internal phone storage and the microSDXC
card (if one is installed).
Saving location: When a microSDXC card is installed, you
can select Phone or SD card as the default location for new
data.
Internal shared storage: Get a detailed breakdown of
space usage by type.
PORTABLE STORAGE: Safely mount, unmount (eject),
and format your microSDXC card. If you need to store large
applications, games, and their data in your microSDXC card,
you can format the card and use it as part of the device
storage.
Privacy
Open Settings and touch Privacy to configure the privacy
settings.
Permission manager: Check what apps have been
allowed to access certain permissions. You can also change
the app permissions.
72
Page 73

WARNING!
Changing the app permissions may result in the app not
working correctly or as originally intended.
Show passwords: Display passwords as you enter them.
Notifications on lock screen: Choose what notification
contents will be shown on the lock screen.
Autofill service from Google: Set the options of Autofill
with Google. With a single touch, you can fill in passwords,
addresses, credit cards, and other information saved to your
Google account.
Advanced: Set advanced options such as Google location
history, activity controls, Ads personalization, and usage &
diagnostics.
Location
Open Settings and touch Location to manage location
services, which help your phone and apps determine your
location. To use location-related applications, such as finding
your location on Google Maps, you must have location services
enabled on your phone.
Security
Open Settings and touch Security to configure options that
help keep your phone and data safe. Touch Advanced if
necessary.
73
Page 74

Google Play Protect: Google Play Protect regularly checks
your apps and phone for harmful behaviour and warns you
about any detected potential harm.
Find My Device: Use Find My Device to locate, lock, or
wipe your lost device remotely. The lost device must be
signed in to a Google account.
Security update: Check for security update of your system.
Screen lock: Disable the screen lock or enable it with swipe,
pattern, PIN, or password. See Protecting Your Phone With
Screen Locks.
Touch beside Screen lock to set its options.
Smart Lock: Keep the phone unlocked when connected to
trusted devices, in trusted places, or unlocked when your
phone is being carried on the body.
NOTE:
You need to sign in to your Google account on the phone to
use all the Smart Lock features.
Device admin apps: View or deactivate apps you have
authorized to be device administrators.
SIM card lock:
Lock SIM card: Activate or deactivate the PIN lock to
require the PIN before accessing the nano-SIM card.
Change SIM PIN: Change the PIN used to access the
nano-SIM card.
NOTE:
74
Page 75

Put all your confidential passwords in a safe place for future
use. If you enter the wrong SIM PIN more times than
allowed, your nano-SIM card will be locked and you cannot
access the mobile phone network. Contact your operator for
a PIN Unlock Key (PUK) to restore the nano-SIM card.
Encryption & credentials: Check the encryption status of
your phone and set the credential storage options.
Trust agents: View or deactivate trust agents.
App pinning: Pin an app's screen to keep it in view until
you unpin it. This feature can be used, for example, to let a
trusted friend play a specific game. See Protecting Your
Phone With App Pinning.
Accounts
Open Settings and touch Accounts to manage your accounts
and synchronization. Touch Add account to sign in to or create
accounts on your phone. Touch an account you have added to
adjust its settings.
Accessibility
Open Settings and touch Accessibility to configure
accessibility options and services on your phone, such as using
Color correction or Display size for users with sight problems.
75
Page 76

Digital Wellbeing & Parental Controls
Open Settings and touch Digital Wellbeing & parental
controls to get information about how you spend time on your
phone, like how often you unlock it and how long you use each
app. You can use that information to improve your digital
wellbeing. You can also help your child balance their screen
time with the Family Link app.
Touch Show your data to get information on how you
spend time on your phone and apps.
Dashboard: Check the screen time, number of
notifications, and opened times of each app. You can set
daily timers for the most-used apps to avoid indulgence
(see Screen Time.)
Focus mode: Select distracting apps and turn on focus
mode to pause these apps when you need time to focus.
REDUCE INTERRUPTIONS: Manage app notifications
and Do Not Disturb settings to reduce interruptions from
your important tasks.
Show icon in the app list: Display or hide the Digital
Wellbeing app in the app list.
In the Parental controls section, touch Set up parental
controls to add content restrictions and set other limits for
your child with the Family Link app.
Google
Open Settings and touch Google to manage settings for
76
Page 77

Google apps and services.
System
Languages & Input
Open Settings and touch System > Languages & input to
configure options related to system language, input methods
and assistance, speech output, mouse/trackpad input, and
vibration redirection.
Date & Time
Open Settings and touch System > Date & time to set date,
time, time zone, and the time format. You can also use
network-provided data.
Downloads
Open Settings and touch System > Downloads to view and
manage your downloaded files.
Backup
Open Settings and touch System > Backup to manage data
backup options. To easily restore or switch phones at any time,
you can enable automatic backup to Google Drive of important
data. You need to sign in to your Google account to use this
feature.
77
Page 78

Reset Options
Open Settings and touch System > Advanced > Reset
options to reset network settings, app preferences, or the
phone to factory default status.
System Update
Open Settings and touch System > Advanced > System
update to check for system updates and install them when they
become available.
About Phone
Open Settings and touch About phone to view phone
information, nano-SIM card status, legal information, and other
information. You can also touch Emergency information to
edit your medical information and emergency contacts for first
responders to read from your lock screen.
78
Page 79
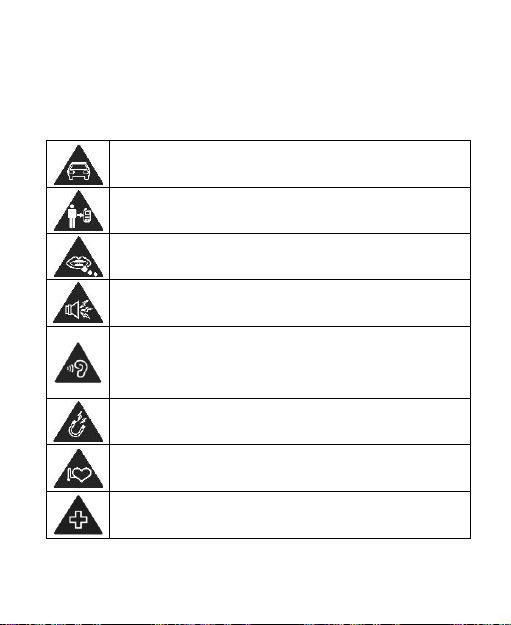
Don’t make or receive phone calls while driving. Never
text while driving.
Keep your phone at least 15 mm away from your body
while making calls.
Small parts may cause choking.
Your phone can produce a loud sound.
To prevent possible hearing damage, do not listen at high
volume levels for long periods. Exercise caution when
holding your phone near your ear while the loudspeaker
is in use.
Avoid contact with anything magnetic.
Keep away from pacemakers and other electronic
medical devices.
Turn off when asked to in hospitals and medical facilities.
For Your Safety
General Safety
79
Page 80
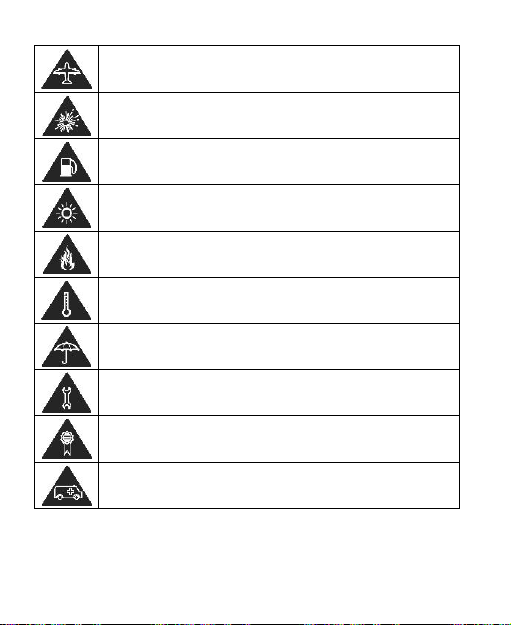
Turn off when told to on aircraft and at airports.
Turn off when near explosive materials or liquids.
Don’t use at gas stations.
Your phone may produce a bright or flashing light.
Don’t dispose of your phone in fire.
Avoid extreme temperatures.
Avoid contact with liquids. Keep your phone dry.
Do not attempt to disassemble your phone.
Only use approved accessories.
Don’t rely on your phone as a primary device for
emergency communications.
80
Page 81

FCC RF Exposure Information (SAR)
This phone is designed and manufactured not to exceed the
emission limits for exposure to radio frequency (RF) energy set
by the Federal Communications Commission of the United
States.
During SAR testing, this device was set to transmit at its highest
certified power level in all tested frequency bands, and placed
in positions that simulate RF exposure in usage against the
head with no separation, and near the body with the separation
of 15 mm. Although the SAR is determined at the highest
certified power level, the actual SAR level of the device while
operating can be well below the maximum value. This is
because the phone is designed to operate at multiple power
levels so as to use only the power required to reach the network.
In general, the closer you are to a wireless base station
antenna, the lower the power output.
The exposure standard for wireless devices employing a unit of
measurement is known as the Specific Absorption Rate, or SAR.
The SAR limit set by the FCC is 1.6 W/kg.
This device is complied with SAR for general
population/uncontrolled exposure limits in ANSI/IEEE
C95.1-1992 and had been tested in accordance with the
measurement methods and procedures specified in IEEE1528.
The FCC has granted an Equipment Authorization for this
model phone with all reported SAR levels evaluated as in
compliance with the FCC RF exposure guidelines. SAR
information on this model phone is on file with the FCC and can
81
Page 82

be found under the Display Grant section of
www.fcc.gov/oet/ea/fccid after searching on FCC ID:
SRQ-ZTEA31LITE. The FCC ID also can be found on the
device when you swipe on the home screen and touch
Settings > About phone > FCC ID.
For this device, the highest reported SAR value for usage
against the head is 0.779 W/kg, and for usage near the body is
1.411 W/kg.
While there may be differences between the SAR levels of
various phones and at various positions, they all meet the
government requirements.
SAR compliance for body-worn operation is based on a
separation distance of 10 mm between the unit and the human
body. Carry this device at least 10 mm away from your body to
ensure RF exposure level compliant or lower to the reported
level. To support body-worn operation, choose the belt clips or
holsters, which do not contain metallic components, to maintain
a separation of 10 mm between this device and your body.
RF exposure compliance with any body-worn accessory that
contains metal was not tested and certified, and use of such
body-worn accessory should be avoided.
FCC Regulations
This device complies with part 15 of the FCC Rules. Operation
is subject to the following two conditions: (1) This device may
not cause harmful interference, and (2) this device must accept
any interference received, including interference that may
82
Page 83

cause undesired operation.
This equipment has been tested and found to comply with the
limits for a Class B digital device, pursuant to part 15 of the FCC
Rules. These limits are designed to provide reasonable
protection against harmful interference in a residential
installation. This equipment generates, uses and can radiate
radio frequency energy and, if not installed and used in
accordance with the instructions, may cause harmful
interference to radio communications. However, there is no
guarantee that interference will not occur in a particular
installation. If this equipment does cause harmful interference
to radio or television reception, which can be determined by
turning the equipment off and on, the user is encouraged to try
to correct the interference by one or more of the following
measures:
Reorient or relocate the receiving antenna.
Increase the separation between the equipment and
receiver.
Connect the equipment into an outlet on a circuit different
from that to which the receiver is connected.
Consult the dealer or an experienced radio/TV technician
for help.
CAUTION:
Changes or modifications not expressly approved by the
manufacturer could void the user’s authority to operate the
equipment.
83
Page 84

The antenna(s) used for this transmitter must not be co-located
or operating in conjunction with any other antenna or
transmitter.
Distractions
Driving
Full attention must be given to driving at all times in order to
reduce the risk of an accident. Using a phone while driving
(even with a hands-free kit) can cause distraction and lead to
an accident. You must comply with local laws and regulations
restricting the use of wireless devices while driving.
Operating Machinery
Full attention must be given to operating the machinery in order
to reduce the risk of an accident.
Product Handling
General Statement on Handling and Use
You alone are responsible for how you use your phone and any
consequences of its use.
You must always switch off your phone wherever the use of a
phone is prohibited. Use of your phone is subject to safety
measures designed to protect users and their environment.
Always treat your phone and its accessories with care and
84
Page 85

keep them in a clean place.
Keep the screen and camera lens clean. An unclean screen
or camera lens may slow down the phone's reaction to your
operations or interfere with the image quality.
Clean your phone and its accessories with a soft material
such as cleaning cloth for eyeglass lenses. Do not use
alcohol or other corrosive substances for cleaning or allow
them to get inside.
Do not expose your phone or its accessories to open flames
or lit tobacco products.
Do not expose your phone or its accessories to liquid,
moisture or high humidity.
Do not drop, throw or try to bend your phone or its
accessories.
Do not use harsh chemicals, cleaning solvents, or aerosols to
clean the phone or its accessories.
Do not paint your phone or its accessories.
Do not attempt to disassemble your phone or its accessories.
Only authorized personnel can do so.
Do not place your phone inside or near heating equipment or
high-pressure containers, such as water heaters, microwave
ovens, or hot cooking utensils. Otherwise, your phone may be
damaged.
Please check local regulations for disposal of electronic
products.
85
Page 86

Do not carry your phone in your back pocket as it could break
when you sit down.
Battery Safety Information
Using ZTE-unapproved or incompatible battery, charger or
power adapter may damage your device, shorten its lifespan
or cause a fire, explosion or other hazards.
The recommended operating temperatures are 0 °C to 35 °C
and the storage temperatures are -20 °C to +45 °C. Extreme
temperatures can damage the device and reduce the
charging capacity and lifespan of your device and battery.
Do not place the device or the battery in or near heating
equipment, such as microwave ovens, stoves or radiators.
Keep the device and the battery away from excessive heat
and direct sunlight. If not, the device or the battery may
overheat and cause explosion or fire.
Please disconnect the charger when the battery is fully
charged. Overcharging may shorten the battery life.
Do not short-circuit the battery, as this can cause excessive
heat and fire.
Do not throw the battery into a fire to avoid explosion.
Do not disassemble, squeeze or puncture the battery, as this
can cause explosion or fire.
When not using the battery for a long period, please charge
the battery about half then remove the battery from your
device and store it in a cool dry place.
86
Page 87

If the battery damages or shows signs of swelling or leakage,
please stop use immediately and contact ZTE or ZTE
authorized service provider for replacement.
Return the worn-out battery to the provider or put it in the
designated recycle place. Do not put it in household waste.
There is a risk of explosion if the wrong battery model is
replaced.
WARNING!
If the battery is broken, you should avoid contact with the
contents inside. If they contaminate the skin, immediately rinse
with plenty of water and seek medical help when necessary.
Small Children
Do not leave your phone and its accessories within the reach of
small children or allow them to play with it. They could hurt
themselves or others, or could accidentally damage the phone.
Your phone contains small parts with sharp edges that may
cause an injury or may become detached and create a choking
hazard.
Demagnetization
To avoid the risk of demagnetization, do not allow electronic
devices or magnetic media close to your phone for a long time.
Electrostatic Discharge (ESD)
Do not touch the metallic connectors of the nano-SIM card and
87
Page 88

the microSDXC card
Antenna
Do not touch the antenna unnecessarily.
Normal Use Position
When placing or receiving a phone call, hold your phone to your
ear, with the bottom towards your mouth.
Airbags
Do not place a phone in the area over an airbag or in the airbag
deployment area, as an airbag inflates with great force and
serious injury could result. Store the phone in a safe and secure
area before driving your vehicle.
Seizures/Blackouts
Your phone can produce a bright or flashing light. A small
percentage of people may be susceptible to blackouts or
seizures (even if they have never had one before) when exposed
to flashing lights or light patterns such as when playing games or
watching videos. If you have experienced seizures or blackouts
or have a family history of such occurrences, please consult a
physician. To reduce the risk of blackouts or seizures, use your
phone in a well-lit room and take frequent breaks.
88
Page 89

Repetitive Strain Injuries
To minimize the risk of Repetitive Strain Injury (RSI) when texting
or playing games with your phone:
Do not grip the phone too tightly.
Press the buttons lightly.
Use the special features which are designed to minimize the
times of pressing buttons, such as Message Templates and
Predictive Text.
Take frequent breaks to stretch and relax.
Emergency Calls
This phone, like any other wireless phone, operates using radio
signals, which cannot guarantee connection in all conditions.
Therefore, you must never rely solely on any wireless phone for
emergency communications.
Loud Noise
This phone is capable of producing loud noises, which may
damage your hearing. Turn down the volume before using
headphones, Bluetooth headsets or other audio devices.
Phone Heating
Your phone may become warm during charging and during
normal use.
89
Page 90

Electrical Safety
Accessories
Use only approved accessories.
Do not connect with incompatible products or accessories.
Take care not to allow metal objects, such as coins or key rings,
to contact or short-circuit the charging jack and battery terminals.
Never puncture the surface of the phone with sharp objects.
Connection to Vehicles
Seek professional advice when connecting a phone interface to
the vehicle electrical system.
Faulty and Damaged Products
Do not attempt to disassemble the phone or its accessories. Only
qualified personnel can service or repair the phone or its
accessories. If your phone (or its accessories) has been
submerged in water, punctured, or subjected to a severe fall, do
not use it until you have taken it to be checked at an authorized
service center.
Radio Frequency Interference
General Statement on Interference
Care must be taken when using your phone in close proximity to
90
Page 91

personal medical devices, such as pacemakers and hearing aids.
Please consult your doctor and the device manufacturers to
determine if the operation of your phone may interfere with the
operation of your medical devices.
Pacemakers
Pacemaker manufacturers recommend that a minimum
separation of 15 cm be maintained between a mobile phone and
a pacemaker to avoid potential interference with the pacemaker.
To achieve this, use the phone on the opposite ear to your
pacemaker and do not carry it in a breast pocket.
Hearing Aids
People with hearing aids or other cochlear implants may
experience interfering noises when using wireless devices or
when one is nearby.
The level of interference depends on the type of the hearing
device and the distance from the interference source. Increasing
the separation between them may reduce the interference. You
may also consult your hearing aid manufacturer to discuss
alternatives.
Medical Equipment
Switch off your wireless device when you are requested to do
so in hospitals, clinics or healthcare facilities. These requests
are designed to prevent possible interference with sensitive
medical equipment.
91
Page 92

Aircraft
Switch off your wireless device whenever you are instructed to do
so by airport or airline staff.
Consult the airline staff about the use of wireless devices
onboard the aircraft and enable airplane mode of your phone
when boarding an aircraft.
Interference in Vehicles
Please note that because of possible interference with electronic
equipment, some vehicle manufacturers forbid the use of mobile
phones in their vehicles unless a hands-free kit with an external
antenna is included in the installation.
Explosive Environments
Gas Stations and Explosive Atmospheres
In locations with potentially explosive atmospheres, obey all
posted signs to turn off wireless devices such as your phone or
other radio equipment.
Areas with potentially explosive atmospheres include fueling
areas, below decks on boats, fuel or chemical transfer or storage
facilities, and areas where the air contains chemicals or particles,
such as grain, dust, or metal powders.
92
Page 93

Blasting Caps and Areas
Power off your mobile phone or wireless device when in a
blasting area or in areas where signs are posted to power off
“two-way radios” or “electronic devices” to avoid interfering with
blasting operations.
93
 Loading...