

Page 1

ZTE Blade III
WCDMA/GSM Mobile Phone
User Manual
1
Page 2

LEGAL INFORMATION
Copyright © 2012 ZTE CORPORATION.
All rights reserved.
No part of this publication may be quoted, reproduced, translated
or used in any form or by any means, electronic or mechanical,
including photocopying and microlm, without the prior written
permission of ZTE Corporation.
ZTE Corporation reserves the right to make modifications on
print errors or update specifications in this guide without prior
notice.
The Bluetooth® trademark and logos are owned by the Bluetooth
SIG, Inc. and any use of such trademarks by ZTE Corporation is
under license. Other trademarks and trade names are the prop-
erty of their respective owners.
Version No.: R1.0
Edition Time : 2012.07.10
We offer self-service for our smart terminal device users. Please
visit ZTE ofcial website (at www.zte.com.cn) for more information on self-service and supported product models. Information
subject to the website.
2
Page 3

Contents
Getting Started .............................................................11
Your Phone at a Glance ....................................................... 11
Knowing the Keys ................................................................12
Installing the SIM Card, microSD Card, and Battery ............ 13
Charging the Battery ............................................................ 15
Powering On/Off ...................................................................16
Setting Up for the First Time ................................................16
Locking/Unlocking the Screen and Keys .............................17
Using the Touch Screen .......................................................18
Getting to Know the Home Screen ......................................19
Personalizing ...............................................................21
Changing the System Language .......................................... 21
Setting the Date and Time ...................................................21
Changing Ringtone and Notication Sound ......................... 21
Adjusting Volumes ...............................................................22
Applying New Wallpapers ....................................................23
Changing Screen Brightness ...............................................23
Protecting Your Phone With Screen Locks ..........................24
Protecting Your Phone With Encryption ...............................25
Knowing the Basics ....................................................27
Monitoring the Phone Status ................................................ 27
Managing Notications ......................................................... 28
3
Page 4

Managing Shortcuts and Widgets ........................................ 30
Organizing With Folders.......................................................31
Rearranging the Favorites Tray ...........................................32
Entering Text ........................................................................33
Editing Text ...........................................................................39
Opening and Switching apps ...............................................40
Connecting to Networks and Devices .......................41
Connecting to Mobile Networks ...........................................41
Connecting to Wi-Fi..............................................................43
Using Wi-Fi Direct ................................................................ 45
Connecting to Bluetooth Devices ......................................... 46
Connecting to Your Computer via USB ................................49
Sharing Your Mobile Data Connection .................................50
Connecting to Virtual Private Networks ................................53
Phone Calls ..................................................................56
Place a Call by Dialing ......................................................... 56
Answering or Rejecting Calls ............................................... 57
Working With the Call Log ....................................................57
Calling Your Contacts ........................................................... 59
Checking Voicemail ..............................................................60
Using Options During a Call ................................................. 60
Managing Multi-party Calls ..................................................61
Adjusting Your Call Settings .................................................62
4
Page 5

People ...........................................................................67
Opening Your Contact List ...................................................67
Adding a New Contact .........................................................67
Setting Up Your Own Prole ................................................68
Importing, Exporting, and Sharing Contacts ........................68
Working With Favorite Contacts ...........................................70
Working With Groups ...........................................................71
Searching for a Contact .......................................................73
Editing Contacts ................................................................... 73
Accounts ......................................................................76
Adding or Removing Accounts .............................................76
Conguring Account Sync ....................................................77
Email .............................................................................79
Set Up the First Email Account ............................................79
Checking Your Emails .......................................................... 80
Responding to an Email ....................................................... 80
Writing and Sending an Email ..............................................81
Adding Signature to Your Emails .........................................82
Adding and Editing Email Accounts .....................................82
Changing General Email Settings ........................................ 84
GmailTM .........................................................................85
Opening Your Gmail Inbox ...................................................85
Switching Accounts ..............................................................85
5
Page 6

Writing and Sending a Message ..........................................86
Adding Signature to Your Gmail Messages .........................86
Replying to or Forwarding a Message .................................87
Working With Received Attachments ...................................87
Searching for Messages ......................................................88
Working With Labels ............................................................88
Changing Gmail Settings .....................................................90
Messages .....................................................................91
Opening the Messages Screen ............................................ 91
Sending a Text Message ......................................................91
Sending a Multimedia Message ........................................... 92
Replying to a Message ........................................................93
Forwarding a Message ........................................................93
Viewing Details About a Message ........................................93
Deleting Messages or Threads ............................................94
Changing Message Settings ................................................ 94
Calendar .......................................................................95
Viewing Your Calendars and Events ....................................95
Creating an Event ................................................................97
Editing or Deleting an Event ................................................97
Changing Calendar Settings ................................................ 98
Google Talk .................................................................99
Signing In to See Your Friends ............................................99
6
Page 7

Adding a Friend .................................................................... 99
Changing Your Online Status .............................................100
Chatting With Friends.........................................................100
Changing Google Talk Settings ..........................................101
Google+ ......................................................................102
Organizing Your Contacts ..................................................102
Getting Updates ................................................................. 102
Chatting With Contacts ......................................................103
Checking Photos ................................................................ 103
Checking and Managing Your Prole .................................104
Browser ......................................................................105
Opening the Browser .........................................................105
Working With an Opened Page ..........................................107
Using Multiple Browser Windows ....................................... 108
Downloading Files .............................................................. 109
Using Bookmarks ............................................................... 109
Changing Browser Settings ............................................... 110
Maps, Navigation, Places, and Latitude .................. 111
Activating Location Services .............................................. 111
Getting Your Location ......................................................... 111
Searching for a Location .................................................... 111
Getting Directions to Your Destination ............................... 112
Searching for Local Places ................................................ 113
7
Page 8

Sharing Location ................................................................ 114
Google Search, Voice Search, and Voice Actions .. 115
Searching With Text ........................................................... 115
Searching by Speaking ...................................................... 115
Using Voice Actions ........................................................... 116
Changing Search and Voice Search Settings .................... 116
Camera .......................................................................117
Capturing a Photo .............................................................. 117
Customize Camera Settings .............................................. 118
Recording a Video .............................................................. 119
Customizing Camcorder Settings ......................................120
Gallery ........................................................................122
Opening Gallery ................................................................. 122
Working With Albums ......................................................... 122
Working With Pictures ........................................................123
Working With Videos ..........................................................126
Music ..........................................................................127
Copying Music Files to Your Phone ...................................127
Viewing Your Music Library ................................................127
Playing Music ..................................................................... 129
Managing Playlists ............................................................. 130
Play Music ..................................................................132
Playing Your Music ............................................................. 132
8
Page 9

Managing Playlists ............................................................. 134
Video Player ...............................................................136
Opening the Video Library .................................................136
Playing and Control Videos ................................................136
Managing Video Files .........................................................137
FM Radio ....................................................................138
Scanning and Saving Channels ......................................... 138
Listening to FM Radio ........................................................ 138
Adding a Radio Station to Favorites ..................................139
Other Options and Settings ................................................ 140
Sound Recorder .........................................................141
Recording a Voice Memo ...................................................141
Playing a Voice Memo .......................................................141
More Apps ..................................................................142
Alarm .................................................................................. 142
Backup and Restore ..........................................................143
Calculator ........................................................................... 143
File Manager ...................................................................... 143
News and Weather .............................................................143
Note pad ............................................................................144
Software Update Service ...................................................144
Task Manager.....................................................................144
Timer ..................................................................................145
9
Page 10

World Time .........................................................................145
YouTube .............................................................................145
Play Store ...................................................................146
Browsing and Searching for Apps ......................................146
Downloading and Installing Apps .......................................146
Managing Your Downloads ................................................147
Settings ......................................................................148
Wireless and Networks ......................................................148
Device ................................................................................ 150
Personal ............................................................................. 152
System ............................................................................... 155
Troubleshooting ........................................................157
For Your Safety ..........................................................163
General Safety ................................................................... 163
Radio Frequency (RF) Exposure .......................................164
Distraction .......................................................................... 166
Product Handling ...............................................................167
Electrical Safety .................................................................171
Radio Frequency Interference ...........................................172
Explosive Environments ..................................................... 174
Declaration of RoHS Compliance ............................175
Disposal of Your Old Appliance ...............................176
EC DECLARATION OF CONFORMITY .....................177
10
Page 11
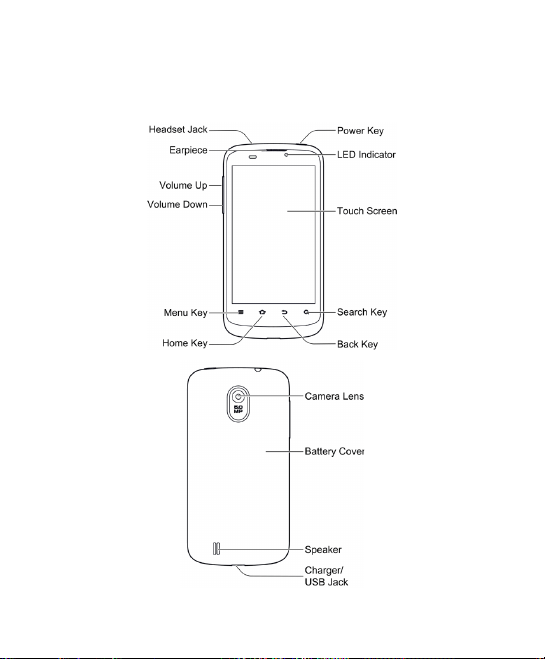
Getting Started
Your Phone at a Glance
11
Page 12

Knowing the Keys
Key Function
• Press and hold to turn on or off Flight
mode, enable silent mode, vibration
Power Key
Home Key
Menu Key
Back Key Touch to go to the previous screen.
Search Key
Volume Keys
12
mode or sound, or to power off.
• Press to switch your phone to Sleep
mode.
• Press to wake up your phone.
• Touch to return to the Home Screen
from any application or screen.
• Touch and hold to see recently used
applications.
Touch to get the options for the current
screen.
• Touch to search information on the current screen or application.
• Touch and hold to use Google voice action.
Press or hold to turn the volume up or
down.
Page 13
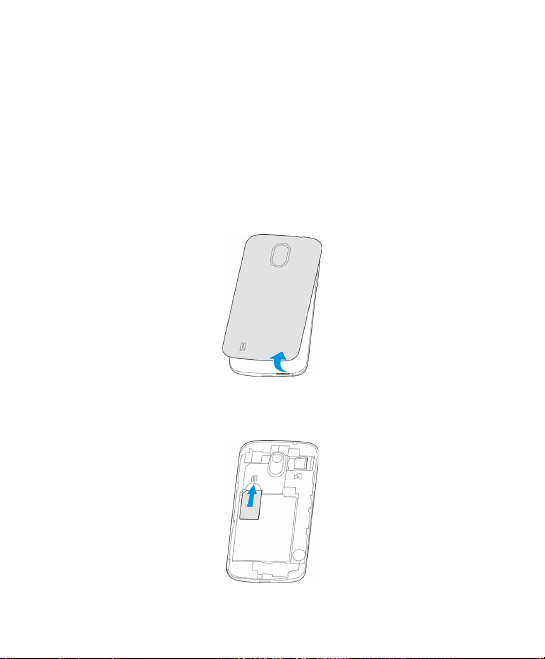
Installing the SIM Card, microSD Card, and
Battery
Switch off your phone before installing or replacing the battery or
the SIM card. The microSD card can be installed and removed
while the phone is turned on. Unmount the microSD card before
removing it.
1. Remove the back cover.
2. Hold the SIM card with the cut corner oriented as shown and
slip it into the card holder.
13
Page 14
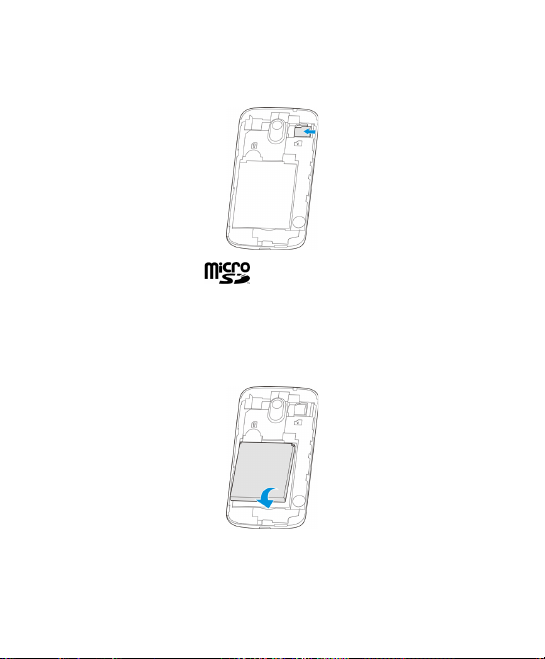
3. Hold your microSD card with the metal contacts facing down
and slide it in.
NOTE: microSD logo
sociation.
4. Insert the battery by aligning the gold contacts on the battery
with the gold contacts in the battery compartment. Gently
push down on the battery until it clicks into place.
5. Press the cover gently back into place until you hear a click.
14
is a trademark of the SD Card As-
Page 15
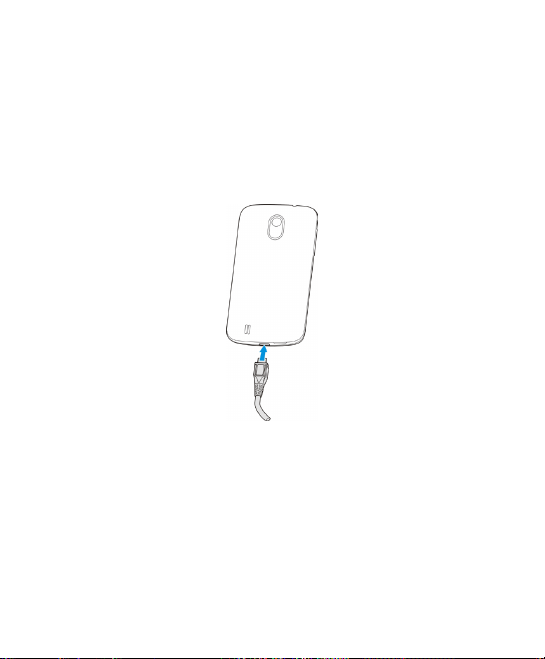
Charging the Battery
When you rst get your new phone you’ll need to charge the battery.
1. Connect the adapter to the charger jack. Ensure that the
adapter is inserted with the correct orientation. Do not force
the connector into the charger jack.
2. Connect the charger to a standard AC wall outlet.
3. Disconnect the charger when the battery is fully charged.
How much charge have you got?
If the battery is low, there will be a pop-up message on the
screen. As you charge your phone, the screen will tell you the
exact battery level each time you wake up your phone.
15
Page 16

If the phone is on, you’ll see a charging icon, such as
appear on the status bar.
or ,
Powering On/Off
Make sure the SIM card is in your phone and the battery is
charged.
• Press and hold the Power Key to turn on your phone.
• To turn it off, press and hold the Power Key to open the op-
tions menu. Touch Power off and then touch OK.
Setting Up for the First Time
When you rst power on your phone after you purchase it or re-
set it to factory settings (see Settings – Personal – Backup and
Reset), you need to do some settings before using it.
1. Touch the language eld to select the language you want to
use and then touch Start.
2. Set the date, time, and time zone, or use date and time data
provided by the network. Then touch Next.
3. Touch Get an account to create a Google account or touch
Sign in to sign in to your account.
You can also touch Not now to set up an account later.
4. Congure the Google location options and touch Next.
5. Enter your name which the phone uses to personalize some
apps and touch Next.
16
Page 17

6. You will be prompted to accept the terms of Google service.
Touch Next to continue.
7. Touch Finish to complete the setup.
NOTE: If the SIM is not installed, the phone would prompt you
to connect to a Wi-Fi network before asking you to sign in to a
Google account.
Locking/Unlocking the Screen and Keys
Your phone allows you to quickly lock the screen and keys when not
in use and to turn the screen back on and unlock it when you need.
To lock the screen and keys:
To immediately turn the screen off and lock the keys, press the
Power Key.
NOTE: To save battery power, the phone automatically turns off
the screen after a certain period of time when you leave it idle.
You will still be able to receive messages and calls while the
phone screen is off.
To unlock the screen and keys:
1. Press the Power Key to turn the screen on.
2. Touch and hold
NOTE: If you have set an unlock pattern, PIN or password for
your phone (see chapter Personalizing – Protecting Your Phone
With Screen Locks), you’ll need to draw the pattern or enter the
PIN/password to unlock your screen.
at the center of the screen.
17
Page 18

Using the Touch Screen
Your phone’s touch screen lets you control actions through a variety of touch gestures.
• Touch
When you want to type using the onscreen keyboard, select
items onscreen such as application and settings icons, or
press onscreen buttons, simply touch them with your nger.
• Touch and Hold
To open the available options for an item (for example, a
message or link in a Web page), touch and hold the item.
• Swipe or Slide
To swipe or slide means to quickly drag your nger vertically
or horizontally across the screen.
• Drag
To drag, press and hold your nger with some pressure be-
fore you start to move your finger. While dragging, do not
release your nger until you have reached the target position.
• Pinch
In some apps (such as Maps, Browser, and Gallery), you can
zoom in and out by placing two ngers on the screen at once
and pinching them together (to zoom out) or spreading them
apart (to zoom in).
18
Page 19
• Rotate the screen
For most screens, you can automatically change the screen
orientation from portrait to landscape by turning the phone
sideways.
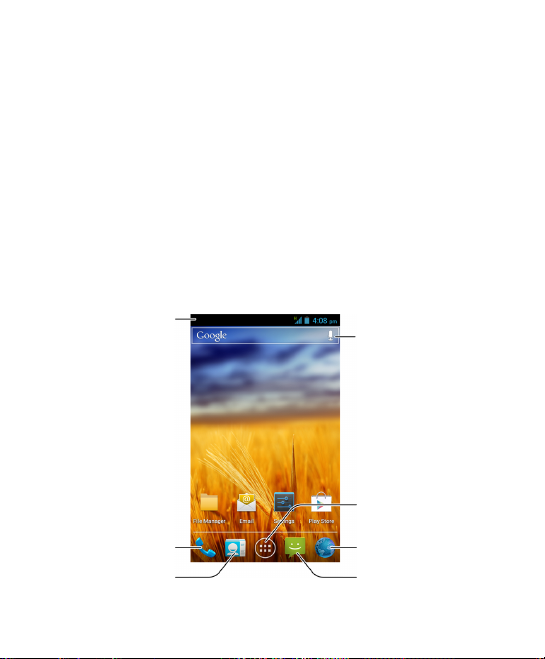
Getting to Know the Home Screen
The home screen is the starting point for your phone’s applica-
tions, functions, and menus. You can customize your home
screen by adding application icons, shortcuts, folders, widgets,
and more. Your home screen extends beyond the initial screen.
Swipe the screen left or right to display additional screens.
Status &
Notications
Google Search
All apps
Phone
People
Browser
Messages
19
Page 20

Extended Home Screens
Your home screen extends beyond the initial screen, providing
more space to add icons, widgets, and more. Simply swipe left
or right on the screen to see the extended Home Screens.
To add or remove an extended Home Screen:
1. Touch the Home Key to return to the Home Screen.
2. Touch the Menu Key > Personalization > Screen edit.
3. Touch
Touch
To adjust the order of an extended Home Screen:
1. Touch the Home Key to return to the Home Screen.
2. Touch the Menu Key > Personalization > Screen edit.
3. Touch and hold a thumbnail and drag it to the place you
need.
20
to add more extended Home Screens.
on a thumbnail to remove a screen.
Page 21

Personalizing
Changing the System Language
1. Touch the Home Key > Menu Key > System settings >
Language & input > Language.
2. Select the language you need.
Setting the Date and Time
1. Touch the Home Key > Menu Key > System settings >
Date & time.
2. Clear the Automatic date & time and Automatic time zone
check boxes if you want to set the date, time and time zone
by yourself.
3. Set the date, time, time zone, and date/time format.
Changing Ringtone and Notication Sound
You can customize the default ringtone for incoming calls and
default notication sound quickly.
1. Touch the Home Key > Menu Key > Personalization.
2. Touch Phone ringtone or Notication ringtone.
3. Scroll through the ringtone list and select the ringtone you
want to use.
4. Touch OK.
21
Page 22

TIP: See chapter People – Editing Contacts – Set a Ringtone for
a Contact for how to assign a special ringtone to an individual
contact.
Adjusting Volumes
1. Touch the Home Key > Menu Key > System settings >
Sound > Volumes.
2. Adjust the volume for music, video, games, and other media,
the ringtone and notication volume, and the alarm volume.
3. Touch OK to save.
TIP: You can adjust the media volume when a media application
is in use by pressing the Volume Keys. If no media application is
active, press the Volume Keys to adjust ringtone volume (or the
earpiece volume during a call).
To enable the silent or vibration mode:
You can set the phone to the silent or vibration mode by using
one of the following methods.
• Press and hold the Power Key and then touch
the silent mode, touch
touch
• Press the Volume Keys down when no media application
is active. When the
22
to disable the silent mode.
to enable the vibration mode, or
icon appears in the status bar, the
to enable
Page 23

phone is set to the vibration mode. When the
pears in the status bar, the phone is in the silent mode.
• Touch the Home Key > Menu Key > System settings >
Sound > Silent mode, and touch Off, Vibrate or Mute.
icon ap-
Applying New Wallpapers
You can set the wallpaper for the Home Screen or Lock Screen.
1. Touch the Home Key > Menu Key > Wallpaper.
2. Touch Home or Lock screen.
3. Select a wallpaper source from Gallery, Live Wallpapers, or
Wallpapers and choose the image or animation you want to
use as the wallpaper. Some cropping may be needed for Gallery images.
4. Touch CROP at the top of the screen (for Gallery images) or
Set wallpaper.
NOTE: Live Wallpapers are not available for the Lock Screen.
Changing Screen Brightness
1. Touch the Home Key > Menu Key > System settings > Dis-
play > Brightness.
2. Tick the Automatic brightness box to make the phone adjust the screen brightness automatically, or clear the tick box
to adjust the brightness manually.
3. Touch OK.
23
Page 24

Protecting Your Phone With Screen Locks
You can protect your phone by creating a screen lock. When
enabled, you need to draw a pattern or enter a numeric PIN or
password to unlock the phone’s screen and keys.
1. Touch the Home Key > Menu Key > System settings > Se-
curity.
2. Touch Screen lock.
3. Touch Pattern, PIN or Password.
If you touch Pattern, you’re guided to create a pattern you
must draw to unlock the screen. The rst time you do this, a
short tutorial about creating an unlock pattern appears. Then
you’re prompted to draw and redraw your own pattern.
If you touch PIN or Password, you’re prompted to set a
numeric PIN or a password you must enter to unlock your
screen.
The next time you turn on your phone or wake up the screen,
you must draw your unlock pattern or enter your PIN or pass-
word to unlock it.
IMPORTANT: Screen lock options are listed in the approximate
order of the strength of their security, starting with None and
Long press, which provide no security. Pattern provides minimal
security, although it can be more convenient than the stronger
options.
24
Page 25

Protecting Your Phone With Encryption
You can encrypt all the data on your phone: Google Accounts,
application data, music and other media, downloaded information, and so on. If you do, you must enter a numeric PIN or pass-
word each time you power on your phone.
WARNING! Encryption is irreversible. The only way to revert to
an unencrypted phone is to perform a factory data reset, which
erases all your data.
Encryption provides additional protection in case your phone is
stolen, and may be required or recommended in some organizations. Consult your system administrator before turning it on. In
many cases the PIN or password you set for encryption is controlled by the system administrator.
Before turning on encryption, prepare as follows:
1. Set a lock screen PIN or password.
2. Charge the battery.
3. Keep the phone connected to the charger.
4. Schedule an hour or more for the encryption process: you
must not interrupt it or you will lose some or all of your data.
When you're ready to turn on encryption:
1. Touch the Home Key > Menu Key > System settings > Se-
curity > Encrypt phone.
2. Read the information about encryption carefully.
25
Page 26

The Encrypt phone button is dimmed if your battery's not
charged or your phone's not plugged in.
If you change your mind about encrypting your phone, touch
the Back Key.
WARNING! If you interrupt the encryption process, you will
lose data.
3. Touch Encrypt phone.
4. Enter your lock screen PIN or password and touch Next.
5. Touch Encrypt phone again.
The encryption process starts and displays its progress. Encryp-
tion can take an hour or more, during which time your phone
may restart several times.
When encryption is completed, you're prompted to enter your
PIN or password.
Subsequently, you must enter your PIN or password each time
you power on your phone, to decrypt it.
26
Page 27
Knowing the Basics
Monitoring the Phone Status
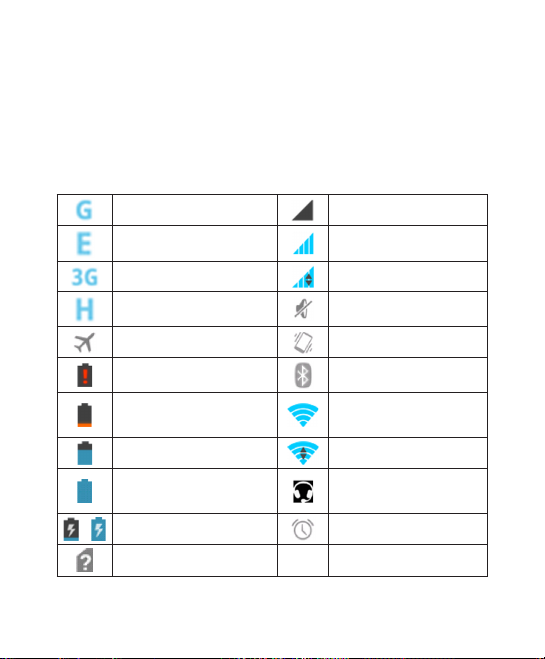
The status bar at the top of the home screen provides phone and
service status information on the right side. You can monitor the
phone status by checking the following status icons.
GPRS connected No signal
EDGE connected Signal strength
3G connected Mobile data in use
HSPA connected Ringer off
Flight mode Vibrate mode
Battery at Bluetooth on
Battery low
Battery partially drained Wi-Fi in use
Battery full
/ Battery charging Alarm set
No SIM card installed
Connected to a Wi-Fi
network
Wired headset connected
27
Page 28
Managing Notications
Notication Icons
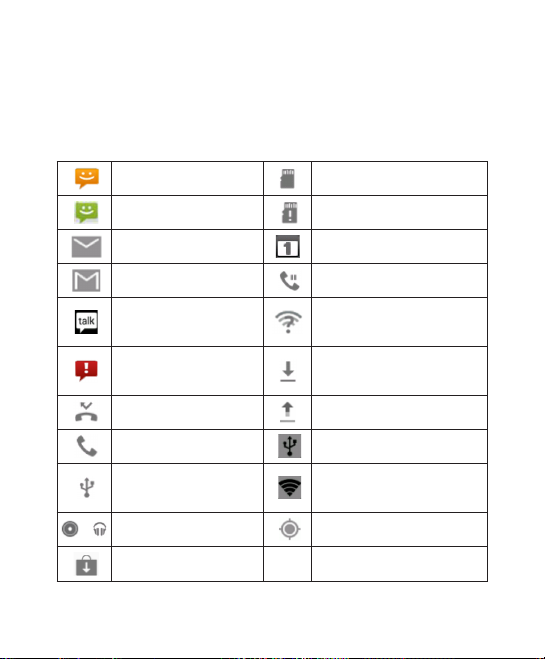
The status bar at the top of the home screen provides notication
alerts on the left. You can view the following notication icons.
New SMS microSD card unmounted
New MMS microSD card removed
New Email Upcoming event
New Gmail message Call on hold
New Google Talk
instant message
Problem with SMS/
MMS delivery
Missed call Sending data
Call in progress USB tethering is on
USB connected
/ Song is playing GPS on
Updates available
28
New Wi-Fi network detected
Downloading data
Portable Wi-Fi hotspot or
Wi-Fi direct is on
Page 29

Open/Close the Notication Panel
Notifications report the arrival of new messages, calendar
events, and alarms, as well as ongoing events, such as when
you've congured your phone as a Wi-Fi hotspot. You can open
the notication panel to view the details of notications.
• To open the notication panel, swipe your nger down from
the top of the screen.
• To close the notication panel, swipe your nger up from the
bottom of the screen or touch the Back Key.
Respond to or Remove a Notication
In the notication panel, you can respond to a notication or re-
move the notications.
• To respond to a notication, just touch it.
• To remove a notication, swipe it left or right.
• To remove all notications, touch
• Most apps that send notications, such as Gmail and Google
Talk, have notication settings that you can adjust.
TIP: In the notication panel, touch
list to get to the Settings menu quickly.
in the top right corner.
at the top of notications
Use Quick Settings
The Quick Settings in the notication panel make it convenient to
view or change the most common settings for your phone.
29
Page 30

Open the notication panel and you can nd the following Quick
Settings on the top of the screen. Slide left or right to view the
setting options.
• Auto-rotate: Touch to turn on or off the Auto-rotate feature.
• Sound: Touch to turn on or off vibration.
• Wi-Fi: Touch to turn on or off Wi-Fi.
• Data: Touch to enable or disable data access over the mobile
network.
• Bluetooth: Touch to turn on or off Bluetooth.
• GPS: Touch to turn on or off GPS function.
• Sync: Touch to turn on or off account sync.
• Airplane mode: Touch to turn on or off the airplane mode.
• Brightness: Touch to adjust the screen brightness.
Managing Shortcuts and Widgets
Add Shortcuts and Widgets
1. Touch the Home Key > > Widgets.
2. Touch Widgets or Shortcuts to view the available widgets
and shortcuts.
3. Touch and hold a widget or shortcut and drag it to the Home
Screen.
Move Shortcuts or Widgets
1. Touch and hold a widget or shortcut on the Home Screen.
30
Page 31

2. Drag it to the place you need.
Remove Shortcuts or Widgets
1. Touch and hold a widget or shortcut on the Home Screen.
2. Drag it to
to remove it.
Adjust Widget Size
1. Touch and hold a widget on the Home Screen and then release it.
2. An outline appears around the widget. Drag the outline to re-
size the widget.
NOTE: Not all widgets can be resized.
Organizing With Folders
You can create folders on the Home Screen and add several
shortcuts in a folder.
Create a Folder
1. Touch and hold the shortcut on the Home Screen you want to
add into a folder until
2. Drag the shortcut to
will be created and the shortcut is added into the folder.
Rename a Folder
1. Touch a folder to open it.
2. Touch the folder name eld and enter a new name.
appears.
and release it. A new folder
31
Page 32
Add Shortcuts to a Folder
1. Touch and hold a shortcut and then drag it onto a folder icon.
2. Release the shortcut and it will be added into the folder.
Remove Shortcuts From a Folder
1. Touch a folder to open it.
2. Touch and hold the shortcut you want to remove and then
drag it to the Home Screen.
3. Release the shortcut and it will be removed from the folder.
Rearranging the Favorites Tray
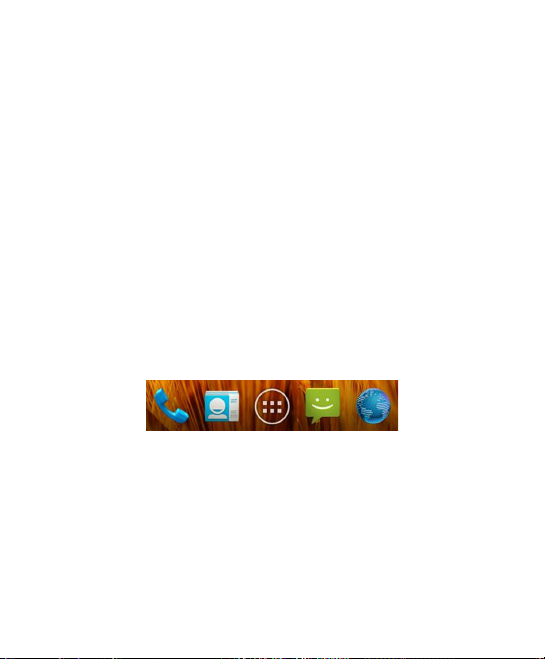
The Home Screen includes a customizable favorites tray at the
bottom visible from all Home Screens. You can drag apps, short-
cuts, folders, and other priority items in or out of the favorites tray
for instant access from any Home Screen.
To remove items from the favorites tray:
Touch and hold an item in the favorites tray and drag it out of the
tray.
To add items to the favorites tray:
Touch and hold an item on the Home Screen and drag it into the
favorites tray.
32
Page 33

If the favorites tray is full, you need to remove an item in the tray.
Entering Text
You can enter text using the onscreen keyboard. Some apps
open it automatically. In others, you open it by touching where
you want to type. You can touch the Back Key to hide the on-
screen keyboard.
Change Input Methods
1. When you use the onscreen keyboard to enter text, the icon
appears on the notication bar.
2. Open the notication panel and touch Select input method.
3. Select an input method you need.
Android Keyboard
The Android Keyboard provides a layout similar to a desktop
computer keyboard. Turn the phone sideways and the keyboard
will change from portrait to landscape. The landscape keyboard
is not supported in all applications.
33
Page 34

• Touch the alphabetic keys to enter letters. Touch and hold
some specific keys to enter associated accented letters or
numbers. For example, to enter È, touch and hold
available accented letters and number 3 appear. Then slide
to choose È.
• Touch
case. This key also changes to indicate the current case you
are using:
locked in uppercase.
• Touch
• Touch
touch
played on top of the keyboard.
• Touch and hold
• Touch
• Touch and hold
the Android keyboard.
to use uppercase. Double-tap to lock upper-
for lowercase, for uppercase, and when
to delete the text before the cursor.
to select numbers and symbols. You can then
to find more. Also, often used symbols are dis-
and then swipe to choose the emoticons.
to use Google’s networked voice input.
to change the input languages or set up
and the
TouchPal Keyboard
TouchPal Keyboard offers three layouts: Full QWERTY, 12-Key
34
Page 35
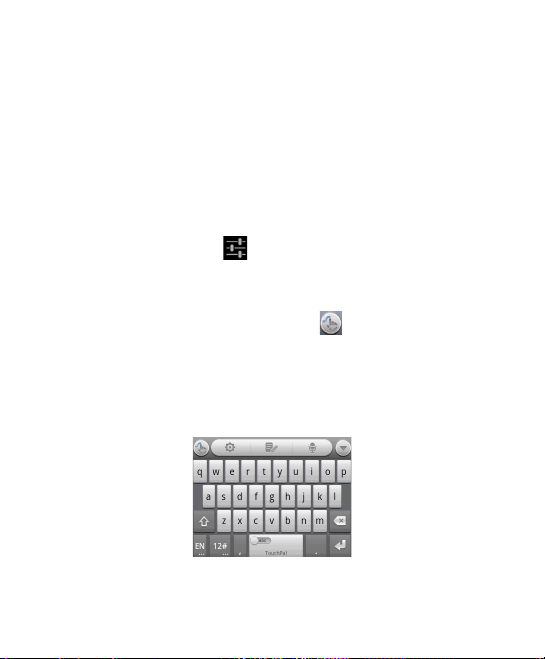
PhonePad and CooTek T+. You can swipe left or right on the
TouchPal keyboard to switch the layout.
You can also use TouchPal CurveTM to speed up text input by
replacing the key tapping operation with a tracing gesture where
you move your nger from letter to letter without lifting the nger
until you reach the end of the word.
To switch the keyboard layout:
1. Touch the Home Key > Menu Key > System settings >
Language & input >
layout.
2. Tick the Swipe layout check box.
3. On the TouchPal keyboard, touch
box, and then touch Close.
4. Swipe left or right on the TouchPal keyboard to select the Full
QWERTY, 12-Key PhonePad or CooTek T+ layout.
Full QWERTY
(TouchPal Keyboard) > Keyboard
and clear the Curve
35
Page 36
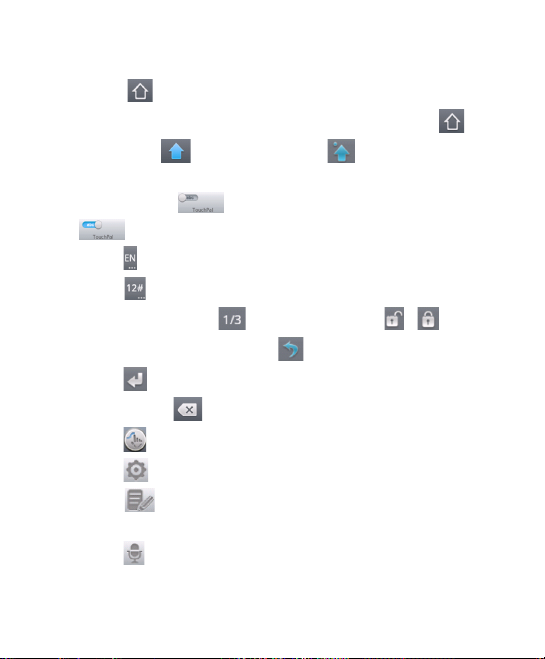
• Touch the alphabetic keys to enter letters.
• Touch
changes to indicate the current case you are using:
lowercase,
percase.
• Slide right on
• Touch
• Touch
dened texts. Touch
or unlock the inputting. Touch
• Touch
• Touch or hold
• Touch
• Touch
• Touch
copy, paste, and delete text, or move the cursor.
• Touch
36
to use uppercase or lowercase. This key also
for uppercase, and when locked in up-
to enable word prediction. Slide left on
to disable word prediction.
to change input language.
to enter digits, symbols, emoticons and other pre-
to nd more. Touch / to lock
to go back to enter letters.
to start a new line.
to delete text before the cursor.
to access the quick settings of TouchPal keyboard.
to set the TouchPal keyboard.
to open text editing options. You can select, cut,
to use voice input.
for
Page 37
• Touch
text eld again to show the keyboard.
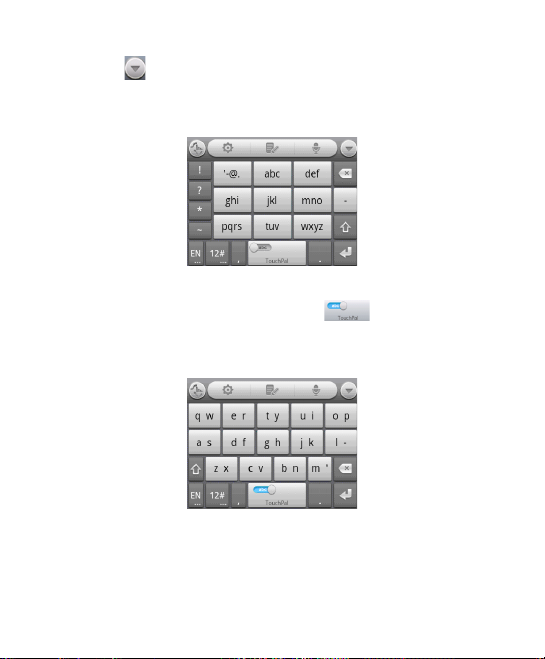
12-Key PhonePad
Touch a key repeatedly until the desired letter or symbol ap-
pears. If word prediction is enabled (
keys once and choose the right word.
CooTek T+
Touch to enter the left letter on the key; Double-tap or ick right
to enter the right letter/symbol on the key. If word prediction is
to hide the onscreen keyboard. You can touch the
), just touch the
37
Page 38
enabled (
), just touch the keys and choose the right
word.
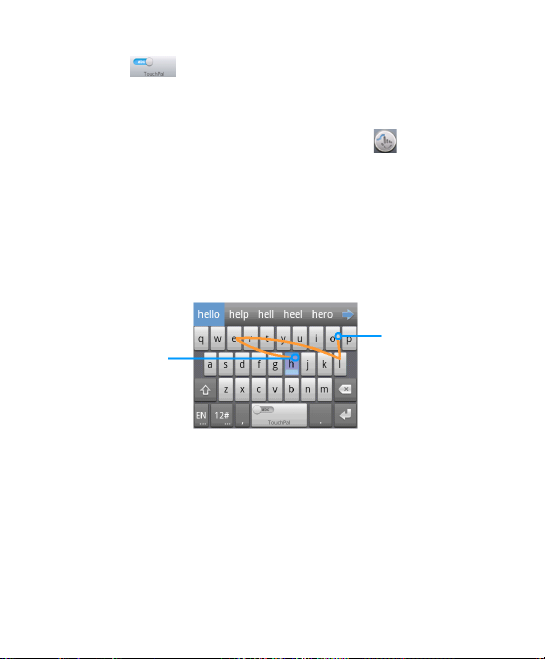
To enable and use TouchPal Curve:
1. In the TouchPal keyboard screen, touch
and tick the
Curve check box, and then touch Close.
2. Move your nger from letter to letter on the keyboard to trace
a word without lifting the nger until you reach the end of the
word.
NOTE: TouchPal Curve is only available in the Full QWERTY
layout.
End of the word
Start of the word
Tips for using TouchPal Curve:
• Touch when you want to. If you want to enter a single letter,
go ahead and touch.
• Lift your nger at the end of the word. A space is added auto-
matically when you begin to trace the next word.
38
Page 39
Touch Input Settings
Choose the touch input settings by touching the Menu Key >
System settings > Language & input from the Home Screen.
In the KEYBOARD & INPUT METHODS section, you can set
the default input method and choose the settings for input methods.
Editing Text
• Move the insertion point: Touch where you want to type.
The cursor blinks in the new position, and a tab appears be-
low it. Drag the tab to move the cursor.
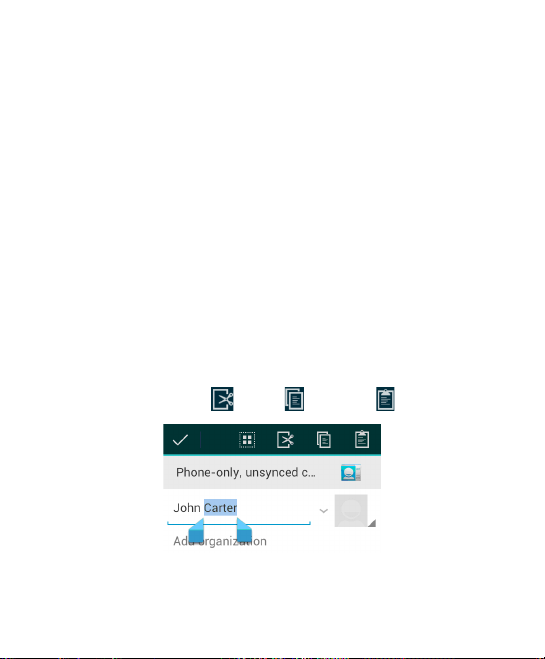
• Select text: Touch and hold or double-tap within the text. The
nearest word highlights, with a tab at each end of the selec-
tion. Drag the tabs to change the selection.
• Cut, copy, paste: Select the text you want to manipulate.
Then touch the Cut
, Copy , or Paste button.
39
Page 40

Opening and Switching apps
Open an App
1. Touch the Home Key > .
2. Slide left or right on the screen and touch an app to open it.
Switch Between Recently Opened Apps
1. Touch and hold the Home Key.
A list of the names and thumbnails of apps you’ve used re-
cently opens. If you’ve been using more apps recently than
can t on the screen, you can scroll the list up and down.
2. Touch a thumbnail to open that app.
You can swipe a thumbnail sideways to remove it from the
list.
40
Page 41

Connecting to Networks and Devices
Connecting to Mobile Networks
Select Network Operator
1. Touch the Home Key > Menu Key > System settings >
More > Mobile networks > Network operators.
2. Touch Search networks to search for all available networks.
3. Touch a network in the network list to register manually.
You can also touch Select automatically to select preferred
network automatically.
Control Mobile Data Use
To enable or disable data access:
1. Touch the Home Key > Menu Key > System settings >
More > Mobile networks.
2. Tick the Data enabled check box to enable data access over
the mobile network. Clear the check box to disable data access.
To enable always-on data access:
1. Touch the Home Key > Menu Key > System settings >
More > Mobile networks.
2. Tick the Always-on mobile data box to allow applications to
update data automatically.
41
Page 42

IMPORTANT: When you enable this option, more data trafc will
be generated for automatic updates of applications data. And
your phone will consume more power.
To get data services when roaming:
1. Touch the Home Key > Menu Key > System settings >
More > Mobile networks.
2. Tick the Data roaming check box.
IMPORTANT: Data roaming may incur signicant roaming charg-
es.
Use 2G Network Only to Save Power
1. Touch the Home Key > Menu Key > System settings >
More > Mobile networks.
2. Tick the Use only 2G networks check box to save battery
power.
Set Access Point Names
To connect to the Internet you can use the default Access Point
Names (APN). And if you want to add a new APN, please contact
the service provider to get the necessary information.
1. Touch the Home Key > Menu Key > System settings >
More > Mobile networks > Access Point Names.
2. Touch the Menu Key > New APN.
3. Touch each item to enter the information you get from your
service provider.
42
Page 43

4. Touch the Menu Key > Save to complete.
TIP: To set the APN to default settings, touch the Menu Key >
Reset to default.
Connecting to Wi-Fi
Wi-Fi is a wireless networking technology that can provide Internet access at distances of up to 100 meters, depending on the
Wi-Fi router and your surroundings.
Turn Wi-Fi On and Connect to a Wi-Fi Network
1. Touch the Home Key > Menu Key > System settings > Wi-Fi.
2. Slide the Wi-Fi switch to the ON position to turn on Wi-Fi.
The Wi-Fi networks that your phone has detected are dis-
played with their names and security settings. If your phone
nds a network that you connected to previously, it connects
to it.
3. Touch a network name to connect to it.
NOTE: If the network is secured, you're prompted to enter a
password or other credentials. (Ask your network administrator
for details.)
Get Notied of Open Networks
1. Touch the Home Key > Menu Key > System settings > Wi-Fi.
2. Slide the Wi-Fi switch to the ON position.
3. Touch the Menu Key > Advanced.
43
Page 44

4. Tick the Network notication check box.
When Wi-Fi is on, you receive notications in the status bar
when your phone detects an open Wi-Fi network. Clear the
check box to turn off notications.
Add a Wi-Fi Network
You can add a Wi-Fi network if the network does not broadcast
its name (SSID), or to add a Wi-Fi network when you are out of
range.
To connect to a secured network, you rst need to get the secu-
rity details from the network's administrator.
1. Touch the Home Key > Menu Key > System settings > Wi-Fi.
2. Slide the Wi-Fi switch to the ON position.
3. Touch ADD NETWORK.
4. Enter the network SSID (name). If necessary, enter security
or other network conguration details.
5. Touch Save.
Forget a Wi-Fi Network
You can make your phone forget about the details of a Wi-Fi net-
work that you added - for example, if you don’t want the phone to
connect to it automatically or if it is a network that you no longer
use.
1. Touch the Home Key > Menu Key > System settings > Wi-Fi.
2. Slide the Wi-Fi switch to the ON position.
44
Page 45

3. Touch the Wi-Fi network name and then touch Forget.
Using Wi-Fi Direct
Wi-Fi Direct allows Wi-Fi devices to connect to each other with-
out the need for wireless access points (hotspots).
NOTE: Activating this feature will disconnect your current Wi-Fi
network connection.
1. Touch the Home Key > Menu Key > System settings >
More.
2. Tick the Wi-Fi direct check box to turn on Wi-Fi direct.
3. Your phone will search for other devices enabled with Wi-
Fi direct connections. Touch Wi-Fi direct settings to see all
available devices.
4. Touch a device name to begin the connection process.
NOTE: The target device must also have Wi-Fi Direct ser-
vice activated and running before it can be detected by your
phone.
5. Touch Connect.
The other device will receive a Wi-Fi Direct connection
prompt and need to accept the request for connection.
6. Once connected the device is displayed as “Connected” in
the Wi-Fi Direct devices list.
45
Page 46

Connecting to Bluetooth Devices
Bluetooth® is a short-range wireless communication technol-
ogy. Phones or other devices with Bluetooth capabilities can
exchange information wirelessly within a distance of about 10
meters. The Bluetooth devices must be paired before the communication is performed.
Turn Bluetooth On/Off
1. Touch the Home Key > Menu Key > System settings >
Bluetooth.
2. Slide the Bluetooth switch to the ON or OFF position.
When Bluetooth is on, the
Make Your Phone Visible
In order to work with other phones or devices that have Blue-
tooth, you need to make your phone ‘visible’ to them.
1. Touch the Home Key > Menu Key > System settings >
Bluetooth.
2. Slide the Bluetooth switch to the ON position.
3. Touch your device name and visibility status on the top of the
screen to make your phone visible or invisible.
NOTE: Touch the Menu Key > Visibility timeout to set for how
long the phone will remain visible.
46
icon will appear in the status bar.
Page 47

Change the Device Name
When your phone is visible to other Bluetooth devices it will be
seen by its name and you can make that anything you want –
like ‘Ben’s Phone’.
1. Touch the Home Key > Menu Key > System settings >
Bluetooth.
2. Slide the Bluetooth switch to the ON position.
3. Touch the Menu Key > Rename phone.
4. Edit the name and touch Rename.
Pair With a Bluetooth Device
1. Touch the Home Key > Menu Key > System settings >
Bluetooth.
2. Slide the Bluetooth switch to the ON position.
3. Touch SEARCH FOR DEVICES. Your phone scans for and
displays the IDs of all available Bluetooth devices in range.
4. Touch the device you want to pair with.
Follow the instructions to complete the pairing. If you're prompted
to enter a passcode, try entering 0000 or 1234 (the most com-
mon passcodes), or consult the documentation that came with
the device.
47
Page 48

Connect to a Bluetooth Device
Once you've paired with a Bluetooth device, you can connect to
it manually; for example, to switch devices or to reconnect after it
is back in range.
1. Touch the Home Key > Menu Key > System settings >
Bluetooth and make sure Bluetooth is turned on.
2. In the list of paired devices, touch a paired but unconnected
device.
Disconnect a Bluetooth Device
1. Touch the Home Key > Menu Key > System settings >
Bluetooth and make sure Bluetooth is turned on.
2. In the list of paired devices, touch a paired and connected
device.
3. Touch OK to disconnect it.
Unpair From a Bluetooth Device
You can make your phone forget its pairing connection with another Bluetooth device. To connect to the device again, you may
need to enter or conrm a passcode again.
1. Touch the Home Key > Menu Key > System settings >
Bluetooth and make sure Bluetooth is turned on.
2. In the list of paired devices, touch the icon
Bluetooth device you want to unpair from.
48
beside the
Page 49

3. Touch Unpair.
Connecting to Your Computer via USB
You can connect your phone to a computer with a USB cable
and transfer music, pictures, and other les in both directions.
Your phone stores these les in internal storage or on a remov-
able microSD card.
If you are using USB tethering, you must turn that off before you
can use USB to transfer les between your phone and computer.
Connect Your Phone to a Computer via USB
1. Connect your phone to the PC with a USB cable.
2. Open the Notication panel and touch Connected as an in-
staller.
3. Choose one of the following options:
Media device (MTP): Transfer media les on Windows,
or using Android File Transfer on Mac.
Camera (PTP): Transfer photos using camera software,
and transfer any les on the computers that don’t support
MTP.
Disconnect Your Phone From the Computer
To disconnect the phone from the computer, simply unplug the
USB cable when you’re nished.
49
Page 50

Remove the microSD Card From Your Phone
If you need to remove the microSD card while the phone is on,
you must unmount it rst.
1. Touch the Home Key > Menu Key > System settings >
Storage.
2. Touch Unmount SD card > OK.
3. The
icon appears in the status bar and you can now safely
remove the microSD card from the phone.
Erase microSD Card
1. Touch the Home Key > Menu Key > System settings >
Storage.
2. Slide down the screen and touch Erase SD card > Erase SD
card > Erase everything.
NOTE: The formatting procedure erases all the data on the mi-
croSD card, after which the les CANNOT be retrieved.
Sharing Your Mobile Data Connection
You can share your phone’s data capabilities through tethering or
by activating the mobile hotspot feature to create a portable WiFi hotspot.
50
Page 51

Share Your Mobile Data Connection via USB
You can access the Internet on your computer via the USB tethering feature of your phone. The feature needs data connection
on a mobile network and may result in data charges.
NOTE: If your phone has a microSD card or USB storage, you
can’t mount it on your computer when USB tethered.
1. Connect your phone to your computer with a USB cable.
2. Touch the Home Key > Menu Key > System settings >
More > Tethering & portable hotspot.
3. Tick the USB tethering check box. A new network connec-
tion will be created on your computer.
4. To stop sharing your data connection, uncheck USB tethering or disconnect the USB cable.
Share Your Mobile Data Connection via Bluetooth
If your computer or other device can obtain an Internet connection via Bluetooth, you can configure your phone to share its
mobile data connection with that device.
1. Pair your phone with the device via Bluetooth.
2. Configure your device to obtain its network connection via
Bluetooth. For more information, please see your computer's
documentation.
3. Touch the Home Key > Menu Key > System settings >
More > Tethering & portable hotspot.
51
Page 52

4. Tick the Bluetooth tethering check box. Your computer is
now sharing your phone's data connection.
5. To stop sharing your data connection, uncheck Bluetooth
tethering.
Share Your Mobile Data Connection as a Wi-Fi Hot-
spot
You can share your phone’s data connection with other devices
by turning your phone into a portable Wi-Fi hotspot. The feature
needs data connection on a mobile network and may result in
data charges.
NOTE: When the portable Wi-Fi hotspot feature is enabled, you
cannot use your phone’s applications to access the Internet via
its Wi-Fi connection. You still remain connected to the Internet
via your mobile data network.
1. Touch the Home Key > Menu Key > System settings >
More > Tethering & portable hotspot.
2. Tick the Portable Wi-Fi hotspot check box.
After a moment, the phone starts broadcasting its Wi-Fi net-
work name (SSID).
3. To stop sharing your data connection, uncheck Portable Wi-
Fi hotspot.
52
Page 53

Rename or Secure Your Wi-Fi Hotspot
You can change the name of your phone's Wi-Fi network name
(SSID) and secure your portable Wi-Fi hotspot.
1. Touch the Home Key > Menu Key > System settings >
More > Tethering & portable hotspot > Congure Wi-Fi
hotspot.
2. Set your name and security options as follows:
Network SSID: Enter or edit a network SSID (name) that
other devices see when scanning for Wi-Fi networks.
Type: Broadcast or hide your network SSID. If the broad-
cast is disabled, other users need to get your network
SSID to nd the Wi-Fi hotspot.
Security: Choose a security option: Open (not recom-
mended), WPA PSK or WPA2 PSK (other users can
access your mobile hotspot only if they enter the correct
password). When you select WPA PSK or WPA2 PSK,
touch the Password eld to edit the security password.
3. Touch Save to save your settings.
Connecting to Virtual Private Networks
Virtual private networks (VPNs) allow you to connect to the re-
sources inside a secured local network. VPNs are commonly
deployed by corporations, schools, and other institutions to let
53
Page 54

people access local network resources when not on campus, or
when connected to a wireless network.
Depending on the type of VPN you are using, you may be
required to enter your login credentials or install security cer-
ticates before you can connect to your VPN. You can get this
information from your network administrator.
Add a VPN
1. Touch the Home Key > Menu Key > System settings >
More > VPN.
2. Touch Add VPN network and ll in the information provided
by your network administrator.
3. Touch Save.
The VPN is added to the list on the VPN screen.
Connect to a VPN
1. Touch the Home Key > Menu Key > System settings >
More > VPN.
2. Touch the VPN that you want to connect to.
3. When prompted, enter any requested credentials, and then
touch Connect.
When you are connected, the VPN connected icon appears in
the status bar.
54
Page 55

Modify a VPN
1. Touch the Home Key > Menu Key > System settings >
More > VPN.
2. Touch and hold the VPN that you want to modify.
3. Touch Edit network and edit the VPN settings you want.
4. Touch Save.
Delete a VPN
1. Touch the Home Key > Menu Key > System settings >
More > VPN.
2. Touch and hold the VPN that you want to delete.
3. Touch Delete network.
55
Page 56
Phone Calls
You can place calls from the Phone app, the People app, or
other apps or widgets that display contact information. Wherever
you see a phone number, you can usually touch it to dial.
Placing and Ending Calls
Place a Call by Dialing
1. Touch the Home Key > .
2. In the dialer tab
screen keypad. Touch
NOTE: As you enter digits, your phone searches for contacts
that match. If you see the number you want to dial, touch it
to place the call immediately without entering the rest of the
number.
3. Touch the Phone icon
TIP: To make an international call, touch and hold the 0 key to
enter the plus (+) symbol. Then enter the international prex for
the country, followed by the area code and phone number.
End a Call
During a call, touch on the screen.
56
, enter the phone number with the on-
to delete wrong digits.
below the keypad to dial.
Page 57
Answering or Rejecting Calls
When you receive a phone call, the Incoming Call screen opens,
displaying the caller ID and any additional information about the
caller that you've entered in People. You can answer or reject the
call, or reject it with a text message.
Answer a Call
When you receive a phone call, drag over to answer the
call.
NOTE: To silence the ringer before answering the call, press the
Volume Keys up or down.
Reject a Call
When you receive a phone call, drag over to reject the
call.
You can also drag
set text message to the caller.
TIP: To edit the text response from within the Phone app, touch
the Menu Key > Settings > Quick responses.
over to reject the call and send a pre-
Working With the Call Log
The Call log is a list of all the calls you've placed, received, or
missed. It provides a convenient way to redial a number, return a
call, or add a number to your Contacts.
57
Page 58

To open the call log, you can touch the Home Key >
log or touch the
tab in the Phone app.
> Call
Place a Call From the Call Log
1. Open the call log.
2. Touch a number for more information about the call, or touch
beside it to call back.
NOTE: You can touch
lect the call log type you want to view.
on the bottom of the screen and se-
Add a Call Log Number as a Contact
1. Open the call log.
2. Touch a number to view more call information.
3. Touch
4. To add the number to an existing contact, touch a contact in
the list. To add a new contact, touch CREATE NEW CON-
TACT.
.
Take Other Actions on a Call Log Entry
1. Open the call log.
2. Touch a number to view more call information. While viewing
the call details, you can:
Touch the number to call it.
58
Page 59
Touch the Menu Key > Edit number before call to edit
the number in the dialer before calling it.
Touch to send a message.
If the number belongs to a contact you have, touch to
view contact details.
Delete the Call Log
1. Open the call log.
2. Touch the Menu Key > Select item(s).
3. Touch the call log items you want to delete and then touch
> OK to delete the call logs.
NOTE: You can also touch a number in the call log screen, and
touch the Menu Key > Remove from call log to delete the call
log of the number.
Calling Your Contacts
Call a Contact
1. Touch the Home Key > and then touch the Contact tab
.
2. Flick the screen up or down to view all your contacts with
phone numbers.
TIP: You can search for a contact by touching
screen.
on the
59
Page 60

3. Touch a contact or number to call it.
Call a Favorite Contact
1. Touch the Home Key > and then touch the Contact tab
.
2. Your favorite contacts and frequently called contacts or numbers are listed at the top of the screen. Touch a contact or
number to call it.
Checking Voicemail
1. Touch the Home Key > .
2. Touch and hold the 1 key in the dialer. If prompted, enter your
voicemail password.
3. Follow the voice prompts to listen to and manage your voice-
mail messages.
NOTE: To set your voicemail service, touch the Menu Key >
Settings in the dialer and touch the voicemail settings you want
to change. For detailed information, please contact the service
provider.
Using Options During a Call
During a call, you will see a number of onscreen options. Touch
an option to select it.
• Touch
60
to turn on or off the speaker.
Page 61

• Touch
• Touch
which is put on hold.
• Touch
• Touch
current call, record phone conversation, or switch to another
call in progress.
• Touch
call.
• Touch
WARNING! Because of higher volume levels, do not place the
phone near your ear during speakerphone use.
to mute or unmute your microphone.
to make another call separately from the rst call,
to switch to the dialer, for example to enter a code.
for more call options. You can hold or unhold the
to merge separate calls as a single conference
to end the current call.
Managing Multi-party Calls
When the call waiting and three-way call features are available,
you can switch between two calls or set up a conference call.
NOTE: The call waiting and three-way call features need network
supports and may result in additional charges. Please contact
your service provider for more information.
Switch Between Current Calls
When you’re on a call, your phone screen informs you that another call is coming in and displays the caller ID.
61
Page 62
To respond to an incoming call while you’re on a call:
Drag
over to answer the call. (This puts the rst caller on
hold and answers the second call.)
To switch between two calls:
Touch
> Swap on the screen.
Set Up a Conference Call
With this feature, you can talk to two people at the same time.
1. On the dialer screen, enter a number and touch
2. Once you have established the connection, touch
dial the second number. (This puts the rst caller on hold and
dials the second number.)
3. When you’re connected to the second party, touch
If one of the people you called hangs up during your call, you
and the remaining caller stay connected. If you initiated the call
and are the rst to hang up, all callers are disconnected.
To end the conference call, touch
.
.
and
.
Adjusting Your Call Settings
Use Fixed Dialing Numbers
Fixed Dialing Numbers (FDN) allows you to restrict outgoing
calls to a limited set of phone numbers.
62
Page 63

1. Touch the Home Key > Menu Key > System settings > Call
> Fixed Dialing Numbers.
2. The following options are available:
Enable FDN: Input the PIN2 code to enable the FDN fea-
ture.
Change PIN2: Change the PIN2 code for FDN access.
FDN list: Manage the FDN list.
NOTE: The PIN2 code is provided by your carrier. Entering an
incorrect PIN2 code more times than allowed can cause the
phone to lock. Contact the service provider for assistance.
Edit Quick Response to Rejected Callers
1. Touch the Home Key > Menu Key > System settings > Call
> Quick responses.
2. Touch the text message to edit it.
Set Voicemail
1. Touch the Home Key > Menu Key > System settings >
Call.
2. Touch Voicemail service to check. Voicemail service pro-
vided by your carrier is the default.
3. Touch Voicemail settings > Voicemail number to edit the
voicemail number if necessary.
63
Page 64

Set DTMF Tones
You can set the length of Dual-tone multi-frequency (DTMF) signal tones.
1. Touch the Home Key > Menu Key > System settings > Call
> DTMF Tones.
2. Touch Normal or Long.
Set Speed Dials
You can touch and hold the 1 ~ 9 key from the dialer to call the
corresponding speed dial number.
The number key 1 is reserved to speed dial your voicemail.
To assign a speed dial key:
1. Touch the Home Key > Menu Key > System settings > Call
> Speed dial.
2. Touch a speed dial key.
3. Enter a phone number or select one from the contact list.
4. Touch OK.
Bar Certain Calls
Call barring feature allows you to forbid certain types of calls
from your phone.
1. Touch the Home Key > Menu Key > System settings > Call
> Call Barring Settings.
2. Set the restriction of specic types of calls from your phone.
64
Page 65

Forward Incoming Calls
Call forwarding feature allows you to forward your incoming calls
to another phone number.
1. Touch the Home Key > Menu Key > System settings > Call
> Call forwarding.
2. Touch an available option ( Always forward, Forward when
busy, Forward when unanswered, or Forward when unreachable) to enable it.
Other Options
1. Touch the Home Key > Menu Key > System settings > Call
> Additional settings.
2. Touch Caller ID to choose whether your number is displayed
when someone receives your outgoing call. Or check Call
waiting to get notied of incoming calls during a call.
NOTE: Please contact the service provider to check whether the
caller ID and call waiting features are available.
Internet Call Settings
To add an Internet calling account:
1. Touch the Home Key > Menu Key > System settings > Call
> Accounts.
2. Touch ADD ACCOUNT.
3. Follow the instructions from your Internet calling service pro-
vider to congure the settings for your account.
65
Page 66

4. Touch SAVE.
To congure which calls use Internet calling:
You can congure your phone to place all calls using Internet
calling (when you’re connected to a Wi-Fi network), just calls to
Internet calling addresses, or to ask each time you place a call.
1. Touch the Home Key > Menu Key > System settings >
Call.
2. Touch Use Internet calling.
3. Touch the Internet calling option you want.
To congure your phone to receive Internet calls:
By default, your phone is congured to make Internet calls, but
not to ensure that you will receive them. But you can congure
your phone to listen for Internet calls made to an Internet calling
account you added to your phone.
1. Touch the Home Key > Menu Key > System settings > Call
> Accounts.
2. Tick the Receive incoming calls check box. Checking this
setting will reduce your battery life between charges.
66
Page 67

People
You can add contacts on your phone and synchronize them with
the contacts in your Google account or other accounts that support contact syncing.
To see your contacts, touch the Home Key >
you can touch the tabs on the top of the screen to quickly switch
to the contact groups
or favorite contacts .
Opening Your Contact List
1. Touch the Home Key > and touch the all contacts tab
to access your contact list.
2. Scroll through the list to view all your contacts.
3. Touch a contact to view its details.
TIP: If you have a lot of contacts stored, you'll see a slide bar on
the right side of the screen. To go directly to a letter, touch and
hold the slide bar and drag it to a letter.
Adding a New Contact
1. Touch the Home Key > and touch the all contacts tab
.
2. Touch
to add a new contact.
. From there,
67
Page 68

3. Touch the account eld on the top of the screen to choose
where to save the contact. If a sync account is selected, the
contacts will be synced automatically with your account on-
line.
4. Enter the contact name, phone numbers, email addresses,
and other information.
5. Touch DONE to save the contact.
Setting Up Your Own Prole
You can create your own business card in your phone.
1. Touch the Home Key >
.
2. Scroll to the top of the screen and touch Set up my prole.
3. Edit your prole information and touch DONE.
and touch the all contacts tab
Importing, Exporting, and Sharing Contacts
You can import/export contacts from/to your SIM or microSD
card. This is especially useful when you need to transfer con-
tacts between different devices. You can also quickly share your
contacts using Bluetooth, Email or Messages, etc.
Import Contacts From the SIM Card
1. Touch the Home Key > .
68
Page 69

2. Touch the Menu Key > Import/export > Import from SIM
card.
3. Select an account to save the contacts.
4. Touch to select the contacts you need and then touch
.
Import Contacts From the microSD Card
1. Touch the Home Key > .
2. Touch the Menu Key > Import/export > Import from SD
card.
3. Select an account to save the contacts.
4. If there is more than one vCard le in the microSD card, select the one or those you need and touch OK.
Export Contacts to the SIM Card
1. Touch the Home Key > .
2. Touch the Menu Key > Import/export > Export to SIM card.
3. Touch to select the contacts you need and then touch
.
Export Contacts to the microSD Card
1. Touch the Home Key > .
2. Touch the Menu Key > Import/export > Export to SD card.
3. The phone will prompt you with the name of the vCard le.
Touch OK to create the le in the microSD card.
69
Page 70
Share Contacts
1. Touch the Home Key > and touch the all contacts tab
.
2. Touch the Menu Key > Select item(s).
3. Touch to select the contacts you want to share and then
touch
4. Choose to share the contacts via Bluetooth, Email, Gmail
or Messaging.
.
Working With Favorite Contacts
In the favorite contacts tab, you can nd your favorite con-
tacts and frequently contacted contacts.
Add a Contact to Favorites
You can add the contacts used frequently to Favorites, so you
can nd them quickly.
1. Touch the Home Key >
.
2. Touch a contact and then touch
Remove a Contact From Favorites
1. Touch the Home Key > and touch the favorite contacts
tab
.
70
and touch the all contacts tab
next to the contact name.
Page 71

2. Touch a favorite contact and then touch
tact name.
next to the con-
Working With Groups
View Your Contact Groups
1. Touch the Home Key > and touch the contact groups tab
.
2. Scroll through the list to view the preset groups and the
groups you create.
3. Touch a group to view its members.
NOTE: To send messages to the group members, you can touch
next to the group and select message recipients from the
listed group members.
Add a New Group
1. Touch the Home Key > and touch the contact groups tab
.
2. Touch
3. Touch the account eld on the top of the screen to choose an
account for the group.
4. Enter the group name and touch DONE.
to create a new group.
71
Page 72

Add Members to a Group
1. Touch the Home Key > and touch the contact groups tab
.
2. Touch a group and then touch
3. Touch to select the contacts you need as the group members.
4. Touch
.
.
Delete a Group
1. Touch the Home Key > and touch the contact groups tab
.
2. Touch a group and then touch the Menu Key > Disband
group.
3. Touch OK to disband the group. The contacts in the group
will not be deleted.
Edit a Group
1. Touch the Home Key > and touch the contact groups tab
.
2. Touch a group and then touch the Menu Key.
3. Touch Rename group to edit the group name. Or touch
Select item(s) to select the members you don’t need and
remove them.
72
Page 73

Searching for a Contact
1. Touch the Home Key > .
2. Touch
Key.
3. Input the contact information you want to search for, such
as contact name, phone number, or email. The contacts
matched will be listed.
on the bottom of the screen or touch the Search
Editing Contacts
Edit Contact Details
1. Touch the Home Key > .
2. Touch a contact you need to edit and then touch the Menu
Key > Edit.
3. Edit the contact and touch DONE.
Set a Ringtone for a Contact
Assign a special ringtone to a contact, so you know who is call-
ing when you hear the ringtone.
1. Touch the Home Key >
2. Touch a contact you want to set a ringtone for and then touch
the Menu Key > Set ringtone.
NOTE: The contact must be saved on the phone, not the SIM
card.
.
73
Page 74

3. Select a ringtone you like and touch OK.
Delete a Contact
1. Touch the Home Key > .
2. Touch a contact you want to delete and touch the Menu Key
> Delete.
3. Touch OK to conrm.
To delete several contacts, you can:
1. Touch the Menu Key > Select item(s) in the all contacts
screen.
2. Touch to select the contacts you want to remove and then
touch
3. Touch OK to conrm.
.
Join Contacts
Your phone can synchronize with multiple accounts contain-
ing your contact information (such as Google and Microsoft
Exchange ActiveSync). When you synchronize your phone with
those accounts, each account adds a separate contact entry in
the Contacts list.
You can merge all the separate information of one account into
one record in the Contacts list.
1. Touch the Home Key >
74
.
Page 75

2. Touch a contact to which you want to join one or more other
contacts, to view the contact’s details. This is the contact you
will see in the Contacts list after the join.
3. Touch the Menu Key > Join. The phone will list the sug-
gested contacts to join.
4. Touch the contact whose information you want to join with the
rst contact.
The information from the second contact is added to the first
contact, and the second contact is no longer displayed in the
Contacts list.
You can repeat these steps to join another contact to the main
contact.
Separate Contact Information
If contact information from different sources was joined in error,
you can separate the information back into individual contacts on
your phone.
1. Touch the Home Key >
2. Touch a contact you want to separate, to view its details.
3. Touch the Menu Key > Separate.
4. Touch OK to conrm.
The contact information is separated into individual contacts in
the list of contacts.
.
75
Page 76

Accounts
Adding or Removing Accounts
You can add multiple Google accounts and Microsoft Exchange
ActiveSync accounts. You may also add other kinds of accounts,
depending on the apps installed on your phone.
Add an Account
1. From the Home Screen, touch the Menu Key > System set-
tings > PERSONAL > Accounts & sync.
2. Touch ADD ACCOUNT.
3. Touch the type of account you want to add.
4. Follow the onscreen steps to enter the information about the
account. Most accounts require a username and password,
but the details may vary. You may also need to obtain some
information from IT support or system administrator.
When the account is successfully added, it is displayed in the
Accounts & sync list.
Remove an Account
Removing an account will delete it and all information associated
with it from your phone, such as emails and contacts.
1. From the Home Screen, touch the Menu Key > System set-
tings > PERSONAL > Accounts & sync.
76
Page 77

2. Touch the account.
3. Touch the Menu Key > Remove account > Remove ac-
count.
Conguring Account Sync
Congure Auto Sync Setting
1. Open the Accounts & sync settings screen.
Your accounts and sync status are displayed .
green if automatic sync is enabled for some or all of the accounts data, and gray if automatic sync is disabled.
2. Touch the ON/OFF switch to turn on or off automatic sync.
When automatic sync is turned on, changes you make to
information on your phone or on the web are automatically
synced with each other.
When auto sync is turned off, you need to sync manually
to collect emails, updates, or other recent information.
Sync Manually
1. Open the Accounts & sync settings screen.
2. Touch the account whose data you want to sync.
3. Touch the Menu Key > Sync now.
turns
77
Page 78

Change an Account’s Sync Settings
1. Open the Accounts & sync settings screen.
2. Touch the account whose sync settings you want to change.
The Sync settings screen appears, showing a list of informa-
tion the account can sync.
3. Check or uncheck items as you need. Checked types of infor-
mation on the phone and the web will be kept in sync when
auto-sync is turned on.
78
Page 79

Touch in the Home Screen and select Email. Use it to read
and send emails from services other than Gmail.
Set Up the First Email Account
1. When you open Email for the rst time, enter your email ad-
dress and password and then touch Next.
NOTE: Your phone will connect to the Internet and verify in-
coming and outgoing server settings before proceeding to the
next step. If the email service provider is not a popular one,
you need to select the type of your account and edit the settings for incoming and outgoing servers. Please contact your
mobile service provider and email service provider for more
information.
2. Set the email checking frequency, download options, account
name and other settings. Touch Next when you nish.
Your phone will show the inbox of the email account and start to
download email messages.
TIP: To add more email accounts, open Email to get the Inbox
screen. Then touch the Menu Key > Account settings and
touch ADD ACCOUNT at the top right of the screen.
79
Page 80
Checking Your Emails
Your phone can automatically check for new emails at the inter-
val you set when setting up the account.
You can also check new emails manually by touching
of the email account’s boxes. Touch Load more messages at
the bottom of the email list to download earlier messages.
in any
Responding to an Email
You can reply to or forward a message that you receive. You can
also delete messages and manage them in other ways.
Rely to or Forward an Email
1. Open the email you want to reply to or forward from Inbox.
2. Do the following as you need:
To… do…
Reply to the sender, touch
Reply to the sender and
all recipients of the original
message,
Forward the message,
3. Edit your message and touch
80
touch in the message header
Reply all.
touch in the message header
Forward.
in the message header.
>
>
.
Page 81

Mark an Email as Unread
You can return a read email to the unread state—for example, to
remind yourself to read it again later. You can also mark a batch
of emails as unread.
• While reading a message, touch the Menu Key > Mark as
unread.
• While in a message list (for instance, the inbox), touch the
checkboxes before the messages and then touch
.
Delete an Email
You can delete an email from its folder. You can also delete a
batch of emails.
• While reading a message, touch
• While in a message list (for instance, the inbox), touch the
checkboxes before the messages and then touch
> OK.
> OK.
Writing and Sending an Email
1. Open your email Inbox.
2. Touch
3. If you have more than one email accounts added on the
phone, touch the sender line to select the account you want
to use for sending the message.
to open the compose screen.
81
Page 82

4. Enter a contact name or email address in the ‘To’ eld. Sepa-
rate each recipient with a comma. You can also touch
select recipients from your contacts.
5. Enter the email subject and compose the email text.
6. Touch the Menu Key > Attach le to add audio les, images,
videos and other types of les as attachment.
7. Touch
at the top right of the screen to send the message.
to
Adding Signature to Your Emails
You can set a few lines of plain text as signature for every outgoing email message from an account, such as your name and
contact information.
1. Open the Email app.
2. Touch the Menu Key > Account settings and select the ac-
count you want to add signature to.
3. Touch Signature and enter the text.
4. Touch OK.
Adding and Editing Email Accounts
Add an Email Account
After setting up your first email account (see Email – Set Up
the First Email Account), you can add more email accounts and
manage them separately.
82
Page 83

1. Open Email to get the Inbox screen.
2. Touch the Menu Key > Account settings and touch ADD
ACCOUNT at the top right of the screen.
3. Set up the account as you would with the rst one.
Edit an Email Account
You can change a number of settings for an account, including
how often you check for email, how you’re notied of new mails,
and details about the servers the account uses to send and receive mails.
1. Open Email to get the Inbox screen.
2. Touch the Menu Key > Account settings and touch the ac-
count whose settings you want to change.
3. Make the changes you want and touch the Back Key when
you’re nished.
Remove an Email Account
1. Open Email to get the Inbox screen.
2. Touch the Menu Key > Account settings and touch the ac-
count you want to remove.
3. Touch Remove account > OK.
83
Page 84

Changing General Email Settings
General settings apply to all email accounts you add.
1. Open Email to get the Inbox screen.
2. Touch the Menu Key > Account settings > General.
3. Make the changes you want and touch the Back Key when
you’re nished.
84
Page 85

GmailTM
After you sign in to your Google account on the phone, you can
send and retrieve Gmail messages with the Gmail app.
NOTE: This feature may not be available in certain region or with
certain service provider.
Opening Your Gmail Inbox
Touch in the Home Screen and select Gmail. The Inbox
screen appears.
If you haven’t signed in, you will be prompted to do so or create
a new account.
Touch
and download new messages.
Switching Accounts
Gmail displays conversations, messages, and settings from one
Google account at a time. If you have signed in to more than one
Google account on your phone, you can switch accounts and
view information in each account.
1. From your Inbox, touch the current account at the top of the
2. From the drop-down menu, touch the account you want to
at the bottom right of the screen to refresh your Inbox
screen.
see. The account’s Inbox will open.
85
Page 86

Writing and Sending a Message
1. Open your Gmail Inbox and switch to the account you want to
use for sending the message.
2. Touch
3. Enter a contact name or email address in the ‘To’ eld. Sepa-
rate each recipient with a comma.
4. Enter the email subject and compose the email text.
5. To attach an image, touch the Menu Key > Attach le and
select a le from the image gallery.
6. Touch
.
at the top right of the screen to send the message.
Adding Signature to Your Gmail Messages
You can set a few lines of plain text as signature for every outgoing Gmail message. The signature you set on the phone is inde-
pendent of the signature you use for Gmail on the web.
1. Open the Gmail app.
2. Touch the Menu Key > Settings and select the account you
want to add signature to.
3. Touch Signature and enter the text.
4. Touch OK.
86
Page 87
Replying to or Forwarding a Message
1. Open the Gmail message you want to reply to or forward to
another person.
2. Do the following as you need:
To… do…
Reply to the sender, touch
Reply to the sender and
all recipients of the original
message,
Forward the message,
3. Edit your message and touch the send icon
touch in the message header
Reply all.
touch in the message header
Forward.
in the message header.
>
>
.
Working With Received Attachments
When a message has an attachment, Gmail displays information
about that attachment at the top of the message.
Depending on the attachment type, the applications installed on
your phone as well as your settings, you may preview, view, play,
save the attachment, or check information about the attachment.
TIP: For documents with multiple pages, touching the Preview
option will only download the pages you view, while touching
87
Page 88

View, Play, or Save will download the entire le and cost more
time and data.
Searching for Messages
You can search for messages using words that appear in addresses, subjects, labels, or contents.
NOTE: If you search while the phone doesn’t have an active In-
ternet connection, only messages synchronized onto your phone
can be searched.
1. Open the Gmail app and touch
2. Enter the words to search for and touch the search key on
the screen keyboard.
As you type, suggestions may appear below the search eld.
You can touch a suggestion to search for it right away, or
touch the arrow next to it to add its text to the search eld.
3. In the search results, touch the message you need and work
with it just as you would with any Gmail message.
or the Search Key.
Working With Labels
Message labels include both labels you create and default labels
such as Sent, Starred, and Outbox. You can organize your
emails by labeling them or adding stars to them. Labels also help
you sort your messages, just like folders.
88
Page 89
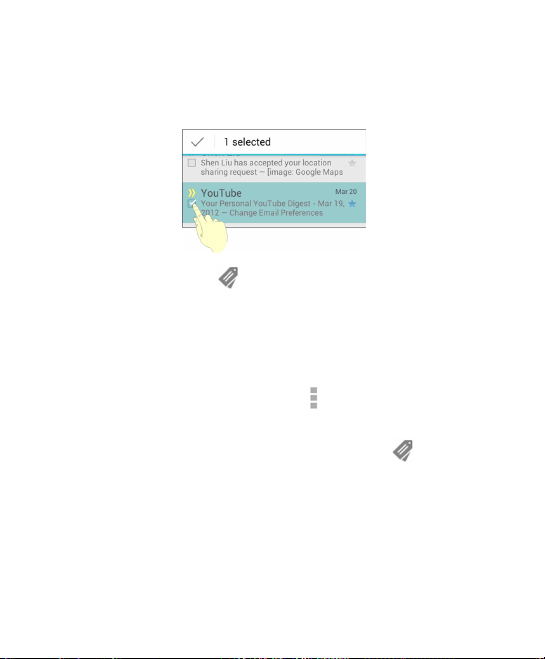
To label or change labels:
1. Open the Gmail app and touch in the message list the check-
boxes before the messages you want to label.
2. Touch the label icon at the bottom of the screen.
3. Check or uncheck labels in the new screen and touch OK.
To add stars to messages:
1. Open the Gmail app and touch in the message list the check-
boxes before the messages you want to star.
2. At the bottom of the screen, touch
To view messages by label:
1. Open the Gmail app and touch the label icon
tom of the message list without checking any message.
2. Touch the label to view messages with that label.
TIP: You can also touch the name of your account at the top of
the screen. Then touch one of the labels listed in the RECENT
section, below account names.
> Add star.
at the bot-
89
Page 90

Changing Gmail Settings
Touch Menu Key > Settings in any Gmail screen to change
General settings, which apply to all Gmail accounts, or other
settings that only apply to specic accounts.
90
Page 91

Messages
You can use Messages to exchange text messages (SMS) and
multimedia messages (MMS).
Opening the Messages Screen
Touch in the Home Screen and select Messaging.
The Messaging screen opens, where you can create a new
message, search for messages, or open an ongoing message
thread.
• Touch
• Touch
• Touch an existing message thread to open the conversation
you’ve had with a certain number.
Sending a Text Message
1. On the Messaging screen, touch at the bottom.
2. Touch the To eld, and enter the recipient’s number or, if the
recipient is stored in People as a contact, the rst letters of
the recipient’s name. As matching contacts appear, you can
touch a suggested recipient.
3. Touch the Type to compose eld, and enter the contents of
your text message.
to write a new text or multimedia message.
to search for message with keywords.
91
Page 92

4. Touch
.
Sending a Multimedia Message
1. On the Messaging screen, touch at the bottom.
2. Enter the recipient and the text of the message, as you do
when sending a text message.
3. Touch the Menu Key > Add subject to add a message subject.
4. Touch the paper clip icon
open a menu where you can select the kind of media le to
attach to the message.
Pictures: Select a picture to add to your message.
Capture picture: Take a photo and add to your message.
Videos: Select a video clip to attach to your message.
Capture video: Shoot a video clip and add to your mes-
sage.
Audio: Select an audio le to add to your message.
Record audio: Record an audio le and add to your mes-
sage.
Slideshow: Edit a slideshow and add to your message.
Files: Select a le of any kind to add to your message.
People: Select a contact to add to your message as an
attachment.
92
beside the message text box to
Page 93

5. Touch
.
Replying to a Message
Messages you receive are appended to existing threads of the
same number. If the new message comes from a new number, a
new thread is created.
1. On the Messaging screen, touch the thread that has the mes-
sage you want to reply to.
2. Type your reply in the text box at the bottom. You can touch
the attach icon
3. Touch
if you want to reply with an MMS.
.
Forwarding a Message
1. On the Messaging screen, touch the thread that has the mes-
sage you want to forward.
2. Touch and hold the message.
3. Touch Forward in the menu that opens.
4. Enter a recipient for the message and edit the content if you
want.
5. Touch
.
Viewing Details About a Message
1. Touch and hold a message in a thread.
93
Page 94

2. Touch View details to see information about the message,
such as message type, sender, recipient, or date.
Deleting Messages or Threads
To delete messages in a thread:
1. On the Messaging screen, touch a thread.
2. Touch the Menu Key > Select item(s).
3. Touch the messages you want to delete. The ones you touch
will have a check in the box in front of them.
4. Touch
5. Touch Delete.
To delete message threads:
1. On the Messaging screen, touch and hold one thread you
want to delete.
2. If there are more threads you want to delete, touch them one
by one.
3. Touch
4. Touch Delete.
at the bottom.
at the bottom.
Changing Message Settings
Touch the Menu Key > Settings in the Messaging screen to
change Messages settings.
94
Page 95

Calendar
Calendar on the phone works with the web-based Google Calendar service for creating and managing events, meetings, and
appointments. It also works with the Microsoft Exchange ActiveSync calendar once you sign into your Exchange account on the
phone.
To open Calendar, touch
Calendar.
Viewing Your Calendars and Events
Select Visible Calendars
1. Open the Calendar app.
2. Touch the Menu Key > Calendars to display.
3. In the new screen, touch the calendars to check the ones you
want to see or uncheck those you’d like to hide.
Events from hidden calendars are not shown in the Calendar
app.
Change Calendar Views
You can view your calendars in different forms. The app offers
four view types: Month, Week, Day, and Agenda.
To change calendar views, touch the time shown at the top left
and select the view you prefer.
in the Home Screen and select
95
Page 96
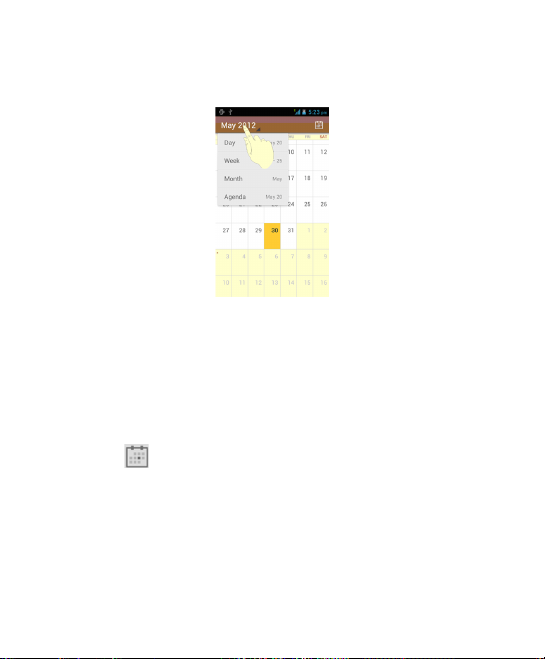
You can also change to Day view from Month view by touching
any day in the grid.
TIPS:
• In Month view, swipe vertically to see earlier months and later
months.
• In Week or Day view, swipe horizontally to see earlier weeks/
days and later weeks/days.
• When you are viewing earlier or later days, weeks, or months,
touch
at the top to quickly switch to today.
View Event Details
In Agenda, Day, or Week view, touch an event to view its details.
In Month view, touch a day to switch to Day view. Then touch an
event to view its details.
96
Page 97

Creating an Event
1. In any Calendar view, touch the Menu Key > New event to
open an event details screen for a new event.
You can also touch a spot in Day or Week view twice to add
an event to that time spot.
2. Add details about the event.
Enter a name, location, time span, and other additional de-
tails about the event.
NOTE: If you have more than one calendar, you can choose
the calendar to which to add the event by touching the current calendar above the Event name box.
3. Touch DONE at the top of the screen to save the new event.
Editing or Deleting an Event
1. Find the event you want to edit or delete.
2. Open its details screen (see Viewing Your Calendars and
Events – View Event Details in this chapter).
3. Do one of the following as you need.
97
Page 98
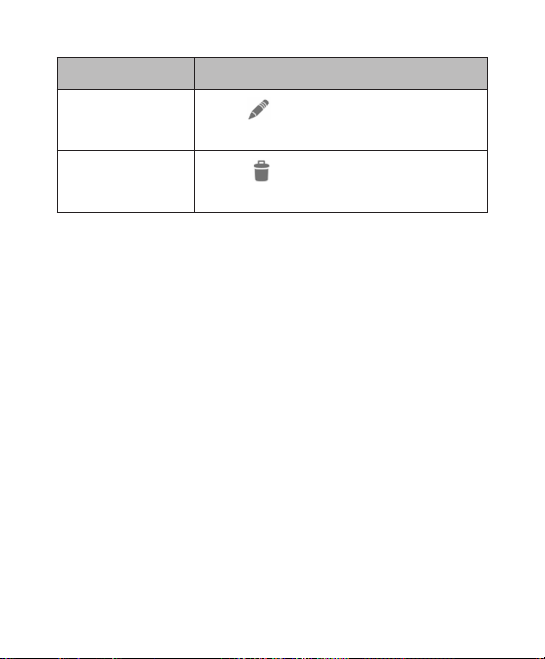
To… do…
Edit the event,
Delete the event,
touch
DONE to save your changes.
touch
then touch OK.
at the top of the screen. Touch
at the top of the screen and
Changing Calendar Settings
To change Calendar settings, open a Calendar view (Day, Week,
Month, or Agenda). Then touch the Menu Key > Settings.
You can change General settings, which apply to all accounts,
or other settings that only apply to specic accounts.
98
Page 99

Google Talk
Google Talk is Google’s instant messaging service. You can use
it to communicate in real time with other people who also use
Google Talk, on a phone, on the web, or with a desktop applica-
tion.
Signing In to See Your Friends
You must sign in to your Google account before you can use
Google Talk.
Touch
you launch Talk, touch the account you want to sign in with. Your
friends list is then displayed.
NOTE: You remain signed in to Google Talk after launching the
Talk app even if you switch to other apps, until you explicitly sign
out. To sign out, go back to your friends list and touch the Menu
Key > Sign out.
Adding a Friend
1. In the friends list, touch at the top right of the screen.
2. Enter your friend’s address and touch DONE.
Your friend’s address in Google Talk is a Gmail or other email
address that is congured to connect to Google Talk.
in the Home Screen and select Talk. The rst time
99
Page 100
NOTE: If other people try to add you as a friend, you will receive
a notication in the status bar and the invitation appears in your
friends list. You can touch the invitation to Accept, Decline, or
Block.
Changing Your Online Status
1. Touch your own entry at the top of your friends list.
2. In the screen that opens, touch your current status to change
it (or to sign out of Talk).
3. Enter a status message or if you already have one, edit it.
In addition to the standard status settings, you can also touch
Change to a recently-used status to select a message that
you’ve entered previously.
4. Touch the Back Key to return to your friends list.
Chatting With Friends
1. Touch a friend in your friends list. The chat screen for that
friend opens.
2. Enter your message and touch
or to initiate a video chat or voice chat if the friend is
online.
Switch Between Active Chats
If you have more than one chat going, you can switch between
100
. You can also touch
 Loading...