

Page 1
ZTE A302+
GSM Dual-band Digital Mobile Phone
User Manual
Page 2
Copyright © 2008 by ZTE Corporation
All rights reserved
No part of this publication ma y be excerpted, reprodu ced, translated or util ized
in any form or by any means, electronic or mechanical, inc luding photo copying
and microfilm, without the prior written permiss ion of ZTE Corporat ion.
ZTE operates a policy of continuous development. We reserve the right to
update the technical specifications in this document at any time without
prior notice.
Release:
Manual number:
08 05, 2008
V1.0
056584500840
Page 3
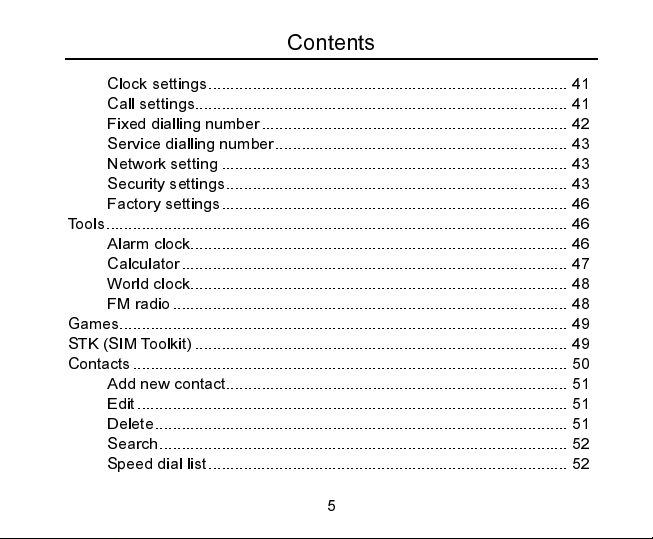
Contents
General Information...................................................................7
Welcome ................................................................................................... 7
Security ..................................................................................................... 7
Safety Precautions.................................................................................... 8
Getting Started .........................................................................15
Key Definition.......................................................................................... 15
Display Symbols...................................................................................... 17
Technical Parameters.............................................................................. 18
Battery..................................................................................................... 19
Removing & Installing the Battery.................................................. 19
Charging the Battery ...................................................................... 21
Connecting to the Network...................................................................... 23
SIM Card........................................................................................ 23
Inserting & Removing SIM Card..................................................... 24
Switch on/off Your Phone ............................................................... 24
Unlocking the SIM Card and Mobile Phone ................................... 25
Connecting to the Network............................................................. 26
Basic Operations......................................................................27
3
Page 4
Contents
Making a Call...........................................................................................27
Answering a Call......................................................................................28
Call Menu.................................................................................................29
Function Menu......................................................................... 31
Usage and Structure of Function Menu...................................................31
Messaging ...............................................................................................31
New message.................................................................................32
Inbox/Outbox .................................................................................. 33
Draftbox ..........................................................................................34
Msg settings....................................................................................34
Voicemail ........................................................................................36
Cell Info...........................................................................................36
Call Menu.................................................................................................36
Calls................................................................................................ 36
Diverts.............................................................................................37
Profiles.....................................................................................................39
Settings....................................................................................................40
Phone settings................................................................................40
Display settings...............................................................................41
4
Page 5
Contents
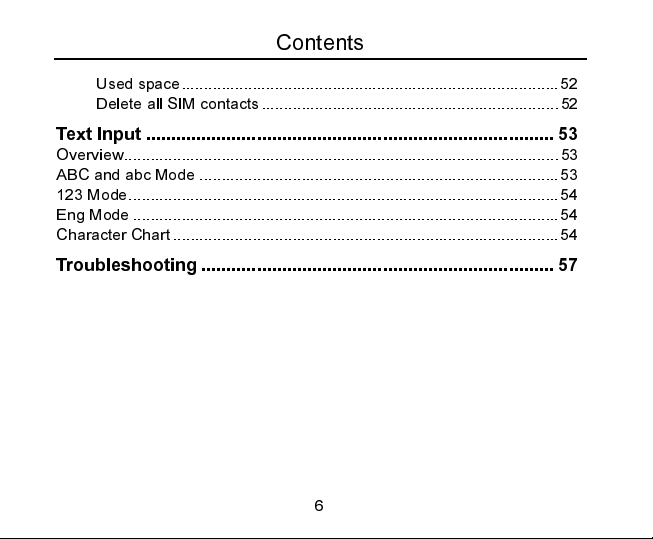
Clock settings................................................................................. 41
Call settings.................................................................................... 41
Fixed dialling number..................................................................... 42
Service dialling number.................................................................. 43
Network setting .............................................................................. 43
Security settings............................................................................. 43
Factory settings.............................................................................. 46
Tools........................................................................................................ 46
Alarm clock..................................................................................... 46
Calculator....................................................................................... 47
World clock..................................................................................... 48
FM radio......................................................................................... 48
Games..................................................................................................... 49
STK (SIM Toolkit) .................................................................................... 49
Contacts.................................................................................................. 50
Add new contact............................................................................. 51
Edit................................................................................................. 51
Delete............................................................................................. 51
Search............................................................................................ 52
Speed dial list................................................................................. 52
5
Page 6
Contents
Used space..................................................................................... 52
Delete all SIM contacts...................................................................52
Text Input ................................................................................. 53
Overview.................................................................................................. 53
ABC and abc Mode .................................................................................53
123 Mode.................................................................................................54
Eng Mode ................................................................................................54
Character Chart .......................................................................................54
Troubleshooting...................................................................... 57
6
Page 7
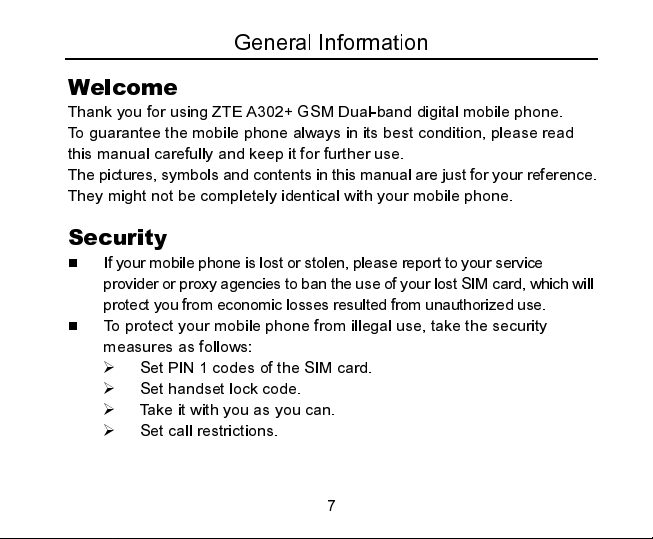
General Information
Welcome
Thank you for using ZTE A302+ GSM Dual-band digital mobile phone.
To guarantee the mobile phone always in its best condition, please read
this manual carefully and keep it for further use.
The pictures, symbols and contents in this ma nual are just for your reference.
They might not be completely identical with your mobile phone.
Security
If your mobile phone is lost or stolen, plea se report to your service
provider or proxy agencies to ban the use of your lost SIM card, which will
protect you from economic losses resulted from unauthorized use.
To protect your mobile phone from illegal use, take the security
measures as follows:
Set PIN 1 codes of the SIM card.
Set handset lock code.
Take it with you as you can.
Set call restrictions.
7
Page 8
General Information
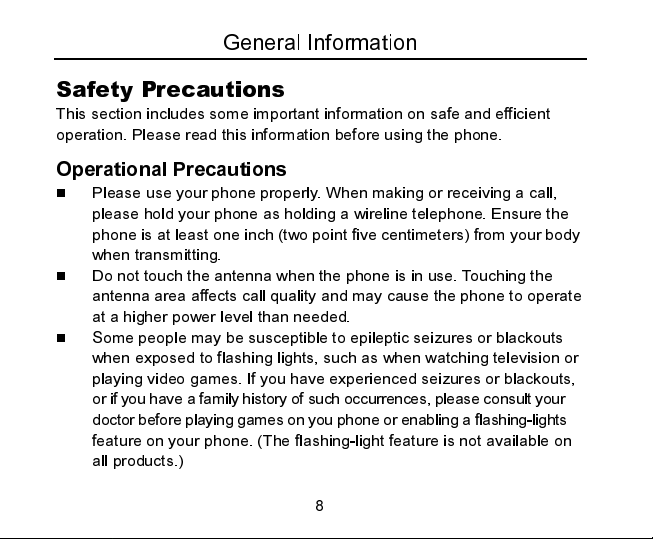
Safety Precautions
This section includes some important information on safe and efficient
operation. Please read this information before using the phone.
Operational Precautions
Please use your phone properly. When making or receiving a call,
please hold your phone as holding a wireline telephone. Ensure the
phone is at least one inch (two point five centimeters) from your body
when transmitting.
Do not touch the antenna when the phone is in use. Touching the
antenna area affects call quality and may cause the phone to operate
at a higher power level than needed.
Some people may be susceptible to epileptic seizures or blackouts
when exposed to flashing lights, such as when watching television or
playing video games. If you have experienced seizures or blackouts,
or if you have a family history of such occurrences, pl ease consu lt your
doctor before playing games on you phone or enabling a fla shing-li ghts
feature on your phone. (The flashing-light feature is not available on
all products.)
8
Page 9
General Information
Keep the phone out of the reach of small children. The phone may
cause injury if used as a toy.
Precautions While Driving
Please pay attention to the traffi c safety. Check the laws and regulat ions
on the use of your phone in the area where you drive. Always obey them.
Use hands-free function of the phone, if available.
Pull off the road and park bef ore making or answering a call i f condit ions
require.
Precautions for Medical Devices and Facilities
When using your phone near pacemakers, please always keep the
phone more than eight inches (twenty centimeters) from the pac emaker
when the phone is switched on. Do not carry the phone in the breast
pocket. Use the ear opposite the pacemaker to minimize the potential
for interference. Switch off the phone immediately if necessary.
Some phones may interfere with some hearing aids. In the event of
such interference, you may consult your hearing aids manufacturer to
discuss alternatives.
9
Page 10
General Information
If you use any other personal medical device, please consult the
manufacturer of your device to determine if it is adequately shielded
from RF energy.
In those facilities with special demand, such as hospital or health care
facilities, please pay attention to the restriction on the use of mobile
phone. Switch off your phone if required.
Mobile Phone
Please use original accessories or accessories approved by the phone
manufacturer. Using any unauthorized accessories may affect your
mobile phone’s performance, damage your phone or even ca use danger
to your body and violate related local regulations about telecom terminals.
Turn off your phone before you clean it. Use a damp or anti-static
cloth to clean the phone. Do not use a dry cloth or electrostatically
charged cloth. Do not use chemical or abrasive cleaners as these
could damage the phone.
As your mobile phone can produce electromagnetic field, do not
place it near magnetic items such as computer disks.
10
Page 11
General Information
Using the phone near electrical appliances such as TV, telephone,
radio and personal computer can cause interference.
Do not expose your mobile phone to direct sunlight or store it in hot
areas. High temperatures can shorten the life of electronic devices.
Keep your phone dry. Any liquid may damage your phone.
Do not drop, knock or harshly treat the phone. Rough handling can
break internal circuit boards.
Do not connect the phone with any incompatible enhancement.
Do not attempt to disassemble the mobile phone and battery.
Do not store the phone with flammable and explosive articles.
Do not charge the mobile phone without battery.
Precautions for Potentially Explosive Atmospheres
Switch off your phone prior to entering any area with potentially
explosive atmospheres, such as fueling areas, fuel or chemical
transfer or storage facilities.
Do not remove, install, or charge batteries in such areas. Spark in a
potentially explosive atmosphere can cause an explosion or fire
resulting in bodily injury or even death.
11
Page 12
General Information
T o avoid pos sible interferen ce with blasting operation s, switch off your
phone when you are near electrical blasting cap s, in a blastin g area, or in
areas posted “Turn off electronic devices.” Obey all signs and instructions.
Precautions for Electronic Devices
Some electronic devices are susceptible to ele ctromagnetic interference
sent by mobile phone if inadequately shielded, such as electronic
system of vehicles. Please consult the manufacturer of the device
before using the phone if necessary.
Safety and General Use in Vehicles
Safety airbag, brake, speed control system and oil eject system should n’t
be affected by wireless transmitting. If you do meet problems above,
please contact your automobile provider. Do not place your phone in
the area over an airbag or in the airbag deployment area. Airbags
inflate with great force. If a phone is placed in the airbag deployment
area and the airbag inflates, the phone may be propelled with great
force and cause serious injury to occupants of the vehicle.
12
Page 13
General Information
Please turn off your mobile phone at a refueling point, and the same
to the place where the use of two-way radio is prohibited.
Aircraft Safety
Please turn off your mobile phone before the airplane takes off. In
order to protect airplane’s communication system from interference, it
is forbidden to use mobile phone in flight. Using mobile phone before
the plane taking off should get aircrew’s permission according to
safety regulations.
If the mobile phone comprises the function of automa tic tim ing power-on,
please check your alarm setting to ensure that your phone will not be
automatically turned on during flight.
Battery Use
Do not short-circuit the battery, as this can cause overheating to bring
about fire.
Do not store battery in hot areas or throw it into fire. Otherwise, it will
cause explosion.
13
Page 14
General Information
Do not disassemble or refit the battery. Otherwise, it will cause liquid
leakage, overheating, explosion and ignition of the battery.
Please store the battery in a c ool dr y place if yo u do n’t use it for a
long period.
The battery can be recharged for hundreds of times, but it wi ll eventu ally
wear out. When the operating time (talk time and standby time) is
noticeably shorter than normal, it is time to replace a new one.
Please stop using the charger and battery when they are damaged or
show evidence of aging.
Return the wear-out battery to the provider or dispose of it in
accordance with environment regulations. Do not dispose of it in
household rubbish.
Warning:
does come into contact with the eyes or skin, wash thoroughly in clean
water and consult with a doctor.
If the battery is damaged, do not discharge it. If the leakage
14
Page 15
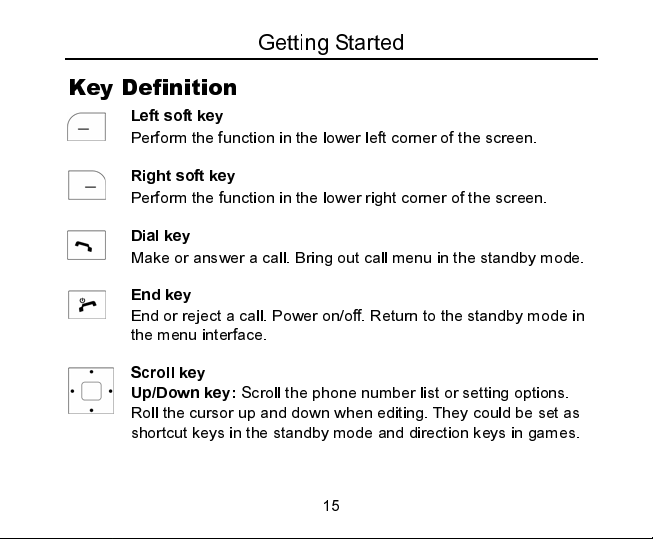
Key Definition
Left soft key
Perform the function in the lower left corner of the screen.
Getting Started
Right soft key
Perform the function in the lower right corner of the screen.
Dial key
Make or answer a call. Bring out call menu in the standby mode.
End key
End or reject a call. Power on/off. Return to the standby mode in
the menu interface.
Scroll key
Up/Down key:
Roll the cursor up and down when editing. They could be set as
shortcut keys in the standby mode and direction keys in games.
Scroll the phone number list or setting options.
15
Page 16
Getting Started
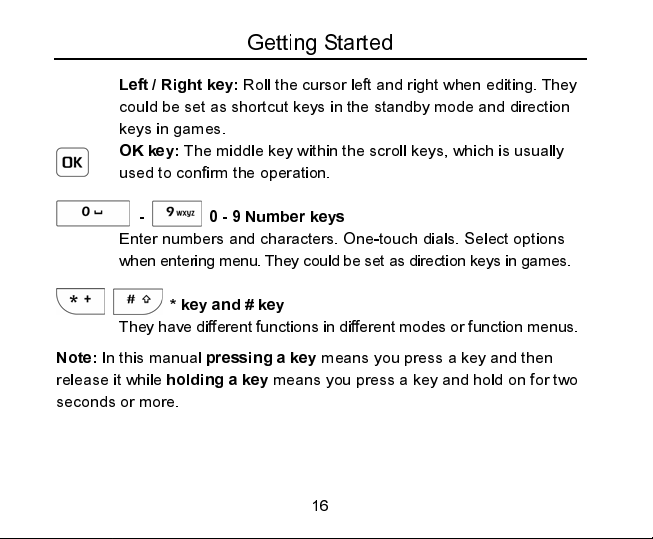
Left / Right key:
could be set as shortcut keys in the standby mode and direction
keys in games.
OK key:
used to confirm the operation.
- 0 - 9 Number keys
Enter numbers and characters. One-touch dials. Select options
when entering menu. They could be set as direct ion keys in ga mes.
They have different functions in different modes or function menus.
Note:
In this manual
release it while
seconds or more.
holding a key
Roll the cursor left and right when editing. They
The middle key within the scroll keys, which is usually
* key and # key
pressing a key
means you press a key and then
means you press a key and hold on for two
16
Page 17
Getting Started
Display Symbols
Signal strength.
Keypad locked.
Roaming.
New message. No space for messages when blinking.
Enable mute mode.
Indicate the alarm clock has been set.
Indicate battery level.
Enable vibrating function.
17
Page 18
Getting Started
Technical Parameters
Handset
Type ZTE A302+
Dimensions(W×L×H) 46.8mm×108.2mm×12.8mm
Weight Approx. 48g (without battery)
Battery
Continuous standby time Approx. 90 hours - 130 hours
(subject to network status)
Continuous talk time Approx. 2 hours - 4 hours
(subject to network status)
For other parameters about battery and charger, refer to their labels.
18
Page 19

Getting Started
Battery
The accessory lithium battery of the handset can be immediately used
after unpacking. A new battery will have the best performance after full
charge/discharge cycles for the first three times.
Removing & Installing the Battery
Remove: Power off your phone. Push down the spring buckle up and slide
down the cover and then lift the battery from the compartment to remove it.
19
Page 20

Getting Started
Install: Place the bottom of the battery into position, push down on the
upper section of the battery until it clicks into place and then install the
battery cover.
20
Page 21

Getting Started
Charging the Battery
Plug the charger connector into the charge port at the bottom of the
phone. (Note: Put upward the side with arrow.) Then plug the other
end of the charger in an appropriate electrical outlet.
Now, a charge indicator d isplays in the upper rig ht corner of the screen. If
the battery is charged in power-off condition, the indicator bar will scroll.
If the phone is over-used in shortage of battery or not used for a long
time, it will take a few minutes that the indicator bar is shown.
21
Page 22

Getting Started
When the battery is fully charged, the bar stops scrolling. Generally
the whole charge process needs two to three hours (charge the
battery for six to eight hours for the first three times). During the
charge process, your phone, battery and charger may become hot,
and this is a normal phenomenon.
Disconnect the charger with the phone and the power outlet when
charging finished.
Warning:
Put the phone at a ventilated place with temperature between
+
5 °C ~+40 °C.Use only the supplied or approved chargers.
Using unauthorized charger may cause danger and violate the
authorization and warranty rules of the phone.
Charge the battery in time when your phone automatically powers off
or displays a warning “Battery low”.
The conversation time and standby time of the phone lie on ideal
working environments. In practice, the battery working time varies
with different network conditions, working environments and modes.
22
Page 23

Getting Started
Connecting to the Network
SIM Card
Insert the SIM card (Subscriber Identity Module card) into the phone. This
SIM card can be used by any GSM mobile phone (A new phone can read
the SIM card automatically).
Don’t touch the metal contact area of the SIM card, doing so may cause
information in the card lost or destroyed. Keep the card away from
electricity and magnetism.
Warning:
or removing the SIM card is forbidden when it is connected to an outer
power source.
Switch off your phone before changing the SIM card. Inserting
23
Page 24

Getting Started
Inserting & Removing SIM Card
Switch off your phone, disconnect the outer power source and
remove the battery.
Insert the SIM card into the SIM card slot or pull it out from the slot.
Switch on/off Your Phone
Hold
End key
The mobile phone will automatically test whether the SIM card is plugged
in and valid after power on, then the following messages will be displayed
on the screen sequentially:
to power on/off the phone.
24
Page 25

Getting Started
Enter PIN 1 ——
Enter Phone Code ——
Searching ——
if a SIM card password has been set.
if a handset lock code has been set.
search for the right network.
Unlocking the SIM Card and Mobile Phone
By setting a PIN 1 (personal identification number) code of the SIM card
and the handset lock code, you can protect your SIM card and phone from
illegal use.
Method to unlock the SIM card: Enter the PIN 1 code and press the #
key or Left soft key [OK].
If you enter an incorrect PIN 1 code three times in a row, your SIM card will
be locked by the network and the phone will ask for the PUK code instead.
Note:
Your service provider will set a standard PIN 1 code (four to eight
digits) for your SIM card; please change it with your private password as
soon as possible.
Method to unlock the phone: Enter the phone lock code and press the
# key or Left soft key [OK].
Note:
If you forget your handset lock code, please connect with your
dealer or the authorized local customer service center.
25
Page 26

Getting Started
Connecting to the Network
After the SIM card and the phone are unlocked, the mobile phone will
automatically search for the network.
After a few seconds, your phone will be registered on the network. Now
your phone is in the standby mode. Besides receiving and sending calls,
you can do the following things:
Press the Left soft key to enter the function menu.
Press the Right soft key to enter the Contacts.
The Up/Down/Left/Right key could be set under the setting menu as
shortcut keys in the standby mode.
Note:
If “Emergency only” is shown on the screen, you can only make
emergency calls.
Note:
Pressing # and then * in less than two seconds in the standby mode
may allow you to lock the keypad, and unlock it with the same operation.
The keypad lock is used to prevent the keys from being accidentally
pressed, and allows you to answer calls in this mode.
26
Page 27

Basic Operations
Making a Call
You can make or answer calls in the standby mode. The bar at the upper
left corner of the screen shows the network signal strength.
Making DDD: Enter the telephone number by Number keys (including
the area code when making a long distance call), press Dial key to
send a call. Press the End key to end a call.
Dialing an extension number:
Method 1: Dial the telephone exchange and then the extension number.
Method 2: Enter the telephone exchange number, press the # key
twice to enter pause character “P”, enter the extension number, and
then press Dial key. Then your phone will dial the extension automatic ally
after getting through the exchange. The entering s equence i s as bel ow:
Area code Exchange number P Extension number Dial key
Making IDD: Press the * key twice until your screen displays the
character “+” which is the preset symbol of an international call,
then enter the country code and the phone number and then press
the Dial key.
27
Page 28

Basic Operations
Dialing the number in the List: Generally, all calls you have made or
received are saved in a list of the phone numbers. All numbers are
grouped as Dialled Calls, Received Calls and Missed Calls. Your
mobile phone lists all the numbers so that you can view all the call
logs. When the list is full, old numbers will be deleted automatically.
You can check the list by the following operations:
View All calls by pressing the Dial key.
View Contacts by pressing the shortcut keys you set.
All the numbers in the list can be directly dialled by pressing the
Dial key.
Note:
The Up/Down/Left/Right key shortcuts can be customized in
Settings - Phone settings - Fastkey settings
.
Answering a Call
Press the Dial key to answer an incoming call. If Anykey Answer is
activated, you can press any key (except the End key/Right soft key) to
answer a call in call-in mode.
28
Page 29

Basic Operations
Call Menu
When in the in-call mode, you can enter the call menu by pressing
The operation methods are the same as those in function menu. Call menu
can be seen only in the process of communication and those functions such as
Call waiting, Call keeping, Multiparty requires support from the network. If
you need those services, please contact your network service provider.
You can do the following operations in the call menu:
Mute:
Stop sending local voice.
Speaker volume:
Hold/Retrieve calls/Swap calls:
Adjust speaker volume.
Keep the current call/Resume the
kept call/Switch between two calls.
Contacts:
Messaging:
Conference call
Join all calls:
Hold all calls:
Private:
Enter the contacts list.
Enter the messaging interface.
Add the current call to Multiparty.
Hang on all calls.
Converse with one side privately and keep the session
with others.
29
Option
.
Page 30

Basic Operations
Exclude:
End all calls:
Note:
Some menu items can only appear in special cases. Menu items
such as
Swap
coexist at the same time.
Keep one call from Multiparty.
End up the current call and the hang-on calls.
will appear only when the ongoing call and the hang-on call
30
Page 31

Function Menu
Usage and Structure of Function Menu
Scrolling search function: Enter the Function main menu by pressing
Menu
or the OK key in the standby mode. Press the Up/Down key to
select in menu.
In the function menu, you can select or quit some menus by pressing
the Left soft key or Right soft key according to the prompt displayed
on the screen.
Messaging
If the network support s and you have s ubs cri bed this ser vic e, you can sen d
and receive text short messages. And you also can subscribe a voice mailbox
to receive voicemai l. Ple ase contact your service provider for de ta il s.
In the standby mode, press
OK key to access the message menu interface.
The submenus include: New message, Inbox, Outbox, Draftbox, Msg
settings, Voicemail and Cell info. You will be informed with vibration or
ringing tone (depending on your settings) when a new message is
Menu
, select
31
Messaging
and then press the
Page 32

Function Menu
received. The amount of messages that can be stored depends on the
capacity of your SIM card.
New message
Set a message service center number before starting to send messages.
In the message interface, select
OK key to access message input interface to write the message.
(Please refer to Chapter 5 “Text Input”.)
When you finish inputting the message, press
then use the Up/Down key to select
save, Send to contacts,
Select
Send to one
or select a recipient from the
to send and save message to the Outbox. You can directly input
the recipient’s number according to prompts on the screen, or
select a recipient from the
you can only bring out the recipient’s numbers from the Contacts.
Press the OK key to select the record, and then press Left soft
key to send the SMS. There will be prompt information on the
, you can directly enter the recipient’s numb er,
New message
or
Save as draft
Contacts
Contacts
32
and press the
Options
Send to one, Send and
.
. Select
. Select
Send to contacts
, and
Send and save
,
Page 33

Function Menu
screen after the message is sent successfully. Select
draft
to save messages to the Draftbox.
Note:
The SMS centers of some countries and regions do not support
messages longer than one hundred and sixty English characters.
Inbox/Outbox
Select
In the message list, press the OK key to view the message
Inbox
to check received short messages; select
to check the successfully outgoing messages saved in the SIM
card, and use the
details; press
Read:
Read the message.
Reply:
Send messages to the recipients. (The menu appears
Up/Down
Options
key to select in the message list.
to do the following operations:
only when you are reading messages in the inbox.)
Delete:
Delete the message.
Forward:
Call sender:
Transfer messages to others.
Call the sender. (The menu appears only when
you are reading messages in the Inbox.)
33
Save as
Outbox
Page 34

Function Menu
Extract No.:
it on the screen. If you select one, the number will be
displayed on the dialing interface for editing or dialing.
Delete all:
Draftbox
Select
Draftbox
to check short messages which have been edited, yet not
sent out, but saved in the SIM card, and use
message list; press
Read:
Delete:
Forward:
Delete all:
Msg settings
You must set up necessary SMS information before using message
functions. Access the
Templates:
Extract a number from the message text and list
Delete all the received or saved messages.
Up/Down key
Options
to do the following operations:
to select in the
Read the message.
Delete the message.
Transfer the message to others.
Delete all the draft messages.
Msg settings
submenu:
When editing messages, holding the * key can bring
34
Page 35

Function Menu
out the preset template sentences. In this menu, you can edit or
change phrases.
Message center:
number (You must obtain this number from your service
provider.), and then press
Message validity:
will repeat to deliver a message till it is received. Press the
Up/Down key to select a valid time and then press
confirm. Note: This function requires the network to support.
Status report:
be sent to inform you after the sent message has reached the
destination. There is no st atus report when you select
Note:
This function requires the network to support.
Used space:
number of records in SIM card.
Input the short message service center
Save
to store the number.
In the period of validity, the message center
Select
If the
Status report
Check the number of saved records and maximum
is set ON, a message report will
Send to contacts.
35
to
Page 36

Function Menu
Voicemail
Select and access
Select
the voice message.
Voicemail No.:
Voicemail
Get voicemail
submenu:
to check the voicemail box and listen to
Set the voicemail number.
Cell Info.
Press
Select
to set Subjects, Language or Service status. In
Subjects interface, select Add subject to add subjects.
Call Menu
In the standby mode, press
OK key to access the Call Menu interface.
Calls
View calls list
Select
All calls
Select
Received calls
Menu
, select
Call Menu
to view all calls list.
to view the calls that you have received.
36
and then press the
Page 37

Function Menu
Select
Dialled calls
Select
Missed calls
have not answered.
In the calls list interface, pre ss
Send message:
operation is the same as creating messages.
Detail:
Save:
Delete:
Select
Call duration
the approximate total duration or clear the record.
Save the number to the SIM card.
Diverts
This service enables you to divert some incoming calls to other preset
numbers. Please contact your service provider for details.
Diverts: Set diverts in different conditions.
Divert always:
When busy:
to view calls that you have dialed.
to view the calls that you have received, but
Options
to access the detailed submenus:
Send short messages to the number. The
View the detailed information of the call.
Delete this entry.
to view the approximate duration of the last call, view
Divert all calls unconditionally.
Divert calls when you are already on another call.
37
Page 38

Function Menu
No reply:
Divert calls when you are not able to answer the
phone within a preset period.
Unreachable:
Divert calls when you are not in an area covered
by your service network.
Cancel all
Use Scroll key to select
Cancel all
to cancel all diverts services.
When you have set conditions and types of divert services, the
following can be chosen:
Activate:
Deactivate:
Checking availability:
Only registered services are functional.
Delete the divert service.
Check the status of the recent service.
By service
Under the
By service
submenu, there are following service
options you can choose to set by a preset divert number:
All services:
Divert incoming calls, voice calls and short
messages.
Voice calls:
Data:
Only divert voice calls.
Only divert data.
38
Page 39

Function Menu
Fax:
Only divert faxes.
Messages:
All except messages:
Only divert short messages.
Diverts all services except short messages.
Profiles
In the standby mode, press
key to access the profile interface.
Select Profiles: You can select the profile you need in this submenu.
The profile options are:
Headset
(this option only appears when an earphone is inserted)
The default settings for each individual profile are preset by the
manufactory. You can change them in
Edit Profile: Change the detailed settings of the selected profile.
Ringtone:
Ringing volume:
Speaker volume:
Key tones:
Alarm tone:
Menu
, select
Profiles
and then press the OK
General, Meeting, Outdoor, Indoor
Personalise
menu.
Select one from ten types of polyphonic ring tones.
Adjust the volume of the ring tone.
Adjust the volume of the speaker.
Select to turn ON/OFF the tone when a key is pressed.
Select to turn ON/OFF alarm tone for low power.
39
and
.
Page 40

Function Menu
Missed alert:
missed call.
Message alert:
is coming or select to turn off the alert tone.
Vibrator:
Select to turn ON/OFF the tone when there is a
Select the alert tone type when a new message
Select to turn on/off the vibrator.
Settings
In the standby mode, press
key to access the setting interface.
Phone settings
Select and enter the Phone Settings submenu.
Language:
Own number:
Fastkey settings:
Up/Down/Left/Right key.
Auto lock keypad:
function. If you select “On”, the keypad will be locked in one minute
Select the language for the display texts.
Menu
, select
Settings
and then press the OK
Edit/Add/Delete your own phone number.
Set the shortcut menu item corresponding to the
Select to turn on/off the automatic keypad locking
40
Page 41

Function Menu
after the screen is switched to the standby mode. You can unlock the
keypad according to the prompt on the interface.
Display settings
Backlight:
Select to turn on/off the light of screen’s background.
Clock settings
Date and Time:
You can set date and time. Use the Scroll key to
switch among day, month, year and time. Date can be set from
January 1st, 2007 to December 31st, 2055. Time can be set from
00:00 to 23:59. After correctly inputting the date and time, press OK
to confirm and exit.
Date format:
Set the date displayed format.
Call settings
Anykey answer:
pressing any key except the End key and the Right soft key.
Minute minder:
per minute during a call, or selects “Always off” instead to turn it off.
If “ON” is selected, you can answer the call by
This function enables a remin der 5 or 15 se conds ahead
41
Page 42

Function Menu
Connected minder:
call is connected.
Call waiting:
function; select Checking availability to query the current status.
When enabled, the network will notify you of a new call if a new
incoming call takes place during the current conversation. Please
contact the network service provider for detailed usage.
Hide my number:
select Set by network. Please contact the network service provider for
detailed usage.
Fixed dialling number
Settings: You can enable or disable fix dialing to a specified phone
number only. You must enter your PIN 2 code for authentication. You
can select to change the PIN 2 code.
List: List of the fixed dialled numbers.
Select to turn ON/OFF the alert ring when the
Select Activate/Deactivate to enable/disable this
Select ON/OFF to enable/disable this function; or
42
Page 43

Function Menu
Service dialling number
The service number has been preset in the SIM card by the network
service provider. The service dialling number can be checked or dialled,
however, these numbers can not be modified or deleted.
Network setting
In this menu, you can select
service provider according to requests.
If you select Automatic to choose a network provider, and then change the
other SIM card, you need to select the network provider again by choosing
Automatic or Manual.
Automatic/Manual
Security settings
Security features protect you from illegal use of your phone and SIM card.
Note:
You need to input the handset lock code to enter the security
settings interface. The default lock code is 1234. Please change it with
your own private password as soon as possible.
43
to select the network
Page 44

Function Menu
SIM password:
SIM card from illegal use. Select
SIM password protection; select
Note:
Three consecutive incorrect PIN 1 code entries will lock the SIM card.
Then, the PUK code is needed to unlock the SIM card. The PIN 1 code
and the PUK code may be provided to you together with the SIM card. If
not, please contact with your network service provider. Please change it
with your own private password as soon as possible.
Phone lock:
unauthorized use. Select
lock protection; select
Note:
The default Phone lock code is 1234.
Network call bar:
restriction options to improve security level. Please contact with the
network service provider for detailed use . Th e network servi ce provid er
provides a 4-digit network password to enable your call restrictions.
International calls:
The SIM password (PIN 1 code) can prevent your
ON/OFF
Change PIN 1
to enable or disable the
to set a new PIN 1 code.
Phone lock can prevent your mobile phone from
ON/OFF
Change code
to enable or disable the handset
to set a new handset lock code.
You can set any combination of the following call
Bar all international calls.
44
Page 45

Function Menu
All except home:
Incoming calls:
Incoming if abroad:
Outgoing calls:
After choosing one of the above options, choose
Bar international calls except local call.
Bar all incoming calls.
Bar all incoming calls when roaming abroad.
Bar all outgoing calls.
Select
restrict any of the following services:
All services:
Voice calls:
Data:
Fax:
Messages:
All except messages:
Restrict incoming calls, voice calls and short message s.
Restrict voice calls only.
Restrict data only.
Restrict faxes only.
Restrict short messages only.
Restrict all services except short messages.
After select one type of restriction services, the following can be
chosen:
Activate:
Deactivate:
Checking availability:
restriction service.
The restriction is functional.
Delete the restriction.
Check the current status of the
45
to
Page 46

Function Menu
Cancel all:
Note:
You need to input the network password to set or cancel network
restrictions. Three consecutive incorrect password entries will lock the call
restrictions service. Please contact network service provider to unlock it.
Select
Cancel all
to cancel all call restrict ions set ting.
Factory settings
In this menu, you can select to restore the related settings of the phone to
factory settings.
Tools
In the standby mode, press
to access the tools interface.
Alarm clock
Your phone can set up to two alarm clocks at the same time.
Set alarm:
features of the alarm according to instructions: alarm type, date (if
required), time, and ring tone.
Under Set alarm submenu, you can set the corresponding
Menu
, select
46
Tools
and then press the OK key
Page 47

Function Menu
List alarms:
key to view alarm clocks settings. Press Options to enter the setting
screen, select Edit to edit the alarm clock settings, or select Delete to
delete it, or select Enable/Disable to enable/disable it.
Clear all:
Define rest day:
within a week. Workday alarm will not ring on the defined rest day(s).
Press the Up/Down key to select and then press the OK key to set or
cancel rest day.
Calculator
Press 0-9 Number keys to input numbers, press the # key to enter the
decimal point.
Press the Left soft key to switch among +, -, *, /.
Press 0~9 Number keys to input numbers, and pre ss the
number can come.
Press the Right soft key to clear last digit and results. Press the End
key to exit the calculator. Press the Left soft key [Equal] to get results.
Select List alarms submenu, you can use the Up/Down
Select Clear all to clear all the alarm clocks.
Select Define rest day to set or change rest days
* key
47
negative
Page 48

Function Menu
Note:
This calculator has limited accuracy and rounding errors may occur
especially in long division.
World clock
The World clock function provi des ti me informati on on maj or worldwide citi es.
You can view the time of the desired city by using the
Left/Right/Up/Down key on the navigation screen of World Time.
Press the Left soft key
local time of the phone.
Press the Right soft key
FM radio
Your handset can be used as a FM radio with an inserted earphone.
Auto search:
Save:
Channels:
Set frequency:
Note:
Insert an earphone firstly then you can enter the FM radio interface.
search the channel automatically.
save current channel.
check saved channels.
[Save]
to save the selected city time as new
[Back]
to quit.
set the frequency manually.
48
Page 49

Function Menu
Games
In the standby mode, press
key or the Left soft key to access the games interface.
Push box:
The options are as follows:
New game:
Load game:
Help:
Check the rules and instructions of the game.
Menu
, select
Games
Start a new game.
Reload the last saved game.
and then press the OK
STK (SIM Toolkit)
In the standby mode, press Menu, select
to access the STK interface.
This service requires the network service provider’s support. If neither the
SIM card nor the network service provider supports this service, this
service will not be available. For more information, please consult the
network service provider.
49
STK
and then press the OK key
Page 50

Function Menu
Contacts
In the standby mode, press the Right soft key to access the
It prompts
can press the Left soft key to add records. Saved records will be listed in
the contacts list and ordered by the first character of the name. View the
records by pressing the Up/Down key, and then press the Dial key to dial
the number.
Contacts empty
In the contacts list interface, press the
information of a record, and in the detailed information interface press
Options
to access the menu interface. The menu opti ons are as f ollows:
Send message:
Edit:
Delete:
Send name card:
Add to speed:
Edit this record.
Delete this record.
to contacts,
record to one specific number (0,2-9) into the speed dial list, so
when there is no record in the Contacts, you
OK
Access the message input interface.
Select
Send to one, Send and save, Send
or
Save as draft
Select Setting Speed Dial to set the current
to send or save the current record.
50
Contacts
key to view the detailed
interface.
Page 51

Function Menu
that in the standby mode, if you hold this corresponding number
key, the phone will dial the number automatically. Press
to cancel the setting.
Add new contact
In the contacts list interface, press
Enter the phone number you want to add.
Enter the name of the number you want to add.
Press OK to store the contact into the SIM card.
Edit
In the names list interface, press
current Contact record.
Delete
In the names list interface, press
all information of the current record.
Options
Options
Options
51
and select
and select Add new Contact
and select
Edit
. You can edit the
Delete
, you can delete
Delete
.
Page 52

Function Menu
Search
In the names list interface, press
enter the name you want to search.
Quick-search: In the contacts list interface, you can press the number
keys to go to the record of the name with the similar initial character.
Sort principle: Sort by ASCII Code in English mode.
Match principle: If match, go to the character; if not, go to the next.
Speed dial list
List the speed dial number.
Used space
View the number of saved records and maximum number of records in
SIM card.
Delete all SIM contacts
Delete all records stored in SIM.
Options
52
, select
Search
and then
Page 53

Text Input
Overview
Your mobile phone provides the following input methods: upper and lower
case input, numeric input and predictive text input, punctuation mark or
special characters input.
When you are in a field that allows characters to be entered, you will notice
the text input mode indicator in the upper left corner of the screen. Press
the # key to switch among different input modes.
ABC and abc Mode
Use the number keys from 2 to 9 to enter your text.
Press the key labeled with the required letter.
Once for the first letter.
Twice for the second letter.
And so on.
To insert a space, press the 0 key once. To delete letters, press the
Right soft key.
Press the * key to open a list of special characters, use the Scroll key
to move through the list, and press the OK key to select a character.
53
Page 54

Text Input
123 Mode
The 123 mode enables you to enter numbers in a text message.
Press the keys corresponding to the required digits.
Eng Mode
It is a Predictive text input mode. You can enter any letter with a
single key press. Predictive text input is based on a built-in dictionary.
To write the desired word, press the keys 2 to 9. Press each key only
once for one letter. For example, to write “book”, press 2 for B, 6 for O
twice, 5 for K.
When you finish writing the word and it is correct, press the OK key to
enter in the screen. If the word is not correct, press the Scroll key to
view other matching words found in the dictionary.
Character Chart
Refer to the table below for more information on the characters available
using the keys.
54
Page 55

Text Input
key Corresponding Characters
1 1 and some common symbols
2 ABCabc2
3 DEFdef3
4 GHIghi4
5 JKLjkl5
6 MNOmno6
7 PQRSpqrs7
8 TUVtuv8
9 WXYZwxyz9
0 Space 0
* key Press * key to bring out symbol entering.
55
Page 56

Text Input
# key Switch among different input modes.
Up/Down key Roll the cursor up/down.
Left/Right key Roll the cursor left/right.
End key Exit
56
Page 57

Troubleshooting
This section descri bes how to tro ubl es hoot so me probl ems when they oc cur
to your phone. If you cannot deal with them, contact your local dealer.
“Enter PIN 1 code” is shown when the phone is switched on.
Input the PIN 1 or input the new PIN 1 if you have changed the code. The
code can be set “off” if you do not want to input.
“Insert SIM” is shown when the phone is switched on.
Turn off your phone and make sure that you have inserted a valid SIM card.
No key tone volume when pressing keys.
Check the keypad setting in the Profiles.
No incoming ring tone.
Check the ringing tone and ringing volume settings in the Profiles.
No alarm tone when the reminder time reaches.
Check the Profiles and the alarm ring.
A phone number cannot be dialed.
Check whether call restriction is set to the number.
57
Page 58

Troubleshooting
A phone call cannot be answered.
Check whether call restriction is set to the number.
Short message cannot be sent.
Check the Message center setting in the Messaging-Msg settings.
Some menus related to voice setting cannot be used.
Check the Profiles.
58
Page 59

Health and safety information
The phone with internal antenna has been te sted for co mplian ce with FCC RF Ex posu re
(SAR) limits and is complied with FCC RF exposure compliance requirements.
Exposure to radio frequency energy
Radio wave exposure and Specific Absorption Rate (SAR) information The
handset is designed to comply with safely, requirements for exposure to radio
waves. This requirement is based on scientific guidelines that include safety
margins designed to assure the safety of all persons, regardless of age and
health.
The radio wave exposure guidelines employ a unit of measurement known as
the Specific Absorption Rate, or SAR. Tests for SAR are conducted using a
standardized method with the phone transmitting at its highest certified power
level in all used frequency bands.
While there may be differences between the SAR levels of various ZTE phone
models, they are all designed to meet the relevant guidelines for exposure to
radio waves.
The SAR limit recommended is 1.6W/kg averaged over one(1) gram of tissue.
The highest SAR value for this model phone tested by 7LAYERS for use at the
head is 1.36 W/kg(1g)
The highest SAR value for this model phone tested by 7LAYERS for use at the
body is 0.733 W/kg(1g) SAR compliance for body-worn operations is restricted
to belt-clips, holsters, or similar accessories that have no metallic component in
the assembly and which provide at least 1.5 cm separation between the device,
including its antenna, and the users body.
FCC Part 15 statement
This device complies with part 15, part 22 and part 24 of the FCC rules. Operation is
subject to the following two conditions:
(1) this device may not cause harmful interference (2) this device must accept any
interference, including interference that may cause undesired operation.
This equipment has been tested and found to comply with the limits for a Class B digital
device, pursuant to Part 15 of the FCC Rules. These limits are designed to provide
reasonable protection against harmful interference in a residential installation. This
equipment generates uses and can radiate radio frequency energy and, if not installed
and used in accordance with the instructions, may cause harmful interference to radio
communications. However, there is no guarantee that interference will not occur in a
particular installation. If this equipment does cause harmful interference to radio or
television reception, which can be determined by turning the equipment off and on, the
Page 60

user is encouraged to try to correct the interference by one or more of the following
measures:
- Reorient or relocate the receiving antenna.
- Increase the separation between the equipment and receiver.
- Connect the equipment into an outlet on a circuit different from that to which the receiver
is connected.
Consult the dealer or an experienced radio/TV technician for help.
WARNING
Changes or modifications made to this equipment not expressly approved by ZTE
compliance could void the user's authority to operate the equipment.
for
 Loading...