

ZT Amplifiers LBA1 User Manual
Owner’s Manual
ZT
ZT Ampliers
Lunchbox Acoustic
Acoustic/Vocal Amplier LBA1
1 2 3 4
Features
Top Panel
INSTRUMENT
VOLUME
3
2
1
OFF
FEEDBACK CUT
BASS TREBLEGAIN REVERB
MICROPHONE
8 7 5 6
9 10 11 12 13 14
Rear Panel
/ Line
MIC IN
Phantom
Power
EFX
ON
Aux
Input
Send / DI
Return
Volume
15
Acoustic / Vocal
Amplifier LBA1
19
20
21
~115V/230V
60HZ/50HZ
200W
Voltage
115
Fuse T2AL 250V
16
On
Power
Off
17
18
Speaker
Internal External
Speaker
8Ω Minimum
Out
Out
/ Line

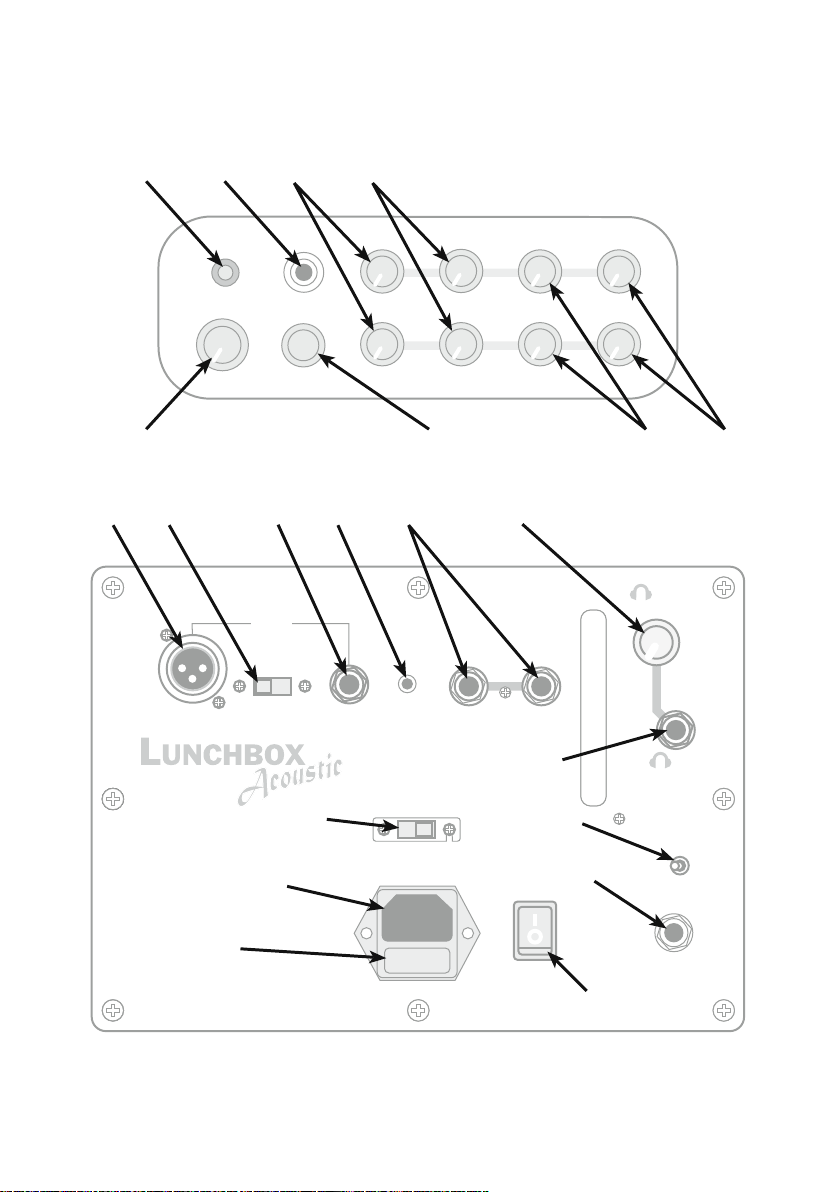
Top Panel Features
1. Pilot Light –– LED that indicates the amplier is on.
2. INPUT Jack –– Plug in your instrument here. The input can take a wide range of instrument signal
levels based on how you set the gain control.
3. GAIN Controls –– Controls the amount of input signal for each channel of the amplier. Use these
to balance the volume between your microphone and guitar. Keeping this as high as possible will
help reduce noise. NOTE: The Lunchbox Acoustic was designed to work with a very wide range of
guitar signal levels, because of this, it is not unusual to have the guitar gain turned up very high to
get optimum tone and volume.
4. BASS Controls –– Turn all the way to the right for extra warmth, or all the way to the left to roll off
the lows and increase clarity. Leave the knob centered for the most neutral tone.
5. TREBLE Controls –– Turn all the way to the right for a bright crisp tone, or all the way to the left to
roll off the highs and smooth out your tone. Leave the knob centered for the most neutral tone.
6. REVERB Controls –– Turn to the left for no reverb and to the right for a plate-style reverb effect.
7. FEEDBACK CUTs –– An adjustable notch lter that cuts frequencies that commonly cause
feedback from acoustic guitars. This feature will not eliminate all feedback, but can help when you
are unable to play at a lower volume, or keep your guitar farther away from the speaker.
8. VOLUME Control –– Controls the master volume of the amplier.
Rear Panel Features
9. XLR Microphone Input –– A balanced input for a microphone with an XLR connector.
10. Phantom Power Switch –– Sends power to condenser microphones and other equipment designed
to work with phantom power. Consult the manufacturer’s specications to see if your equipment
requires phantom power. Phantom power does not affect the ¼ inch microphone input.
11. ¼ Inch Microphone/Line Input -– An unbalanced input for a microphone that uses an instrument
cable or for an additional instrument.
12. Aux Input –– Stereo ⅛ inch (3.5 mm) input for music or other audio. The VOLUME control is the
only control that affects this signal.
13. Effects Loop/DI –– Use this to send a signal to effects pedals or an external effects processor.
Using an effects loop can help keep noise down and boost signal strength. The effects send can
also be used as a DI to send to a PA or recording equipment. This signal is affected by all the
controls except master volume. Headphone/Line Out Volume Control –– Controls the volume of the
Headphone/Line Out jack.
14. Headphone/Line Out Volume Control –– Controls the volume of the Headphone/Line Out jack.
15. Headphone/Line Out Jack –– Stereo ¼ inch (6.35 mm) jack to drive headphones or send a line out
to monitoring or recording equipment. Use the Headphone/Line Out Volume Control to adjust the
signal level.
16. Speaker Selector Switch –– Select between the internal 6.5 inch (165 mm) speaker and an external
cabinet. Use this for quiet practicing with headphones or for using the amplier solely as a head to
power an external cabinet. NOTE: The Lunchbox Acoustic will power either the internal speaker or
an external cabinet, but not both together.
17. Speaker Out Jack –– Use a ¼ inch (6.35 mm) speaker cable to power an external speaker.
Minimum recommended speaker impedance is 8Ω.
18. Power Switch –– Turns the Lunchbox Acoustic on or off.
 Loading...