

Page 1
z-K6 manual © 2001, Z-Systems Audio Engineering
The z-K6 K-Surround Processor
Introduction...........................................................................................................................................................2
Making Physical Connections............................................................................................................................... 3
Front Panel Controls.............................................................................................................................................3
Controlling Channel Output Levels ..................................................................................................................... 4
Controlling Front Ambience.................................................................................................................................4
Controlling Surround Extraction ......................................................................................................................... 6
Controlling Front Ambience Equalization...........................................................................................................7
Controlling Surround Equalization......................................................................................................................8
Bypassing the z-K6 .................................................................................................................................................8
Saving and Loading Presets...................................................................................................................................8
MIDI Automation................................................................................................................................................ 10
Adjusting Sample Rate & Wordwidth ................................................................................................................11
Specifications........................................................................................................................................................12
Important note:
The z-K6 does not auto-detect the input sample rate. You must select the sample rate
manually. Please make note of this and always make sure that the selected sample rate
matches the incoming sample rate. This will change on subsequent firmware revisions.
Page 2

z-K6 manual
2
Introduction
Figure 1 -- z-K6 block diagram
The z-K6 K-Surround processor uses very sophisticated DSP algorithms to produce a convincing
and realistic surround-sound "extrapolation" from two-channel material. Unlike other processors
that use techniques such as room modeling and synthetic reverberation, the z-K6 is based on
novel techniques that are the result of contemporary psychoacoustic research. We believe you'll
find that the z-K6 produces better, more natural-sounding results than any other technique
currently available.
Referring to Figure 1, please observe that the z-K6 is subdivided into two functional blocks. The
first block, seen at top, takes the stereo input and produces three frontal channels (LF, C, and RF).
The second block, seen at bottom, takes the stereo input and extracts the surround channels (LS,
and RS) and the LFE channel (Sub). Each of these blocks merits further attention.
Let's take a closer look at the front-channel subsystem. First, the signal is passed through a pair of
shelving filters, allowing you to selectively filter the low- and high-frequency response of the input
signal. Next, the front ambience extraction module takes the shelf-filtered stereo signal and
produces an ambience-enhanced stereo signal with complete control over the type (i.e., wide,
deep), the amount (level), and the spectral character (EQ) of the ambience. Finally, the enhanced
stereo signal is converted to a three-channel signal. The three channels are derived using a
technique that renders a timbrally accurate match to the stereo signal, but with pinpoint imaging
that is stable over a much wider listening window.
Now we'll take a brief look at the surround/LFE subsystem. Again, the user can selectively shelffilter the input signal. Then the surround generation module derives the signal to be sent to the
surround channels, with user-specified control over the amount of ambience to be generated.
The user can also control the equalization of the ambience. In tandem, the z-K6 allows you to
derive a lowpass-filtered mono sum of the stereo signal and send the result to the LFE channel.
Page 3
z-K6 manual
3
Making Physical Connections
The z-K6 has three AES/EBU inputs and three AES/EBU outputs. These input/output pairs are
labeled input /output 1/2, input/output 3/4, and input/output 5/6.
In order to assure perfectly synchronous timing between channel pairs, we require that you use an
AES/EBU distribution amplifier (for example, a Z-Systems Digital Detangler) and feed the same
stereo input signal to all three AES/EBU inputs. When the unit detects a valid input stream, the
corresponding validity indicator on the front panel will illuminate, indicating the presence of
signal.
The outputs from the z-K6 are as follows:
1/2: Left and right front
3/4: Left and right surround
5/6: Center and LFE (sub)
Please don't forget the warning from the front-cover of this document:
The z-K6 does not auto-detect the input sample rate. You must select the sample rate
manually. Please make note of this and always make sure that the selected sample rate
matches the incoming sample rate. This will change on subsequent firmware revisions.
See the section titled "Adjusting Sample Rate and Wordwidth" for directions on changing the
input sample rate.
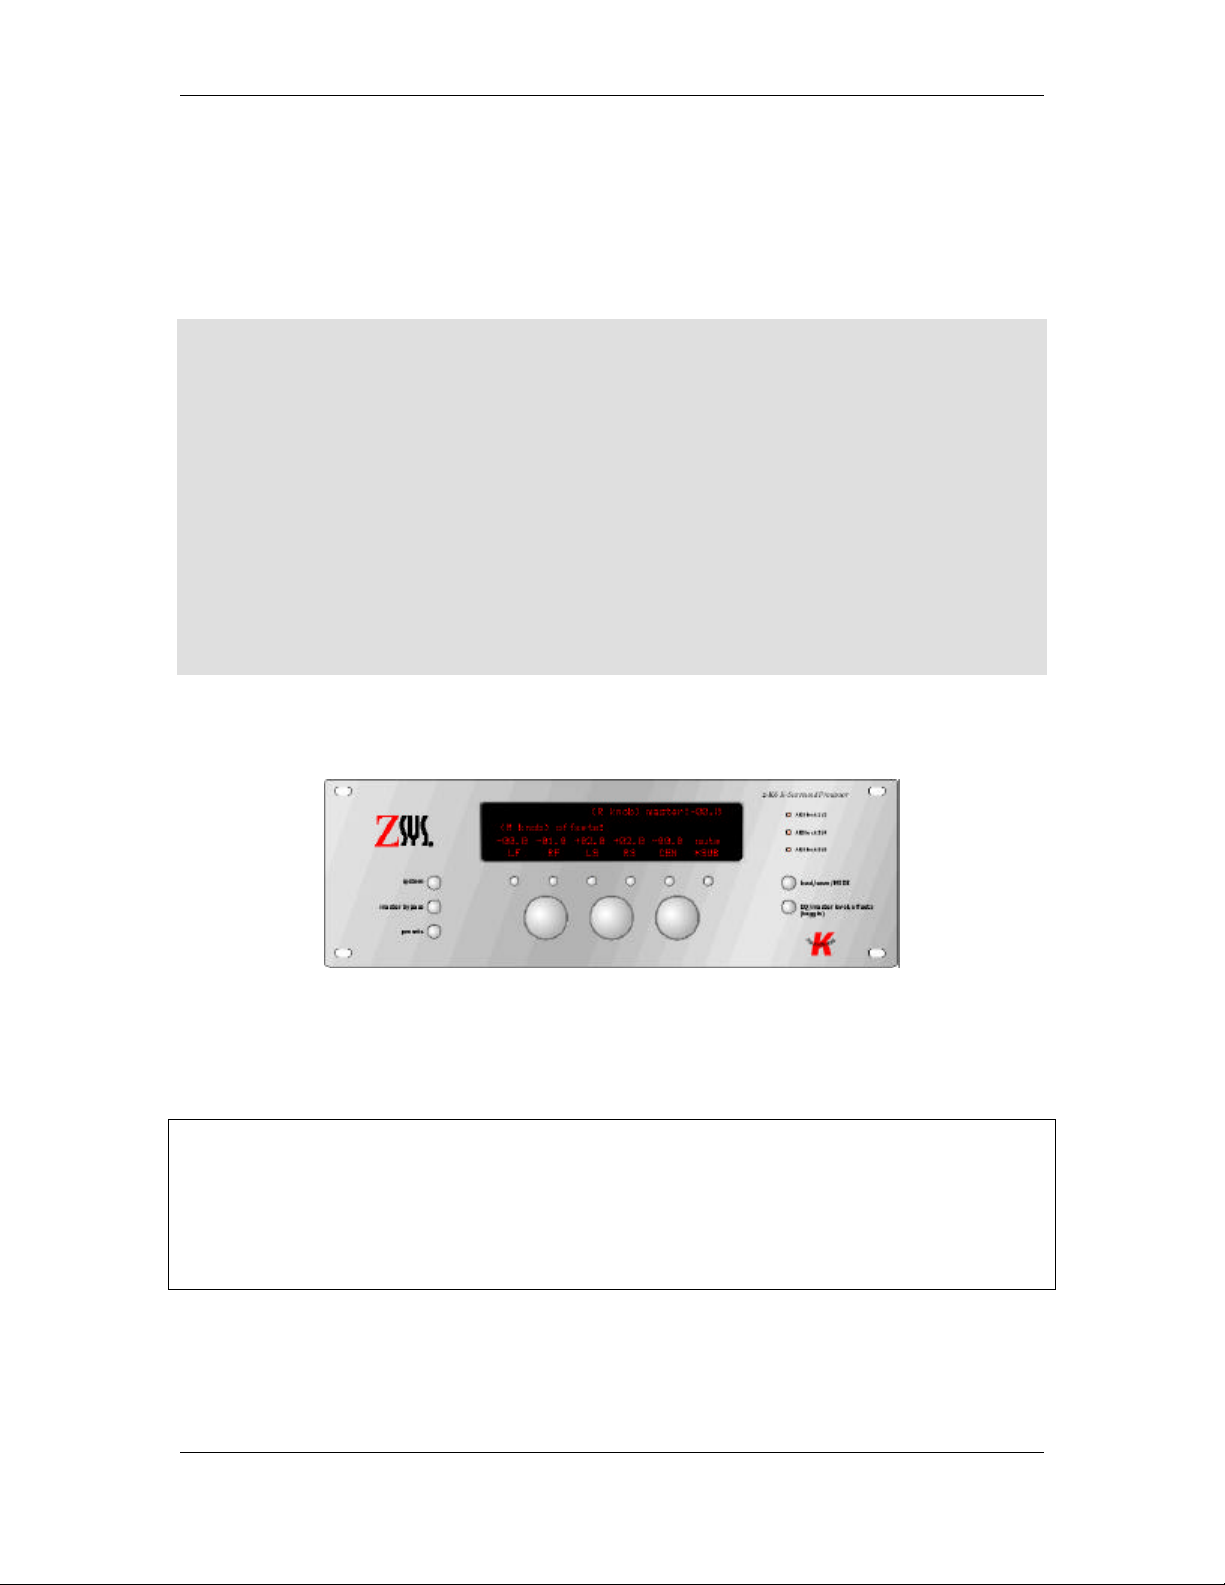
Front Panel Controls
Figure 2 -- Front Panel Controls
Page 4
z-K6 manual
4
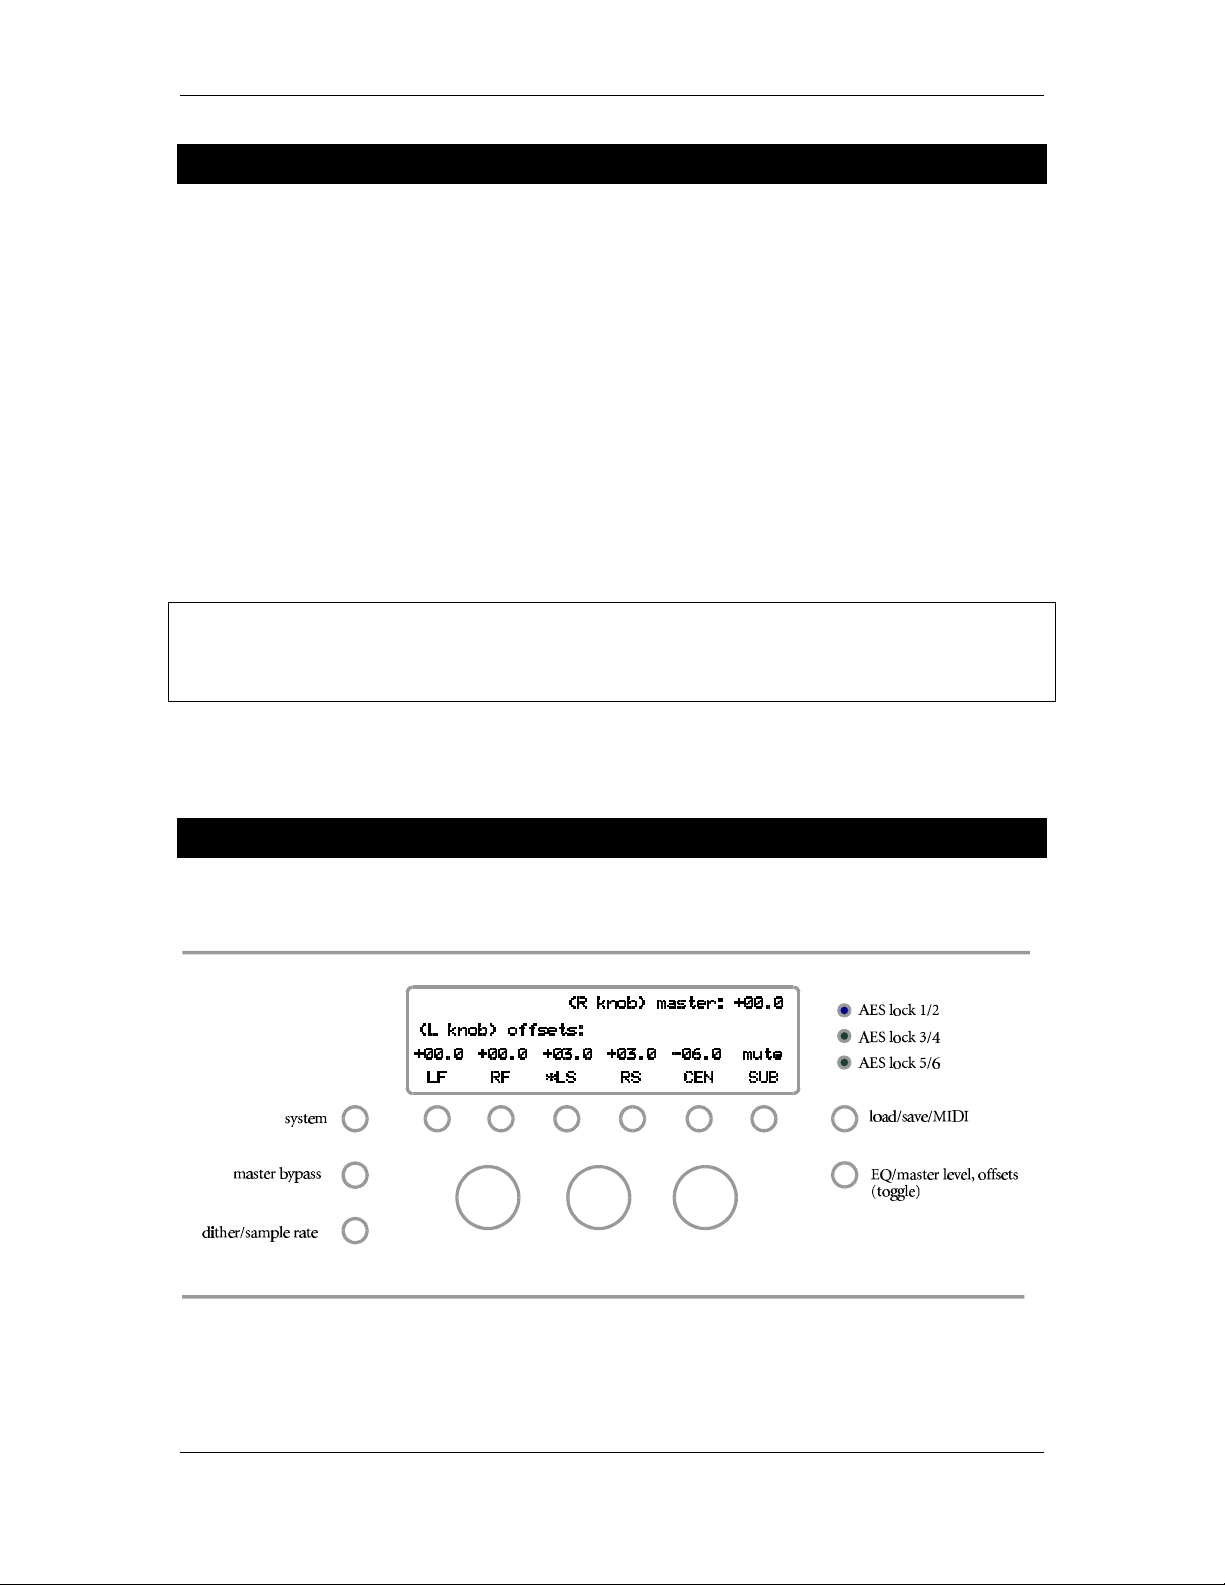
Controlling Channel Output Levels
Figure 3 - channel level control screen
Press the EQ/Master Level, offsets button until the display appears as in Figure 3 (this button
toggles between EQ and level functions). As indicated by the display, the left knob controls the
individual channel offsets and the right knob controls the overall system level. To change the level
of a channel offset, press the button below that channel's label. The display will show an asterisk
next to the name and the left knob will control that channel's offset. Pressing the button again
will mute that channel. Pressing the button a third time will bring that channel out of mute and
restore the channel's gain to its value before the mute was invoked. The master system level is
applied after the channel offsets so that the relative levels between offsets will be maintained
regardless of overall system level.
The z-K6 is also endowed with the ability to solo channels. If you press and hold one of the
channel select buttons, that channel will solo -- i.e., the other channels will mute and you will only
hear that channel. If you hold down the channel button again, the unit will "un-solo" that
channel and return to the state before the solo function was invoked. This includes all of the
various channel mutes from the other channels.
Controlling Front Ambience
Press the system button. The display will appear as in Figure 4. Notice that the top-right part of
the display indicates that the display is showing ambience parameters for the LRC page. That is,
this screen pertains to the left, right, and center channels. The left side of the screen has an arrow
pointing to the first button below the screen, along with the words "to LRS page." As indicated,
pressing this button will take the unit to a similar mode, only one in which the surround
ambience parameters are displayed. On the LRC page, the left knob controls the front K-level and
the right knob controls which algorithm is used to enhance the ambience.
The front K-level is best interpreted as the amount of added ambience. It varies from an "off"
position (fully counter-clockwise) to +6.0 dB (fully clockwise). For more information on the
meaning of K-level, see the Appendix.
Page 5

z-K6 manual
5
Please note: the front K-level control will rotate all the way through 90 degrees and back to 0 degrees so
that you can readily compare the two extremes.
Figure 4 - Front Ambience screen, two -channel mode
There are eight algorithms for ambience enhancement. They are
1) small 2
2) small/deep 2
3) wide 2
4) wide/deep 2
5) small 3
6) small/deep 3
7) wide 3
8) wide/deep 3
As the names imply, the different algorithms have sonic characteristics described by their width
and depth. The "2" algorithms do not derive any center channel, whereas the "3" algorithms do
derive a center channel. When the right knob is turned so that one of the three-channel
algorithms is invoked, a third parameter appears in the screen: the focus. The focus parameter
effectively controls the "mono-ness" of the three-channel image, i.e., how much the stereo image
"pulls" toward the center. Nominally, you should leave the focus set to 45 degrees, although you
can experiment with the setting: the focus is controlled by the middle knob and varies from 0
degrees to 90 degrees. The best way to understand how the focus control works is to think in
terms of an MS encoder/decoder. The control determines how much of the M component goes to
the center channel and how much of the M component is taken away from the left and right
channels. With the focus set to 0 degrees, the center channel gets all of the M component and the
left and right channels are purely S. With the focus set to 90 degrees, the left and right output
channels are the same as the left and right input channels and nothing comes out of the center
channel.
Page 6

z-K6 manual
6
Figure 5 -- Front ambience screen, three -channel mode
Please note: the focus control will rotate all the way through 90 degrees and back to 0 degrees so that
you can readily compare the two extremes.
You will find that between each of the algorithm positions on the control is an "off" position. The
"off" position disengages the ambience enhancement module (which can also be accomplished by
turning the K-level control to its off position). If one of the three-channel algorithms is engaged,
the "off" position still produces a center channel, but no ambience enhancement. Thus it is a
simple matter to audition the comparative effect of applying or bypassing the ambience
enhancement -- simply rotate the algorithm knob between the neighboring "off" position and the
desired algorithm.
Controlling Surround Extraction
Figure 6 -- Surround extraction/LFE mode
Page 7

z-K6 manual
7
From the LRC ambience screen press the "to LRS page" button to get to the surround page.
Subsequently, pressing the system button will return you to this page. This page contains two
parameters: the rear K-level and the LFE cut frequency, as shown in Figure 5. The rear K-level
controls the amount of ambience extracted to the rear channels. The LFE cut controls the cutoff
frequency of the filter in the LFE signal path.
The rear-channel ambience merits a more in-depth discussion. If you listen to the rear channels
by themselves, you will notice that they probably don't sound like what you would expect. This is
because our surround extraction technique actually depends on the rear channels being played in
tandem with the front channels. There is a psychoacoustic "fusion" that occurs when the front
and rear channels are experienced simultaneously. When you have dialed in the appropriate
amount of rear K-level and set the rear channel offsets to the correct values, you will hear a
tremendous soundstage, with an image that wraps around you. Furthermore, the timbral
character of the music will not change appreciably, resulting in a very natural surround experience
that is comparable to having heard the source material in a real acoustic space. The character of
this space can be altered by manipulating the rear K-level and the rear EQ.
Controlling Front Ambience Equalization
Push the EQ/Master Level, offsets button until the screen in Figure 7 appears. You will see
parameters for five filters:
1) Input high shelf
2) Input low shelf
3) Ambience high-pass
4) Ambience low-pass
5) Ambience bell
The input high and low shelving filters are applied to the input signal and affect the shelving of
both the input and the enhanced frontal ambience. The high-pass, low-pass, and bell filters are
applied to the enhanced frontal ambience only. These three filters are used to change the spectral
character of the frontal ambience. The shelving filters have variable corner frequencies and shelf
gains. The bell filter is fully parametric, with controls for gain, bandwidth, and center frequency.
The high- and low-pass filters can be turned off; the full counter-clockwise position for the highpass filter is its off position and the full clockwise position for the low-pass filter is its off position.
Figure 7 - Front ambience equalization page
Page 8

z-K6 manual
8
Controlling Surround Equalization
Figure 8 - Surround equalization page
From the screen shown in Figure 7, press the "to LRS page" button to get to the screen shown in
Figure 8. This page allows you to control the equalization of the extracted surround channel. The
filters work just like the filters for the front channels,and you will notice a marked difference in
the sound of the extracted ambience as these filters are changed. You will likely find the the lowpass filter is the most useful tool, giving a great deal of control over the amount of high-frequency
energy that appears in the surrounds. This characteristic gives a strong impression of the type of
acoustic space you are attempting to emulate; to emulate a highly absorptive space, you'll want to
attenuate the highs in the surrounds, whereas a very "live" space will have high frequencies coming
from the rear.
Bypassing the z-K6
The master bypass button bypasses all of the z-K6's internal processing and routes the input
stereo signal to the output. When in bypass, none of the controls can be used until master bypass
is pressed again, which returns the unit to its previous state. Bypass mode is very useful for
comparing the overall surround result to the raw two-channel feed.
Saving and Loading Presets
The entire state of the z-K6 can be saved and recalled. Press the load/save/MIDI button. This
will bring the z-K6 to the state shown in Figure 9. To save a preset, use the left knob to choose a
preset number then press the button beneath the SAVE indication. This will then bring the z-K6
to the state shown in Figure 10, which confirms that the SAVE operation took place.
Page 9

z-K6 manual
9
Figure 9 - preset mode
Figure 10 - confirmati on of preset save
There is one special preset that cannot be over-written. This preset is given number 00 and stores
the z-K6 's "flat" settings. This is the preset you will want to use in order to return the z-K6 to a
"blank" setting. If you attempt to over-write preset 00, the display will tell you that the preset was
not saved and that you should choose another preset number.
To recall a preset, from the screen in Figure 8 press the button beneath the LOAD indication. The
preset indicated in the display will be loaded and the z-K6 will let you know the load operation
was successful, as in Figure 11.
Figure 1 1 - confirmation that preset has been loaded
Page 10

z-K6 manual
10
MIDI Automation
The z-K6 can be automated via MIDI commands; it supports MIDI program change commands
and also uses system exclusive commands to allow the unit’s entire collection of presets to be sent
to and restored from a MIDI sequencer.
The z-K6’s MIDI controls are on the same screen as the preset LOAD and SAVE screen. Simply
press the presets button once, which brings the z-K6 to the state shown in Figure 12.
Figure 1 2 – MIDI control screen
To set a MIDI channel number, use the right knob, as prompted by the screen. This sets the
MIDI channel the z-K6 will use for both its MIDI program change commands and for system
exclusive messages.
To save all 50 of the z-K6’s presets, put your MIDI sequencer into record mode with the channel
set to the z-K6’s MIDI channel. Press the button below the DUMP message on the screen. You
will see a blinking asterisk next to the word DUMP. This lets you know that the z-K6 is sending
its entire bank of presets, one at a time, to the MIDI sequencer via MIDI system exclusive
commands. When the system exclusive dump is finished, the blinking asterisk will disappear.
To retrieve a collection of 50 presets from a MIDI sequencer, again make sure you have the z-K6’s
MIDI channel number set to the same channel as the MIDI sequencer. Press the button below the
READ message and then begin to play the MIDI system exclusive stream from your MIDI
sequencer. A blinking asterisk will appear next to the word READ, letting you know that the z-K6
is indeed receiving and decoding the system exclusive commands. When the z-K6 has decoded
the last preset from the MIDI sequencer, the blinking asterisk will disappear.
To execute MIDI program change commands, simply make sure the MIDI sequencer is set to the
same MIDI channel as the z-K6 and begin sending program change commands. The z-K6 will
jump to the preset number indicated by the program change, with the display updated to show
the parameter changes. If an invalid program number is sent to the z-K6, it will be ignored.
Page 11

z-K6 manual
11
Adjusting Sample Rate & Wordwidth
Figure 1 3 - wordwidth/sample rate mode
Press the dither/sample rate button to get to the screen shown in Figure 13. As prompted by the
display, the sample rate is selected by the left knob and the output wordwidth is selected by the
middle knob. Use the button below the indicated channel group names to select the group of
interest, and an asterisk will appear to indicate the selection, as in Figure 13.
Unlike most digital audio processors, the z-K6 does not auto-detect the input sample rate.
Rather, you must select the sample rate manually. This will change on subsequent firmware
revisions.
The wordwidth for each channel group can be controlled independently. There are four settings
for the output wordwidth:
24 bits dithered
24 bits undithered
20 bits dithered
16 bits dithered
The dither used is a variant of flat TPDF dither. The undithered 24-bit setting is provided to
allow bit-transparent transfers when all of the controls are in the flat position.
Page 12

z-K6 manual
12
Specifications
• Inputs and outputs: Transformer-isolated, 110-ohm terminated AES/EBU (3 inputs, 3
outputs)
• Sample rates supported: 32 kHz – 96 kHz
• Input resolution: up to 24 bits
• Output resolution: 16, 20, or 24 bits undithered, TPDF dithered, or POW-r noise-shaped
• Dynamic range: better than 130 dB
• THD + Noise: less than –130 dB
• AC Power: 110/220 volts @ 50/60 Hz
 Loading...