

Page 1

PI330 pico
Page 2

ZOTAC ZBOX pico
User’s Manual
No part of this manual, including the products and software described in it,
may be reproduced, transmitted, transcribed, stored in a retrieval system,
or translated into any language in any form or by any means, except by the
purchaser for backup purposes, without the express written permission of
ZOTAC.
Products and corporate names mentioned in this manual may be registered
trademarks or copyrights of their respective companies, and are used for
identication purposes only. All trademarks are the property of their respective
owners.
Every effort has been made to ensure the contents of this manual are correct
and up to date. However, the manufacturer makes no guarantee regarding
the accuracy of its contents, and reserves the right to make changes without
prior notice.
1 ZOTAC ZBOX pico
Page 3

Table of Contents
Product specications ----------------------------------------------------------------------------- 3
Safety information ----------------------------------------------------------------------------------- 4
Setting up your system -------------------------------------------------------------------------- 4
Care during use ----------------------------------------------------------------------------------- 4
Welcome ------------------------------------------------------------------------------------------------ 5
Package contents --------------------------------------------------------------------------------- 5
Port Layout --------------------------------------------------------------------------------------------- 6
How to disable the ZOTAC logo indicator --------------------------------------------------- 8
How to disable the O-ring indicator -----------------------------------------------------------10
Mounting the ZOTAC ZBOX pico to an LCD monitor----------------------------------- 12
Getting started with Windows 10 Home 64-bit --------------------------------------------14
Using your ZOTAC ZBOX pico ------------------------------------------------------------------ 18
Conguring a wireless connection -----------------------------------------------------------18
Conguring an Ethernet connection ---------------------------------------------------------18
Using a static IP ------------------------------------------------------------------------------18
Using a dynamic IP (PPPoE connection) ----------------------------------------------19
Conguring audio output via an HDMI device --------------------------------------------20
ZOTAC ZBOX pico 2
Page 4

Product specications
Product Dimensions
• 115mm x 76mm x 20.7mm
Processor
• Intel Atom X5-Z8500 (quad-core, 1.44GHz up to 2.24GHz)
Graphics processor
• Intel HD graphics
• HDMI 1.4b (max resolution: 4096X2160 @30Hz)
• DP 1.1a (max resolution: 2560X1600 @60Hz)
Memory
• 2GB LPDDR3 memory
USB ports
• Two USB 3.0 ports
• One USB 3.0 Type-C port
Audio
• One combo headphone/microphone jack
Storage
• 32GB eMMC
• 2-in-1 card reader (Micro SDHC/SDXC)
Networking
• 10/100/1000Mbps Ethernet
Wireless networking
• 802.11ac Wi-Fi
• Bluetooth 4.0
Operating System
• Windows 10 Home 64-bit preinstalled
3 ZOTAC ZBOX pico
Page 5

Safety information
Your ZOTAC ZBOX pico is designed and tested to meet the latest standards of safety for
information technology equipment. However, to ensure your safety, it is important that you
read the following safety instructions.
Setting up your system
Read and follow all instructions in the documentation before you operate your system.
Do not use this product near water or a heat source such as a radiator.
Set up the system on a stable surface.
Openings on the chassis are for ventilation. Do not block or cover these openings.
Make sure you leave plenty of space around the system for ventilation. Never insert
objects of any kind into the ventilation openings.
Use this product in environments with ambient temperatures between 0℃ and 35℃.
Care during use
Do not walk on the power cord or allow anything to rest on it.
Do not spill water or any other liquids on your system.
When the system is turned off, a small amount of electrical current still ows. Always
unplug all power, modem, and network cables from the power outlets before cleaning
the system.
If you encounter the following technical problems with the product, unplug the power
cord and contact a qualied service technician or your retailer.
¾ The power cord or plug is damaged.
¾ Liquid has been spilled into the system.
¾ The system does not function properly even if you follow the operating instructions.
¾ The system was dropped or the cabinet is damaged.
¾ The system performance changes.
ZOTAC ZBOX pico 4
Page 6
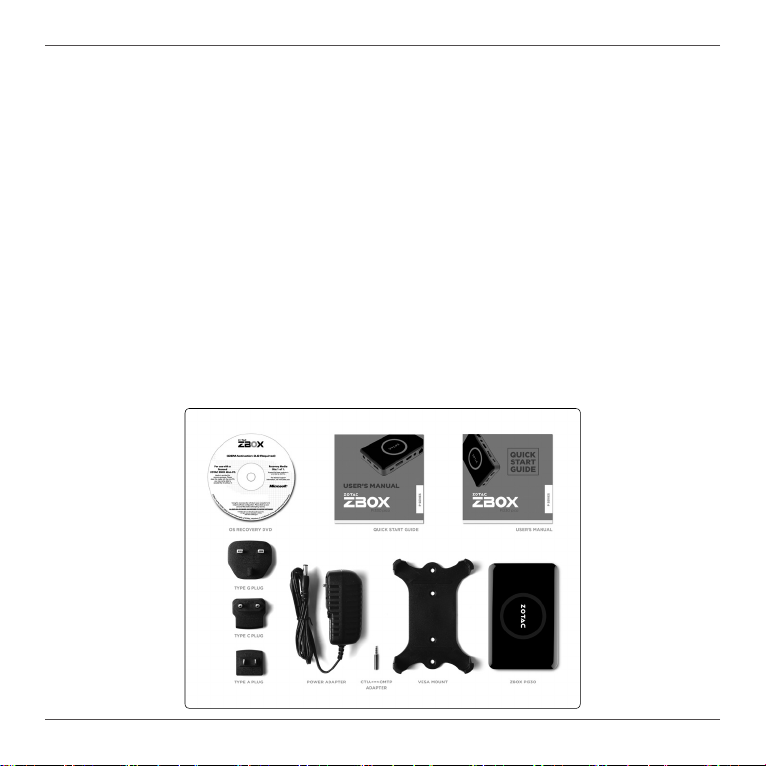
Welcome
Congratulations on your purchase of the ZOTAC ZBOX pico. The following illustration
displays the package contents of your new ZOTAC ZBOX pico. Please contact your retailer
if any of the below items are damaged or missed.
Package contents
• 1 x ZOTAC ZBOX pico
• 1 x Mounting bracket
• 2 x Mounting screws
• 1 x AC adapter
• 1 x CTIA<=>OMTP adapter
• 1 x OS Recovery DVD (optional)
• 1 x Warranty Card
• 1 x User Manual
• 1 x Quick Start Guide
5 ZOTAC ZBOX pico
Page 7

Port Layout
4
1
7
2 3
8
5
6
9
1. USB 3.0 Type-C port
The USB 3.0 type-C port supports the SuperSpeed USB 3.0 devices and is
backwards compatible with USB 2.0/1.1 devices. Use this port for USB 3.0
devices
for maximum performance with USB 3.0 compatible devices.
2. DisplayPort
DisplayPort supports both external (box-to-box) and internal (laptop LCD panel)
display connections.
3. HDMI output
The HDMI (High Denition Multimedia Interface) output supports a Full HD 1080p
displays such as an HDTV or monitor.
ZOTAC ZBOX pico 6
Page 8

4. Combo Headphone/Microphone jack (3.5mm)
The combo headphone/microphone jack (3.5mm) is used to connect the system’s
audio out signal to amplied speakers, 3-pole headphones or 4-pole OMTP
headphones.
Note: The combo headphone/microphone jack does not support the traditional
microphone.
5. Ethernet port
The eight-pin RJ-45 LAN port supports standard Ethernet cable for connection to
a local network.
6. MicroSD memory card slot
The built-in memory card reader supports Micro SDHC/SDXC cards to expand the
storage capabilities of the ZOTAC ZBOX pico.
7. Power input (DC 5V, 3A)
The supplied power adapter converts AC power to DC power for use with this jack.
Power supplied through this jack supplies power to the mini-PC. To prevent damage
to the mini-PC, always use the supplied power adapter.
8. USB 3.0 ports
The USB 3.0 port supports SuperSpeed USB 3.0 devices and is backwards
compatible with USB 2.0/1.1 devices. Use this port for USB 3.0 devices for
maximum performance with USB 3.0 compatible devices.
9. Power button
The power button turns the system ON and OFF.
Note 1: The power adapter may get warm or hot when in use. Do not cover the adapter and keep it away from your body.
Note 2: Due to the unique design, some connectors are placed upside down.
7 ZOTAC ZBOX pico
Page 9

How to disable the ZOTAC logo indicator
1. Turn on the ZBOX pico mini-PC, then press <Delete> to enter the BIOS
SETUP UTILITY.
2. Use the arrow keys to navigate to the Power menu and select Logo Indicator.
ZOTAC ZBOX pico 8
Page 10

3. Press <Enter> and select Disabled.
4. Press F10 to save the conguration and exit. The PC will reboot.
9 ZOTAC ZBOX pico
Page 11

How to disable the O-ring indicator
1. Turn on the ZBOX pico mini-PC, then press <Delete> to enter the BIOS
SETUP UTILITY.
2. Use the arrow keys to navigate to the Power menu and select O-ring
Indicator.
ZOTAC ZBOX pico 10
Page 12

3. Press <Enter> and select Disabled.
4. Press F10 to save the conguration and exit. The PC will reboot.
11 ZOTAC ZBOX pico
Page 13

Mounting the ZOTAC ZBOX pico to an LCD monitor
You can attach the ZOTAC ZBOX pico to the back of a VESA75/100 compliant display.
1. Secure the mounting bracket to the LCD monitor using 2 screws.
Disclaimer: ZOTAC is not liable for damages resulting from an improper installation.
2. Attach the ZOTAC ZBOX pico to the VESA mount and gently press down to
secure the ZBOX to the mount.
ZOTAC ZBOX pico 12
Page 14

3. Connect the ZOTAC ZBOX pico to the LCD monitor with an HDMI cable.
Note: You can also mount the ZOTAC ZBOX pico vertically as shown in the picture
below.
13 ZOTAC ZBOX pico
Page 15

Getting started with Windows 10 Home 64-bit
Please follow the steps below to begin using your ZBOX pico with Windows 10 Home
64-bit.
1. Power on the system.
2. Connect to the Internet via Ethernet or Wi-Fi.
3. Select the language and region.
ZOTAC ZBOX pico 14
Page 16

4. Read and accept the license terms.
5. We recommend using the express settings.
15 ZOTAC ZBOX pico
Page 17

6. Create a Microsoft new account if you don’t have one. Otherwise, select “Sign in”.
7. Setup your account.
ZOTAC ZBOX pico 16
Page 18

8. Wait for the initial system setup to complete .
17 ZOTAC ZBOX pico
Page 19

Using your ZOTAC ZBOX pico
Conguring a wireless connection
Please follow the instructions below to connect to a wireless network:
1. Double-click the wireless network icon (pic) in the notication
area.
2. Select the wireless network you want to connect to from the
list and click Connect.
3. After connection is established, you will see “Connected.”
Note 1: For security concerns, Do NOT connect to an unsecured network,
otherwise, the transmitted information without encryption might be visible to
others.
Note 2: Enter the network security key if necessary.
Conguring an Ethernet connection
Using a static IP
1. Right-click the network icon in the
notication area and select “Open
Network Connections”.
2. Right-click “Local Area Connection” and
select “Properties”.
3. Highlight “Internet Protocol (TCP/IP)”
and click “Properties”.
4. Select “Use the following IP address”.
5. Enter your IP address, subnet mask and
Default gateway.
6. Enter the preferred DNS server address if necessary.
7. After entering all of the related values, click “OK” to nish the conguration.
ZOTAC ZBOX pico 18
Page 20

Using a dynamic IP (PPPoE connection)
1. Repeat Step 1-3 in the previous section.
2. Select “Obtain an IP address automatically” and click “OK”.
3. Click “Create a new connection” to start the NEW Connection Wizard.
4. Click “Next”.
5. Select “Connect to the Internet” and click “Next”.
6. Select “Set up my
connection manually”.
7. Select your connection
type and click “Next”.
8. Enter your ISP Name and
click “Next”.
9. Enter your User name and
Password. Click “Next”.
10. Click “Finish” to nish the
conguration.
11. Enter your user name and password. Click
“Connect” to connect to the internet.
Note: Contact your internet Service Provider (ISP) if you have problems connecting to the network.
19 ZOTAC ZBOX pico
Page 21

Conguring audio output via an HDMI device
Follow the steps below to enable audio output via HDMI when connecting the
ZOTAC ZBOX pico to a TV or receiver via HDMI.
1. Access the Sound settings via the system
Control Panel.
2. Under Playback devices, click the display
device that corresponds with your HDMI
audio compatible display
3. Click the “Set Default” button in the lower
right hand corner.
4. Click “OK” to exit the setup.
ZOTAC ZBOX pico 20
291-MB309-00
 Loading...